Article Overview
This article describes how to configure a workflow. It starts by detailing how to create roles and how to add steps and configure them. The article also explains how to create automatic output communication channels and how to perform workflow related troubleshooting.
Troubleshooting
The following section describe common troubleshooting scenarios for different areas of the Builder.
Process Manager
Table 1 describes malfunctions that may occur when trying to add business groups and processes. The table also describes the reason/s for the malfunctions and provides possible solutions.
Table 1: Process Manager Troubleshooting
| Number | Malfunction | Reason/s | Solution/s |
1 | Cannot Add a new process |
| Add a new process as described in the Add a new Process section |
2 | Cannot find a process | Then search is done within a business group | Click the All business group and then perform the search |
3 | Cannot Add a new business group | Another business group with the same name already exists | Add a new business group as described in the Add a new Business Group section |
Webflow
Table 2 describes malfunctions that may occur when trying to create a Webflow, adding components, and editing properties. The table also describes the reason/s for the malfunctions and provides possible solutions.
Table 2: Webflow Troubleshooting
Number | Malfunction | Reason/s | Solution/s |
1 | Cannot create a new Webflow |
| Create a new Webflow according to the instructions described in the How to Create a Webflow section |
2 | Some Components are missing, or their design is incorrect | The wrong theme is selected | Select the appropriate theme according to the instructions described in the Selecting a Theme section |
3 | The components in the grid displayed in the wrong direction | The properties of the Grid component are not set correctly | Set the properties of the Grid component. Read the details described in the Containers Components Properties article |
4 | Problem displaying the Webflow on a mobile device | The direction property of the Grid component is not set correctly | Set the properties of the Grid component. Read the details described in the Containers Components Properties article |
5 | Cannot add certain components like buttons, Multiple Choice, and other components to the canvas | Must of the components can only be add onto a Main Page, Greeting Page, and Container components | Add components according to the instructions described in the Adding Components section |
6 | The buttons on the Main Page do not appear | The buttons properties of the Main Page are not set correctly | Set the button properties of the Main Page component. Read the details described in the Page and Sections Components Properties article |
7 | The Co Browsing button does not appear | The co browsing property of the Main Page are not set correctly | Set the co browsing property of the Main Page component. Read the details described in the Page and Sections Components Properties article |
8 | The value of the Radio Question options is not returned correctly | The Text and the Value of the Radio Question component options do no match | Set the options of the Radio Question component. Read the details described in the Multiple Choice Components Properties article |
9 | The image for the Dynamic Image component does not exist |
|
|
10 | The Br Component height is not applied | The height of the Br component is not written correctly | The height of the Br component must contain a number followed by px, for example: 10px. For additional information see the Other Components Properties article |
11 | Cannot upload files | The file type is not written in the acceptFileTypes property | Write the type of the file in the acceptFileTypes property. For additional information see the Other Components Properties article |
12 | The text direction of the Text Input component is wrong | The textDirection property of the Input Text component is not set to the appropriate direction | Set the appropriate text direction. For additional information see the Other Components Properties article |
13 | There is a limit on the number of characters allowed to input into the Text Input component | The maxLength property of the Input Text component is not set to the appropriate direction | Set the appropriate maximum length. For additional information see the Other Components Properties article |
14 | The numbering of the Progress Bar Steps is wrong | The numbering steps of the Progress Bar component have an offset of +1 | Set the first step of the Progress Bar component to zero. For additional information see the Other Components Properties article |
15 | The Preview component prevents from deploying the Webflow | The Preview component must be connected to a PDF form | Connect the Preview Component to a PDF form. For additional information see the Other Components Properties article |
Model
Table 3 describes malfunctions that may occur when trying to create transaction data items, associate transaction data items with Webflow components, and enforce logic. The table also describes the reason/s for the malfunctions and provides possible solutions.
Table 3: Model Troubleshooting
Number | Malfunction | Reason/s | Solution/s |
| 1 | Cannot create a transaction data item | The name of the transaction data item is not written according to the rules | Create the transaction data item and provide a name according to the rules described in the How to create a Transaction Data Item? section |
| 2 | Transaction data items that need to be nested inside an object type transaction data item are not |
|
|
| 3 | Cannot associate a Webflow component with a transaction data item |
| Associate the Webflow component with the required transaction data item as described in the How to Associate Webflow Component with a Transaction Data Item? section |
| 4 | Autocomplete does not work | The Autocomplete Service is not connected to an integration | Configure the Autocomplete Service as described in the Values article |
| 5 | A user can input information instead of choosing one a Multi-option (Static) value | The Multi-option (Static) is not used to validate | Set the Multi-option (Static) to Also use to validate as described in the Values article |
| 6 | Cannot find the required transaction data items to connect to the Model (Computed (Service)) | Transaction data item is nested inside an object | Locate the transaction data item according to the rules described in the Values article |
| 7 | Cannot find the required transaction data items to use as alias (Computed (Inline)) | ||
| 8 | Cannot find the required transaction data items to use as dynamic fields (Expression) | Transaction data item is nested inside an object | Locate the transaction data item according to the rules described in the Values article |
| 9 | Cannot find the required transaction data items to use as a condition selector (Expression, Condition) | ||
| 10 | Computed (Service) does not work |
|
|
| 11 | Creating a condition with two or more logical expressions does not work as expected (Expression, Condition) | An operation between the logical expressions is not set or not set correctly | Set the operation between the conditions as described in the Conditions article |
| 12 | Validation is missing | The validation is not located in the Validations screen | Please contact our support team |
| 13 | Validation is added but not implemented | The validation was added but the adding process was not completer or failed | Add the validation again until the icon appears next the name of the transaction data item as described in the Validations article icon appears next the name of the transaction data item as described in the Validations article |
| 14 | Cannot add roles and access permissions | Roles are not created | Create roles as described in the Configuring a Workflow article |
Table 4 describes malfunctions that may occur when trying to create new PDFs, define new PDF fields and connect them and the PDF pages to the Model. The table also describes the reason/s for the malfunctions and provides possible solutions.
Table 4: PDF Troubleshooting
Number | Malfunction | Reason/s | Solution/s |
1 | Cannot create a new PDF | The name of the new PDF already exists | Create the new PDF and provide a new name as described in the Creating a PDF Form section |
2 | Cannot deploy the digital process | A PDF is not attached to the Preview component | Attach a PDF form to the Preview component as described in the PDF Output Example section |
3 | The digital process is stuck on generating a preview | The PDF fields are not connected to the Model properly | Connect the PDF fields PDF to the Model as described in the How to define and Connect PDF Fields? section |
4 | The PDF does not display any Output | The PDF fields are not connected to the Model properly | Connect the PDF fields to the Model as described in the How to define and Connect PDF Fields? section |
5 | The PDF pages are not behaving according to the implemented Model logic | The Pages of the PDF are not connected to the Model properly | Connect the PDF pages to the Model as described in the Connecting PDF Pages to the Model section |
Workflow
Table 5 describes malfunctions that may occur when trying to create transaction data items, associate transaction data items with Webflow components, and enforce logic. The table also describes the reason/s for the malfunctions and provides possible solutions.
Table 5: Workflow Troubleshooting
Number | Malfunction | Reason/s | Solution/s |
1 | Cannot add a role to a step | Roles are not created | Create roles as described in the Creating Roles sections |
2 | Creating two or more conditions does not work as expected | An operation between the condition is not set or not set correctly | Set the operation between the conditions as described in the Adding Step conditions section |
3 | Recipients are not receiving Email or SMS (output communication channels) | The wrong environment for the recipients is set | Configure the Email/SMS communication channel as described in the Start Phase section |
4 | The email/SMS is received by the recipients but does not contain a link to the digital process | The {{link}} is missing | Configure the Email/SMS communication channel as described in the Start Phase section |
5 | An Auto-reminder is not sent | The trigger and the time of the auto-reminder is not set | Configure the Email/SMS communication channel as described in the Auto-Reminder Phase section |
Journey Sender
Table 6 describes malfunctions that may occur when trying to create a Webflow, adding components, and editing properties. The table also describes the reason/s for the malfunctions and provides possible solutions.
Table 6: Journey Sender Troubleshooting
Number | Malfunction | Reason/s | Solution/s |
1 | The Journey Sender feature does not appear on the main screen of the Builder platform | The feature is not enabled | Please contact our support team |
2 | Cannot add components from the Webflow to the Agent screen | The theme of the Webflow does not match the theme of the Journey Sender | Set the theme of the Journey Sender to match the theme of the Webflow as described in the Step 2: Build the Journey Sender section |
3 | Added components to the canvas of the Journey Sender do not appear when the Journey Sender is viewed | The components are not connected to the Model | Add components and connect them to the Model as described in the Step 2: Build the Journey Sender section |
4 | There are no digital processes to select from the Journey Sender |
|
|
5 | After selecting a digital process, dynamic fields do not appear |
|
|
6 | No action buttons (submit, fill out) appear on the Journey Sender | The properties of the Main Page component added to the canvas of the Journey Sender are not sent | Set the properties of the Main Page component as described in the Step 3: Set the Properties of the Main Page section |
7 | The Journey Sender deployment process failed | There are deployment errors preventing the deployment | Perform the steps describe in the Step 4: Deploy and View the Journey Sender section, if the errors proceed see the Deploying and Viewing a Digital Process article for additional details |
8 | A link to the digital process that was initiated through the Journey Sender was not sent to the wanted recipients | The Workflow Manager of the digital process does not contain a step with a configured start phase communication channel output (email or SMS) | Configure the Workflow Manager of the digital process with a step containing a start phase communication channel output (email or SMS), for additional information about the Workflow Manager, see the Workflow Manager Overview and the Configuring a Workflow articles |
9 | Cannot select specific processes/business groups using the Manage Agent Groups window | The All Processes checkbox is checked | Uncheck the All Processes checkbox and select specific processes/business groups as described in the Manage Agent Groups section |
10 | The Journey Sender restarts whenever it is sent | The Send Another option is disabled | Set the toggle to Send Another as described in the Manage Agent Groups section |
11 | There is not data collaboration between the Model of the Journey Sender and the Model of the Webflow | The metadata tagging is not set currently | Retag the data items of the Models as described in the Data Collaboration Between Models section |
FAQ
The following sections describe frequently asked questions and answers about different areas in the Builder.
Question 1 - Restoring Versions
Can I restore different Builder layers to a previous version?
Answer
(See Figure 1 to Figure 4)
Yes it is possible to restore Builder layers to a previous version by using the Versions button, for example:
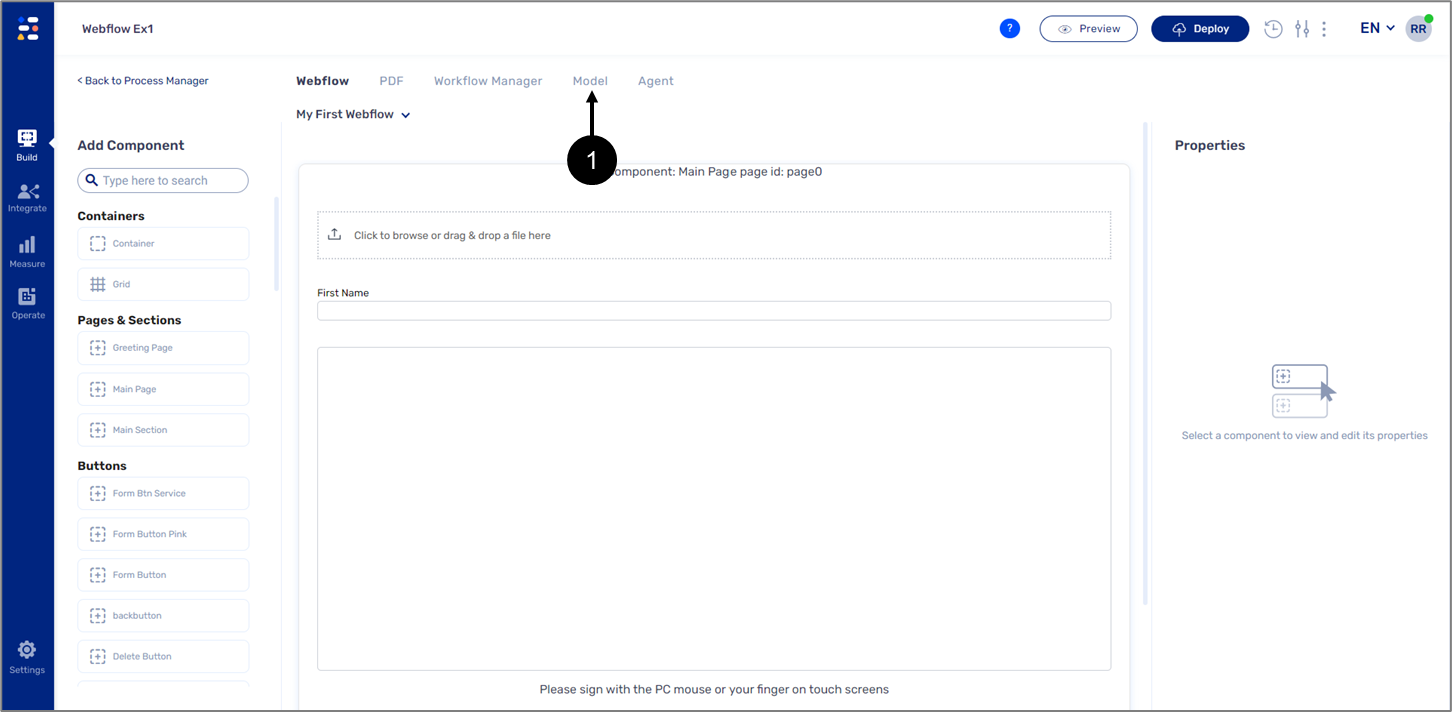
Figure 1: Accessing the Model Layer
- Access the required layer, for example, the Model (1).
Result:
The Model screen appears:
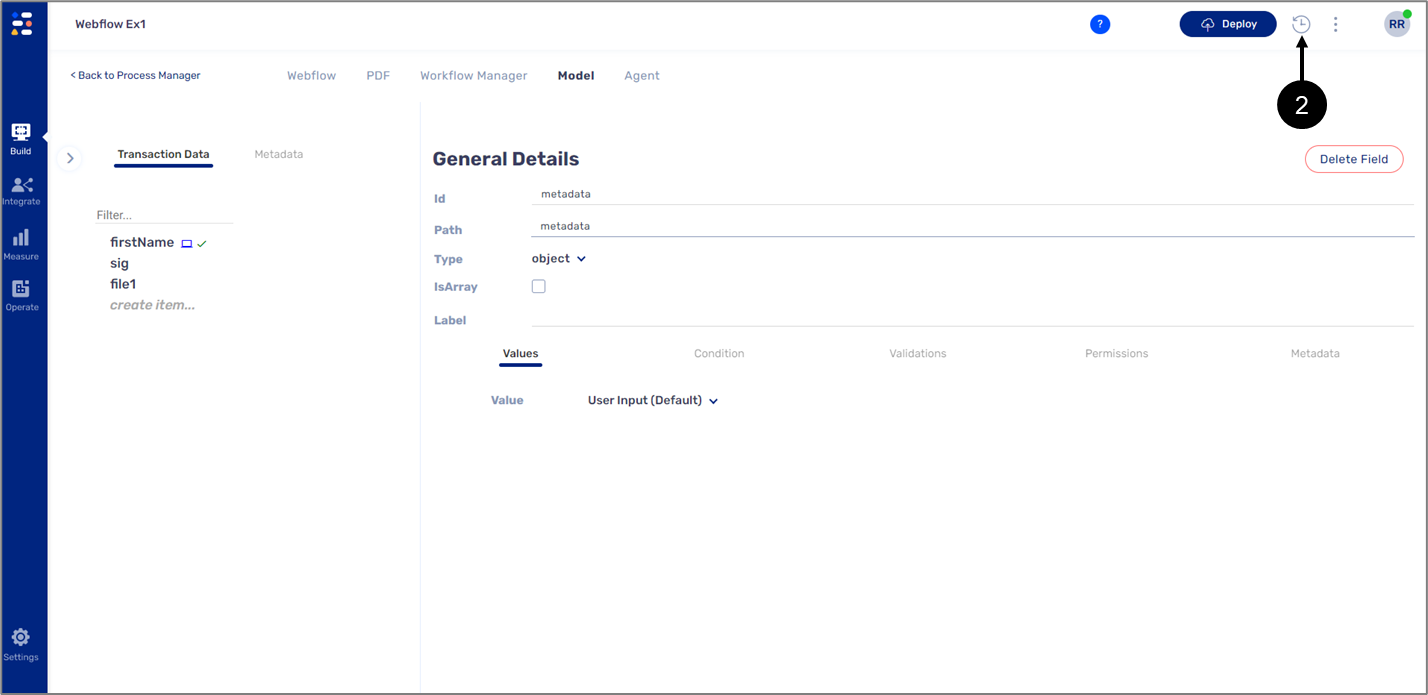
Figure 2: Accessing the Model Layer
- Click the Versions button (2).
Result:
The Version History window appears:
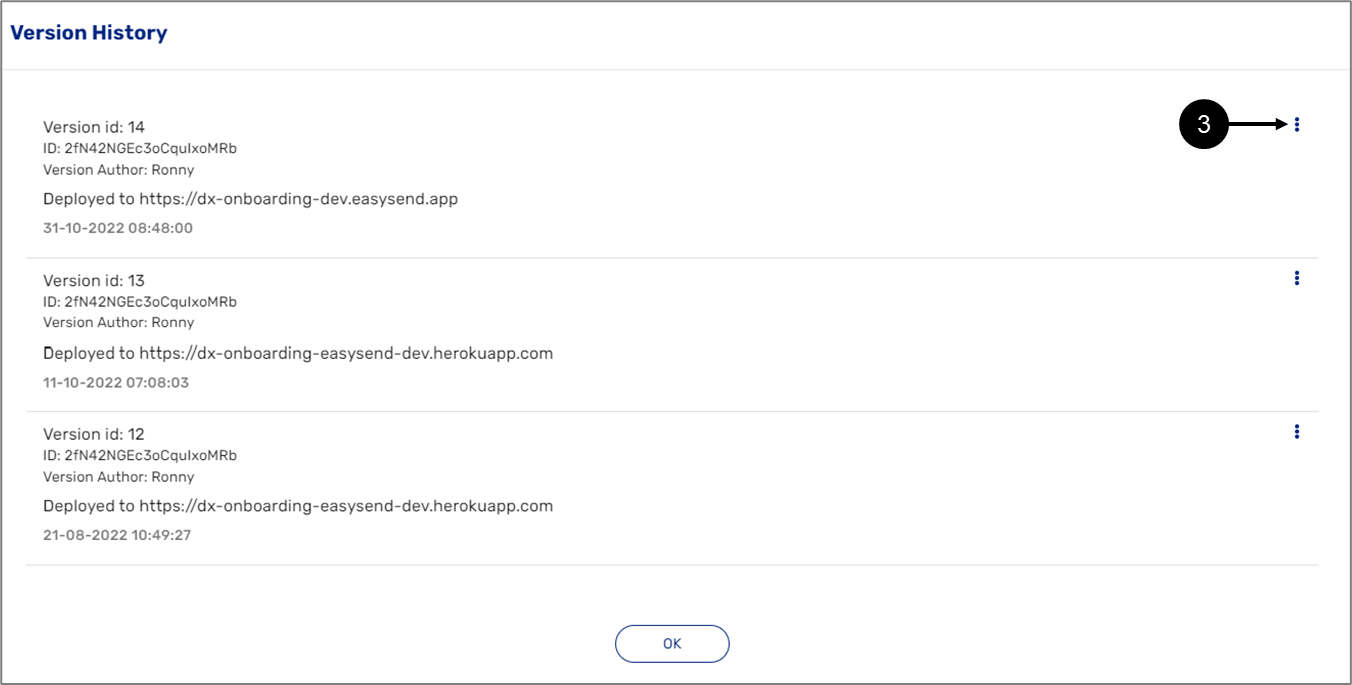
Figure 3: Version History Window
- Locate the required version from the list.
- Click the three dots (3).
Result:
Different options appear:
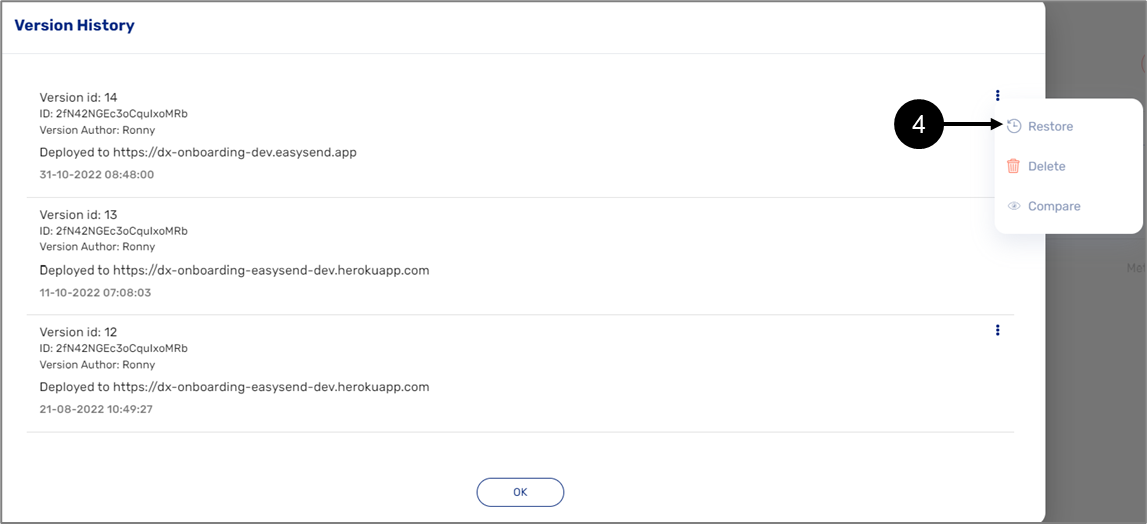
Figure 4: Restore Option
- Click the Restore option(4).
Result:
The previous version is restored.
Question 2 - Comparing Versions
Can I compare different versions of Builder layers?
Answer
(See Figure 5 to Figure 9)
Yes it is possible to compare Builder layers versions, for example:
Figure 5: Accessing the Model Layer
- Access the required layer, for example, the Model (1).
Result:
The Model screen appears:
Figure 6: Accessing the Model Layer
- Click the Versions button (2).
Result:
The Version History window appears:
Figure 7: Version History Window
- Locate the required version from the list.
- Click the three dots (3).
Result:
Different options appear:
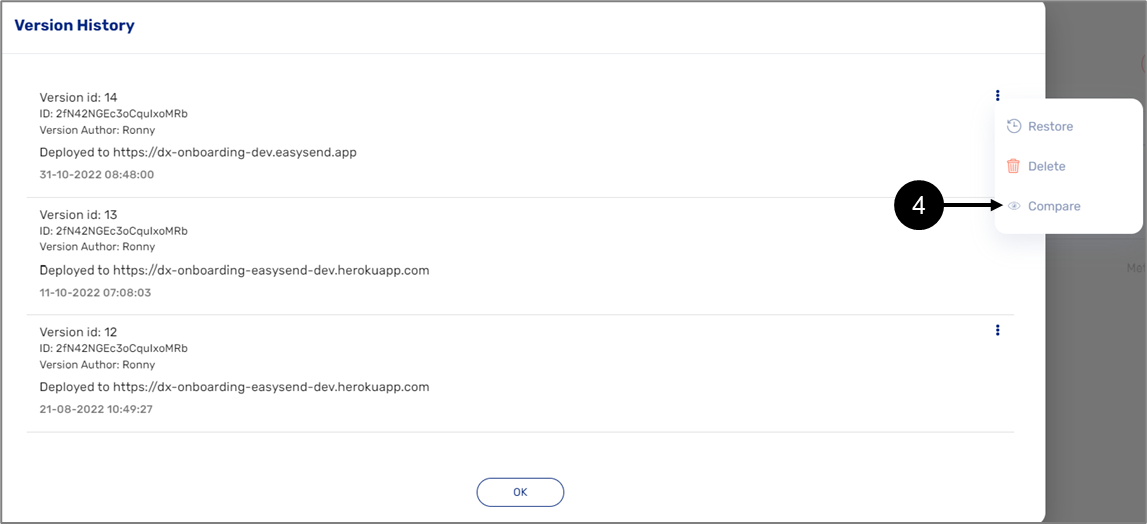
Figure 8: Compare Option
- Click the Compare option(4).
Result:
The Version Comparison window appears, and the selected version is compared to the current version, for example:
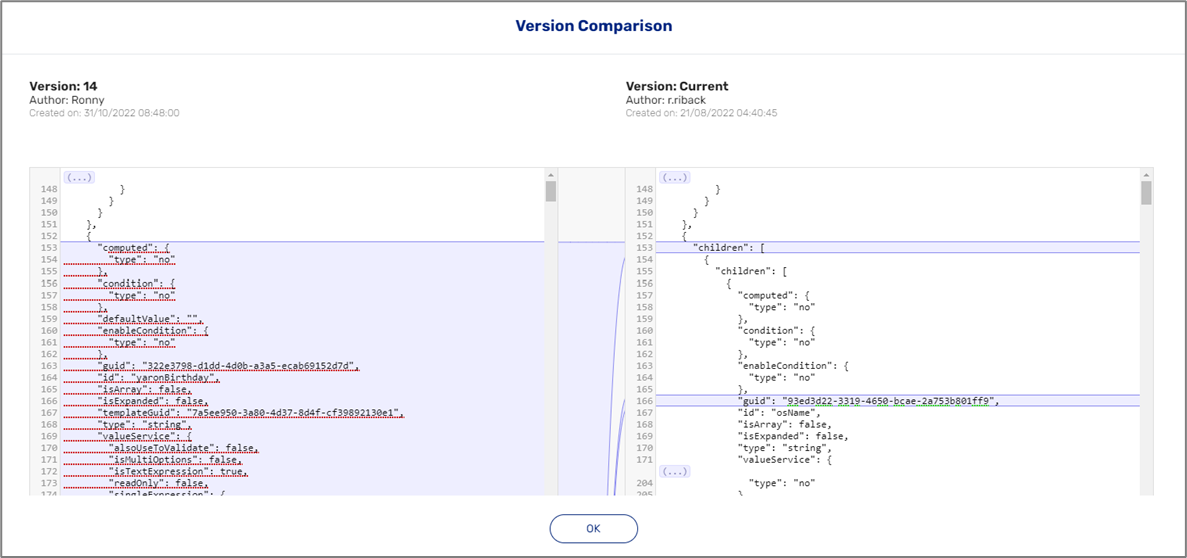
Figure 9: Compare Option
Question 3 - View a Process Last Changes
Can I view a summary of a process's last changes?
Answer
(See Figure 10 to Figure 13)
Yes it is possible to view a summary of a process's last changes, for example:
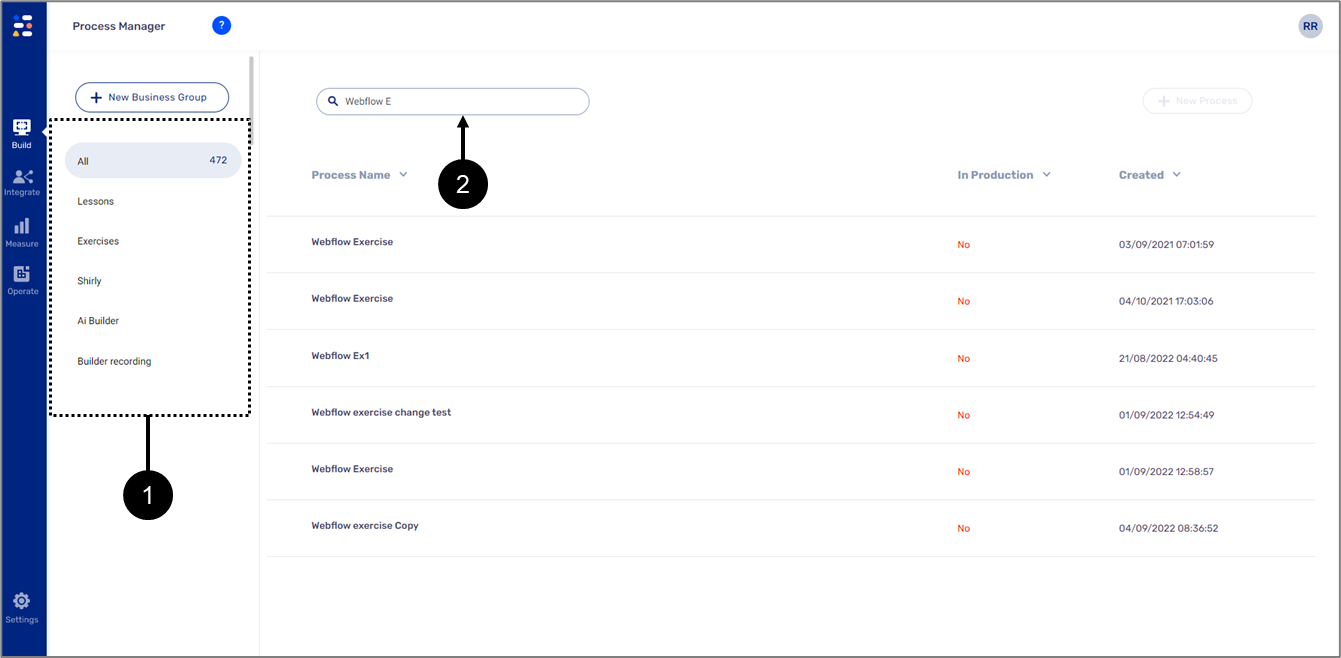
Figure 10: Process Manager Screen
- Access the Process Manager screen.
- Locate the desired process by clicking its business group (1) first or by searching it (2).
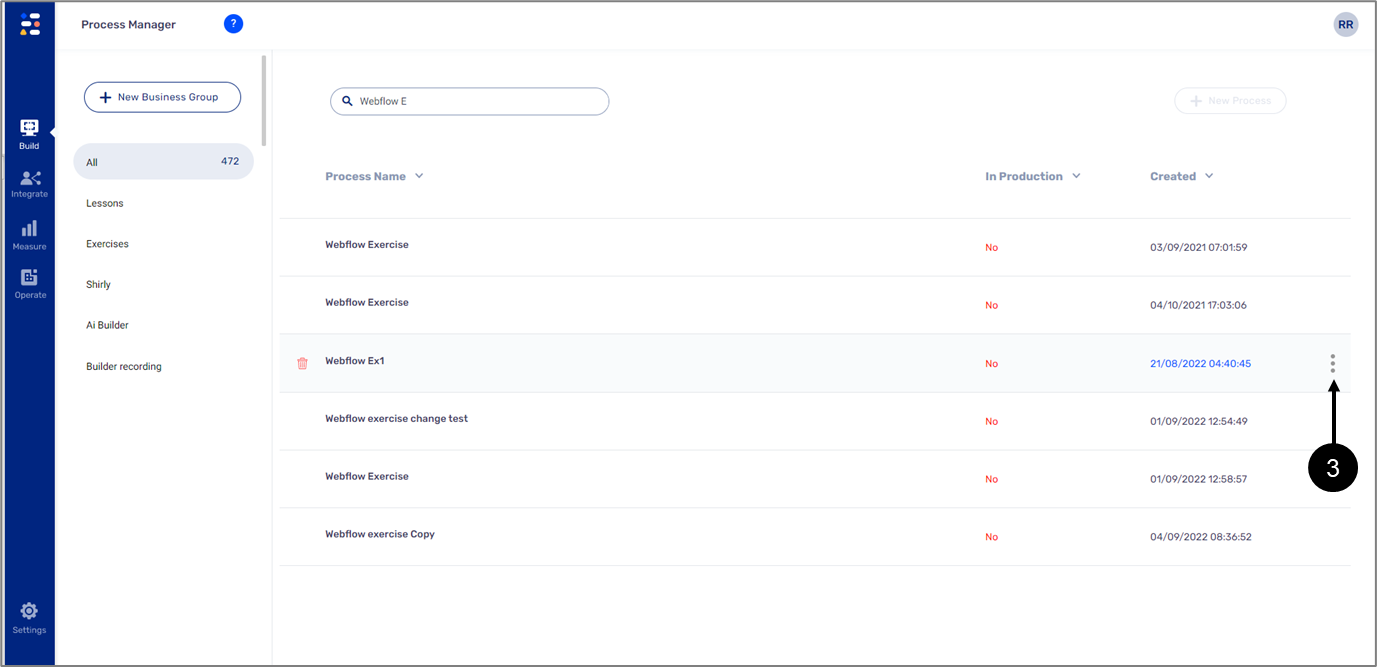
Figure 11: Three Dots
- Hover above the process and click the three dots (3).
Result:
Different options appear:
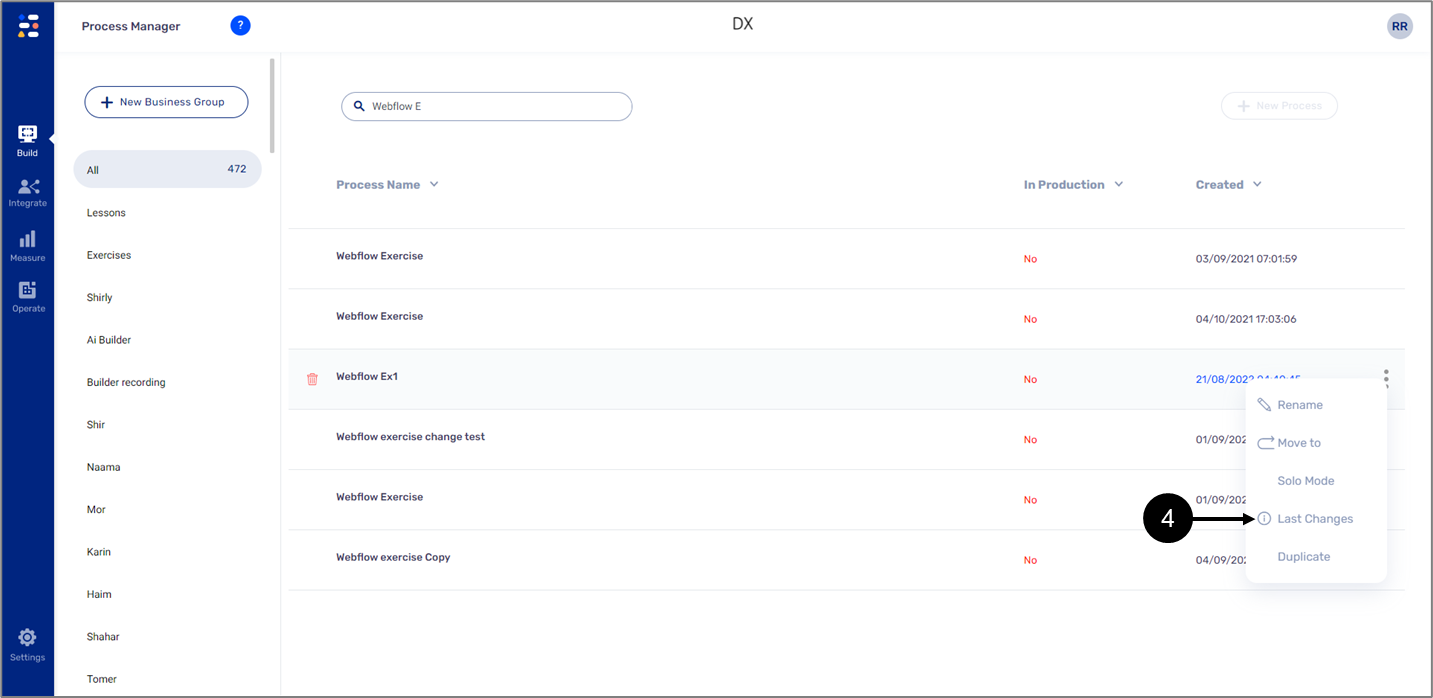
Figure 12: Last Changes
- Click Last Changes (4).
Result:
The Items Last Modified Info window appears:
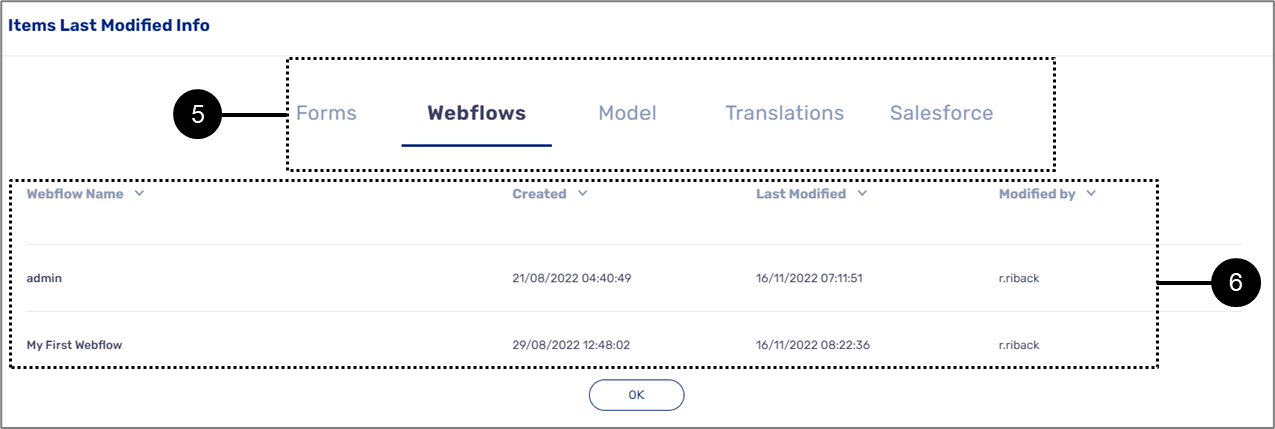
Figure 13: Items Last Modified Info Window
- Click on the sections (5).
- View the information (6):
- Name (Form/Webflow/Model/Translation/Salesforce).
- Date and time of creation.
- Date and time of last modification.
- The name of the user who perform the modification.
Question 4 - Missing Navigation Bar Items
(See Figure 14)
What can I do if some options are missing from the navigation bar?
Figure 14: Missing Options from Navigation Bar
Answer
Please contact our support team.
FAQ - Dynamic Documents
Question 1 - Components visibility
Is it possible to change a component's visibility in A PDF without removing it?
Answer
(See Figure 15)
Yes it is possible to change a component's visibility without removing it by using conditions and expressions, for example:
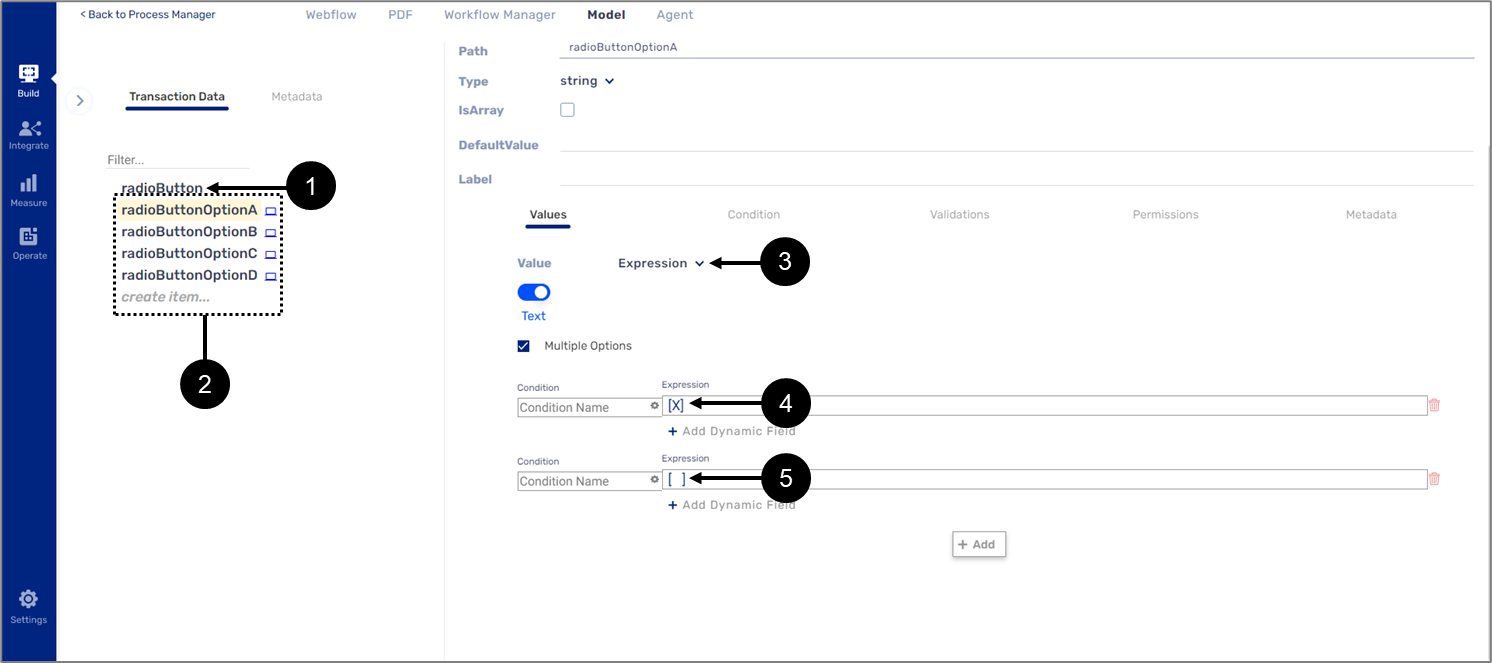
Figure 15: Missing Options from Navigation Bar
- Access the Model screen.
- For a radio button component (1) for example, create new data items (2) that represent its options.
- For each data item:
- Set the Value dropdown to Expression (3).
- Create conditions and expressions that will add the desired characters, for example: [X] (4) or [ ] (5).
- Repeat step 3 as necessary.
- Use the data items in the dynamic document (instead of using blocks).
Question 2 - Removing Automatic Headers
Is it possible to remove headers that were automatically added to the PDF after a save action?
Answer
(See Figure 16 to Figure 17)
Yes it is possible to remove headers that were automatically added to the PDF after a save action, for example:

Figure 16: Insert Tab and Header
- On the dynamic document click the Insert tab (1).
- Click Header (2).
Result:
The Built-in window appears:
- Click Remove Header (3).
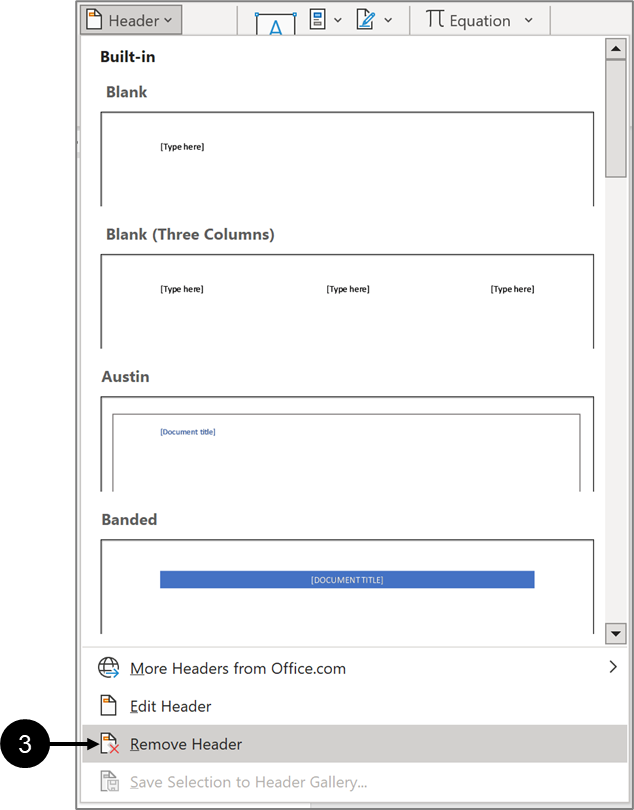
Figure 17: Remove Header
Question 3 - Starting a Section in a New Page without Blank Pages
How can I start a section in a new page without leaving multiple blank pages in the middle?
Answer
To start a section on a new page we will use Microsoft Word’s feature Page break. When there are multiple pages with a condition before the page break, if the condition is not fulfilled, the pages before the page will be empty. To solve this, set a Page Break (or number of Page Breaks as required) inside a condition, for example:
If there are two pages under condition A, at the beginning of the conditional pages, add a conditional Page Break in case condition A will not be fulfilled.
At the end of the conditional pages add a conditional Page Break in case condition A will be fulfilled. In this way, a Page Break will be added, without blank pages in the middle.