Article Overview
The following article describes the Journey Sender feature. It explains what the Journey Sender is used for, and how to build and use Journey Sender to initiate and send digital process links to customers. The article also describes how to create and manage agent groups and how to perform troubleshooting in case a malfunction occurs.
What is the Journey Sender?
The Journey Sender feature enables your representatives to initiate and send digital processes links to customers. The links will be received via email or SMS. The digital process itself is sent with pre-filled information that was filled by your representative using the Journey Sender.
Navigate to the Journey Sender Screen
(See Figure 1 and Figure 2)
To navigate to the Journey Sender screen, perform the following steps:
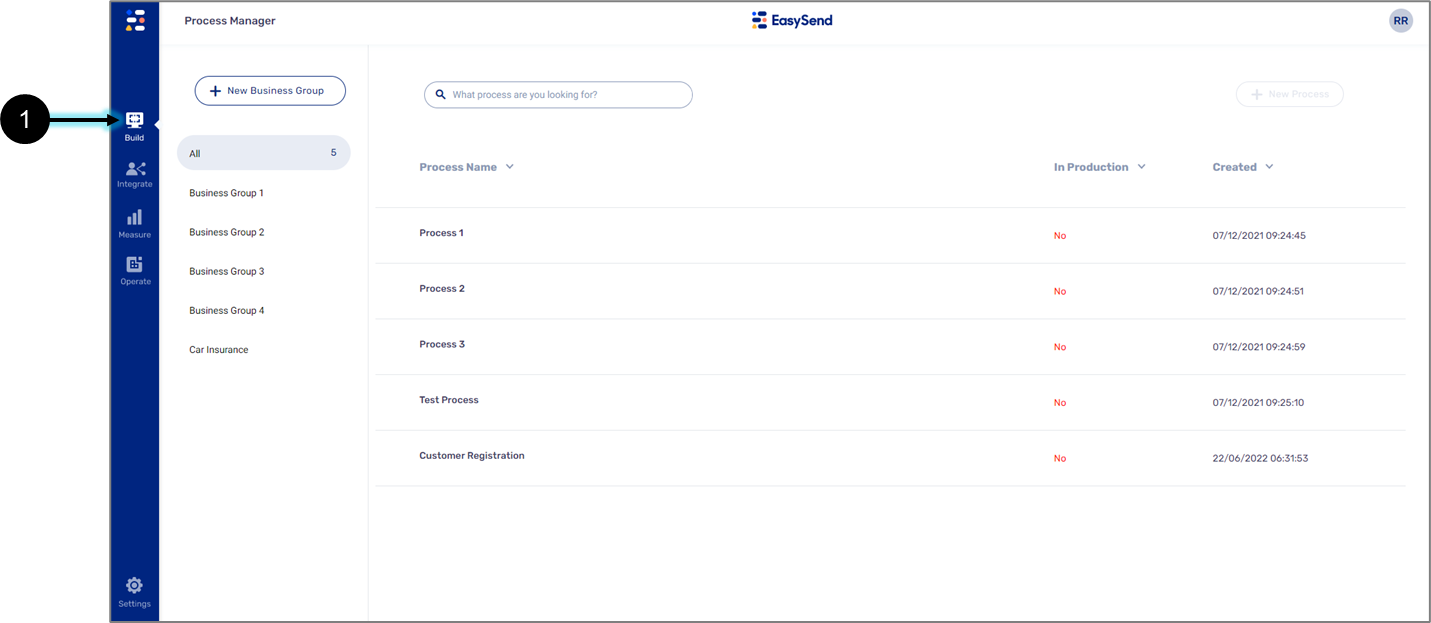
Figure 1: Build Tab
- Click the Build tab (1).
Result:
The Build tab options appear:
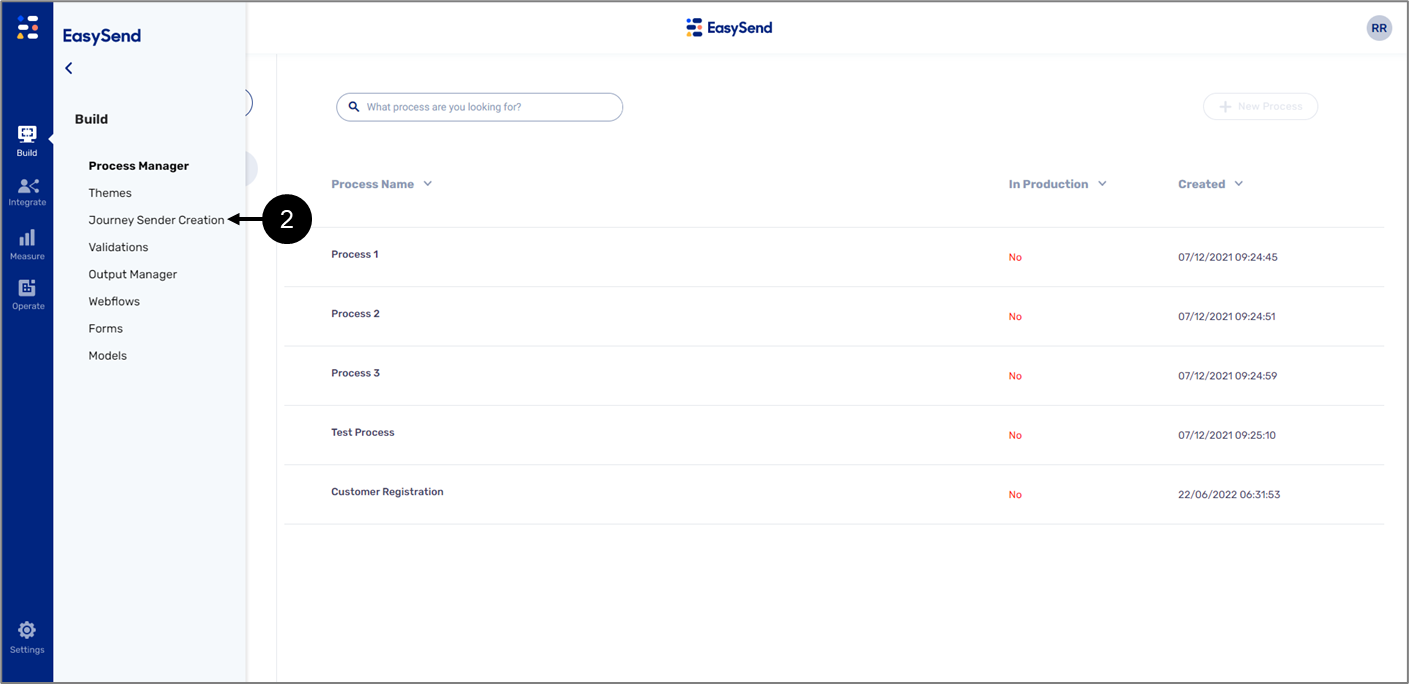
Figure 2: Journey Sender Creation Option
- Click the Journey Sender Creation option (2).
Journey Sender Main Screen
Figure 3 and Table 1 describe the structure of the Journey Sender screen.
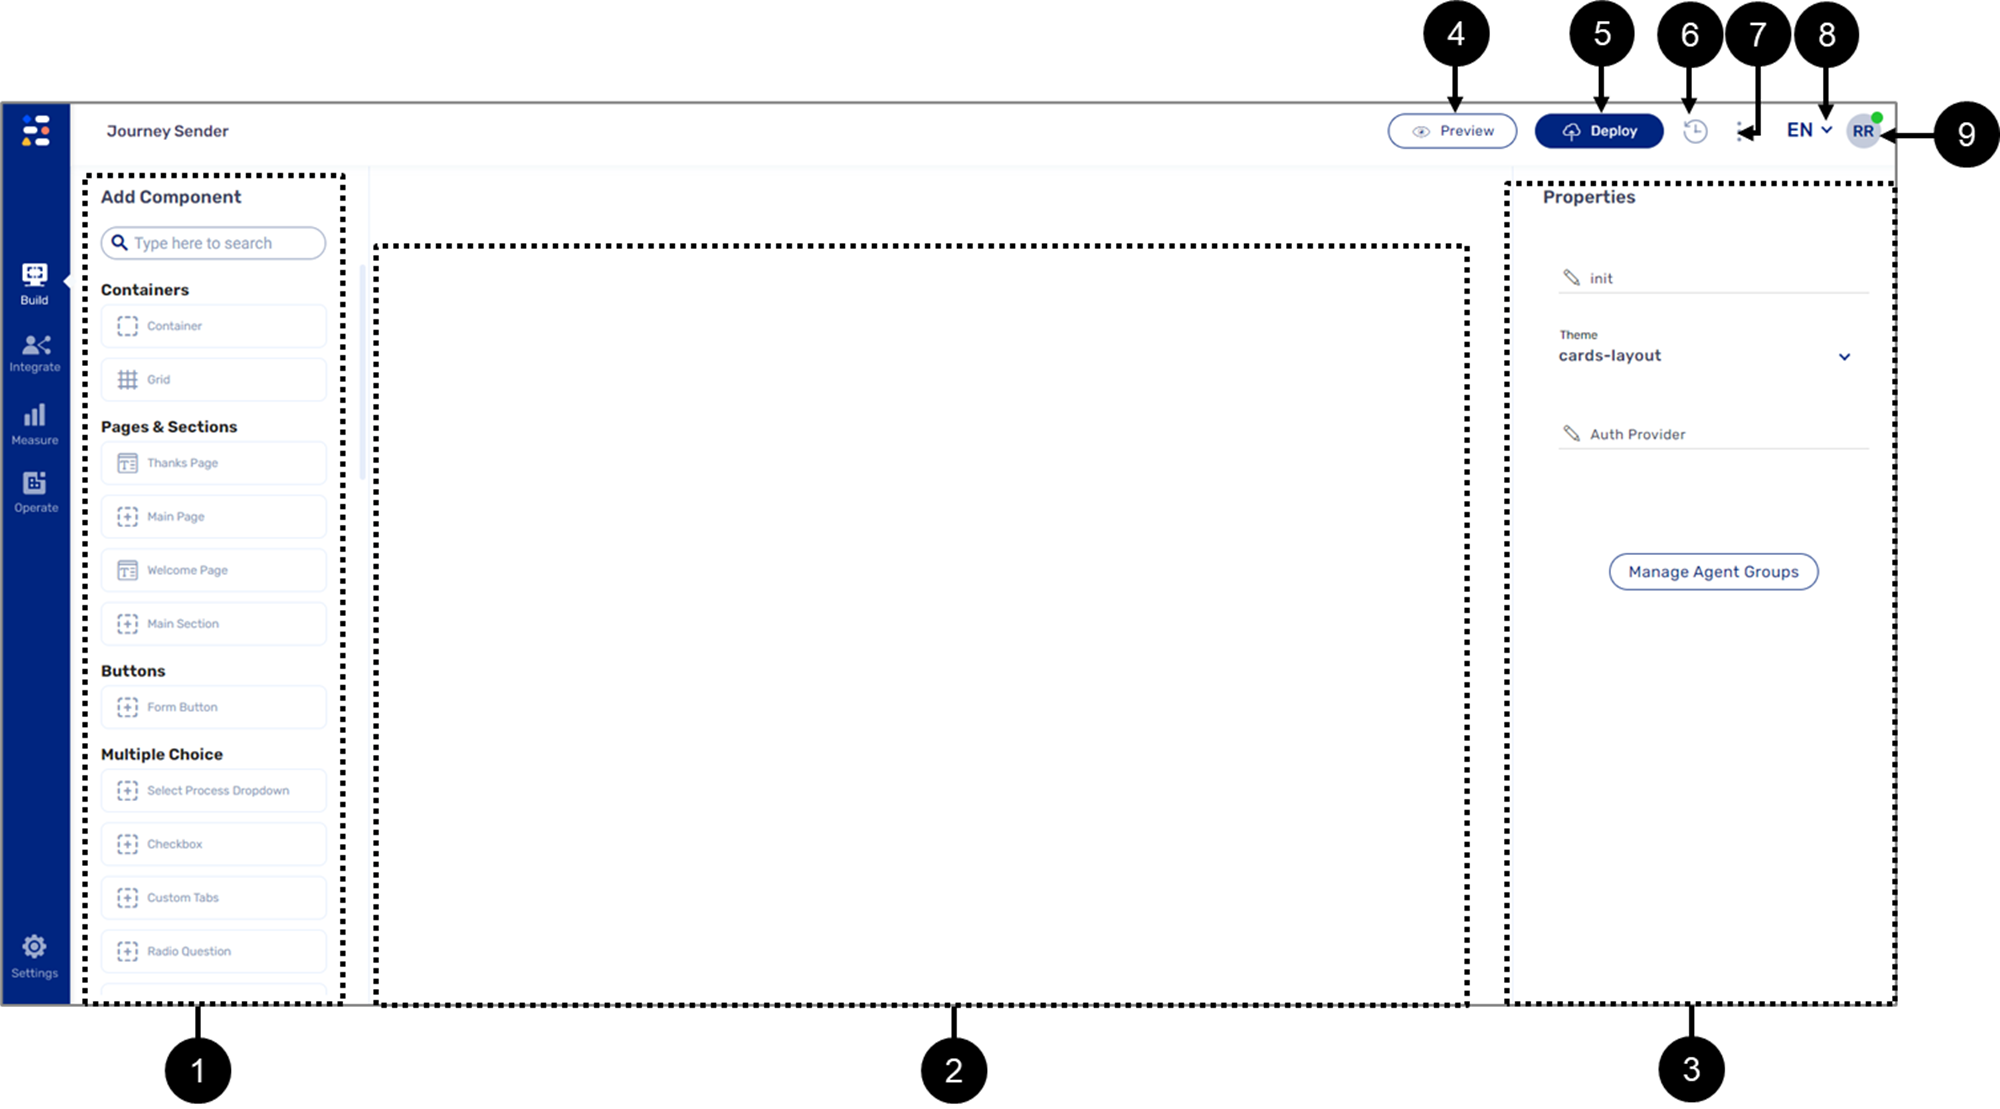
Figure 3: Journey Sender Main Screen
Table 1: Journey Sender Main Screen
Number | Icon | Name | Description |
1 | - | Add Component | Enables to add components to the canvas to create the Journey Sender NOTE For additional information, please see the Journey Sender Unique Components section |
2 | - | Canvas | Contains the components that creates the Journey Sender |
3 | - | Properties Section |
NOTE For additional information about the properties of the Journey Sender, please see the Journey Sender Properties section
NOTE For additional information about managing agent groups, please see the Manage Agent Groups section |
| 4 | - | Preview | Enables to view the Journey Sender after it was deployed to an environment NOTE For additional information, please see the Step 4: Deploy and View the Journey Sender section |
| 5 | - | Deploy | Enables to publish changes made to the Journey Sender, to a selected environment:
NOTE For additional information, please see the Step 4: Deploy and View the Journey Sender section |
6 |
| Versions |
NOTE
|
7 |
| More Options |
NOTE The More Options button also appears on the Webflow, Model, Workflow Manager, and PDF screens |
8 |
| Language |
NOTE This icon will appear only if more than one language is available for selection |
| 9 |  | User Icon |
|


Journey Sender Unique Components
(See Figure 4 and Figure 5)
The components of the Journey Sender are identical to the components of the Webflow with the addition of two unique components that must be used when creating the Journey Sender:
- Select Process Dropdown (under the Multiple Choice section) - this component enables you to select from a list of digital processes to initiate and send through the Journey Sender.
- In some cases, you can limit which digital process will be displayed on the list (for additional information, see the Manage Agent Groups section.
- If a digital process does not appear on the list, see the Troubleshooting section.

Figure 4: Select Process Dropdown Example
- Agent From Specific Fields (under the Labels & Non Input section) - displays the fields that were added to the Agent screen from the Webflow (for additional information, see the Adding Dynamic Fields to the Journey Sender section).

Figure 5: Select Process Dropdown Example
Journey Sender Properties
The Properties section of the Journey Sender is like the Properties section of the Webflow regarding added components. The main difference is that the section also contains properties for the Journey Sender itself. Figure 6 and Table 2 describe the Properties section of the Journey Sender.
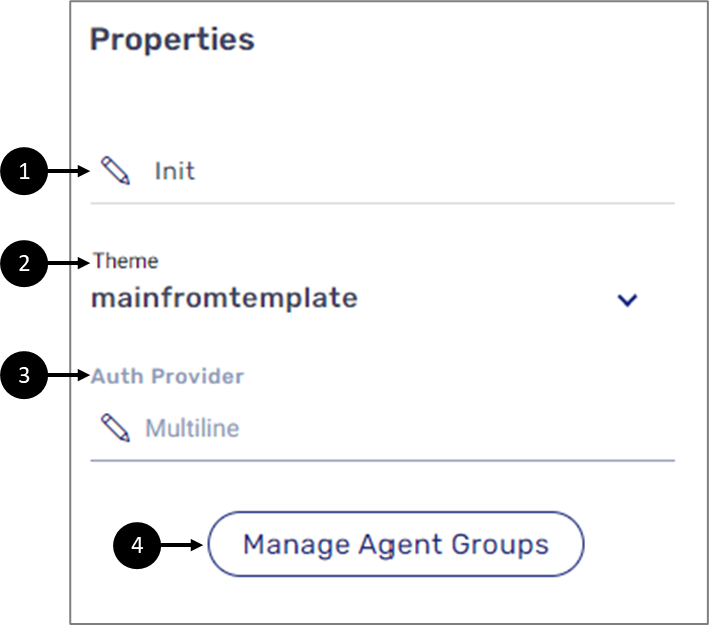
Figure 6: Journey Sender Properties
Table 2: Journey Sender Properties
Number | Icon | Name | Description |
1 |
| init | Enables to add a code for initiating a digital process NOTE The topic is not covered in this article. For additional information about code implementation, please contact our support team |
2 | - | Theme | Enables to select the theme of the Journey Sender NOTE The theme of the Journey Sender must match the theme of the digital process it initiates |
3 |
| Auth Provider | Enables to limit access to the Journey Sender |
4 | - | Manage Agent Groups | Enables to create and manage agent groups NOTE For additional information about managing agent groups, see the Manage Agent Groups section |


Journey Sender Model - Auth Provider
(See Figure 7 and Figure 8)
The Auth Provider enables you to limit access to the Journey Sender for example by asking the user to provide a username and password and in addition by whitelisting IP addresses.
To configure the Auth Provider, click the Icon (1) and when the Auth Provider window appears, configure it, for example:
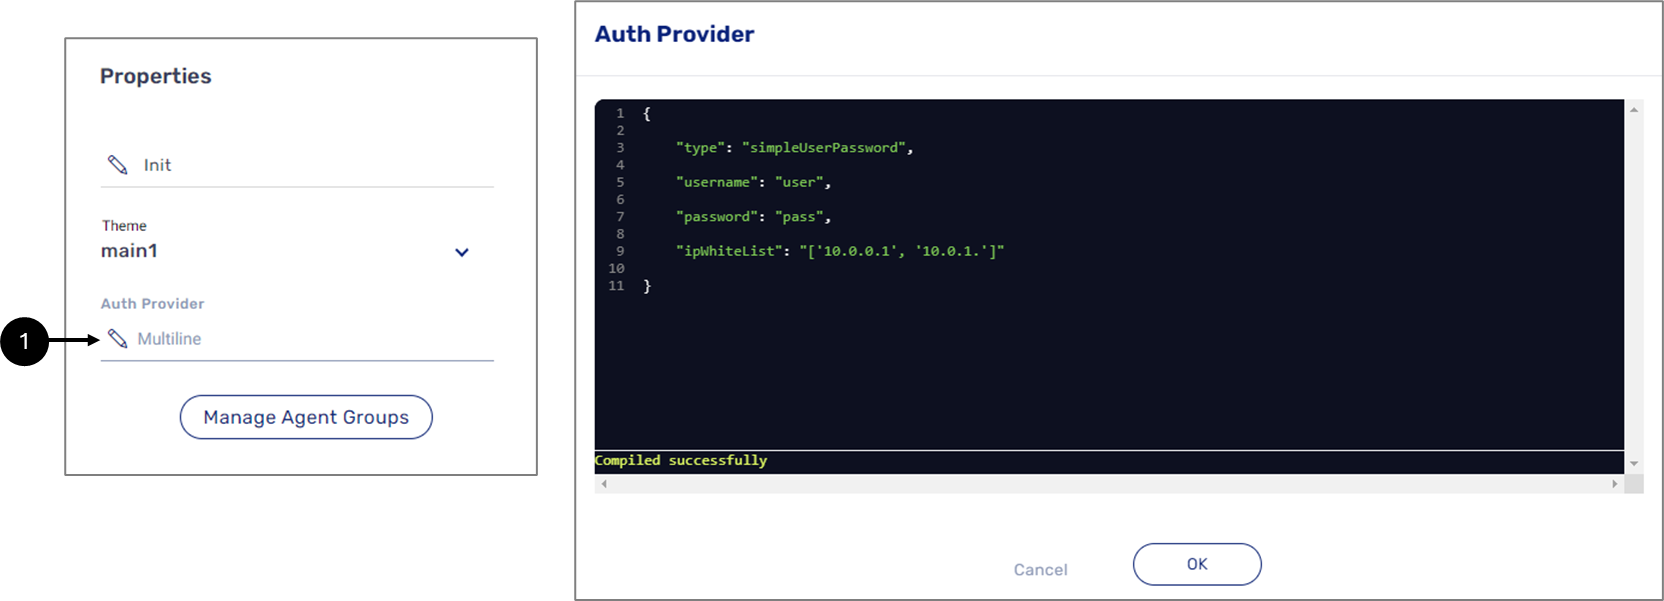
Figure 7: Configured Auth Provider
When the Journey Sender is initiated and the IP address of the device matches one that is written in the whitelist, the following window appears:

Figure 8: Authentication Popup Window
Journey Sender Model - processId Data Item
(See Figure 9)
The Model of the Journey Sender contains pre-created data items used to implement behavior and logic on its components. Additional data items can be created and connected to added components if required. The exception is the processId data item (1) that must be connected to the Select Process Dropdown.
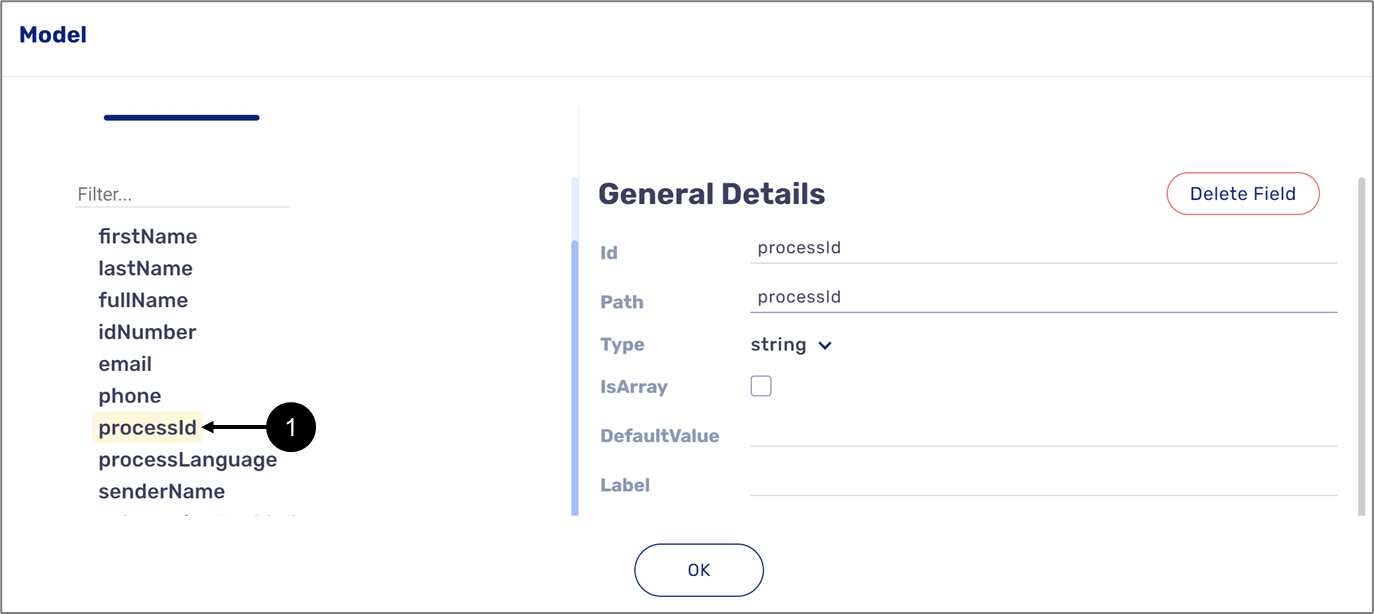
Figure 9: Journey Sender Properties
Adding Dynamic Fields to the Journey Sender
For the components of a digital process to appear as dynamic fields in the Journey Sender after selection, they must be added to the Agent screen. This provides your representatives with the ability to prefill the digital process fields before initiating and sending its link to the customer or before filling out the rest of the digital process independently.
What to do on the Webflow?
(See Figure 10 and Figure 11)
Once the Webflow is operational, mark the components you want to add to the Agent screen. From the Properties section click the + Add to Agent button (1).
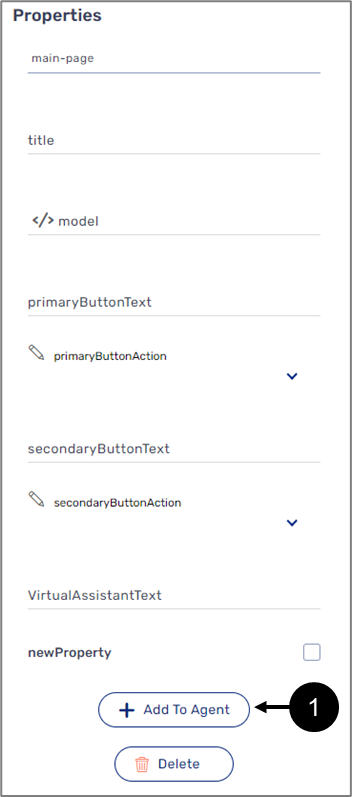
Figure 10: + Add To Agent Button
When marking a container type component (2) or a page type component and clicking the + Add To Agent button, all the components that are located inside/on top will be added to the Journey Sender automatically.
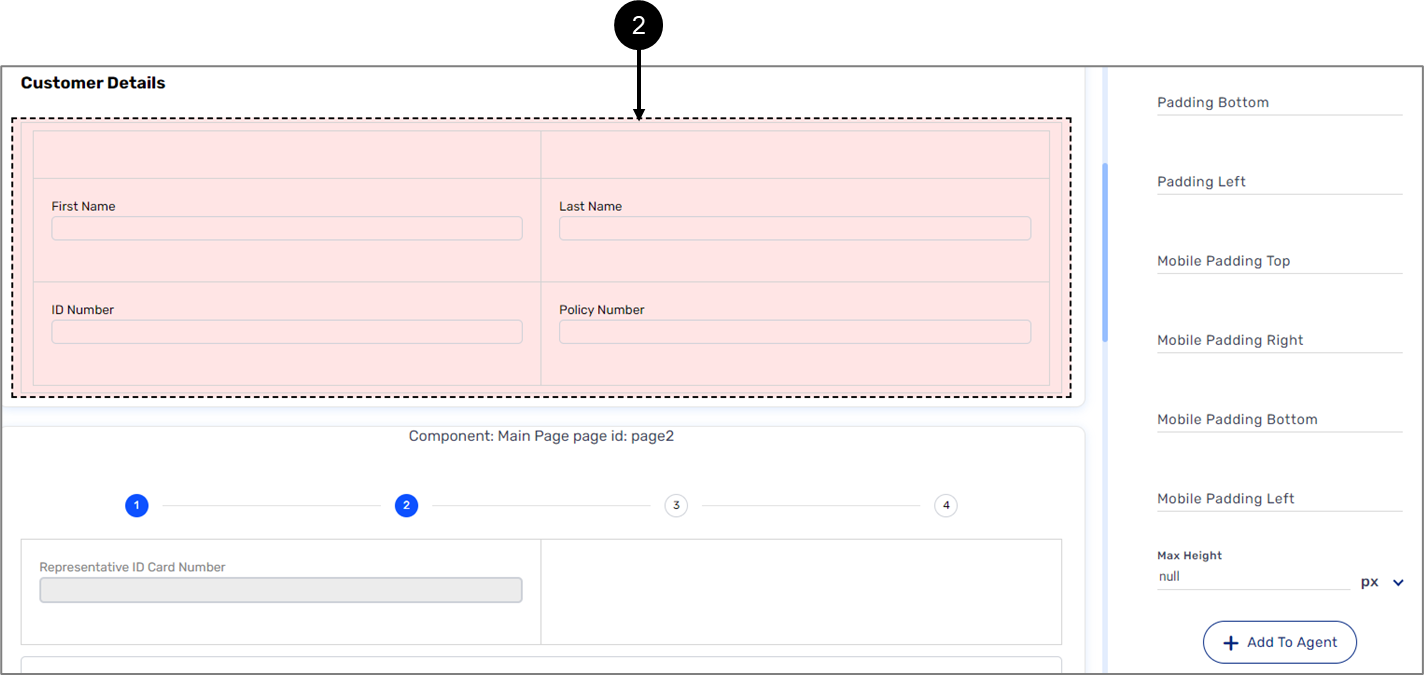
Figure 11: Adding Components inside a Container
The Agent Screen
(See Figure 12)
The Agent screen contains all the added components that will appear as fields for data pre-fill on the Journey Sender. To navigate to the Agent screen, click the Agent tab (1).
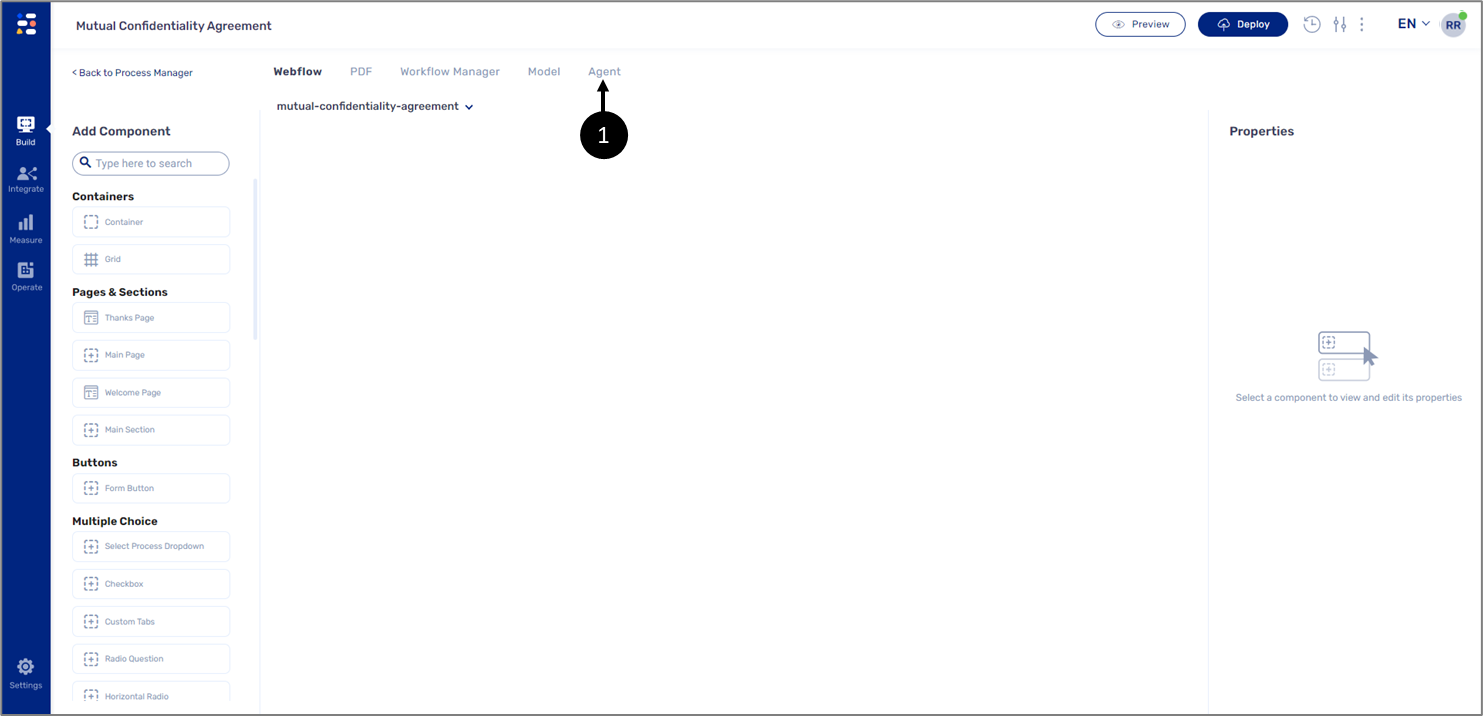
Figure 12: Adding Components inside a Container
Figure 13 displays an example of components added to the Agent screen:
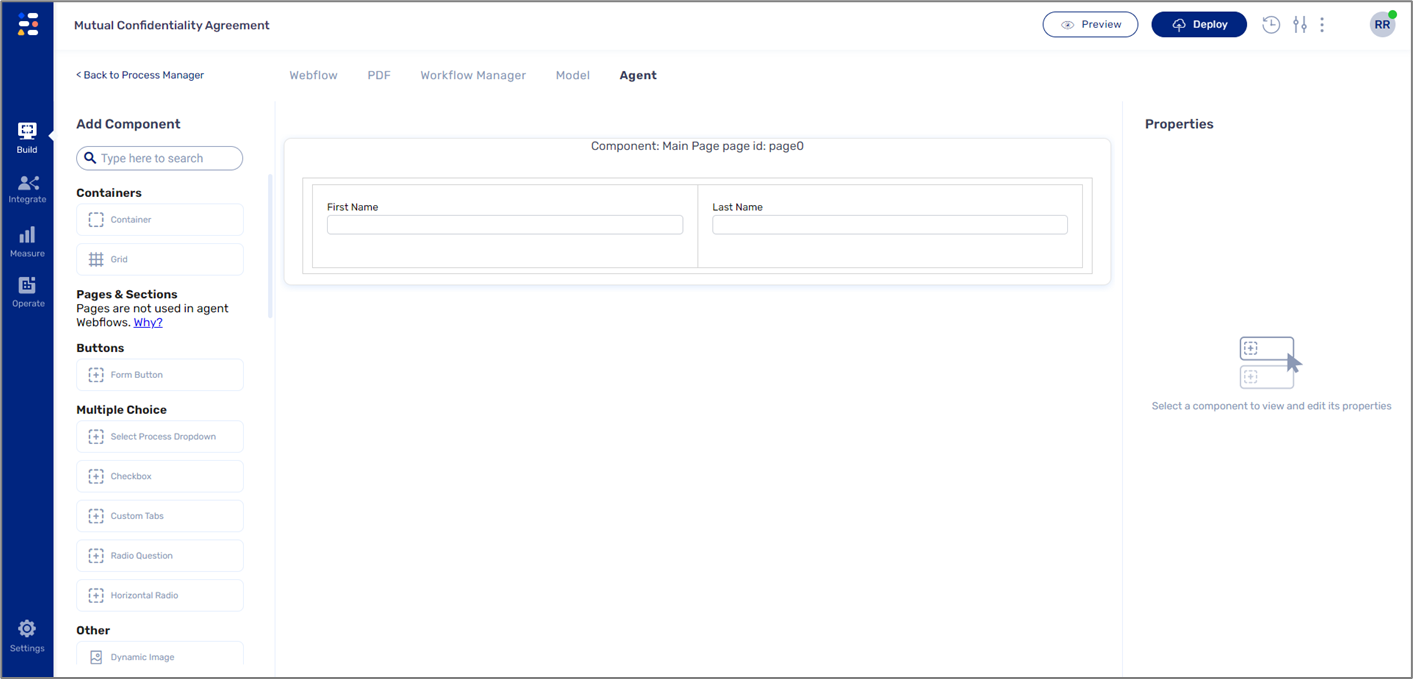
Figure 13: Added Components to the Agent Screen
What to do on the Journey Sender?
(See Figure 14)
On the Journey Sender make sure that the Agent From Specific Fields component (1) is added to the canvas. The components that were added to the Agent screen will serve as dynamic fields once the Journey Sender is deployed and viewed and the appropriate digital process is selected.
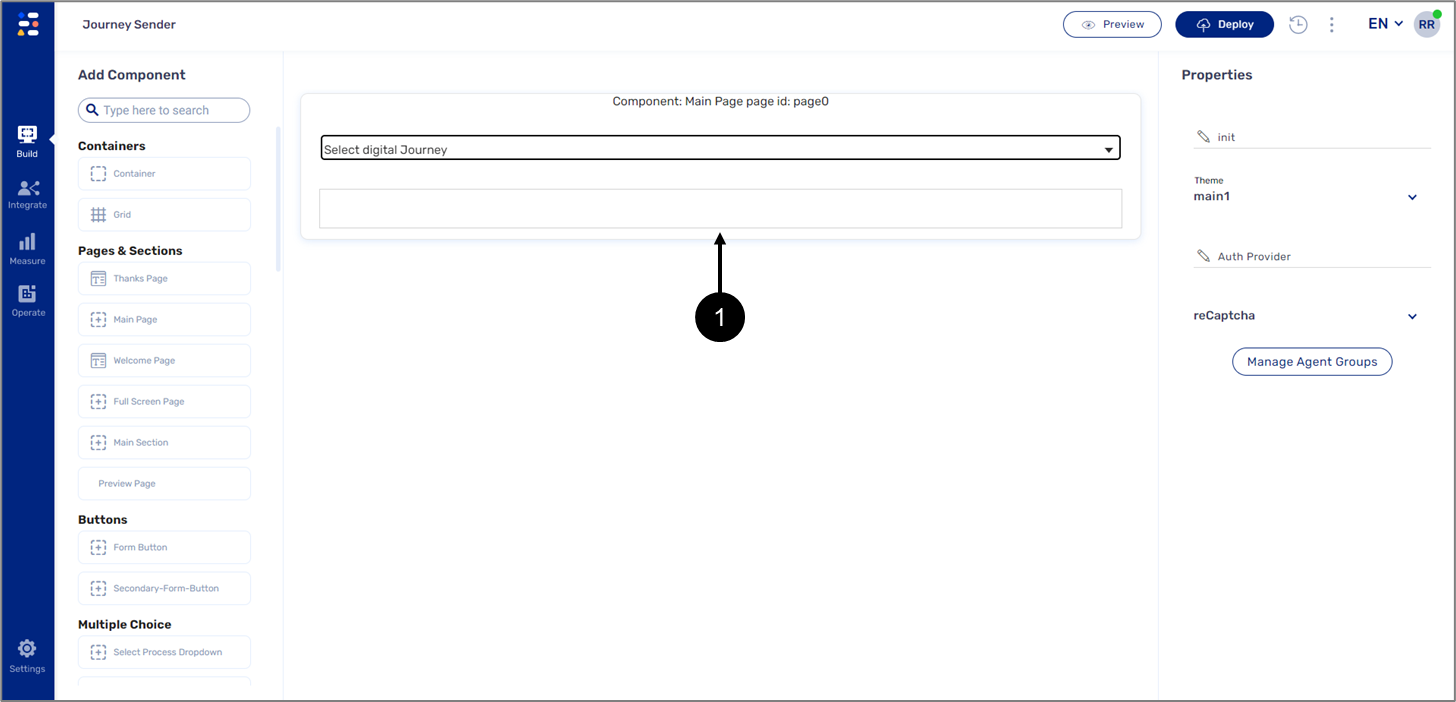
Figure 14: The Agent From Specific Fields Component
Figure 15 displays the Journey Sender where your representative selects (2) which digital process link to send to the customer:
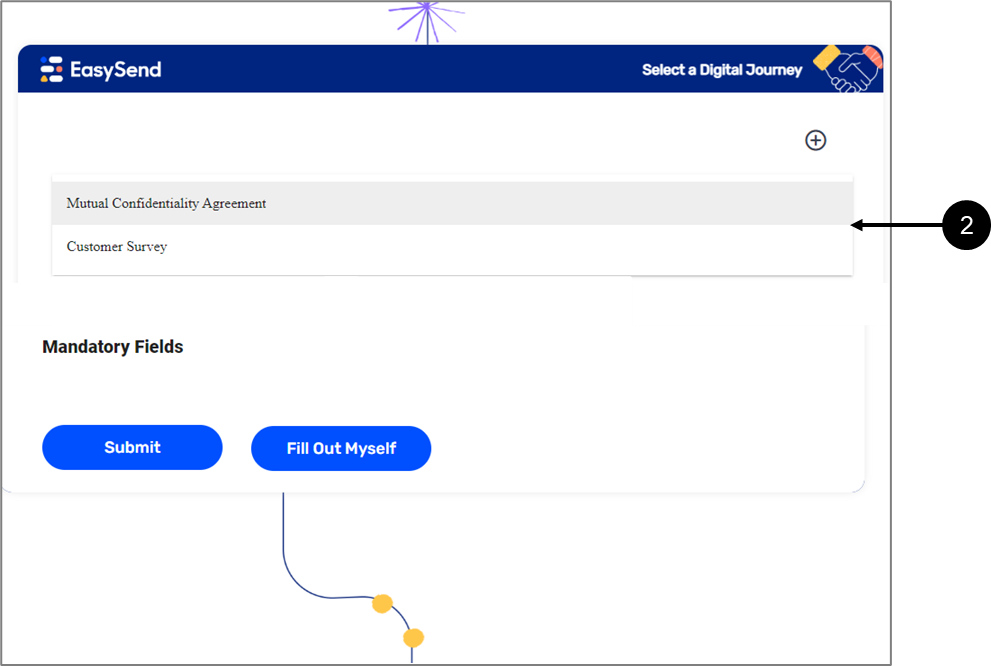
Figure 15: Journey Sender - Selecting a Digital Process
Once the digital process is selected its dynamic fields appear (see Figure 16):
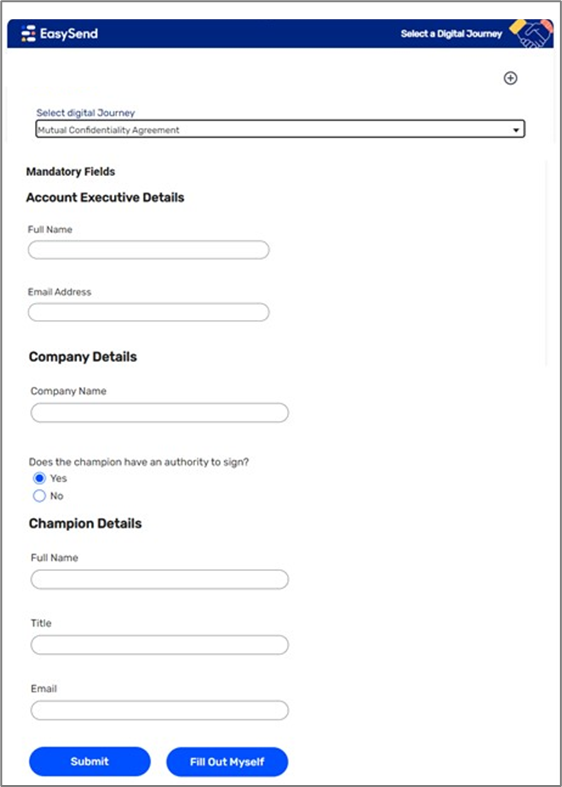
Figure 16: Journey Sender - Dynamic fields
Adding Static Fields to the Journey Sender
Components from the Add section can be added to the Journey Sender. The components will appear as static fields whenever deploying and viewing the Journey Sender regardless of the selected digital process or the added dynamic fields from the Webflow. Each added component must be connected to the Model. Figure 17 displays an example of added components (1) that are connected to the Model (2):
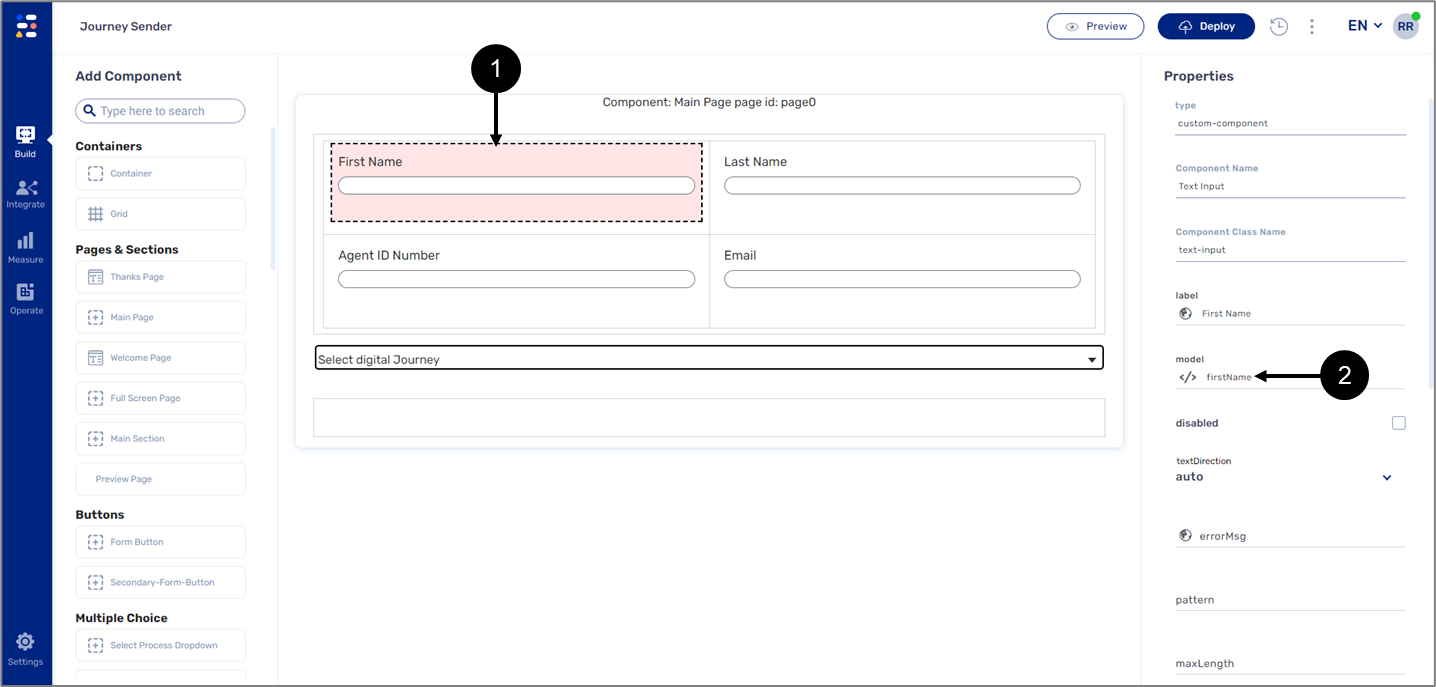
Figure 17: Added Components
Once the Journey Sender is deployed and viewed the component appear as static fields (see Figure 18):
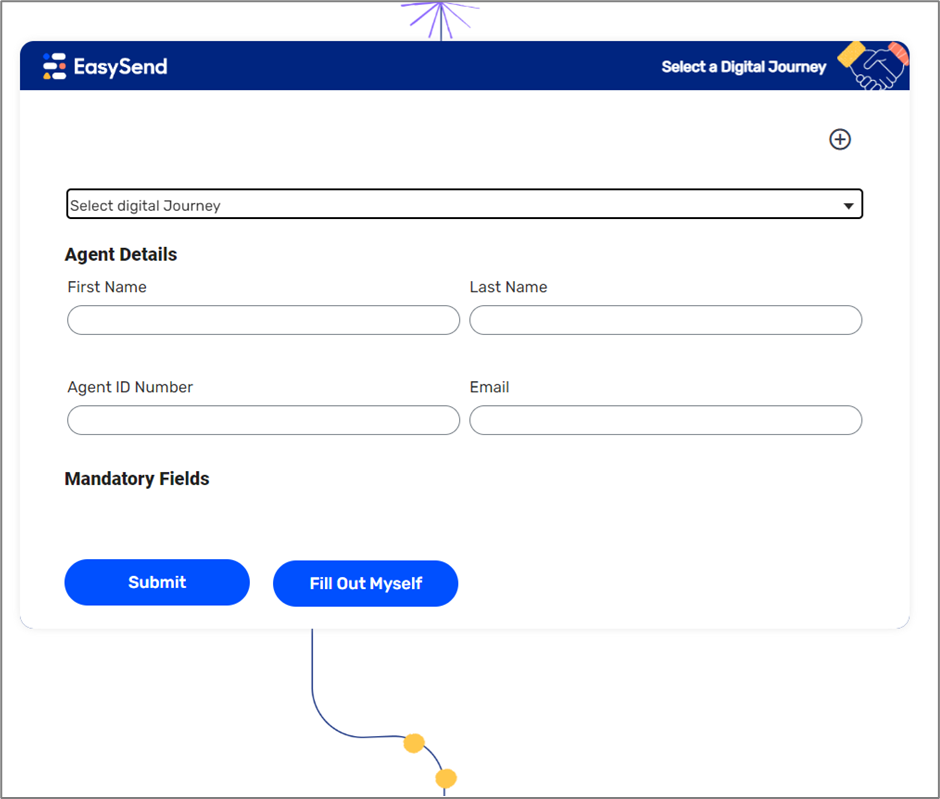
Figure 18: Journey Sender with Static Fields
How to Create and Use a Journey Sender?
The following sections describe how to create and use a Journey Sender.
Step 1: Add Webflow Components to the Agent Screen
(See Figure 19 to Figure 22)
To add Webflow components from the Webflow to the Agent screen, perform the following steps:
- Open the desired Webflow.
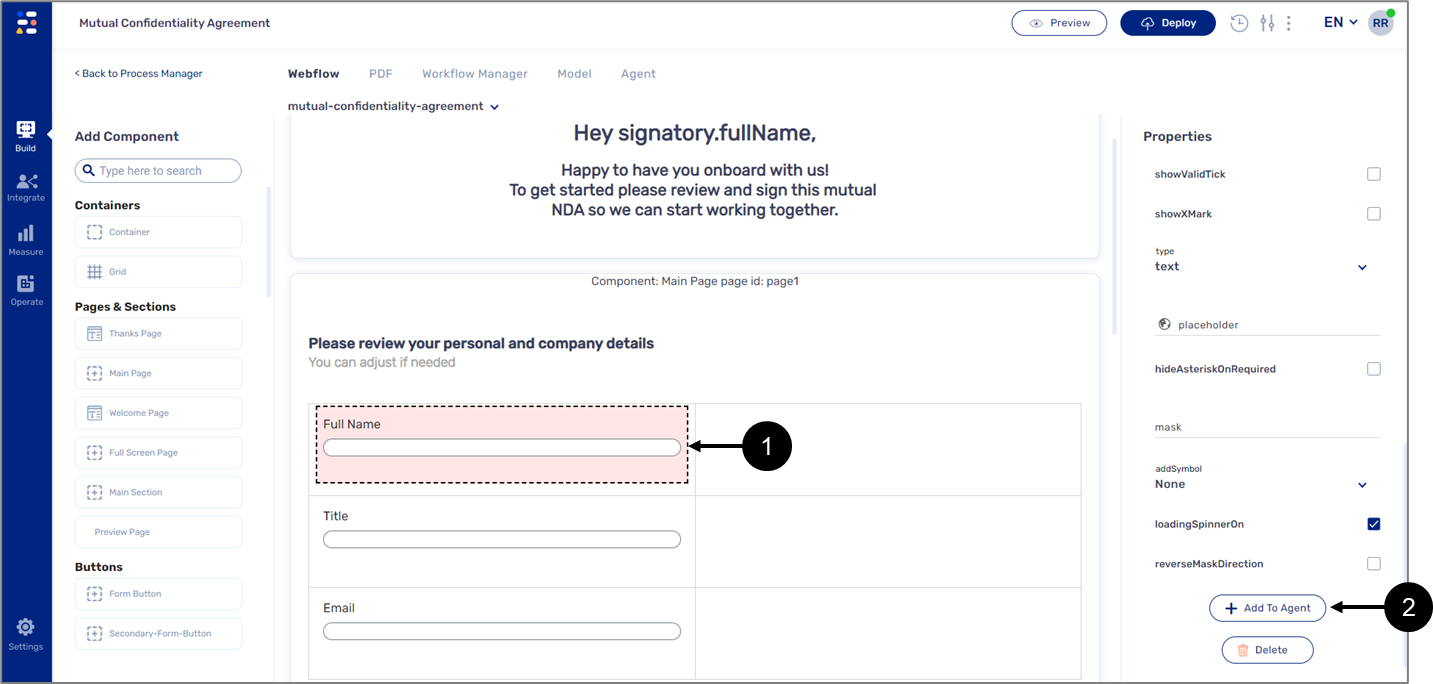
Figure 19: Journey Sender with Static Fields
- Locate the desired components to add and perform the following steps:
- Click the component (1).
- Click the + Add to Agent button (2).
Result:
The following message appears:

Figure 20: Successes Message
- Repeat steps a and b as necessary.
- If the desired components are placed on top of a page type component or inside a container type component it is possible to add them all together by clicking the page/container component and adding it to the Agent screen.
- If the component failed to be added, see the Troubleshooting section.
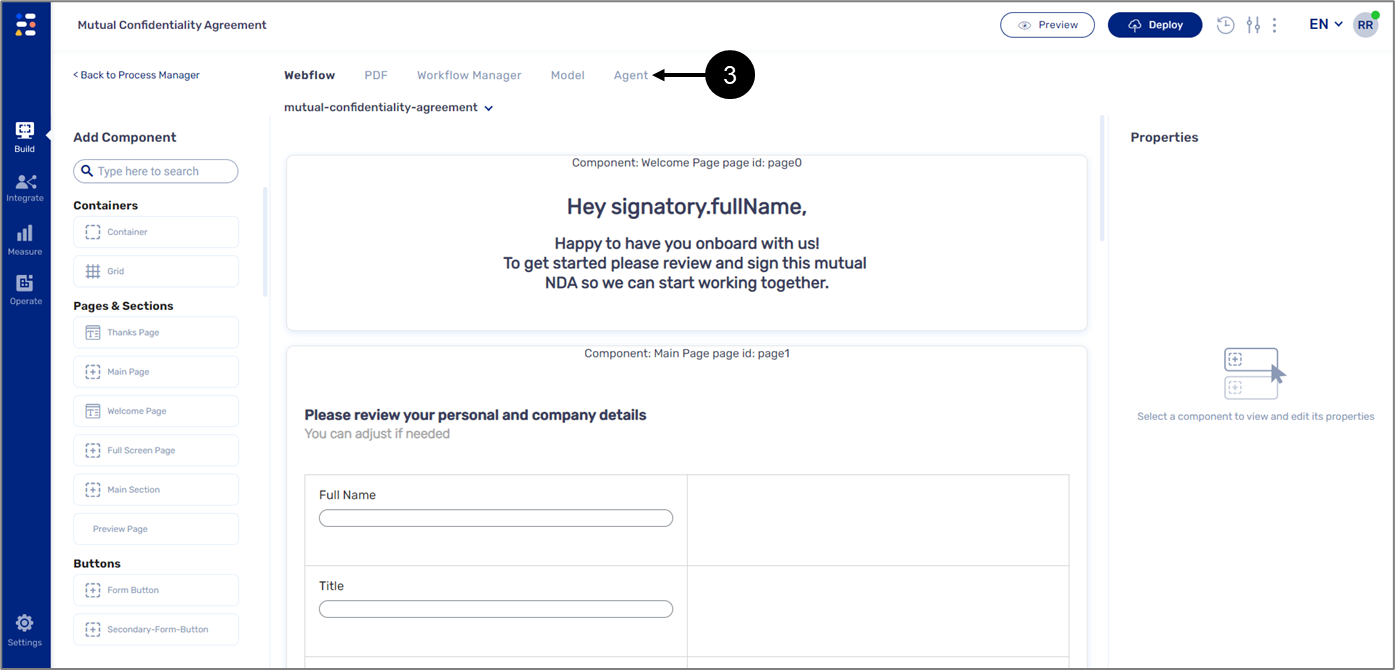
Figure 21: Navigating to the Agent Screen
- Click Agent tab (3).
Result:
The Agent screen appears with the added components:
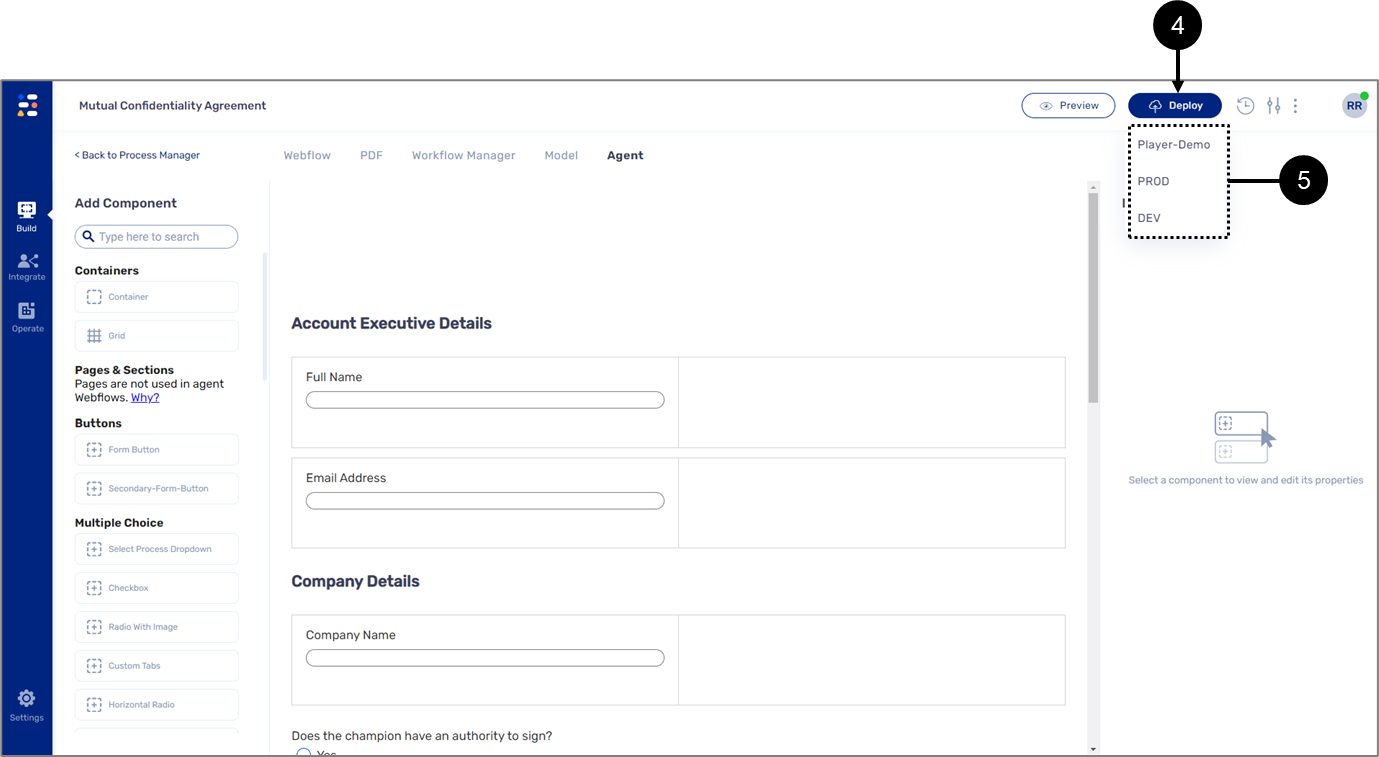
Figure 22: Agent Screen with Added Components
- Click the Deploy button (4) and click the desired environment (5).
Result:
The changes made to the Agent screen are saved.
Step 2: Build the Journey Sender
(See Figure 23 to Figure 28)
To build the Journey Sender, perform the following steps:
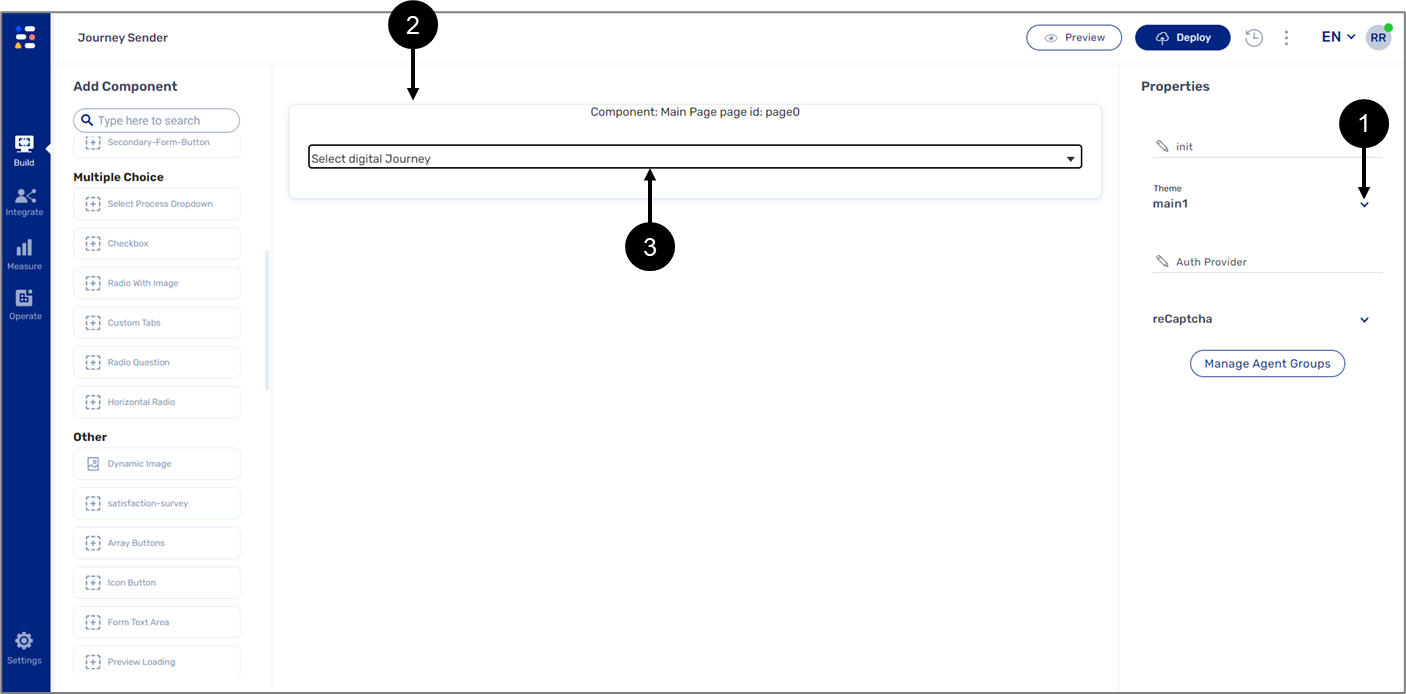
Figure 23: Main Page and Select Process Dropdown components
- Set the theme (1) of the Journey Sender.
- Drag and drop the Main Page Component (2) onto the canvas.
- Drag and drop the Select Process Dropdown component (3) onto the Main Page.
- Connect the Select Process Dropdown component to the Model:
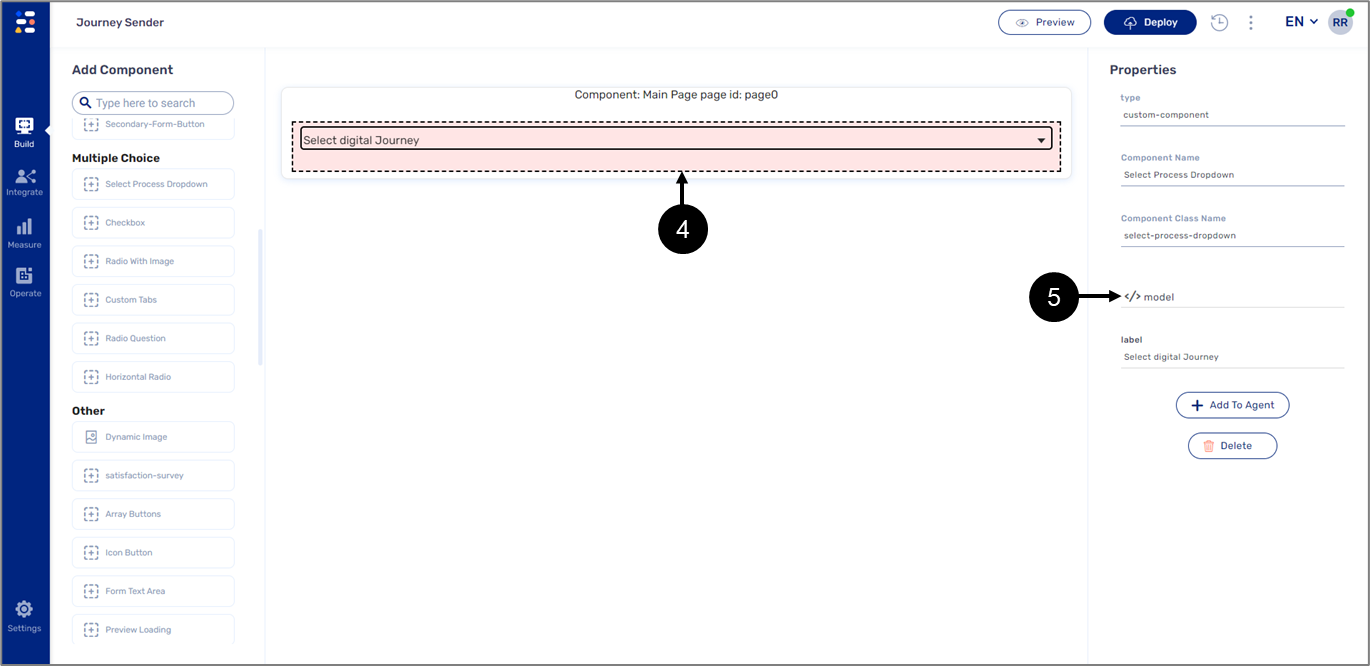
Figure 24: Connecting the Select Process Dropdown Component to the Model
- Mark the component (4).
- On the Properties section, click the model (5).
Result:
The Model screen appears:
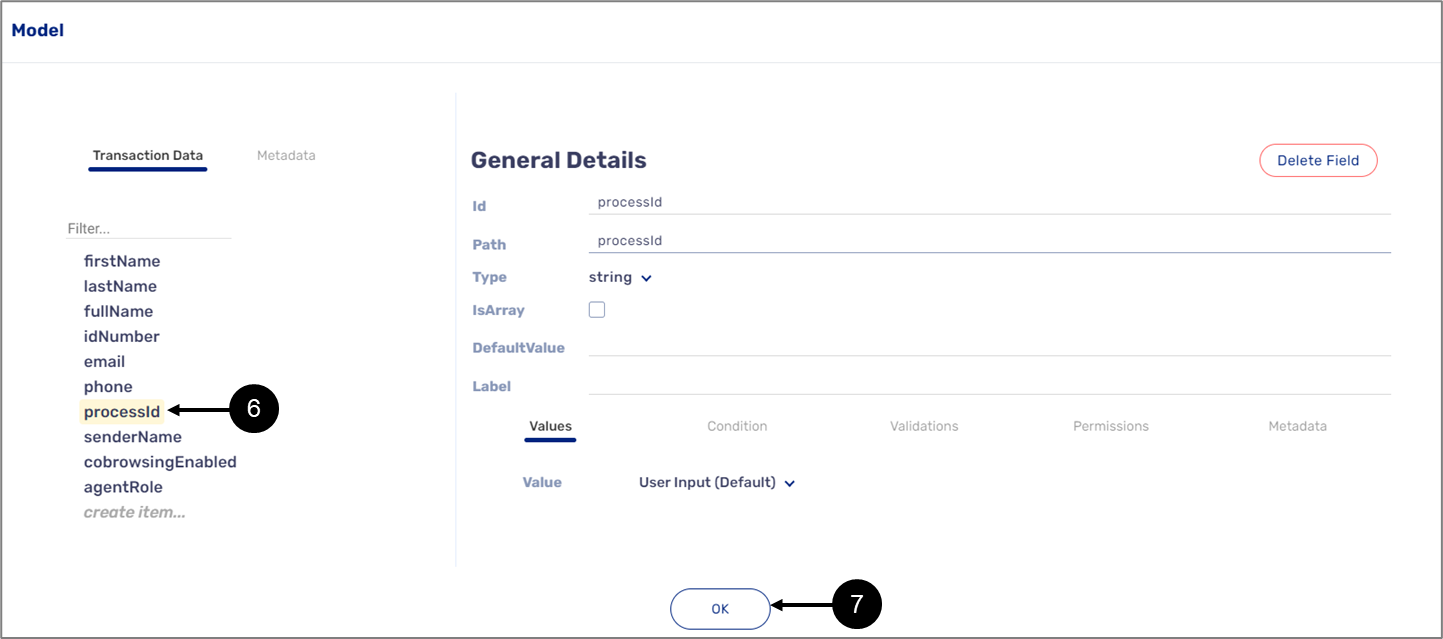
Figure 25: processId Data Item
- Locate the processId data item (6) and click it.
- Click the OK button (7).
Result:
The Select Process Dropdown component is connected to the Model (8).
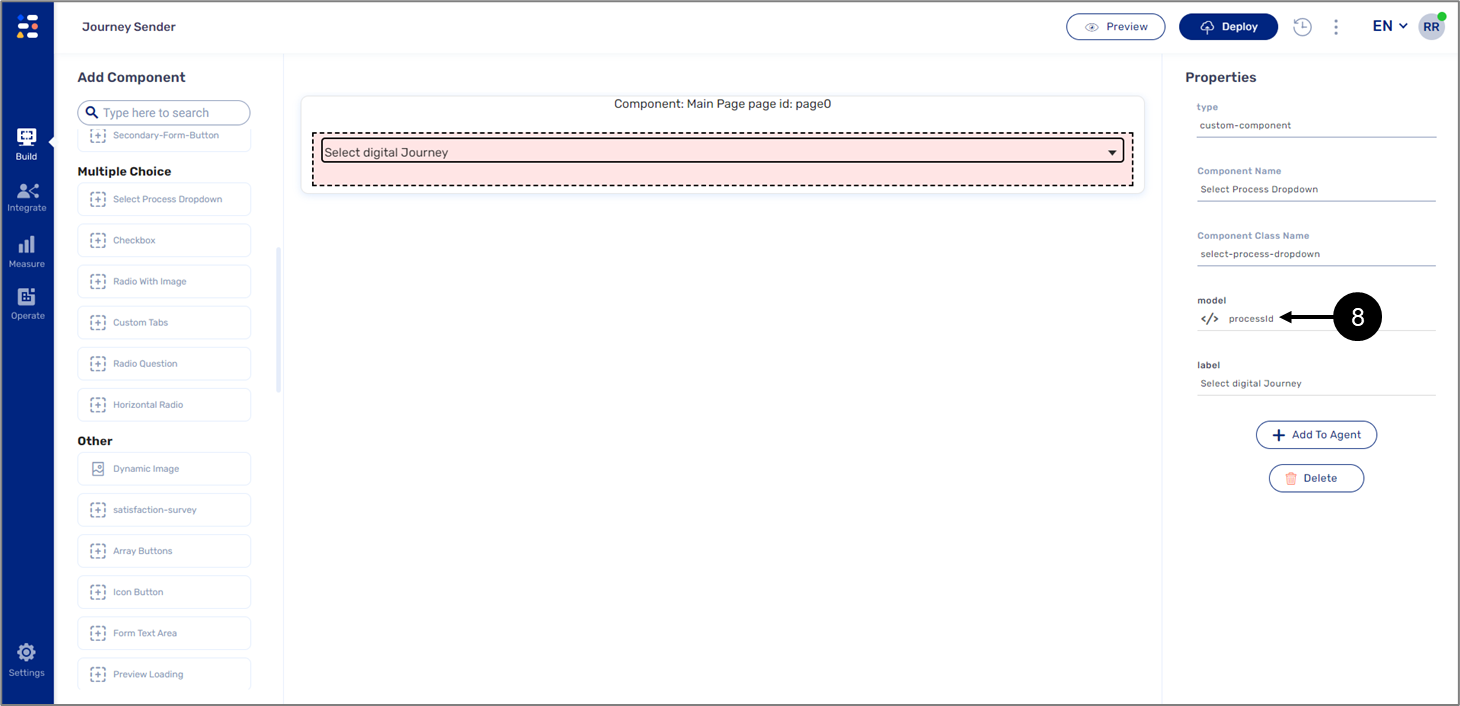
Figure 26: The Select Process Dropdown Component connected to the Model
- Drag and drop the Agent From Specific Fields component (9) onto the Main Page.
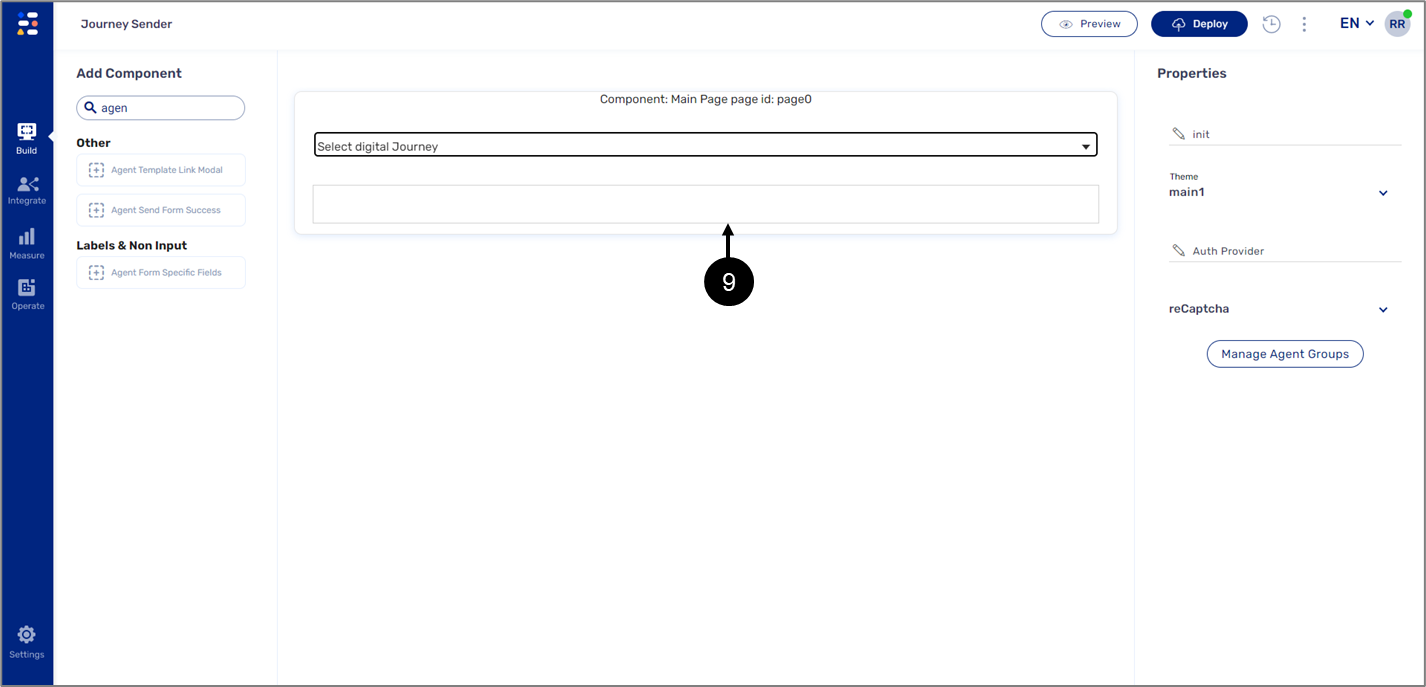
Figure 27: Agent From Specific Fields Component
- Drag and drop additional components onto the Main Page and the canvas to finish the structure of the Journey Sender, connect them to the Model as required. For example:
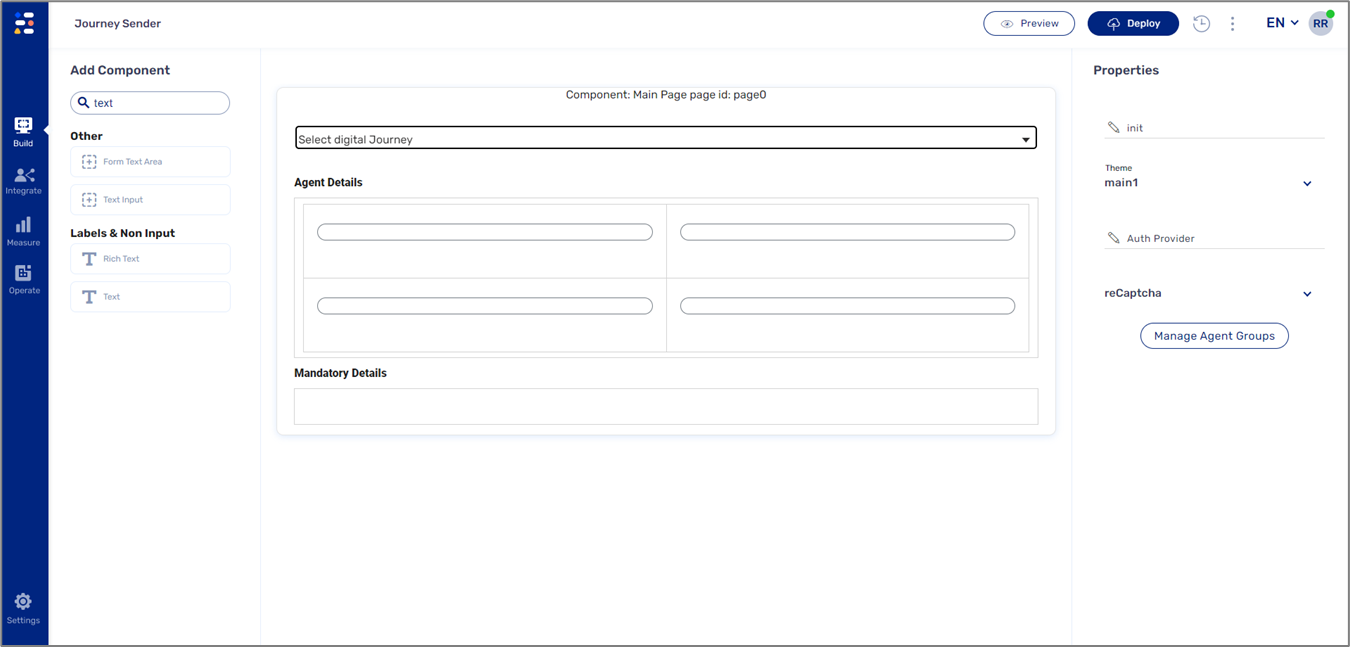
Figure 28: Journey Sender Example
Step 3: Set the Properties of the Main Page
(See Figure 29 and Figure 30)
To set the properties of the Main Page component, perform the following steps:
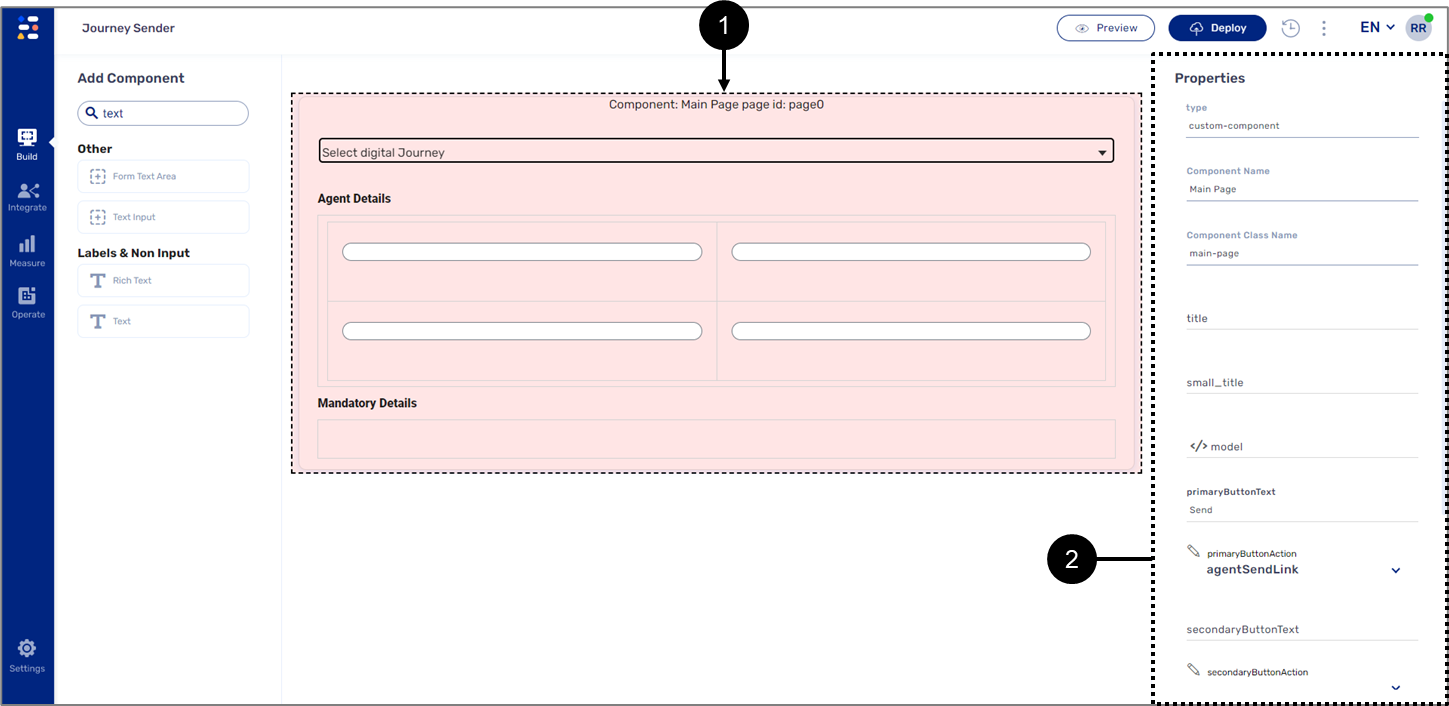
Figure 29: Main Page
- Mark the Main Page component (1).
Result:
The Properties section (2) of the Main Page appears.
- Set the following properties:
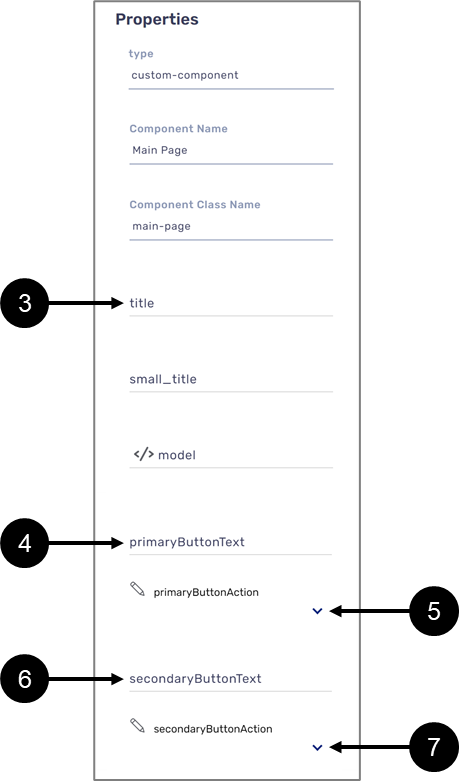
Figure 30: Main Page Properties
- Set the title (3) of the Main Page.
- Set the text of the primary button (4).
- Select the action of the primary button (5).
- Set the text of the secondary button (6).
- Select the action of the secondary button (7).
Main Page buttons
(See Figure 31)
The buttons of the Main Page has two actions:
- agentSendLink - enables your representative to send a link of the digital process with pre-filled information to the customer
- agentFillMyself - enables your representative to open the digital process and fill its information. If the digital process has steps, your representative will access the first one and the rest of the digital process steps will be initiated as set and defined in its Workflow Manager screen.
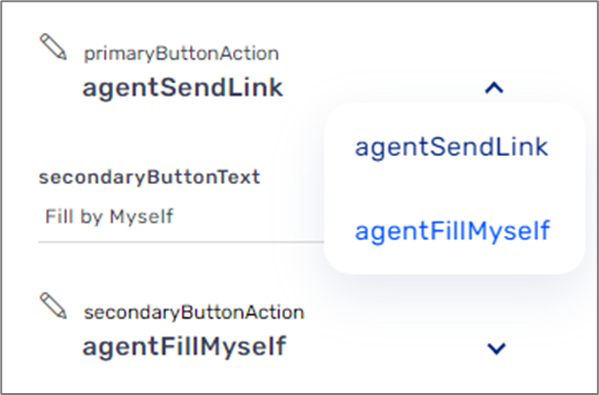
Figure 31: Main Page Buttons Actions
Step 4: Deploy and View the Journey Sender
(See Figure 32 to Figure 37)
To deploy and view the Journey Sender, perform the following steps:
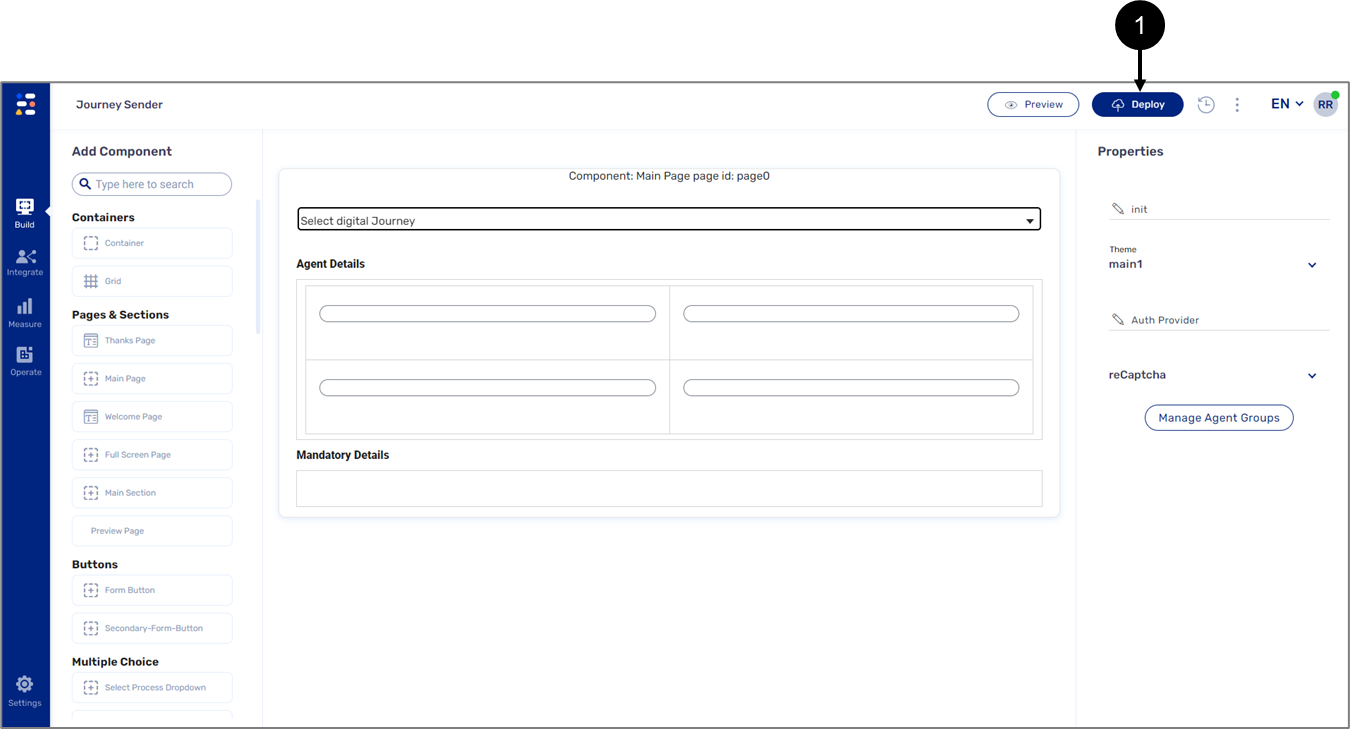
Figure 32: Deploy Button
- Click the Deploy button (1).
Result:
A list of environments appears:
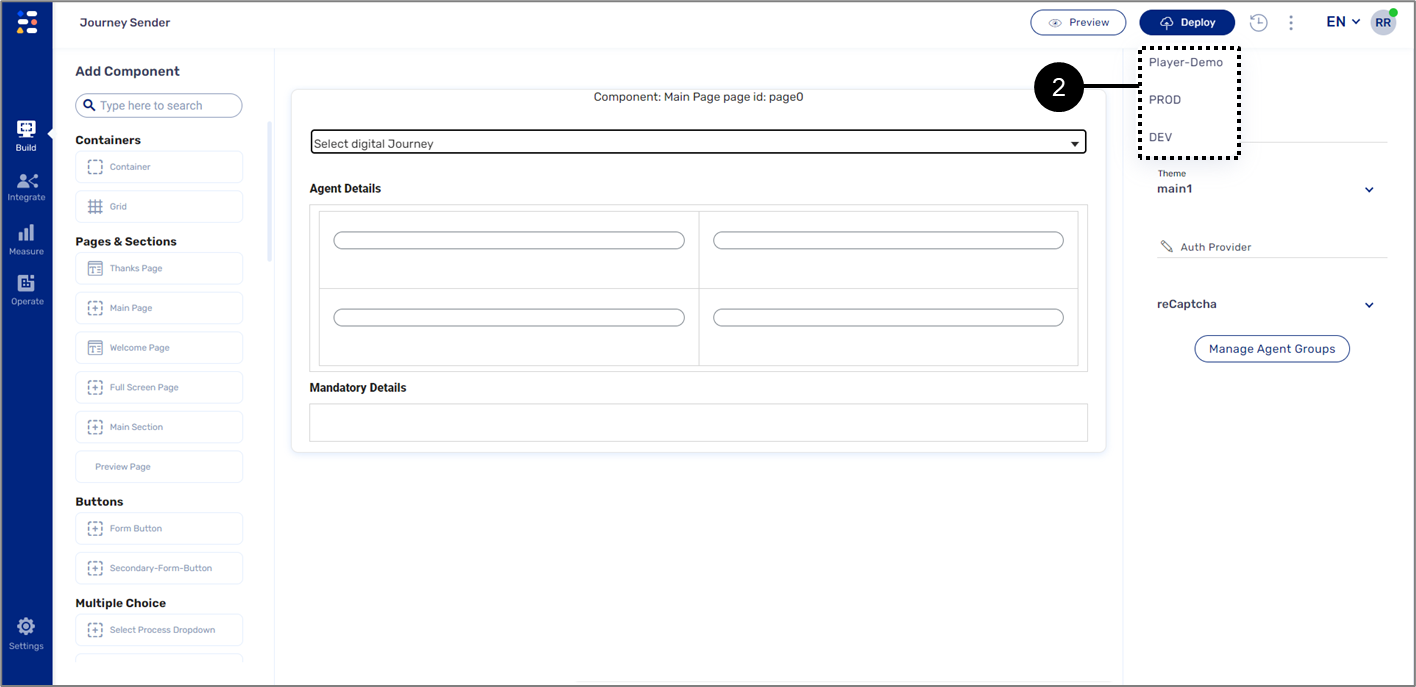
Figure 33: List of Environments
- Select and click an environment from the list (2).
- The selected environment must be identical to the environment in which the digital process and the Agent were deployed and previewed.
- The list of available environments changes according to definitions. For additional assistance, please contact our support team.
- Wait for the deployment process to finish.
Result:
The Journey Sender is deployed as indicated by the icon (3).
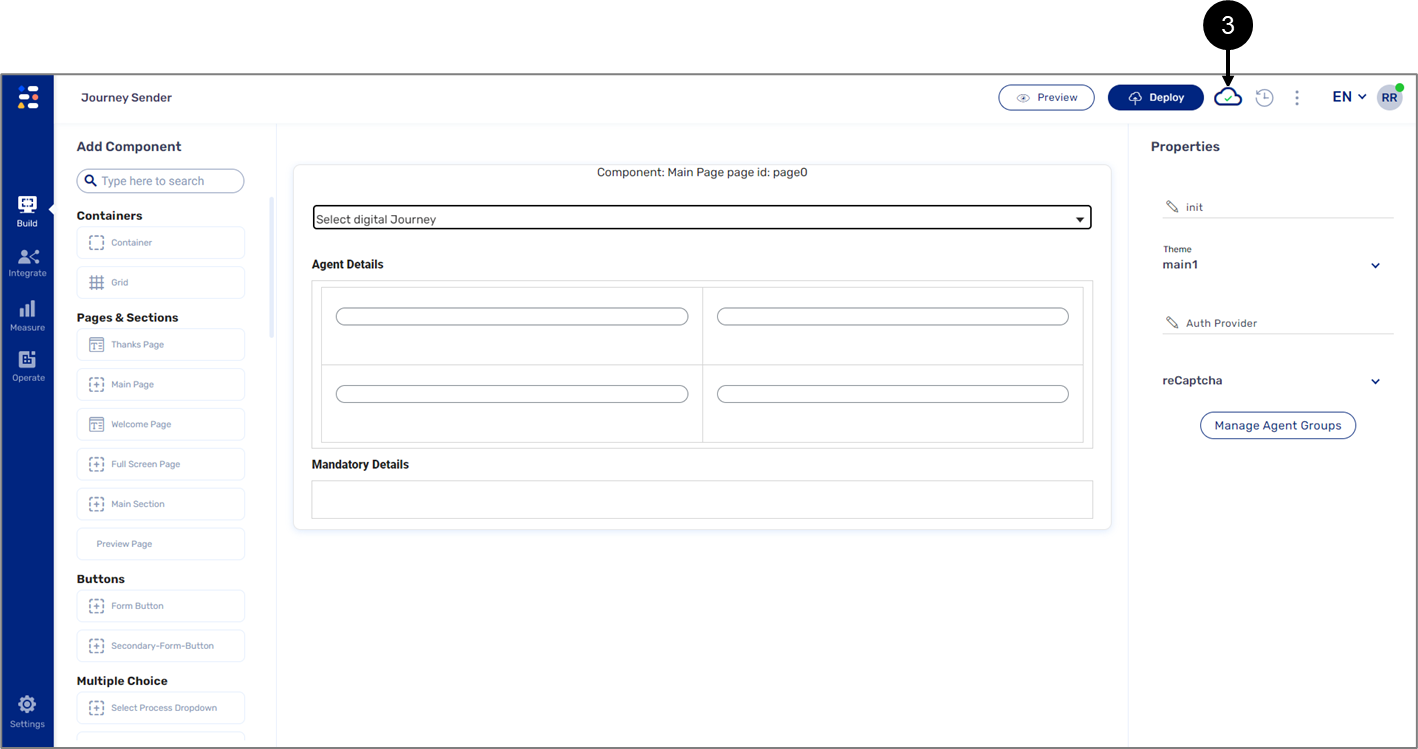
Figure 34: Successful Deployment Icon
If the deployment failed, see the Troubleshooting section.
- Click the Preview icon (4).
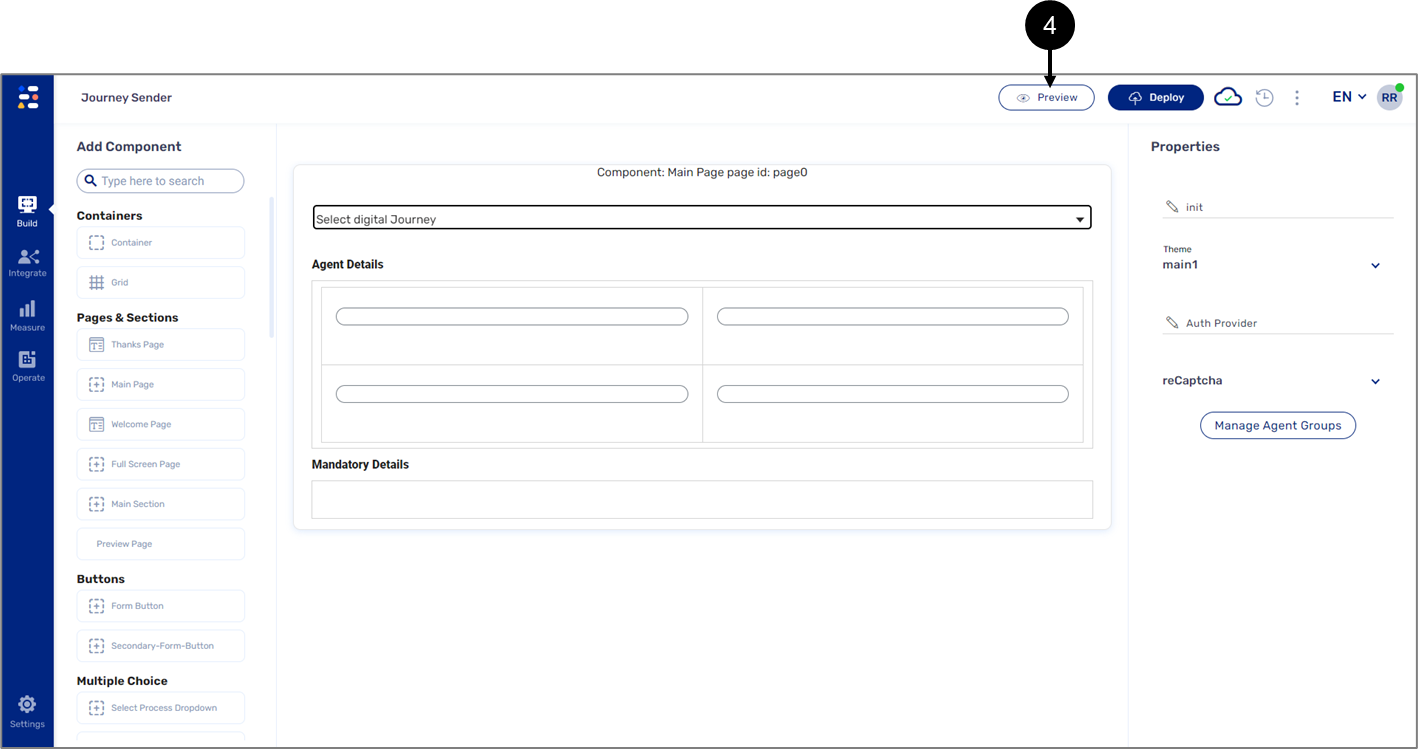
Figure 35: Preview Icon
Result:
A list of environments appears:
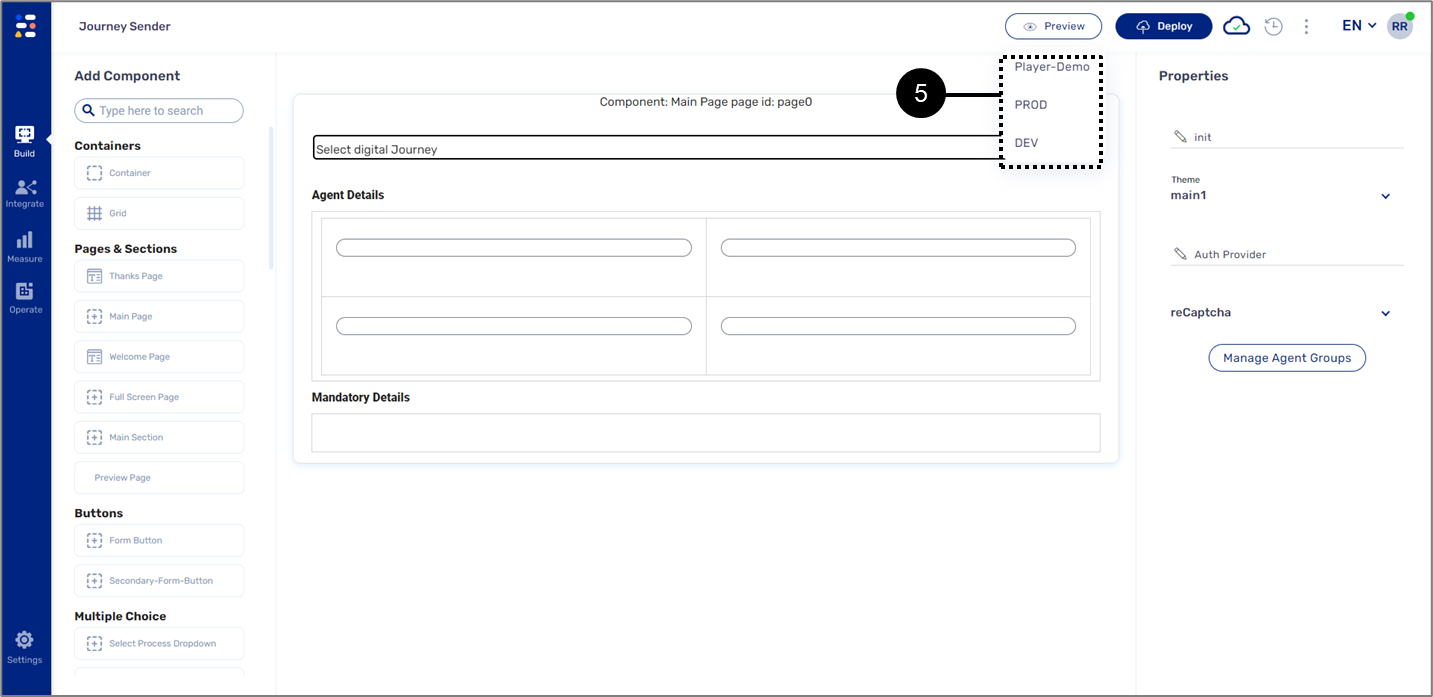
Figure 36: List of Environments
- Select and click an environment from the list.
- The list of available environments changes according to definitions. For additional assistance, please contact our support team.
- The selection of the environment must be identical to the environment selected in step 2.
Result:
The Journey Sender appears:
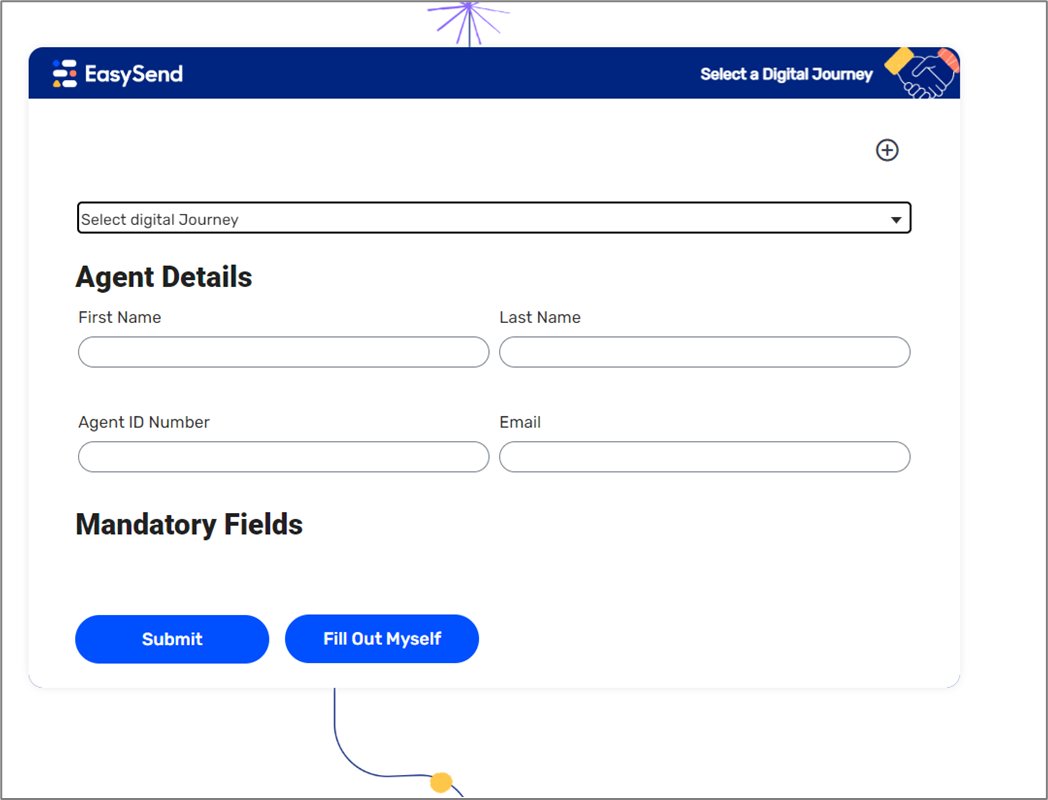
Figure 37: Journey Sender
Step 5: Initiate a Digital Process
(See Figure 38 to Figure 45)
To deploy and view the Journey Sender, perform the following steps:
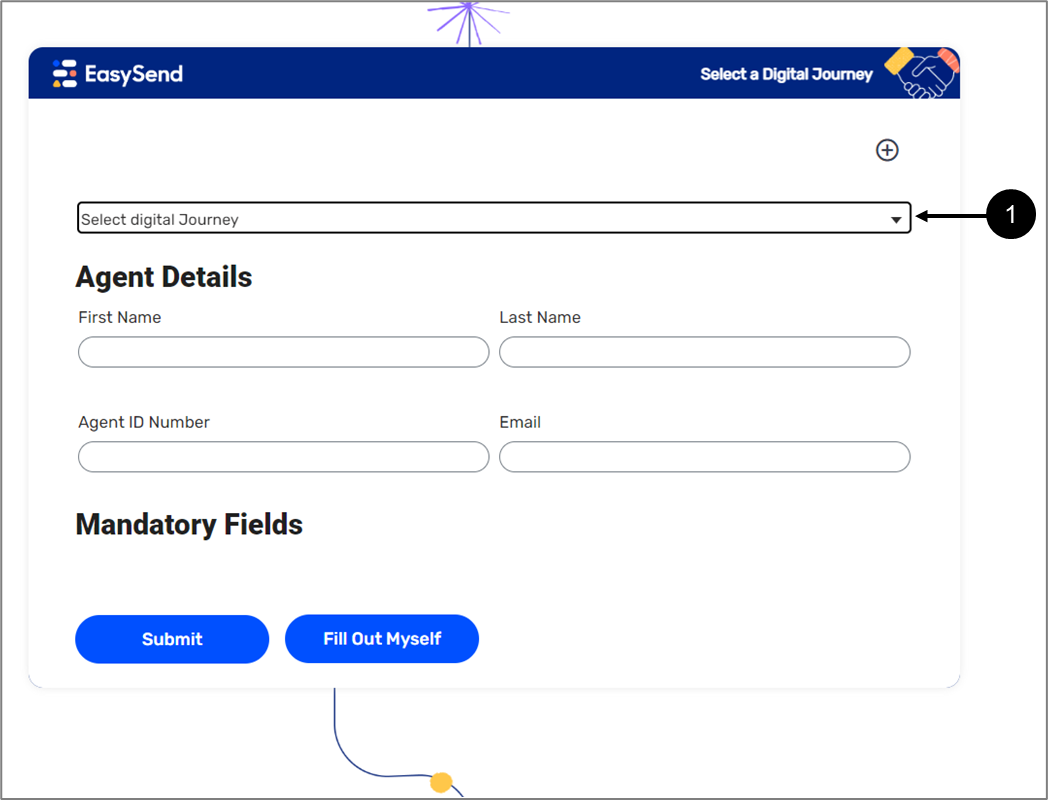
Figure 38: Digital Process Selection
- Click the dropdown (1).
Result:
A list of digital processes appears (2):

Figure 39: Available Digital Processes
- Select and click a digital process from the list (2).
Result:
The dynamic fields of the digital process appear:
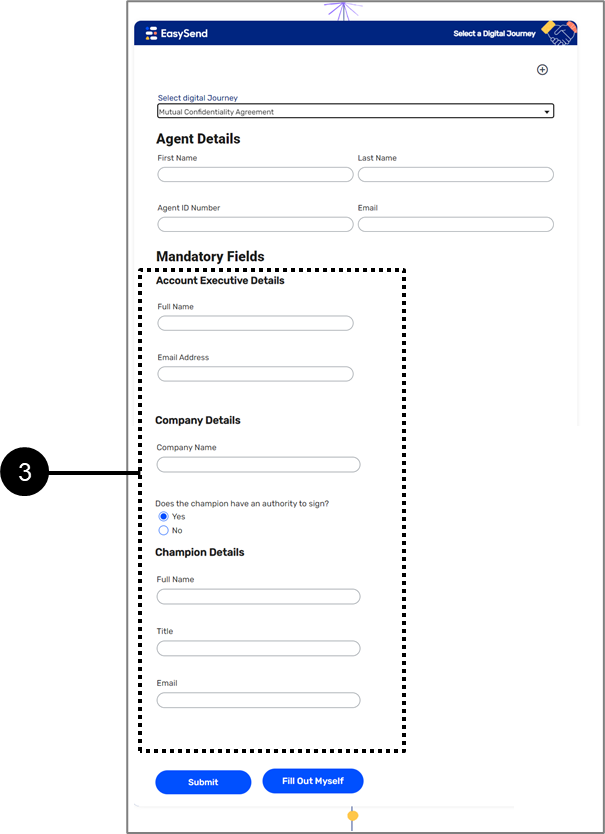
Figure 40: Added Dynamic Fields
- Fill out the required fields.
- Select between two options:
- To send the link of the digital process to the customer, perform the following steps:
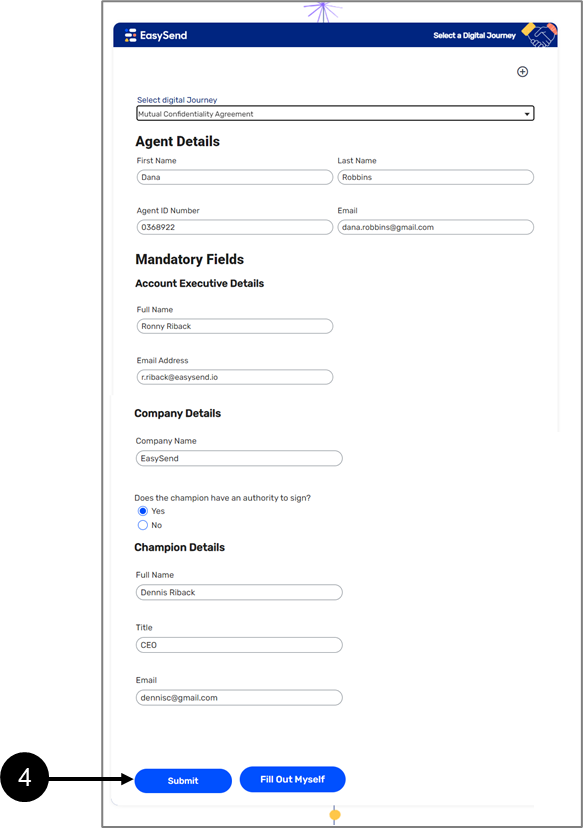
Figure 41: Submit Button
- Click the Submit button (4).
Result:
- The Journey Sender submits a link of the digital process to the customer:

Figure 42: Link Received Through Email Example
- The following message appears:
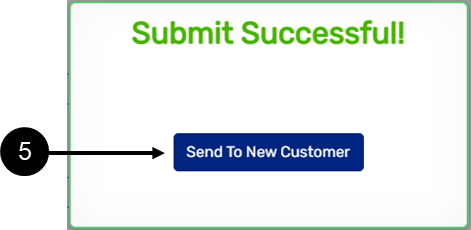
Figure 43: Submit Successful! Message
- Click the button (5) to restart the Journey Sender.
- To receive a link to the digital process and start filling it out by yourself, perform the following steps:
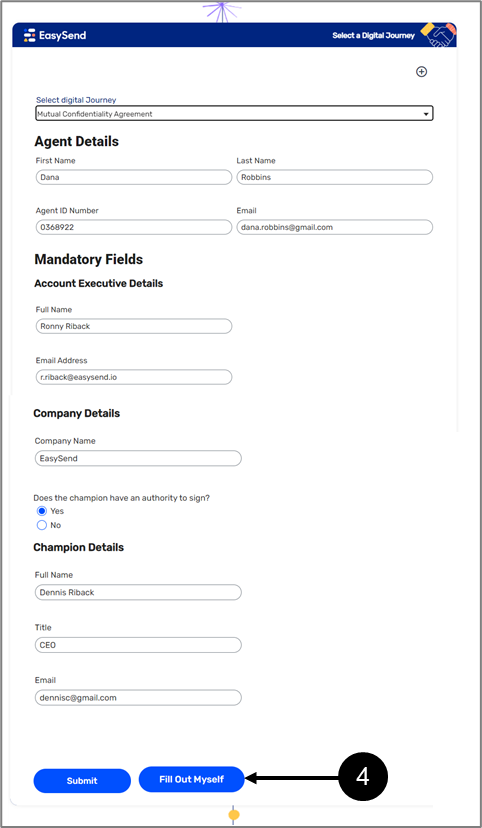
Figure 44: Fill Out Myself Button
- Click the Fill Out Myself button (4).
Result:
The digital process appears:

Figure 45: Digital Process Example
- Fill out the digital process
If the digital process has steps, your representative will access the first one and the rest of the digital process steps will be initiated as set and defined in its Workflow Manager screen.
Manage Agent Groups
Clicking the Manage Agent Groups button located in the Properties section of the Journey Sender displays the Manage Agent Groups window. The Window enables you to perform different actions such creating agent groups to limit or specify the digital processes that representatives can select from the Journey Sender. Figure 46 and Table 3 describe the structure of the Manage Agent Groups window.
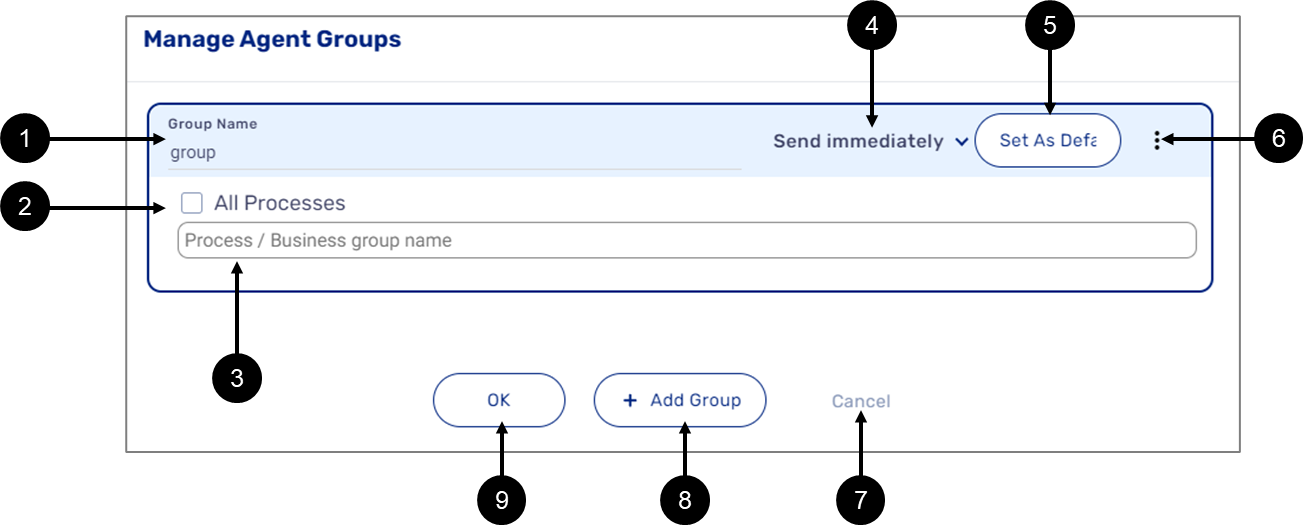
Figure 46: Manage Agent Groups Window
Table 3: Manage Agent Groups Window
Number | Icon | Name | Description |
1 | - | Group Name | Enables to set a name for the agent group |
2 | - | All Processes |
|
3 | - | Process / Business group name | Enables to select processes (individually or through a business group) that will be eligible for selection NOTE When the All processes checkbox is checked, this field is disabled |
4 | - | Send Options | Enables to select between two send options:
|
5 | - | Set as Default | Enables to set the agent group as default |
6 |
| Additional Options | Displays additional options:
|
7 | - | Cancel | Closes the Manage Agent Groups window and cancels all changes |
8 | - | + Add Group | Enables to add a new agent group |
9 | - | OK | Closes the Manage Agent Groups window and saves all changes |


Figure 47: Toggle Set to Send New

Figure 48: Toggle set to Send Another
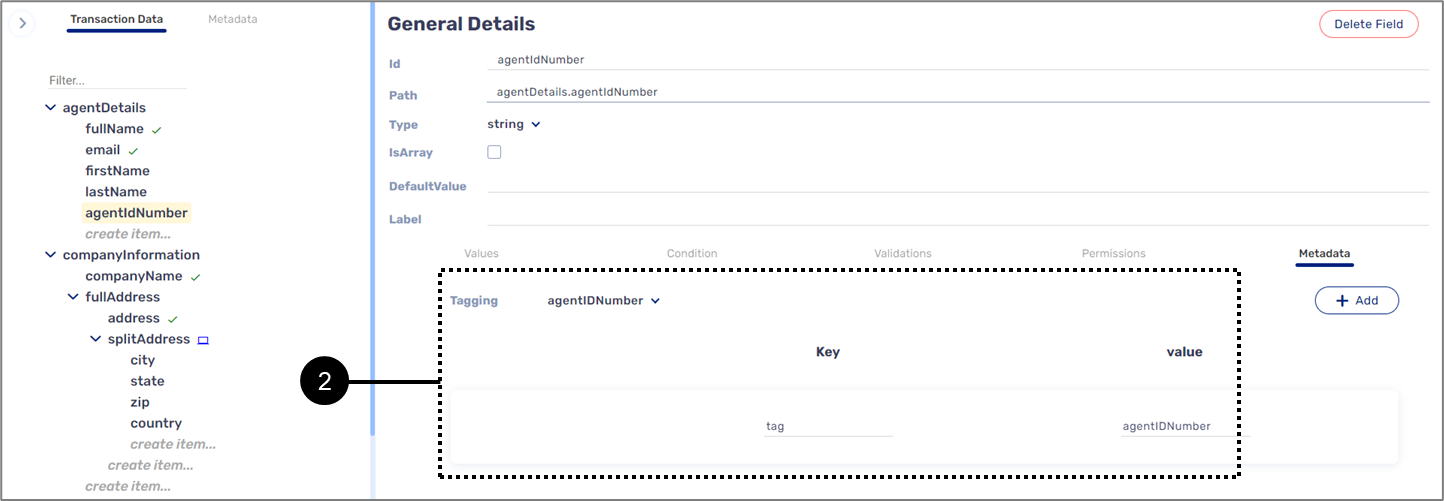
Journey Sender Tagging
The data items in the Model are tagged with metadata. The tagging has two purposes:
- For analytics and reports (for additional information, see the Analytics and Reports article).
- For data collaboration between the Model of the Journey Sender and the Model of the Webflow.
Data Collaboration Between Models
(See Figure 49 and Figure 50)
To verify that the Builder platform supports data collaboration between the Models, the tagging under the metadata must be identical, for example:
- On the Model of the Journey Sender (1):
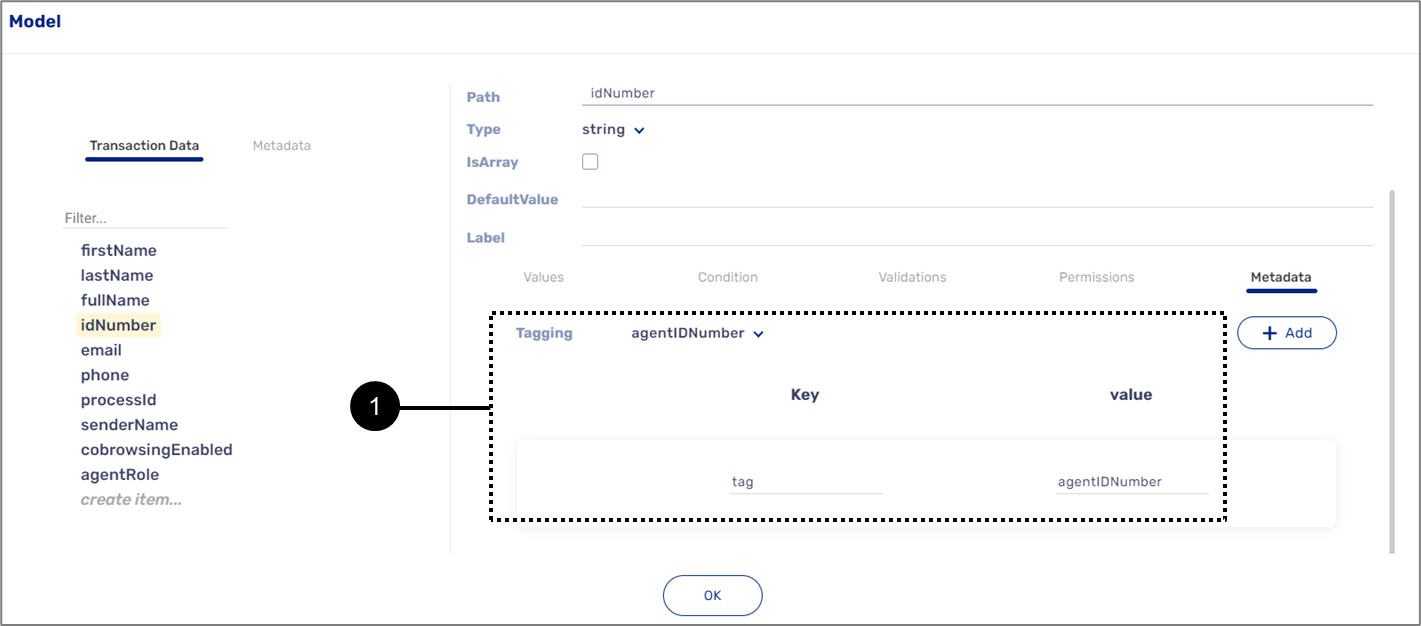
Figure 49: Journey Sender Model
- On the Model of the Webflow (2):
Troubleshooting
Table 4 describes malfunctions that may occur when trying to create a Webflow, adding components, and editing properties. The table also describes the reason/s for the malfunctions and provides possible solutions.
Table 4: Troubleshooting
Number | Malfunction | Reason/s | Solution/s |
1 | The Journey Sender feature does not appear on the main screen of the Builder platform | The feature is not enabled | Please contact our support team |
2 | Cannot add components from the Webflow to the Agent screen | The theme of the Webflow does not match the theme of the Journey Sender | Set the theme of the Journey Sender to match the theme of the Webflow as described in the Step 2: Build the Journey Sender section |
3 | Added components to the canvas of the Journey Sender do not appear when the Journey Sender is viewed | The components are not connected to the Model | Add components and connect them to the Model as described in the Step 2: Build the Journey Sender section |
4 | There are no digital processes to select from the Journey Sender |
|
|
5 | After selecting a digital process, dynamic fields do not appear |
|
|
6 | No action buttons (submit, fill out) appear on the Journey Sender | The properties of the Main Page component added to the canvas of the Journey Sender are not sent | Set the properties of the Main Page component as described in the Step 3: Set the Properties of the Main Page section |
7 | The Journey Sender deployment process failed | There are deployment errors preventing the deployment | Perform the steps describe in the Step 4: Deploy and View the Journey Sender section, if the errors proceed see the Deploying and Viewing a Digital Process article for additional details |
8 | A link to the digital process that was initiated through the Journey Sender was not sent to the wanted recipients | The Workflow Manager of the digital process does not contain a step with a configured start phase communication channel output (email or SMS) | Configure the Workflow Manager of the digital process with a step containing a start phase communication channel output (email or SMS), for additional information about the Workflow Manager, see the Workflow Manager Overview and the Configuring a Workflow articles |
9 | Cannot select specific processes/business groups using the Manage Agent Groups window | The All Processes checkbox is checked | Uncheck the All Processes checkbox and select specific processes/business groups as described in the Manage Agent Groups section |
10 | The Journey Sender restarts whenever it is sent | The Send Another option is disabled | Set the toggle to Send Another as described in the Manage Agent Groups section |
11 | There is not data collaboration between the Model of the Journey Sender and the Model of the Webflow | The metadata tagging is not set currently | Retag the data items of the Models as described in the Data Collaboration Between Models section |