Article Overview
This article describes how to configure a workflow. It starts by detailing how to create roles and how to add steps and configure them. The article also explains how to create automatic output communication channels and how to perform workflow related troubleshooting.
Creating Roles
(See Figure 1 to Figure 6)
Roles are used when multiple personas interact with a digital process (agent, customer, and sales representative). Roles can be assign different permissions using the Model.
To create a role, perform the following steps:
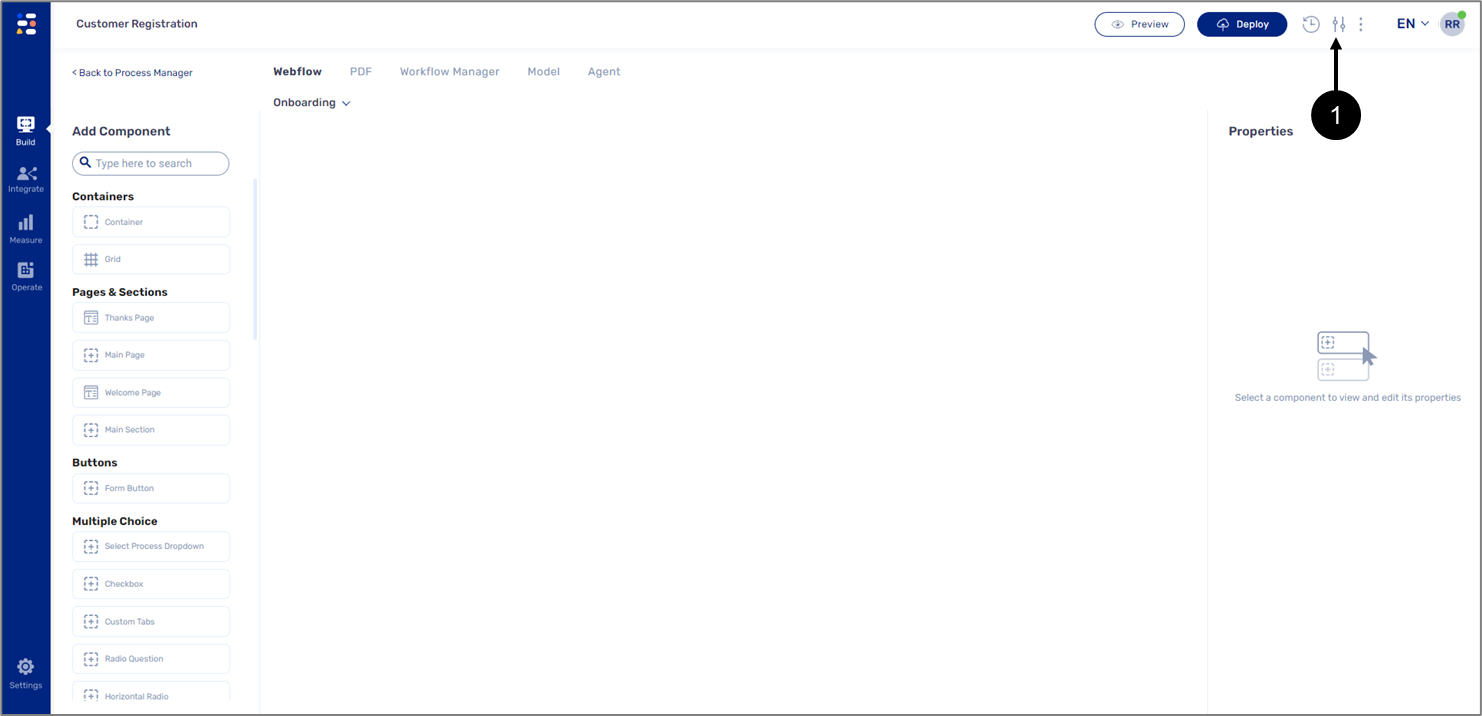
Figure 1: Process Settings Icon
- On the Webflow main screen, click the Process Settings icon (1).
Result:
The Process Settings screen appears:
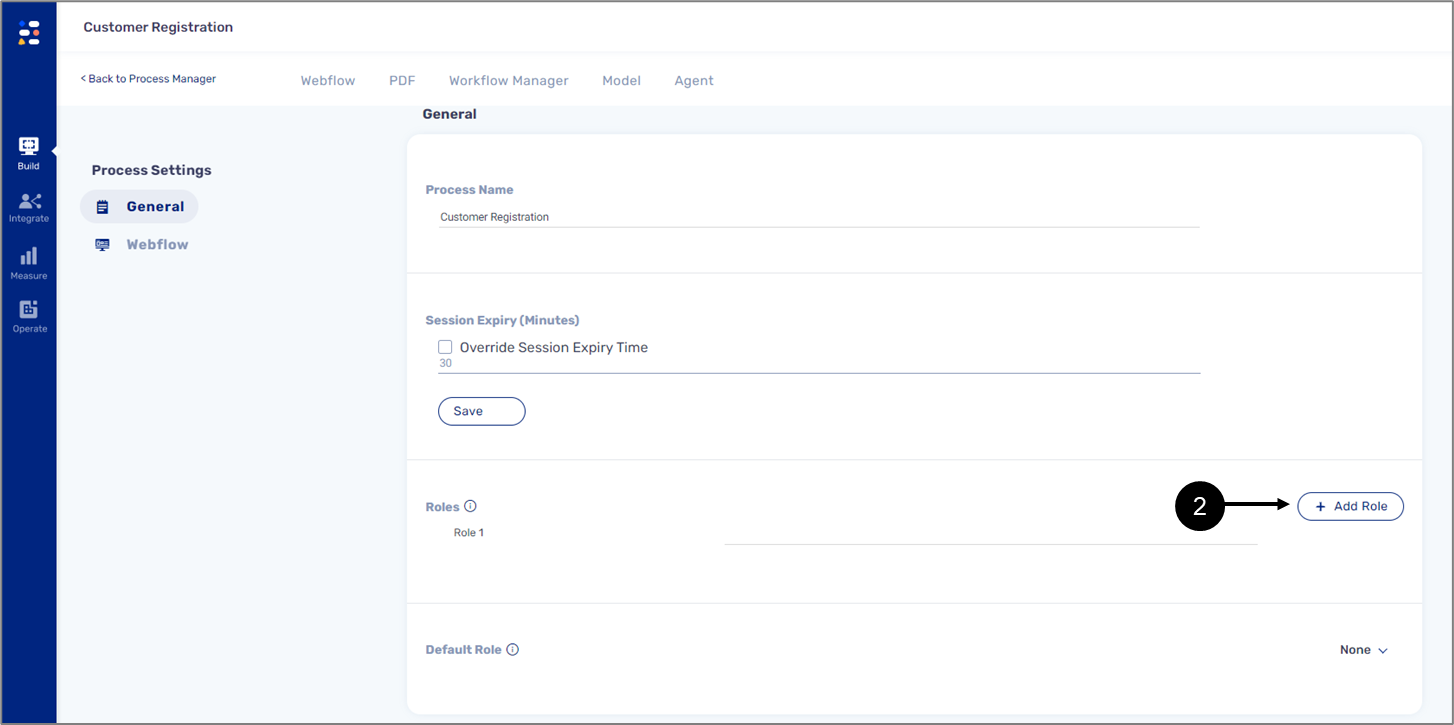
Figure 2: + Add Role Button
- Click the + Add Role button (2).
Result:
A numbered role appears (3):
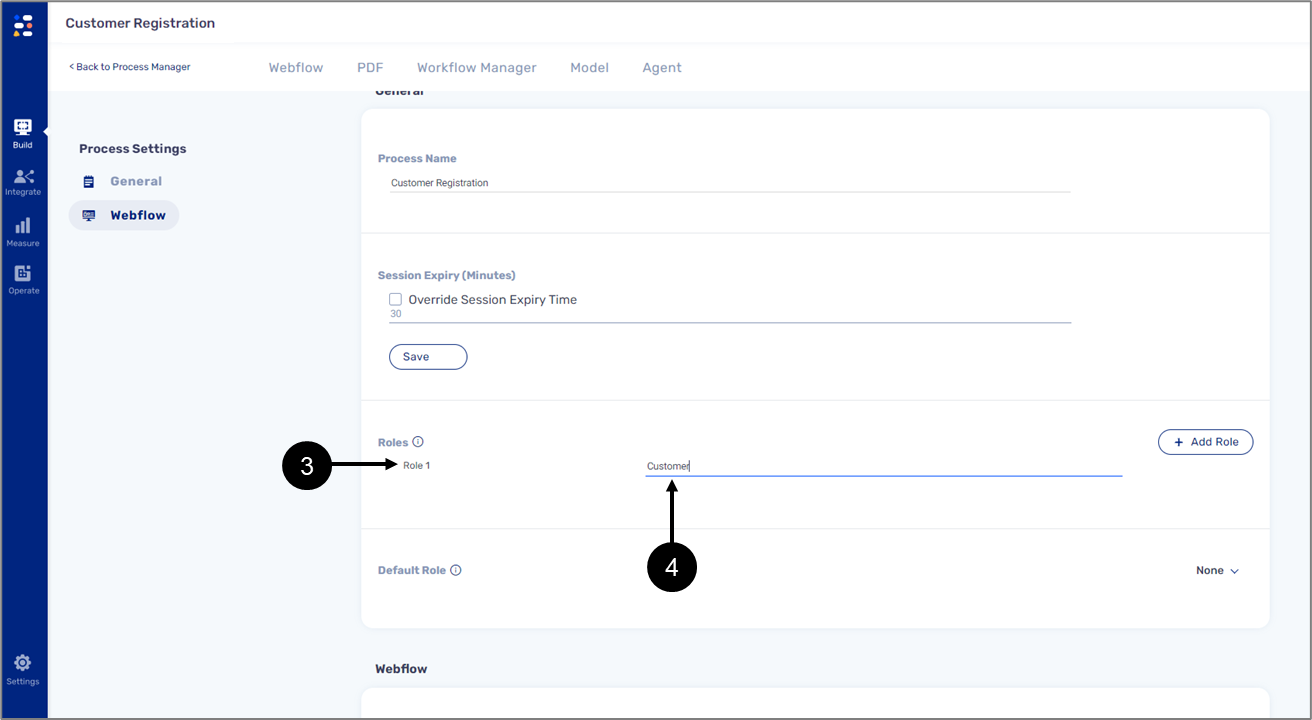
Figure 3: New Role
- Add a name for the new role (4).
- Repeat steps 2 and 3 to add additional roles.
- If necessary, set a default role:
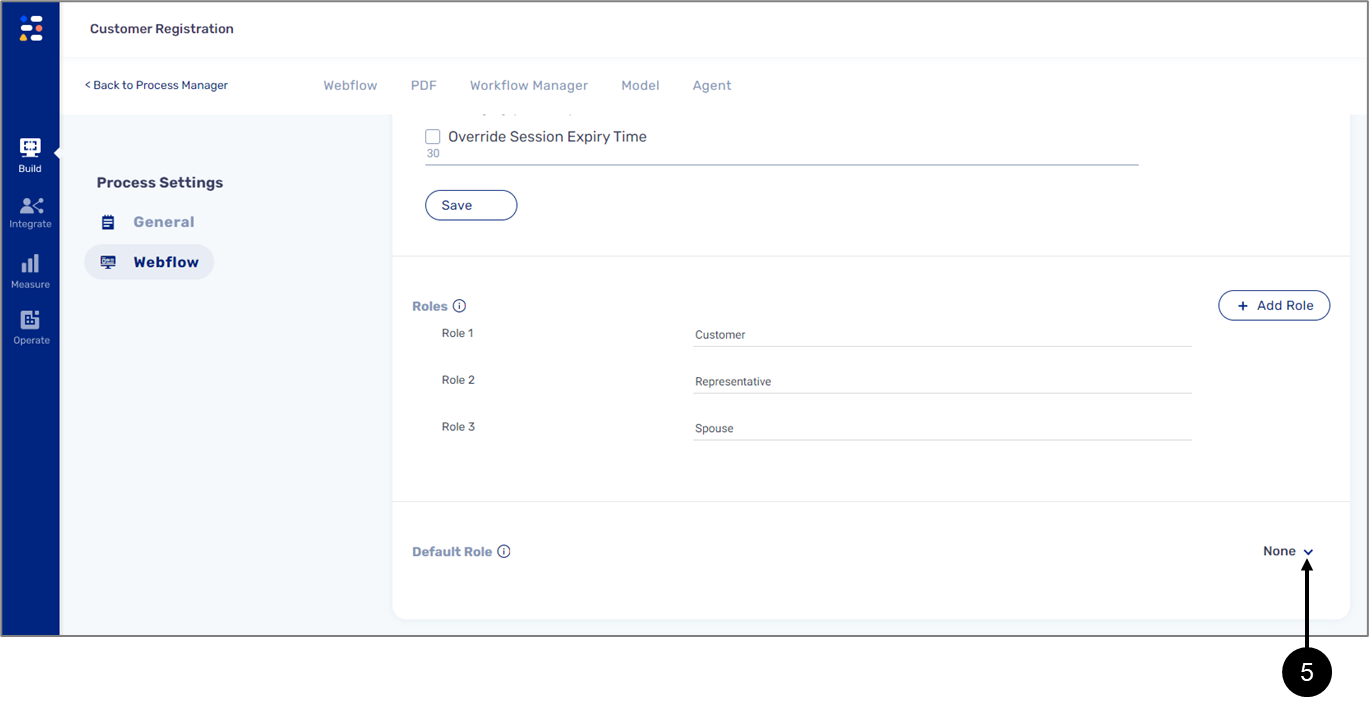
Figure 4: Default Role Dropdown
- Click the Default Role dropdown (5).
Result:
A list of roles appears (6):
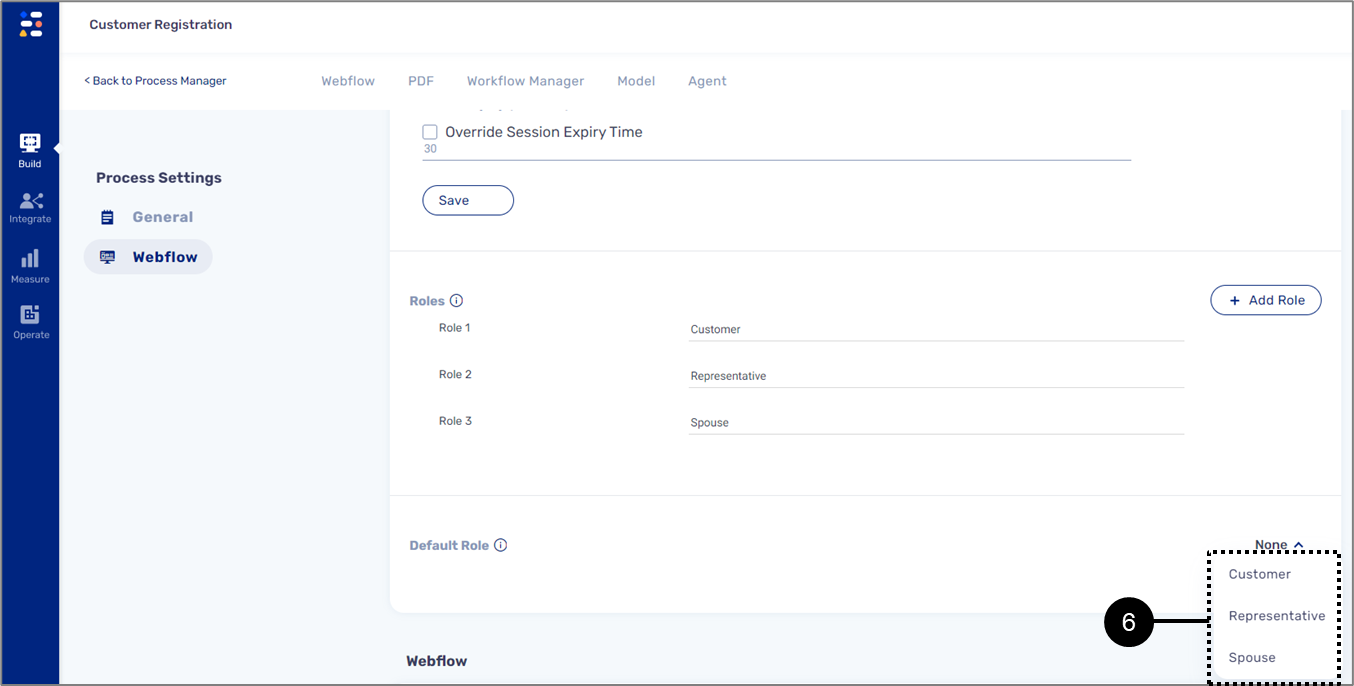
Figure 5: List of Roles
- Select a role from the list (6).
Result:
The selected role is set as default:
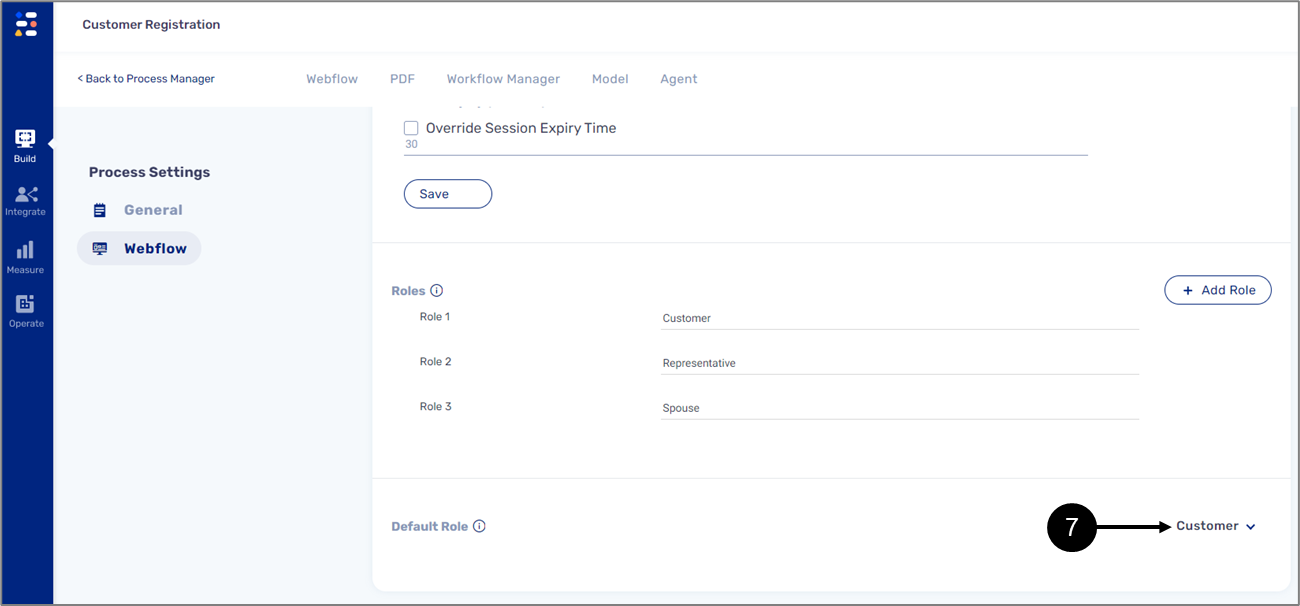
Figure 6: Default Role
Adding Steps
When accessing the Workflow Manager, a first default step appears automatically without a role. To add a role to the step, click the Role Name dropdown (1) and select a role from the list (2) (see Figure 7):
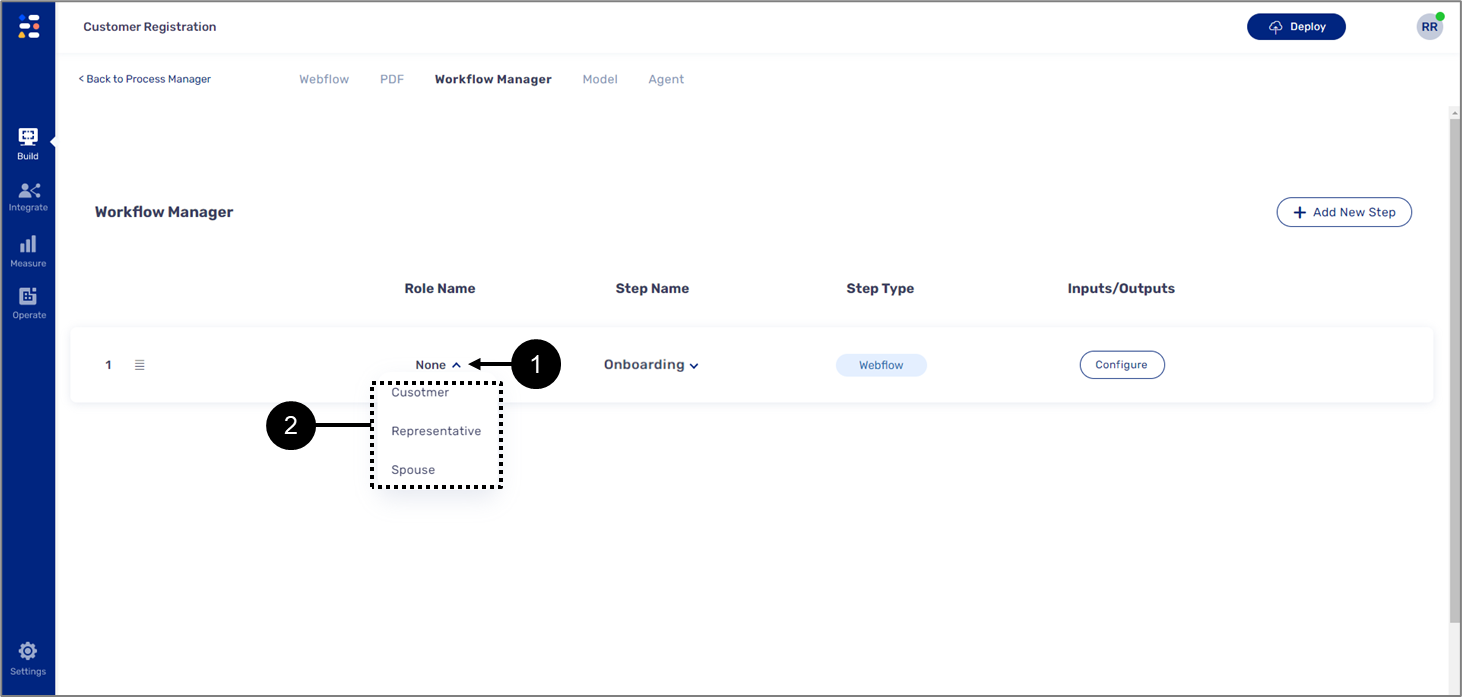
Figure 7: Default Step
To add additional steps, perform the following steps (see Figure 8 and Figure 9):
- Click the + Add New Step button (3).
Result:
The new step options appear (4):
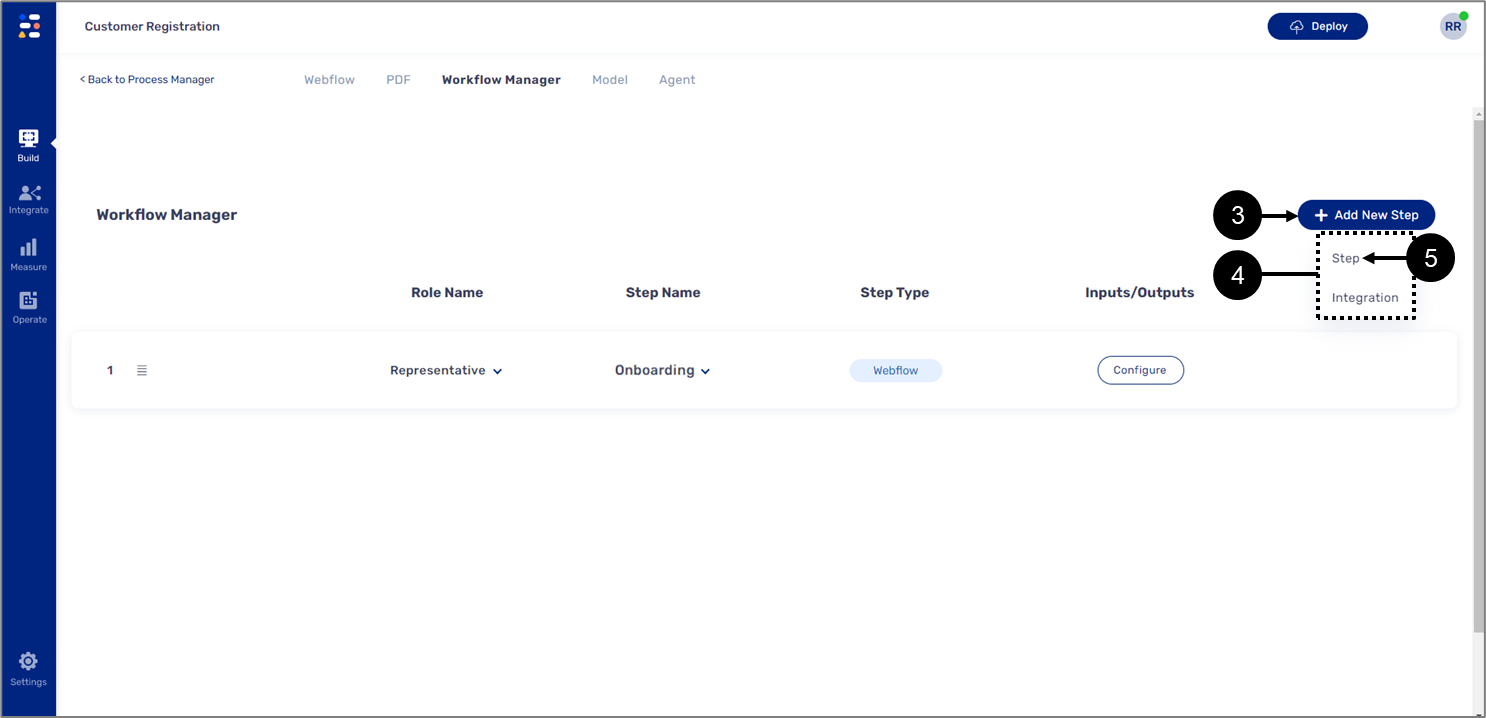
Figure 8: New Step Options
- Click the Step option (5).
Result:
A new step appears (6):
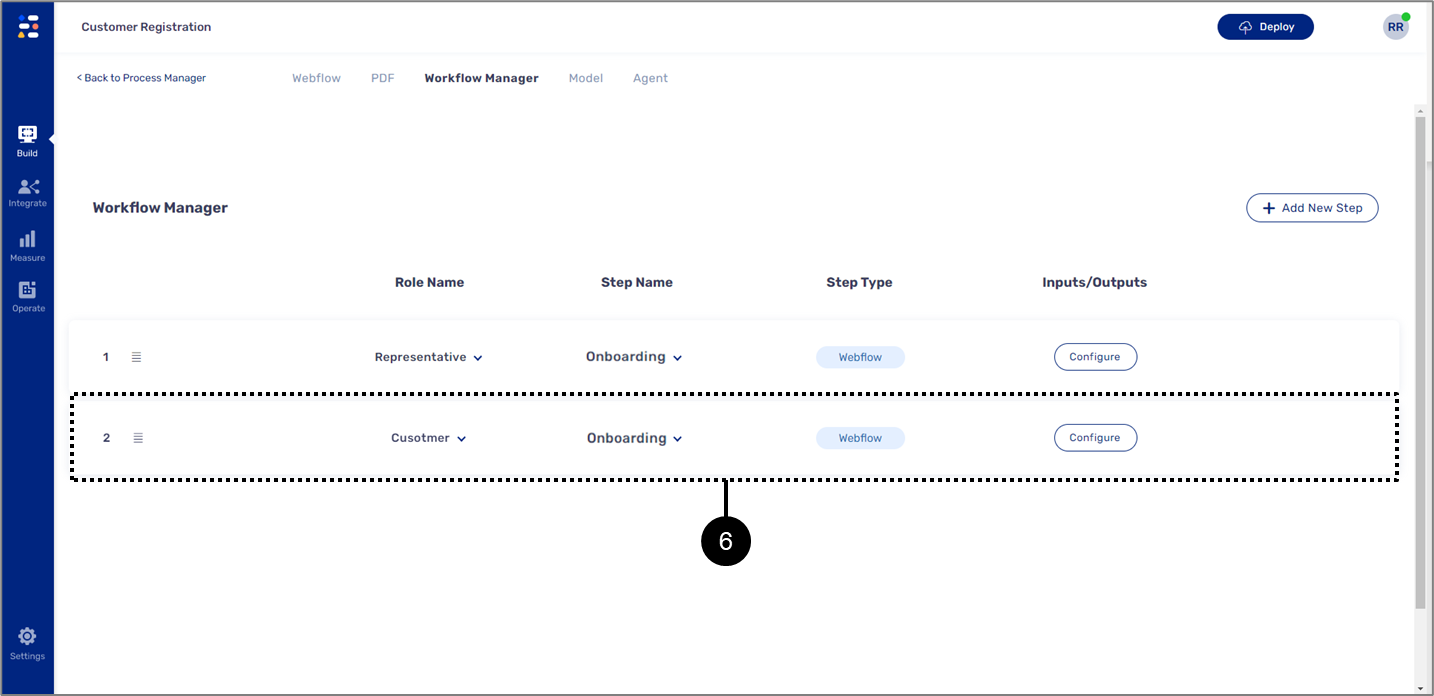
Figure 9: New Step
If a default role is set, it will automatically be assigned to the new step.
Configuring a Step
(See Figure 10)
The following sections describe how to configure a step. Before starting to add conditions or create automatic outputs, it is possible to rearrange the order of the steps (1) or attach a different Webflow (2) if another one exists:
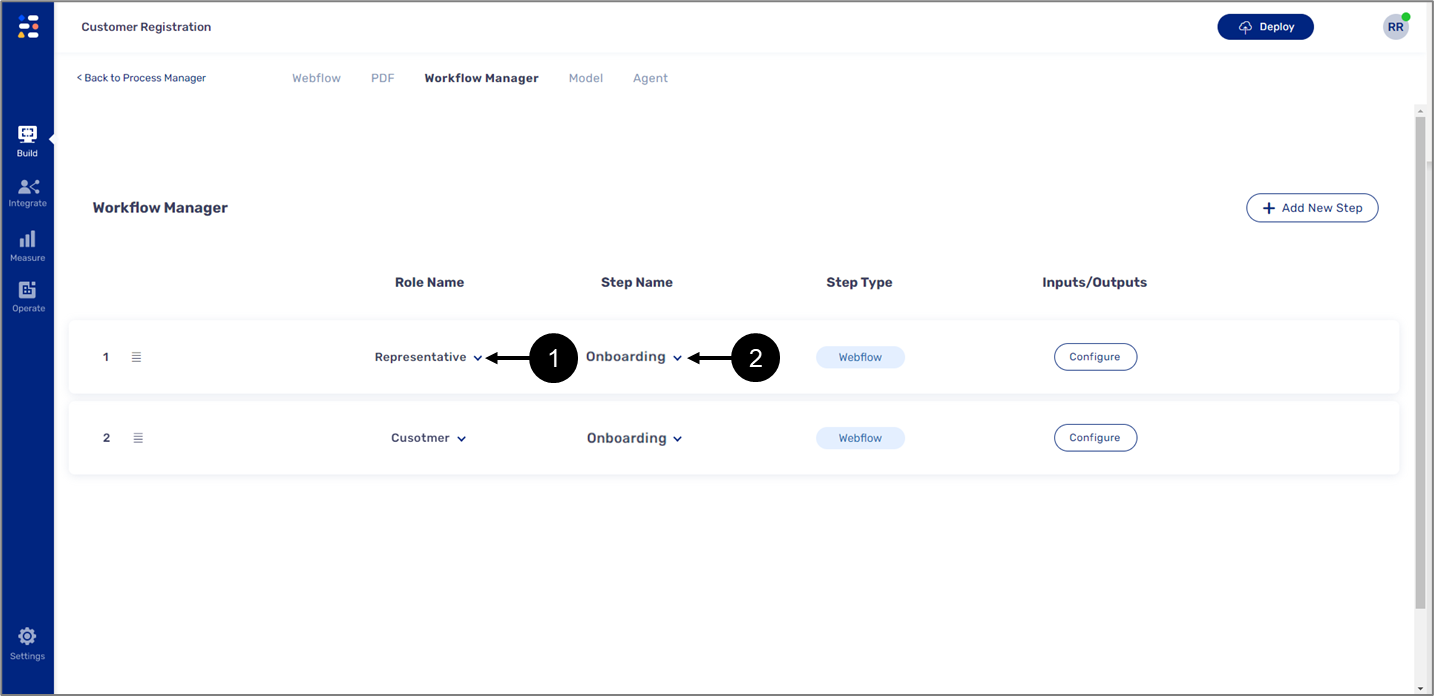
Figure 10: Rearrange/Attaching a Webflow.
Adding Steps Conditions
(See Figure 11 to Figure 14)
To add a new condition to the step, perform the following steps:
- Hover above a step.
Result:
Three dots appear (1):
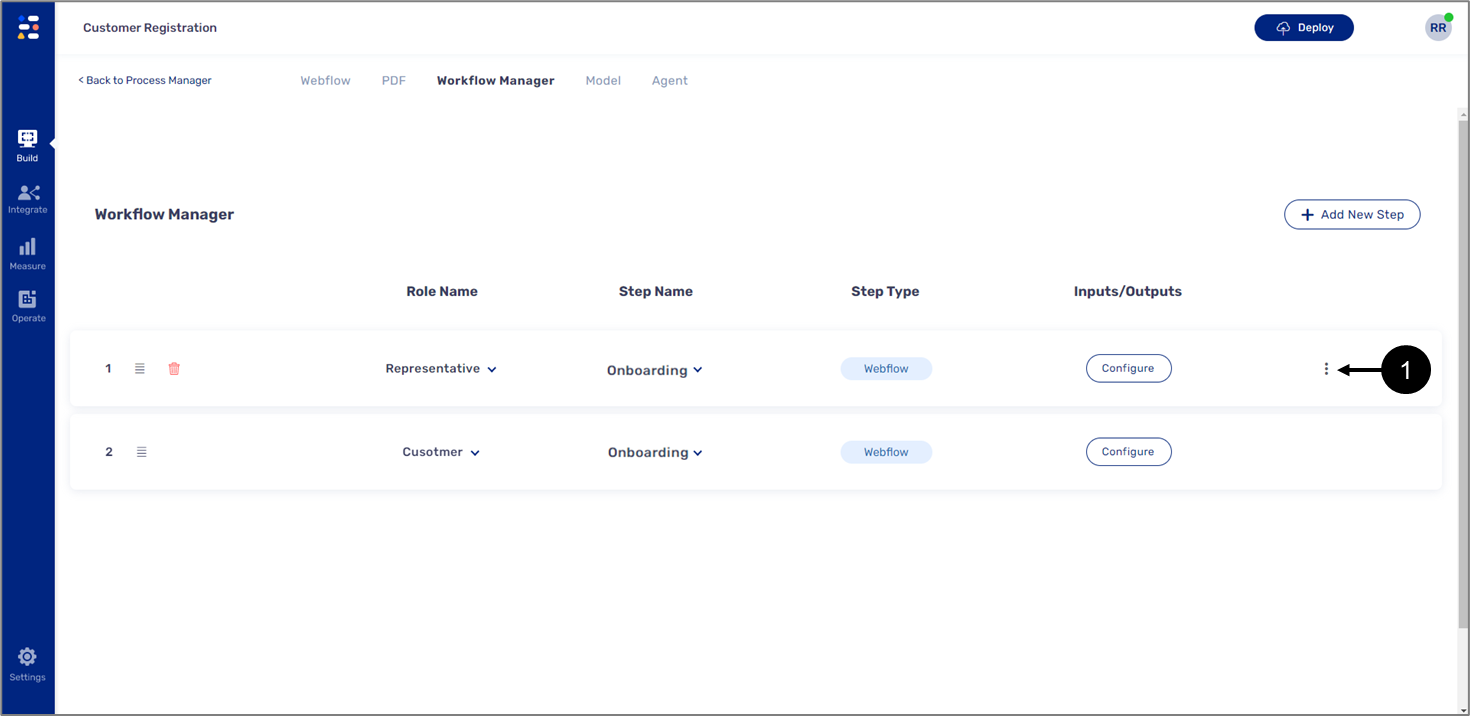
Figure 11: Three Dots
- Click the three dots (1).
Result:
Additional options appear (2):

Figure 12: Condition Option
- Click the Condition option (3).
Result:
The Step Condition window appears:
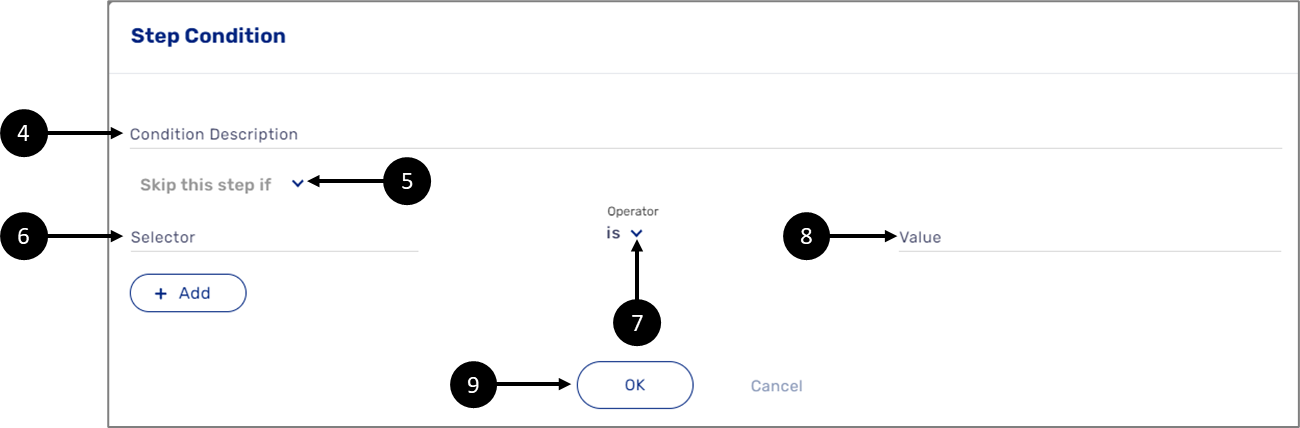
Figure 13: Step Condition Window
- enter the Condition Description (4).
- Click the dropdown (5) and set whether the step will be skipped or applied.
- Enter the Selector (6).
If the transaction data item to add as the Selector is nested inside an object, write, and select the object first and then input a dot (.) and select the transaction data item within the object. It is also possible to input two dots (..) and then select the transaction data item within the object (see Figure 14):
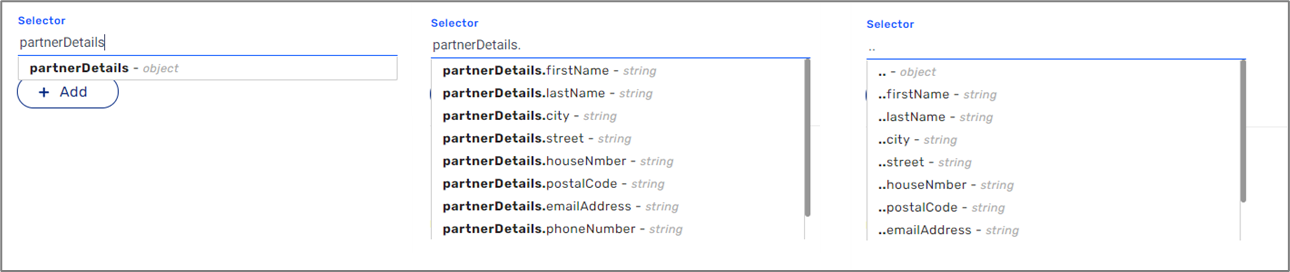
Figure 14: Nested Transaction Data Item
- Click the dropdown (7) and set the Operator.
- Enter the Value (8).
- Click the OK button (9).
Configuring Outputs
(See Figure 15 and Figure 16)
To configure an output, perform the following steps:

Figure 15: Configure Button
- Click the Configure button (1) of the desired step.
Result:
The output configuration window appears:
Figure 16: Output Configuration Window
- Select the desired phase (2).
Start Phase
(See Figure 17 to Figure 22)
To configure an output for the Start phase that will be submitted upon process initiation, perform the following steps:

Figure 17: + Add New Output Button
- Click the + Add New Output button (1).
Result:
A list of outputs appears (2):
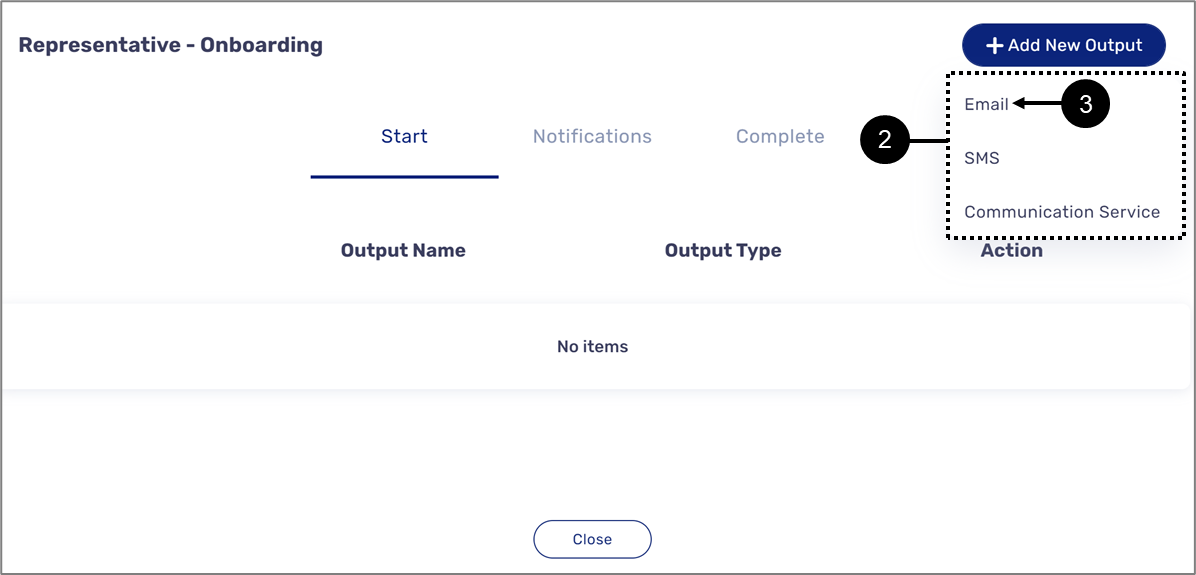
Figure 18: Outputs
- Select the Email output (3).
- The example continues with the Email communication channel. For a description about the SMS output, see the SMS Output section.
- The Communication Service option is not covered in this article.
Result:
New email output appears (4):
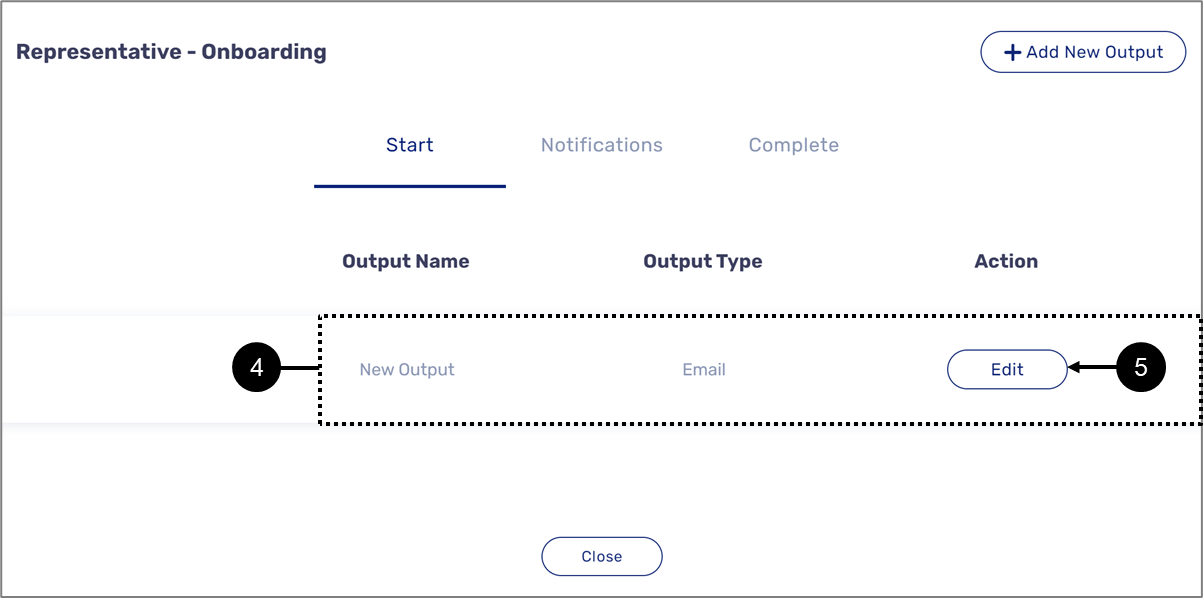
Figure 19: New Email Output
- Click the Edit button (5).
Result:
The Email Details window appears:
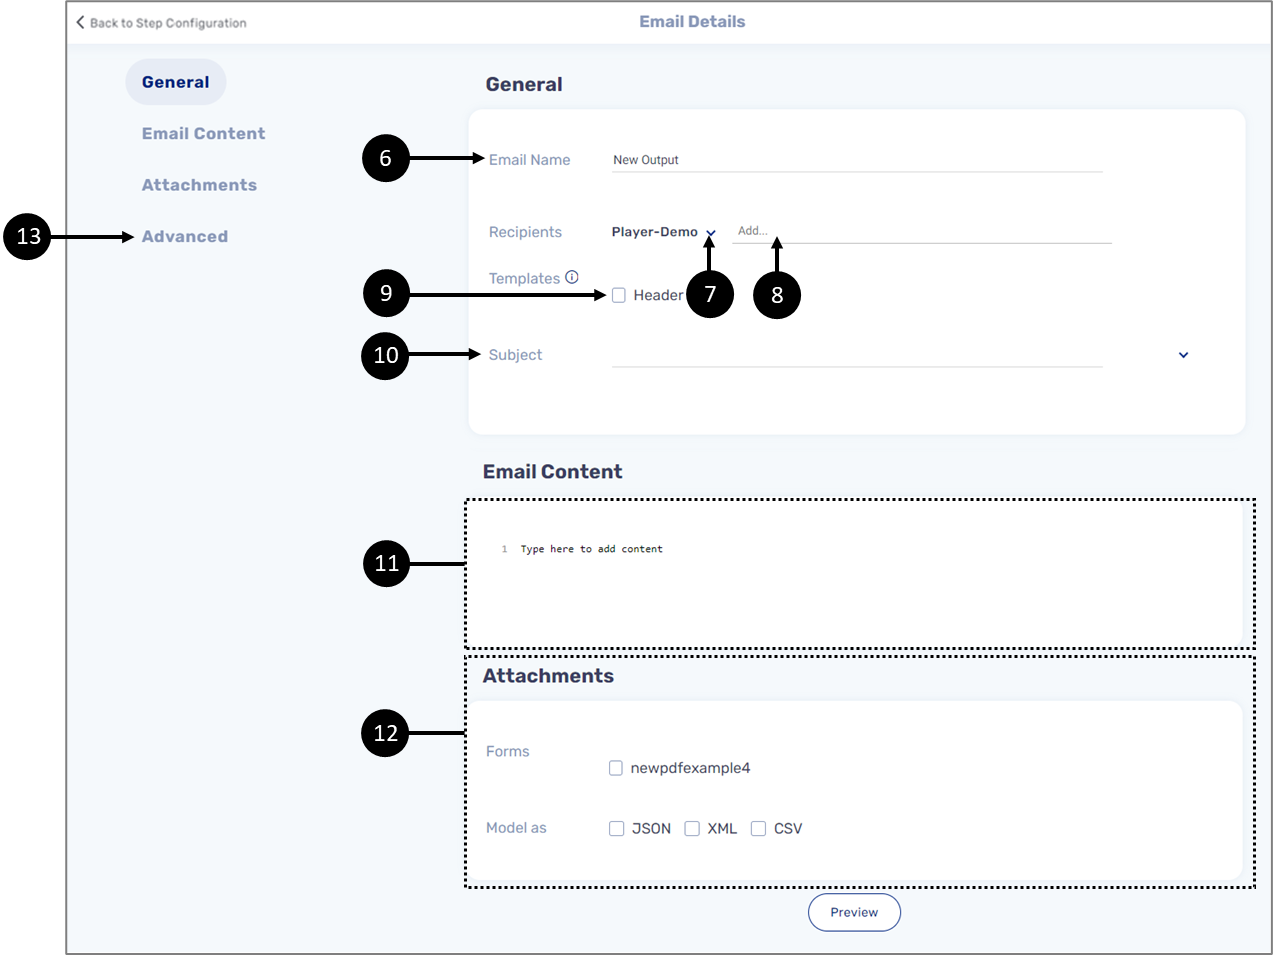
Figure 20: Email Details Window
- Enter the Email Name (6).
- Add the Recipients:
- Select the environment (7).
- Add the recipients (8).
- Check the Header checkbox (9) to add a template.
- Enter the Subject of the email (10).
- Enter the content of the email (11).
- The content editor is an HTML editor.
- Only When adding a new output (email or SMS) for the Start phase of a step, it is mandatory to add a {{link}} to launch the process.
- Add attachments if necessary (12).
- Click Advanced (13).
Result:
The advanced section options appear:
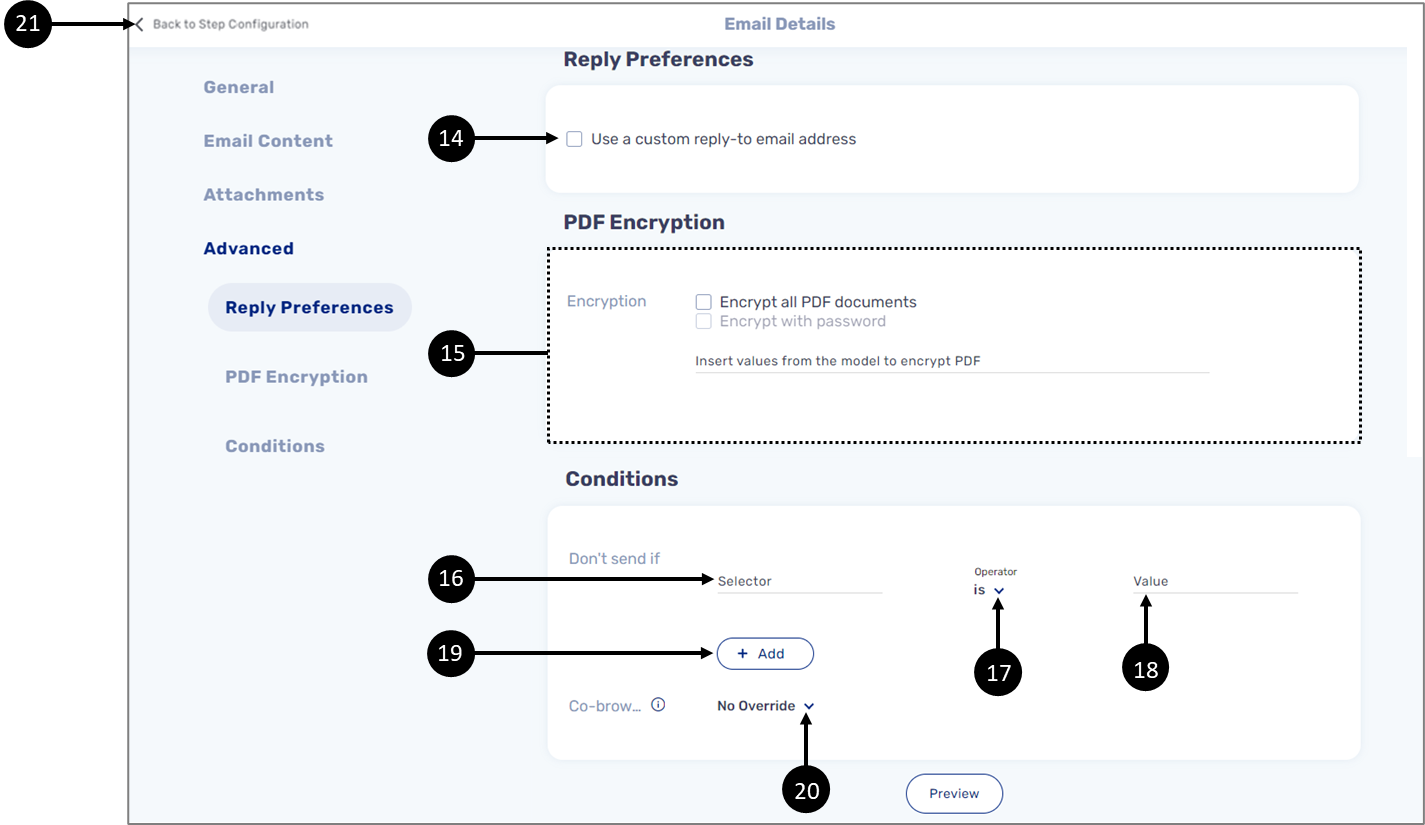
Figure 21: Advanced Section Options
- Check the checkbox (14) to Use a custom reply-to email address.
- Check one of the PDF Encryption checkboxes to set Encryption (15).
- Set a condition with a logical expression:
- Enter the Selector (16).
If the transaction data item to add as the Selector is nested inside an object, write, and select the object first and then input a dot (.) and select the transaction data item within the object. It is also possible to input two dots (..) and then select the transaction data item within the object (see Figure 22):

Figure 22: Nested Transaction Data Item
- Click the dropdown (17) and set the Operator.
- Enter the Value (18).
- If necessary, click the + Add button (19) to add additional logical expressions and repeat steps a to c.
When adding multiple logical expressions to a condition, it is mandatory to set an operation between them - and/or.
- Click the dropdown and set the Co-browsing permissions (20).
- Click the Back Step Configuration button (21).
Result:
The output is configured.
Notifications Phase
(See Figure 23)
To configure a notification that will be sent once, after X number of days, if the digital process was not completed, perform the following steps:
- Perform steps 1 and 2 as described in the Start Phase section.
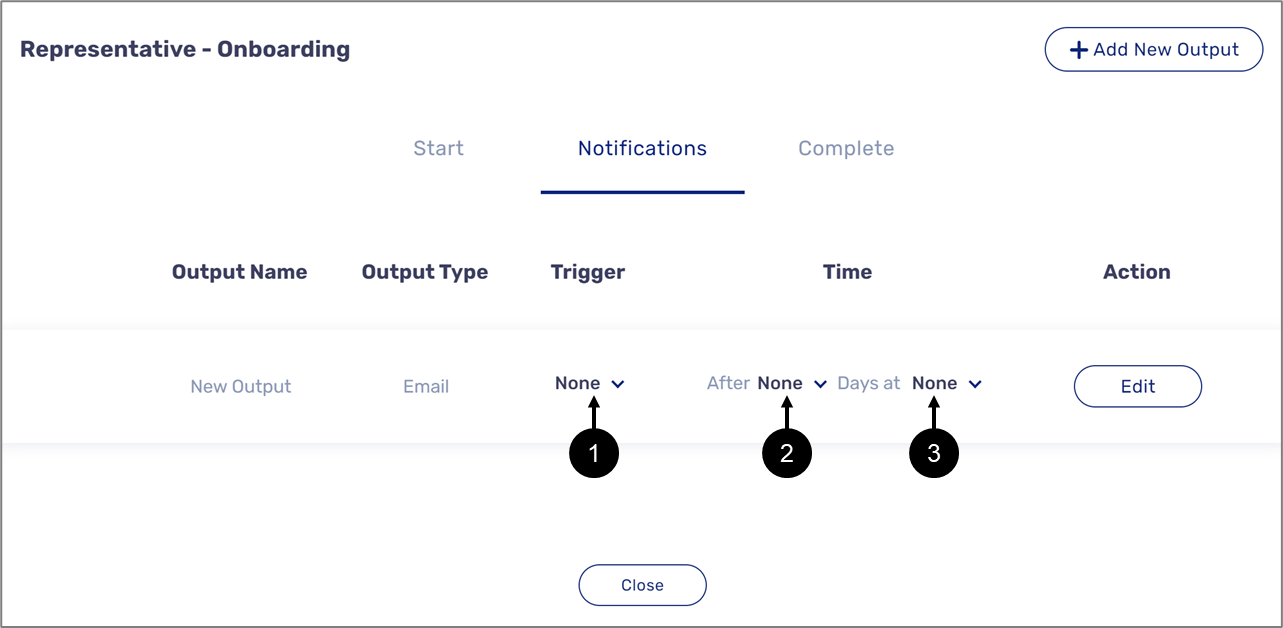
Figure 23: Output Configuration - Notifications
- Click the dropdown (1) and set the Trigger.
- Set the Time:
- Click the dropdown (2) and set the number of days (After).
- Click the dropdown (3) and select the time (at).
- Perform steps 3 to 15 as described in the Start Phase section.
SMS Output
When selecting the SMS as the output, the configuration is done through the SMS Details window. The structure of the window is like the structure of the Email Details window but with fewer options (see Figure 24):
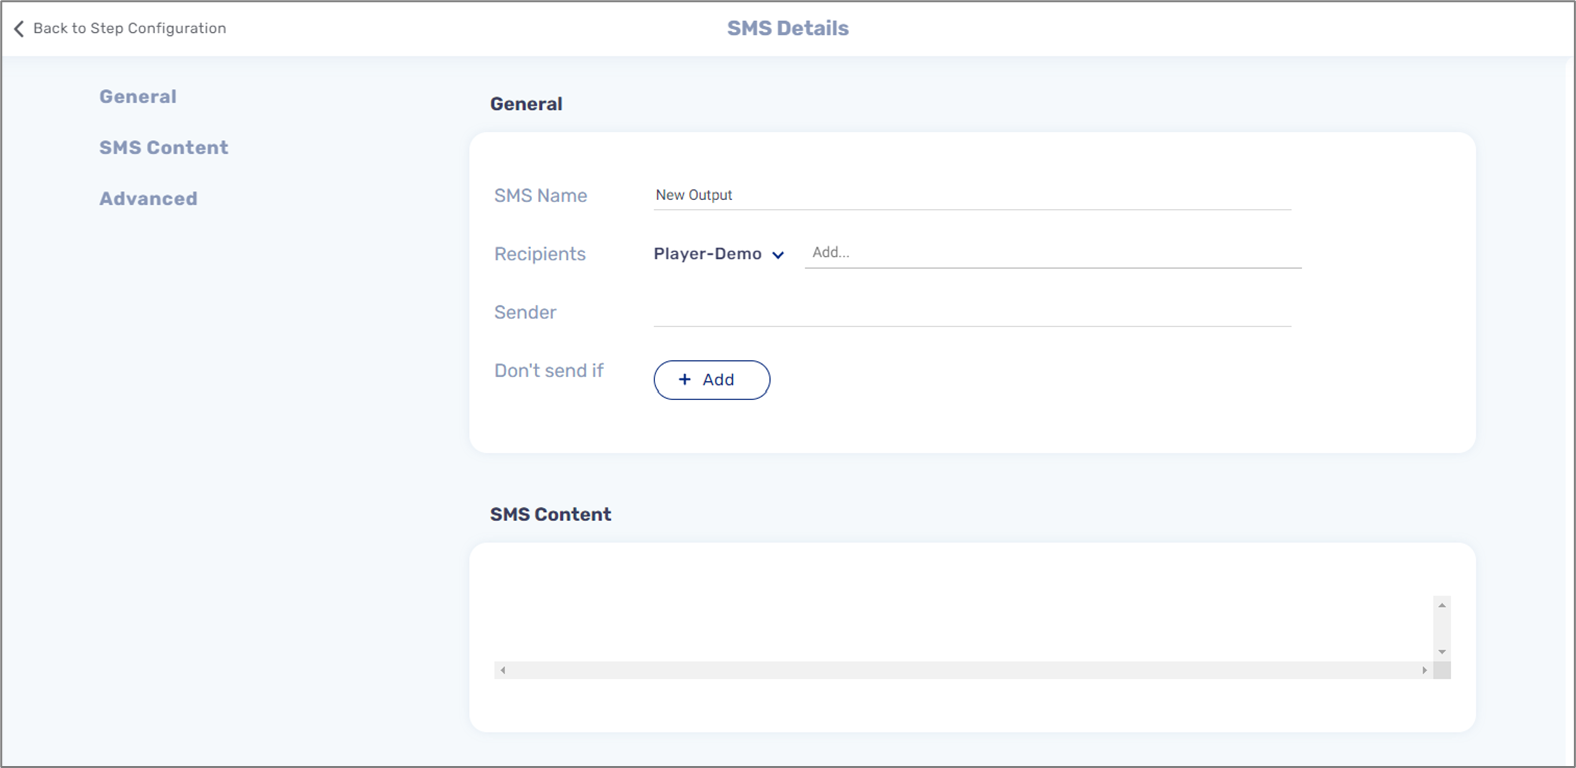
Figure 24: SMS Details Window
- For a detailed description of the SMS details window, see the Workflow Manager Overview article.
- To configure the SMS details window, see the relevant steps described in the Start Phase section.
Troubleshooting
Table 1 describes malfunctions that may occur when trying to configure a workflow. The table also describes the reason/s for the malfunctions and provides possible solutions.
Table 1: Troubleshooting
Number | Malfunction | Reason/s | Solution/s |
1 | Cannot add a role to a step | Roles are not created | Create roles as described in the Creating Roles sections |
2 | Creating two or more conditions does not work as expected | An operation between the condition is not set or not set correctly | Set the operation between the conditions as described in the Adding Step conditions section |
3 | Recipients are not receiving Email or SMS (output communication channels) | The wrong environment for the recipients is set | Configure the Email/SMS communication channel as described in the Start Phase section |
4 | The email/SMS is received by the recipients but does not contain a link to the digital process | The {{link}} is missing | Configure the Email/SMS communication channel as described in the Start Phase section |
5 | An Auto-reminder is not sent | The trigger and the time of the auto-reminder is not set | Configure the Email/SMS communication channel as described in the Auto-Reminder Phase section |
How to Videos
To quickly learn how to configure the Workflow Manager, watch the following videos.
- Steps and Roles:
- Conditions:
- Email Output
- SMS Output: