Article Overview
This article describes different methods for creating a new PDF defining its fields and connecting them to the Model. The article also details an example of a PDF output, an explanation of how to connect PDF pages to the Model, and a description of how to deal with malfunctions when trying to perform the actions described in this article and their solutions.
- If you want to skip to our How to videos section and quickly learn how to create a PDF, add pages, and use the different tools, click here.
- The Flexible and Connectors options are not covered in this article. For additional information, please contact our support team.
Creating a PDF Form
(See Figure 1 and Figure 2)
To create a PDF form using the + Create New button, perform the following steps:

Figure 1: + Create New Button
- Click the + Create New button (1).
Result:
The Create new PDF file window appears:
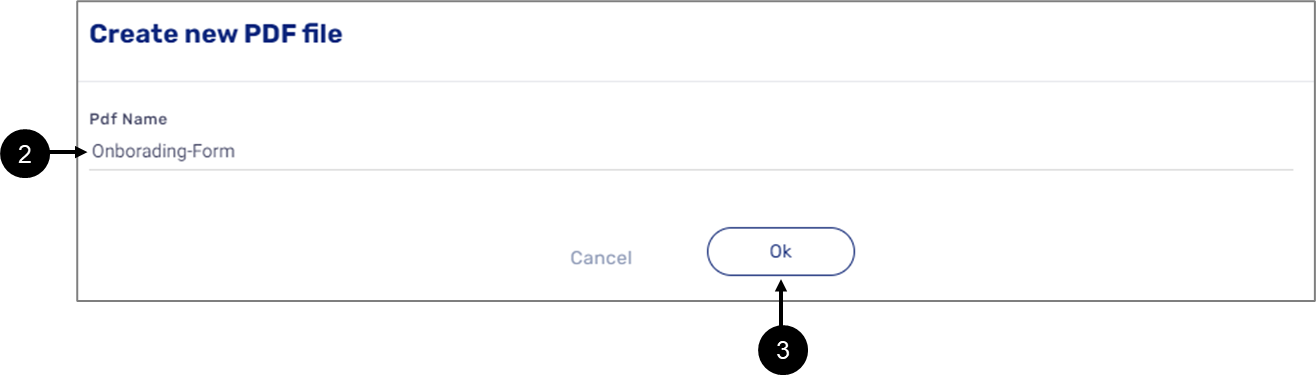
Figure 2: Create a Pdf Window
- Enter a Pdf Name (2).
- Click the Ok button (3).
Result:
The PDF form is created.
Once a PDF is created, use the dropdown to edit its name or to delete it.
Adding PDF Pages
(See Figure 3 and Figure 4)
To add new PDF pages, perform the following steps:
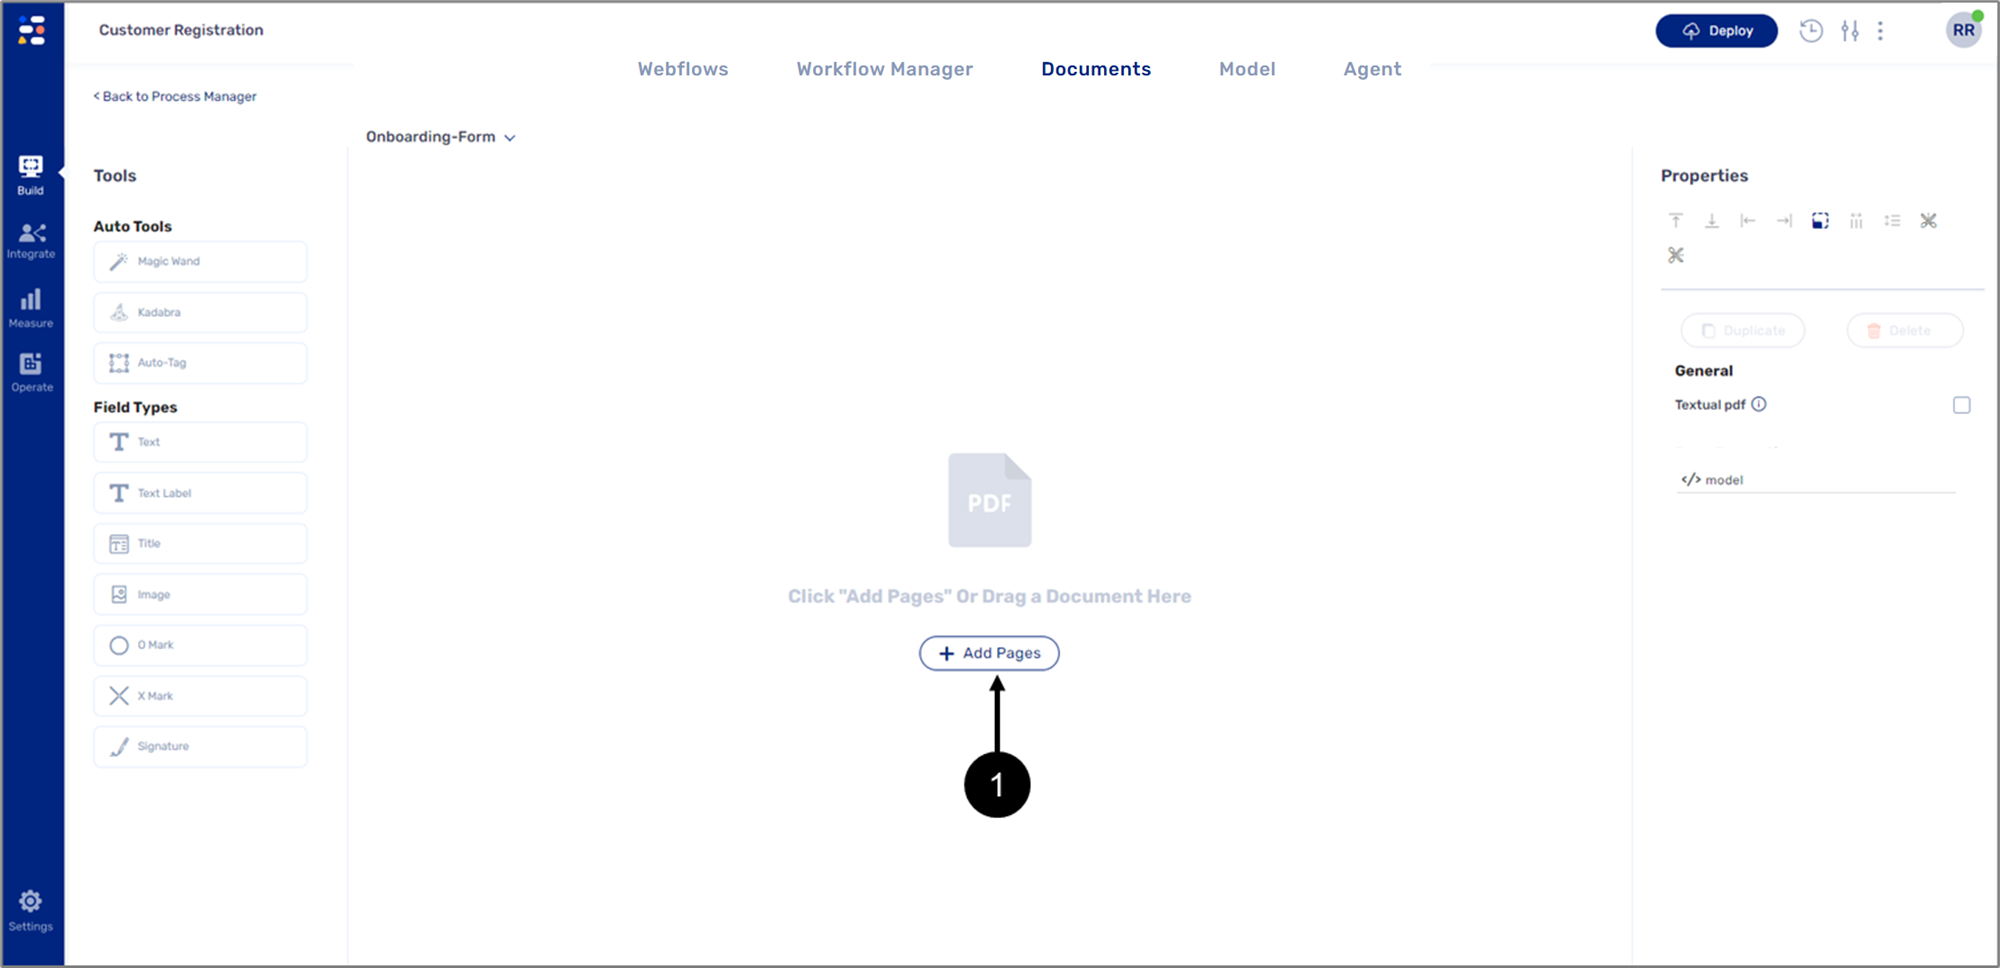
Figure 3: + Add Pages Button
- Click the + Add Pages button (1).
- Select a PDF file.
Result:
The PDF file is added:
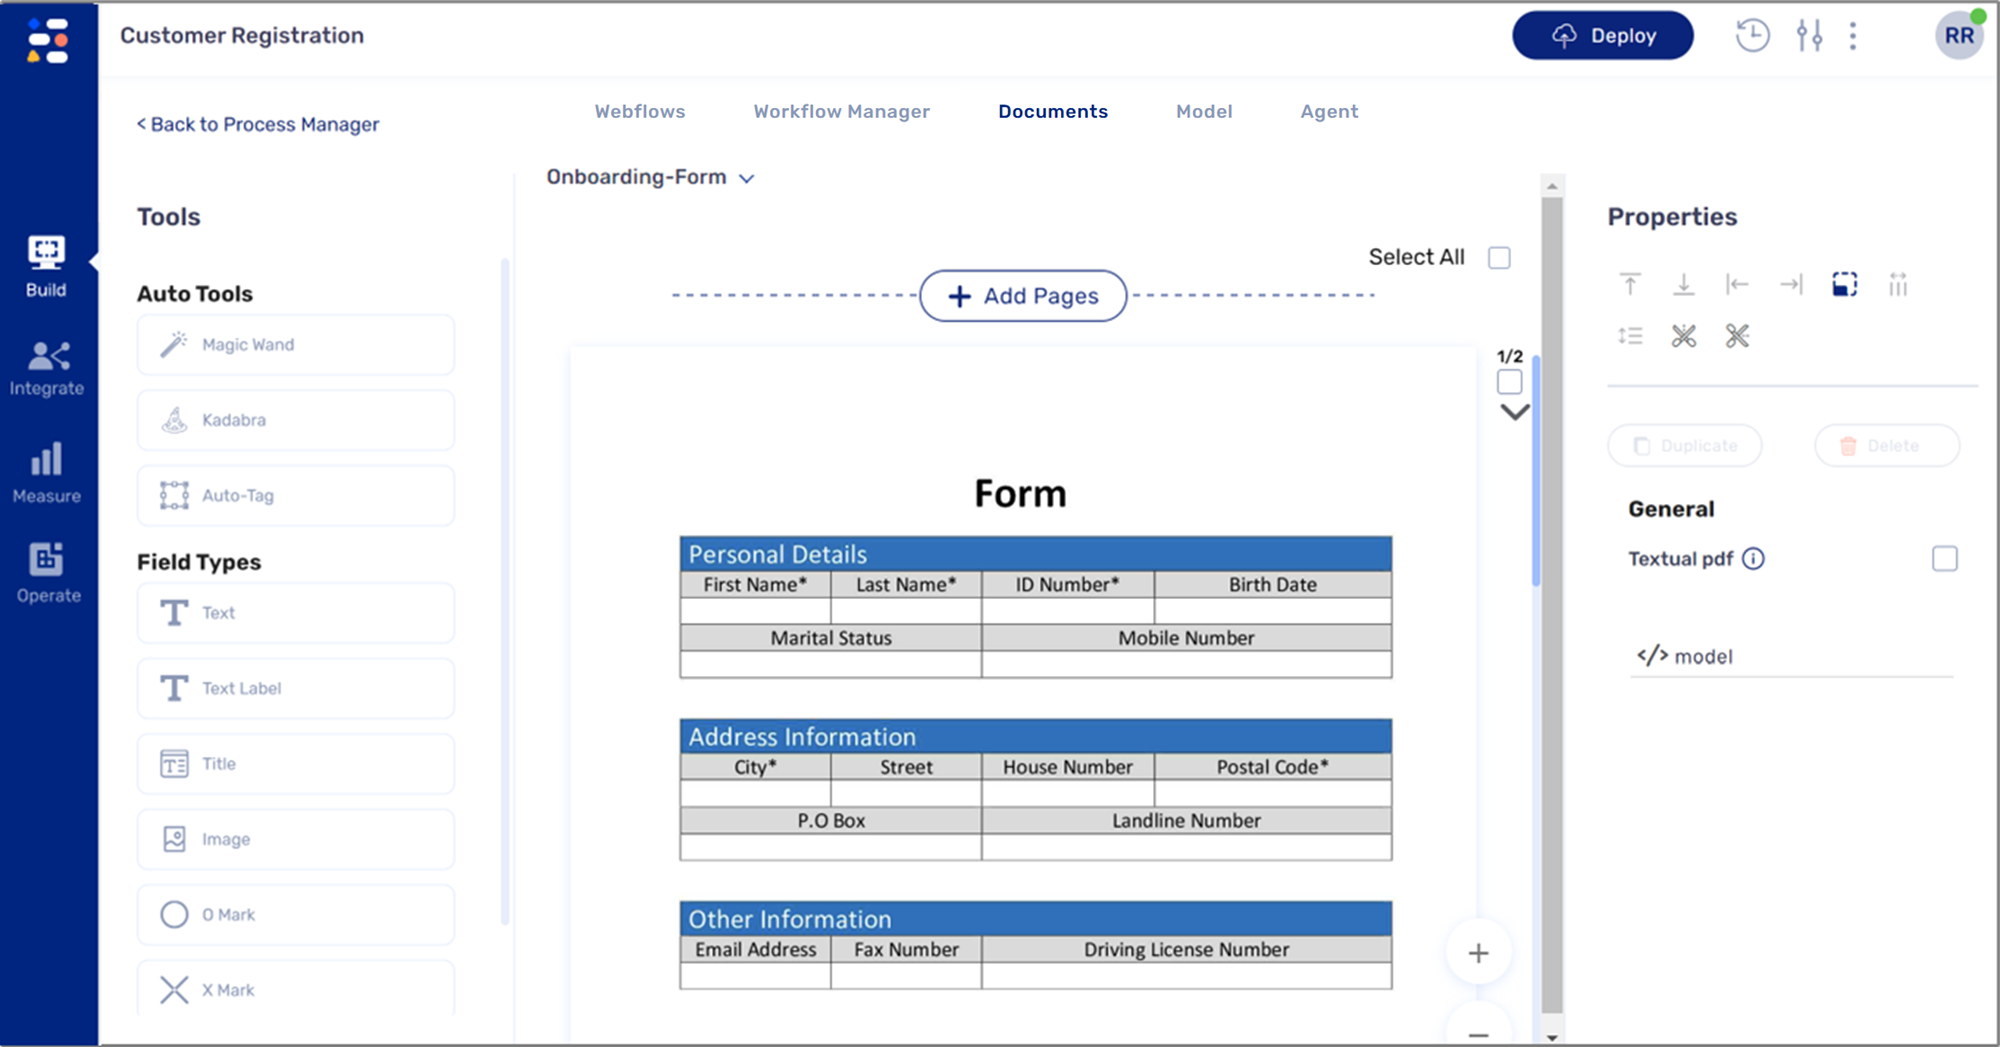
Figure 4: Added PDF File
To add additional PDF pages, above or below the existing PDF, click one of the +Add Pages buttons.
Defining PDF Fields and Connecting Them to the Model
The added PDF pages are based on the structure of the Webflow you created using components. The pages display outputs of information that was input by the digital process end-users. Because of that, fields must be defined and connected to the Model in the same way Webflow components are connected to the Model. The connection of the fields to the Model is done by marking and defining them using different field types from the Tools section and configuring the properties.
Field Properties
The different fields in the Tools section are used to define the PDF fields. Each field type has its field properties.
Text Field Properties
Figure 5 and Table 1 describe the Text Field Properties:
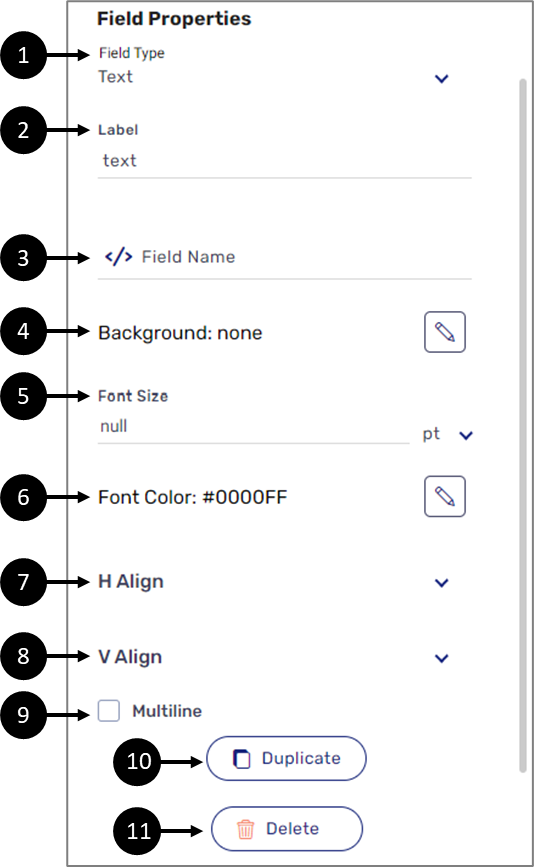
Figure 5: Text Field Properties
Table 1: Text Field Properties
Number | Icon | Name | Description |
1 | - | Field Type |
|
2 | - | Label | Enables to change the label of the field NOTE The label is internal and will not be shown in the PDF preview and output itself. It is an internal indication for the field and is relevant only for the builder user |
3 |
| Field Name | Enables to connect the field to the Model NOTE For additional details on how to connect to the Model, see the How to define and Connect PDF Fields? section |
4 |
| Background | Enables to select a background color for the field NOTE The background color is selected from a color palette or from the theme of the Webflow |
5 | - | Font Size | Enables to set the font size in points (pt) NOTE The default font size is 20 pt |
6 |
| Font Color | Enables to select a font color for the field NOTE
|
7 | - | Horizontal (H) Align | Enables to set the horizontal alignment of the field:
|
8 | - | Vertical (V) Align | Enables to set the vertical alignment of the field:
|
| 9 | - | Multiline (line brake) |
|
| 10 | - | Duplicate | Enables to duplicate the field |
| 11 | - | Delete | Enables to delete the field |


Text Label Field Properties
Figure 6 and Table 2 describe the Text Label Field Properties:
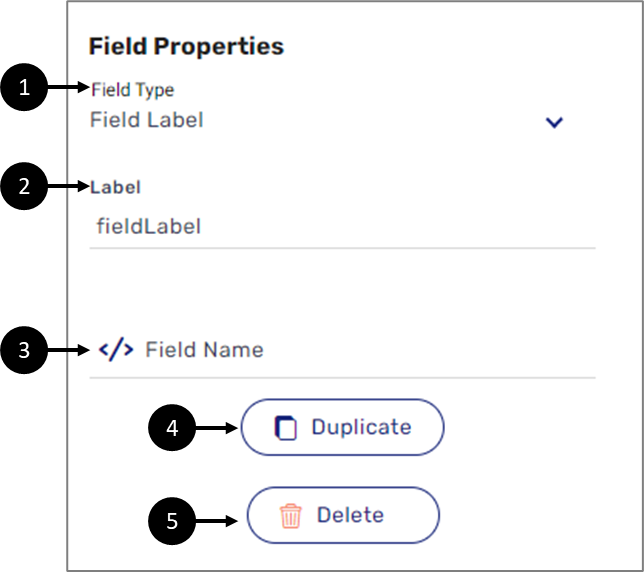
Figure 6: Text Label Field Properties
Table 2: Text Label Field Properties
Number | Icon | Name | Description |
1 | - | Field Type |
|
| - | Label | Enables to change the label of the field |
3 |
| Field Name | Enables to connect the field to the Model NOTE For additional details on how to connect to the Model, see the How to define and Connect PDF Fields? section |
4 | - | Duplicate | Enables to duplicate the field |
5 | - | Delete | Enables to delete the field |

Title Field Properties
Figure 7 and Table 3 describe the Title Field Properties:

Figure 7: Title Field Properties
Table 3: Title Field Properties
Number | Name | Description |
1 | Field Type |
|
2 | Label | Enables to change the label of the field |
3 | Duplicate | Enables to duplicate the field |
4 | Delete | Enables to delete the field |
Image Field Properties
Figure 8 and Table 4 describe the Image Field Properties:
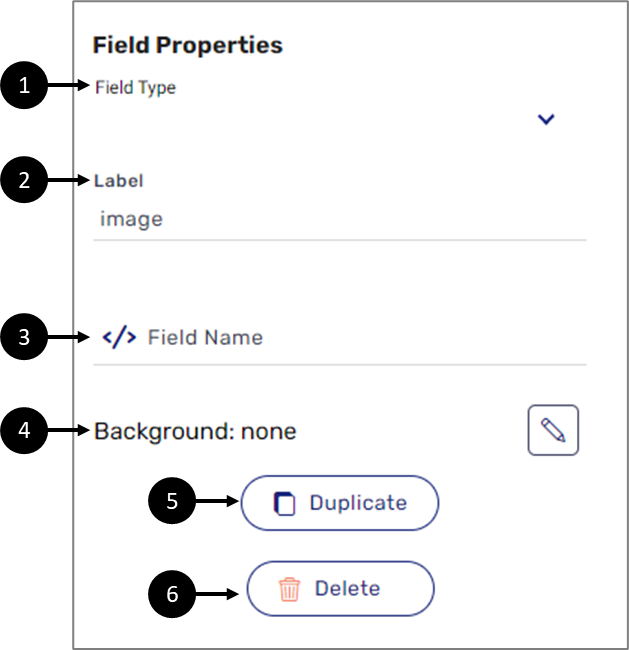
Figure 8: Image Field Properties
Table 4: Image Field Properties
Number | Icon | Name | Description |
1 | - | Field Type |
|
2 | - | Label | Enables to change the label of the field |
3 |
| Field Name | Enables to connect the field to the Model NOTE For additional details on how to connect to the Model, see the How to define and Connect PDF Fields? section |
4 |
| Background | Enables to select a background color for the field NOTE The background color is selected from a color palette or from the theme of the Webflow |
5 | - | Duplicate | Enables to duplicate the field |
6 | - | Delete | Enables to delete the field |


O Mark Field Properties
Figure 9 and Table 5 describe the O Mark Field Properties:
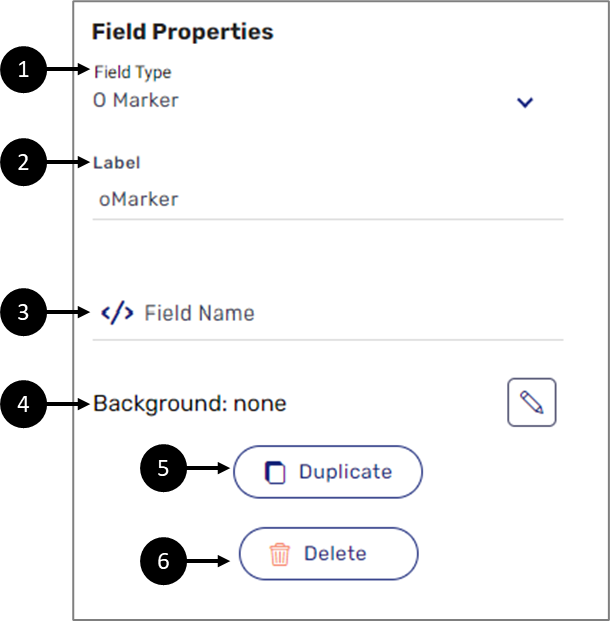
Figure 9: O Mark Field Properties
Table 5: O Mark Field Properties
Number | Icon | Name | Description |
1 | - | Field Type |
|
2 | - | Label | Enables to change the label of the field |
3 |
| Field Name | Enables to connect the field to the Model NOTE For additional details on how to connect to the Model, see the How to define and Connect PDF Fields? section |
4 |
| Background | Enables to select a background color for the field NOTE The background color is selected from a color palette or the theme of the Webflow |
5 | - | Duplicate | Enables to duplicate the field |
6 | - | Delete | Enables to delete the field |


Group Value Property
After marking the desired PDF fields with the O Mark field type (1), it must be connected to the Model, to the appropriate string type transaction data item (2). Once the connection is done, an additional property, the Group Value (3), appears (see Figure 10):
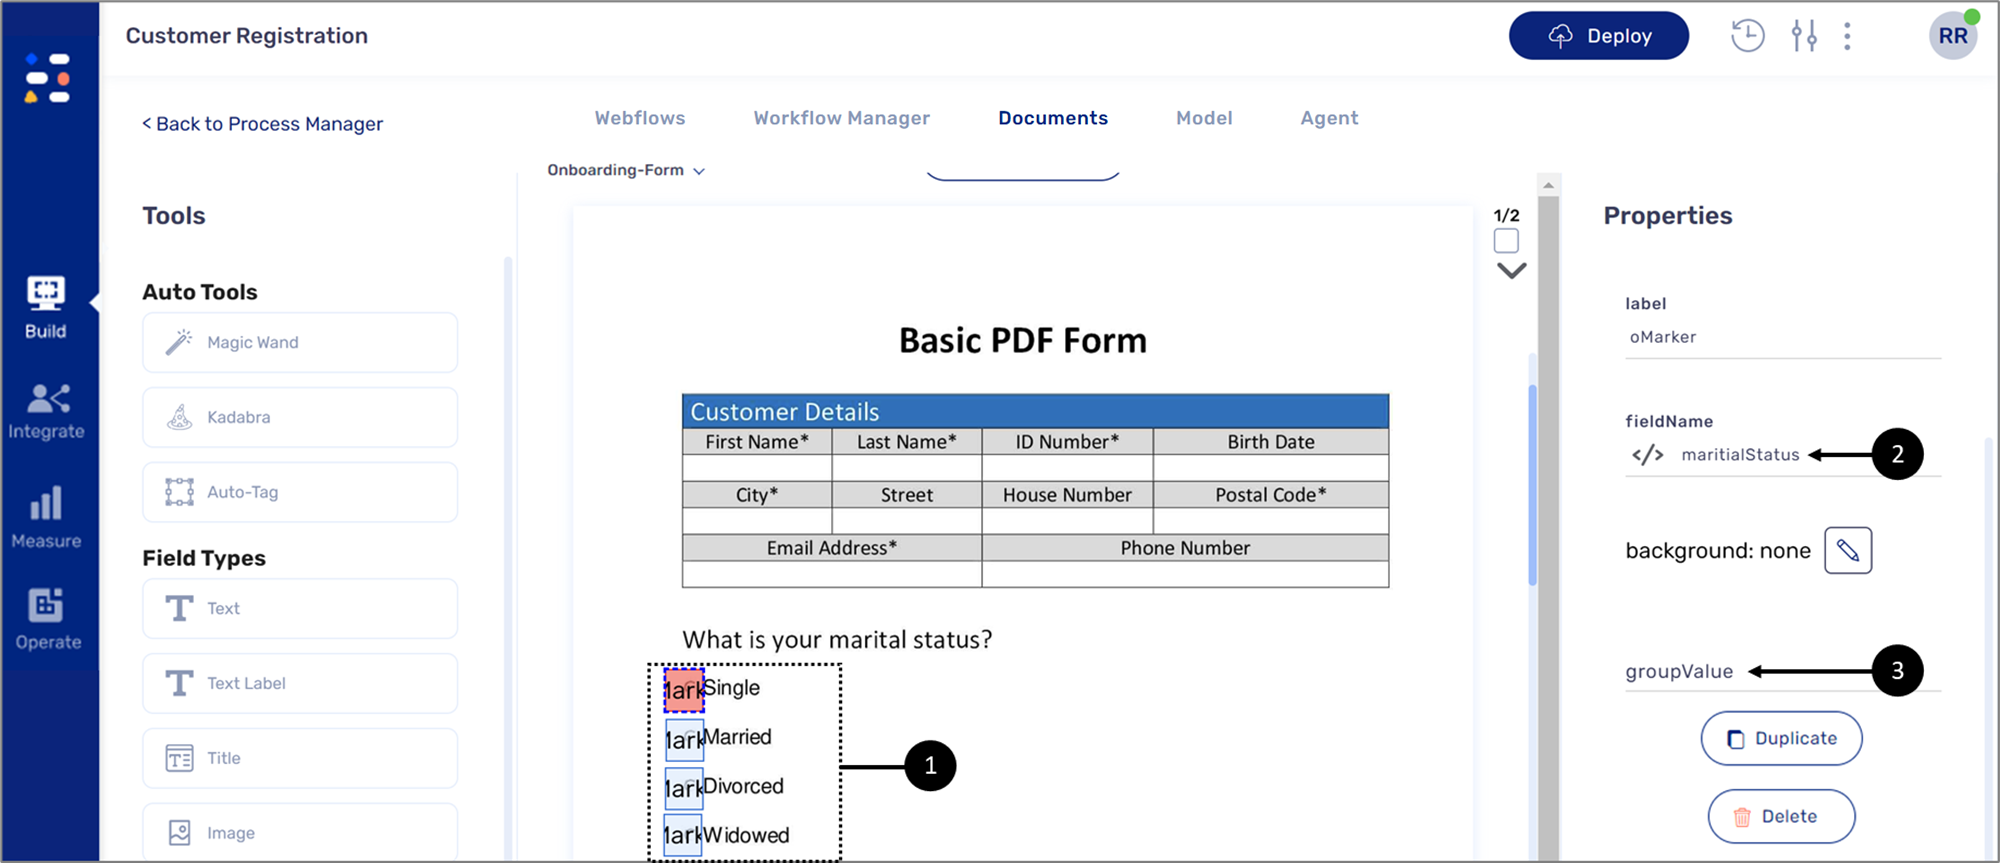
Figure 10: Group Value Property 1 of 3
The Group Value property is set (4) with one of the Radio Questions options Values (5) that were set using the Properties section of the component (see Figure 11):

Figure 11: Group Value Property 2 of 3
When the user selects the radio question option through the digital process, the O Mark field type circles the option (6) on top of the PDF form (see Figure 12):
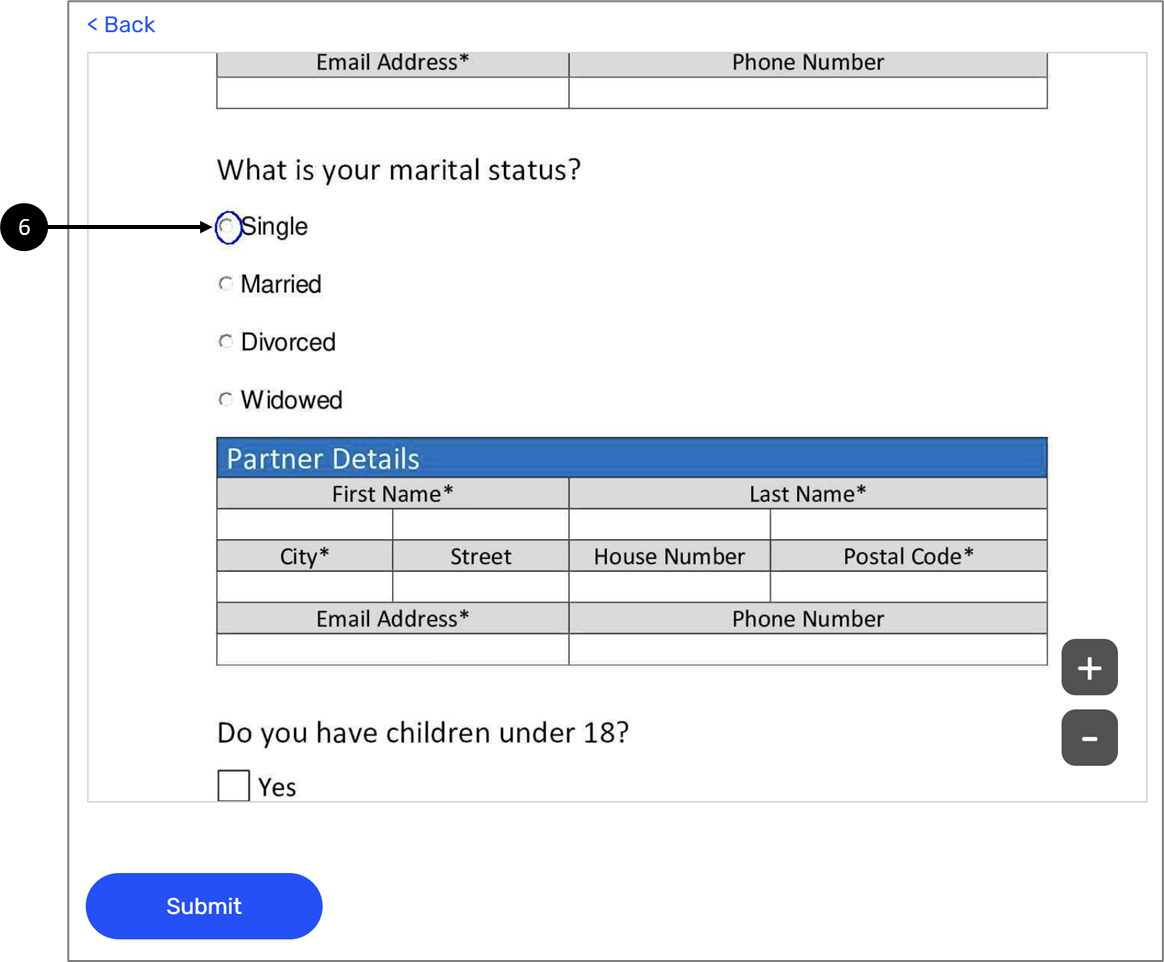
Figure 12: Group Value Property 3 of 3
X Mark Field Properties
Figure 13 and Table 6 describe the X Mark Field Properties:

Figure 13: X Mark Field Properties
Table 6: X Mark Field Properties
Number | Icon | Name | Description |
1 | - | Field Type |
|
2 | - | Label | Enables to change the label of the field |
3 |
| Field Name | Enables to connect the field to the Model NOTE For additional details on how to connect to the Model, see the How to define and Connect PDF Fields? section |
4 |
| Background | Enables to select a background color for the field NOTE The background color is selected from a color palette or from the theme of the Webflow |
5 | - | Duplicate | Enables to duplicate the field |
6 | - | Delete | Enables to delete the field |


Bool Value Property
After marking the desired PDF fields with the X Mark field type (1), it must be connected to the Model, to the appropriate boolean type transaction data item (2). Once the connection is done, an additional property, the Bool Value (3), appears. The Bool Value property is set to a true value (checked) by default (4) (see Figure 14):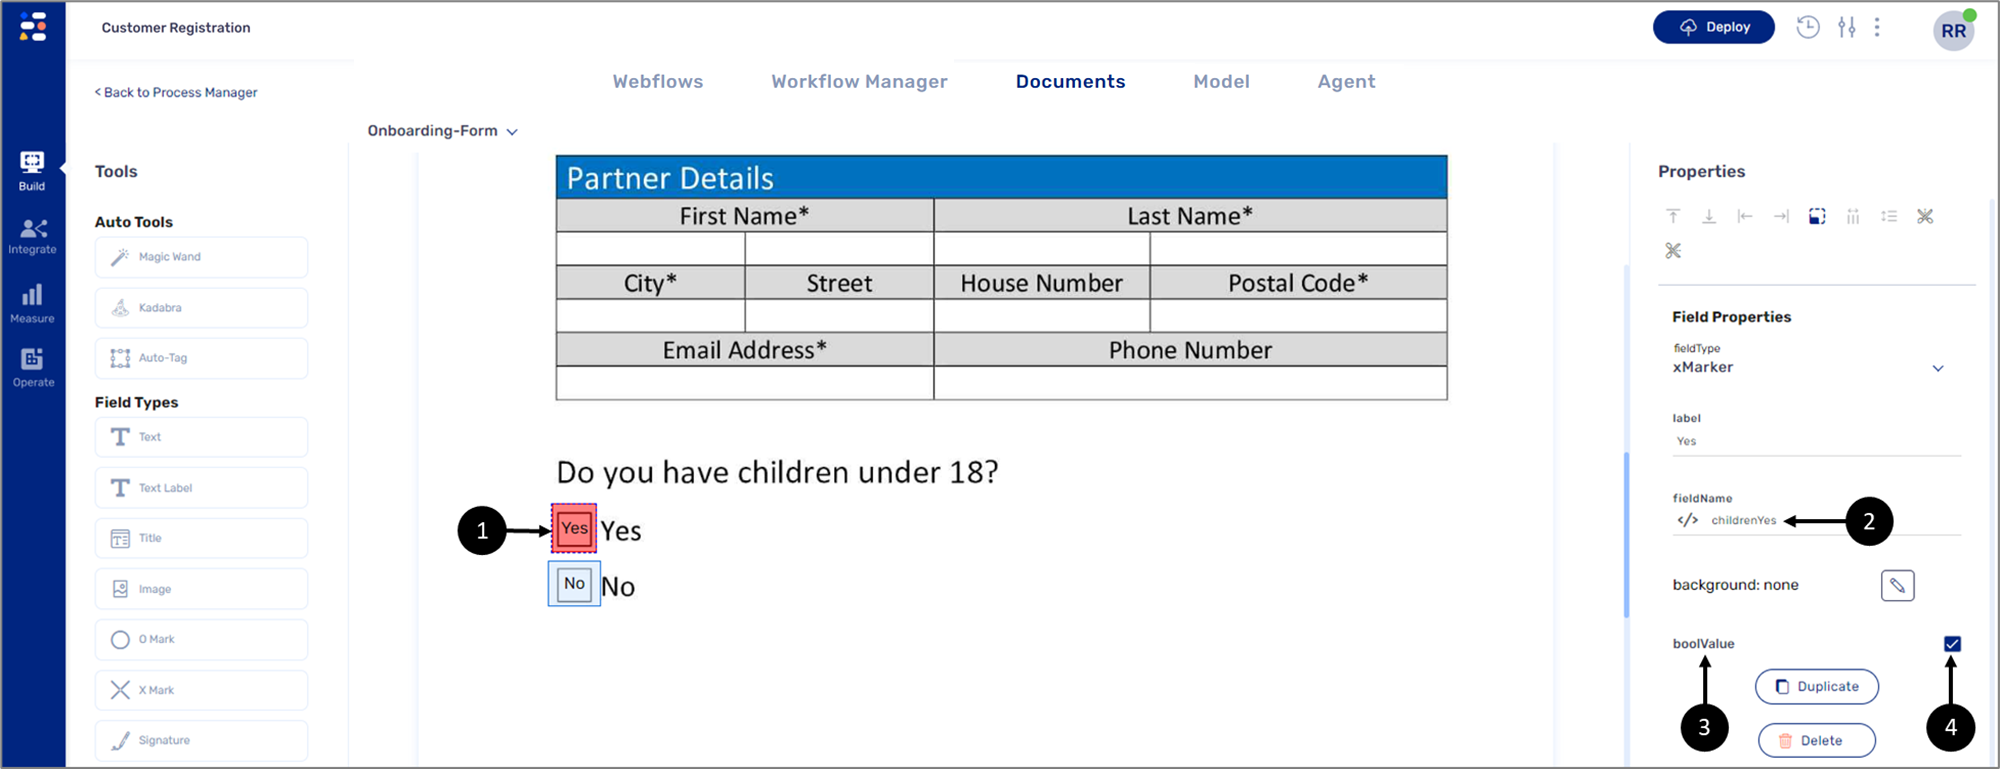
Figure 14: Bool Value Property 1 of 2
When a checkbox is checked by the user through the digital process and as a result returns a true value, the X Mark field type marks the checkbox with an X (5) on top of the PDF form (see Figure 15):
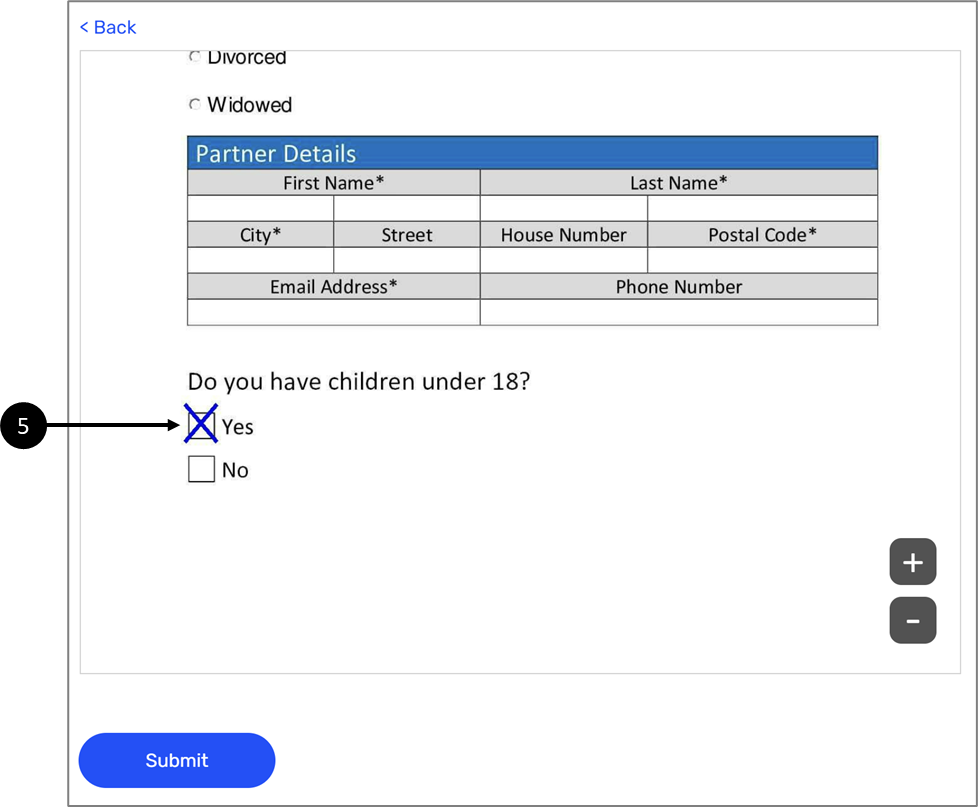
Figure 15: Bool Value Property 2 of 2
Signature Field Properties
Figure 16 and Table 7 describe the Signature Field Properties:
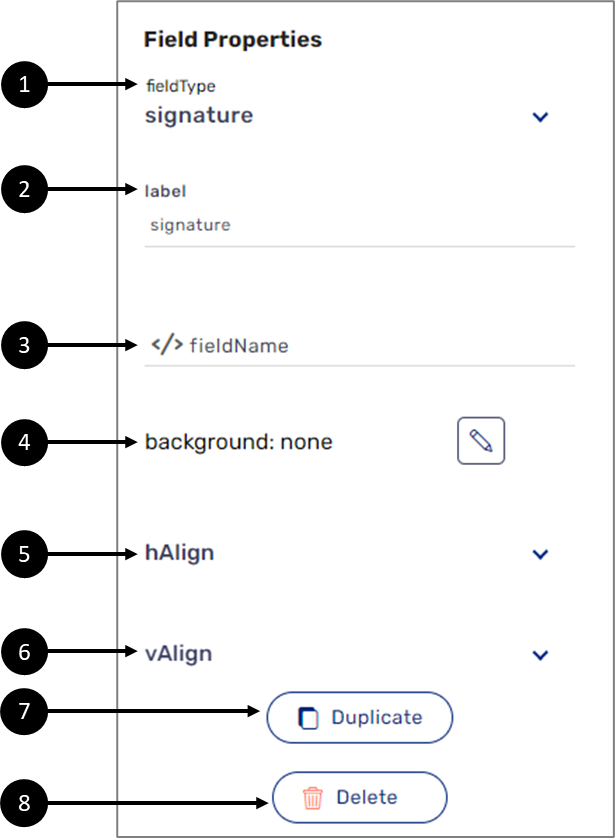
Figure 16: Signature Field Properties
Table 7: Signature Field Properties
Number | Icon | Name | Description |
1 | - | Field Type |
|
2 | - | Label | Enables to change the label of the field |
3 |
| Field Name | Enables to connect the field to the Model NOTE For additional details on how to connect to the Model, see the How to define and Connect PDF Fields? section |
4 |
| Background | Enables to select a background color for the field NOTE The background color is selected from a color palette or from the theme of the Webflow |
5 | - | Horizontal (H) Align | Enables to set the horizontal alignment of the field:
|
6 | - | Vertical (V) Align | Enables to set the vertical alignment of the field:
|
7 | - | Duplicate | Enables to duplicate the field |
8 | - | Delete | Enables to delete the field |


How to Define and Connect PDF Fields
(See Figure 17 to Figure 22)
To define new PDF fields, perform the following steps:
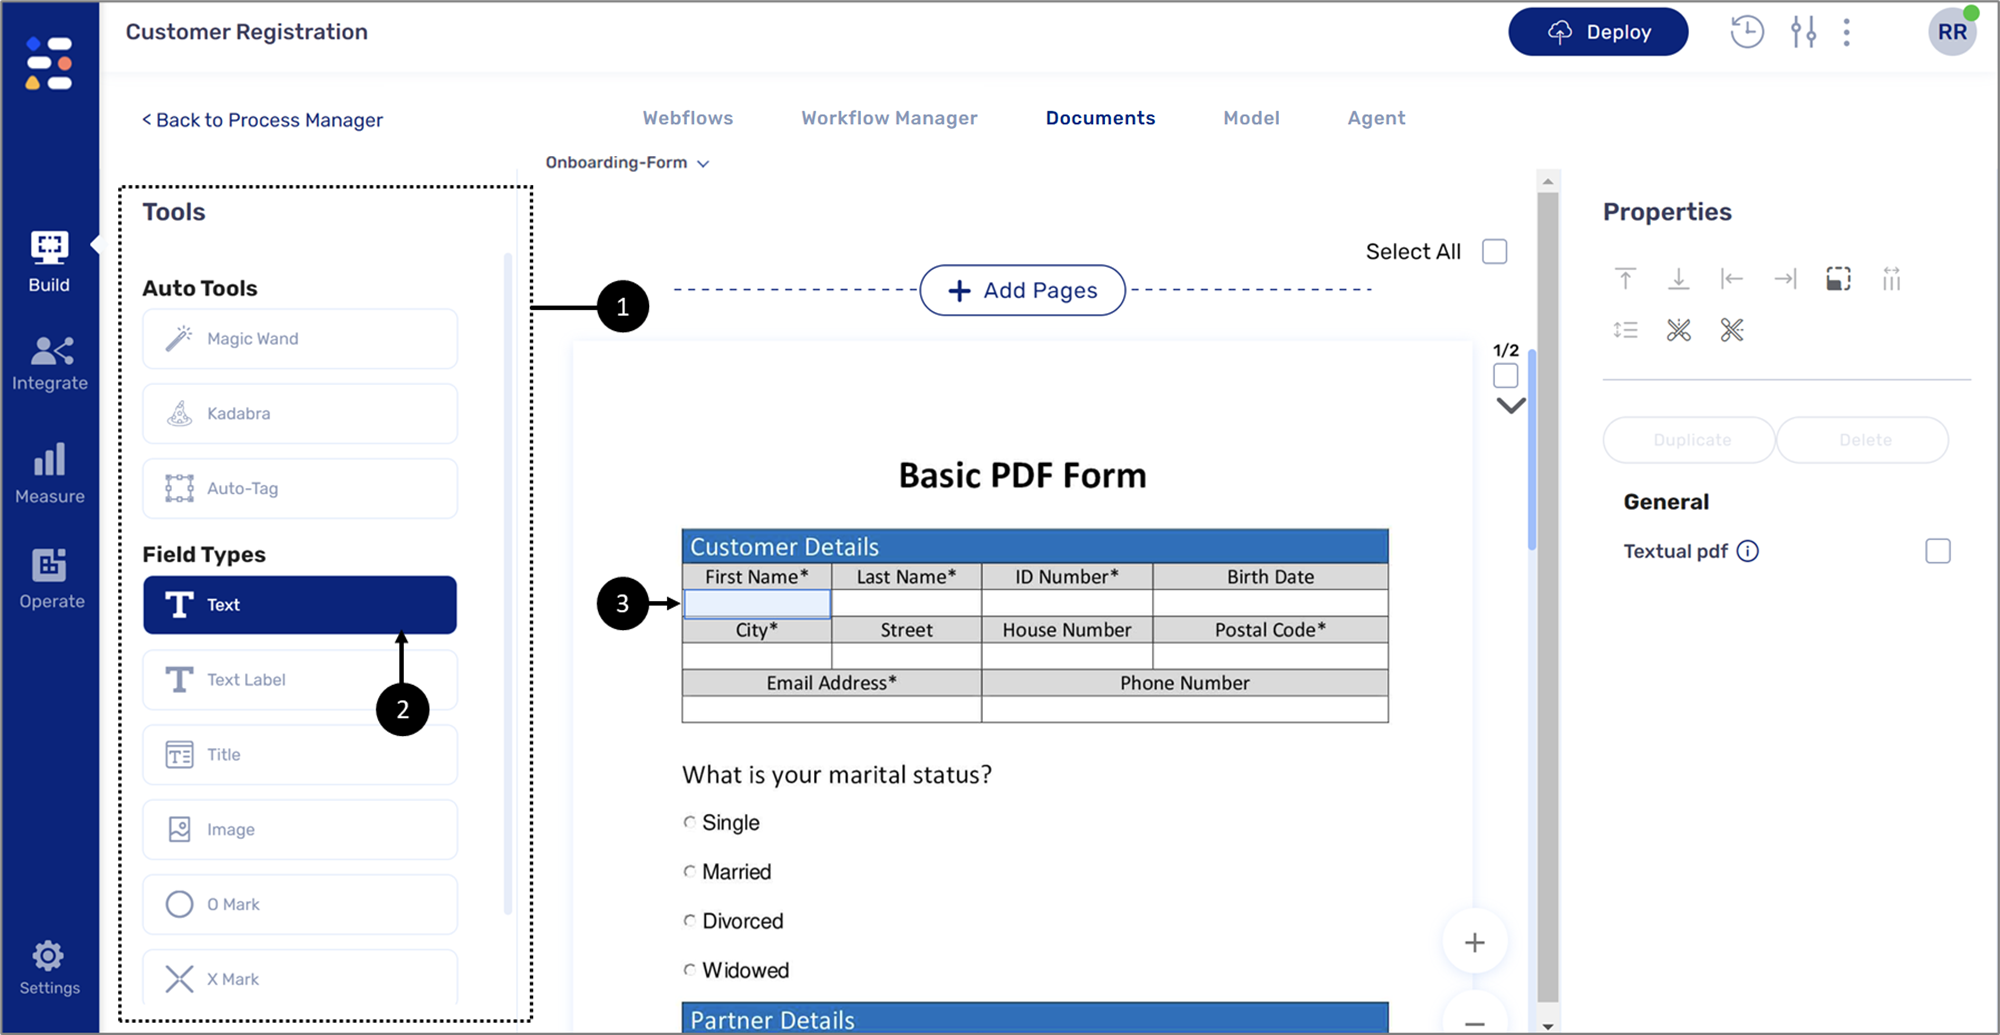
Figure 17: Tools Section and Marking
- Click the desired field from the Tools section (1).
For this example, the process will continue with the Text field type (2).
- Using the left click of the mouse, mark the desired PDF fields (3) with the Text field type.
Result:
The field is defined as text (4):
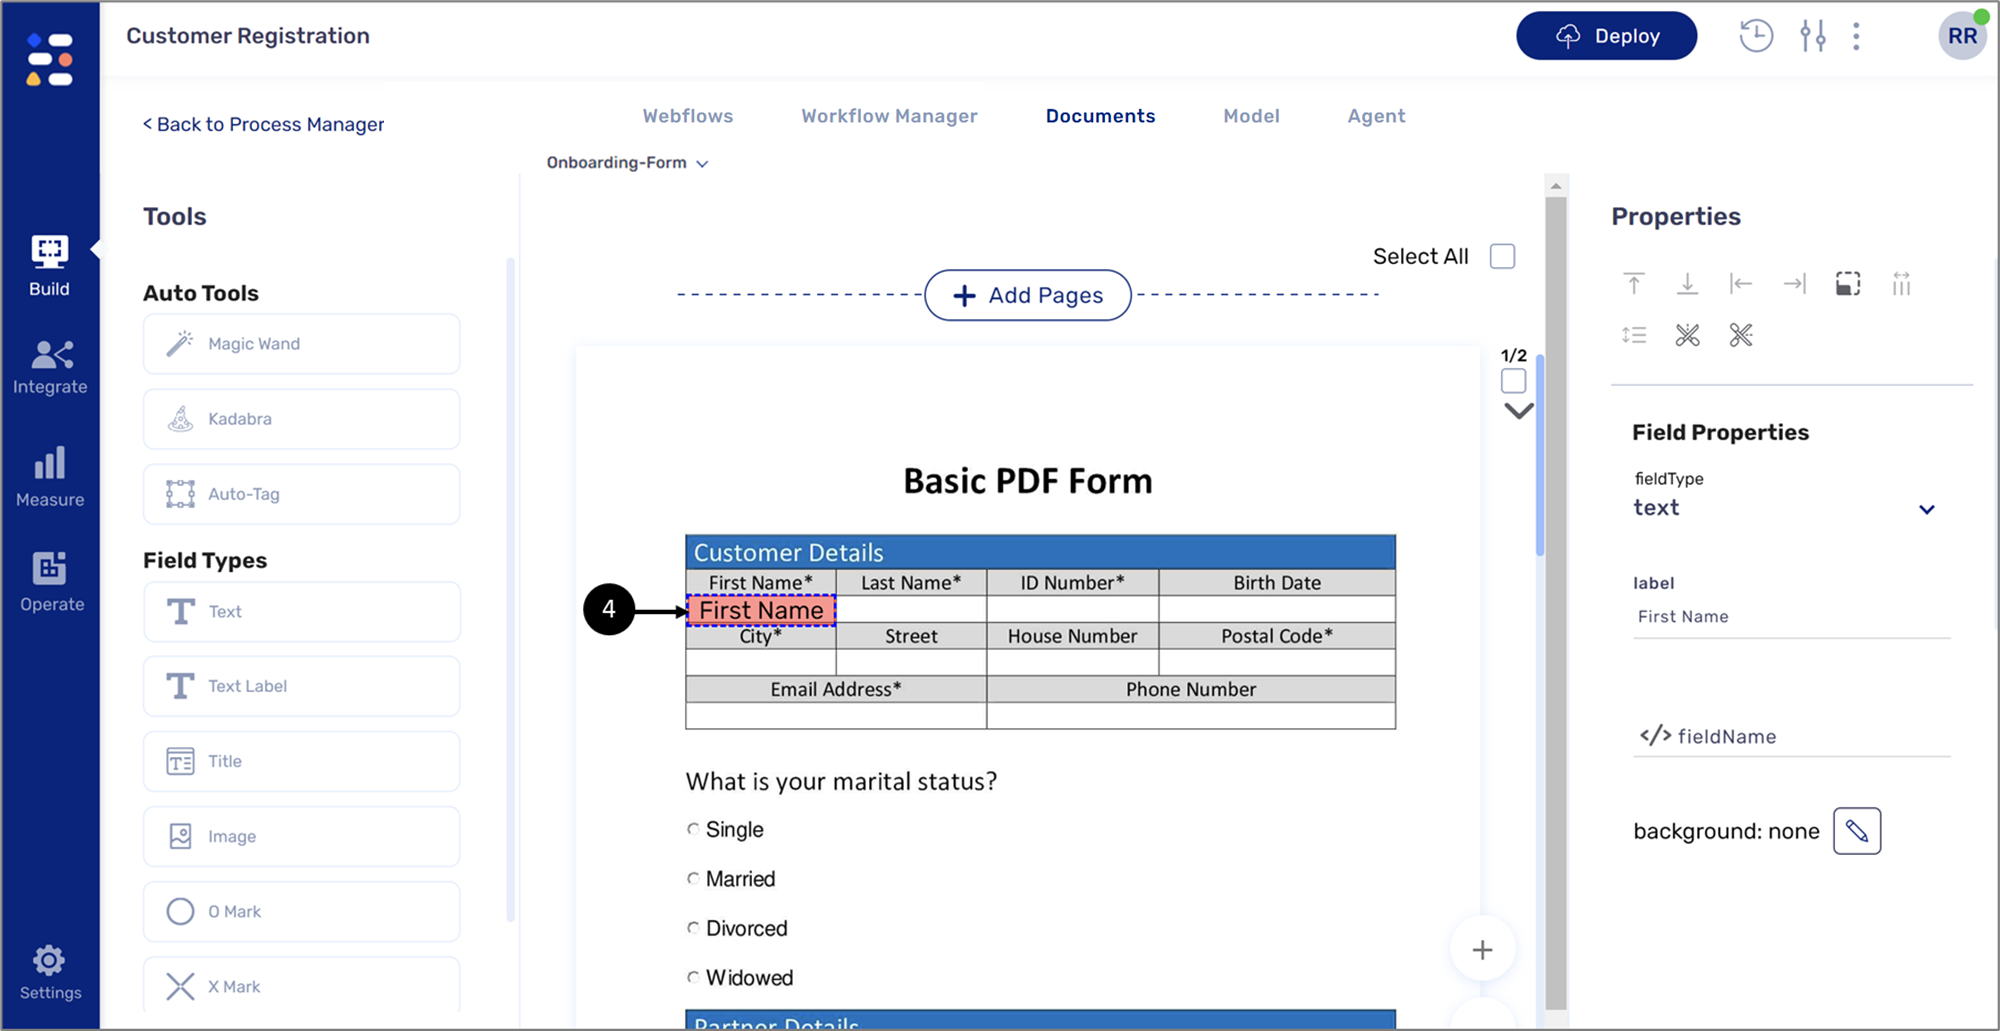
Figure 18: Defined field - text
It is best practice to change the label of the Text field to match the name of the field it defines.
- Click the field (4).
Result:
The Properties (5) section displays the Field Properties (6):
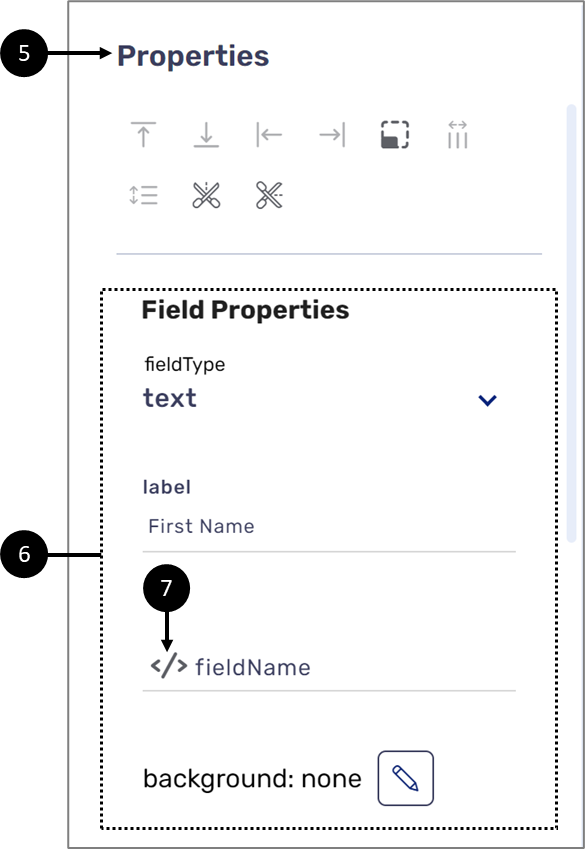
Figure 19: Defined field - Text
- Configure the field properties, as necessary.
- Connect the field to the Model:
- Click the icon (7).
Result:
The Model main screen is displayed:
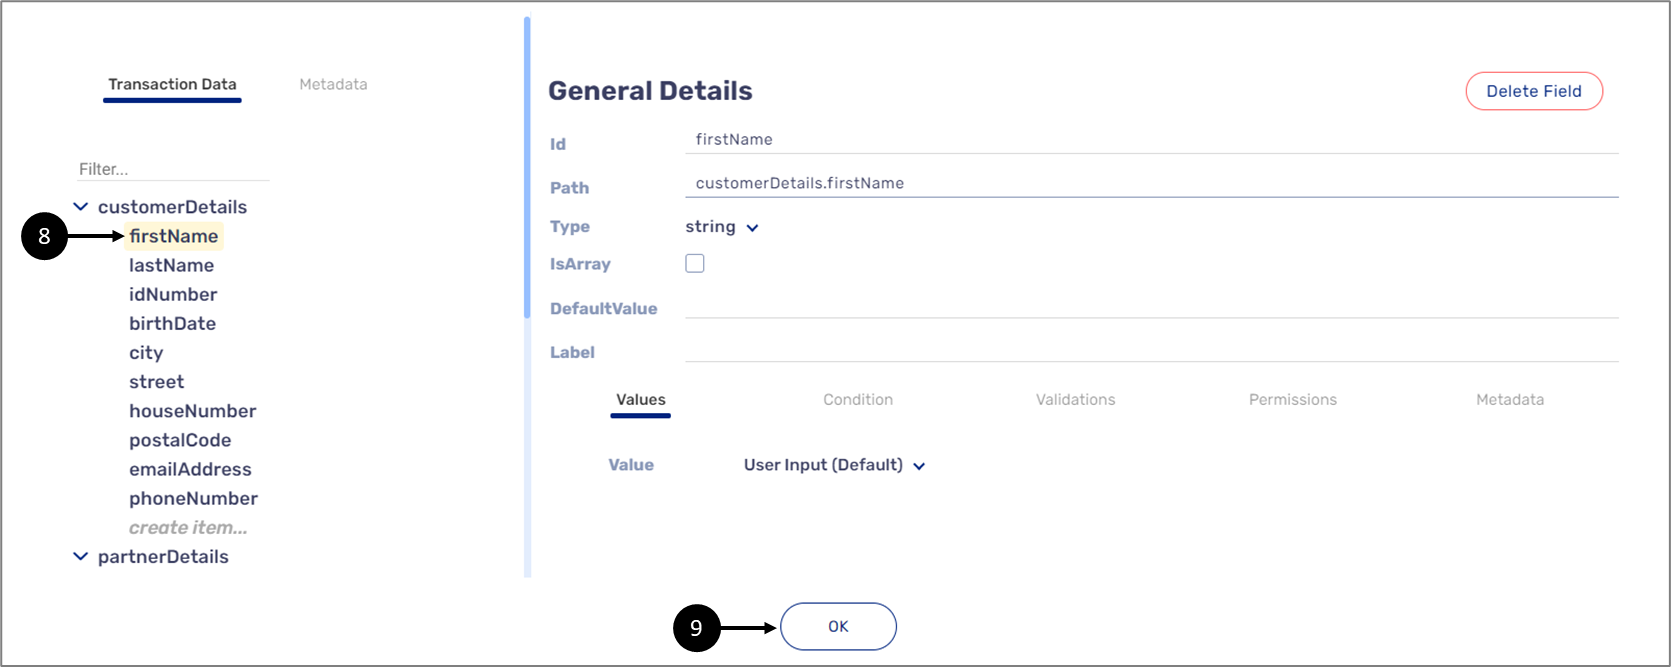
Figure 20: Model Main Screen
- Click the appropriate transaction data item (8).
- Click the OK button (9).
Result:
The PDF screen is displayed:

Figure 21: PDF Screen
- Click the Text field (10).
Result:
The Properties (11) section displays the Field Properties (12) with the connection to the Model (13):
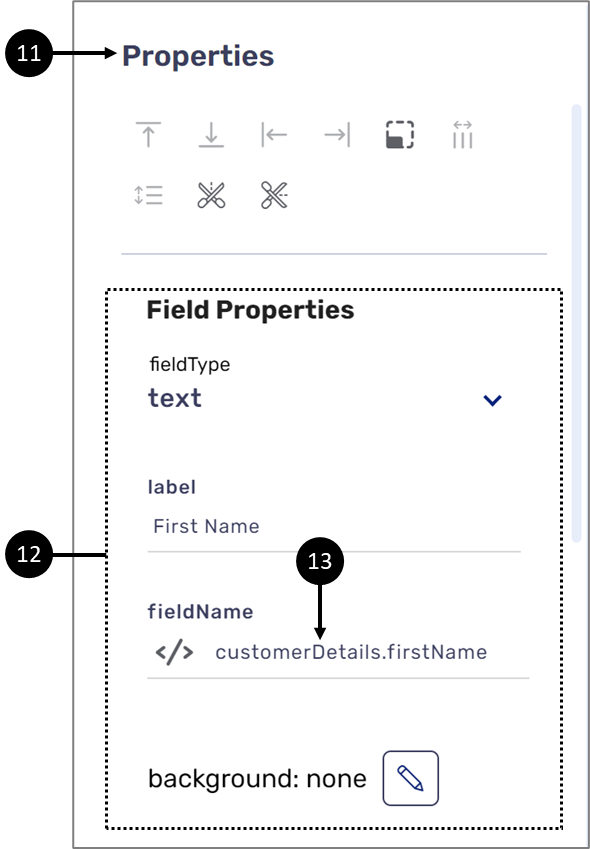
Figure 22: Connection to the Model
PDF Output Example
Figure 23 displays the structure of the Webflow. Three Main Page components, the first two contain Containers, Grids, and Text Input components that the end user will use to input information. The third Main Page contains the Preview component that will display the PDF with the output:
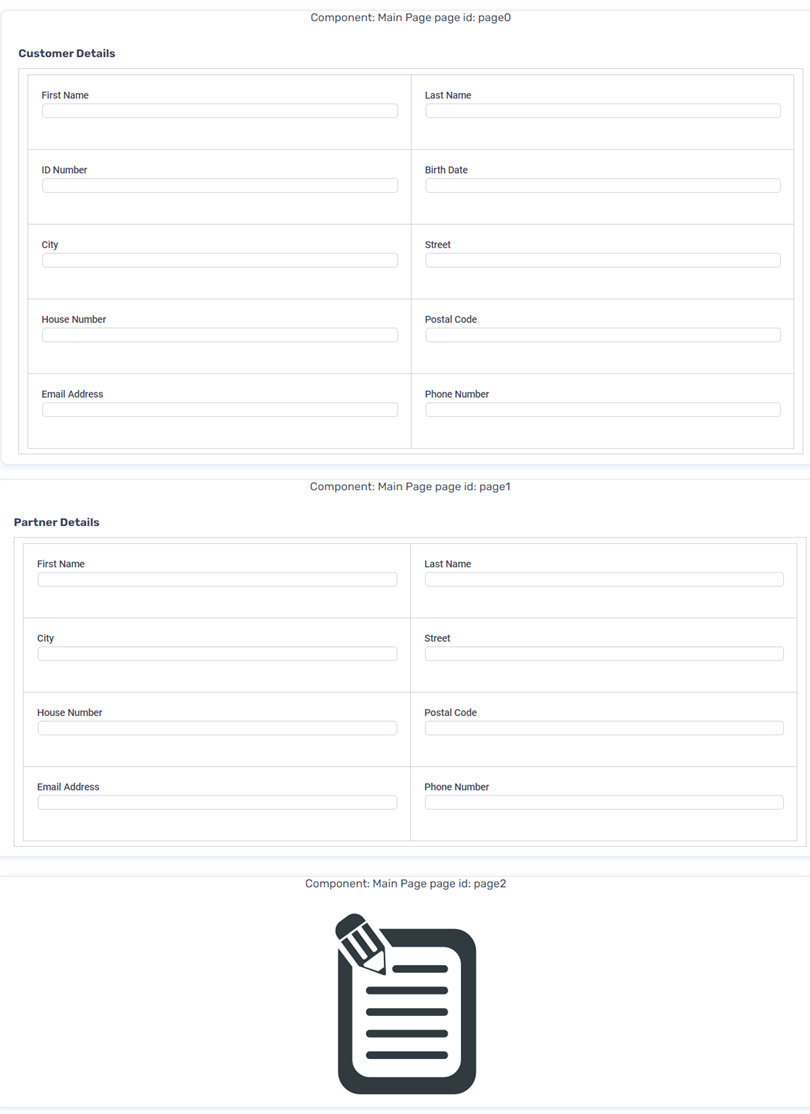
Figure 23: Webflow
The Preview component must be connected to the PDF form (see Figure 24 to Figure 27):
- Click the Preview component
Result:
The Properties section appears:
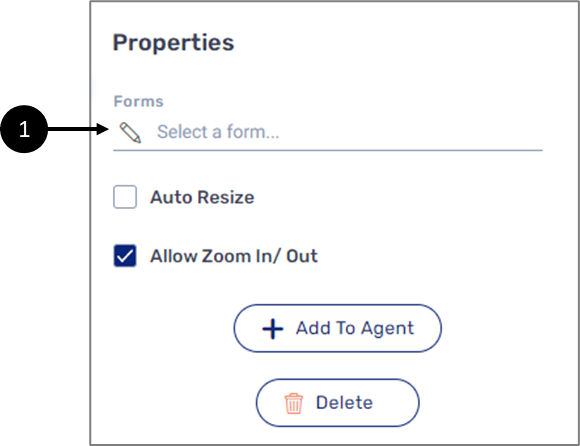
Figure 24: Properties Section
- Click the pencil (1).
Result:
The + Add button appears:

Figure 25: The + Add Button
- Click the +Add button (2).
Result:
The Form dropdown appears:
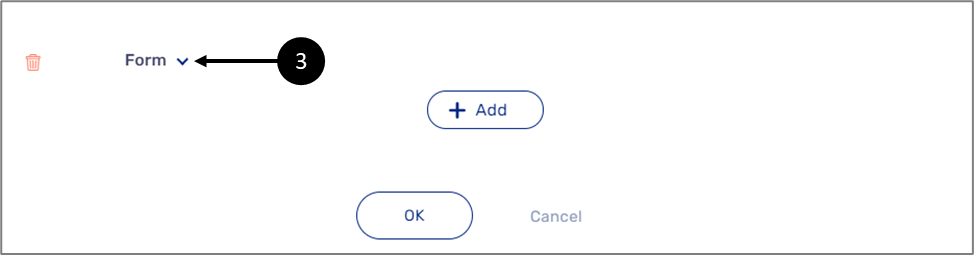
Figure 26: The + Add Button
- Click the Form dropdown (3).
Result:
A list of available forms (4) appears:
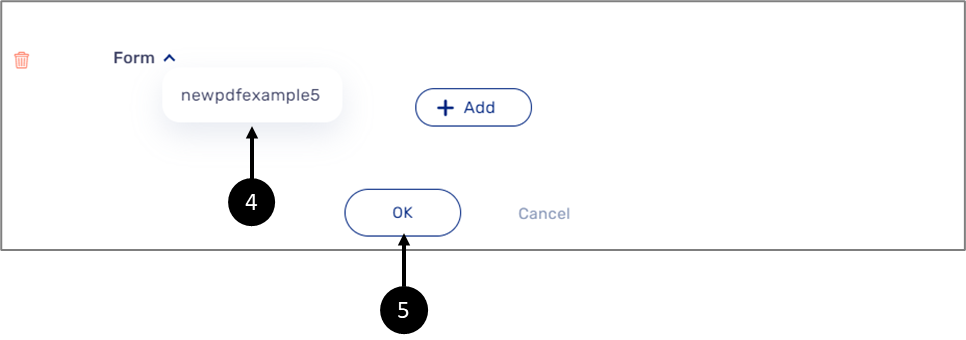
Figure 27: Forms
- Select the desired form.
- Click the Ok button (5).
Result:
The form is attached to the Preview component.
Figure 28 and Figure 29 display the digital process in which the end user inputs the information:

Figure 28: Digital Process Page 1
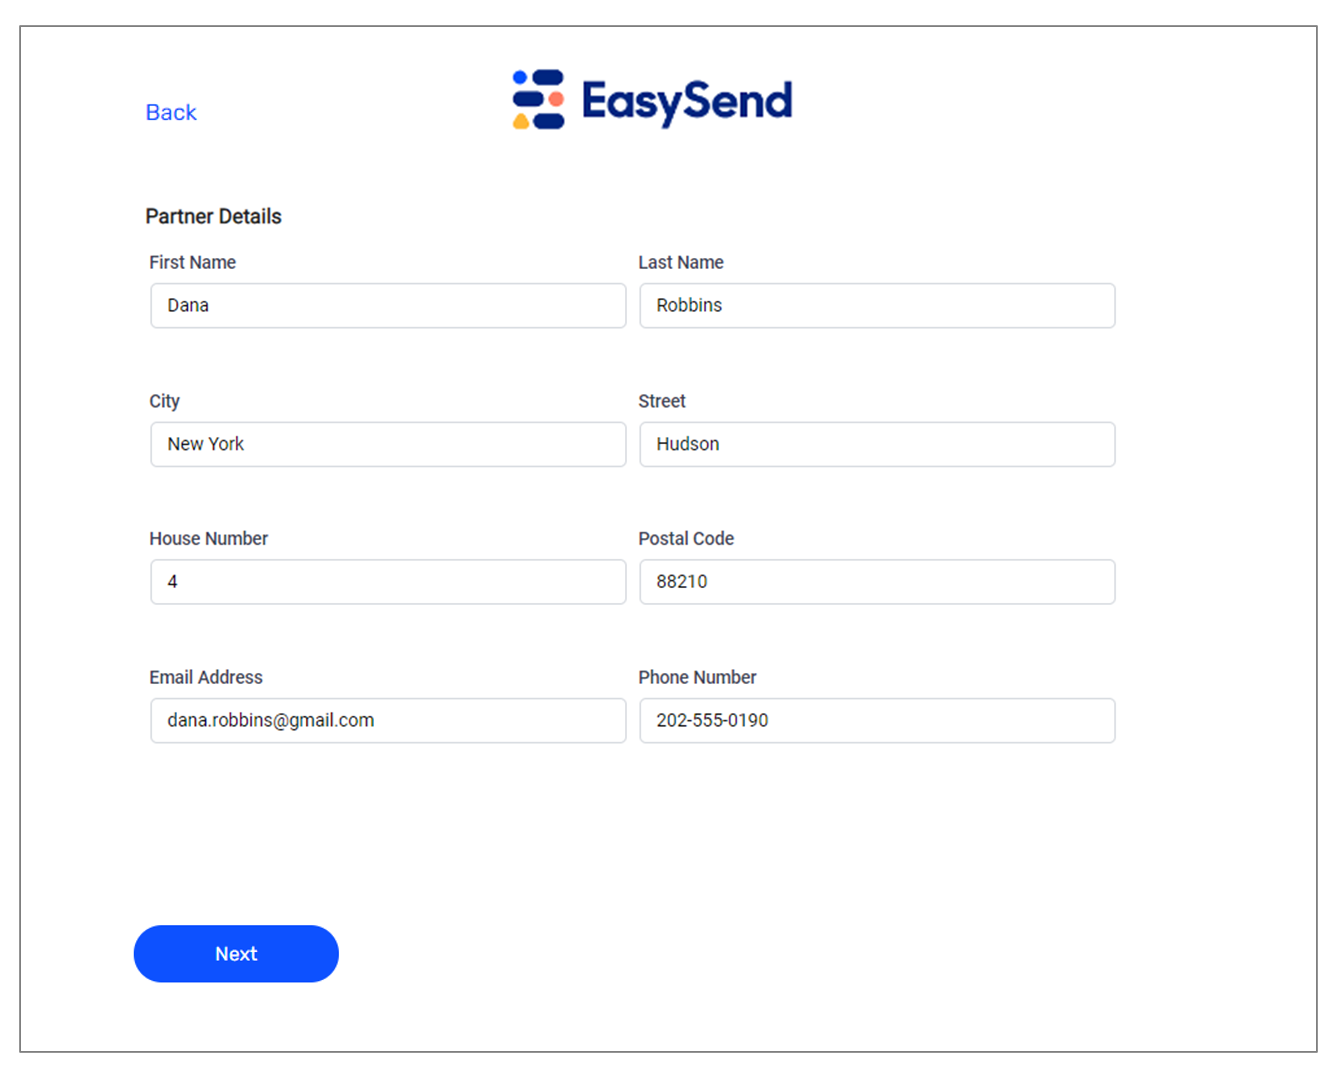
Figure 29: Digital Process Page 2
Figure 30 displays the PDF with the output:

Figure 30: PDF with Output
Connecting PDF Pages to the Model
When a Webflow is implemented with Model conditioning, the output of the conditioning must also be reflected on the PDF as well. For example, a Webflow is built with three Main Page components. The first Main Page contains Text Input components for customer details and a Radio Question component with a yes or no question. The visibility of the second Main Page depends on the answer to the Radio Question. If yes, the second Main Page will be displayed and then the Third Main Page, and if no, the second Main Page will be skipped (see Figure 31):
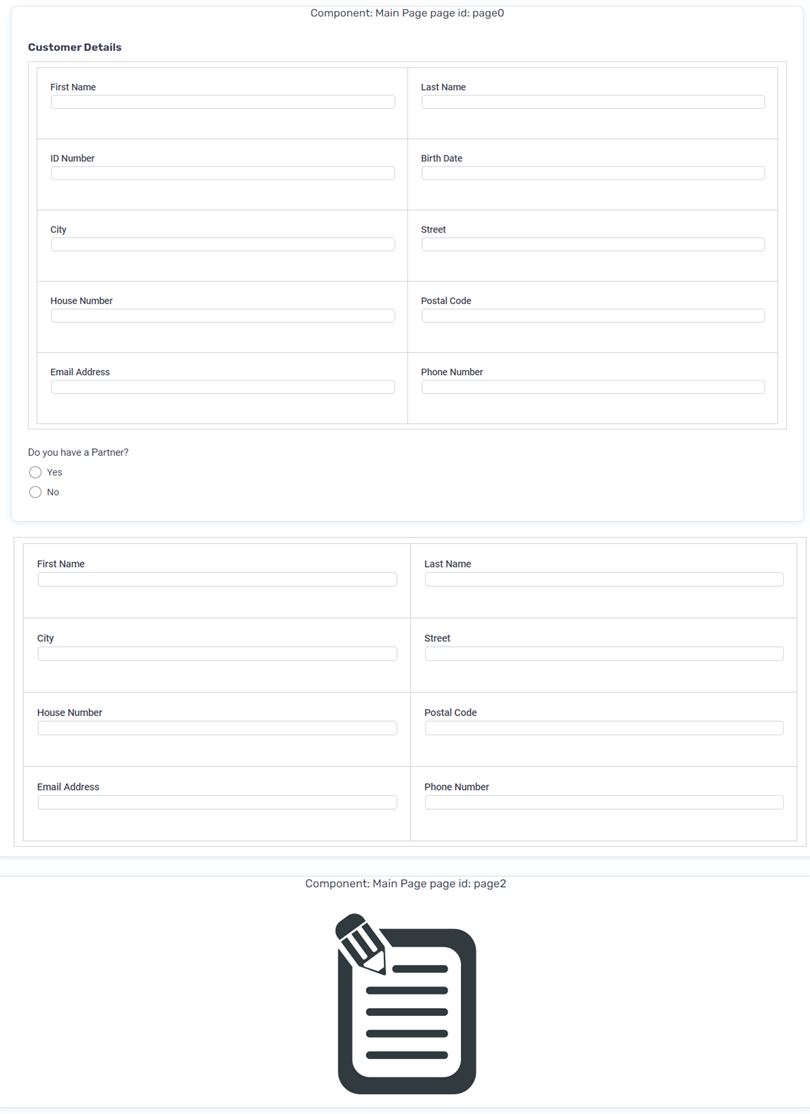
Figure 31: Webflow
To enforce the logic, the transaction data item (1) connected to the second Main Page must be implemented with conditioning (2) (see Figure 32):
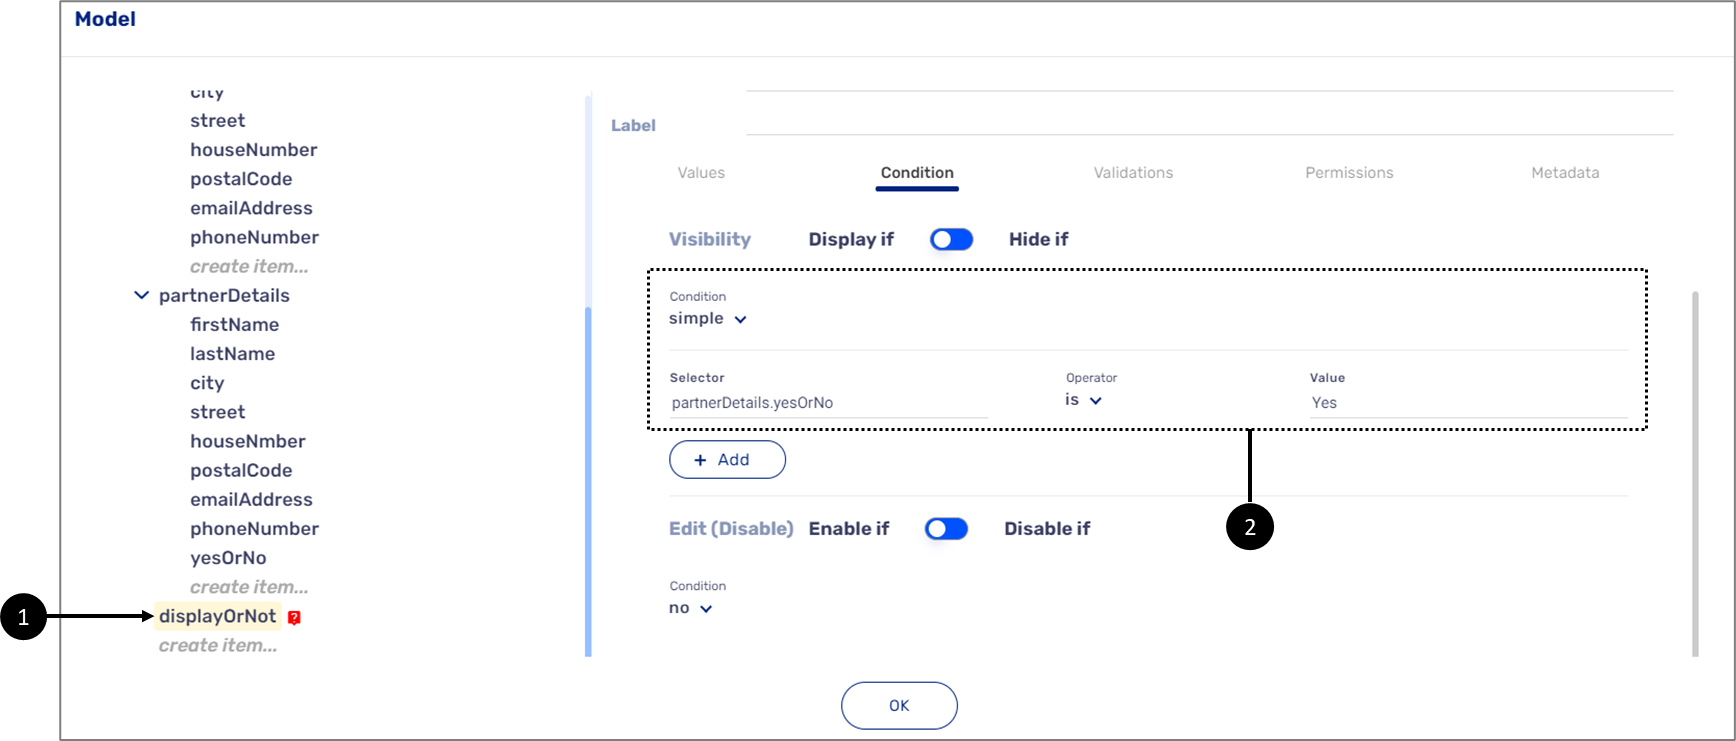
Figure 32: Model
The same conditioning must also be reflected on the PDF. The form attached to the Preview components contains two pages. The first page (1) for the customer details and second page (2) for the partner details (see Figure 33):
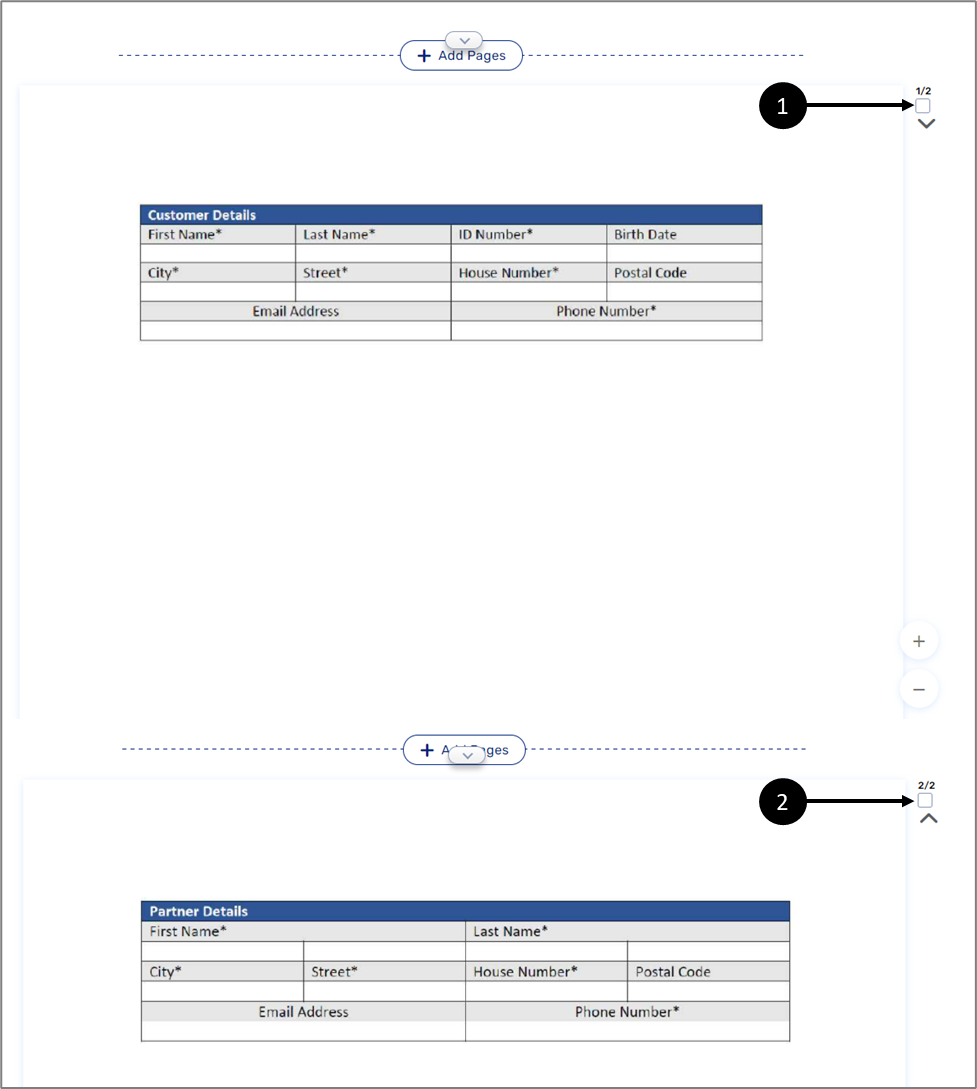
Figure 33: PDF Pages
The second page must also be connected to the Model so that the condition that was implemented on the second Main Page component will be implemented on it as well (see Figure 34 to Figure 37):
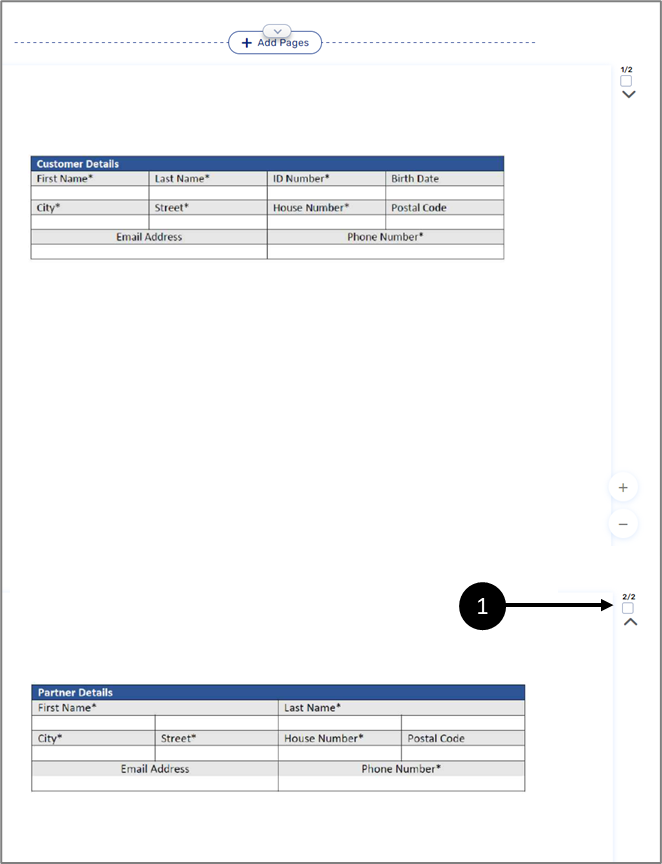
Figure 34: PDF Second Page
- Check the second page (2/2) checkbox (1).
Result:
The Page Properties appear (2):
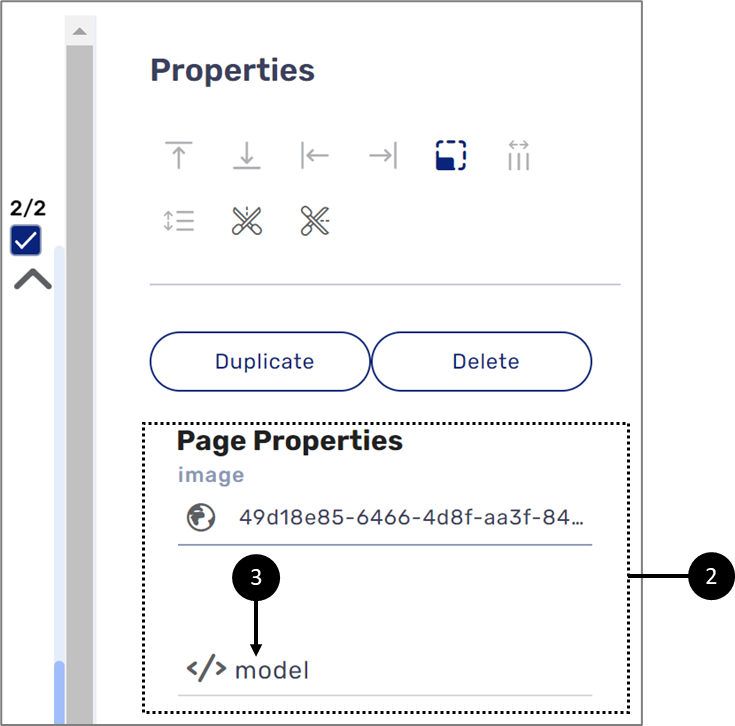
Figure 35: Page Properties
- Connect the page to the Model:
- Click the icon (3).
Result:
The Model main screen appears:
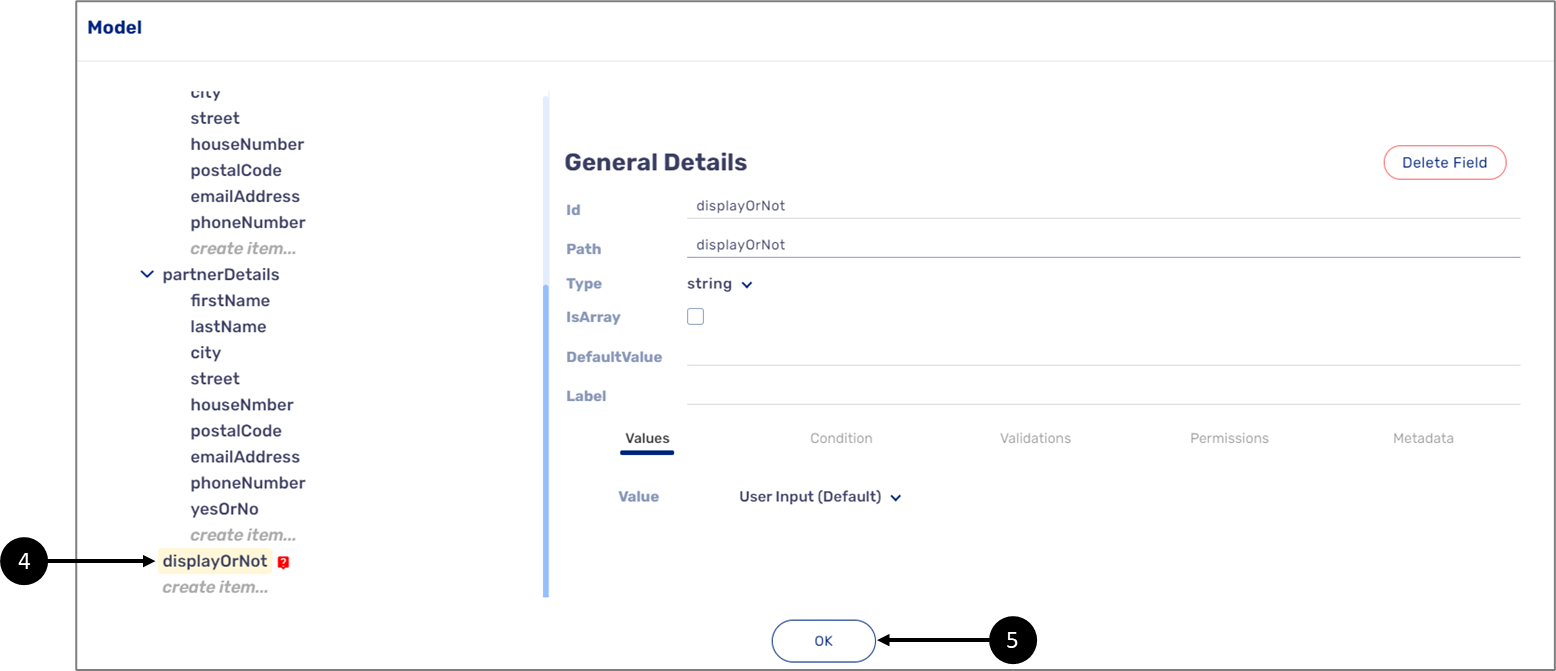
Figure 36: Model
- Click the appropriate transaction data item (4).
- Click the OK button (5).
Result:
The PDF main screen is displayed with the second page connected to the Model:
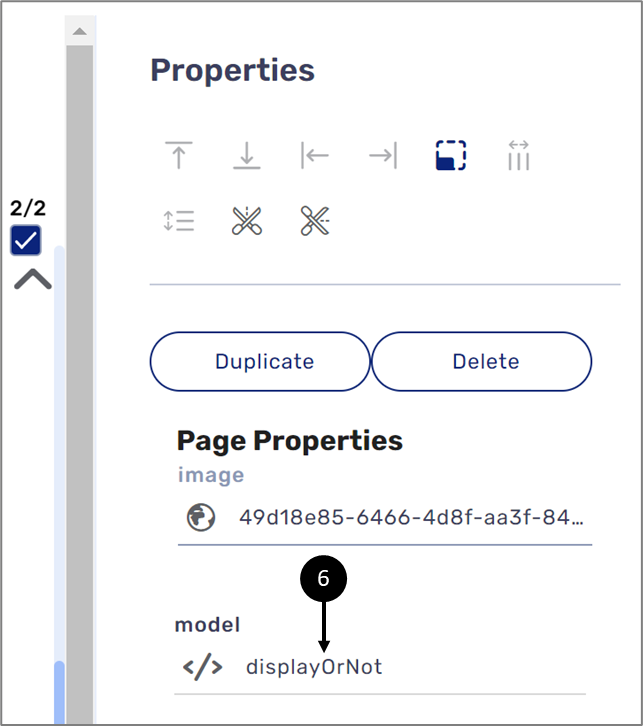
Figure 37: Page Properties Connected to the Model
Figure 38 displays the digital process in which the end user inputs the information. If the answer to the radio question (1) is Yes, then the second page will be displayed, and the user will input the information for the partner:
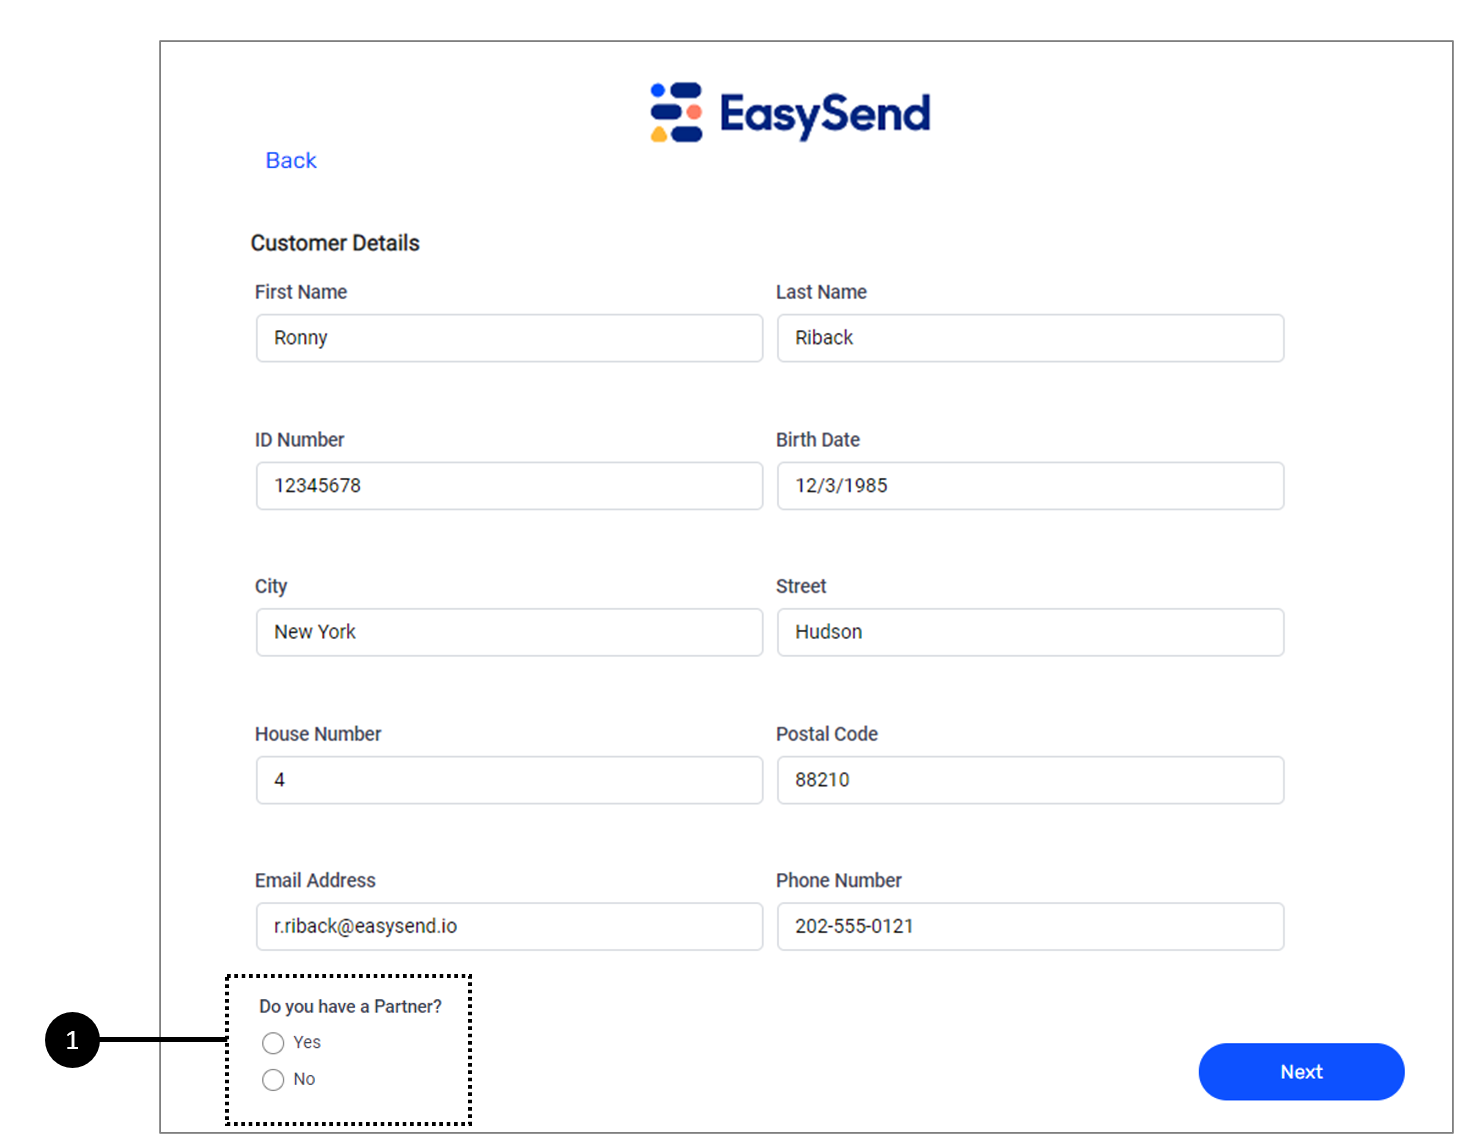
Figure 38: Digital Process Page 1
The same conditioning logic is also applied on the PDF. If the answer was Yes, then two pages are displayed with information (see Figure 39):
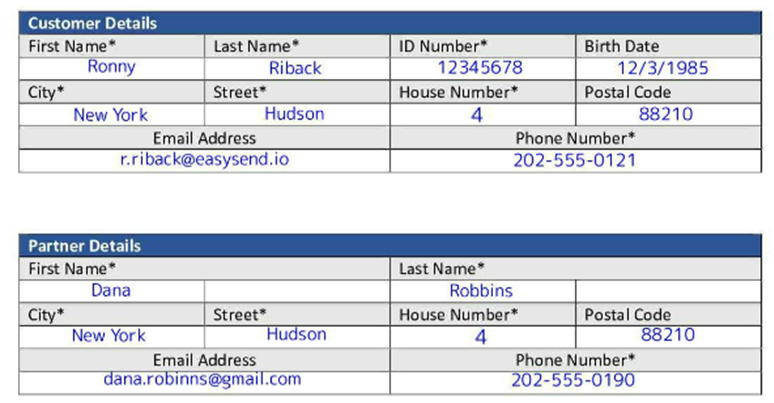
Figure 39: PDF with Two Pages Output
If the answer was No, only one page is displayed with information (see Figure 40):
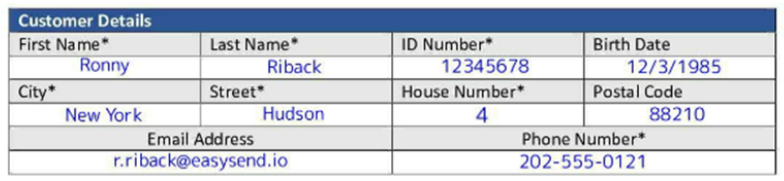
Figure 40: PDF with One Page Output
Troubleshooting
Table 7 describes malfunctions that may occur when trying to create new PDFs, define new PDF fields and connect them and the PDF pages to the Model. The table also describes the reason/s for the malfunctions and provides possible solutions.
Table 7: Troubleshooting
Number | Malfunction | Reason/s | Solution/s |
1 | Cannot create a new PDF | The name of the new PDF already exists | Create the new PDF and provide a new name as described in the Creating a PDF Form section |
2 | Cannot deploy the digital process | A PDF is not attached to the Preview component | Attach a PDF form to the Preview component as described in the PDF Output Example section |
3 | The digital process is stuck on generating a preview | The PDF fields are not connected to the Model properly | Connect the PDF fields PDF to the Model as described in the How to define and Connect PDF Fields? section |
4 | The PDF does not display any Output | The PDF fields are not connected to the Model properly | Connect the PDF fields to the Model as described in the How to define and Connect PDF Fields? section |
5 | The PDF pages are not behaving according to the implemented Model logic | The Pages of the PDF are not connected to the Model properly | Connect the PDF pages to the Model as described in the Connecting PDF Pages to the Model section |
How to Videos
To quickly learn about the structure of the PDF screen and about its features, watch the following videos.
- Creating a PDF:
- PDF Screen Overview:
- Vertical/Horizontal Slicer:
- Select:
- Text Output:
- Signature Output:
- Image Output:
- X Mark Output:
- O Mark Output: