Article Overview
This article describes how to add a new business group and process and how to create a new Webflow. The article also details how to add components to a Webflow and how to configure its properties. The article also lists malfunctions that may occur when trying to perform the actions described in this article and their solutions.
Add a New Business Group
(See Figure 1 to Figure 3)
To add a new business group, perform the following steps:
- On the Process Manager screen (1), click the +New Business Group button (2).
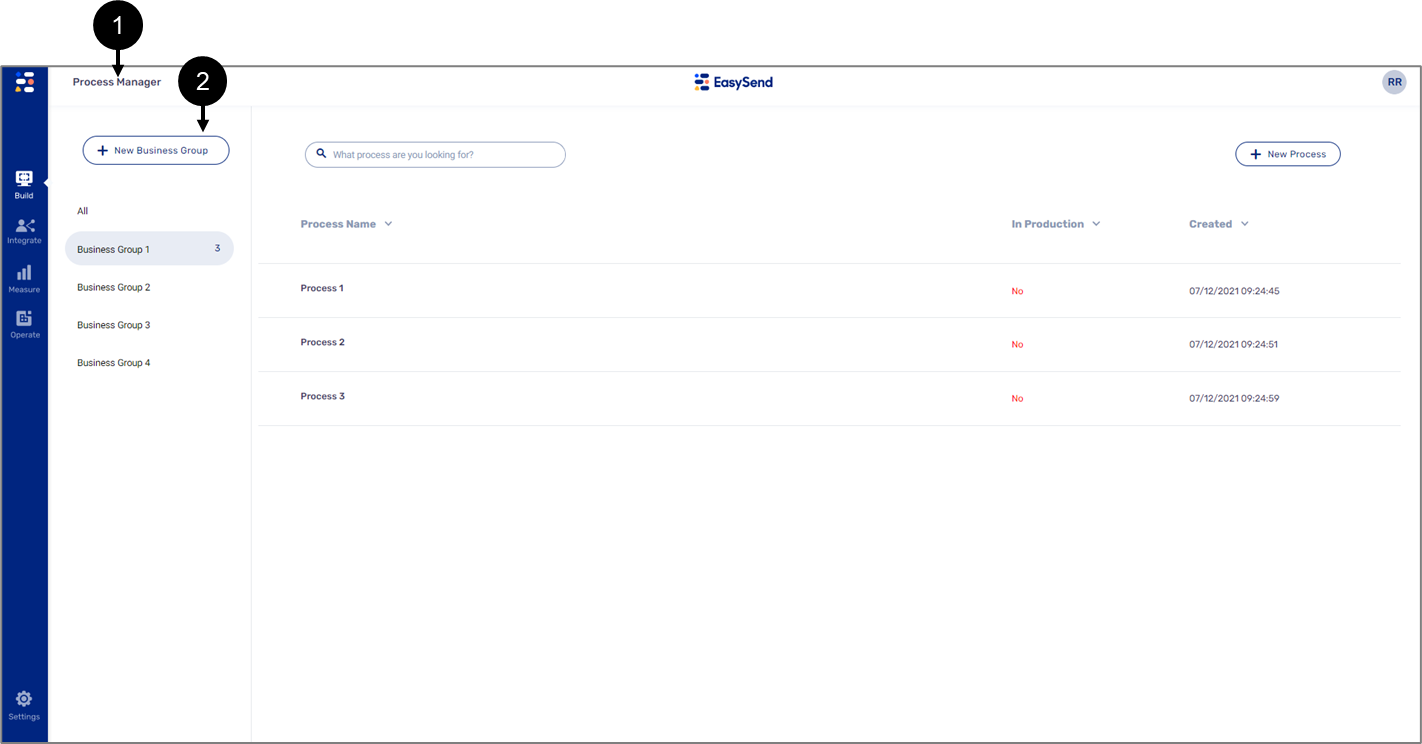
Figure 1: + New Business Group Button
Result:
The Business Group window appears:
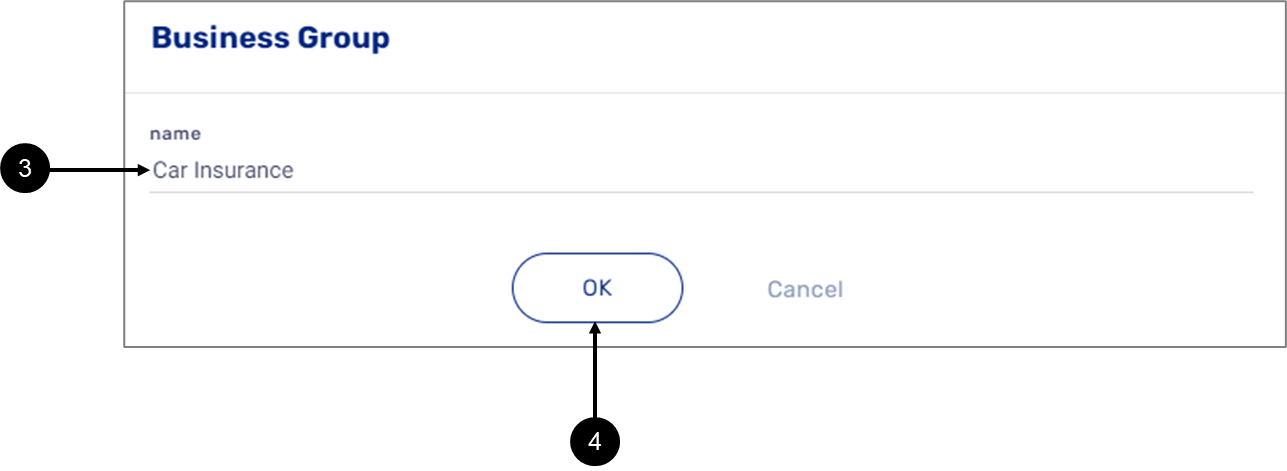
Figure 2: Business Group Window
- Enter the name (3) of the new business group.
- Click the OK button (4).
Result:
The new business group is added (5):
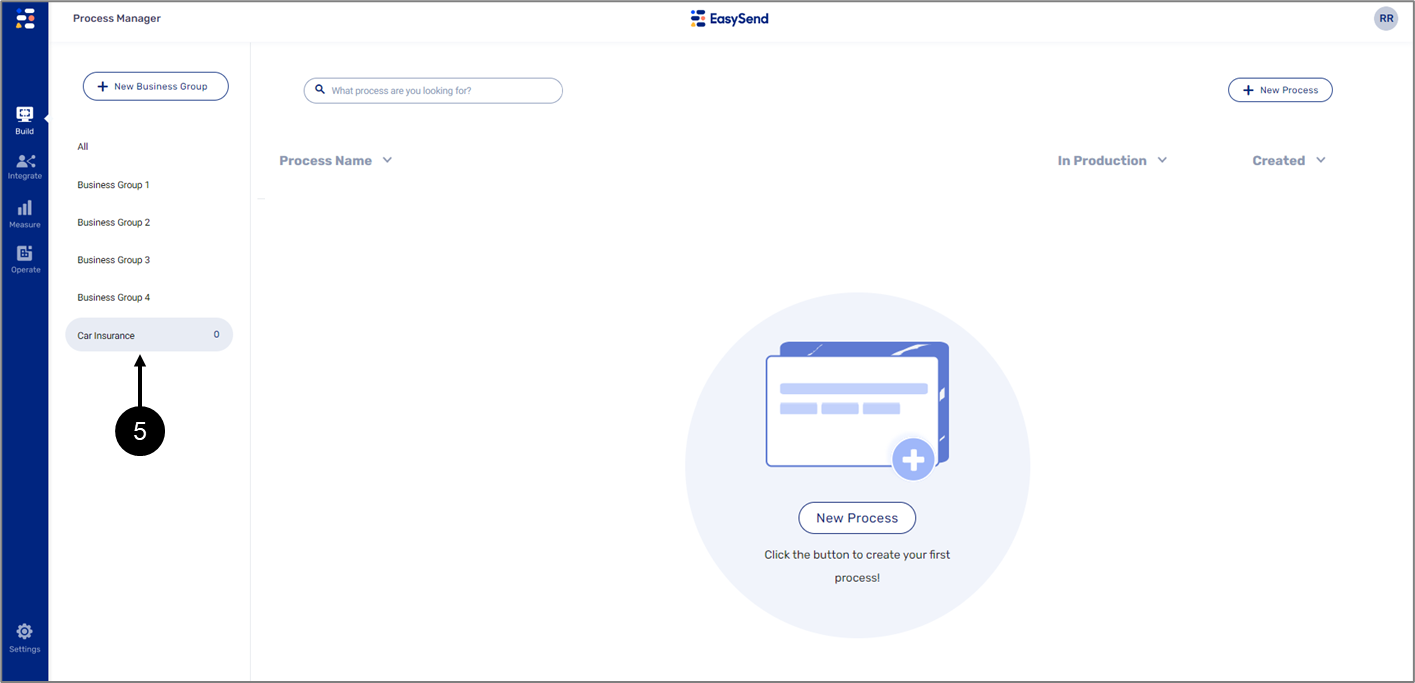
Figure 3: New Business Group
Add a New Process and Create a New Webflow
(See Figure 4 and Figure 5)
To add a new process and create a new Webflow, perform the following steps:
- Click the desired business group from the list (1).
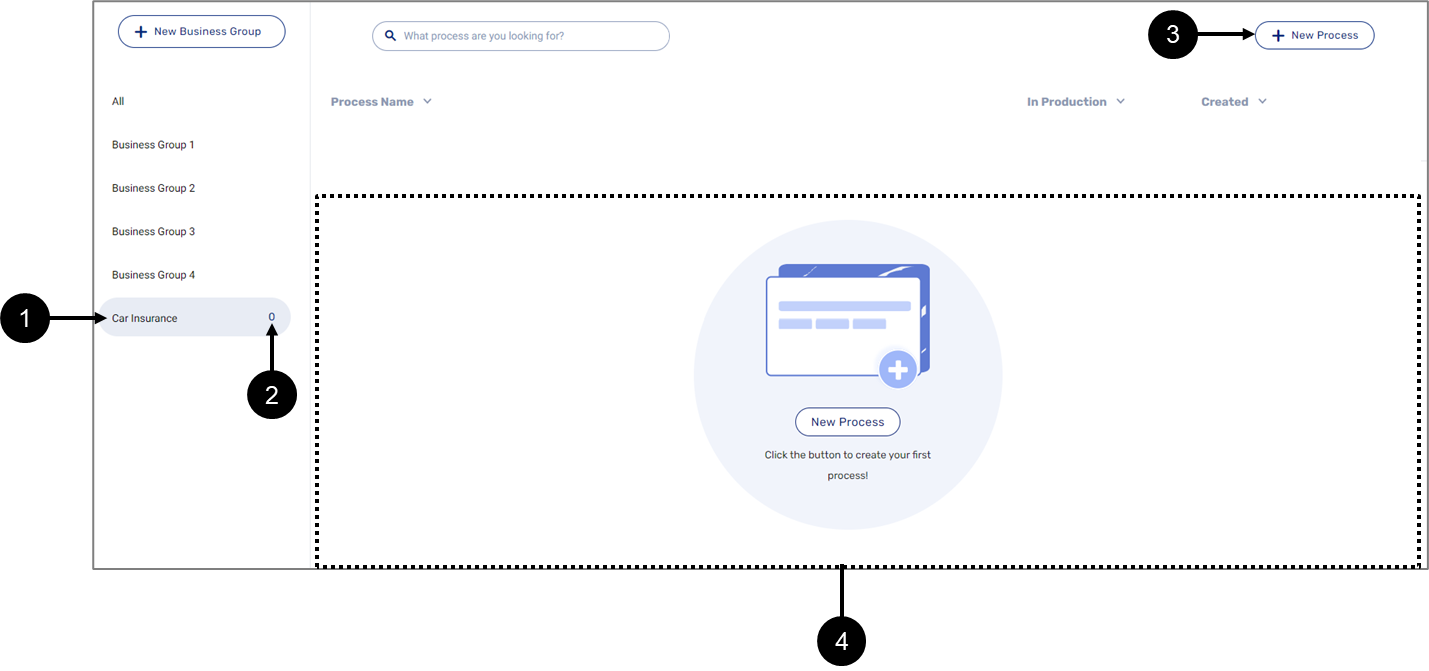 Figure 4: Selected Business Group
Result:
- The number of processes the business group has appears (2).
- The + New Process (3) becomes enabled.
- A request to add the first process appears (4).
If the business group already contains processes, once a business group is selected, its processes will be displayed in a list instead of the request to add a new process.
- Click the + New Process (3 or 4).
Result:
The Create a Process window appears:
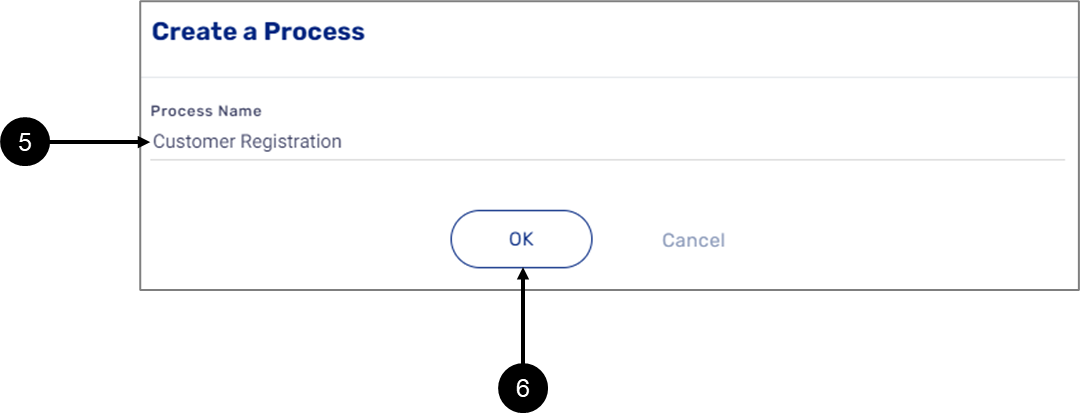
Figure 5: Create a process Window
- Enter the name (5) of the new process (it will be the name of the Webflow as well).
- Click the OK button (6).
Result:
The Webflow main screen appears.
- Within a process, a Webflow name must be unique.
- The Webflow name is only displayed internally.
- The Webflow Name is limited to 100 characters.
Selecting a Theme
(See Figure 6 to Figure 8)
To select a digital process theme, perform the following steps:

Figure 6: Process Settings Icon
- Click the Process Settings icon (1).
Result:
The Process Settings screen appears:
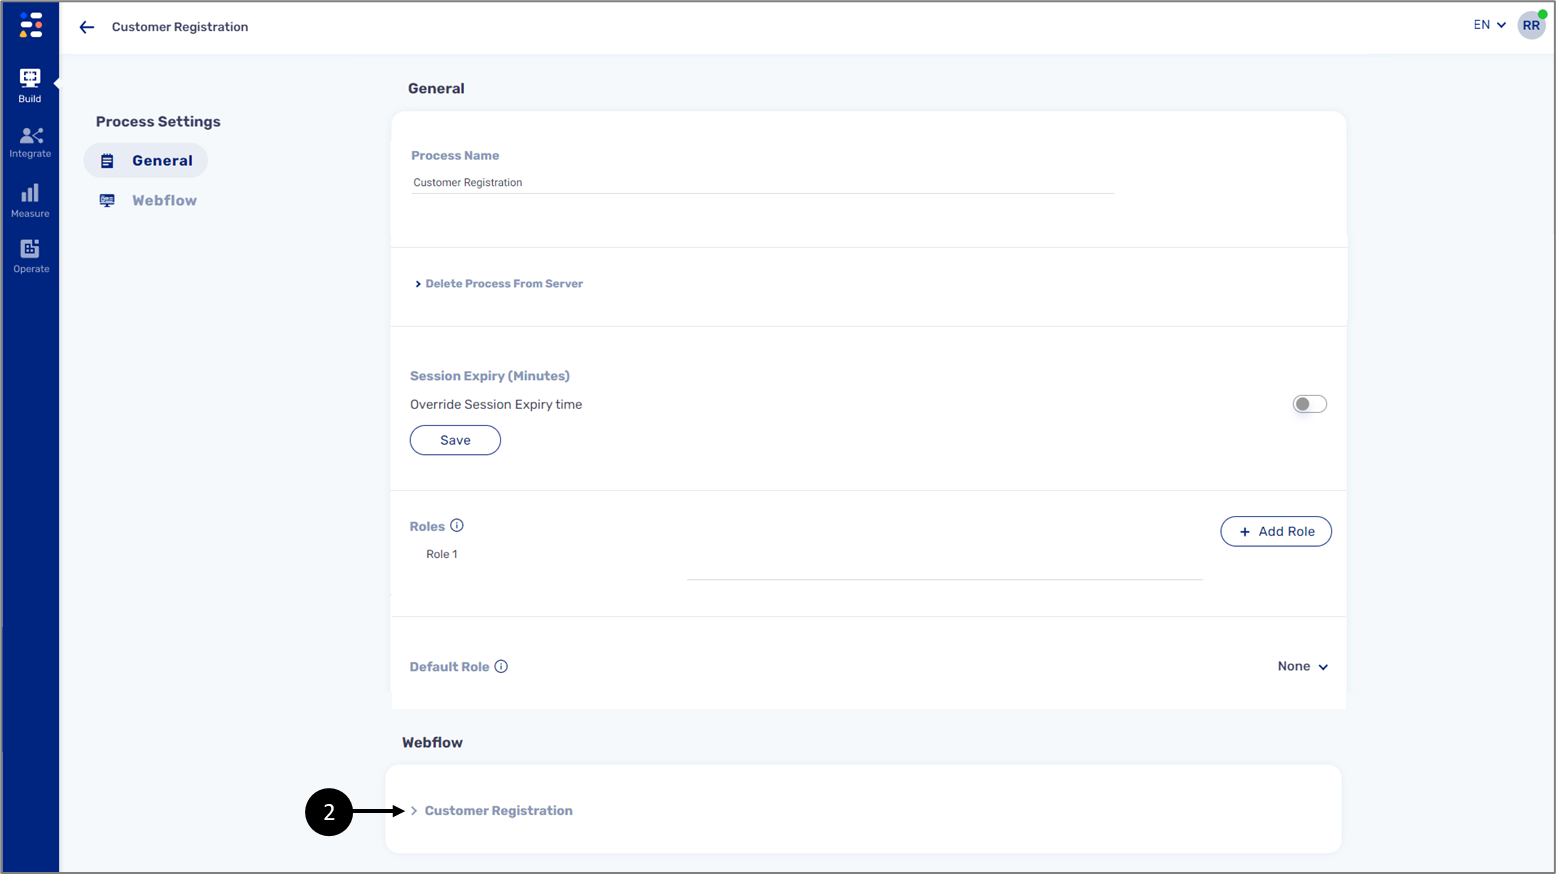
Figure 7: Webflow Dropdown
- Click the Webflow section (with the desired Webflow name) dropdown (2).
Result:
The Webflow section options appear:
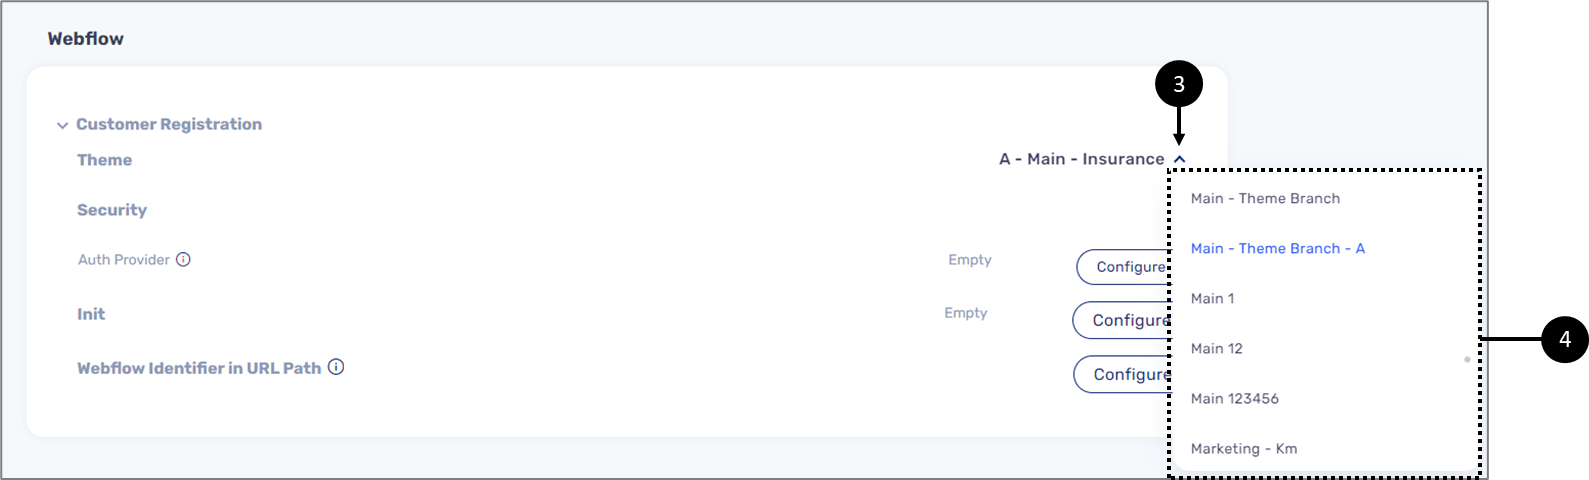
Figure 8: Selecting a Theme
- Click the Theme dropdown (3) and select the desired theme from the list (4).
Adding Components
(See Figure 9 and Figure 10)
When building a new Webflow only the page components will be available to add to the canvas at first, either by drag and drop (1) or by clicking the Add a new page button (2) and then clicking the appropriate component (3).
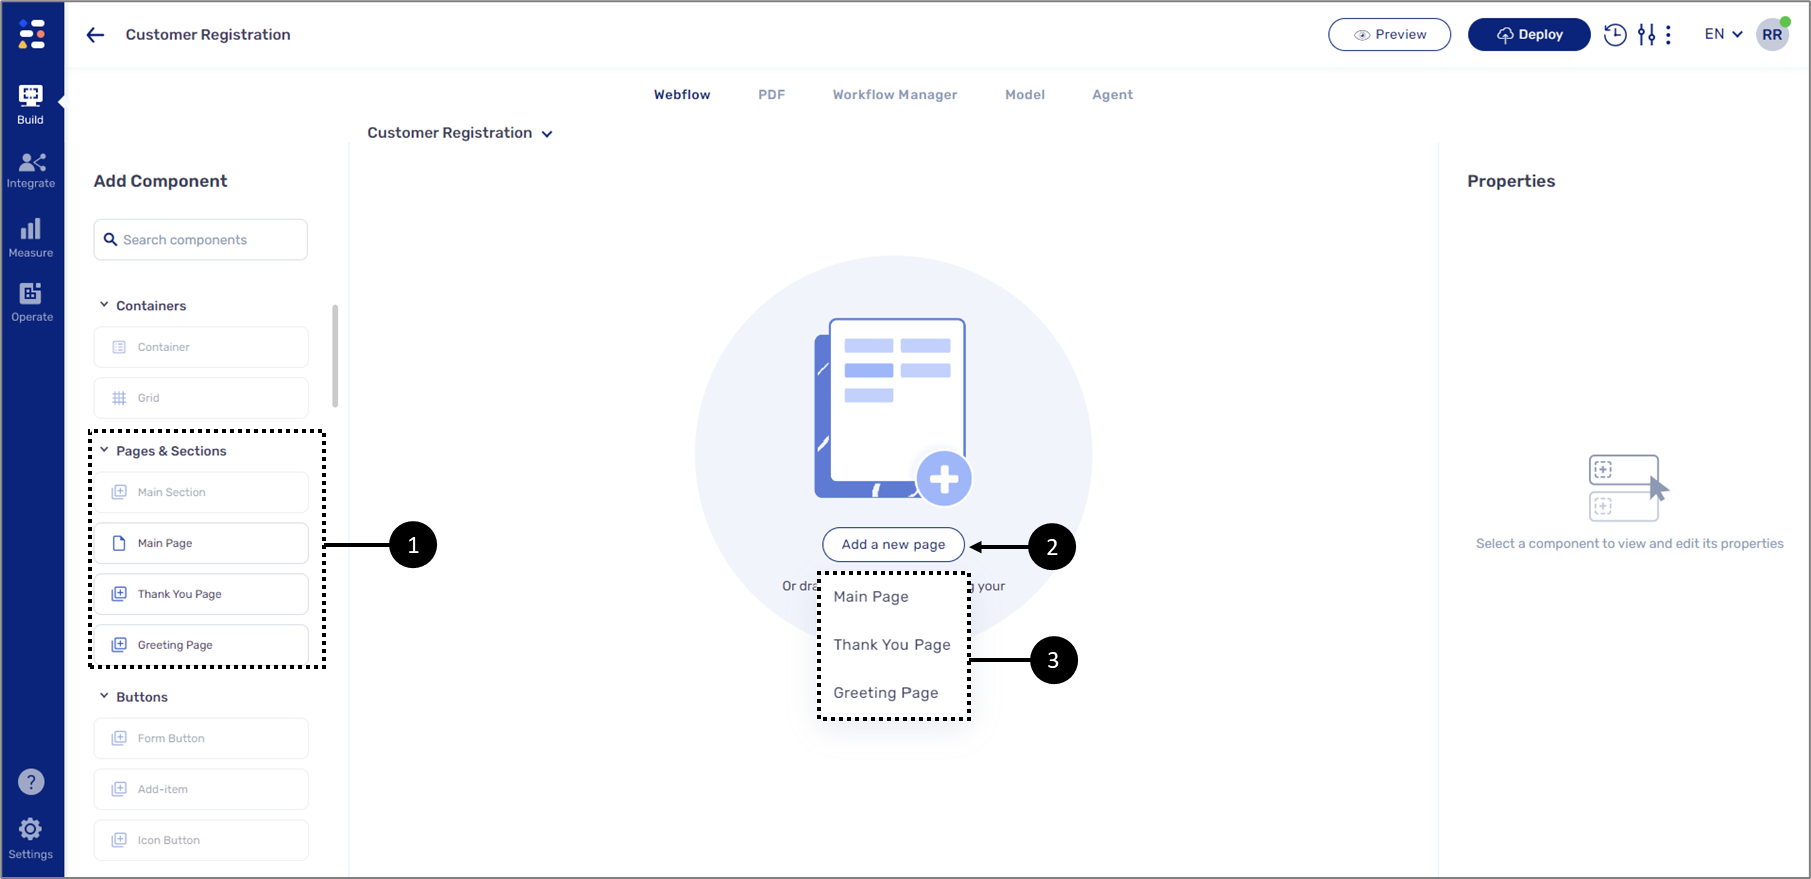
Figure 9: Adding Page Components
Once one of the page components is added the rest of the components become available and can be added on top of them by a drag and drop.
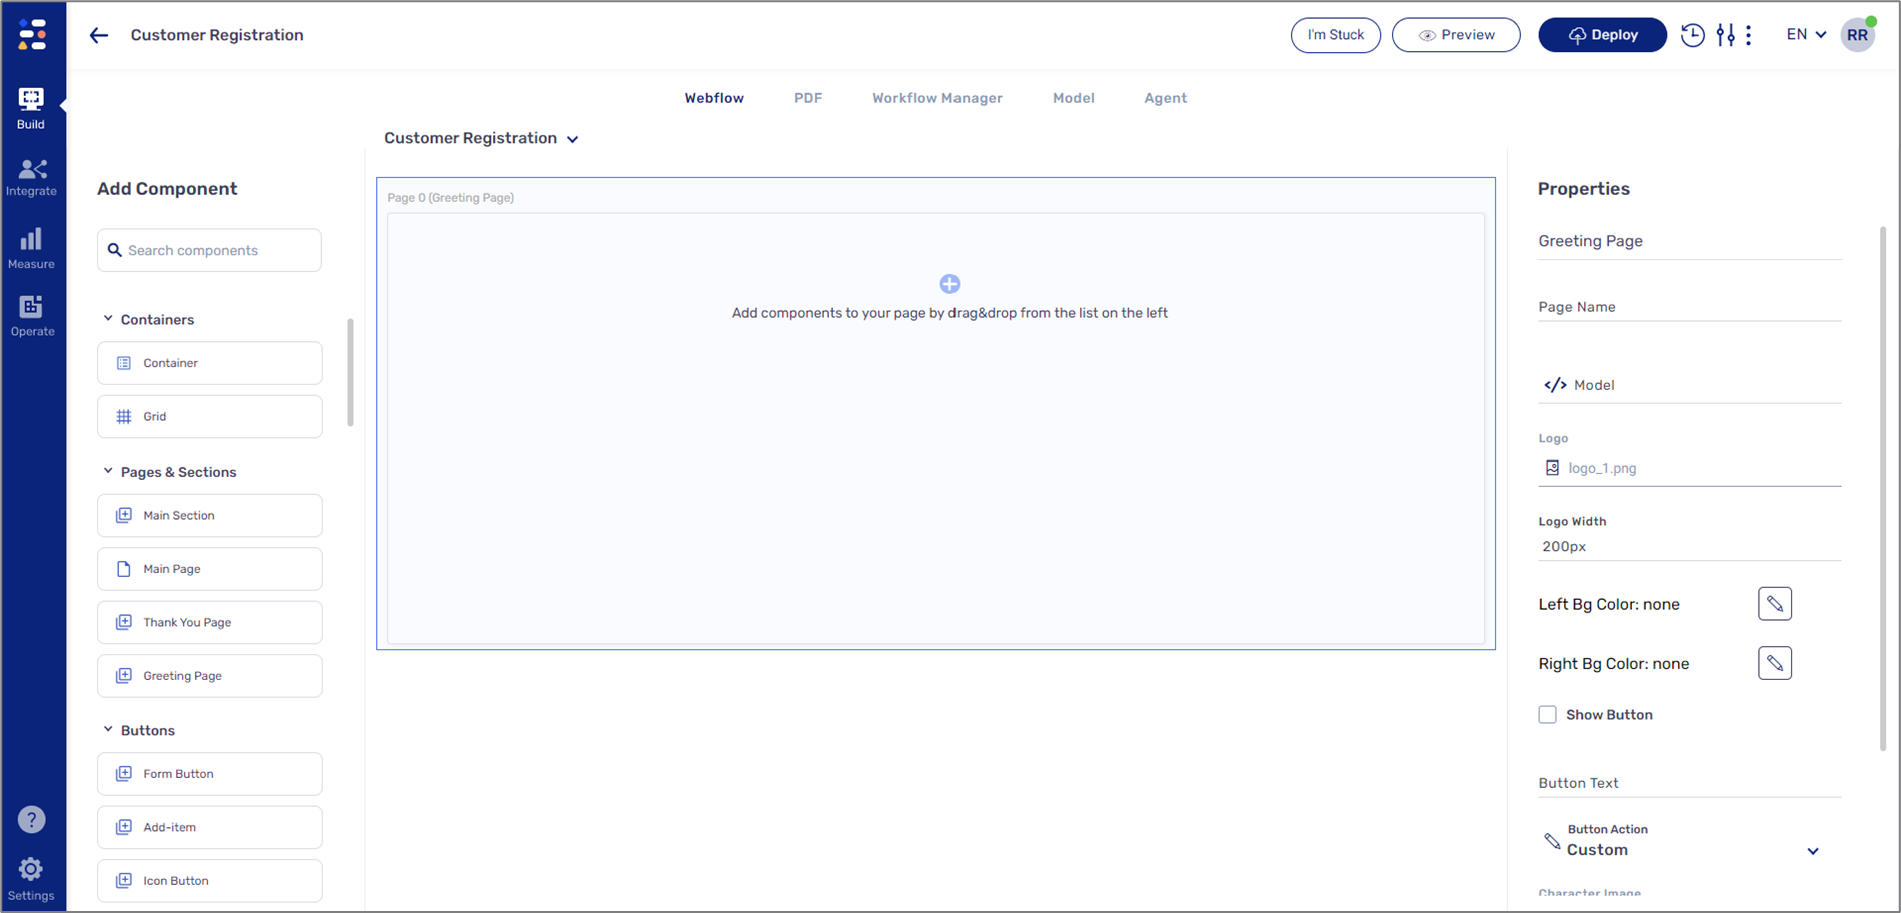
Figure 10: Adding All Components
Configuring the Properties Section
(See Figure 11 and Figure 12)
To configure the properties of an added component, perform the following steps:
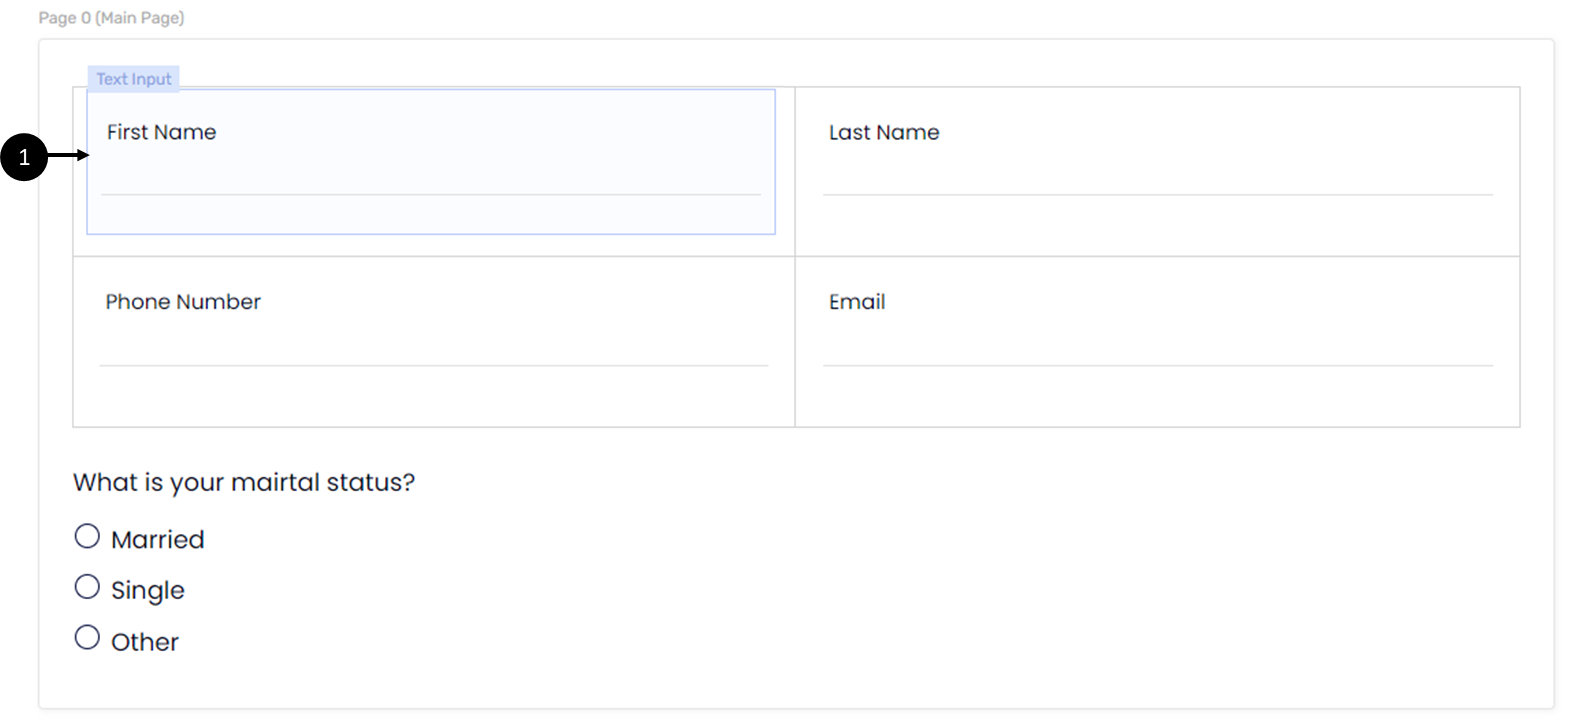
Figure 11: Added Components
- Click the desired component from the components added to the canvas (1).
Result:
The Properties section appears:
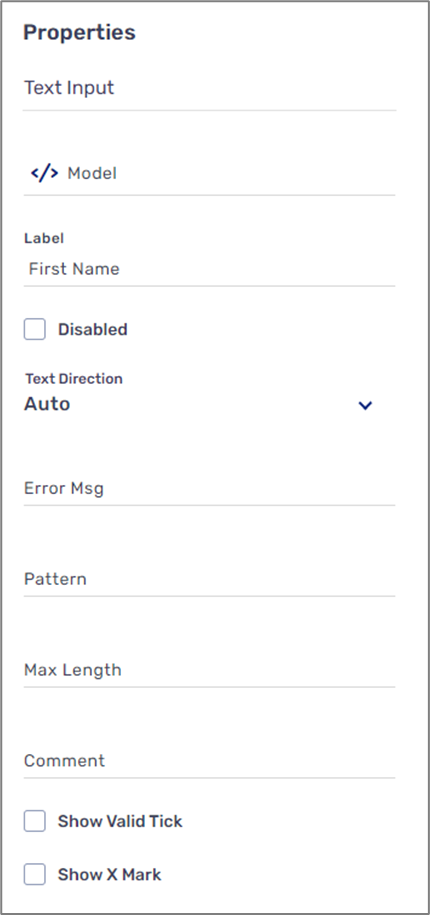
Figure 12: Example Properties Section
- Edit the desired properties.
- Connect the component to the Model (for additional information see the Setting Up the Model article).
- Repeat steps 1 to 3 for every added component.
Troubleshooting
Table 1 describes malfunctions that may occur when trying to create a Webflow, adding components, and editing properties. The table also describes the reason/s for the malfunctions and provides possible solutions.
Table 1: Troubleshooting
Number | Malfunction | Reason/s | Solution/s |
1 | A Webflow is not created automatically when creating a new process | A Webflow with the same name already exists in the environment | Create a new Webflow according to the instructions described in the How to Create a Webflow section |
2 | Most of the components are disabled | A page was not added yet | Add components according to the instructions described in the Adding Components section |
3 | Some Components are missing, or their design is incorrect | The wrong theme is selected | Select the appropriate theme according to the instructions described in the Selecting a Theme section |
4 | The components in the grid displayed in the wrong direction | The properties of the Grid component are not set correctly | Set the properties of the Grid component. Read the details described in the Layout Components Properties article |
5 | Problem displaying the Webflow on a mobile device | The direction property of the Grid component is not set correctly | Set the properties of the Grid component. Read the details described in the Layout Components Properties article |
6 | Cannot add certain components like buttons, Multiple Choice, and other components to the canvas | Must of the components can only be add onto a Main Page, Greeting Page, and Container components | Add components according to the instructions described in the Adding Components section |
7 | The buttons on the Main Page do not appear | The buttons properties of the Main Page are not set correctly | Set the button properties of the Main Page component. Read the details described in the Layout Components Properties article |
8 | The Co-browsing button does not appear | The Co-browsing property of the Main Page are not set correctly | Set the Co-browsing property of the Main Page component. Read the details described in the Layout Components Properties article |
9 | The value of the Radio Question options is not returned correctly | The Text and the Value of the Radio Question component options does no match | Set the options of the Radio Question component. Read the details described in the Single Select Components Properties article |
10 | The image for the Dynamic Image component does not exist |
|
|
11 | The Br Component height is not applied | The height of the Br component is not written correctly | The height of the Br component must contain a number followed by px, for example: 10px. For additional information see the Other Components Properties article |
12 | Cannot upload files | The file type is not written in the acceptFileTypes property | Write the type of the file in the acceptFileTypes property. For additional information see the Input Components Properties article |
13 | The text direction of the Text Input component is wrong | The textDirection property of the Input Text component is not set to the appropriate direction | Set the appropriate text direction. For additional information see the Input Components Properties article |
14 | There is a limit on the number of characters allowed to input into the Text Input component | The maxLength property of the Input Text component is not set to the appropriate direction | Set the appropriate maximum length. For additional information see the Input Components Properties article |
15 | The numbering of the Progress Bar Steps are wrong | The numbering steps of the Progress Bar component have an offset of +1 | Set the first step of the Progress Bar component to zero. For additional information see the Layout Components Properties article |
16 | The Preview component prevents from deploying the Webflow | The Preview component must be connected to a PDF form | Connect the Preview Component to a PDF form. For additional information see the Media Components Properties article |
How to Videos
To quickly learn how to use different components to create a Webflow, watch the following videos.
Container Components
To quickly learn how to use Container components watch the following videos.
- Container Component:
- Grid Component:
Labels and Nun Input Components
To quickly learn how to use Labels and Nun Input components, watch the following videos.
- Preview:
- Rich Text:
Multiple Choice Components
To quickly learn how to use Multiple Choice components, watch the following videos:
- Checkbox Component:
- Radio Question:
Other Components
To quickly learn how to use Other components, watch the following videos.
- Text Input:
- Dynamic Image:
- Upload Component:
- Signature:
- Date Input:
Page and Sections Components
To quickly learn how to use Page and Sections components, watch the following videos.
- Greeting Page:
- Main Page:
- Main Section: