Article Overview
The following article describes the structure of the Services screen and the platform's services and integration capabilities.
Service Steps
(See Figure 1 and Figure 2)
When creating a new integration, you can use a variety of steps to perform different actions
- Code - manipulate service data using JavaScript
- File Storage Service - upload files to various storage types (for additional information, see the File Storage Service article)
- Rest Application Programming Interface (API) Service - communicate with an external service through a REST API call
- Computed Service - calculate expressions or values according to the defined conditions
- Email - add an email-sending event as part of the service
- EasySend Service - add an EasySend preconfigured event as a step of the service
- Structured query language (SQL) Query - run an SQL query in an external database
- File Encode/Decode - encode/decode files with
- Base 64
- Pretty Good Privacy (PGP)
- Rivest–Shamir–Adleman (RSA)
- JSON Web Encryption (JWE)
- JSON Web Token (JWT)
- Salesforce Service - run Select, Create, and Update queries on any Salesforce object (for additional information, see the Salesforce EasySend Two-way Integration article).
- Dataverse - run Select, Create, and Update queries on any Dataverse object (for additional information, see the Dynamics 365 EasySend Two-Way Integration article).
- Hashing - convert strings to hashed hexadecimal value with a Secure Hash Algorithm (SHA), for example, SHA512.
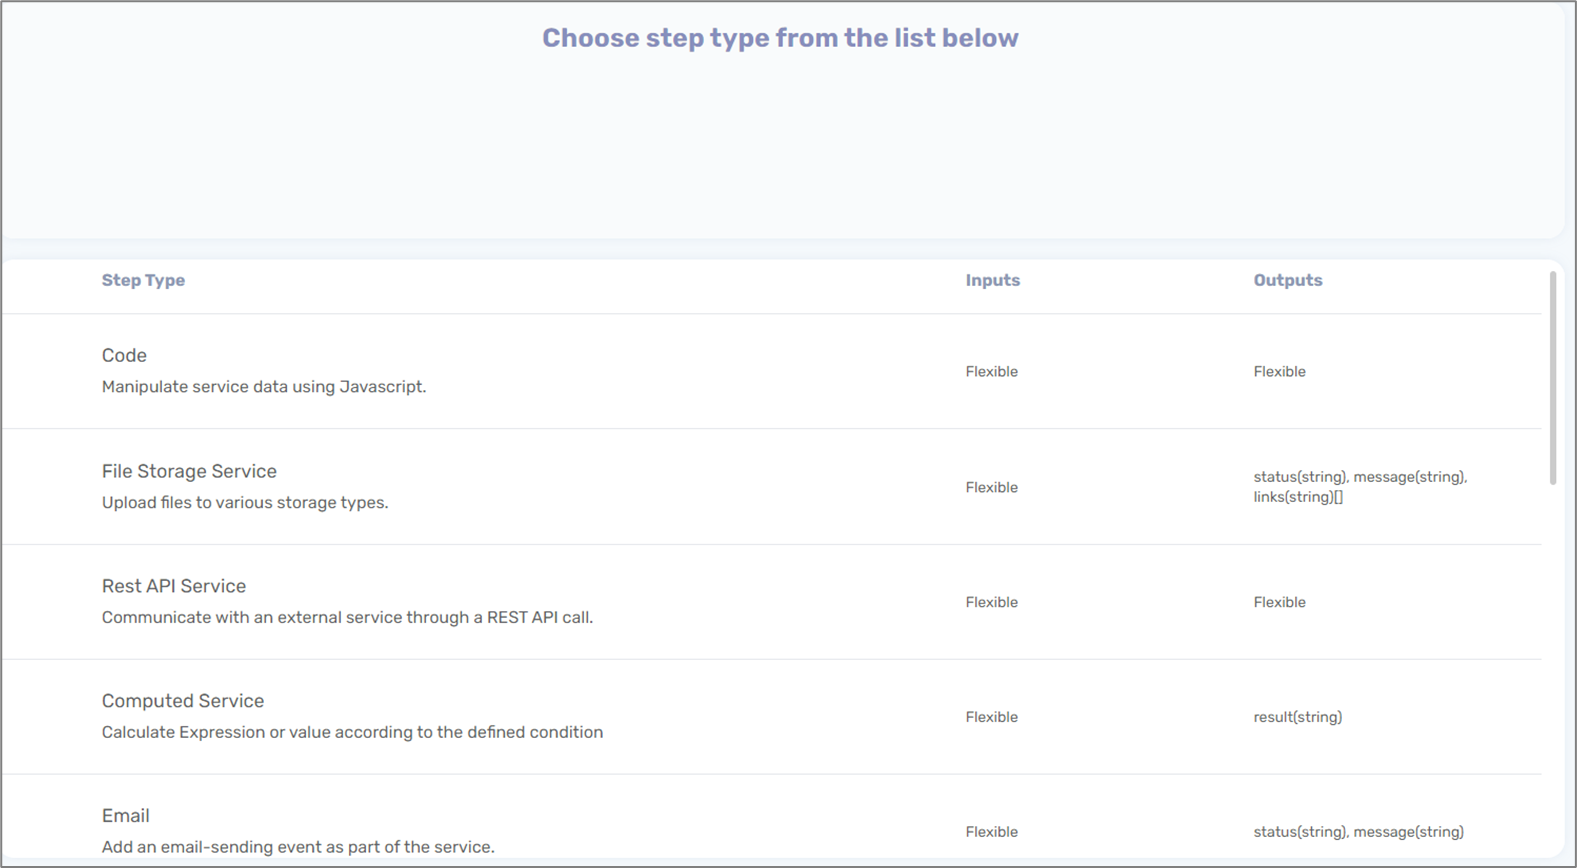
Figure 1: Service Steps
When selecting a step, a name must be provided, and then the selected step screen appears.

Figure 2: Naming a Step
Code Structure
(See Figure 3 to Figure 8)
A Code step contains three sections:
- Code (1)
- Inputs (2)
- Outputs (3)
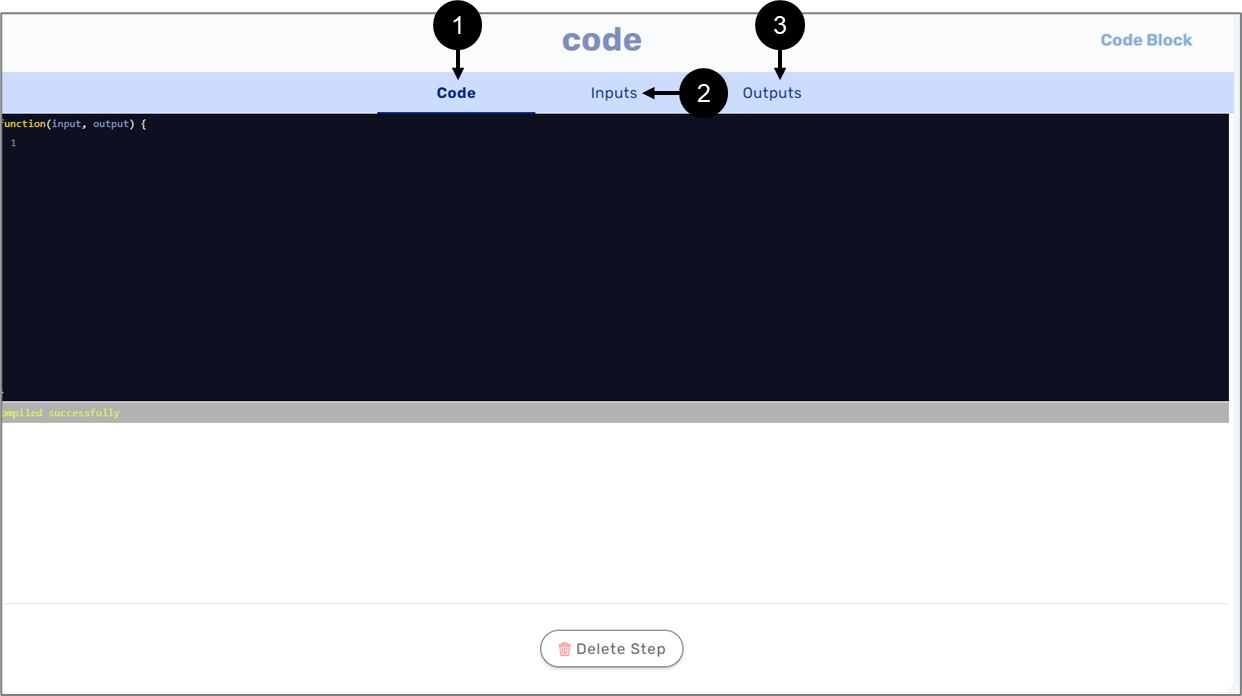
Figure 3: Code Step Structure
The Code section will be written in JavaScript. It can include and utilize variables that were created in the Input and Output sections.
When adding a new input variable, it must contain the following information:
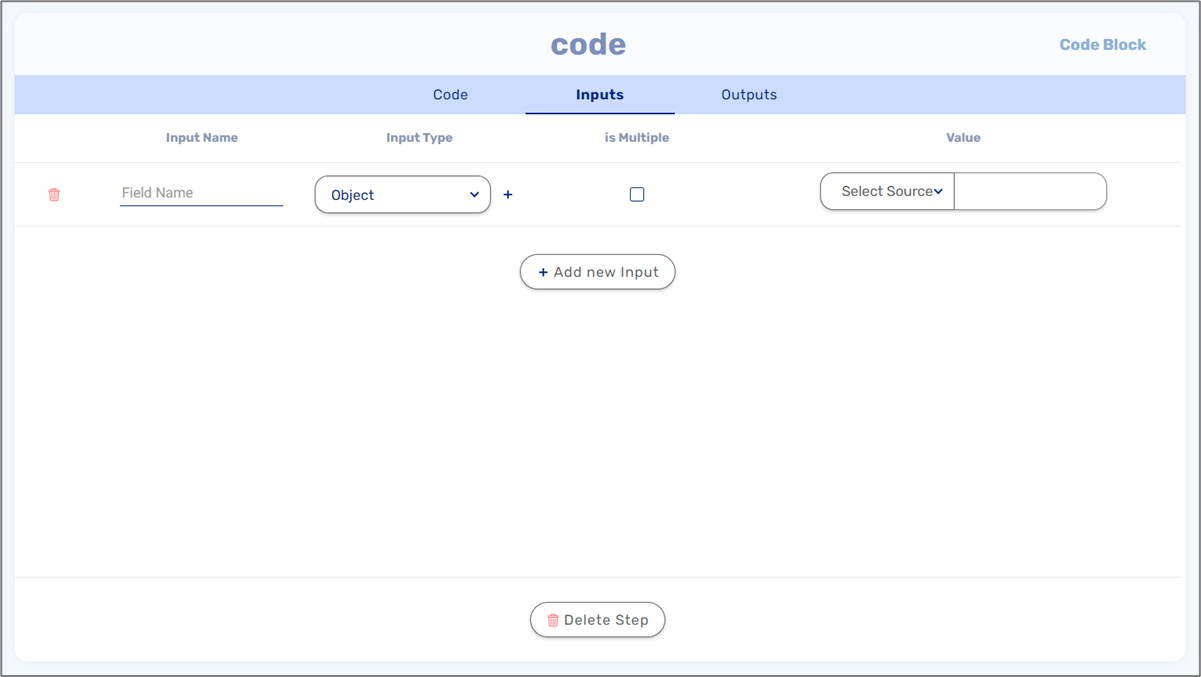
Figure 4: Inputs
- Field Name
- Input Type:
- String
- Number
- Boolean
- File
- Object - when an Object is selected, a plus icon appears. The icon lets you open the Model screen and select an object-type data item.
- Any
- Is Multiple:
- When checked - indicates the input is an array
- When not checked - indicates the input is not an array
- Select Source:
- Constant - static values, for example, for Boolean variables:
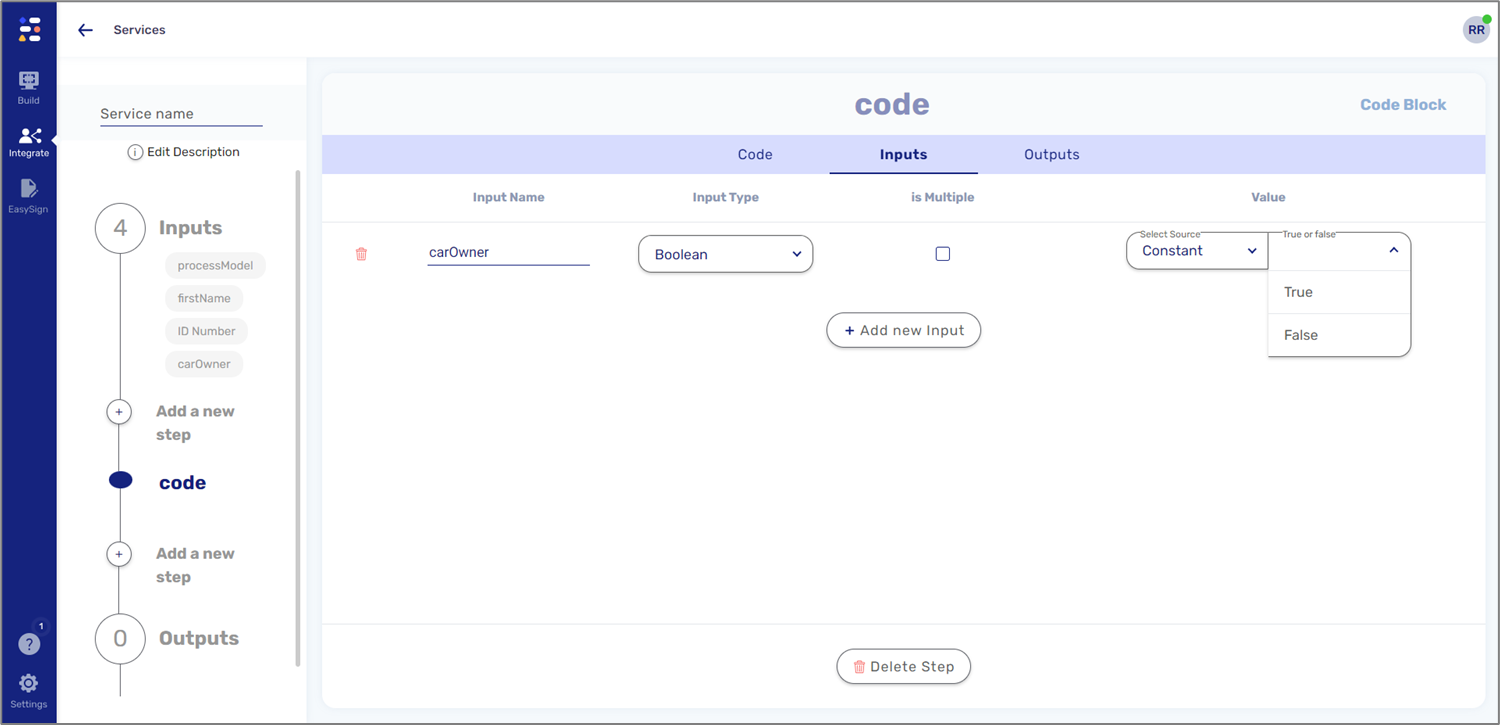
Figure 5: Source - Constant
- Model - items created in the Input section of the service the step was added to, for example:
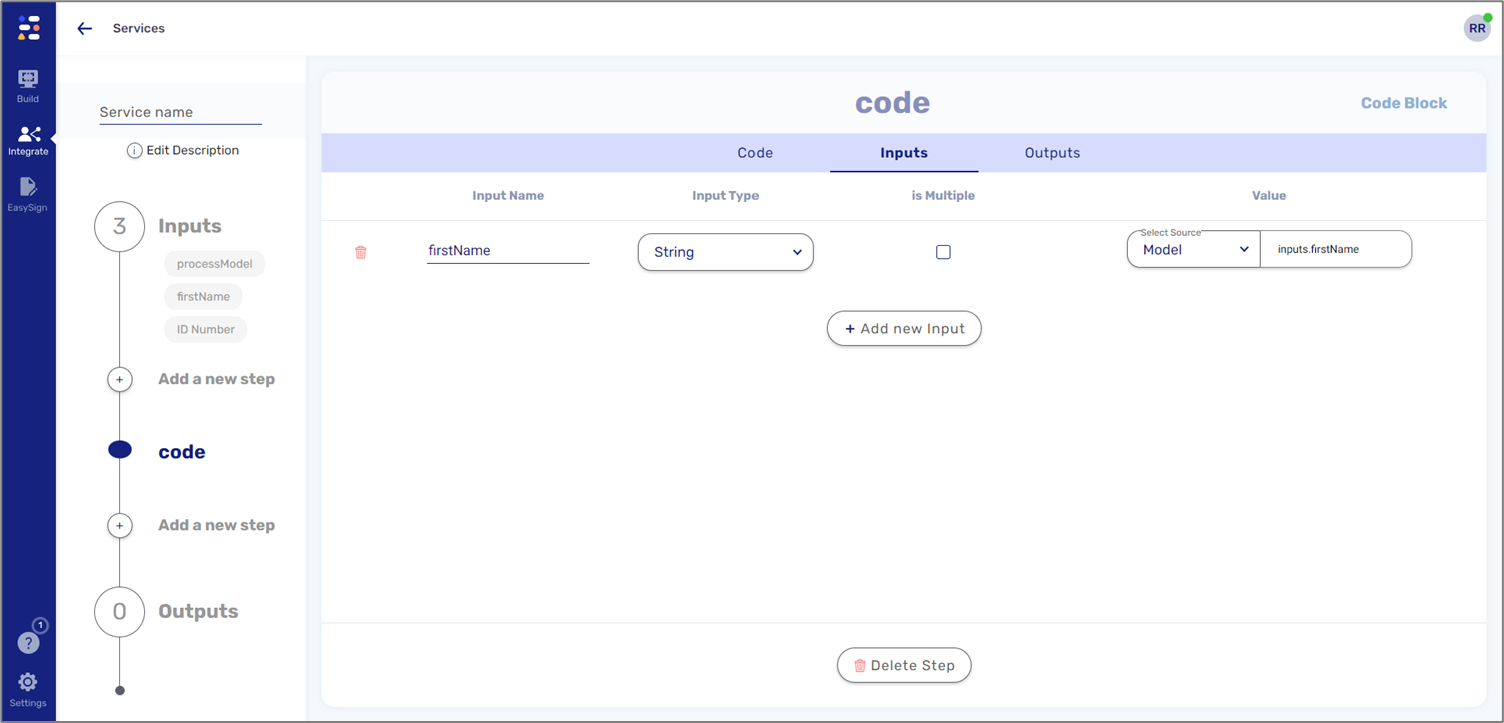
Figure 6: Source - Model
- Metadata - Model metadata items, for example:

Figure 7: Source - Metadata
When adding a new output variable, it must contain the following information:
- Field Name
- Output Type:
- String
- Number
- Boolean
- File
- Object - when an Object is selected, a plus icon appears. The icon lets you open the Model screen and select an object-type data item.
- Any
- Is Multiple:
- When checked - indicates the input is an array
- When not checked - indicates the input is not an array
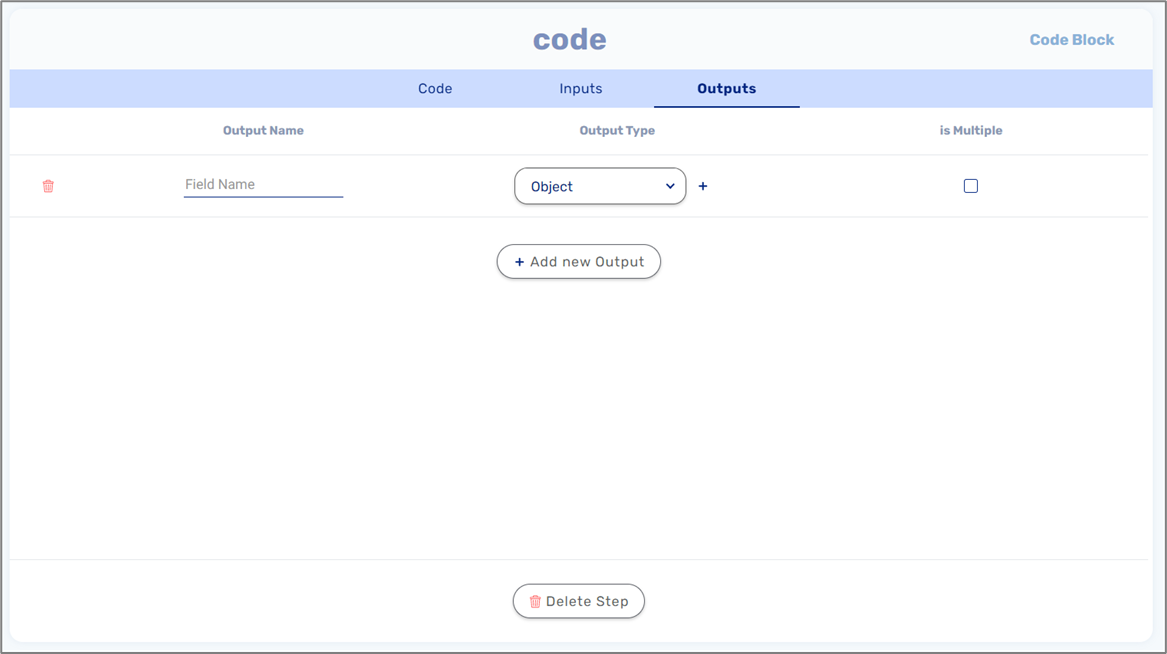
Figure 8: Outputs
File Storage Service
For additional detailed information, see the File Storage Service article.
Rest API Service Structure
The following sections describe the structure of a Rest API Service step,
Authentication and URL
The following sections describe Rest API authentication and URL capabilities.
Authentication
(See Figure 9 to Figure 11)
A Rest API Service step type works as a request-response protocol between clients and servers. It contains parameters for both a Request (1) and a Response (2). A request can include an authentication (3):
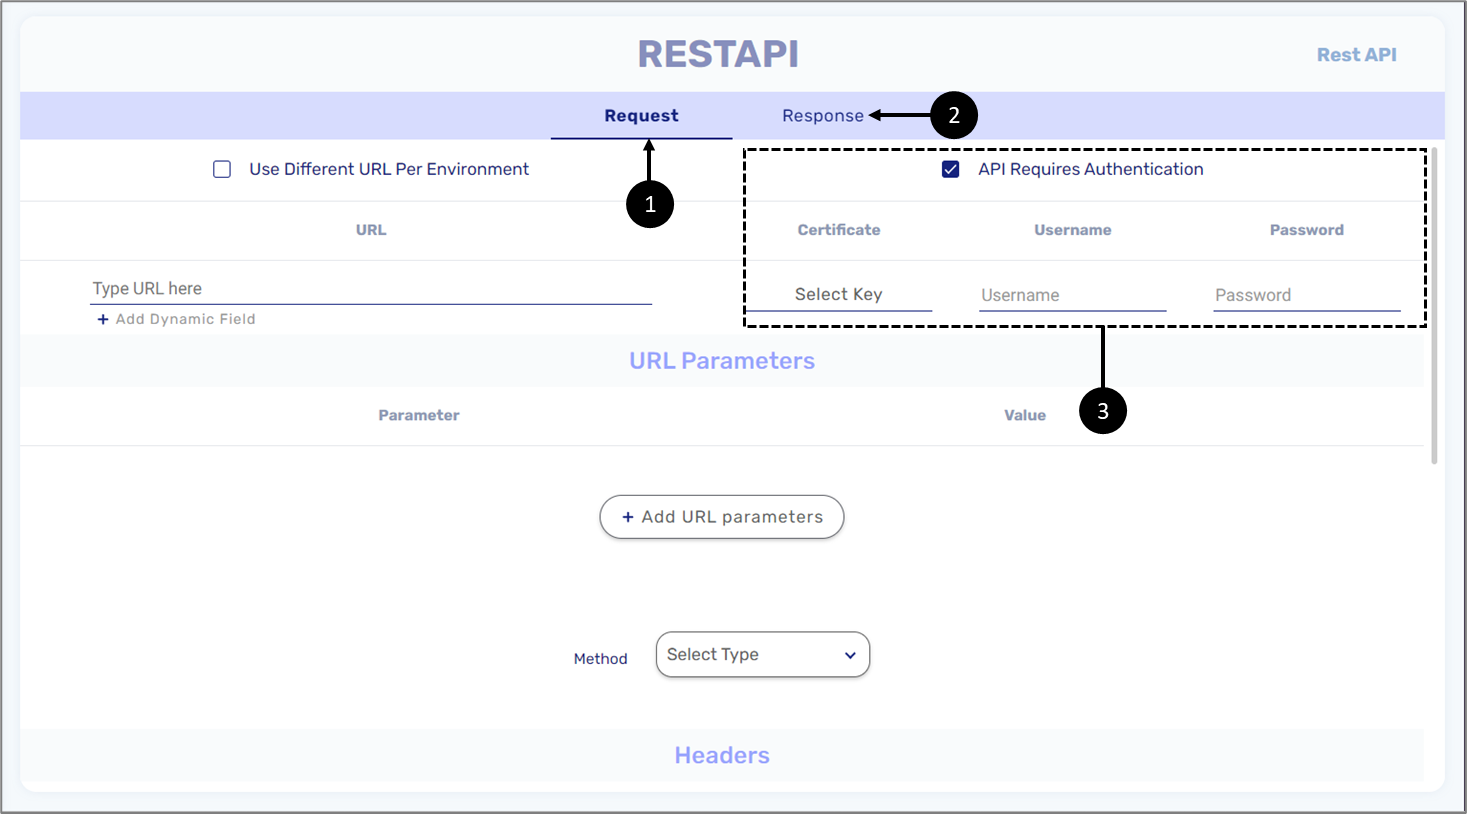
Figure 9: Rest API Service Step
If authentication is required, it is mandatory to provide certificate information by selecting a key. If a key already exists in your environment (under the Resources tab -> Keys) it can be selected using the dropdown, for example:
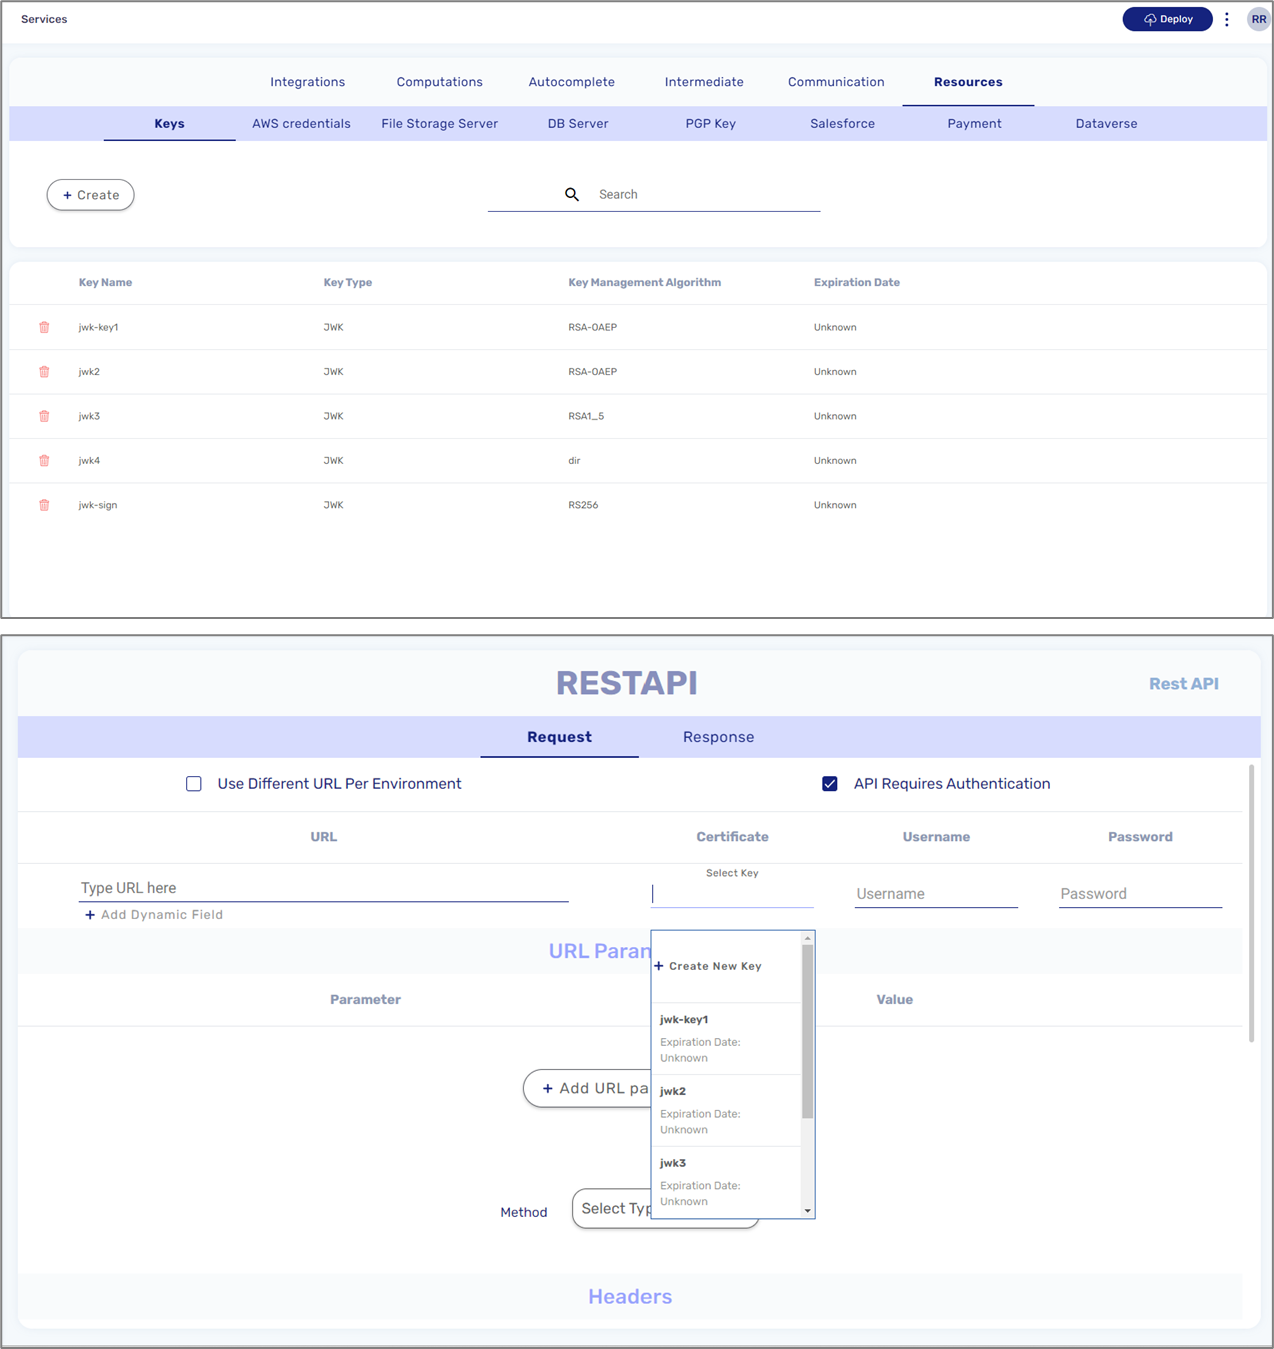
Figure 10: Key Selection
If a key does not exist in your environment, you can use the + Create New Key option to add it, for example:
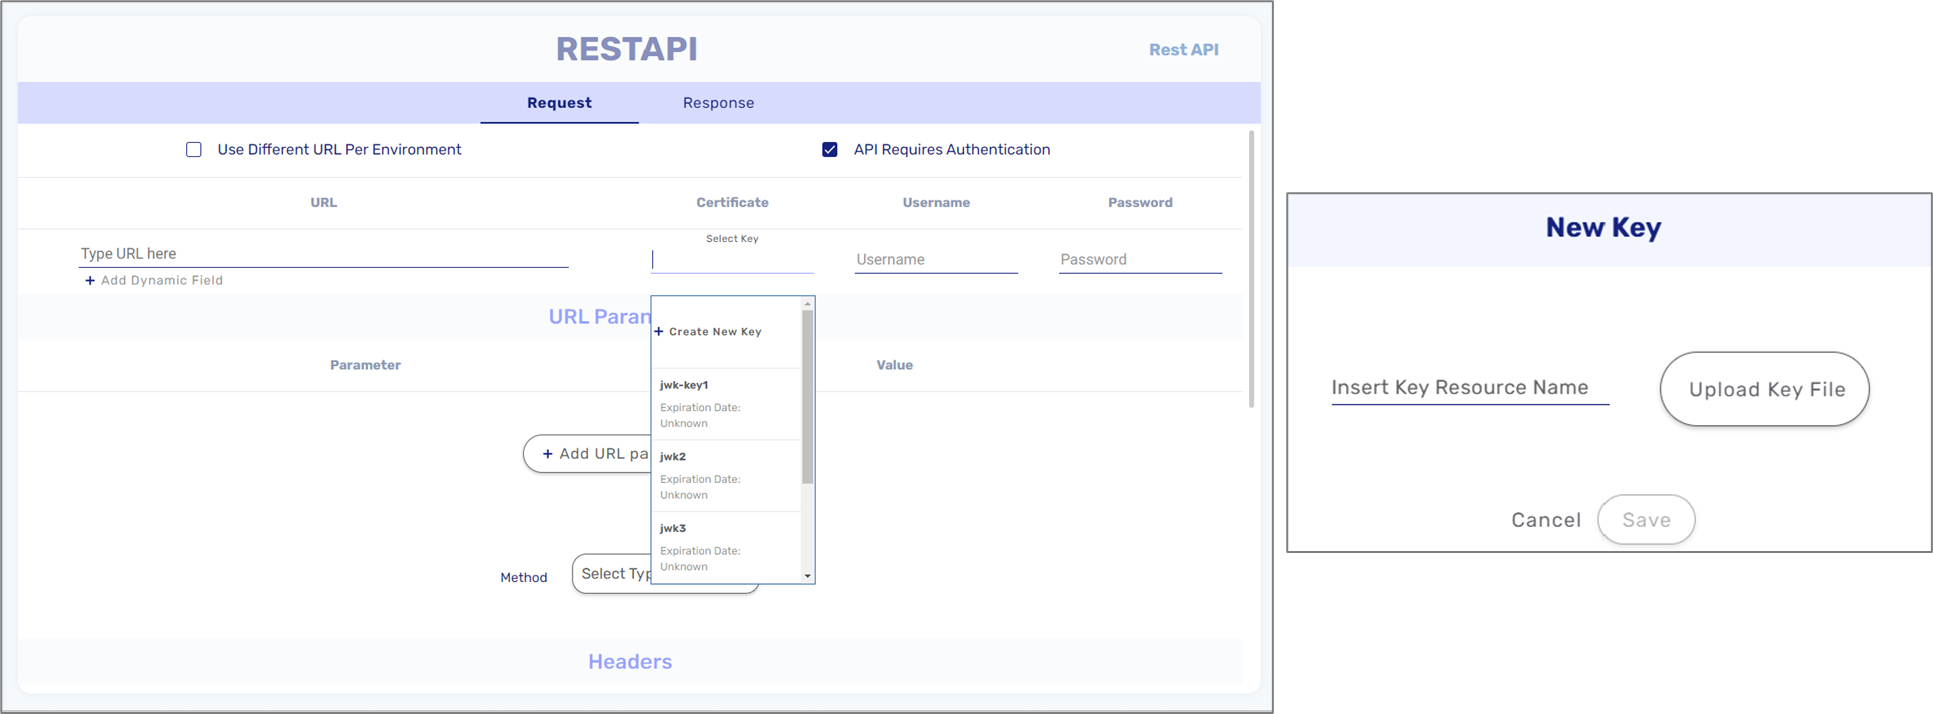
Figure 11: Creating a New Key
The API Requires Authentication checkbox should remain unchecked if you are using Bearar tokens or API keys. In this case, the authentication will be configured in the Headers section, for example:

Figure 12: Bearer Token and API Key Examples
- For a Bearer token, the Header name will be Authorization.
- You must write Bearer before entering the token.
- There must be space between the Bearer and the token.
- You can use a different token/API key per environment (Dev/Prod)
URL
(See Figure 13)
A request must contain at least one URL (4), for example:
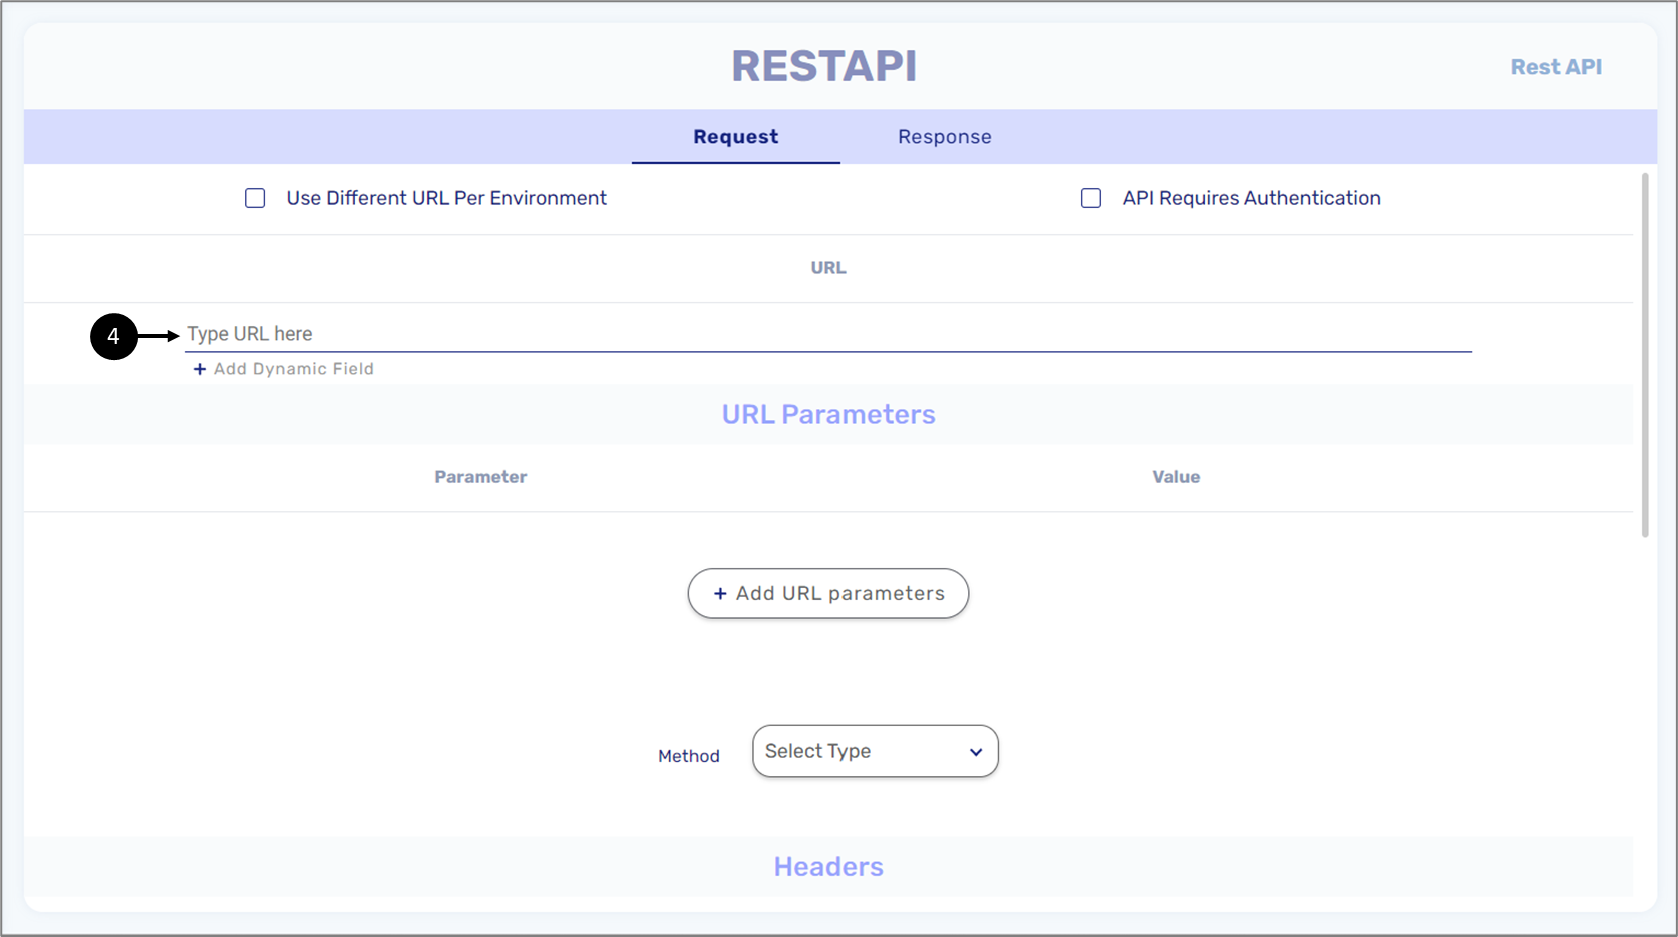
Figure 13: URL
Multiple URLs per Environment
(See Figure 14 to Figure 18)
It is possible to use a different URL per environment (DEV/PROD) (5), for example:
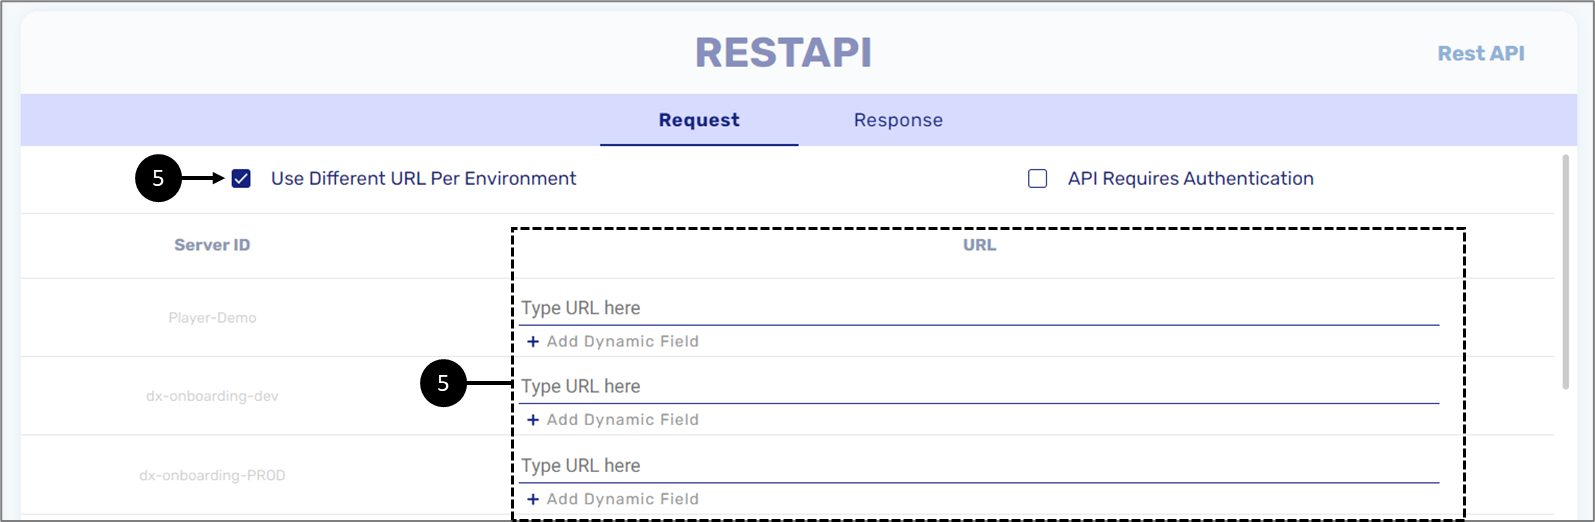
Figure 14: Multiple URLs
A URL can be static or dynamic. For a dynamic URL, a dynamic field must be added:
First, we will add a Code step, add a String type input variable (1), and set the Value (2):
- Source - Metadata
- Value - transaction.environment
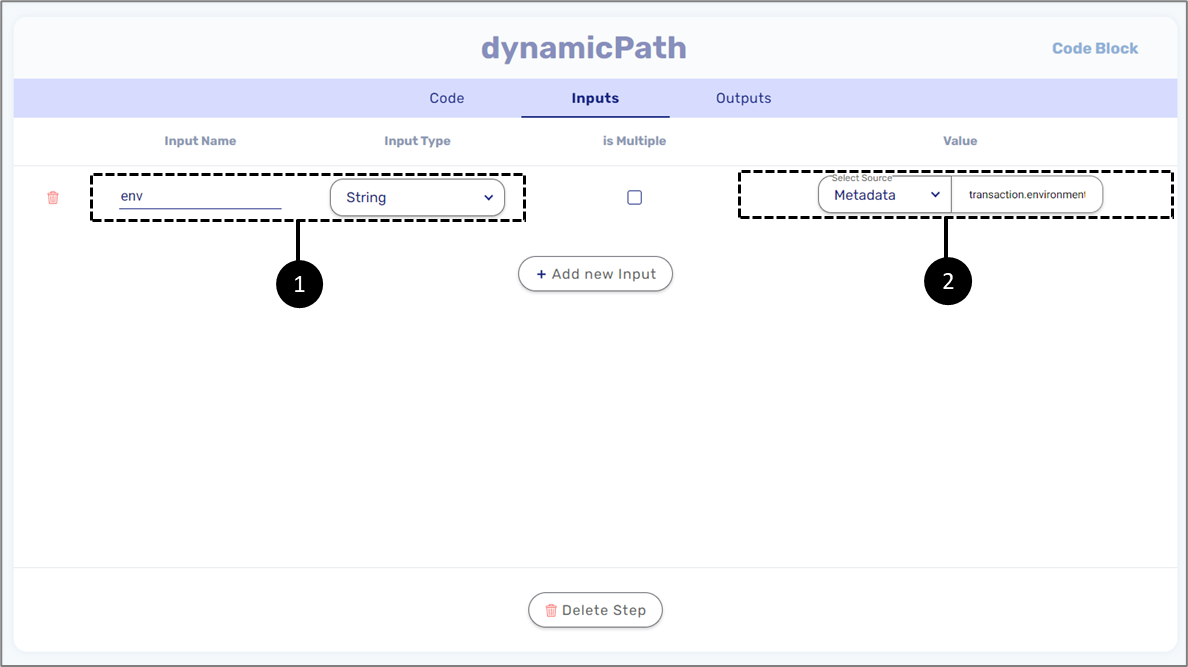
Figure 15: Inputs
Next, we will add a String-type output variable (3).
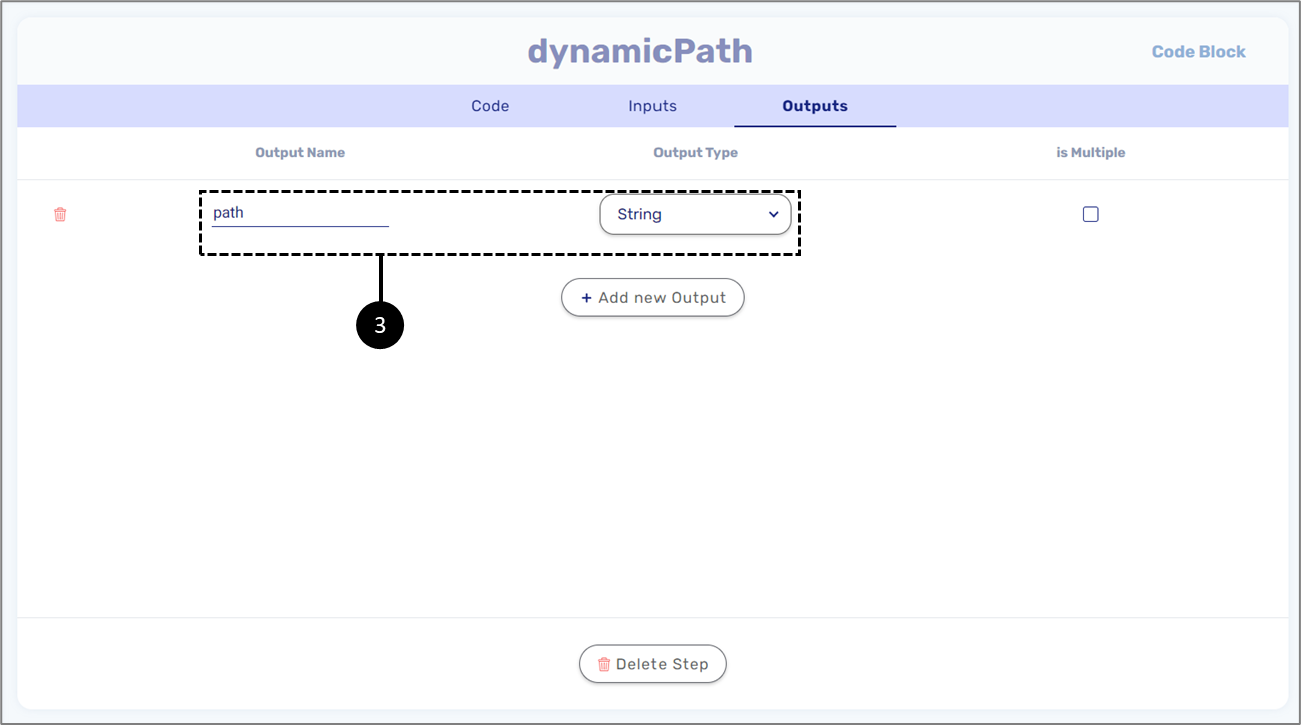
Figure 16: Outputs
Finally, we will write the code utilizing the input and output variables.
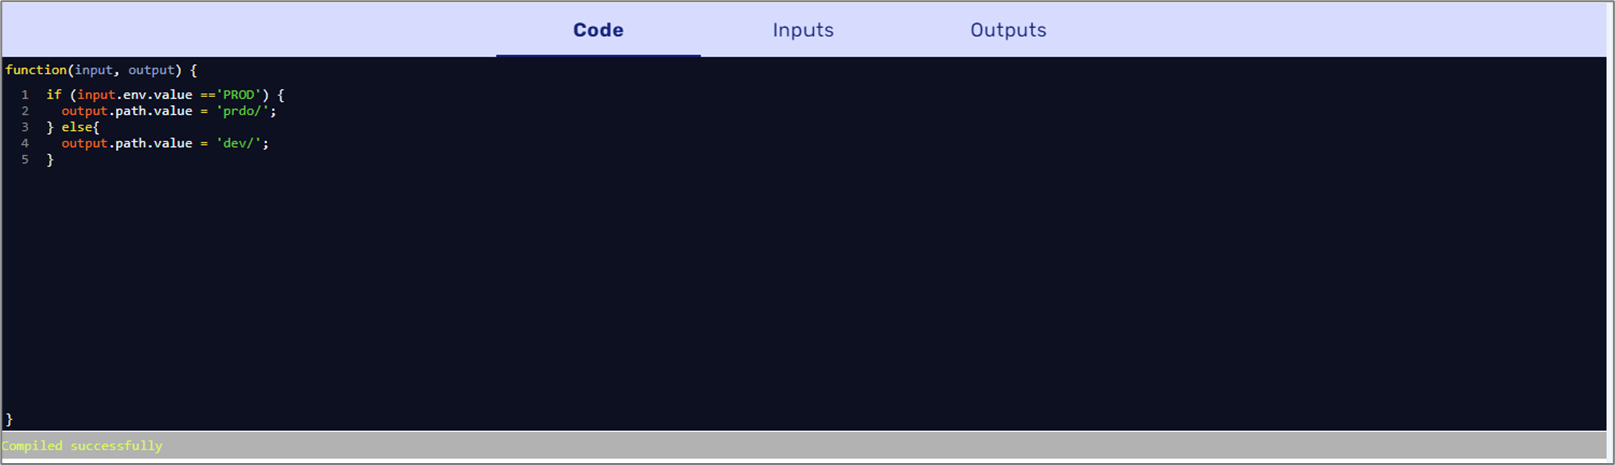
Figure 17: Code
On the Rest API Service step, we will add a new dynamic field and add the Code step output (4).

Figure 18: Dynamic Path
Methods, Parameters, and Headers
(See Figure 19 to Figure 21)
A request contains an option to select an HTTP Method (6):
- GET - used to request data from a specified resource
- POST - used to send data to a server to create/update a resource
- PUT - used to send data to a server to create/update a resource
The difference between POST and PUT is that PUT requests are idempotent. That is, calling the same PUT request multiple times will always produce the same result. In contrast, calling a POST request repeatedly has the side effect of creating the same resource multiple times.
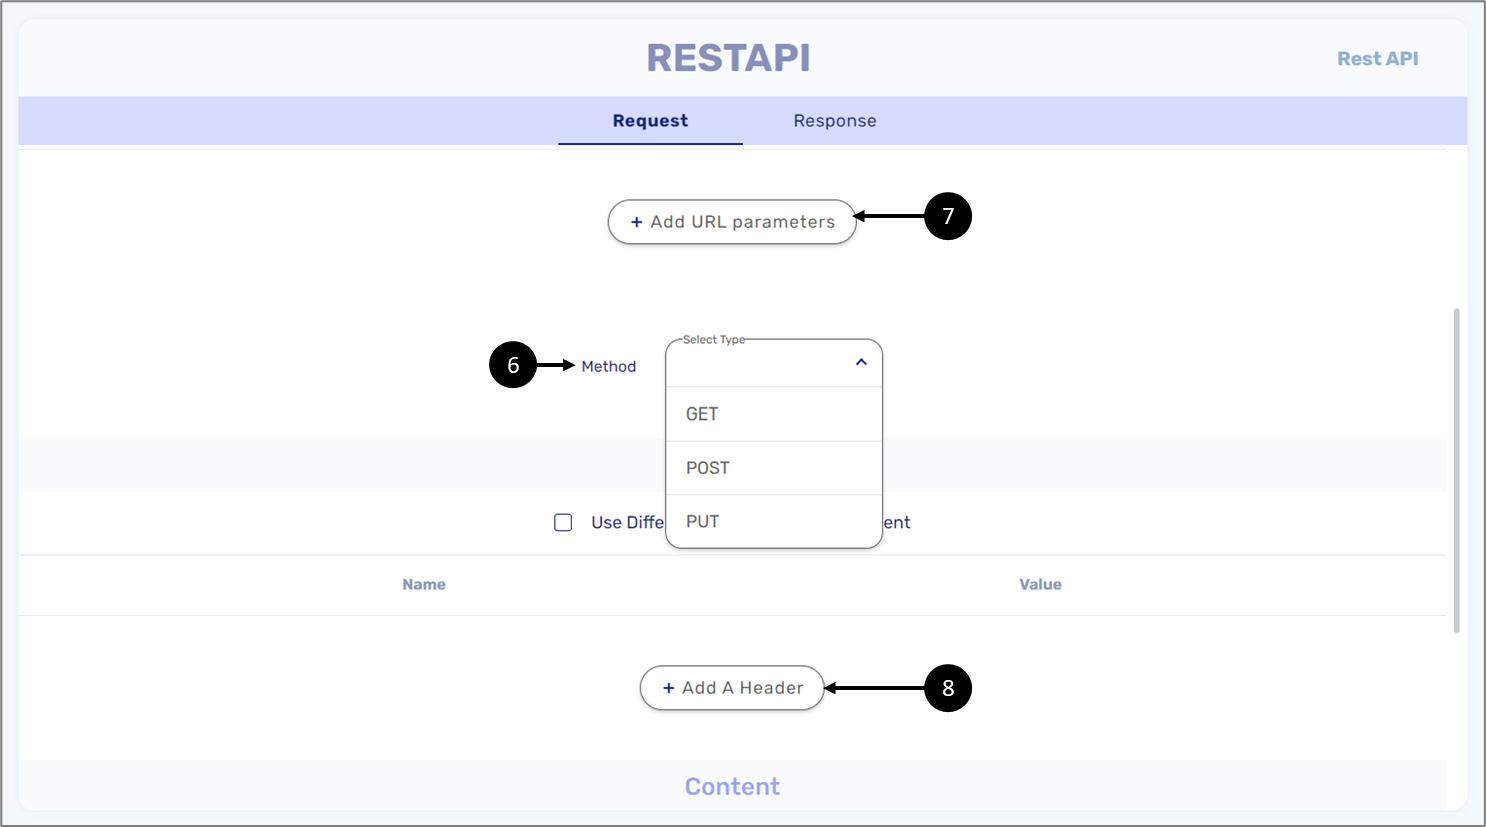
Figure 19: Method, Parameters, and Headers
In addition to selecting an HTTP Method, the request can be configured with URL Parameters (7) and Headers (8). Query parameters are a way to pass information to an API flexibly and simply. They are added to the end of the API endpoint URL as a series of key-value pairs. Headers provide additional information about the API request and response. They are used to carry information such as the request method (GET, POST, PUT), the content type of the request payload, authentication information, and other metadata.
When adding URL Parameters, it is mandatory to specify the parameter names (9) and to set their values (10), for example, sort and category that are passed to the API to specify the desired sorting order and category of items to retrieve.
Values can be:
- Constant
- Model
- Metadata
When the Source is set to Model, the value must use the format inputs.fieldName. This differs from the Dynamic URL field, which requires the model name at the beginning of the syntax.
Examples of URL Parameters:
- Filter
- Sort
- Search
- Format
- Page
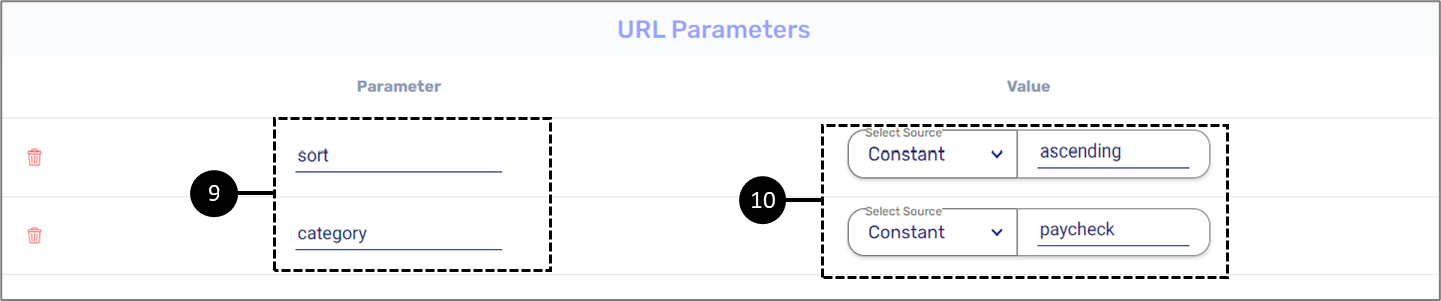
Figure 20: URL Parameters
For Headers, it is also mandatory to specify the parameter names (11) and to set their values (12). In addition, it is possible to use different headers per environment (13). For example, Content-Type and Accept specify the format of the request and response - JSON. Authorization is used to send authentication information, such as an access token or key.
Examples of Headers:
- Content-Type - specifies the format of the request body
- Accept - specifies the preferred format of the response
- Authorization - used to send authentication information, such as an access token or API key
- User-Agent - identifies the client software and version
- Accept-Language - specifies the preferred language of the response
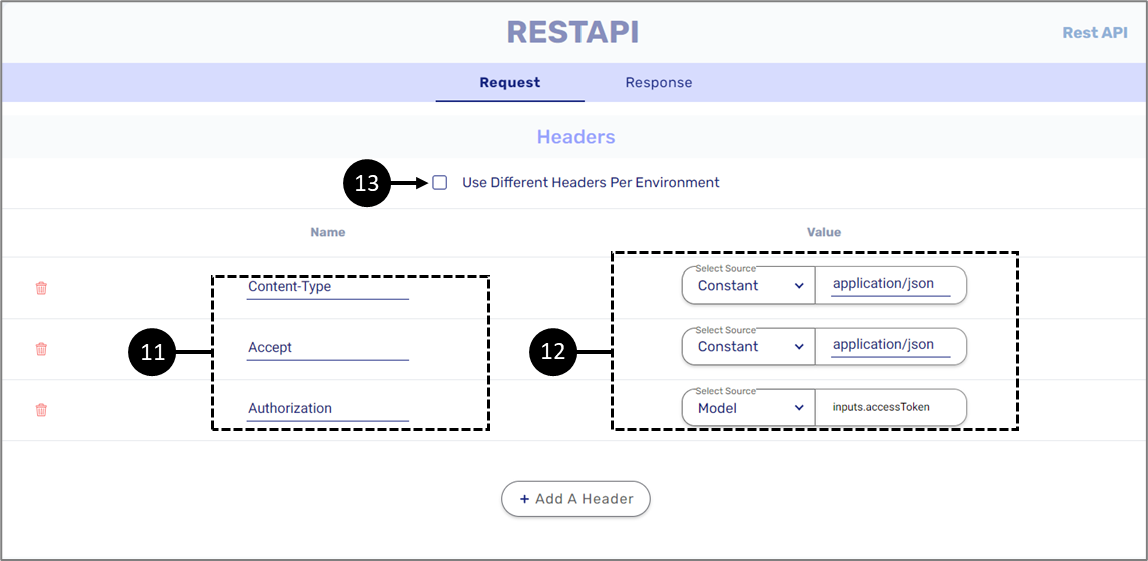
Figure 21: Headers
Content Items
(See Figure 22 to Figure 26)
The request also contains the option to add content items (14). Content items specify in which format the request's payload will be sent (15):
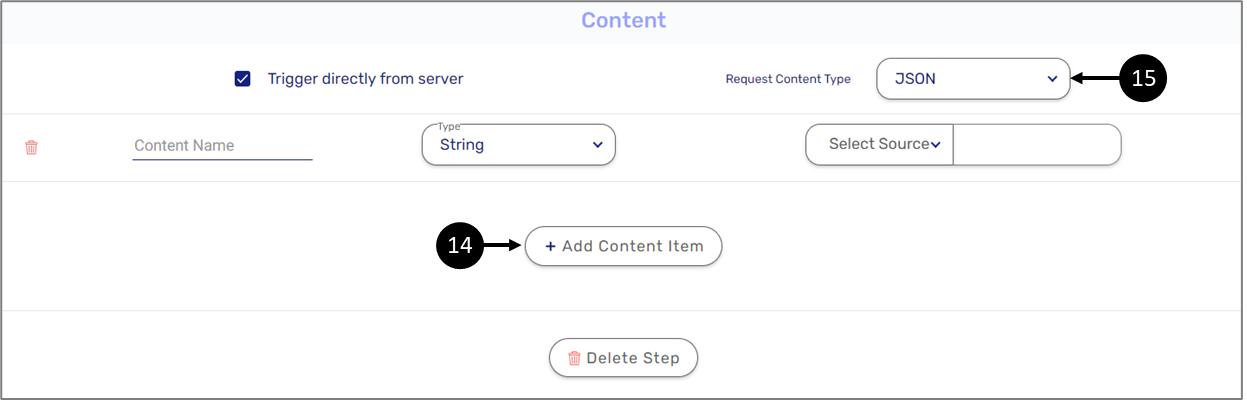
Figure 22: Adding Content Items
- JSON - a JSON object
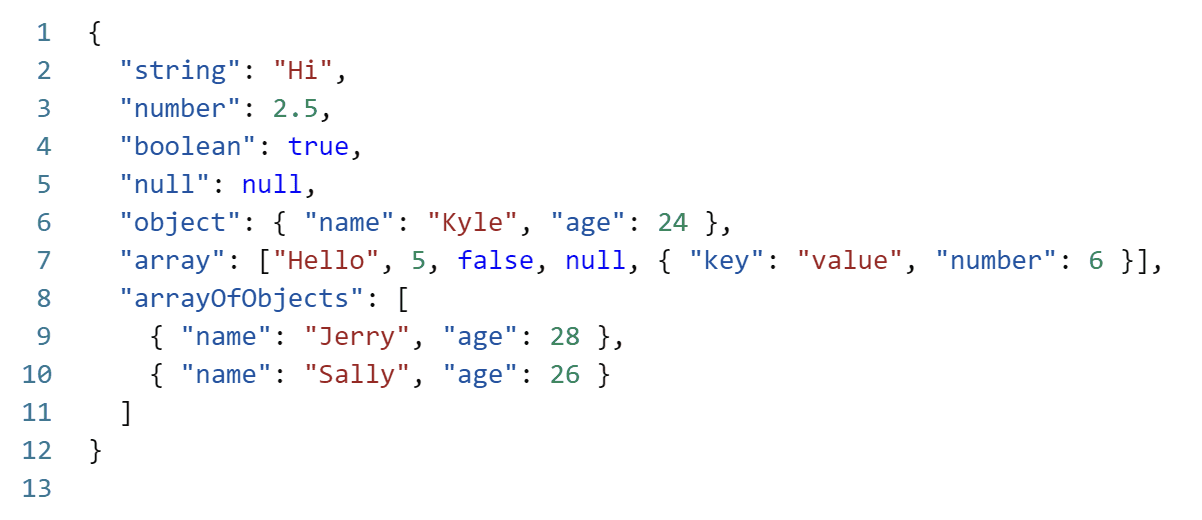
Figure 23: JSON Object
- form-data - a FormData object, in JavaScript, this object is a common way to create a bundle of data to a server using XMLHttpRequest or fetch
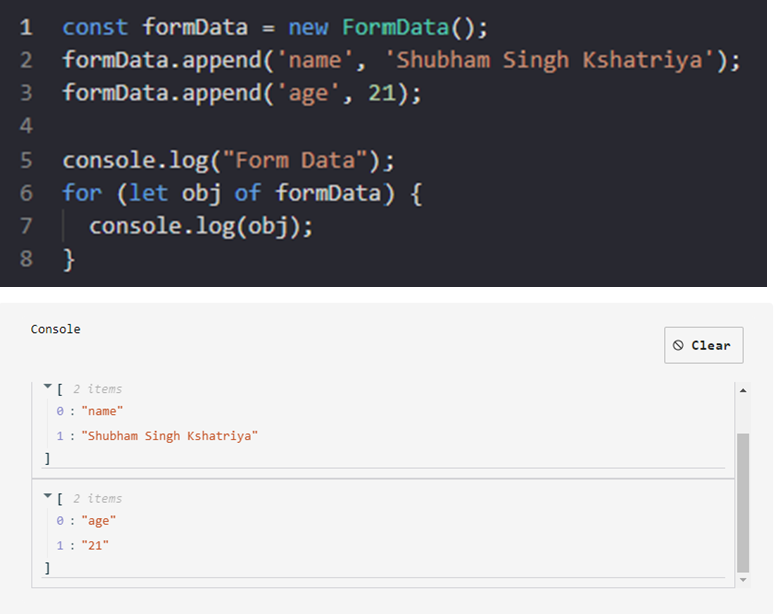
Figure 24: FormData Object
- Raw String - the payload is sent as a raw stringNOTEWhen Raw String is selected, only one content item can be added.
- Binary Large Objects (Blob) - the payload is sent as a collection of binary data stored as a single entity. Blobs are typically images, audio, or other multimedia objects, though sometimes binary executable code is stored as a Blob
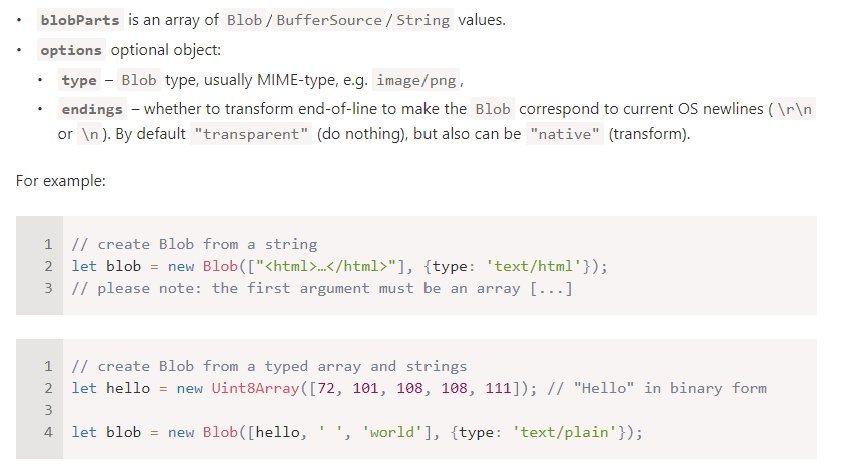
Figure 25: Blob
By default, the content is triggered directly from the server (16). Once a content item is added, a content name (17), type (18), and source must be specified (19).
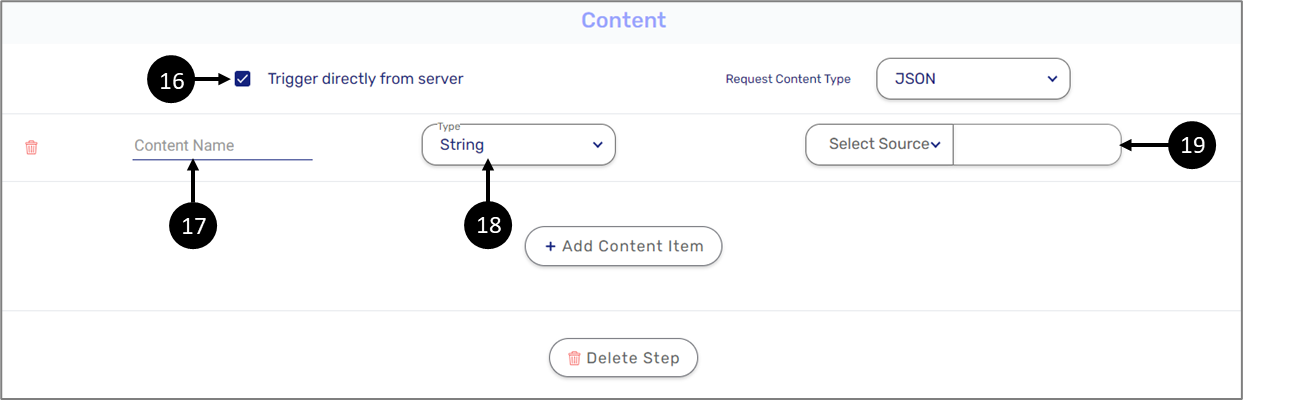
Figure 26: Content
- Content Type:
- String
- Number
- Boolean
- Object
- Source:
- Constant
- Model
- Metadata
Rest API Service - Response
(See Figure 27 and Figure 28)
This section specifies in which format (content type) the response payload will be received (20):
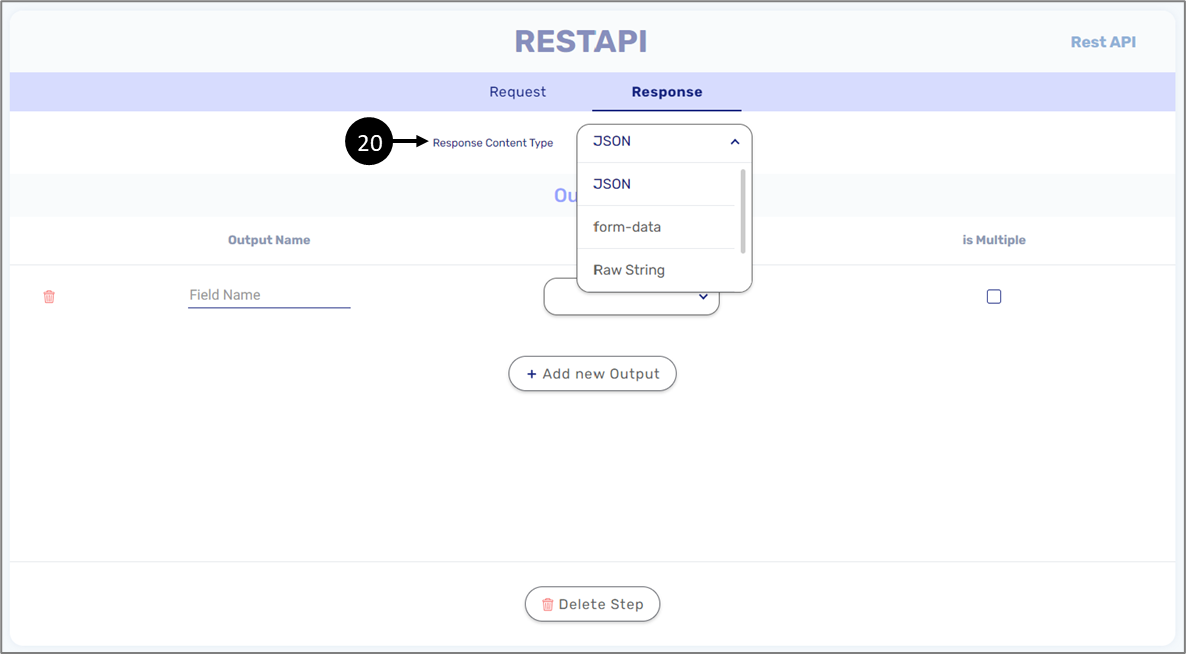
Figure 27: Adding Content Items
- JSON - a JSON object
- form-data
- Raw String
- Blob
Once an output item is added, a name (21), type (22), and whether the item is an array (23) must be specified.
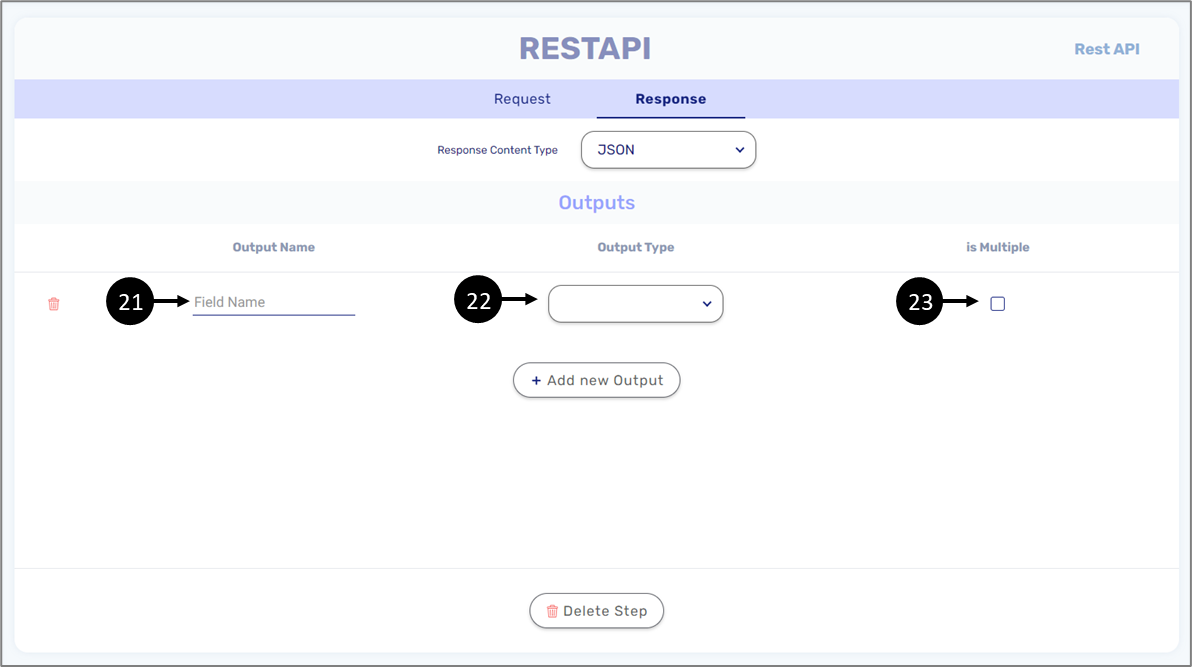
Figure 28: Output
Output Type:
- String
- Number
- Boolean
- File
- Object
Output Type Boolean
(See Figure 29 and Figure 30)
When the selected output type is Boolean, and the response content type is JSON, the output must match the JSON structure. To create the structure, click the + icon (1).
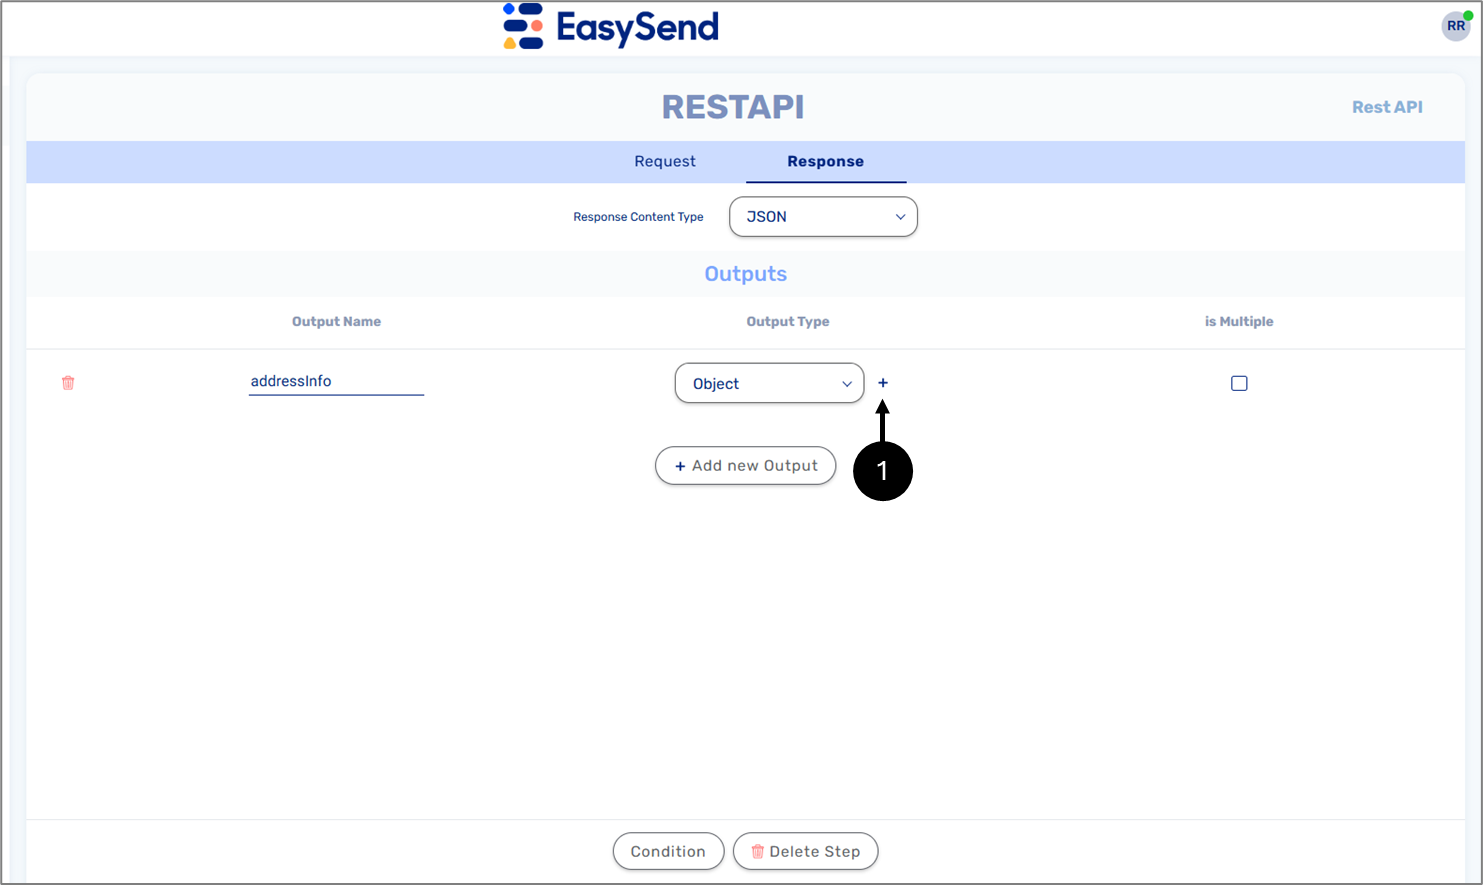
Figure 29: + Icon
When the screen is open, build the structure to fit the structure of the JSON file, for example:
{
  "address": {
    "street": "123 Main Street",
    "city": "Austin",
    "state": "TX",
    "postalCode": "78701",
    "country": "USA"
  }
}

Figure 30: Structures
Computed Service
(See Figure 31 to Figure 33)
A Computed Service step allows you to apply both simple and complex computations with or without conditions as part of the service. This step is used when a computation needs to be executed at the beginning or end of a process and cannot be implemented using options from the Model screen (expressions, formulas, conditions).
The type of computation can be either Text or Number (1).

Figure 31: Computed Service - Text/Number Toggle Switch
After a new computation is added, two new fields appear - Condition and Value. A value contains an Expression field that can include static text and dynamic fields (2).
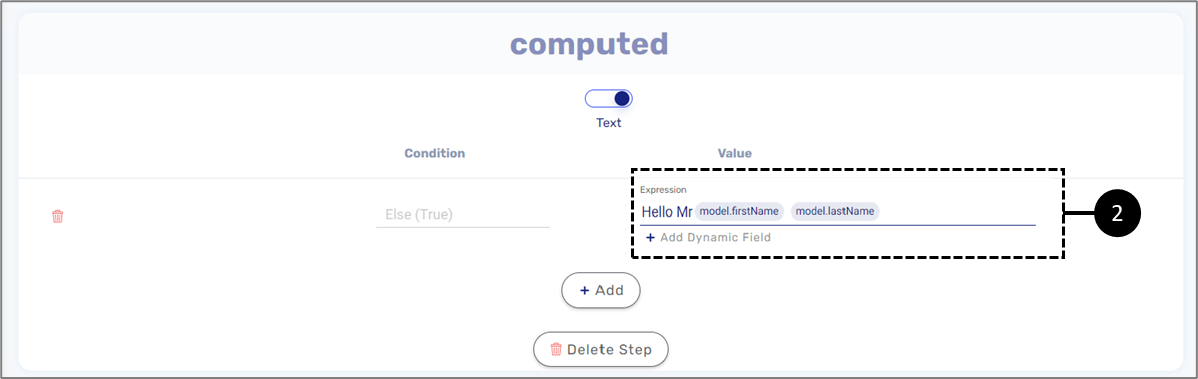
Figure 32: Computed Service - Value
If a condition is required, hovering over the value or the condition displays a gear icon (3), clicking it displays the Condition Configuration window.
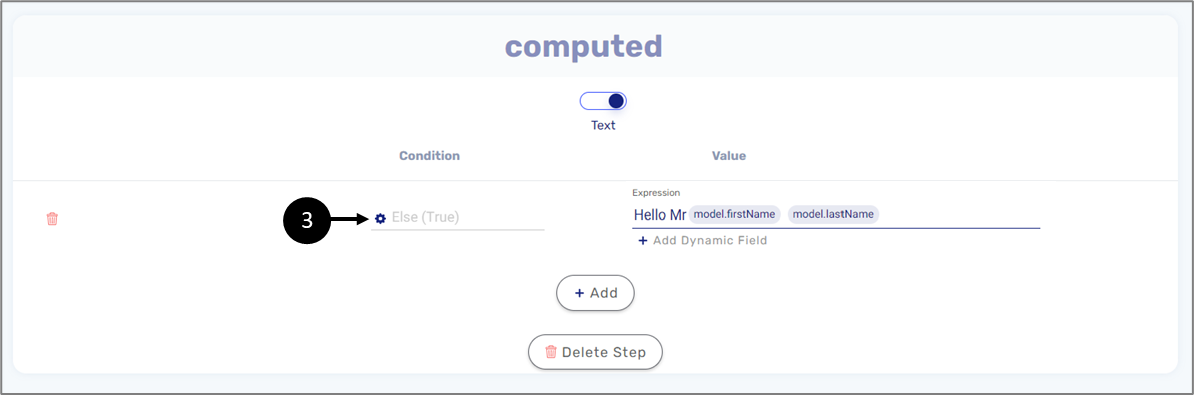
Figure 33: Computed Service - Condition
Condition Configuration Window
(See Figure 34 to Figure 37)
This window contains options for condition configuration:
- Adding condition name (4)
- Edit the expression if needed (5)
- Adding arguments to the condition (6):
- Selector - from the Inputs section of the service
- Operator:
- is
- isn't
- greater than
- less than
- Value
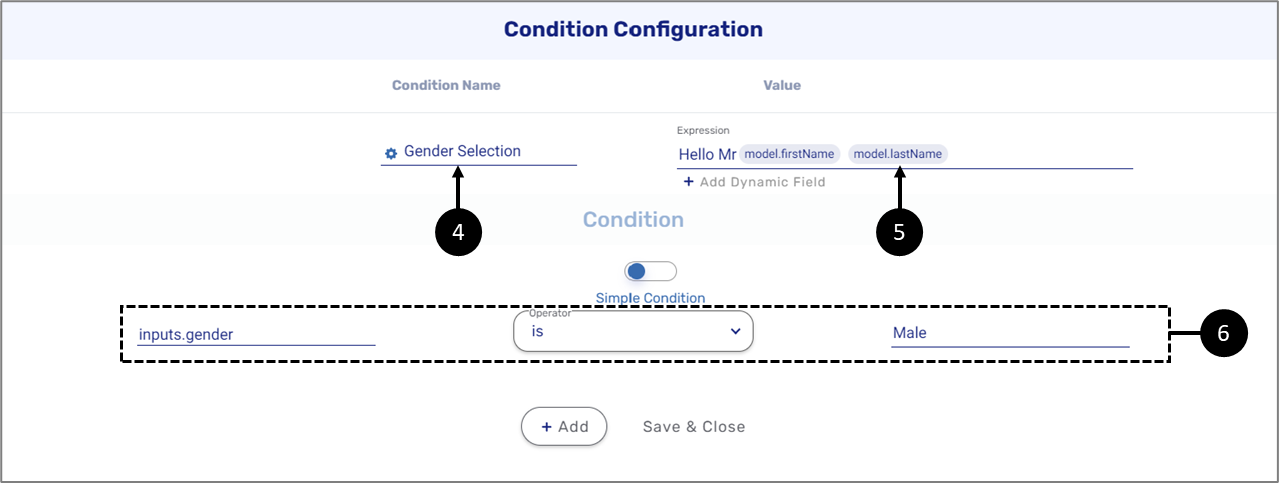
Figure 34: Condition Configuration Window
A condition can contain additional arguments by clicking the + Add button (7). When the argument is added, it will be configured (8) and a condition type (And/Or) (9) will be set.
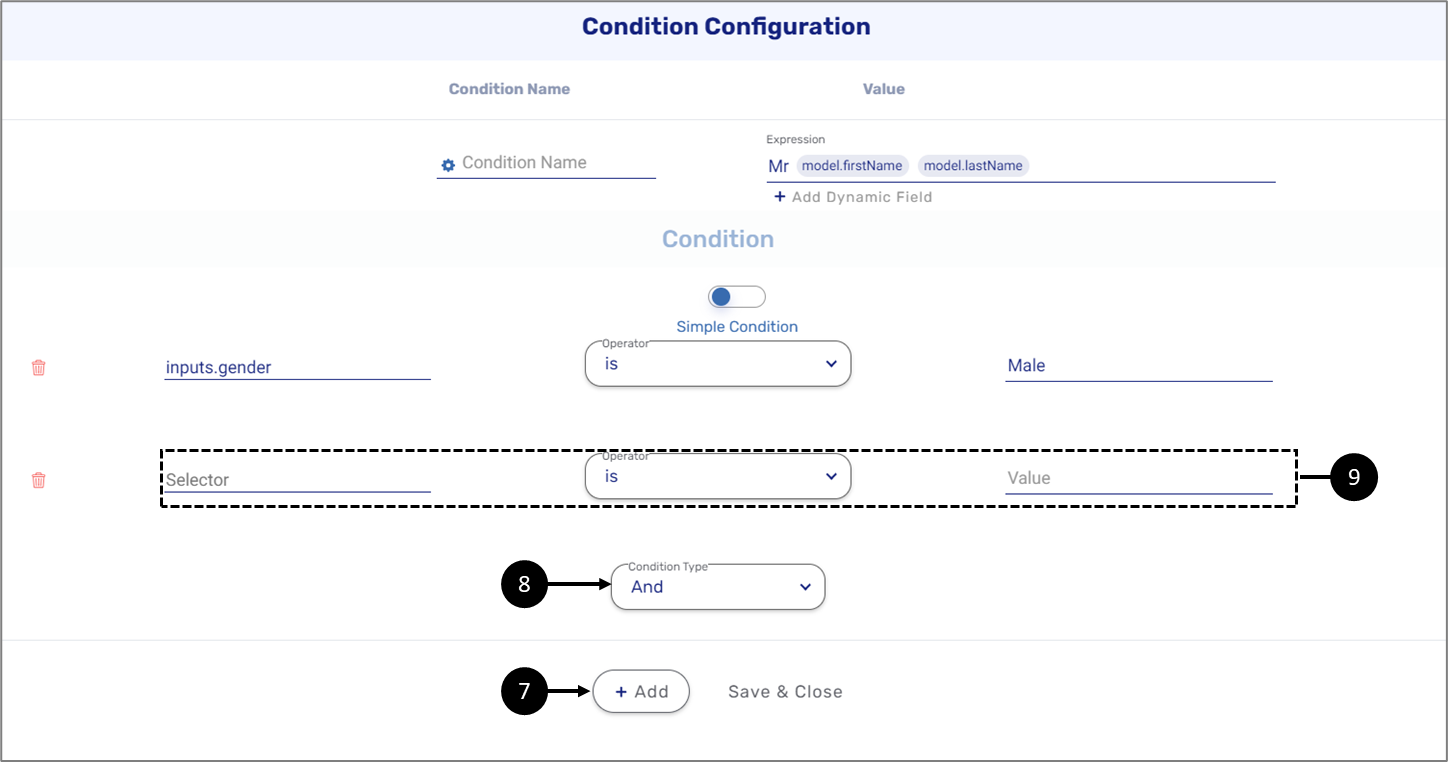
Figure 35: Condition Configuration Window - Two Arguments
If a simple condition is not enough for the computation, it is possible to create an advanced condition by using the toggle switch (10).
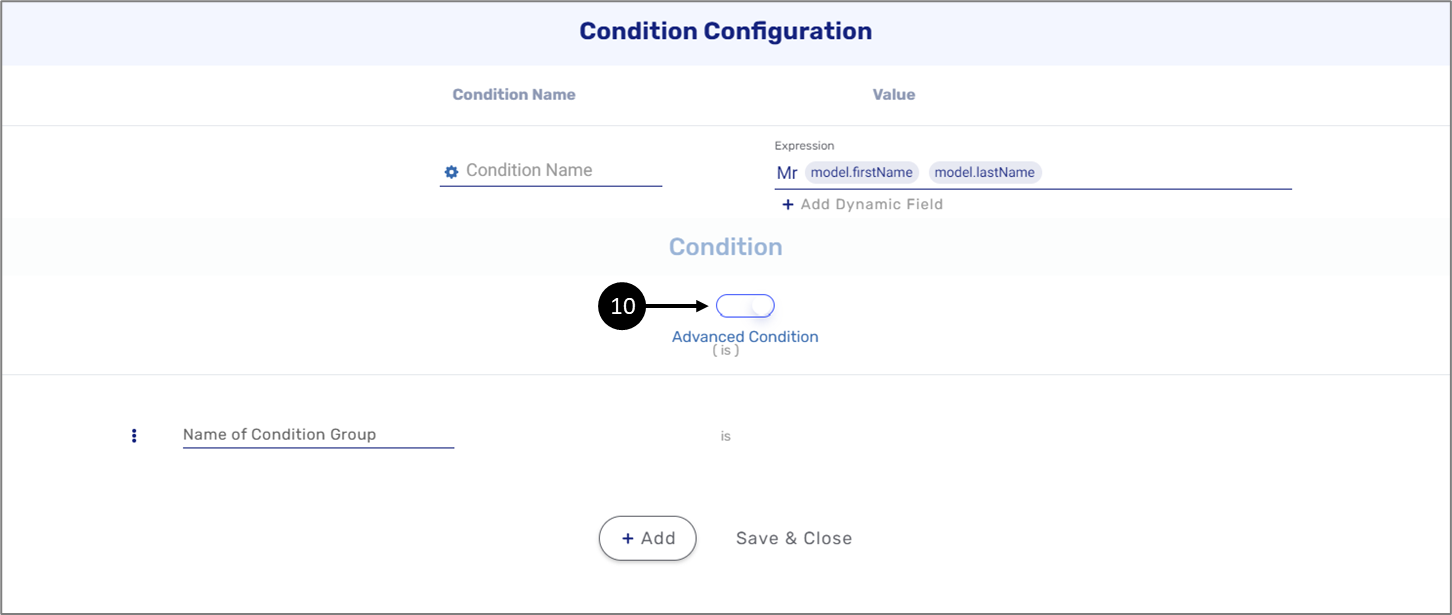
Figure 36: Condition Configuration Window - Advanced Condition
An advanced condition is configured by:
- Adding a name and a condition group (11)
- Creating a Condition Group by clicking the three dots (12)
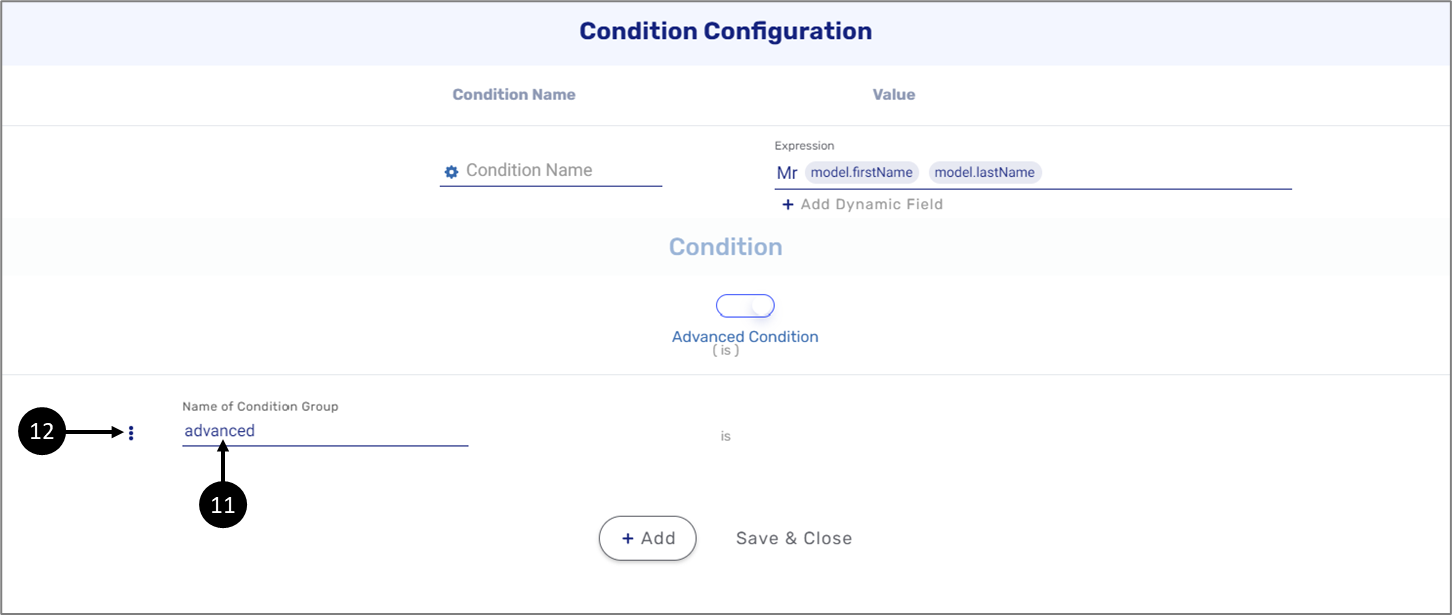
Figure 37: Condition Configuration Window - Configuring an Advanced Condition
(See Figure 38 to Figure 40)
Using this step you can send an email mixed with static and dynamic variables. An email can include recipients for one environment or multiple environments (1). The recipient's information can be static email addresses (2) or dynamic fields from the Inputs section of the service (3).
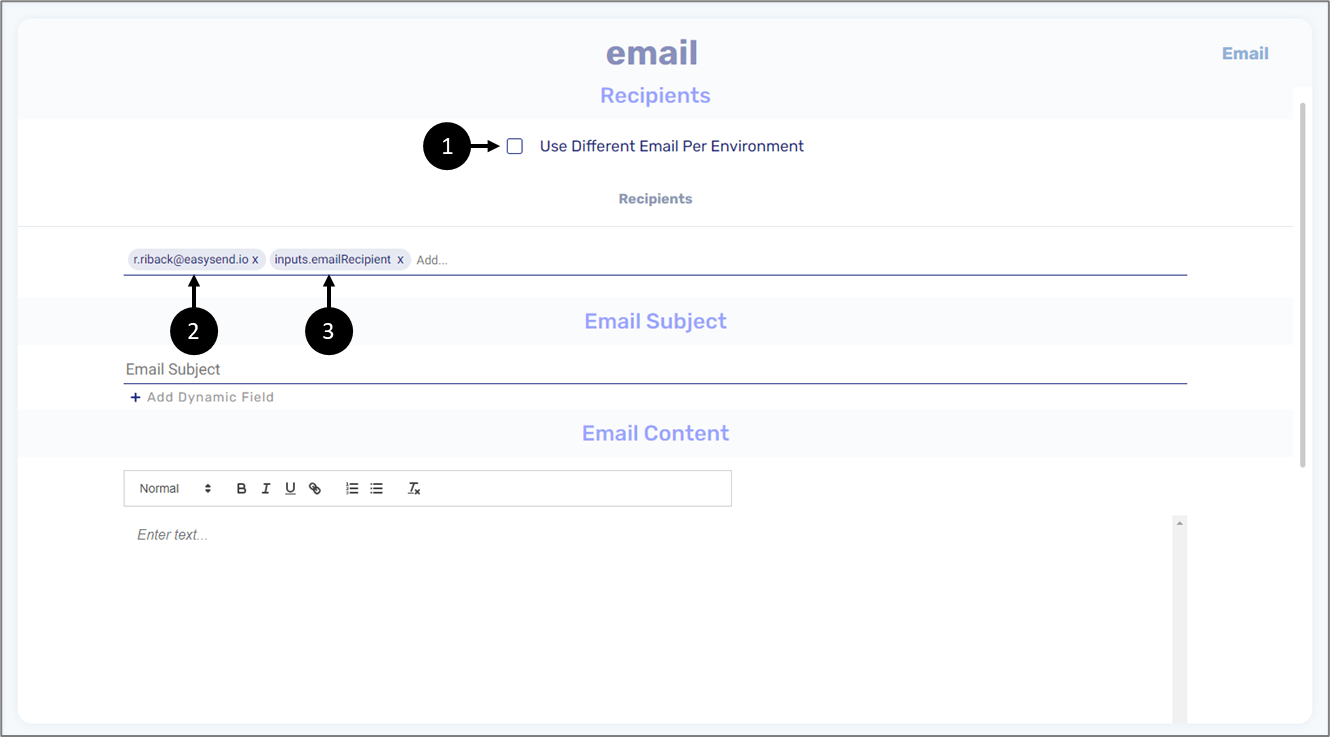
Figure 38: Email - Recipients
The Email Subject can also contain static information (4) and/or dynamic fields. The dynamic fields are taken from the Inputs section of the service (5) or from the Model's metadata (6).
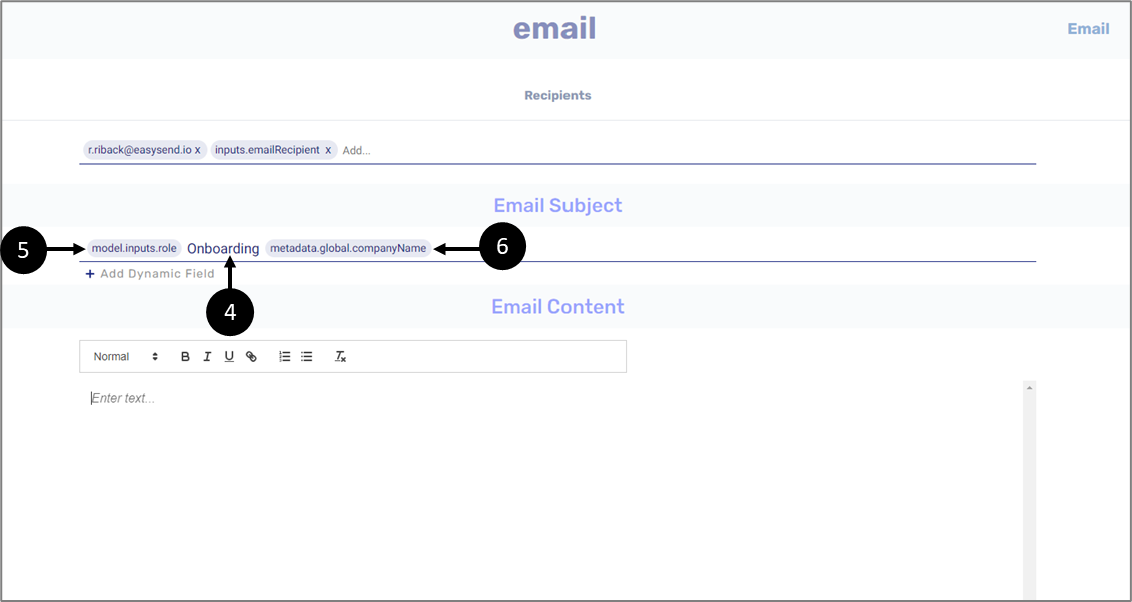
Figure 39: Email - Email Subject
The email content is comprised of static text (7) and dynamic fields from the service's Inputs section (8).
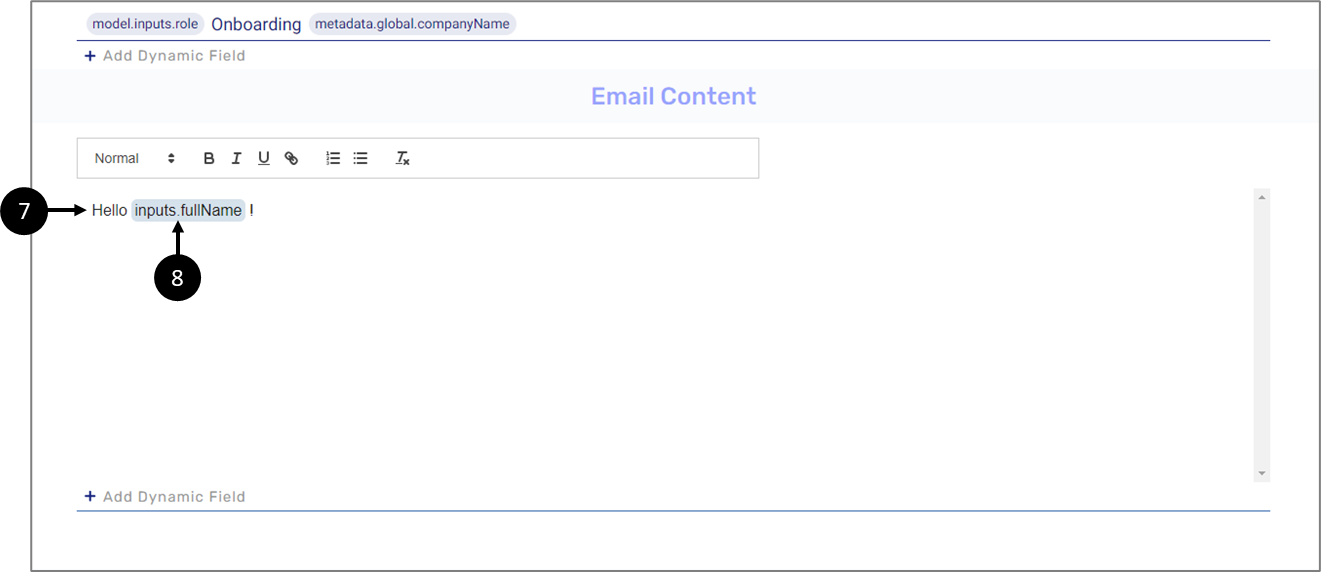
Figure 40: Email - Email Content
EasySend Service
(See Figure 40 to Figure 43)
An EasySend Service step type will be used with a pre-existing EasySend service. The service to be used will be specified under the Id section (1). In addition, Inputs (2) and Outputs (3) items can be added.

Figure 40: EasySend Service
For example, we want to use an EasySend service that converts a PDF to Base64. The Id section will contain the name of the service (4).
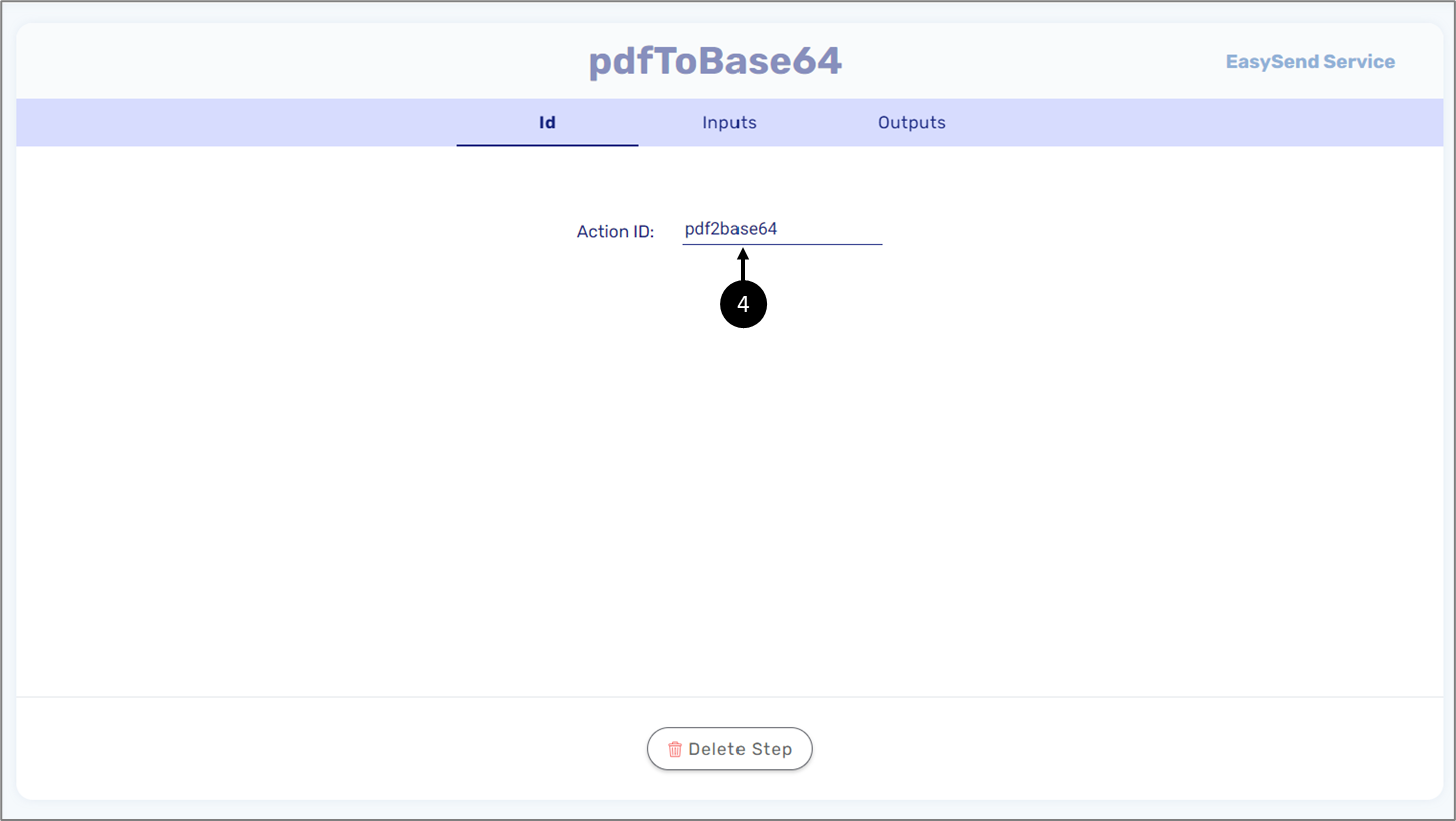
Figure 41: EasySend Service - Id
The input will be added based on the configuration of the Inputs section (5).

Figure 42: EasySend Service - Inputs
The output item will be a String-type item that will be used in the service (6).

Figure 43: EasySend Service - Outputs
SQL Query
(See Figure 44 and Figure 45)
An SQL query step allows you to interact with a Database (DB) server resource. A different DB can be used per environment (1). If a DB resource was created using the Resources tab, it can be selected from the dropdown (2). If a DB was not created before, an option to create one is available (3).
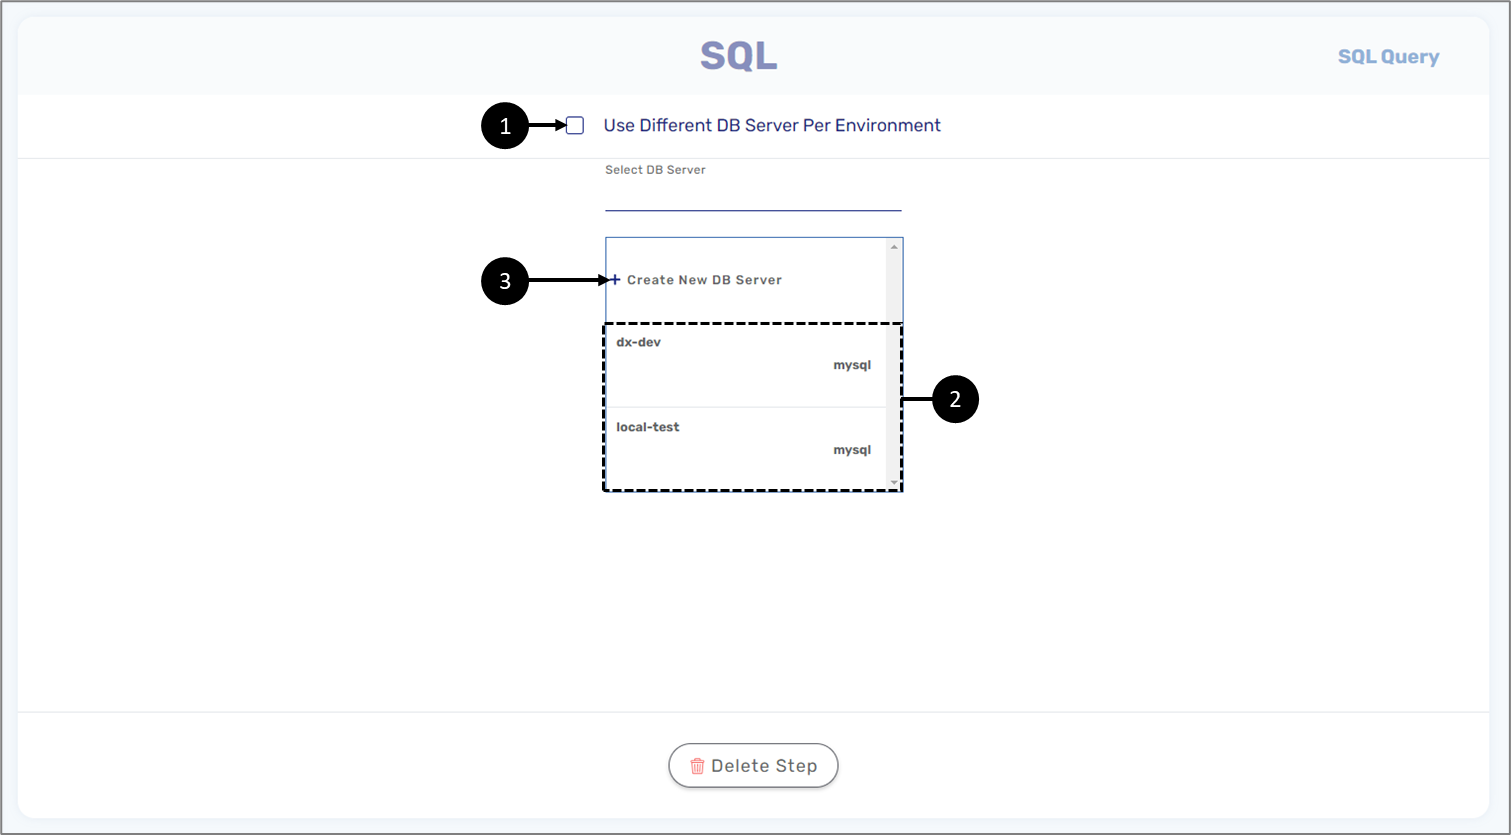
Figure 44: SQL Query
After selecting a DB, it will be configured with a Database Name (4) and Table name (5).
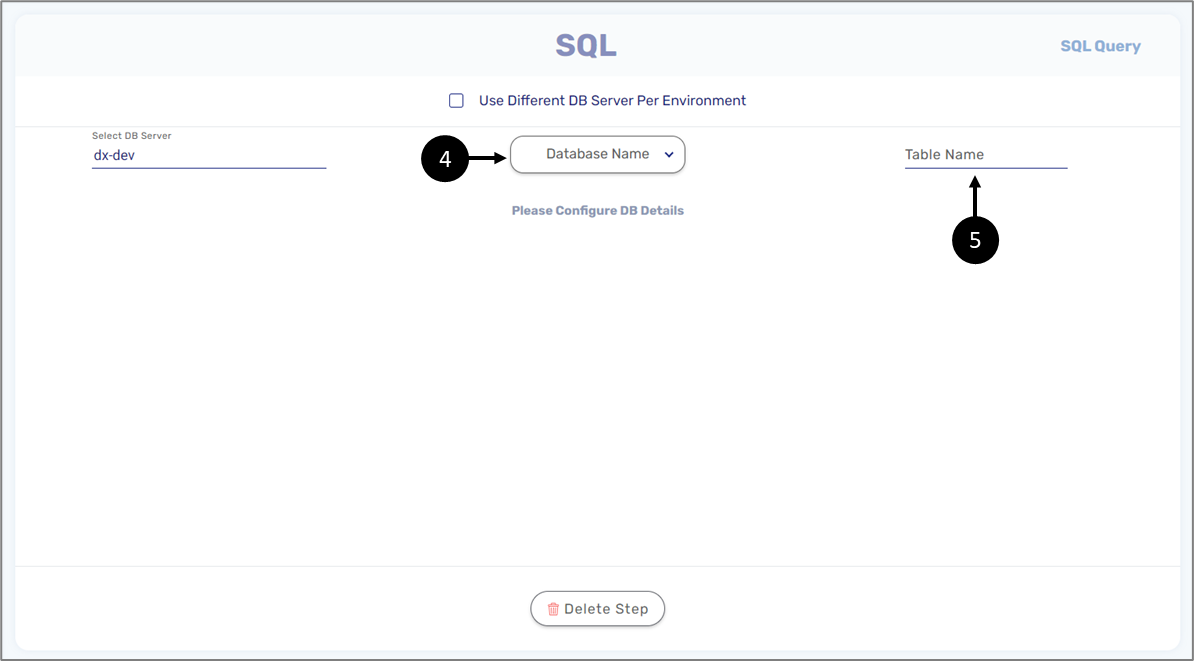
Figure 45: SQL Query - Configuring a DB
File Encode-Decode
(See Figure 46)
A File Encode-Decode step type allows you to encrypt/decrypt files. An encryption/decryption can be selected from five different types (1):
- Base64 (currently not supported)
- PGP encryption
- RSA
- JWE
- JWT
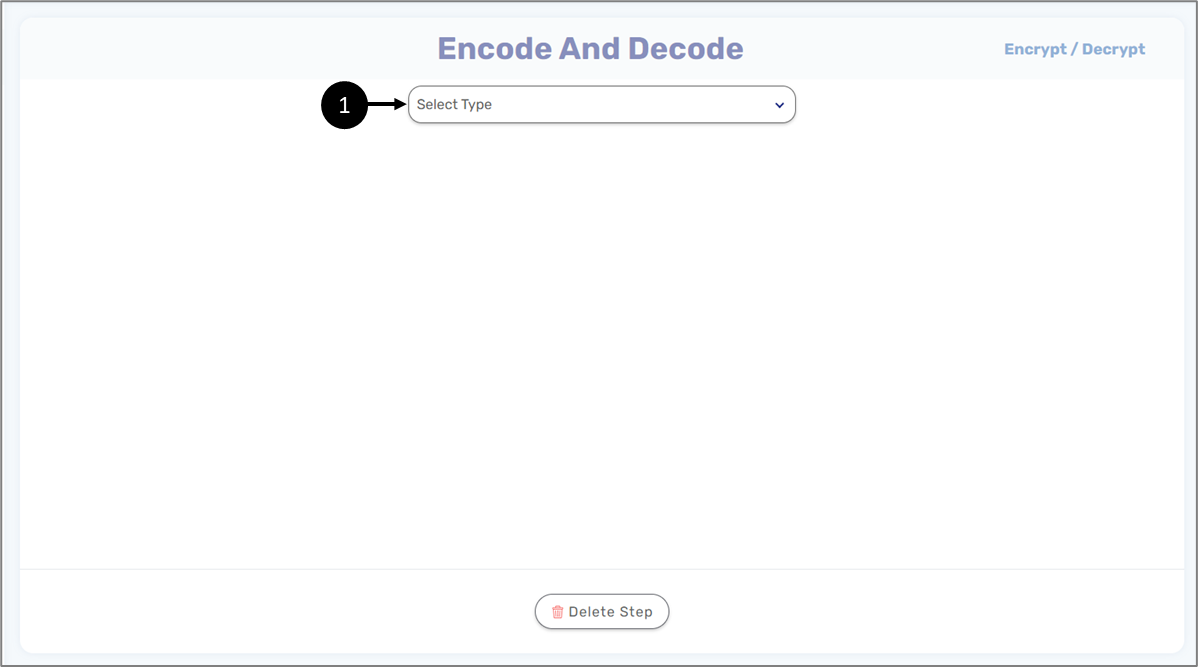
Figure 46: Encode-Decode
PGP Encryption
(See Figure 47)
A PGP key resource must be selected or created if needed (1). A different PGP encryption can be used per environment (2). Once a new file is added (3), it will contain a name (4) and value (4) from a selected source
- Model (items from the Inputs section of the service)
- Metadata
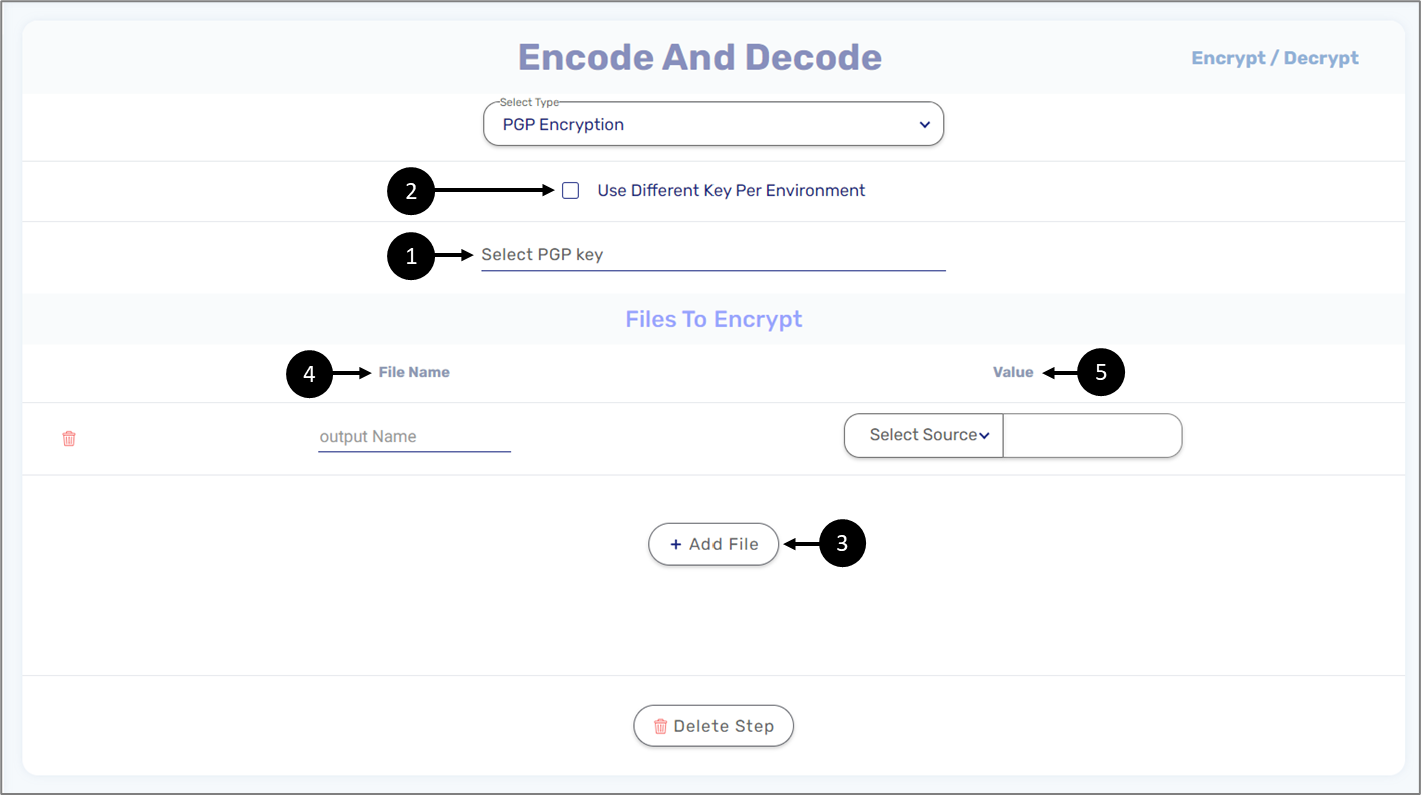
Figure 47: PGP Encryption
RSA Encryption
(See Figure 48)
A key resource must be selected or created if needed (1). A different key can be used per environment (2). Additional RSA Operation parameters must be selected (3):
- Padding Scheme:
- RSA_OAEP
- PKCS1_v1_5
- Operation:
- Encrypt
- Sign
- Hash Algorithm
- MD5
- SHA-1
- SH-224
- SHA-256
- SHA-384
- SHA-512
Once a new file is added (4), it will contain a name (5) and value (6) from a selected source
- Model (items from the Inputs section of the service)
- Metadata
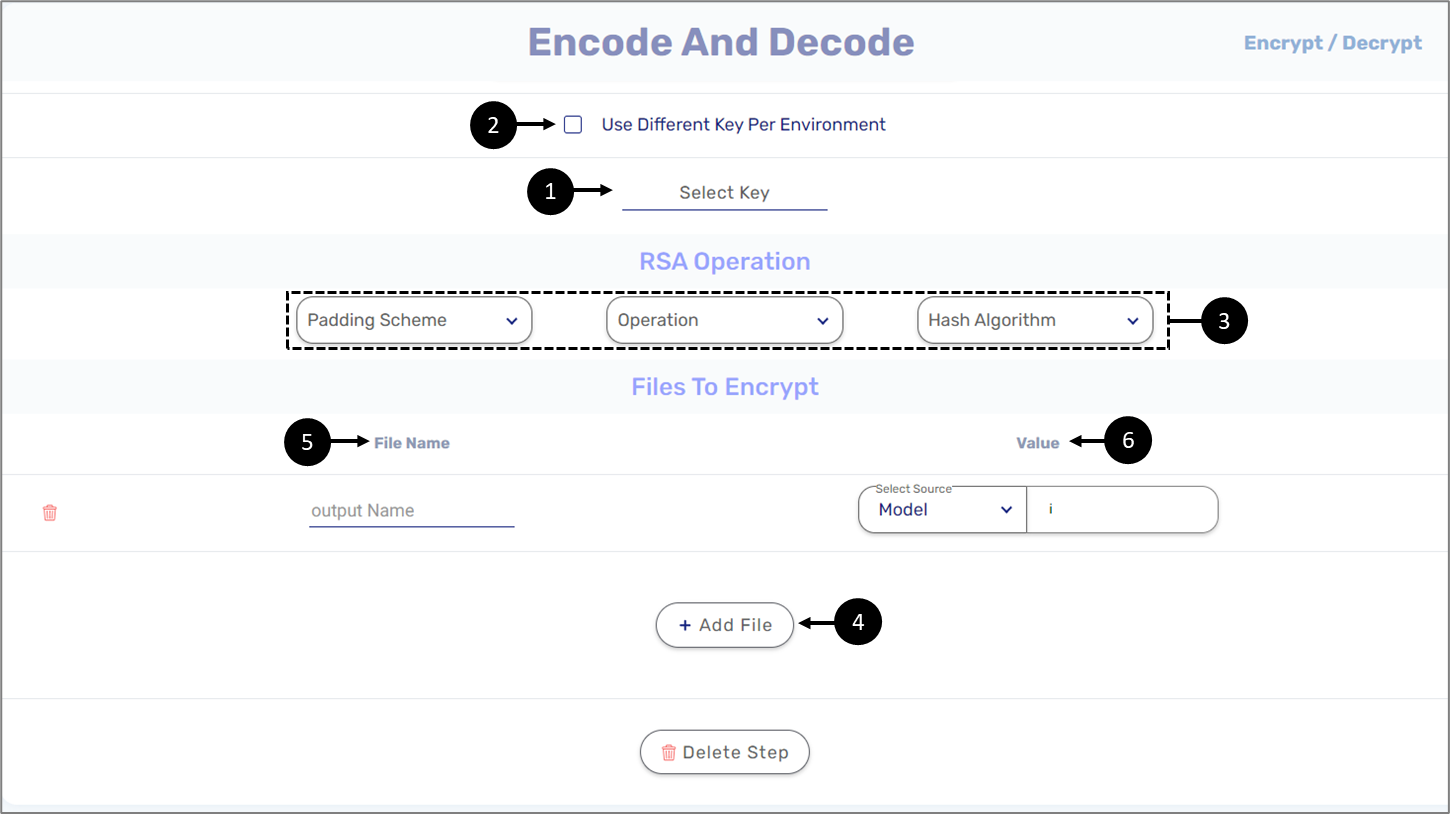
Figure 48: RSA Encryption
JWE
(See Figure 49)
JWE is a means of representing encrypted content using JSON data structures. A key resource must be selected or created if needed (1). A different key can be used per environment (2). The encryption includes two mandatory JWE Headers:
- alg - key man
- enc
. A digital key must be selected (2)(see the Keys section), but a different one can be used per environment (1). JWE Headers must be added. When clicking the + Add Header button (3) for the first time, three headers are added automatically:
- alg (mandatory) - for selecting a key management algorithm:
- RSA-OAEP
- RSA-OAEP-25
- A128KW
- A192KW
- A256KW
- dir
- ECDH-ES
- ECDH-ES+A128KW
- ECDH-ES+A192KW
- ECDH-ES+A256KW
- A128GCMKW
- A192GCMKW
- A256GCMKW
- PBES2-HS256+A128KW
- PBES2-HS256+A192KW
- PBES2-HS256+A256KW
- enc (mandatory) - for selecting content encryption algorithm -
- A128CBC-HS256
- A192CBC-HS384
- A256CBC-HS512
- A128GCM
- A192GCM
- A256GCM
- New header (not mandatory) - for adding a header according to one of three different sources:
- Constant
- Model
- Metadata
Once data to encrypt is added (4), it will contain a name and value from a selected source: Constant, Model or Metadata.
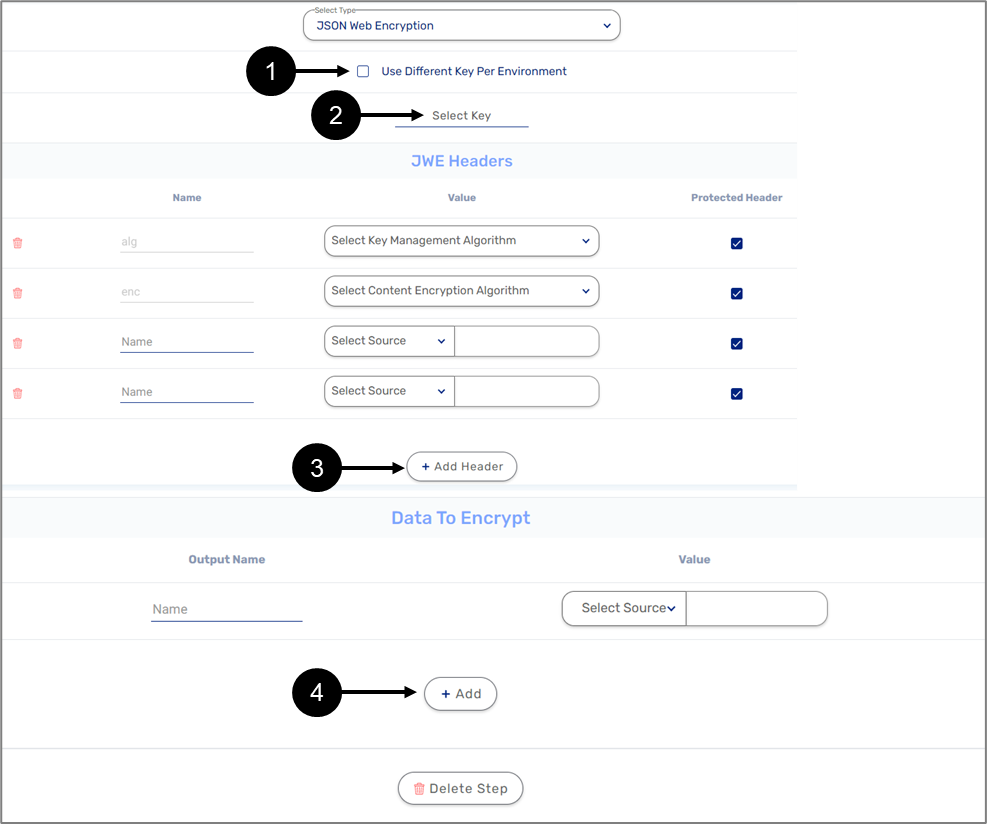
Figure 48: JWE Encryption
JWT
(See Figure 49)
JWT is a compact, URL-safe means of representing claims to be transferred between two parties. A digital key must be selected (2)(see the Keys section), but a different one can be used per environment (1). In addition to the key, a JSON Web Signature and Encryption (JOSE) must be selected from the following options:
- HS256
- HS384
- HS512
- RS256
- RS384
- RS512
- ES256
- ES384
- ES512
- PS256
- PS384
- PS512
When adding a claim (4), the source can be a Constant, from the Model, or Metadata. In general, the JWT specification defines seven reserved claims that are not required, but are recommended to add to allow interoperability with third-party applications:
Name | Description | Type |
| iss (issuer) | Issuer of the JWT | string |
| sub (subject) | Subject of the JWT (the user) | string |
| aud (audience) | Recipient for which the JWT is intended | string |
| exp (expiration time) | Time after which the JWT expires | int |
| nbf (not before time) | Time before which the JWT must not be accepted for processing | int |
| iat (issued at time) | Time at which the JWT was issued; can be used to determine age of the JWT | int |
| jti (JWT ID) | Unique identifier; can be used to prevent the JWT from being replayed (allows a token to be used only once) | int |
For an output, only one JWT token is allowed and must be provided with a name (5).
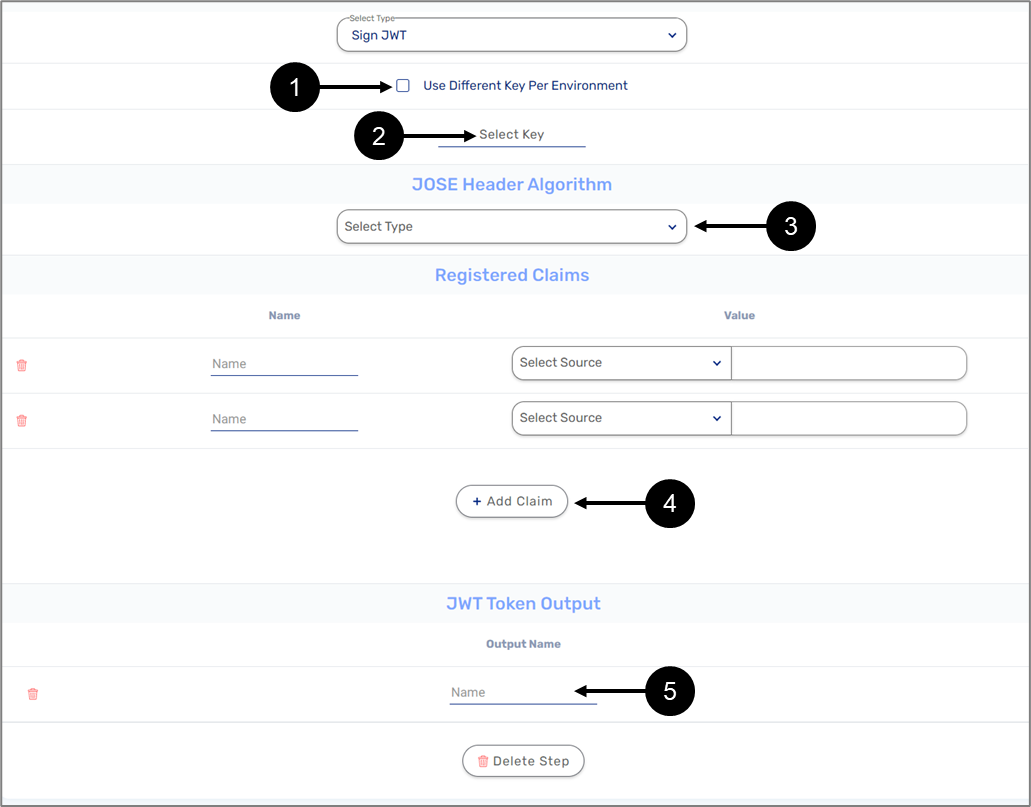
Figure 49: JWT Encryption
Hashing
(See Figure 50)
A Hashing step type allows you to convert strings to a hexadecimal value with SHA. The step must be configured with one of the following a Hash Algorithms (1):
- MD5
- SHA-1
- SHA-224
- SHA-256
- SHA-384
- SHA-512
Added outputs (2) must receive a name, source, and value. A source can be a Constant, from the Model, or Metadata.
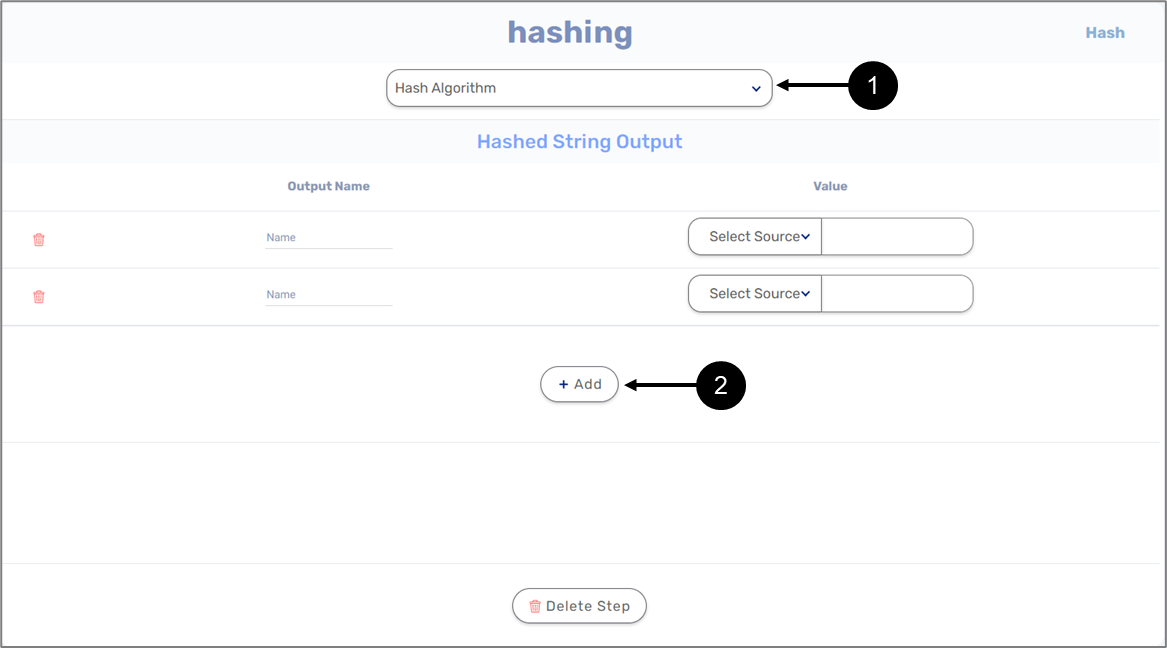
Figure 50: Step Type - Hashing
Outputs
(See Figure 51)
A service contains one output. An output contains the following information:
- Output Name - the field you are referencing in your Webflow.
- Output Type:
- String
- Number
- Boolean
- File
- Object - when an Object is selected, a plus icon appears. The icon allows you to open the Model screen and select an object type data item.
- Any
- Is Multiple:
- When checked - indicates the input is an array
- When not checked - indicates the input is not an array
- Value:
- Constant
- Model
- Metadata
When the source is set to Model Value, the data comes from one of two different origins:
- The service's Inputs section - Inputs.
- The outputs of the added steps - syntax - [api_step_name].[response_field_name/output_field_name]
For example, if your REST API step is named customerAPICall and returns customer_name, the Value should be customerAPICall.customer_name
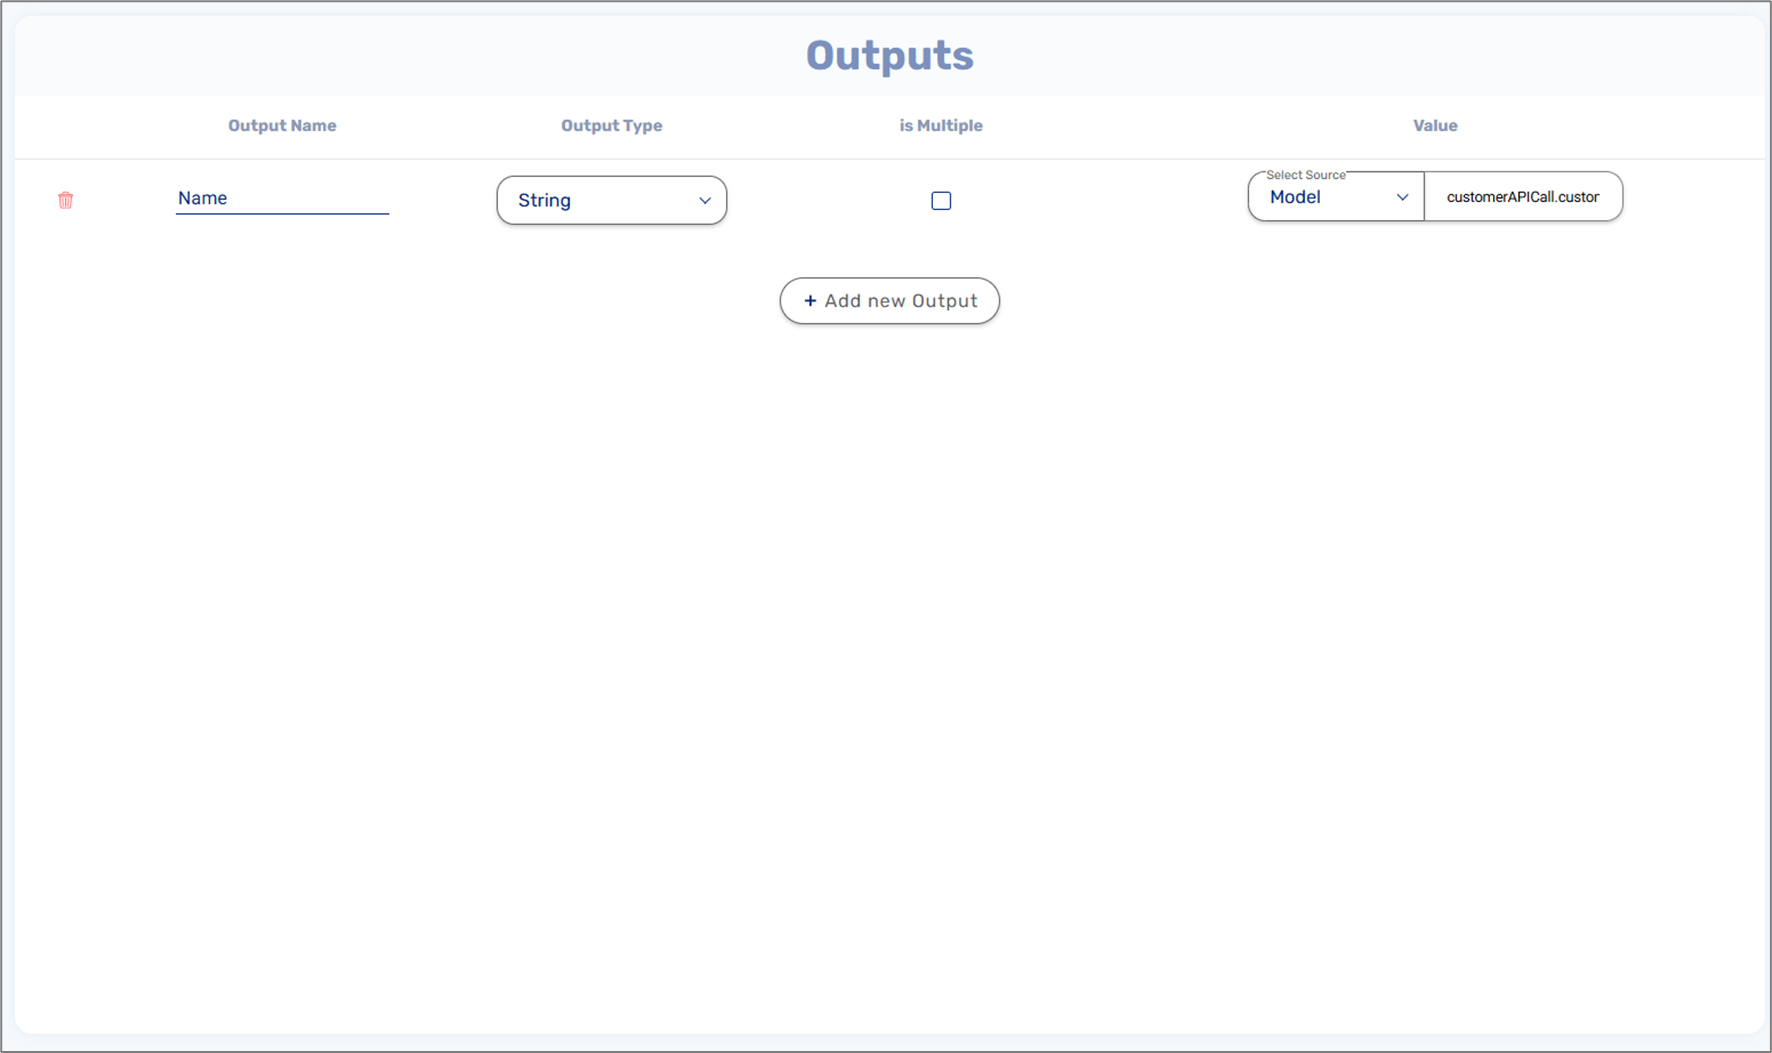
Figure 51: Outputs