Article Overview
The following article describes EasySend's Operations Portal. It explains what it is and how to use it.
What is the Operations Portal?
(See Figure 1)
The Operations Portal is your command center for tracking and managing every digital journey in your environment, all in one place. It gives you a real-time view of what's happening across your processes, from the moment a link goes out to the moment it's completed. No more digging through emails, spreadsheets, or separate boards to find out where a customer is in their journey.
With the Operations Portal, you can view any transaction as a visual map of its journey. Each step appears in order, so you can see where the transaction started, which step it's on now, and what comes next. Color-coded statuses show at a glance whether each step is completed, processing, opened, failed, not taken, or still in the future, so a stuck or failed transaction stands out immediately.
Select any step to see its details, such as who it's assigned to, when it was completed, and its step ID. For longer journeys, you can search for a step by name or ID to jump straight to it.
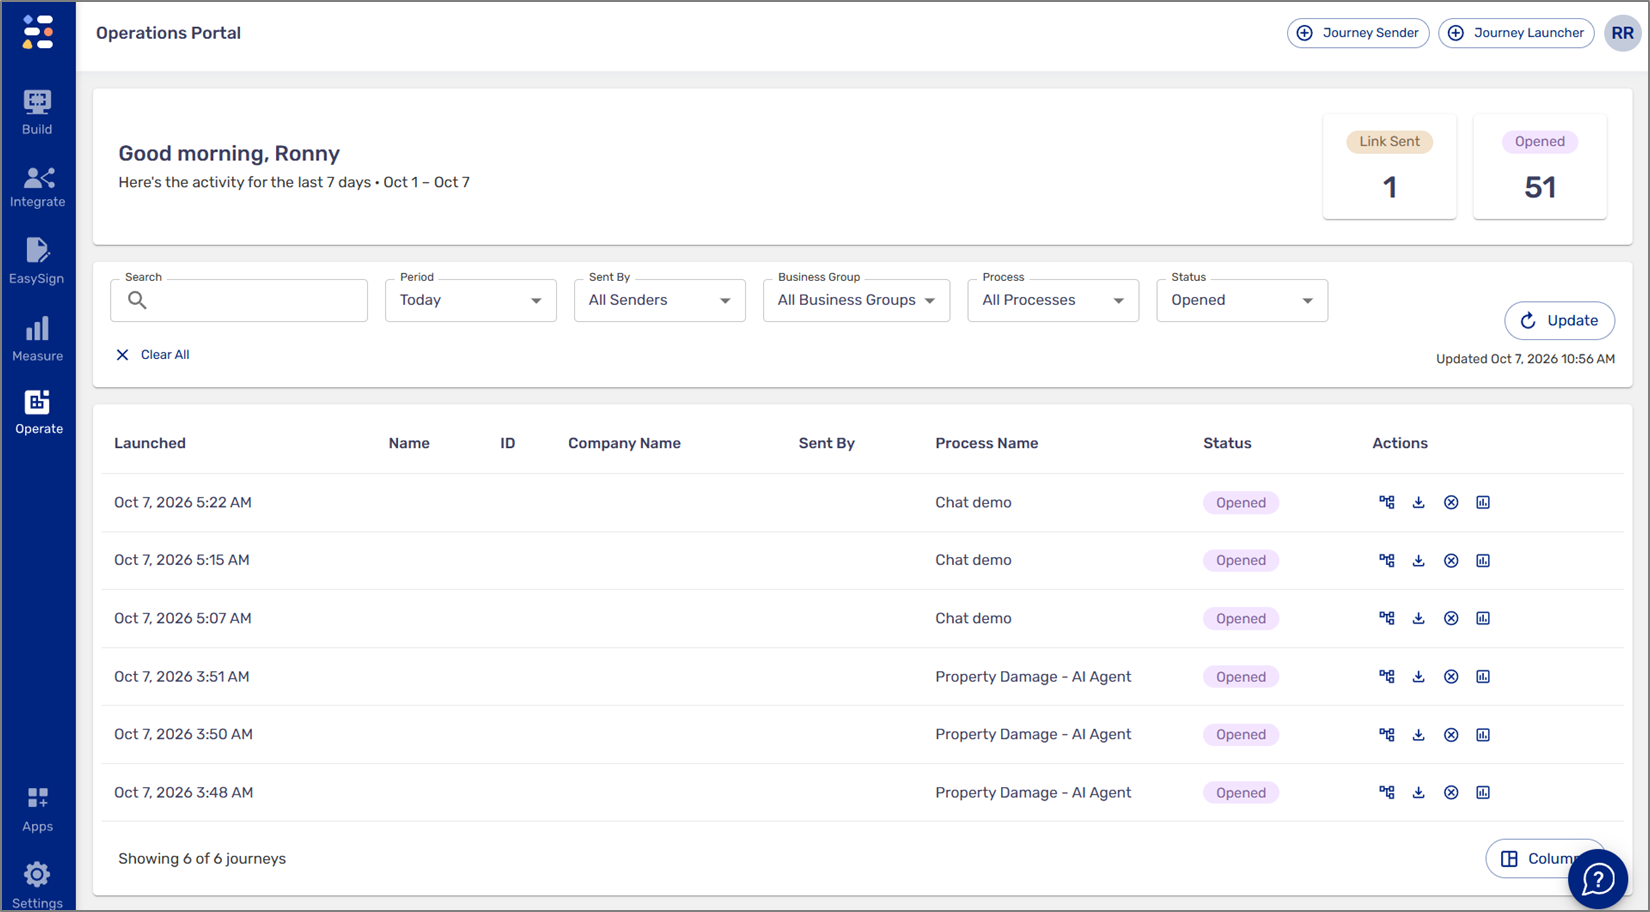
Figure 1: Operations Portal
Business Value
The Operations Portal turns "Where is this customer's application?" from a research task into a few clicks.
- Faster issue resolution. Operations teams can spot exactly where a transaction is stuck or failed and act on it right away, instead of waiting for a customer to call or a deadline to pass.
- Less manual tracking. Teams no longer need to piece together status from emails, spreadsheets, and separate systems, which frees up time for higher-value work.
- Better customer experience. Support and operations staff can answer customer questions confidently and in real time, reducing frustration and drop-off before completion.
- Higher completion rates. Visibility into where journeys stall helps teams intervene early and recover transactions that might otherwise be abandoned.
- Easier audits and compliance. Exportable transaction reports give teams a clear record of each journey, which supports internal reviews, audits, and regulatory requirements.
- Shared visibility across teams. Operations, support, and business owners all work from the same real-time view, reducing back-and-forth and handoff delays.
Navigate to the Operations Portal
(See Figure 2 and Figure 3)
To navigate to the Operations Portal, perform the following steps:
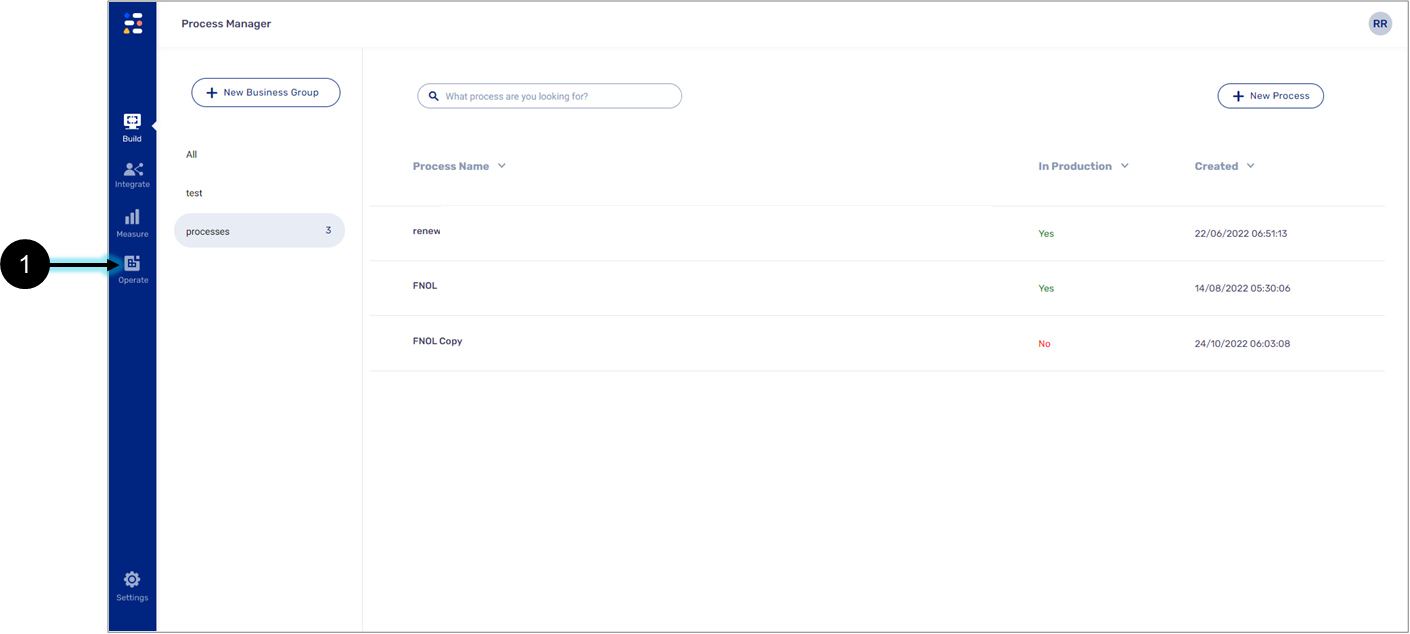
Figure 2: Operate Tab
- Click the Operate tab (1).
Result:
The Operate tab options appear:
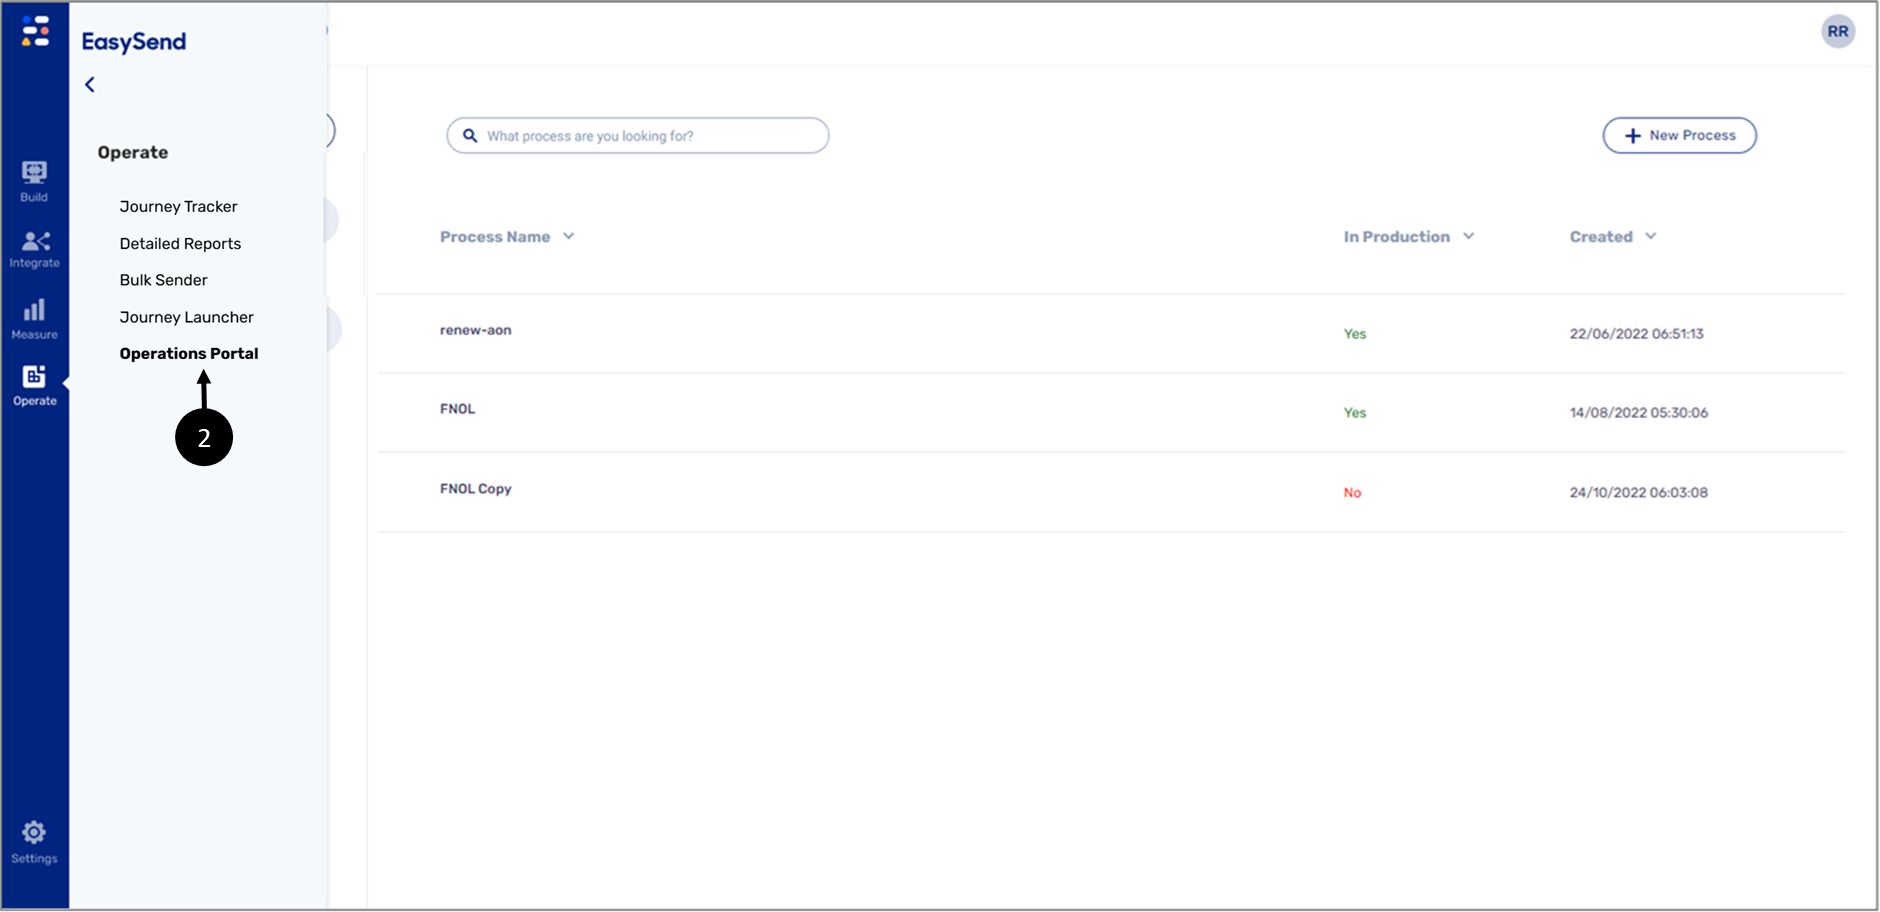
Figure 3: Operations Portal Option
- Click the Operations Portal option (2).
Operations Portal Structure
(See Figure 4)
The following sections describe the structure of the Operations Portal.
Figure 4: Operations Portal
Top Bar
(See Figure 5)
The top bar contains workspace controls and quick actions:
- Journey Sender button (1) - initiates sending a new journey to a recipient
- Journey Launcher button (2) - launches a new journey process
- User avatar (3) - access to profile, account settings, and sign-out
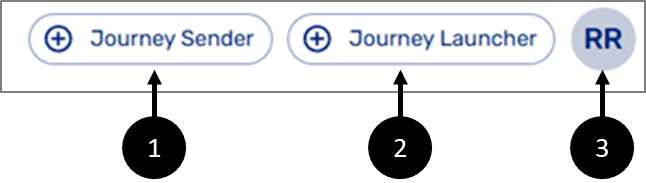
Figure 5: Top Bar
Welcome and Summary Panel
(See Figure 6)
A personalized greeting block that includes key performance counters, showing aggregate activity for the selected filters:
- Link Sent (1) - total journeys sent
- Opened (2) - journeys recipients have opened
- Completed (3) - journeys recipients have finished
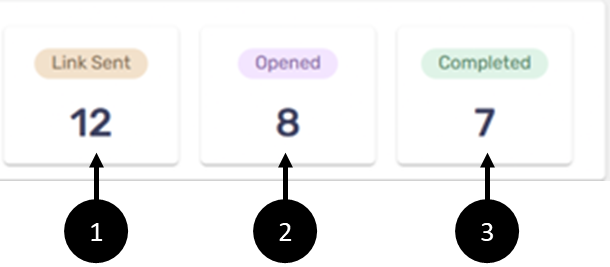
Figure 6: Welcome and Summary Panel
Filters and Controls Bar
(See Figure 7)
A horizontal toolbar that enables users to filter the activity feed and refresh data on demand:
- Search (1) - a free-text search to locate a specific recipient or record
- Period (2) - date range selector:
- Today
- Last 7 days
- Last 90 days
- Sent By (3) - filter by the team member associated with the journey
- Business Group (4) - filter by business groups
- Process (5) - filter by a process
- Status (6) - filter by journey state:
- Link Sent
- Opened
- Completed
- Processing
- Incomplete
- Failed
- Expired
- Canceled
- Update button (7) - manually refreshes the portal with the latest data according to the set filters
 .
.- Last updated timestamp (8) - displays when the data was last refreshed, so users know how current the view is

Figure 7: Filters and Controls Bar
Activity Feed (Main Table)
(See Figure 8 and Figure 9)
- The core of the portal, a list of journeys, with the following columns (1):
- Launched - date and time the journey was sent
- Name - recipient's full name
- ID - recipient identifier
- Phone - recipient's phone number
- Email - recipient's email address
- Sent By - the sender's name
- Status - color-coded badge reflecting the journey's current state:
- Link Sent
- Opened
- Completed
- Processing
- Incomplete
- Failed
- Expired
- Canceled
- Actions - per-row quick actions:
- View Transaction - opens a screen that displays a detailed visual map of the transaction
- Download files - this button emails the transaction's records
- Cancel transaction - terminates an in-progress transaction (hidden once the transaction is canceled or completed)
- The number of currently displayed journeys (2)
- Columns (3) - enables the user to add/remove columns
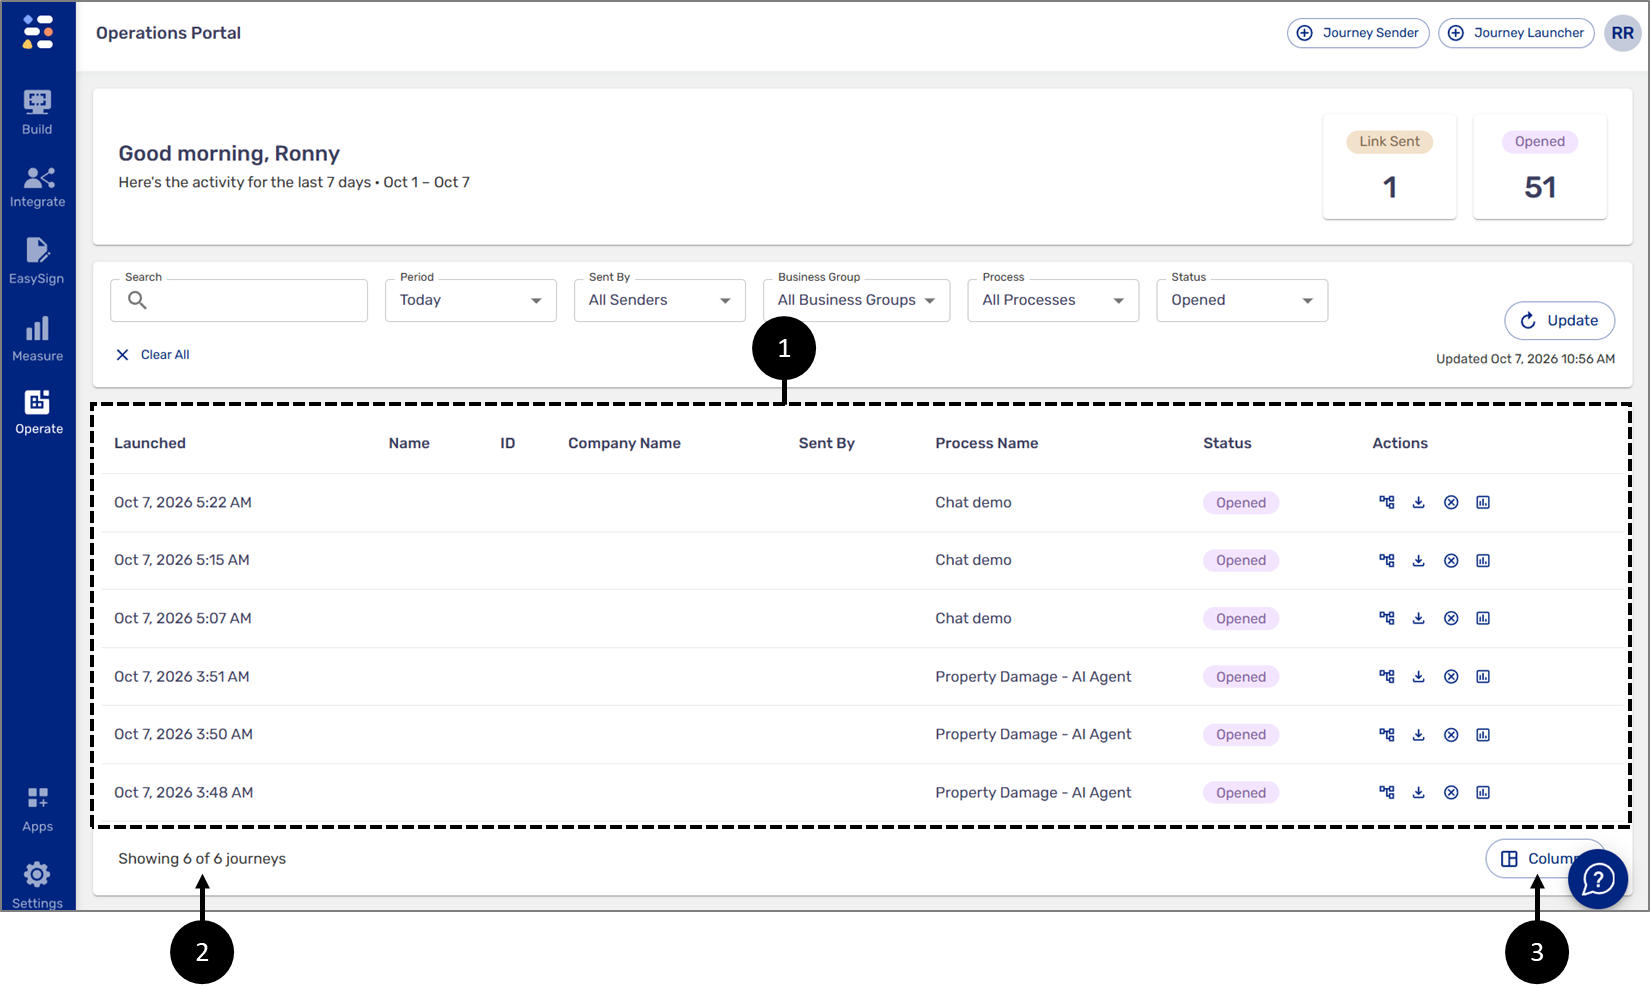
Figure 8: Activity Feed (Main Table)
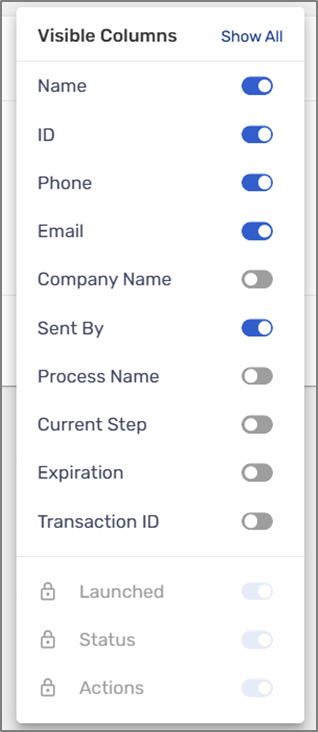
Figure 9: Visible Columns
View Transaction
(See Figure 10)
When you click View Transaction, the Operations Portal opens a visual map of that transaction's journey. The map shows every step in the journey and how they connect, so you can follow the transaction from start to finish and see exactly where it stands right now.
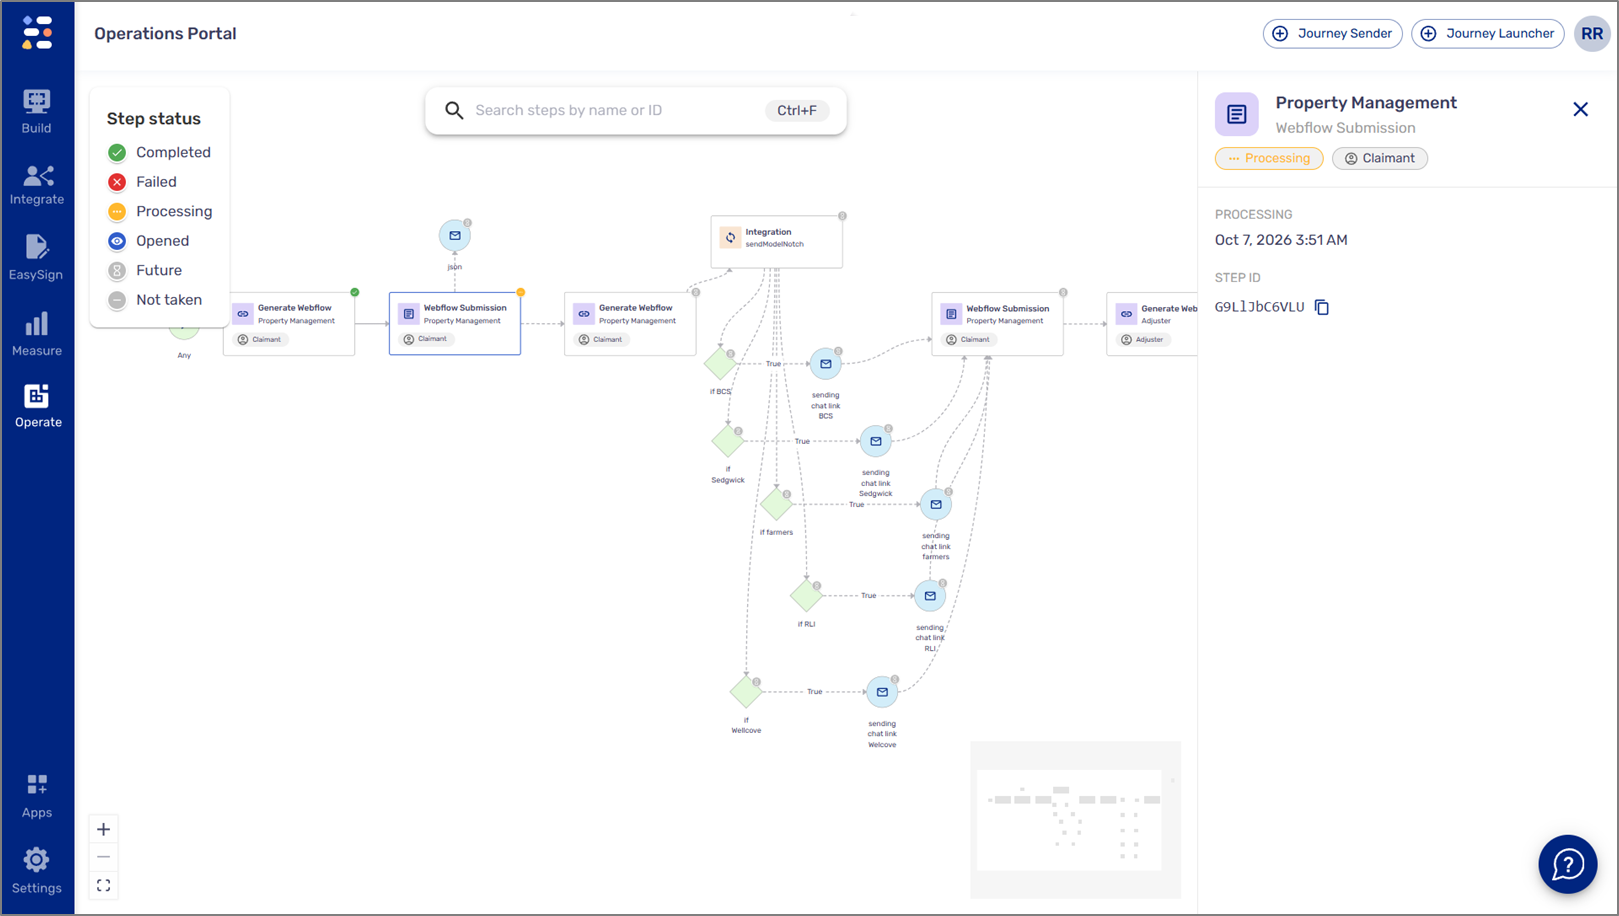
Figure 10: View Transaction
The Journey Map
(See Figure 11)
The main area of the screen displays the journey as a flow of connected steps, read from left to right. Each step appears as a card showing the step type (for example, Generate Webflow or Webflow Submission), the name of the Webflow it relates to, and the participant responsible for it, such as the Claimant or the Adjuster.
The map also shows the journey's logic. Conditions appear as diamond shapes and determine which path the transaction follows, for example, sending a different chat link depending on the carrier. Notifications, such as emails or chat links sent to participants, appear as round icons, and integrations with external systems appear as their own steps. Arrows connect the steps so you can trace every possible route through the journey. Dashed lines are unfulfilled paths, while solid lines are fulfilled paths.
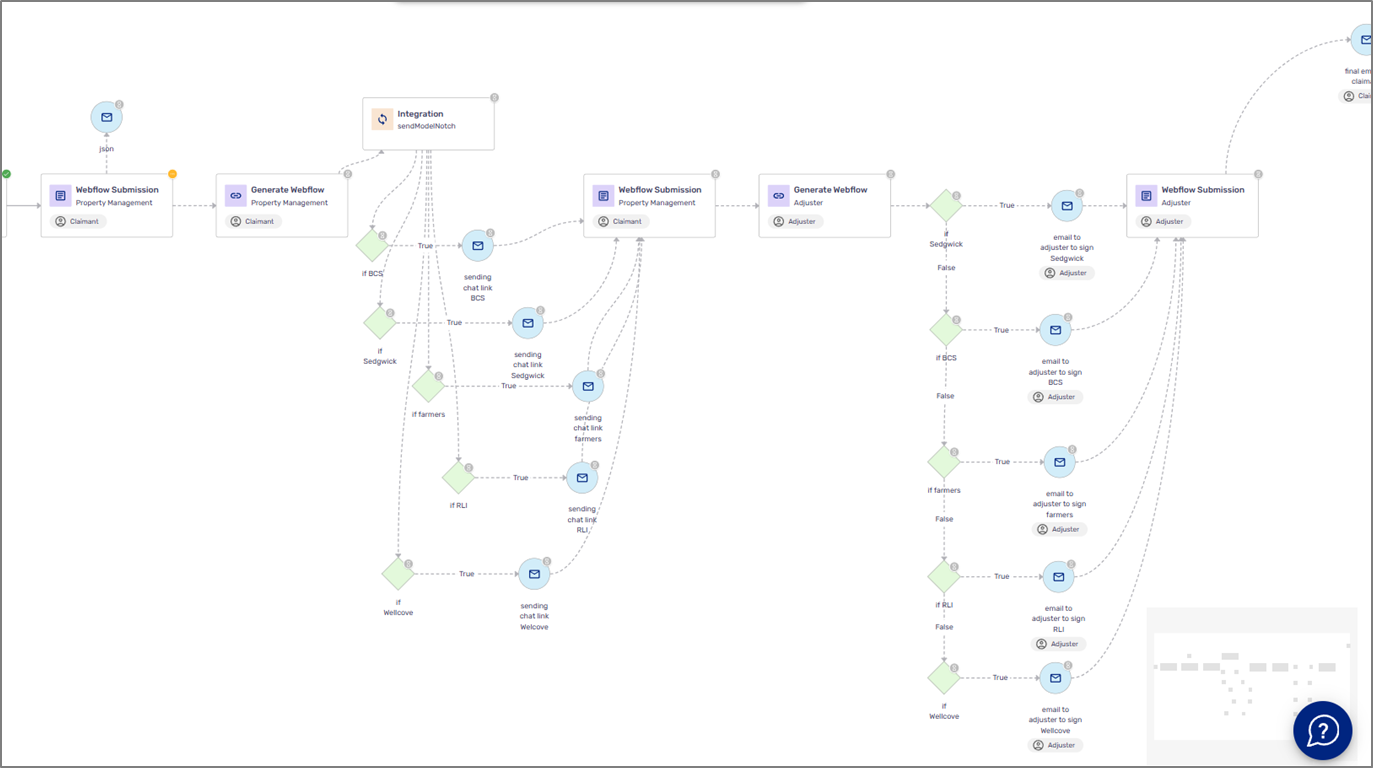
Figure 11: The Journey Map
Step statuses
(See Figure 12)
Each step displays a status indicator in its top-right corner. The Step status legend in the top-left corner explains what each one means:
- Completed - the step finished successfully.
- Failed - the step encountered an error and didn't complete.
- Processing - the step is currently in progress.
- Opened - the participant opened the step but hasn't completed it yet.
- Future - the step hasn't been reached yet.
- Not taken - the transaction followed a different path, so this step will be skipped.
This makes it easy to spot where the transaction is now, which steps are done, and whether anything has failed or stalled.
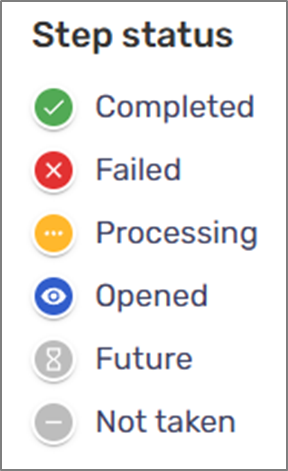
Figure 12: Step Status
Step Details
(See Figure 13)
Click any step on the map to open its details in the panel on the right. The panel shows the step's name and type, its current status, the participant assigned to it, the date and time of its latest status (for example, when it started processing or was completed), and its unique step ID. Click the copy icon next to the step ID to copy it, which is useful when sharing the step with your team or contacting support.
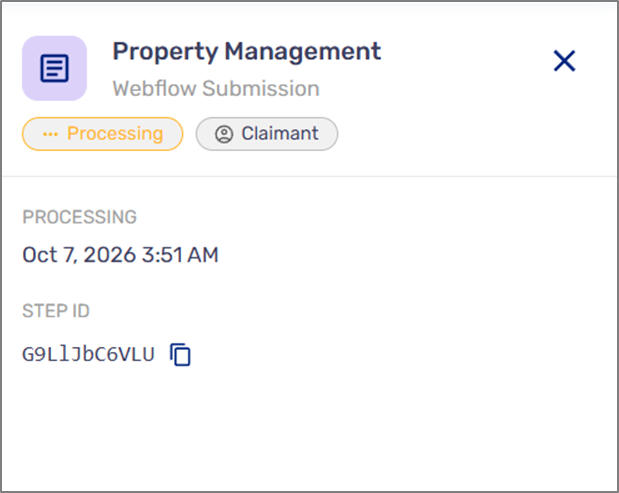
Figure 13: Step Details
Finding and Navigating Steps
(See Figure 14)
For larger journeys, use the search bar at the top of the map (or press Ctrl+F) to find a step by its name or ID. You can zoom in, zoom out, or fit the entire journey to the screen using the controls in the bottom-left corner, and use the mini-map in the bottom-right corner to see your position within the full journey and move around quickly. Dashed lines are paths the transaction hasn't taken.

Figure 14: Search Bar
Transaction Events
(See Figure 15)
When you click a transaction, the Transaction Events section becomes visible. The section displays information about the transaction's steps:
- Last Updated - time and date
- Step - the name of the step (Webflow name)
- Staus:
- Link Sent
- Opened
- Completed
- Processing
- Incomplete
- Failed
- Expired
- Canceled
- Role - as set in the Webflow and Workflow
- Step ID - unique step identifier
- Actions for in-progress transactions:
- Open link - displays the transaction's step
- Copy link - copies the transaction's step link
- Resend link - resends the transaction's step

Figure 15: Transaction events
Fields Tagging
(See Figure 16 and Figure 17)
Some columns, such as:
- Name
- ID
- Phone
will be empty by default unless metadata tagging is performed. To perform the tagging:
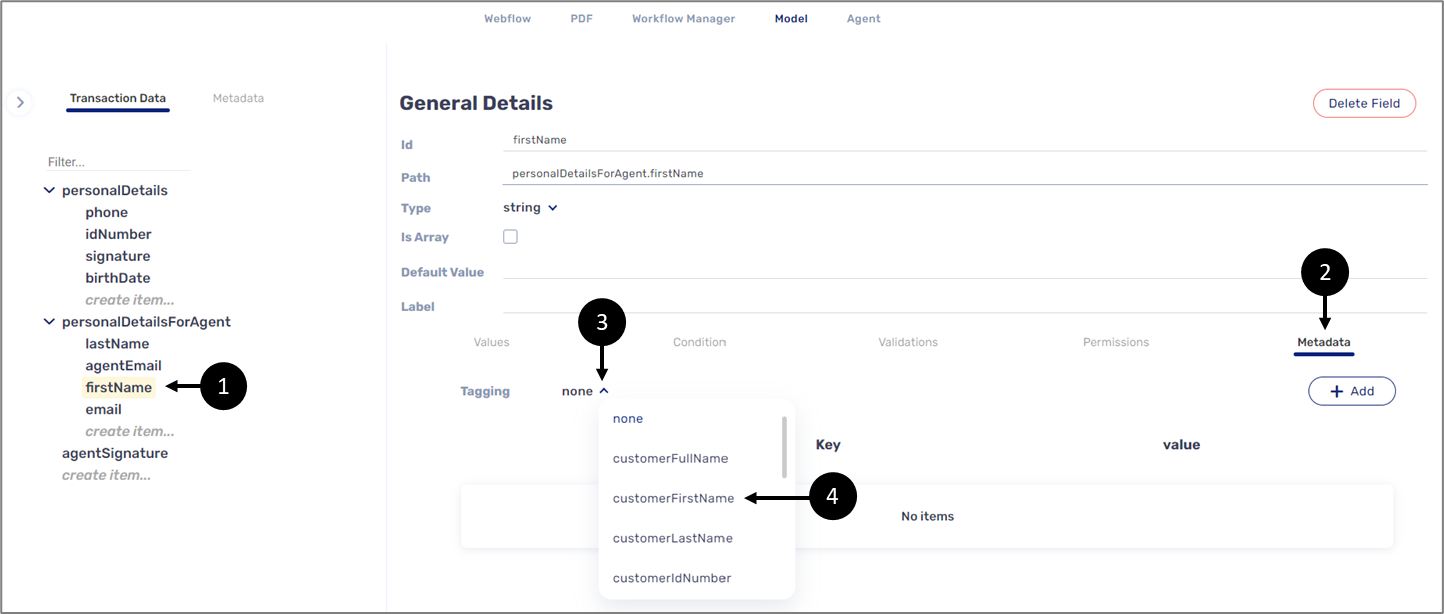
Figure 16: Tagging 1 of 2
- Access the Model screen of the digital process.
- Click the relevant data item, for example, firstName (1).
- Click Metadate (2).
- Click the Tagging dropdown (3).
- Click customerFirstName (4).
Result:
The data item is tagged:
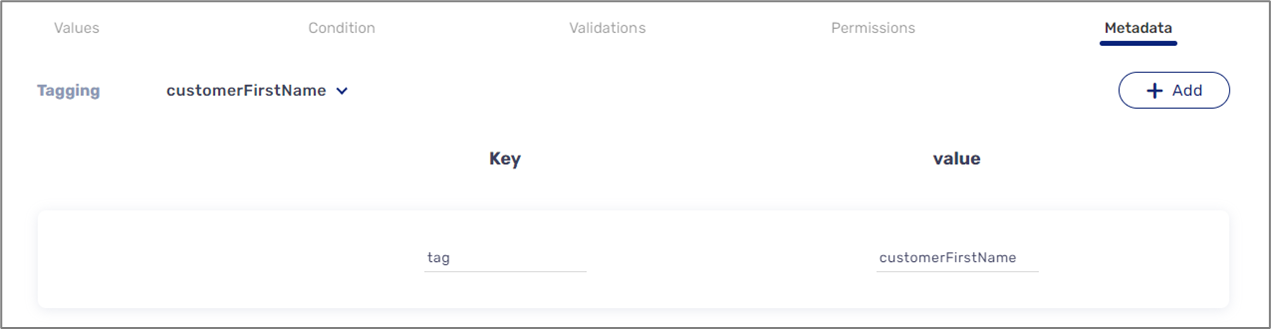
Figure 17: Tagging 2 of 2
Troubleshooting
If something in the Operations Portal isn't behaving as expected, this section walks through the most common issues and how to resolve them.
Data and Display Issues
The activity feed looks out of date or empty
The portal doesn't auto-refresh in real time. If you've just sent a journey or expect to see recent activity, click the Update button to pull the latest data. Check the "Updated" timestamp next to the button to confirm when the view was last refreshed.
If the feed is still empty, verify that your filters aren't excluding the records you're looking for, particularly the Period filter, which defaults to the last 90 days. Older journeys won't appear unless you extend the range.
Can't find a specific journey or recipient
Start by clearing all filters and resetting them one at a time. A common cause is a stale filter combination, for example, a Business Group or Sent By value that excludes the record. Use the Search field with the recipient's name, ID, phone, or email for the fastest lookup.
If the journey still doesn't appear, confirm you're in the correct environment. Journeys sent in one environment won't show up in another.
The dashboard counters (Link Sent / Opened / Completed) don't match the table
The summary counters reflect the currently applied filters. If the numbers seem off, check that your filter selections are intentional. Resetting filters to their defaults should bring the counters back in line with the full activity view.
Status and Journey Issues
A journey is stuck in "Link Sent" and never moves to "Opened."
This usually means the recipient hasn't opened the link yet. Confirm that:
- The recipient's email or phone number on the record is correct
- The message wasn't filtered into spam or blocked by their provider
- The link hasn't expired (depending on your process configuration)
You can resend by launching a new journey to the same recipient, or cancel the existing one first using the action icon on the row.
A journey is stuck in "Opened" and never reaches "Completed."
The recipient opened the link but didn't finish the journey. They may have abandoned mid-process, encountered an error, or set it aside. Reach out directly if needed, or cancel and relaunch.
I can't cancel a journey
The cancel action is only available for journeys that are still in progress (typically Link Sent or Opened). Journeys that are already completed or canceled won't show the cancel icon — this is by design.
Access and Permissions Issues
I don't see the Journey Sender or Journey Launcher buttons
These actions are permission-based. If they're missing or grayed out, your role may not include journey-creation rights. Contact your administrator to request access.
I can't switch environments
The environment selector only shows environments you have access to. If you need to work in a different one, your administrator will need to grant permission.
I don't see certain business groups or processes in the filters
Filter options are scoped to what you have access to. Missing options usually indicate a permissions boundary rather than a system issue.
Performance Issues
The portal is slow to load, or filters take a long time to apply
Large date ranges combined with broad filter selections can return heavy result sets. Try narrowing the Period first, then layering on additional filters. If performance issues persist, refresh your browser or clear its cache.
Downloads aren't working
Make sure your browser allows downloads from the portal and that pop-ups aren't being blocked. If a specific record fails to download repeatedly, note the journey's launch time and recipient and report it through the support channel.