Article Overview
The following article describes best practices, tips, and tricks to use when creating a digital process.
What are Best Practices, Tips, and Tricks?
Best practices, tips, and tricks can be used to simplify the way in which you create a digital process. All The tips and tricks described in this article were written by EasySend’s expert implementers and are based on knowledge and experience.
Building a Digital Process - Where to start?
A digital process has different layers:
- Webflow
- Model
- Workflow
- Journey Sender
It can be confusing when trying to decide where to start. The following sections will guide you through your journey of creating a digital process.
Step 1 - Webflow
The Web Flow contains all the components, and each component has its own set of properties. The following tips from our team of experts are about how you build your Webflow.
TIP 1:
(See Figure 1)
Before adding components to the canvas, verify that the correct theme is attached to the Webflow. Adding components first and changing the theme later can result in deployment errors.
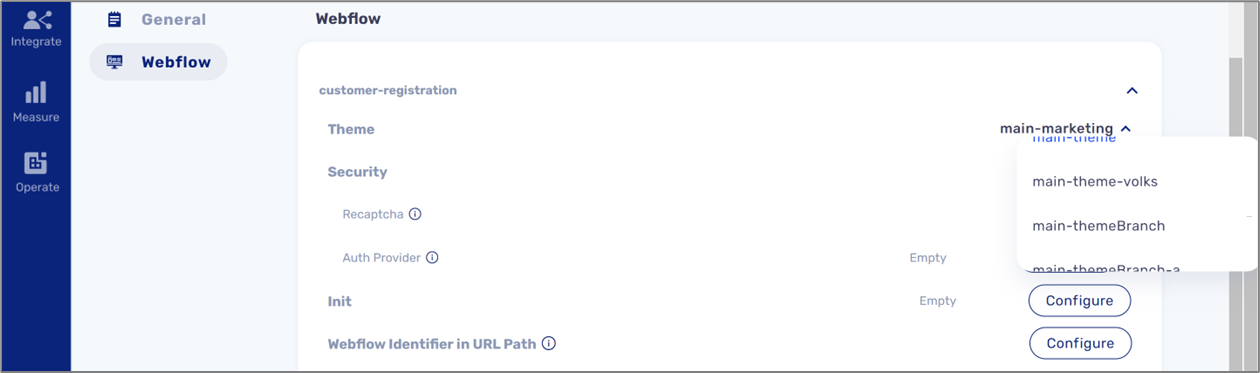
Figure 1: Theme Selection
To read more about themes, see the Webflow Overview article.
TIP 2:
(See Figure 2)
Instead of adding multiple Main pages with components to the canvas, add just one Main Page to the canvas, and add other components on top of it. Configure the properties of each component, when you are done, copy and paste the Main Page and edit it by removing and adding components.
- Use keyboard shortcuts such as Ctrl + C and Ctrl + P to copy and paste the Main Page component.
- To be able to paste a copied Main Page component, first click and mark another Main Page.
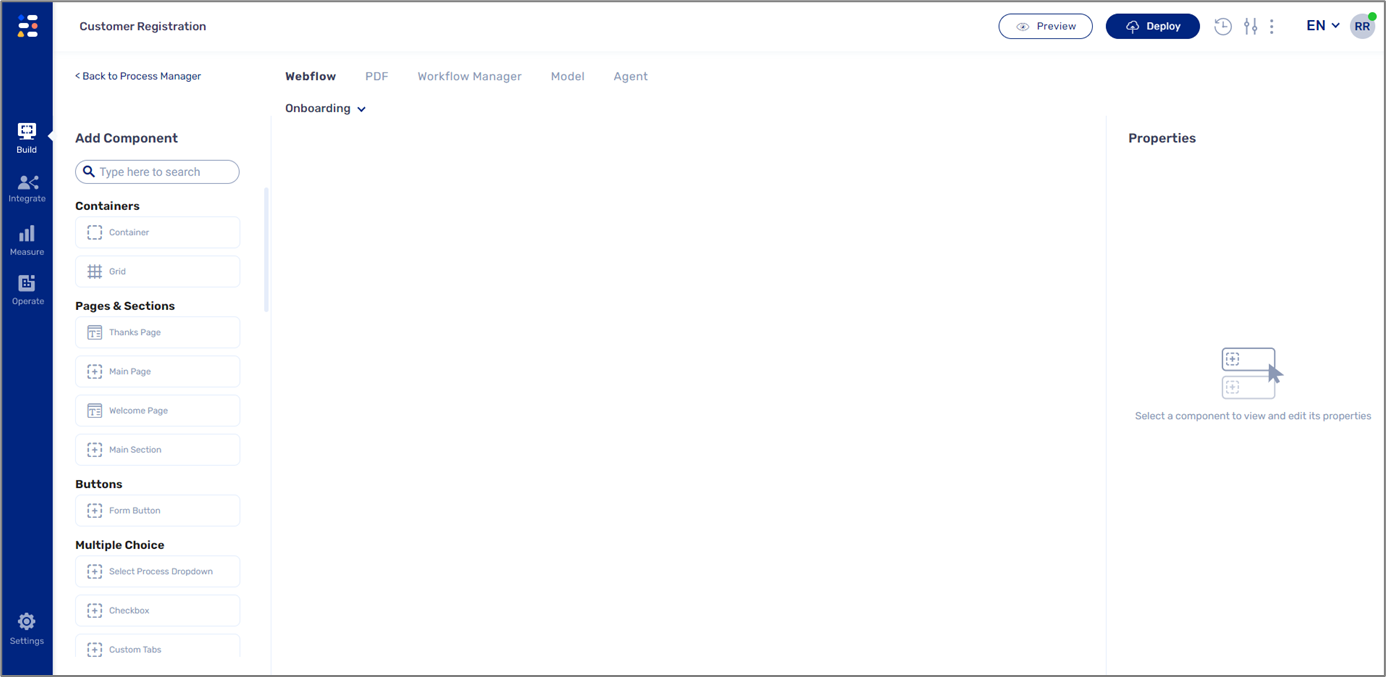
Figure 2: Components
To read more about components and their properties, see the Webflow Components article and the Webflow Basics articles.
TIP 3:
(See Figure 3)
Connect each component to the Model and verify that the connection worked as indicated by the yellow marking. Do not worry about the structure of the data items right now, you can adjust that later.
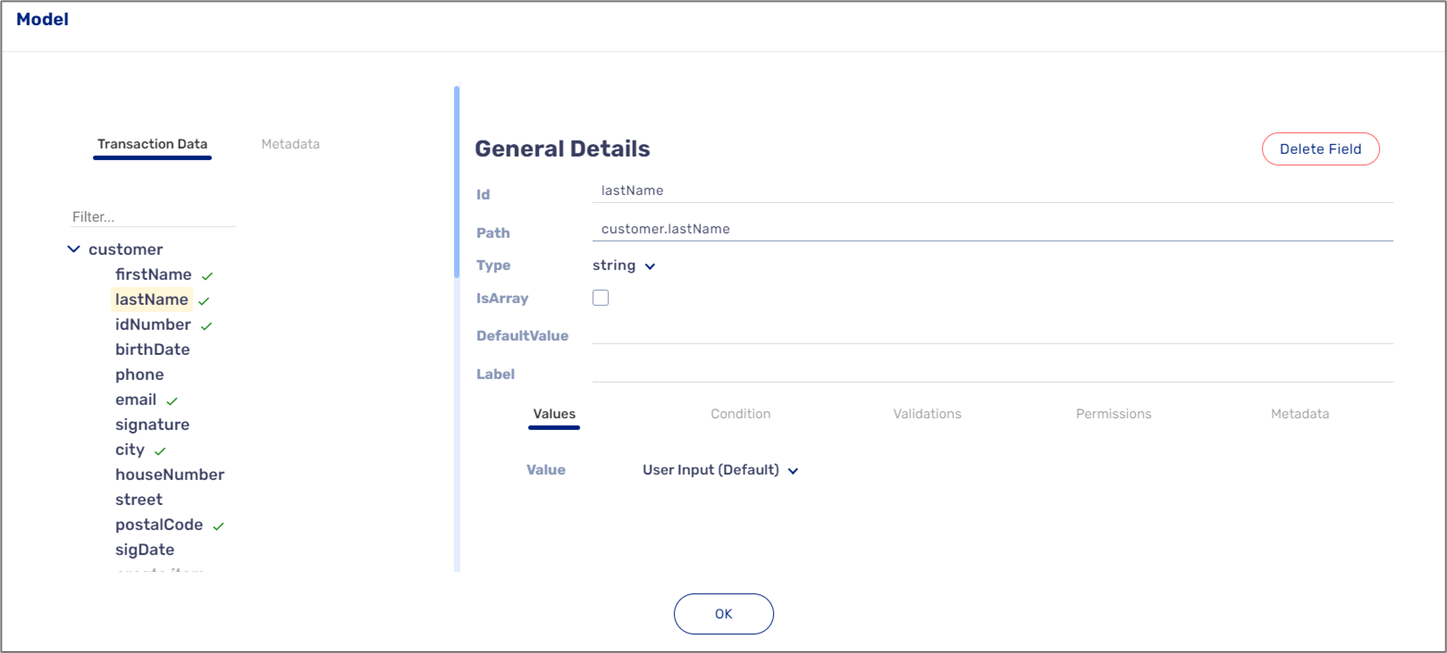
Figure 3: Connecting to the Model
To read more about connecting components to the model and creating data items, see the Model Overview and the Setting Up the Model articles.
TIP 4:
(See Figure 4)
Once you are done configuring and connecting, deploy the digital process and view it to verify everything is fine. In case there are deployment alerts/errors, components do not appear, or the structure is not to your satisfaction, troubleshoot the errors, adjust the structure of the components, and verify the connectivity to the Model once more.

Figure 4: Deployment Errors
TIP 5:
When deploying and viewing for QA purposes, there is no need to click deploy and preview every time a change is implemented. Once the digital process is active, keep its tab open. After you click deploy and the deployment process is over, refresh the tab of the digital process, and all the changes will appear.
TIP 6:
When your QA process is done, copy and paste the Main Page with the components to the canvas as much as needed. Perform adjustments to each pasted Main Page and its components.
TIP 7:
Do not rename a Webflow after you have created it - it will crash the process. If you want to change, create a new Webflow, and copy all the content to it.
Step 2 - Model
The Model contains the data structure of the digital process, and it is also where you will define the logic and behavior of your digital process. The following tips from our team of experts are about the way you set up your Model.
TIP 1:
(see Figure 5)
Always group related data items under an object type data item. Grouping data items helps you organize and track them. For example, all customer-related data items such as firstName, lastName, idNumber will be grouped together under an object data item named customerDetails
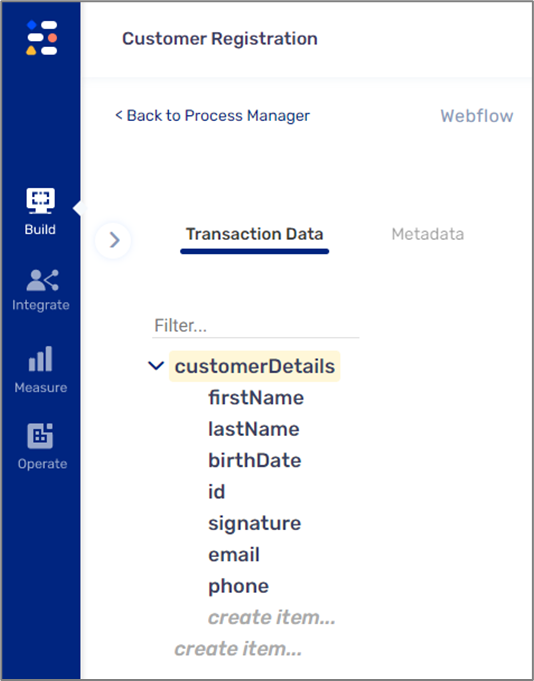
Figure 5: Model Data Items
To read more about creating data items and field types, see the Model Overview, Setting Up the Model, and the Field Types articles.
TIP 2:
(see Figure 6)
When you want to implement logic and behavior such as conditions or permissions on a page/section, make sure to connect a page/section to an object data item. All the data items nested within the object will inherit the logic and behavior.
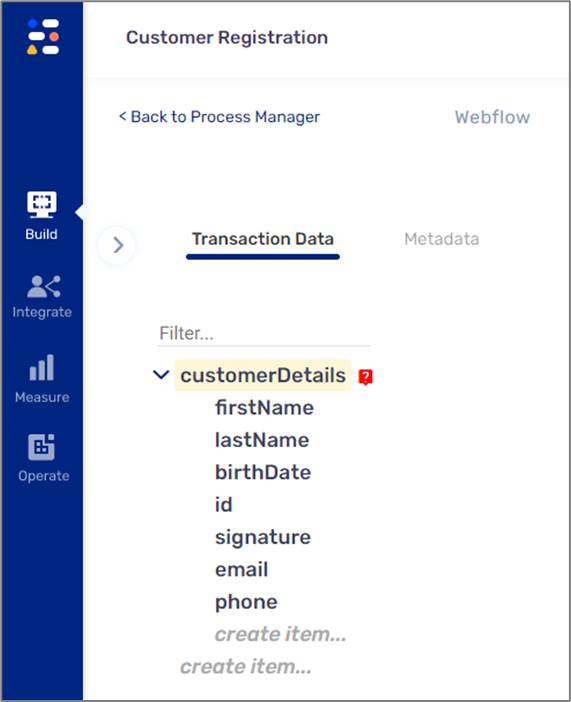
Figure 6: object Data Item with Condition
TIP 3:
(See Figure 7)
When adding dynamic fields to Expressions or Conditions, add the fields as dots and not full paths. When you amend the Model, the fields will update automatically.
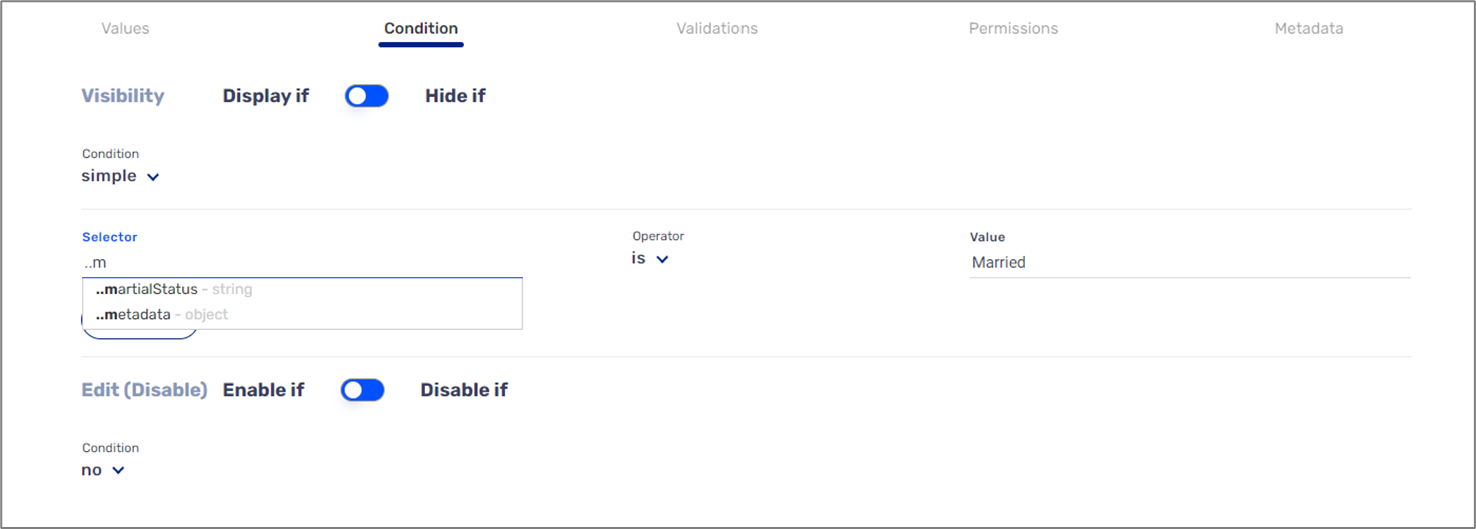
Figure 7: object Data Item with Condition
To read more about Conditions and Expressions, see the Conditions and the Values articles.
TIP 4:
When you QA your digital process, save the required validation for last. This will help you perform the QA process faster.
TIP 5:
(see Figure 8)
When adding validations verify that they are added correctly, as indicated by the appearance of a gray background. Figure 7 displays a validation that is not added correctly (1) and a validation with a gray background (2) that is added correctly.
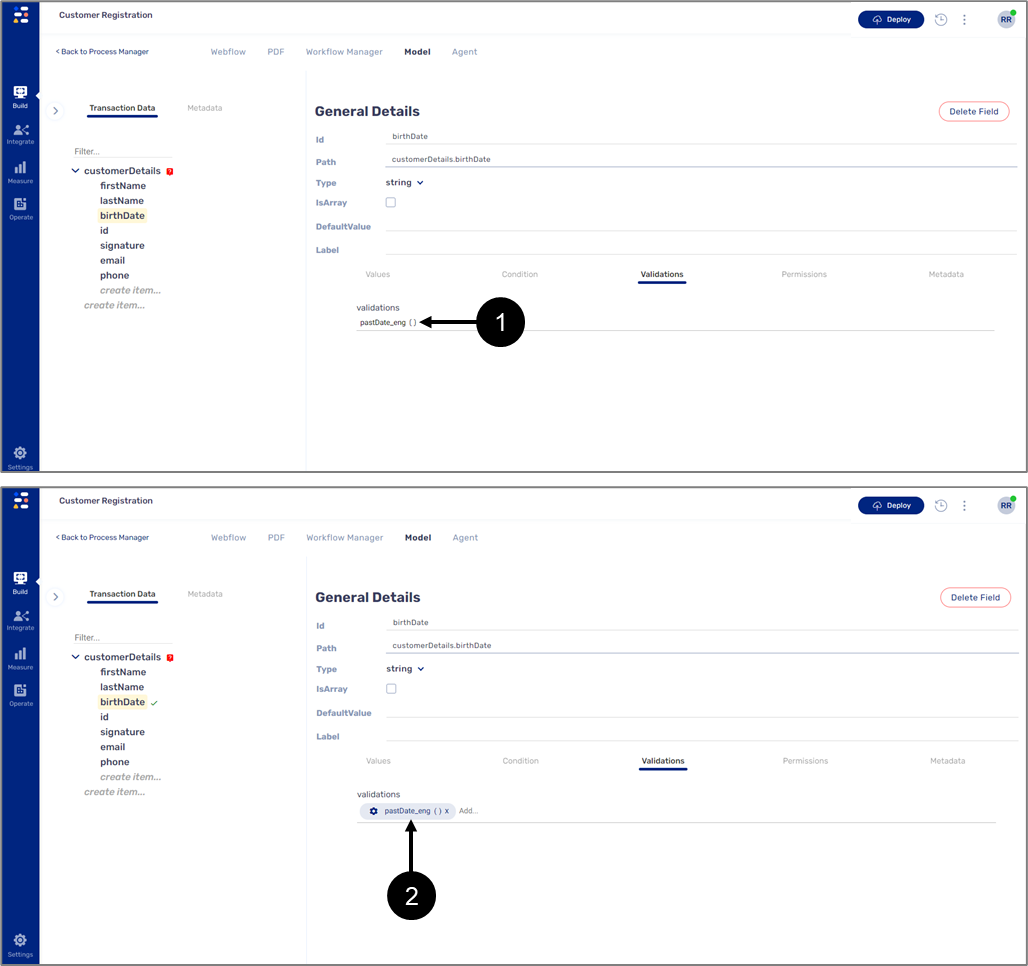
Figure 8: object Data Item with Condition
TIP 6:
(See Figure 9)
When creating validations with code, you need to add them to the Webflow through the validation bank of the Model screen.
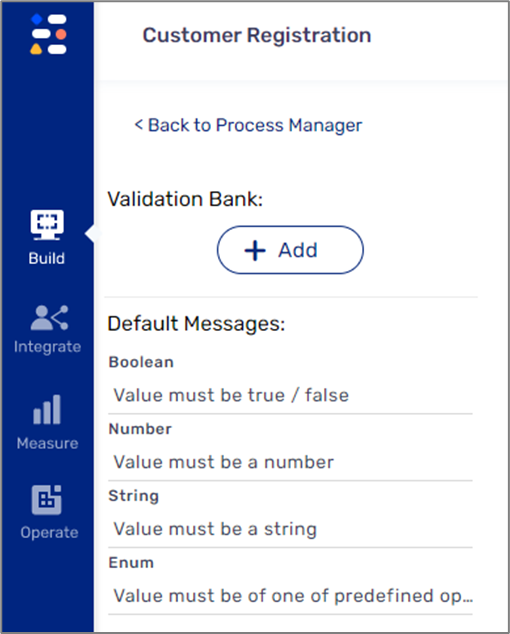
Figure 9: Model Screen Validation Bank
TIP 7:
When adding validations, they are executed in a specific order from left to right, which means there is importance to the order in which you add them. The exception in the required validation will always be executed first.
TIP 8:
When applying permissions, make sure that all the available roles are added with the appropriate access permissions.
Step 3 - PDF
The uploaded PDF is used as a preview page so that the end-user of the digital process can view the information that was input before the final submission. The following tips from our team of experts are about the way you mark and define PDF fields.
TIP 1:
(see Figure 10)
When you mark and define PDF fields using the different field types from the Tools section, you can deploy just one field type and then use the Properties section options to select (1), Duplicate (2), and adjust the fieldType (3) to the desired one.
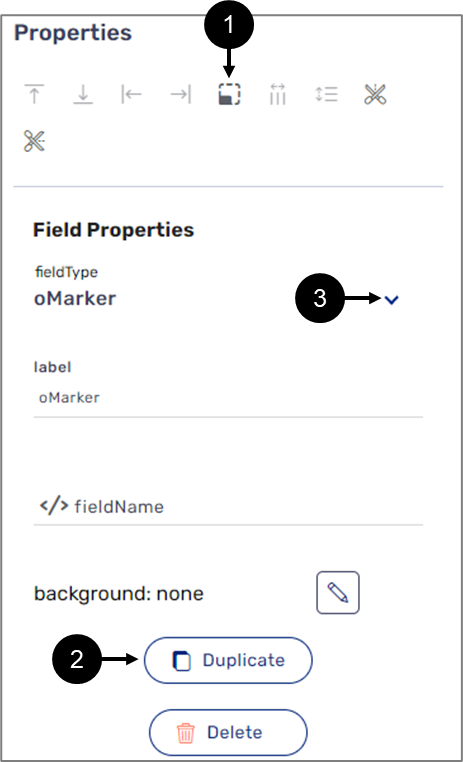
Figure 10: Properties Section Options
- You can also use keyboard shortcuts to copy and paste instead of using the Duplicate button.
- It is possible to navigate between PDFs fields using the Tab key.
- To read more about marking and defining PDF fields and the Properties section options, see the PDF Overview and the Creating and Defining a PDF article.
TIP 2:
(See Figure 11)
Use only one text field type to mark and define rows and columns and use the vertical slicer (1) and the horizontal slicer (2) to adjust.
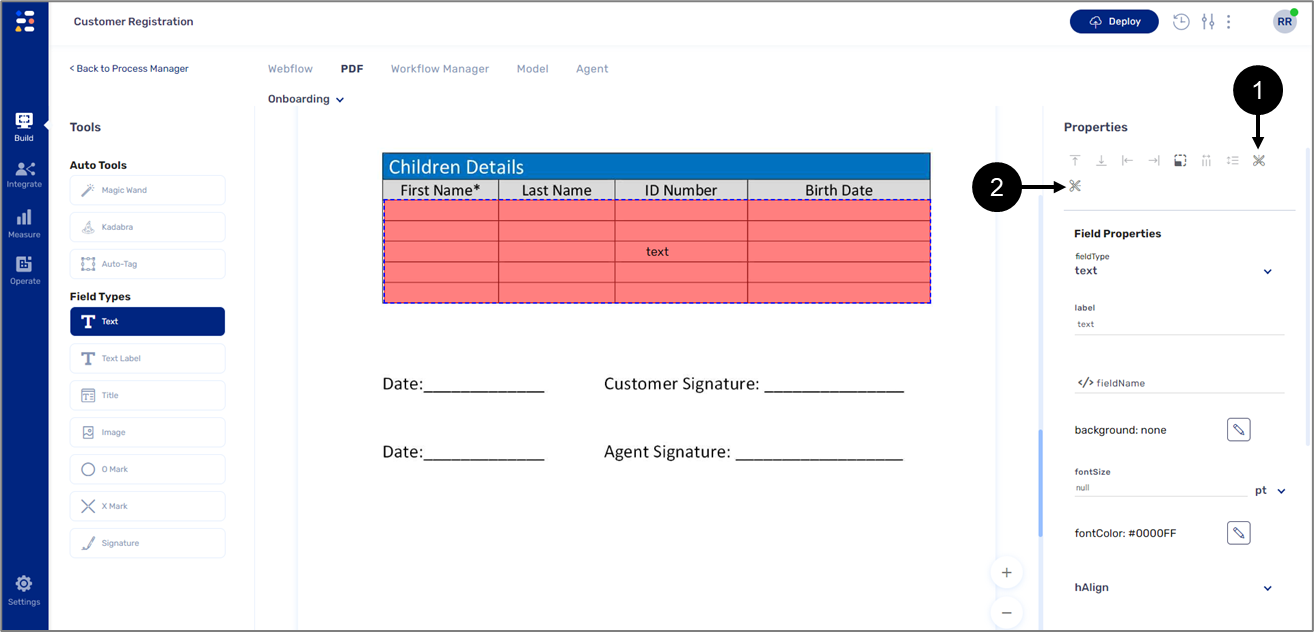
Figure 11: Properties Section label
TIP 3:
(see Figure 12)
Each time you mark and define a PDF field using the Text field type, change its label to indicate which PDF field the specific Text field type is defining, this will help you to better organize and keep track of your work on the PDF.
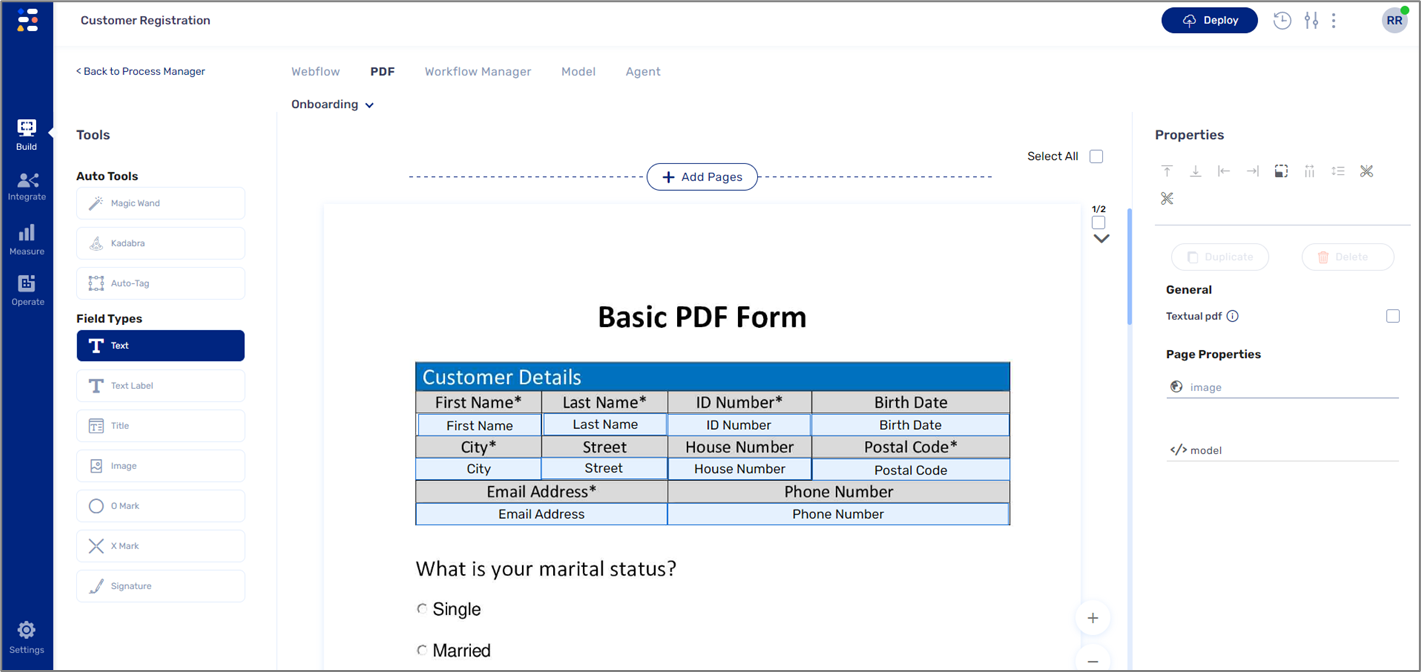
Figure 12: Properties Section label
To read more about marking and defining PDF fields and the Properties section options, see the PDF Overview and the Creating and Defining PDF articles.
TIP 4:
(see Figure 13)
When connecting defined PDF fields to the Model, it is recommended to copy the Model path from the Webflow (1) - from each relevant corresponding component and paste it into the properties section of the field type (2).
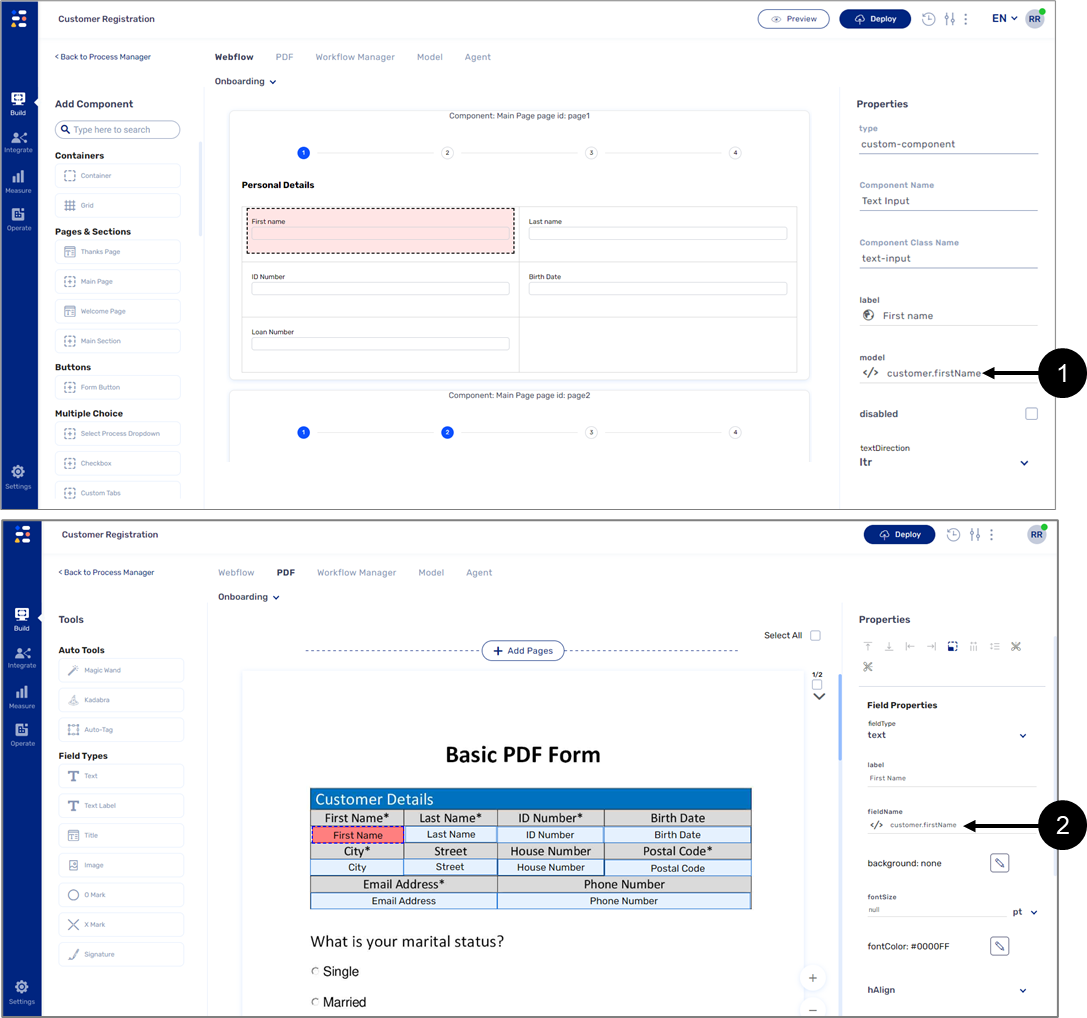
Figure 13: Connecting to the Model
To read more about marking and defining PDF fields and the Properties section options, see the PDF Overview and the Creating and Defining a PDF article.
TIP 5:
(see Figure 14)
When connecting PDF pages to the Model, it is recommended to copy the Model path from the Webflow (1) - from each relevant corresponding component and paste it in the properties section of the page (2).
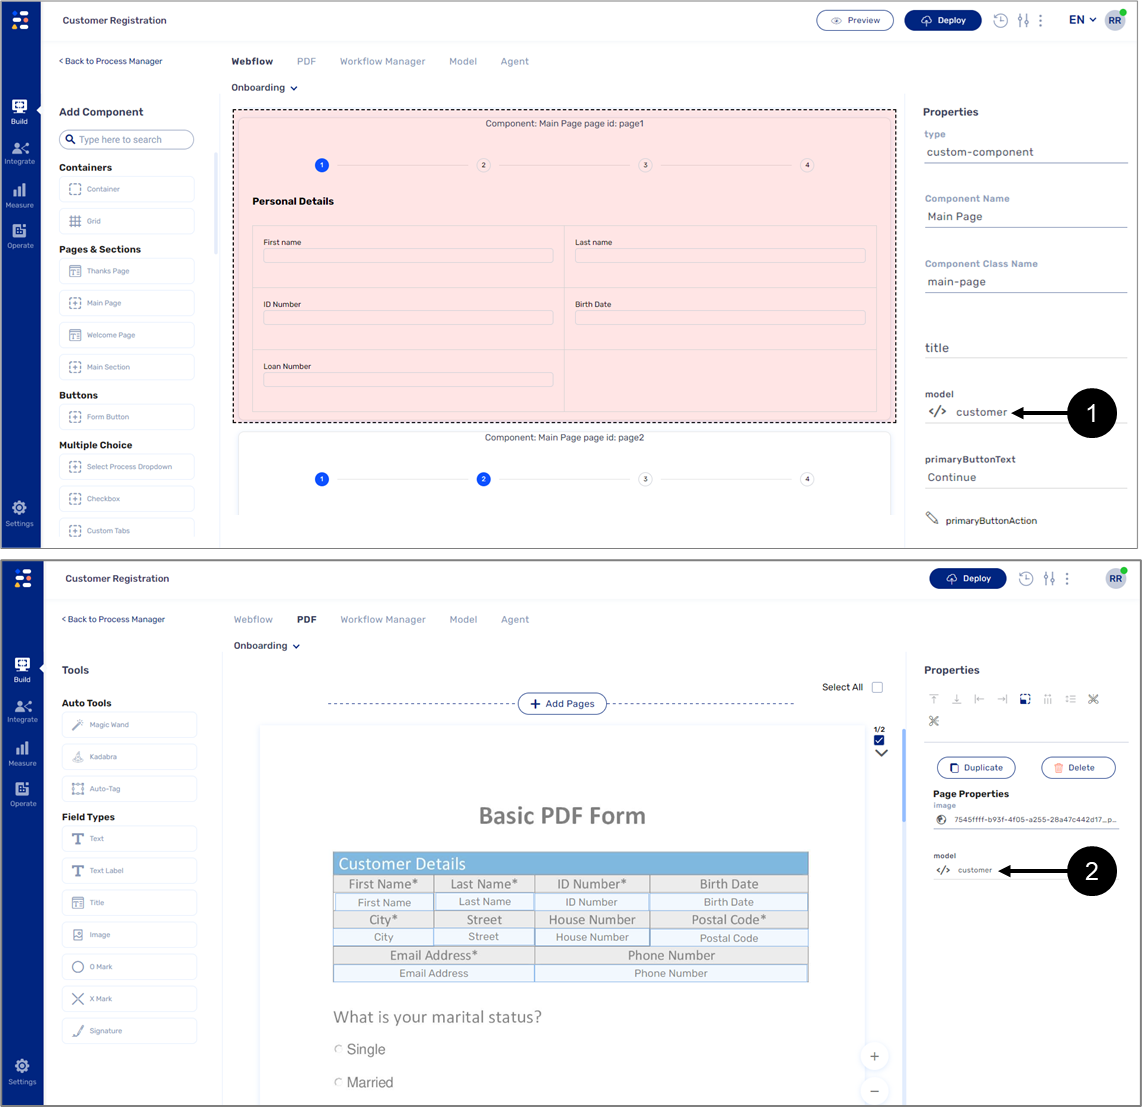
Figure 14: Connecting a Page to the Model
TIP 6:
(see Figure 15)
Verify that the connection worked as indicated by the yellow marking.
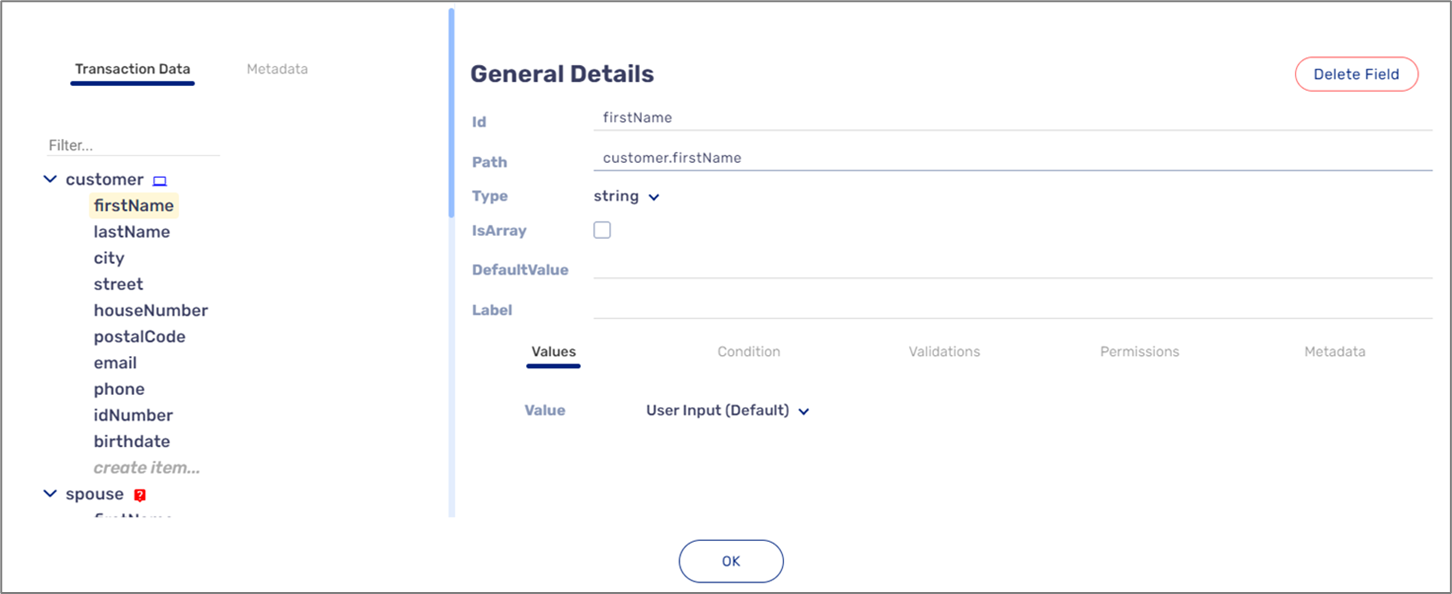
Figure 15: Model Connectivity
TIP 7:
(see Figure 16)
When defining O Mark fields, it is recommended to copy each option value (1) from the Webflow Radio Question component and paste it in the groupValue filed (2) in the Properties section.
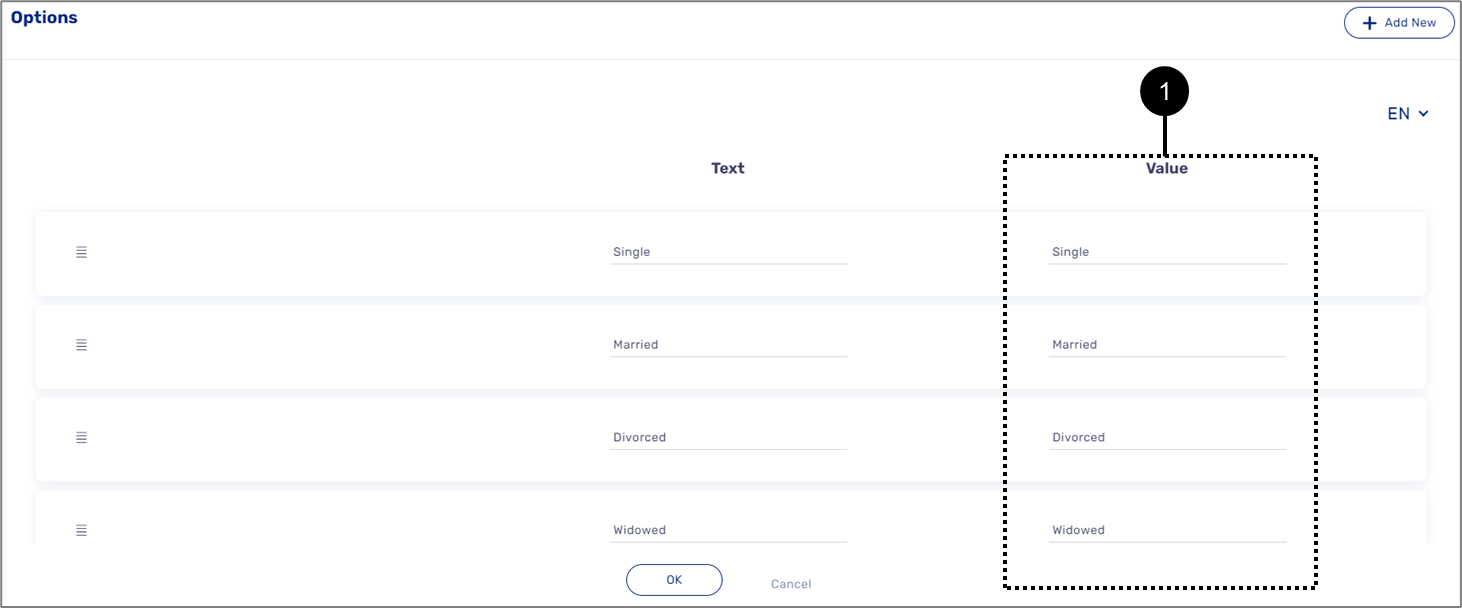
Figure 16: O Mark
Step 4 - Workflow Manager
The Workflow Manager is used to divide a Webflow into steps, set conditions, and configure automatic communication channels. The following tips from our team of experts are about how you use the Workflow Manager.
TIP 1:
(see Figure 17)
Before adding steps, make sure all the required roles are created using the Settings screen and that a default role is set.
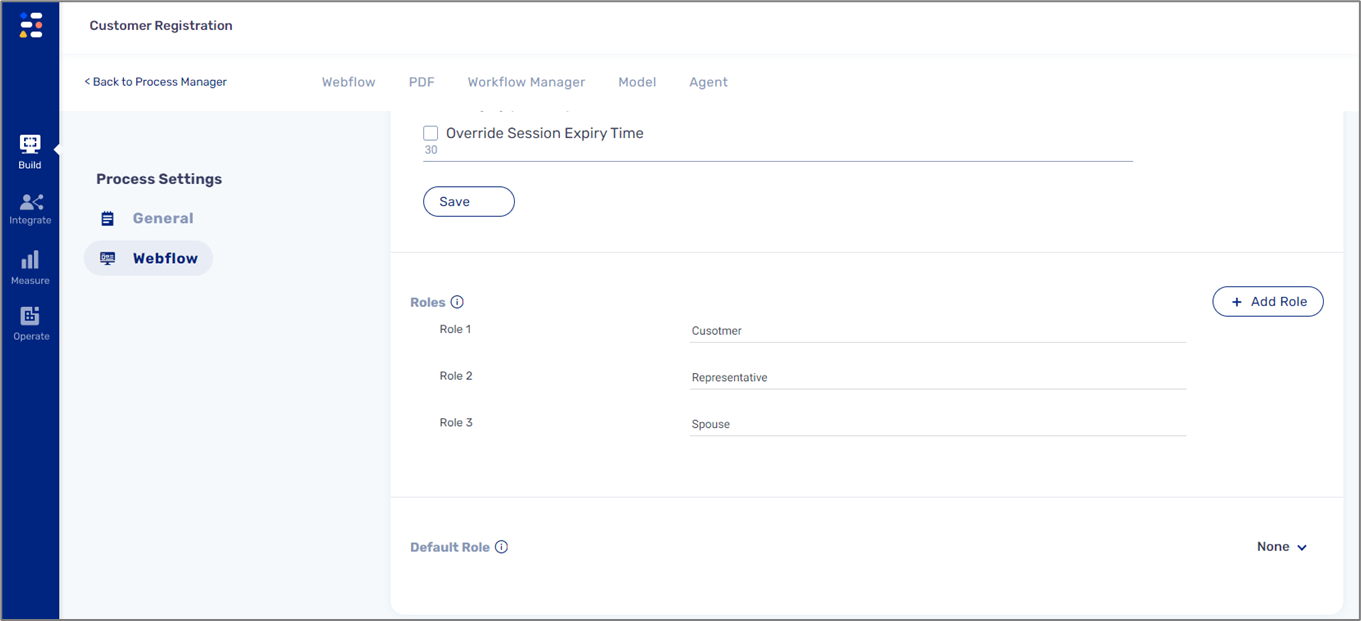
Figure 17: Settings Screen
To read more about the Setting screen and roles, see the Webflow Overview and the Configuring a Workflow articles.
TIP 2:
Before you start the workflow, check if all the fields in the steps are full - if one of them is empty, you will not receive emails.
To read more about the Workflow Manager, see the Workflow Manager Overview and the Configuring a Workflow articles.
TIP 3:
If you decide to change the role name, go to all the fields to which you have added permissions and re-add - otherwise, the process will not be displayed properly.
Step 5 - Journey Sender
The Journey Sender feature enables your agents to initiate and send digital journey links to customers. The links will be received via email or SMS. The following tips from our team of experts are about the way you use the Workflow Manager.
TIP 1:
(see Figure 18)
When marking a container type component (1) or a page type component and clicking the + Add To Agent button (2), all the components that are located inside/on top will be added to the Journey Sender automatically.
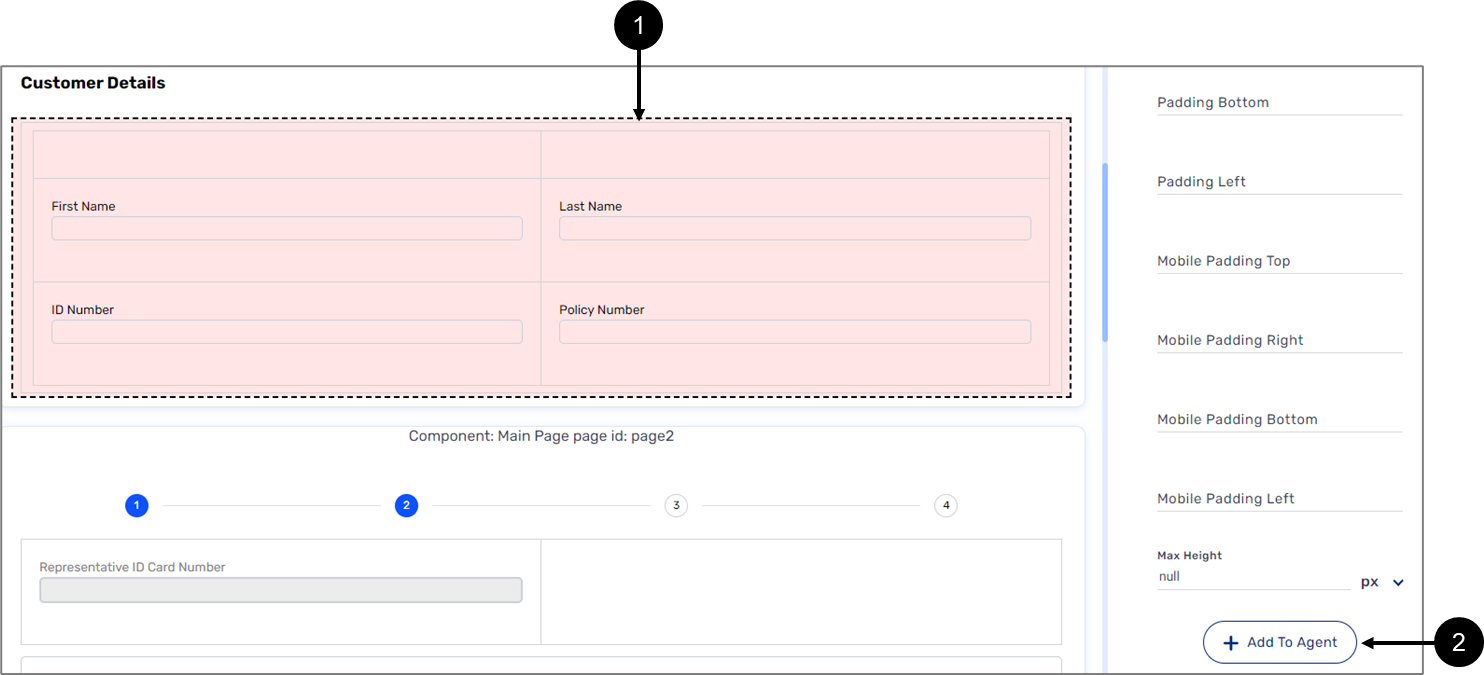
Figure 18: Adding Components