- PDF
Dynamic Document
- PDF
Article Overview
This article describes EasySend's dynamic document feature. The article explains how to create a new document and how to edit it. The article also details how to insert items into a document, how to implement conditions, and how to use arrays. The article also provides examples of how to deal with malfunctions when trying to perform the actions described in this article.
What is a Dynamic Document?
Every EasySend digital process is dynamic and adaptive according to an implemented business logic. In most cases, the information input by the digital process end user/s is displayed on the original PDF. PDFs are static, not editable, and may display irrelevant information next to relevant information.
EasySend’s dynamic document feature provides you with enhanced dynamic capabilities that are embedded in your digital workflow and enable you to turn any Word file into a dynamic document. For example, you can:
- Merge different templates of the same document into one dynamic template
- Generate personalized document/agreement
A dynamic document is based on a pre-existing Webflow, Model data items (including Metadata), and Model business logic. A dynamic document is created and edited using Microsoft Word and an EasySend Microsoft Word Add-in.
Creating a New Dynamic Document
(See Figure 1 to Figure 4)
To create a new dynamic document, perform the following steps:
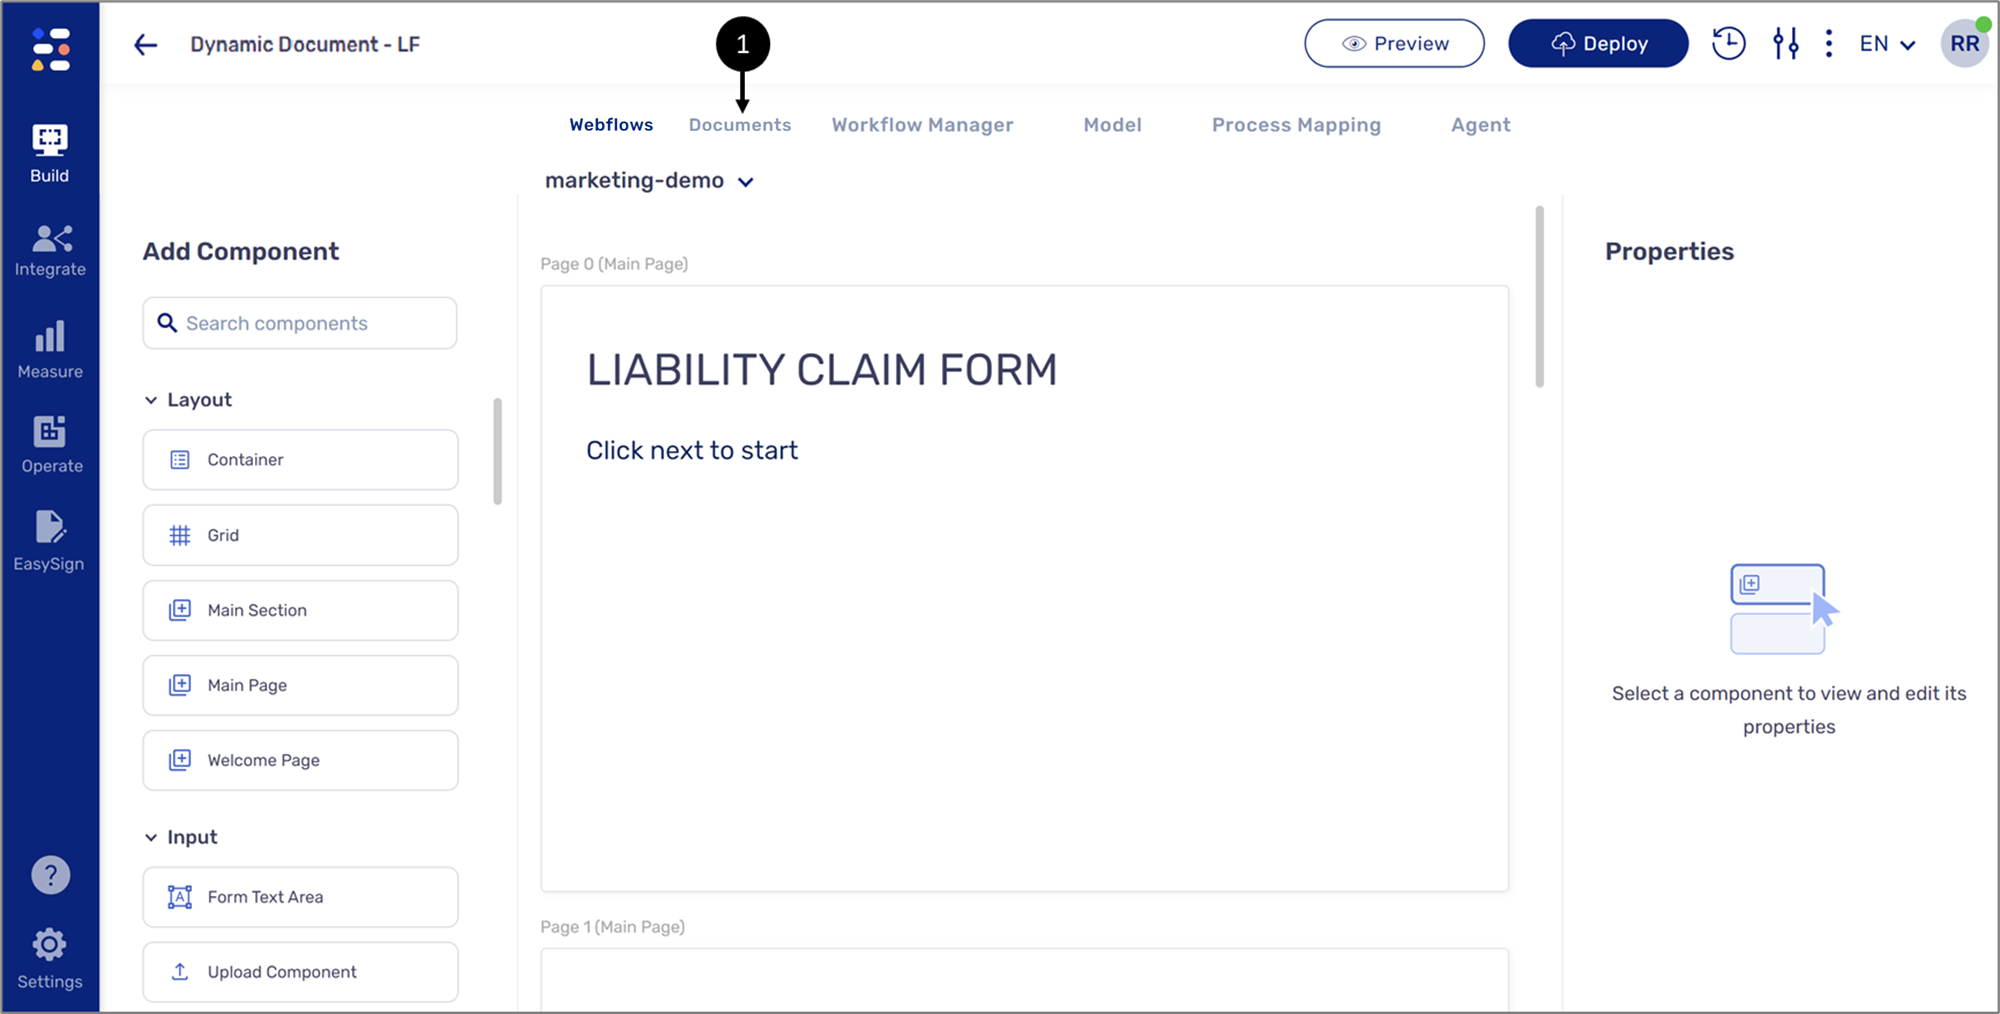
Figure 1: Document Tab
- Click the Documents tab (1) to navigate to the documents screen.
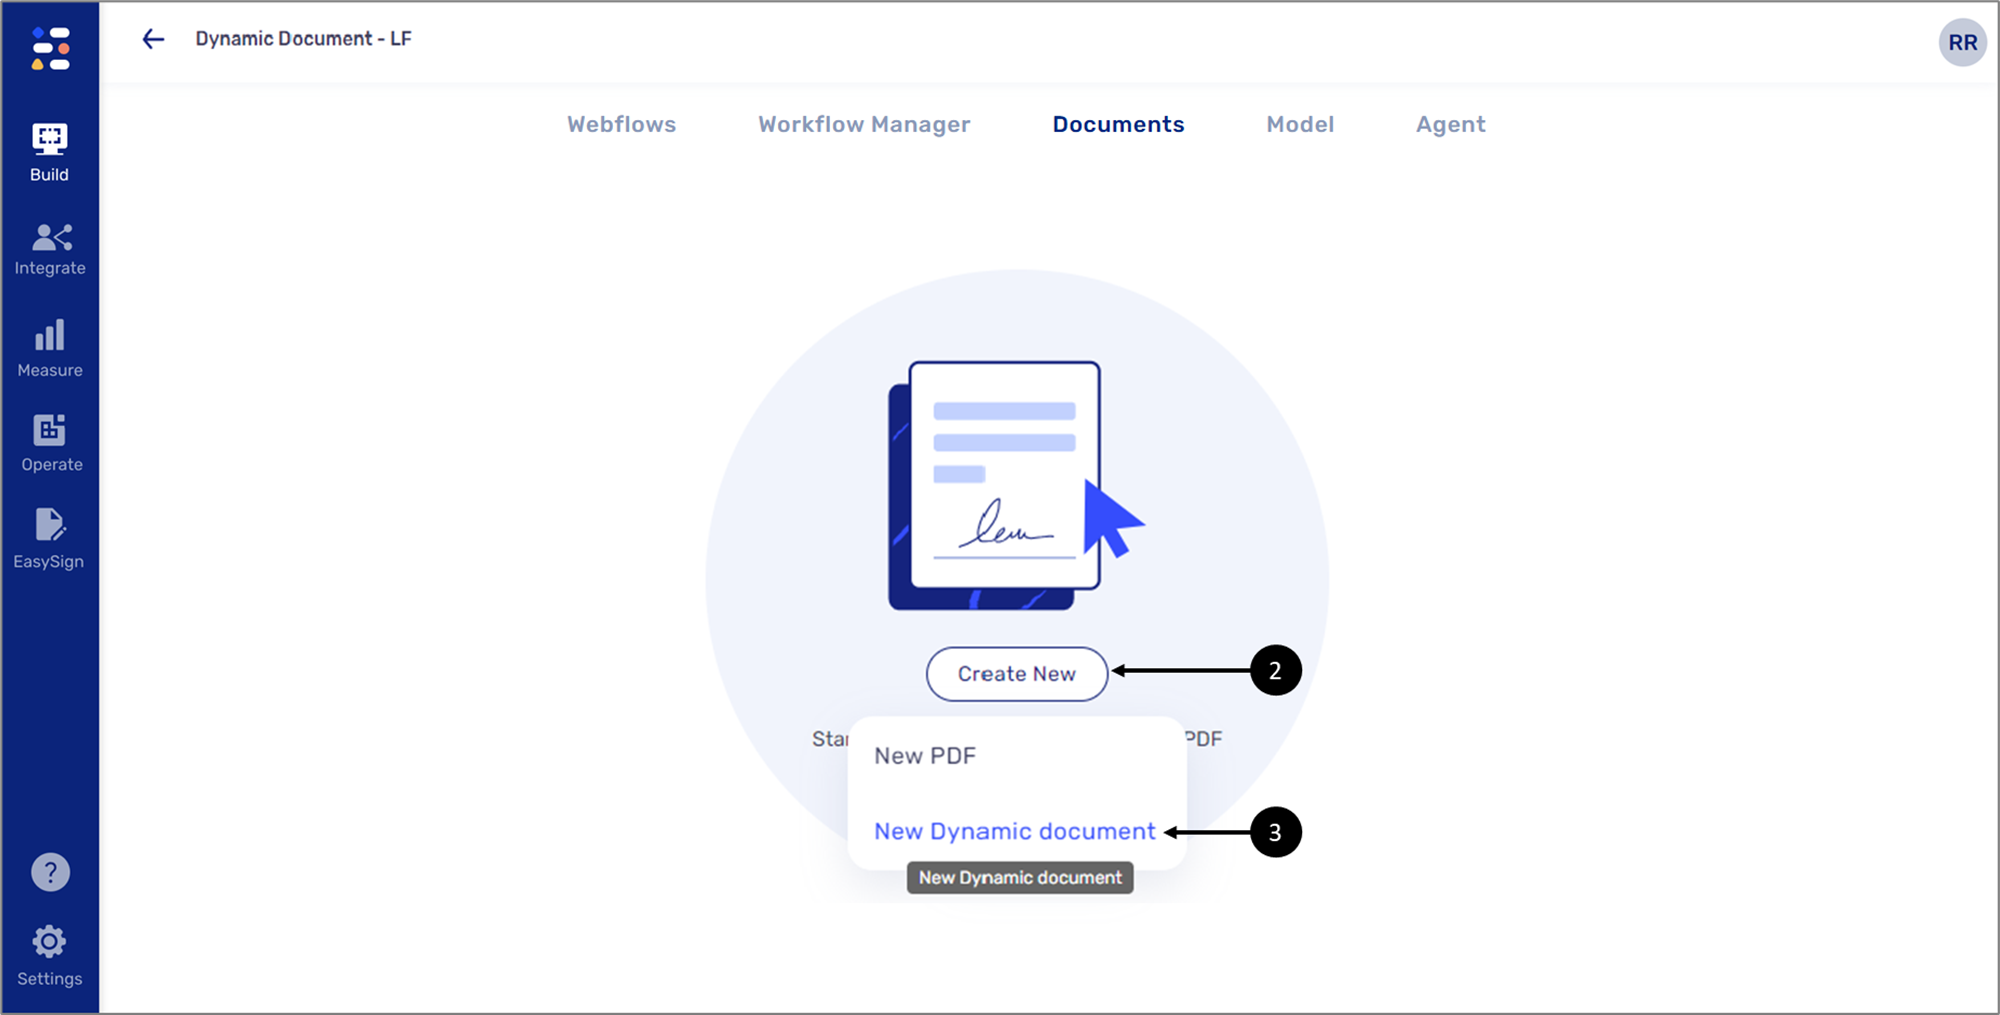
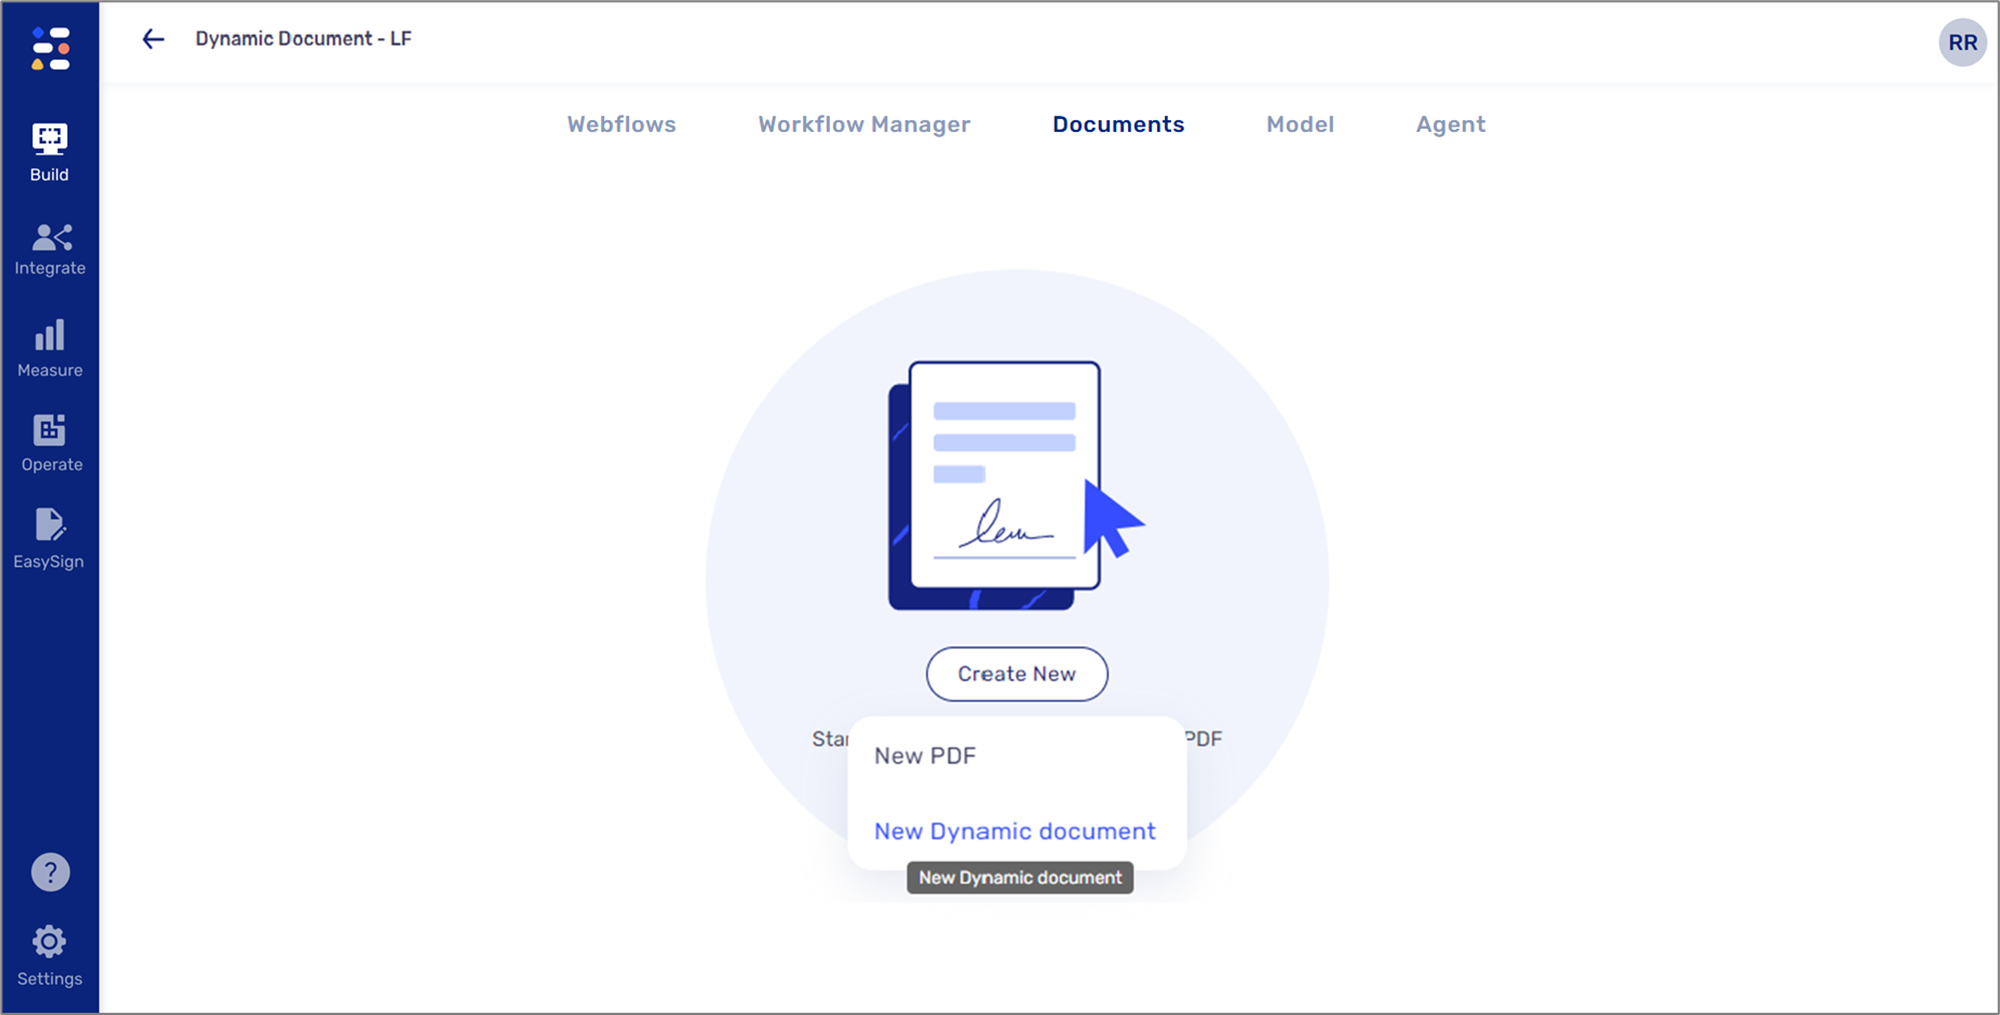
Figure 2: Create New
- On the PDF screen, click Create New (2) and then New Dynamic document (3).
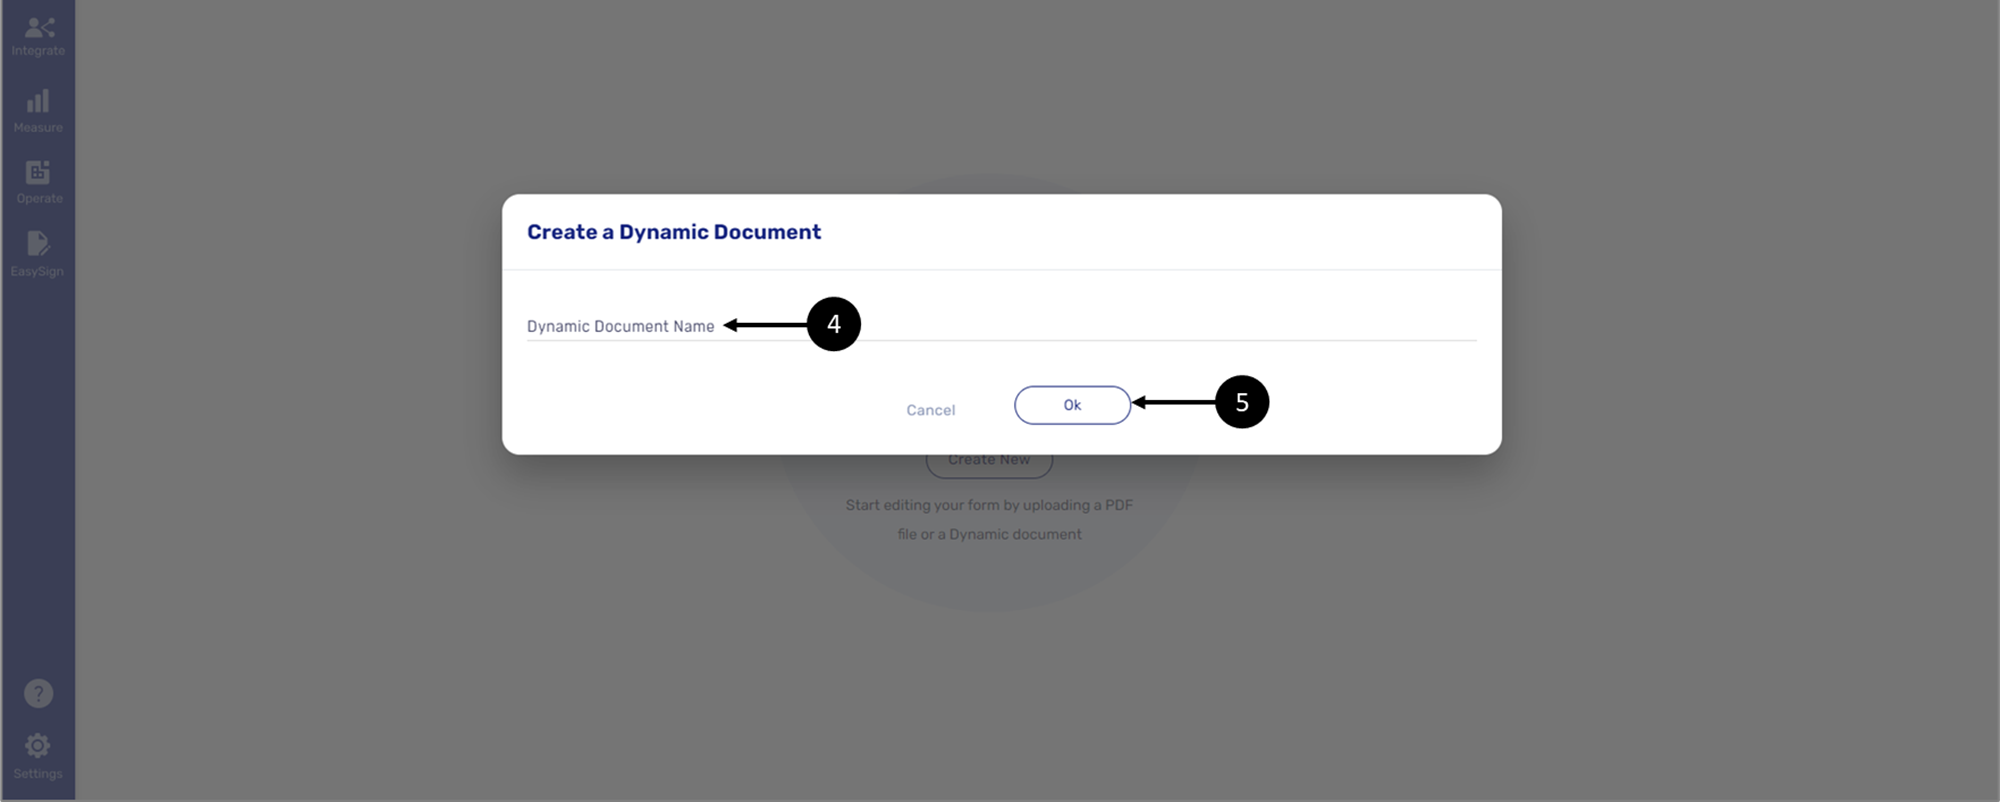
Figure 3: Create a Dynamic Document Window
- Enter a Dynamic Document Name (4) and then click Ok (5).
A new dynamic document is created.
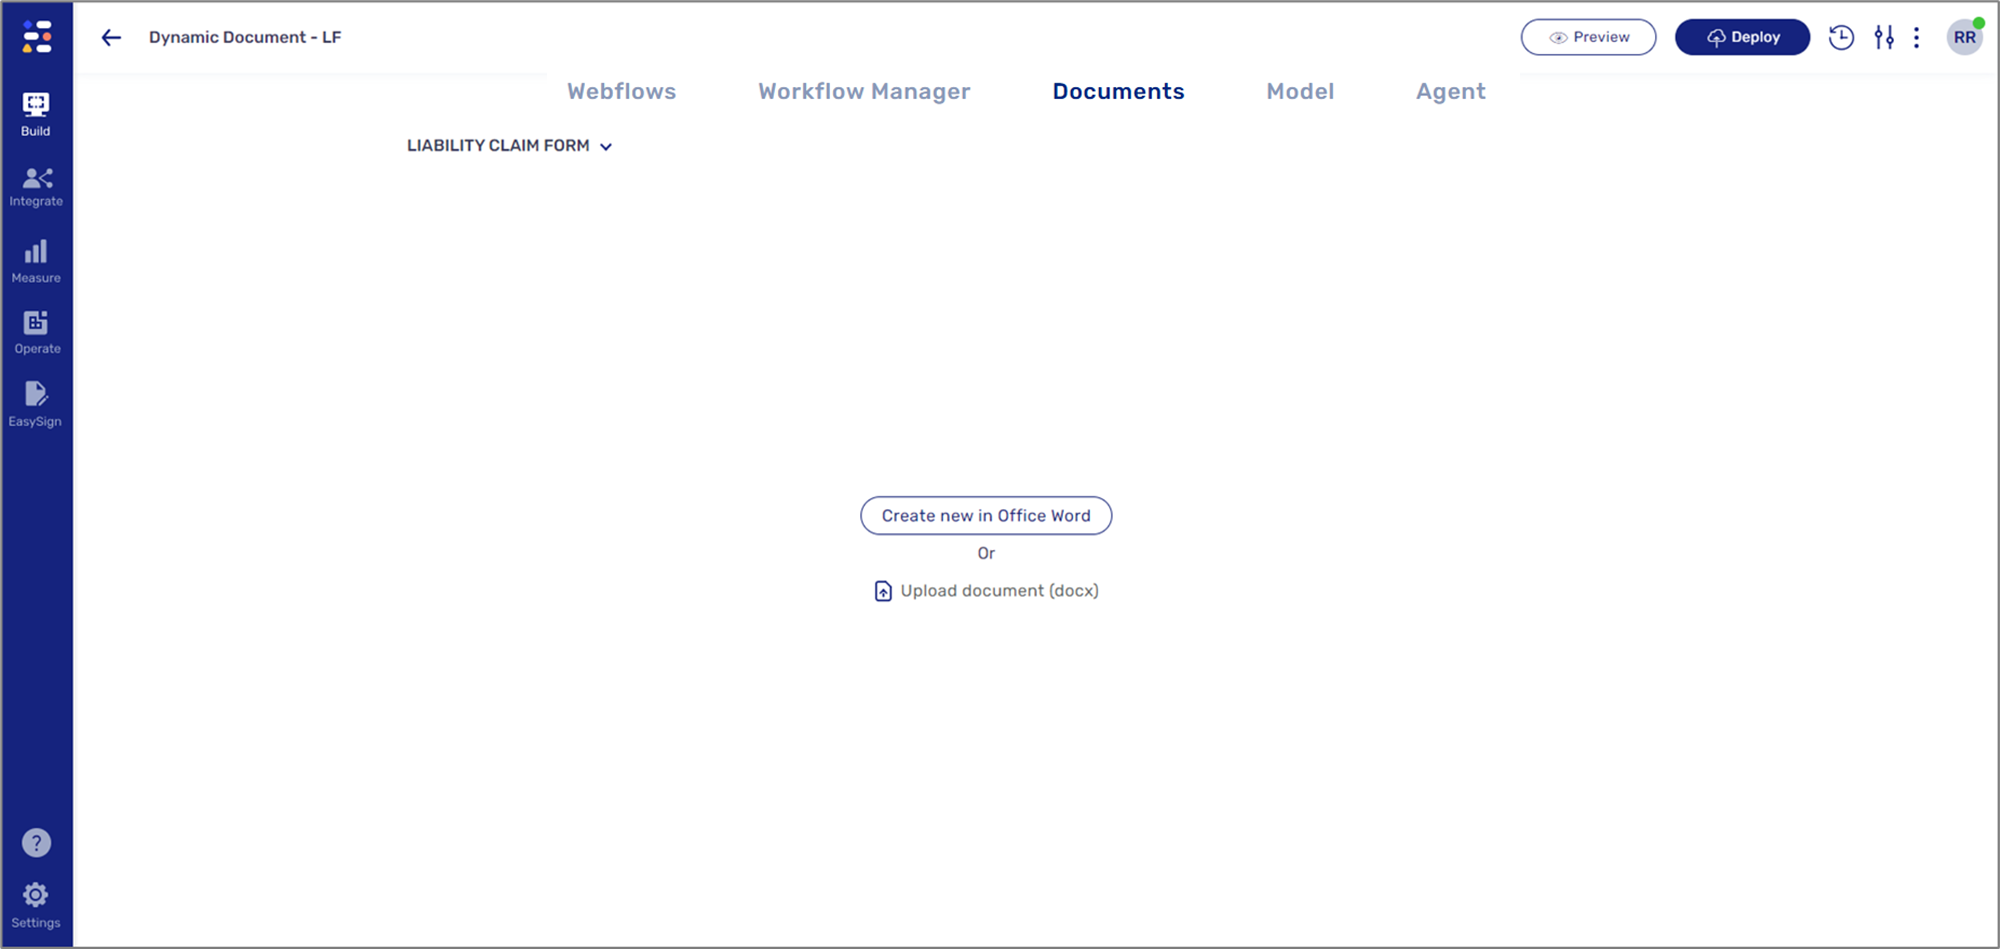
Figure 4: New Dynamic Document
Downloading EasySend Microsoft Add-in
(See Figure 5)
To create and edit a dynamic document, you must use Microsoft Word and EasySend's Microsoft Add-in. To download the Add-in:
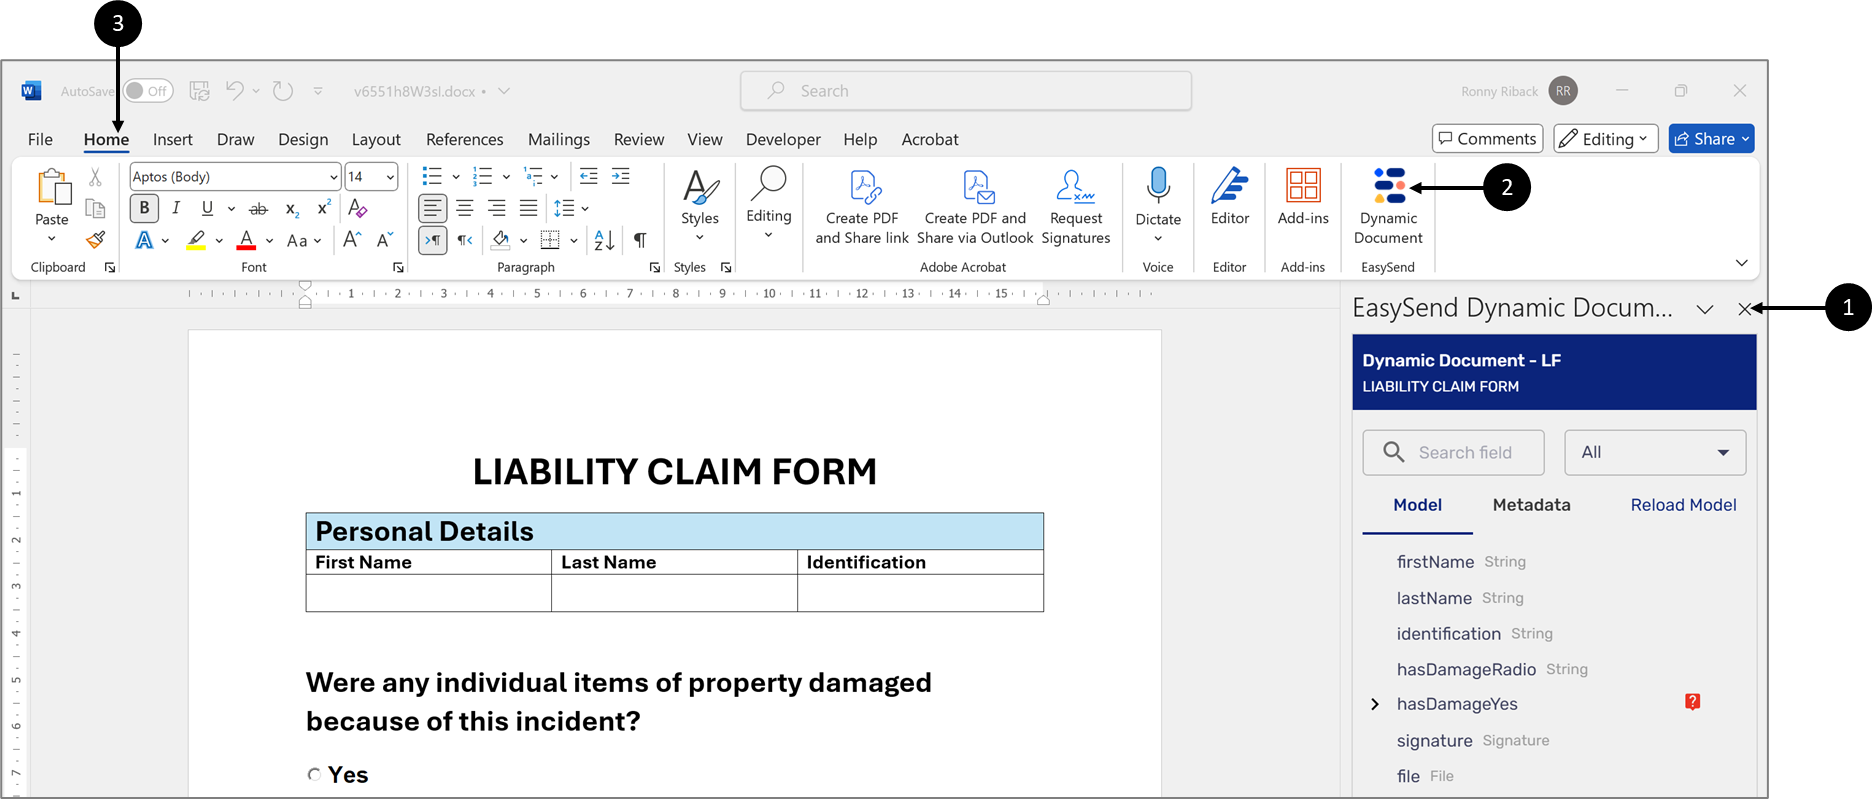
- Open your Microsoft Word.
- Navigate to the Home tab (1).
- Search for the EasySend Add-in (2), and follow the instructions on the screen.
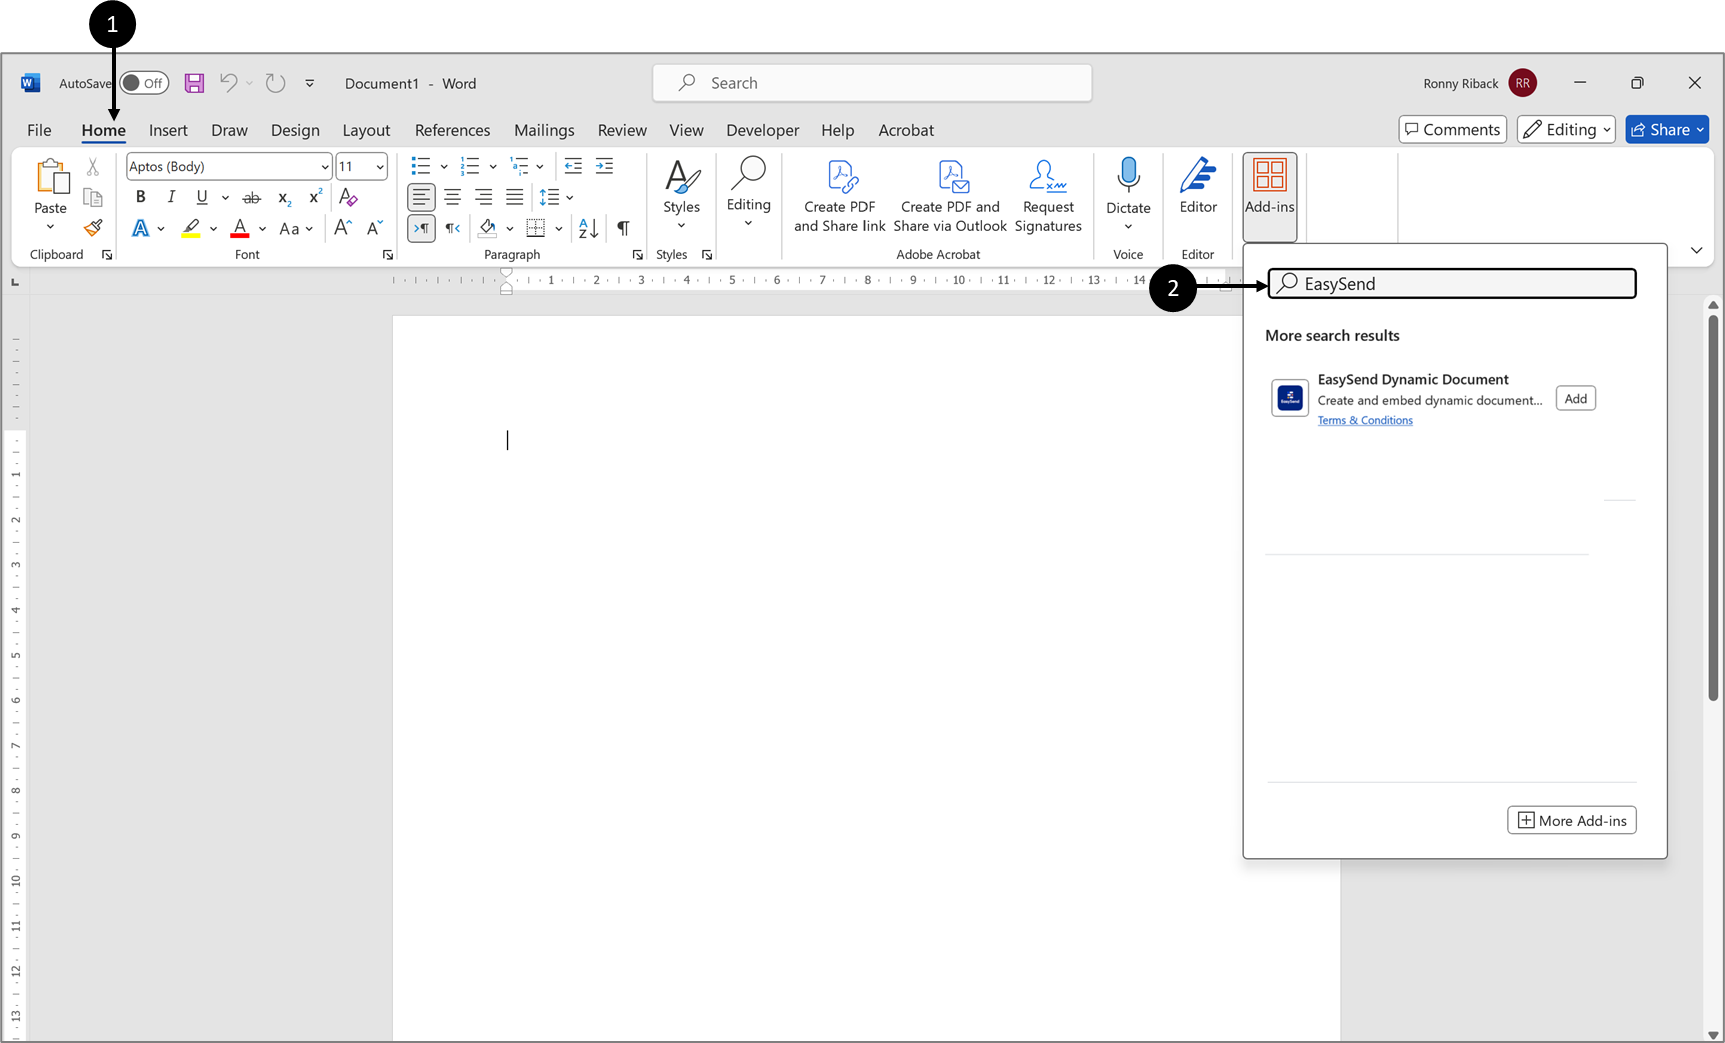
Figure 5: EasySend's Add-in on The App Store
The PDF Screen
(See Figure 6 to Figure 8)
After installing the Add-in, you can start creating and editing dynamic documents. On the PDF screen. First, click the dropdown (1) to make sure you are working with the desired dynamic document (2). If the Dynamic document section is empty or if you need to add a new dynamic document, click + Add New (3) and follow the instructions on the Screen.
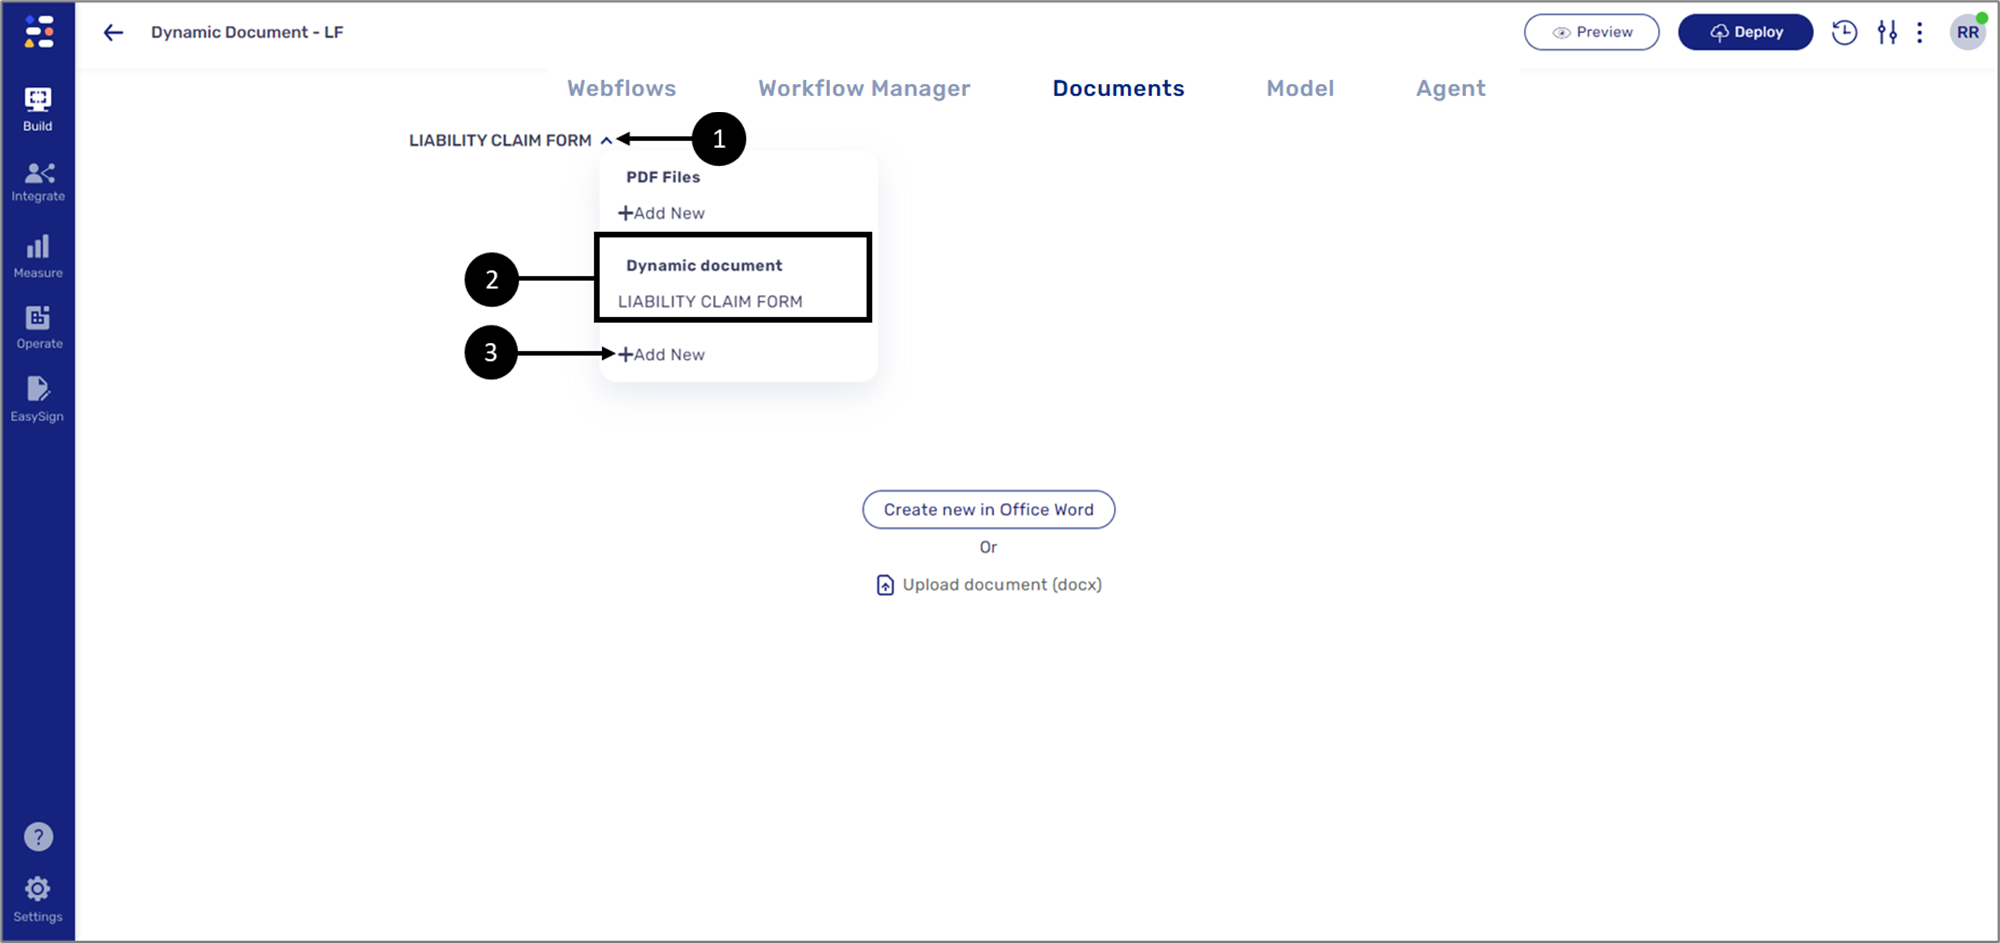
Figure 6: Dynamic Document
A dynamic document has two options:
- Create new in Office Word (1) - opens a new empty Microsoft Word document for creating a dynamic document based on the Webflow and the data items (including Metadata) from the Model.
- Upload document (docx) (2) - uploads an existing Microsoft Word document.
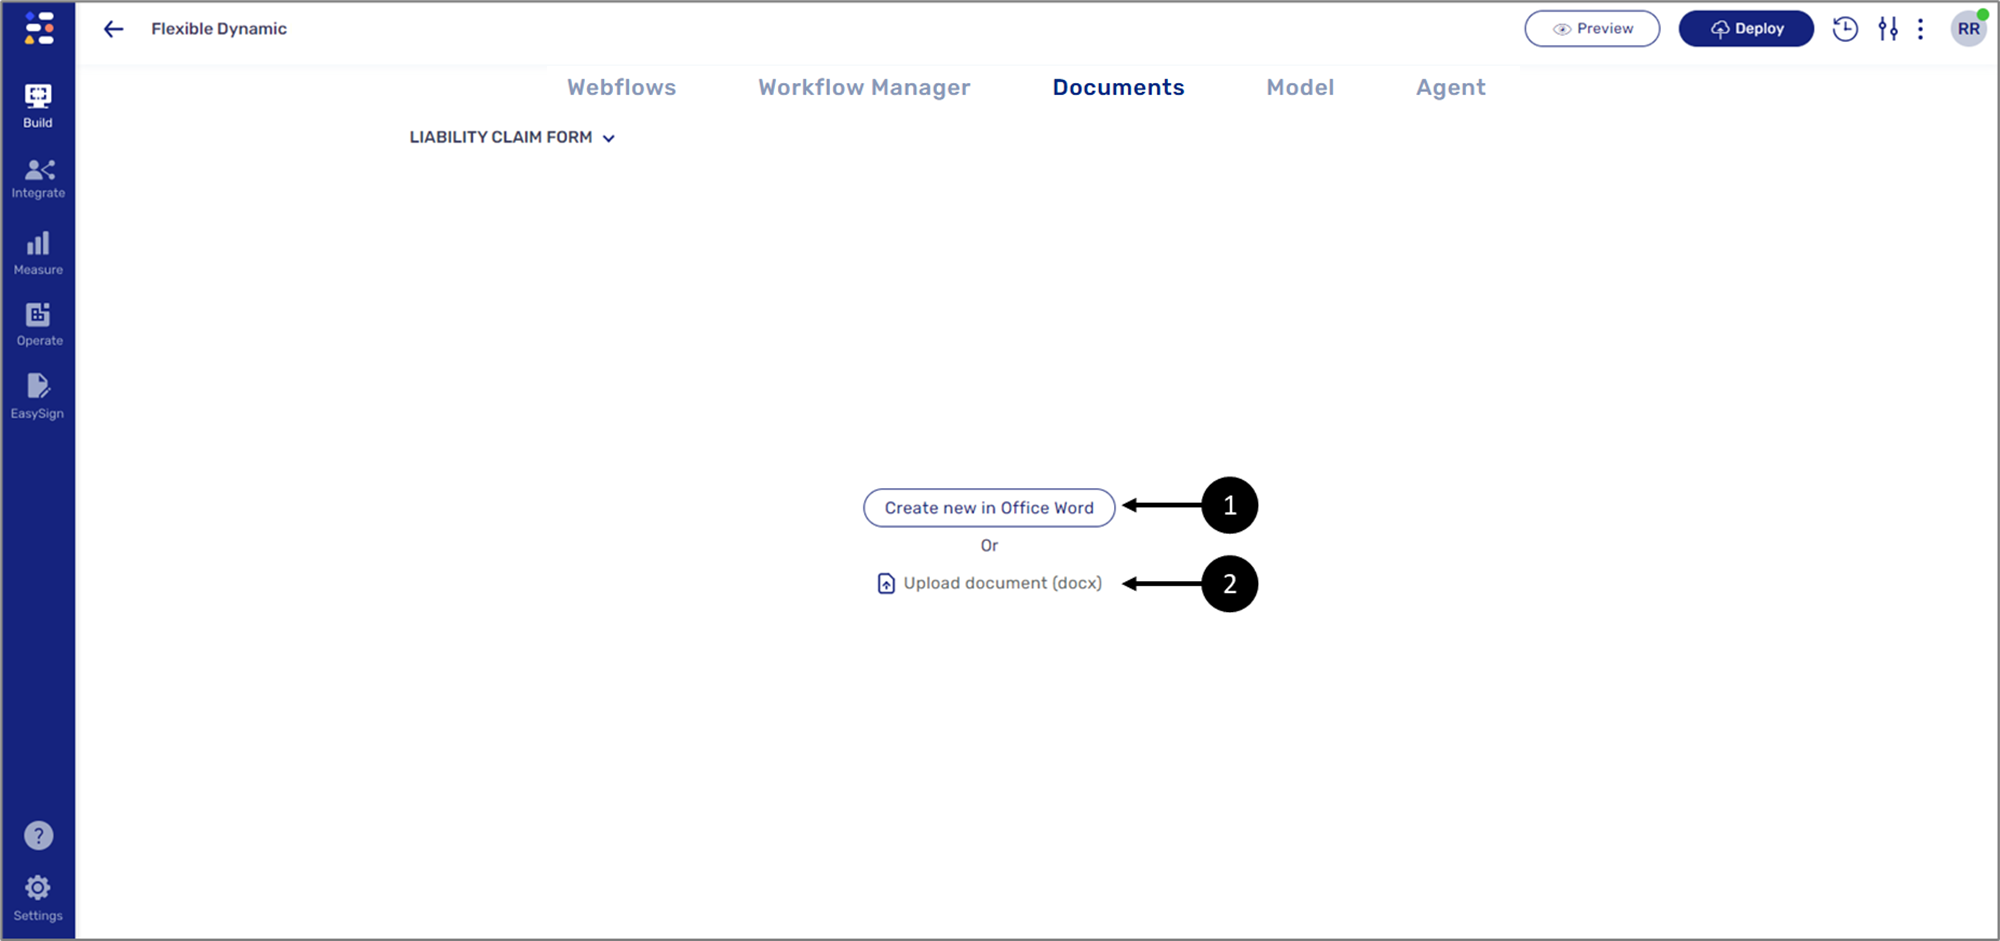
Figure 7: Dynamic Document Options 1 of 2
After creating a new document for the first time or after uploading a document, the screen will display two new options:
- Edit In Office Word - opens the current uploaded document for editing in Microsoft Word. The document will be edited based on the Webflow and the data items (including Metadata) from the Model.
- Change document - uploads a new Word document and overrides the previously uploaded one.
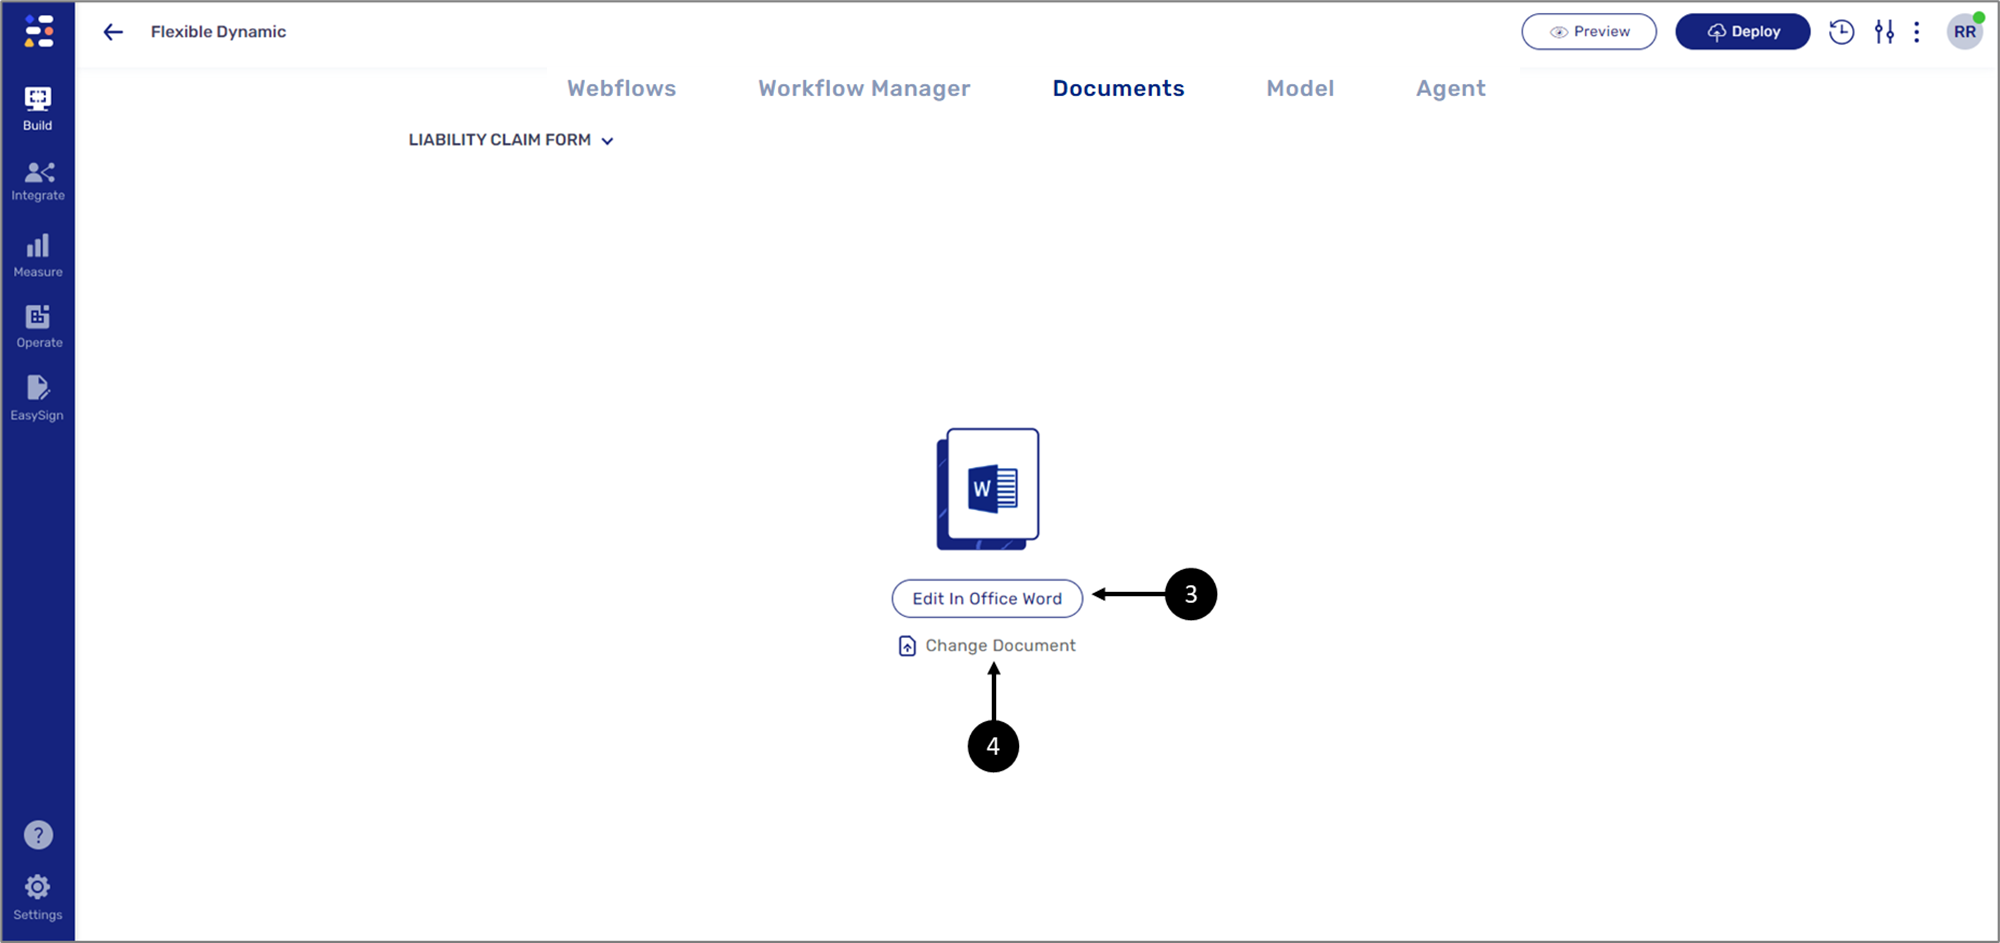
Figure 8: Dynamic Document Options 2 of 2
Uploading and Opening a Document
(See Figure 9 to Figure 11)
To upload and open a pre-existing Word file, perform the following steps:
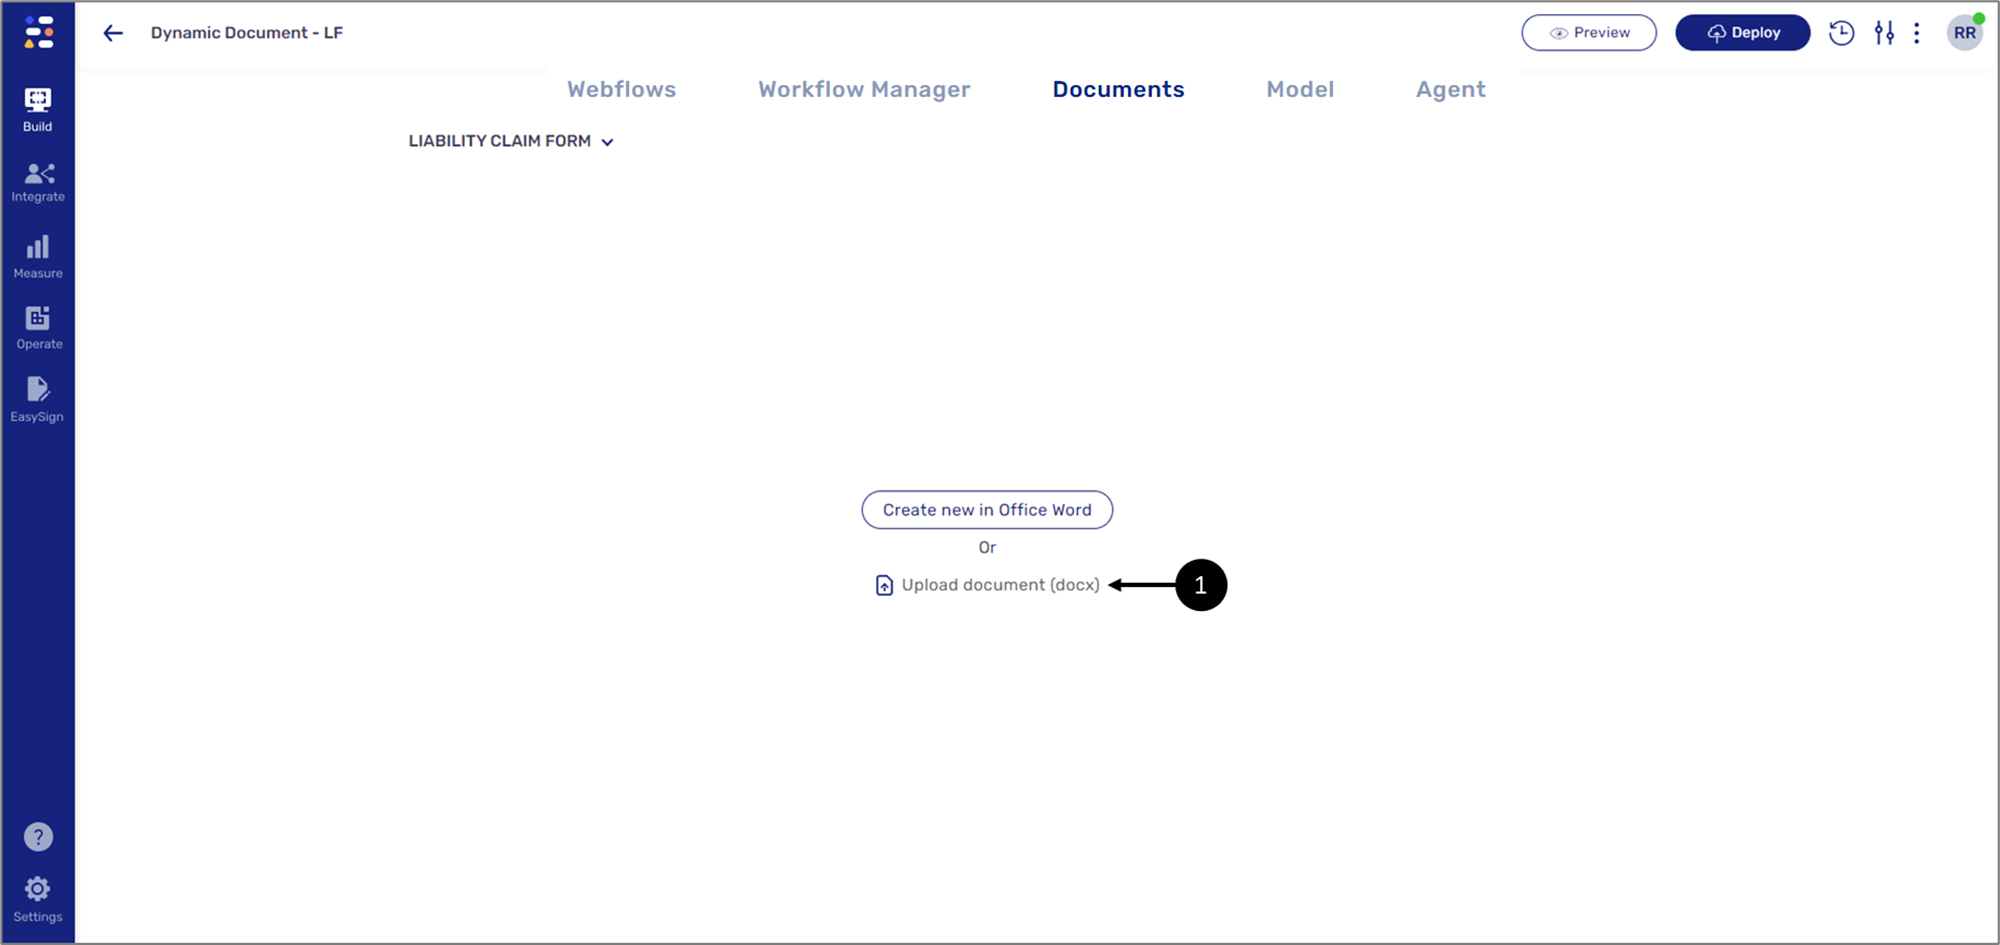
Figure 9: Upload document (docx)
- Click the Upload document (docx) option (1) and then select the desired file.
Result:
Additional options appear:
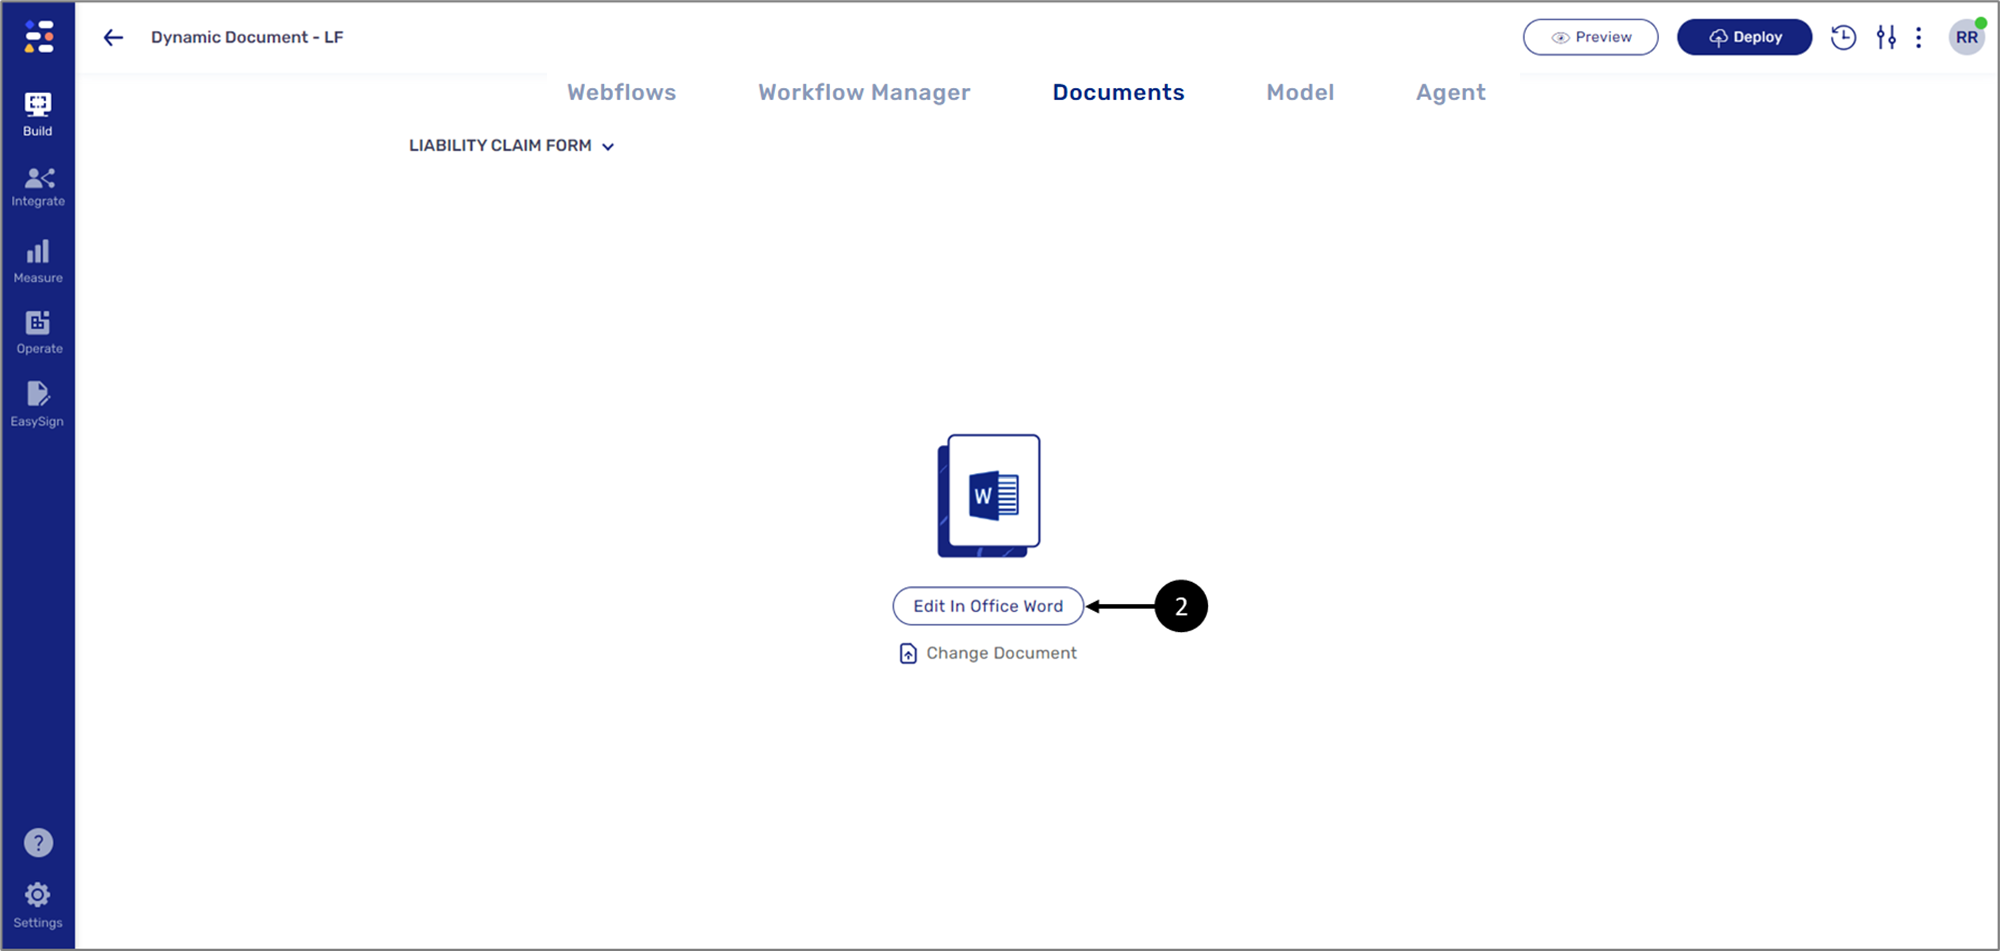
Figure 10: Edit In Office Word
- Click the Edit In Office Word option (2).
Result:
The Word document opens with the Dynamic Document Editor (3):
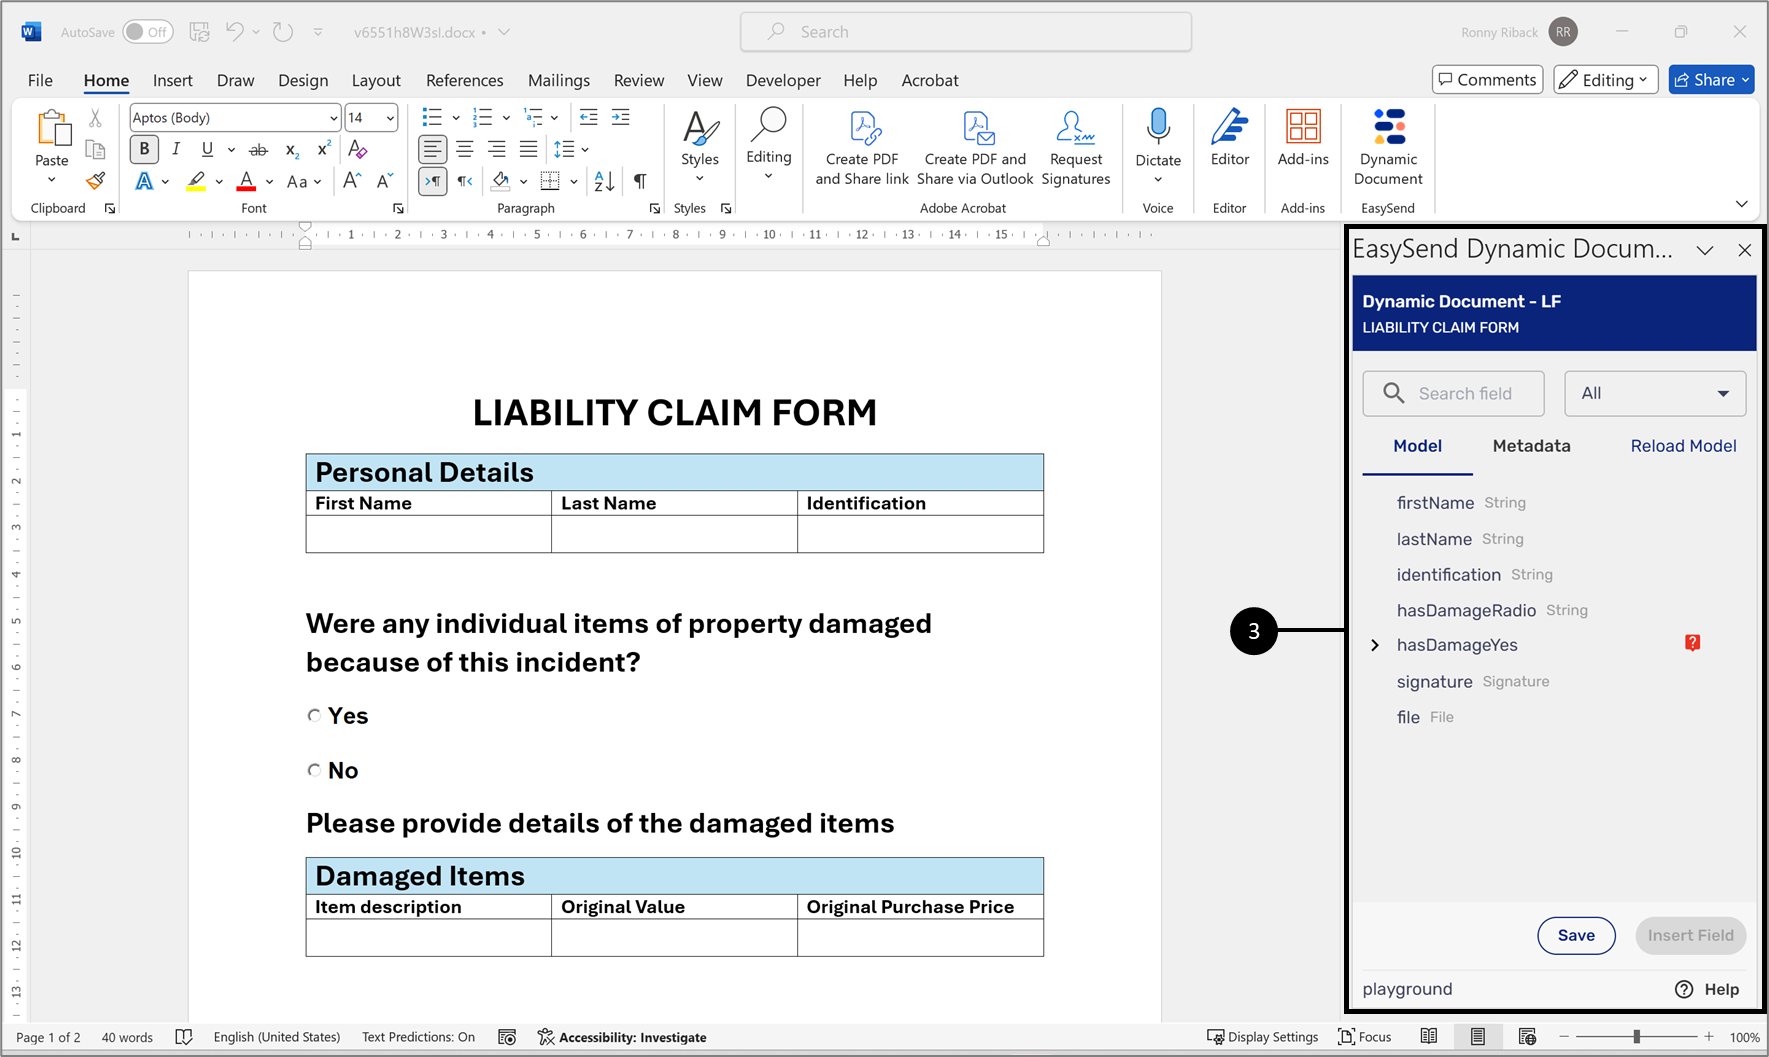
Figure 11: EasySend Dynamic Document Editor
EasySend Dynamic Document Editor
(See Figure 12 and Figure 13)
The EasySend Dynamic Document Editor section contains data items (1) that were created using the Model. The items' type and structure are identical to what was set in the Model. The section also contains fixed Model Metadata items (2). A list of the items is displayed when selecting one of the two options (3). It is possible to filter by searching (4) for an item or by selecting an item type (5):
- Object
- String
- Boolean
- File
- Signature
The Reload Model (6) lets you reload the list of data and Metadata items. It is used to load changes applied to the Model. The Insert Field button (7) becomes enabled once an item is selected. Clicking it will insert the selected item into the Word document. The Save button (8) operates like the Word's save button.
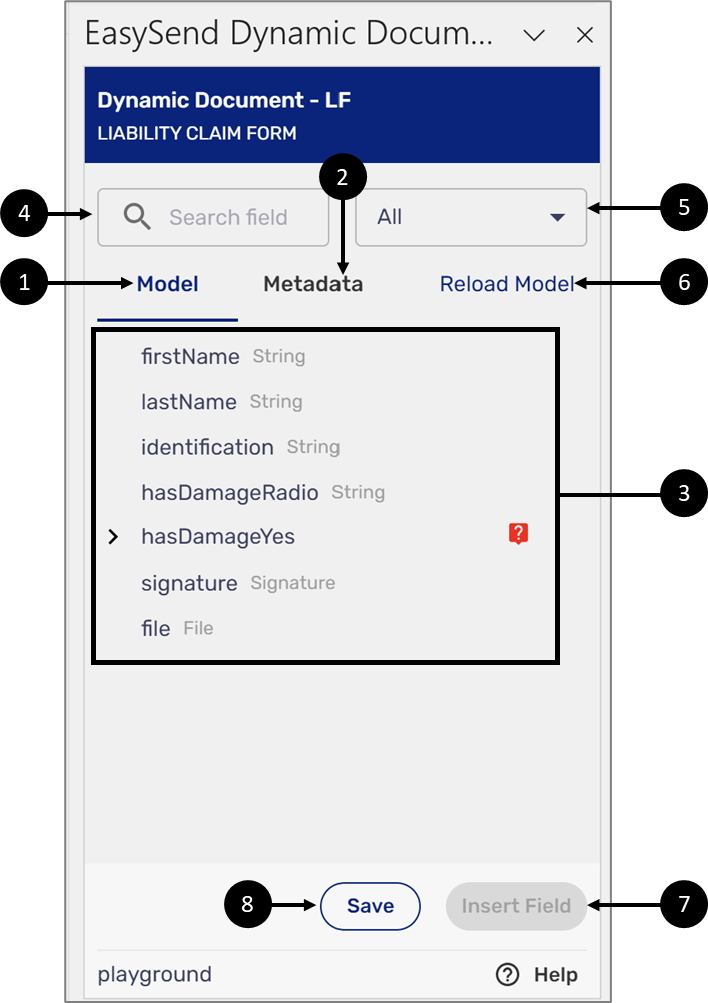
Figure 12: EasySend Document Generation Editor
After inserting an item into the document and clicking it, two additional options appear:
- Remove - deletes the inserted item
- Change - replaces the inserted item, for additional information, see the Replacing Items section.
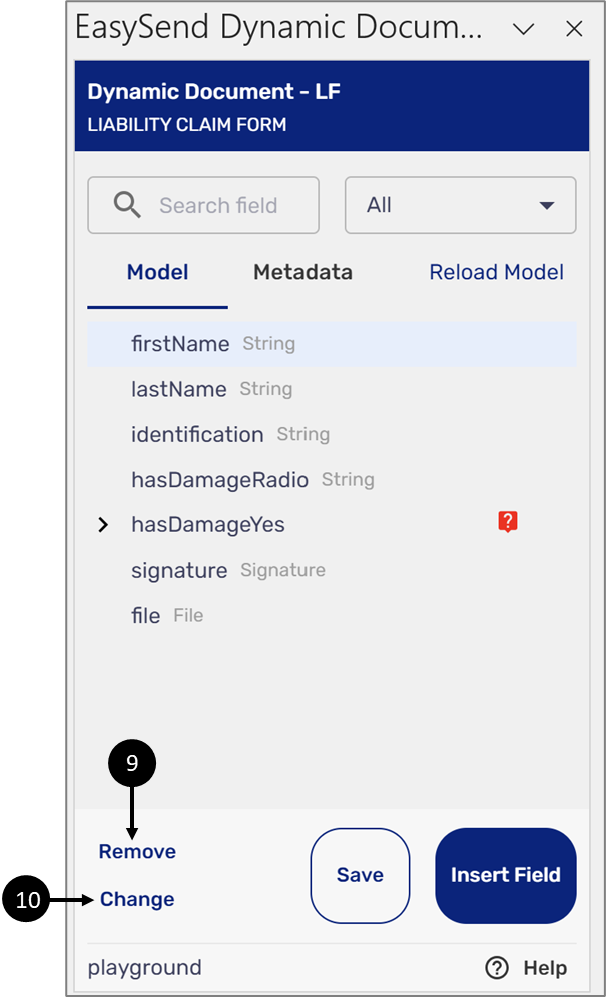
Figure 13: Additional Options - Remove and Change
Inserting Items Into a Dynamic Document
The following sections describe how to insert items into a dynamic document.
Inserting Model Items
(See Figure 14 to Figure 16)
To insert Model items, perform the following steps:
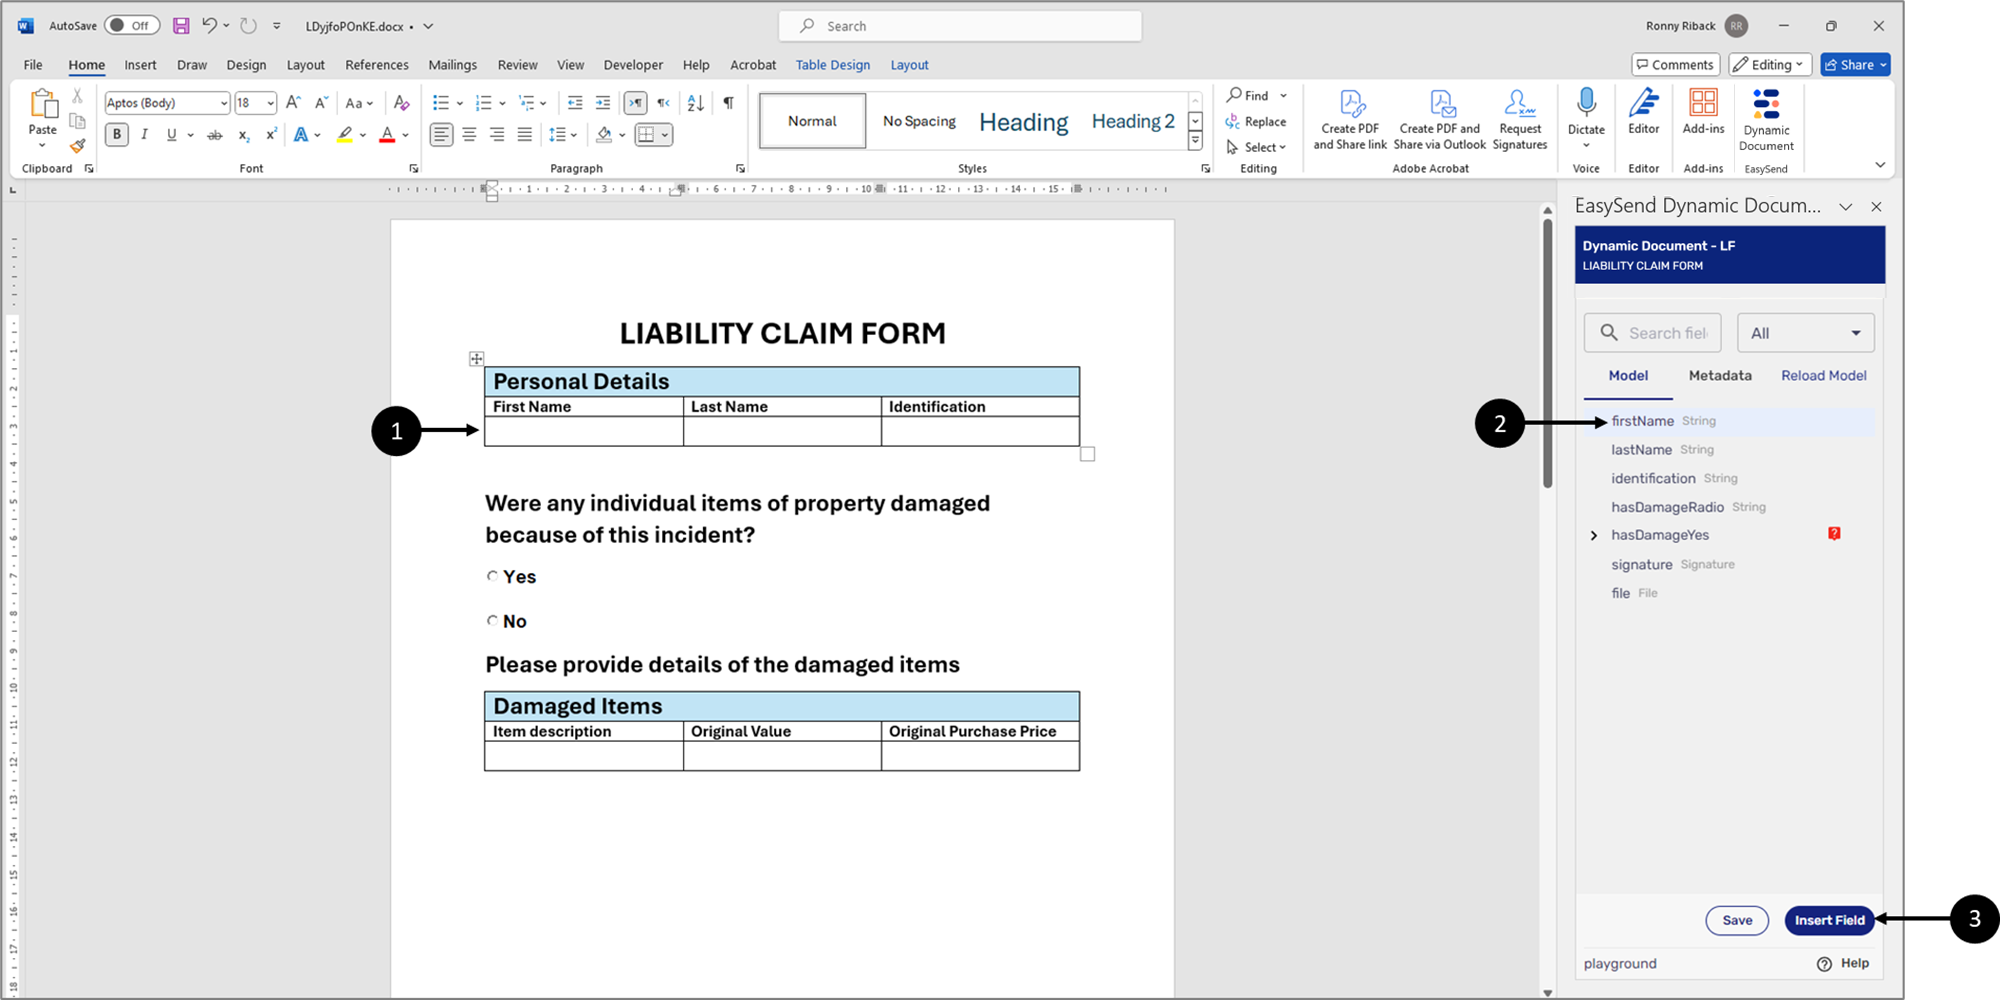
Figure 14: EasySend Document Generation Editor
- Click the desired location (1) on the dynamic document to insert the item.
- Click the desired item from the list (2).
- Click the Insert Field button (3).
Result:
The item is inserted into the dynamic document (4):
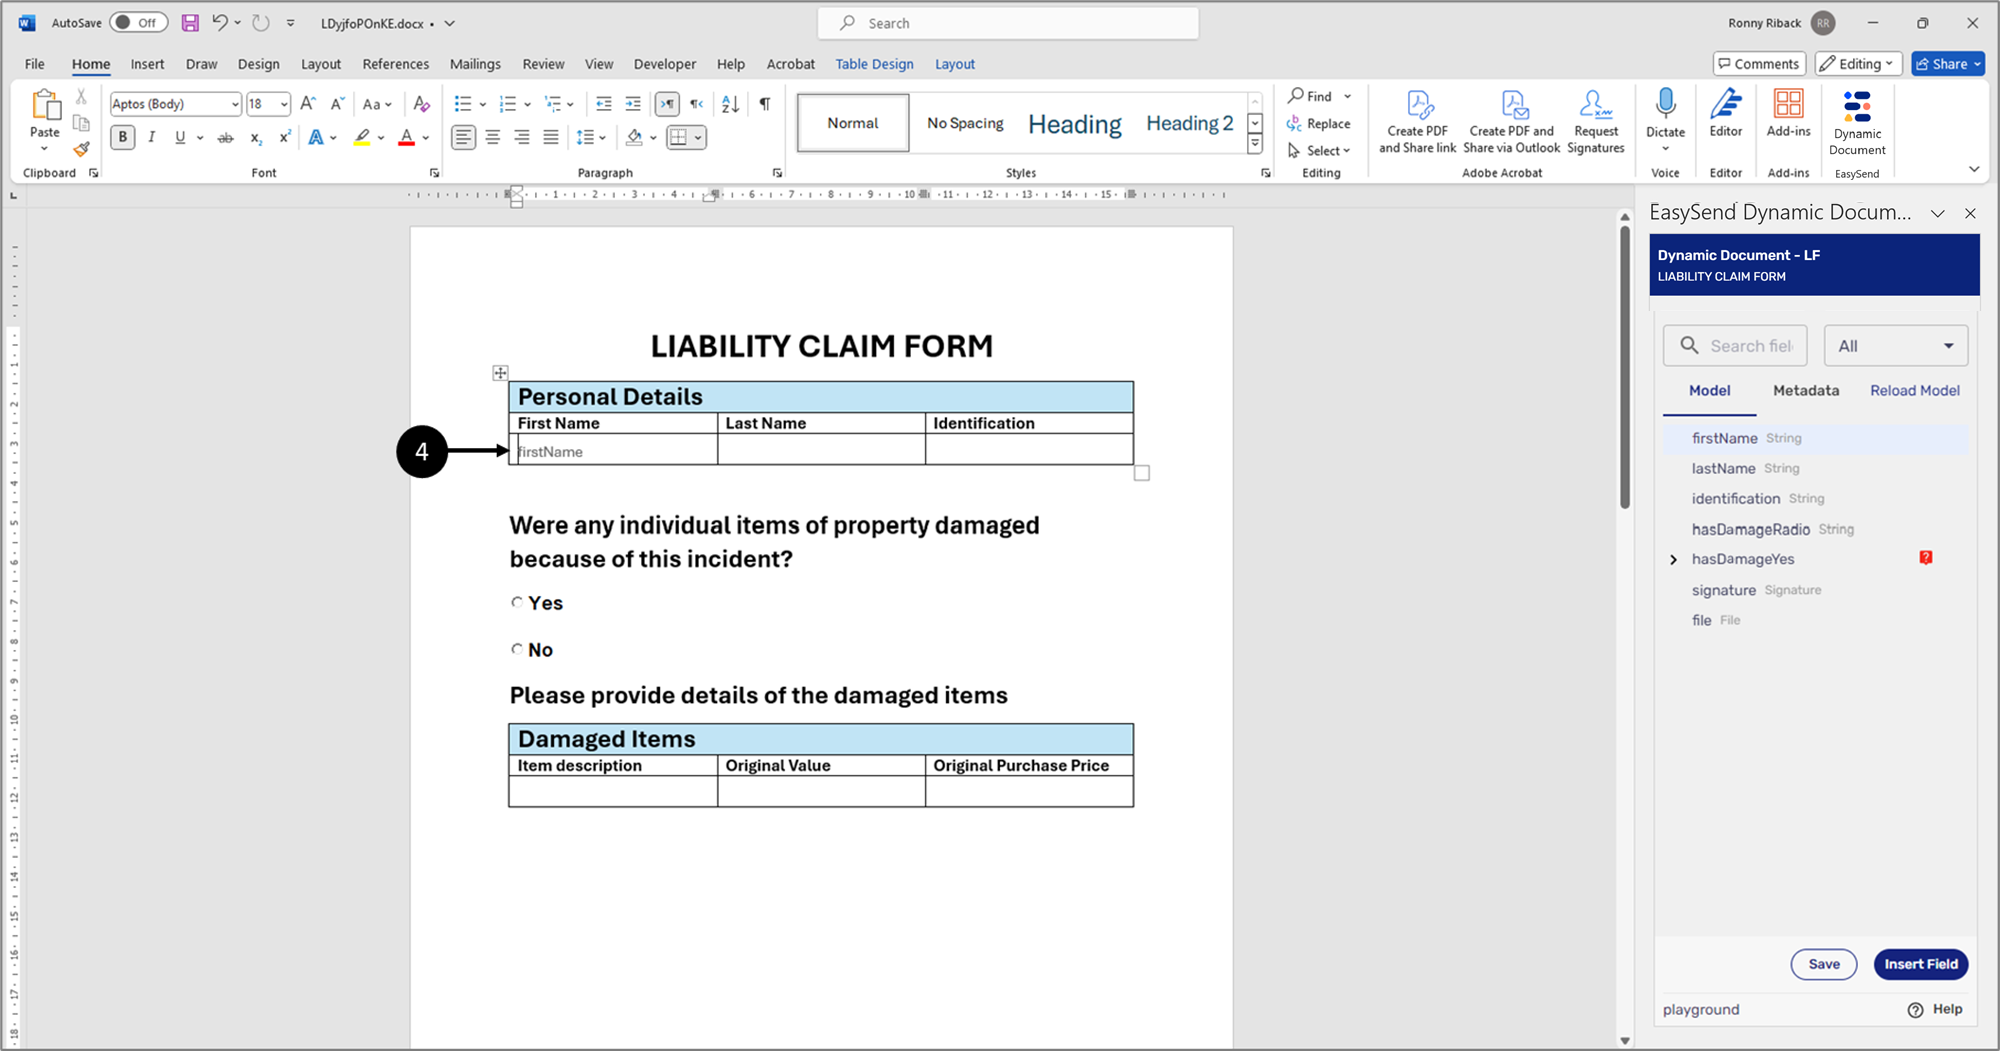
Figure 15: Inserted Item
- Repeat steps 1 to 3 until you are done, for example:
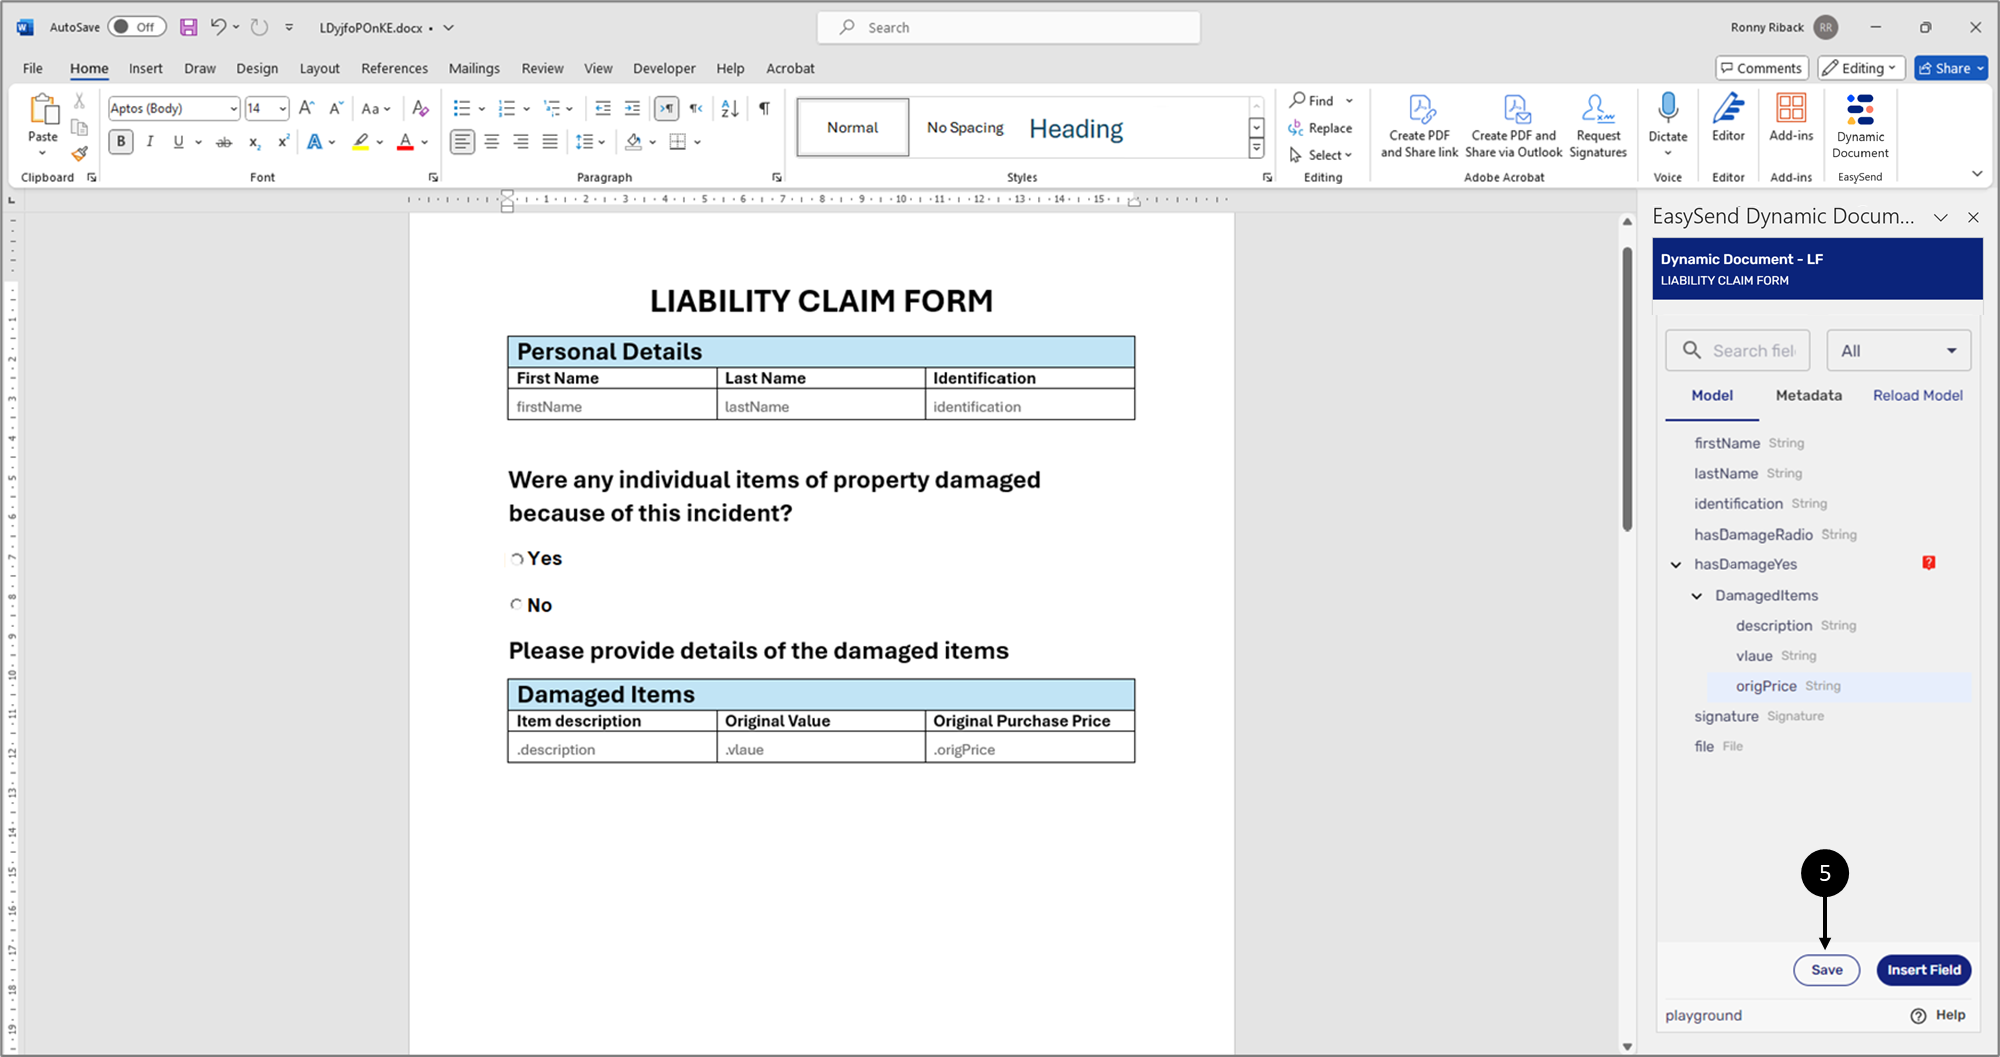
Figure 16: Added Data Items
- Click the Save button (5) when you are done.
Inserting Metadata Items
(See Figure 17)
Metadata items are fixed items that will appear in each digital process. They are divided into different categories:
- device
- file
- global
- transaction
- user
- workflow
- salesforce
- dataverse
Metadata items are added just like Model items, but the Metadata tab (1) must be clicked first.
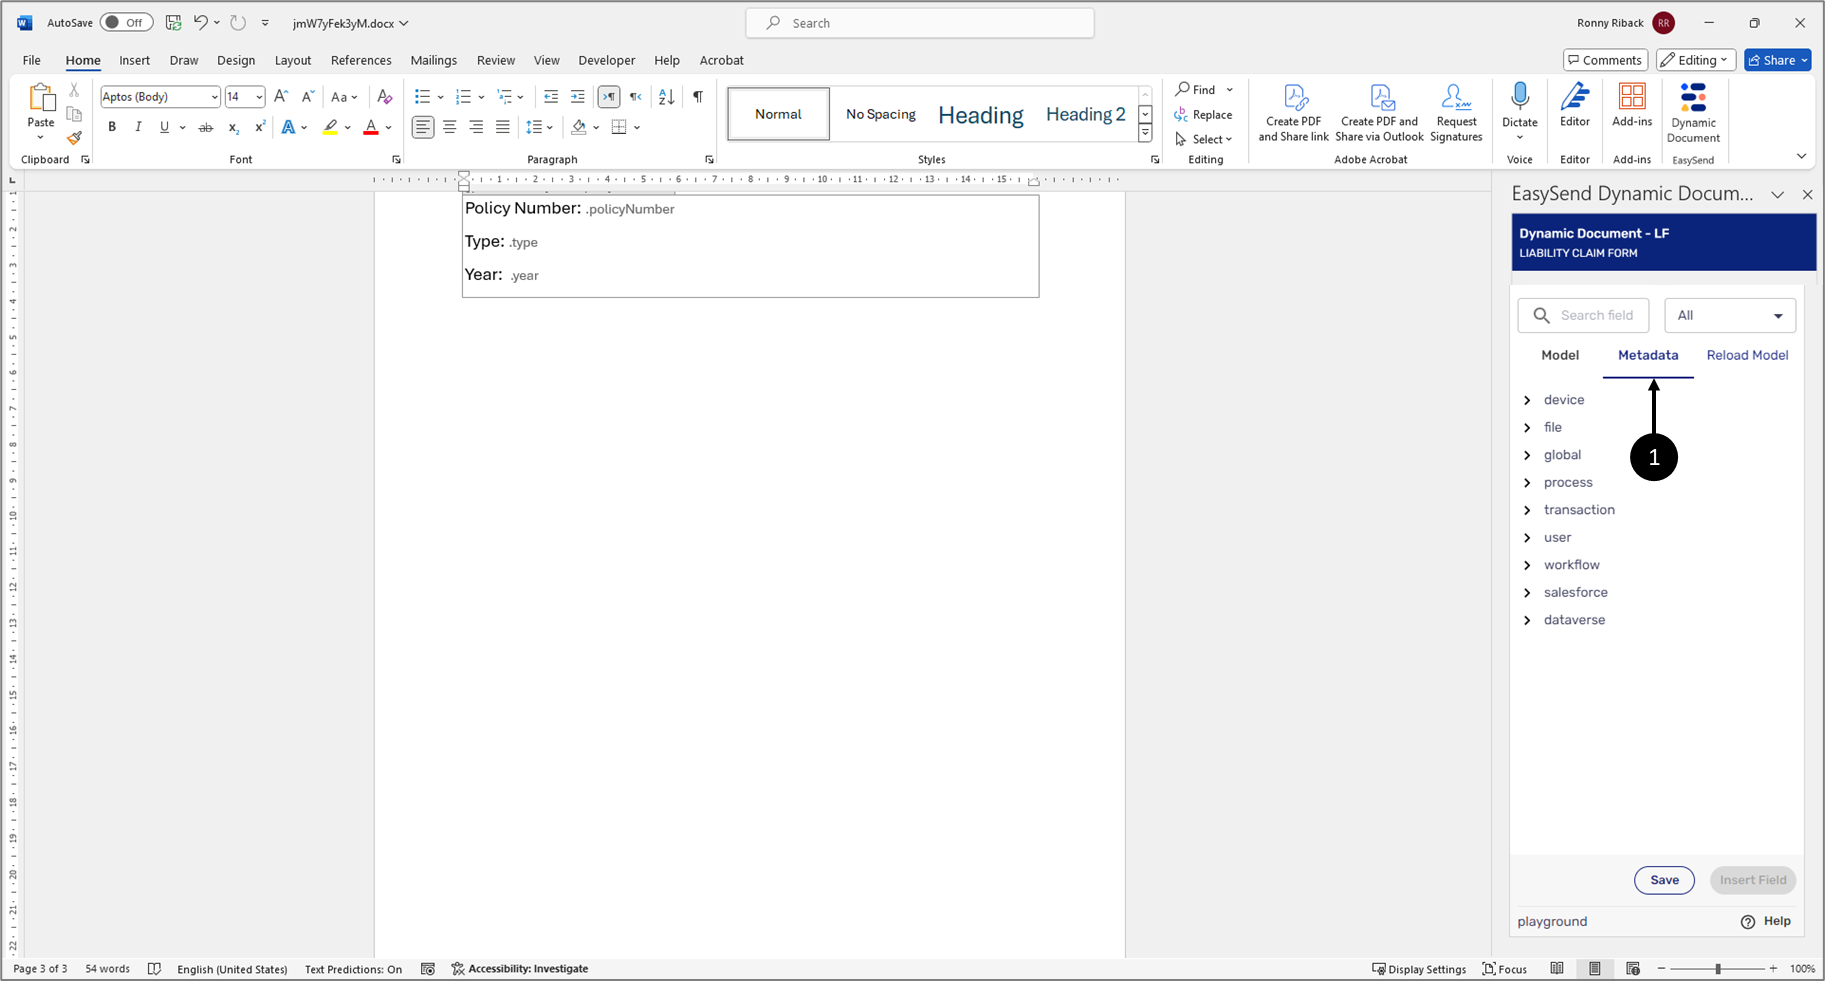
Figure 17: Metadata Items
Adding Metadata Items - Use Case Example
(See Figure 18 to Figure 21)
A dynamic document needs to display the current time in the Header of its first page and the RID of the digital process's transaction in the Footer of its first page. To do so, perform the following steps:
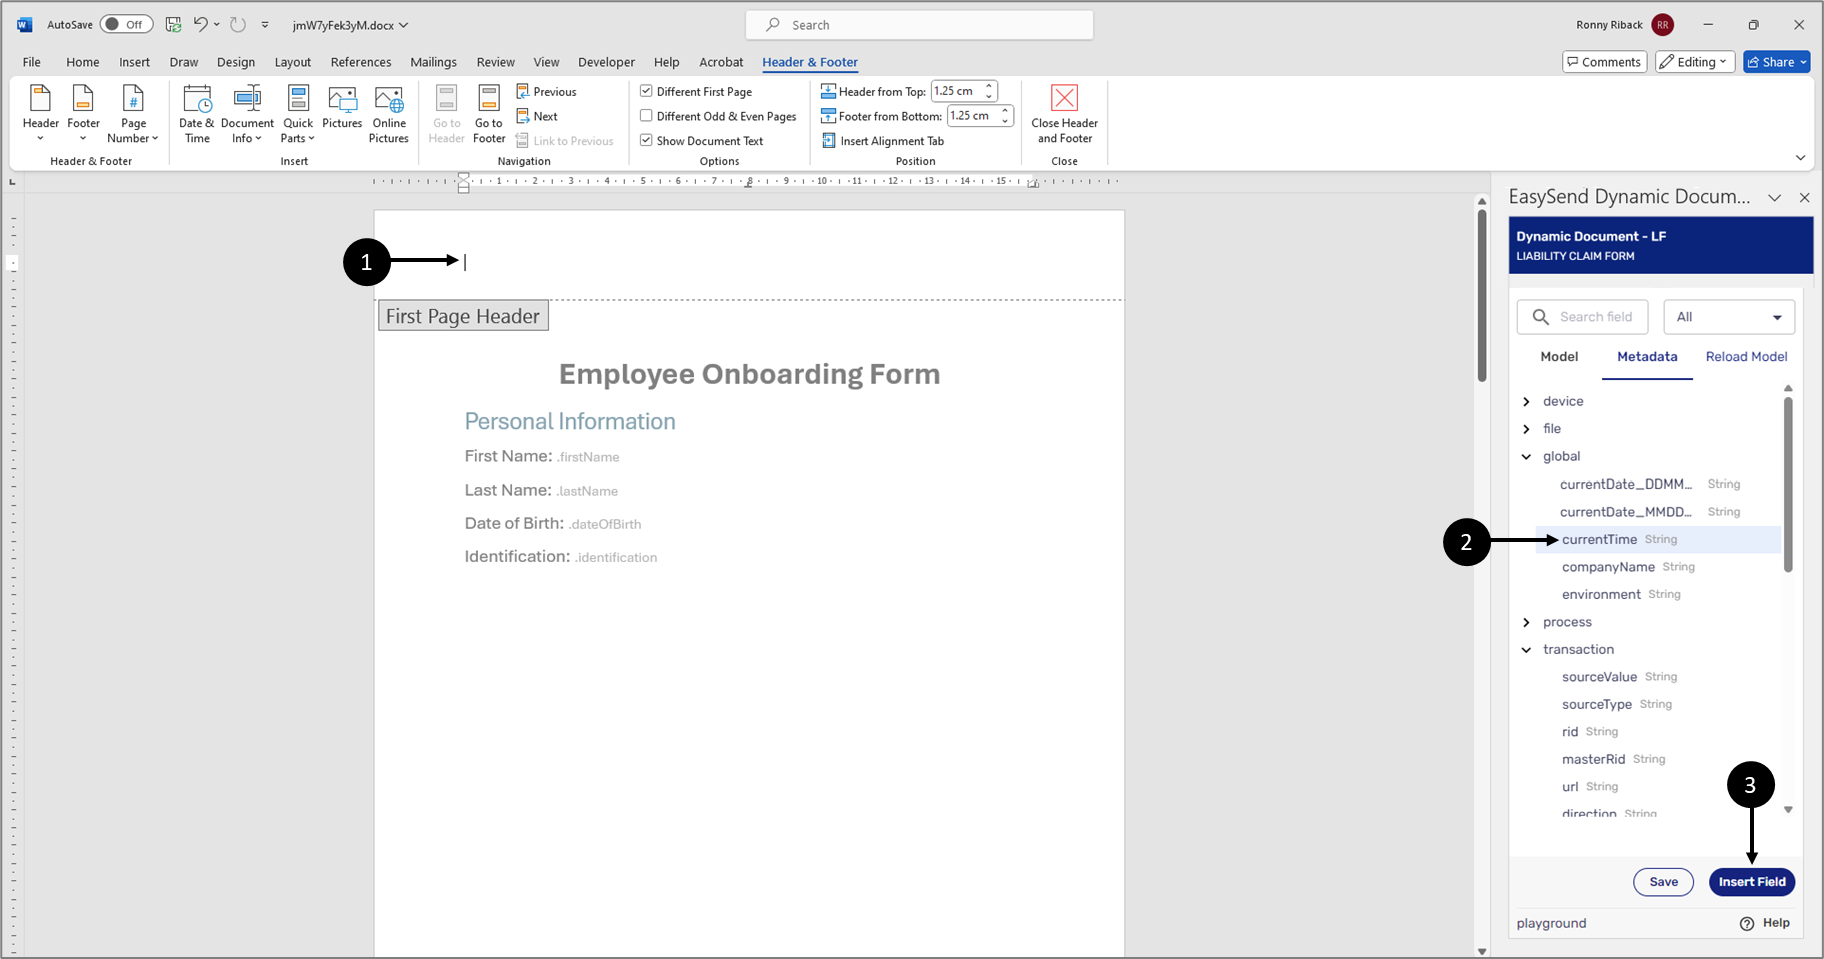
Figure 18: Inserting Metadata Items 1 of 4
- Display the Header and the Footer of the dynamic document.
- Ensure that the first page is different than the other pages.
- Click the desired location in the Header (1).
- locate and click the current time Metadata item (2).
- Click the Insert Field button (3).
Result:
The Metadate item is inserted into the Header of the dynamic document (4):
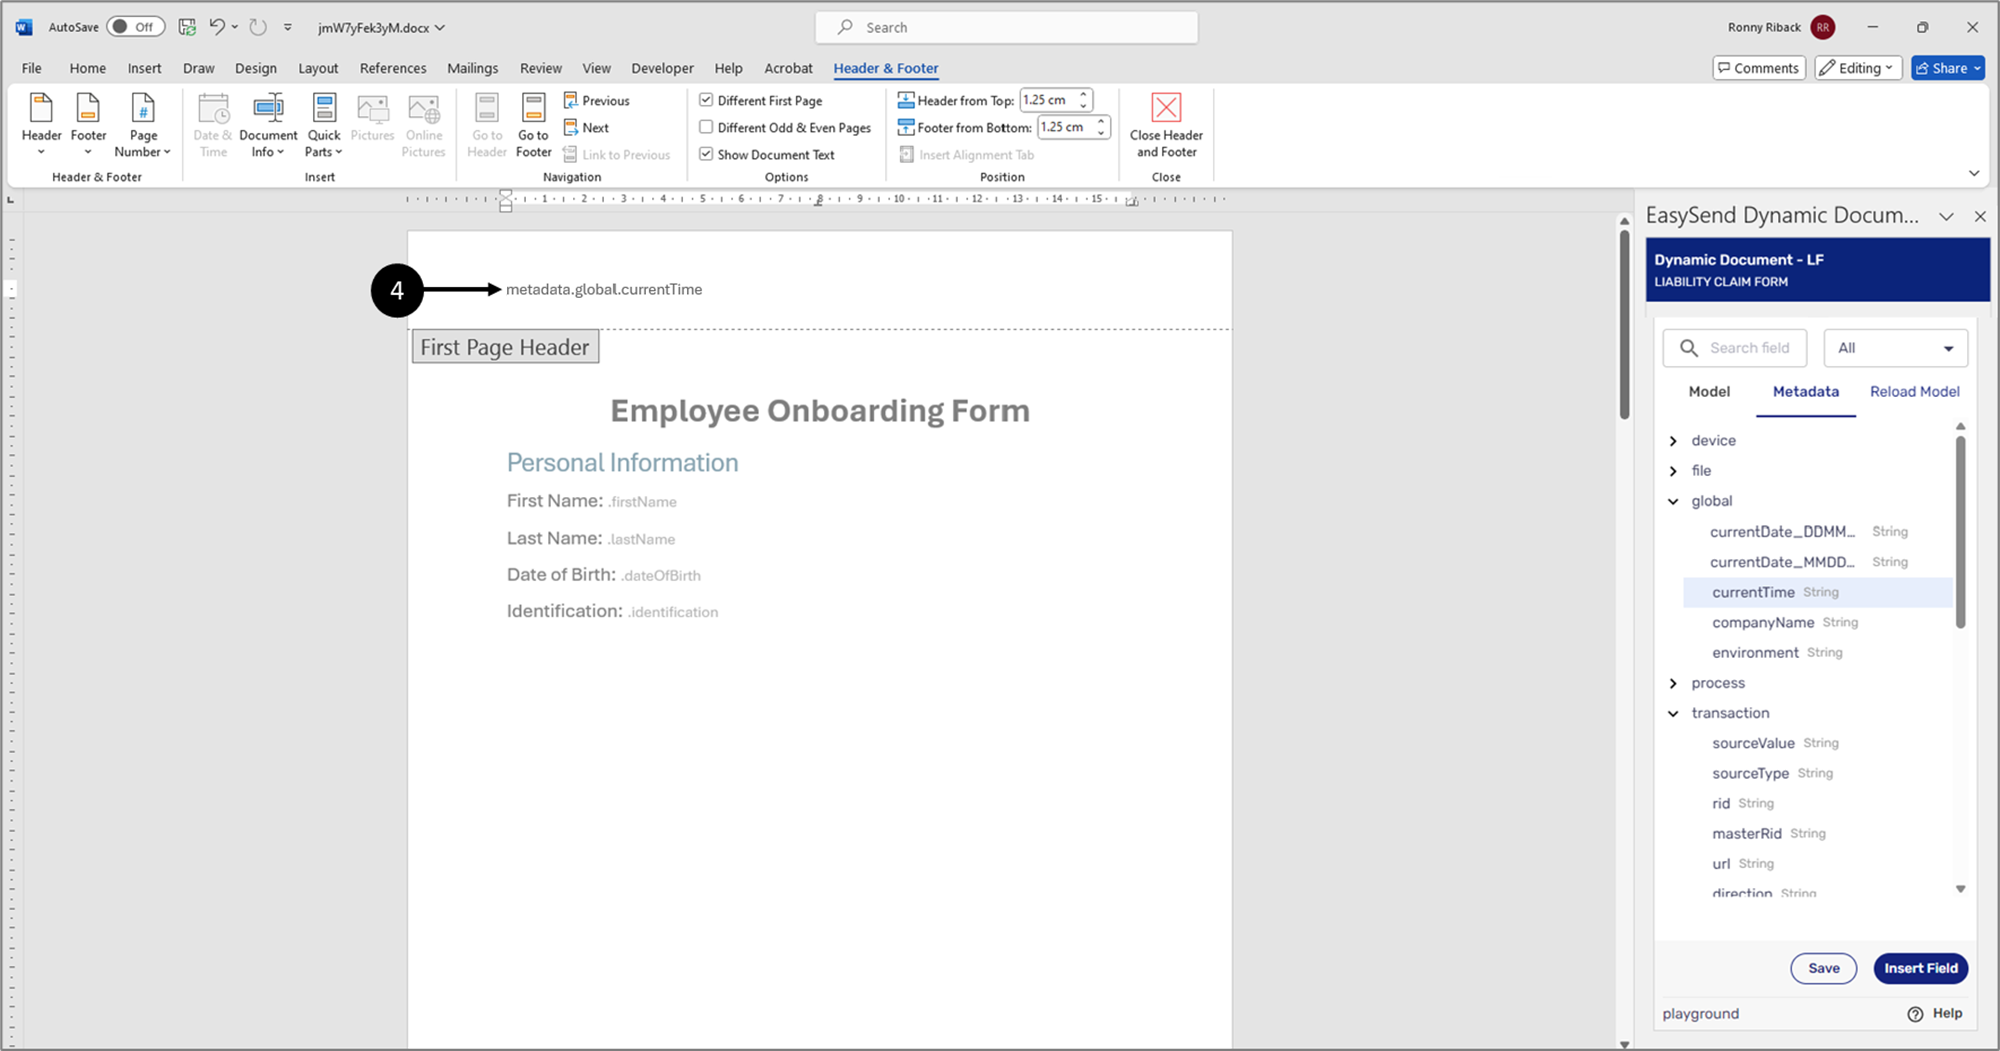
Figure 19: Inserting Metadata Items 2 of 4
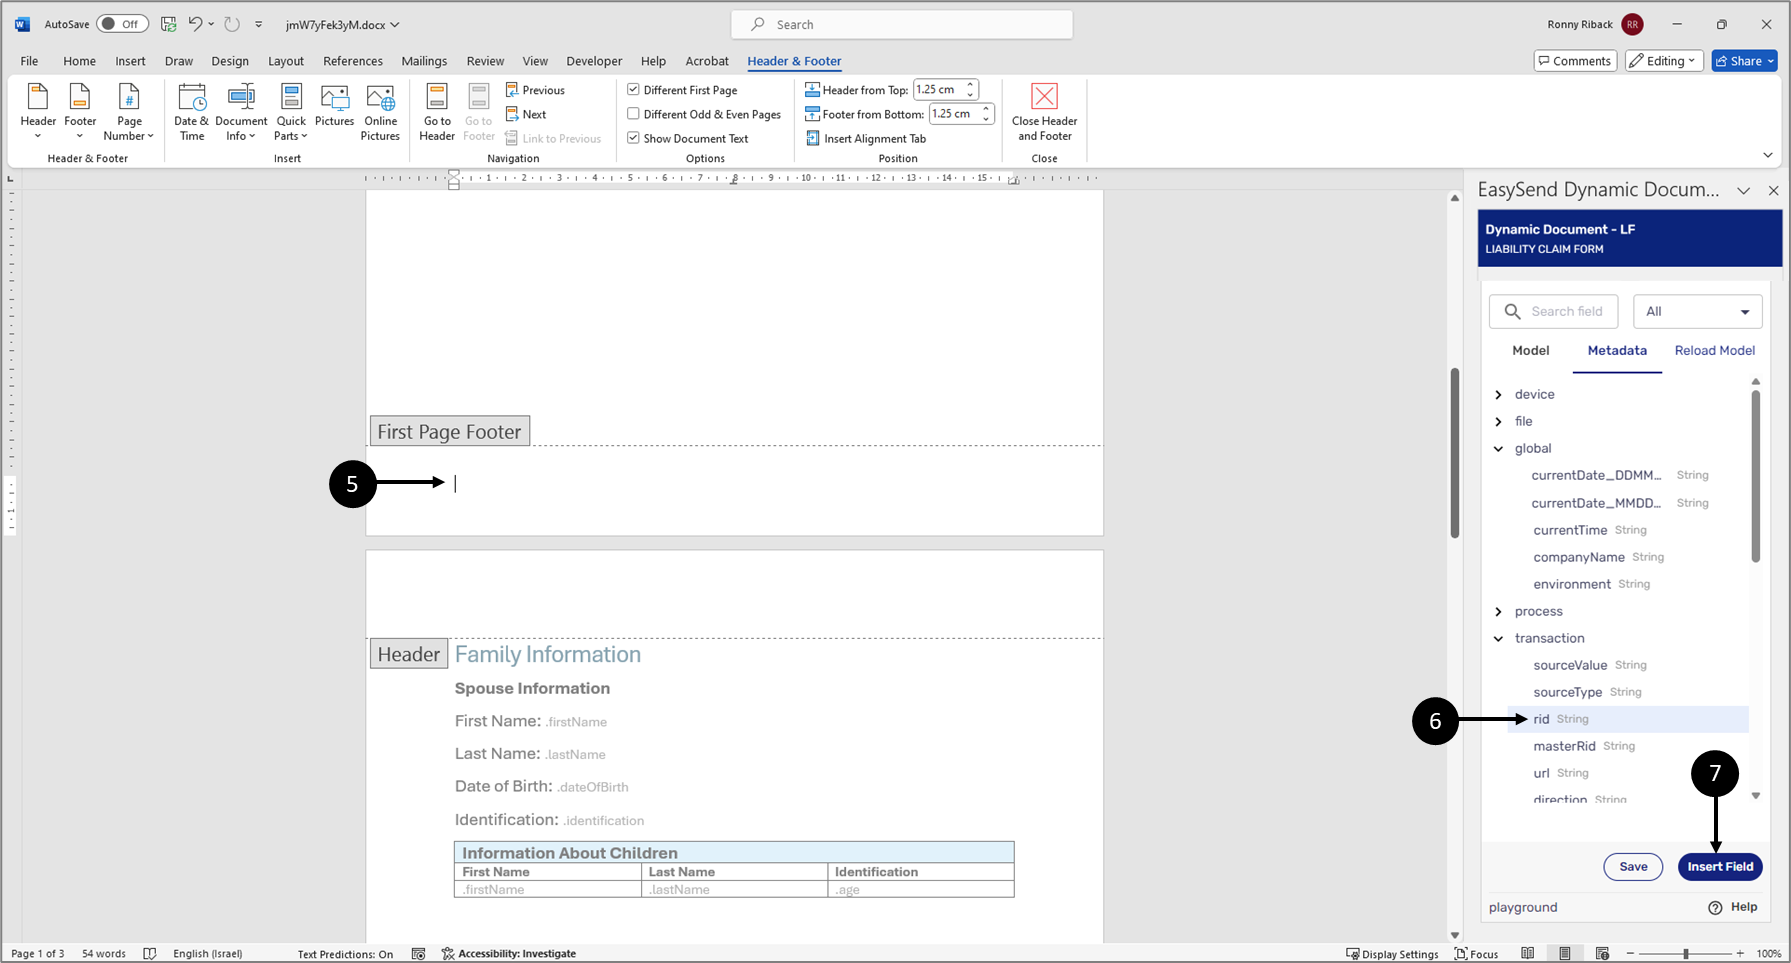 Figure 20: Inserting Metadata Items 3 of 4
- Click the desired location in the Footer (5).
- locate and click the rid Metadata item (6).
- Click the Insert Field button (7).
Result:
The Metadate item is inserted into the Footer of the dynamic document (8):
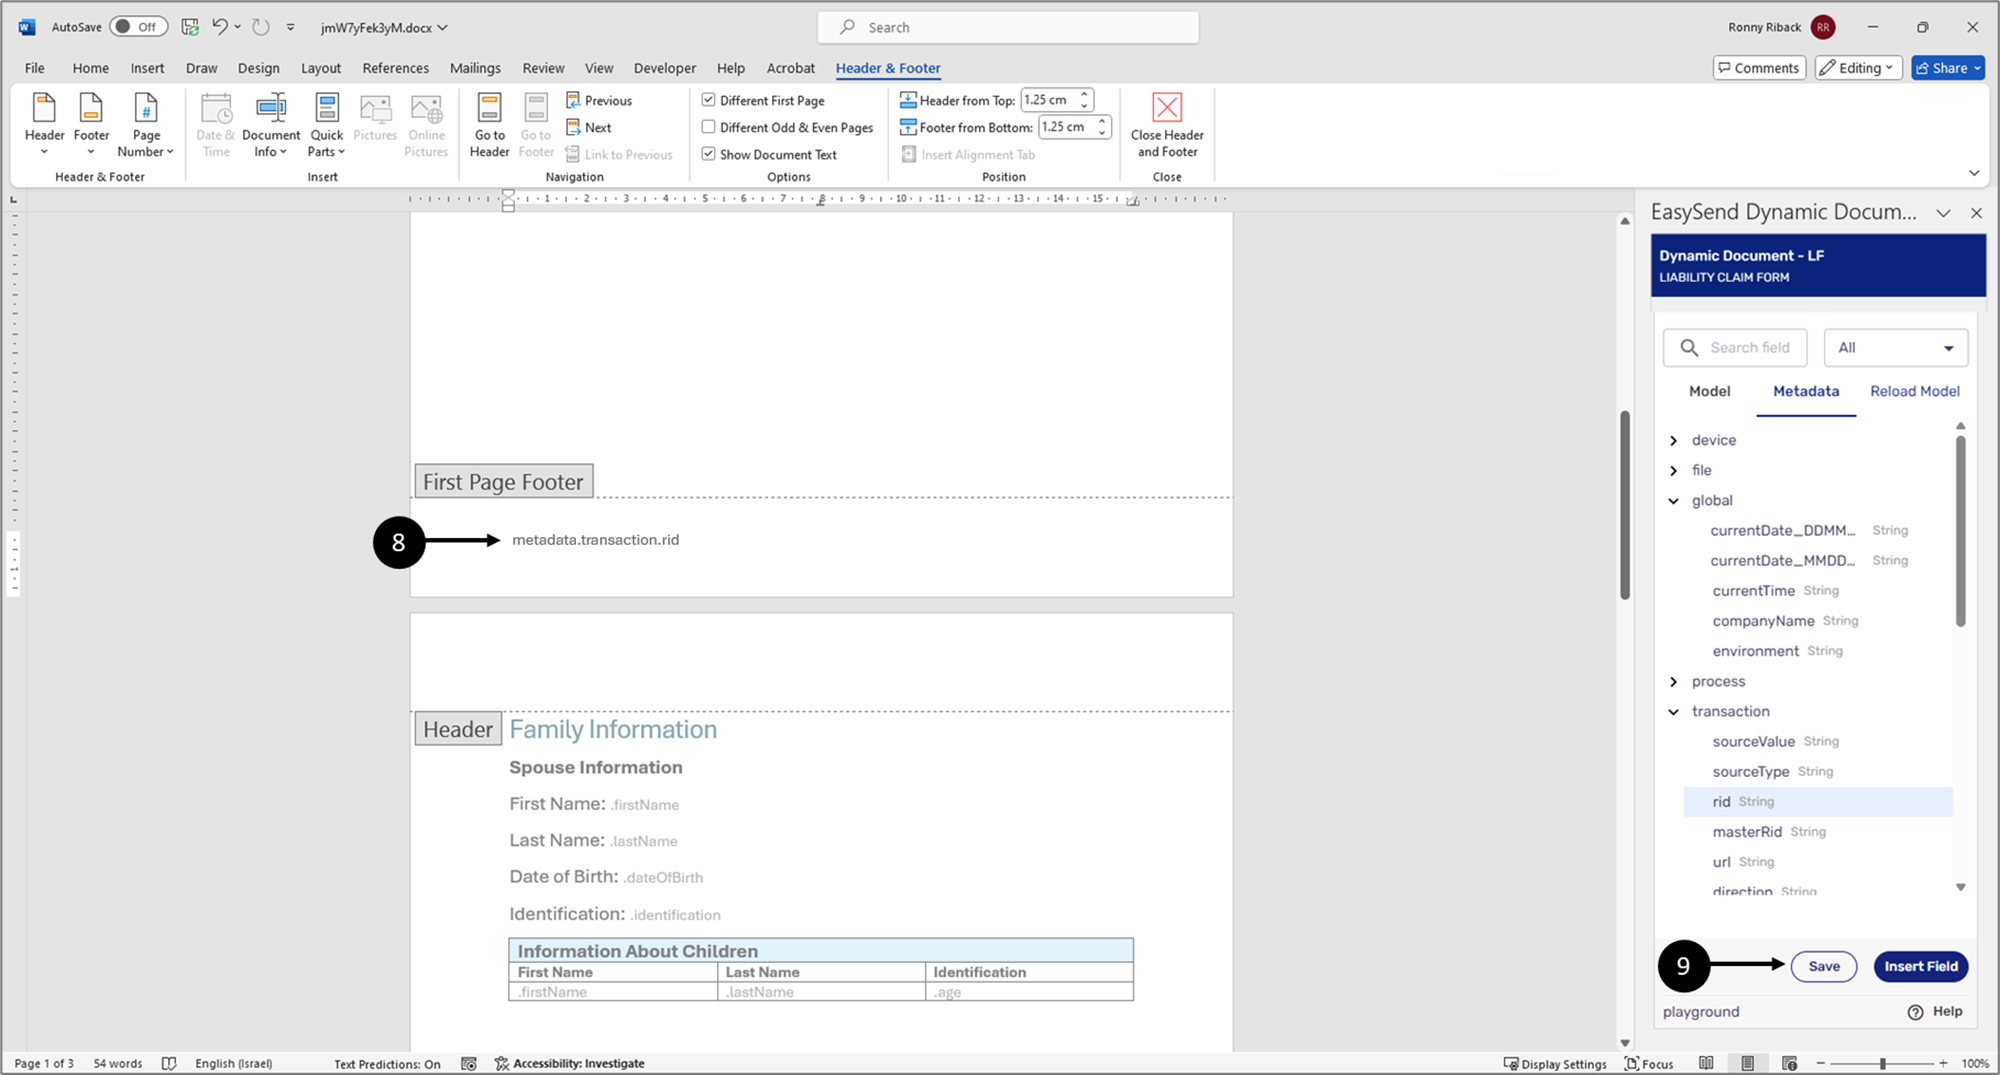
Figure 21: Inserting Metadata Items 4 of 4
- Click the Save button (9).
Nesting Dynamic Document Elements Inside Object-Type Items
(See Figure 22 to Figure 26)
Dynamic document elements such as text, images, and tables can be nested inside object-type items. For example, the following section in the document contains text fields for inputting policy information (1). The items to insert into the document are nested inside two object-type items:
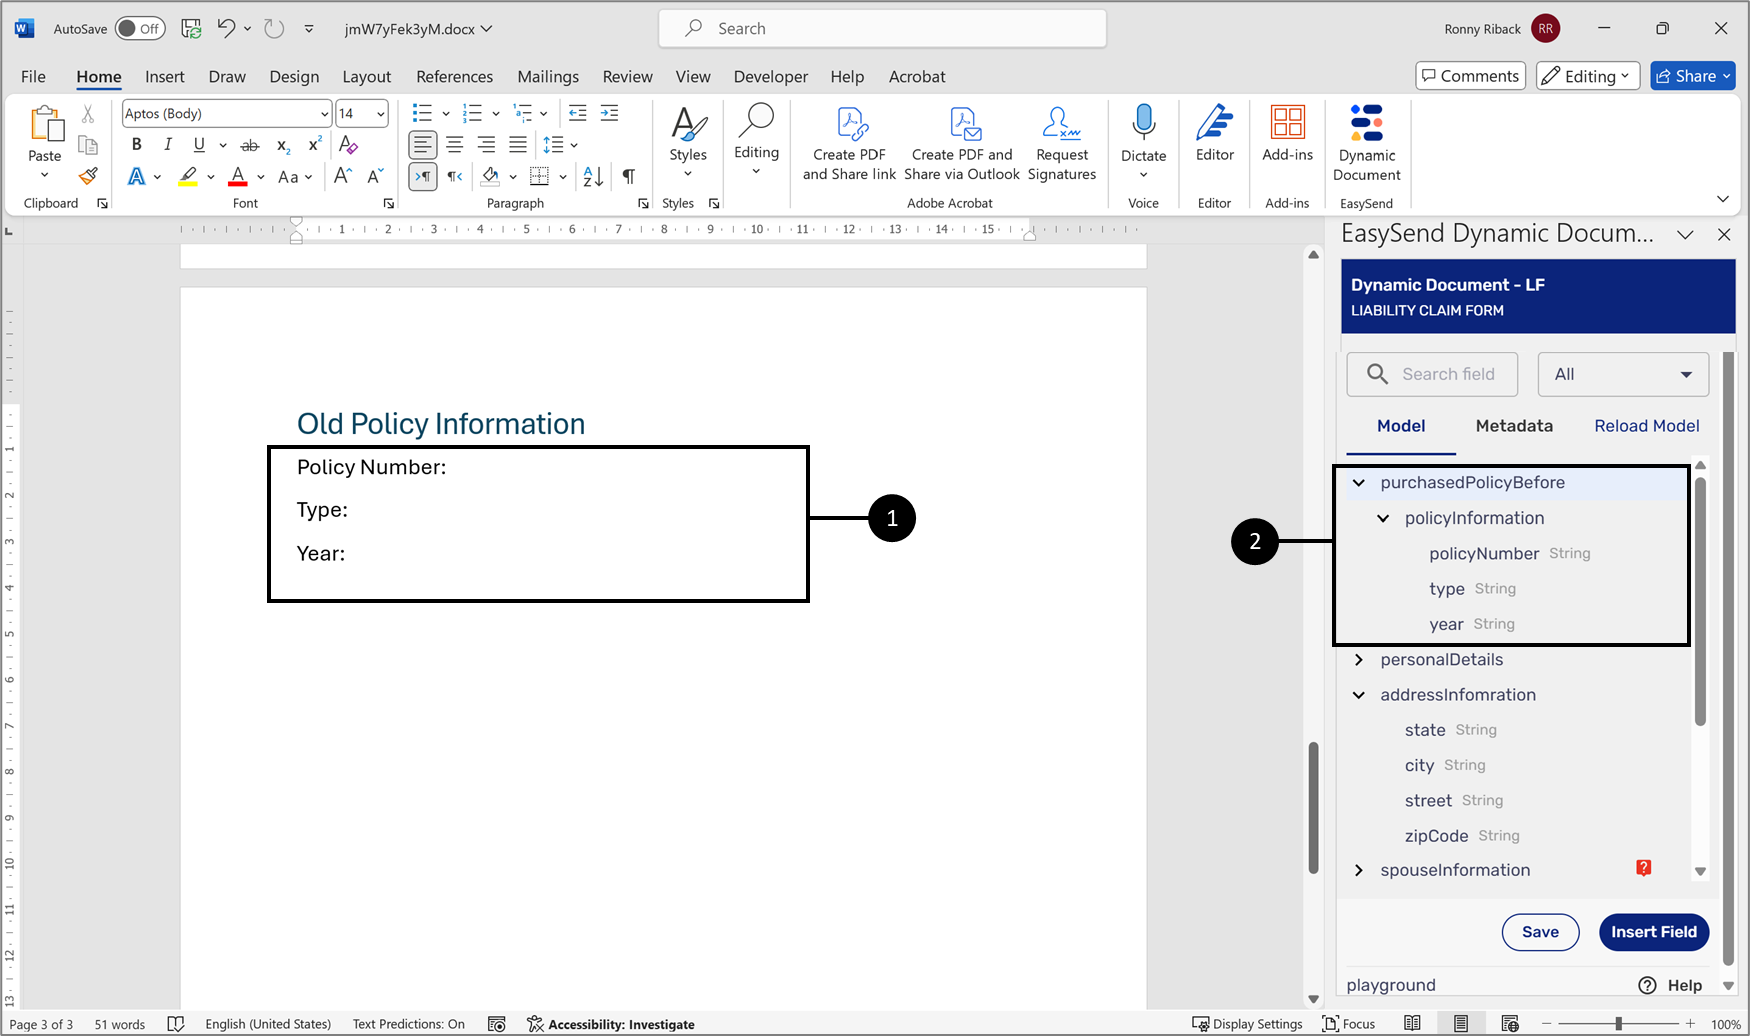
Figure 23: Dynamic Document Text Fields
When inserting the items as described in the Inserting Items Into a Dynamic Document section, they are written with their full path (3):
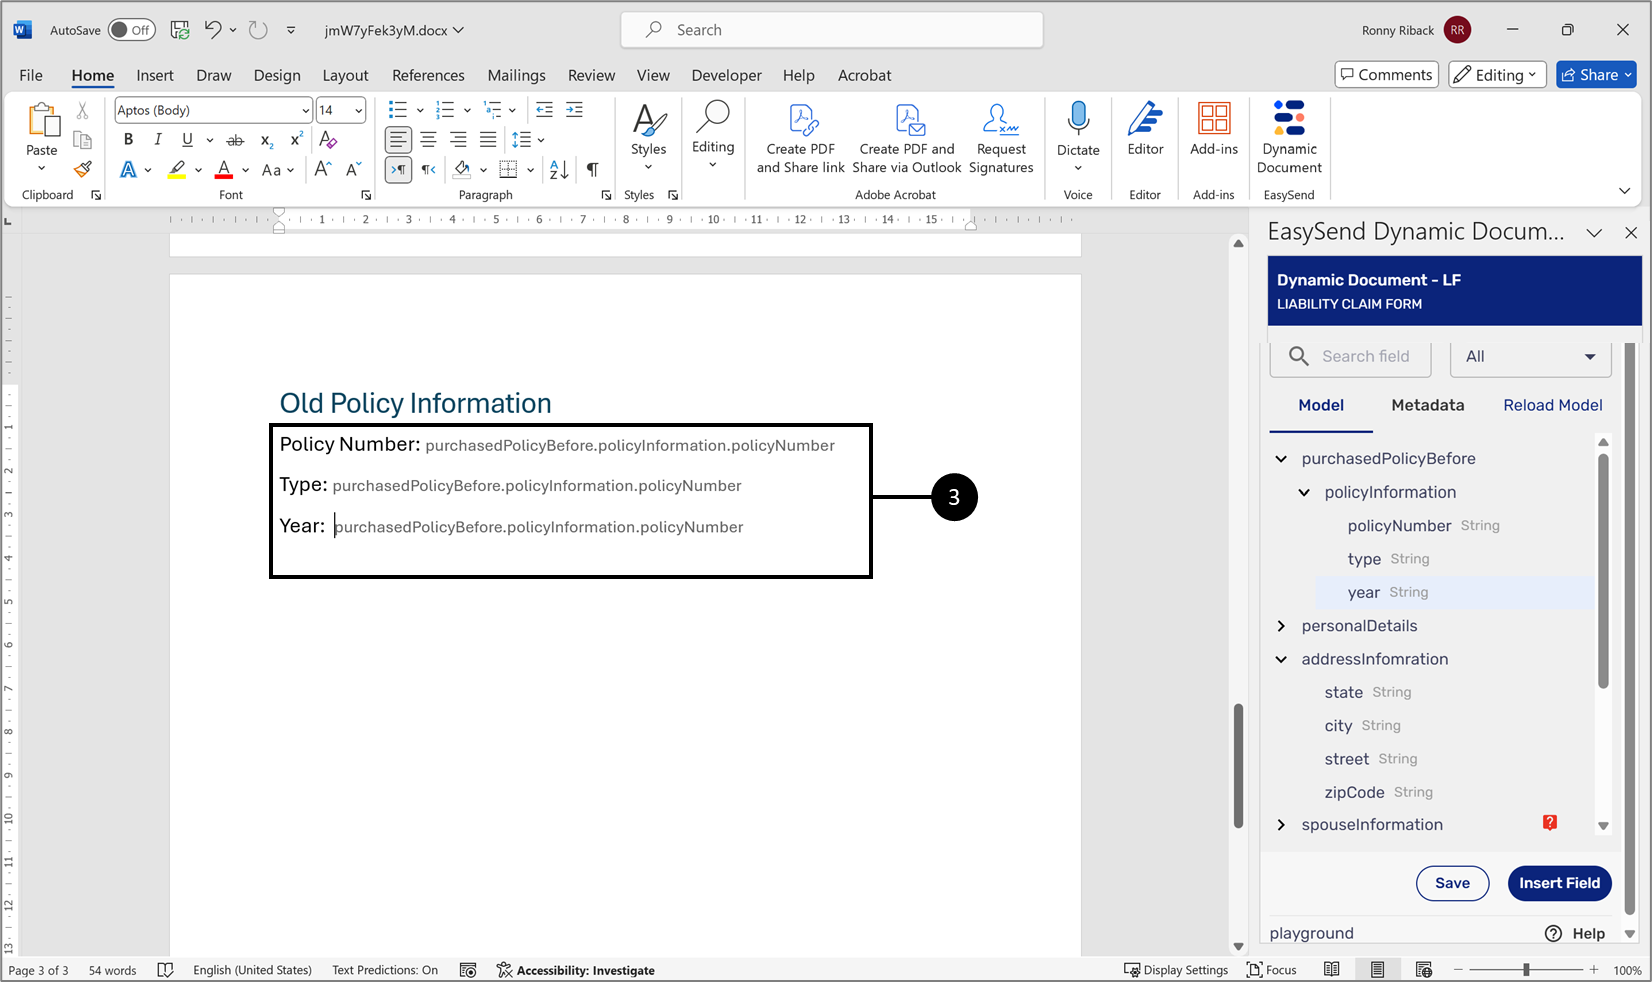
Figure 24: Inserted Items with Full Path
To keep the dynamic document more readable, neat, and organized it is recommended to nest the relevant elements, in this case the text fields, inside an object-type item so that the inserted items can be written with their relative path:
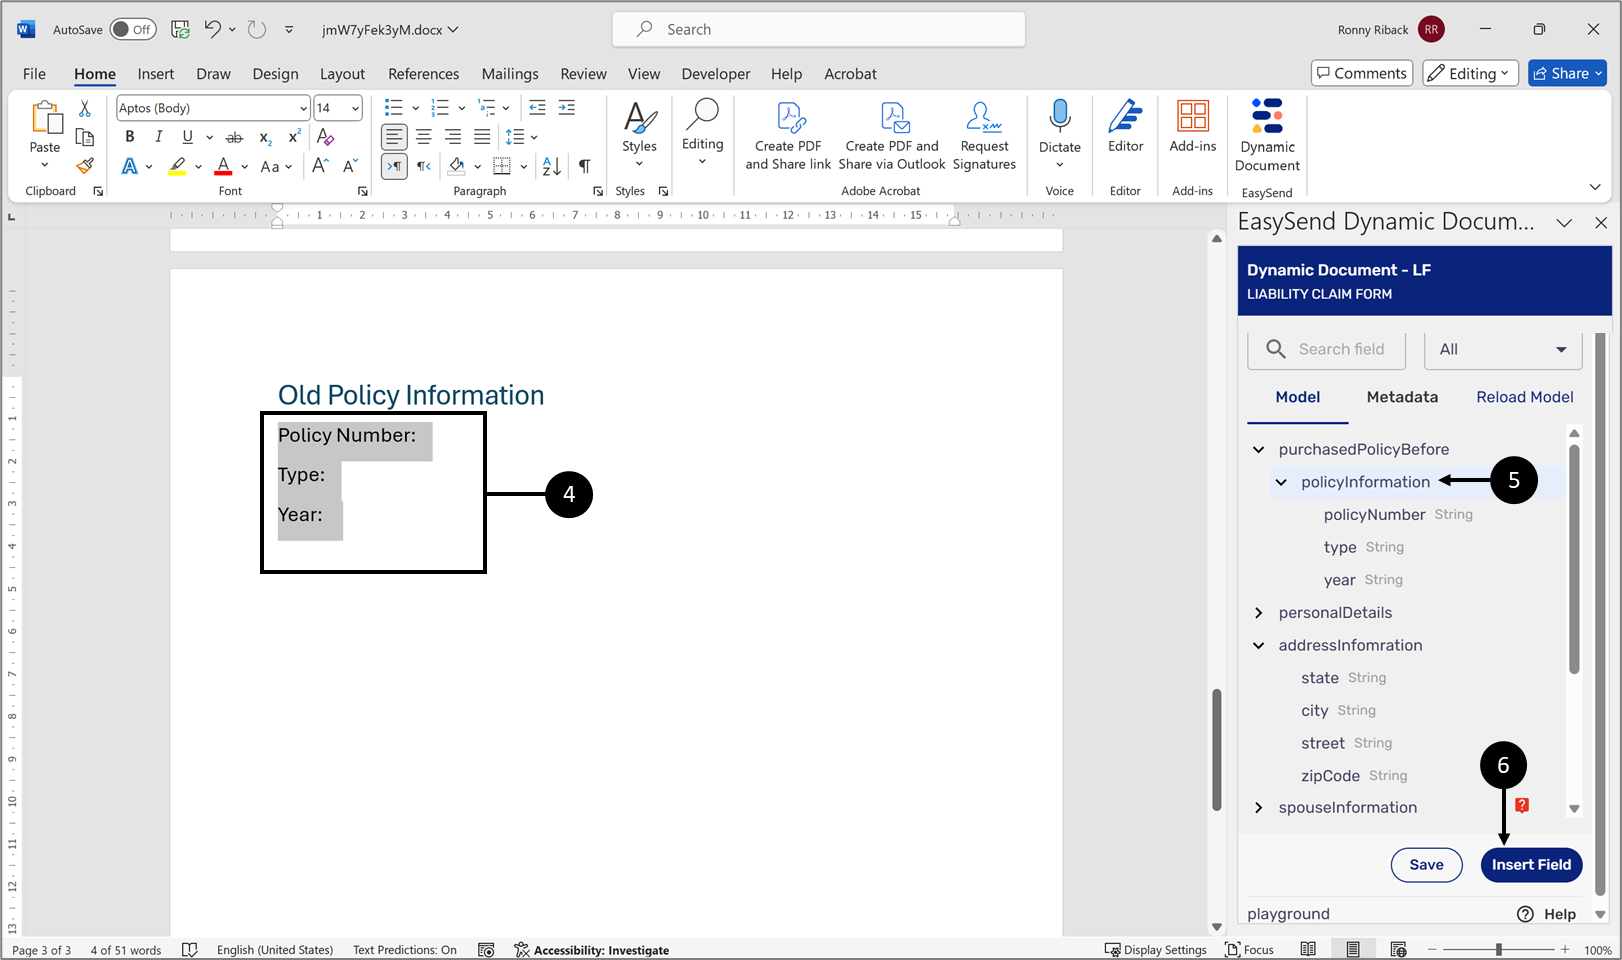
Figure 25: Nesting
- Mark all the relevant elements (4).
- Click the relevant object type item (5).
- Click the Insert Field button (6).
Result:
The text fields are nested inside the object-type item (7):
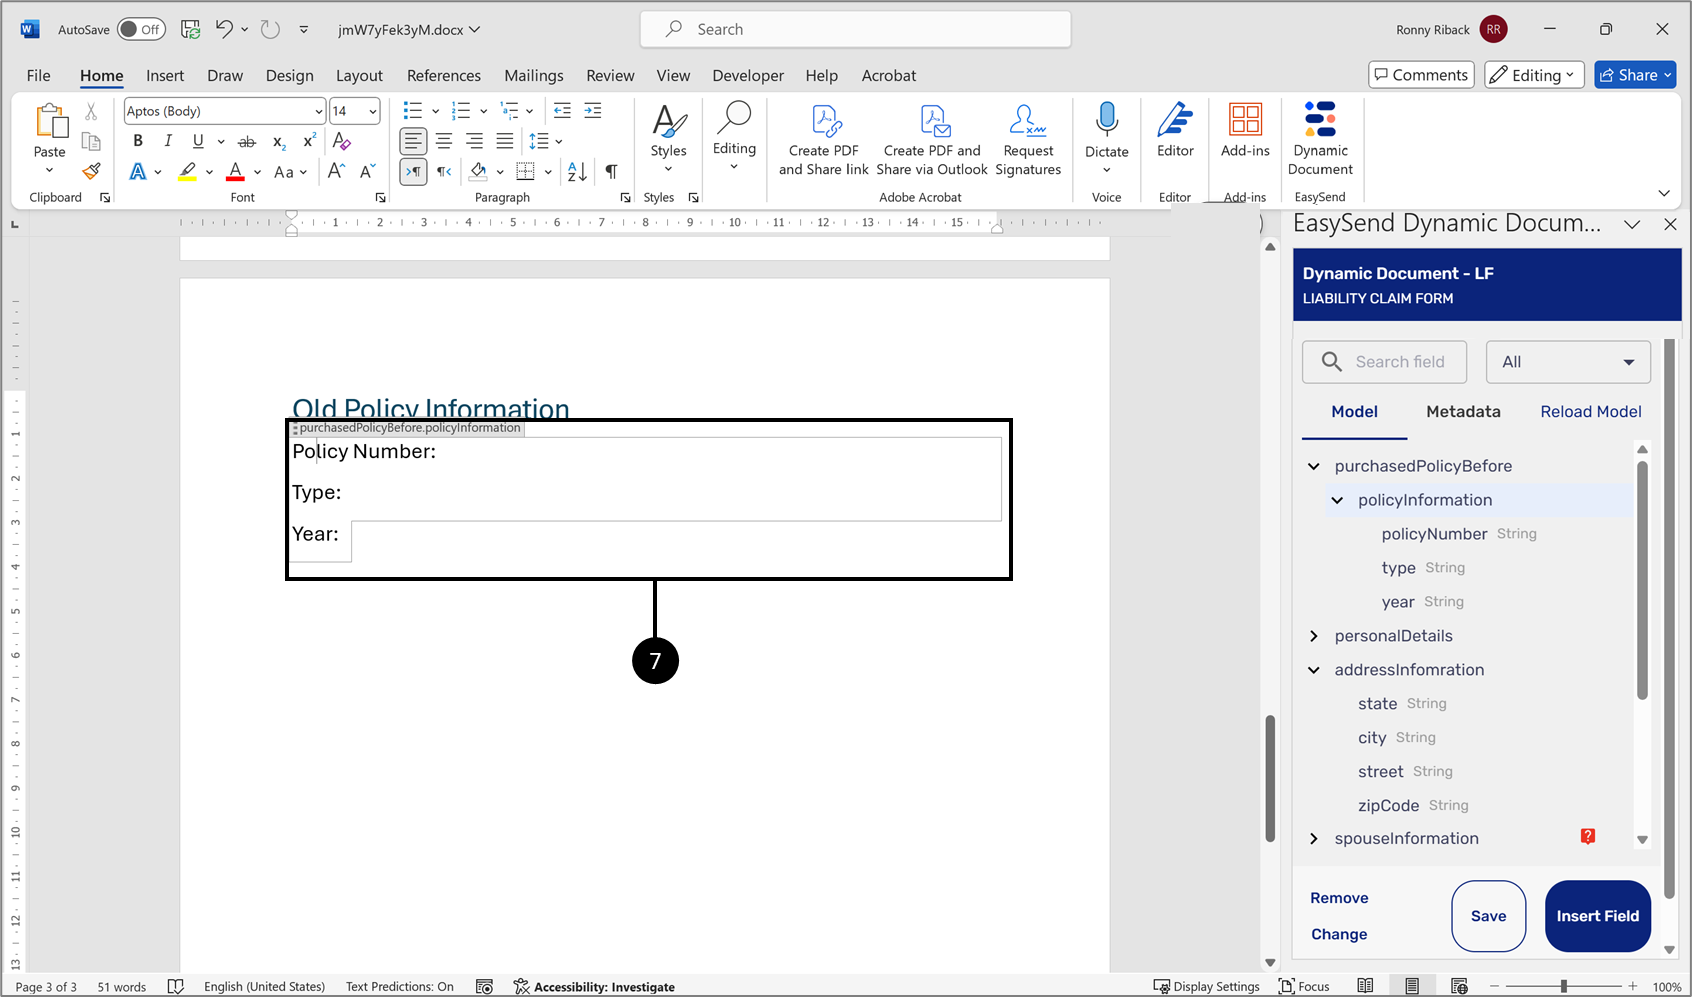
Figure 26: Nested Text Fields
Now, when inserting the items, they will be written with their relative path (8):
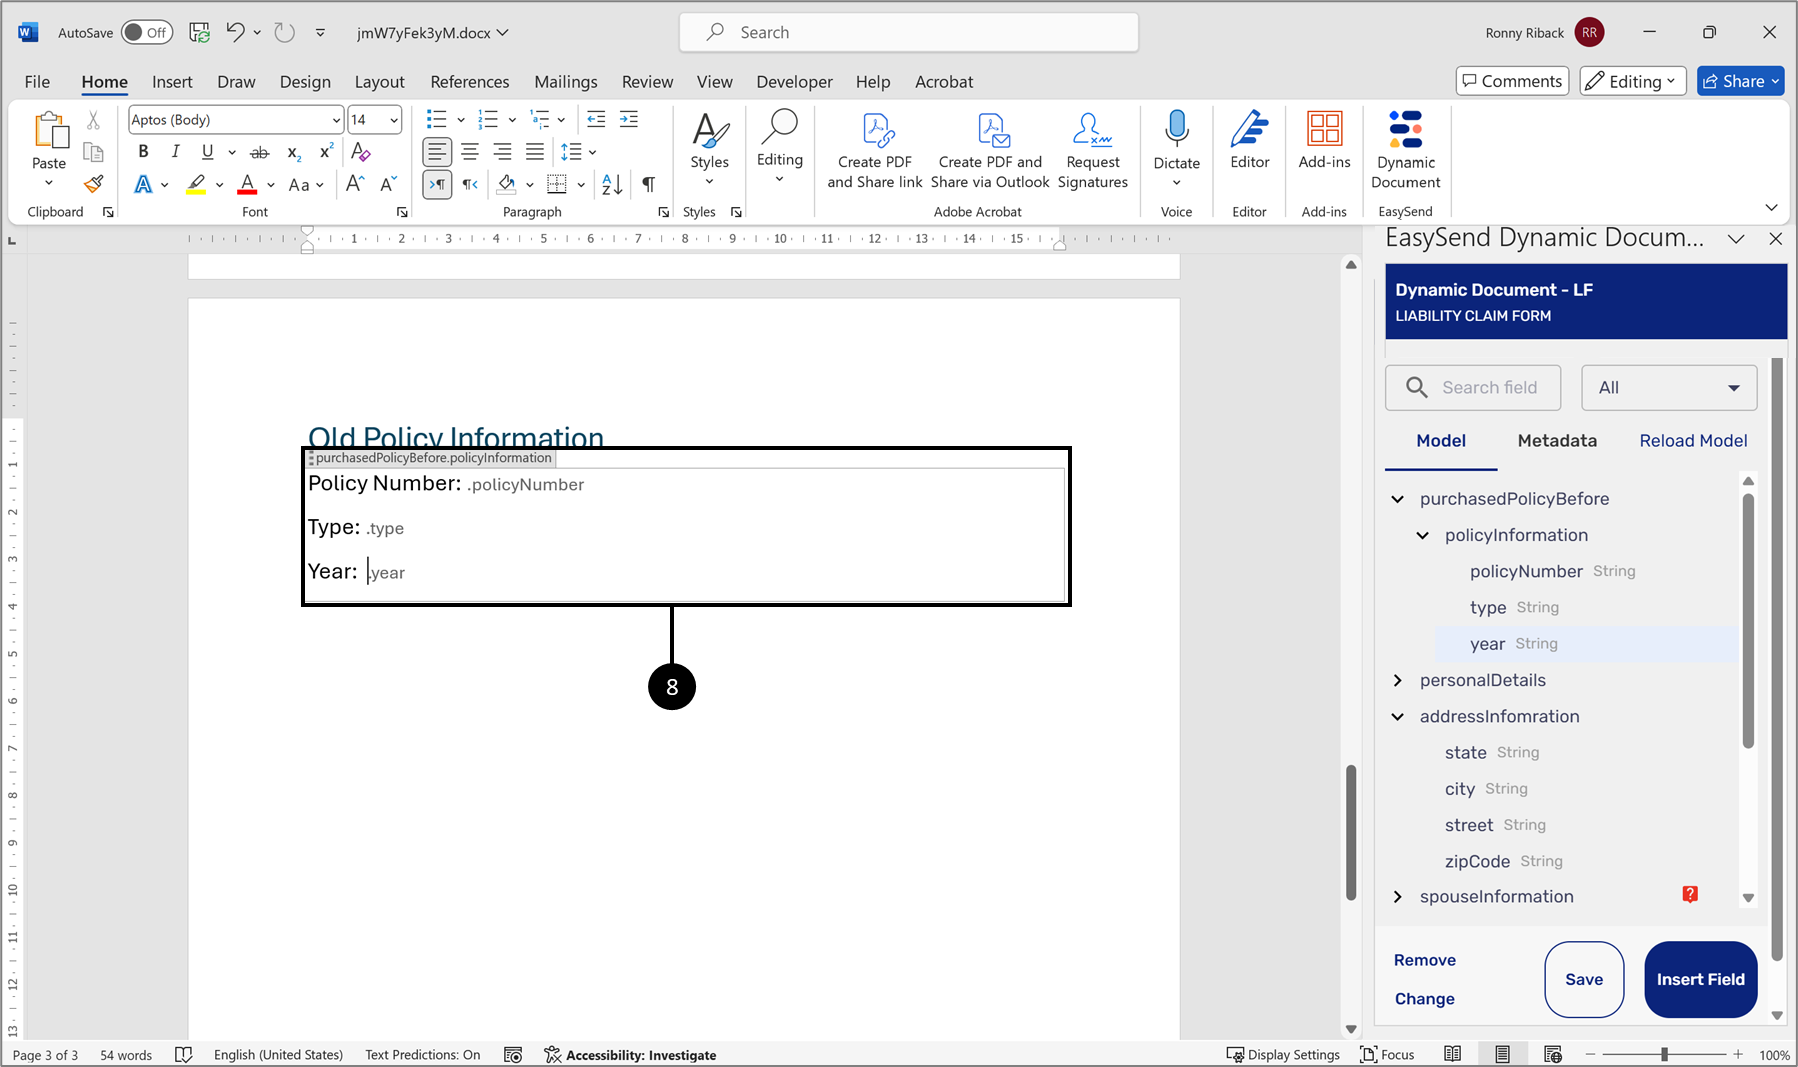
Figure 27: Relative Path
Replacing Items
(See Figure 28 and Figure 29)
To replace items, perform the following steps:
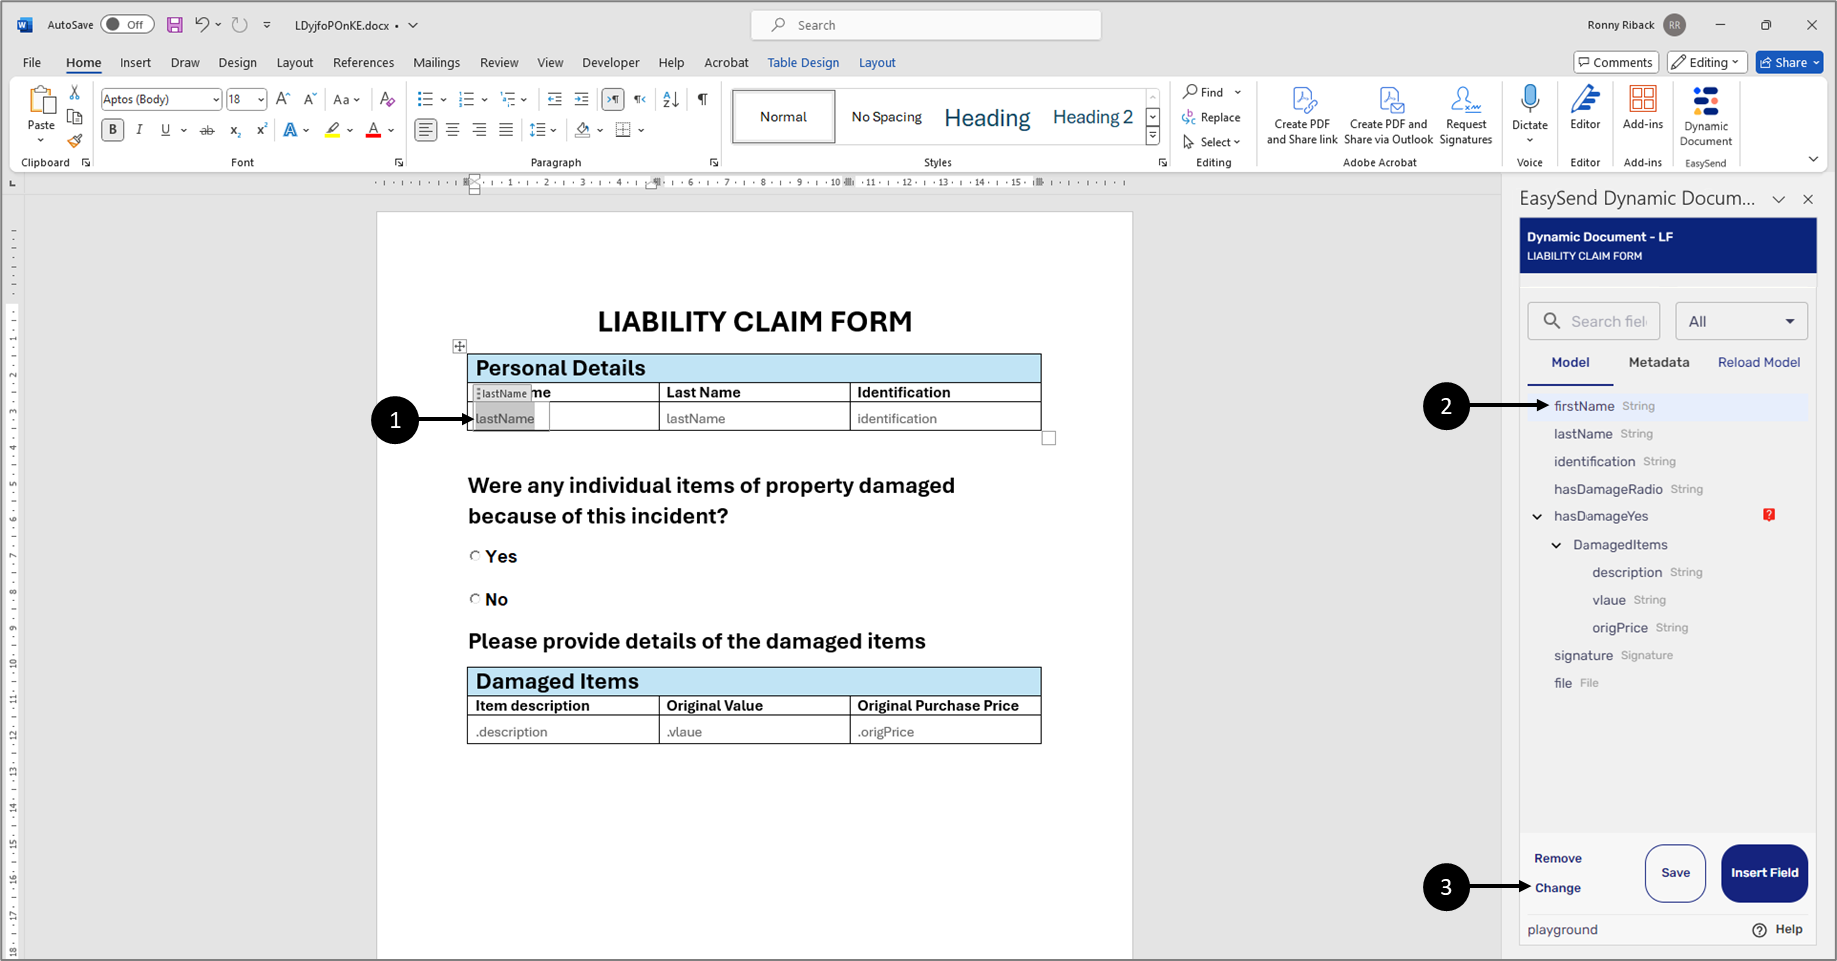
Figure 28: Change Button
- Click the desired inserted item (1).
- Click the desired item from the list (2).
- Click the Change button (3).
Result:
The items are replaced (4):
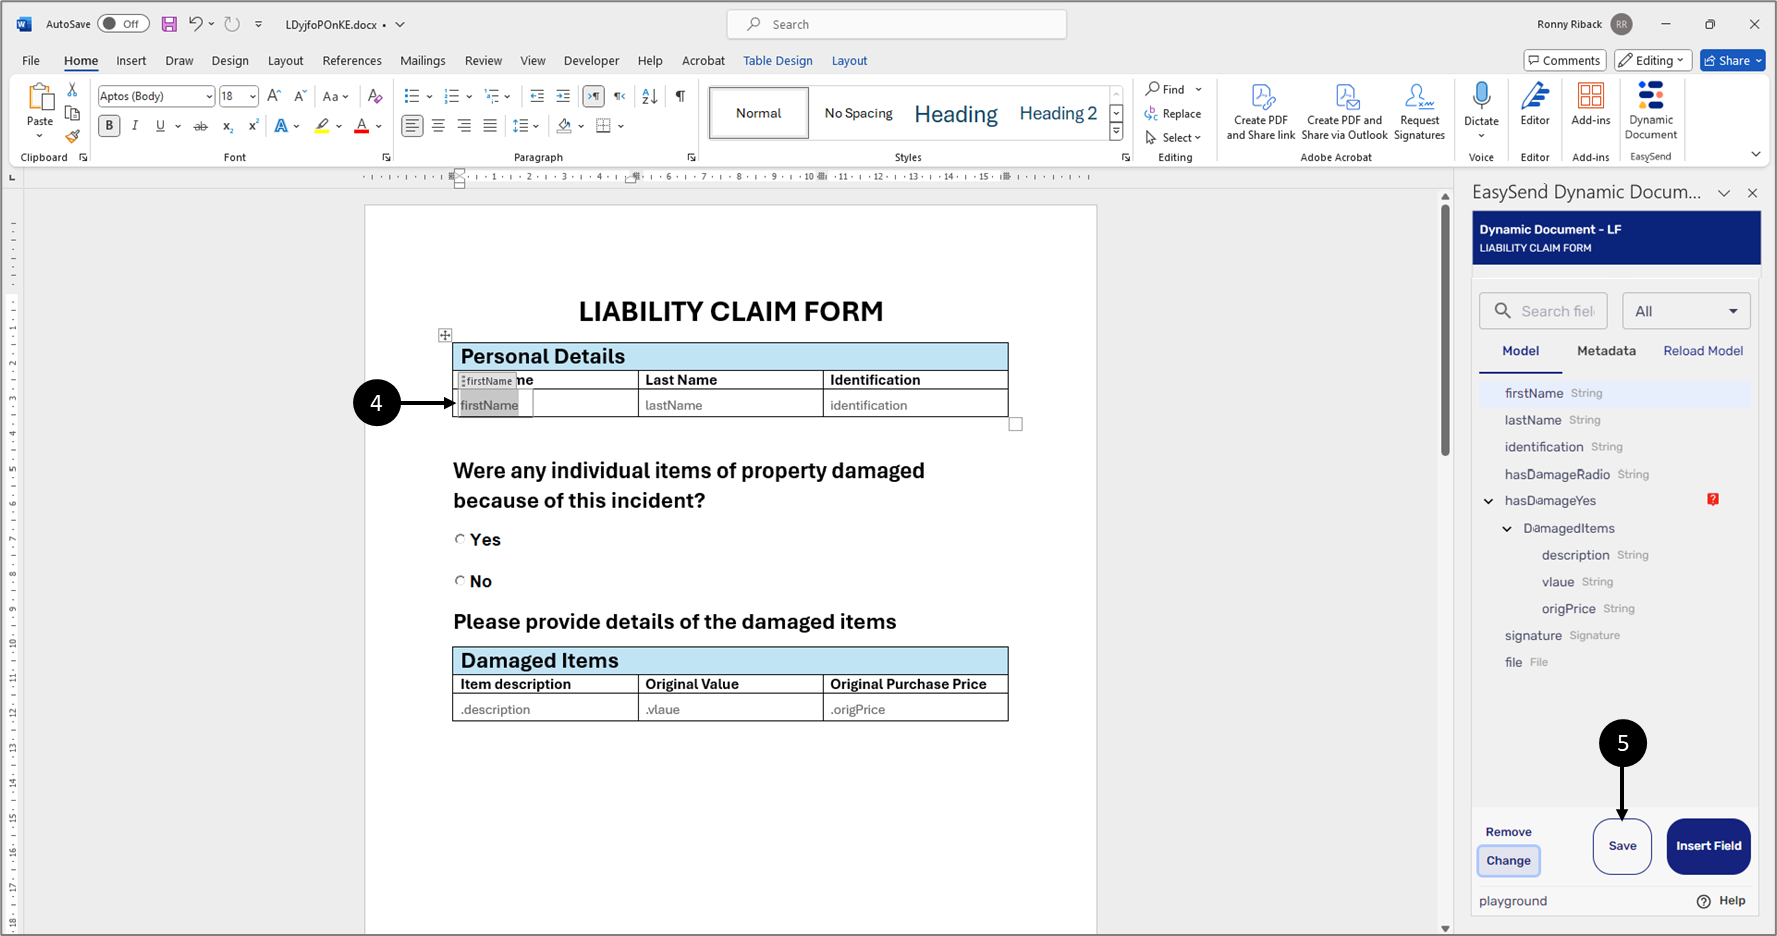
Figure 29: Replaced Item
- Click the Save button (5).
Working With Arrays
(See Figure 30 to Figure 35)
A Model item that was set as an array in the Model (1) will appear in the Dynamic Document Editor as an Array-type item (2).
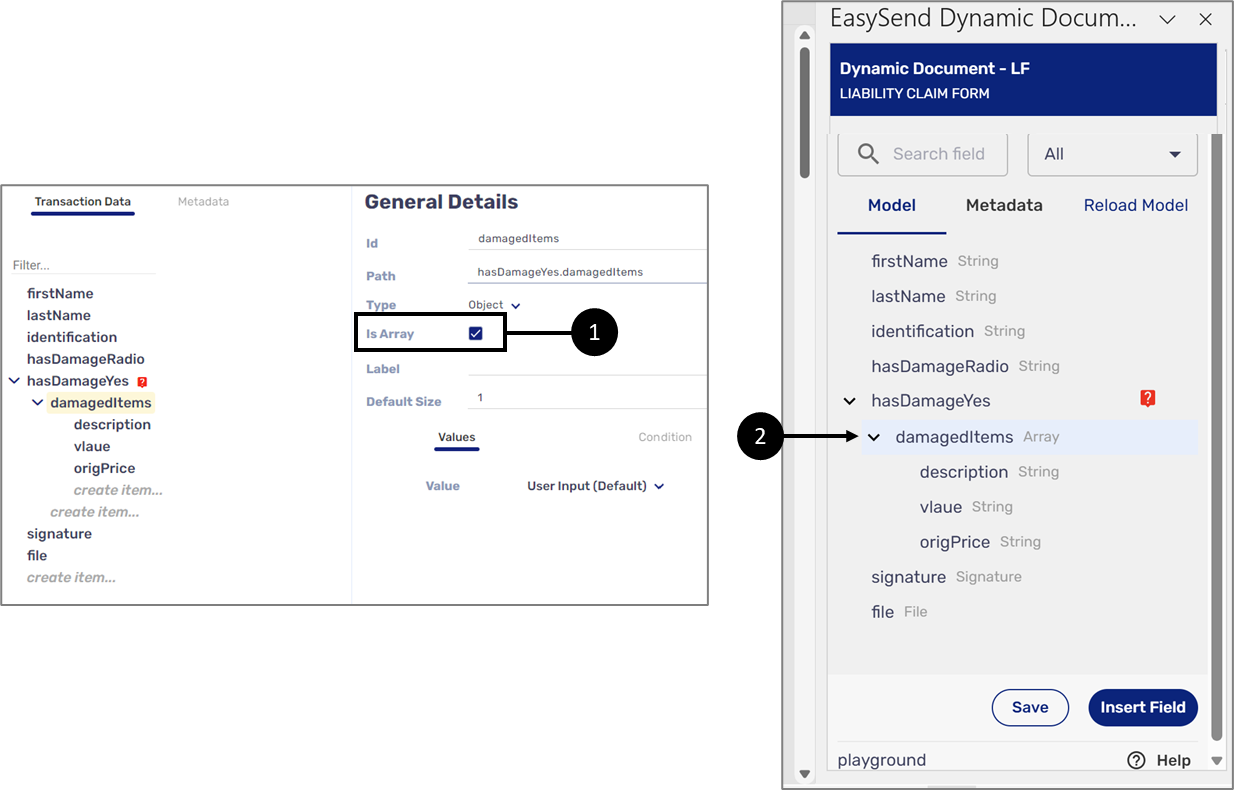
Figure 30: Array and Array-Type
Array items will be inserted into their appropriate fields on the dynamic document. For example, the following table (3) in the dynamic document displays information about damaged items. The table has to be dynamic because the end-user can input multiple items.
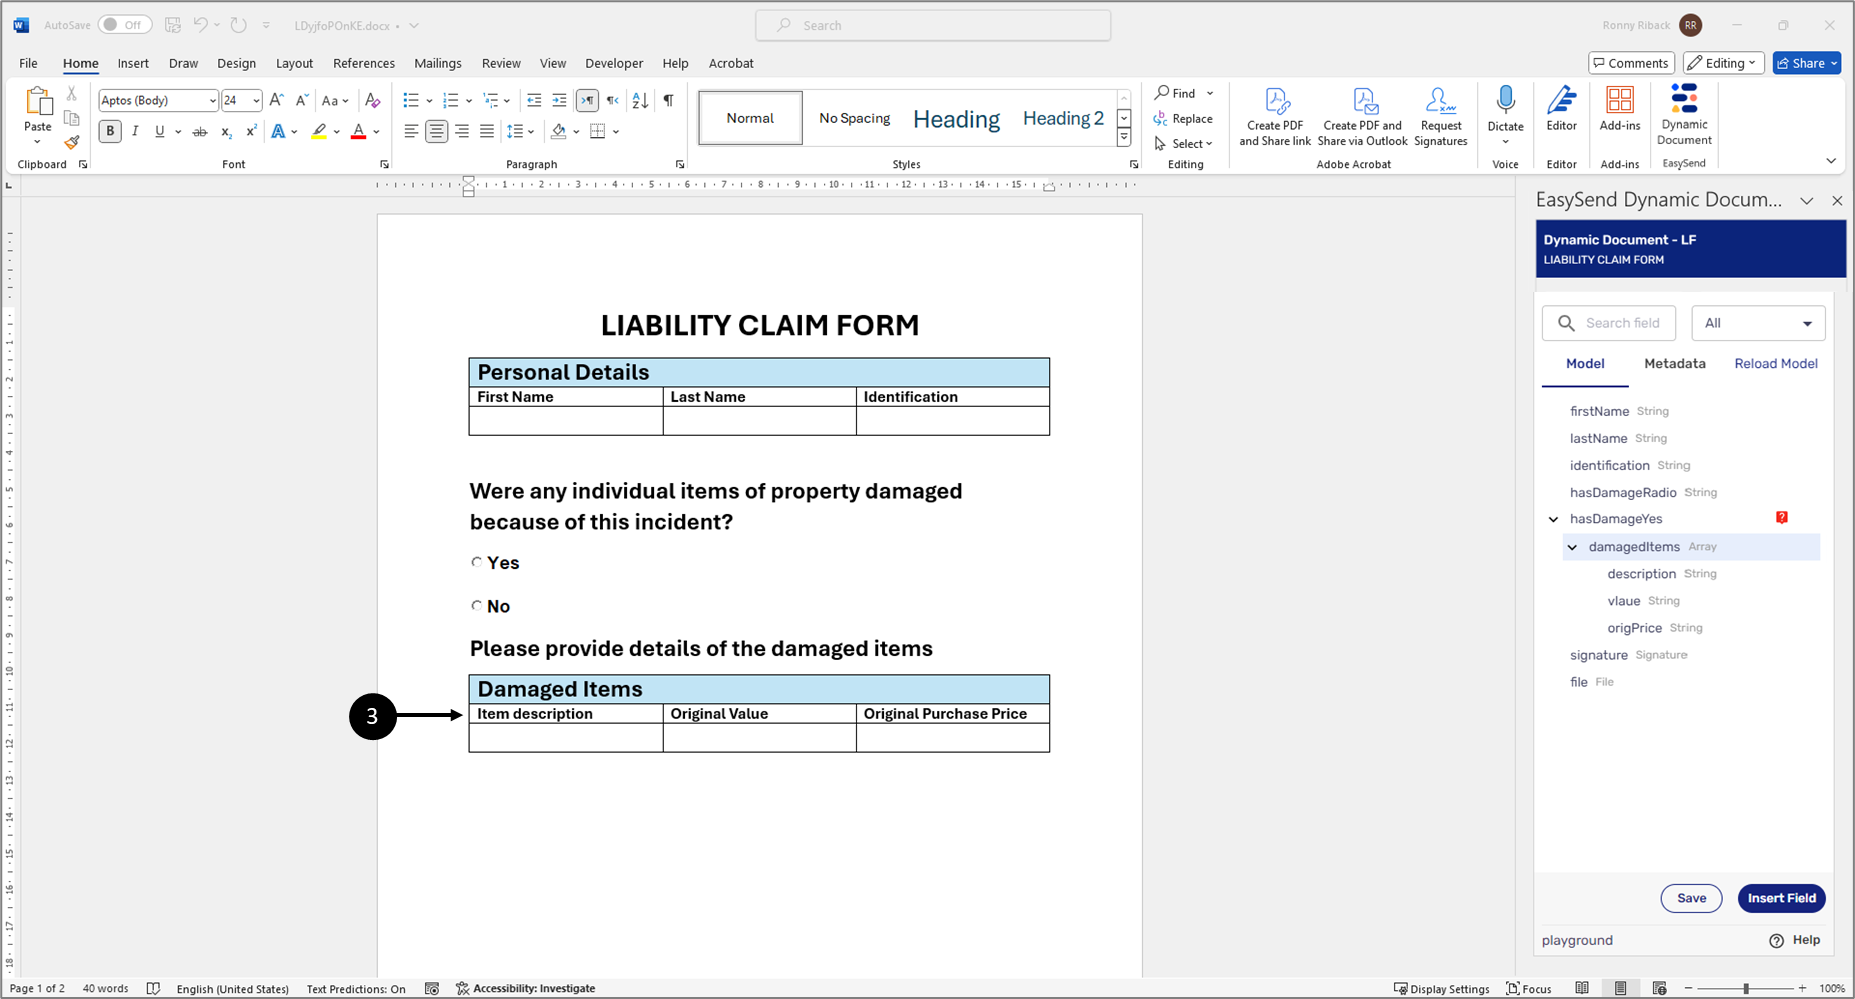
Figure 31: Damaged Items Table
To convert the table to a dynamic table, perform the following steps:
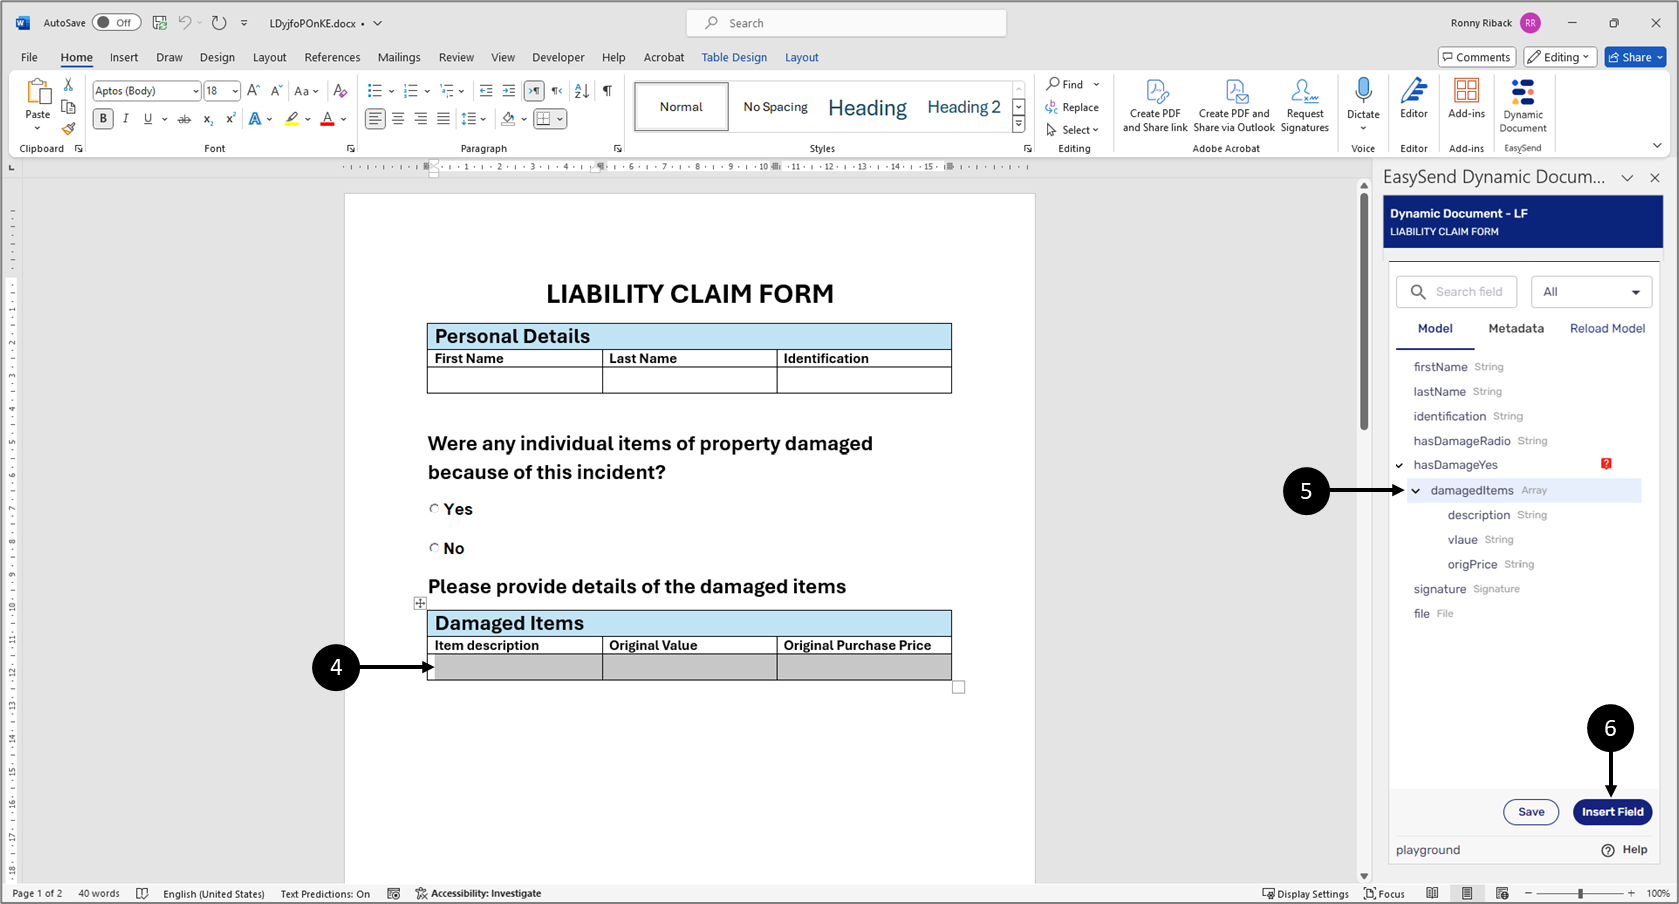
Figure 32: Connecting Table Row
- Select the row of the table (4).
- Click the array-type item that contains the rest of the array items (5).
- Click the Insert Field button (6).
Result:
The row is nested within the array-type item (7):
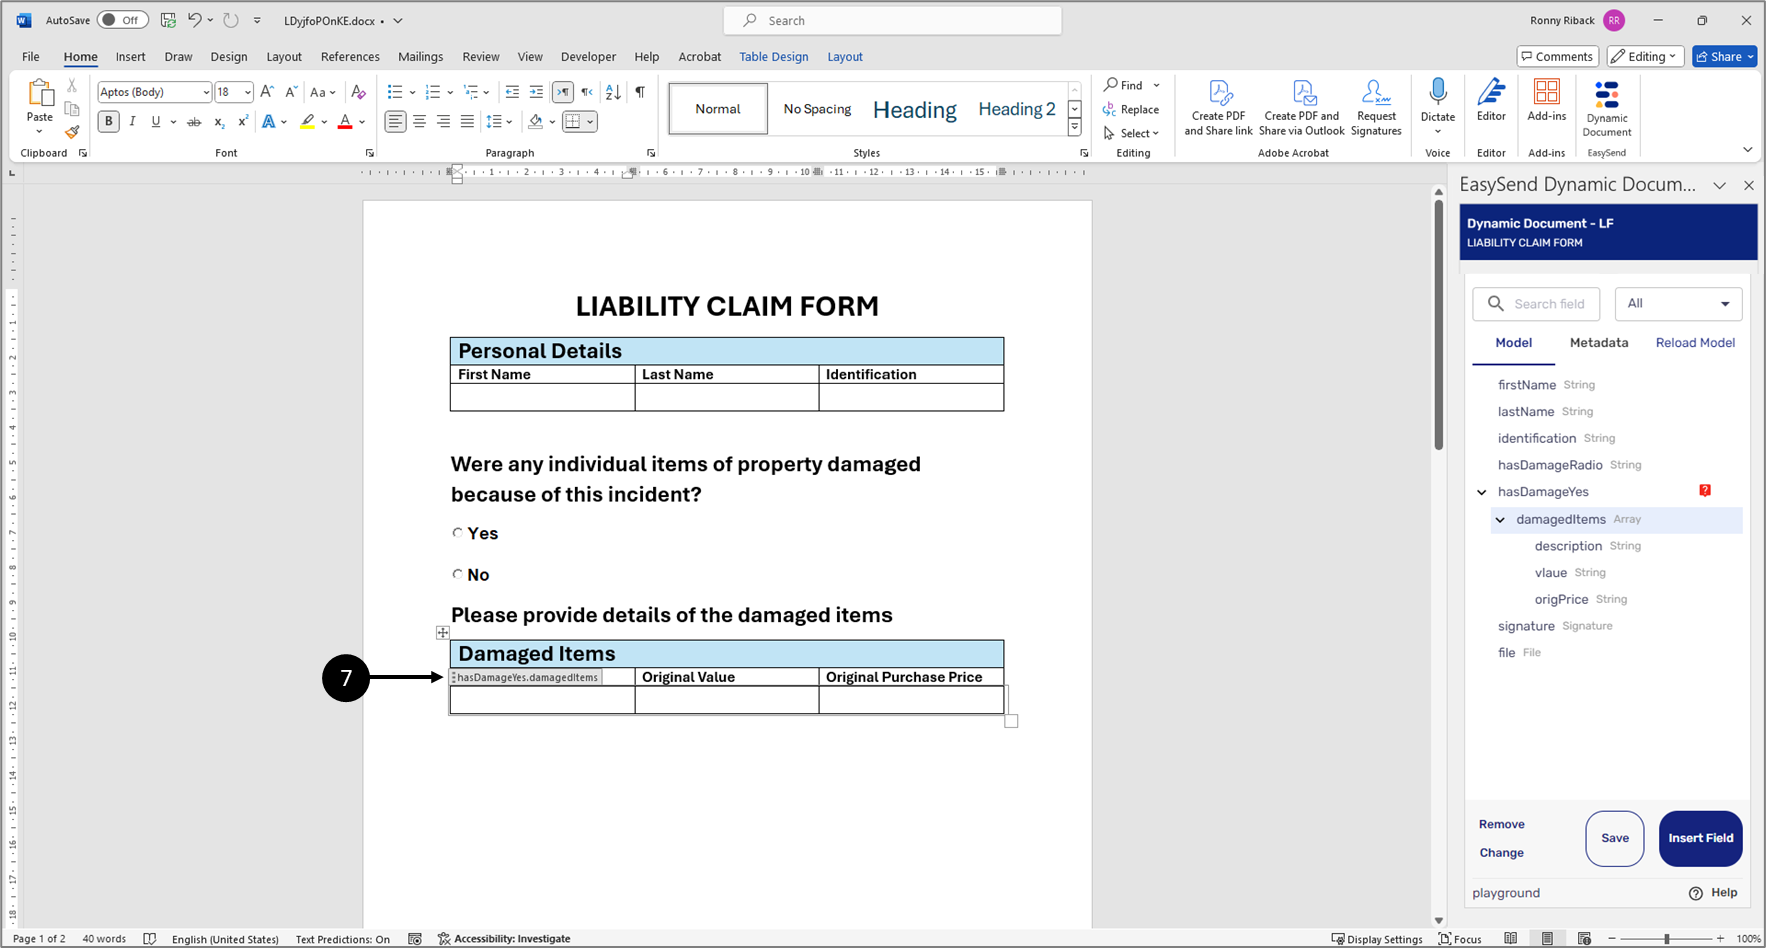
Figure 33: Nested Within Array-Type Item
- Insert the array items into their appropriate locations, for example:
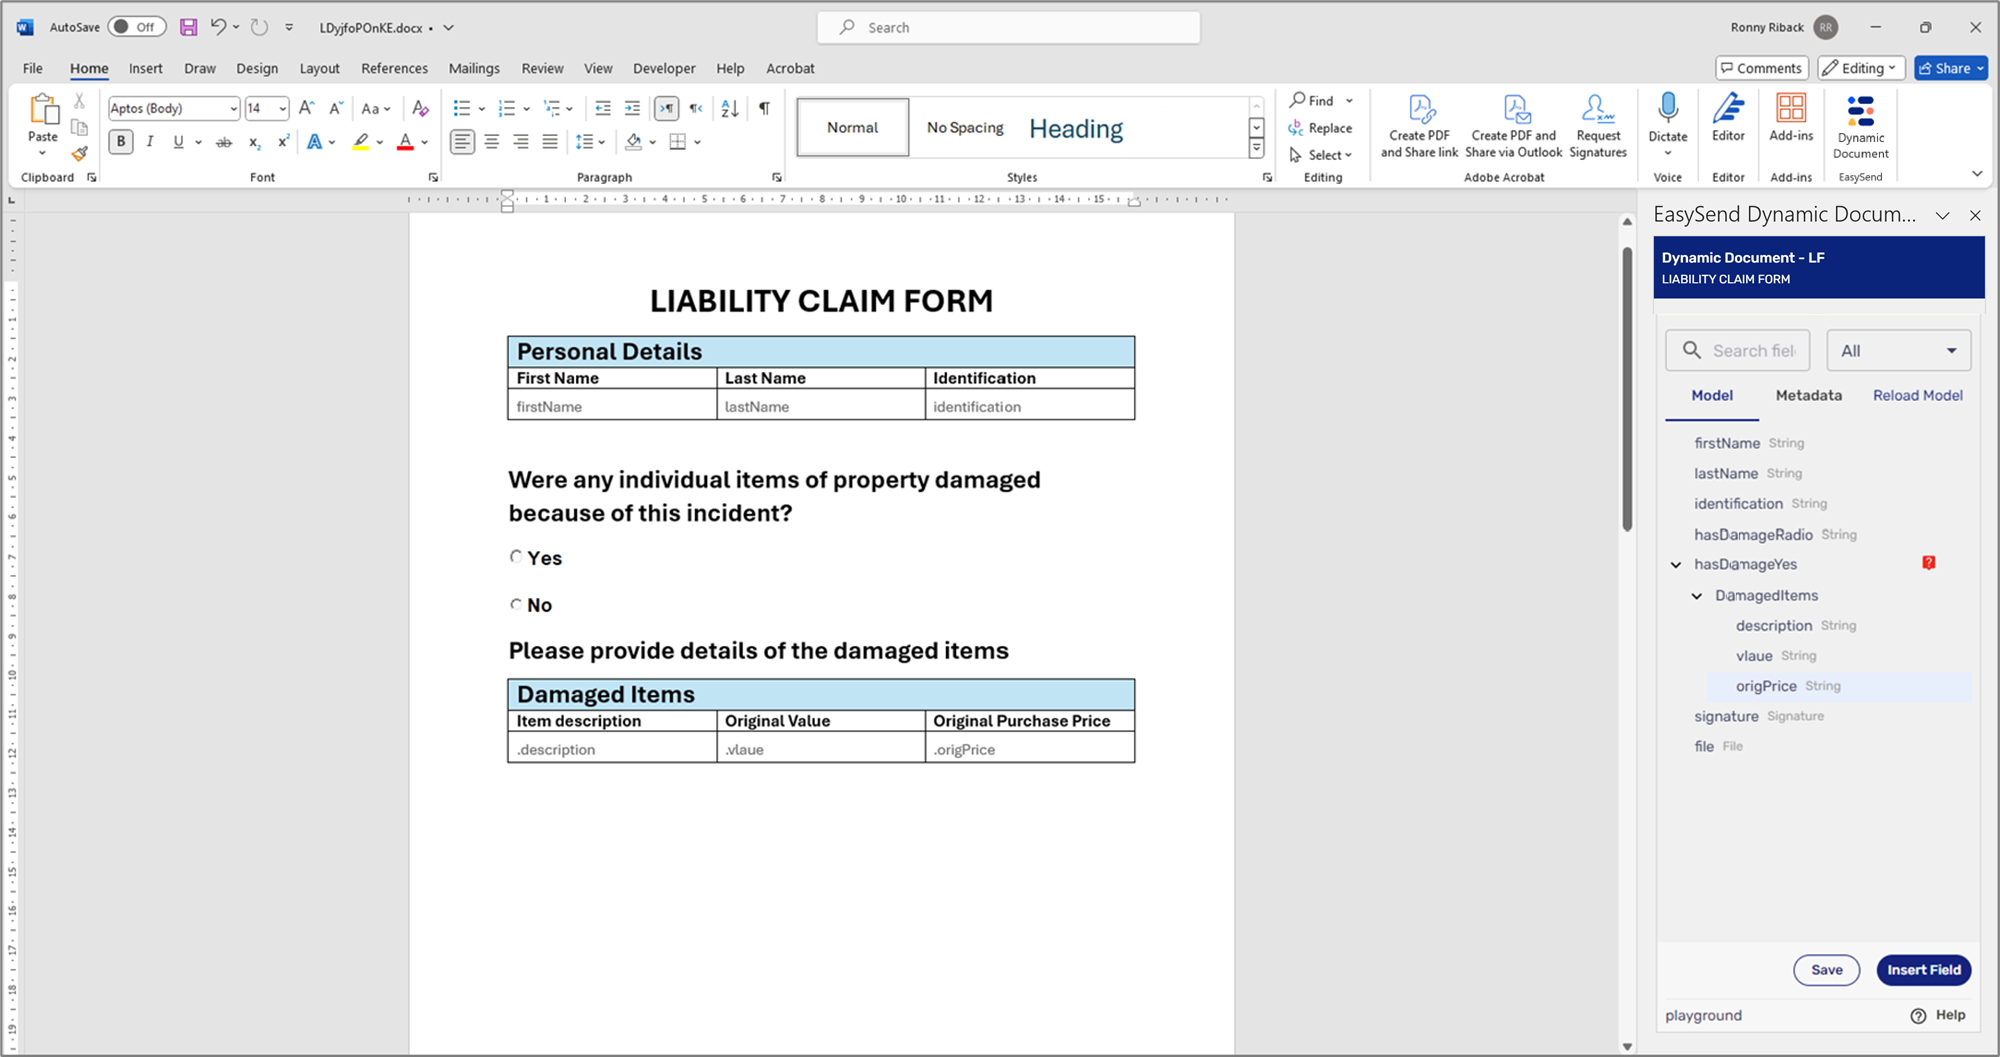
Figure 34: Inserted Array Items

When the document is viewed as a preview before submitting the digital process, the table will be updated according to the number of items the end-user filled out, for example:
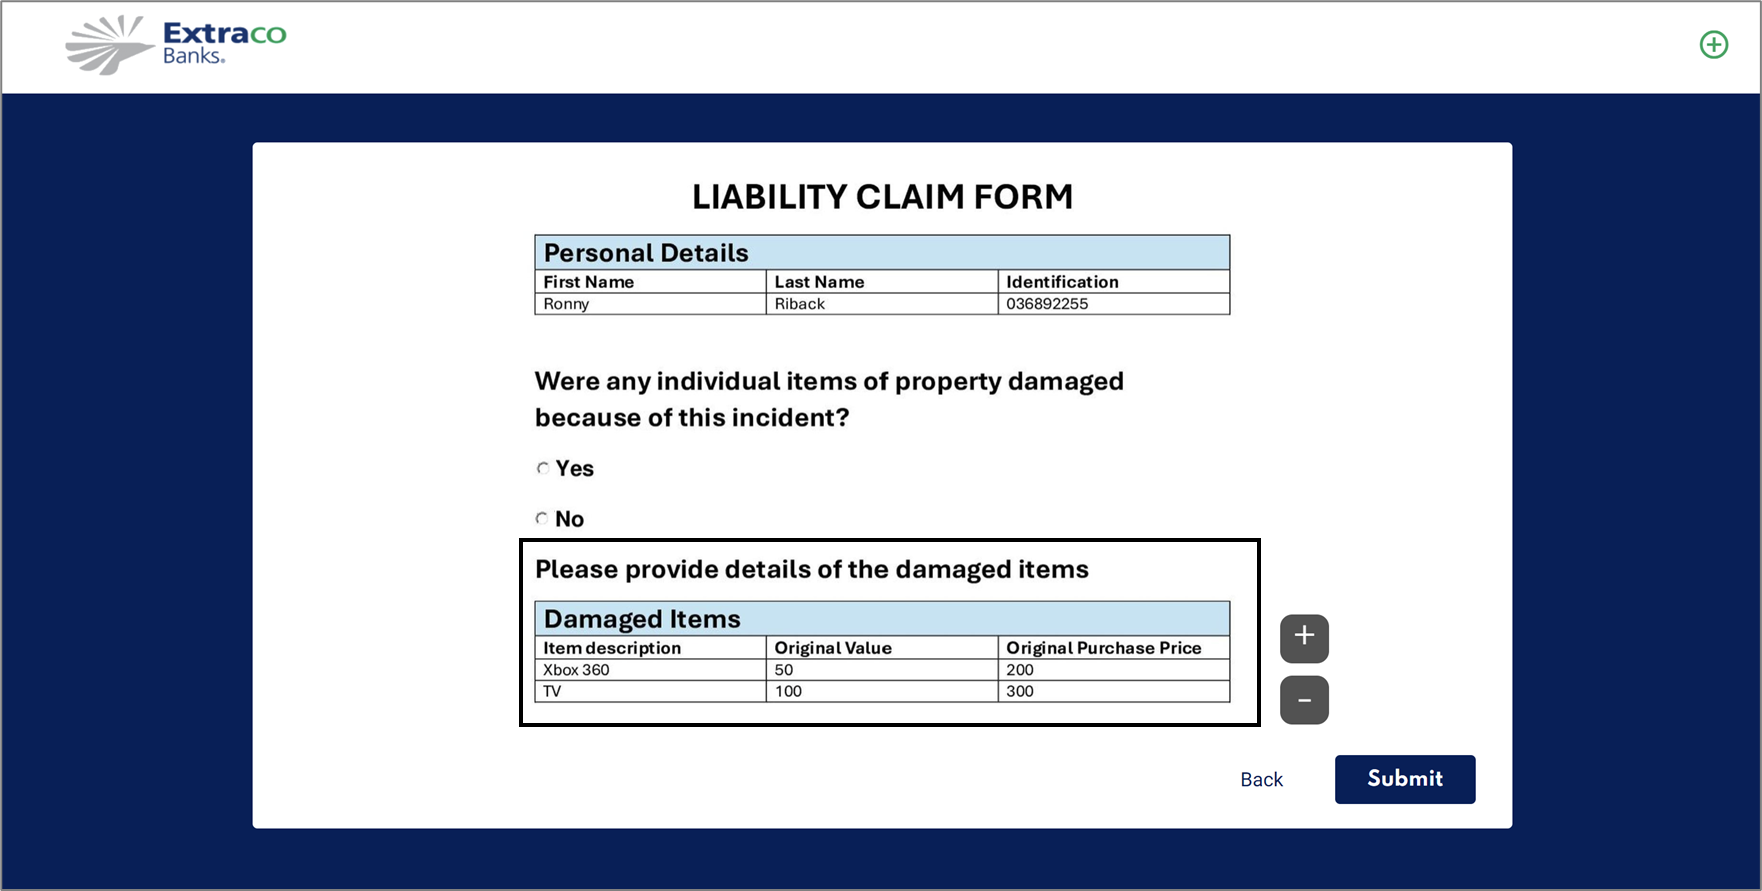
Figure 35: Displayed Array
Dynamic Document and Conditions
The following sections describe how to work with conditions in a dynamic document.
Adding Conditions
(See Figure 36 to Figure 40)
When a Webflow is implemented with Model conditioning, the conditioning output must also be reflected on the dynamic document. For example, a Webflow contains a Radio Question component with a yes or no question (1). The visibility of the container (2) below the Radio Question depends on the Radio Question's answer:
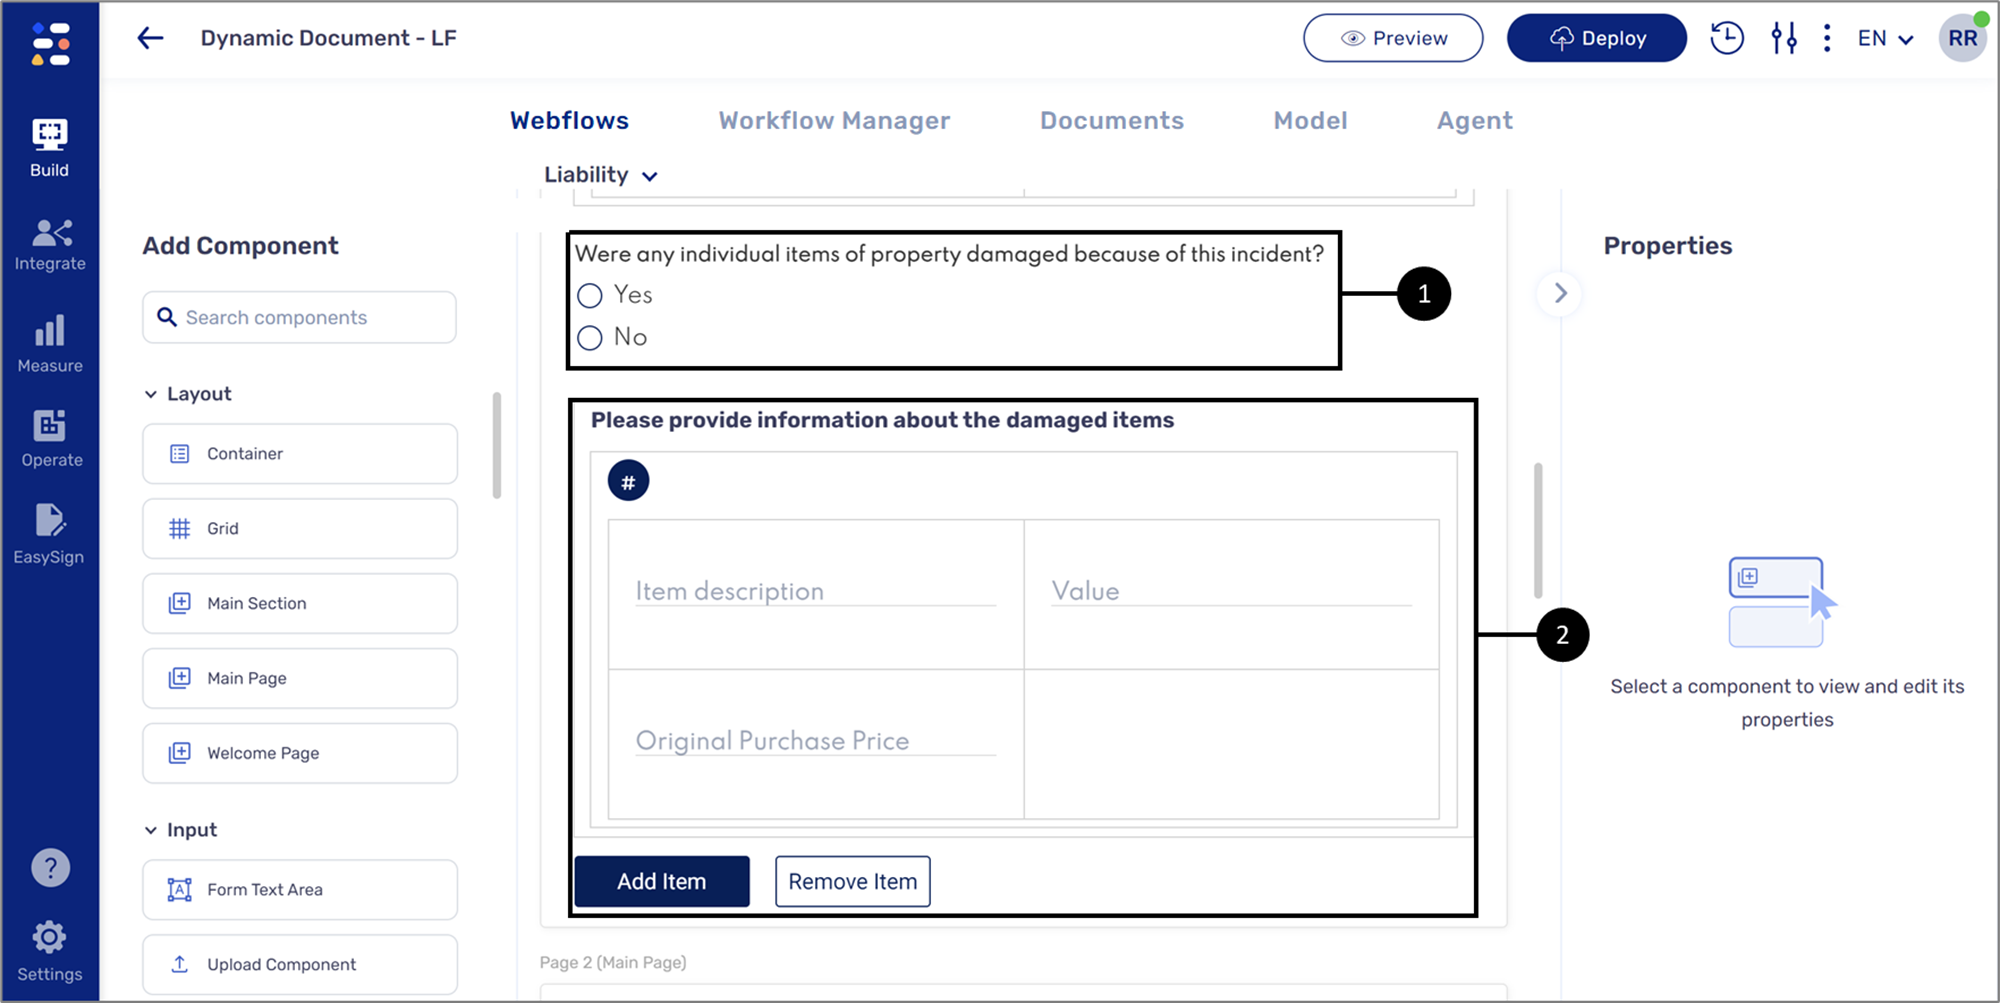
Figure 36: Webflow
To enforce the business logic, the Model data item (3) connected to the container must be implemented with a visibility condition (4):
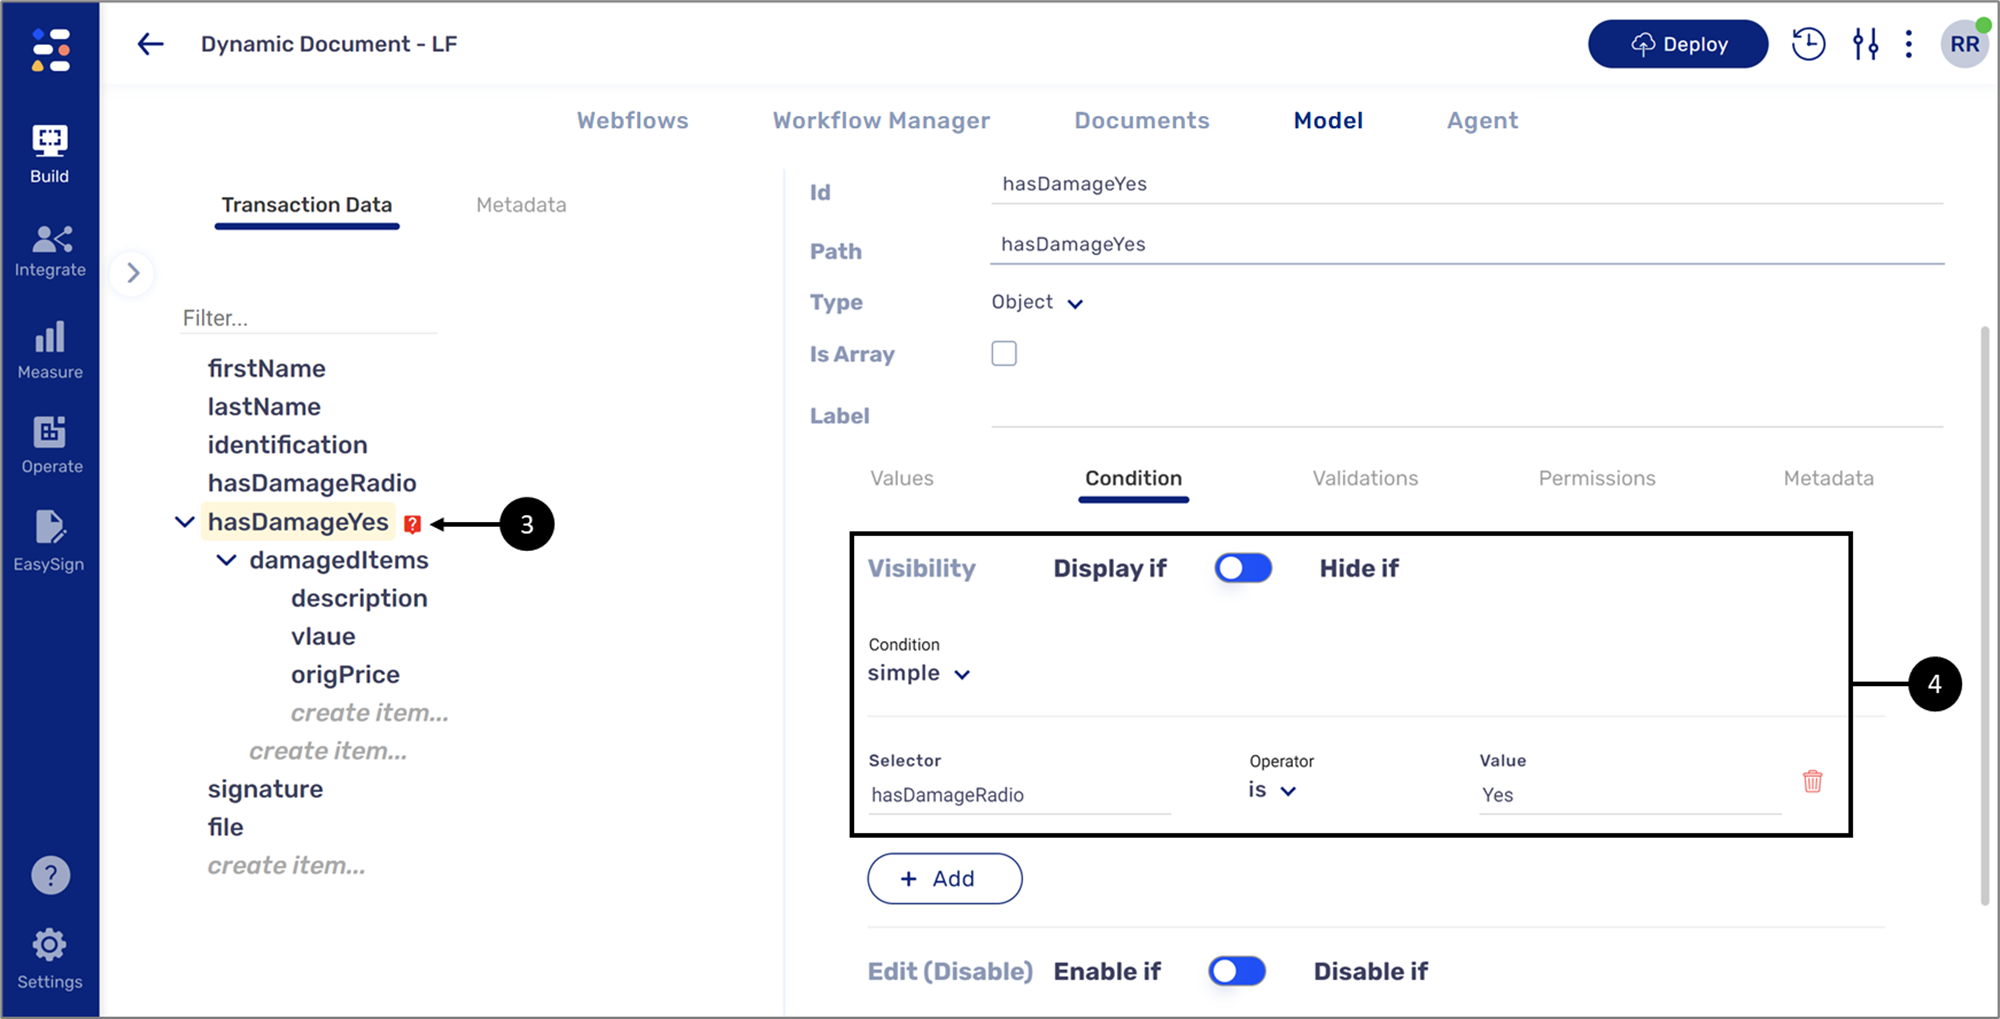
Figure 37: Model
The same condition must also be reflected in the dynamic document:
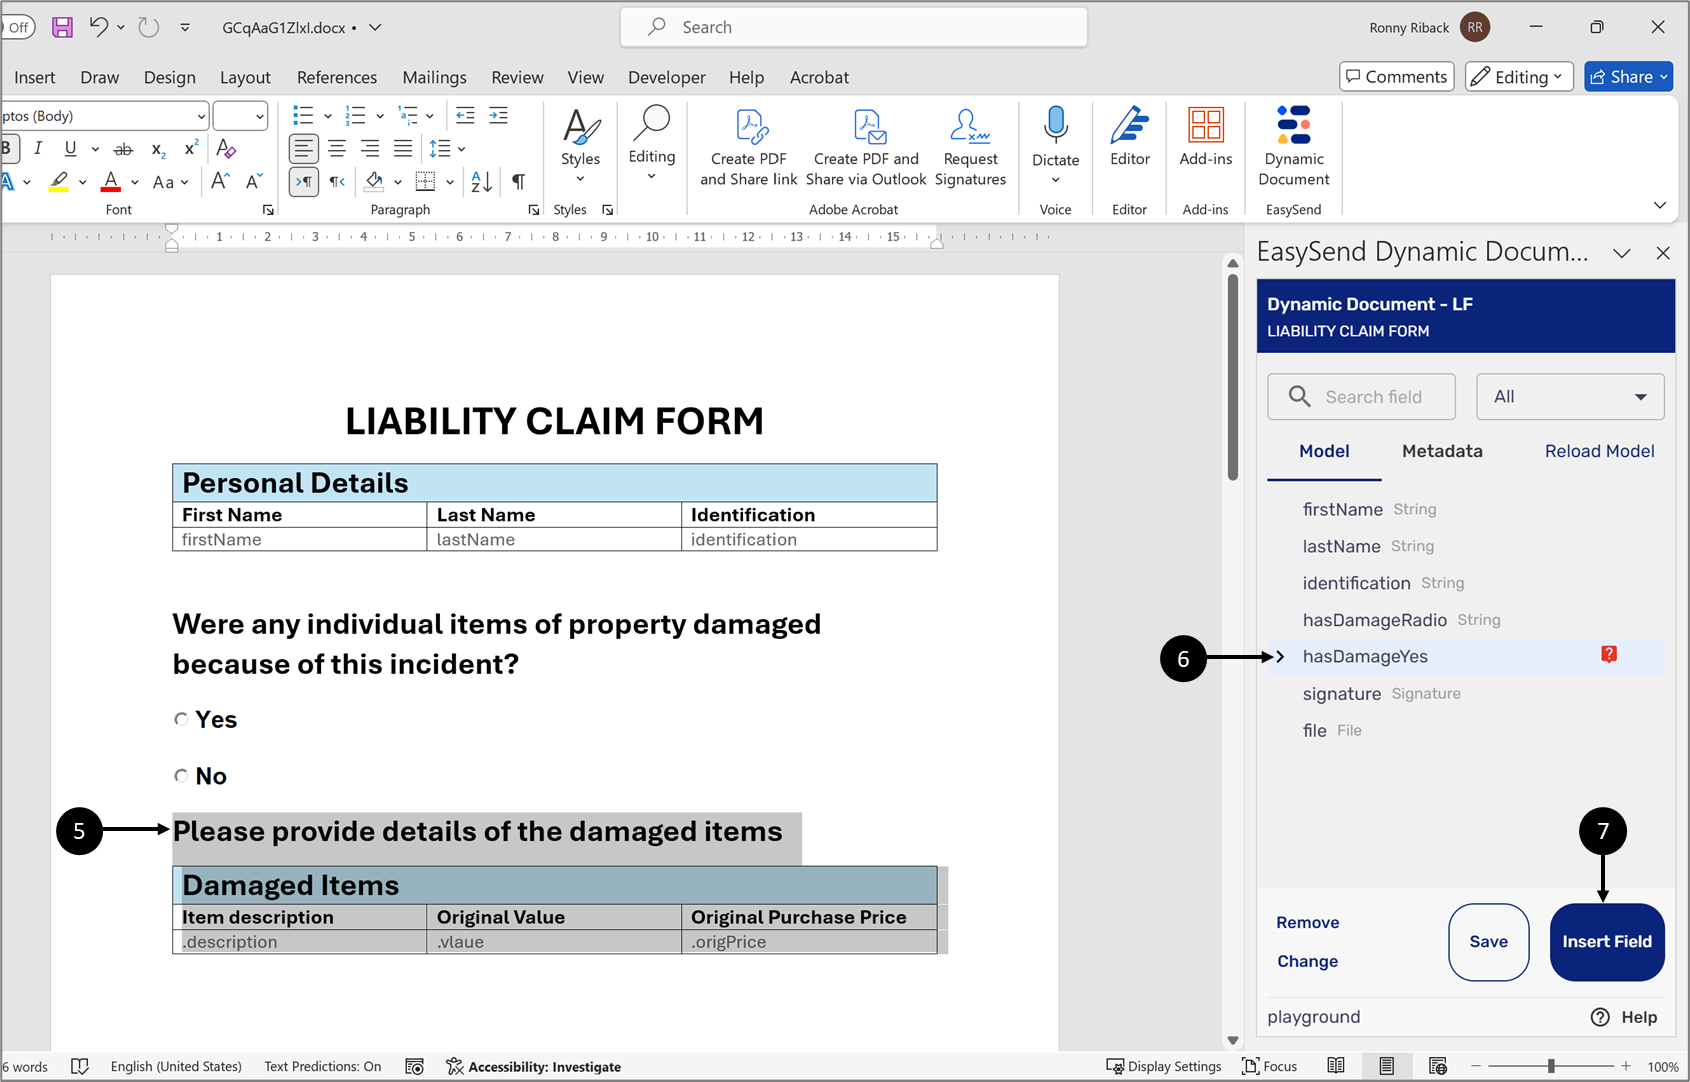
Figure 38: Insert Data Item
- On the dynamic document select all the elements you want to apply the conditions to (5).
- Click the item implemented with the condition (6) (identified by the question mark icon).
- Click the Insert Field button (7).
Result:
The elements are nested inside the item with the condition (8):
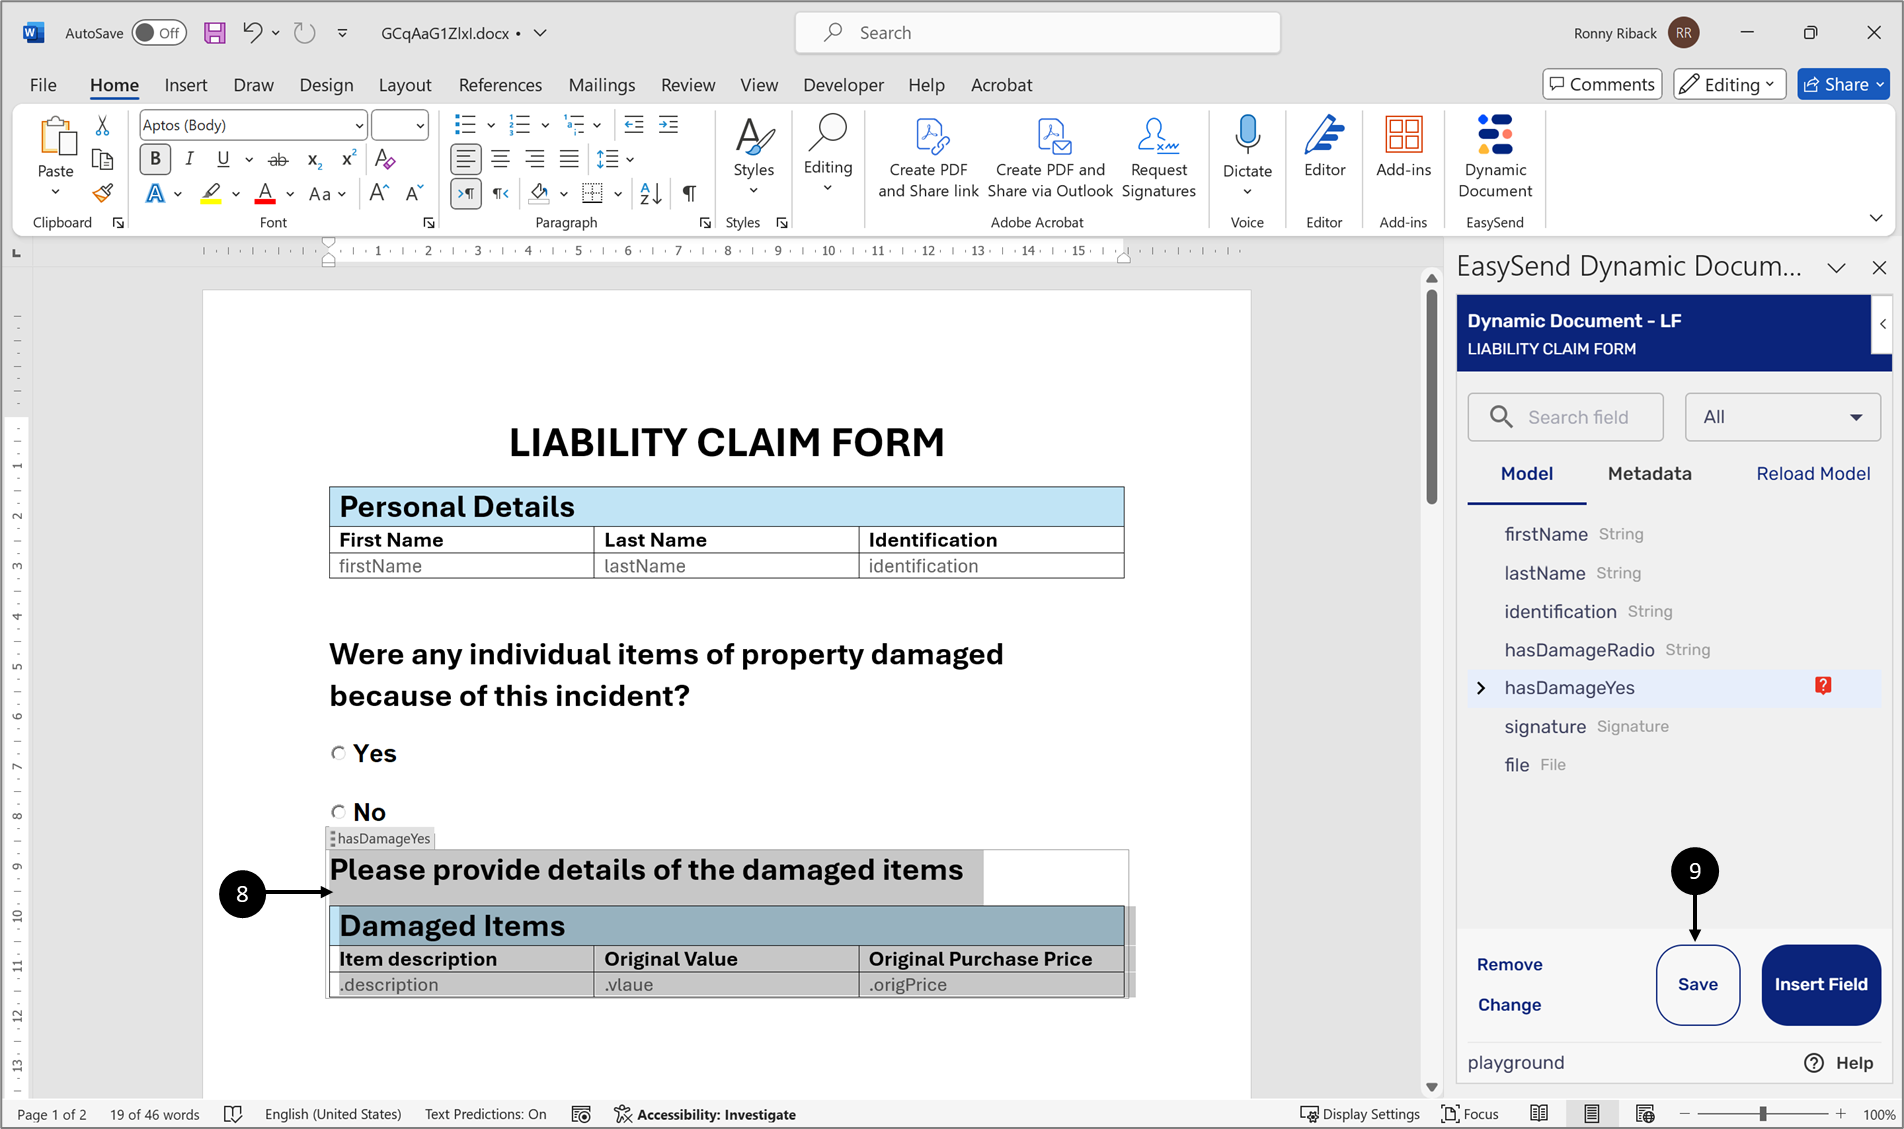
Figure 39: Nested Objects
- Click the Save button (9).
In the digital process, if the answer to the Radio Question is yes, then the information will be displayed on the preview page:
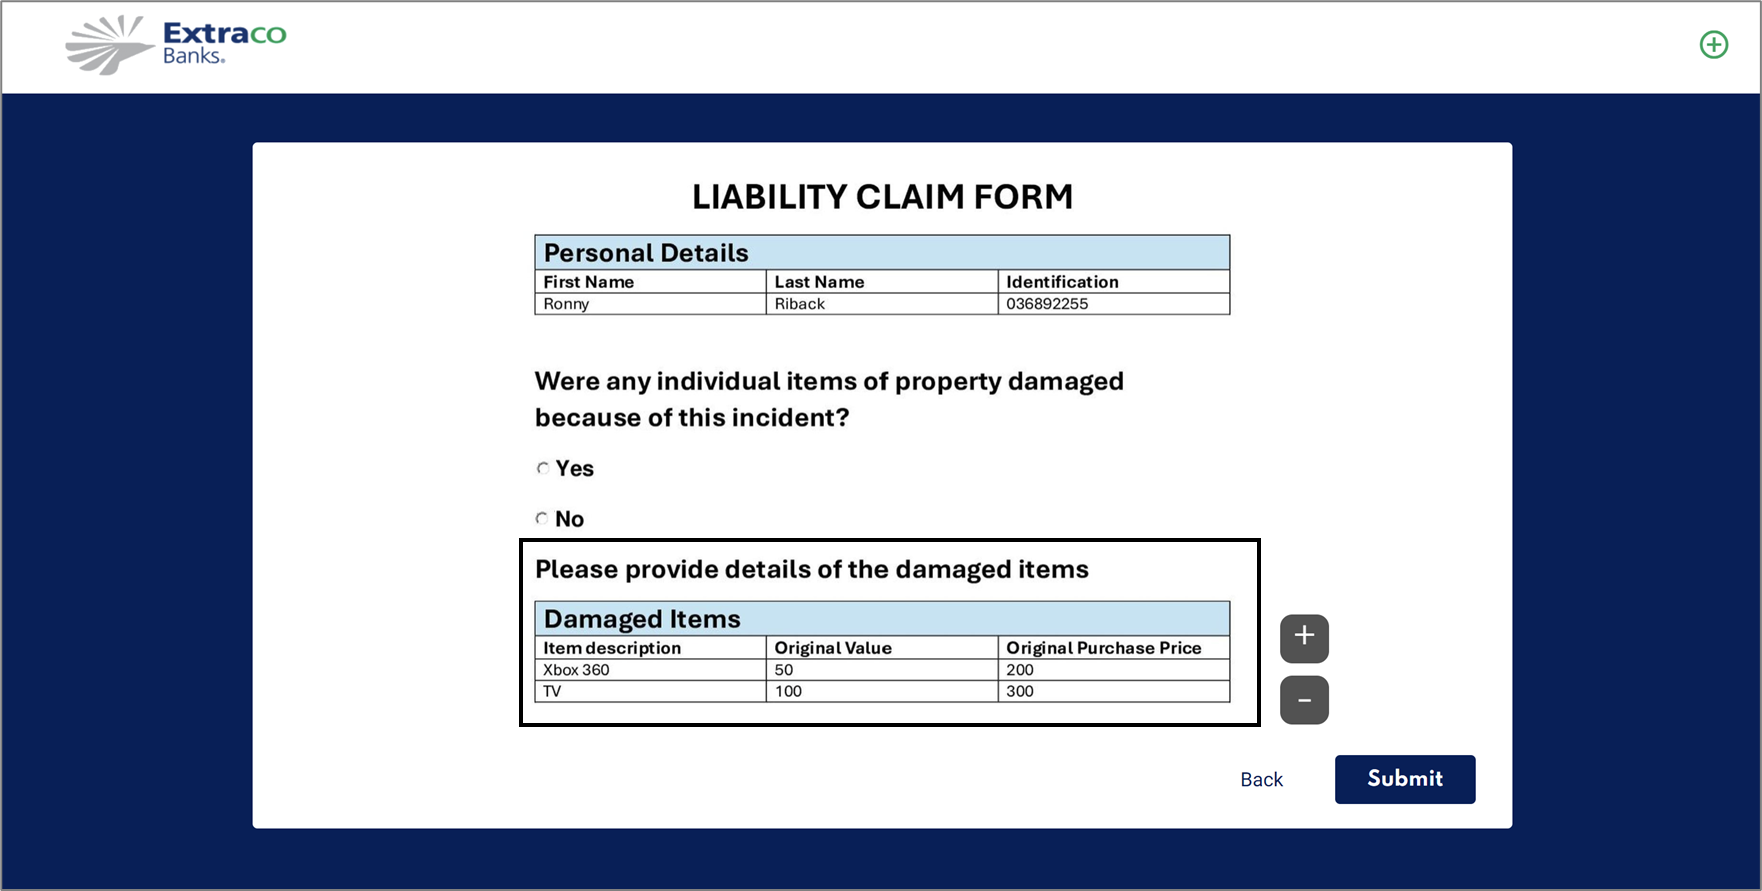
Figure 40: Displayed Information
Conditions and the Page Break Marker
(See Figure 41 to Figure 48)
Using conditions may cause content in the dynamic document to disappear, meaning it will have to restructure itself. To keep the integrity of the document's structure, where a specific content starts and where it ends, it is sometimes necessary to include Word's Page Break Marker in the condition. For example, the following Employee Onboarding process contains two conditions that will display to the end-user fields to fill out information about a spouse and children, only if relevant.
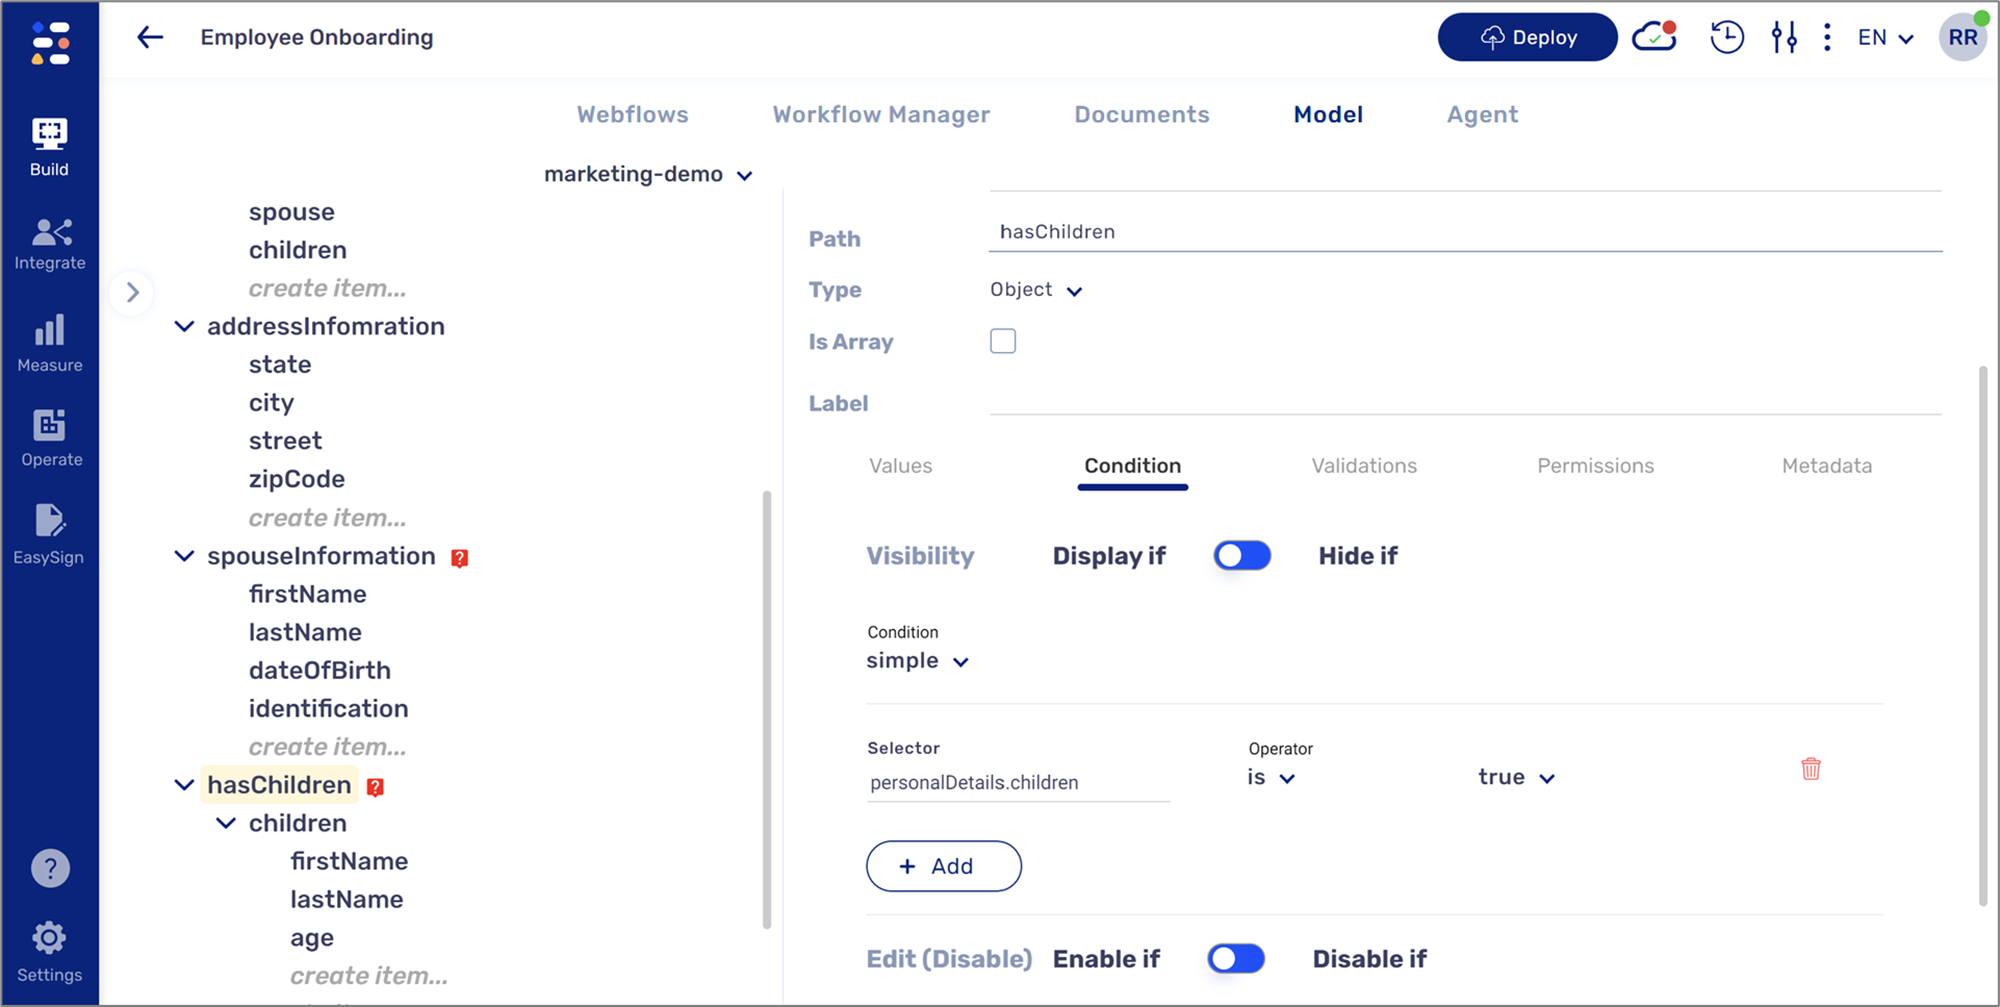
Figure 41: Model Conditions
The same must be reflected in the dynamic document as well. If the end-user does not have a spouse and children, the dynamic document will have to restructure itself, ensuring that the Family Information sections (1) do not appear and that the Address Information section (2) appears immediately after the Personal Information section (3).
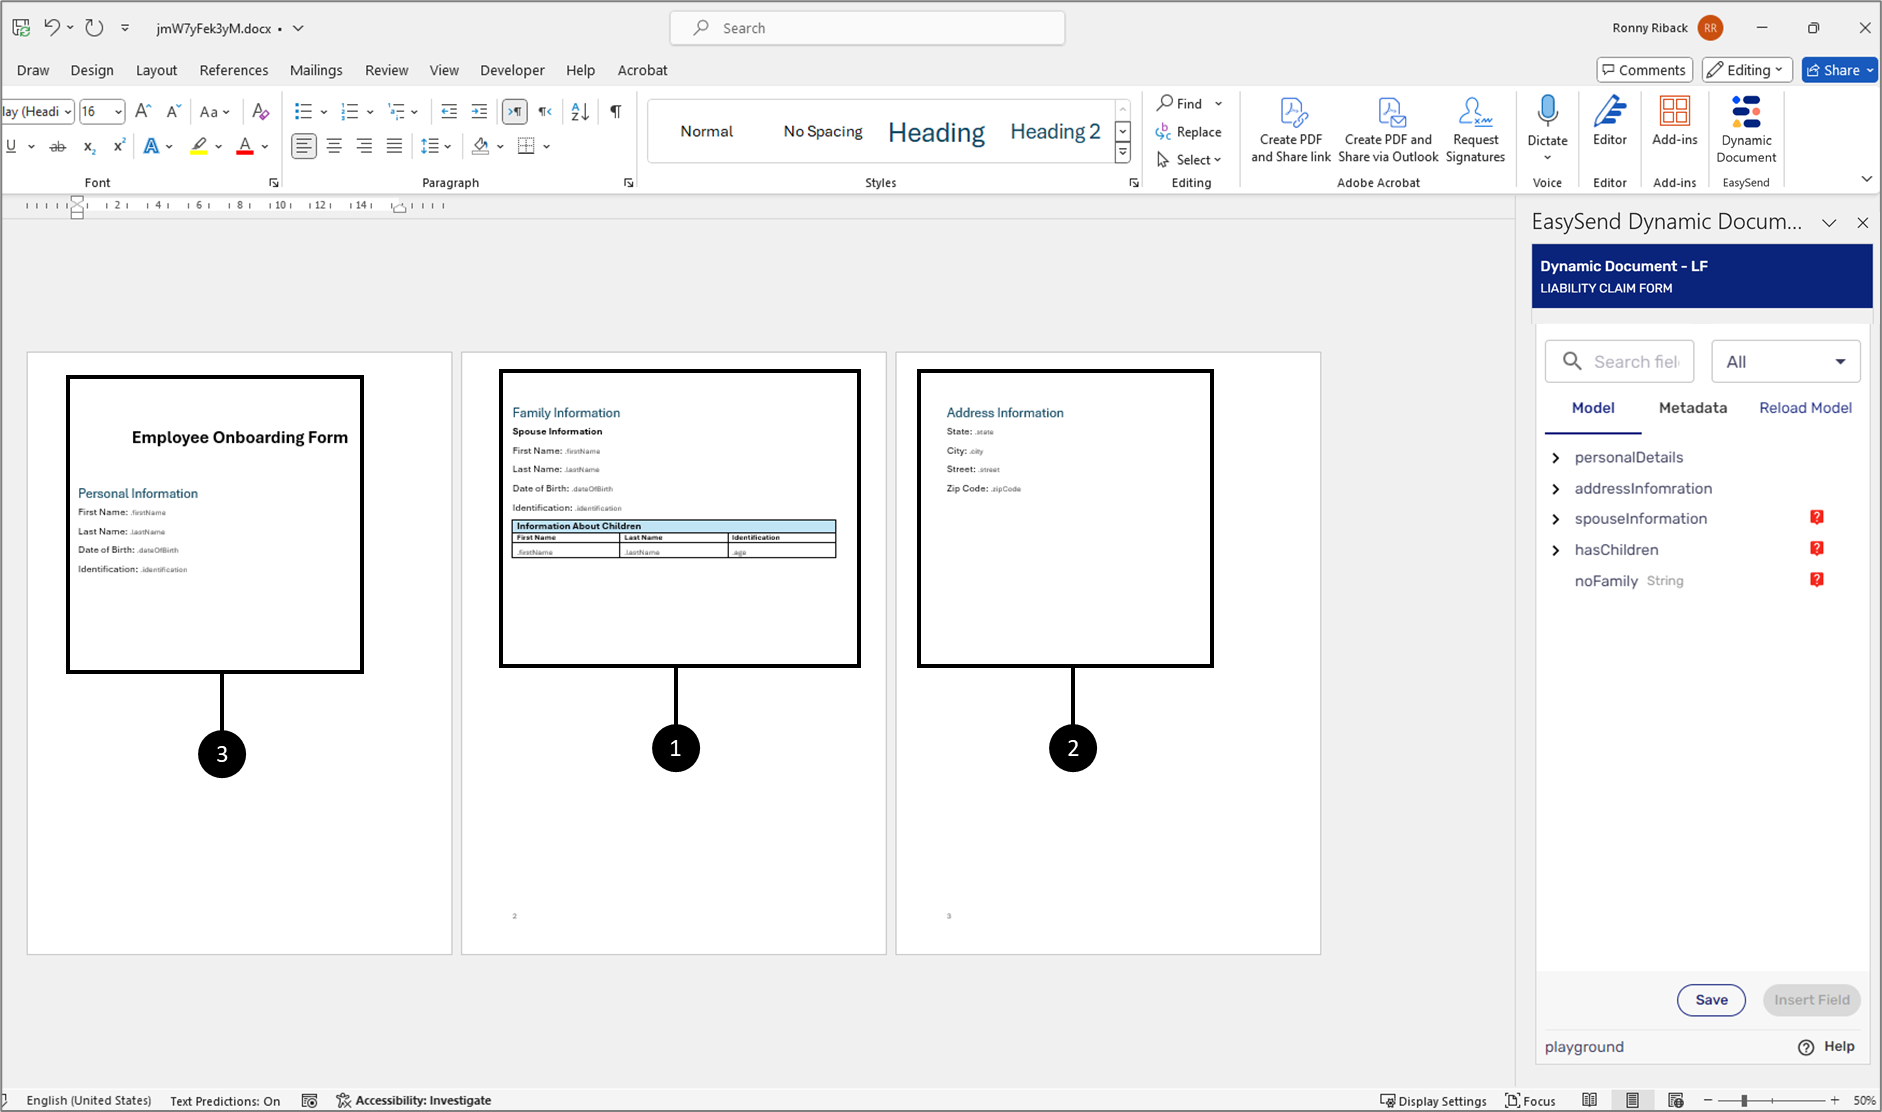
Figure 42: Dynamic Document Sections
This will require the Page Break marker to be included in the condition:
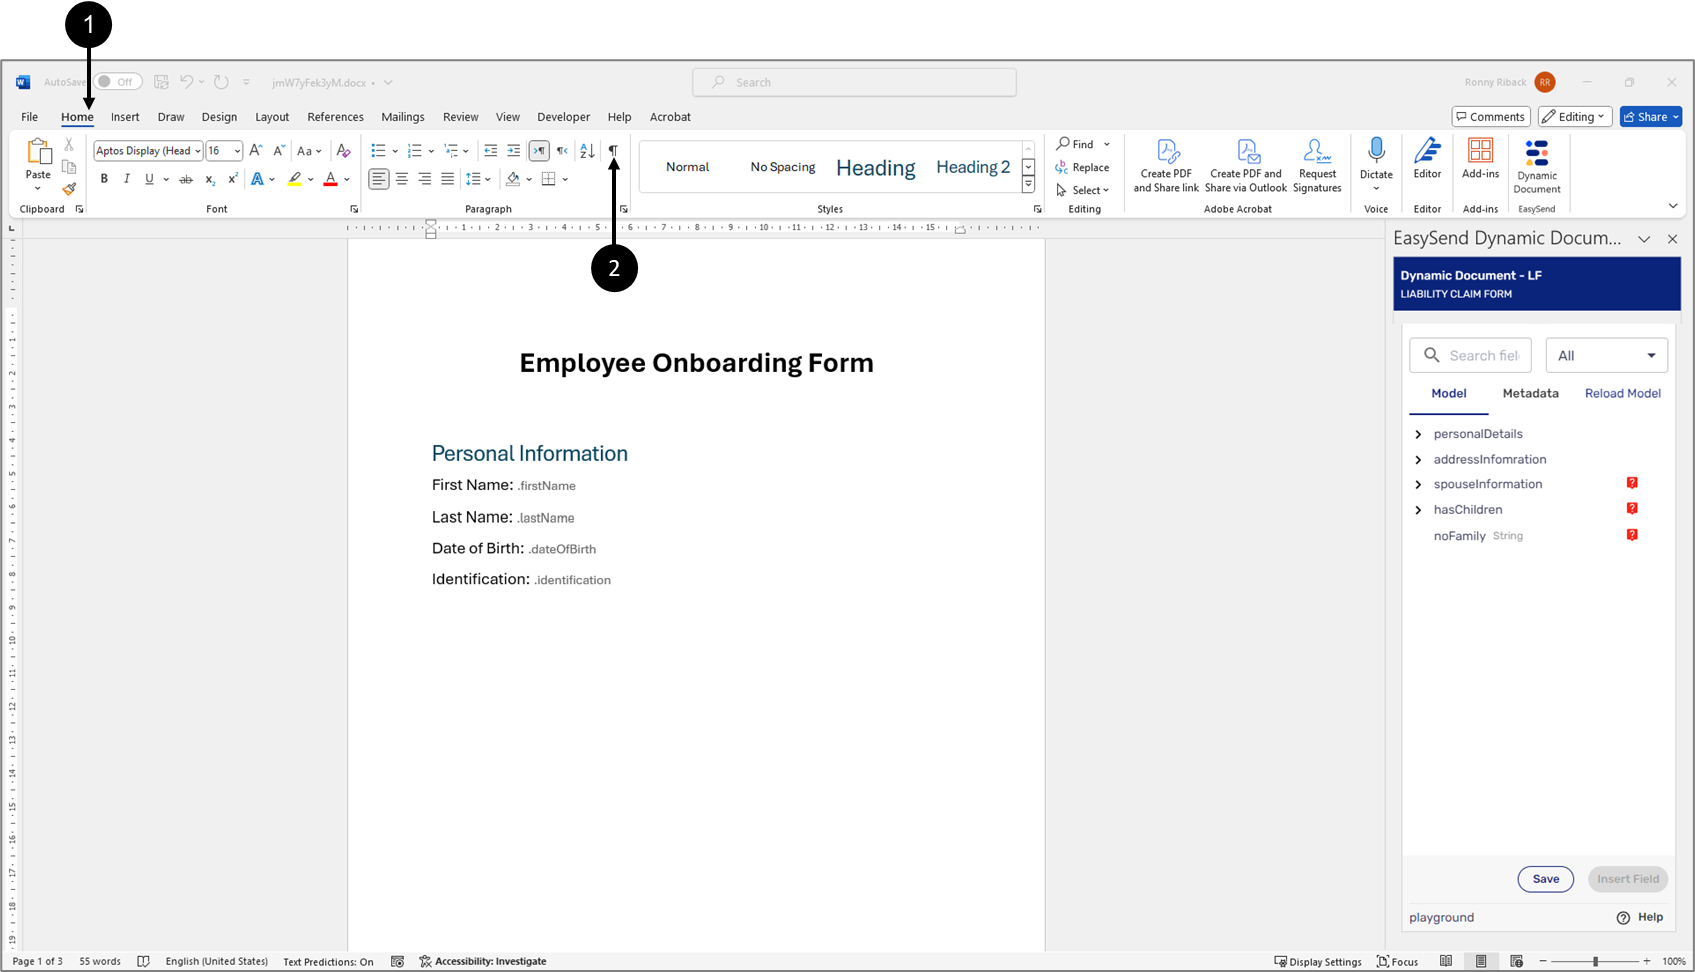
Figure 43: Home Tab + Show/Hide Paragraph Marks Button
- Click the Home tab (1).
- Click the Show/Hide Paragraph Marks button (2).
Result:
Paragraph Markers appear all over the document, revealing Page Break Markers (3):
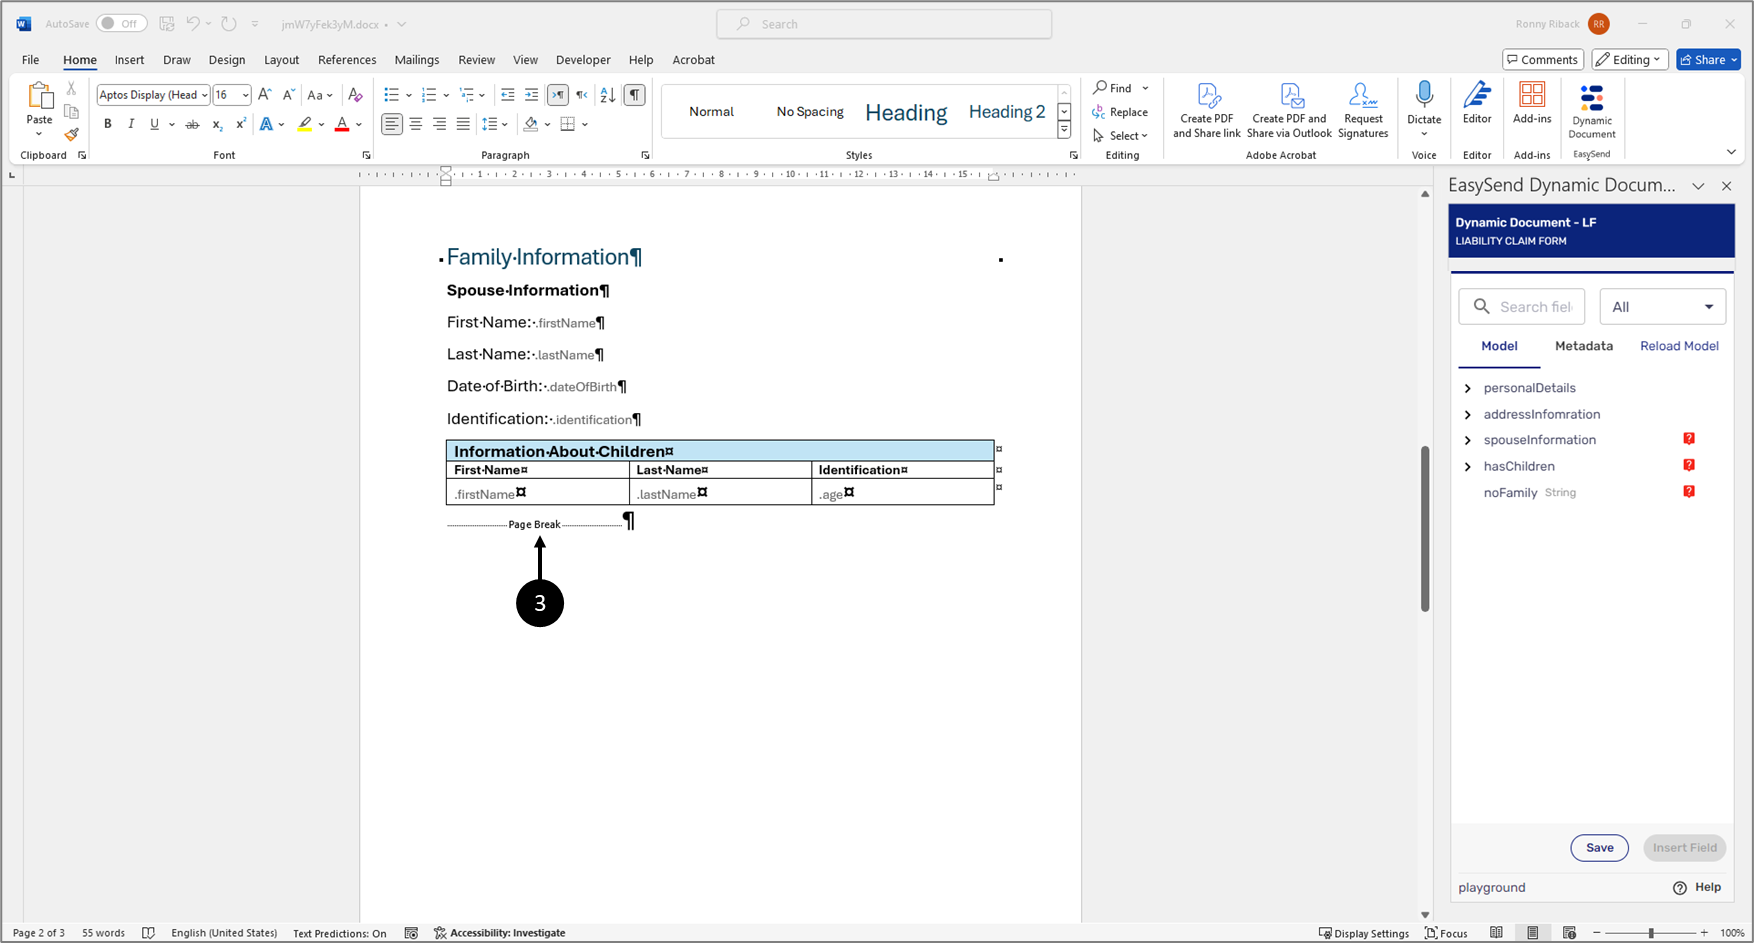
Figure 44: Page Break Marker
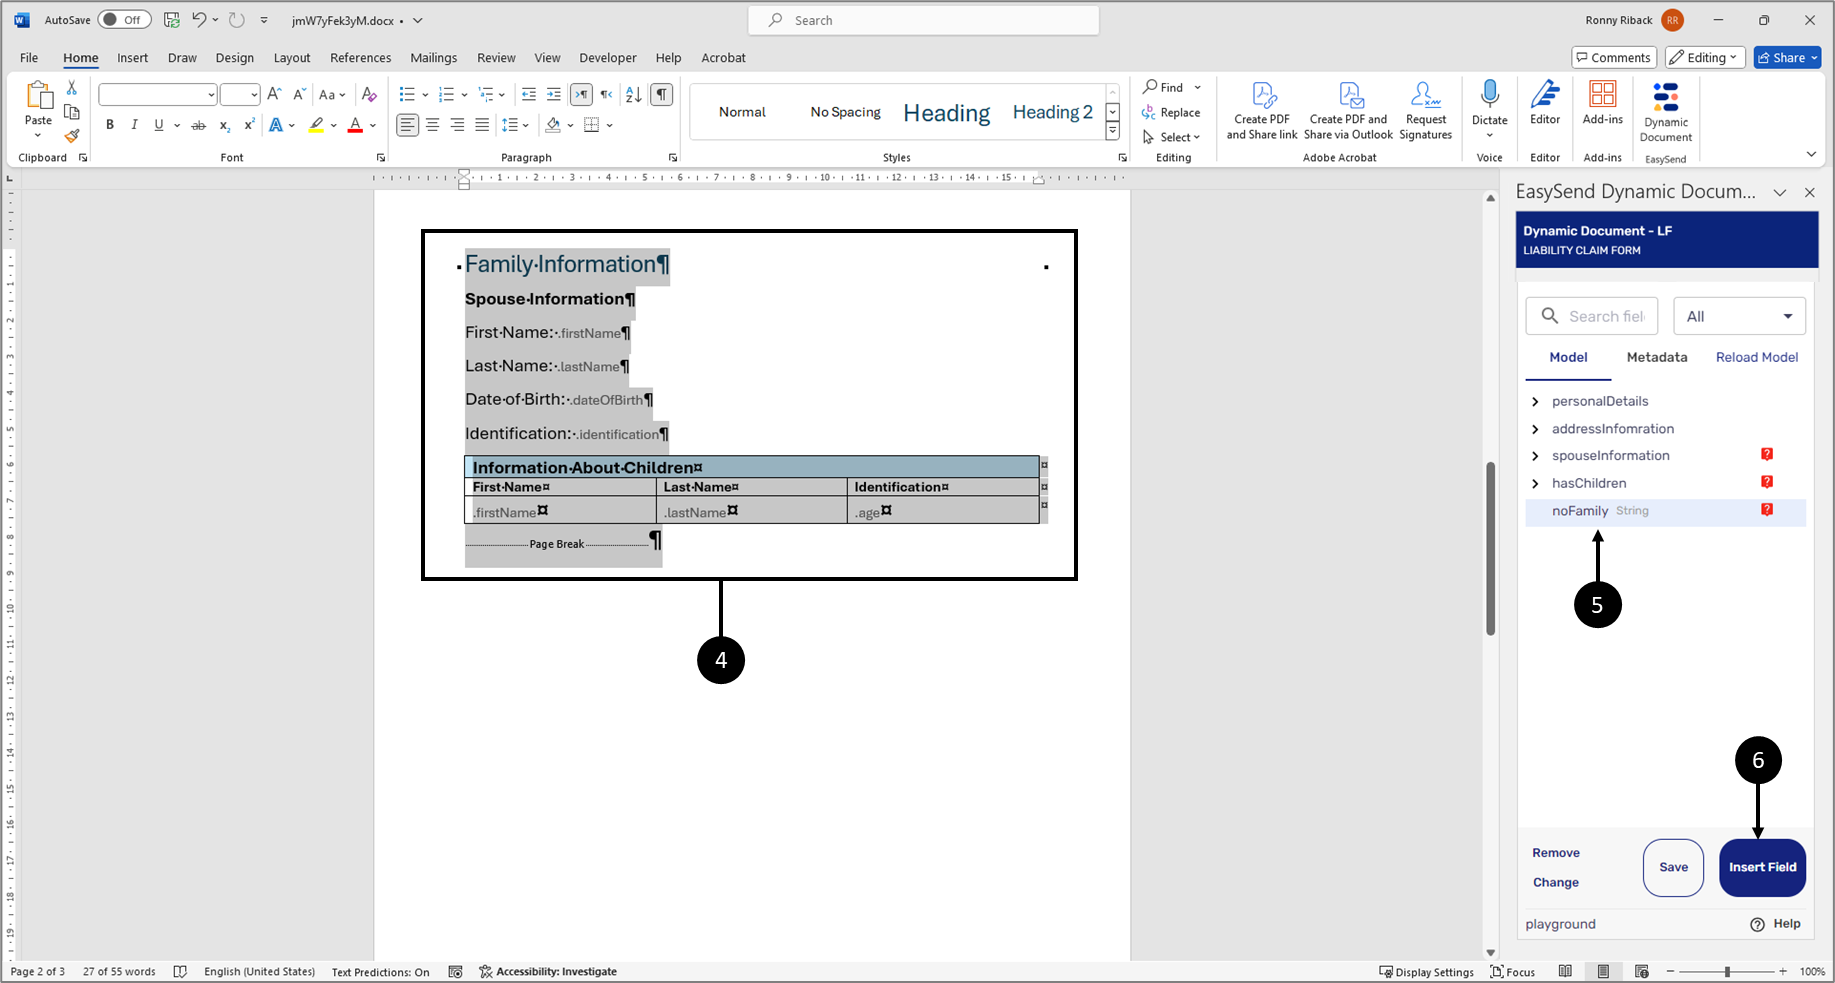
Figure 45: Adding Condition
- Mark the entire Family Information section including the Page Break (4).
- Click the field with the relevant condition (5).
- Click the Insert Field button (6).
Result:
The Family Information section and the Page Break marker are nested inside the item with the condition (7):
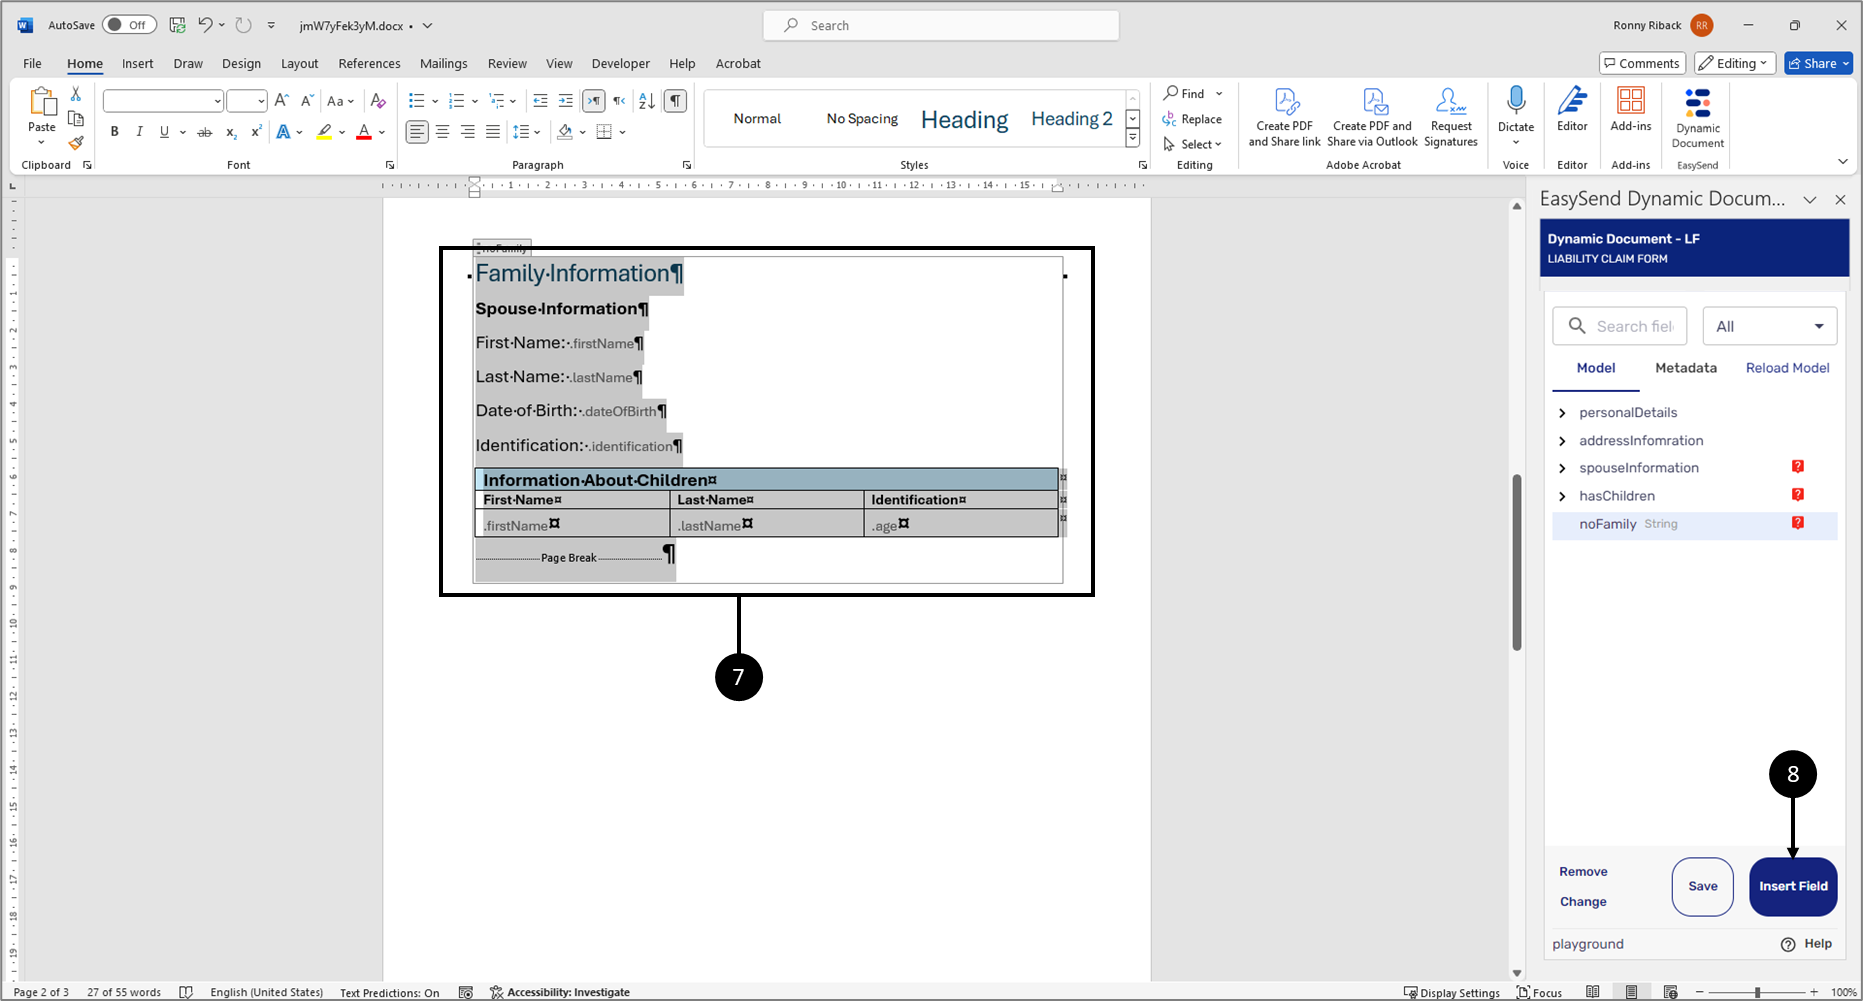
Figure 46: Added Condition
- Click the Save button (8).
Figure 47 displays a preview of a dynamic document in which the Page Break marker was not included in the condition. Notice that the document did not restructure itself:
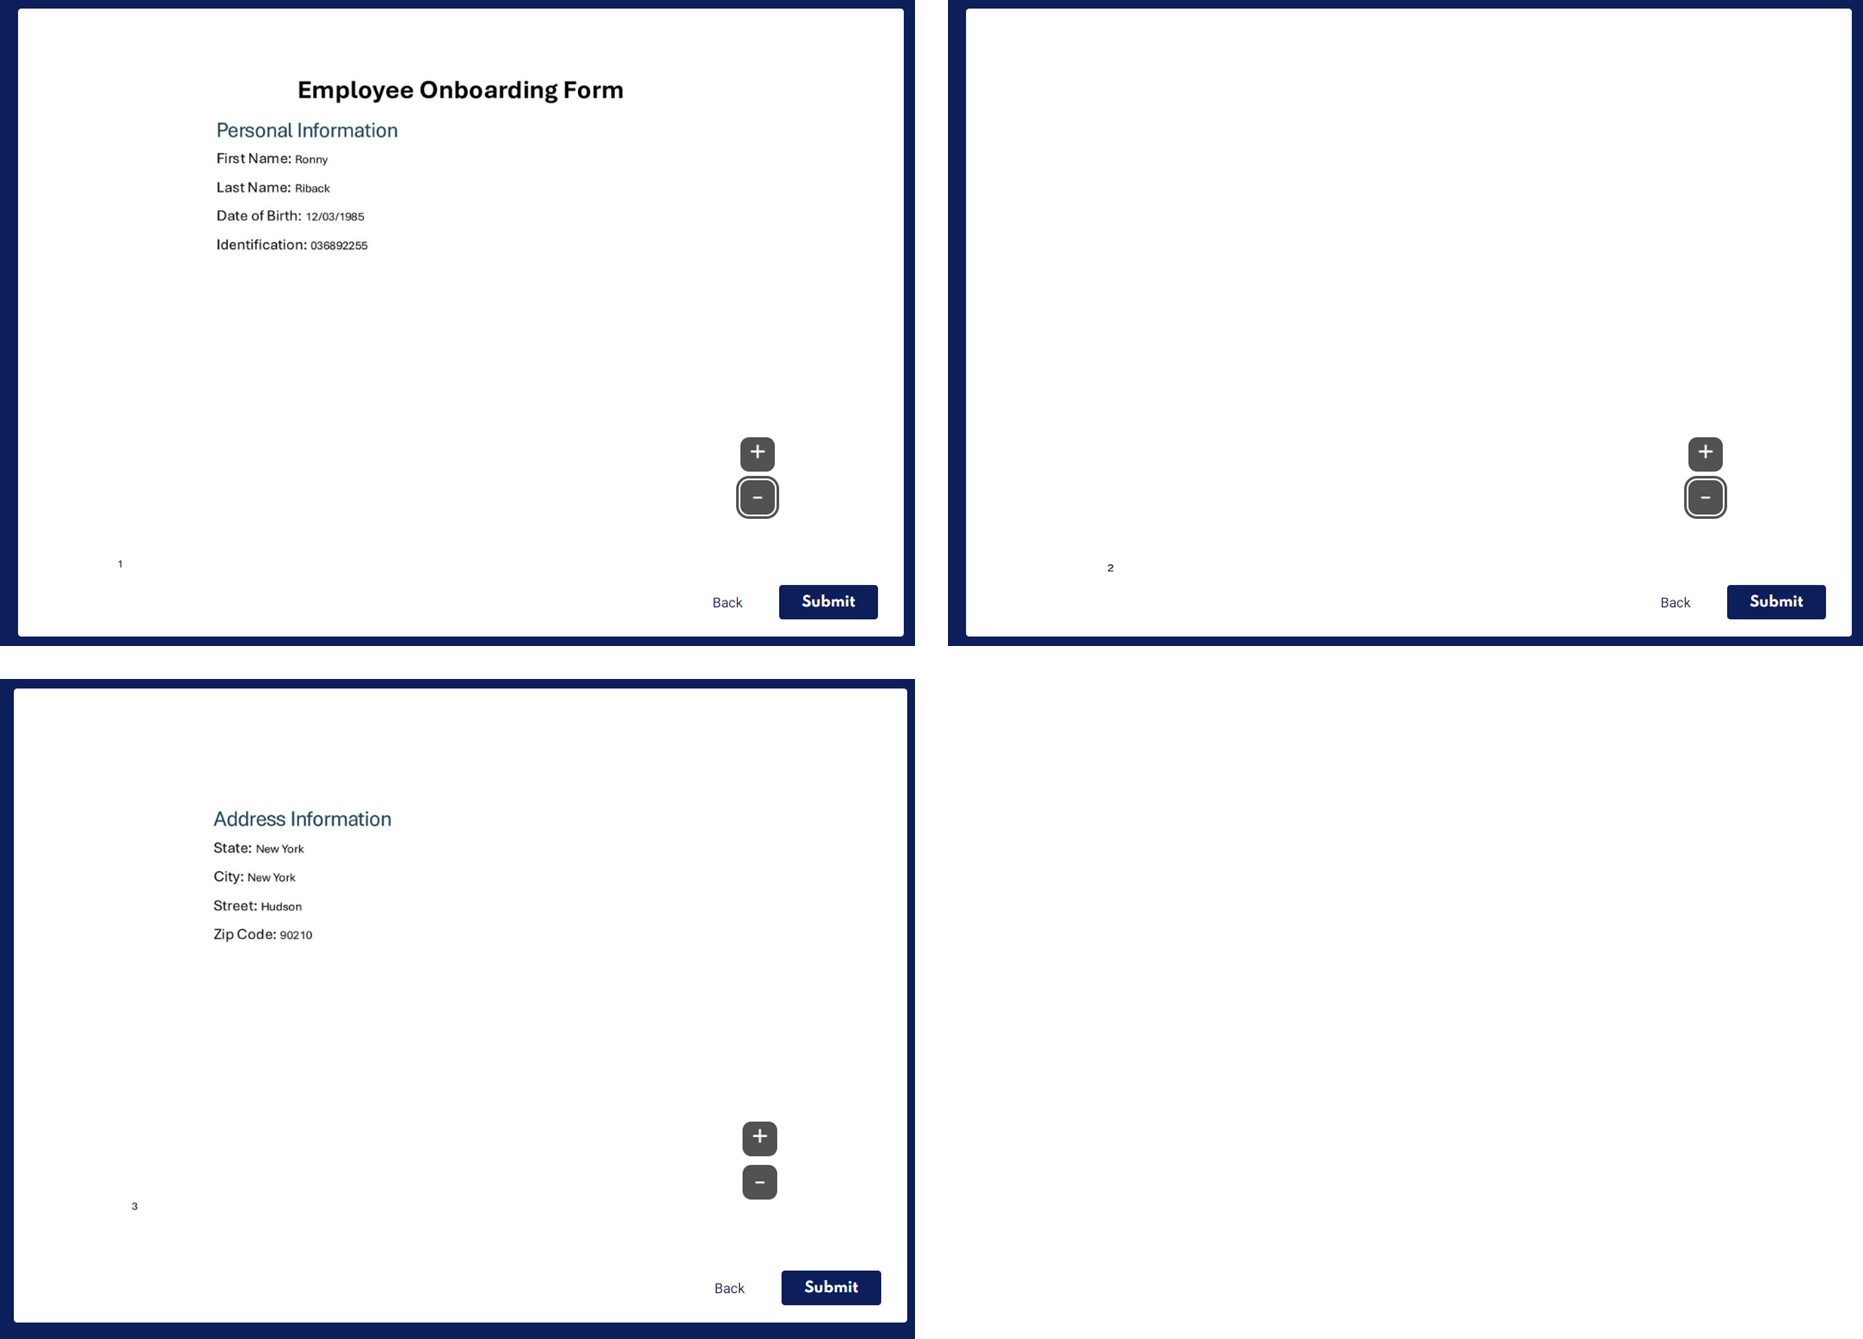
Figure 47: Page Break Marker Not Included
Figure 48 displays a preview of a dynamic document in which the Page Break marker was included in the condition. Notice that the document restructured itself:
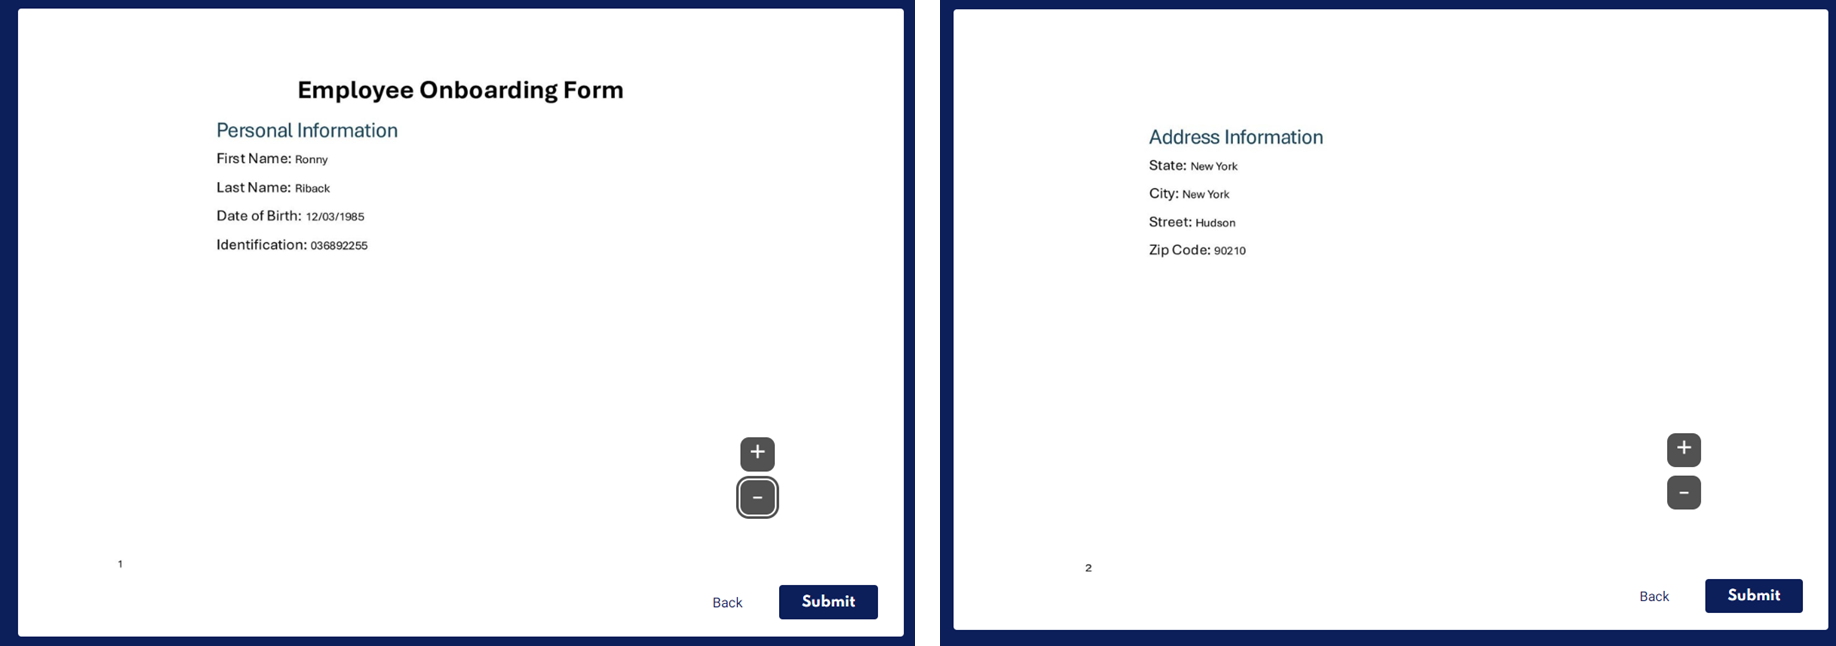
Figure 48: Page Break Marker Was Included
Dynamic Document Use Case - Liability Claim Form
The following sections describe a dynamic document liability claim form use case.
Overview
A company has a digital process that allows its end-users to fill out a liability form. The process includes the option to detail information about damaged items in a table and to upload a supporting image if necessary. Before submitting the digital process, the information the end-user inputs is displayed on the original claim form. The process is dynamic and adaptive meaning that only relevant information is displayed to the end-user. The issue is that the preview form always displays the damaged items table and the location to display an image, even if they are empty. To address these issues, we will use a dynamic document.
Step 1: Building the Digital Process
(See Figure 49 to Figure 57)
To enable the process to be dynamic, the information about the damaged items will be filled out in an array (1) that will only appear if the answer to the Radio Question is Yes (2).
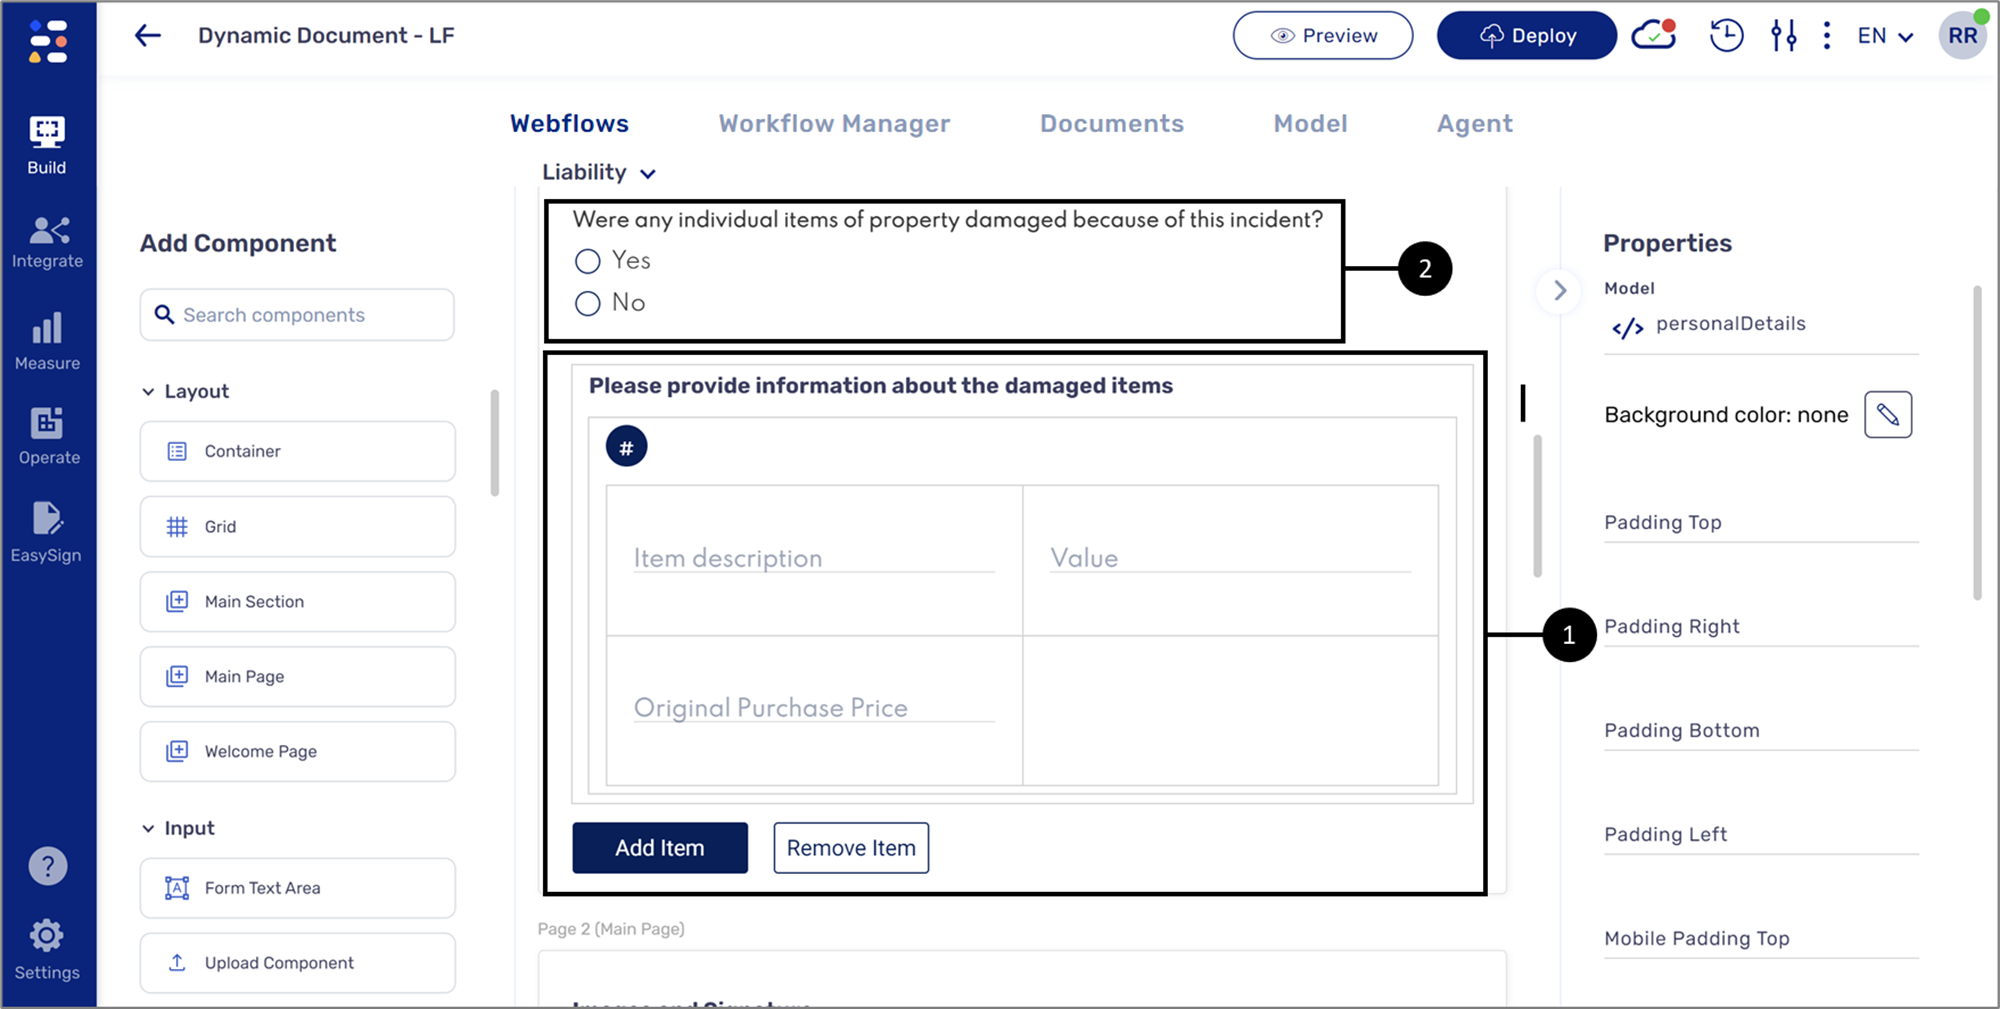
Figure 49: Webflow Structure 1 of 2
The component to upload an image (3) will appear only if the checkbox (4) is checked.
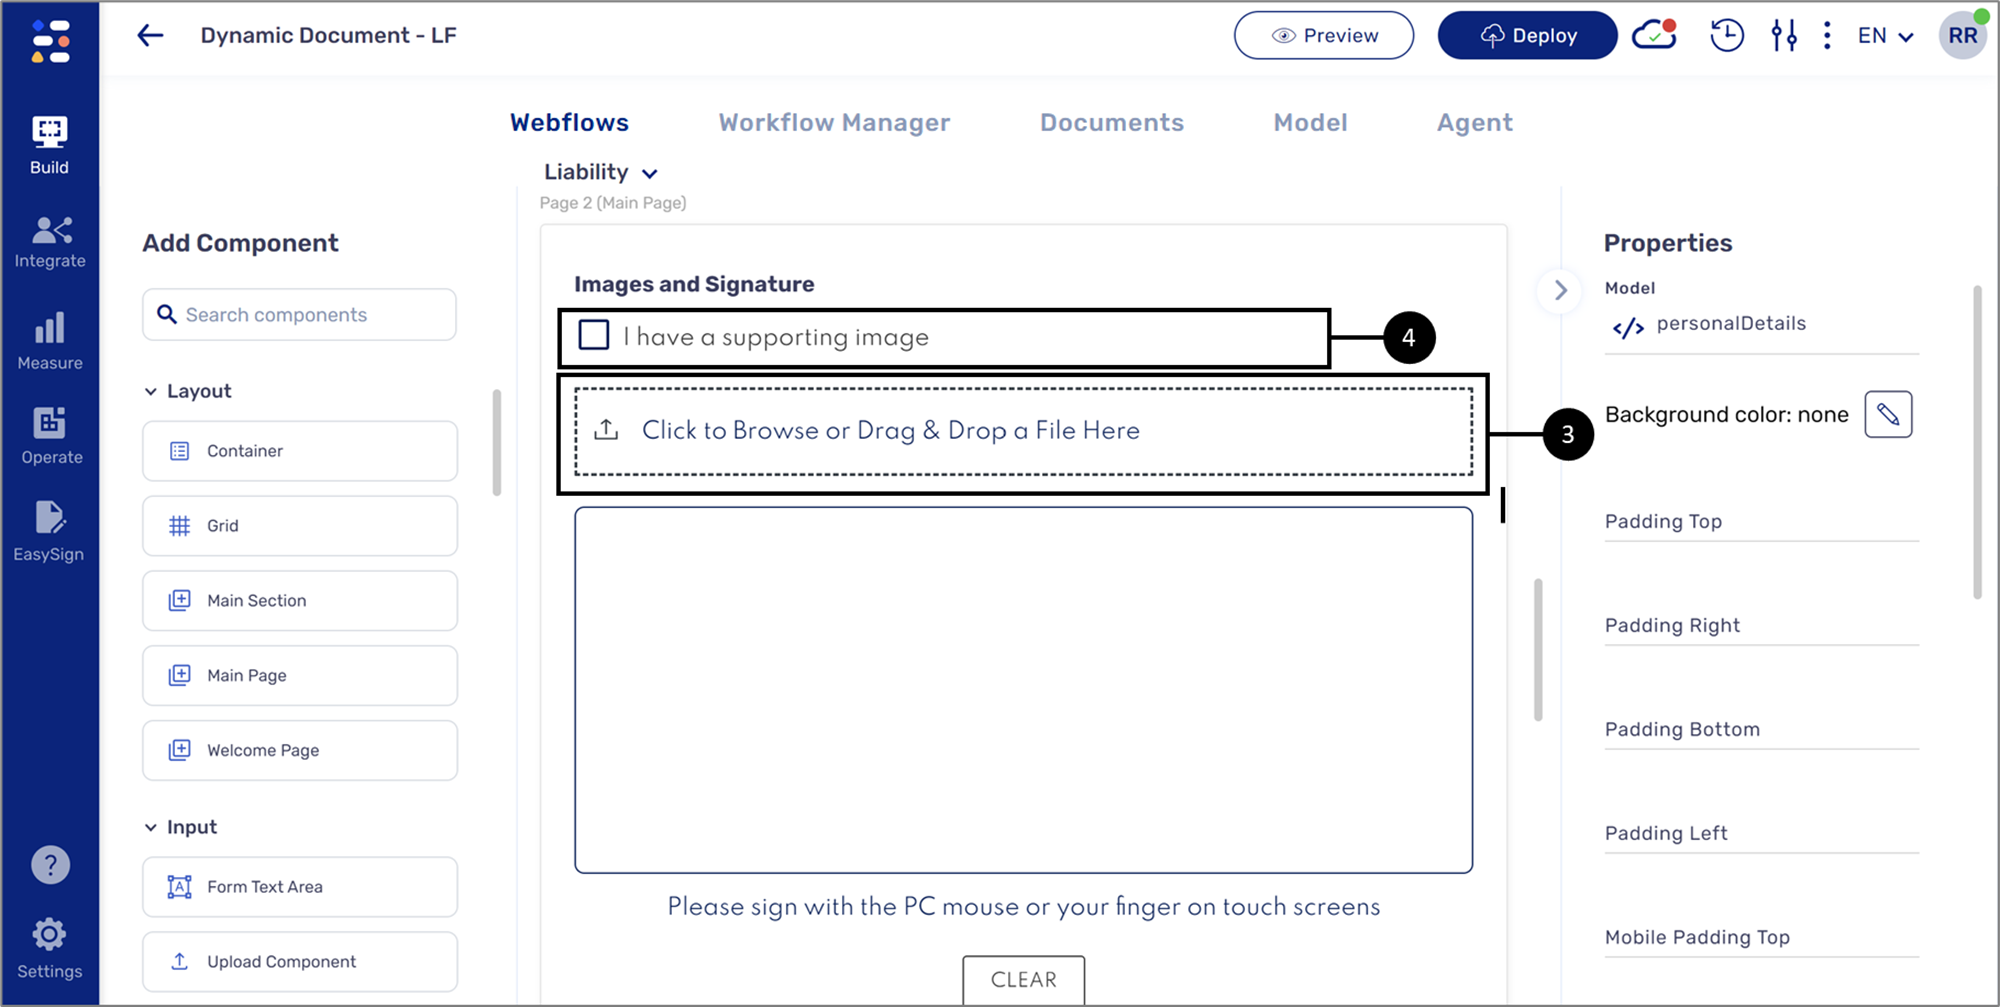
Figure 50: Webflow Structure 2 of 2
In the Model screen, the data item connected to the array external Container (5), is implemented with a visibility condition (6).
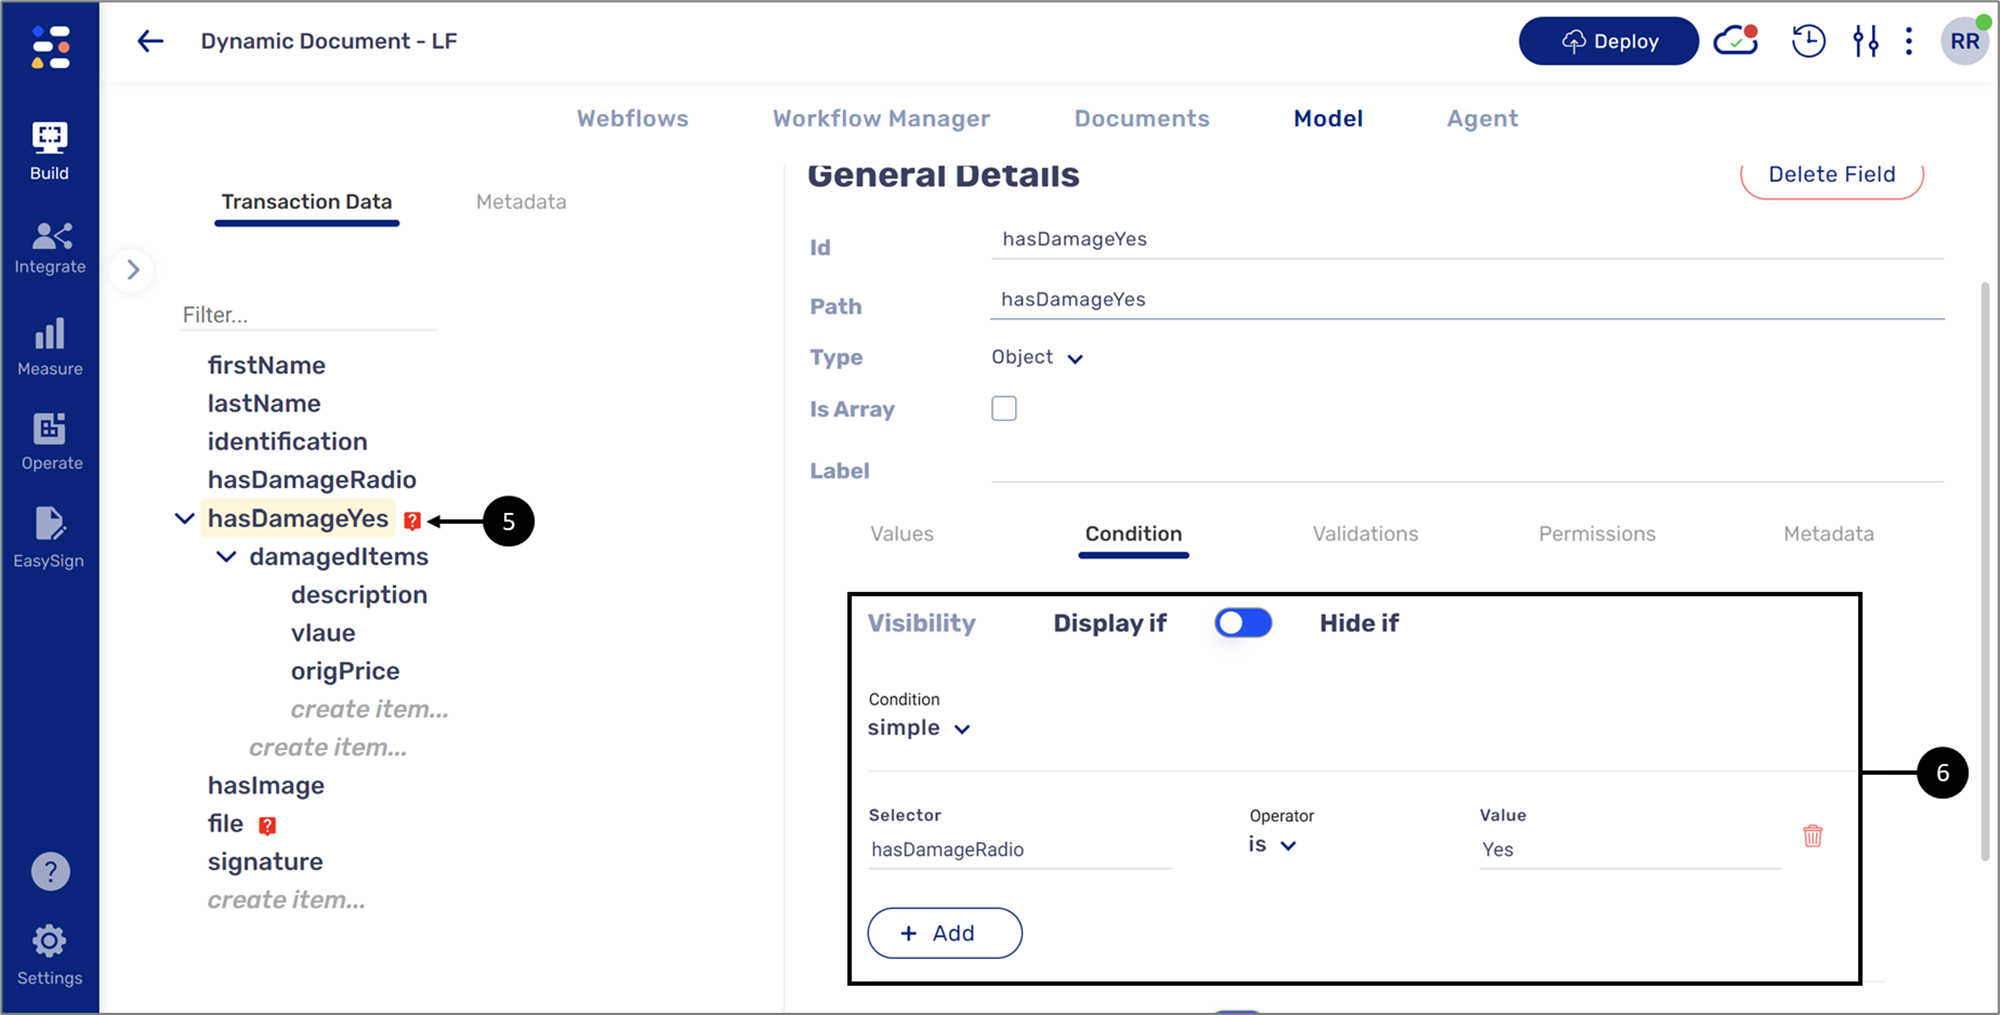
Figure 51: Model Data Item and Condition 1 of 2
A visibility condition (7) is also implemented on the data item (8) connected to the Upload Component.
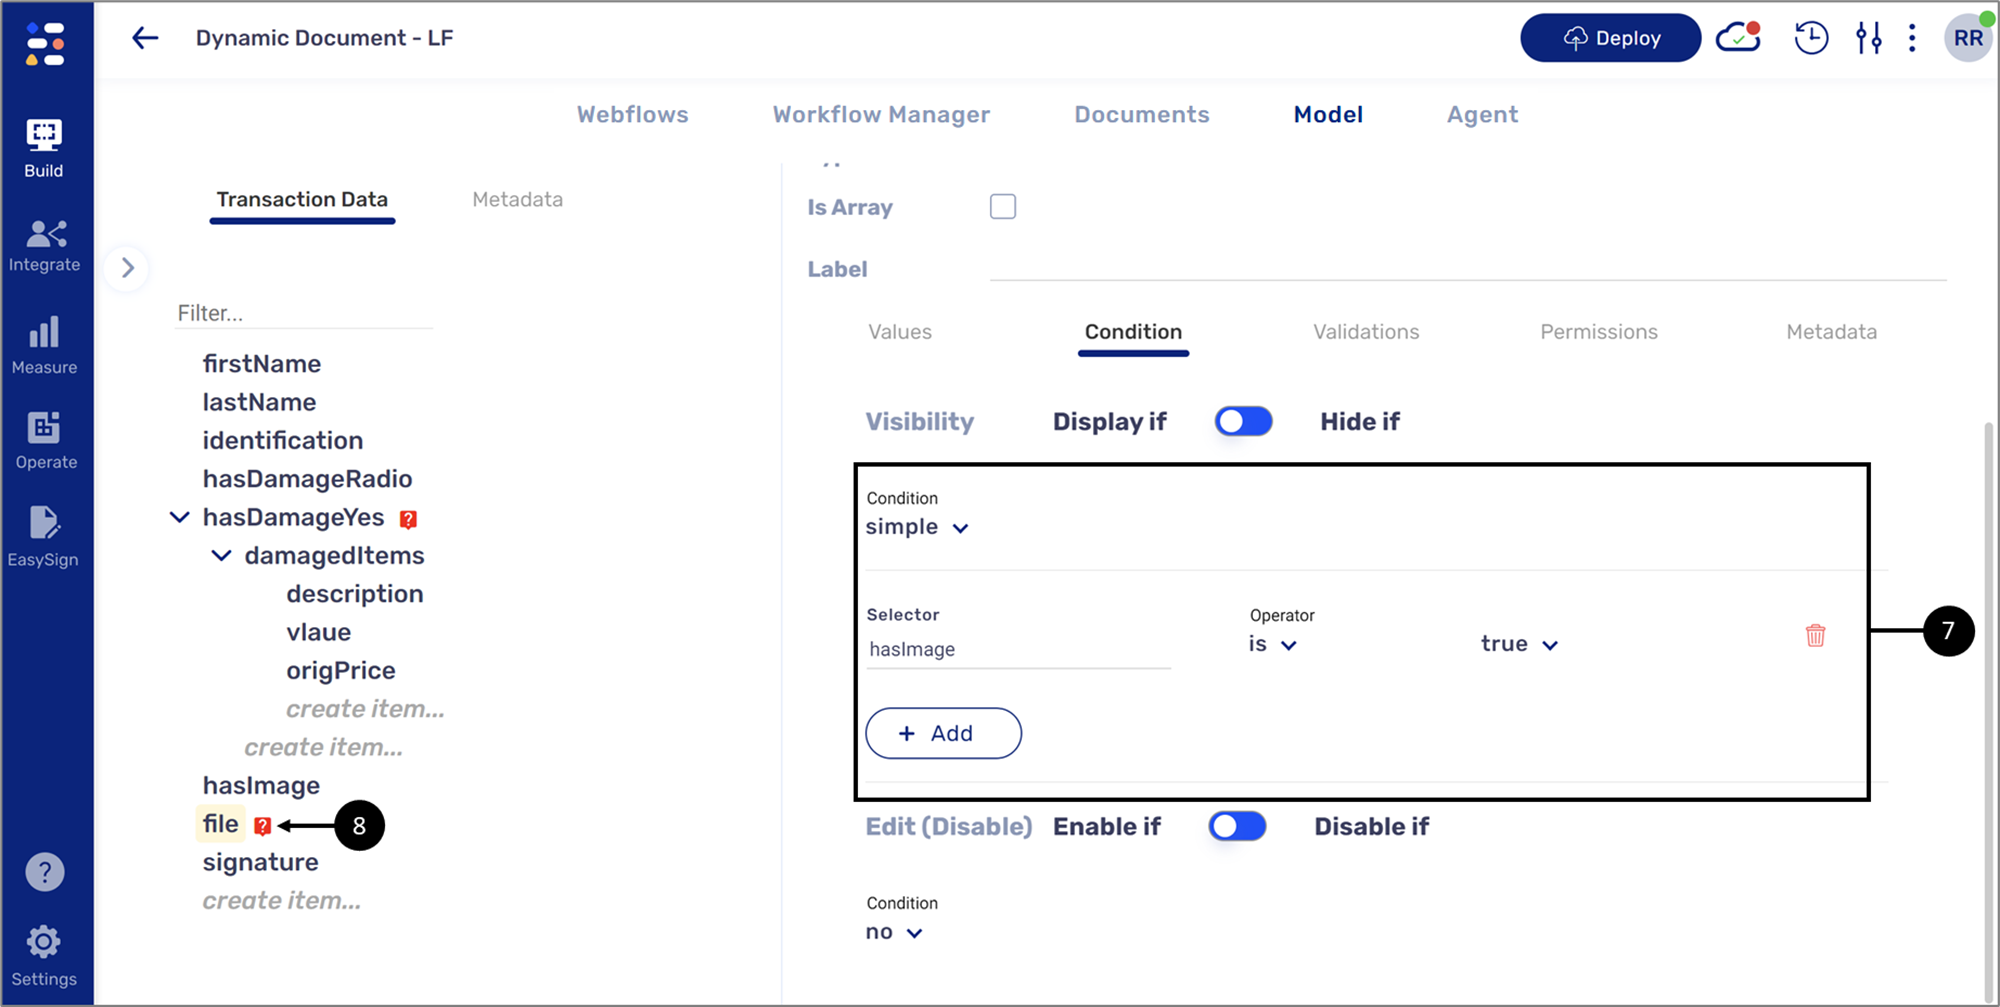
Figure 52: Model Data Item and Condition 2 of 2
On the Documents screen, perform the following steps:
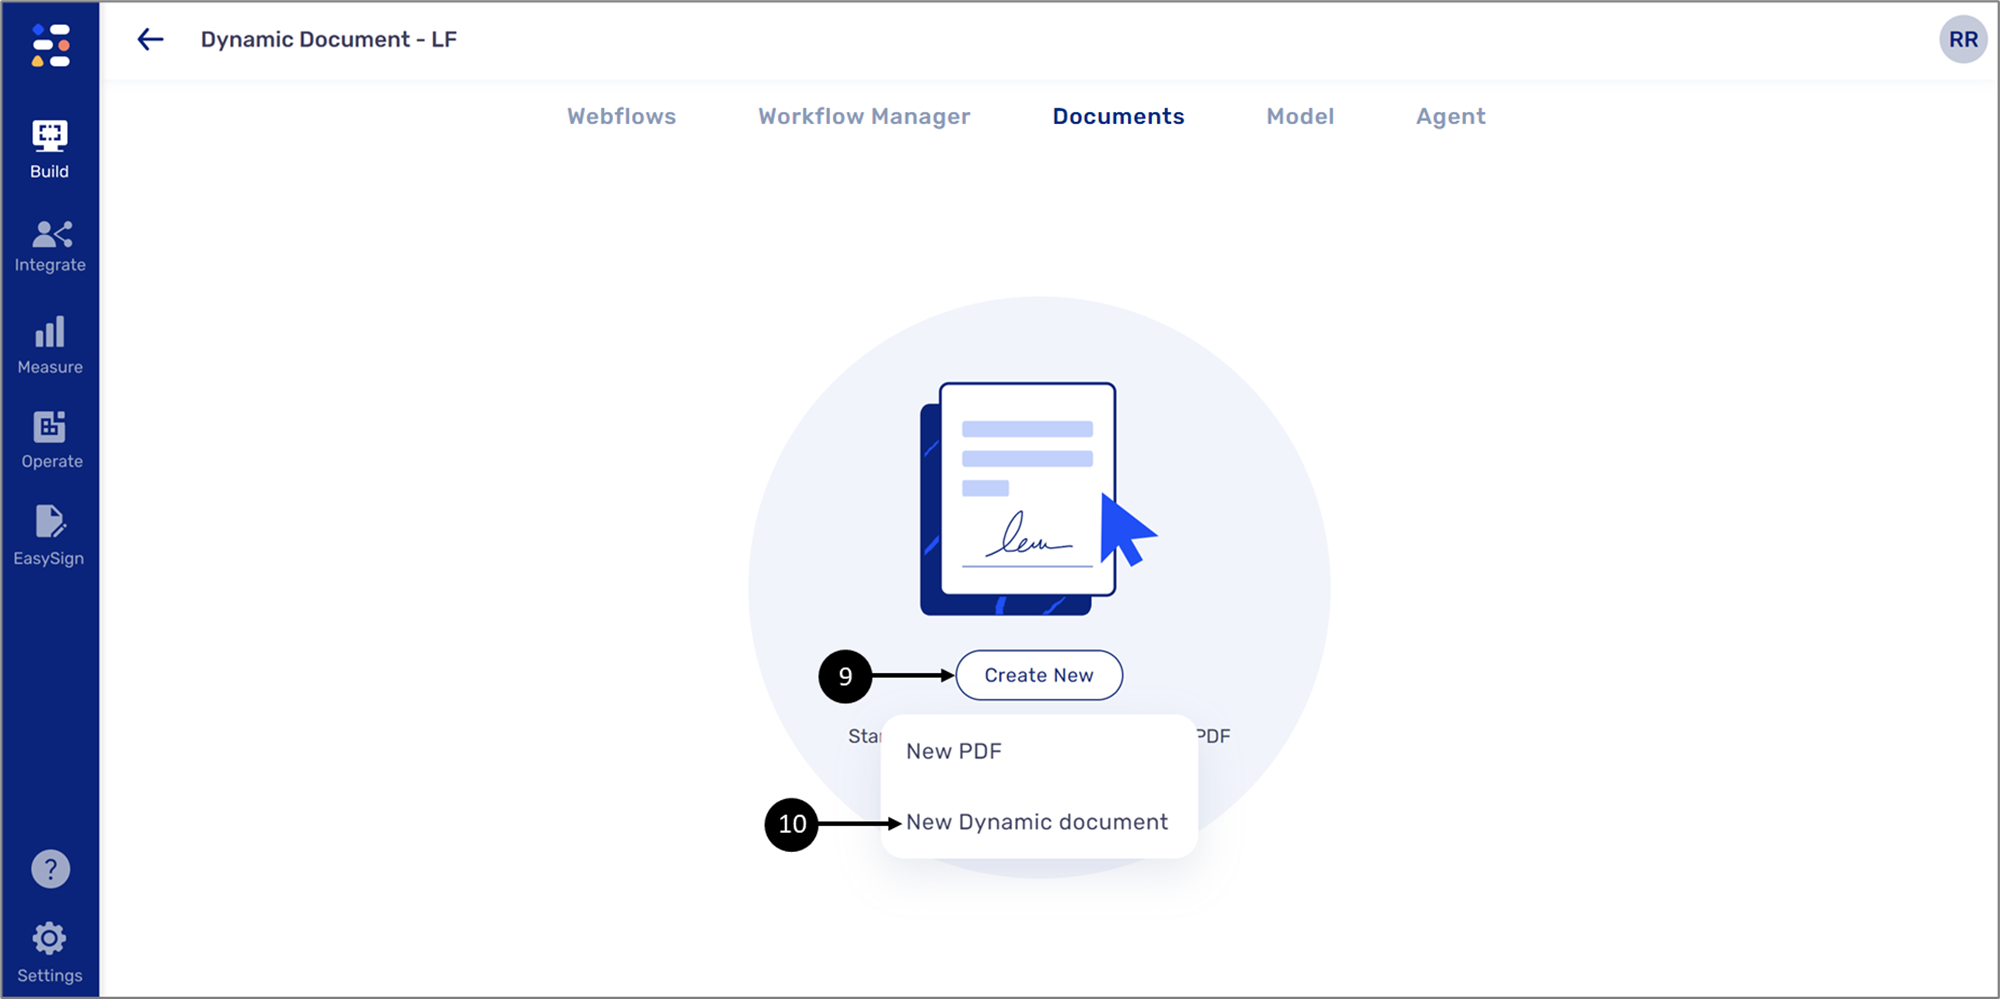
Figure 53: Create New
- Click Create New (9) and then New Dynamic Document (10).
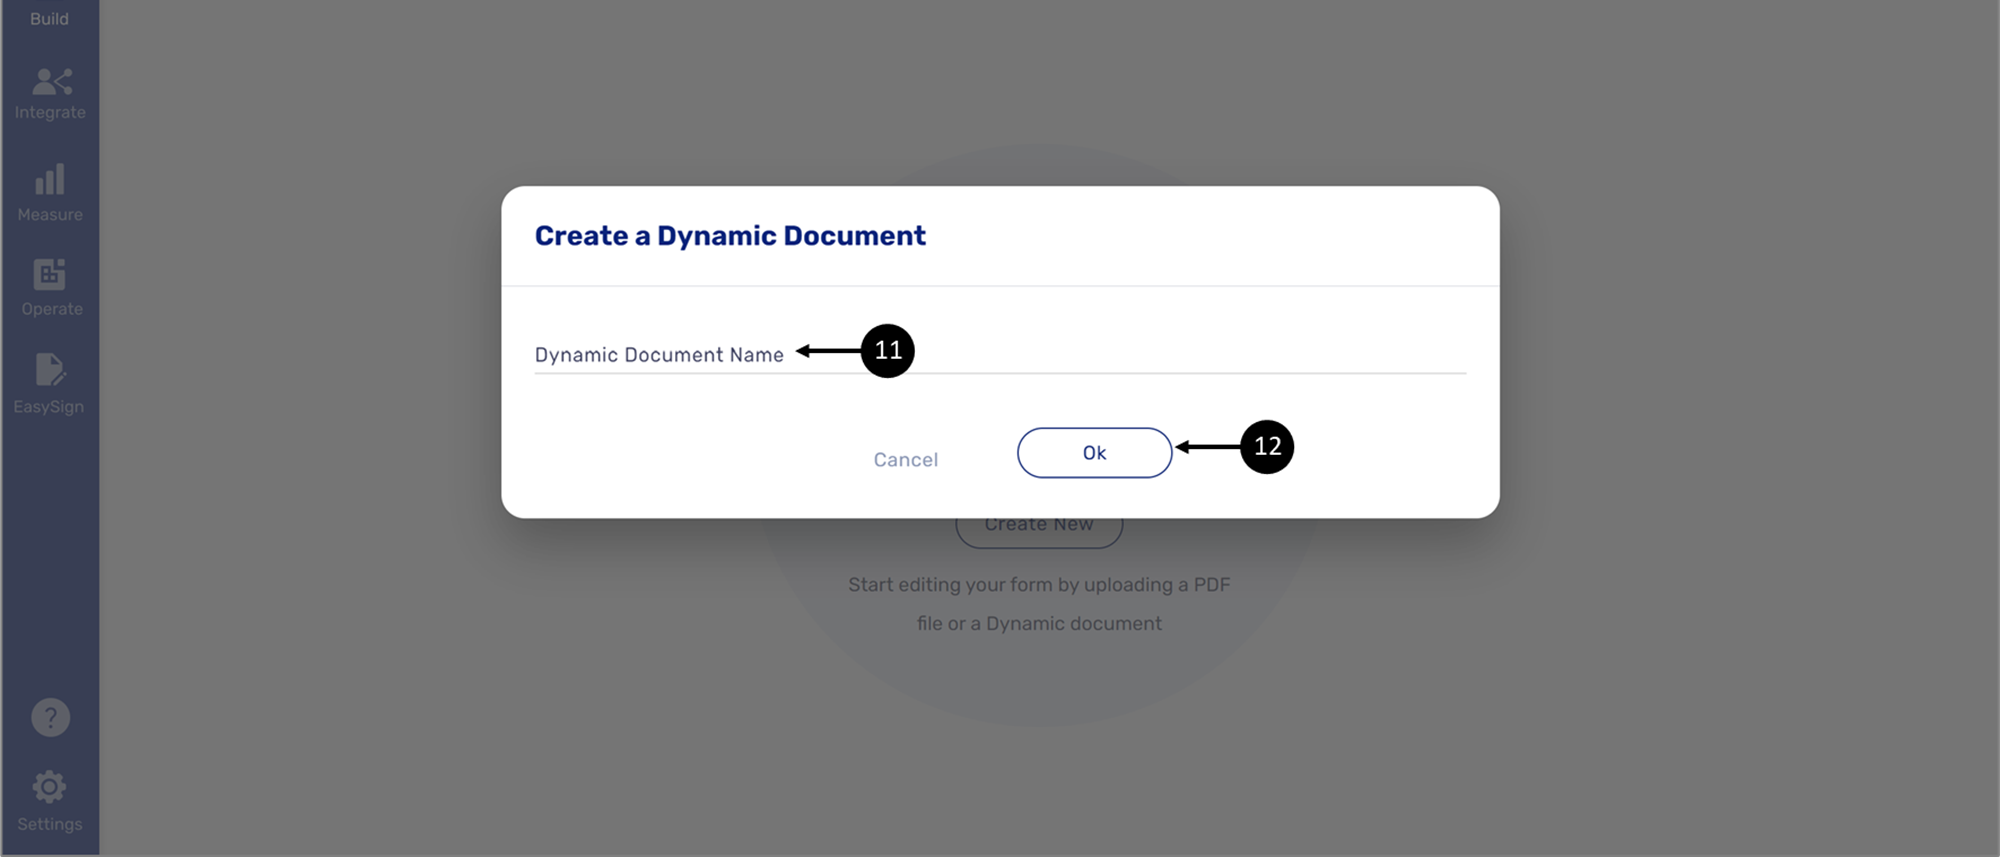
Figure 54: Create a Dynamic Document
- Using the Create a Dynamic Document window, enter a Dynamic Document Name (11) and then click Ok (12).
Result:
A new dynamic document is created:
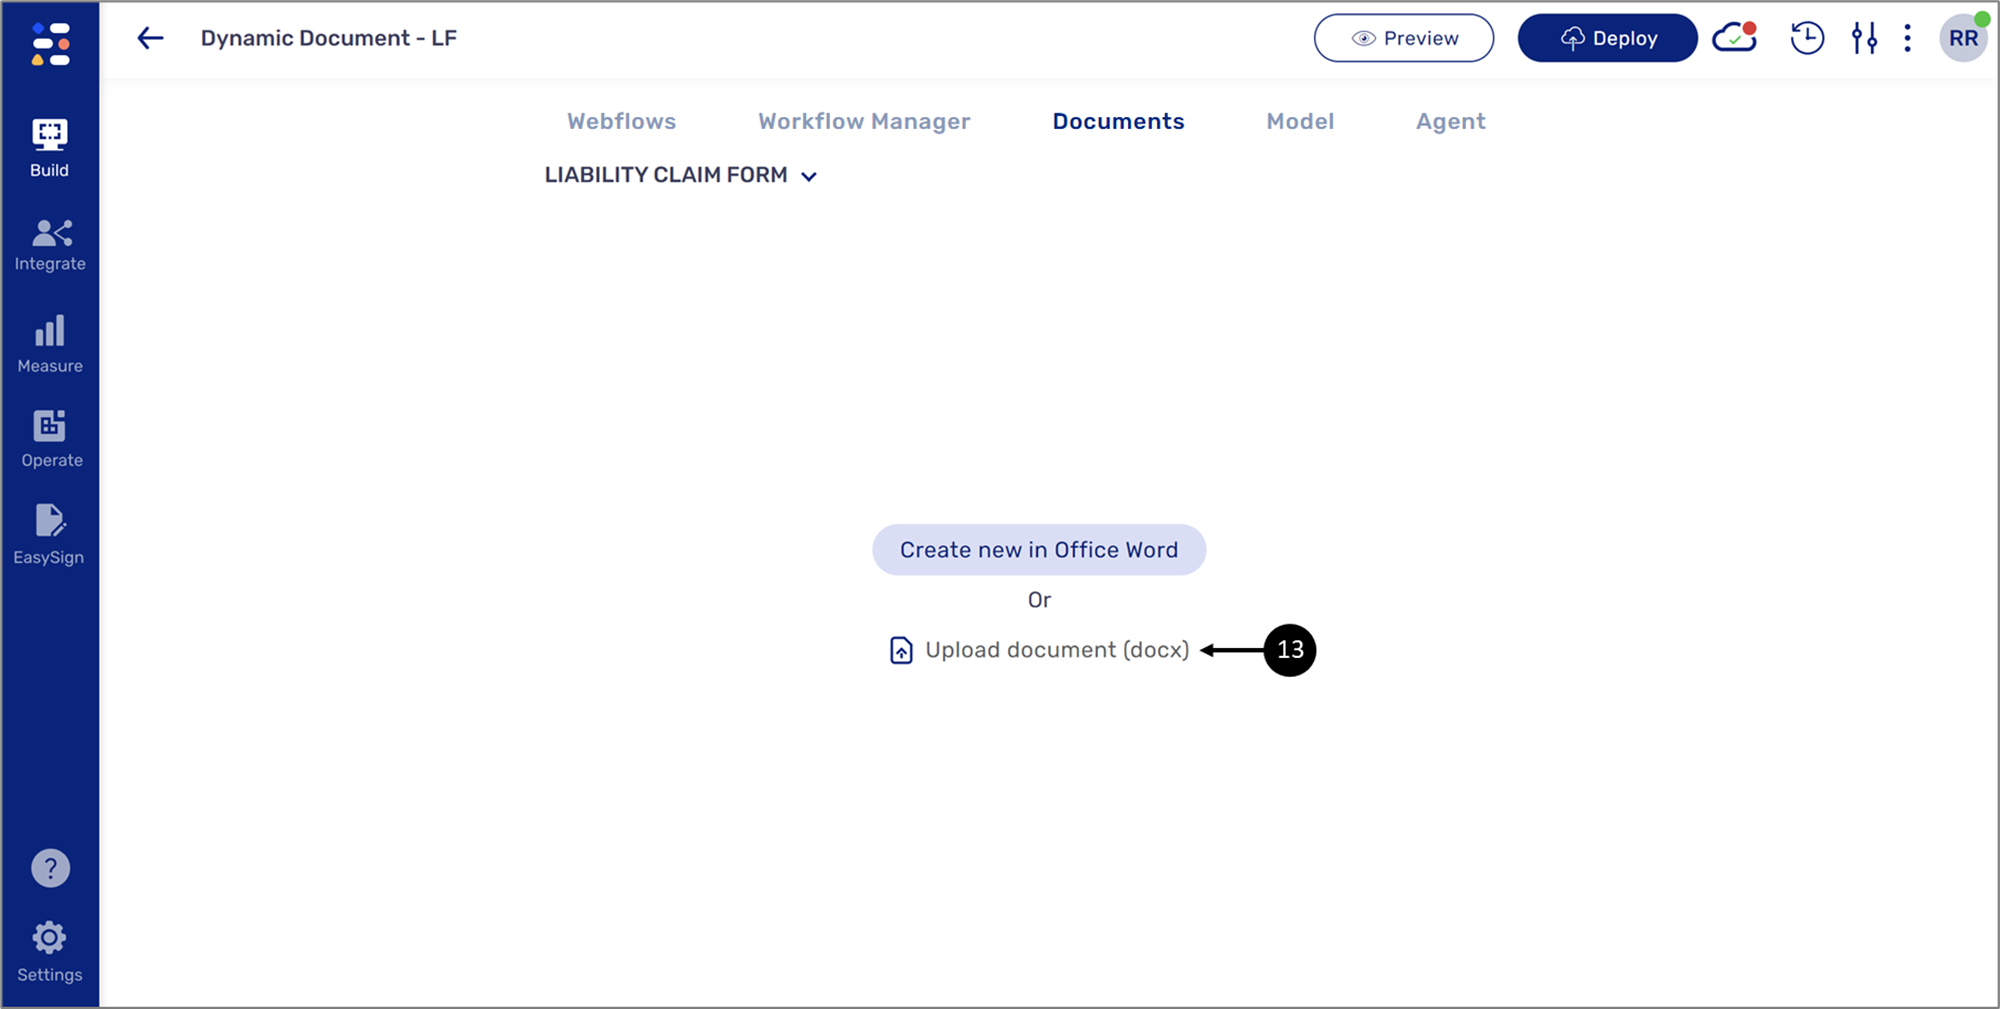
Figure 55: New Dynamic Document
- Click the Upload document (docx) option (13) and then select the desired file.
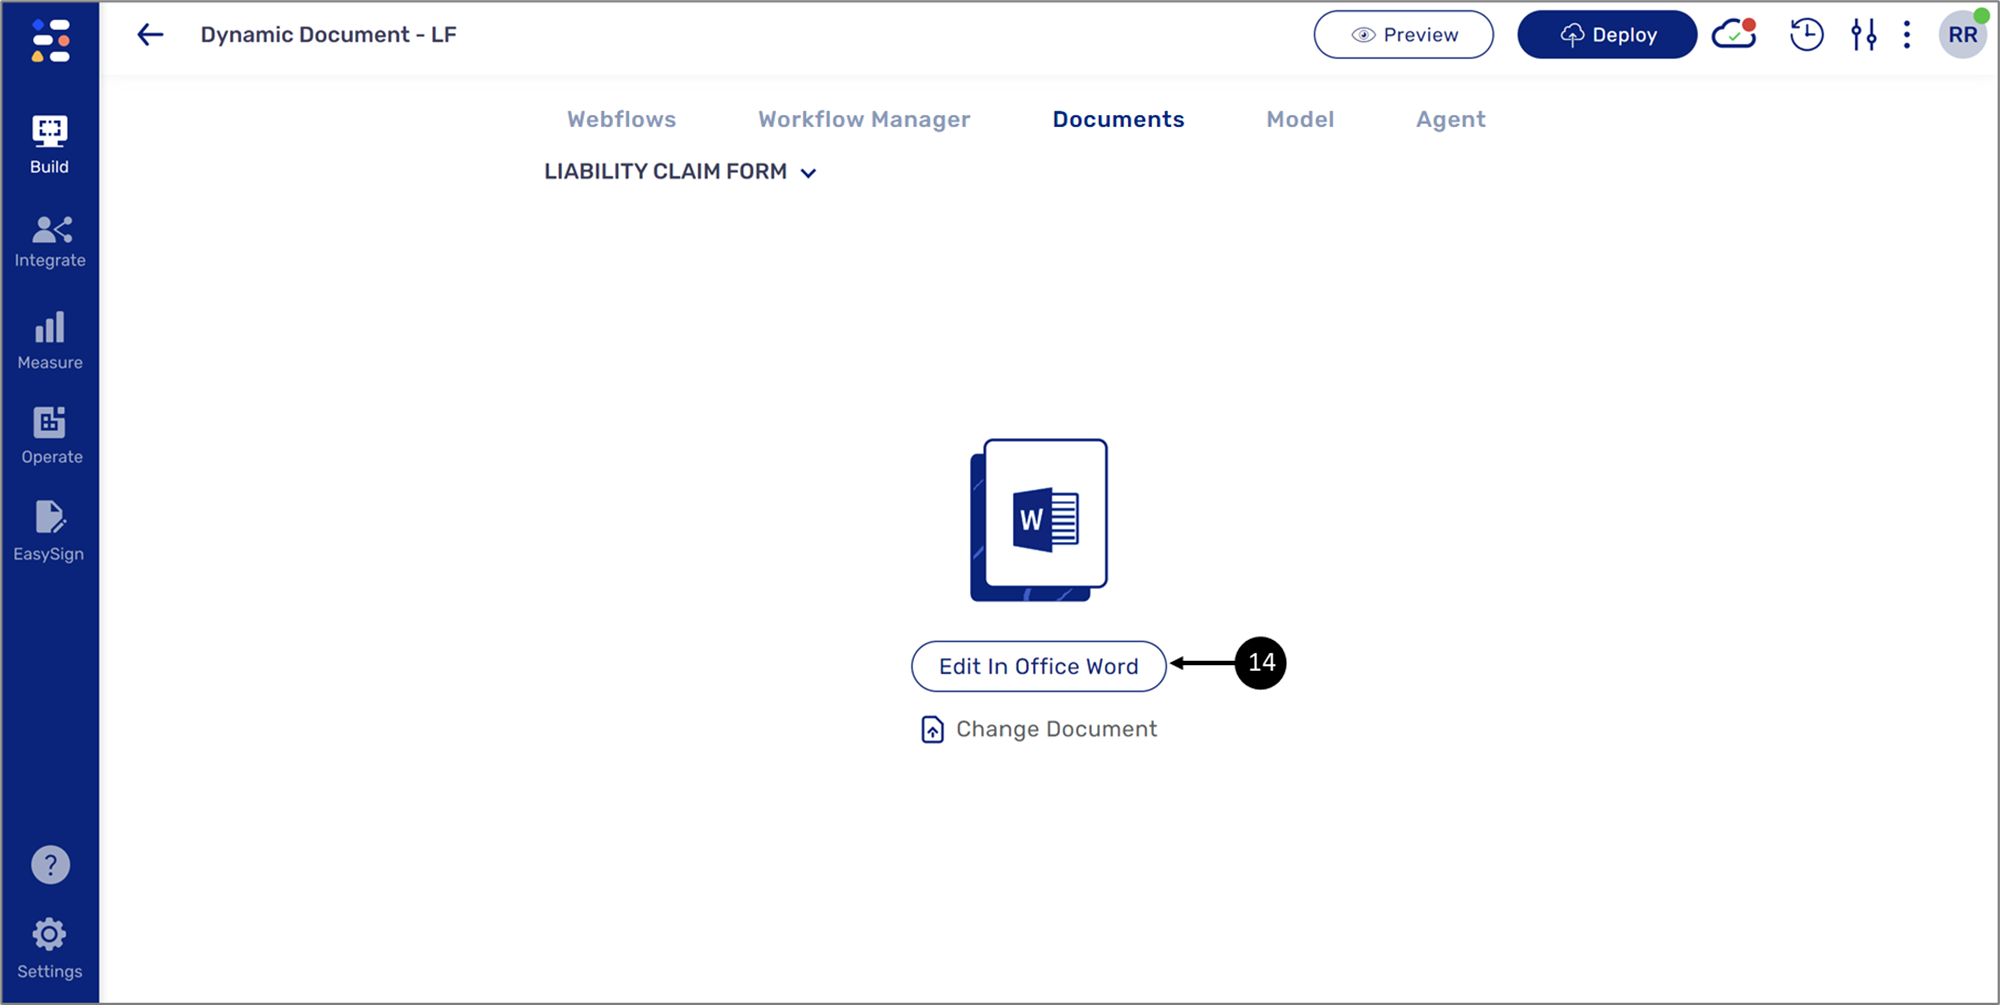
Figure 56: Edit In Office Word
- Click the Edit In Office Word button (14).
Result:
The Word document opens with the EasySend Dynamic Document Editor section:
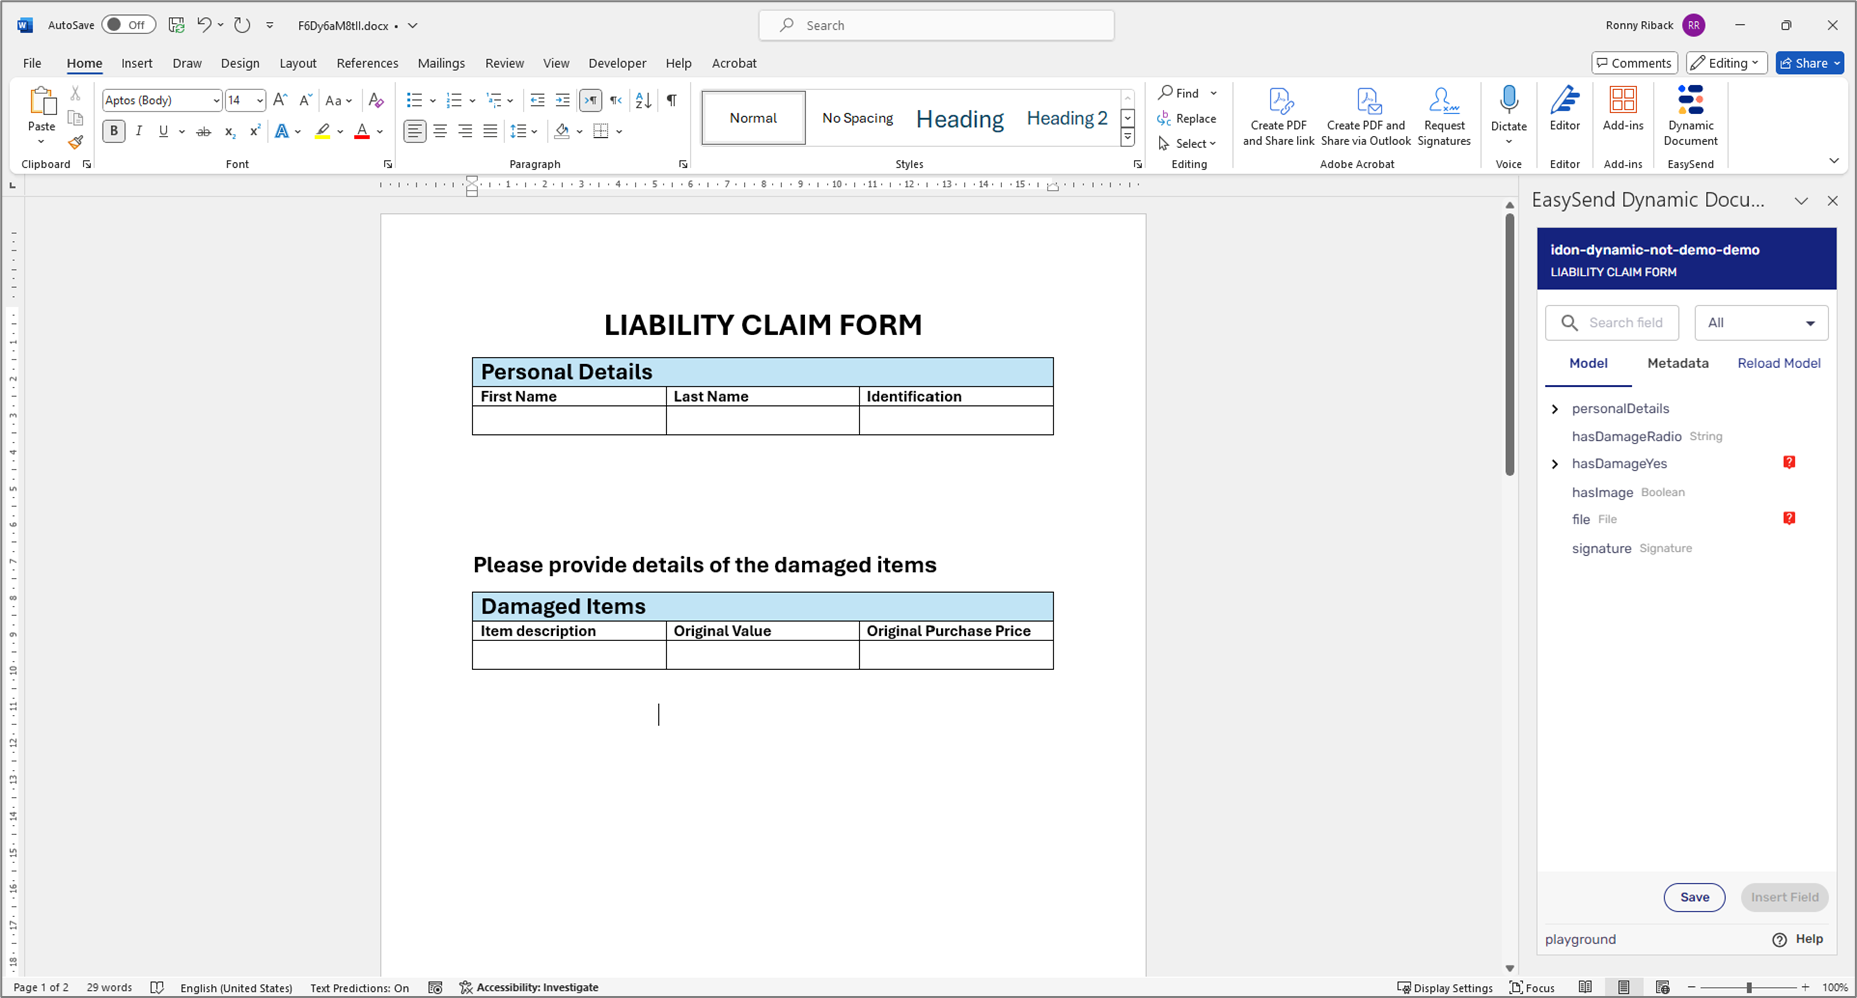
Figure 57: EasySend Document Document Editor
Step 2: Using EasySend's Microsoft Add-in
(See Figure 58 to Figure 74)
The Word document must become a dynamic document to reflect the business logic implemented in the digital process. In addition, the first page of the document needs to contain the name of the process in its Header and the transaction's RID in its Footer. To convert the Word document into a dynamic document, perform the following steps:
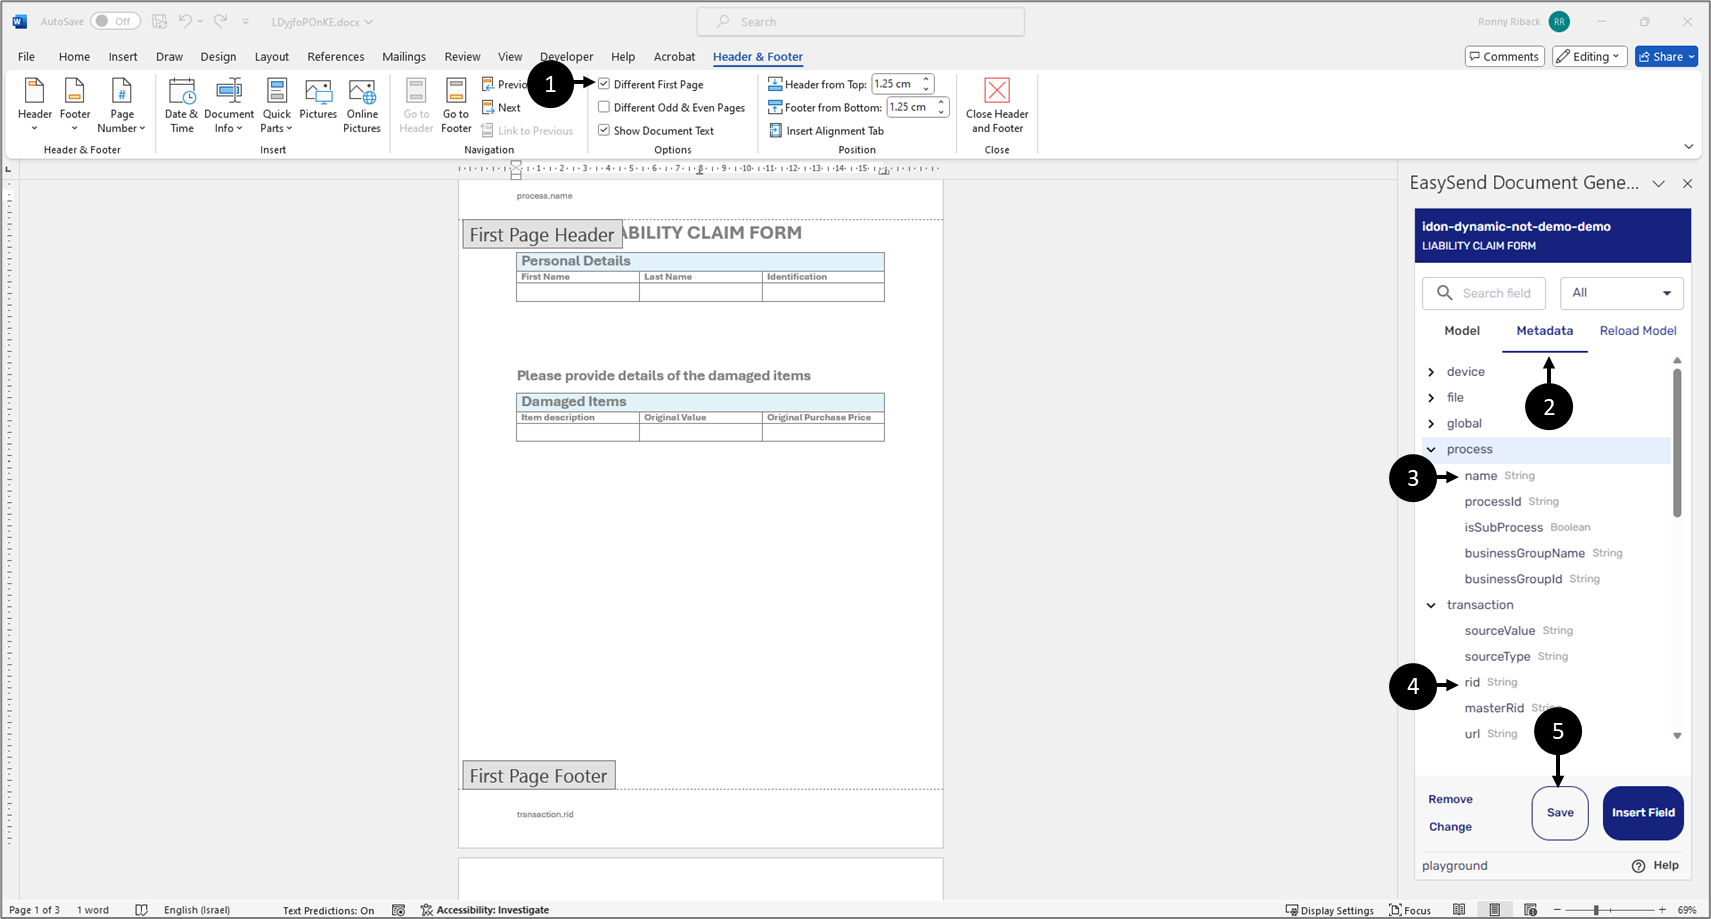
Figure 58: First Page Header and Footer
- Edit the Header and Footer of the first page:
- Display the Header and the Footer.
- Ensure the first page is different than the other pages (1).
- Click the Metadata tab (2).
- Insert the process name (3) into the Header.
- Insert the transaction rid (4) into the Footer.
- Click the Save button (5).
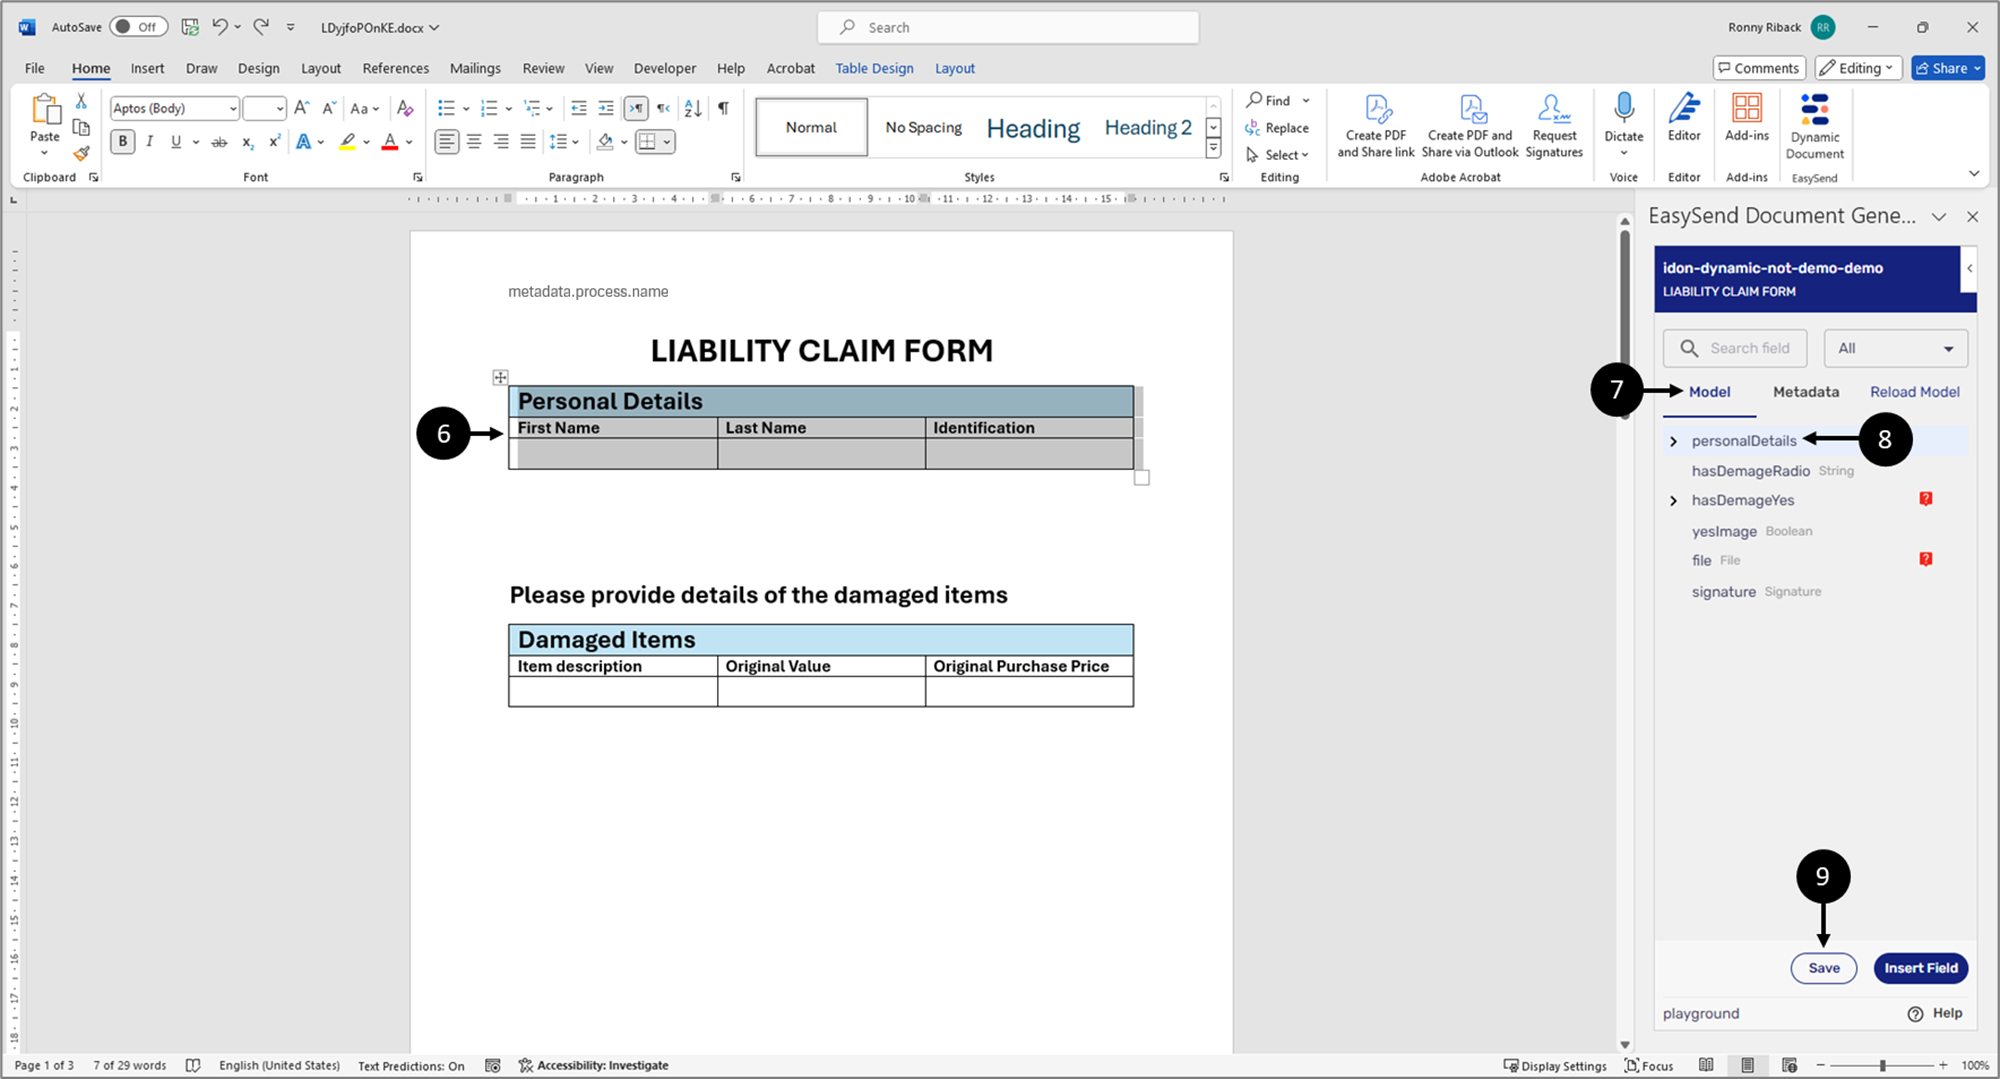
Figure 59: personalDetails
- Nest the Personal Details table inside an object-type data item:
- Select the Personal Details table (6).
- Click the Model tab (7).
- Click the personalDetails object-type data item (8).
- Click the Insert Field button (9).
Result:
The table is nested inside the personalDetails data item (10):
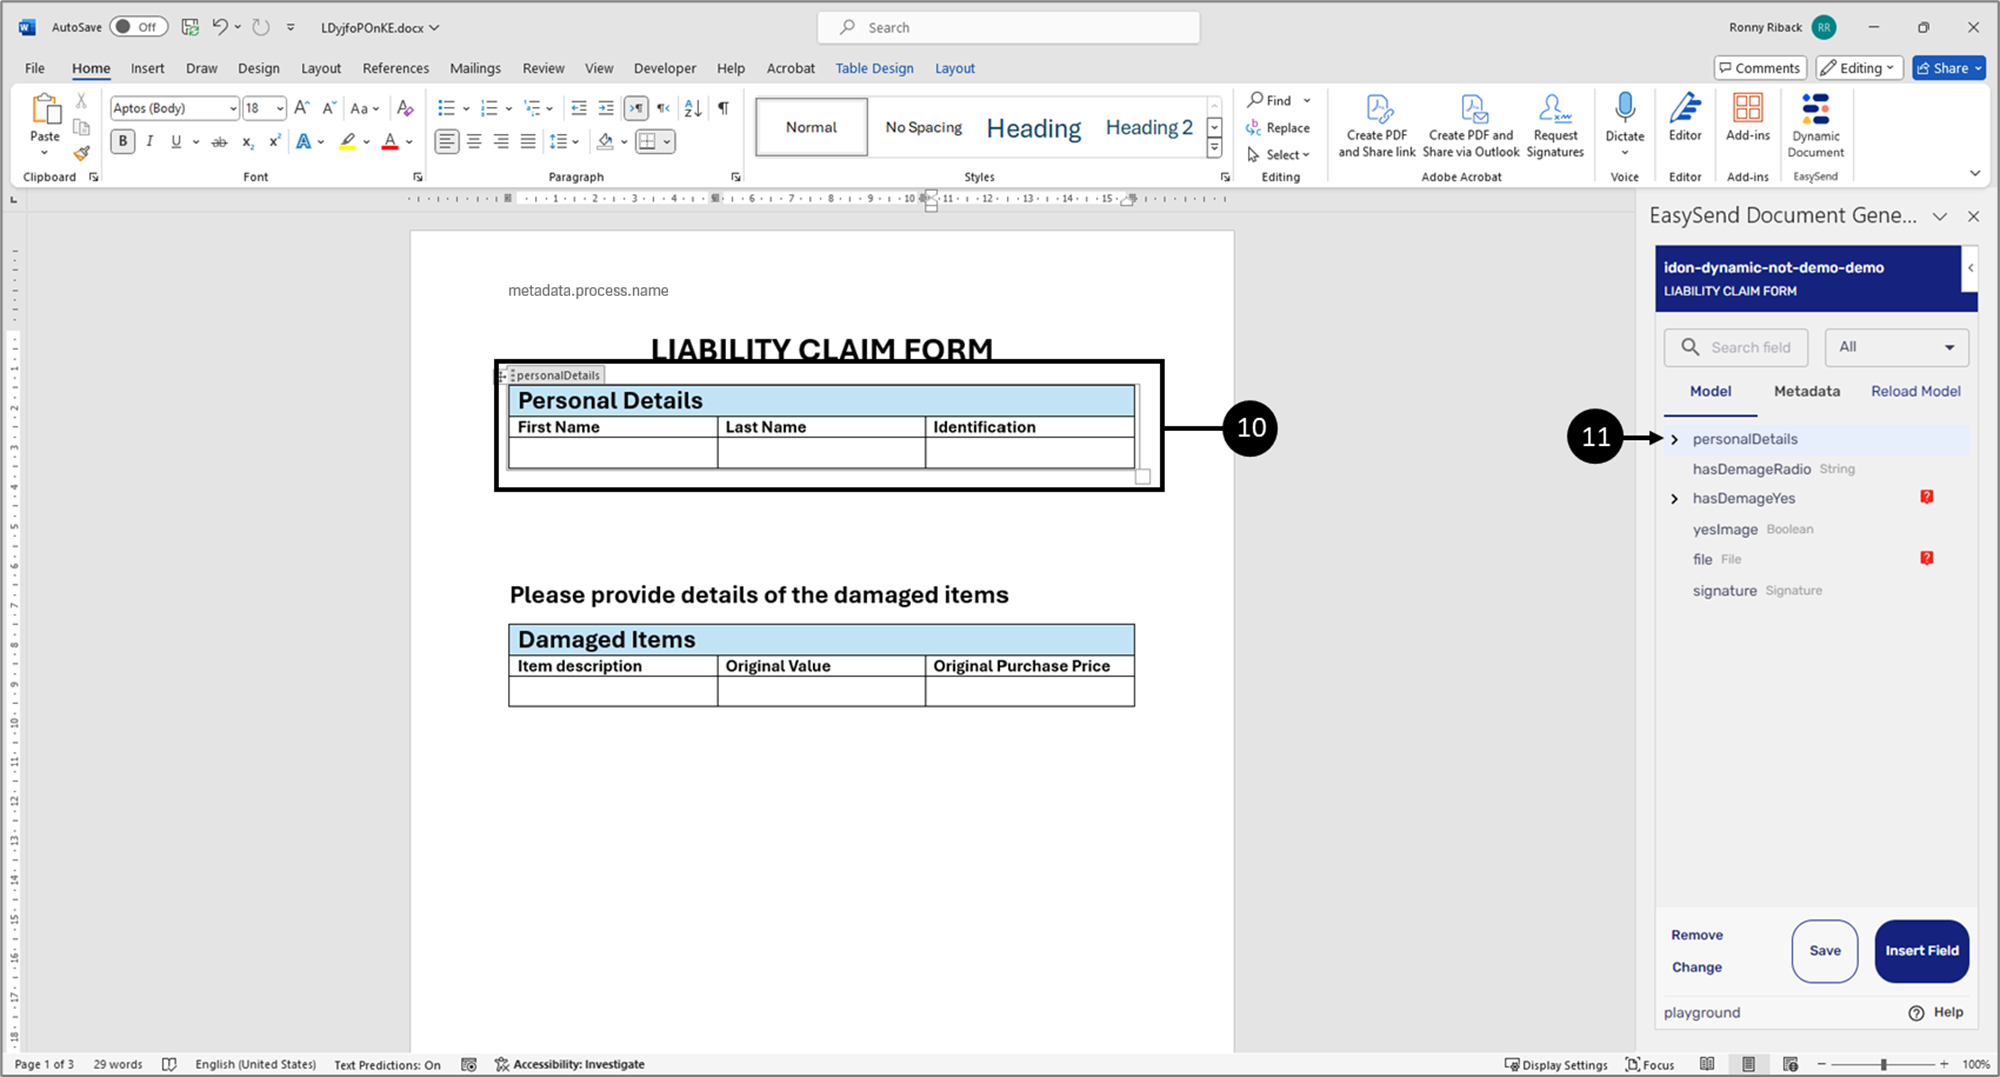
Figure 60: Nested Table
- Click to expand the personalDetails item (11).
Result:
The nested items appear (12):
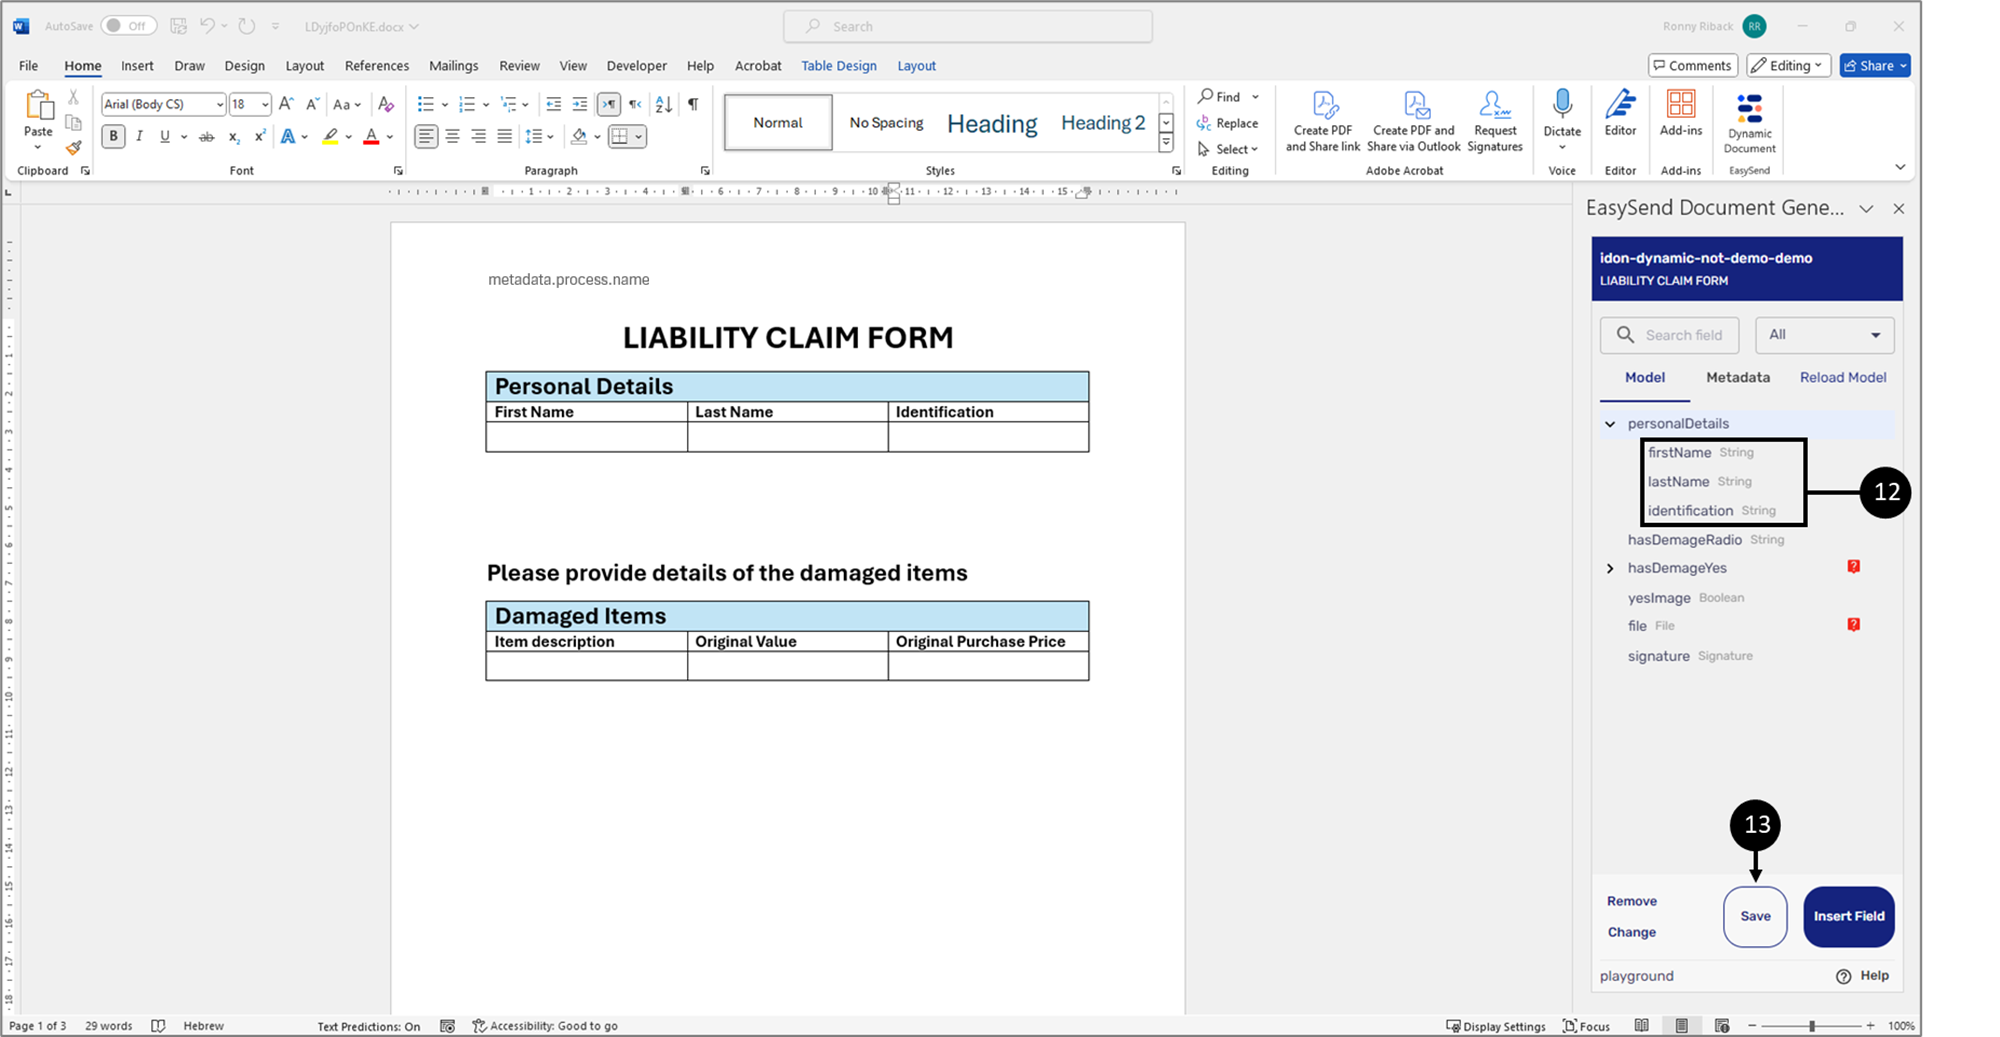
Figure 61: Nested Items
- Insert all other nested items (12).
- Click the Save button (13).
Result:
The items are inserted into the document:
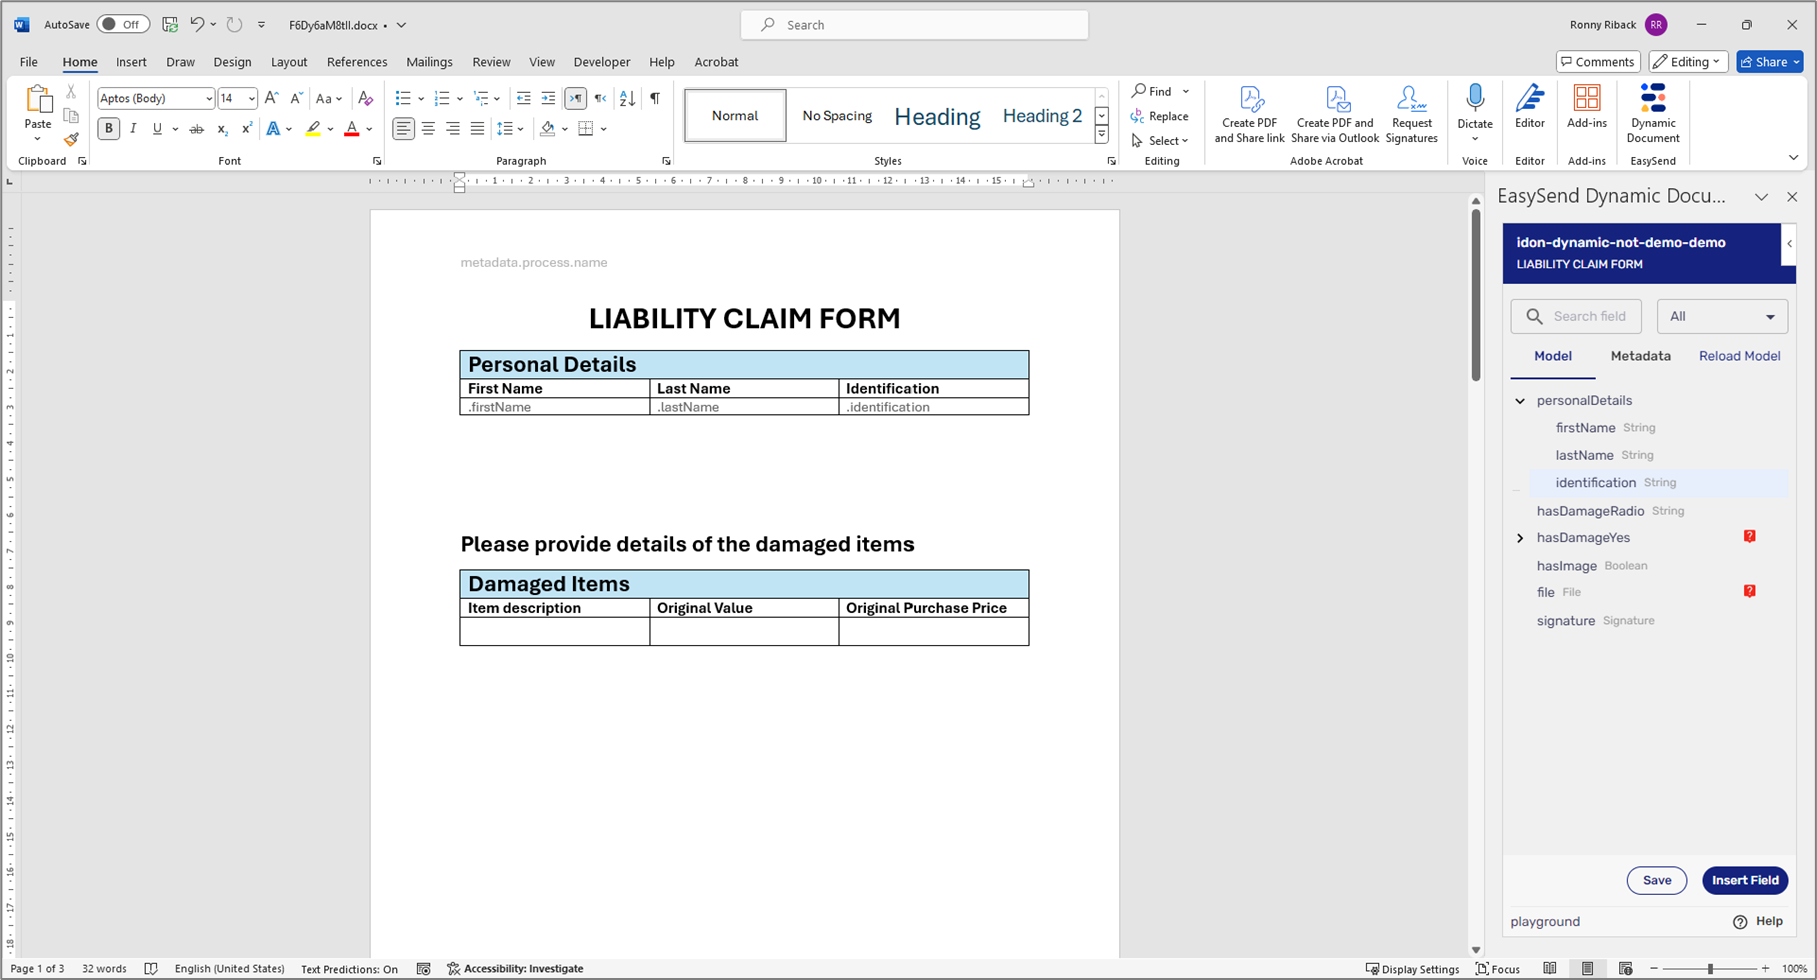
Figure 62: Dynamic Document with Inserted Items
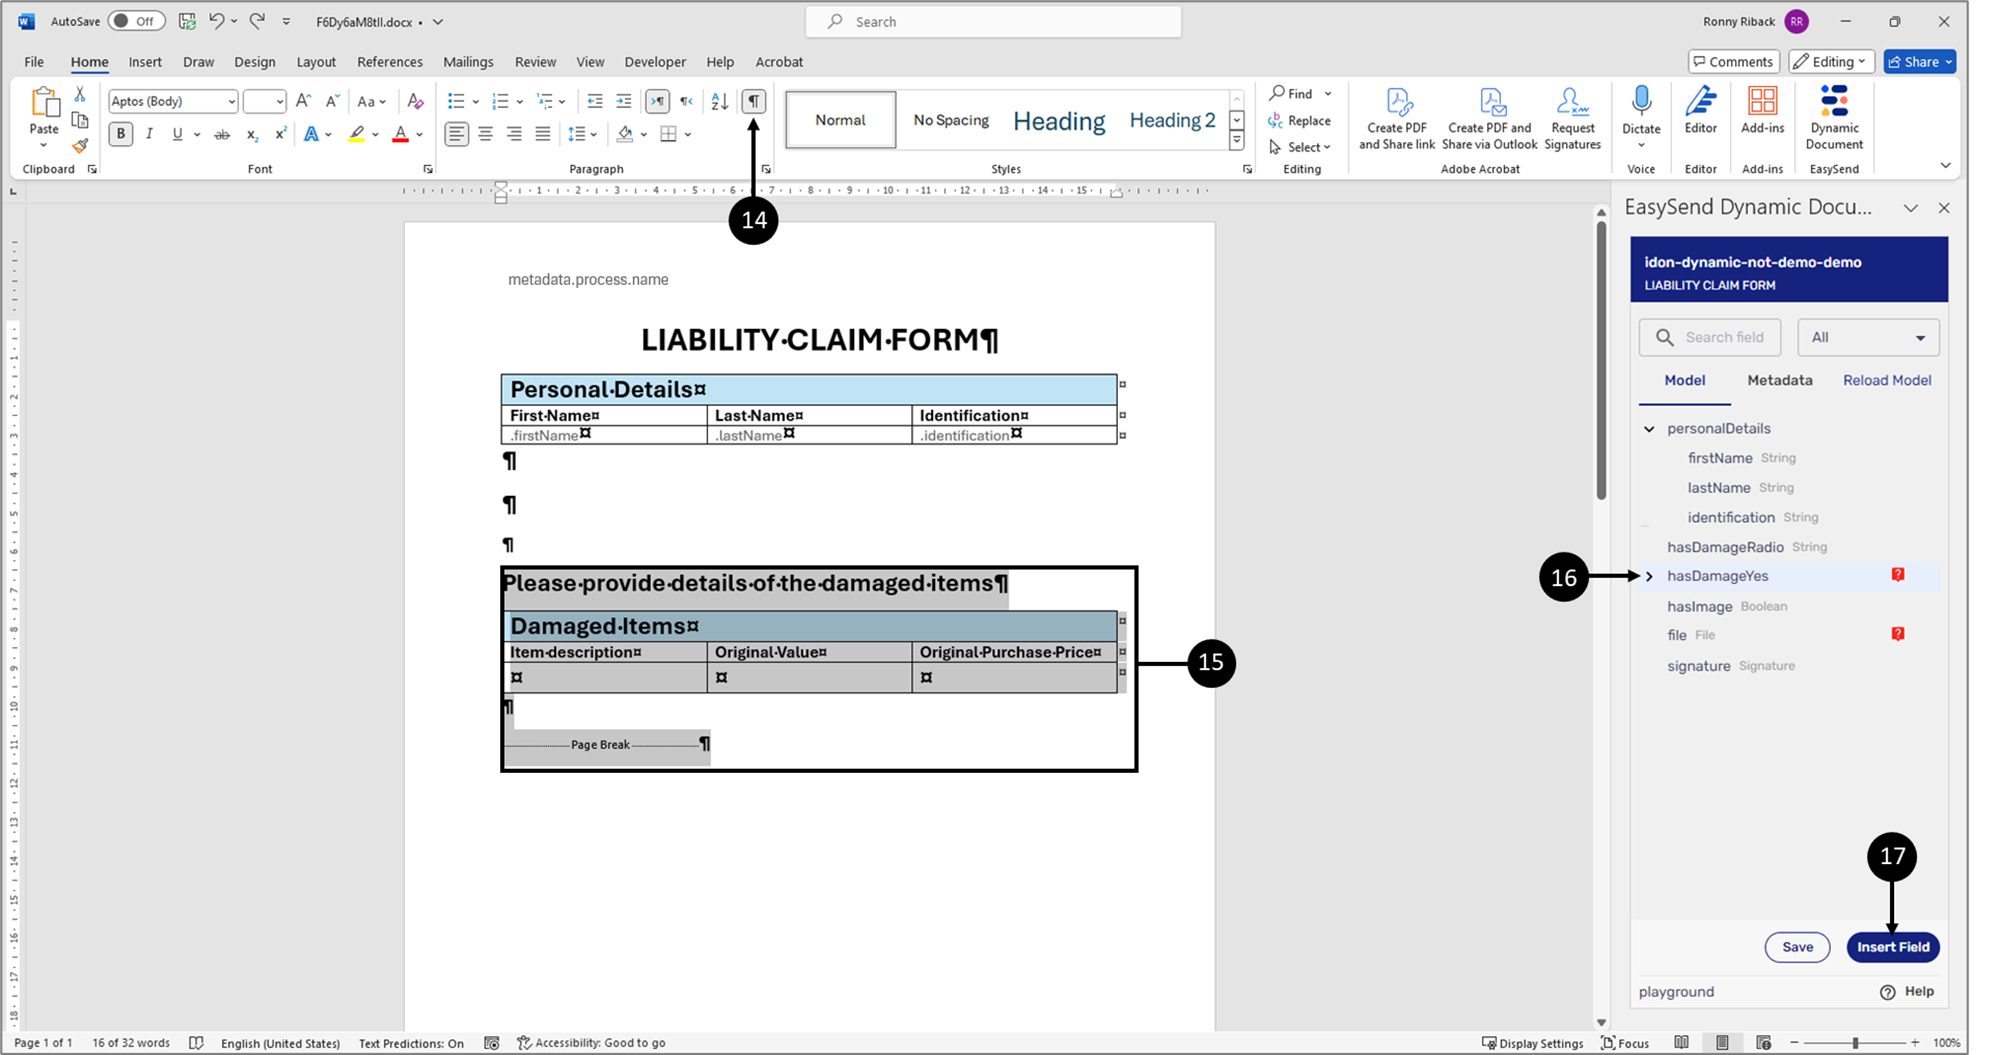
Figure 63: Selecting Elements
- Nest elements inside an object-type item with a condition:
- Display the Page Break marker (14).
- Select the heading, the table, and the Page Break marker (15).
- Click the hasDamageYes object-type item (16).
- Click the Insert Field button (17).
Result:
The elements are nested (18):
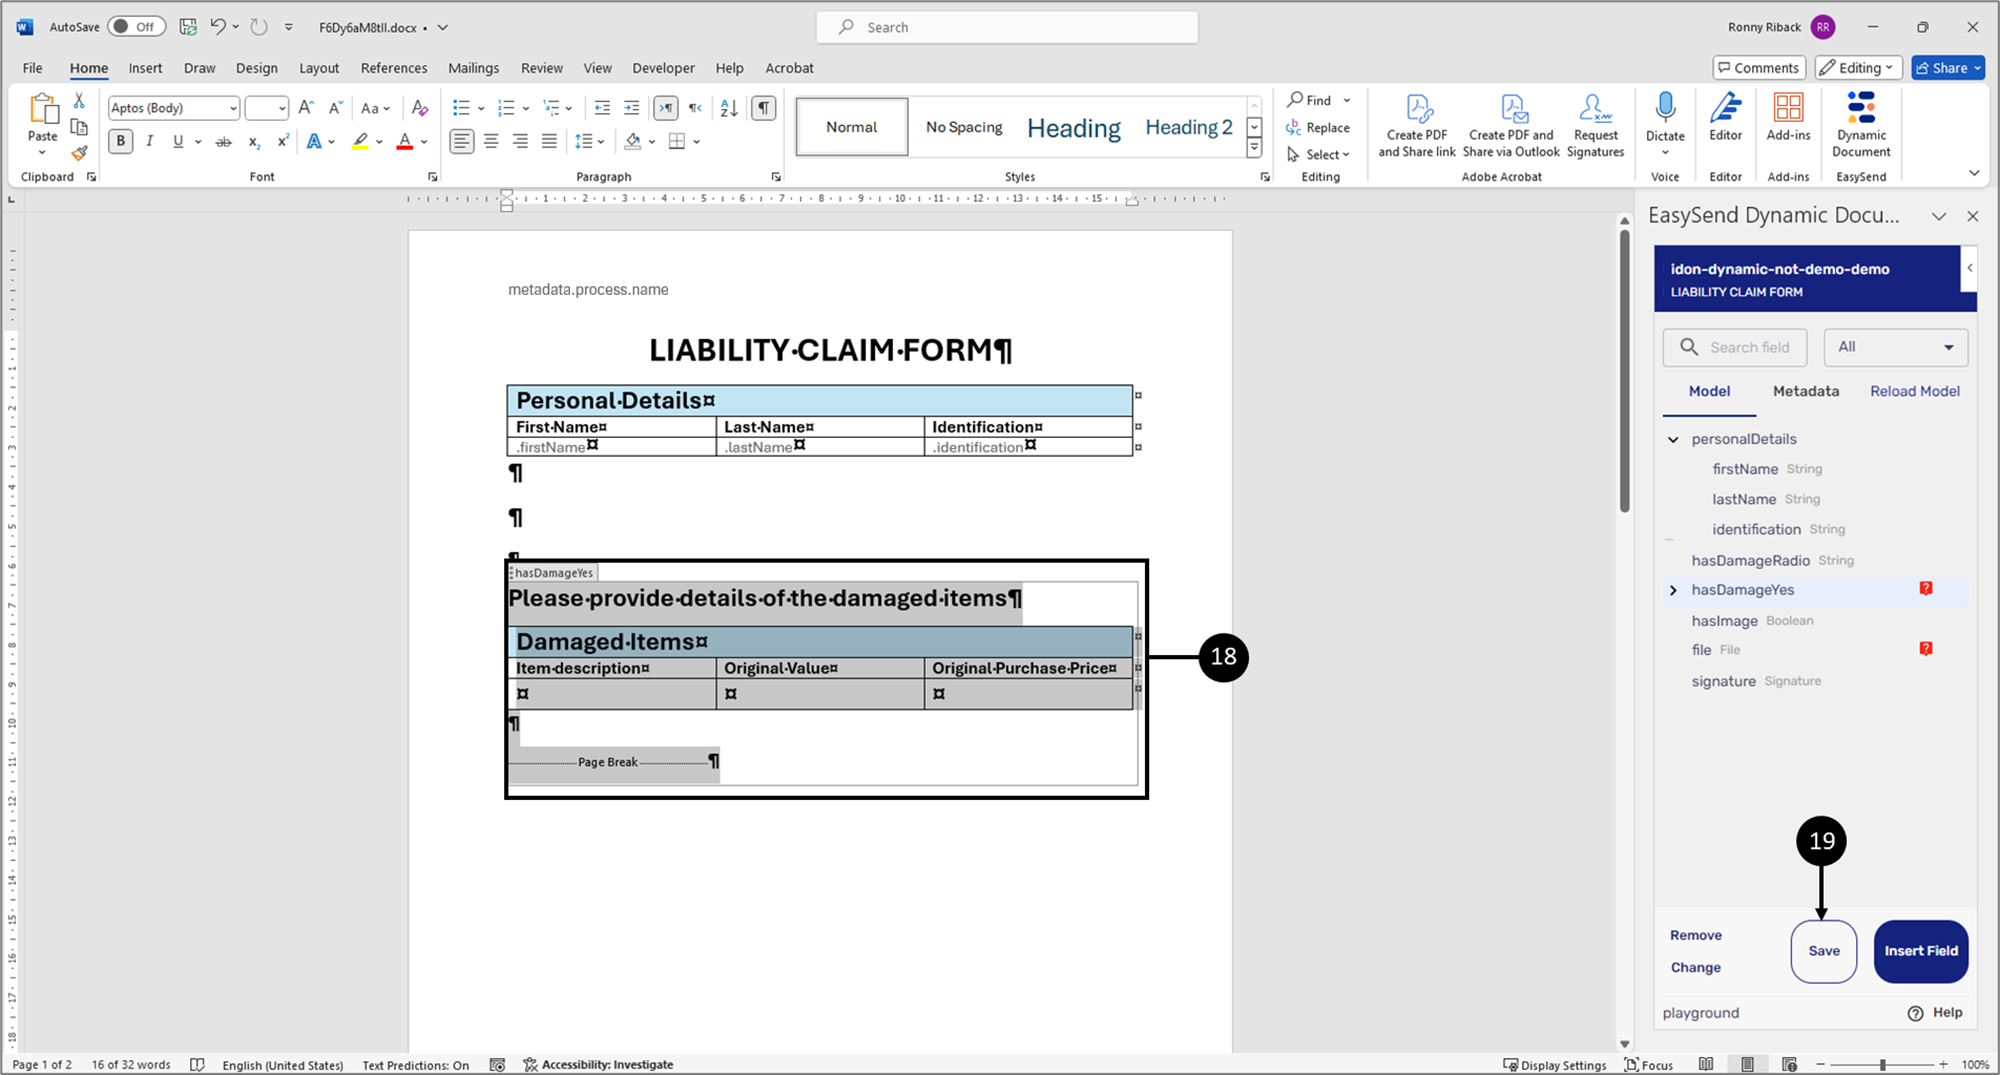
Figure 64: Nested Elements
- Click the Save button (19).
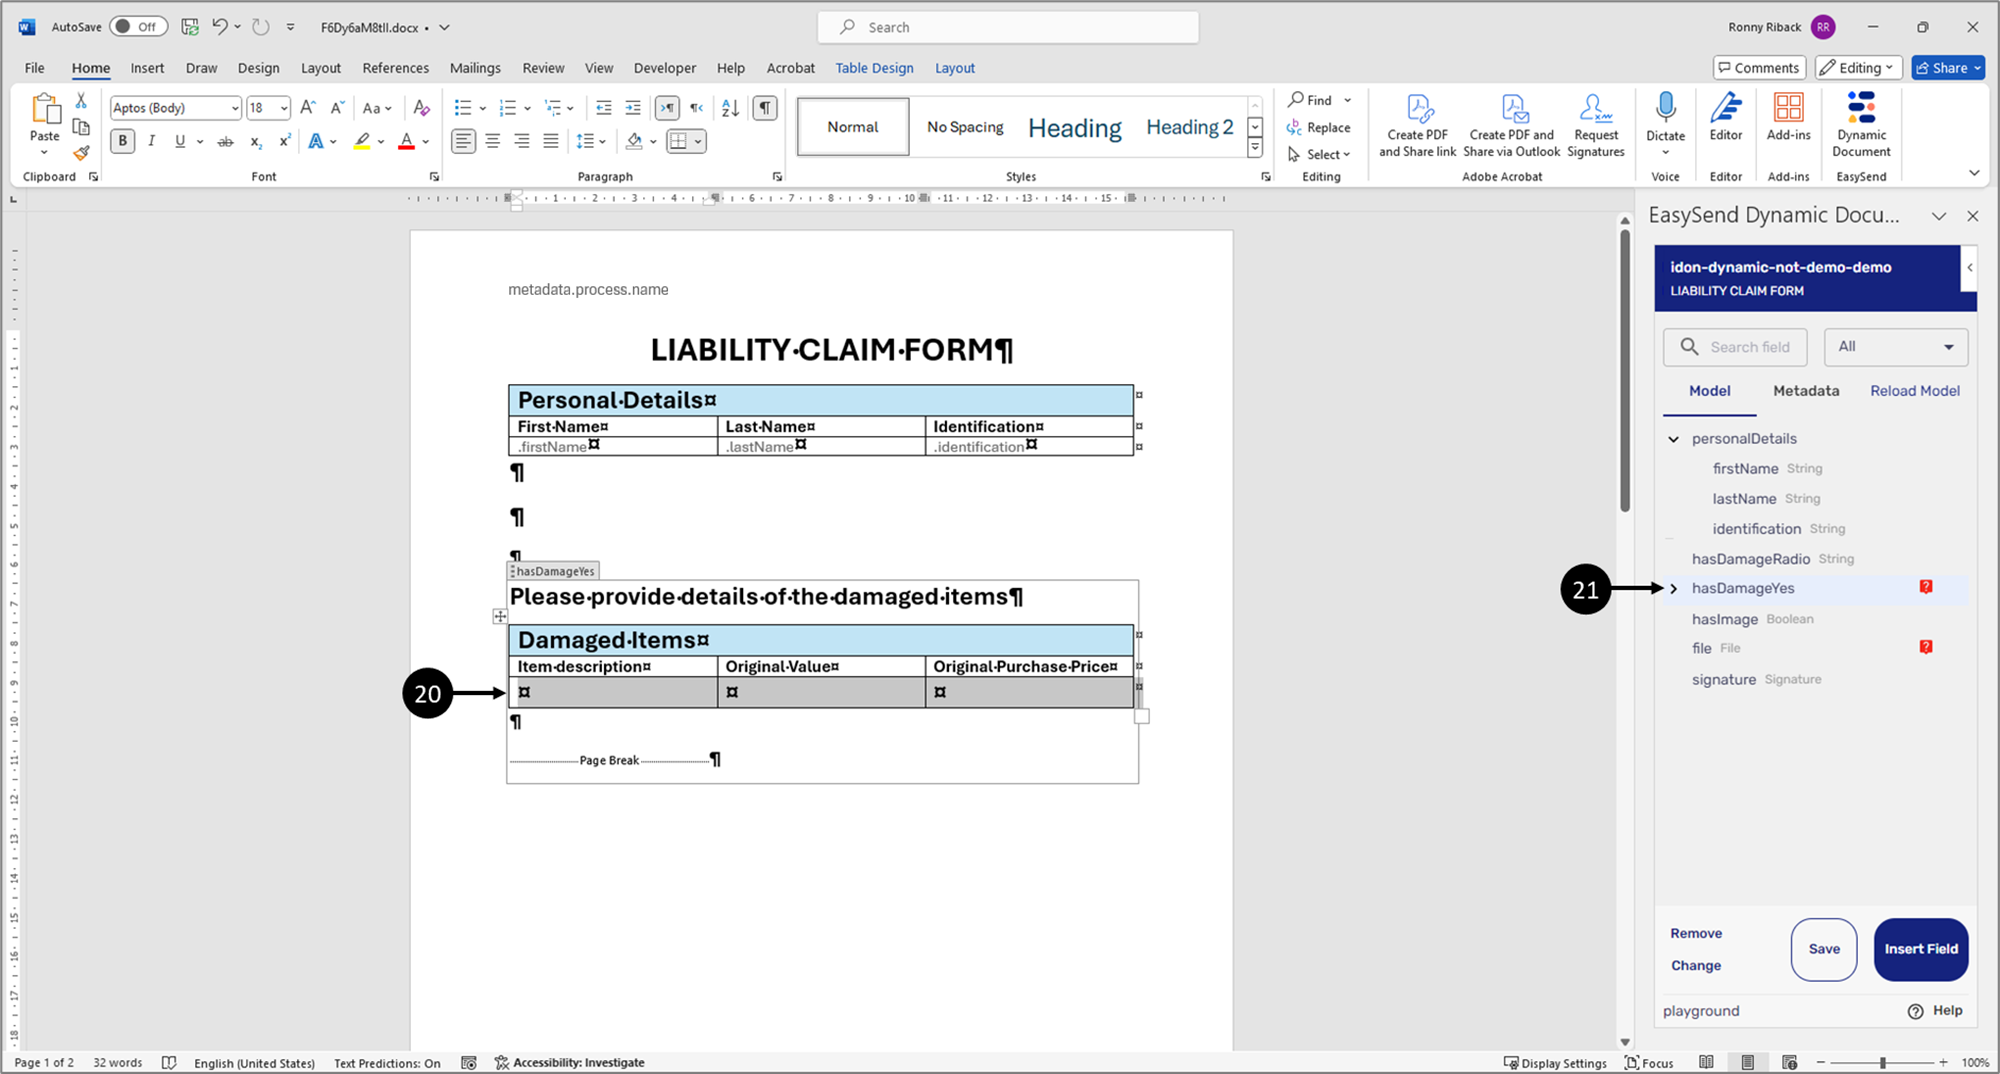
Figure 65: Table Row
- Nest the table row in an array-type item:
- Select the table row (20).
- Expand the object-type item (21).
Result:
The array-type item appears (22):
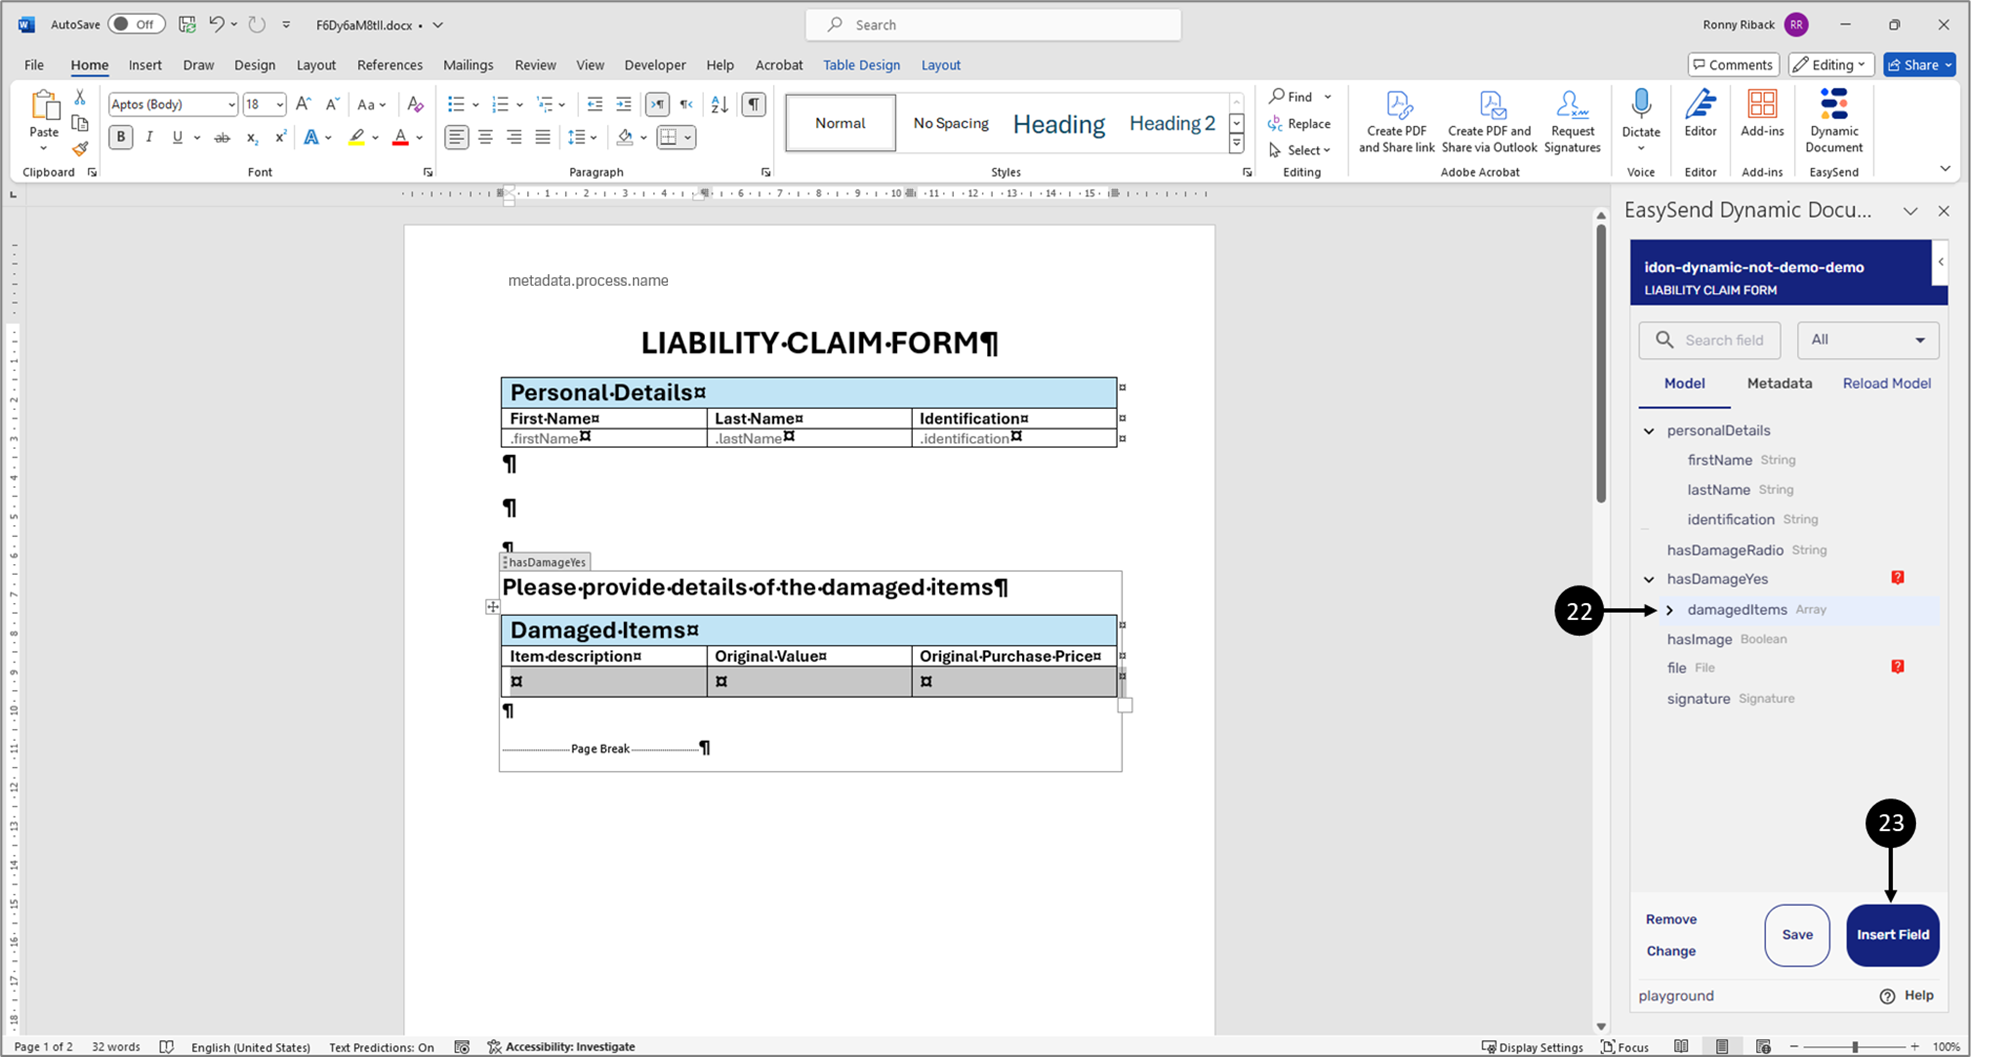
Figure 66: Array-Type Item
- Click the array-type item (22).
- Click the Insert Field button (23).
Result:
The table row is nested inside the array-type item (24):
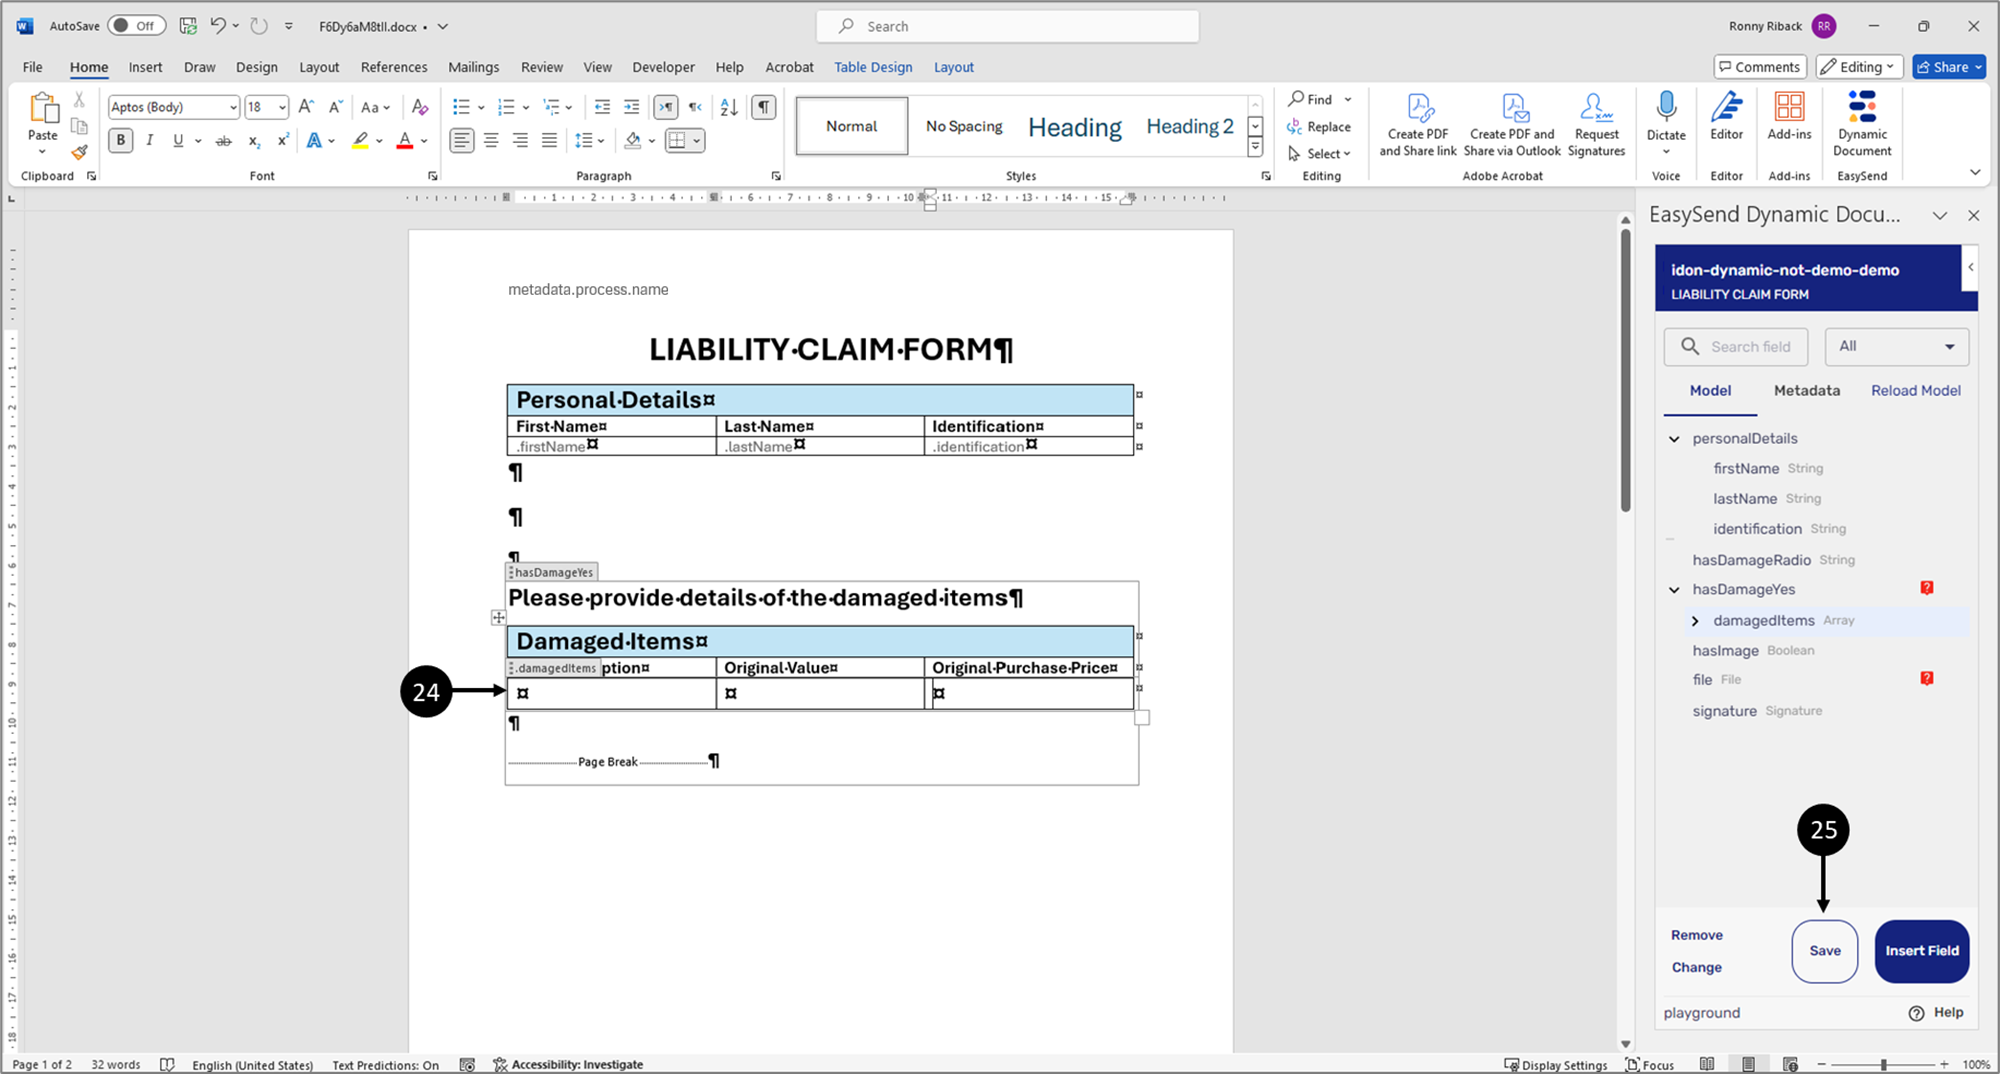
Figure 67: Nested Table Row
- Click the Save button (25).
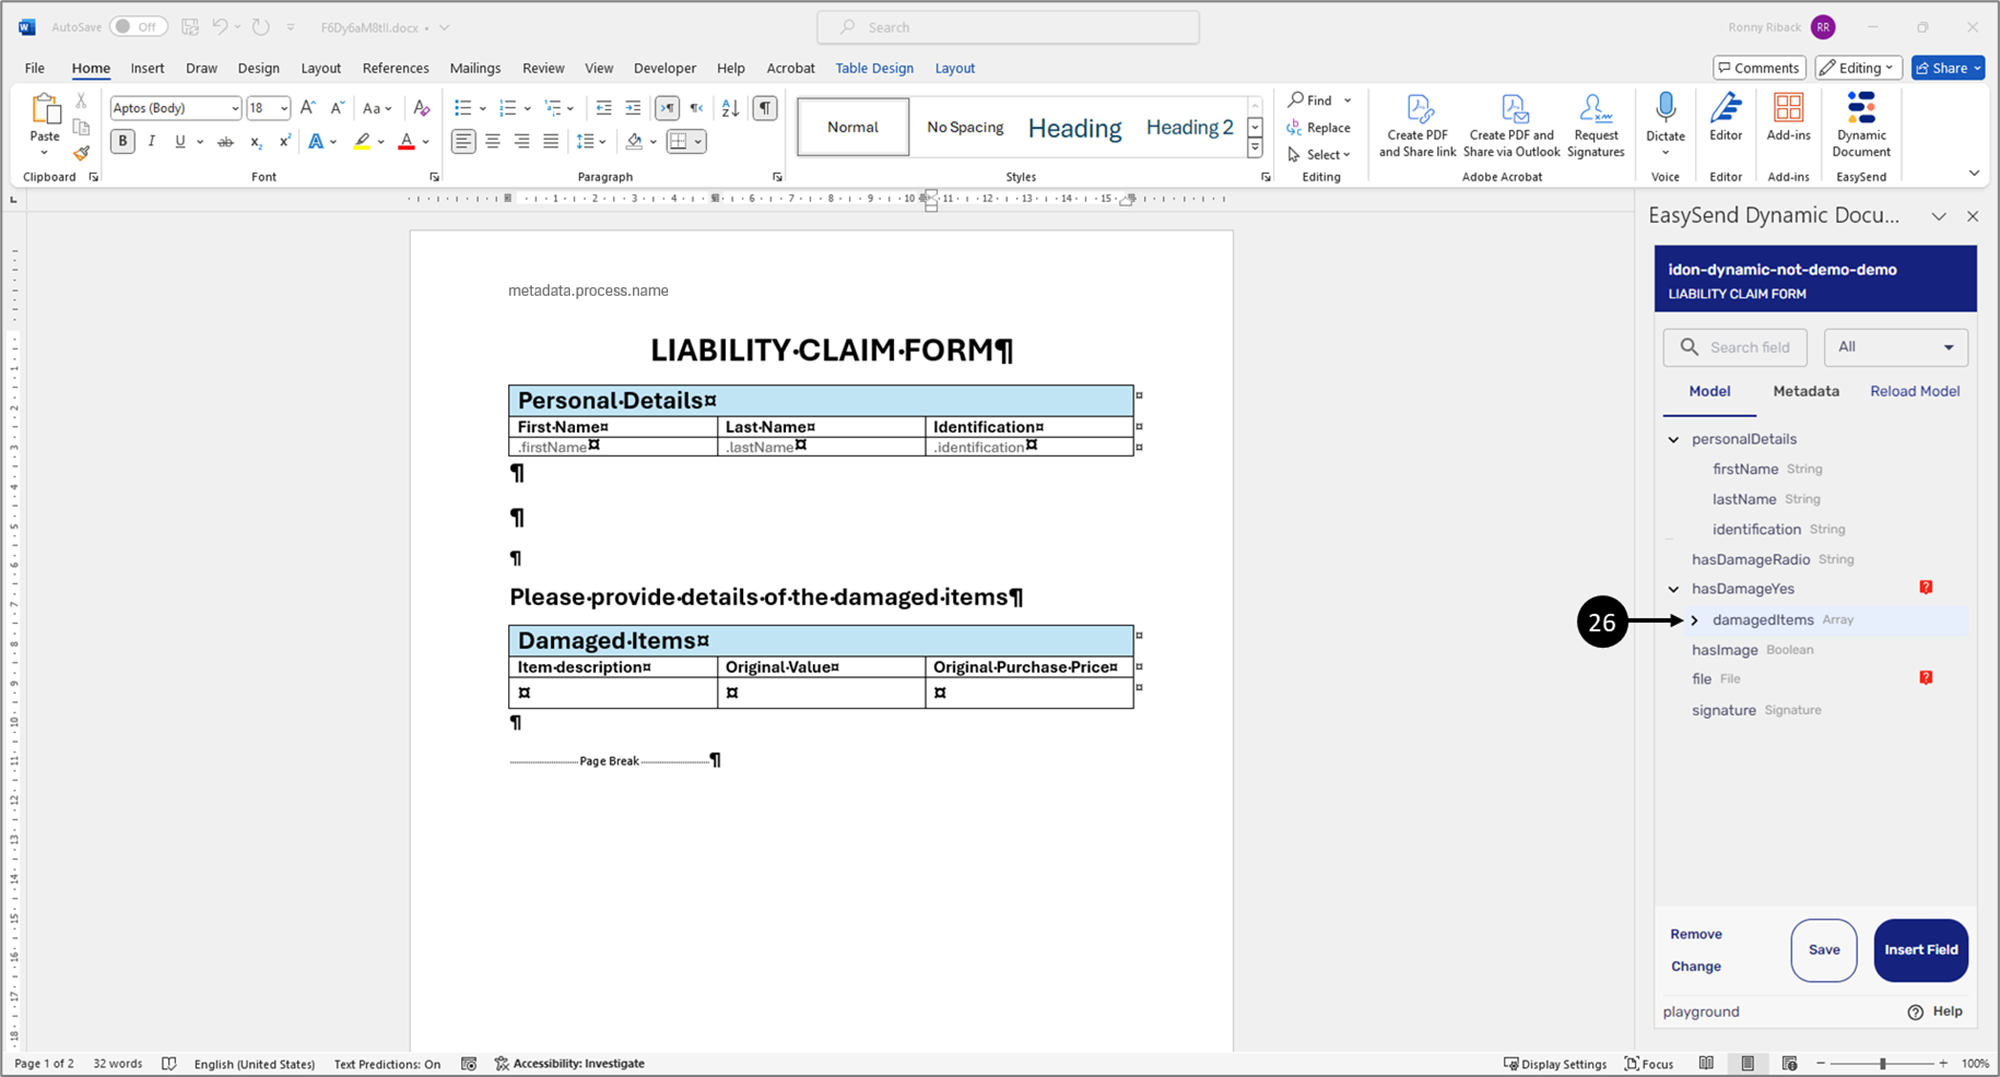
Figure 68: Array-Type Item
- Insert the array items:
- Expand the array-type item (26).
Result:
The nested items appear (27):
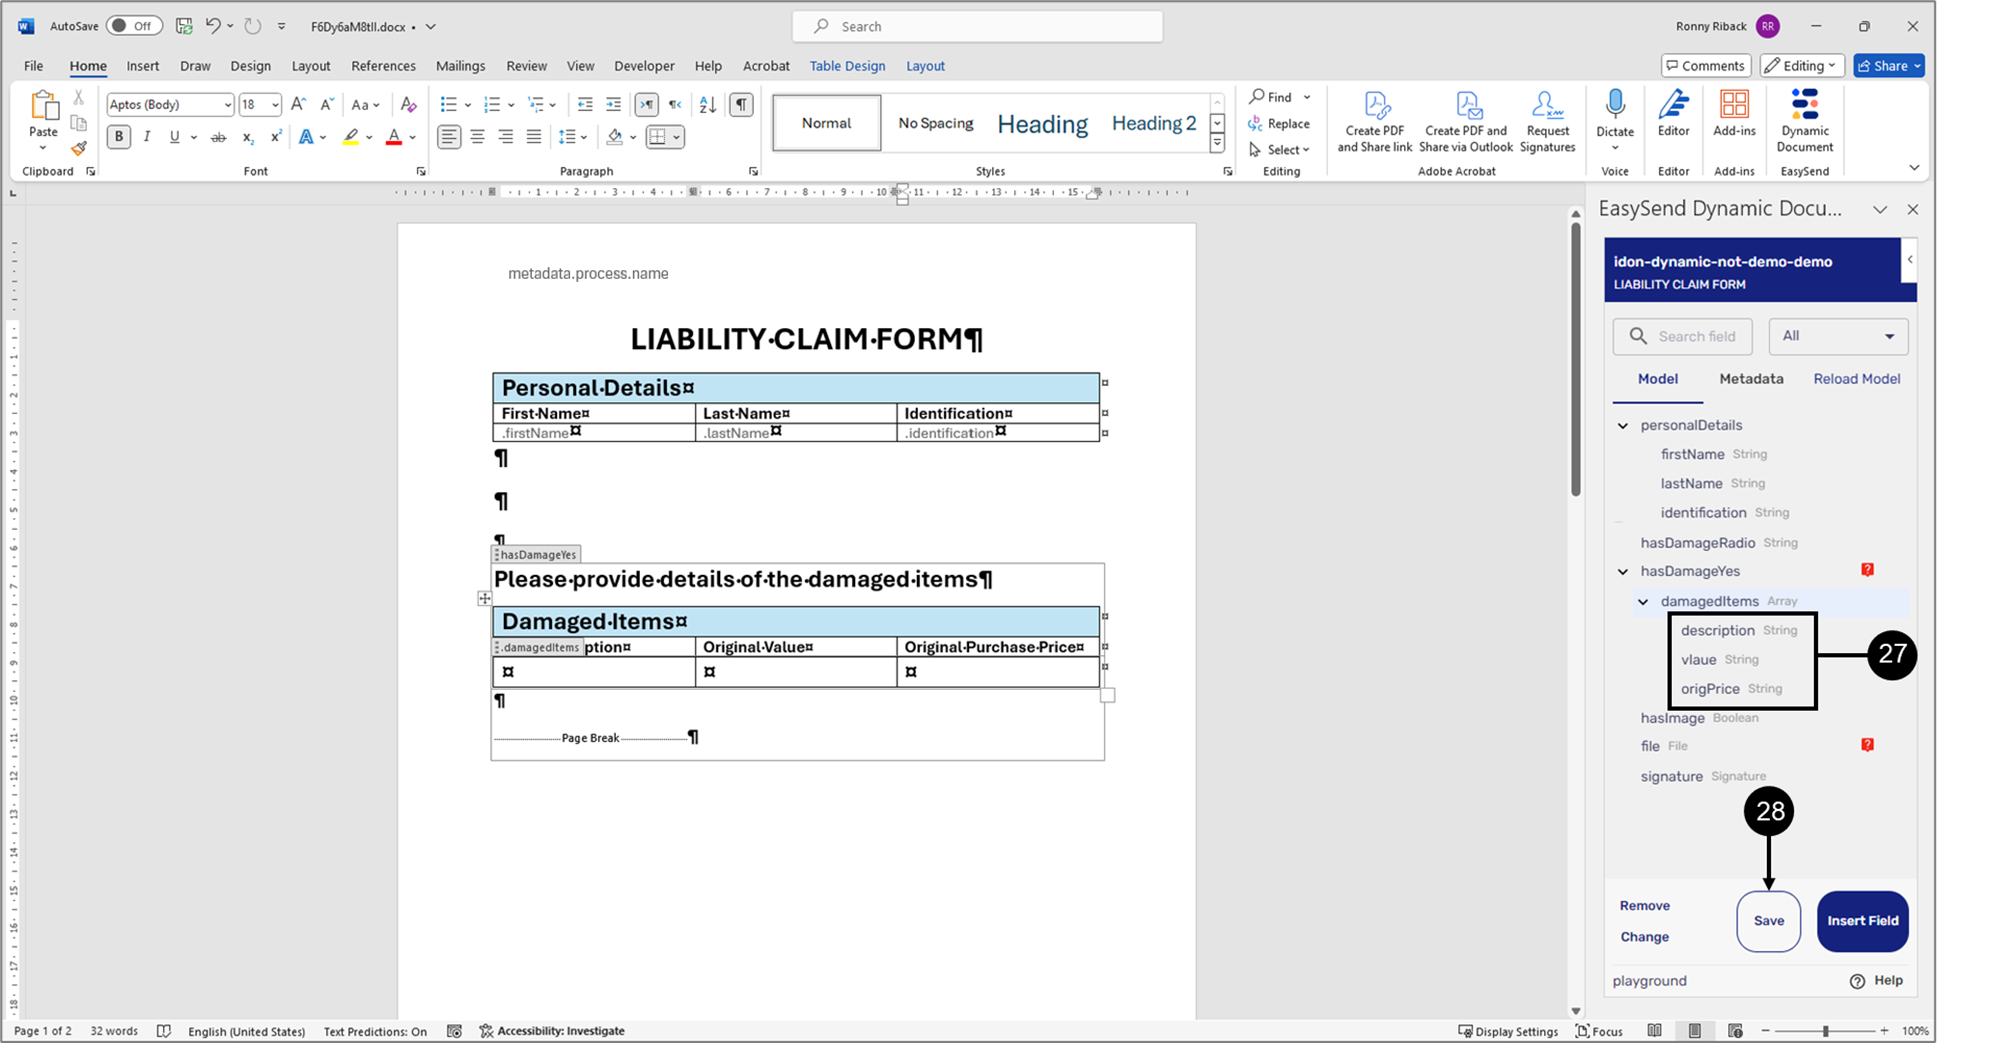
Figure 69: Nested items
- Insert all nested items (27).
- Click the Save button (28).
Result:
The items are inserted into the document:
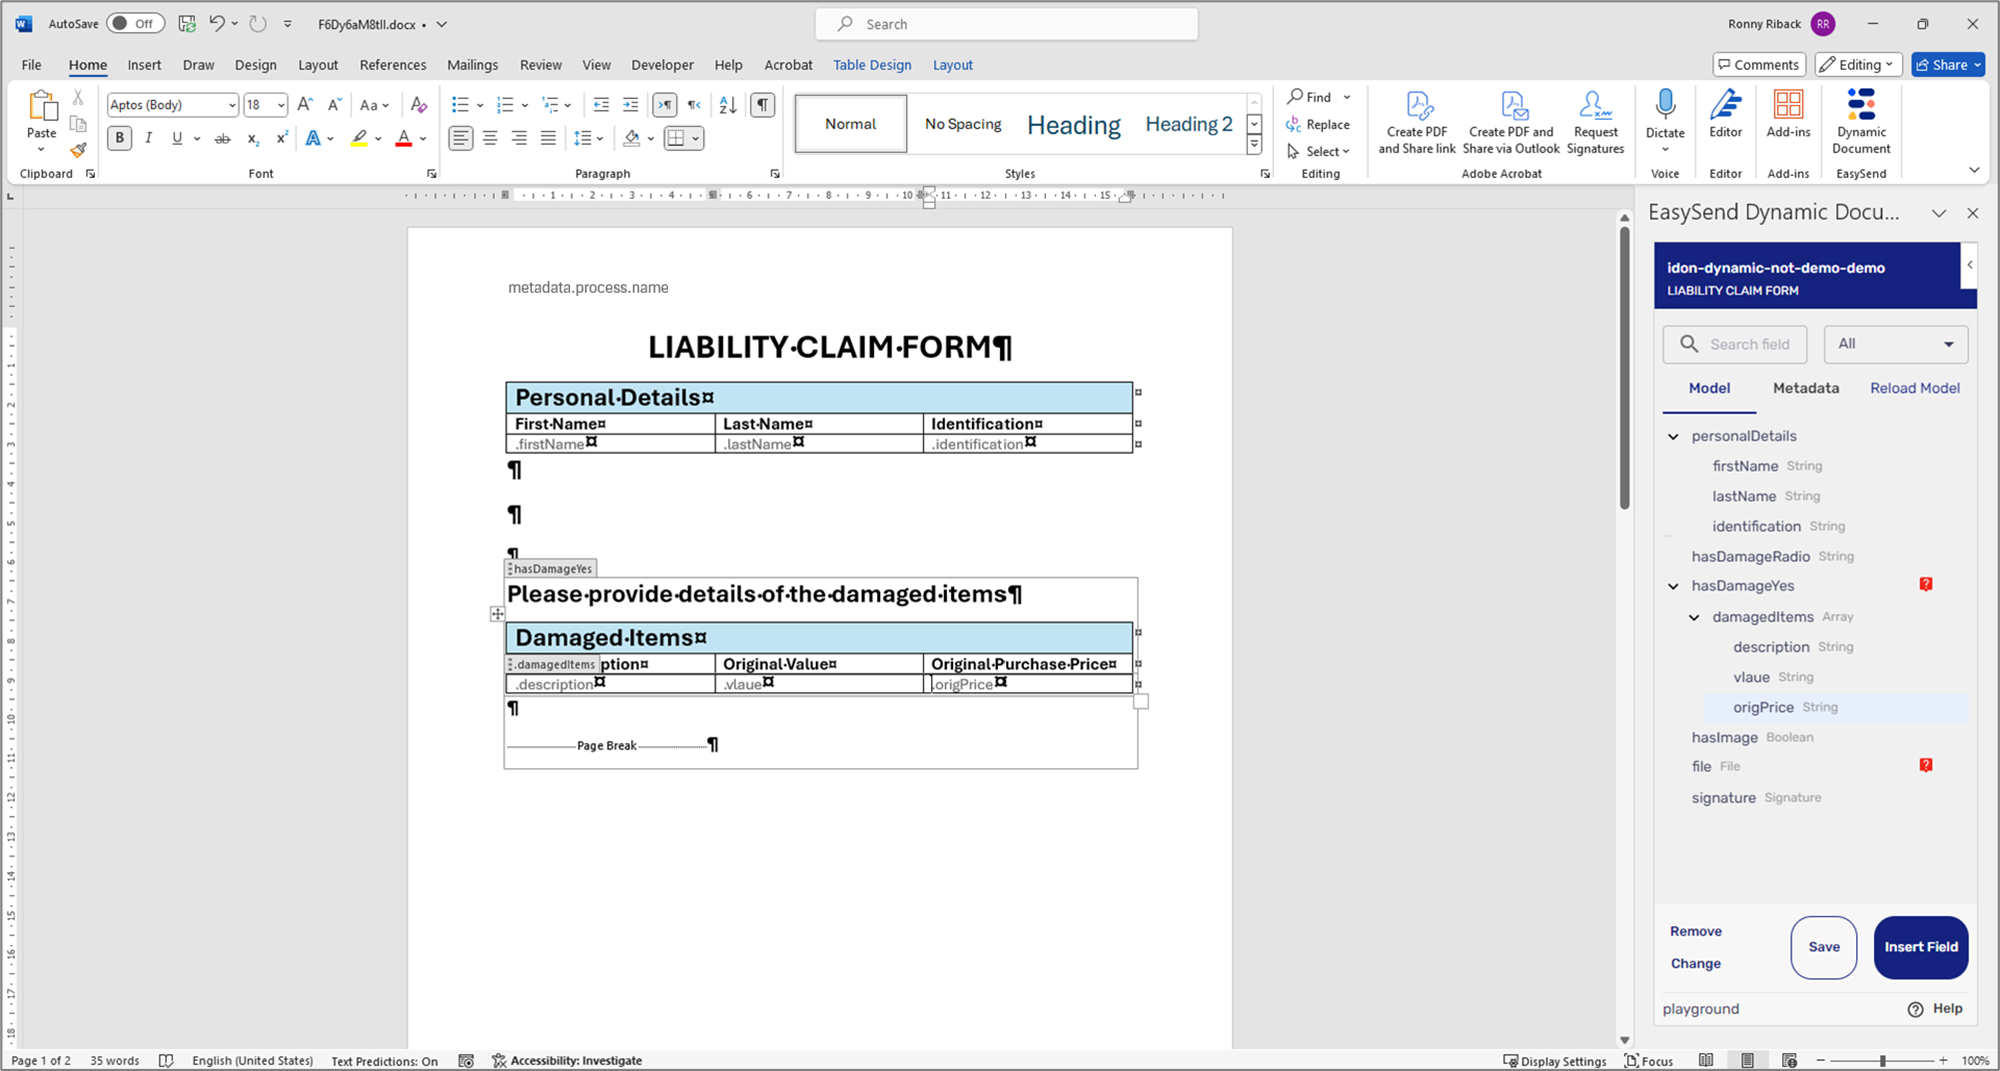
Figure 70: Dynamic Document with Inserted Items
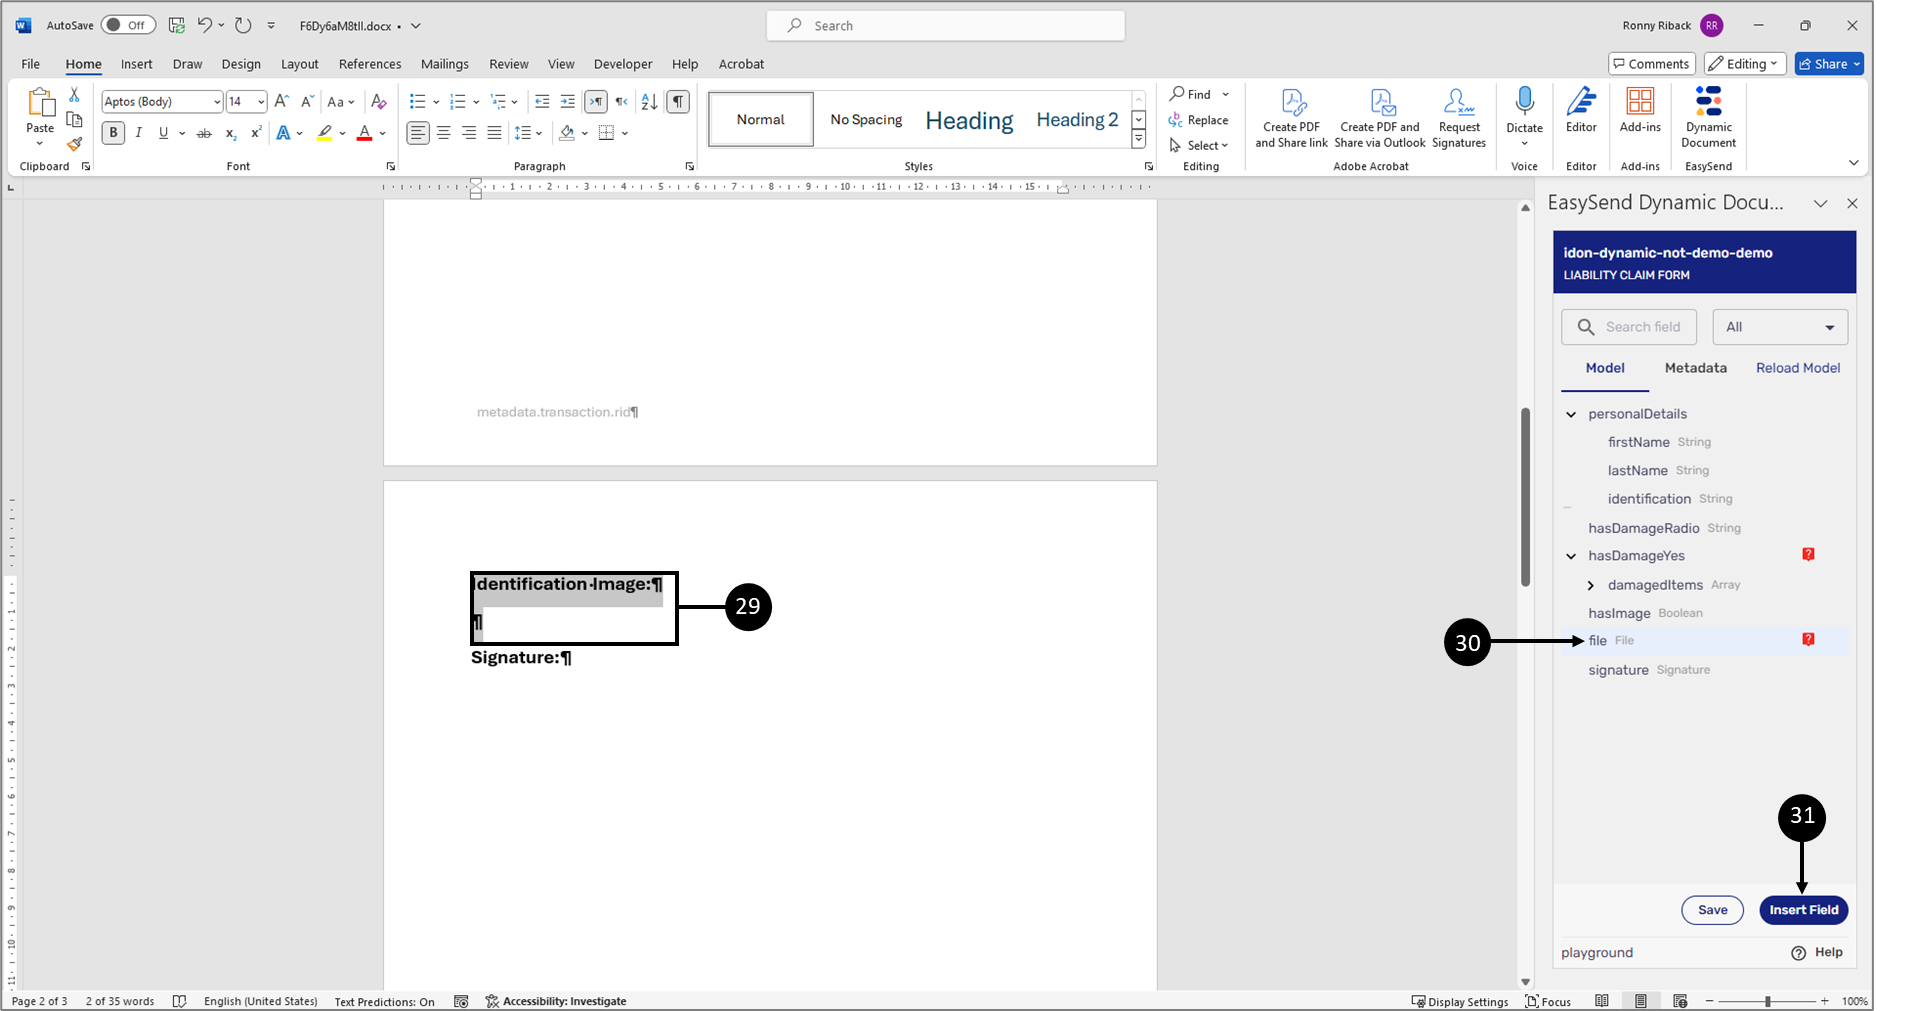
Figure 71: Inserting an Image 1 of 2
- Insert an image with a condition:
- Select the headline and the image location (29).
- Click the file-type item (30).
- Click the Insert Field button (31).
Result:
The image and the condition are inserted into the dynamic document:
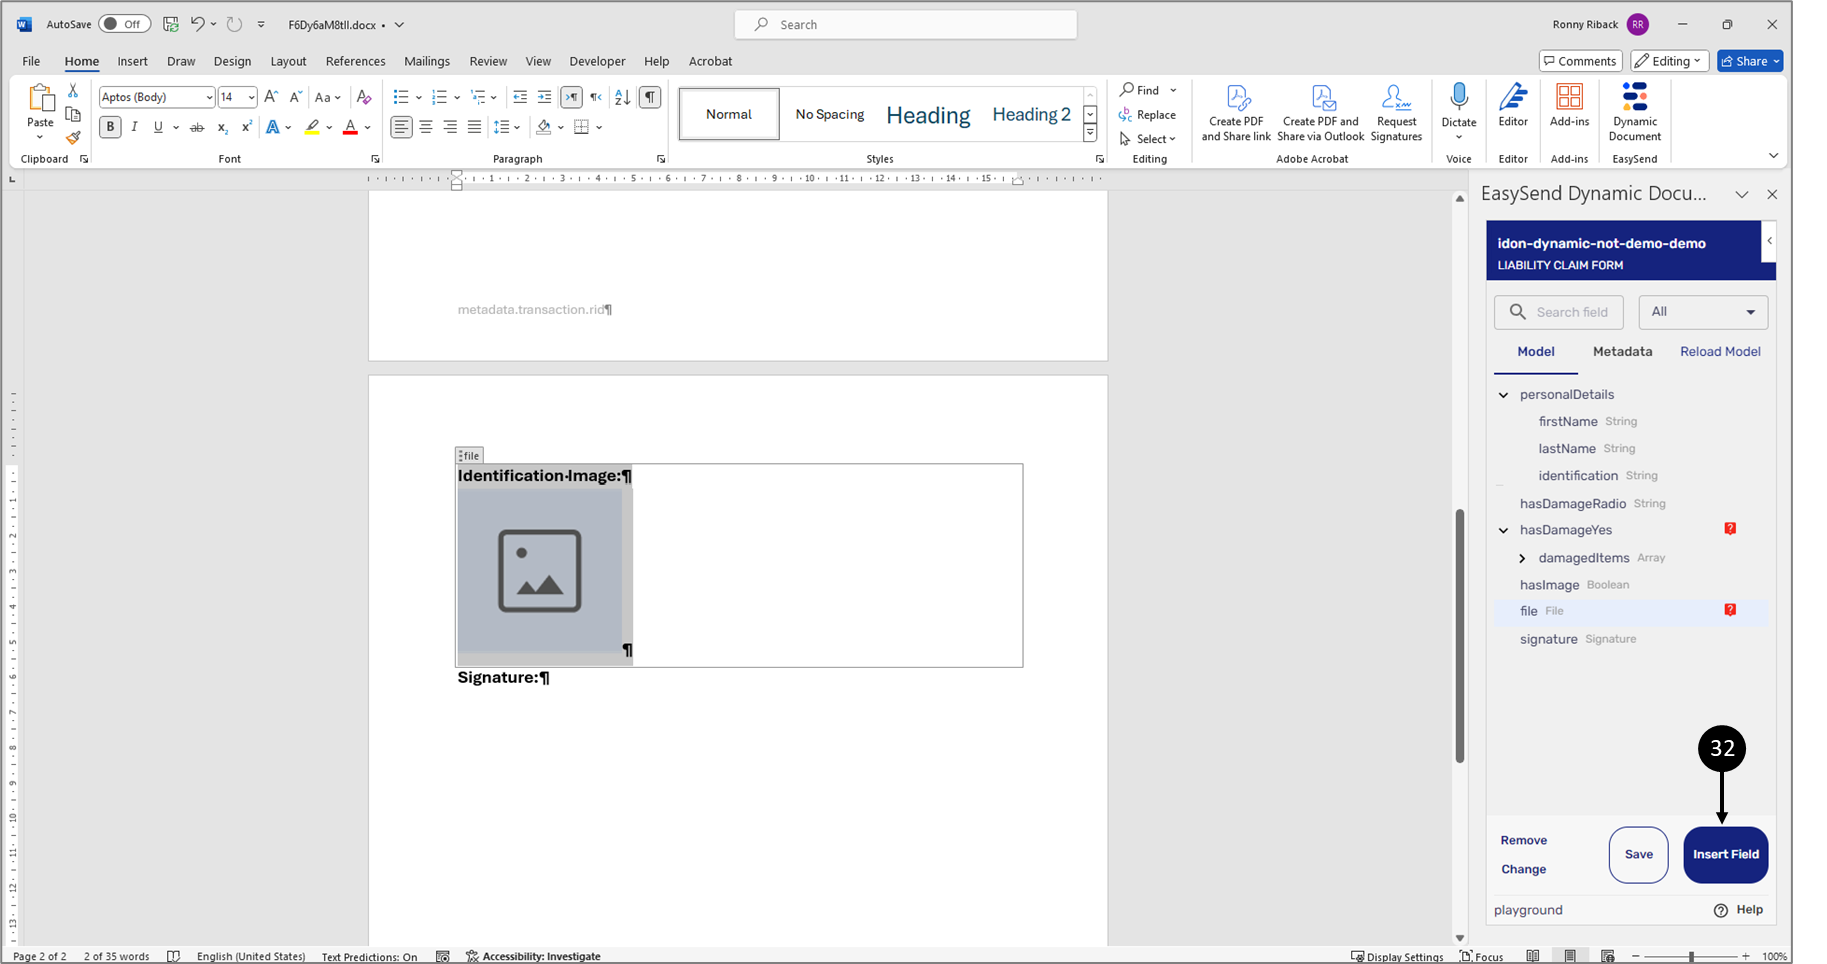
Figure 72: Inserting an Image 2 of 2
- Click the Save button (32).
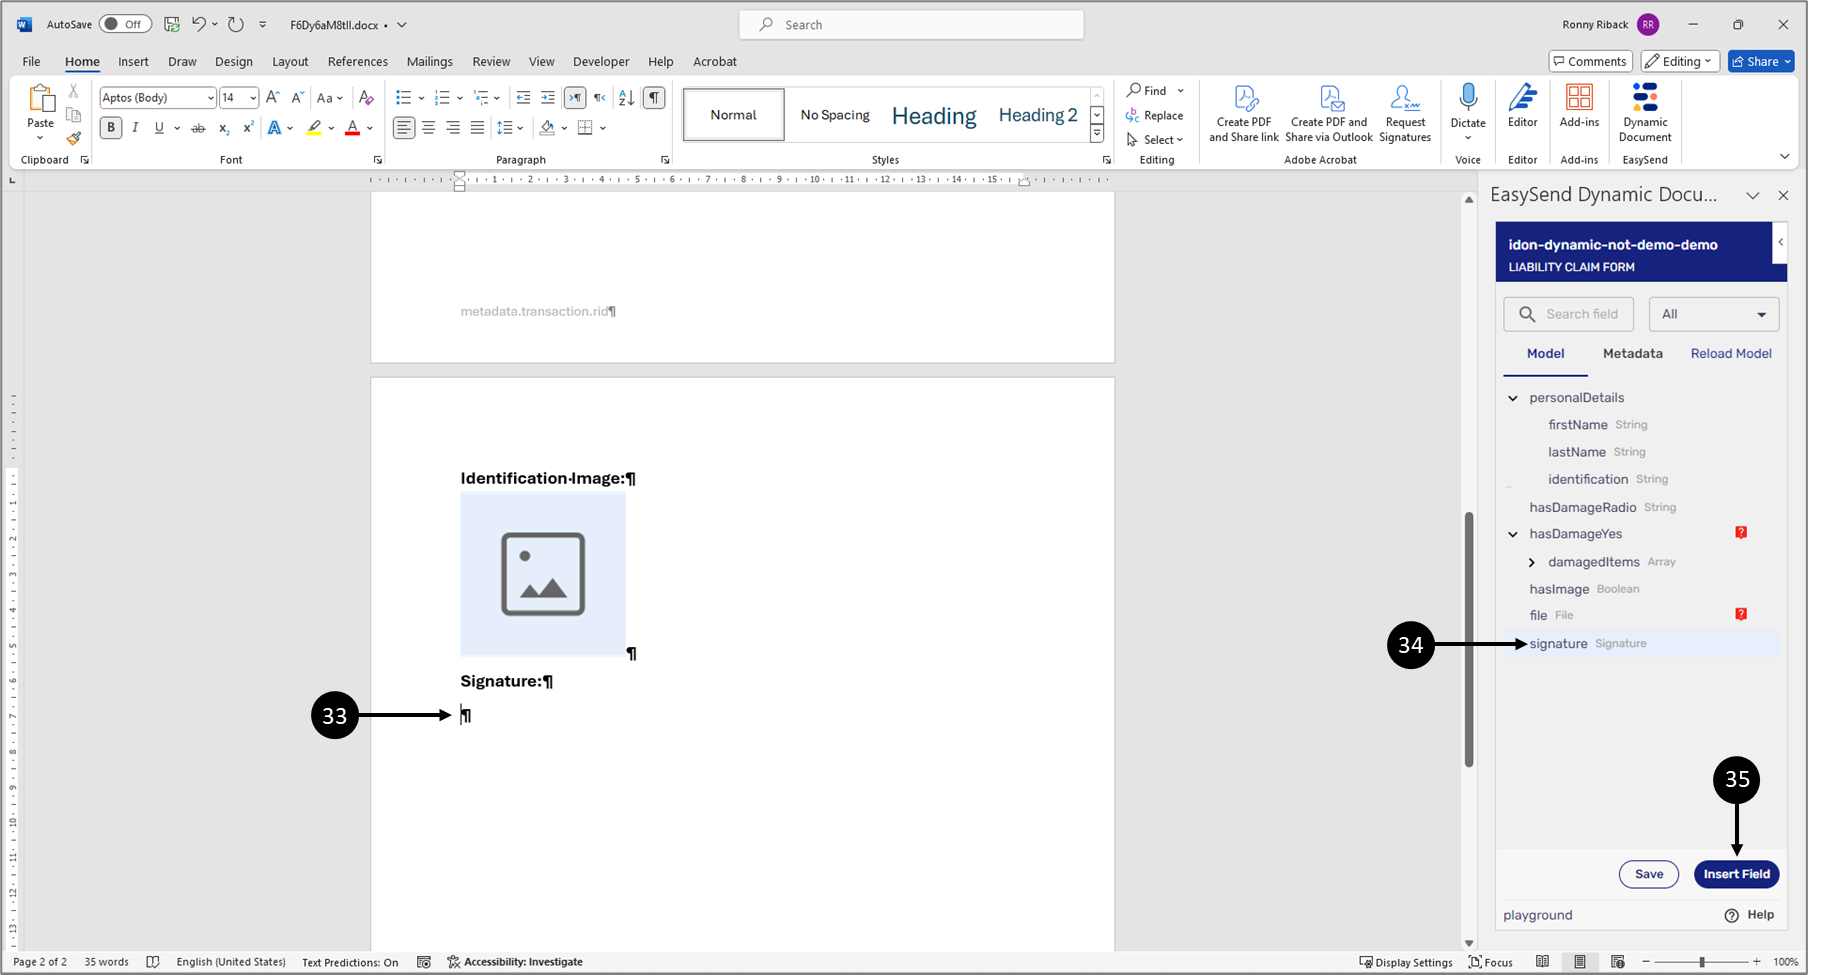
Figure 73: Inserting a Signature 1 of 2
- Insert a signature:
- Click the desired location in the dynamic document (33).
- Click the signature-type item (34).
- Click the Insert Field button (35).
Result:
The signature is inserted into the dynamic document:
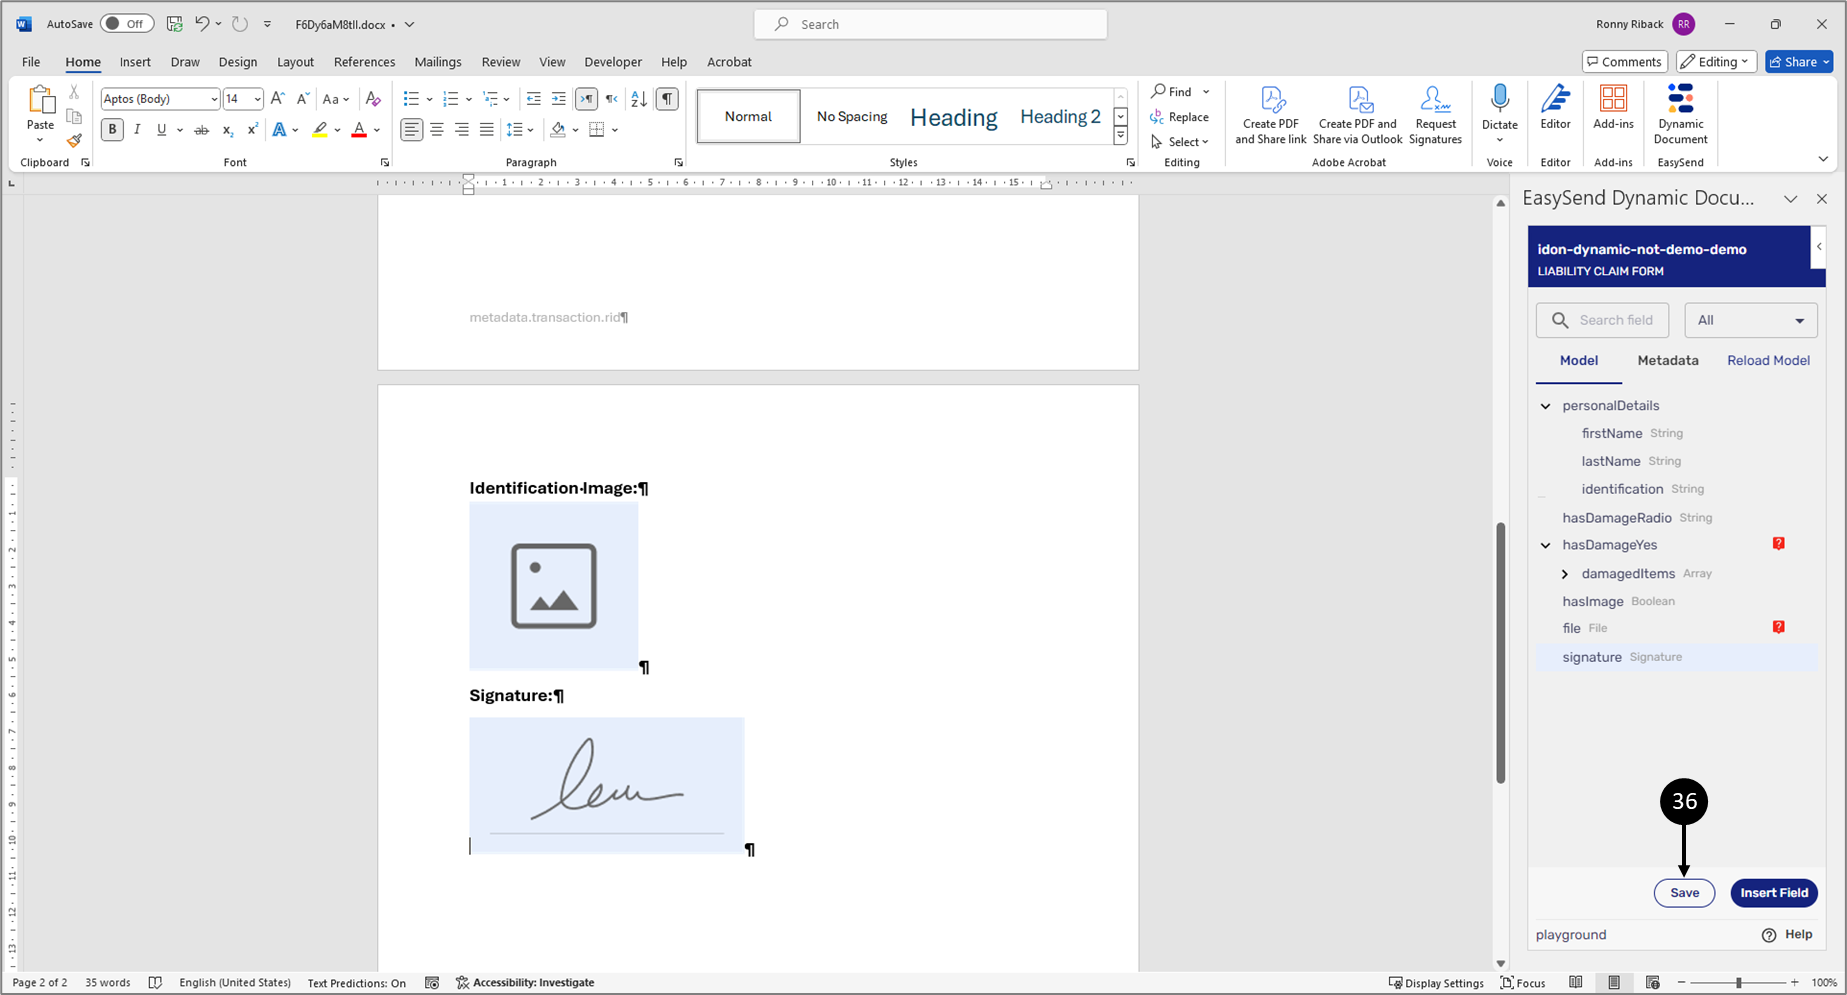
Figure 74: Inserting a Signature 2 of 2
- Click the Save button (36).
Step 3: Deploy and Preview the Digital Process
(See Figure 75 to Figure 77)
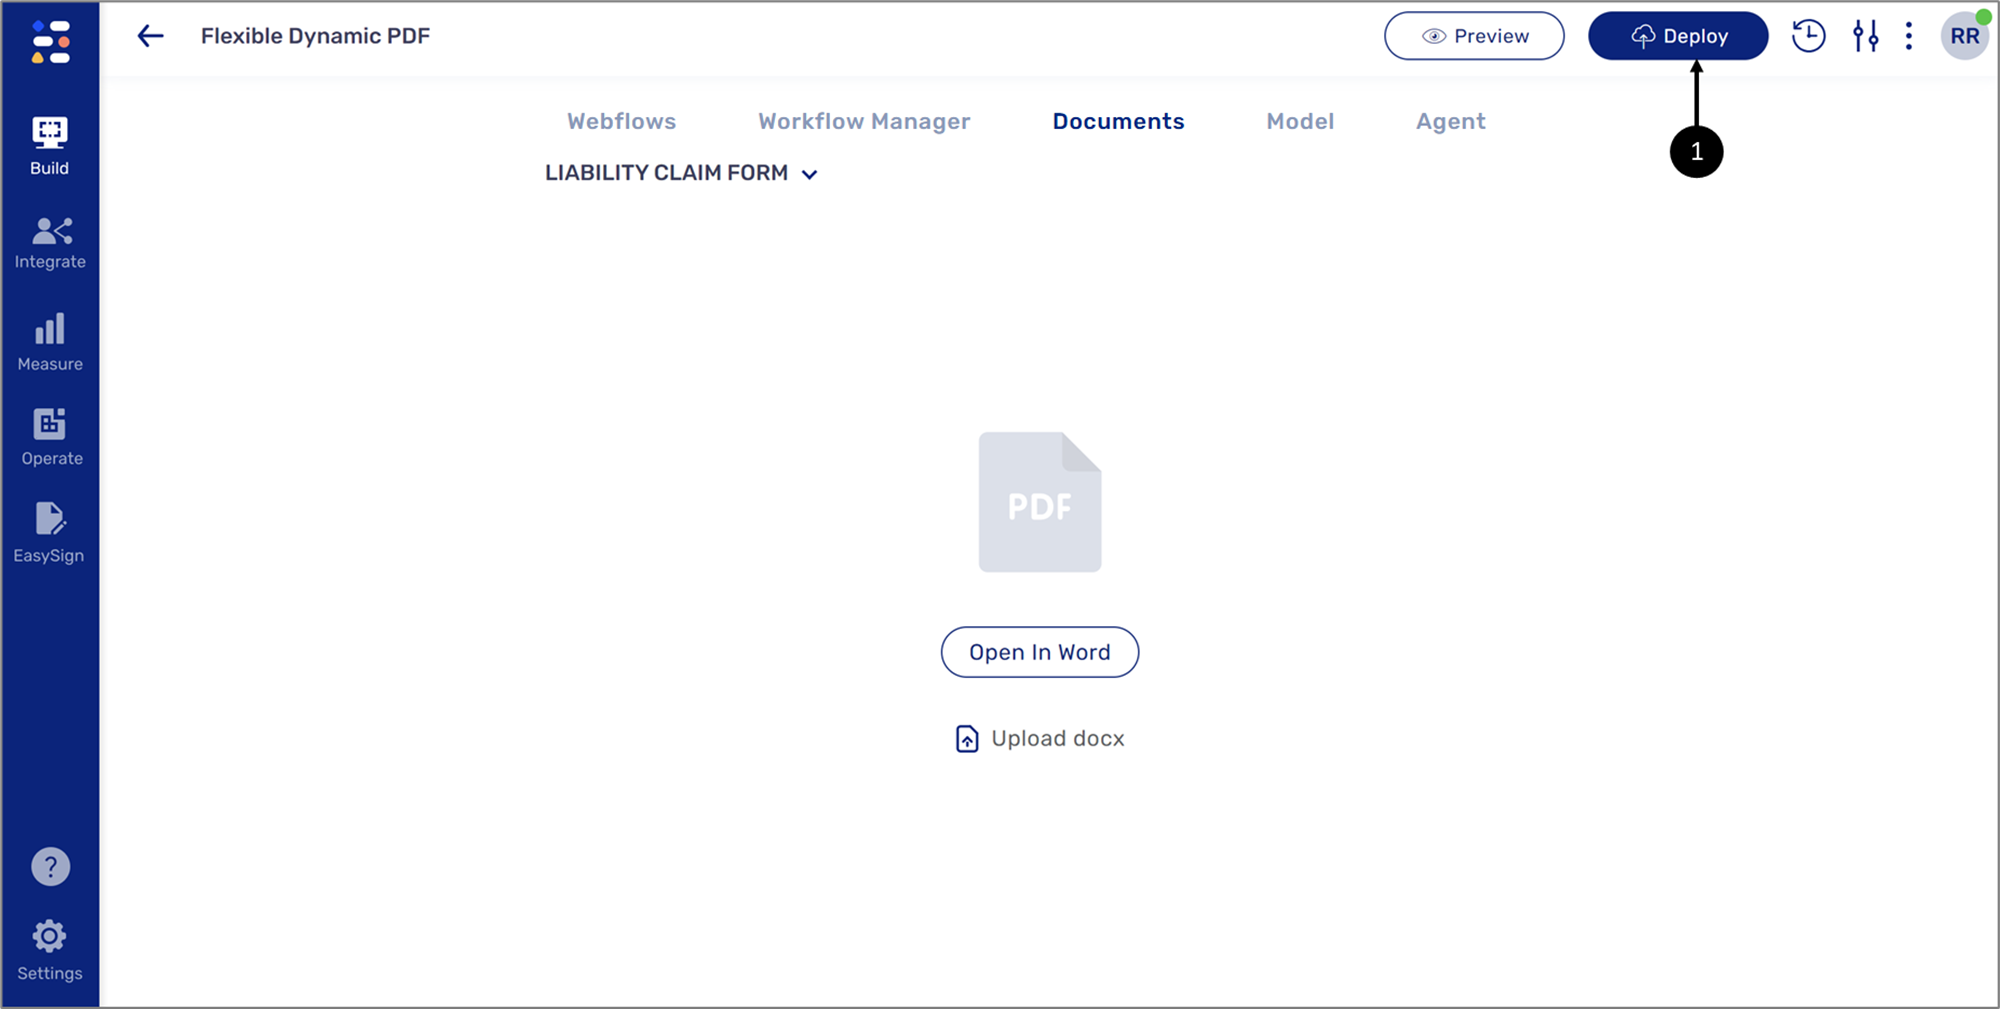
Figure 75: PDF Screen Deployment
- Navigate back to the PDF screen and Deploy (1) the process to the desired server.
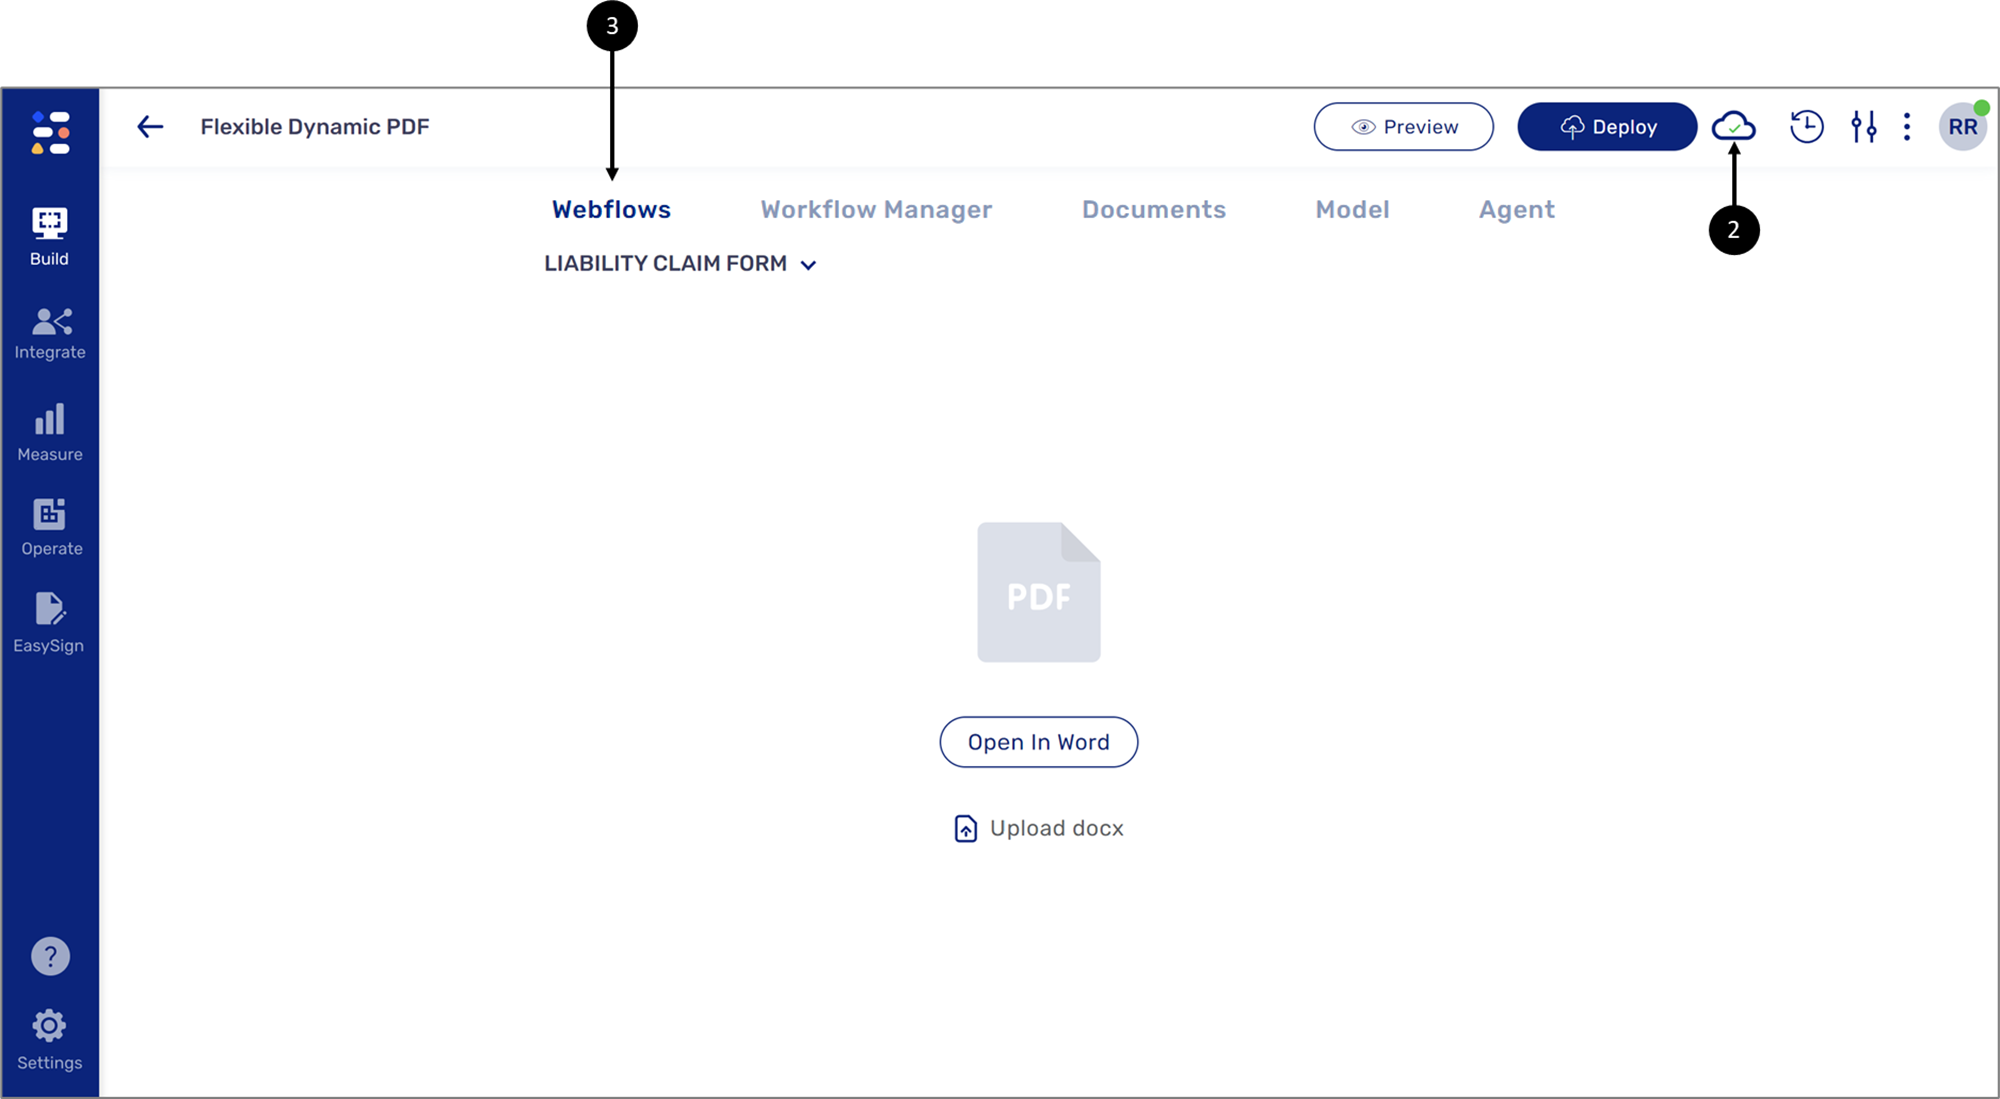
Figure 76: Successful Deployment
- When the deployment process is over, navigate to the Webflow screen.
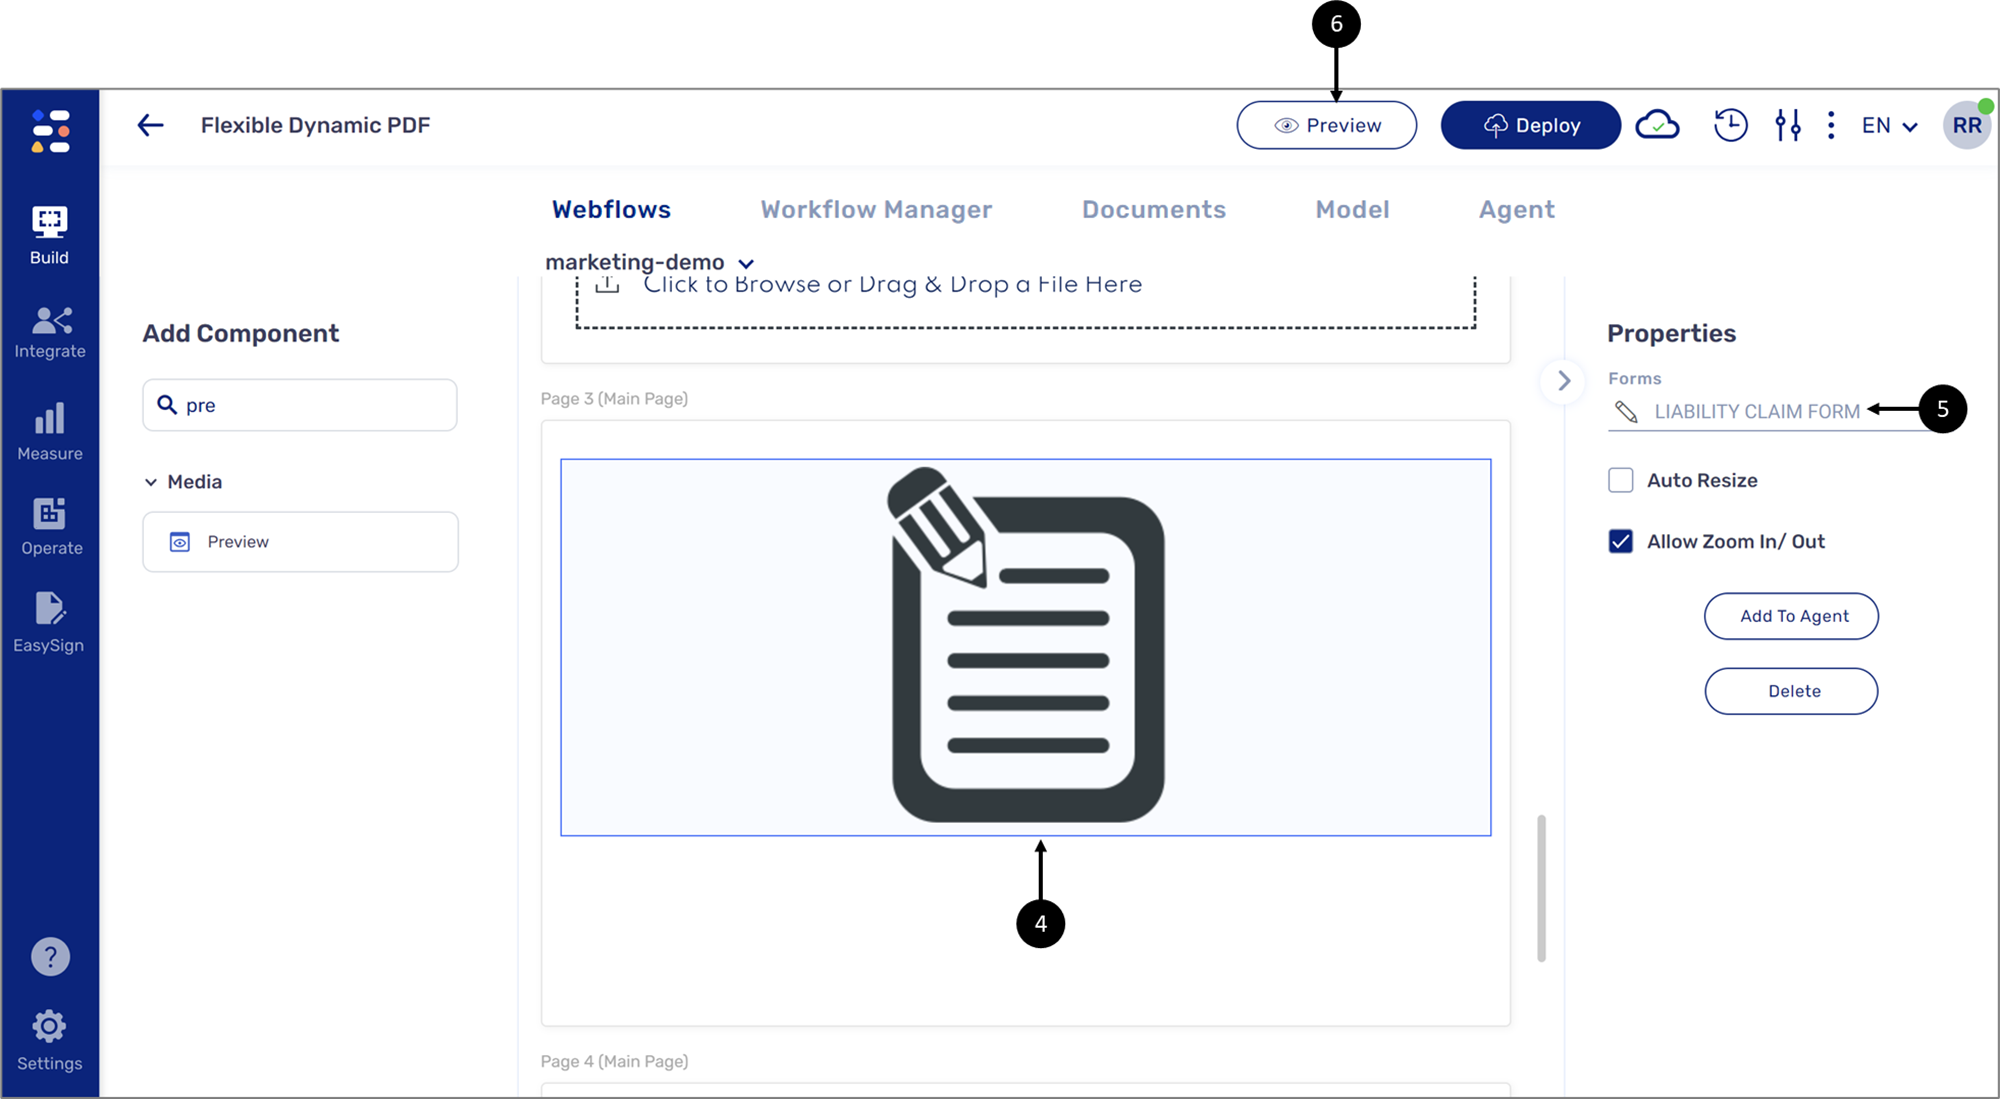
Figure 77: Successful Deployment
- Click the Preview component (4) and verify that it is connected to the dynamic document (5).
- Preview the process (6).
Step 4: Interacting with the Digital Process
(See Figure 78 to Figure 81)
While the end-user interacts with the digital process, they answer the Radio Question - Yes or No (1). The Damaged Items array will appear depending on their answer (2). Using the Add Item button (3) the end-user can add additional items to the array.
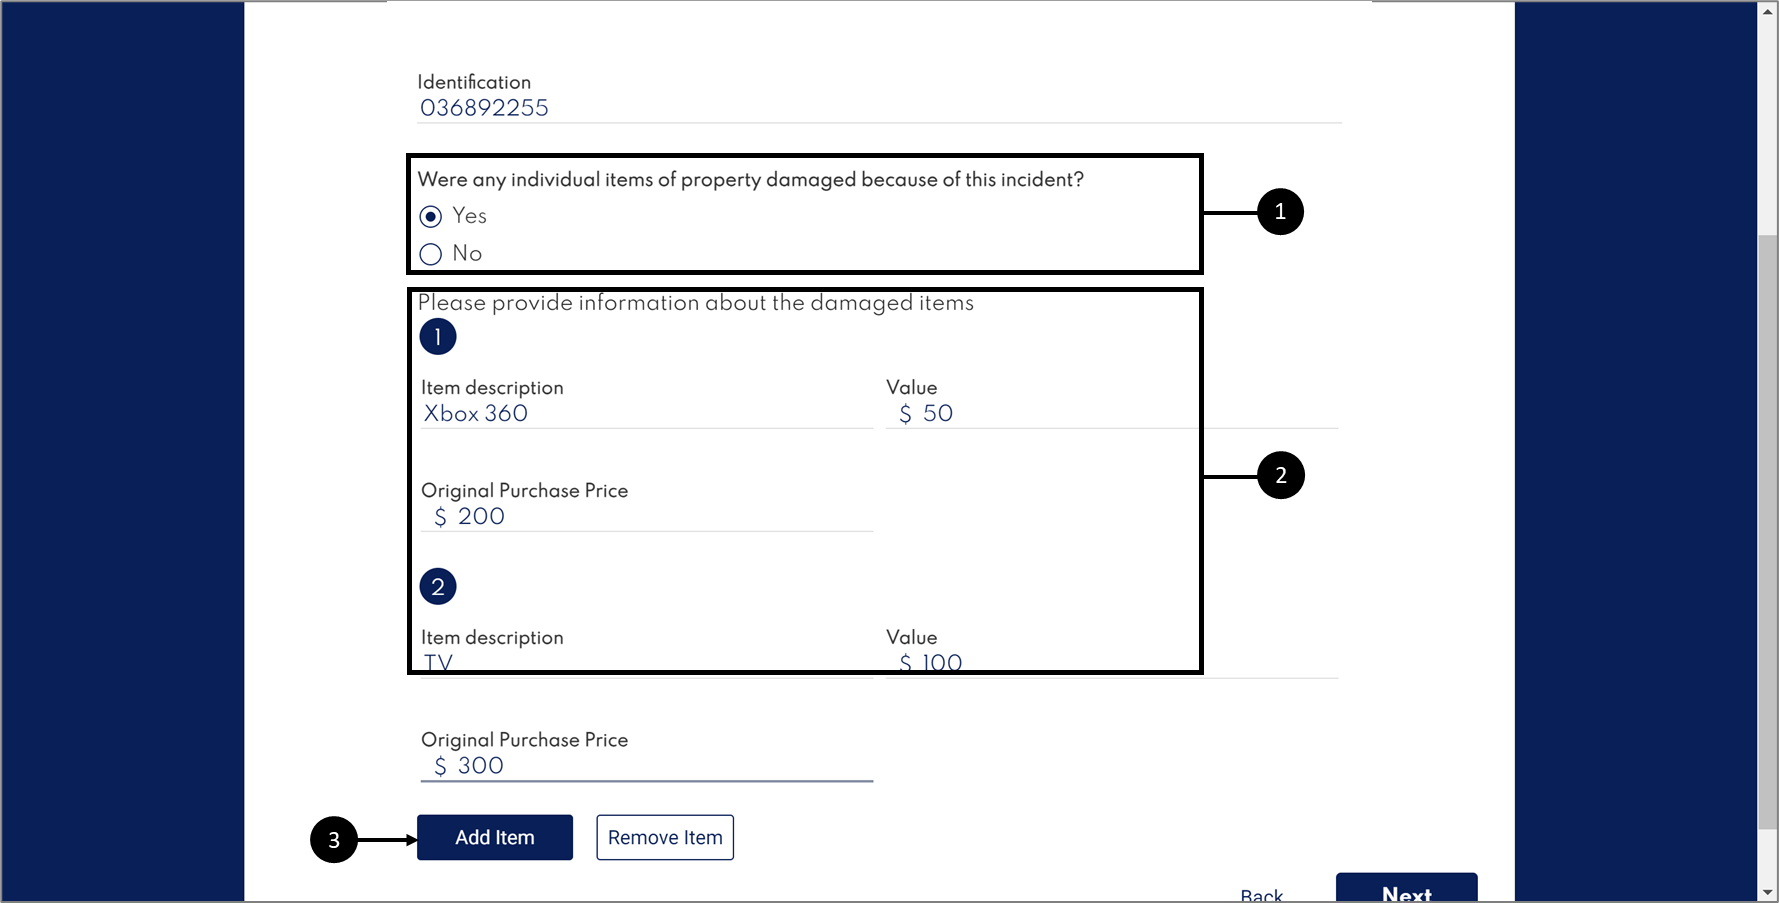
Figure 78: Radio Question and Conditioned Array
If the end-user has an image to upload they will check the checkbox (4) and the Upload Component will appear (5).
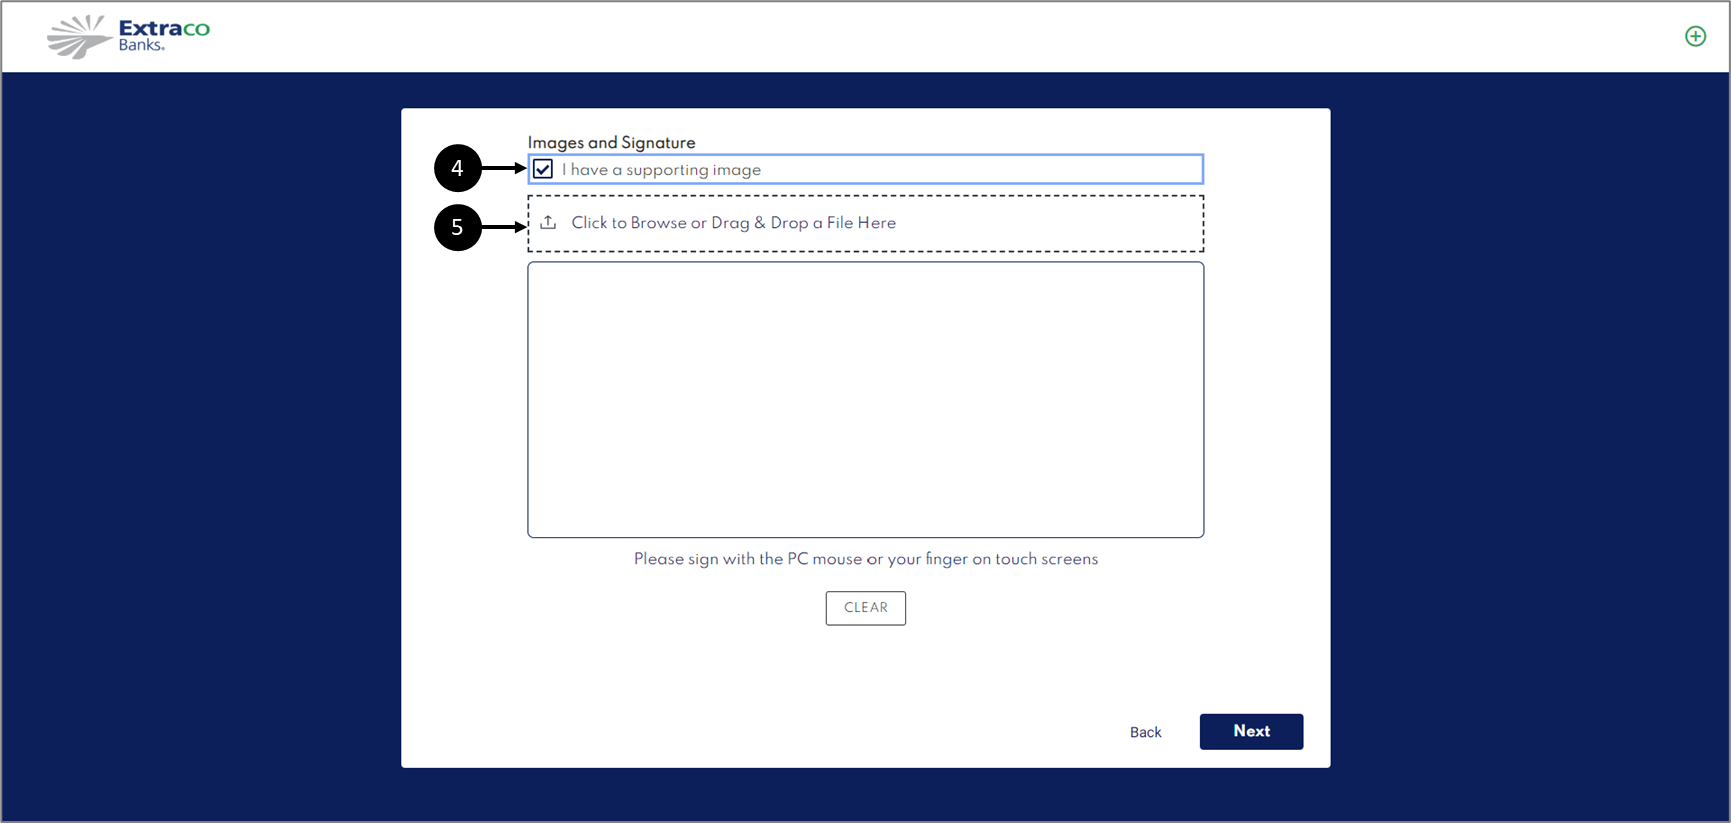
Figure 79: Uploading an Image
Because the dynamic document was built with the same business logic, the end-user's actions will affect it as well. Figure 80 displays the dynamic document with the Damaged Items array.
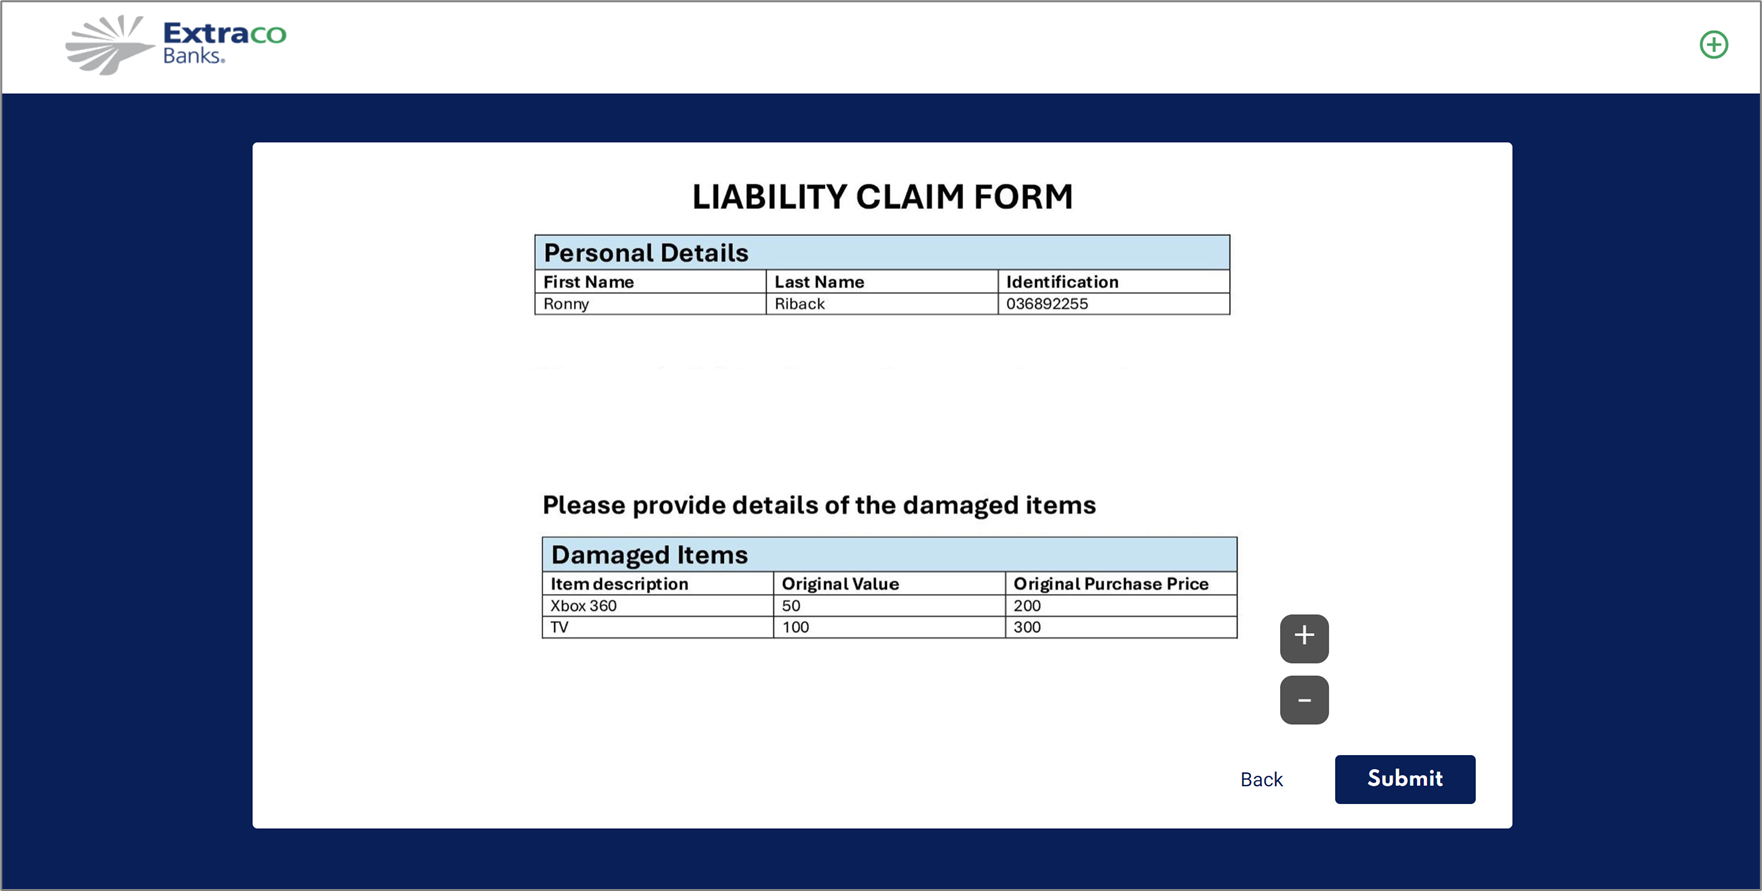
Figure 80: Dynamic Document with Damaged Items Array
Figure 81 displays the dynamic document without an image.
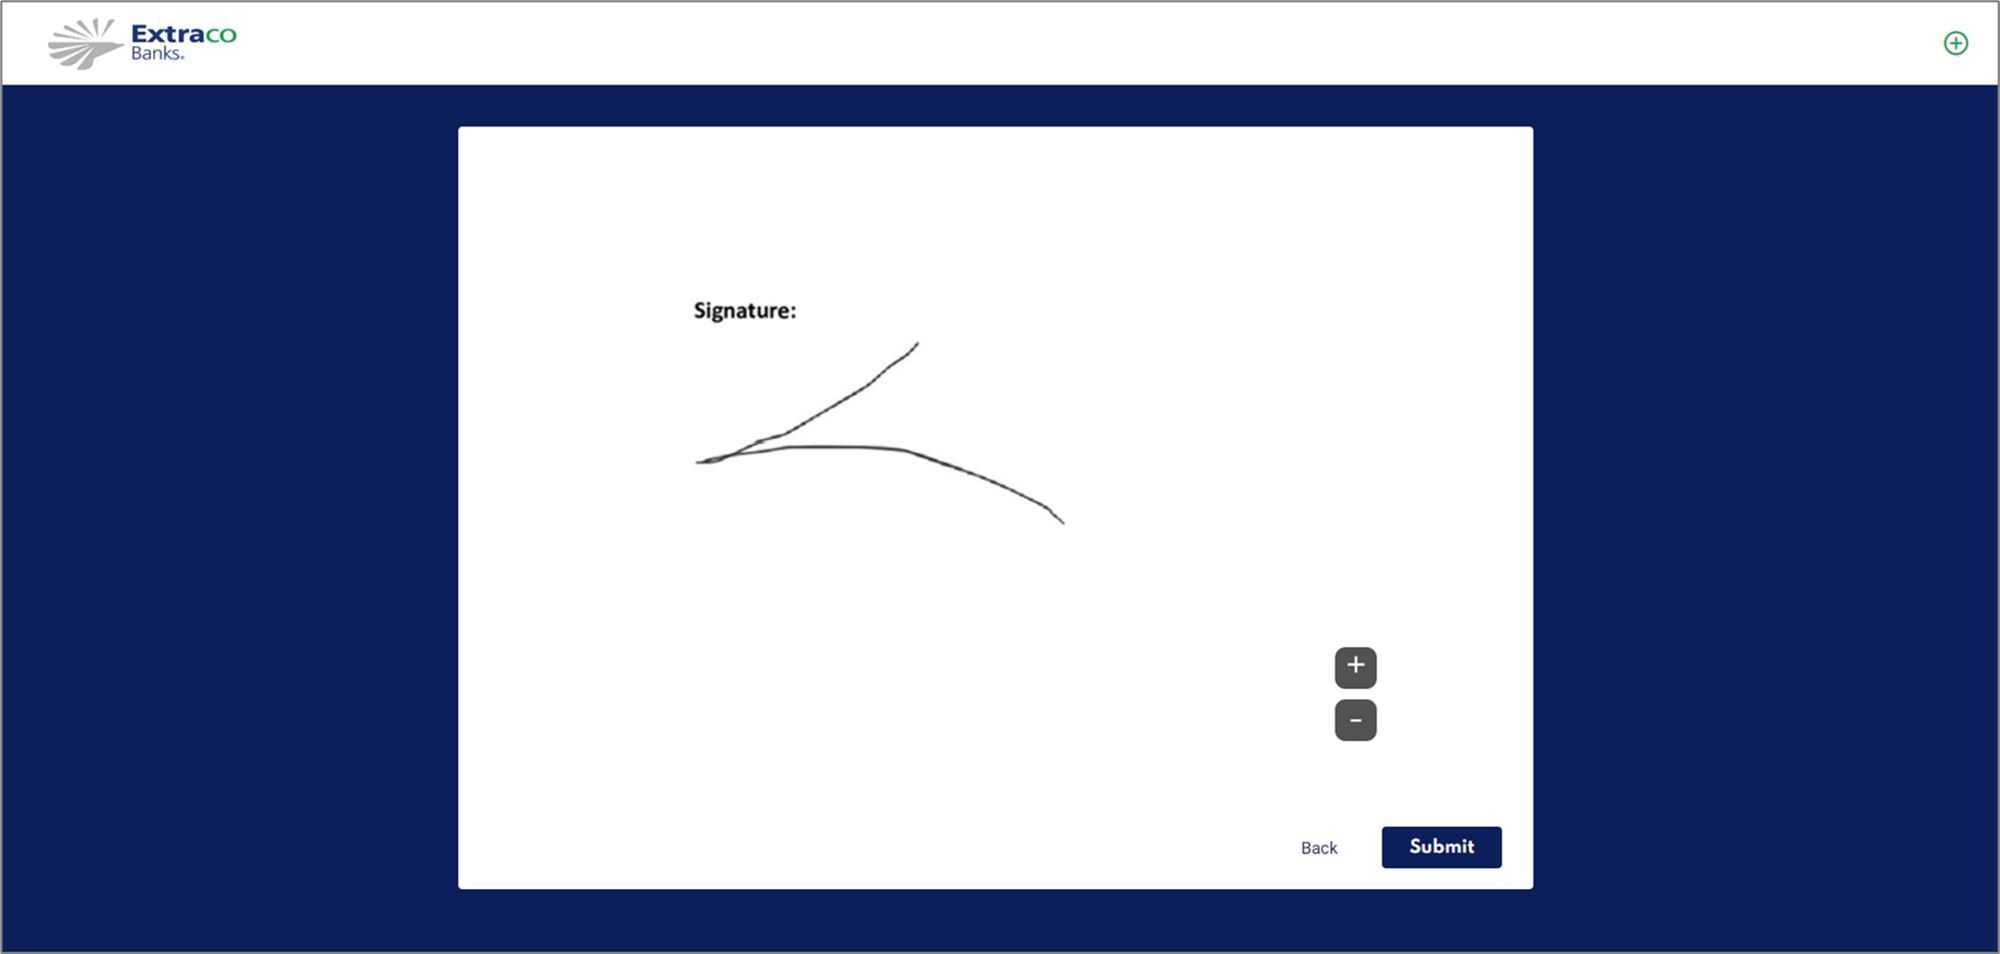
Figure 81: Restructured Dynamic Document
Dynamic Document Use Case - Fertility Clinic
The following sections describe a dynamic document fertility clinic use case.
Overview
A fertility clinic sends a document containing pre-procedure instructions to its patients. The clinic’s rep initiates a digital process where they input the patient's details and select the relevant procedure. Every time the rep submits the process, each patient receives an email with the same attachment. The content of Each attachment must be different according to the procedure the patient is about to go through.
Step 1: Building the Digital Process
(See Figure 82 to Figure 85)
To enable the document to be dynamic, the clinic's rep will fill out the patient's details and select the relevant procedure.
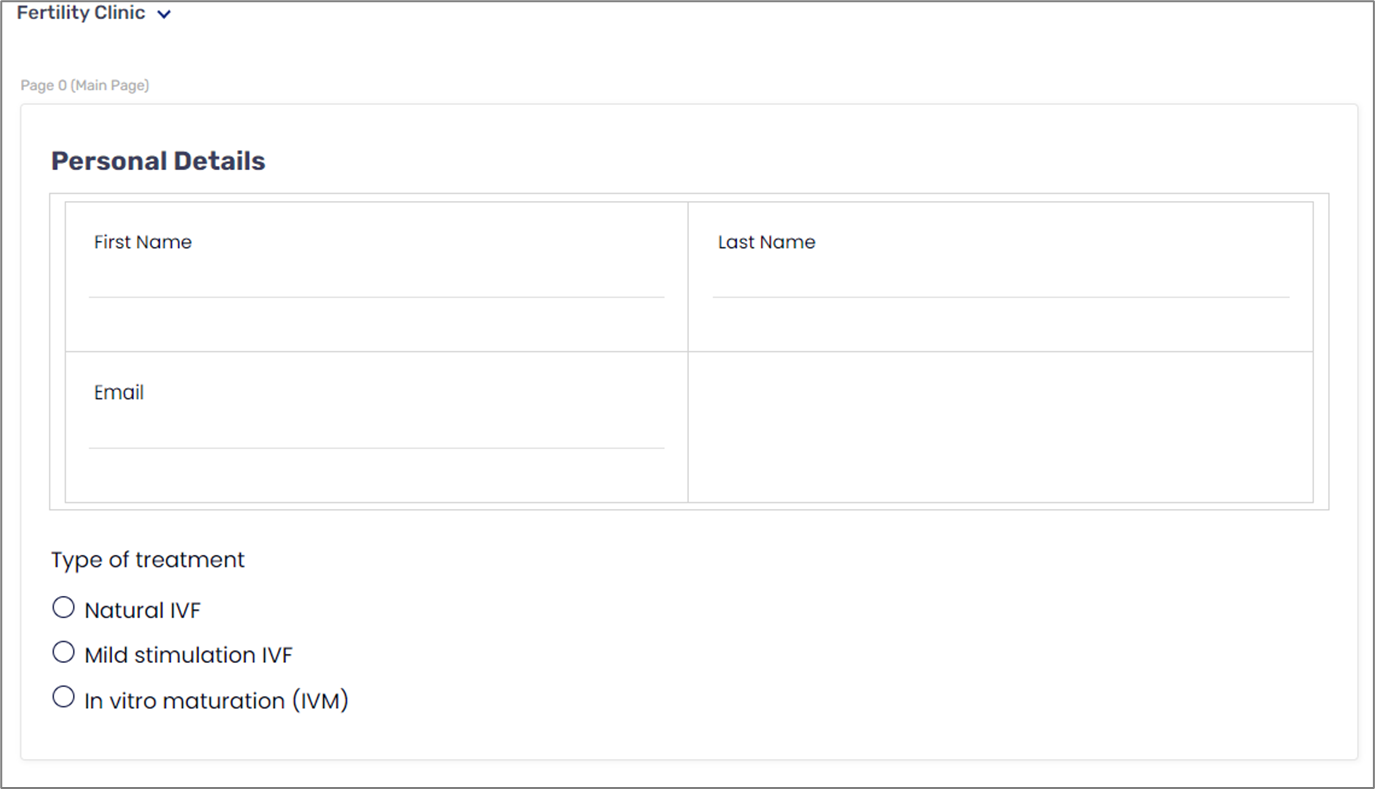
Figure 82: Webflow Structure
In the Model screen, three string-type data items are implemented with a visibility condition that will display information according to the selected type of the procedure.
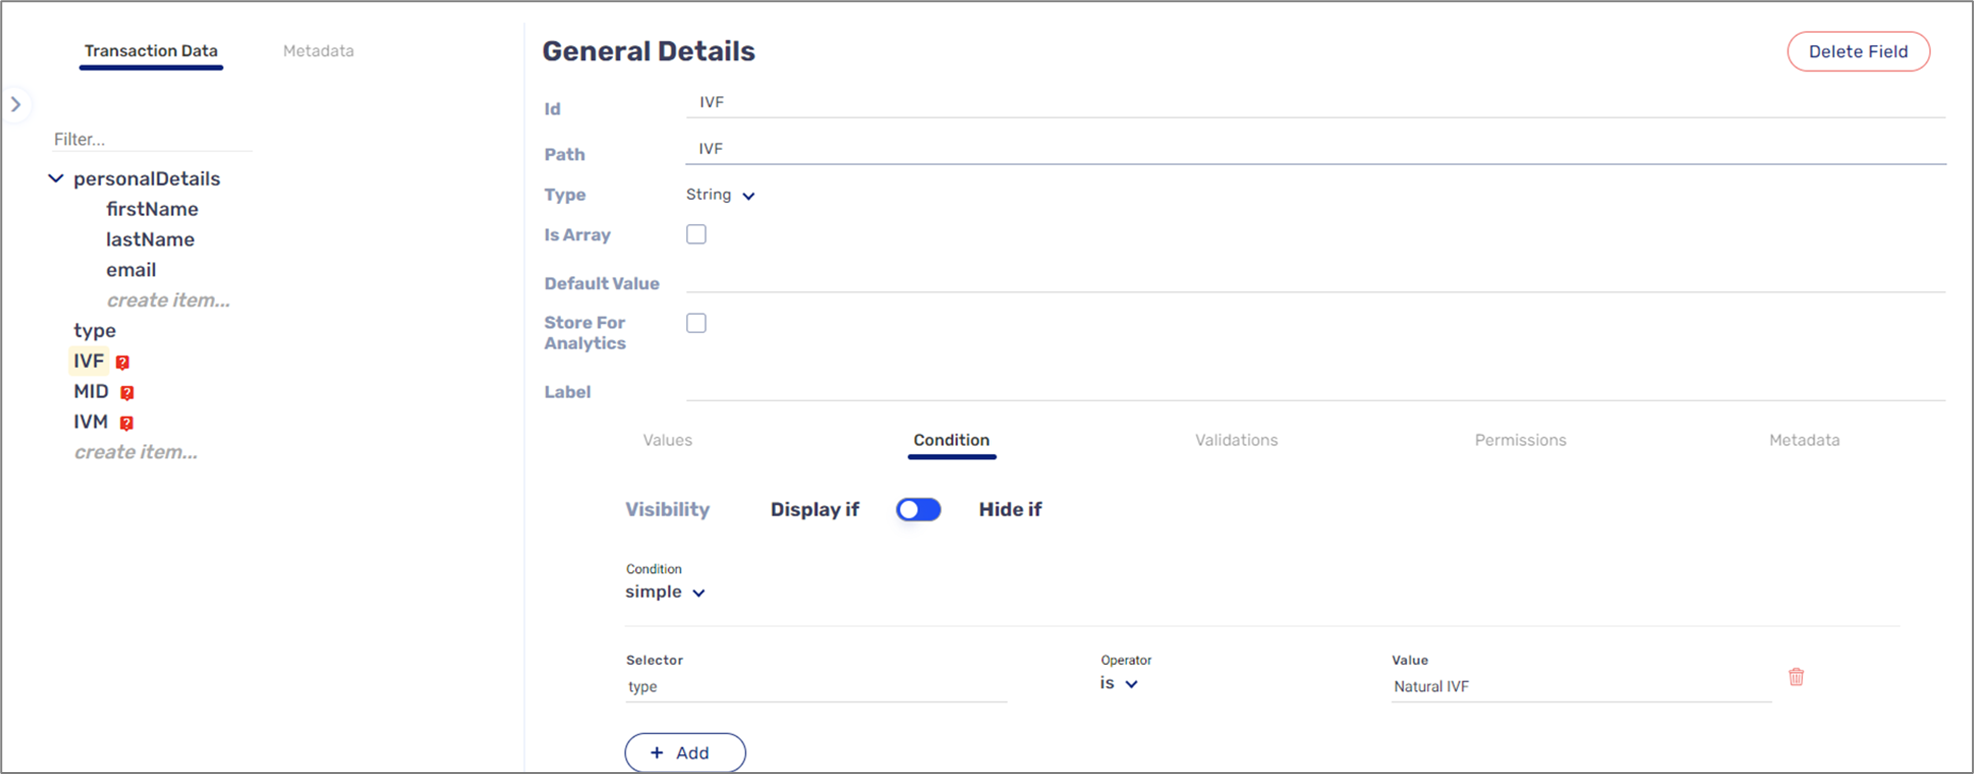
Figure 83: Model Data Items and Conditions
On the Documents screen, we will upload the document and then open it for editing.
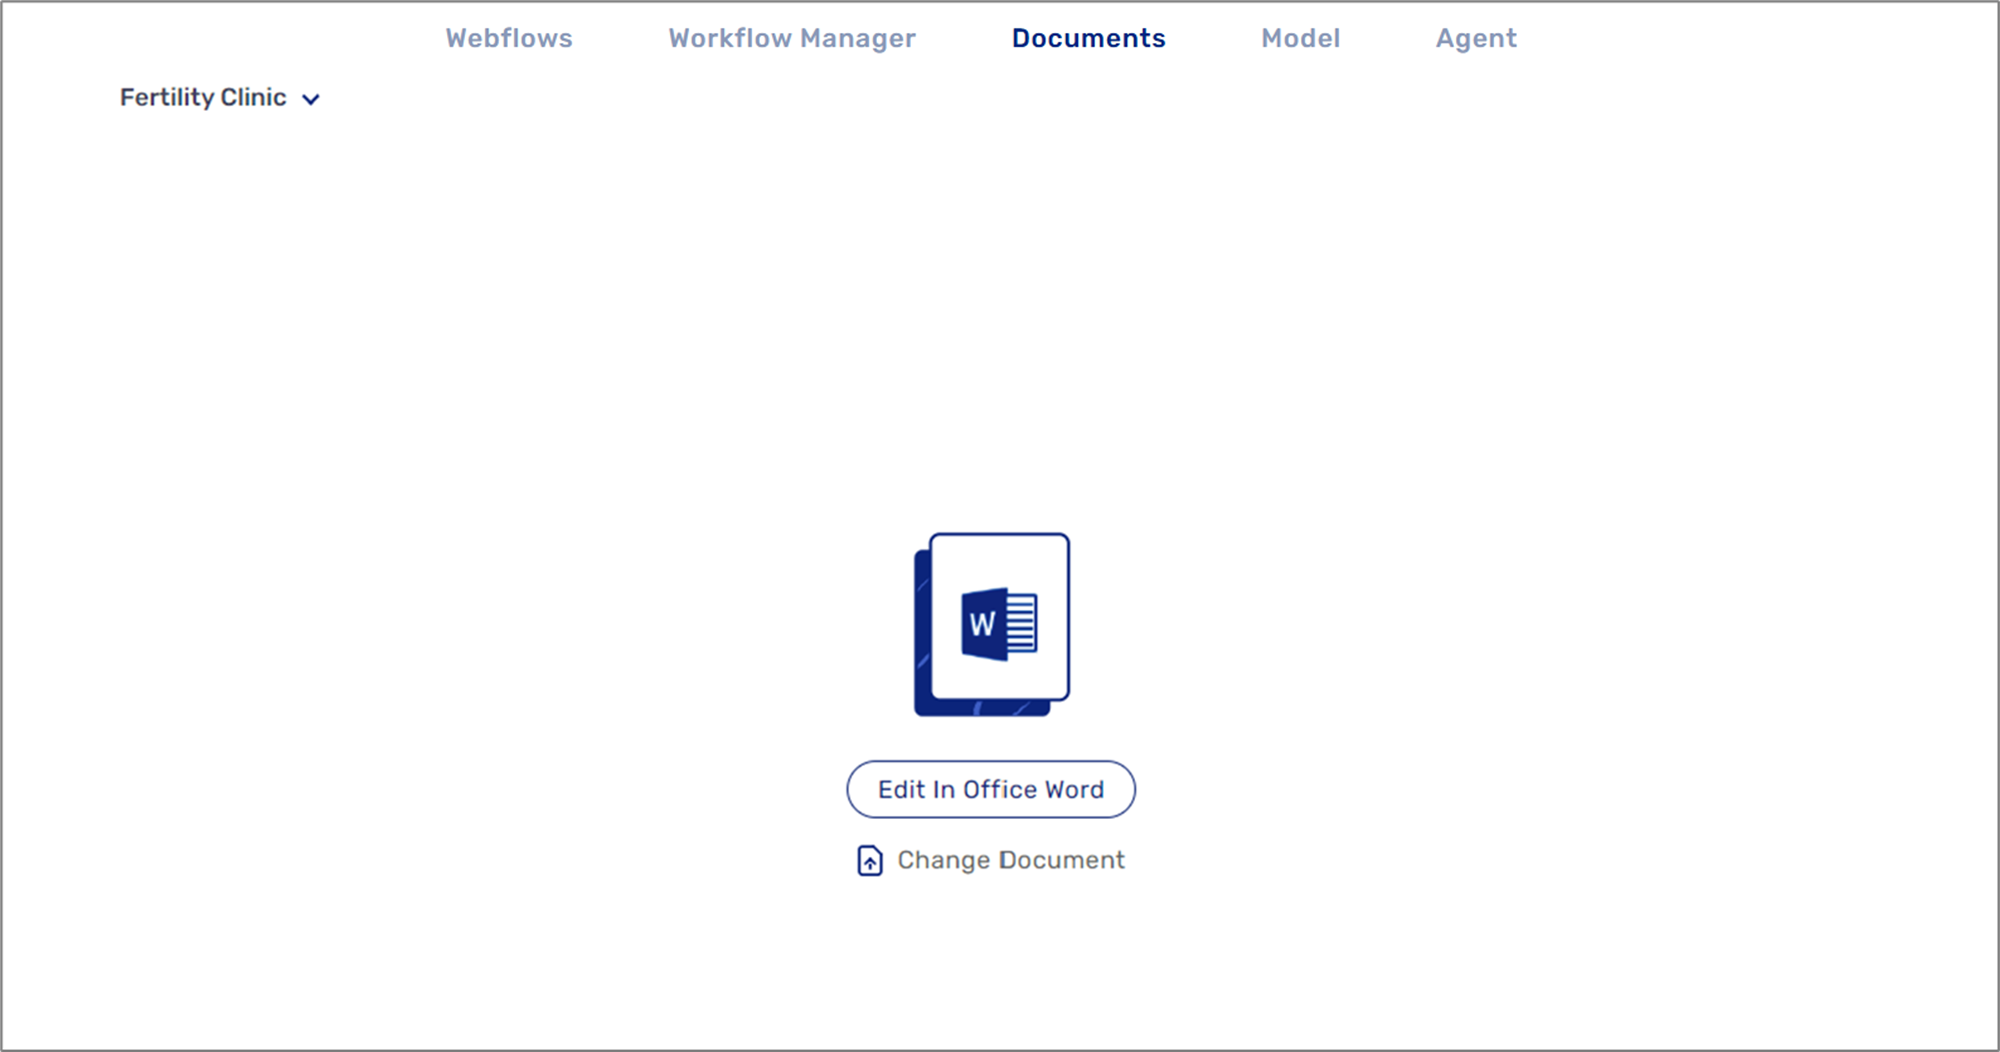
Figure 84: Dynamic Document For Editing 1 of 2
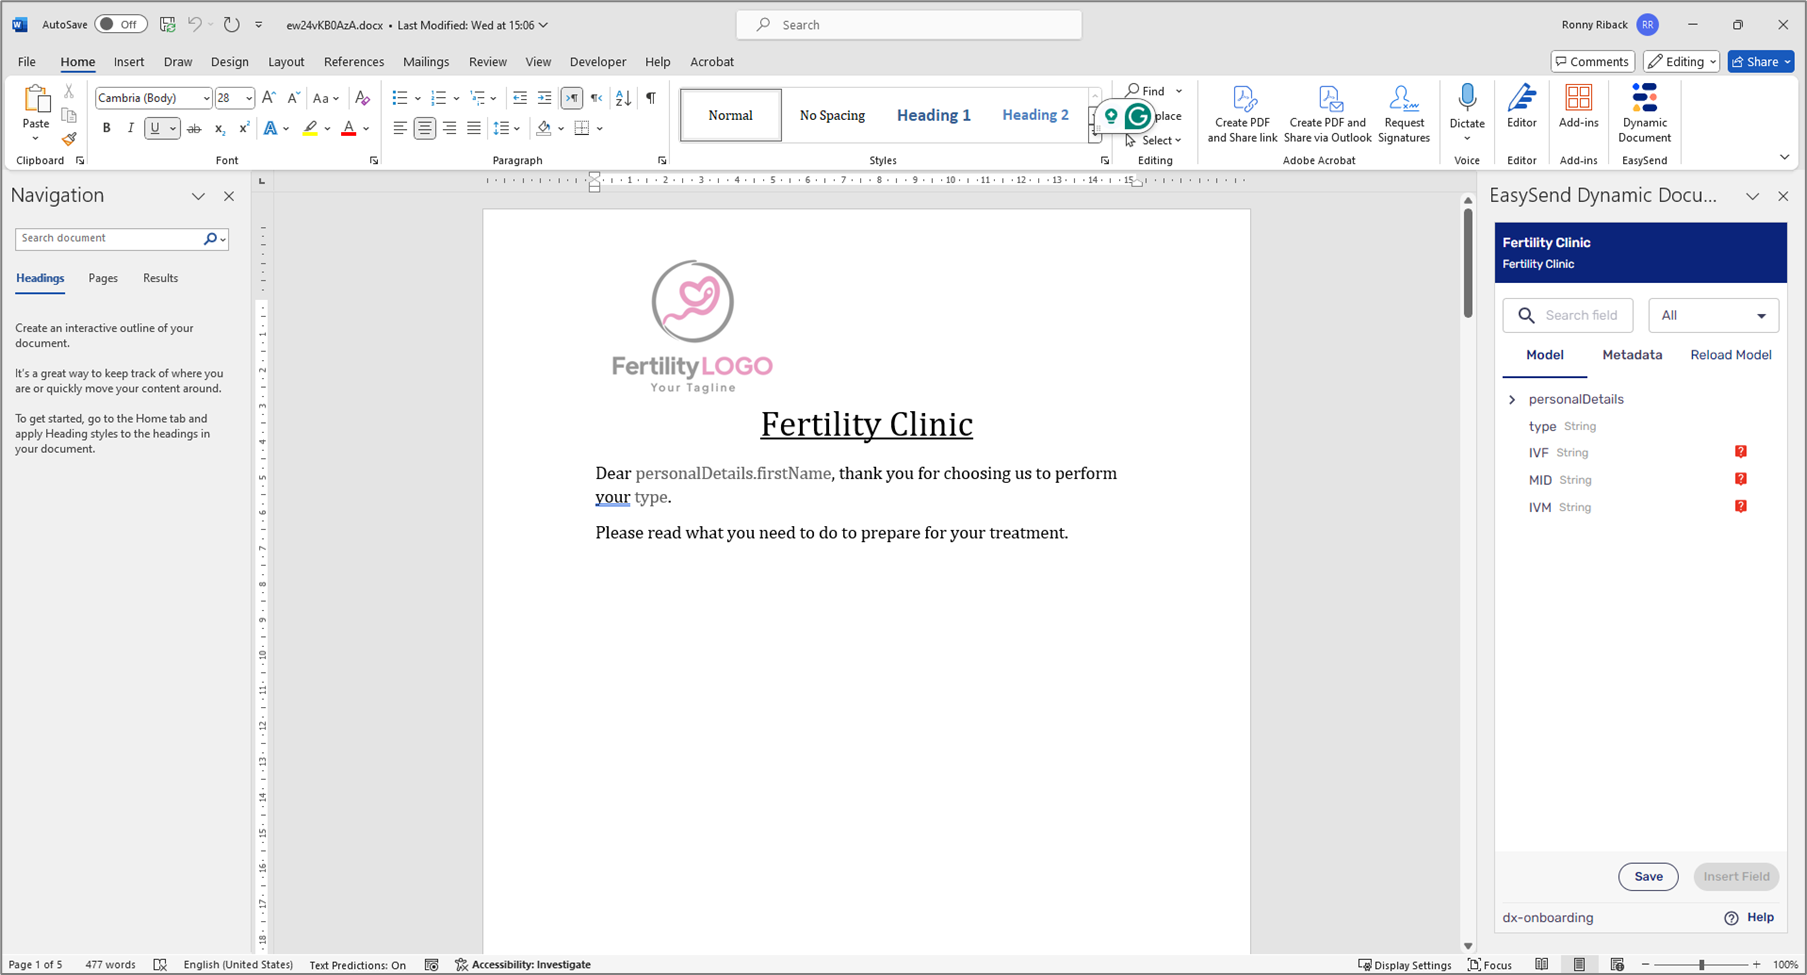
Figure 85: Dynamic Document For Editing 2 of 2
Step 2: Using EasySend's Microsoft Add-in
(See Figure 86)
The Word document must become a dynamic document so only the relevant information will be sent to the patient. Each section of the document will be nested under the relevant condition, for example:
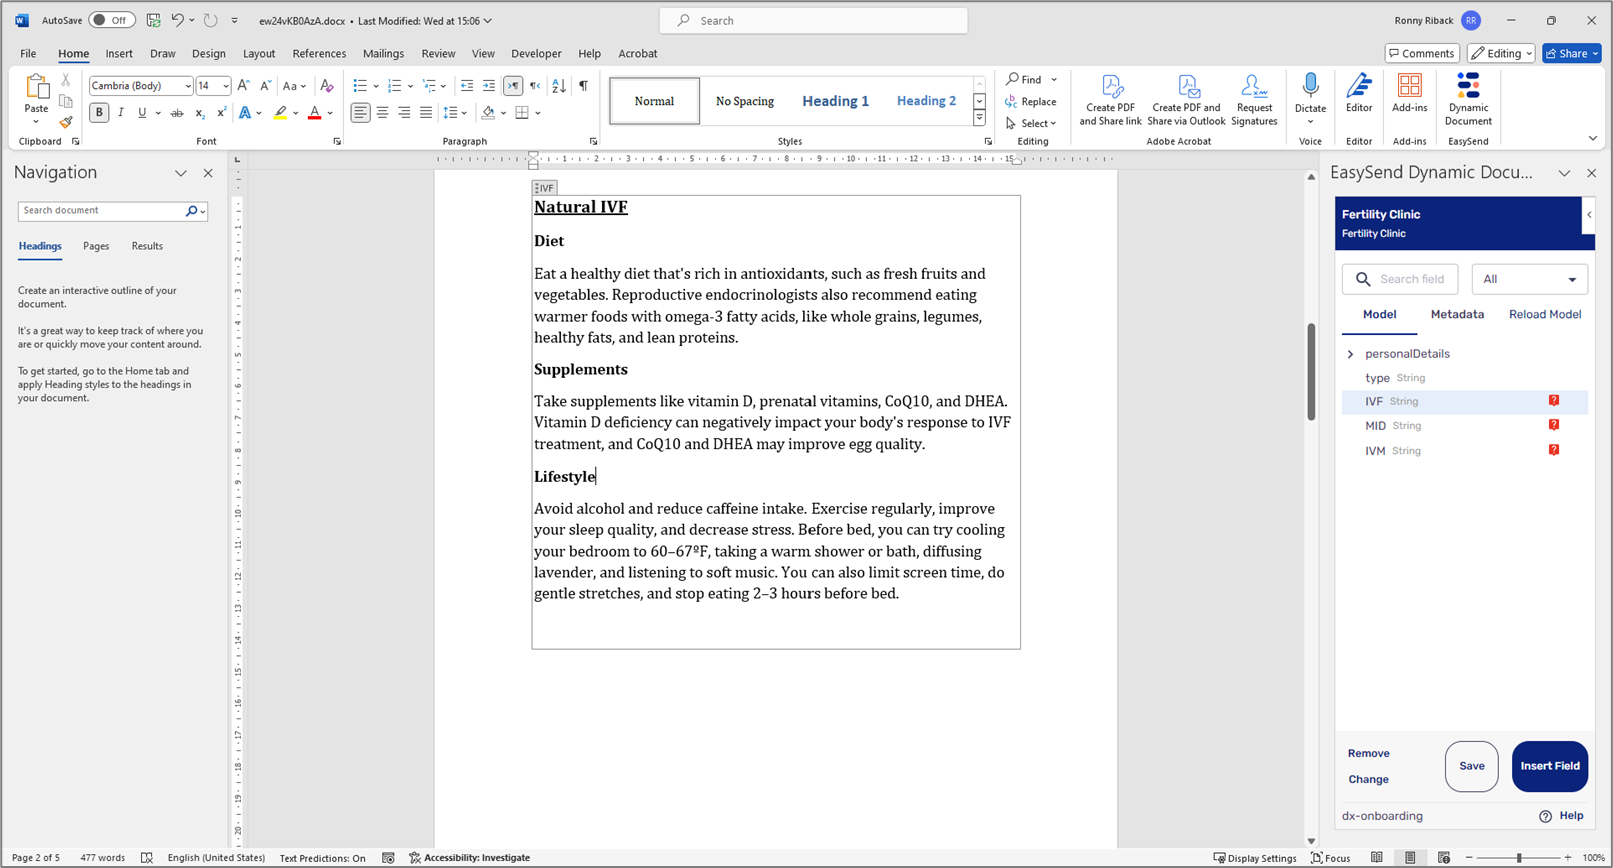
Figure 86: Nesting Text in Condition
Step 3: Interacting with the Digital Process
(See Figure 87 and Figure 88)
The clinic's rep interacts with the digital process, they fill out personal details, select the procedure, and submit the process.
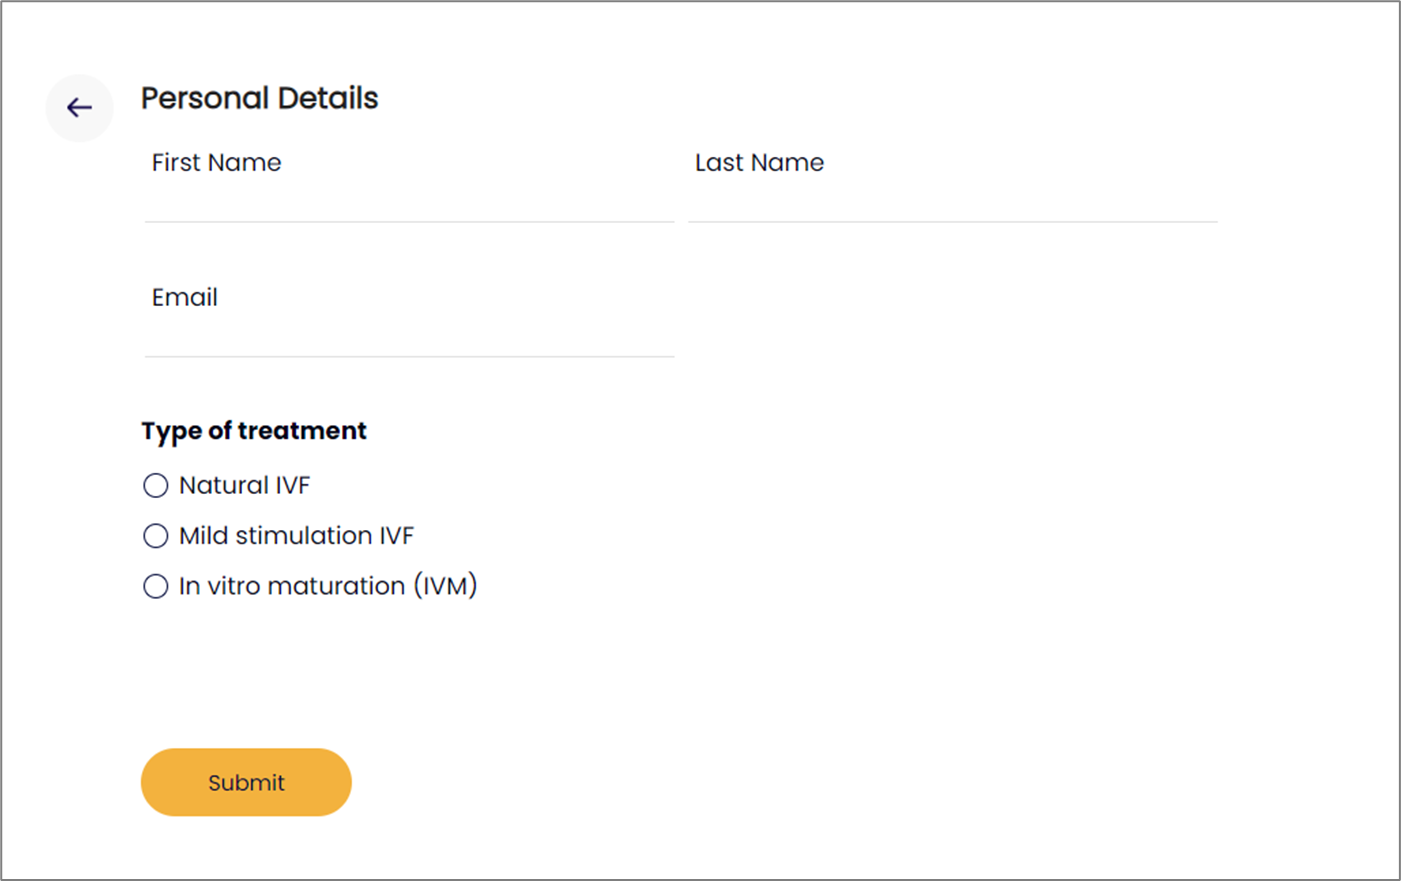
Figure 87: Personal Details and Type of Treatment
The patient will receive the email with the attachment containing only relevant information according to the selected procedure.
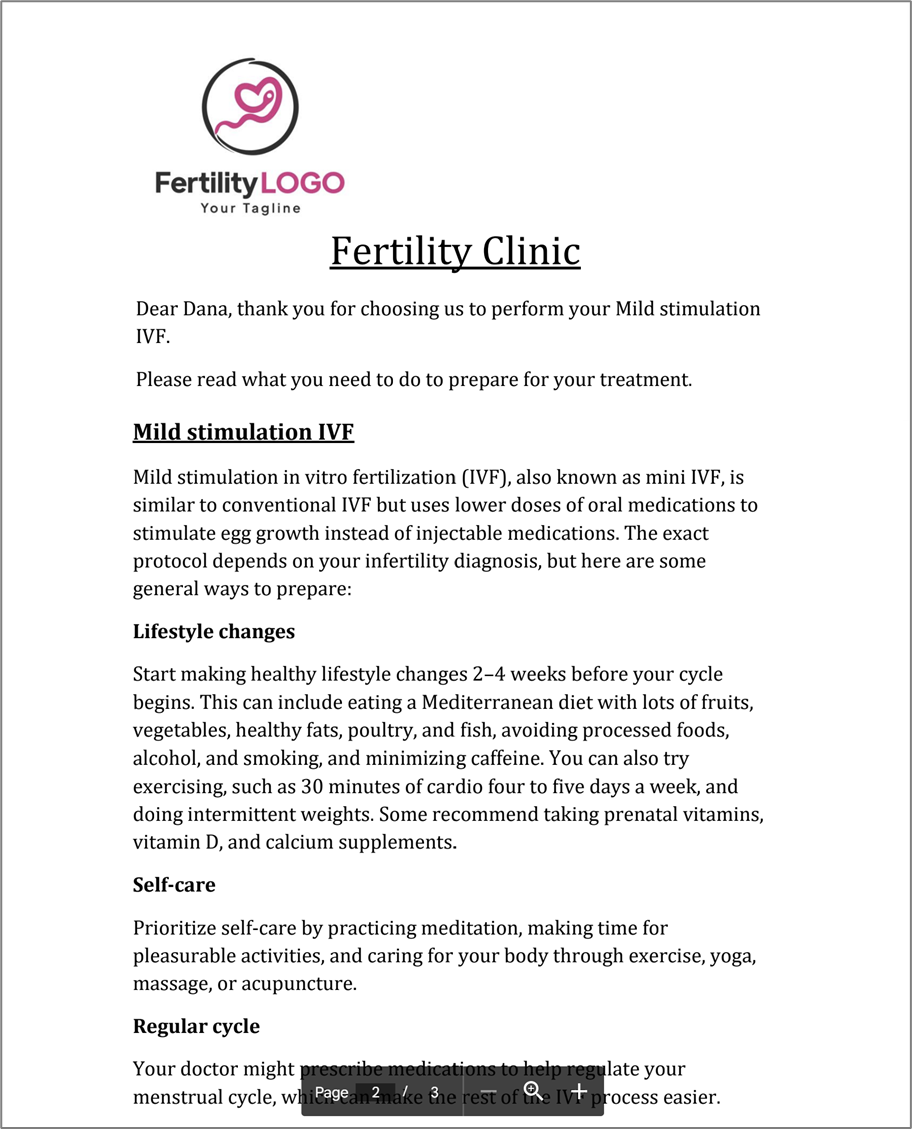
Figure 88: Received Attachment
Dynamic Document Use Case - Hiring Contract
The following sections describe a dynamic document hiring contract use case.
Overview
An HR rep from a US-based company sends hiring contracts to new employees. Each employee has different personal details, can be from a different department, and resides in a different state affecting the amount of taxes to pay. Instead of preparing and issuing each employee a tailor-made contract, the HR rep simply inputs the relevant details, and the dynamic document updates the template and generates a relevant contract. Automatic updates to the template can include, hiding or displaying whole sections, restructuring the numbering of the contract, switching between images, and updating tables.
Step 1: Building the Digital Process
(See Figure 89 to Figure 92)
To enable the document to be dynamic, the HR rep will fill out the employee's details, select the US where the employee resides, and the relevant department.
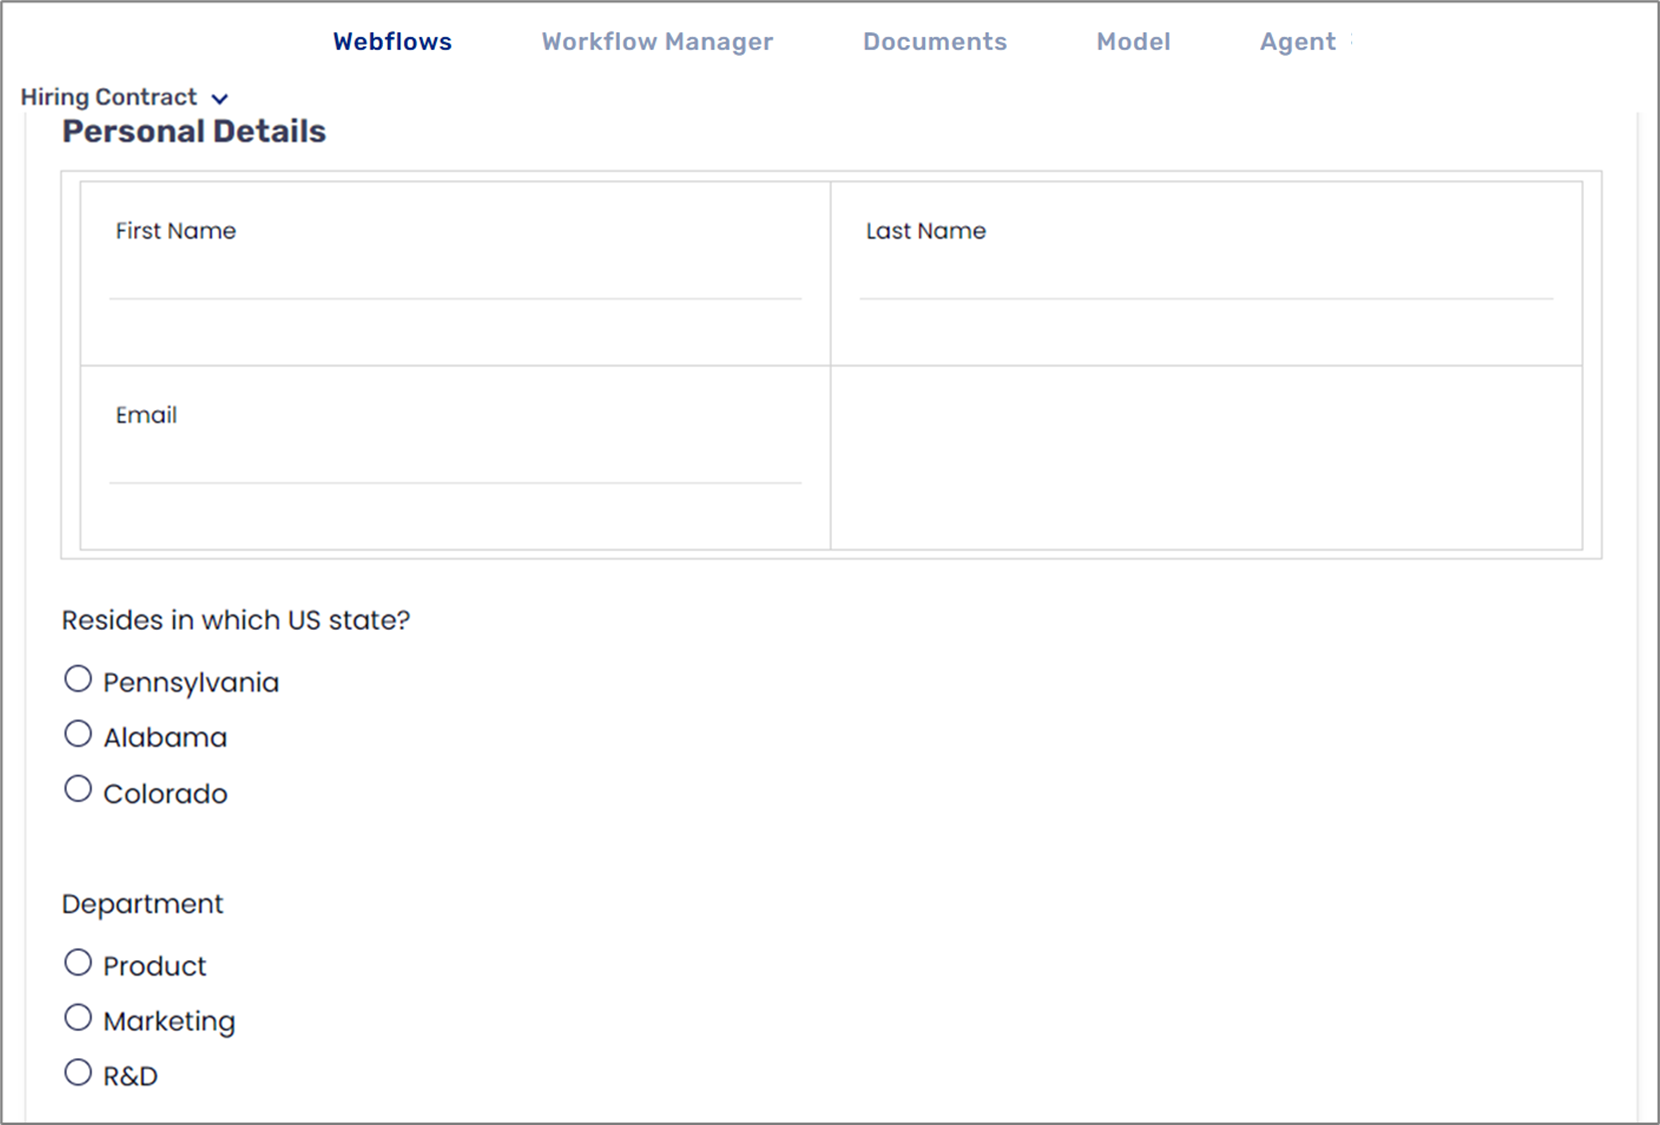
Figure 89: Webflow Structure
In the Model screen, six string-type data items are implemented with a visibility condition that will display information according to the selected US state and department.
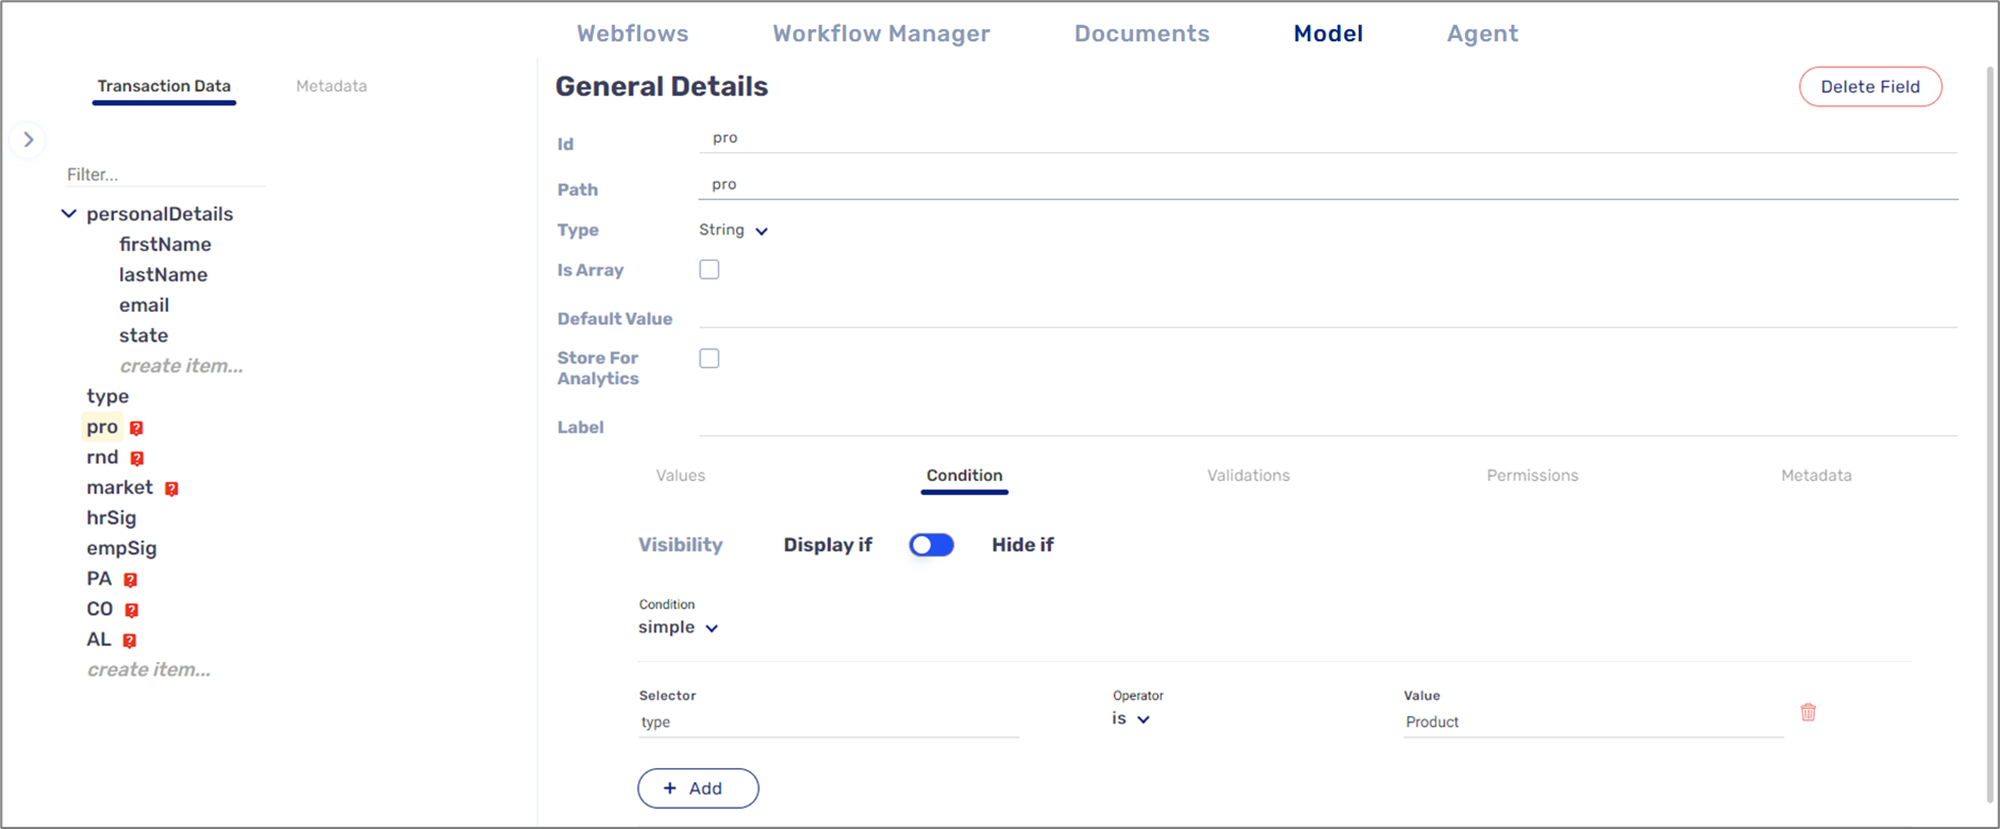
Figure 90: Model Data Items and Conditions
On the PDF screen, we will upload the document and then open it for editing.
Figure 91: Dynamic Document For Editing 1 of 2
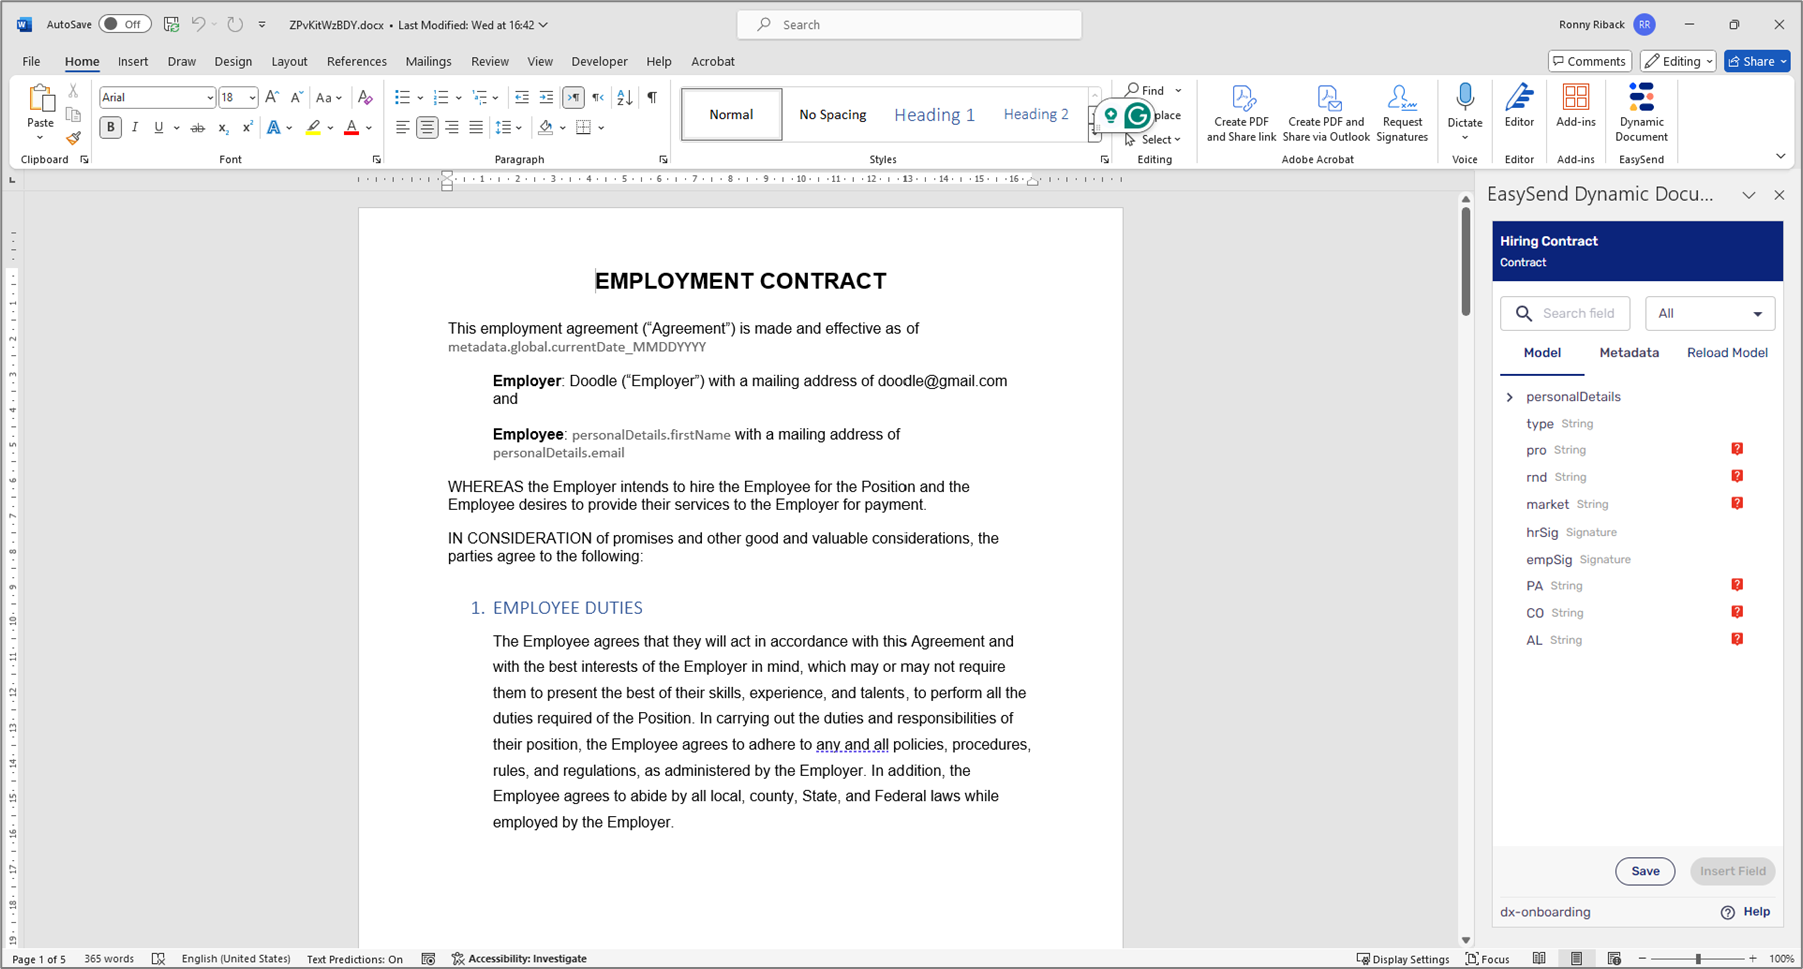
Figure 92: Dynamic Document For Editing 2 of 2
Step 2: Using EasySend's Microsoft Add-in
(See Figure 93 to Figure 95)
The Word document must become a dynamic document so that the relevant contract will be generated for the employee. Different sections of the document will be nested under the relevant condition, for example:
- Payment Details:
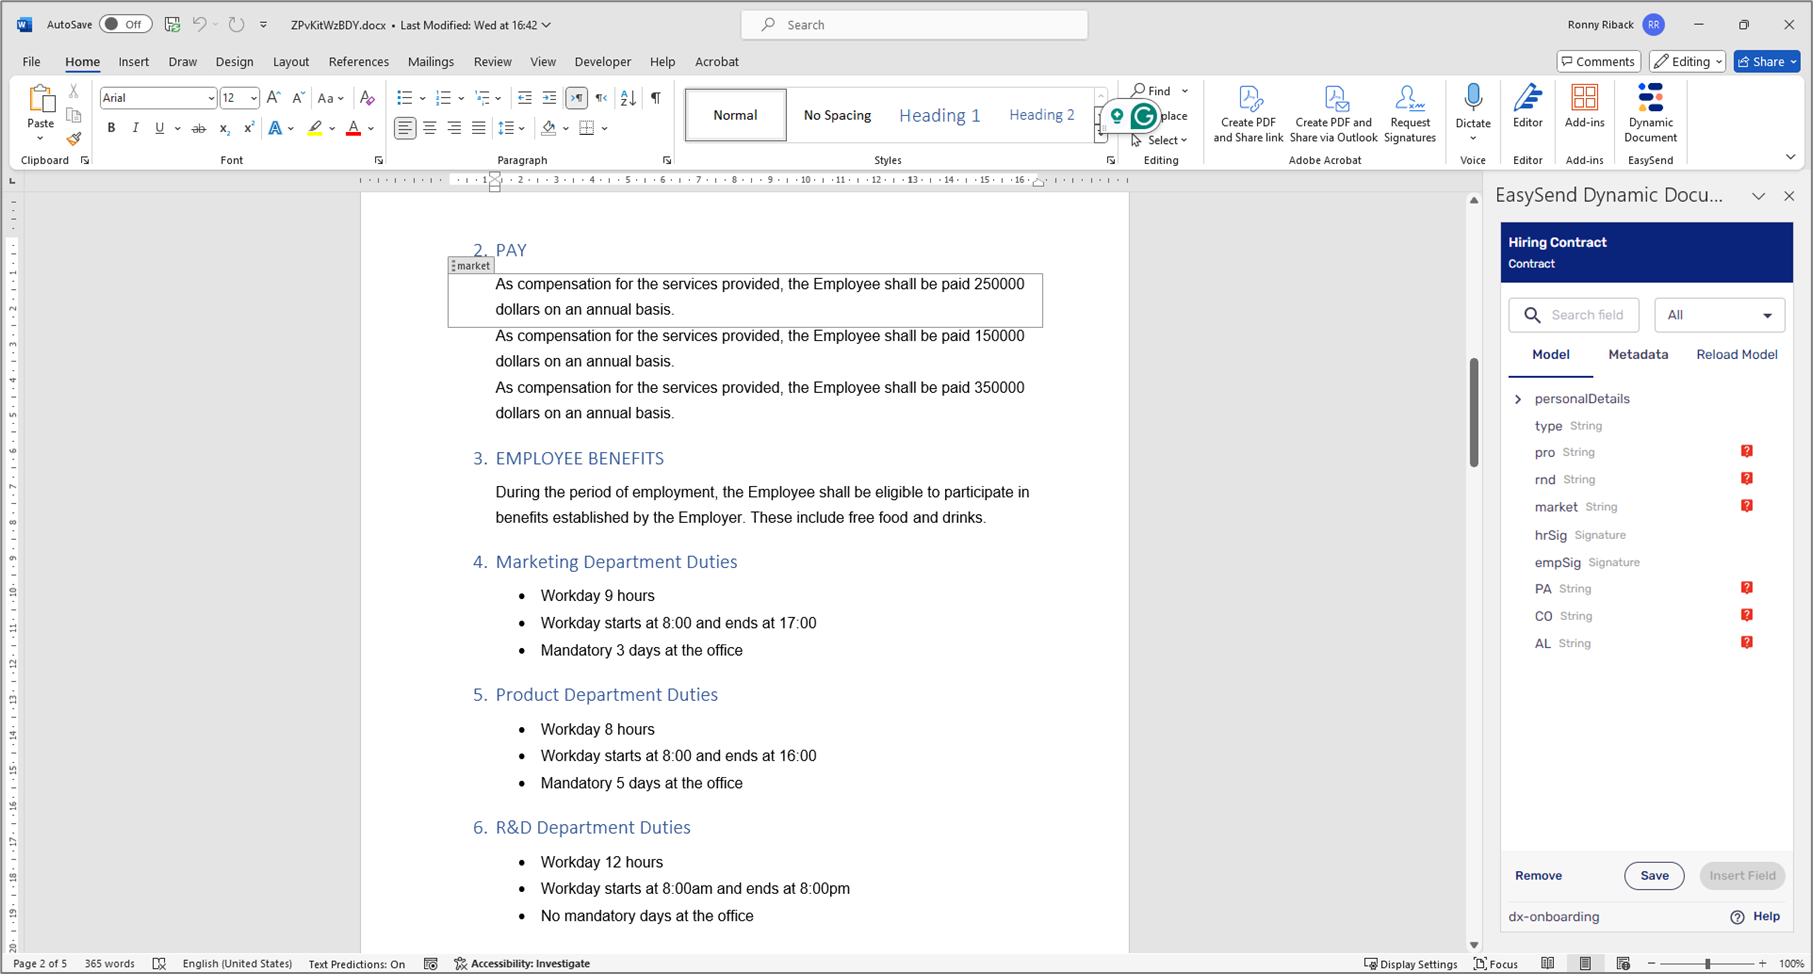
Figure 93: Nesting Text in Condition 1 of 3
- Department Duties:
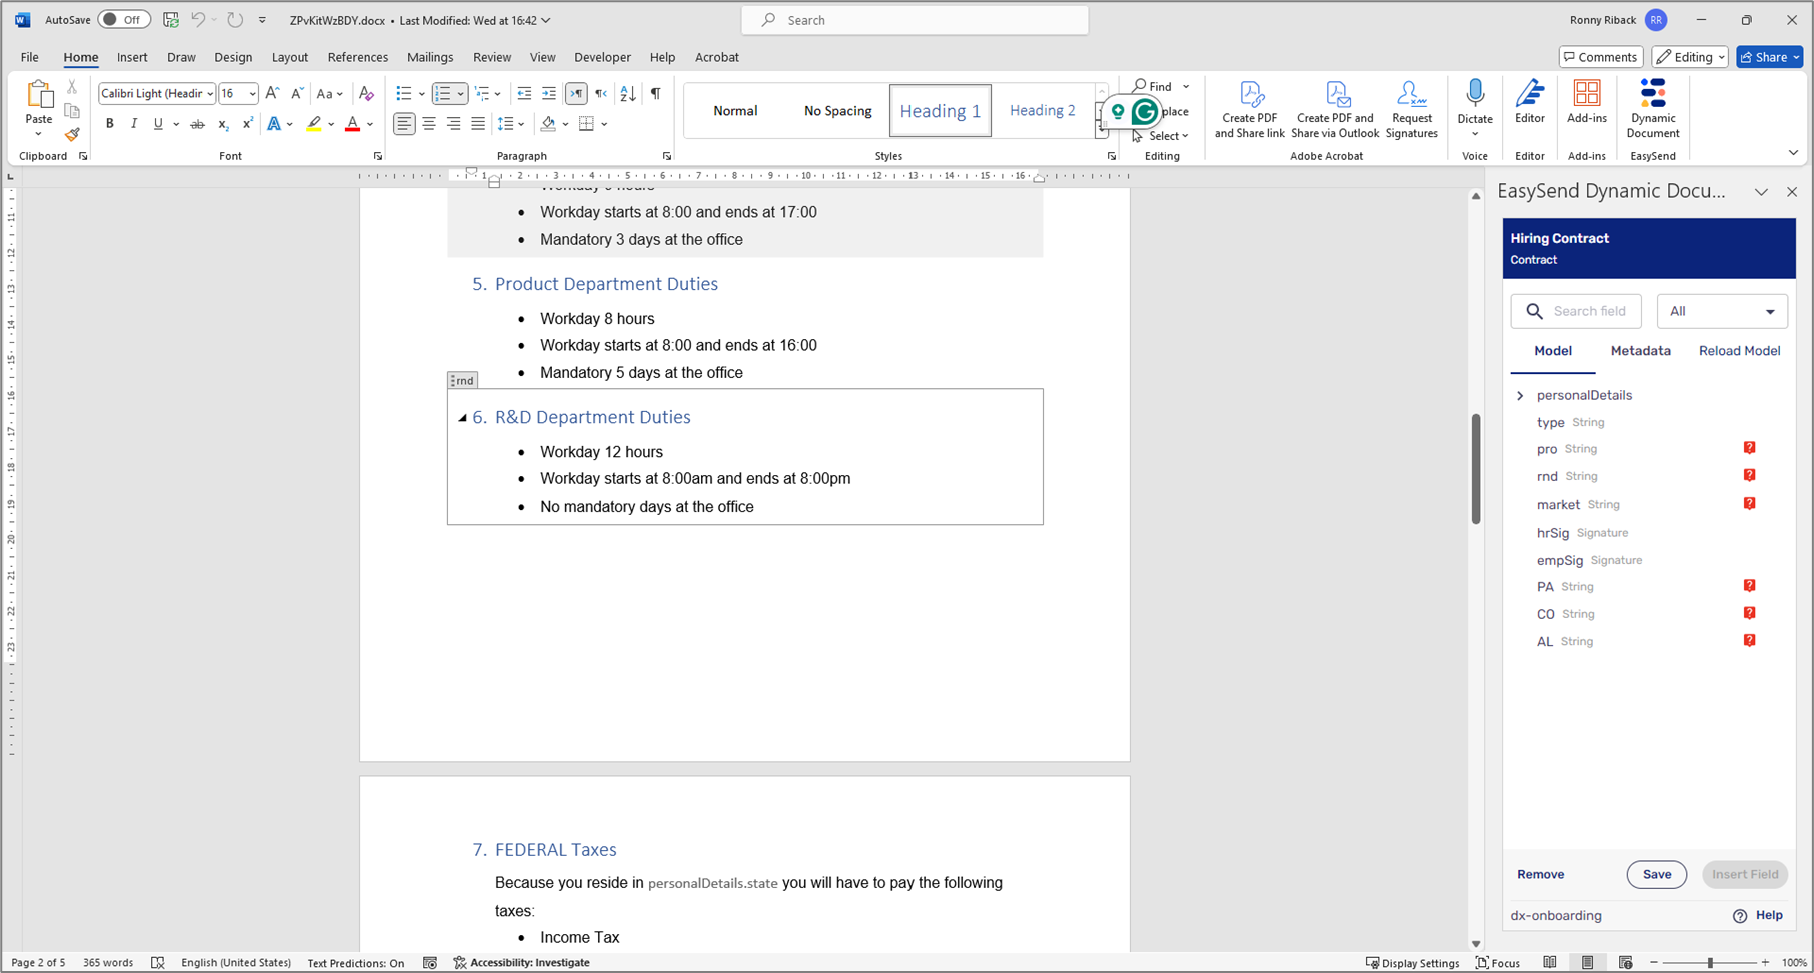
Figure 94: Nesting Text in Condition 2 of 3
- Federal Taxes:
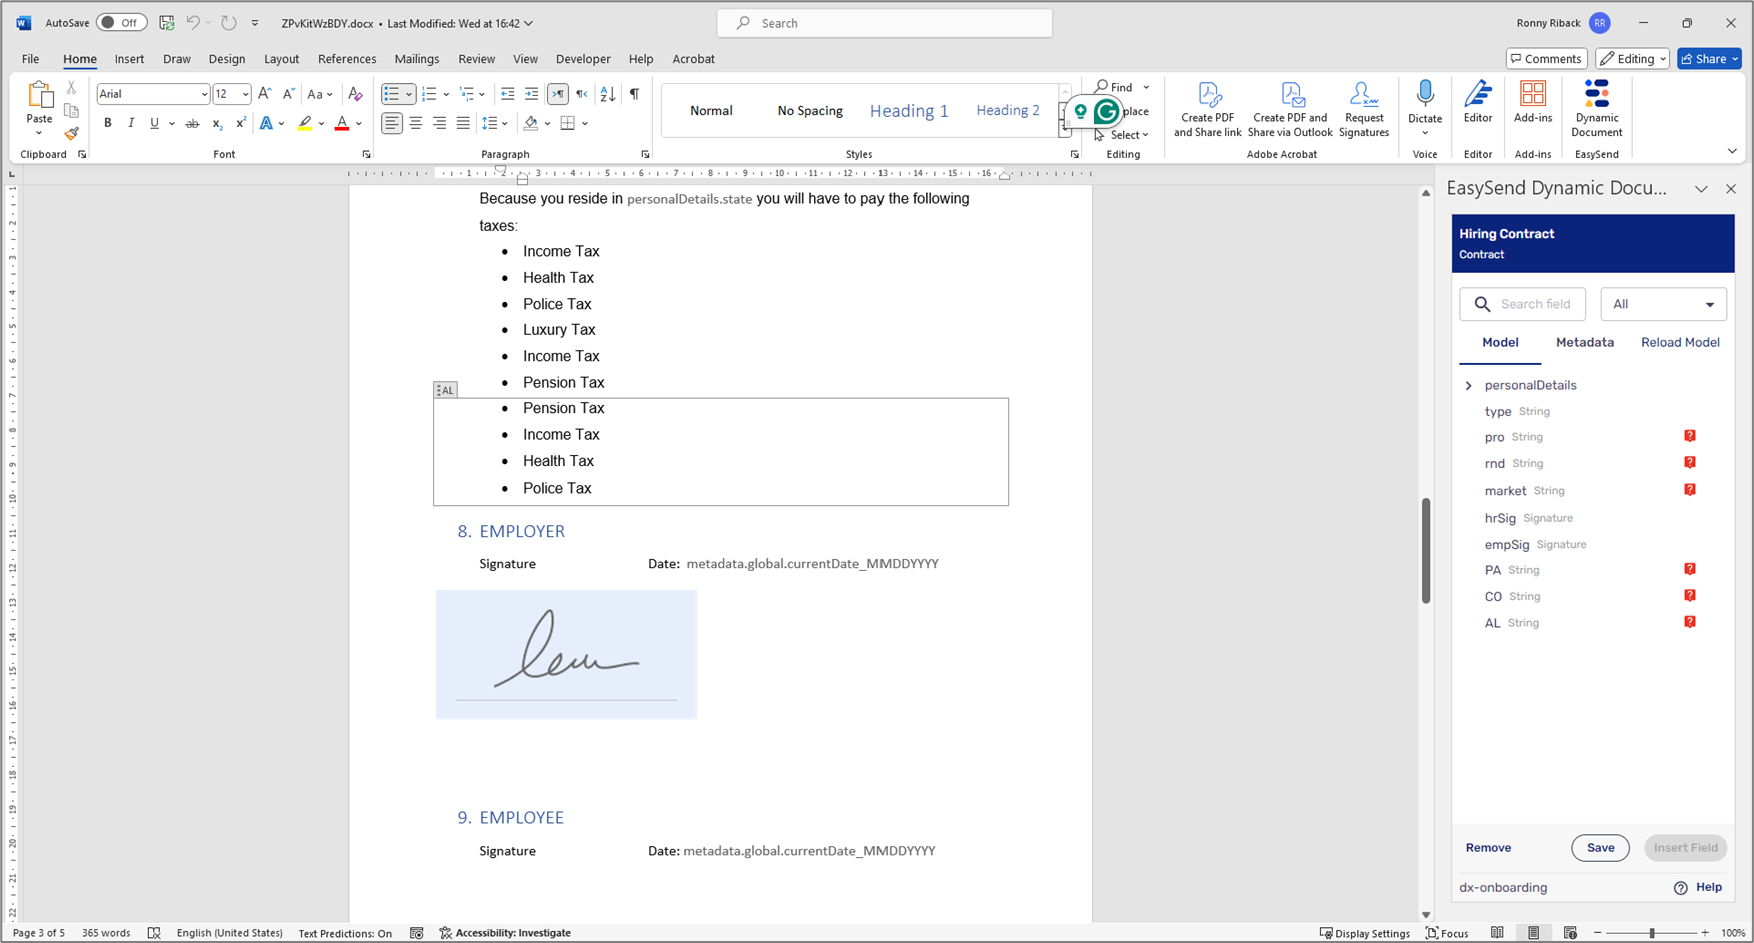
Figure 95: Nesting Text in Condition 3 of 3
Step 3: Interacting with the Digital Process
(See Figure 96 and Figure 97)
The HR rep interacts with the digital process, they fill out personal details, select the US state, the department, sign, and submit the process.
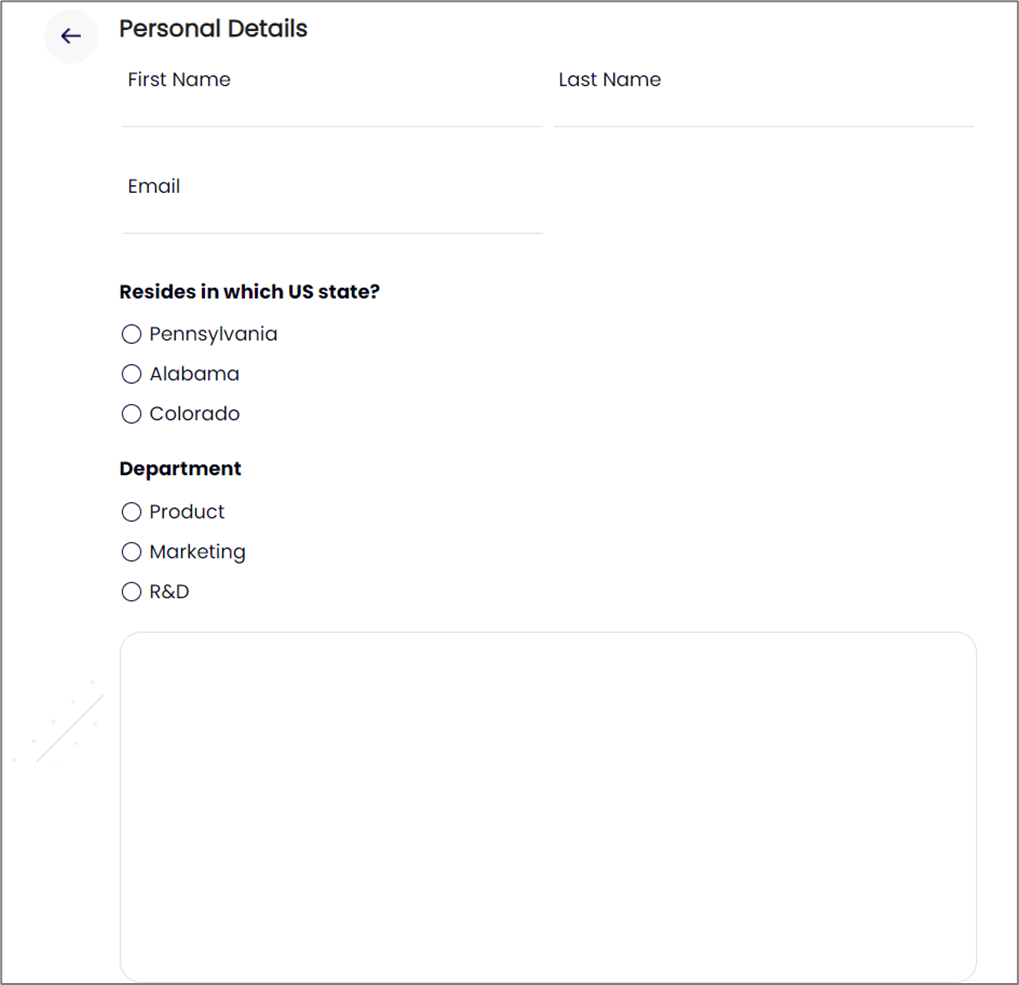
Figure 96: Personal Details, State, and Department
The patient will receive the email with the contract containing only relevant sections and text according to the selected state and department.
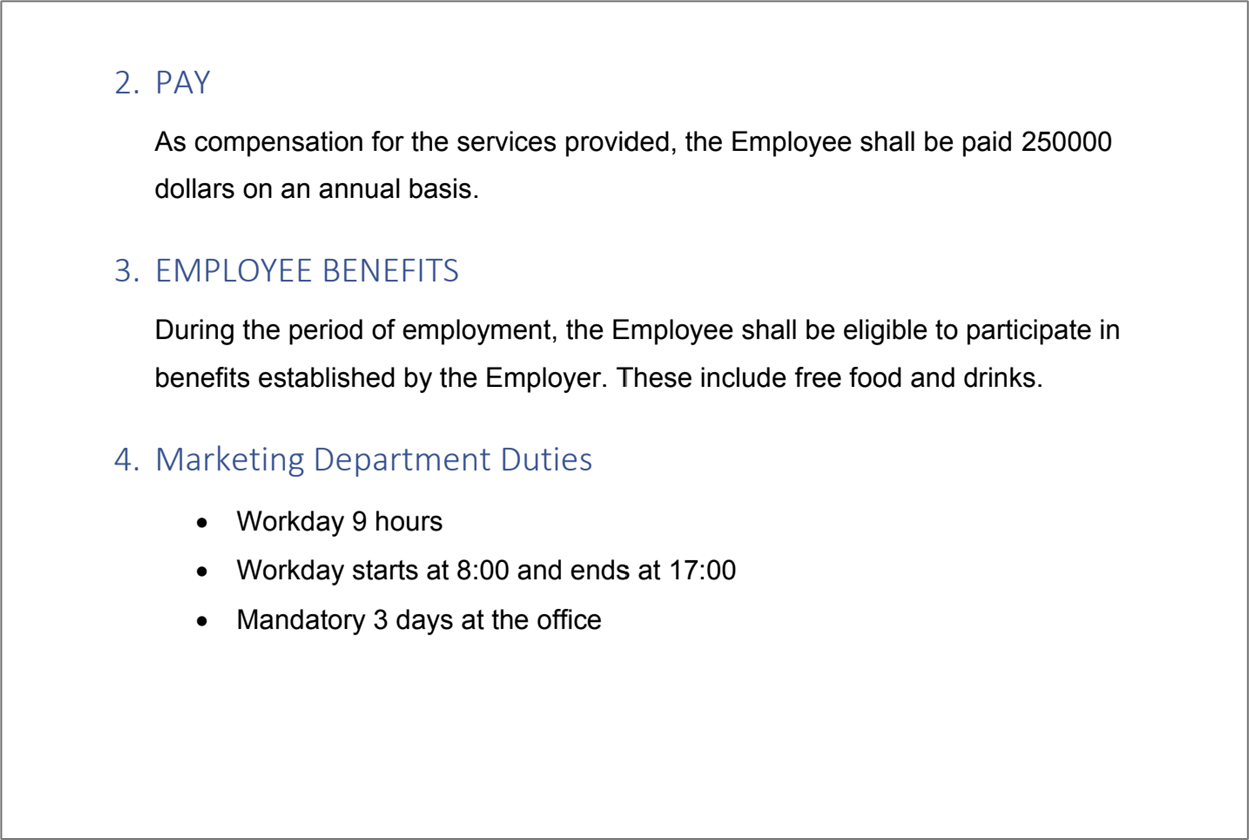
Figure 97: Received Contract
Dynamic Document Use Case - Branding
The following sections describe a dynamic document branding use case.
Overview
An insurance company provides services in three fields:
- Health
- Pet
- Travel
The company's agent needs to send the customer an insurance offer document with the relevant logo.
Step 1: Building the Digital Process
(See Figure 98 to Figure 101)
To enable the document to be dynamic, the agent rep will fill out the customer's details and select the relevant insurance type.
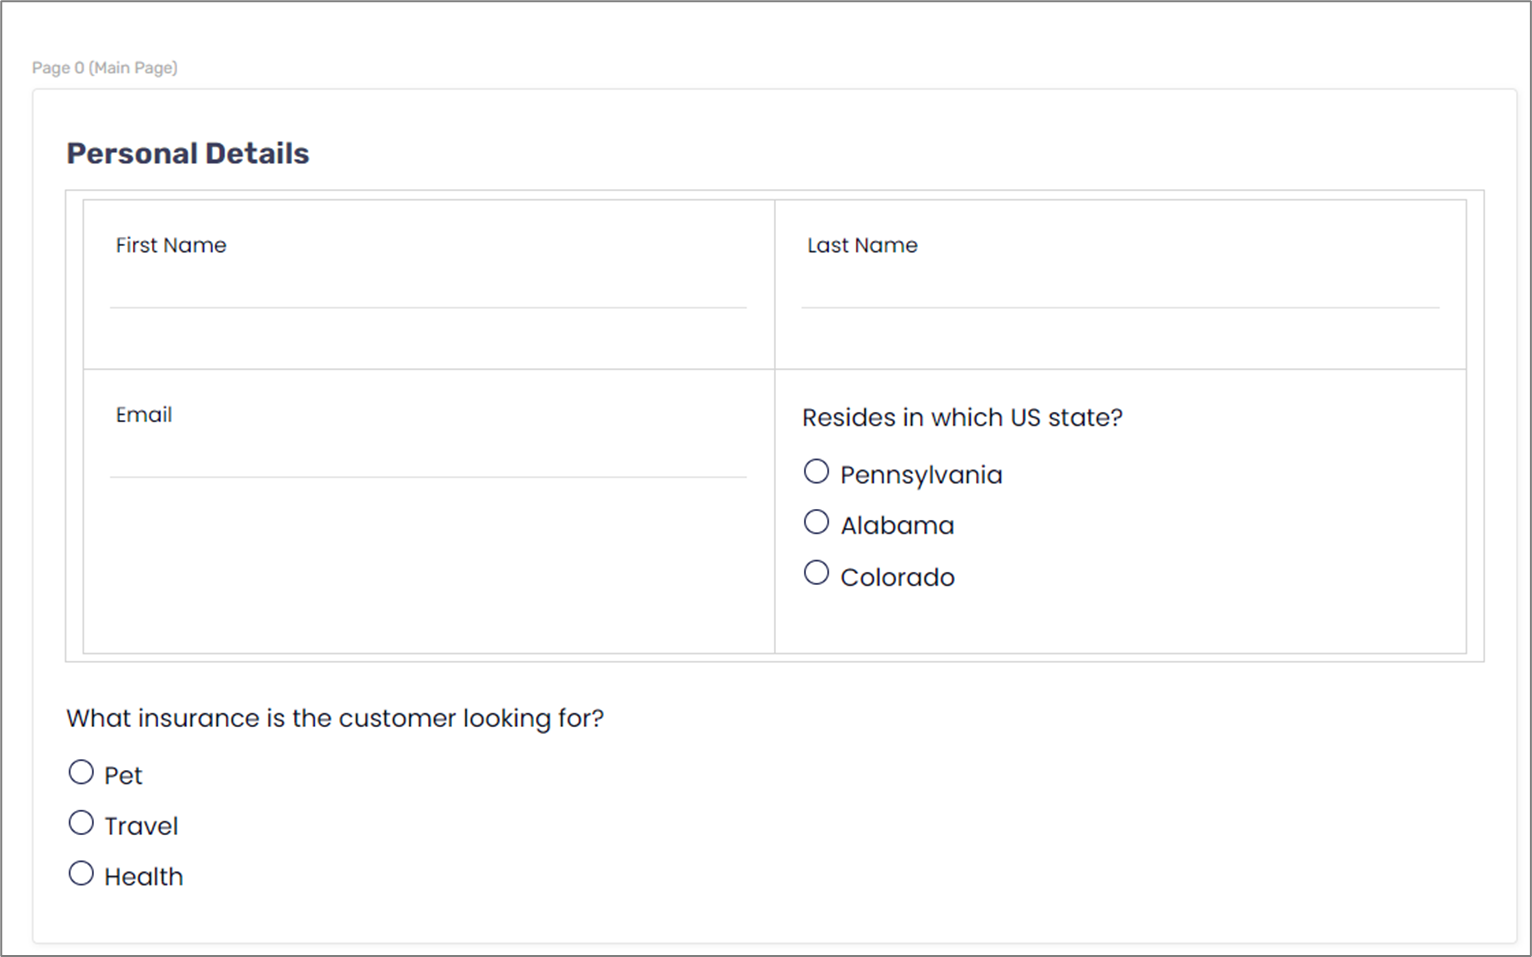
Figure 98: Webflow Structure
In the Model screen, three string-type data items are implemented with a visibility condition that will display information according to the selected type of insurance.

Figure 99: Model Data Items and Conditions
On the PDF screen, we will upload the document and then open it for editing.
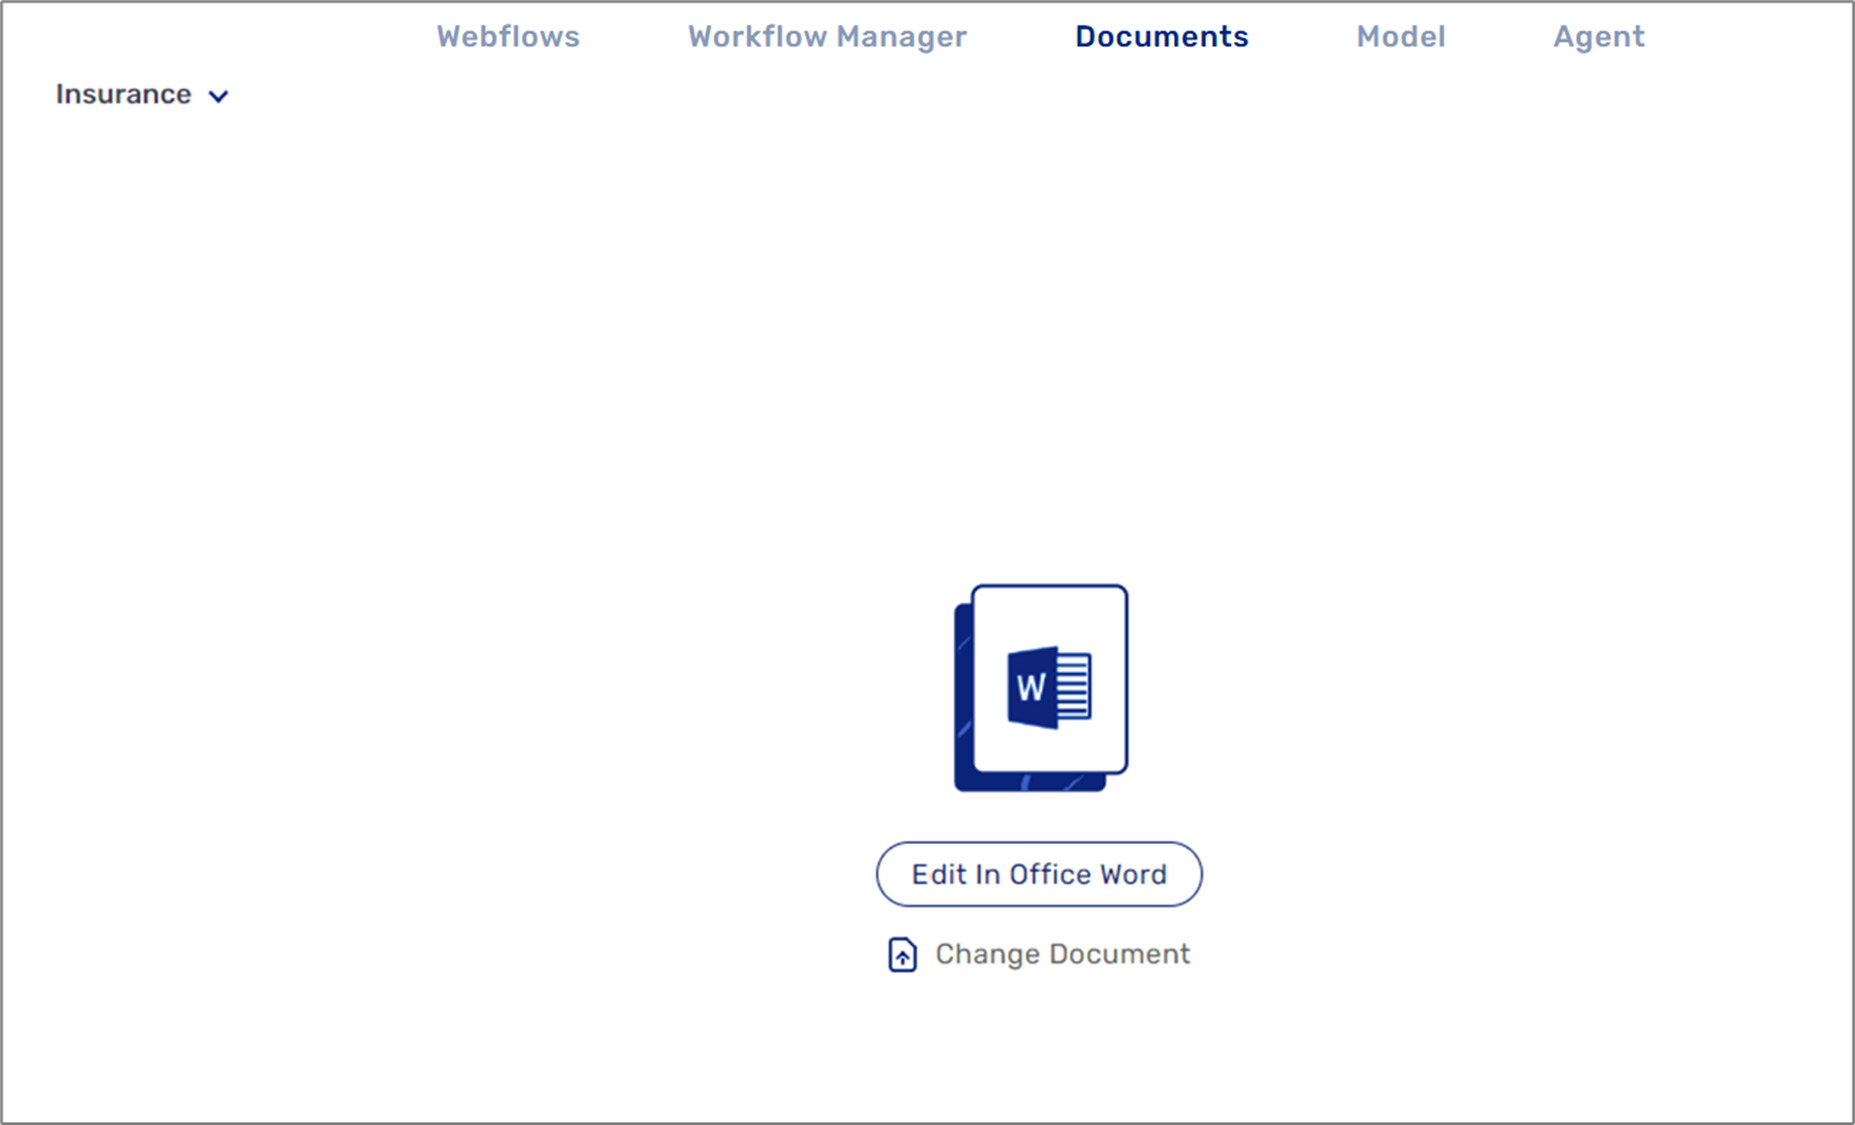
Figure 100: Dynamic Document For Editing 1 of 2
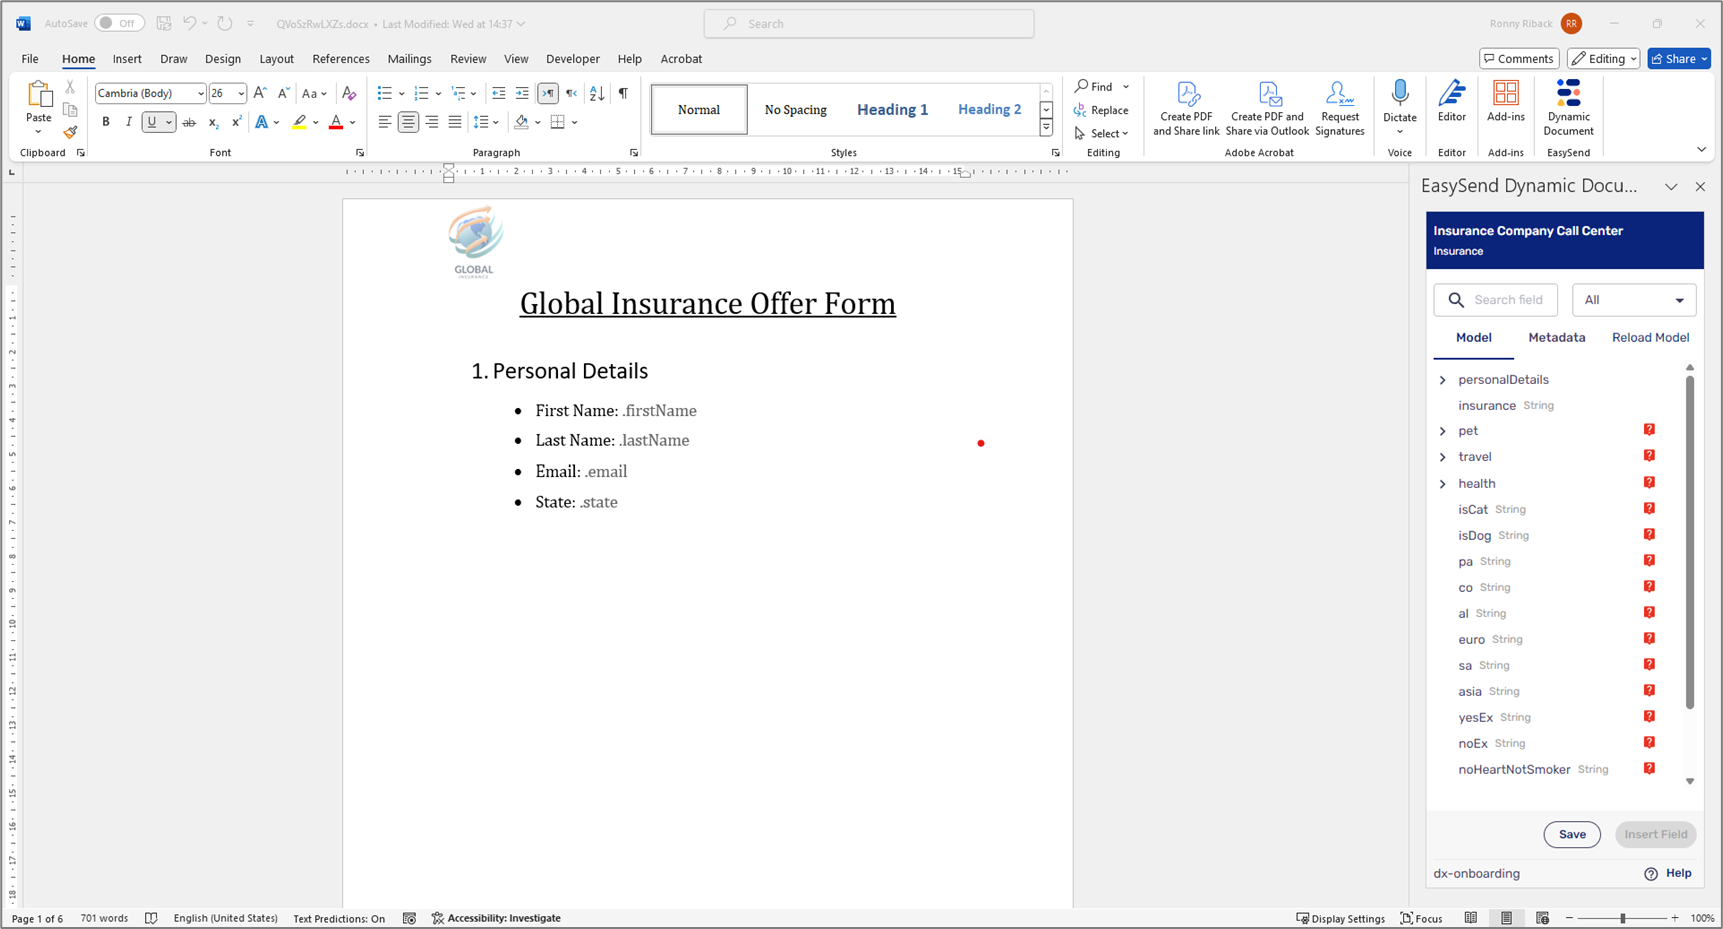
Figure 101: Dynamic Document For Editing 2 of 2
Step 2: Using EasySend's Microsoft Add-in
(See Figure 102)
The Word document must become a dynamic document, so only the relevant document with the relevant branding will be sent to the customer. Each section of the document will be nested under the relevant condition, for example:
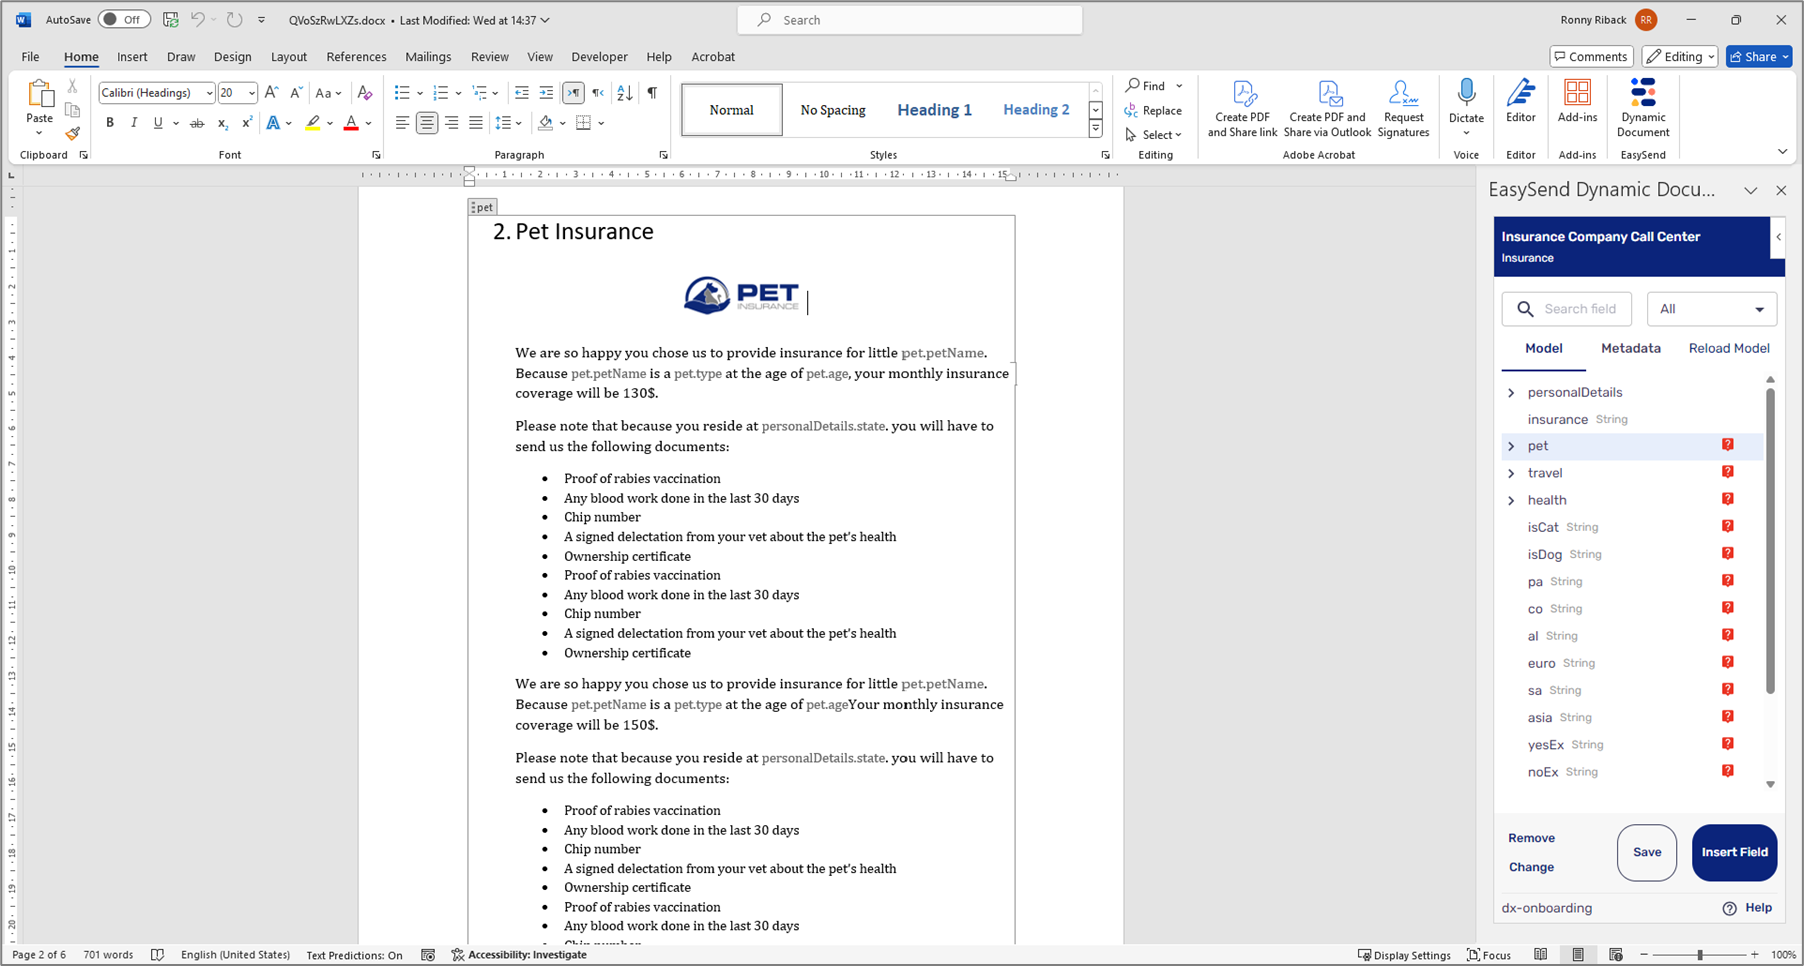
Figure 102: Nesting Text in Condition
Step 3: Interacting with the Digital Process
(See Figure 103 and Figure 104)
The agent interacts with the digital process, they fill out personal details, select the insurance, and submit the process.
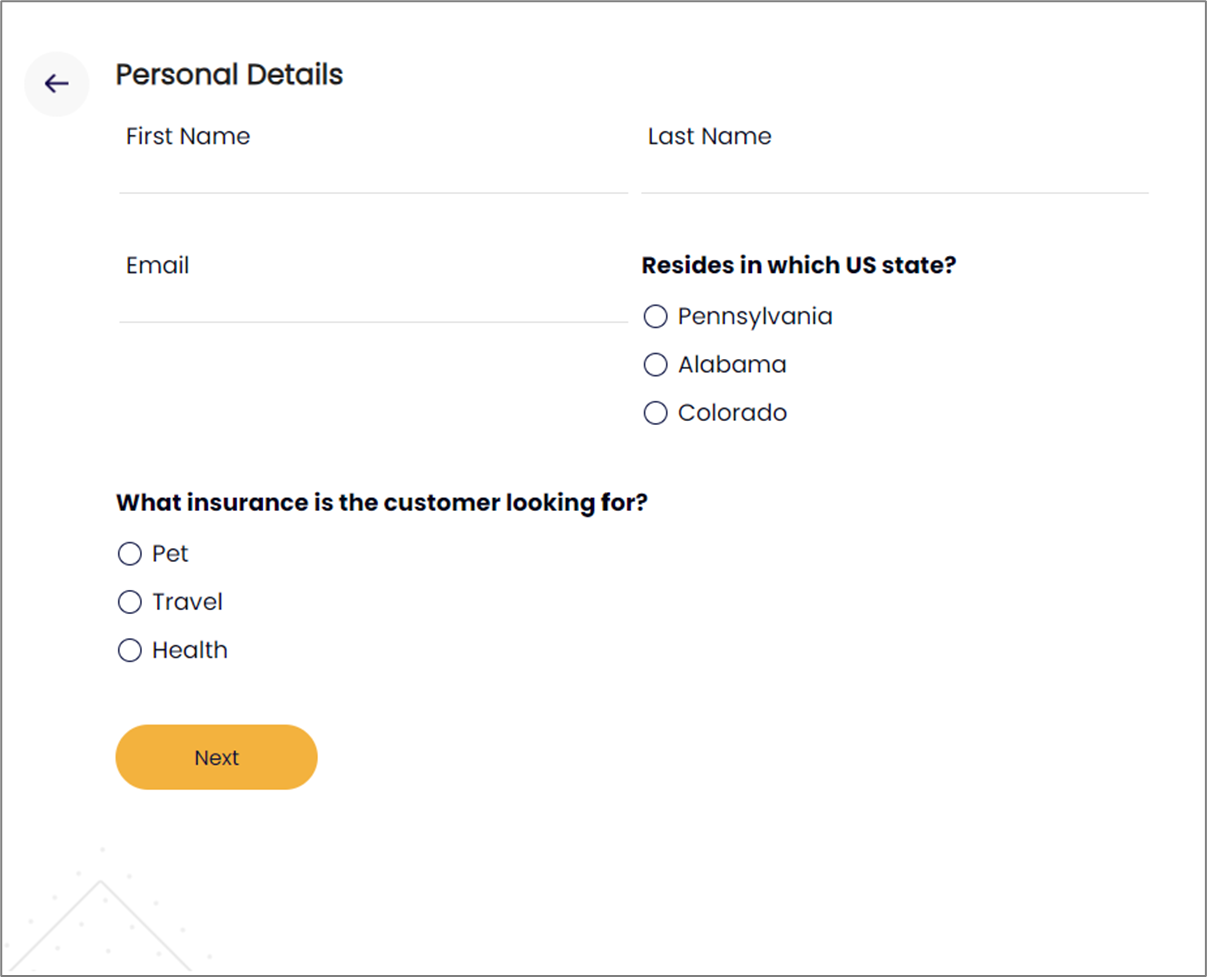
Figure 103: Personal Details and Type of Insurance
The customer will receive the email with the attachment containing only relevant branding and information.

Figure 104: Received Attachment
Troubleshooting
The following sections provide tools for troubleshooting dynamic document issues.
Cannot Open A Word Document Using the Builder
(See Figure 105 to Figure 112)
Your Microsoft Word settings might cause documents to open in Protected View. This can create issues when accessing these documents through the Builder, whether you are creating (1) a new document or uploading (2) one or editing it (3).
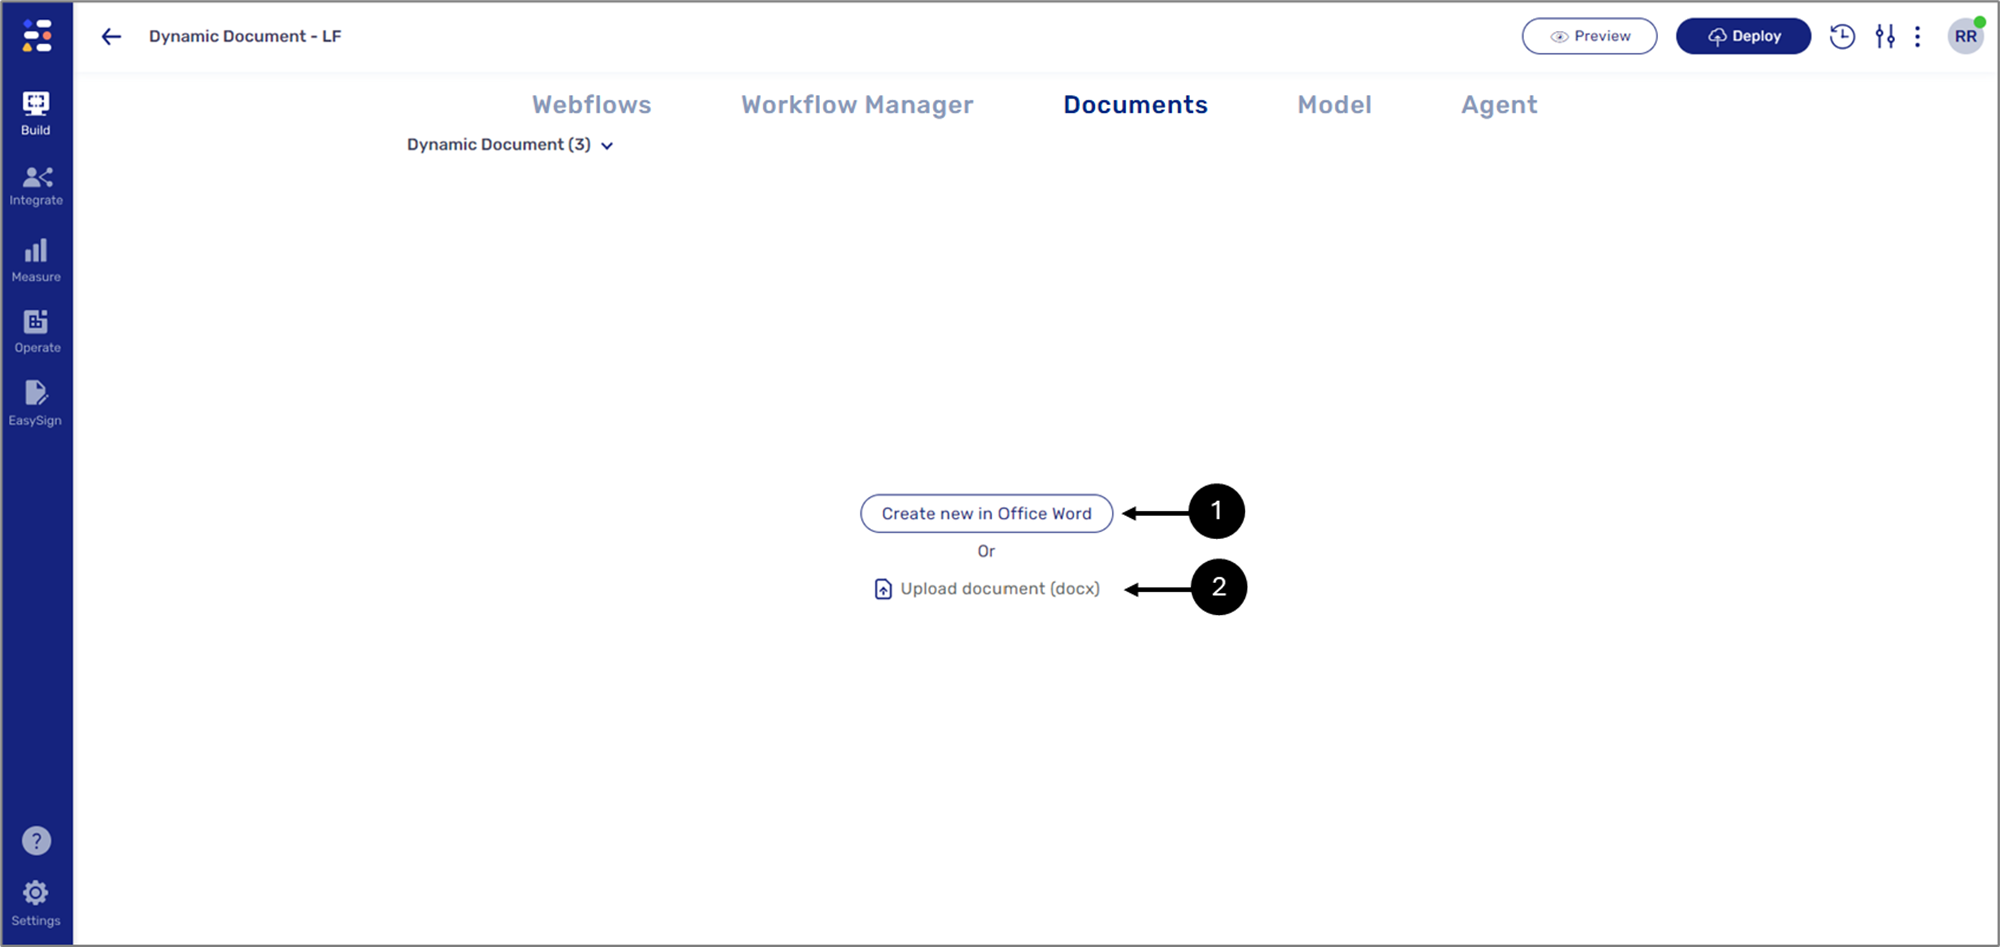
Figure 105: Creating/Uploading
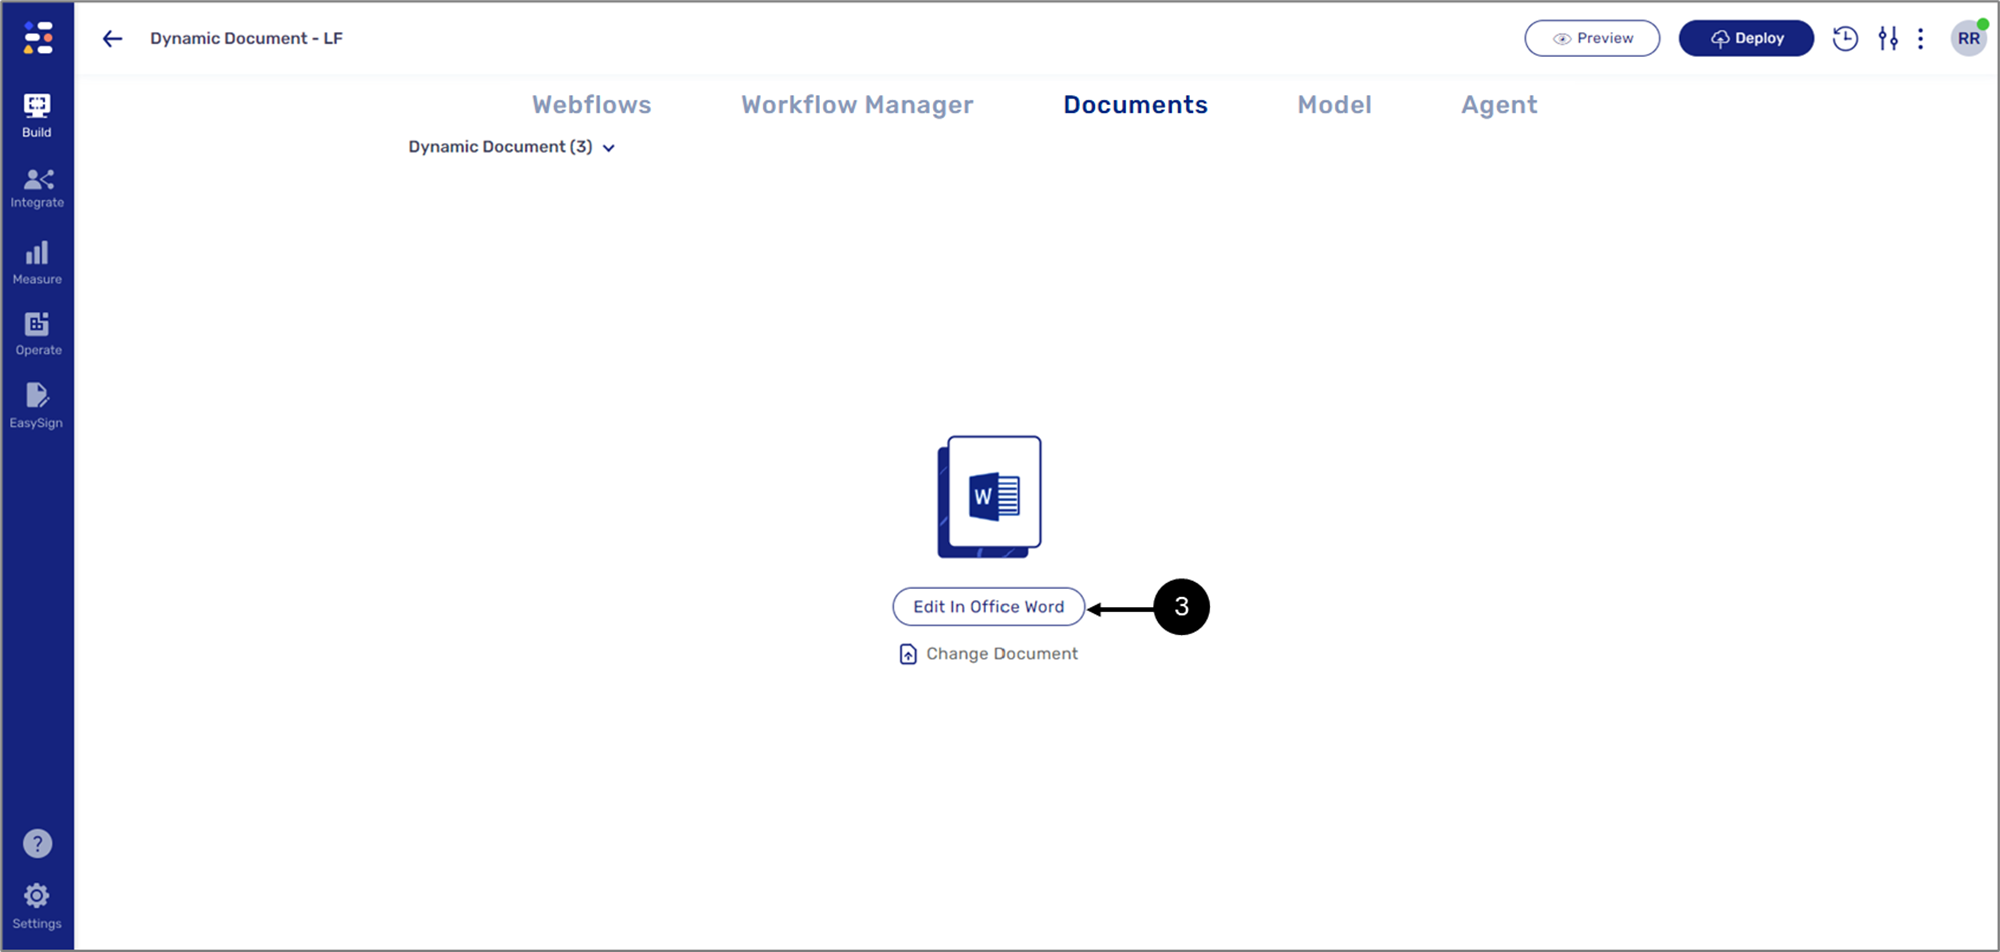
Figure 106: Editing
If after selecting either of the options, the following message appears:
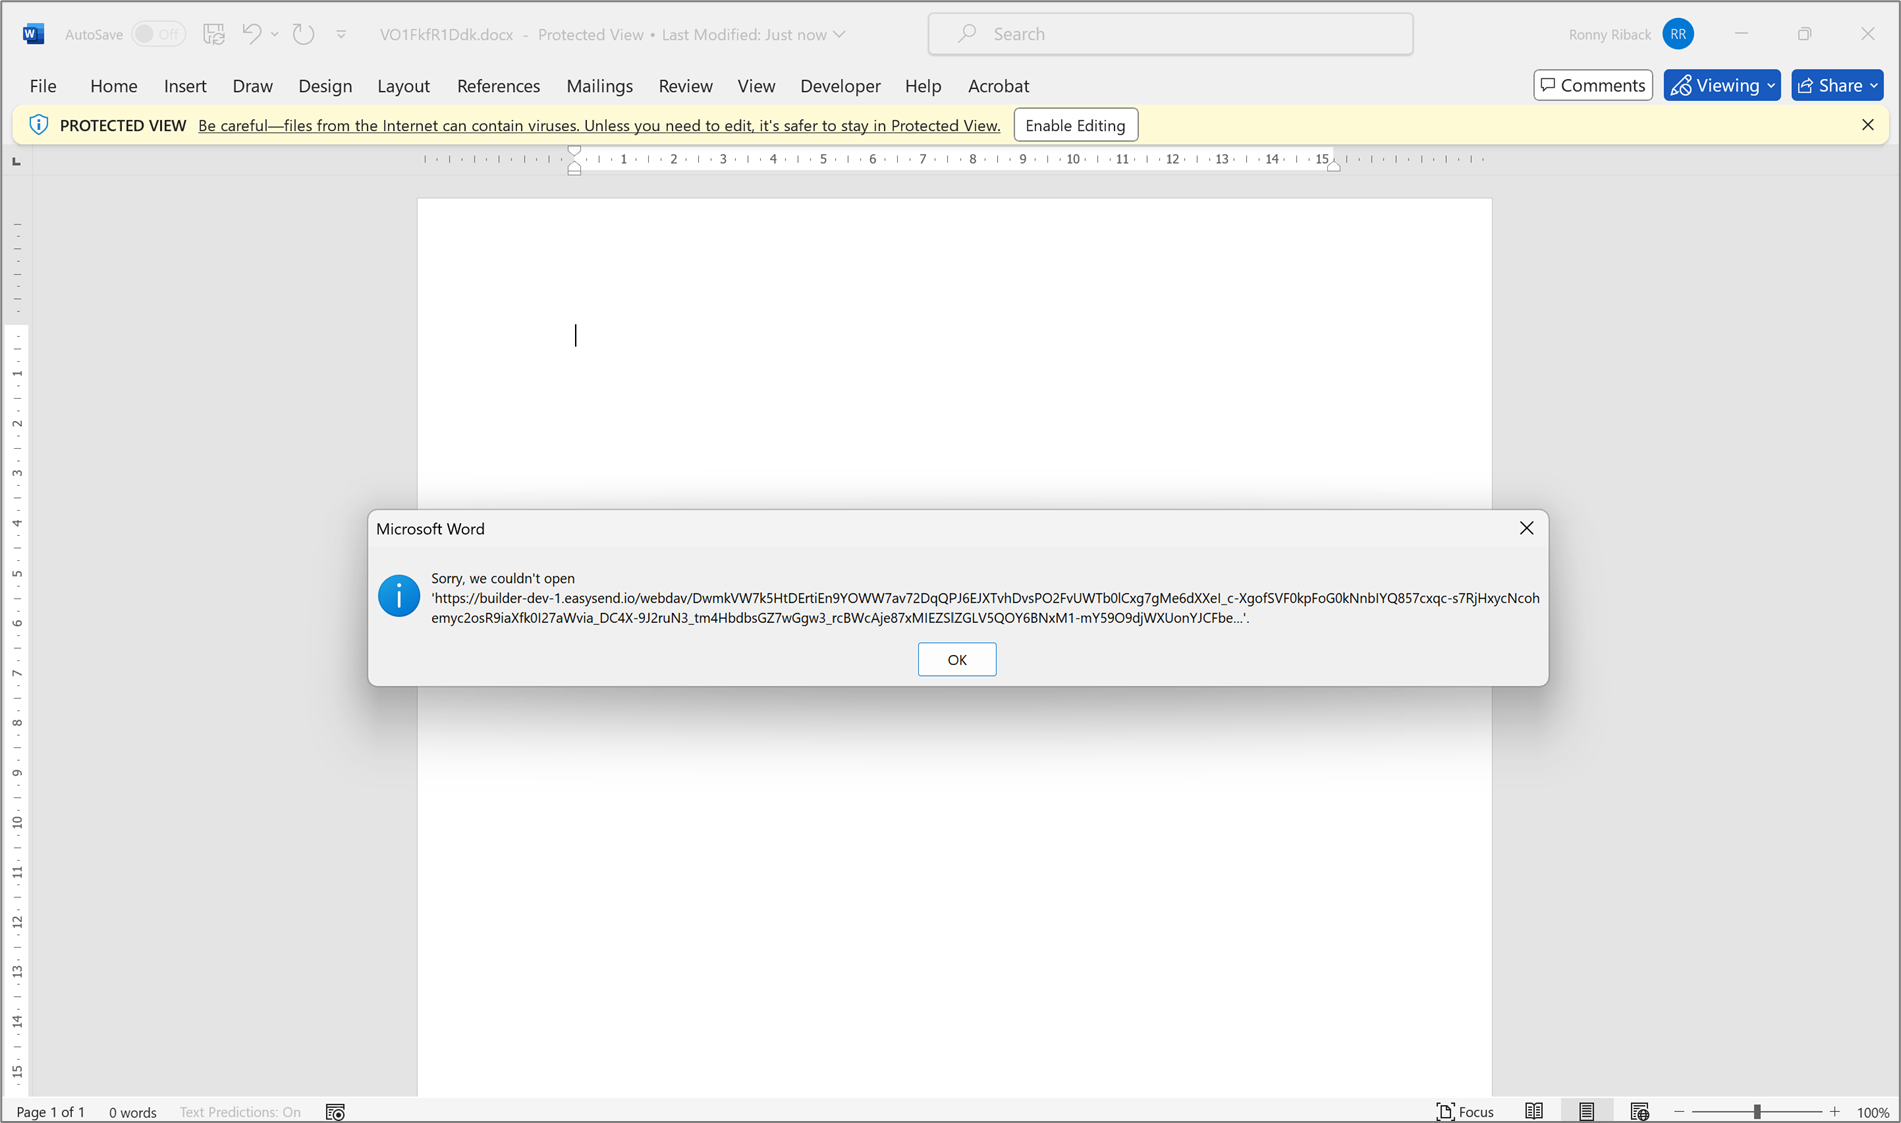
Figure 107: Error Message
perform the following steps:
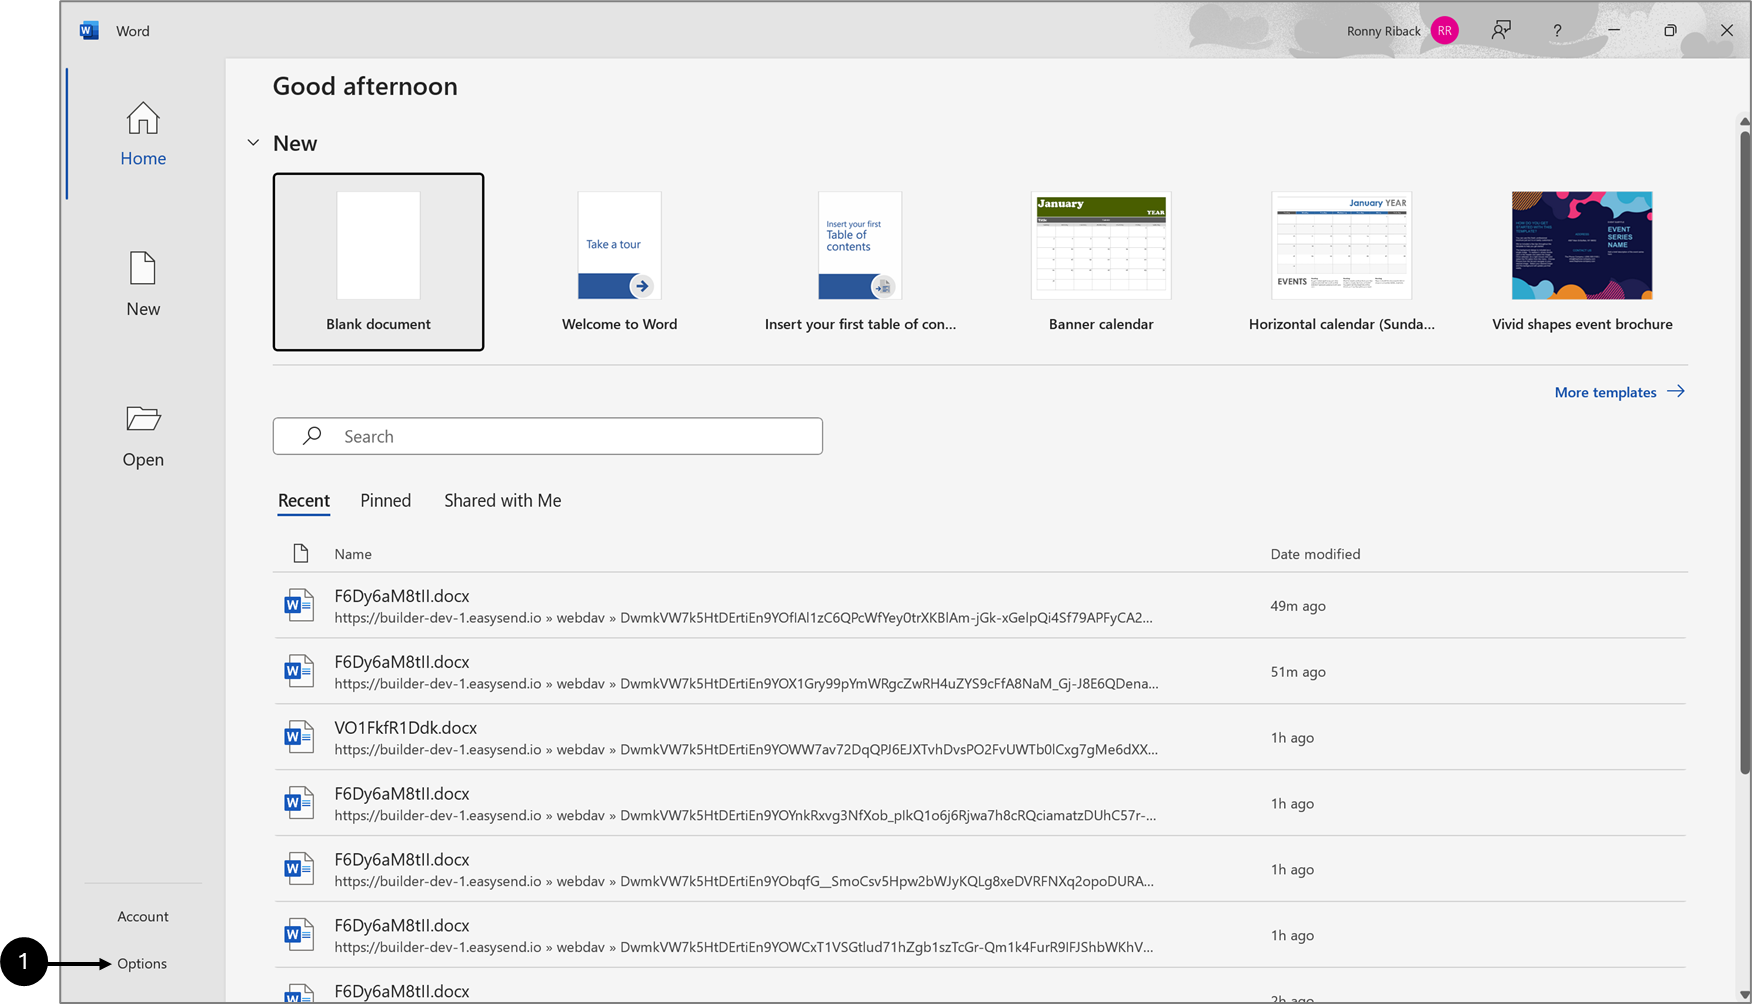
Figure 108: Options
- Open Microsoft Word on your machine locally.
- Click Options (1).
Result:
Word Options window appears:
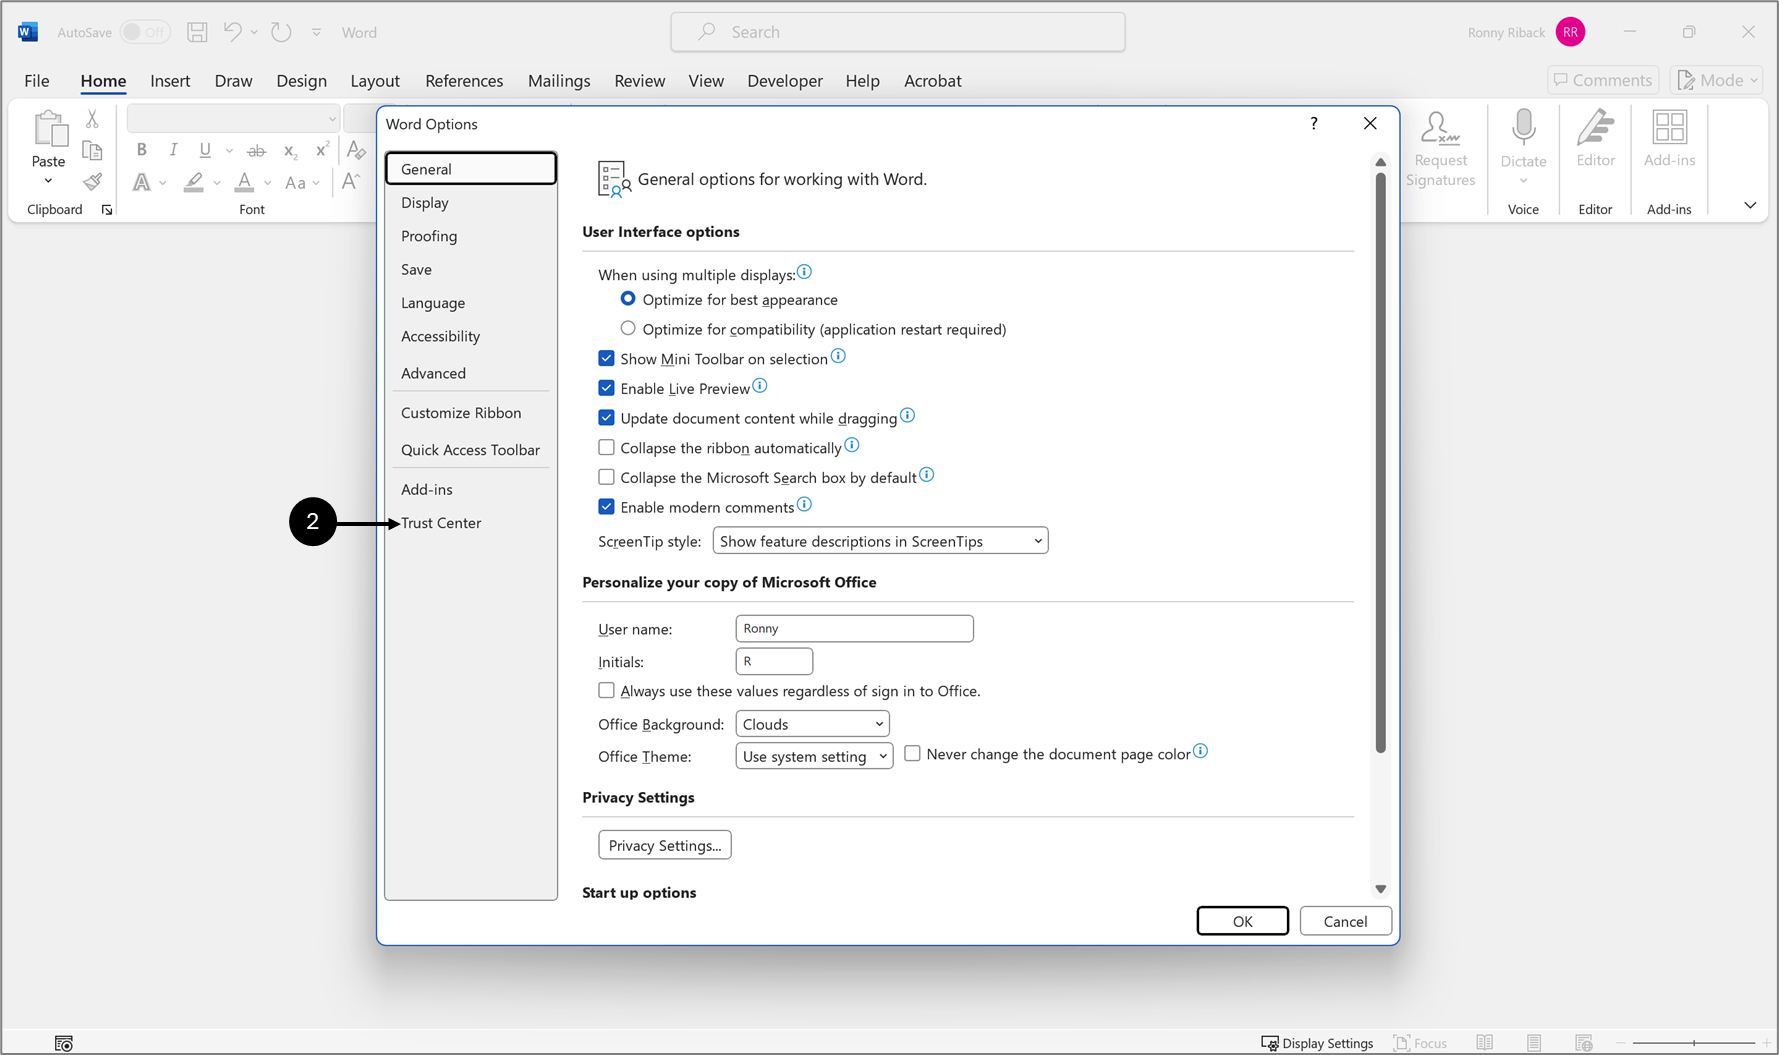
Figure 109: Trust Center
- Click Trust Center (2).
Result:
Trust Center options appear:
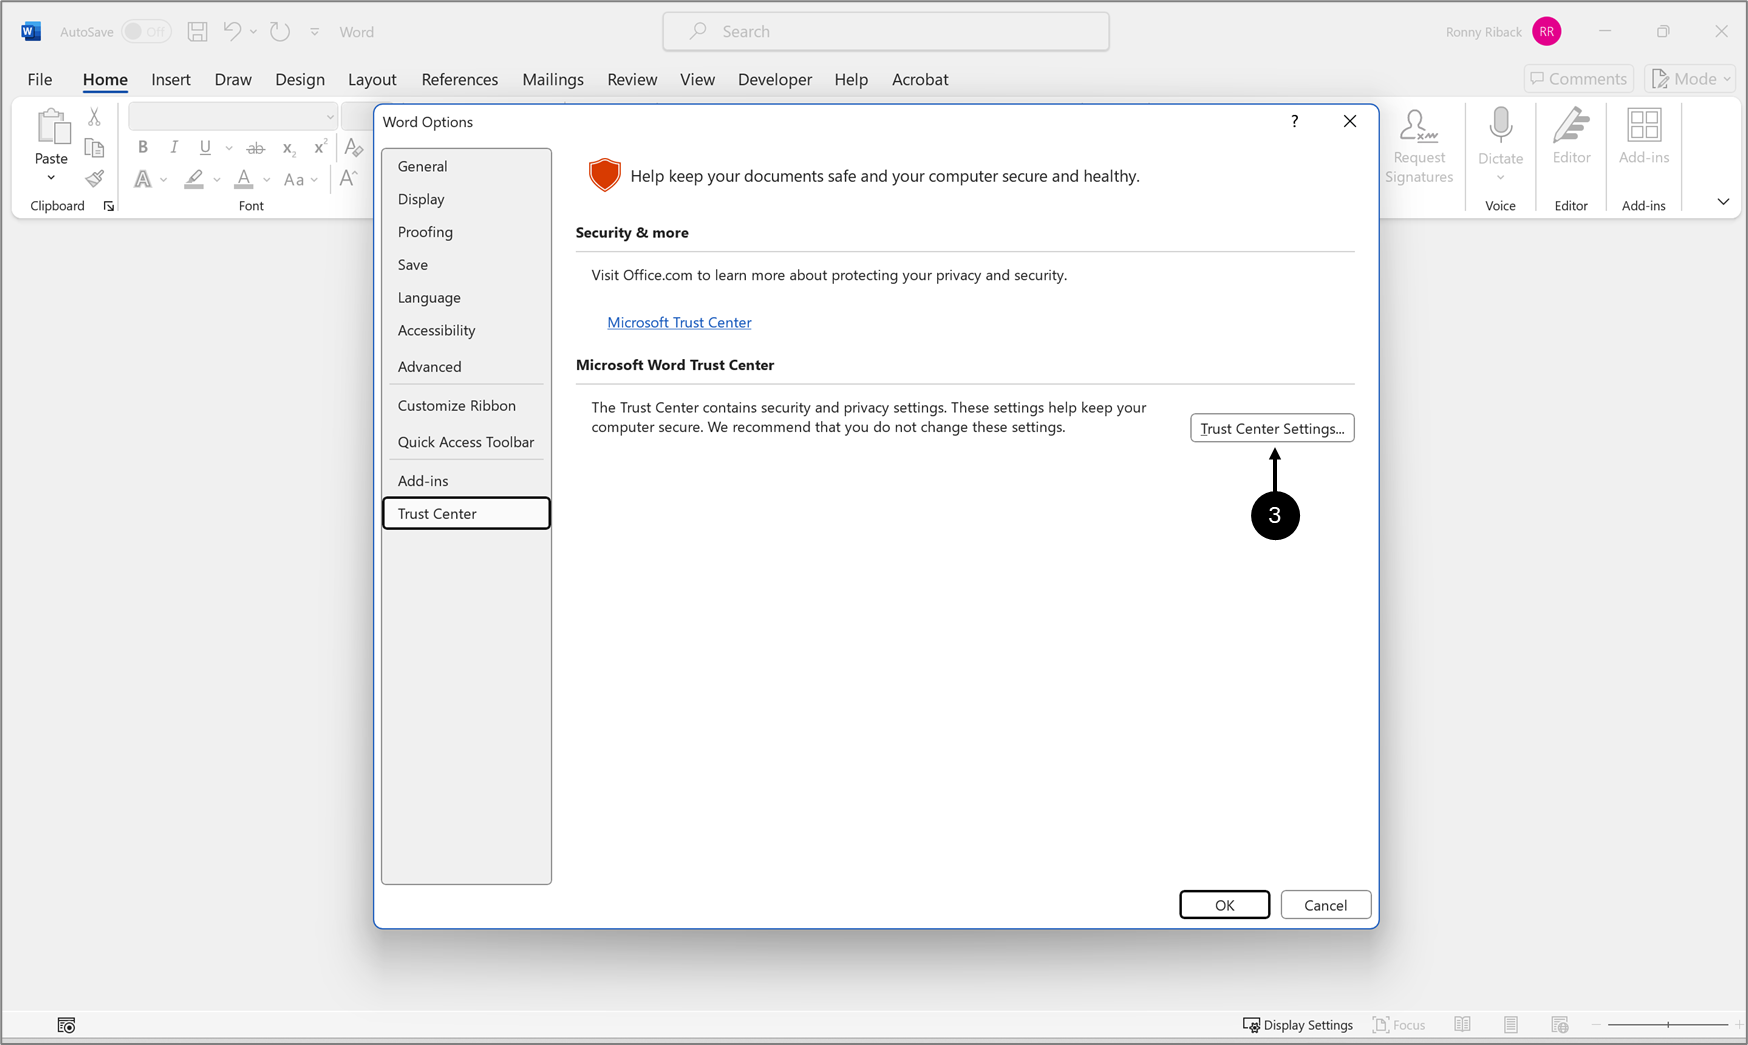
Figure 110: Trust Center Settings
- Click Trust Center Settings (3).
Result:
Trust Center settings appear:
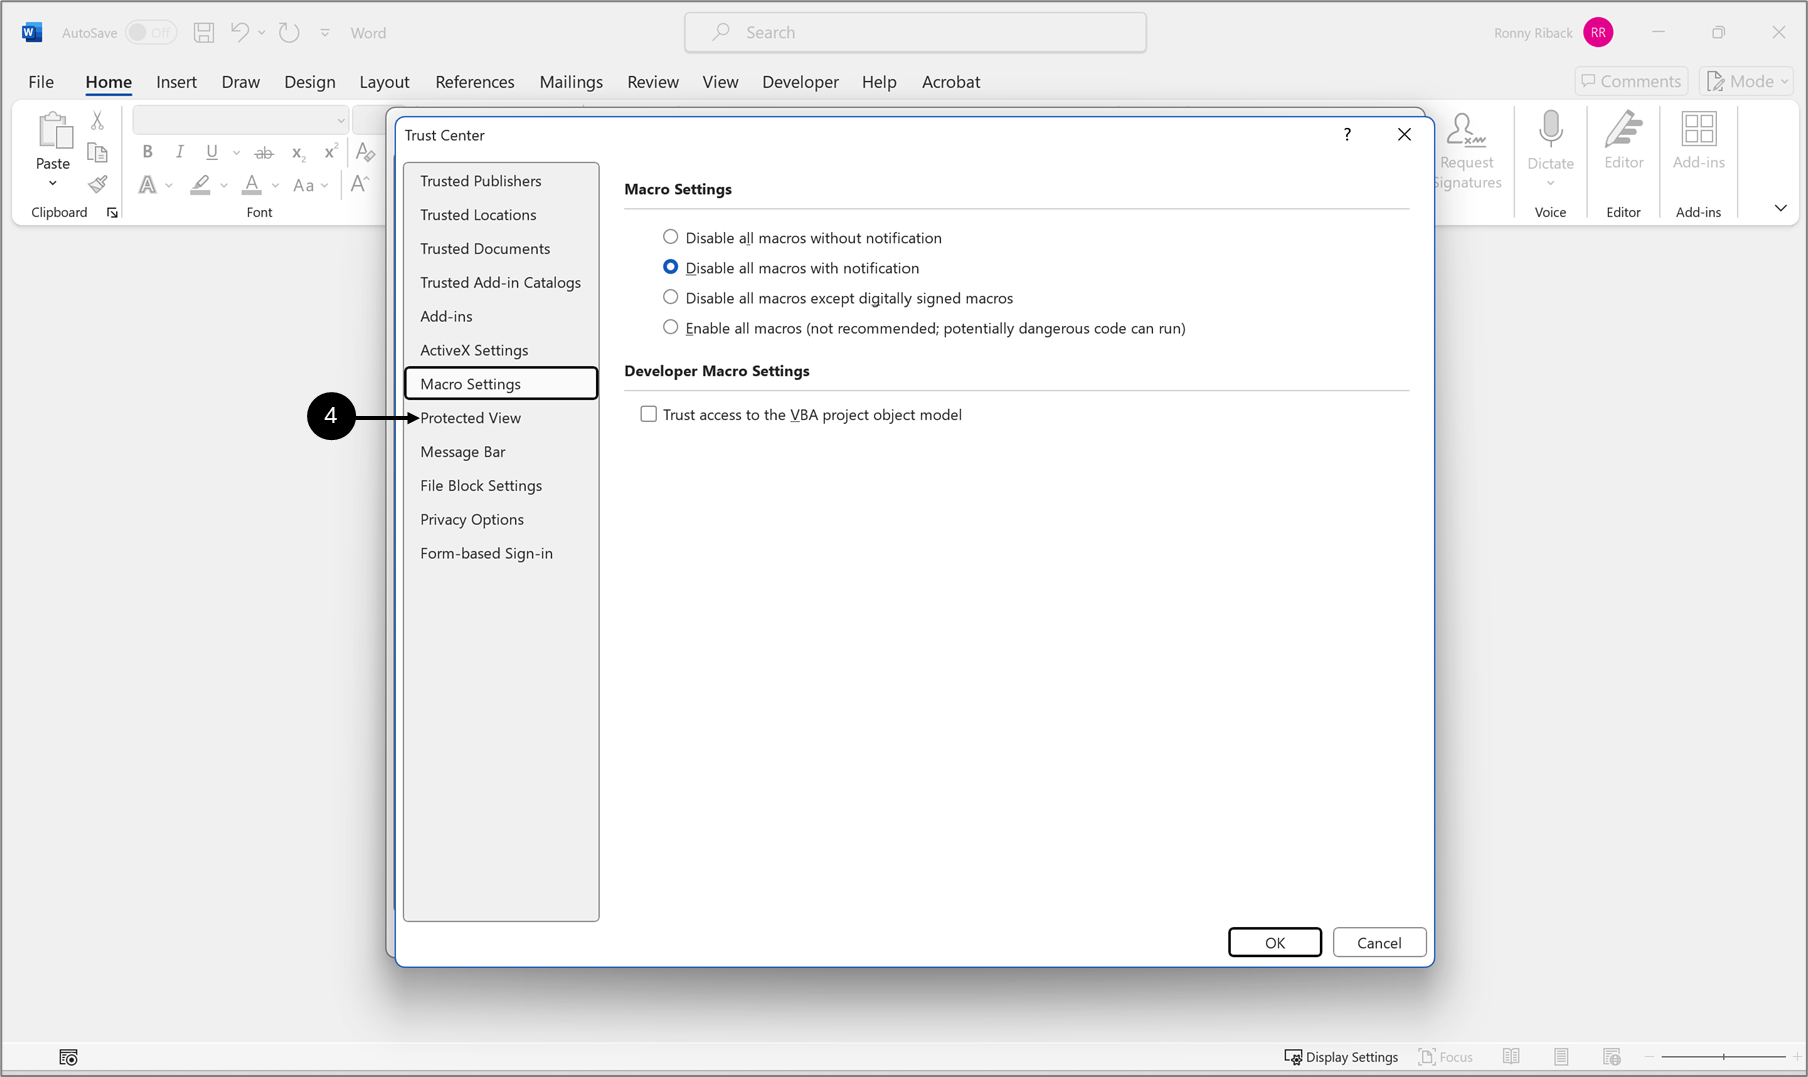
Figure 111: Protected View
- Click Protected View (4).
Result:
Protected View checkboxes appear:
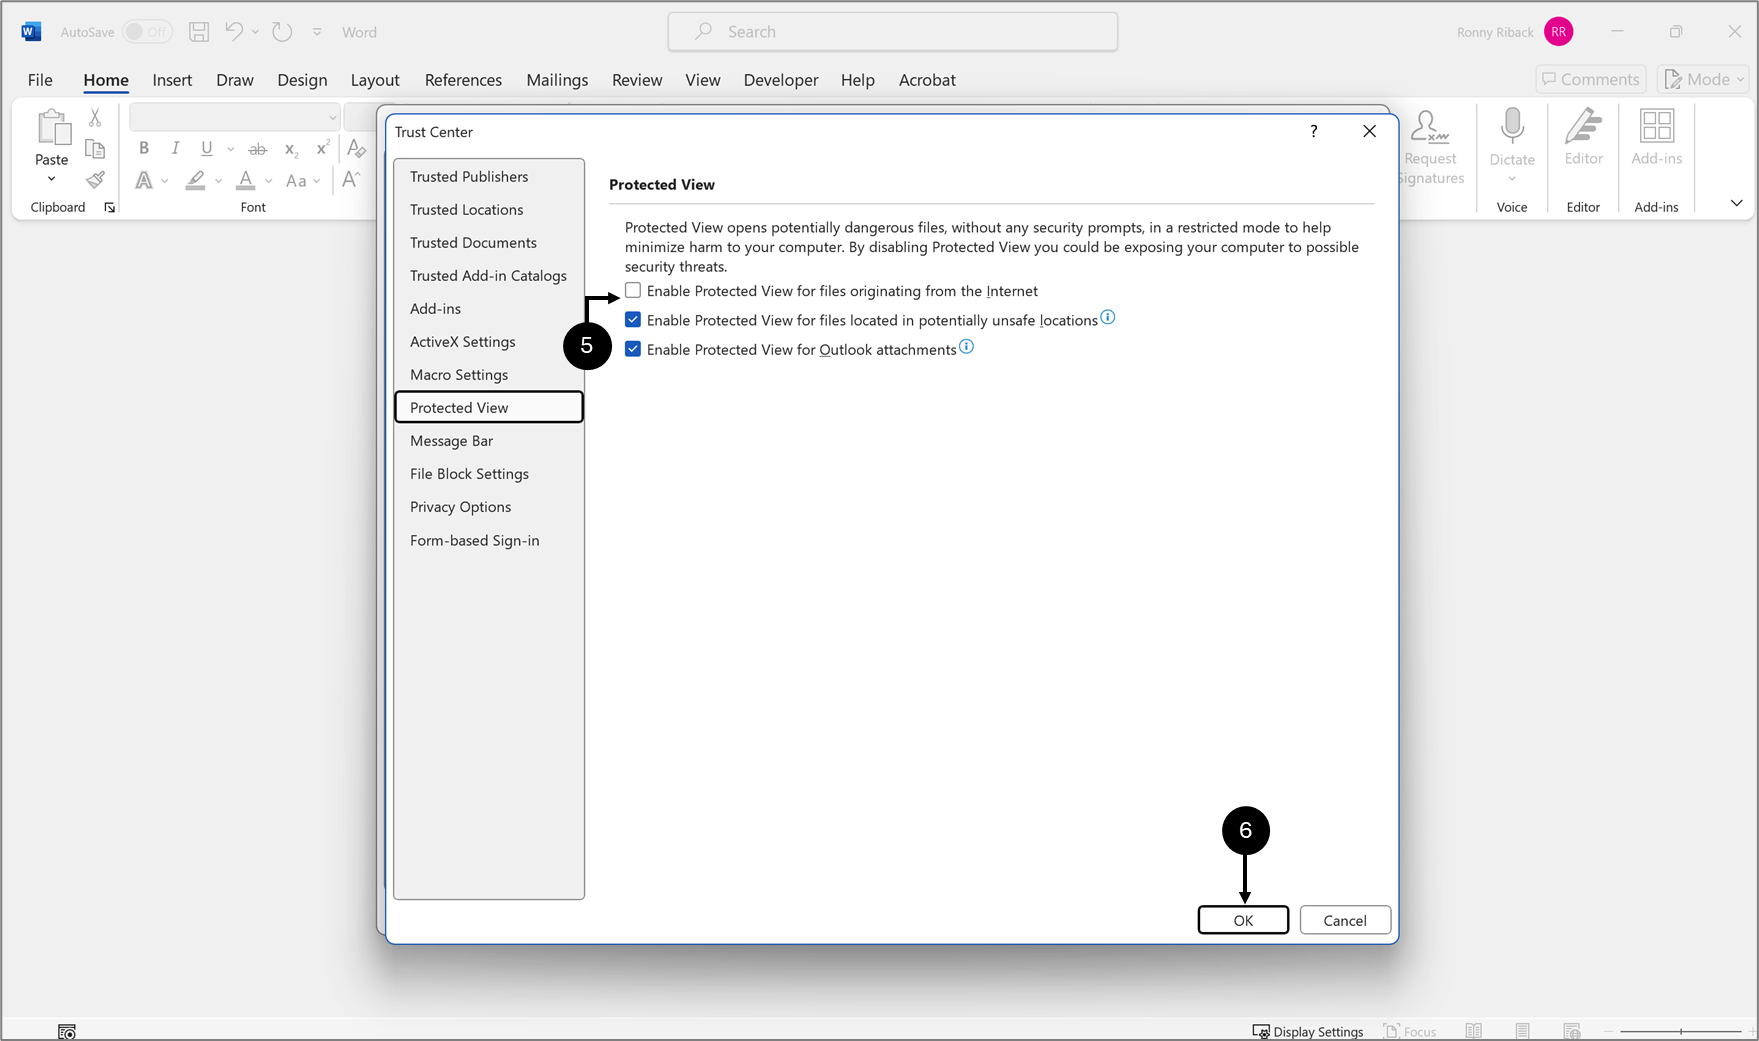
Figure 112: Protected View Checkboxes
- Uncheck the Enable Protected View for files originating form the Internet checkbox (5).
- Click OK (6).
General Troubleshooting
Table 1 describes malfunctions that may occur when trying to create and use a dynamic document. The table also describes the reason/s for the malfunctions and provides possible solutions.
Table 1: Troubleshooting
Number | Malfunction | Reason/s | Solution/s |
| 1 | The dynamic document feature is not available | The feature is not enabled | Please contact our support team |
| 2 | Add-in installation failed | Your MS Word version is lower than 2019, or, you are not using Microsoft 365 | Please contact your IT support team |
3 | Cannot create a new dynamic document | The name of the new dynamic document is already in use | Choose another name to proceed, for additional information, see the Creating a New Dynamic Document section |
| 4 | The Word document opens with an error message in the Add-in | You did not open the Word document using the Builder platform | Open the Word document using the Builder platform as described in the Uploading and Opening Document section |
5 | Cannot deploy the digital process | A dynamic document is not attached to the Preview component | Attach a dynamic document to the Preview component |
6 | When opening a Microsoft Word document, the Add-in is not available |
|
|
| 7 | (For MAC users only) Your current Add-in does not match EasySend's Add-in | The Add-in was installed from the Apple App store | Download the Add-in from the Microsoft App store as described in the Downloading EasySend Microsoft Add-in section |
FAQ - Dynamic Documents
The following sections contain FAQs about dynamic documents.
Question 1 - Components visibility
Is it possible to change a component's visibility in a dynamic document without removing it?
Answer
(See Figure 113)
Yes it is possible to change a component's visibility without removing it by using conditions and expressions, for example:
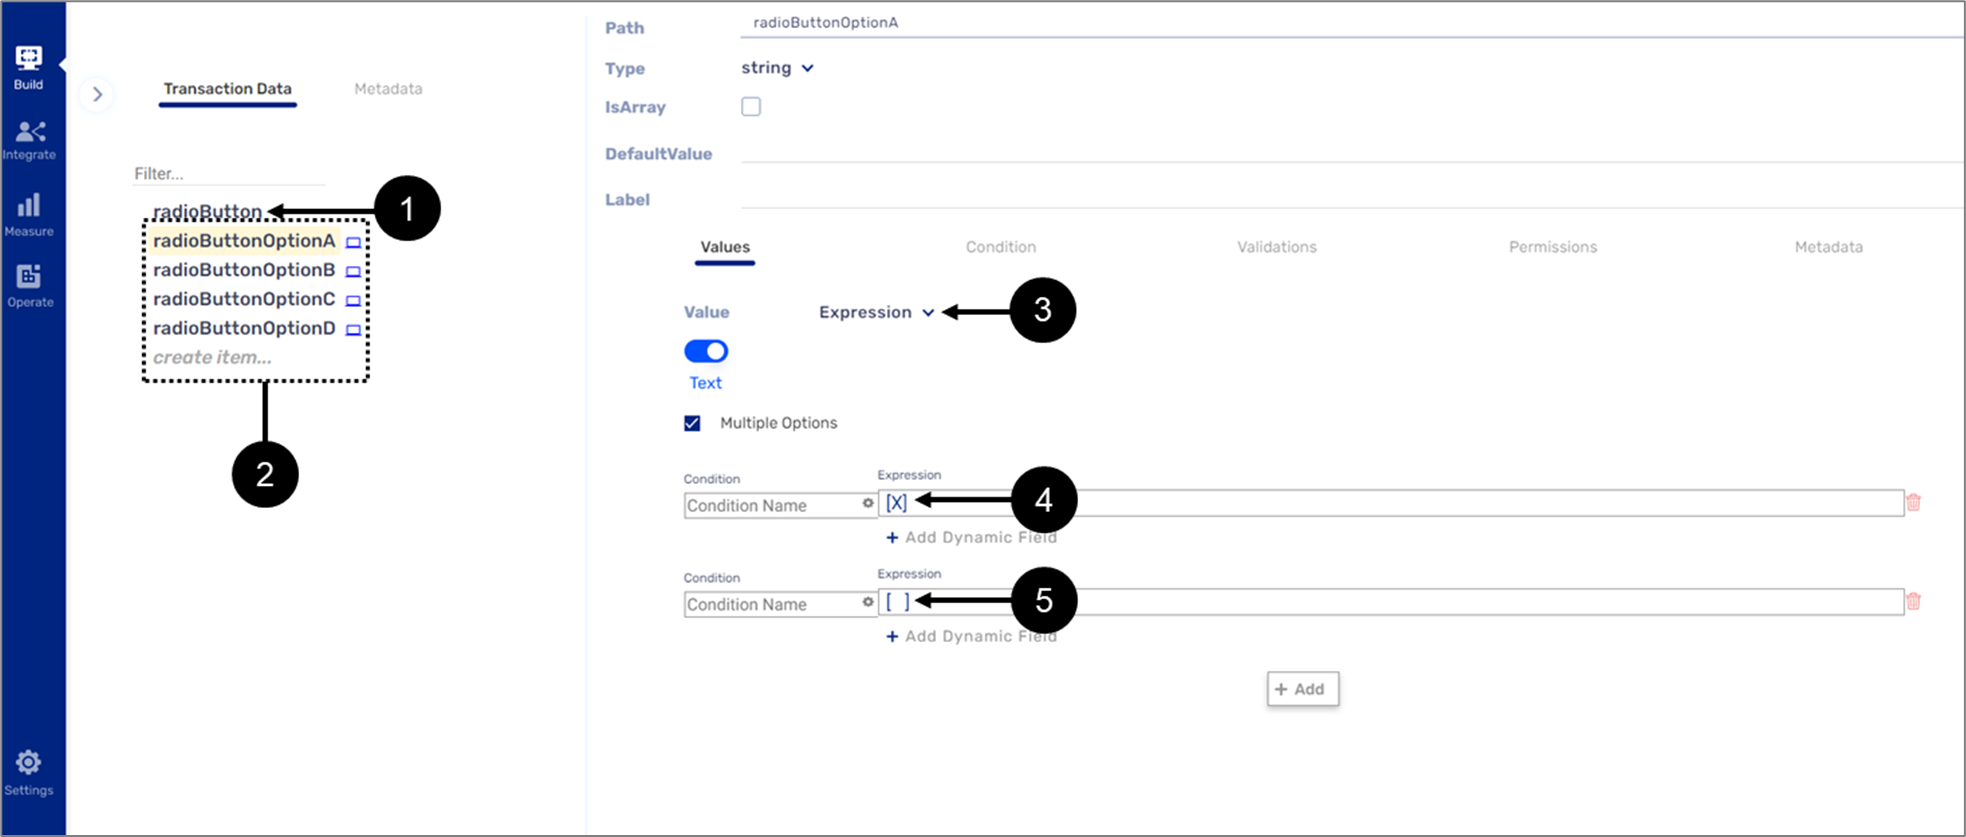
Figure 113: Missing Options from Navigation Bar
- Access the Model screen.
- For a radio button component (1) for example, create new data items (2) that represent its options.
- For each data item:
- Set the Value dropdown to Expression (3).
- Create conditions and expressions that will add the desired characters, for example: [X] (4) or [ ] (5).
- Repeat step 3 as necessary.
- Use the data items in the dynamic document (instead of using blocks).
Question 2 - Removing Automatic Headers
Is it possible to remove headers that were automatically added, because of specific user settings, to the dynamic document after a save action?
Answer
(See Figure 114 and Figure 115)
Yes it is possible to remove headers that were automatically added, because of specific user settings, to the dynamic document after a save action, for example:

Figure 114: Insert Tab and Header
- On the dynamic document click the Insert tab (1).
- Click Header (2).
Result:
The Built-in window appears:
- Click Remove Header (3).
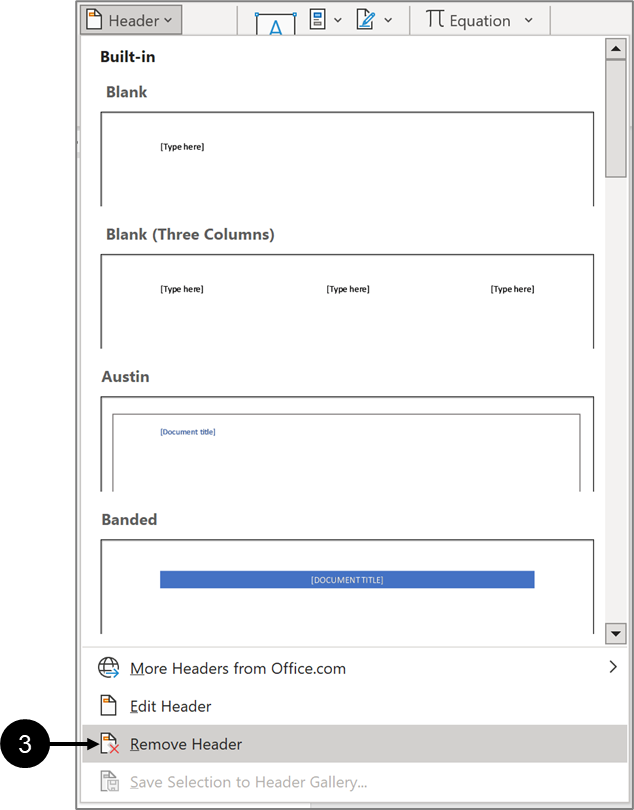
Figure 115: Remove Header
Question 3 - Starting a Section on a New Page without Blank Pages
How can I start a section on a new page without leaving multiple blank pages in the middle?
Answer
To start a new section on a new page, use the Page Break marker. If there are multiple pages with a condition before the Page Break marker and the condition is not met, those pages will remain empty. To avoid this, place the Page Break marker (or multiple Page Break markers if needed) inside the condition. For example:
- If there are two pages under condition A, at the beginning of the conditional pages, add a conditional Page Break marker in case condition A is not fulfilled.
- At the end of the conditional pages, add a conditional Page Break in case condition A will be fulfilled. This way, a Page Break will be added, without blank pages in the middle.
Question 4 - Paragraph and Title Grouping
How can I group paragraphs and/or titles?
Answer
Please read the instructions found here.

