Article Overview
The following article describes EasySend's autocomplete service.
The Autocomplete Service
The autocomplete service helps digital process end-users fill out information faster by completing their inputs automatically, based on generated predictions.
Navigating to the AutoComplete Tab
(See Figure 1 to Figure 3)
Autocomplete services in your environment are accessible using the Integrate tab (1) and the Services screen (2).
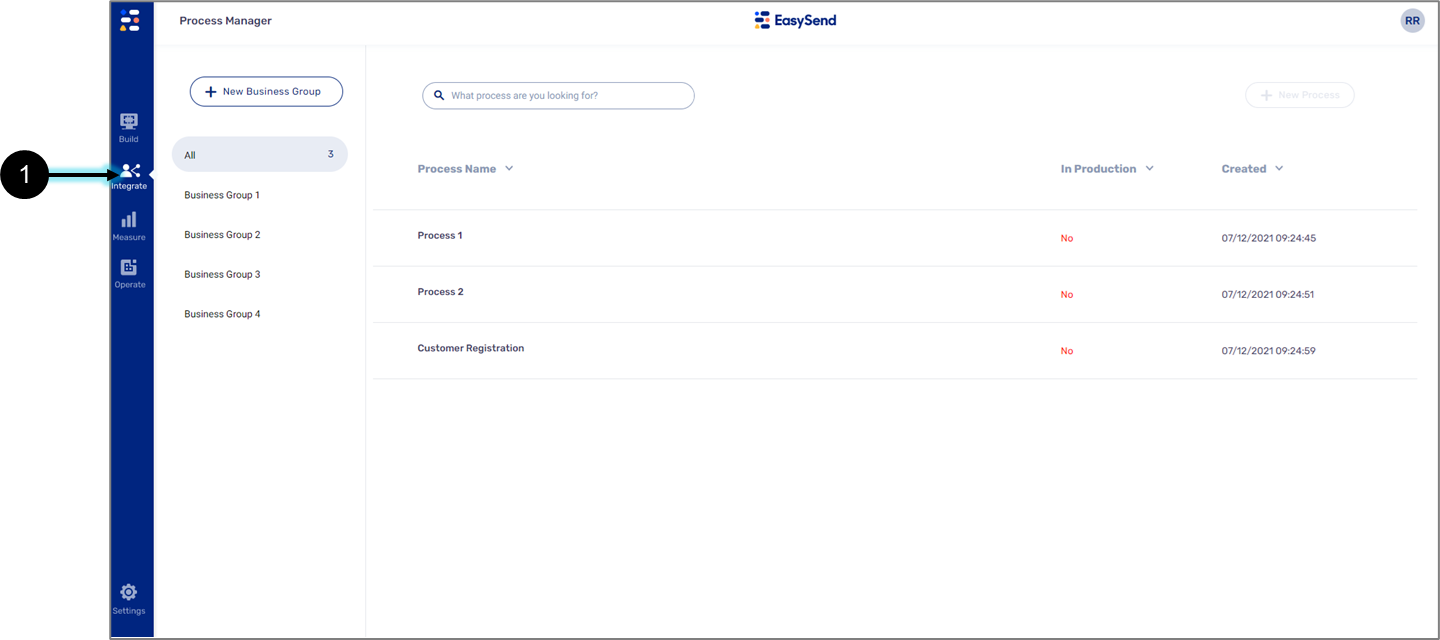
Figure 1: Integrate Tab
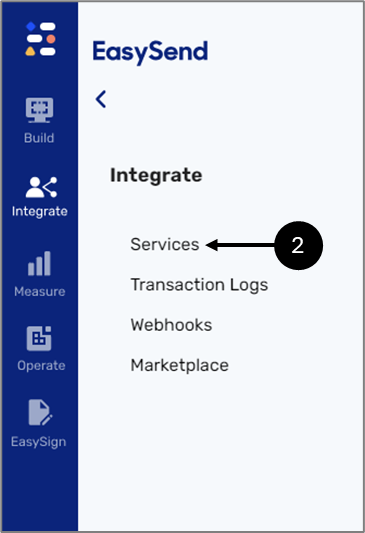
Figure 2: Services
The Services screen contains several tabs including the AutoComplete tab (3).
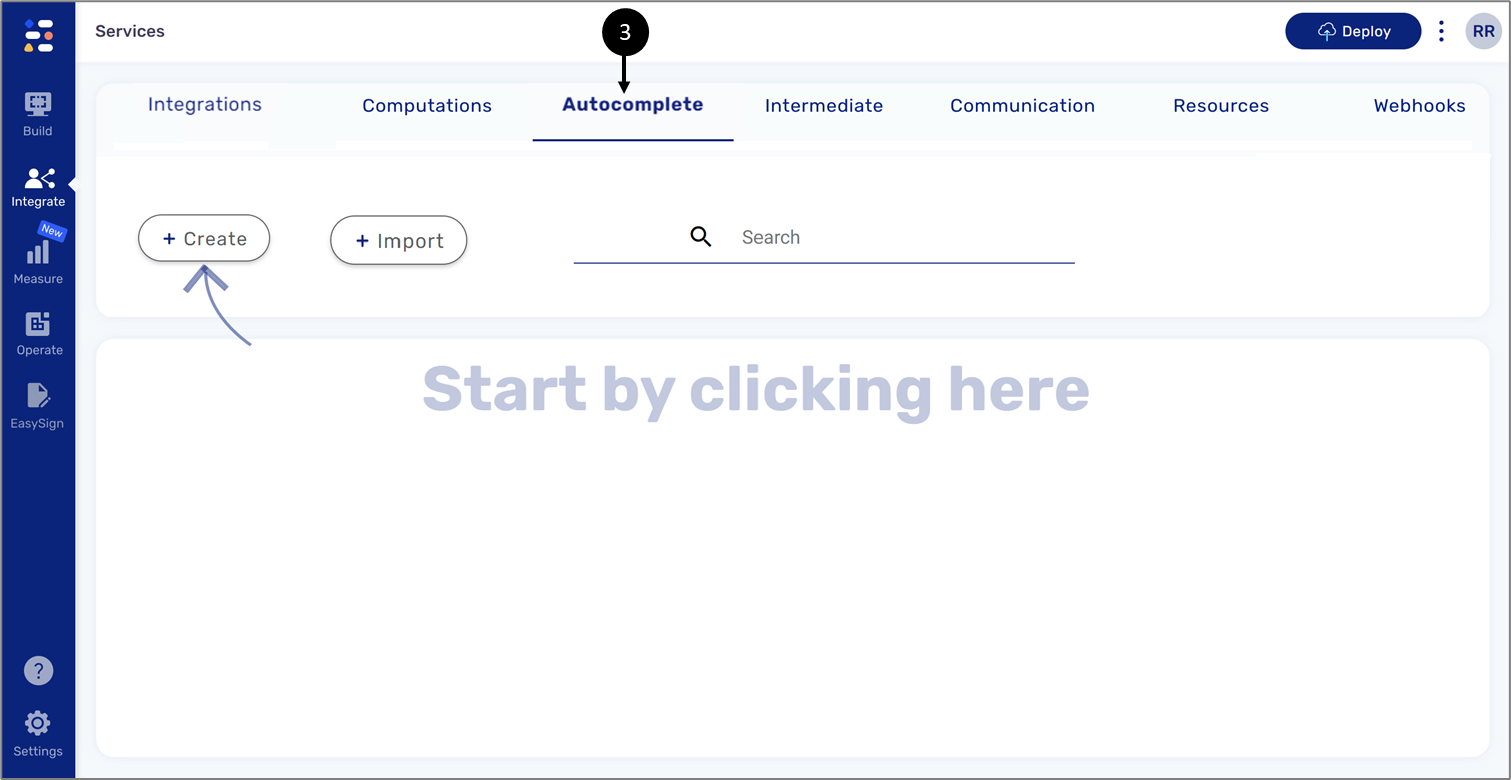
Figure 3: Autocomplete Tab
Creating an Autocomplete Service
(See Figure 4)
Autocomplete services can be created (1) or imported (2). When creating a new service, we need to select whether it is simple or advanced (3).
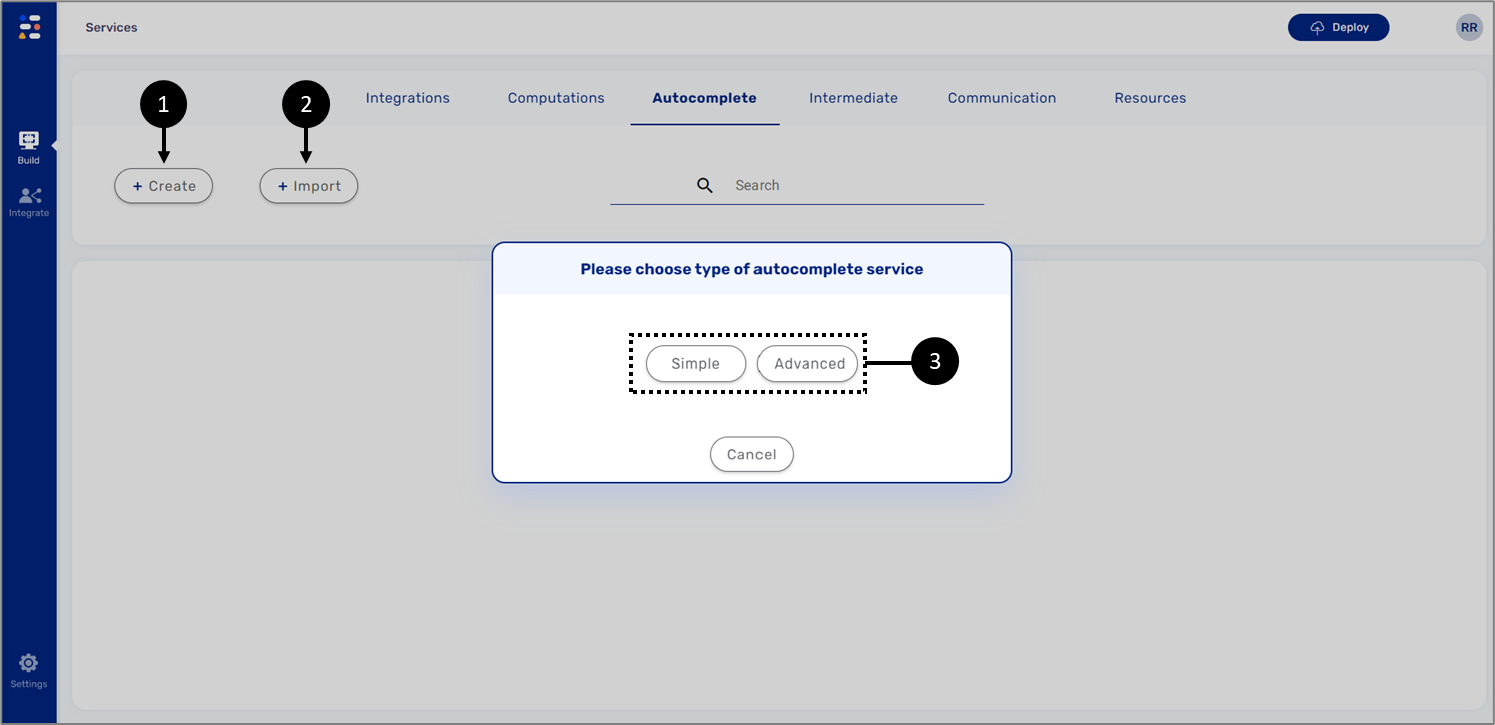
Figure 4: Creating a New Autocomplete
Simple Autocomplete service
(See Figure 5 and Figure 6)
When creating a simple autocomplete service, the Names (1) and the values (2) are added (3) and written manually.
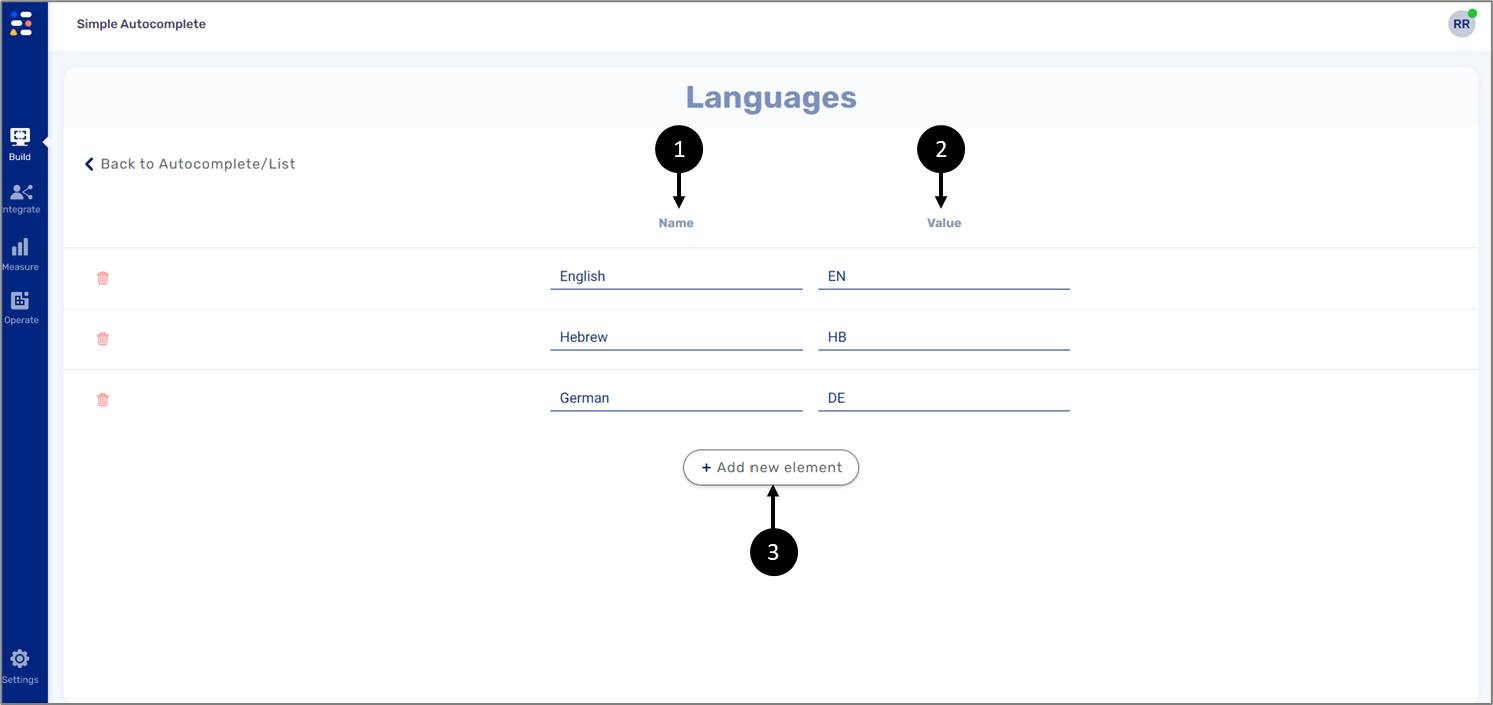
Figure 5: Simple Autocomplete
The names will be displayed to end-users for an autocomplete action when they input information. Values are used internally for conditions or expressions, for example:
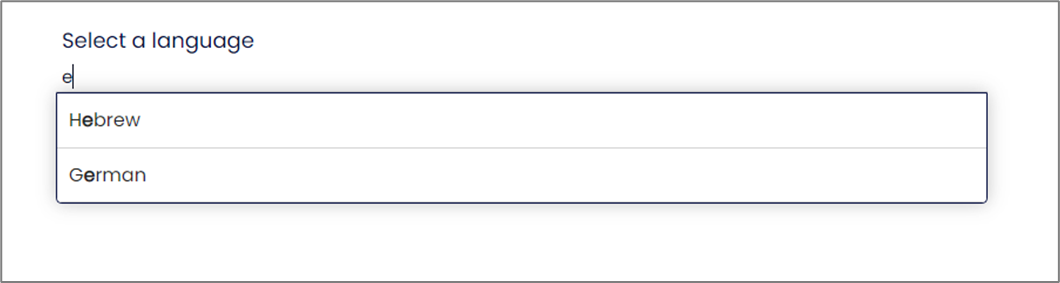
Figure 6: Simple Autocomplete Example
Advanced Autocomplete service
(See Figure 7)
When creating an advanced autocomplete service, three sections appear:
- Inputs (1)
- Different steps (2)
- Outputs (3)
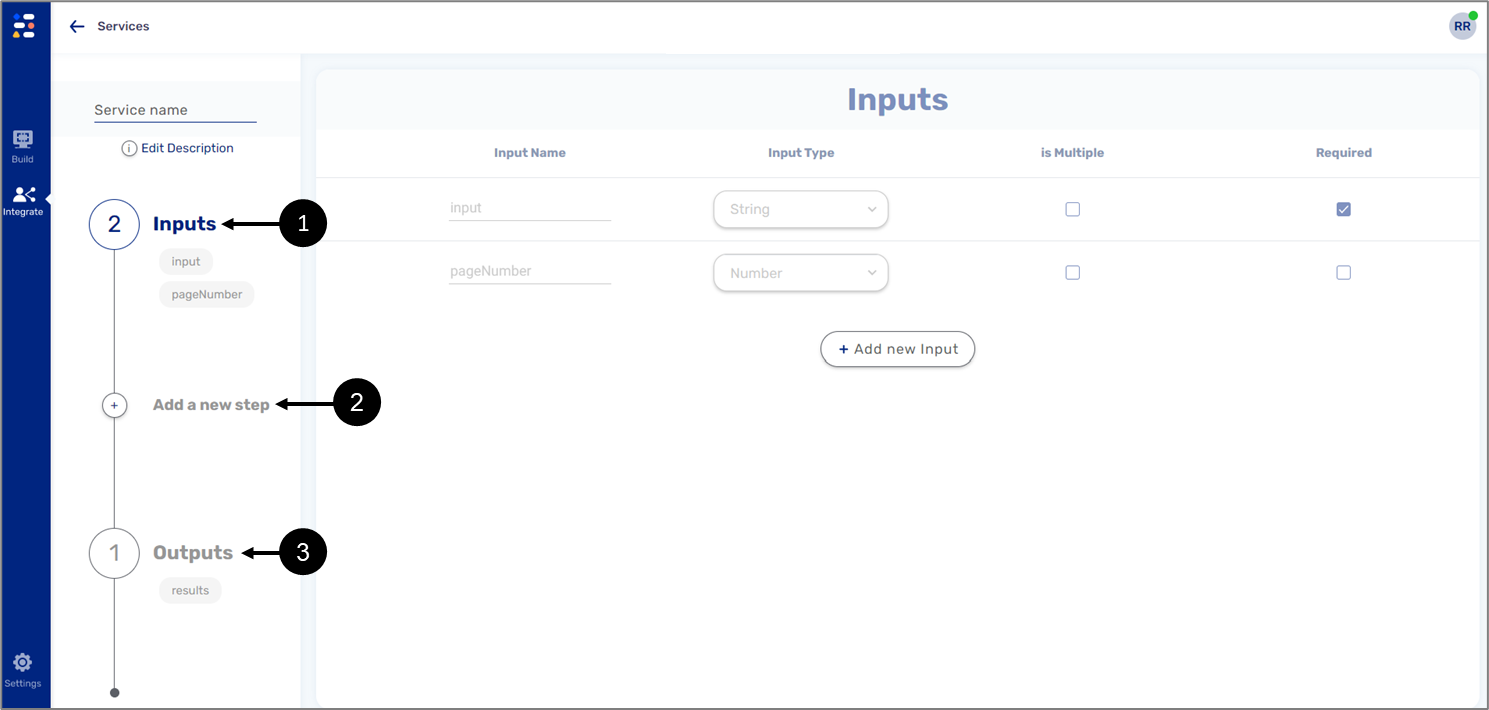
Figure 7: Simple Autocomplete
Advanced Autocomplete Service Structure
The following sections describe the structure of an autocomplete service.
Inputs
(See Figure 8)
By default, an advanced autocomplete service contains two inputs:
- input (string type) (1)
- pageNumber (number) (2)
The default inputs indicate that the autocomplete service will be triggered when the digital process's end-user inputs data. If additional inputs are required they can be added by clicking the +Add new Input button (3).
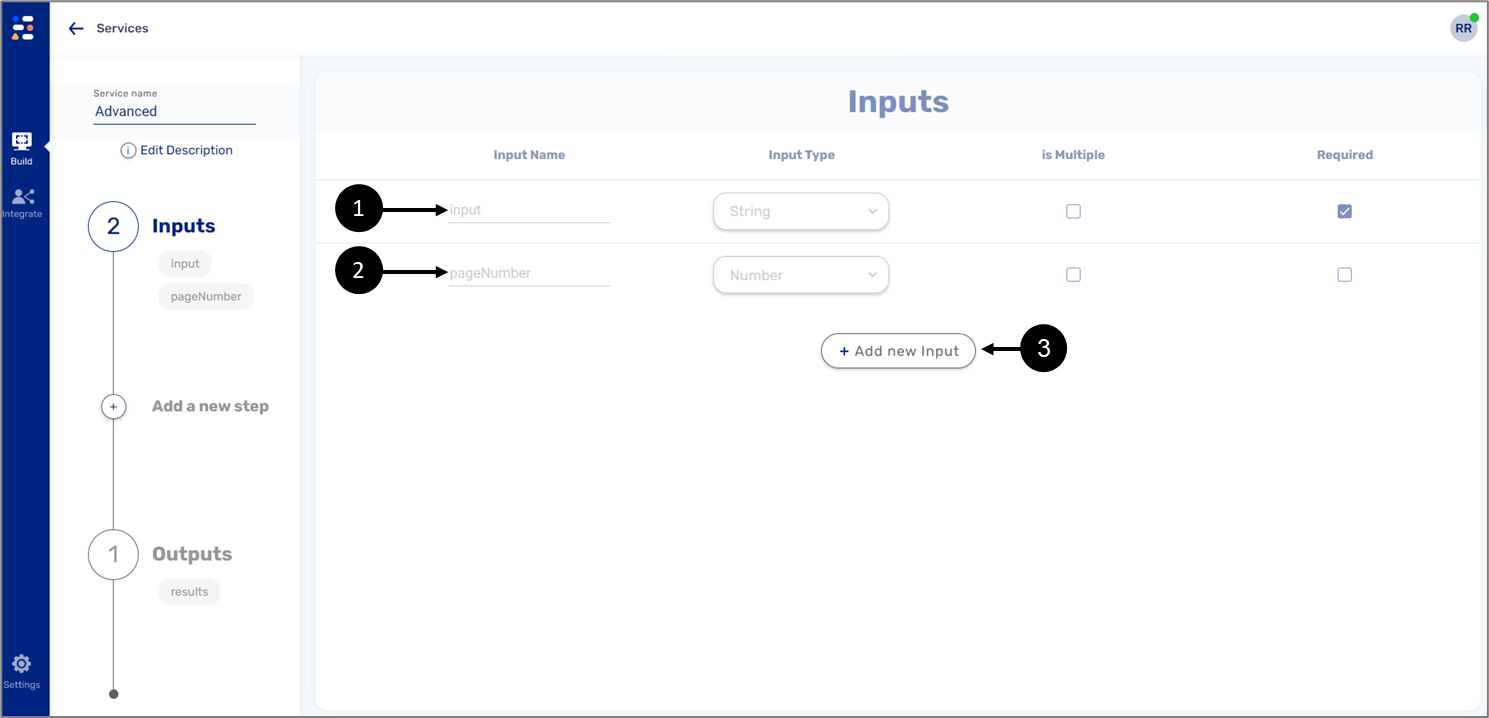
Figure 8: Inputs
Steps
The most common steps to use in an autocomplete service are:
- Rest API Service
- Code Block
Rest API Service
(See Figure 9 and Figure 10)
This step will be used when the data input by the end-user is sent as an API request.
- When using this step, the following information must be detailed under Request (1):
- The URL of the API (2) - provided by the customer or by EasySend.
- Method (3):
- POST
- GET
- PUT
- Content (4):
- Trigger directly from the server
- Request Content Type:
- JSON
- form-data
- Raw String
- Blob
- Content Name
- Type:
- String
- Number
- Boolean
- Object
- Source:
- Model
- Constant
- Metadata
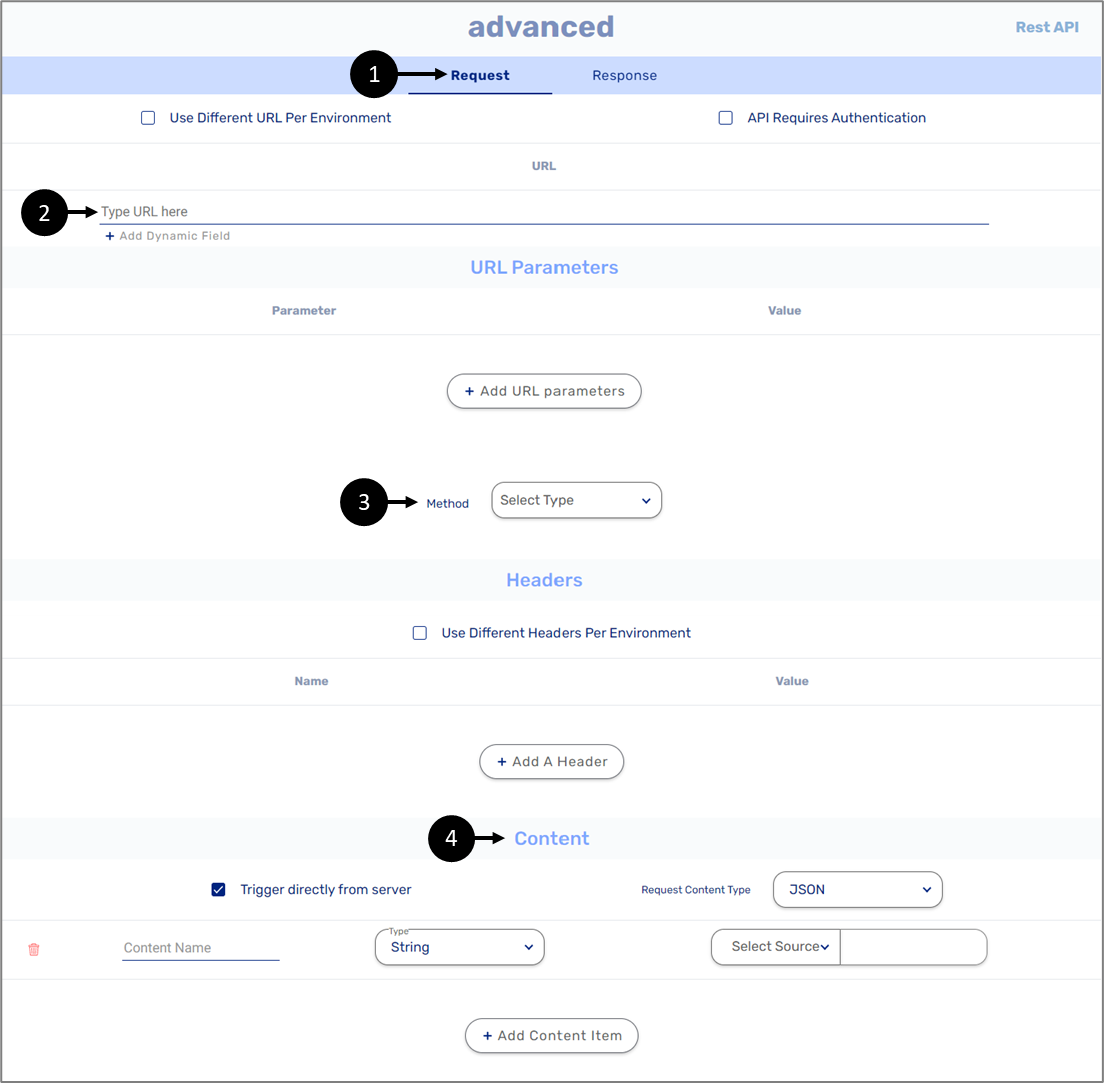
Figure 9: Rest API - Request
- When using this step, the following information must be detailed under Response (5):
- Response Content Type (6):
- JSON
- form-data
- Raw String
- Blob
- Outputs (7):
- Output Name
- Output Type:
- String
- Number
- Boolean
- File
- Object
- Any
- is Multiple
- Response Content Type (6):
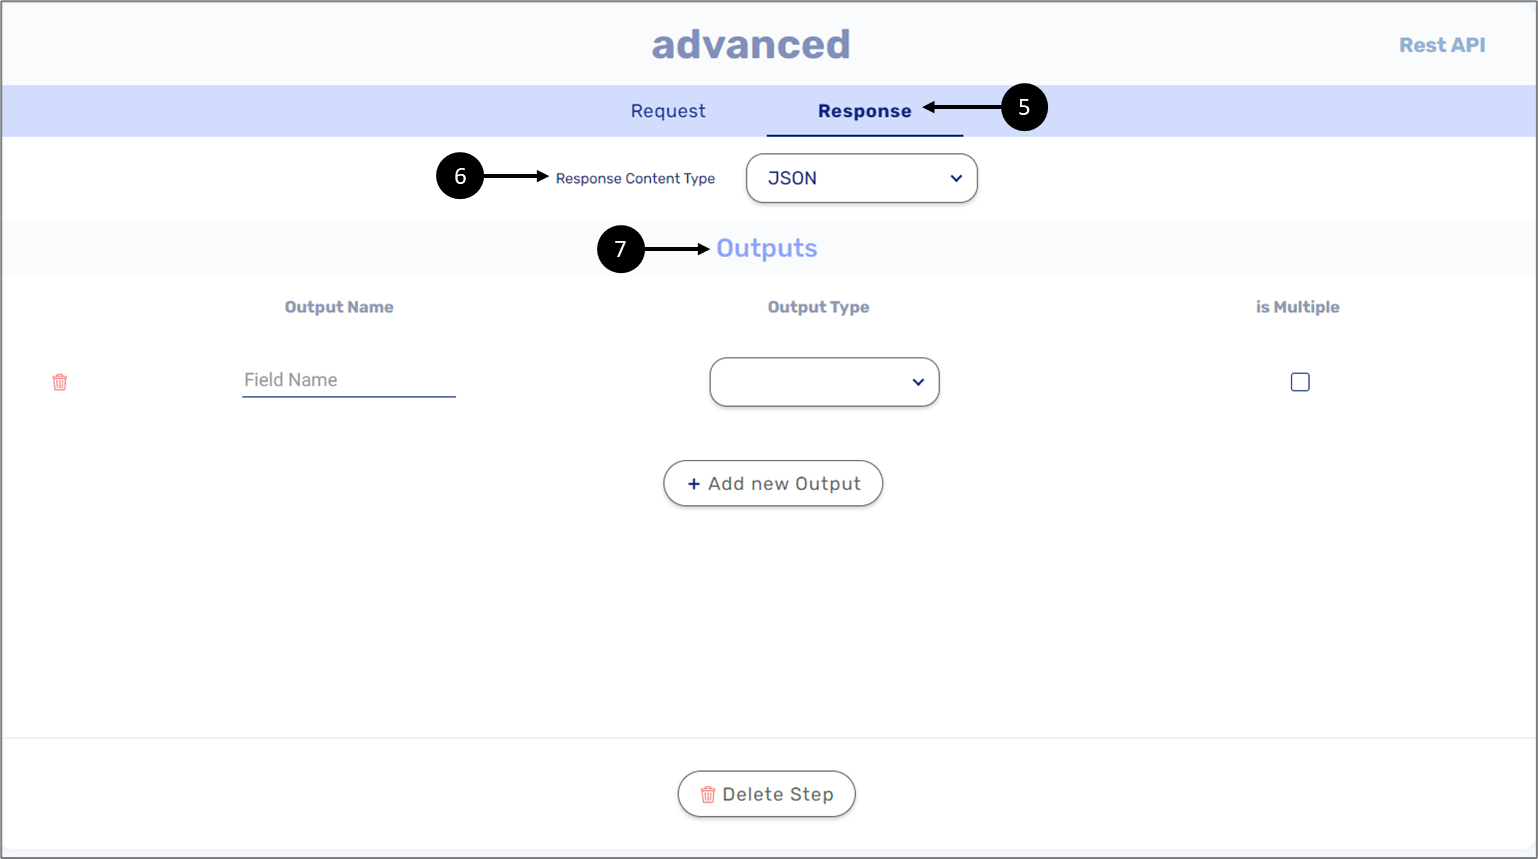
Figure 10: Rest API - Response
Code Block
(See Figure 11)
This step will be used to manipulate service data using JavaScript:
- Code - for example, a code that filters the data that was input by the end-user.
- Inputs - an input specified in the Inputs section.
- Outputs - an output specified in the Outputs section.
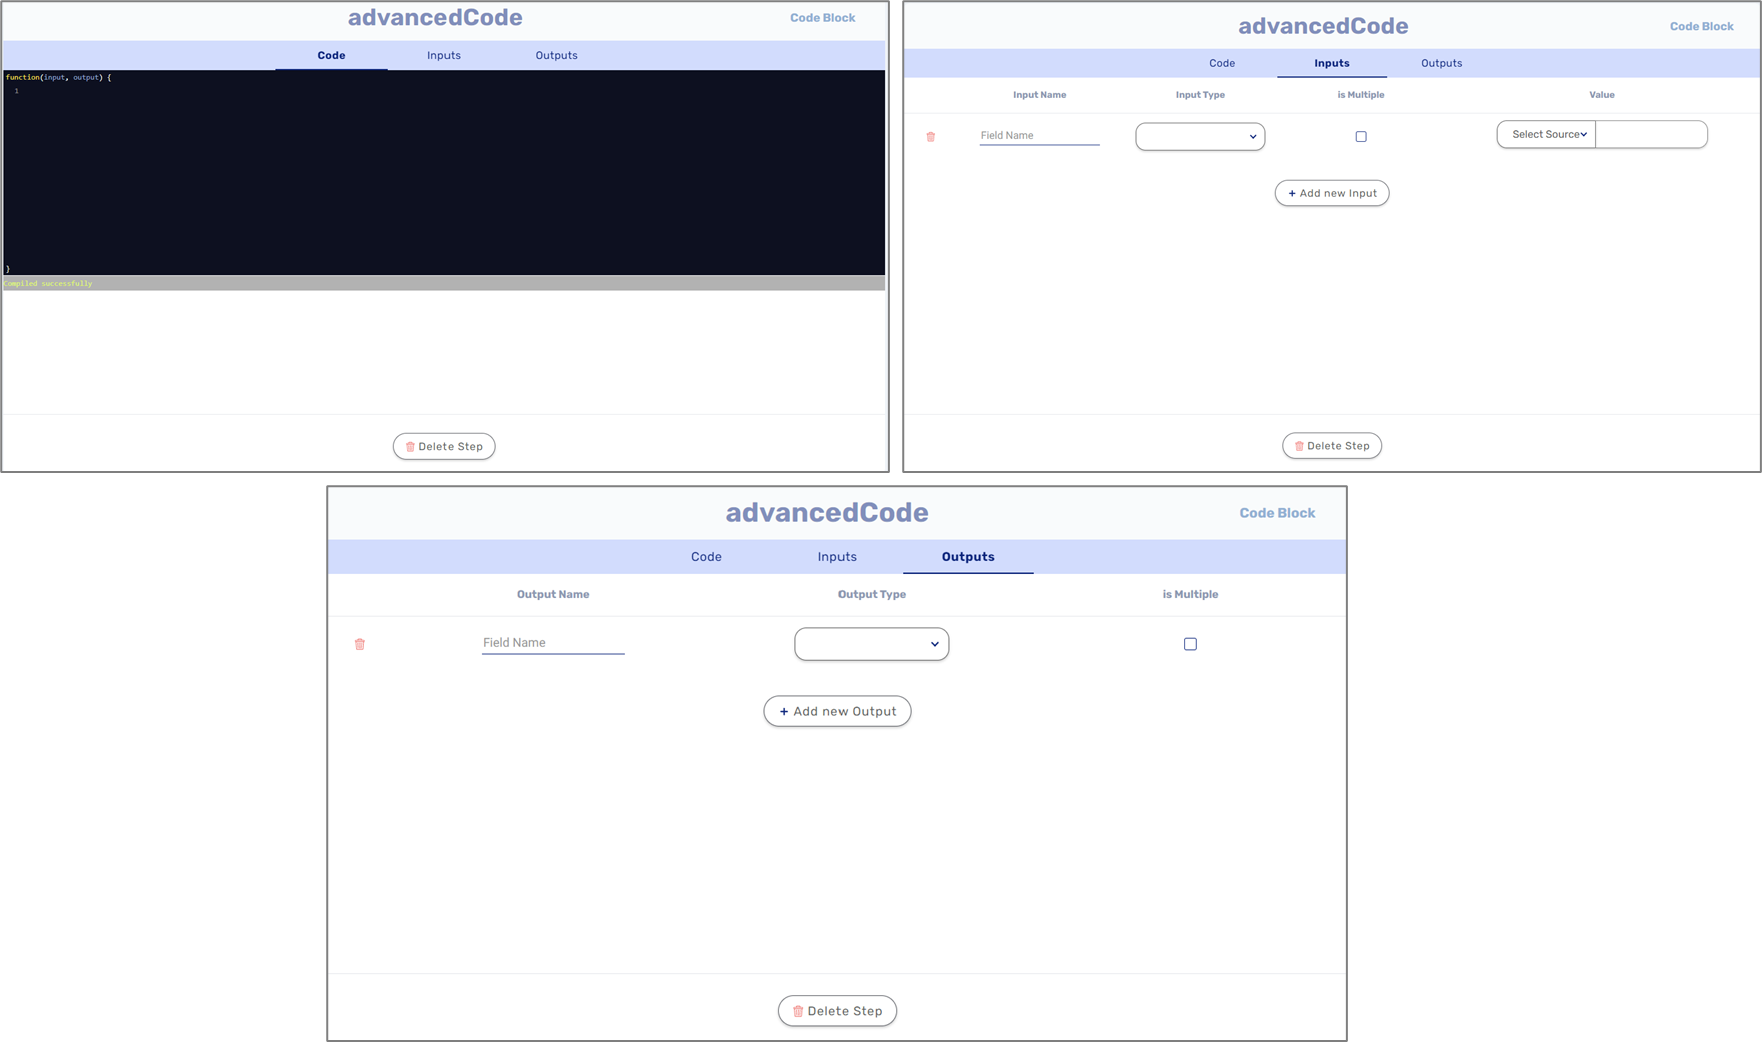
Figure 11: Code Block
Outputs
(See Figure 12)
By default, an advanced autocomplete service contains one output name, results (1), with the following properties:
- Output Type (2) - Object by default with the following structure (see Figure 13):
- results:
- value - data for internal usage such as conditions or expressions.
- displayName - the information displayed to the digital process's end-user.
- results:
- is Multiple (3):
- When checked - indication for an array of values.
- When not checked - indication for a single value.
- Source (4):
- Model
- Constant
- Metadata
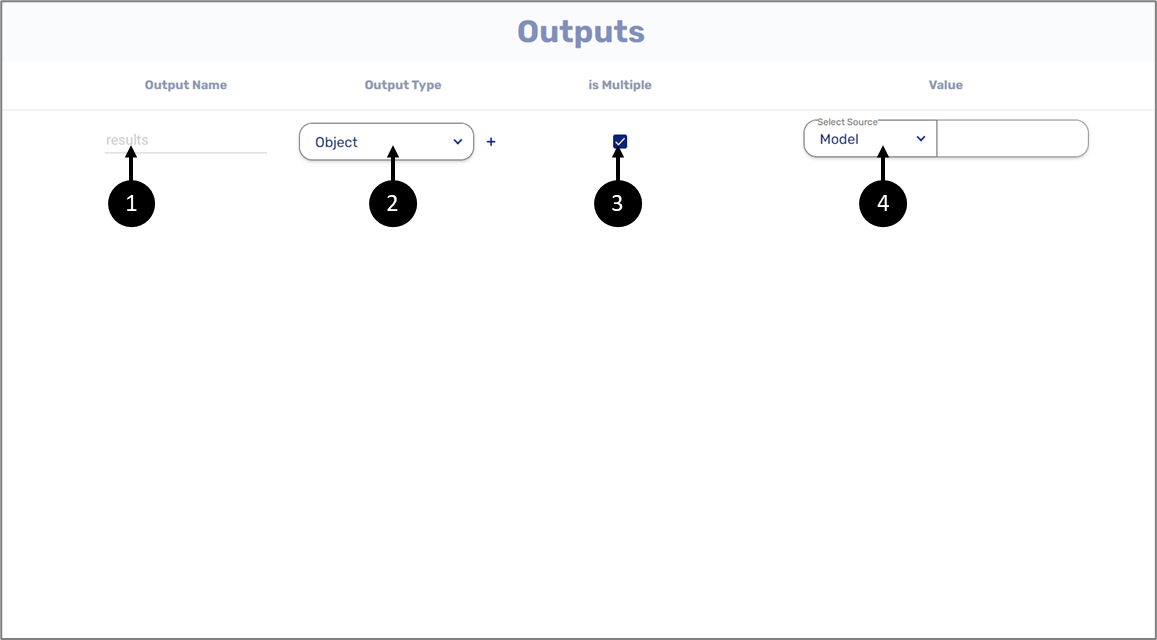
Figure 12: Outputs
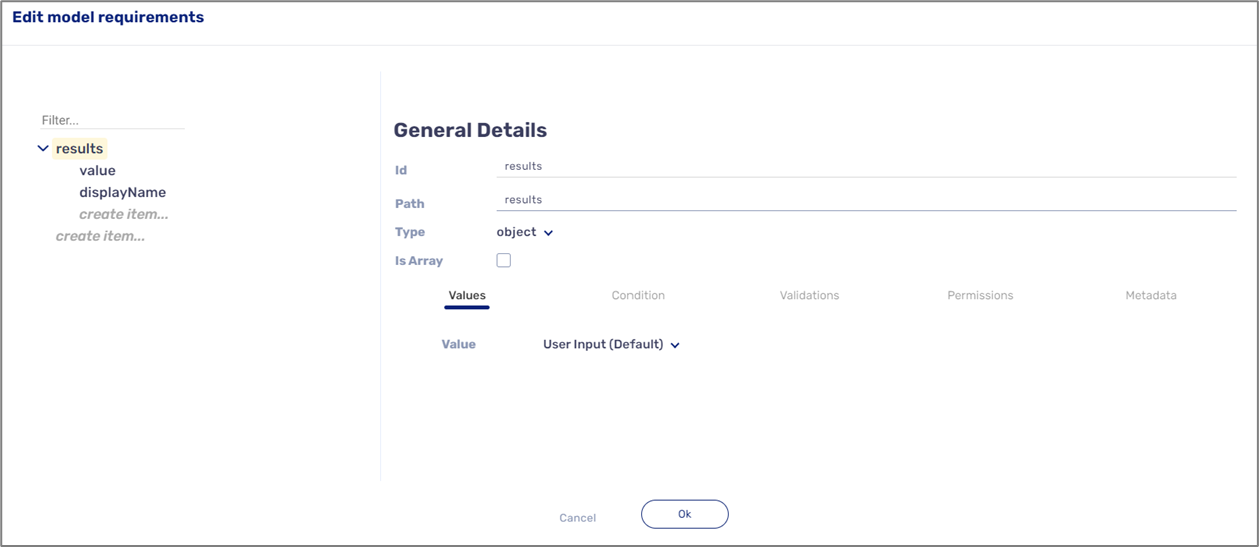
Figure 13: Object Structure
Advanced Autocomplete Service Example
(See Figure 14)
The following example is of an advanced autocomplete service that automatically completes a list of United States capital cities according to an end-user input.
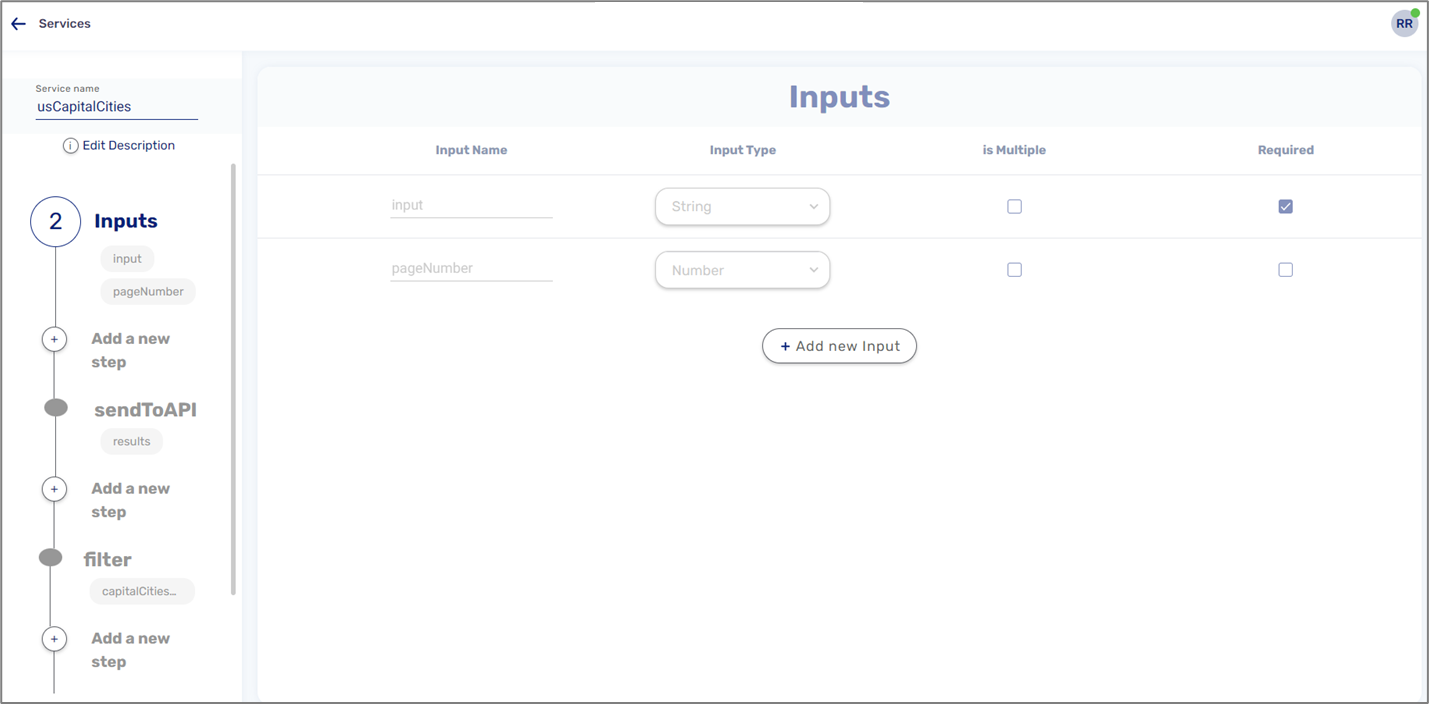
Figure 14: Service Example
Inputs
(See Figure 15)
The default inputs indicate that the autocomplete service will be triggered when the digital process's end-user inputs data.
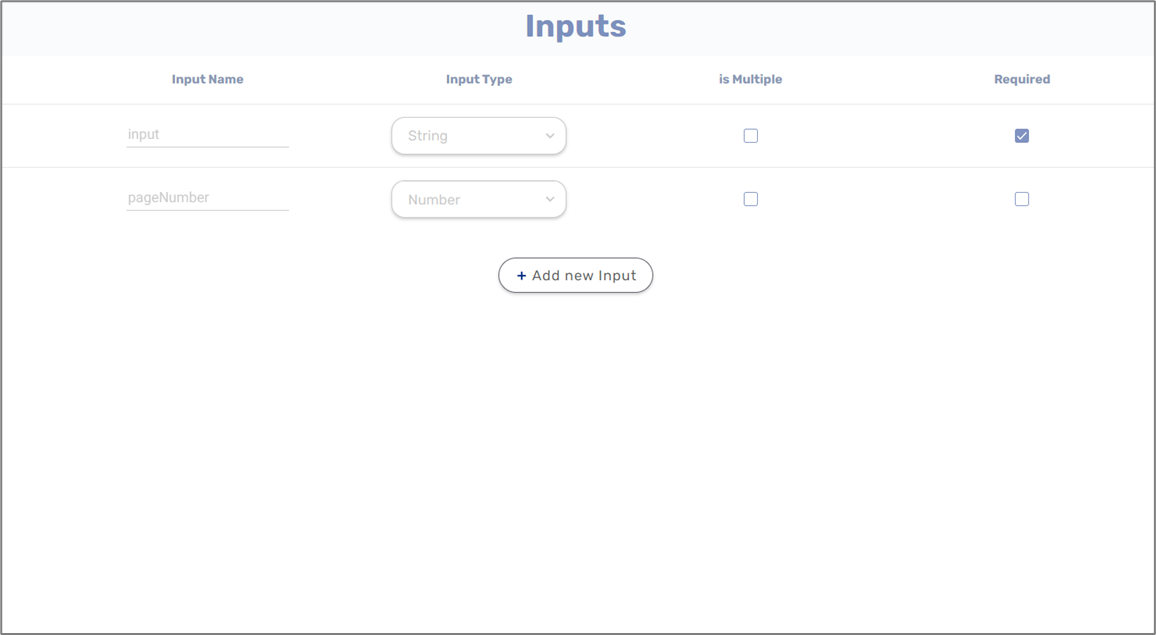
Figure 15: Inputs Example
Steps
(See Figure 16 to Figure 20)
In this autocomplete service we will use two steps:
- Rest API Service:
- On the Request - we will provide the URL of the API (1).
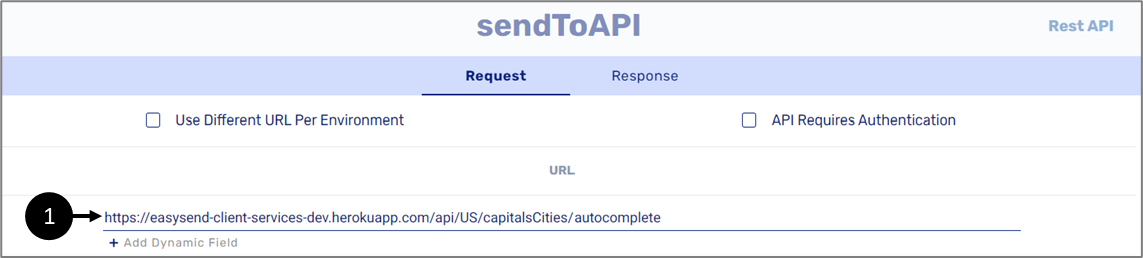
Figure 16: API URL
- On the Response - we will specify the name of the output (2).
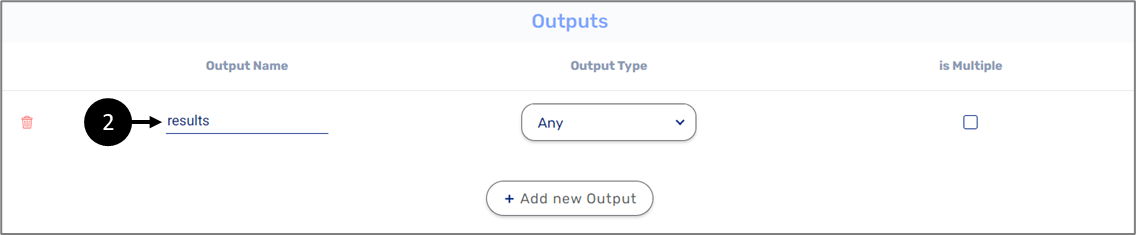
Figure 17: Output Name
- Code - we will create a function that receives the input of the end-user, filters it, and pushes the results to two string type fields (value and displayName) nested under an object type output (capitalCitiesList). The function returns the output (capitalCitiesList).
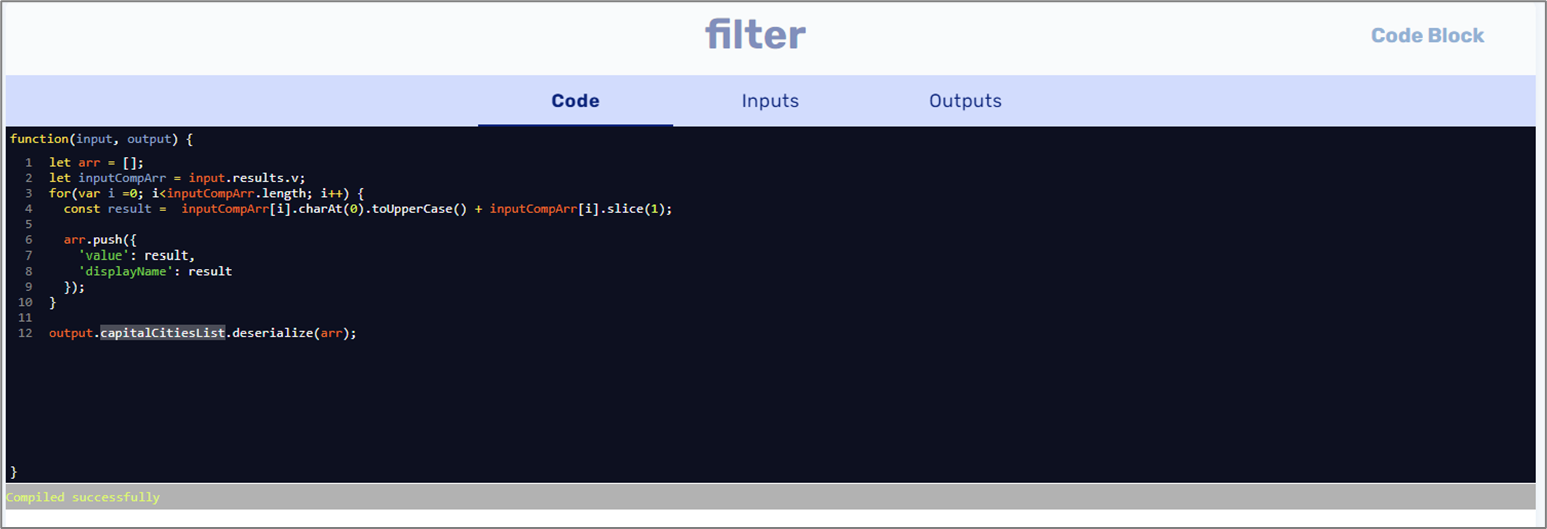
Figure 18: Code
- Inputs - the Input Name (1) will be the output from the Outputs section. The Value will be the response of the API request (2).
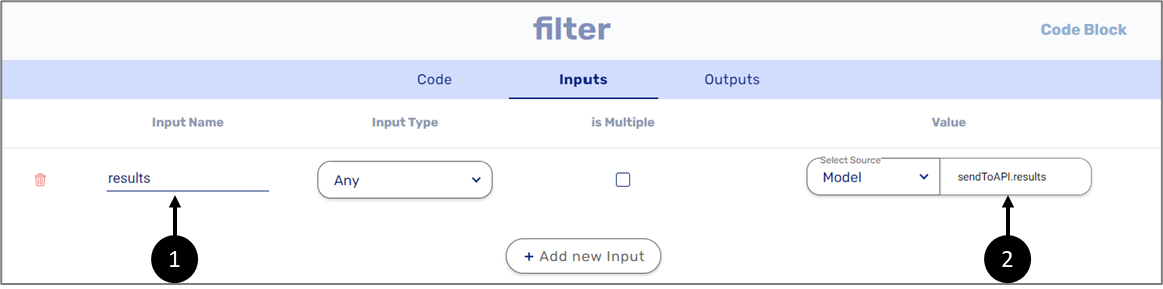
Figure 19: Inputs
- Outputs - we will enter the Output Name, capitalCitiesList (1), set the type to Object (2), and build its structure (see Figure 21).

Figure 20: Outputs
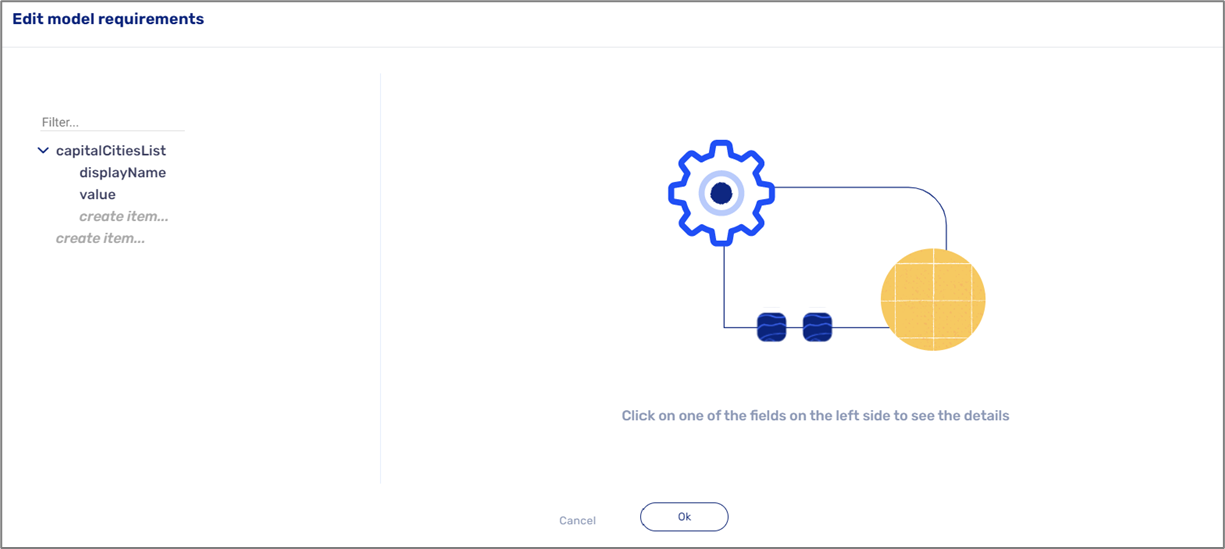
Figure 21: Object Structure
Outputs
(See Figure 22)
We will edit the default output (results), set its source to Model, and specify the name of the Code step (filter) and its output (capitalCitiesList) (1).

Figure 22: Outputs
Importing Global Services
Global services (of any kind) can be imported into your services by clicking the + Import button (1) and selecting a service from the list (2) like the Full address by Google autocomplete service, for example.
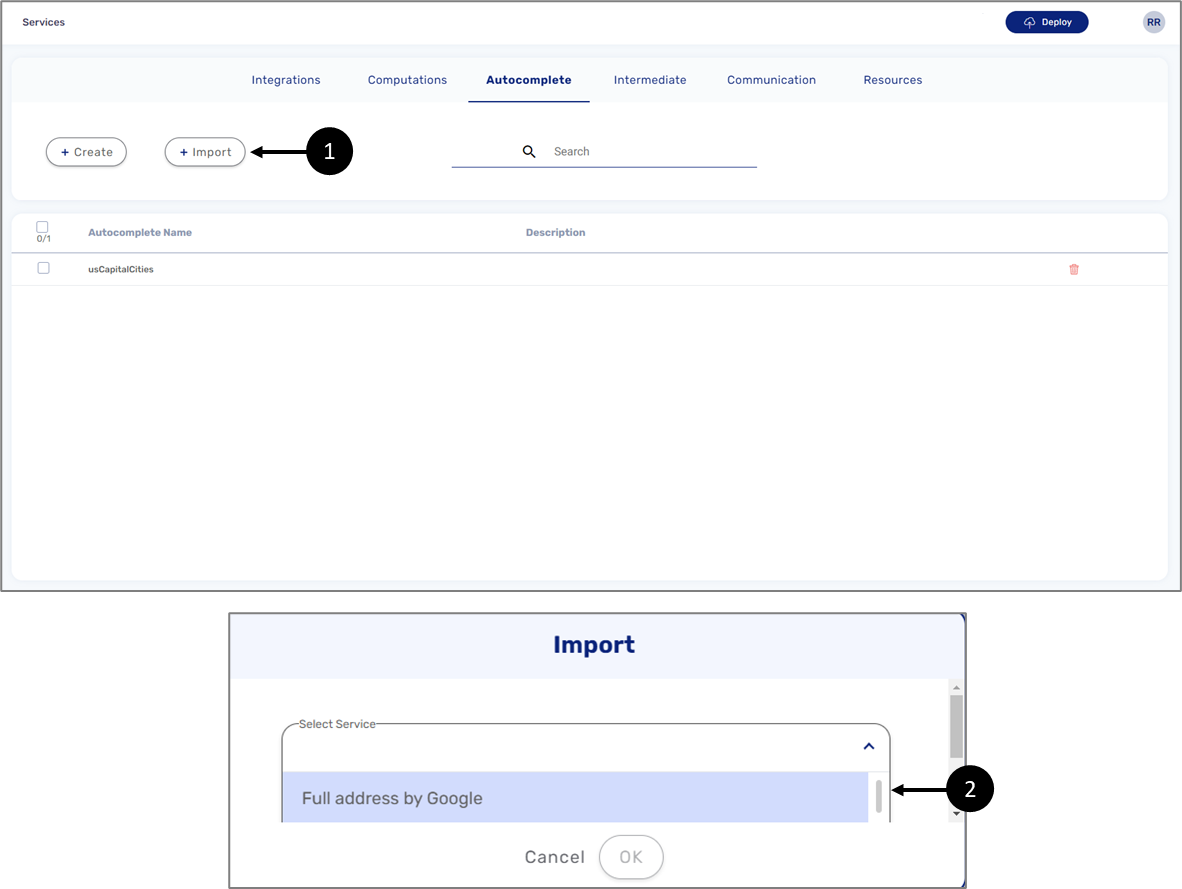
Figure 23: + Import Button and Import List
Full address by Google Autocomplete Service
(See Figure 24 and Figure 25)
This service is a global service that is imported into your environment. The service monitors an input field (such as Text Input) for character entries. As the user enters text, autocomplete returns place predictions in the form of a dropdown list. When the user selects a place from the list, information about that place is returned to the autocomplete object and can be retrieved by your application.
To add this service to your environment perform the following steps:
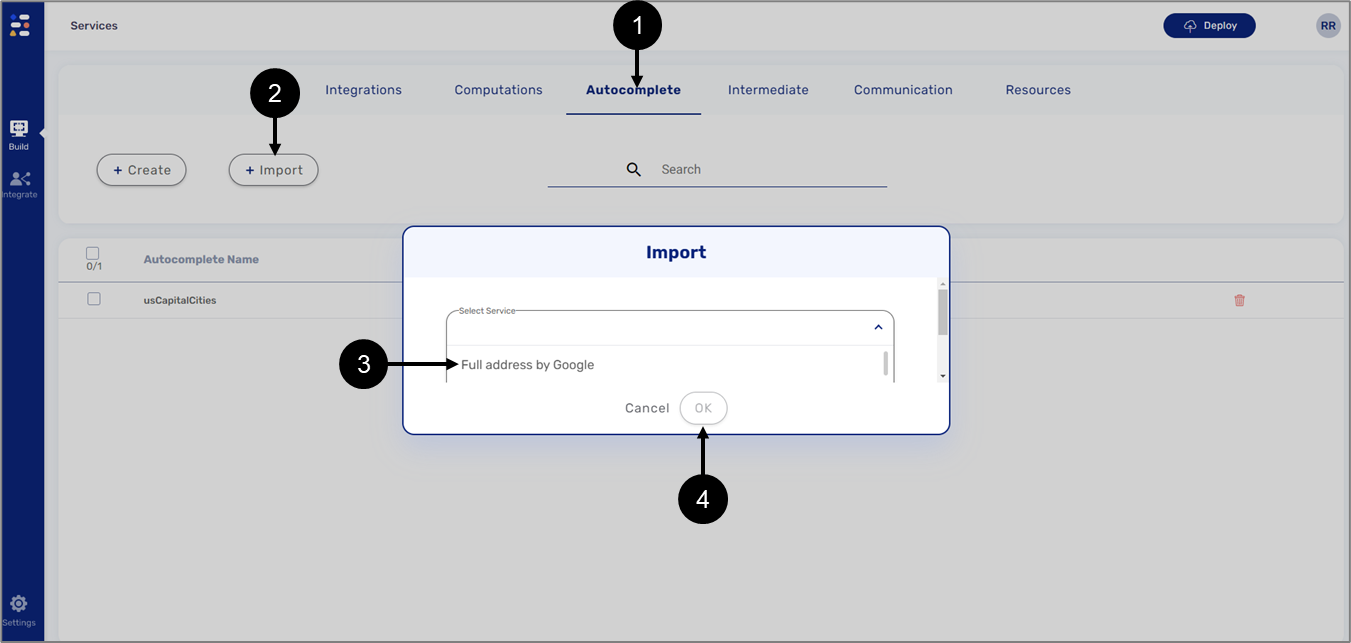
Figure 24: Importing the Service 1 of 2
- Click the Autocomplete tab (1).
- Click the +Import button (2).
- Select the service from the list (3).
- Click the OK button (4).
Result:
The service is added:
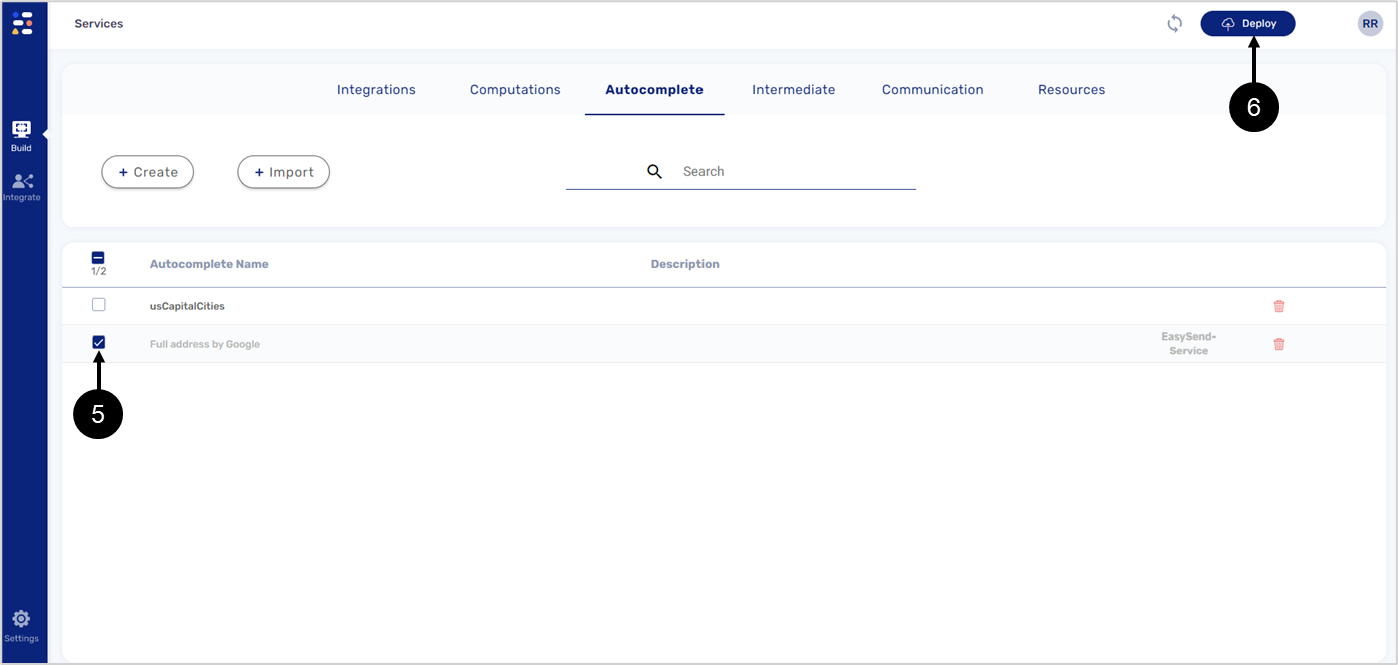
Figure 25: Importing the Service 2 of 2
- Select the service (5).
- Deploy (6) the service.
The Google Split Address Computation Service
(See Figure 26 and Figure 27)
This service is an imported global service found under the Computations tab. It receives the information returned from the Full address by Google autocomplete service and splits it into different fields.
To add this service to your environment perform the following steps:
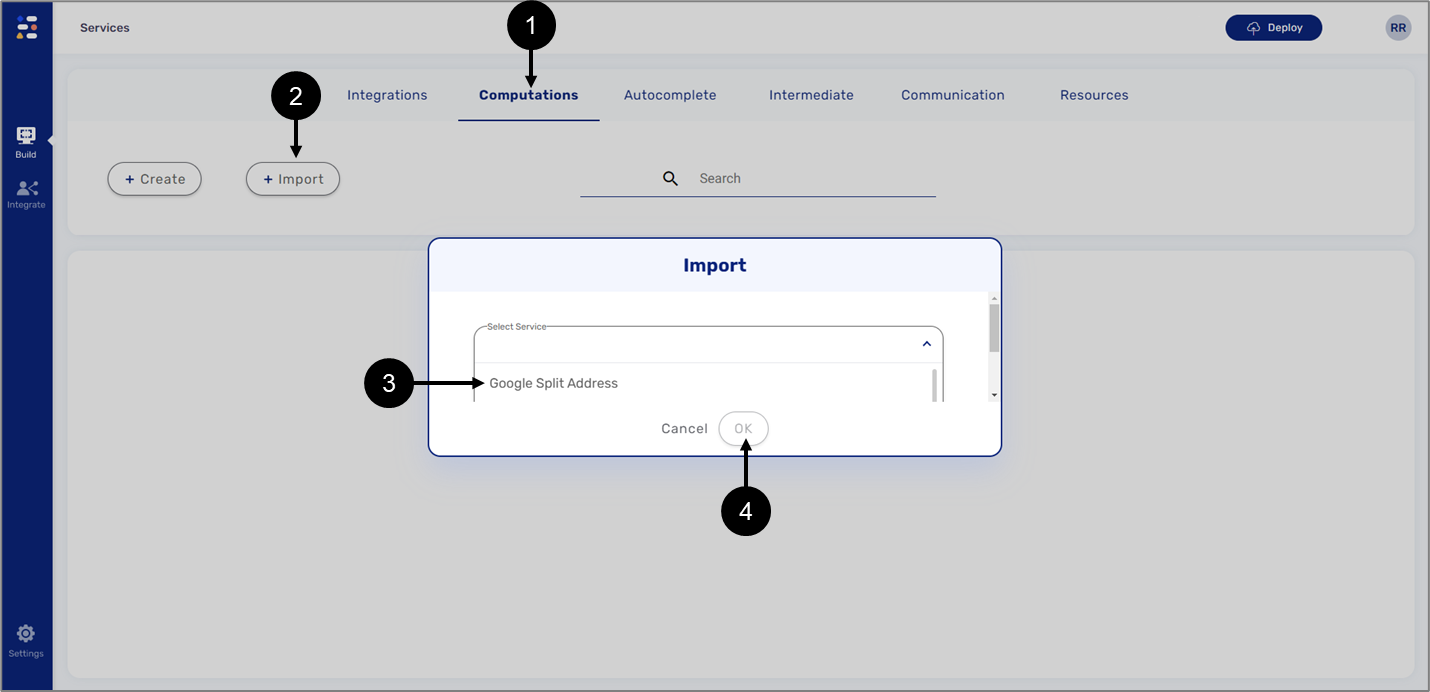
Figure 26: Importing the Service 1 of 2
- Click the Computations tab (1).
- Click the +Import button (2).
- Select the service from the list (3).
- Click the OK button (4).
Result:
The service is added:
Figure 27: Importing the Service 2 of 2
- Select the service (5).
- Deploy (6) the service.
Using the Full Address and Split Address in a Digital Process
The following sections describe how to use the Full address and the Split address services in a digital process.
Webflow Structure
(See Figure 28)
The Webflow must contain components to receive end-user input and to display output. For example, a Text Input component (1) that the end-user will use to input an address that will be autocomplete by the Full Address by Google service and additional four text Inputs components that will display a split address (2).
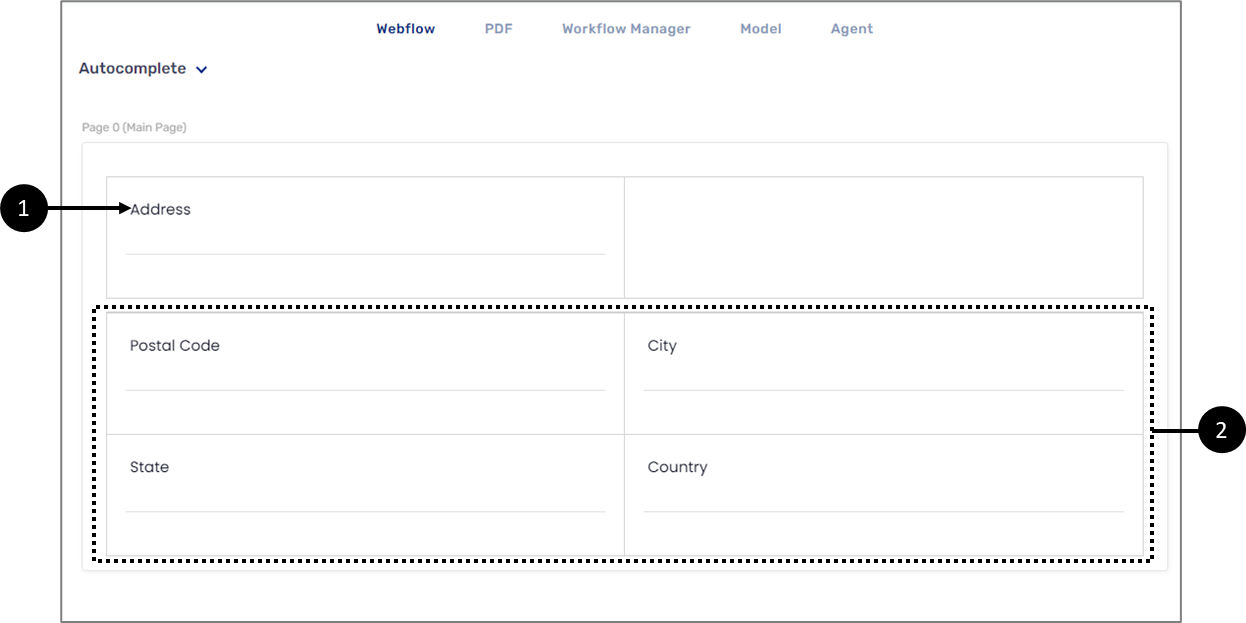
Figure 28: Webflow Components
Model Structure
(See Figure 29 and Figure 30)
The Model will contain data items that will be implemented with the different services and will be connected to the Webflow components.
The first data item, named address (1) will be set with a value from the Values tab (2) of Autocomplete Service (3). The selected service will be Full address by Google (4).
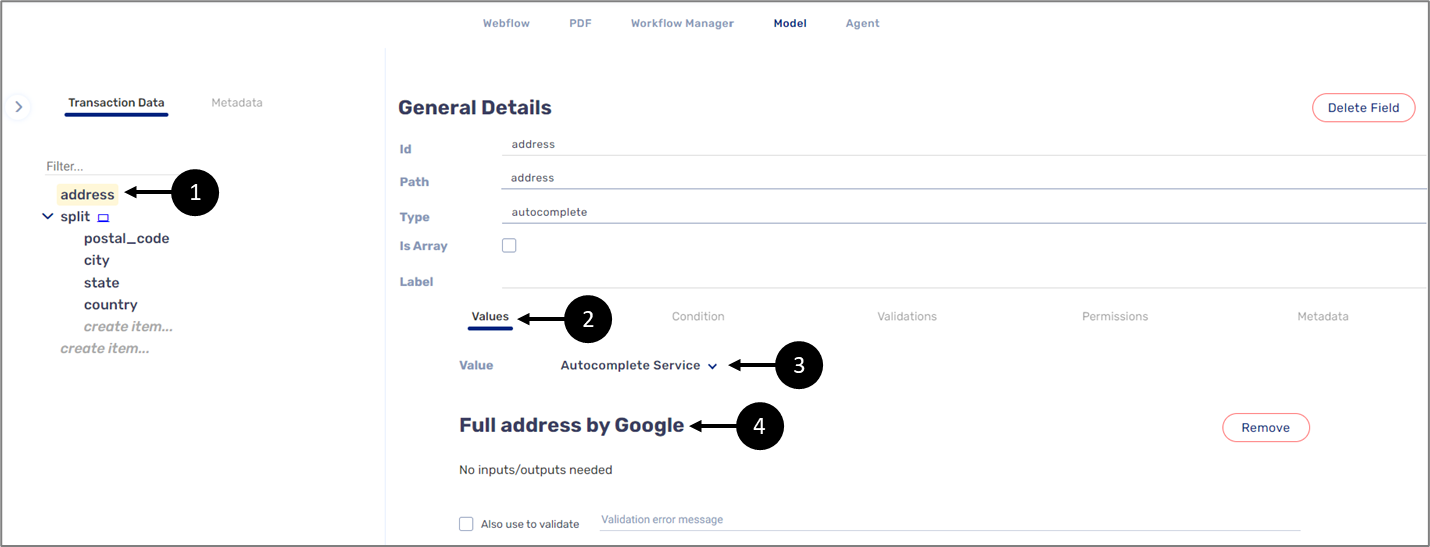
Figure 29: Full address by Google
The rest of the data items (string) (5) will be grouped under an object-type data item (6). The object will be set with a value from the Values tab (7) of Computed (Service) (8). The selected service will be Split address - Google (9). The input of the service (10) must be connected to the Model (11) and to the data item (12) that was set with the Full address by Google service.
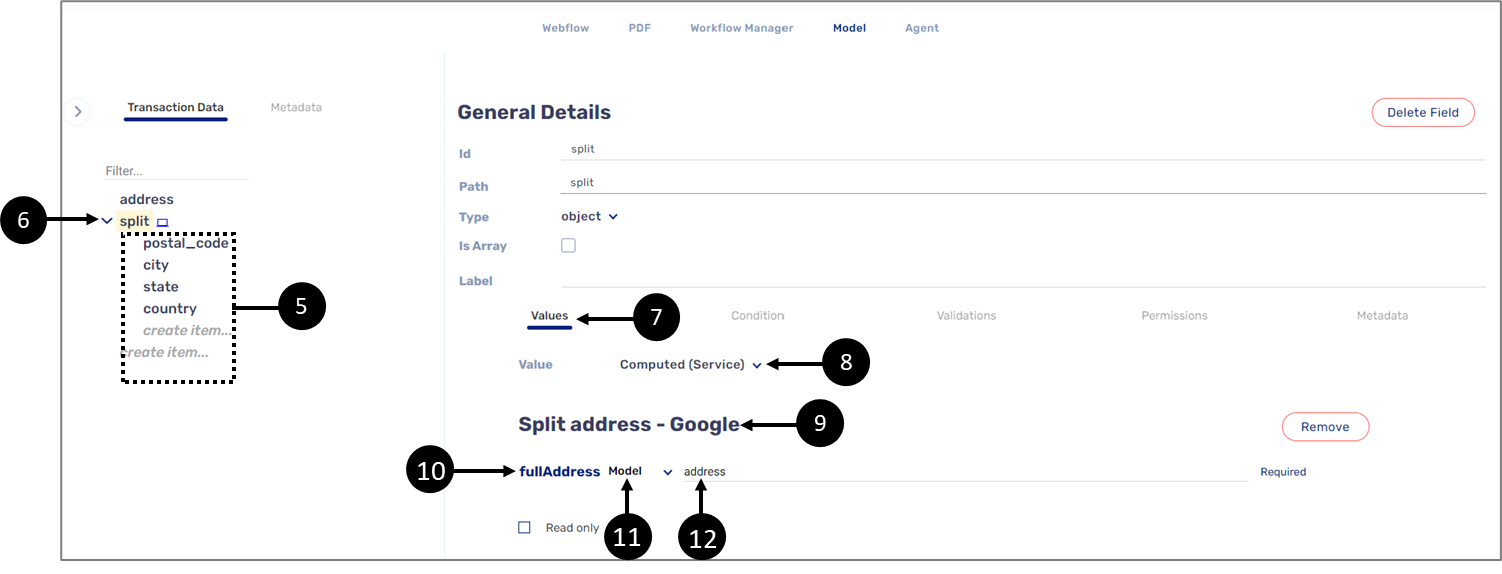
Figure 30: Split address - Google
- country
- street
- street_number
- postal_code
- state
- county
- city
- route
- state_short
End-User Usage
(See Figure 31)
When the digital process is initiated, the end-user will start typing an address. The Full address by Google autocomplete service will generate matching results for selection. When the end-user selects an address from the list, it will be split and displayed in the fields.

Figure 31: End-User Usage
Troubleshooting
If the services are not functioning correctly perform one of the following options:
- Try to deploy the services (for additional information, see the Full Address by Google service section, the Google Split Address Computation service section, or the Single Service Deployment article).
- Verify that the names of the string-type data items for the split address are written according to the appropriate naming convention (for additional information, see the Model Structure section).