What is the Workflow Manager?
A digital process might require more than one step, roles (spouses, customer, and agent), a way to communicate with end-users, and in some cases may include integrations.
The Workflow Manager provides a way to define the flow, roles, communication channels, and integrations that will be used Whitin a digital process.
How to Navigate to the Workflow Manager?
(See Figure 1)
To access the Workflow Manager, click the Workflow Manager tab (1):
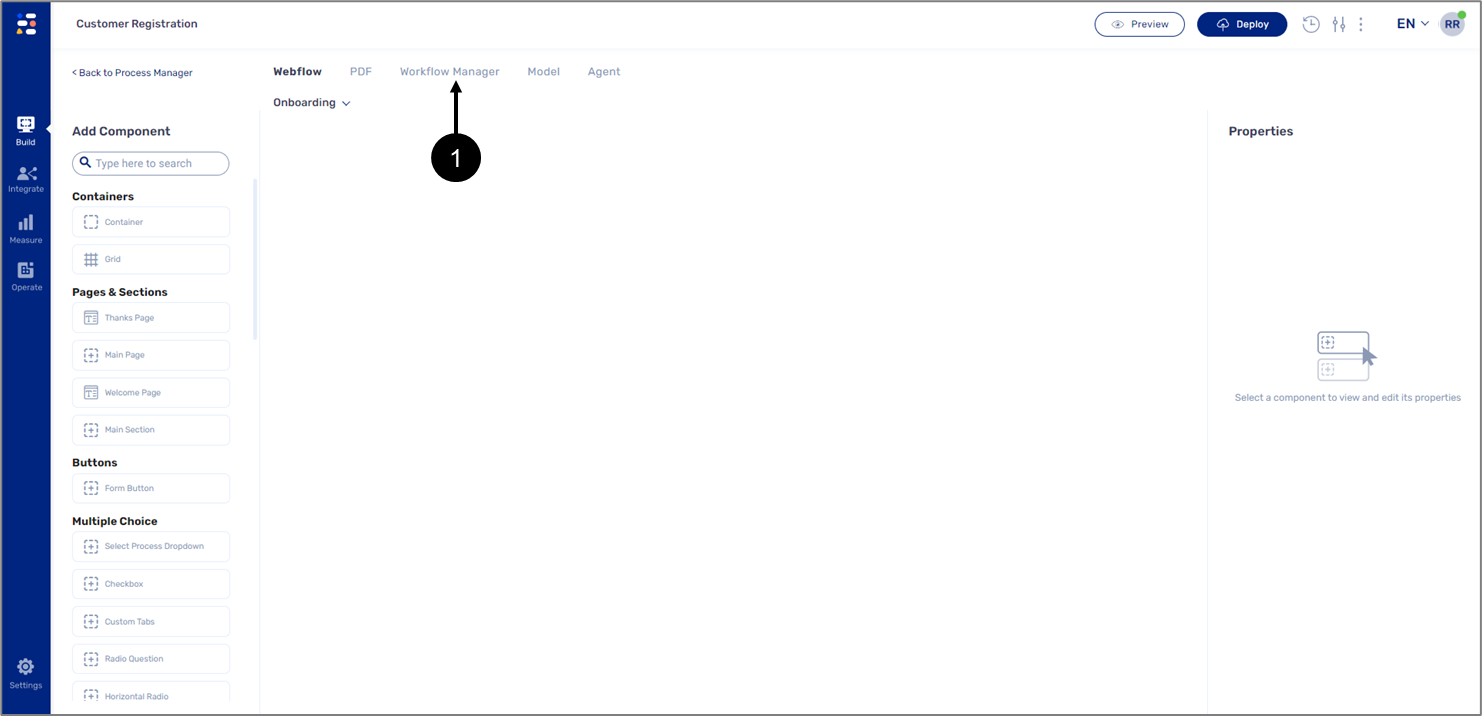
Figure 1: Workflow Manager Tab
Workflow Manager Main Screen
Figure 2, Figure 3, and Table 1 describe the Workflow manager main screen with an automatically added default step.
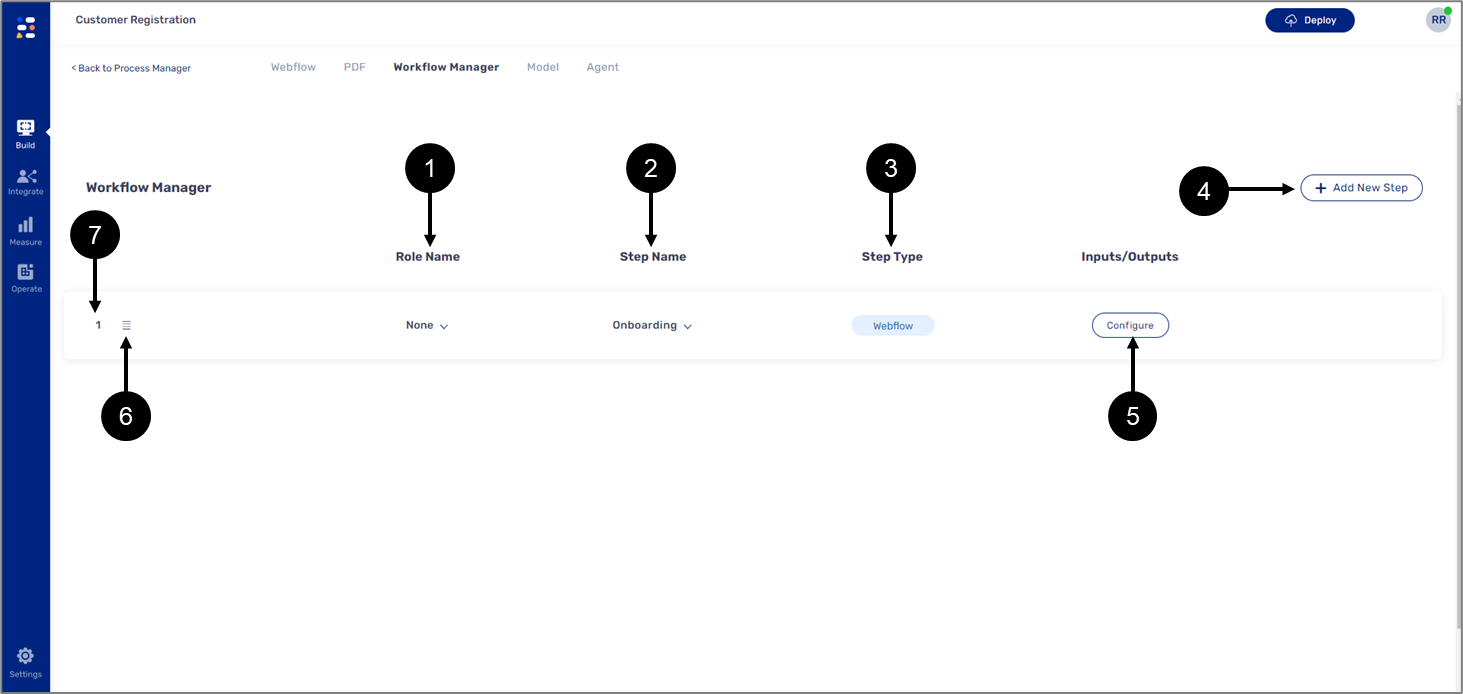
Figure 2: Workflow Manager Screen with an Added Step 1 of 2
Hovering over a step displays two additional options:
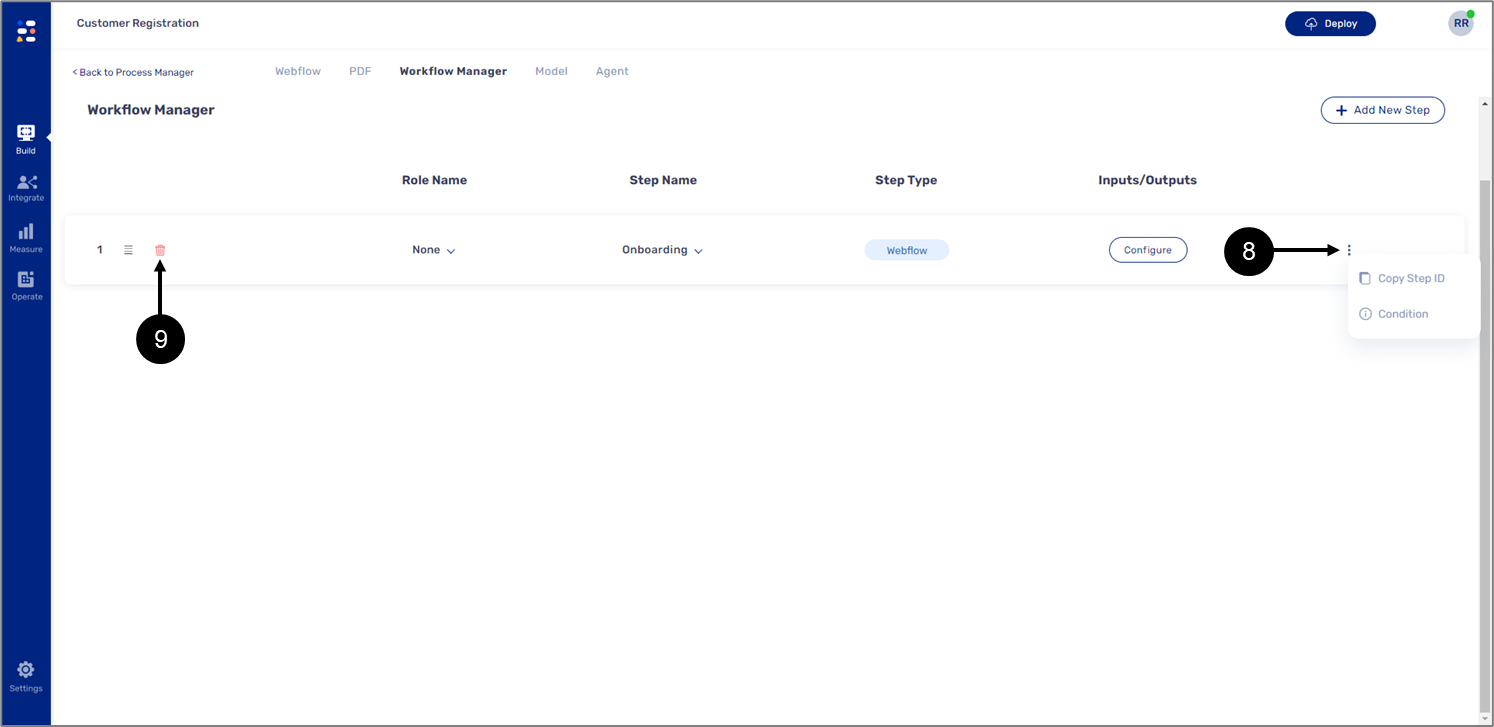
Figure 3: Workflow Manager Screen with an Added Step 2 of 2
Table 1: Workflow Manager Screen with an Added Step
Number | Icon | Name | Description |
1 | - | Role Name | Enables to assign a custom role to the step NOTE
|
2 | - | Step Name | Displays the name of the Webflow connected to the step |
3 | - | Step Type | Displays the step type:
NOTE The first step will always be Webflow by default |
4 | - | +Add New Step | Enables to add a new step:
NOTE Adding a Service type step is not covered in this manual |
5 | - | Configure |
NOTE For additional information, see the Output Configuration Window section |
6 |
| Re-order | Enables to re-order the steps |
7 |
| Sequence Number | Displays the sequence number of the step |
8 |
| Delete Step | Enables to delete a step |
9 |
| Step Options | Displays additional step options Enables to:
NOTE The Step ID can be used for different conditioning when using the Model Condition feature, for additional information see the Conditions article
NOTE For additional information about conditions |


Step Condition Window
(See Figure 5 and Figure 6)
The Step Condition window enables you to set a condition that determines if a step will be skipped or applied. Each condition has a description (1) at least one logical expression with the following parameters:
- Action (2) - a selection between two options:
- Skip this step if - the step is skipped if a condition is met.
- Apply this step if - the step is applied if a condition is met.
- Selector (3) - a field that will trigger the condition. The Selector can be, for example:
- A Transaction data item within the Model.
- Metadata item within the Model (like an Id of a step).
- Operator (4) - a selection between four options that trigger the condition:
- is.
- isn’t.
- greater than.
- less than.
- Value (5) - a string that is compared against the Selector according to the selected Operator to trigger the condition.
Once you are done configuring the condition click the Ok button (7) to save or the Cancel button (8) to abort.
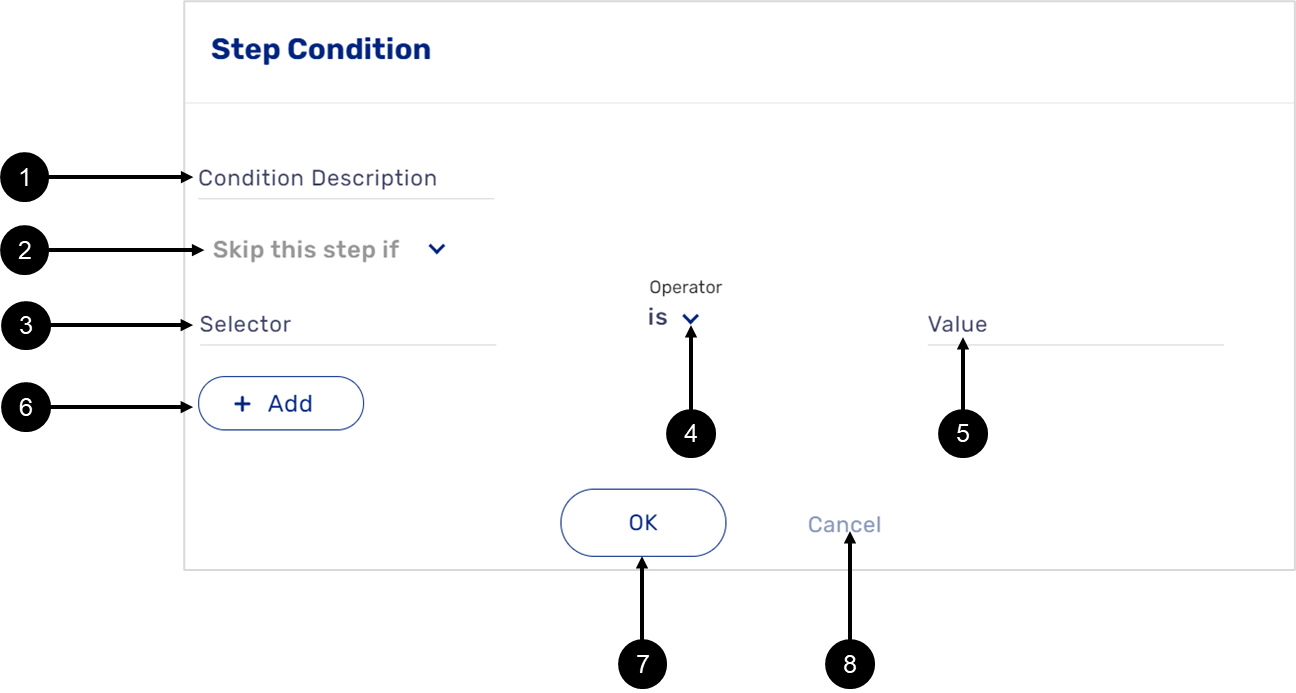
Figure 5: Step Condition Window
When adding more than one logical expression to a condition, the option to select an operator, and/or, between them becomes available:

Figure 6: Operator Between Conditions
Condition Example
(See Figure 7)
The following condition determines that a step will be skipped (1) if an age (2) (a transaction data item from the Model) is greater (3) than the set Value (in this case 18) (4).
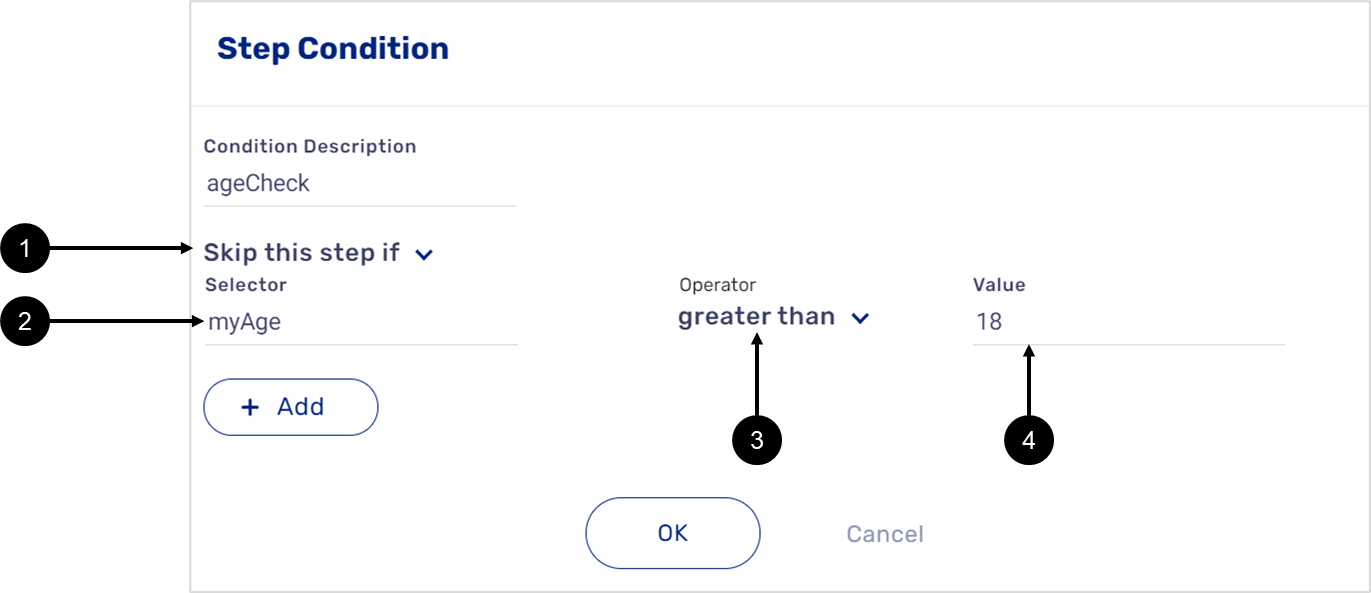
Figure 7: Condition Example
Output Configuration Window
(See Figure 8)
The output configuration window enables you to add new automatic communication outputs channels - email, SMS, or service for different phases of a step:
- Start (1) - when starting a new step, upon the initiation of the transaction.
- Notifications (2) - sending reminders when a digital process was not completed.
- Complete (3) - will be executed upon submission when the end-user has finished and submitted the step, for example, sending a step completed email to an end-user.
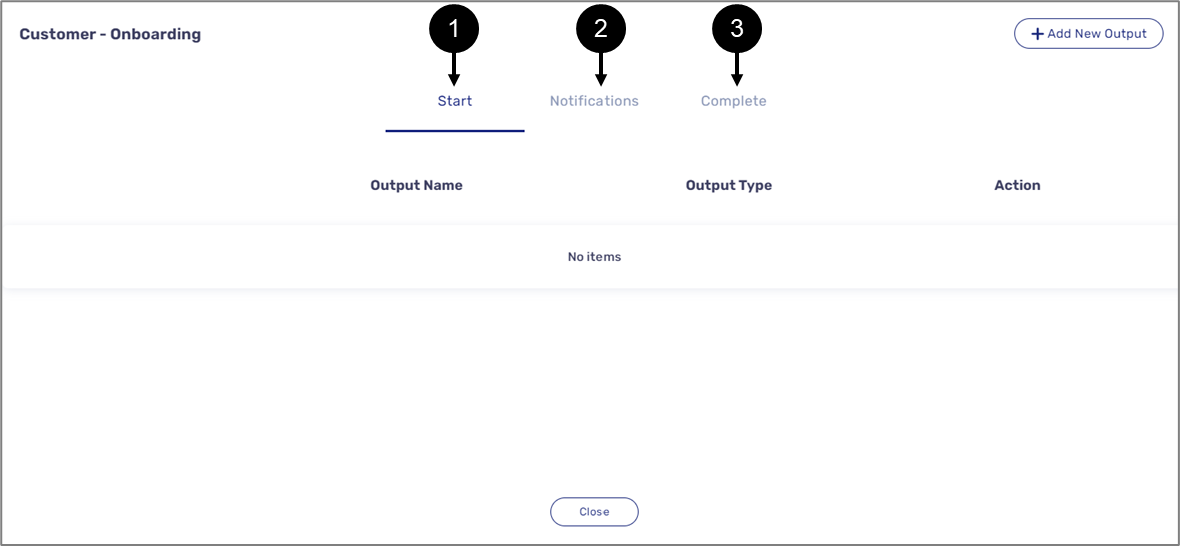
Figure 8: Output Configuration Window
Output Configuration Window - Start/Complete
(See Figure 9 to Figure 11)
When configuring a Start or a Complete phase (identical options), first, click the + Add New Output button (1) and select the desired output from the following options:
- Email (2).
- SMS (3).
- Communication Service (4) (Not covered in this article, for additional information, see the EasySend's Integration Capabilities article).
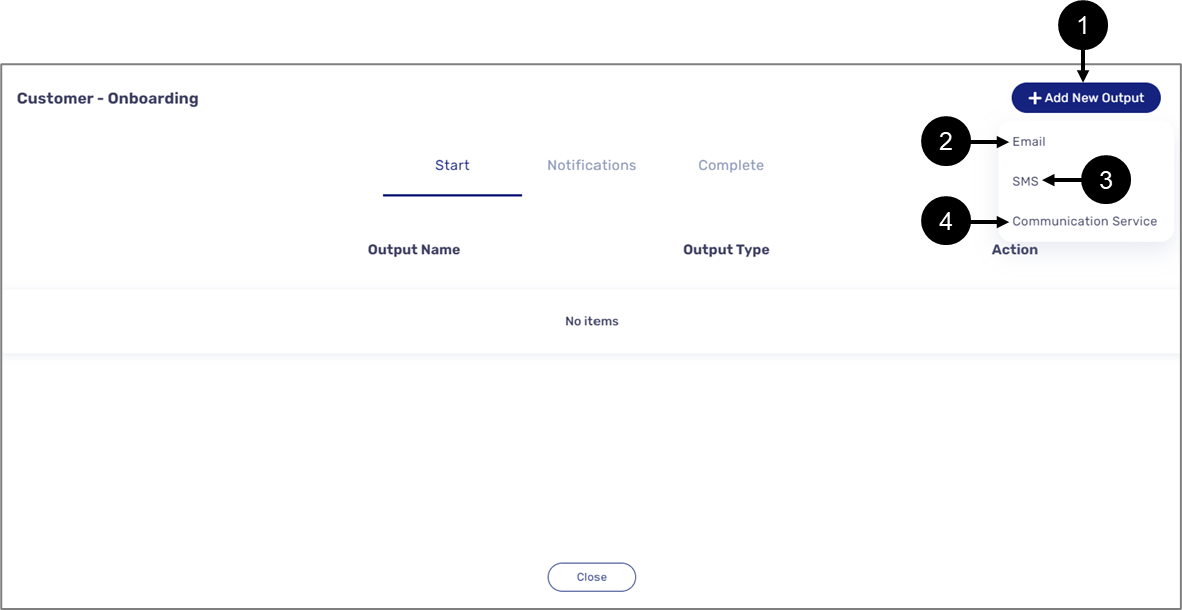
Figure 9: Start Phase Configuration - Outputs
After selecting the output, it appears as an item with the following information:
- Output Name (5) - by default the name of the output is New Output.
- Output Type (6) - according to the communication channel selection.
- Action (7) - enables you to set and edit the selected communication channel by clicking the Edit button (8) (see the Email/SMS Window section).
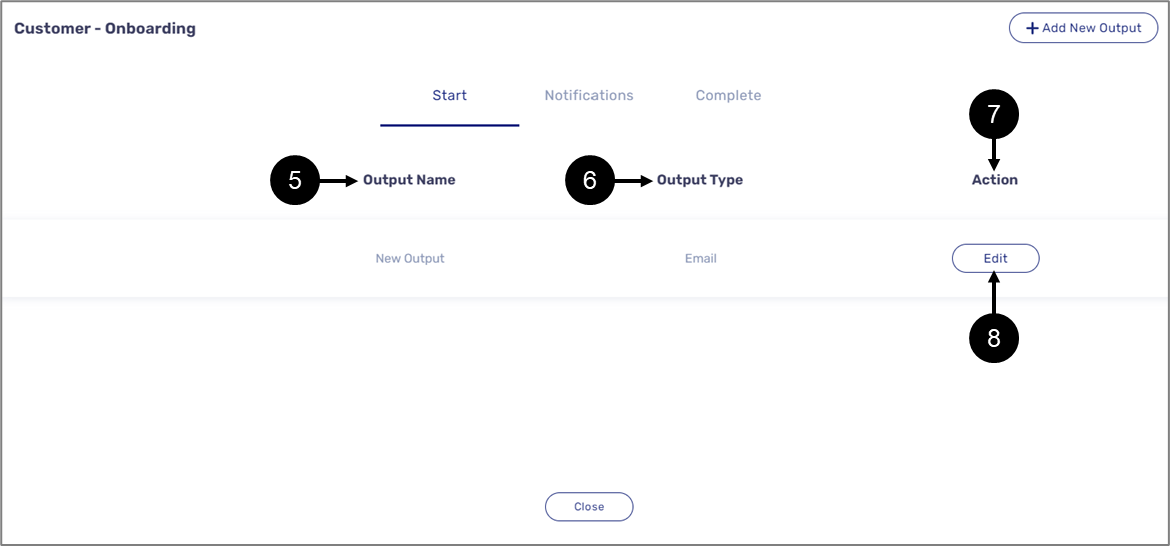
Figure 10: Start Phase Configuration - Output
When hovering over an output, an additional delete icon (9) appears.
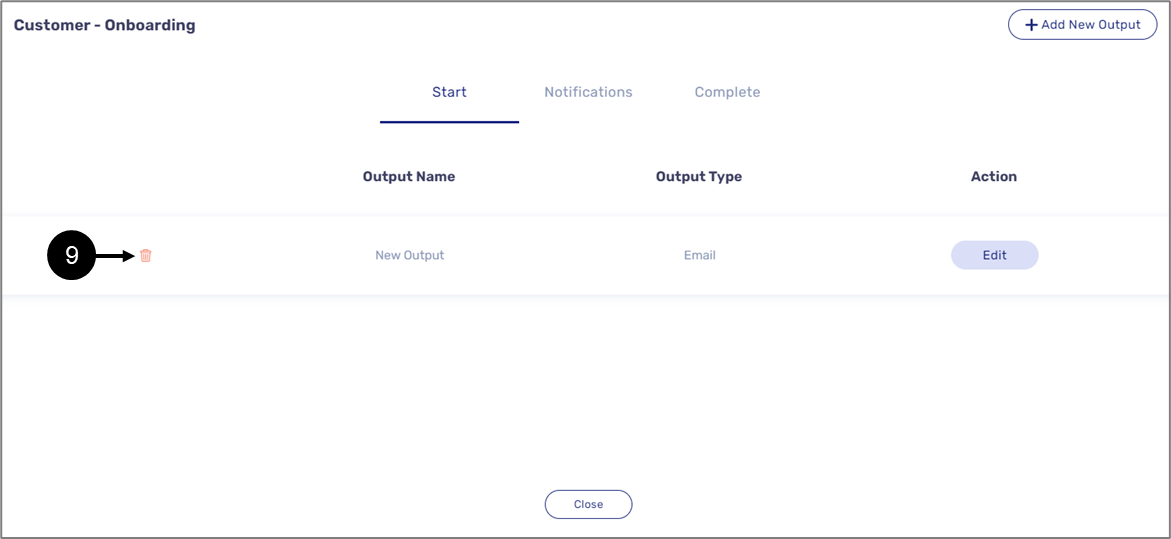
Figure 11: Delete Output
Email Details Window
Figure 12, Figure 13, and Table 2 describe the structure of the Email Details window.
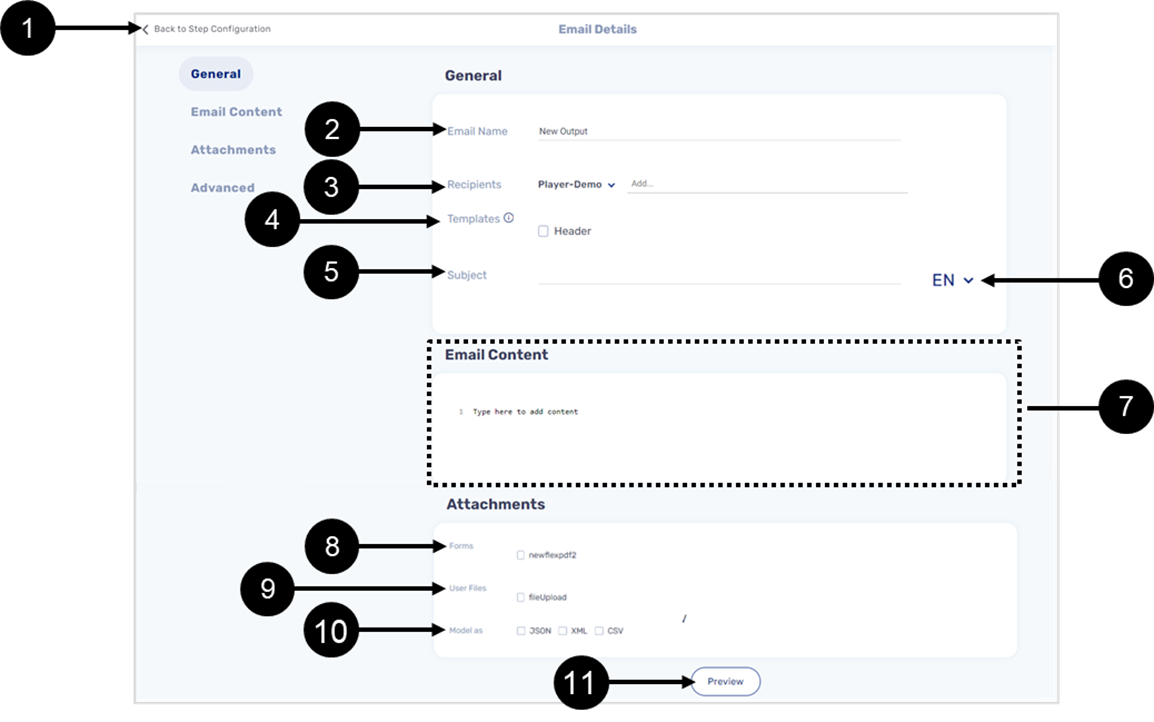
Figure 12: Email Details window 1 of 2
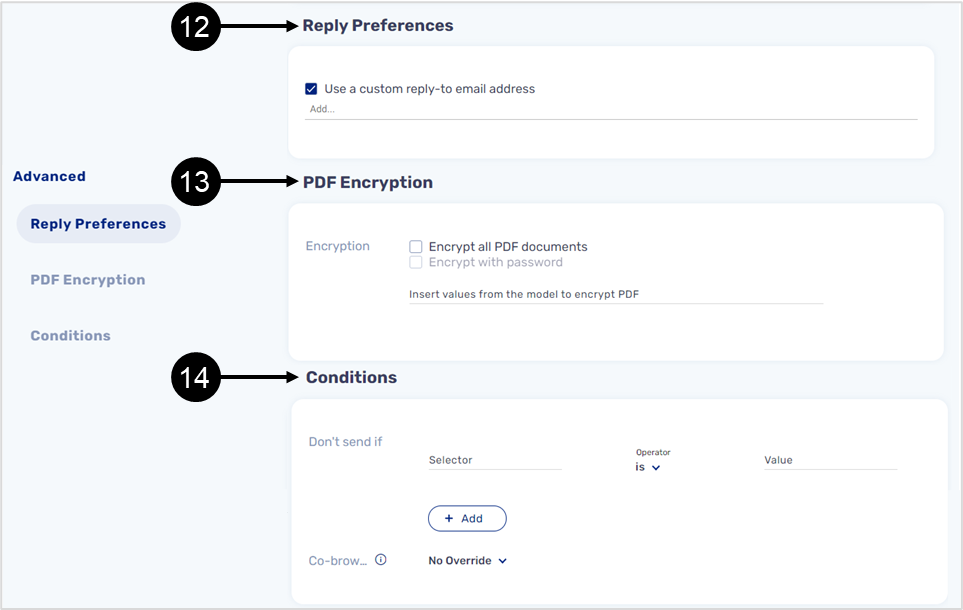
Figure 13: Email Details Window 2 of 2
Table 2: Email Details Window
Number | Section | Icon | Name | Description |
1 | - |
| Back to Step Configuration | Enables to save the configuration and navigate back to the output configuration window |
| 2 | General | - | Email Name |
|
| 3 | - | Recipients | Enables to add the recipients of the email, either statically by writing an email address or dynamically NOTE Dynamic recipients are selected from a production or a development environment by selecting appropriate transaction data items, for example: customerEmail | |
4 | - | Templates | Enables to add header/footer templates to the email NOTE This option will appear only if templates were previously created using the Output Manager of the Builder platform. For additional information please contact our support team | |
5 | - | Subject | Enables to enter the subject of the email | |
6 |
| Language | Enables to select the language the email will be written in | |
| 7 | Email Content | - | Email Editor | Enables to:
NOTE
|
| 8 | Attachments | - | Forms | Enables to add one or more PDF files that were uploaded to the Builder platform as part of the process as attachments to the email NOTE This option will appear only if one or more PDF files were uploaded to the Builder platform |
9 | - | User Files | Enables to add one or more files that were uploaded to the process as attachments to the email NOTE This option will appear only if one or more files were uploaded to the process | |
10 | - | Model As | Enables to send transaction data items and metadata created by using the Model as an attachment in three different file formats:
| |
11 | - | Preview | Enables to view the content of the email editor | |
12 | Advanced | - | Reply Preferences |
|
13 | - | PDF Encryption | Enables to encrypt attached PDF documents with a password and/or with values (transaction data items/metadata) from the Model | |
14 | - | Conditions | Enables to set conditions that will determine when an email will be sent:
Each condition has at least one logical expression with a:
NOTE For additional information about Co-browsing permissions, click here. |


SMS Details Window
(See Figure 14)
The SMS Details window is similar in its structure to the Email Details window but contains fewer options:
- Back to Step Configuration (1).
- General section (2) - contains the following options:
- SMS Name.
- Recipients.
- Sender address bar.
- A Condition and a button to add additional conditions.
- SMS Content (3) - contains the SMS editor and a language dropdown.
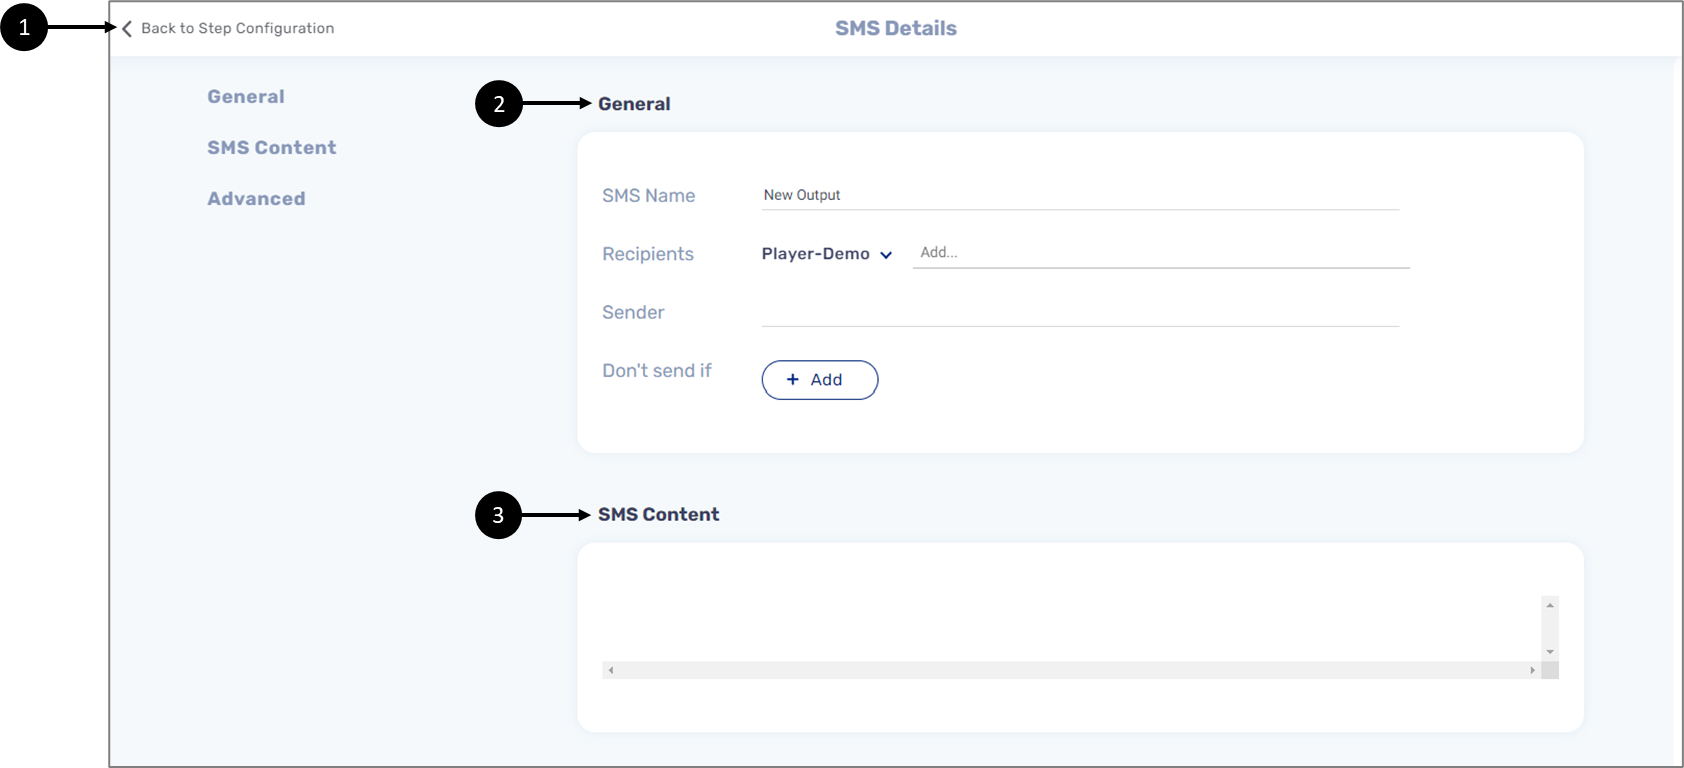
Figure 14: SMS Details Window
Output Configuration Window - Notifications
(See Figure 15)
When configuring a notification, the outputs and fields are similar to the ones under the Start/Complete phases with a few options for selecting when the notification will be sent:
- Trigger (1):
- None (default).
- Last Opened - the date the link was last opened.
- Link Sent - the date the link was sent on.
- After a certain number of days (2) - between 0 and 10.
- at (3) - same time as originally sent or a specific time between 12 AM and 11 PM.

Figure 15: Notifications
Notification Use Case Example
If a notification was set to 1 day after the link was sent, and another notification to 2 days after it Last Opened, and the end-customer opened the digital process every day since the link was sent, then, the first notification will be sent the day after but, the second notification will never be sent as there are never two days without the end-customer last opening the link of the digital process.
Additional Output Options
(See Figure 16)
The Co-browsing invite email and Save & continue later email options will become available only if the Enable Co-browsing option is enabled in the Customer Settings screen. For additional information, please contact our support team.
- Co-browsing invite email - sending a co-browsing invitation email.
- Save & continue later email - sending an email with a link to the process to continue at a later time.
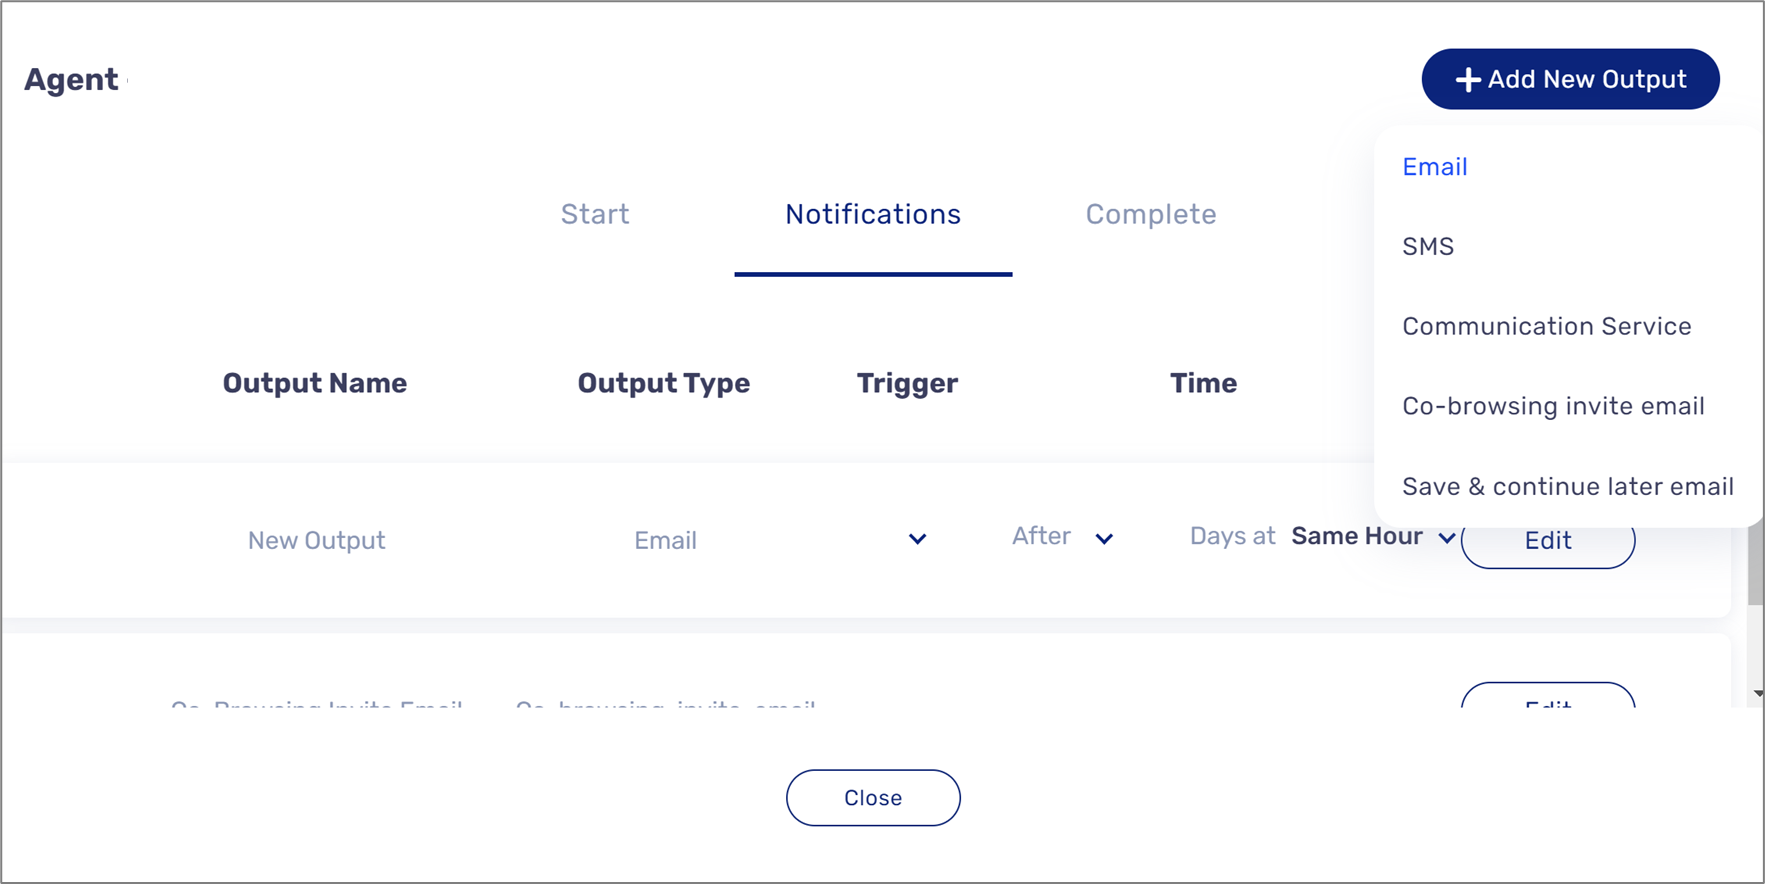
Figure 16: Additional Output Options
- To be able to send the Co-browsing invite email or the Save & continue later email your environment servers version must be 30.0.0 or above.
- You can only add one Co-browsing email and one Save & continue later email.
Co-browsing invite email
The following sections describe the Co-browsing invite email option.
What is Co-browsing?
Co-browsing enables digital process end-users to share the link of a digital process via email and invite other users such as agents or reps to provide real-time online support to quickly bring any processes to a close. With Co-browsing, agents or reps can guide end-users through any digital process whether they are connected through mobile, tablet, or desktop. Data input by the end-users immediately appears on the agent or rep screen and vice versa. When changing a page, the page simultaneously changes for all.
Co-browsing invite email Configuration
(See Figure 17 and Figure 18)
After adding the Co-browsing invite email as an output (1), clicking the Edit button (2) opens the Email Details window.
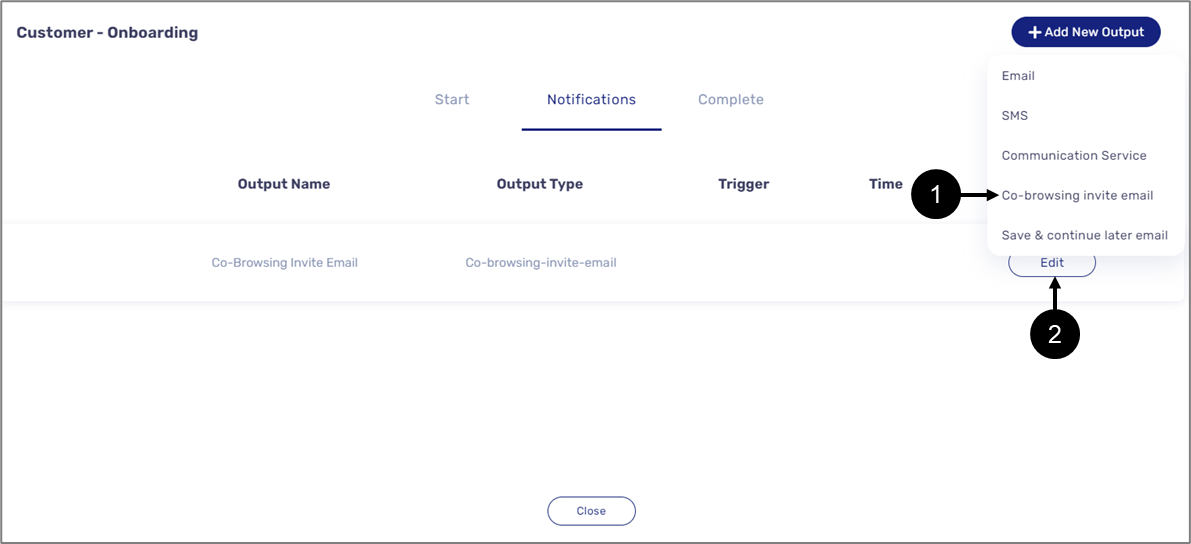
Figure 17: Co-browsing invite email
The Email Details window is divided into two sections:
- General (3) - contains the Email Name and Subject, both are editable.
- Email Content (4) - an HTML editor that contains the content of the email. The content must include a
link to the process - {{link}}. The content is editable.
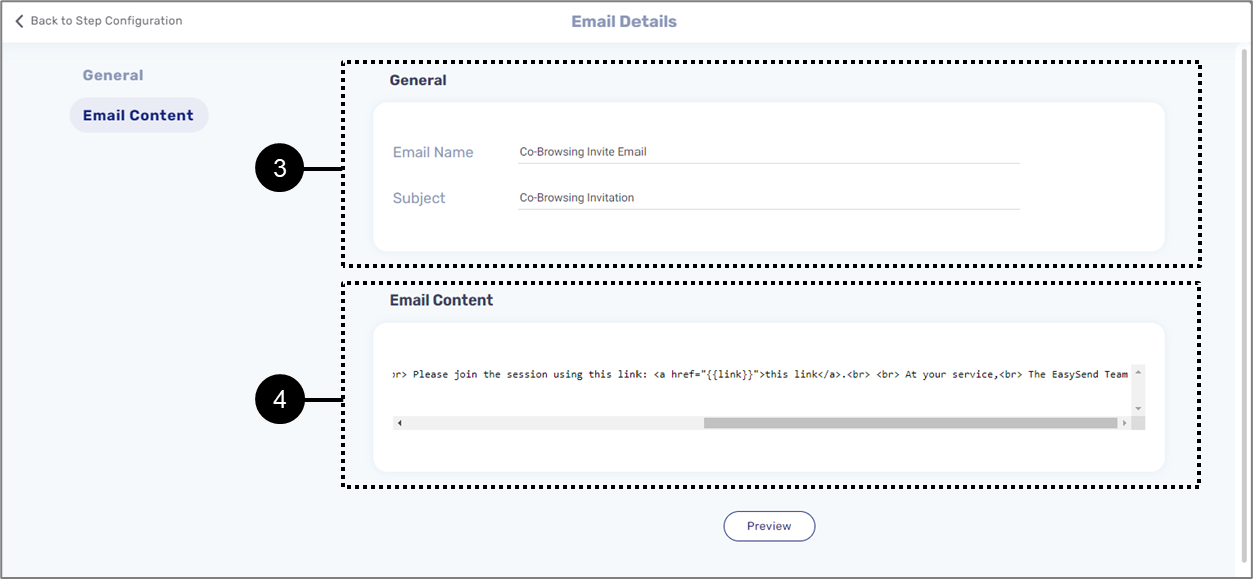
Figure 18: Email Details Window
How to Send the Co-browsing invite email
(See Figure 19 to Figure 21)
To send the Co-browsing invite email, make sure to locate the Co-browsing component (1) and to add it to the Webflow (2), for example:
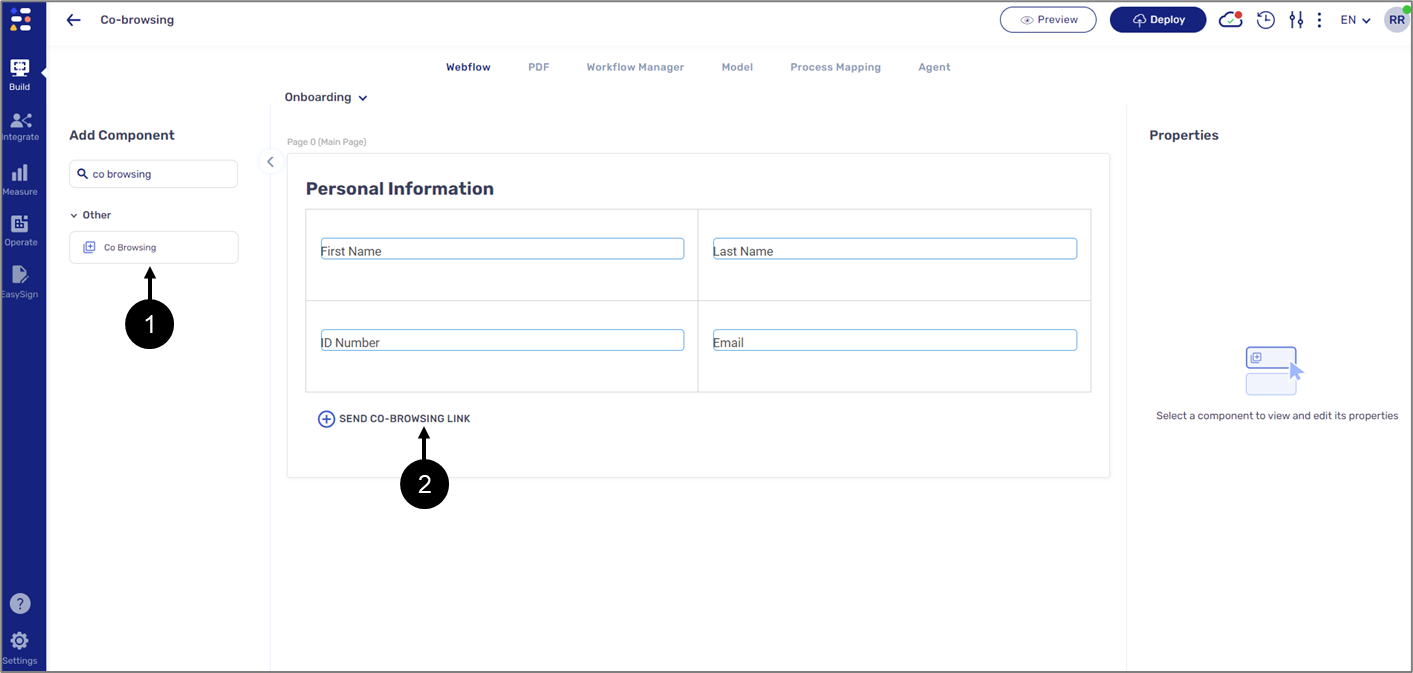
Figure 19: Co-browsing component
When the digital process is initiated and an end-user clicks the Co-browsing component (3) a window (4) to input a recipient email address appears, for example:
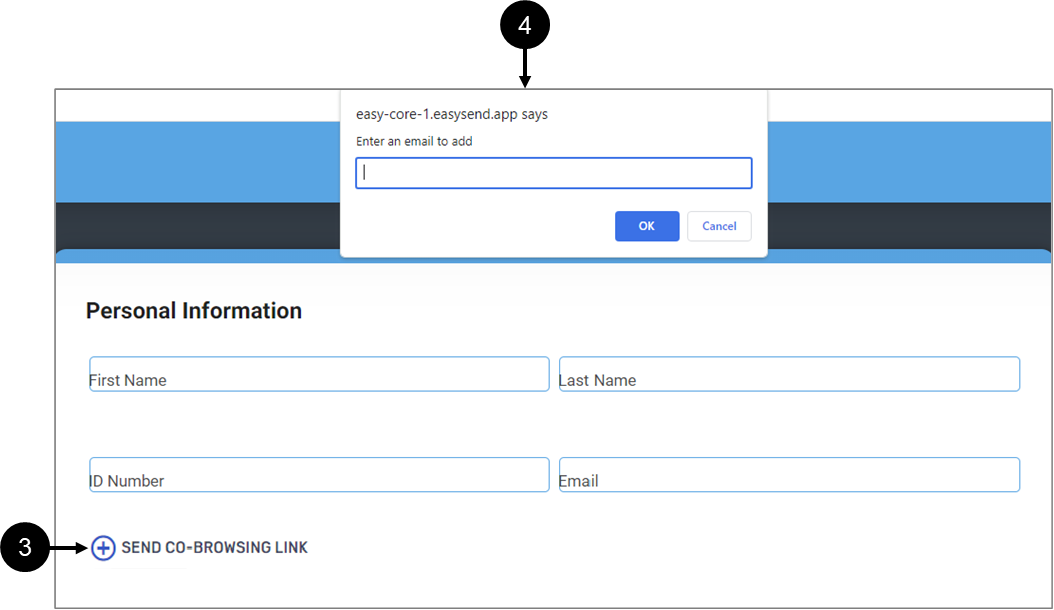
Figure 20: Initiating Co-browsing
The recipient will receive an email with a link to the digital process, for example:
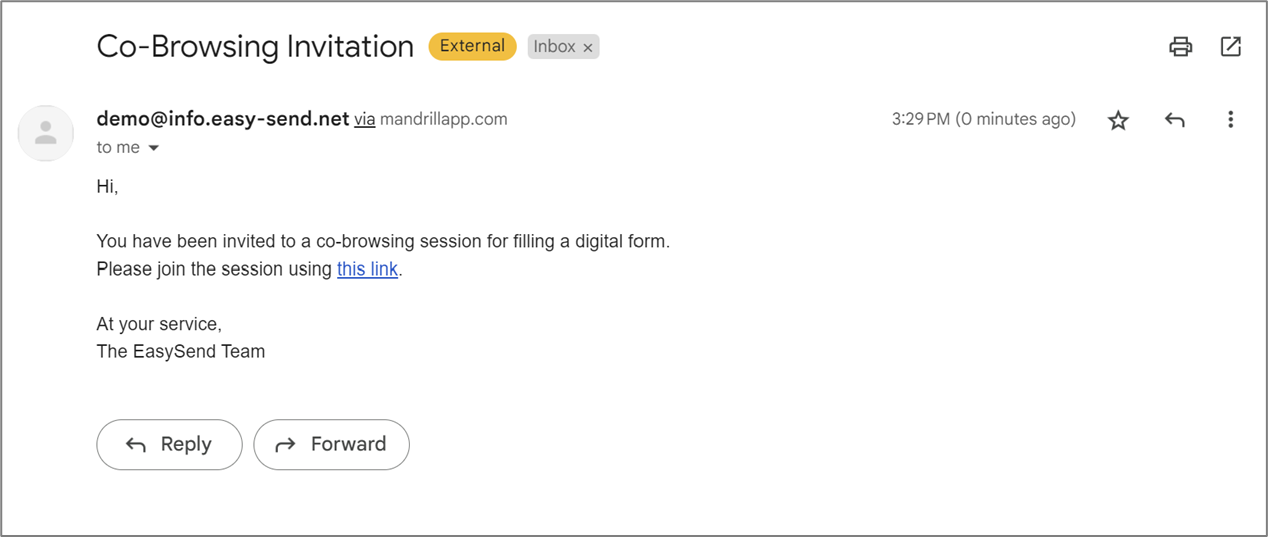
Figure 21: Co-browsing invite email
Co-browsing Component Properties
(See Figure 22)
The properties of the Co-browsing component (component name, version, title, color, action (Co-browsing or Save & continue later)) are configured using your Theme. For additional information please contact our support team.
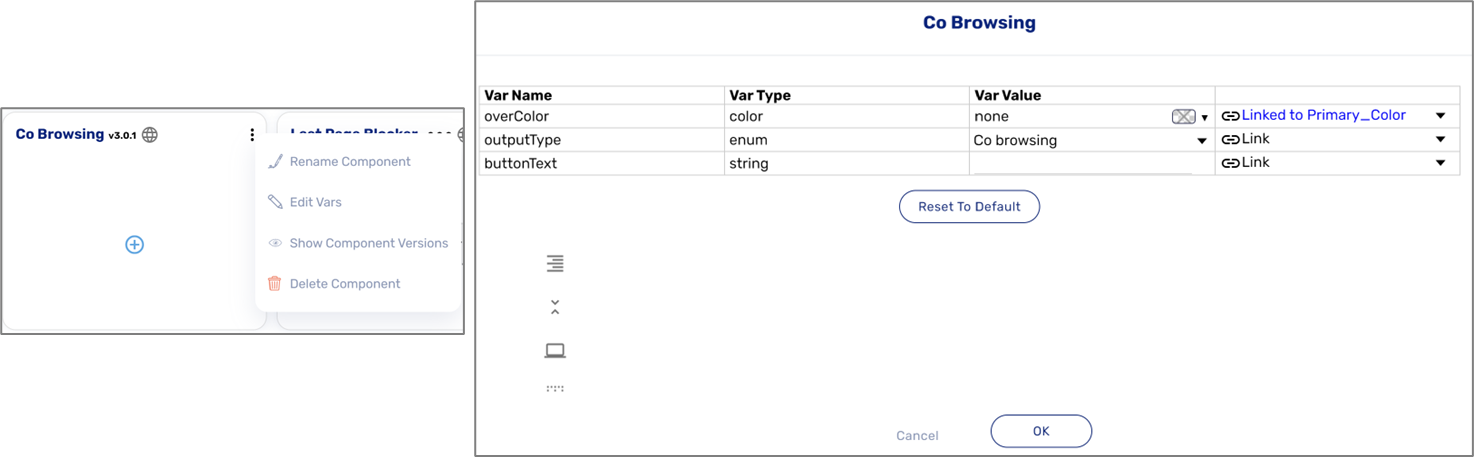
Figure 22: Co-browsing Component Properties
Save & continue later email
The following sections describe the Save & continue later email option.
What is Save & continue later?
Save and continue later enables end-users to save their digital process progress at any stage, close it, and use the link they receive via email to complete it at a later time.
Save & continue later email Configuration
(See Figure 23 and Figure 24)
After adding the Save & continue later email as an output (1), clicking the Edit button (2) opens the Email Details window.
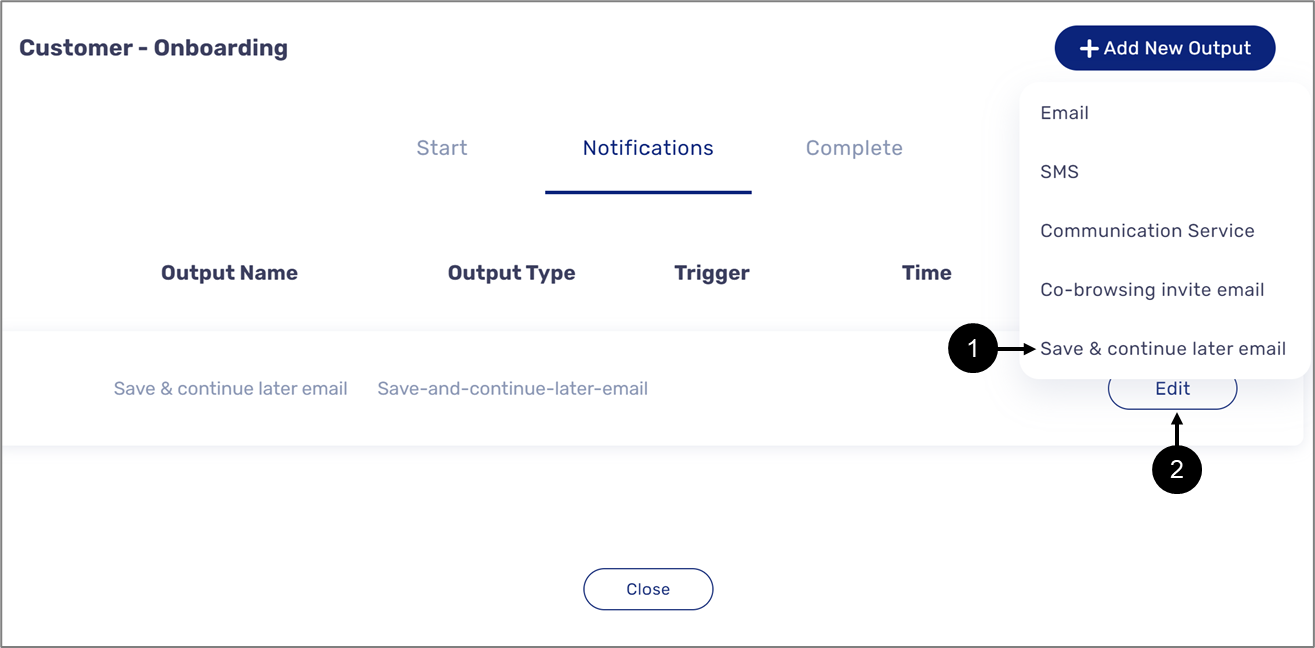
Figure 23: Save & continue later email
The Email Details window is divided into two sections:
- General (3) - contains the Email Name and Subject, both are editable.
- Email Content (4) - an HTML editor that contains the content of the email. The content must include a
link to the process - {{link}}. The content is editable.
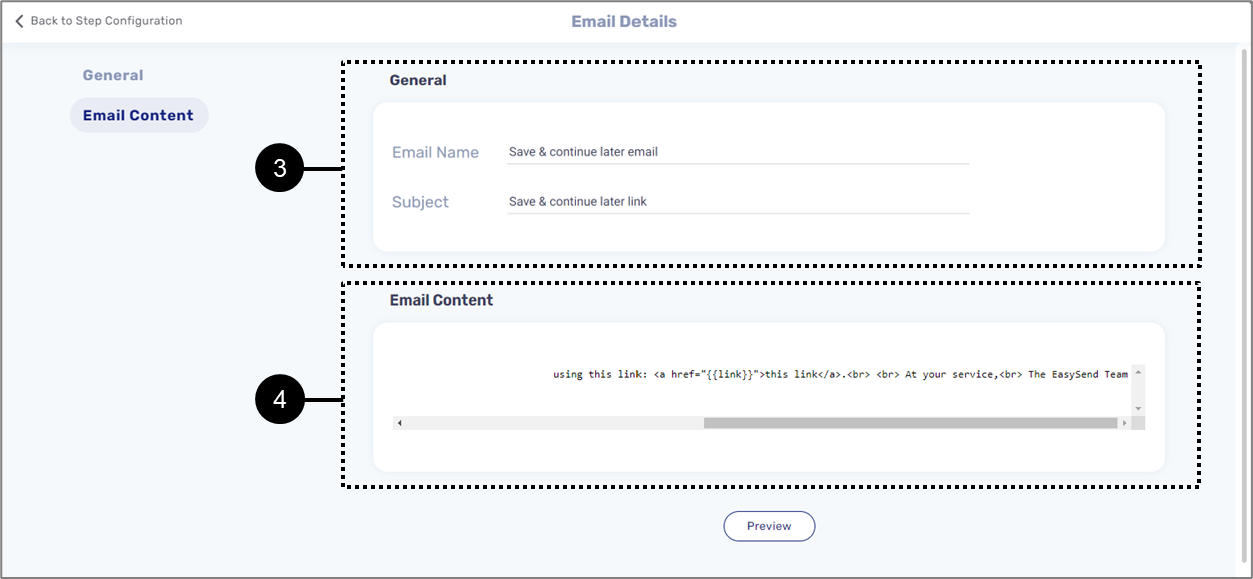
Figure 24: Email Details Window
How to Send the Sand & continue later email
(See Figure 25 to Figure 27)
To send the Save & continue later email, make sure to locate the Co-browsing component (1) and to add it to the Webflow (2), for example:
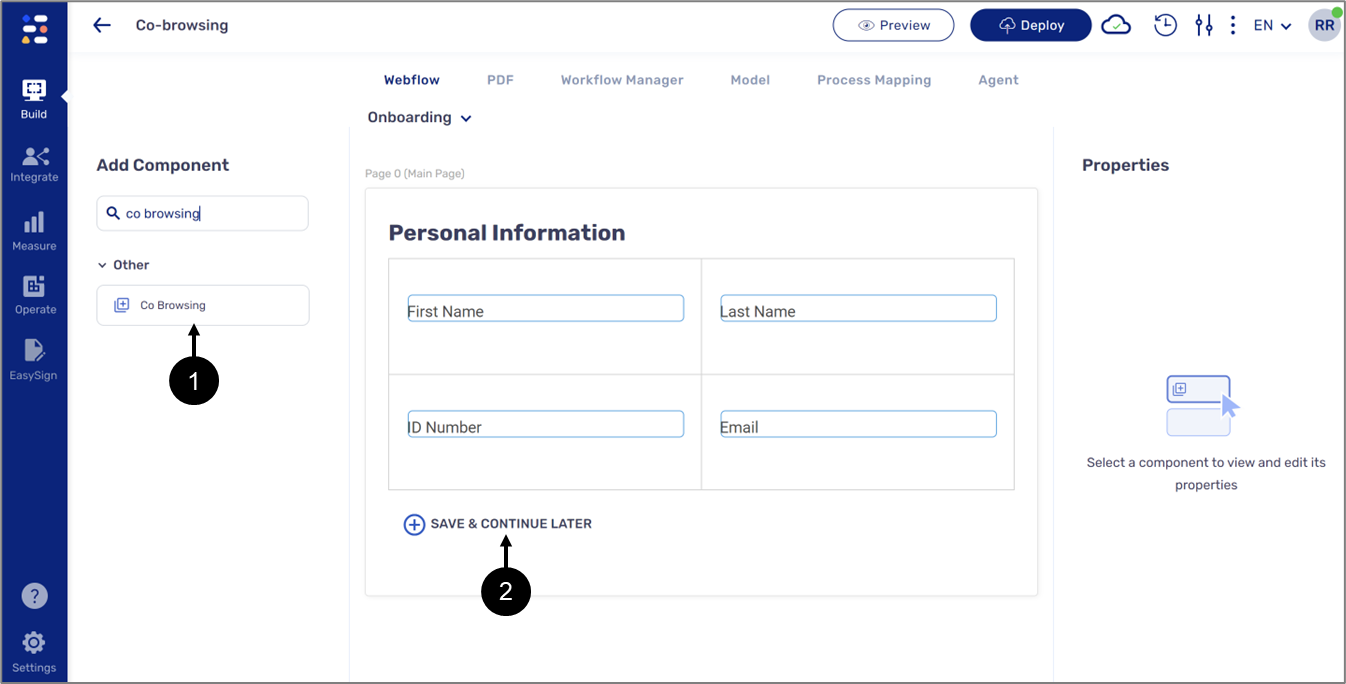
Figure 25: Co-browsing component
When the digital process is initiated and an end-user clicks the Co-browsing component (3) a window (4) to input a recipient email address appears, for example:
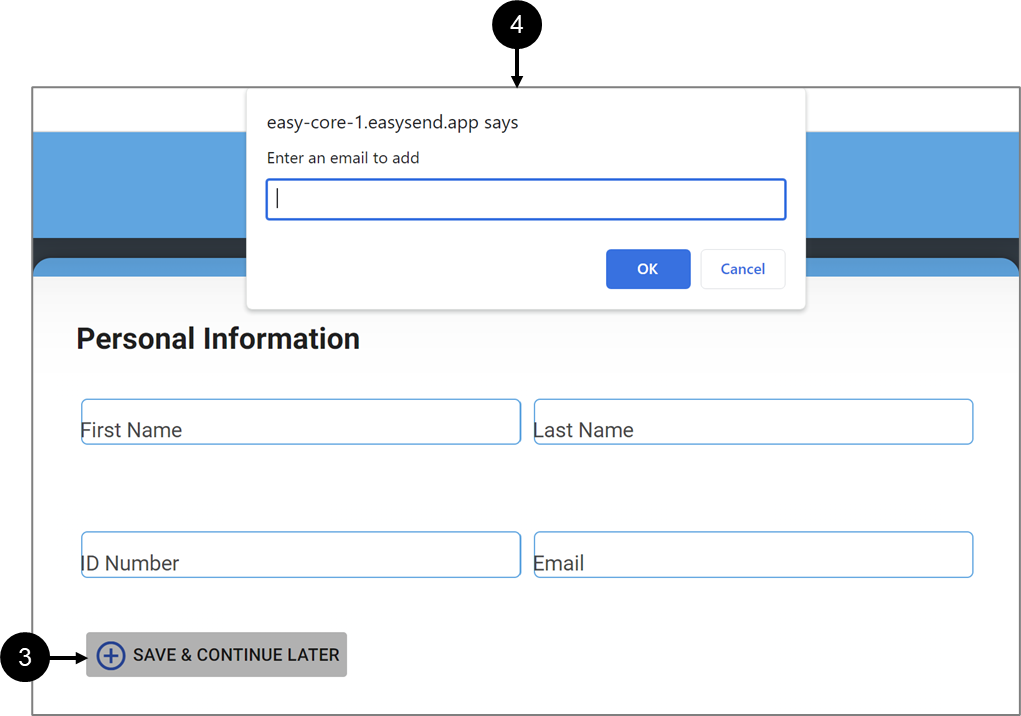
Figure 26: Initiating Co-browsing
The recipient will receive an email with a link to the digital process, for example:
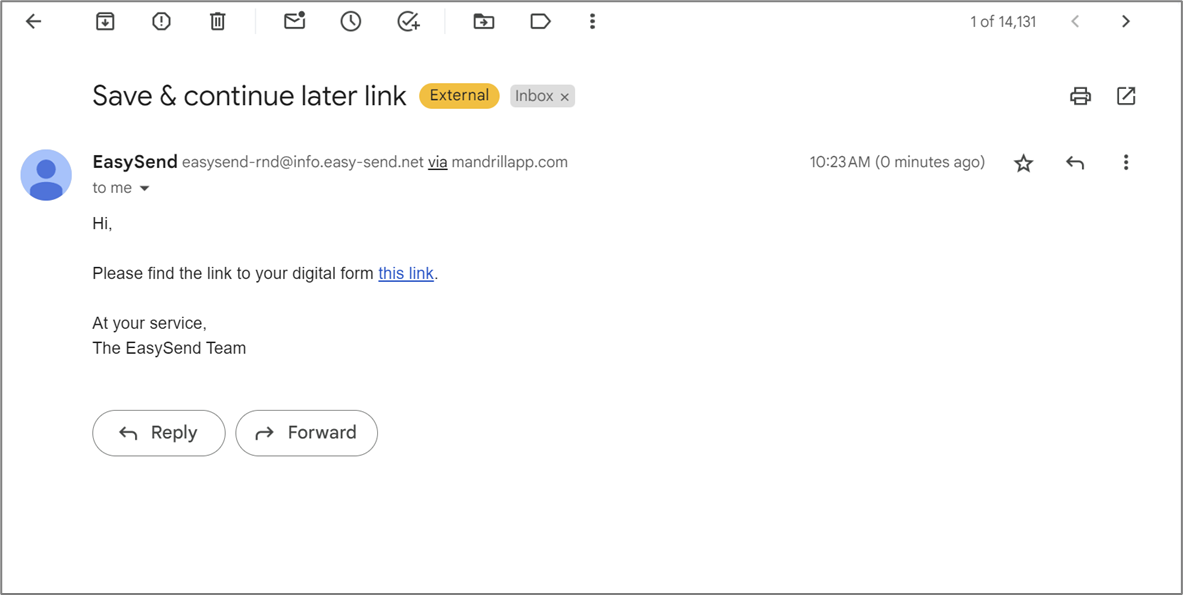
Figure 27: Co-browsing Invite Email
Co-browsing Component Properties
(See Figure 28)
The properties of the Co-browsing component (component name, version, title, color, action (Co-browsing or Save & continue later)) are configured using your Theme. For additional information please contact our support team.
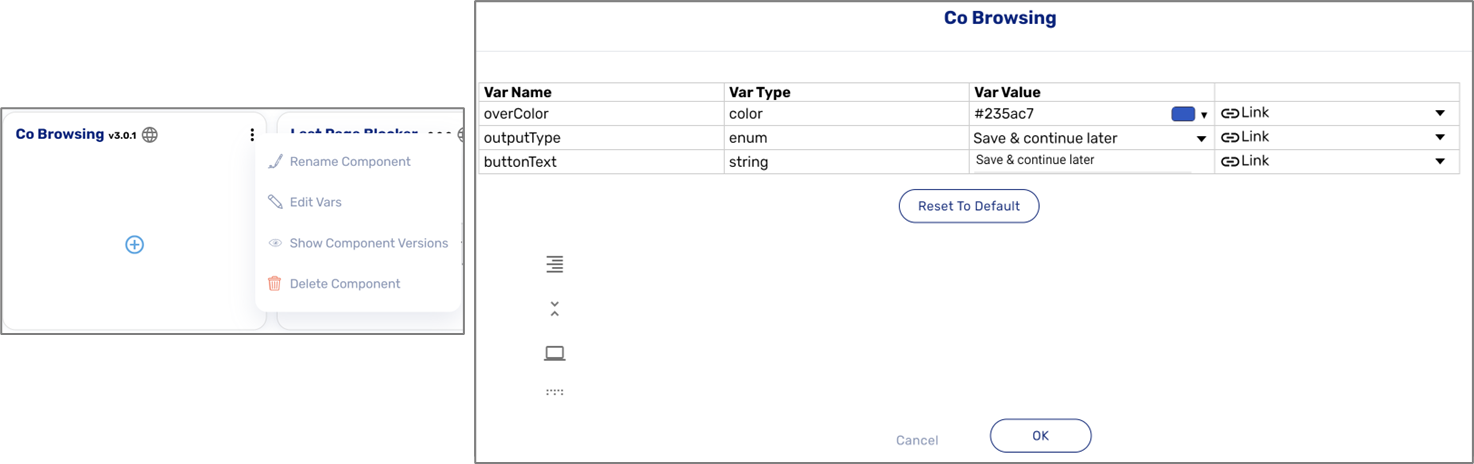
Figure 27: Co-browsing Component Properties