Article Overview
The following article describes EasySend's Webhooks feature. It details how to create, configure, and initialize different Webhooks.
What are Webhooks?
Webhooks are a way for web applications to transfer data in real-time to other applications or services based on event triggers. Triggers occur when performing specific actions.
EasySend and Webhooks
Webhooks are used to enable communication between digital processes/EasySign processes and external applications or services, by performing actions that trigger events and send real-time notifications. Webhooks allow EasySend users to automate workflows and ensure that essential actions taken in one system are communicated to other connected systems.
Webhooks in EasySend
(See Figure 1 and Figure 2)
Webhooks can be found in two areas of the platform:
- Under the Integrate tab - here, you will create new Webhooks.
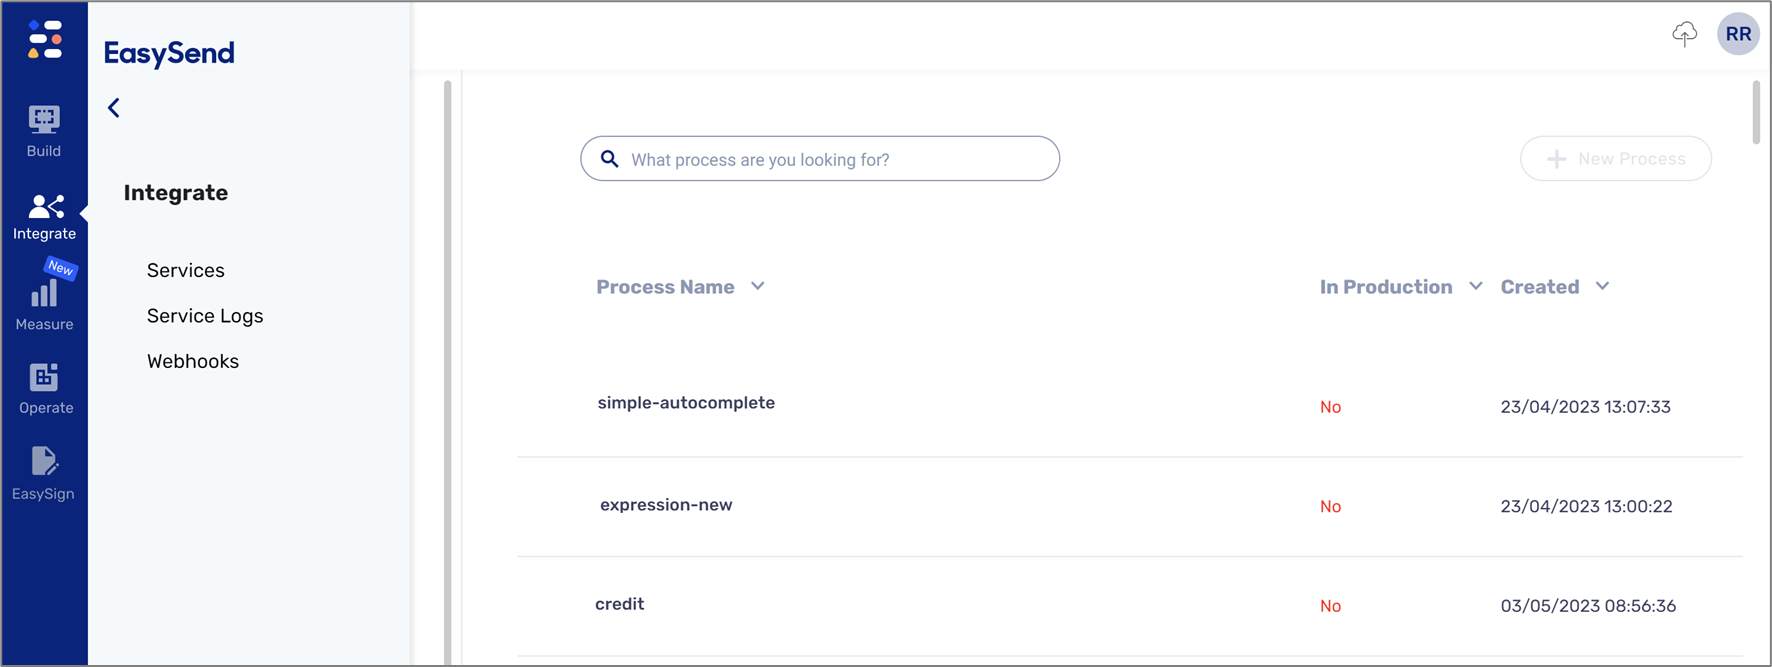
Figure 1: Integrate -> Webhooks
- In the Service screen, you will create custom Webhook services.
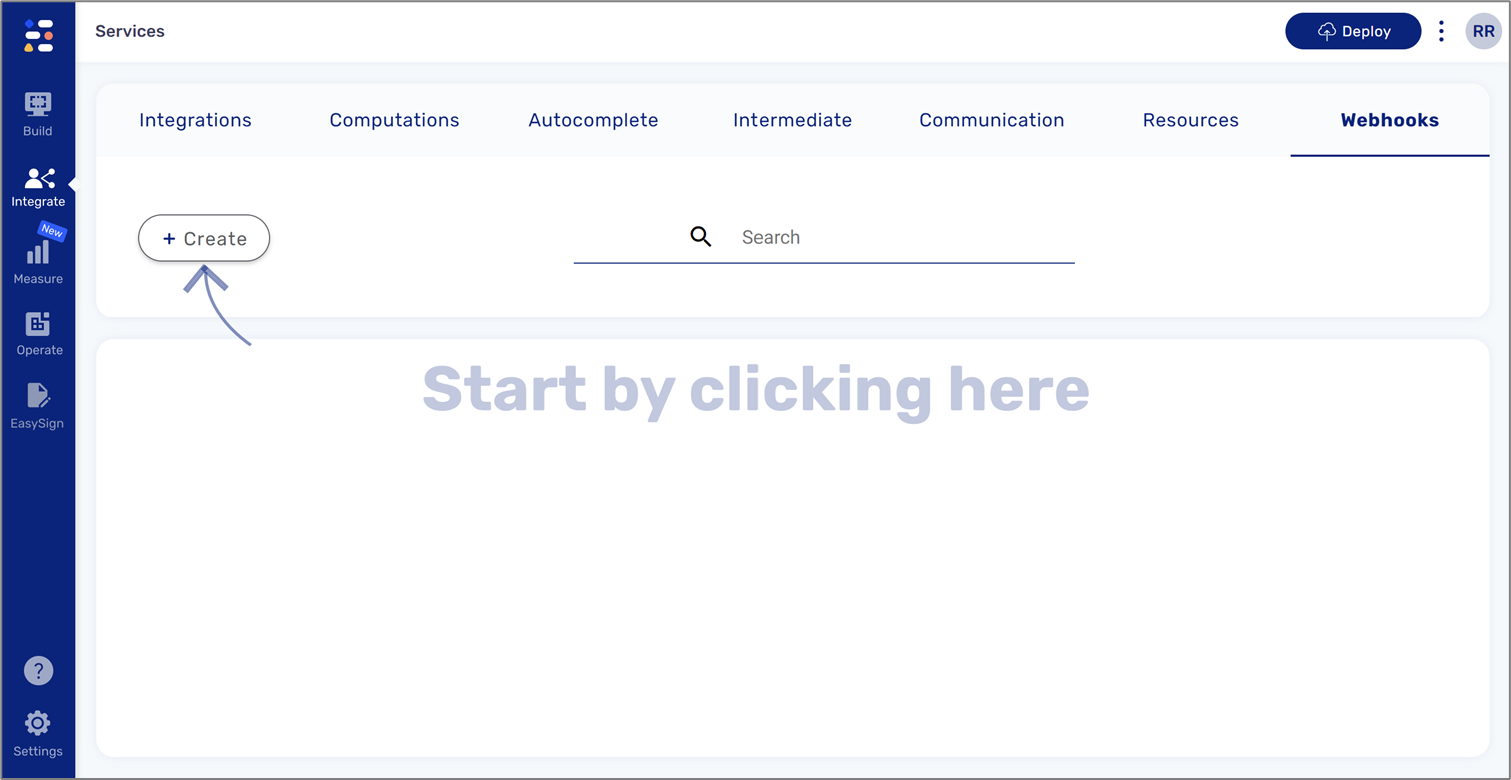
Figure 2: Services -> Webhooks
New Webhooks
(See Figure 3)
To create new Webhooks, click Integrate (1) and Webhooks (2).
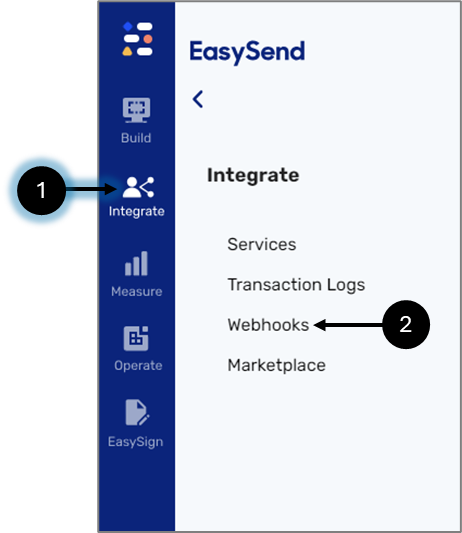
Figure 3: Integrate -> Webhooks
After clicking the Webhooks option, the Webhooks screen appears.
Webhooks Screen
(See Figure 4)
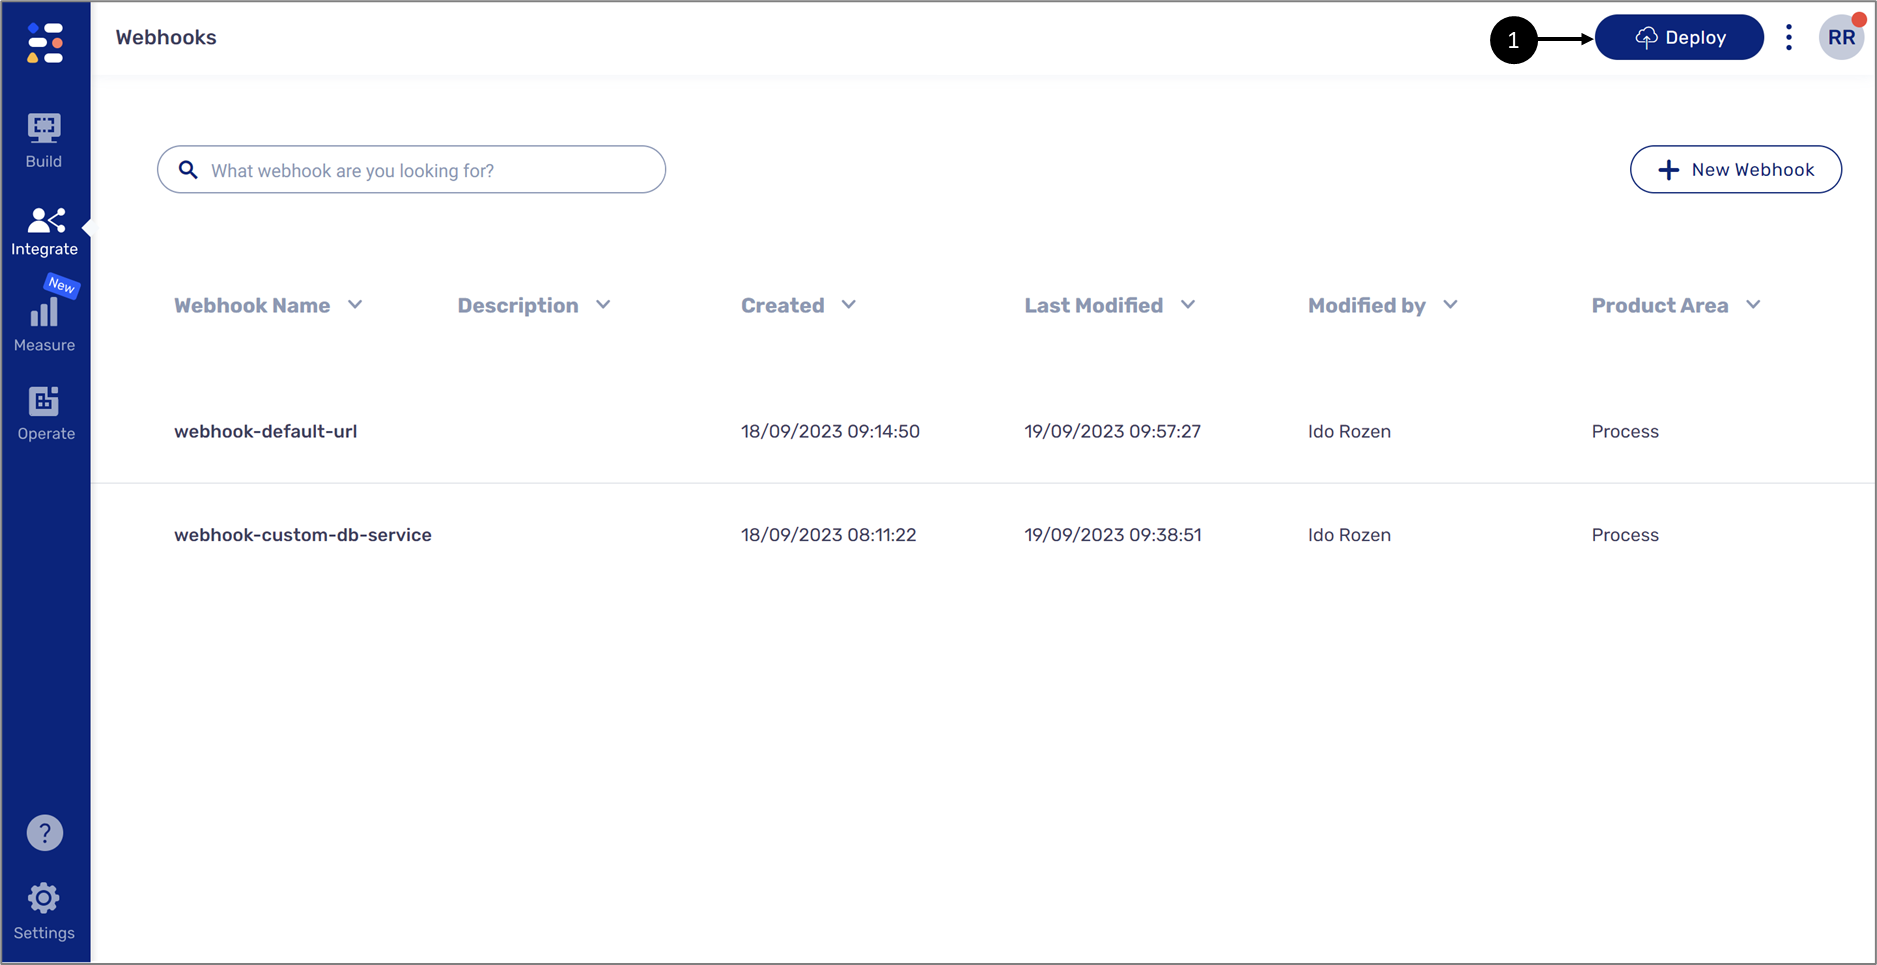
Using the Webhooks screen, you can create new Webhooks. Clicking the + New Webhook (1) (or Create New (1) when available) displays the Webhook Settings window.
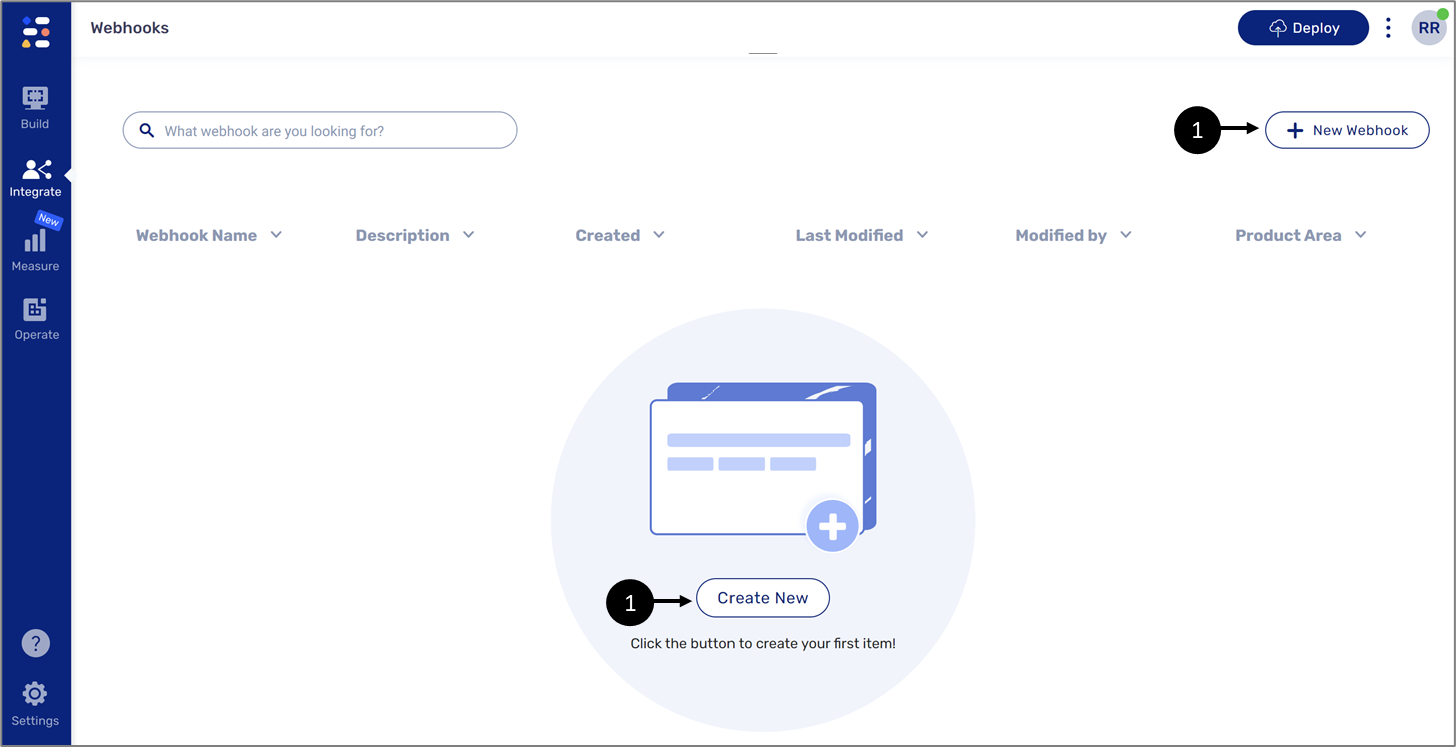
Figure 4: Webhooks Screen
Webhook Settings Window
(See Figure 5)
The Webhook Settings window contains the following sections:
- General Settings (1) - for providing a name and description for the Webhook
- Endpoint Settings (2) - for selecting the type of Webhook to use - simple or custom
- Data transferred (3) - for selecting the payload that will be transferred once the Webhook is triggered
- Event Triggers (4) - for selecting which event will trigger the Webhook, and in some cases, which processes to associate the Webhook with.
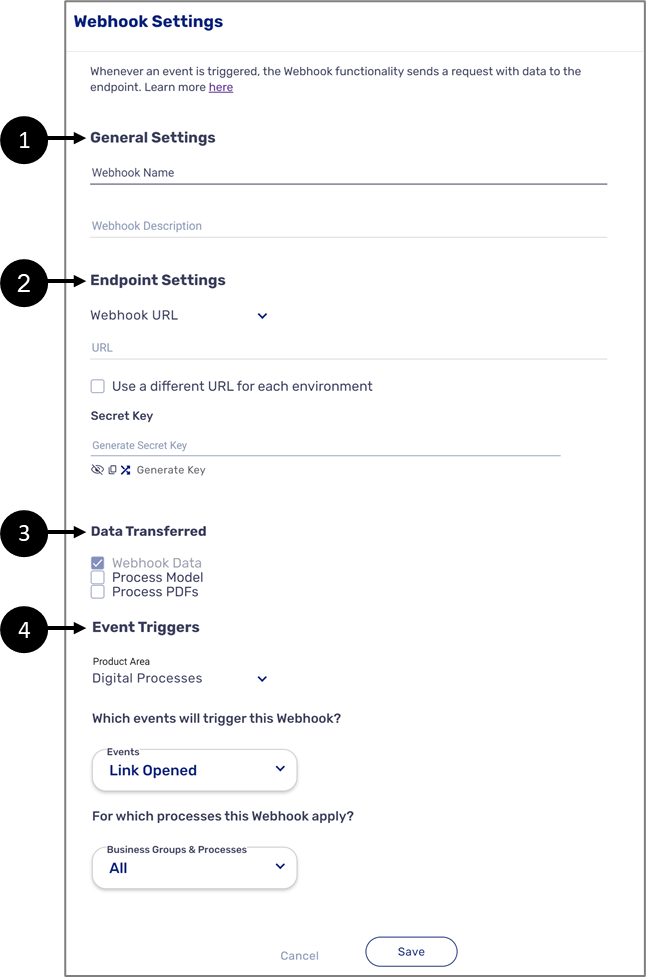
Figure 5: Webhooks Screen
Webhook Settings Window - Endpoint Settings
(See Figure 6 to Figure 9)
This section contains a dropdown (1) with two options:
- Webhook URL - a simple Webhook
- Webhook Service - Webhook, which is based on a pre-existing custom Webhook service
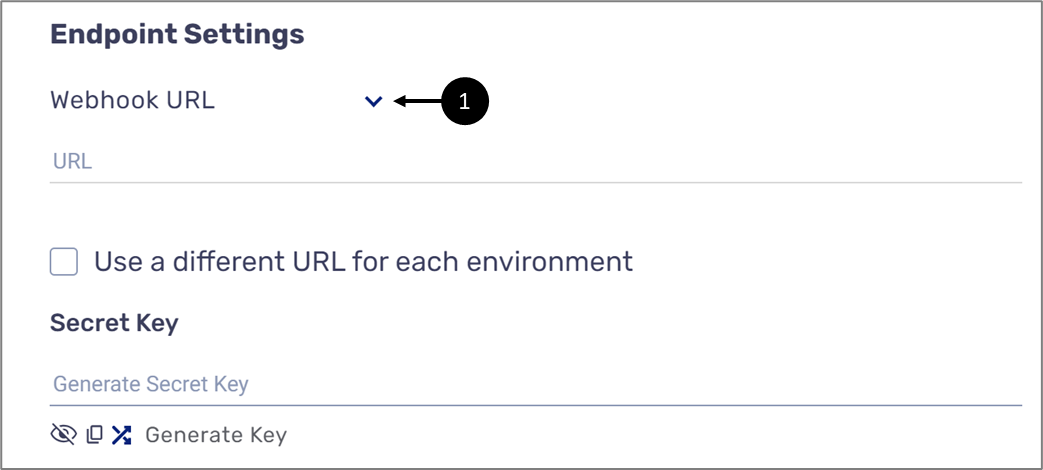
Figure 6: Endpoint Settings Dropdown
When the selected option is Webhook URL (simple), you need to provide URL parameters, one URL (2), or multiple URLs for different DEV/PROD environments (3).
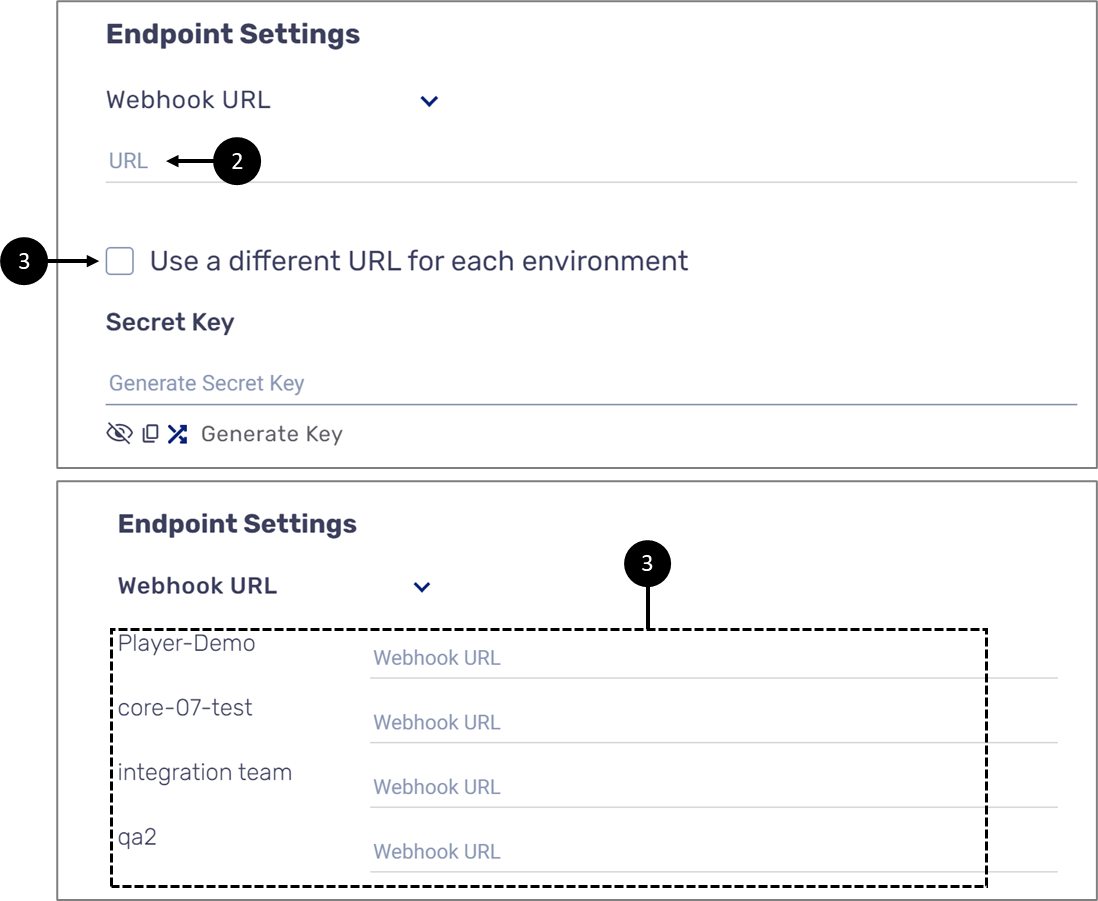
Figure 7: Webhook URLs
In addition to URL parameters, it is mandatory to generate a two-way secret key for the Webhook. The key will be generated by clicking the Generate Key option (4).
The Key will appear hidden (5). It must be copied and used within the external interface/service/application on the other side of the Webhook.
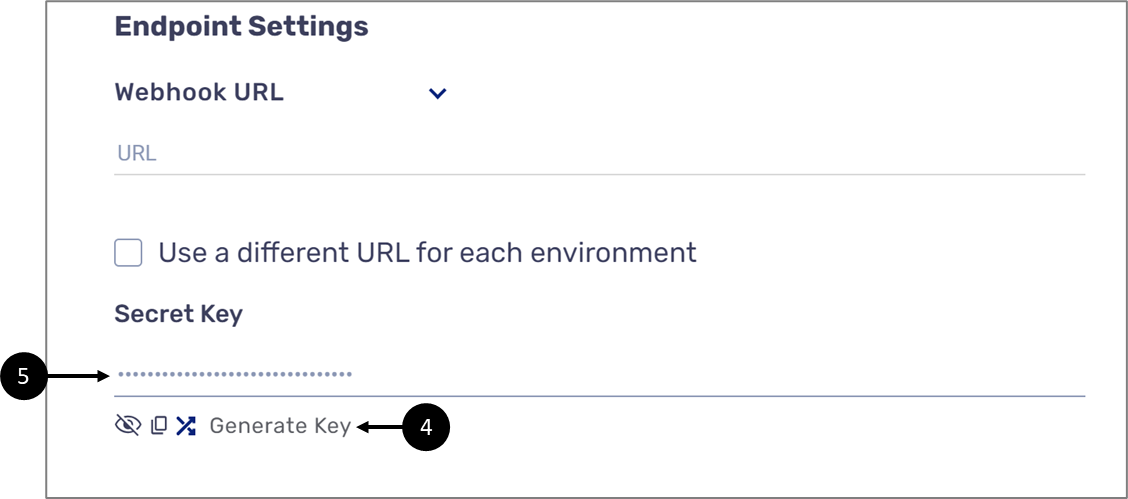
Figure 8: Secret Key
If the dropdown is set to Webhook service (6), the URL and secret key parameters are no longer applicable; instead, you will select a pre-existing custom Webhook service from the Select service dropdown (7).
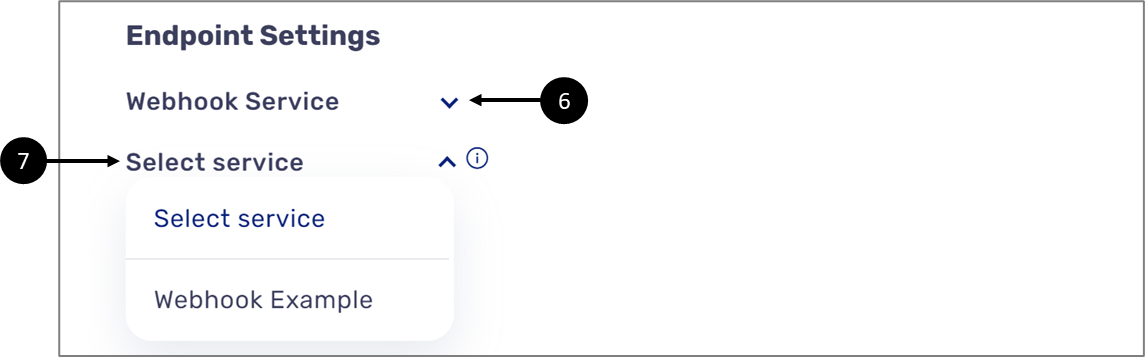
Figure 9: Selecting a Custom Webhook Service
- If your pre-existing custom Webhook service is un-named it will not appear in the list (an empty slot will appear instead)

- Make sure the custom Webhook service you are selecting from the list was deployed to all relevant environments. A custom Webhook service that was not deployed will still appear on the list, but will remain inactive.
Webhook Settings Window - Data Transferred
(See Figure 10)
This section will appear only if the Webhook URL option is selected under the Endpoint section. It is used for selecting the payload that will be transferred once the Webhook is triggered:
- Webhook Data:
- Request Identifier (RID)
- WebflowId
- companyId
- evetnName
- proccessId
- WebhookVersion
- originalRequest - relevant only for EasySign
- Process Model:
- End-user input data, for example:
- First Name
- Last Name
- Model Metadata, for example:
- Browser name
- Current time
- Workflow step Id
- File attachments - for both a simple and a custom Webhook, only a string with the name of the file is sent, and not the actual file
- End-user input data, for example:
- Process PDFs
- The filled-out PDFs are generated at the end of the transaction
- The generated audit trail PDF is generated at the end of the transaction
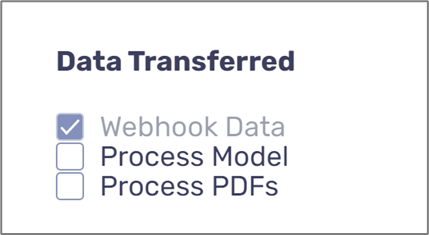
Figure 10: Data Transferred
- The entire Model for both EasySign processes and digital processes will be sent once the Process Model checkbox is marked under Data Transferred. It cannot be customized to send only specific items.
- For EasySign, a model based on the specific request and marked fields is dynamically generated.
(See Figure 11 and Figure 12)
This section applies the Webhook to digital processes or EasySign forms and indicates when it will be triggered. It contains a Product Area dropdown (1) with two options:
- Digital Processes
- EasySign Forms

Figure 11: Event Triggers - Digital Processes
The Events dropdown (2) contains a list of event triggers that will activate the Webhook in real-time. Link Opened is the selected event by default.
When the selected Product Area is Digital Processes, a list of available business groups and processes to apply the Webhook to will appear (3). By default, all the processes are selected.
When the selected Product Area is EasySign forms, the event trigger must be selected (4), but there is no need to select a business group or process.
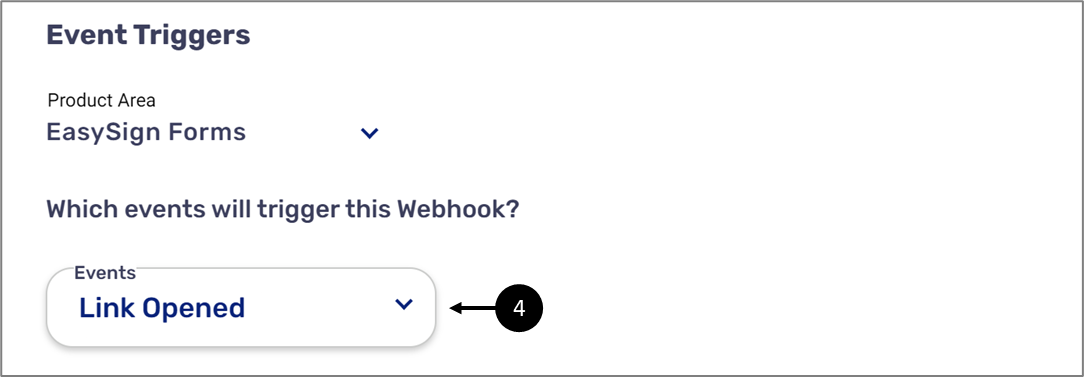
Figure 12: Event Triggers - EasySign Forms
Custom Webhooks Services
(See Figure 13)
Custom Webhooks services are created by using the Service's screen Webhooks tab (1) and the + Create button (2).

Figure 13: Creating Custom Webhook Services
After clicking the + Create button, the custom Webhook service screen appears.
Custom Webhook Service Screen
(See Figure 14)
The screen has three sections:
- Service name (1)
- Inputs (2)
- Steps (3)
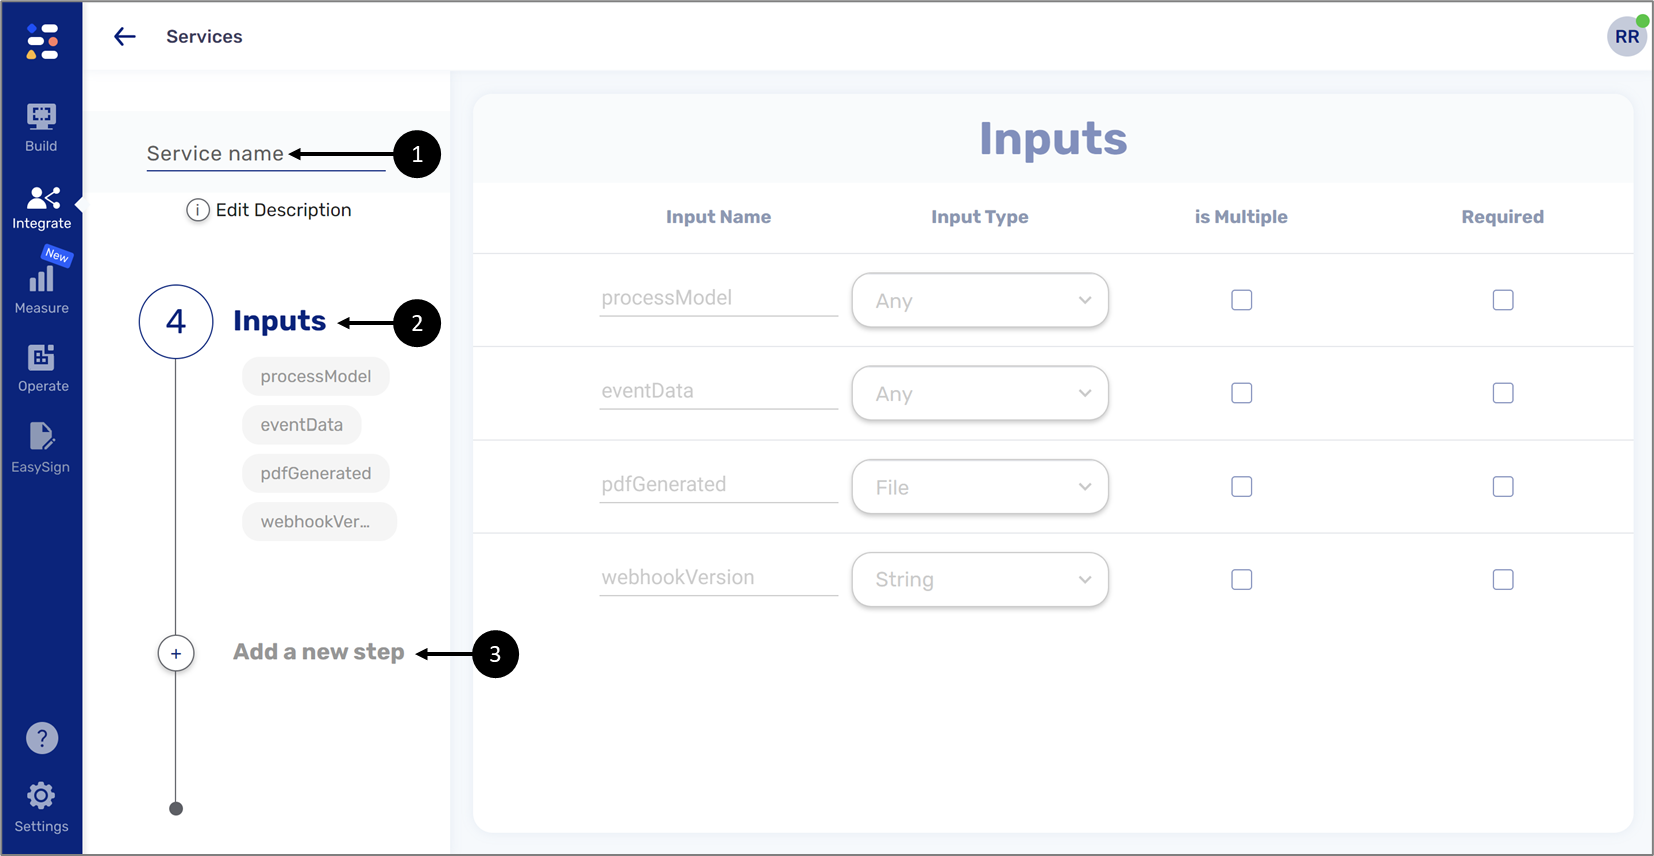
Figure 14: Custom Webhook Service Screen
Custom Webhook Service Screen - Inputs
(See Figure 15)
This section contains the payload that will be passed to the HTTP request of the simple or custom Webhook. By default, a custom Webhook service contains the following inputs (1):
- ProcessModel input - Model information:
- End-user input data, for example:
- First Name
- Last Name
- Model Metadata, for example:
- Browser name
- Current time
- Workflow step Id
- Please note that metadata is not supported for services triggered by an EasySign transaction. When setting up a Webhook service for EasySign transactions, avoid using metadata as an input source for the service
- File attachments - for both a simple and a custom Webhook, only a string with the name of the file is sent, and not the actual file
- End-user input data, for example:
- eventData - session event data, for example:
- Request Identifier (RID)
- WebflowId
- companyId
- evetnName
- proccessId
- originalRequest - relevant only for EasySign, for example:
{
    "version": "1",
    "apiKey": "1122334455",
    "customData": "Example Request 1",
    "participants": [...],
    "communication": {
        "start": [...],
        "finish": [...],
        "autoReminders": [...]
    },
    "documents": [...]
}- pdfGenerated:
- The filled-out PDFs are generated at the end of the transaction
- The audit-trail PDF is generated at the end of the transaction
- webhookVersion - version of Webhooks
- The entire Model for both EasySign processes and digital processes will be sent once the Process Model checkbox is marked under Data Transferred. It cannot be customized to send only specific items.
- For EasySign, a model based on the specific request and marked fields is dynamically generated
pdfGenerated includes the filled PDF file(s) and an audit trail, which are generated at the end of a transaction. For a simple Webhook, an S3 link of the files is sent, while for service Webhooks, EasySend file objects are sent.
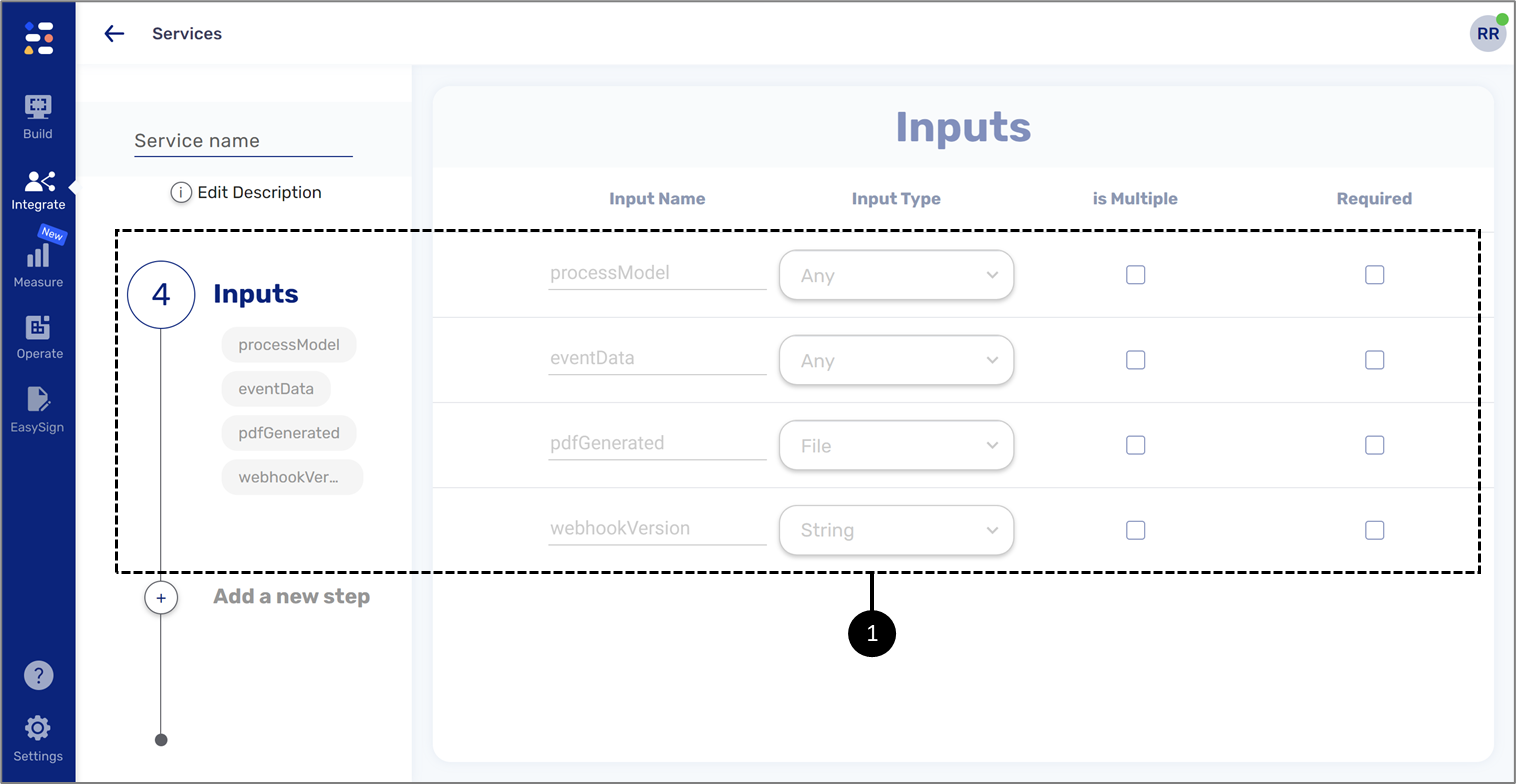
Figure 15: Inputs
Custom Webhook Service Screen - Steps
(See Figure 16)
A custom Webhook service can be configured with multiple steps. Each step is a different action that the Integration service will perform once it is initiated. The steps are:
- Code - writing JavaScript code
- File Storage Service - adding a step to remotely store files
- Rest API Service - interfacing with an external service through a REST API call
- Computed Service - calculating expressions or values according to the defined conditions
- Email - sending emails as part of the integration service
- EasySend Service - adding an EasySend preconfigured event
- SQL Query - running an SQL query in an external database
- File Encode/Decode - encoding/decoding files with Base 64, Pretty Good Privacy (PGP), Rivest–Shamir–Adleman (RSA), JSON Web Encryption (JWE), and JSON Web Token (JWT)
- Salesforce Service - running Select, Create, and Update queries on any Salesforce object
- Dataverse - running Select, Create, and Update queries on any Dataverse object
- Hashing - converting to a hashed hexadecimal value with a Secure Hash Algorithm (SHA), for example, SHA512
Each step has a short description of what it does and what its inputs and outputs are.
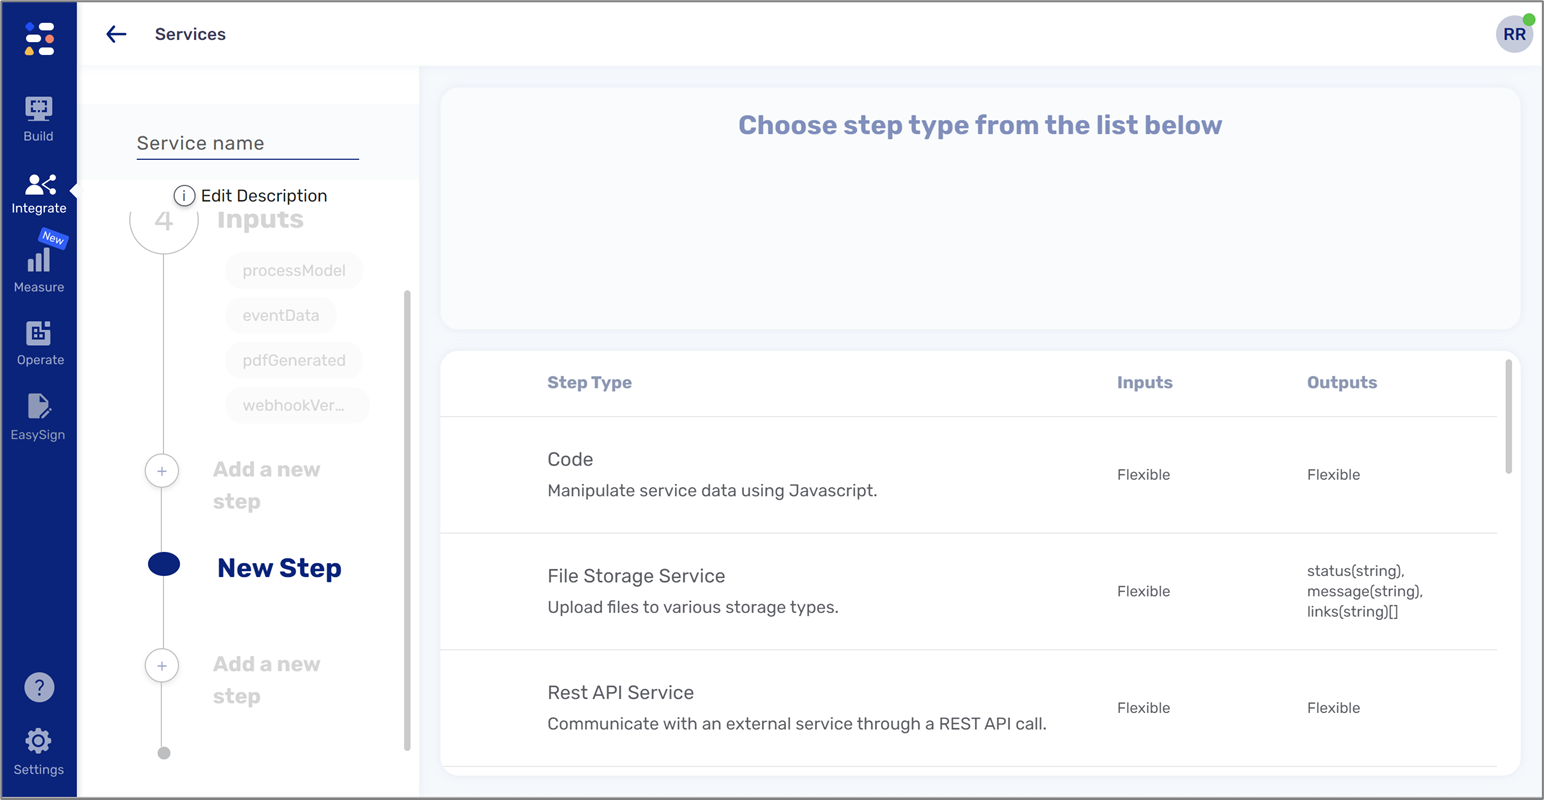
Figure 16: Steps
Usage Examples
The following sections describe common usage examples for Webhooks in EasySend:
- Transfer data from a digital process to an external website using a simple Webhook
- Transfer data from a digital process to an external website using a custom Webhook service
Simple Webhook
(See Figure 17 to Figure 23)
To use a simple Webhook to transfer data from a digital process to an external website, perform the following steps:
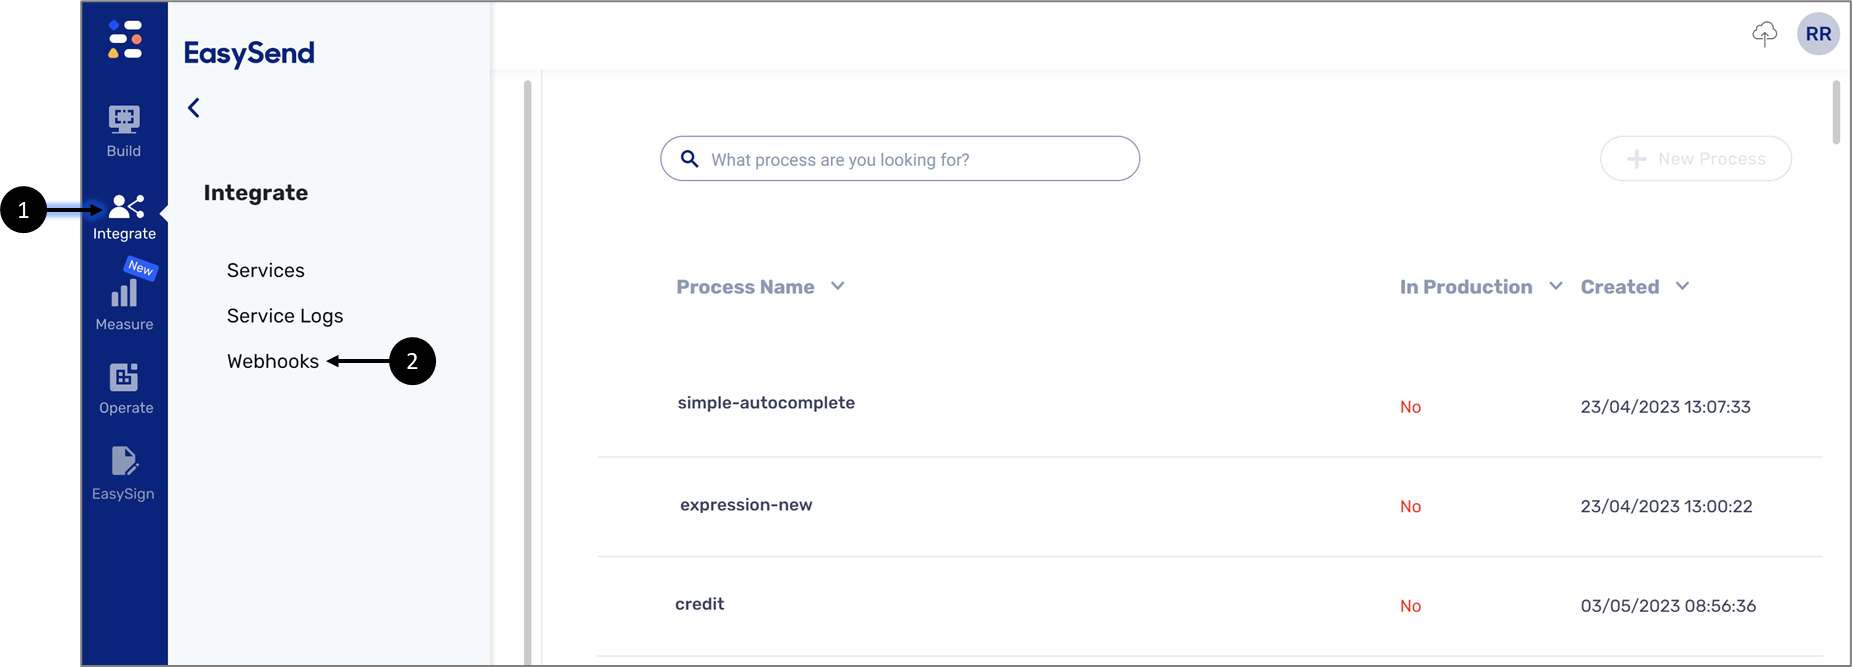
Figure 17: Integrate -> Webhooks
- Click the Integrate Tab (1) and then click Webhooks (2).
Result:
The Webhooks screen appears:
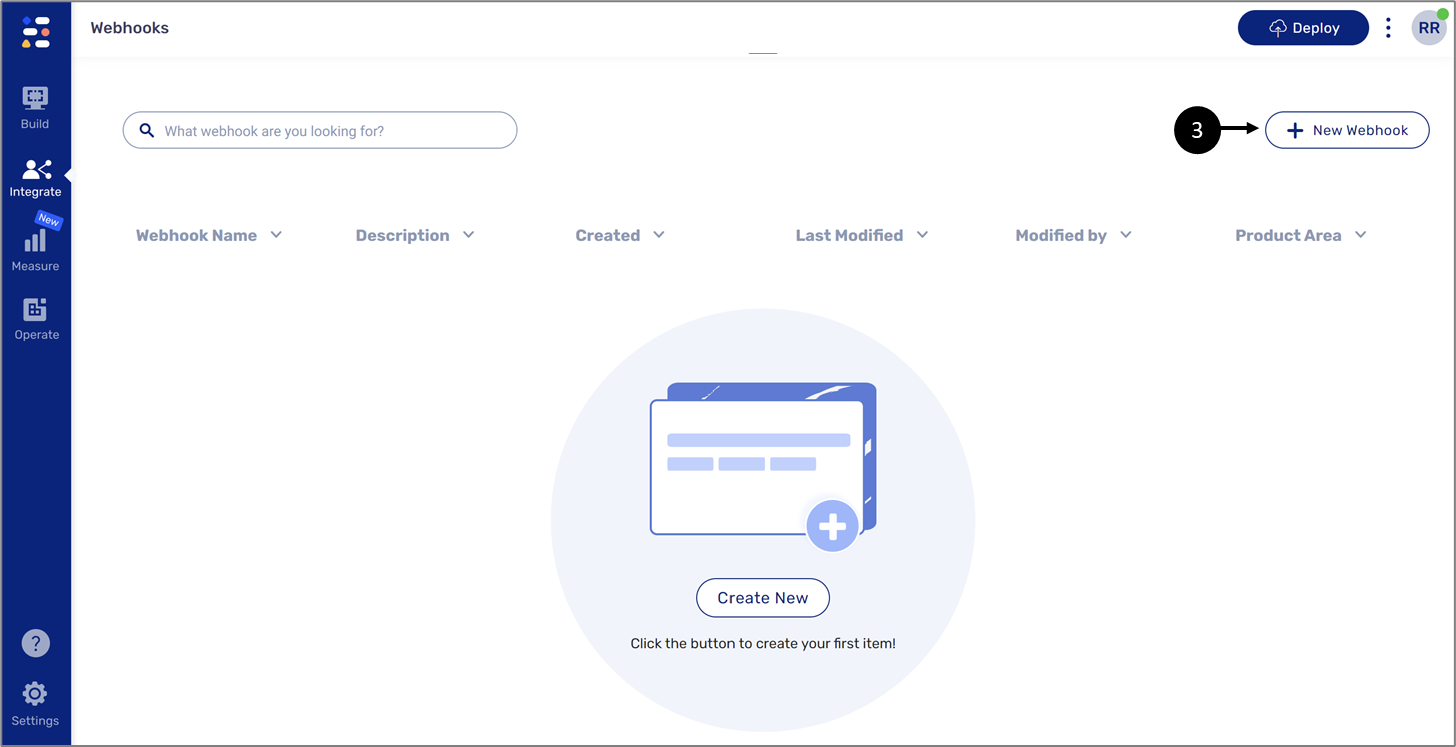
Figure 18: Webhooks Screen
- Click + New Webhook (3).
Result:
The Webhooks Settings window appears:
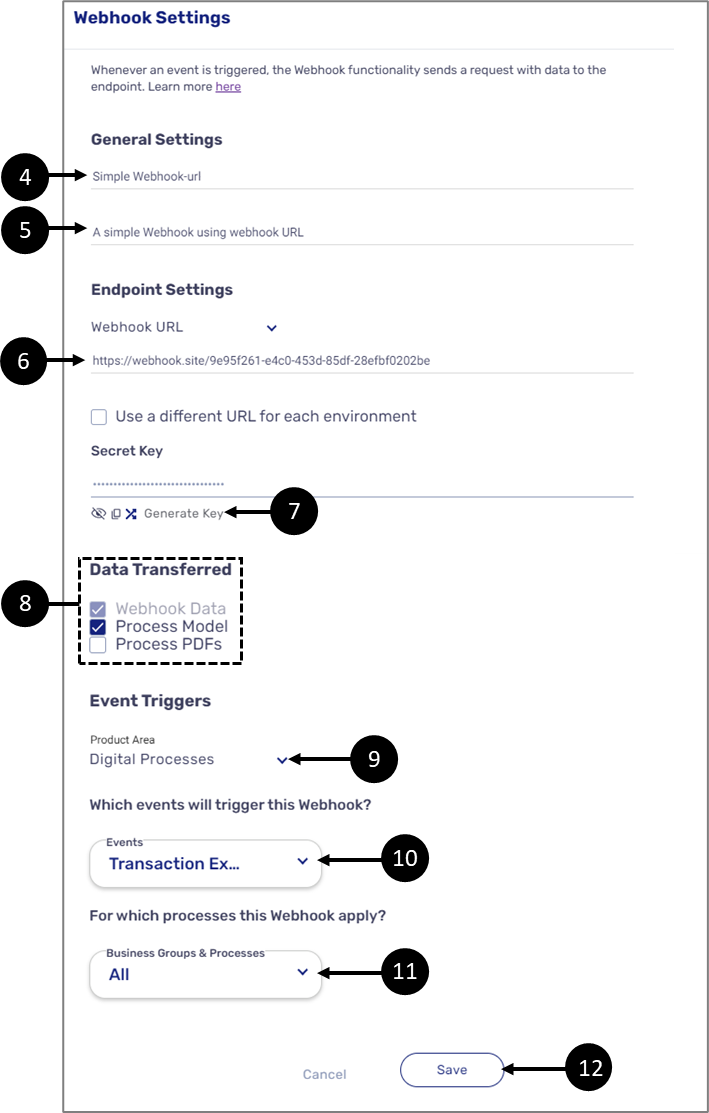
Figure 19: Webhooks Settings Window
- Enter a Webhook Name (4).
- Enter a Webhook Description (5).
- Enter a Webhook URL (6).
- Generate a secret key (7) and use the key with the external interface/service/application.
- Select the data payload to transfer (8).
- Set the product area to Digital Processes (9).
- Select the event trigger/s (10).
- Select the business groups and processes to apply the Webhook (11).
- Click Save (12).
- Initiate the digital process.
Result:
When the selected events occur, for example:
Link Opened:

Figure 20: Linked Opened
Next Page Clicked:

Figure 21: Next Page Clicked
Data Submitted:
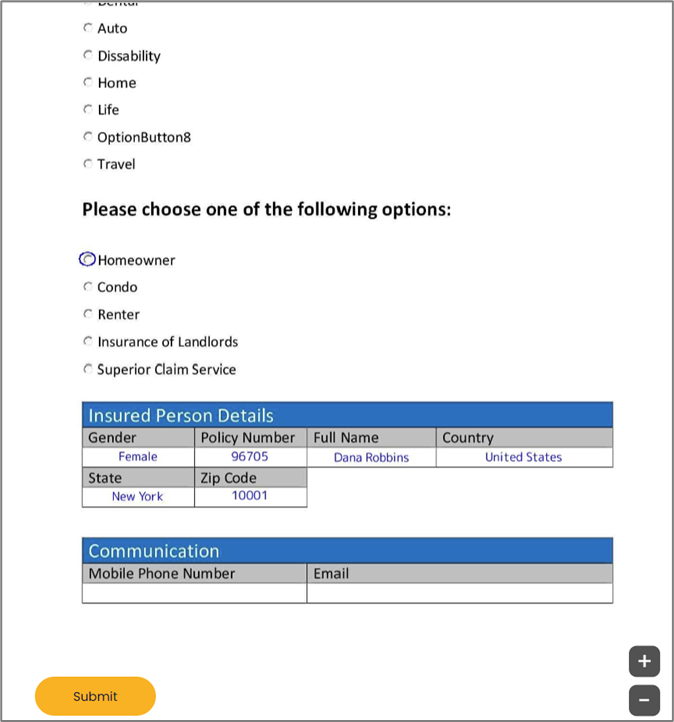
Figure 22: Data Submitted
The Webhook is triggered, and data is transferred to the external website, for example:
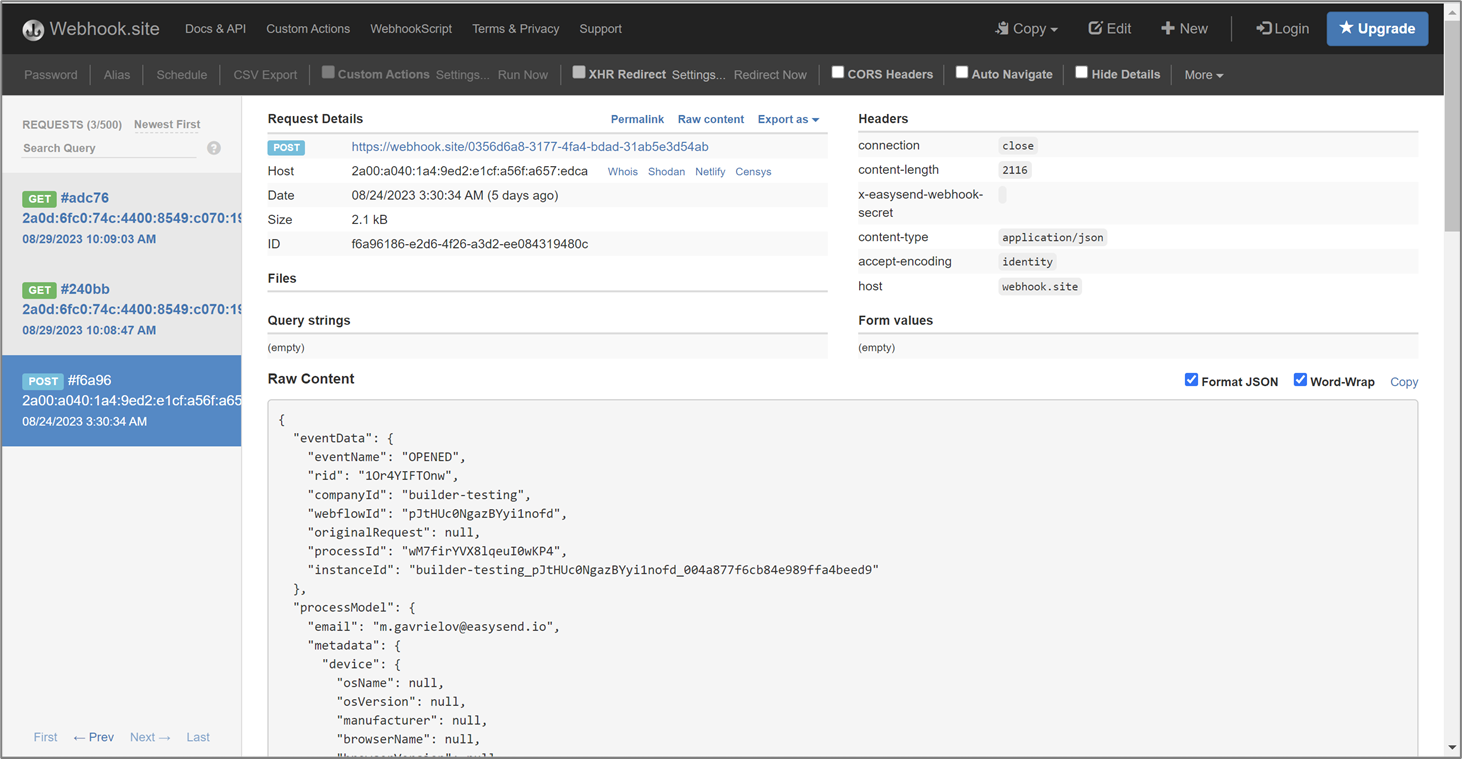
Figure 23: Webhook Example
Custom Webhook Service with a Rest API Service Step
(See Figure 24 to Figure 45)
To use a custom Webhook service to transfer data from a digital process to an external website, perform the following steps:
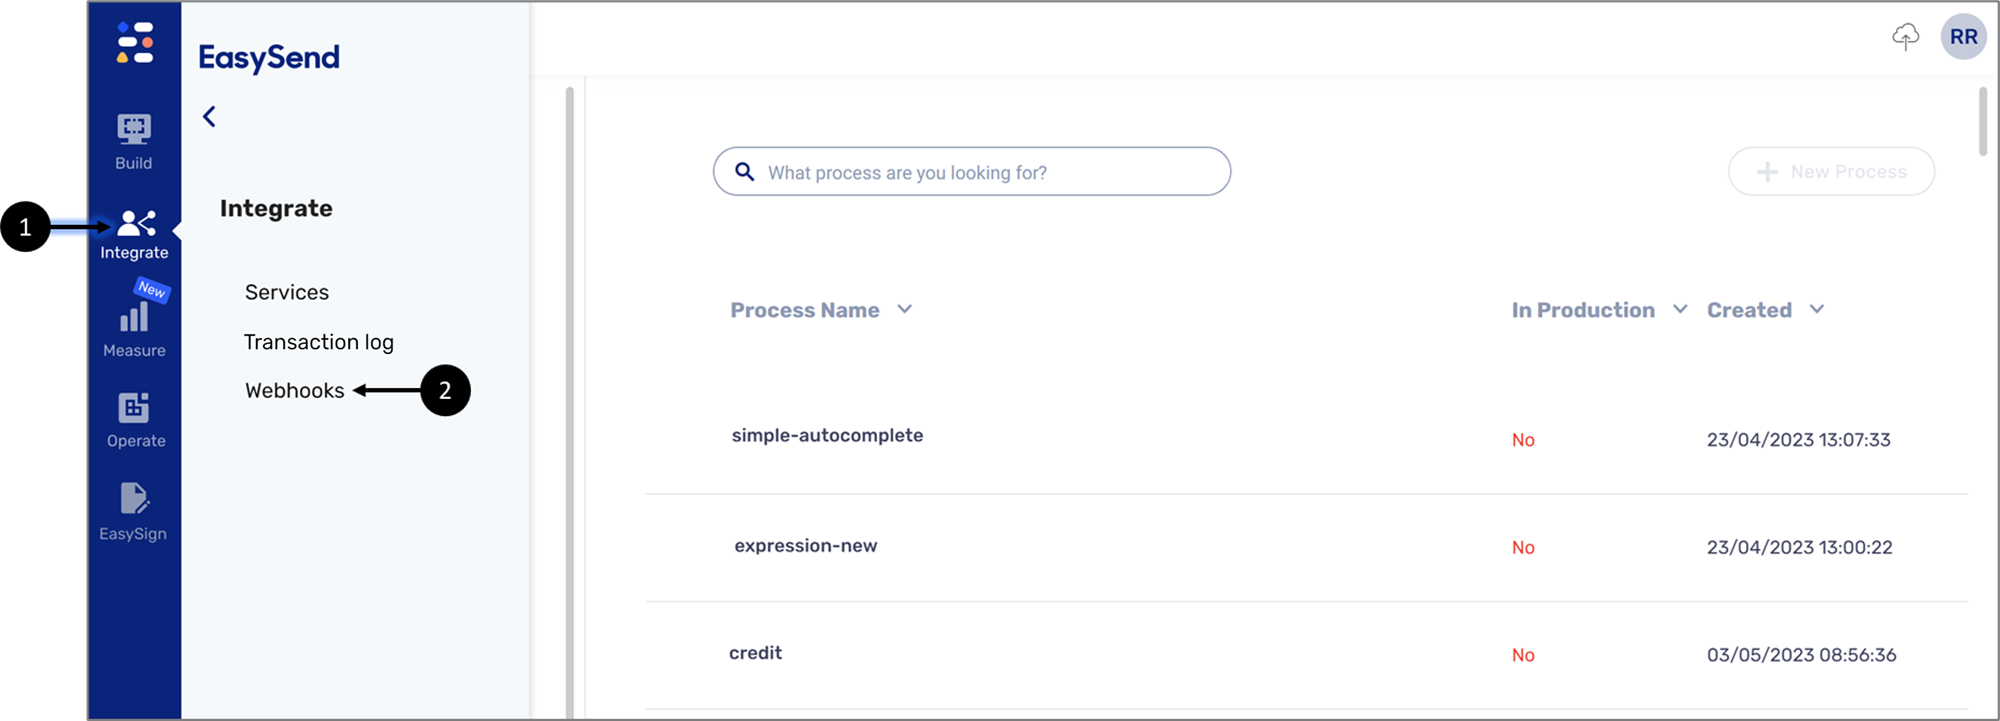
Figure 24: Integrate -> Services
- Click the Integrate tab (1) and then click Services (2).
Result:
The Services screen appears:
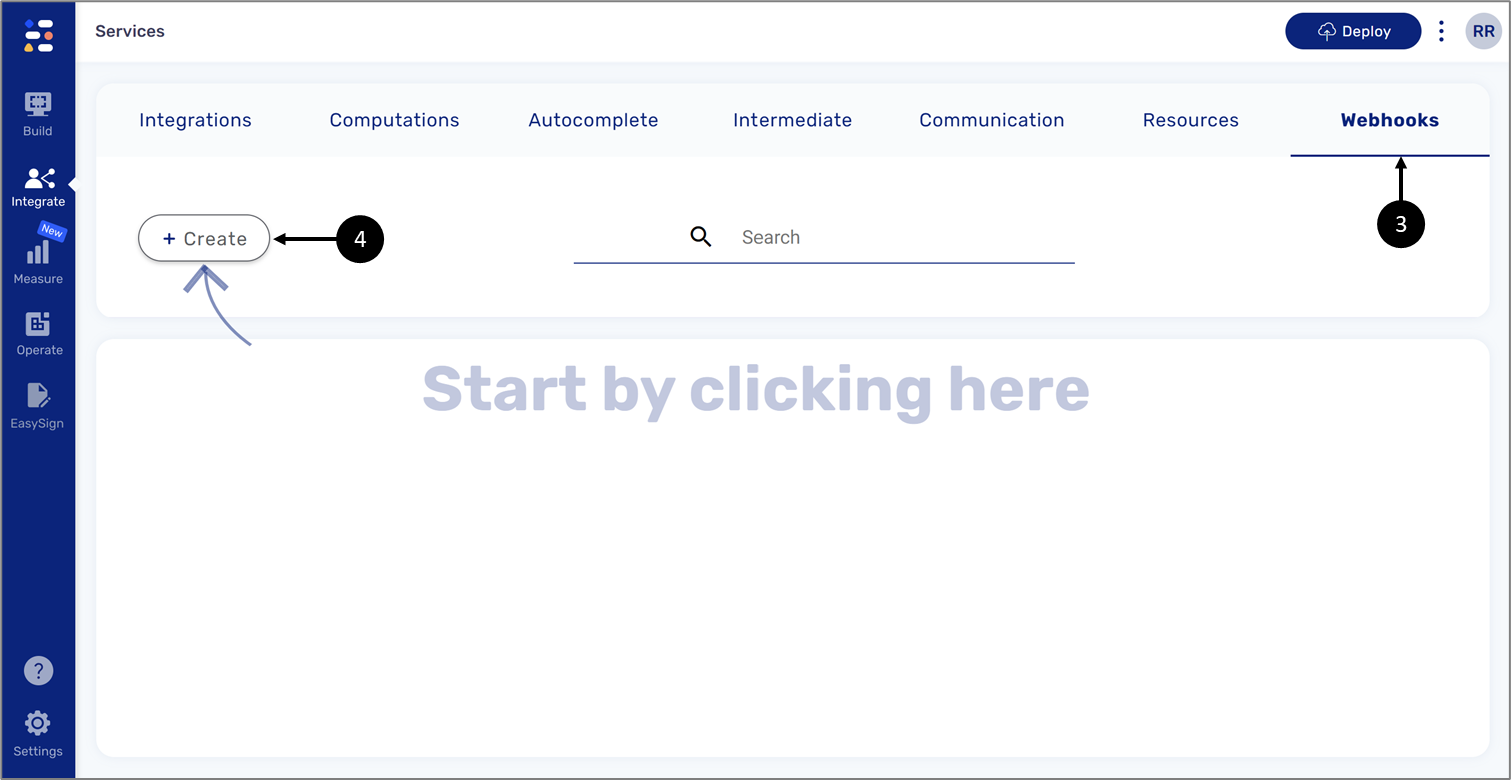
Figure 25: Webhooks -> + Create
- Click the Webhooks tab (3) and then click + Create (4).
Result:
The custom Webhook service screen appears:
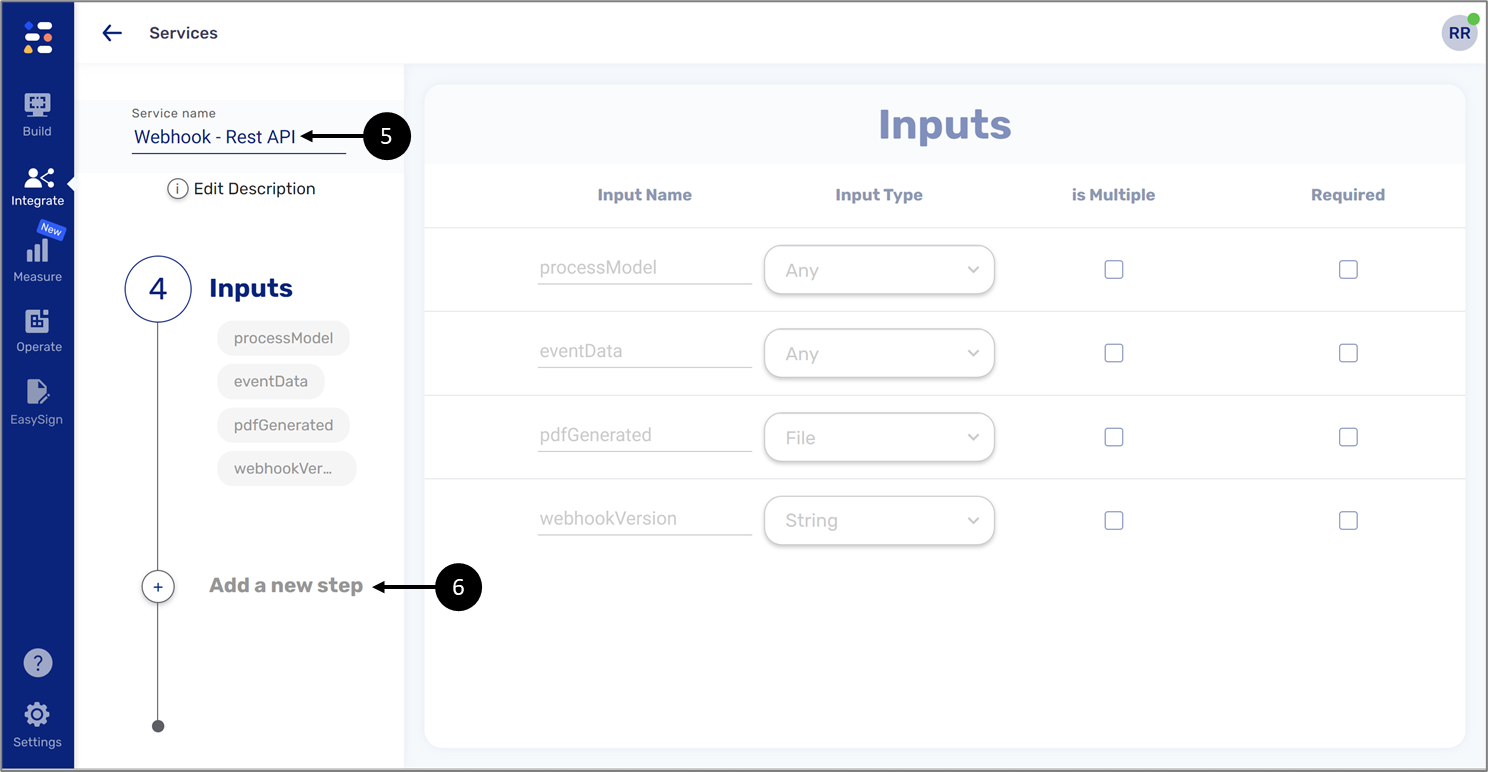
Figure 26: Webhook Service Screen
- Enter a name for the service (5).
- Click Add a new step (6).
Result:
A list of steps appears:

Figure 27: Rest API Service
- Click Rest API Service (7).
Result:
The following window appears:
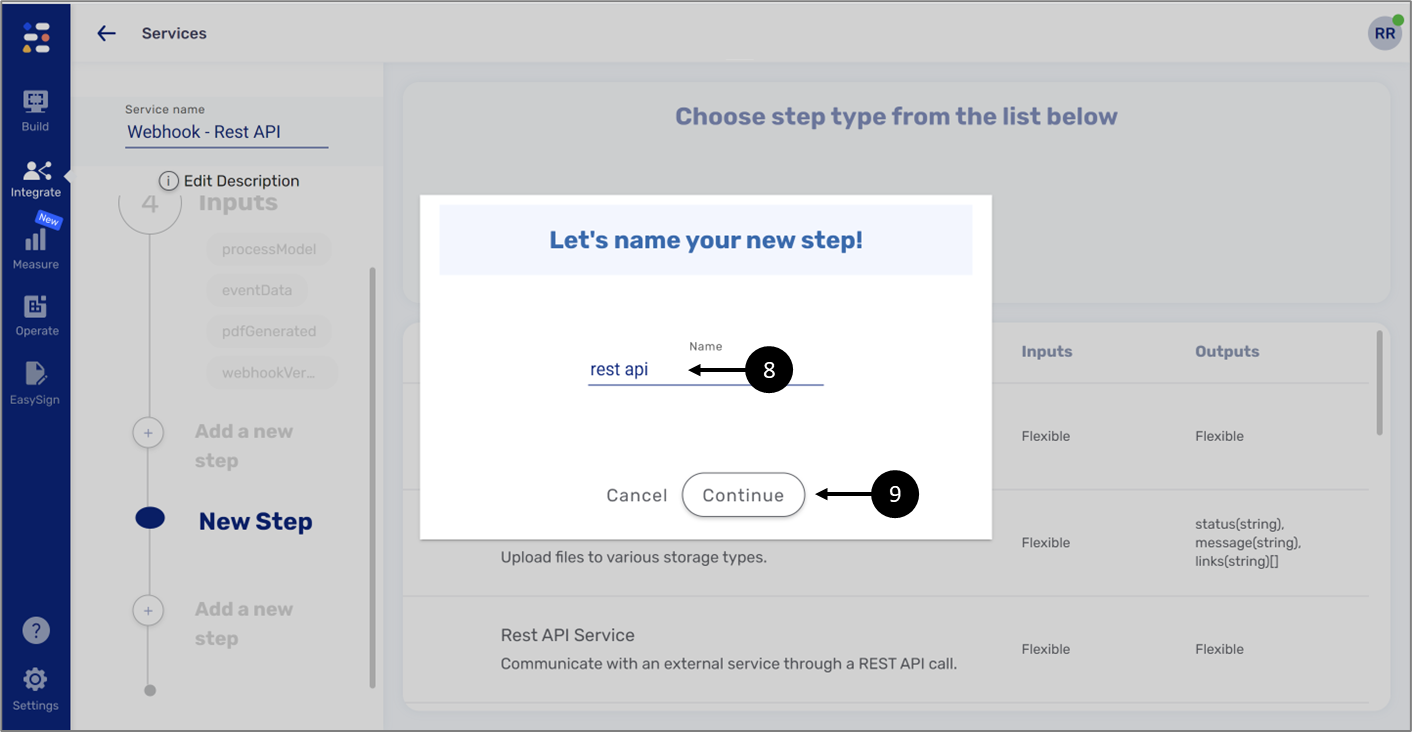
Figure 28: Rest API Service
- Enter a Name (8) and click Continue (9).
Result:
The Rest API screen appears:
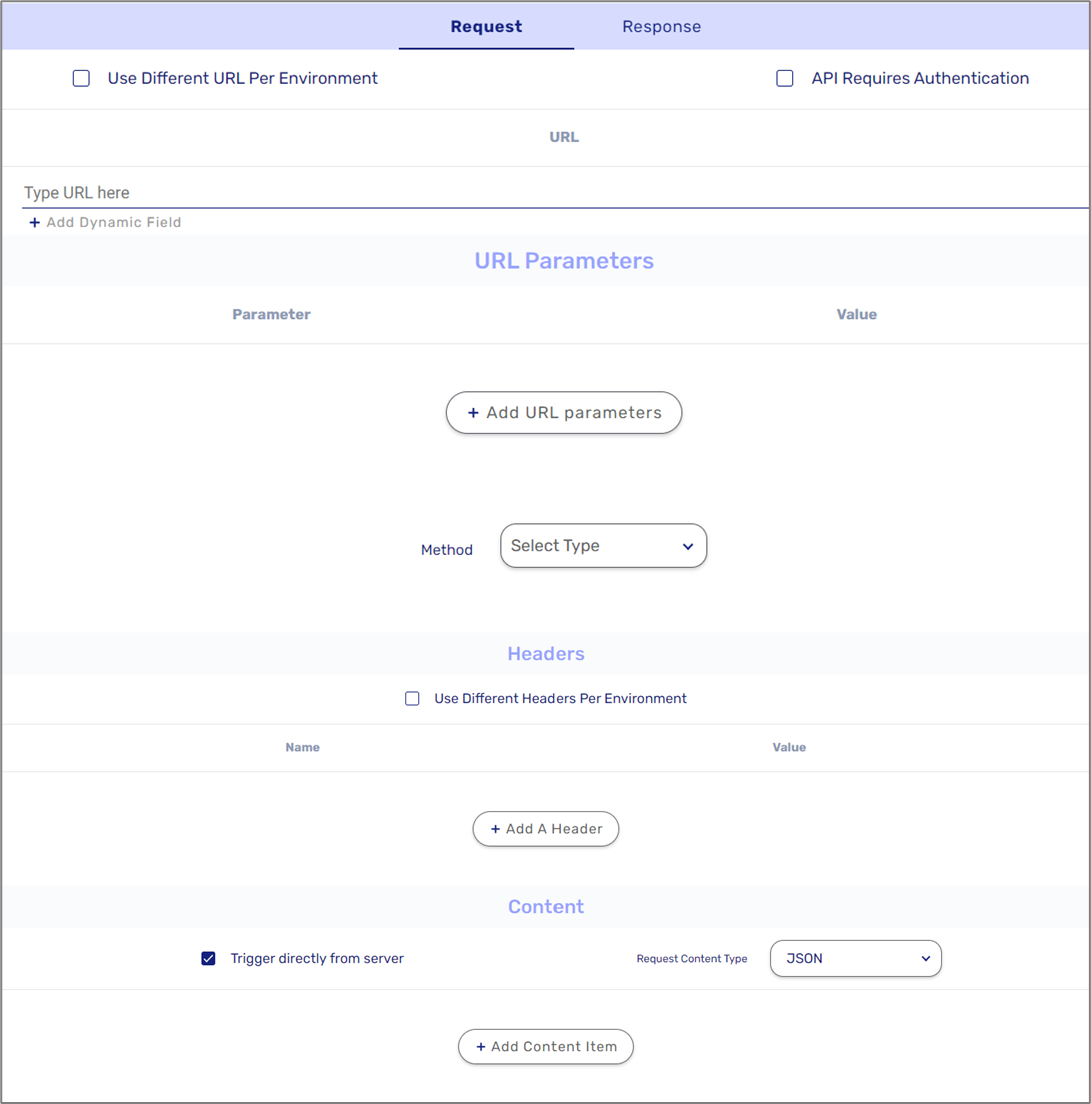
Figure 29: Rest API Screen
- Providing a URL to one or multiple environments
- Using authentication options
- Adding URL parameters and headers
The example detailed in this article describes a scenario of using a custom Webhook service with a Rest API Service step to transfer specific data to an external website.
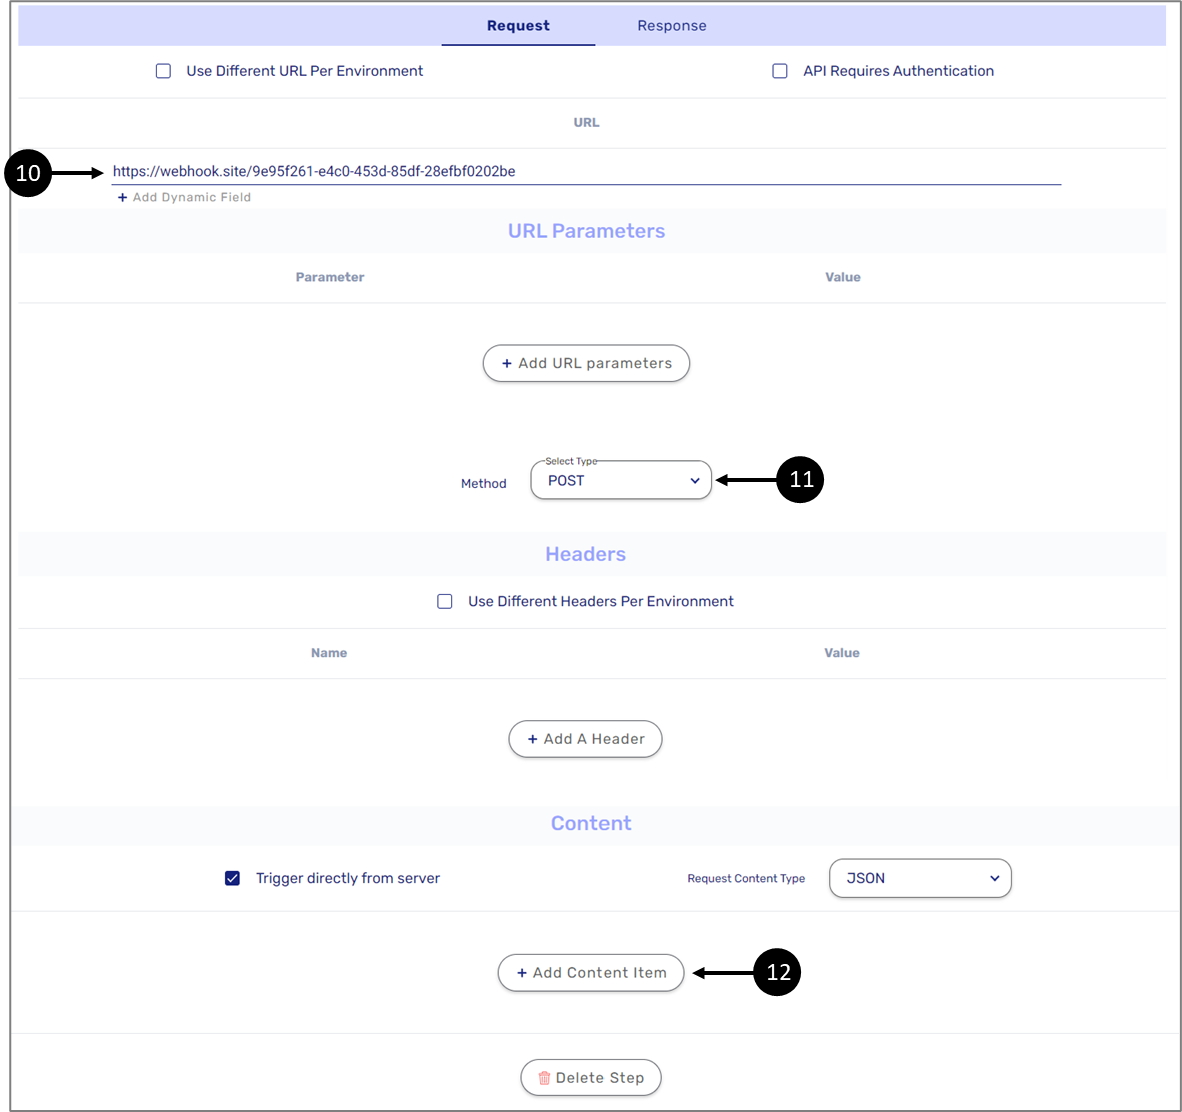
Figure 30: Configuring the Request Section
- Configure the Request:
- Provide a Webhook URL (10).
- Set the Method to Post (11).
- Click + Add Content Item (12) twice.
Result:
Two content items appear (13):
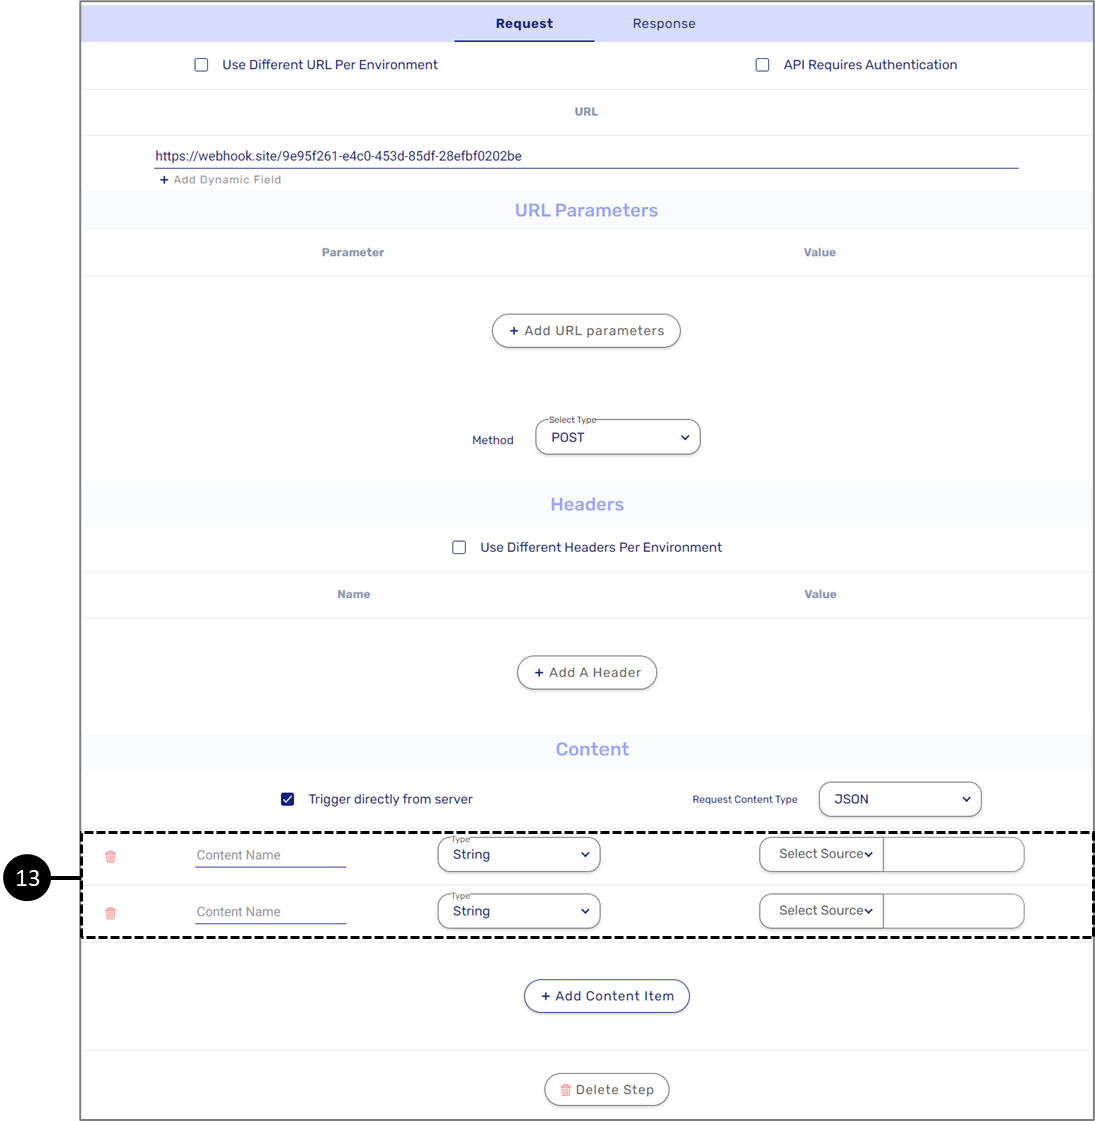
Figure 31: Added Content Items
- Configure the content items:
- Configure the content items:
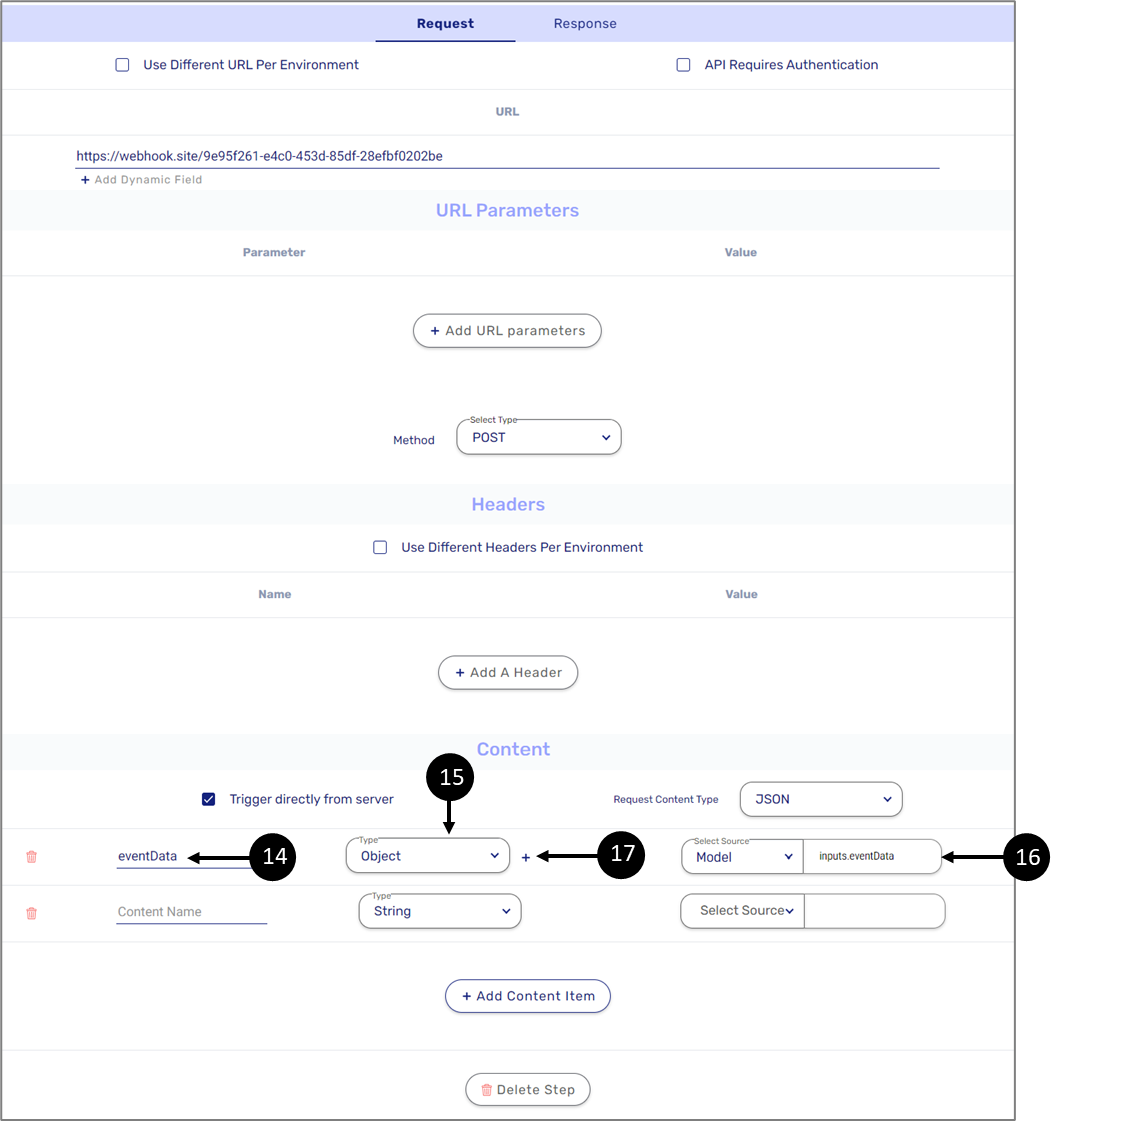
Figure 32: Content Items Configuration
- Enter the first content name - eventData (14).
- Set the Type to Object (15).
- Set the source to Model and inputs.eventData (16).
- Click the icon (17).
Result:
The Edit model requirements window appears:
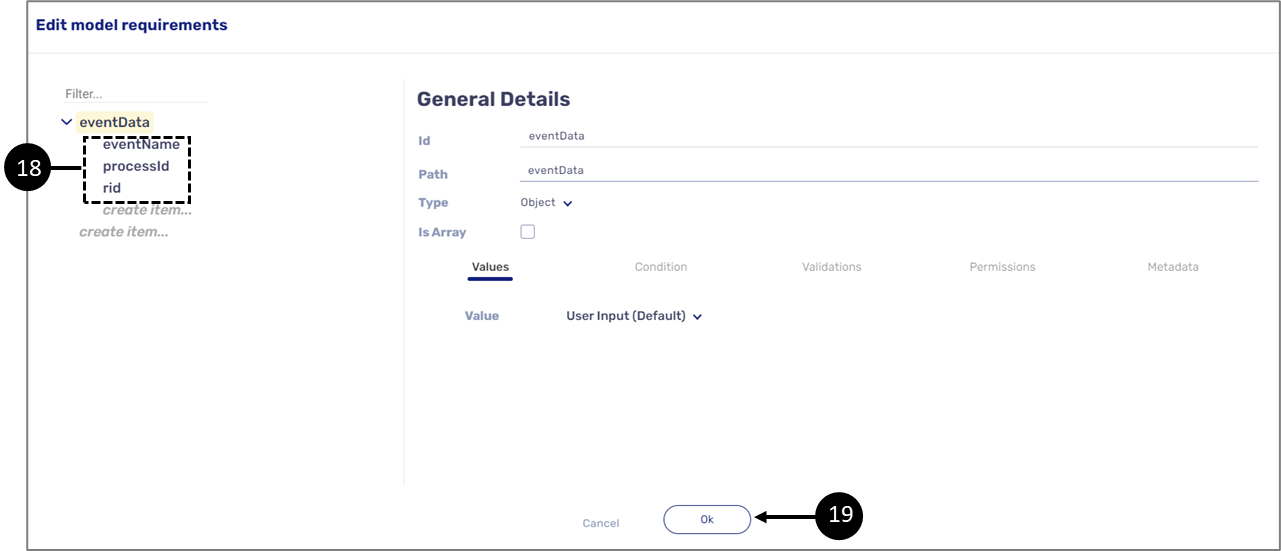
Figure 33: Edit model requirements Window
- Add the eventData items you want to transfer as part of the Webhook (18).
- Click Ok (19) to continue.
Result:
The Request section appears:
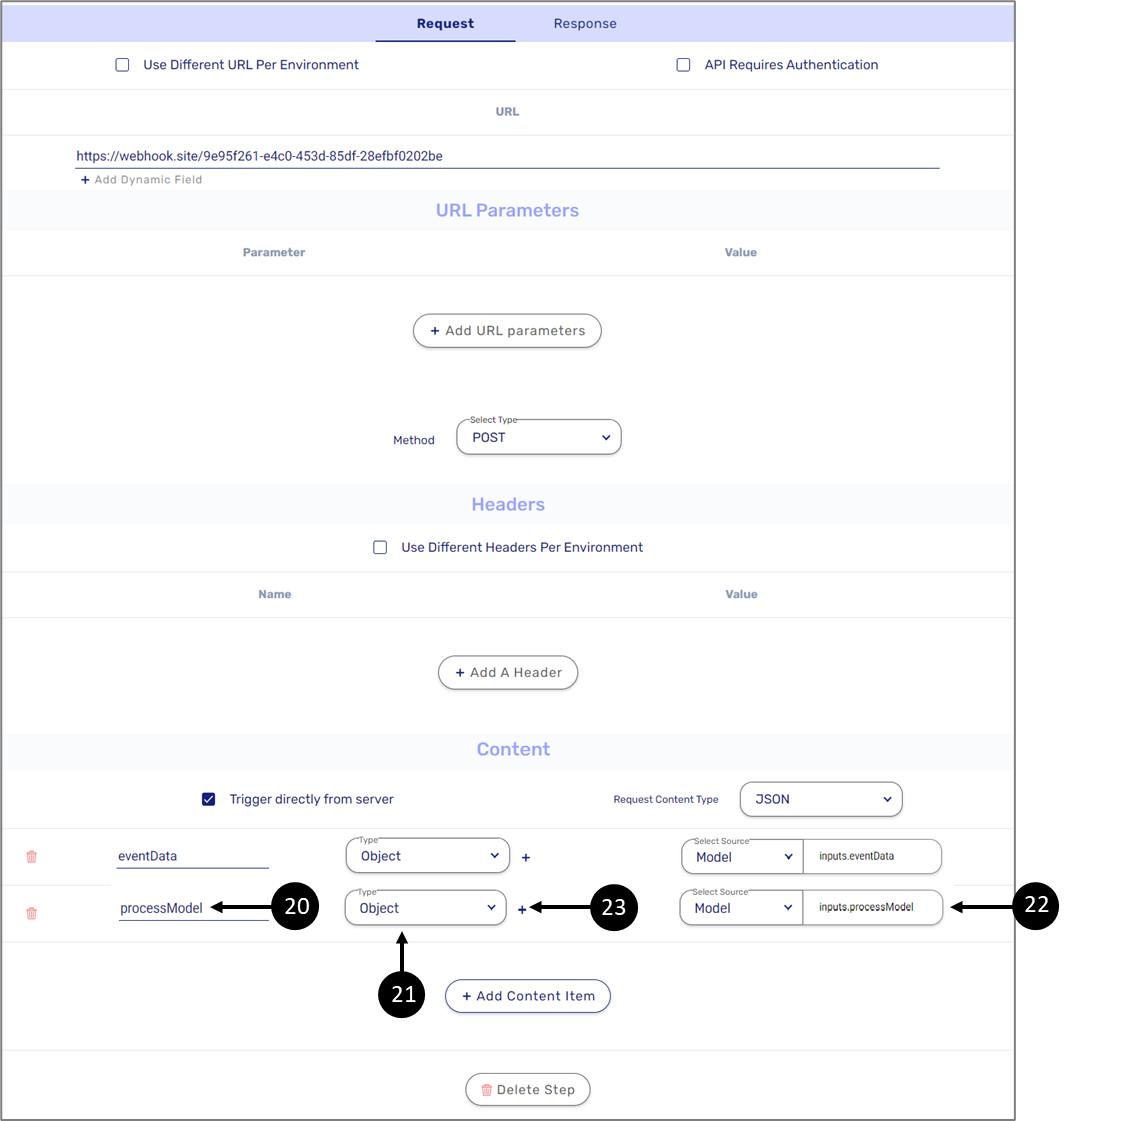
Figure 34: Content Items Configuration
- Enter the first content name - processModel (20).
- Set the Type to Object (21).
- Set the source to Model and inputs.processModel (22).
- Click the icon (23).
Result:
The Edit model requirements window appears:
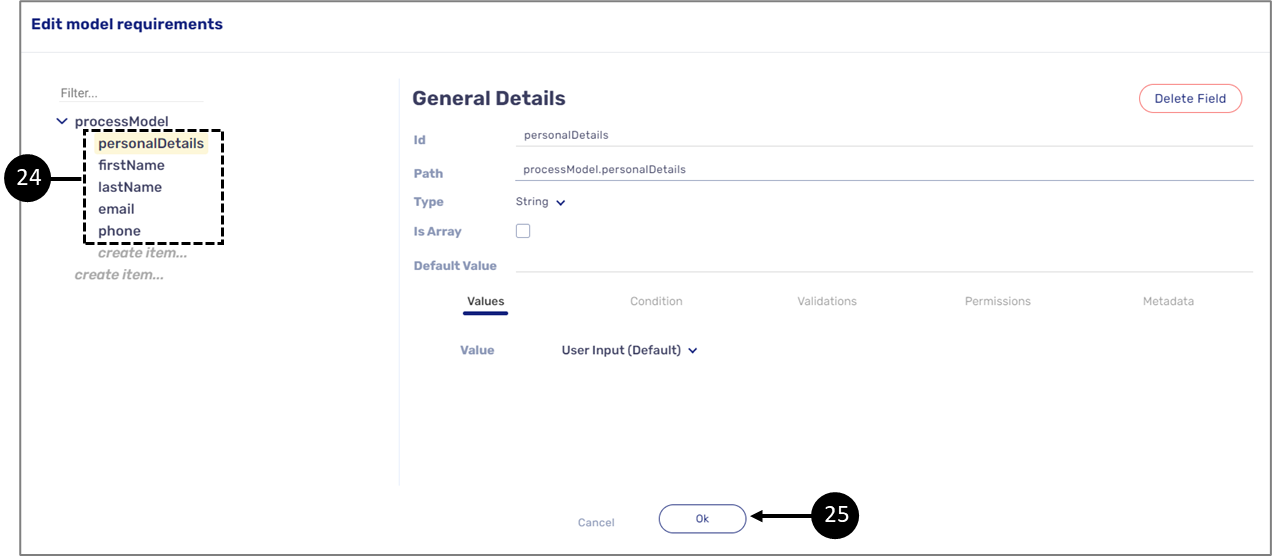
Figure 35: Edit model requirements Window
- Add the processModel items you want to transfer as part of the Webhook (24)
- Click Ok (25) to continue.
Result:
The Request section appears:
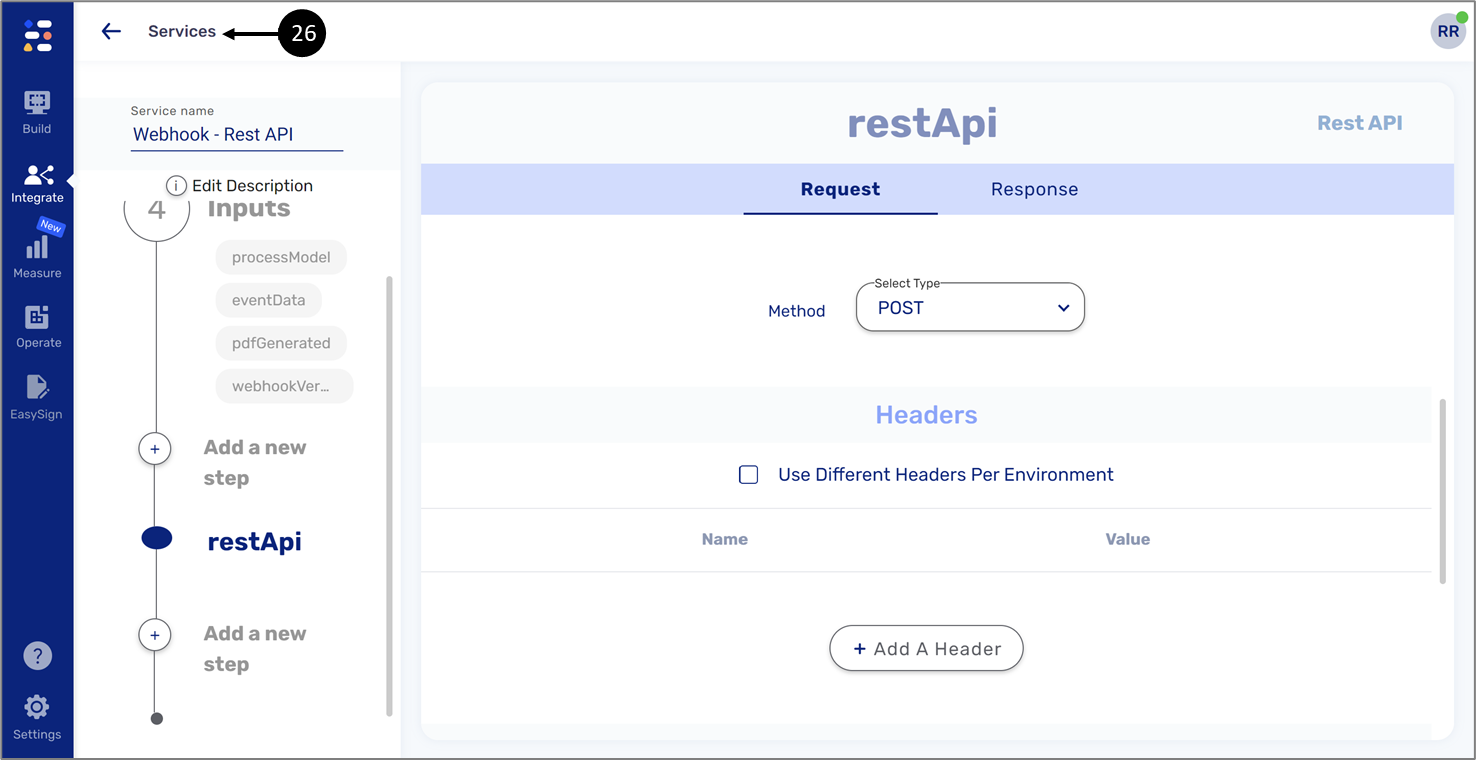
Figure 36: Services
- Navigate back to the Services screen (26).
Result:
The Services screen appears:
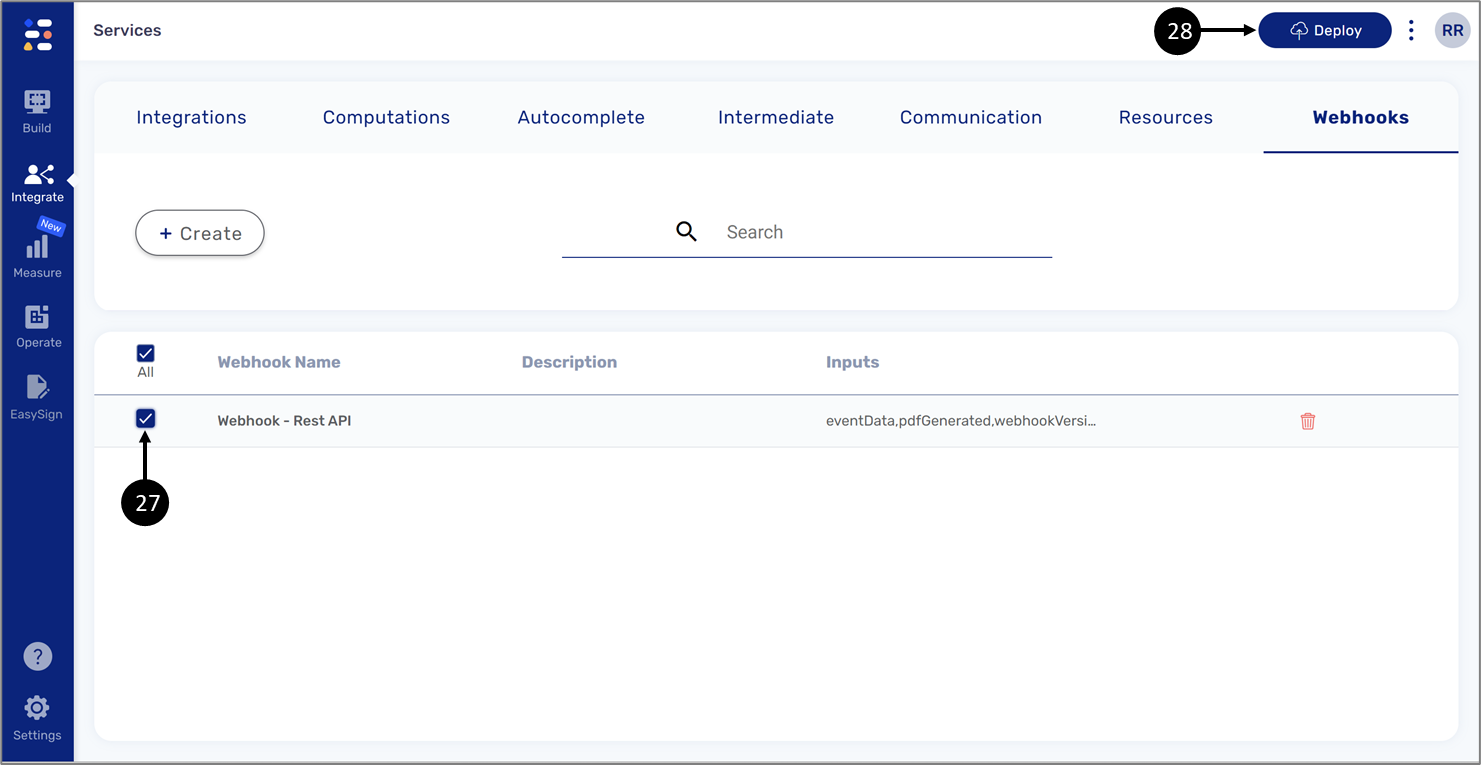
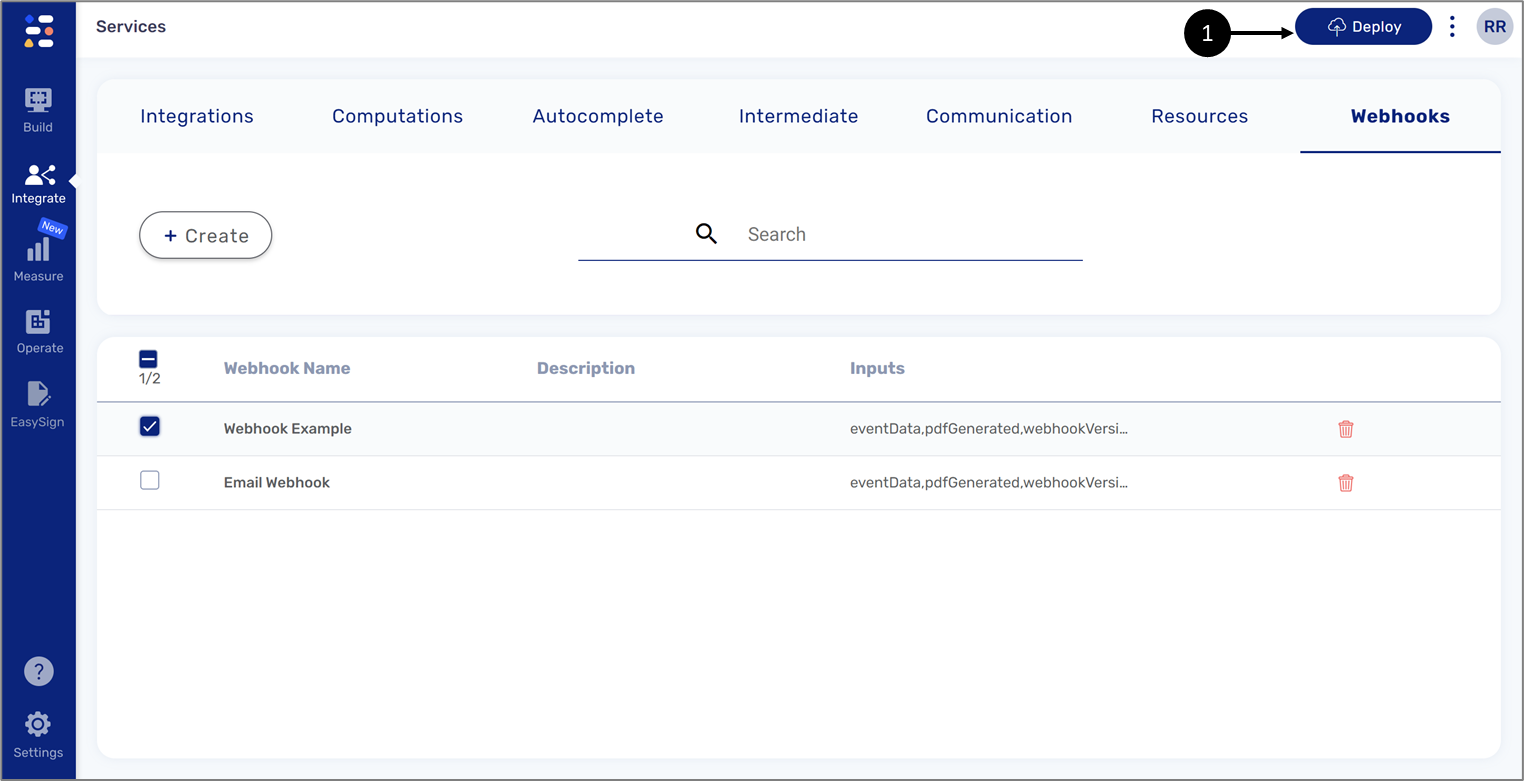
Figure 37: Deploying the Custom Webhook Service
- Check the custom Webhook service you created (27) and deploy (28) to the relevant environments.
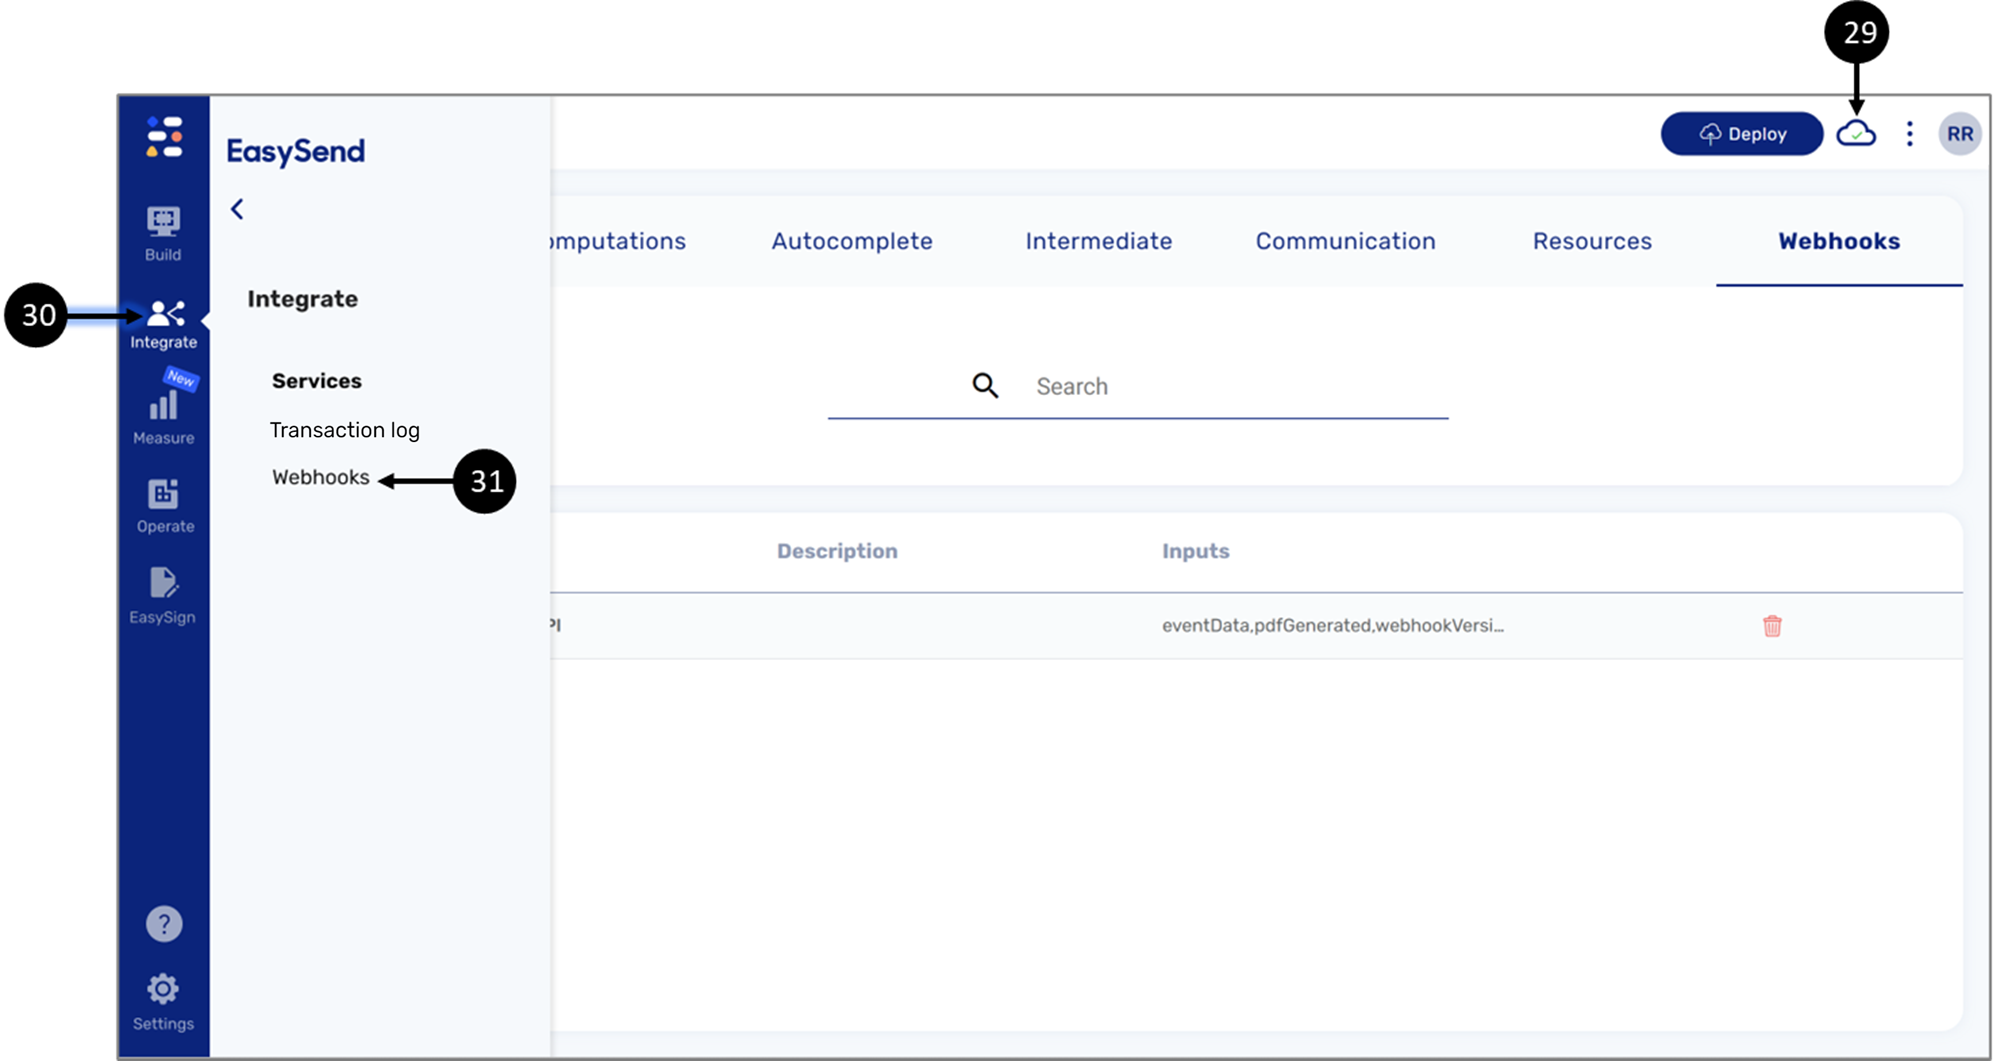
Figure 38: Integrate -> Webhooks
- After successfully finishing the deployment (29), click the Integrate tab (30) and then click Webhooks (31).
Result:
The Webhooks screen appears:

Figure 39: + New Webhook
- Click +New Webhook (32).
Result:
The Webhooks Settings window appears:
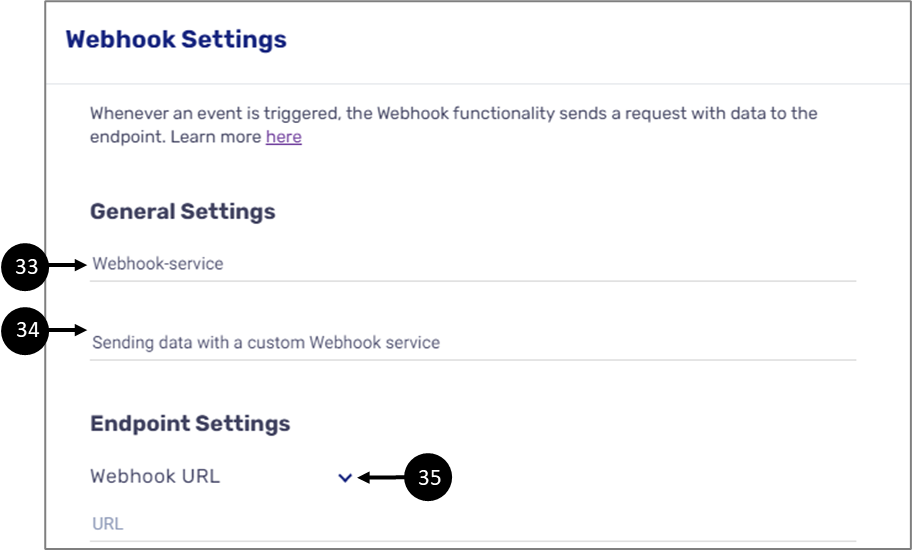
Figure 40: Webhooks Settings Window
- Enter a Webhook name (33).
- Enter a Webhook description (34).
- Click the dropdown (35) and select Webhook Service.
Result:
The Webhook Settings window updates:
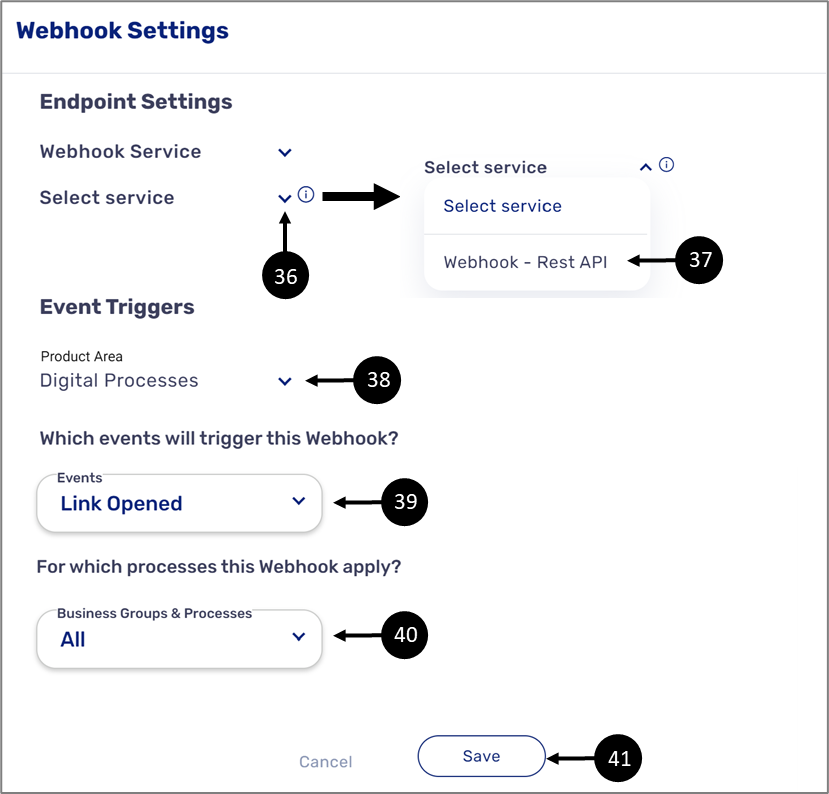
Figure 41: Webhooks Settings Window - Webhook Service
- Click the dropdown (36) and select the desired Webhook service (37).
- Set the product area to Digital Processes (38).
- Select the event trigger/s (39).
- Select the business groups and processes to apply the Webhook (40).
- Click Save (41).
- Initiate the digital process
Result:
When the selected events occur, for example:
Link Opened:
Figure 42: Linked Opened
Next Page Clicked:
Figure 43: Next Page Clicked
Data Submitted:
Figure 44: Data Submitted
the Webhook is triggered, and data is transferred, for example:
Figure 45: Webhook Example
Appendix A - Event Triggers Description
(See Table 1)
The appendix describes the available event triggers for a digital process and EasySign.
Table 1: Event Triggers Description
| Number | Event Name | Product Area | Description |
| 1 | Transaction Created | Digital Process/EasySign | A transaction is an instance of a digital process/EasySign form, this event is triggered when a transaction is generated by EasySend, for example:
|
| 2 | Link Sent | This event is triggered when a transaction link is sent, for example, by using the Journey Sender or the bulk Sender | |
| 3 | Link Opened | This event is triggered when a transaction's link is clicked and opened, for example, clicking a link that was received through an email | |
| 4 | Next Page Clicked | Digital Process only | This event is triggered when an end-user interacts with a digital process's transaction and clicks a button to navigate to the next page |
| 5 | Previous Page Clicked | This event is triggered when an end-user interacts with a digital process's transaction and clicks a button to navigate to a previous page | |
| 6 | Completed Step | Digital Process/EasySign | This event is triggered when a transaction's step is completed |
| 7 | Reminder Sent | This event is triggered when a reminder is sent to an end-user:
| |
| 8 | Signature Applied | EasySign only | This event is triggered when an end-user adds an eSignature to an EasySign form |
| 9 | Data Submitted | Digital Process/EasySign | This event is triggered when an end-user clicks a button to submit data |
| 10 | Completed | This event is triggered when an entire transaction is completed (all its steps) | |
| 11 | Canceled | This event is triggered when an entire transaction is canceled, a transaction is canceled using the Journey Tracker | |
| 12 | Transaction Expired | This event is triggered when an entire transaction is expired, usually after 30 days of inactivity |