What are the Model Values?
Model values are different options to input and output information implemented Model data items that are connected to Webflow components, for example, the Text Input component.
Values Description
(See Figure 1)
The Model Values (1) are:
- User Input (Default) (2).
- Formula (3).
- Autocomplete Service (4).
- Multi-option (Static) (5).
- Computed (Service) (6).
- Computed (Inline) (7).
- Expression (8).
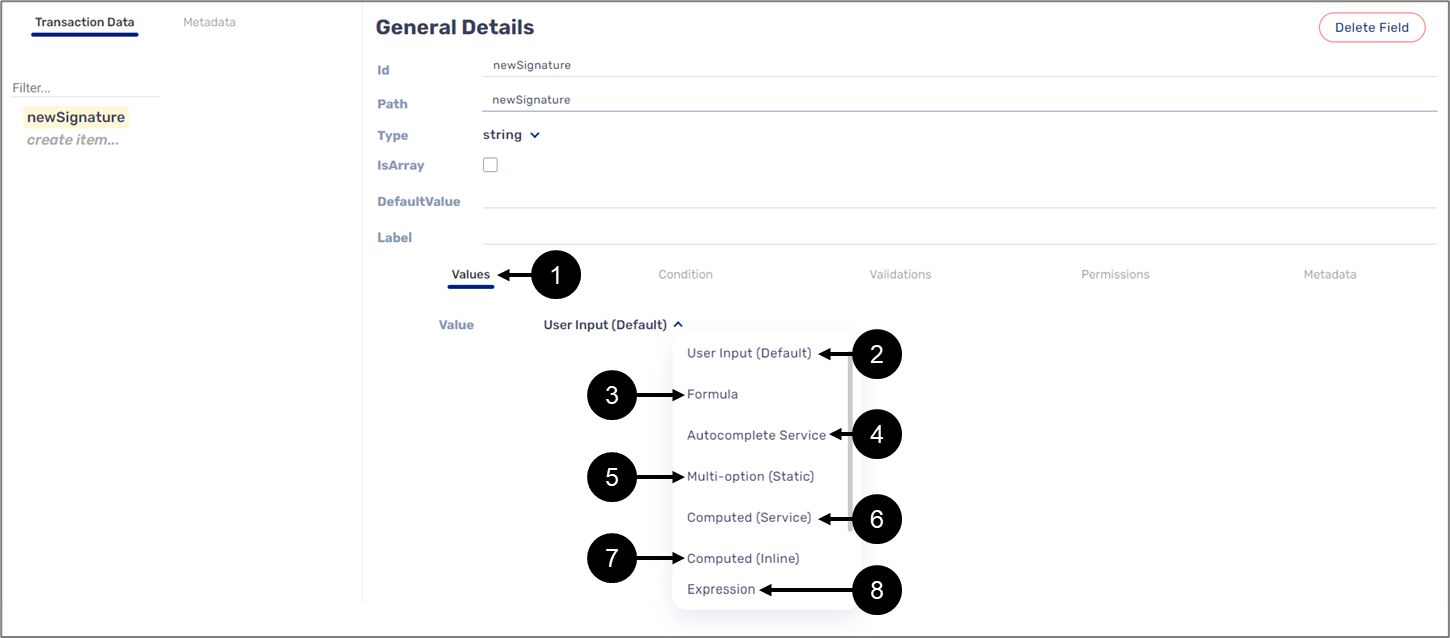
Figure 1: Model Values Options
Values allow you to choose what information needs to be gathered in each field. Adding autocomplete or computed services will help users input answers faster, while Expressions and Formula Editor help you personalize your processes with conversational phrases, complex conditions, and calculations.
User Input (Default)
(See Figure 2)
This is the default value. When it is set, the digital process's end-user inputs information manually.
After adding components to the canvas and connecting them to the Model with transaction data items the Value is automatically set to the User Input (Default) value (1) meaning that the end-user will input information manually. The type of input will be determined by the Type selection (2) (for additional information, see the Field Types article).
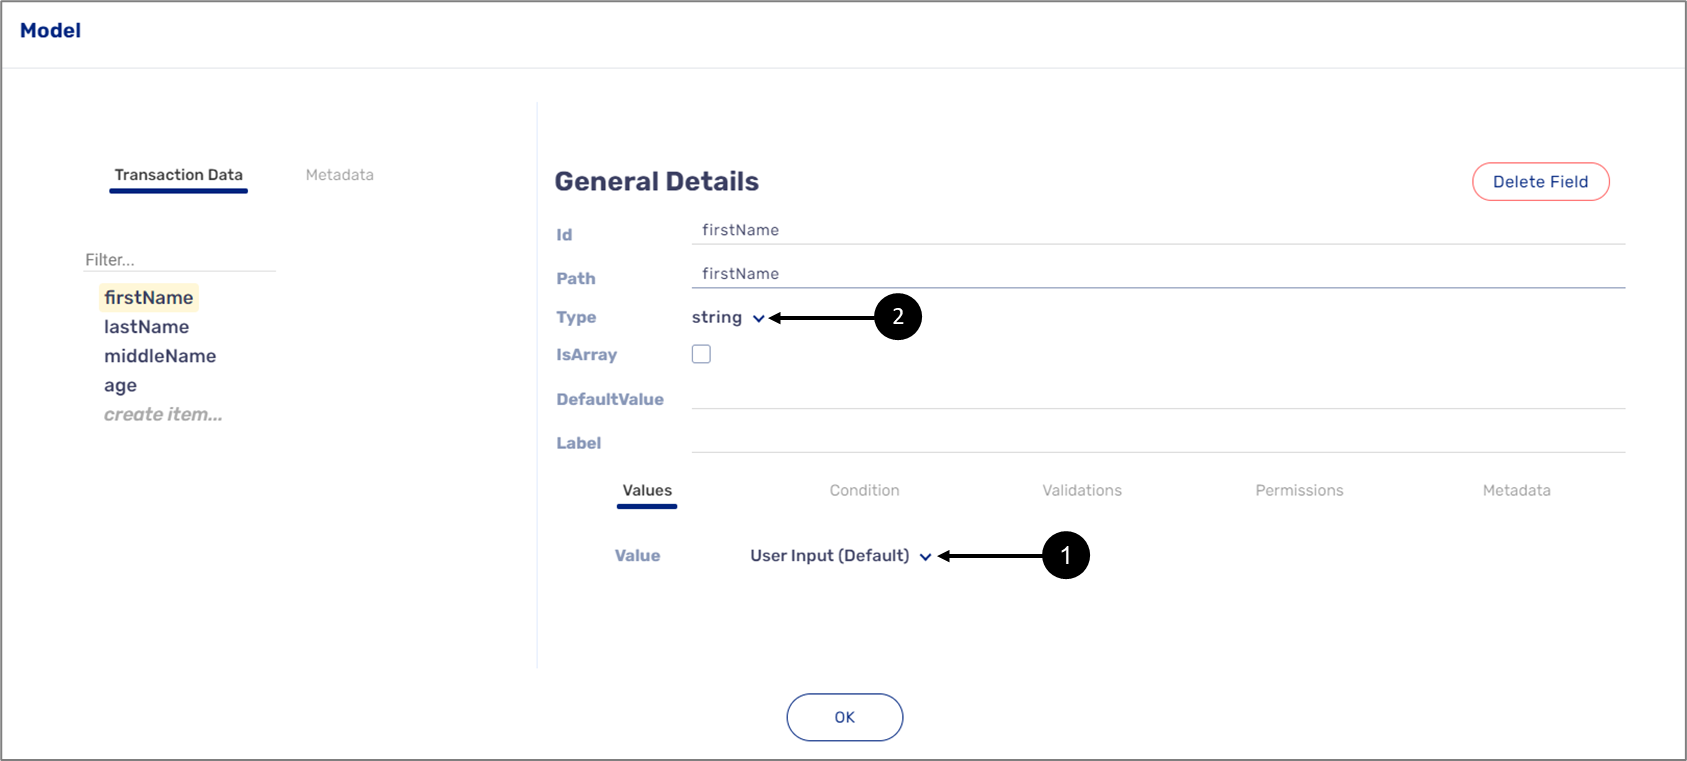
Figure 2: User Input (Default)
Autocomplete Service
This value is designed to autocomplete information according to input from the end-user. This value must be used with an integrated REST API service.
Autocomplete Service Example
One example of autocomplete usage is for autocompleting address information. Figure 3 displays a Webflow with four Input Text components. For the first three - First Name, Last Name, and Age, the end-user will input the information manually, but for the fourth one - the Address, the end-user will start typing, and the information will be completed automatically:
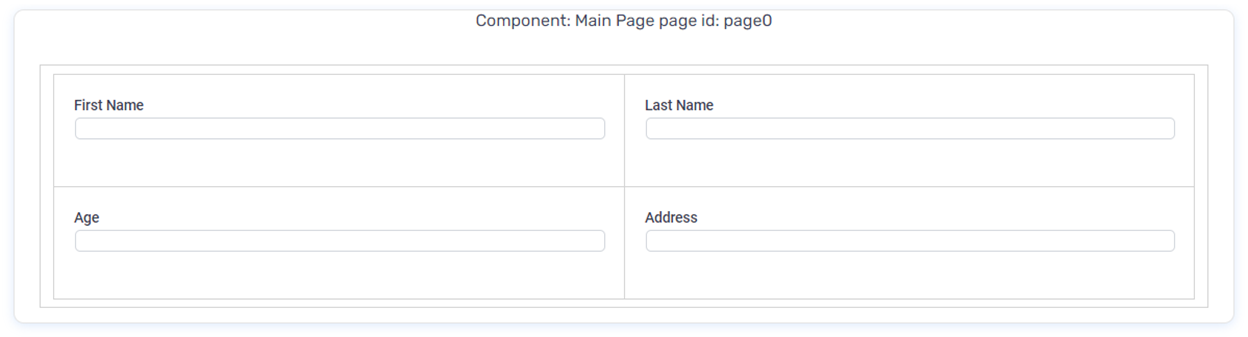
Figure 3: Webflow with Four Text Input Components
Figure 4 displays the Model of the Webflow. The value of the address transaction data item (1) is set to User Input (default) (2):
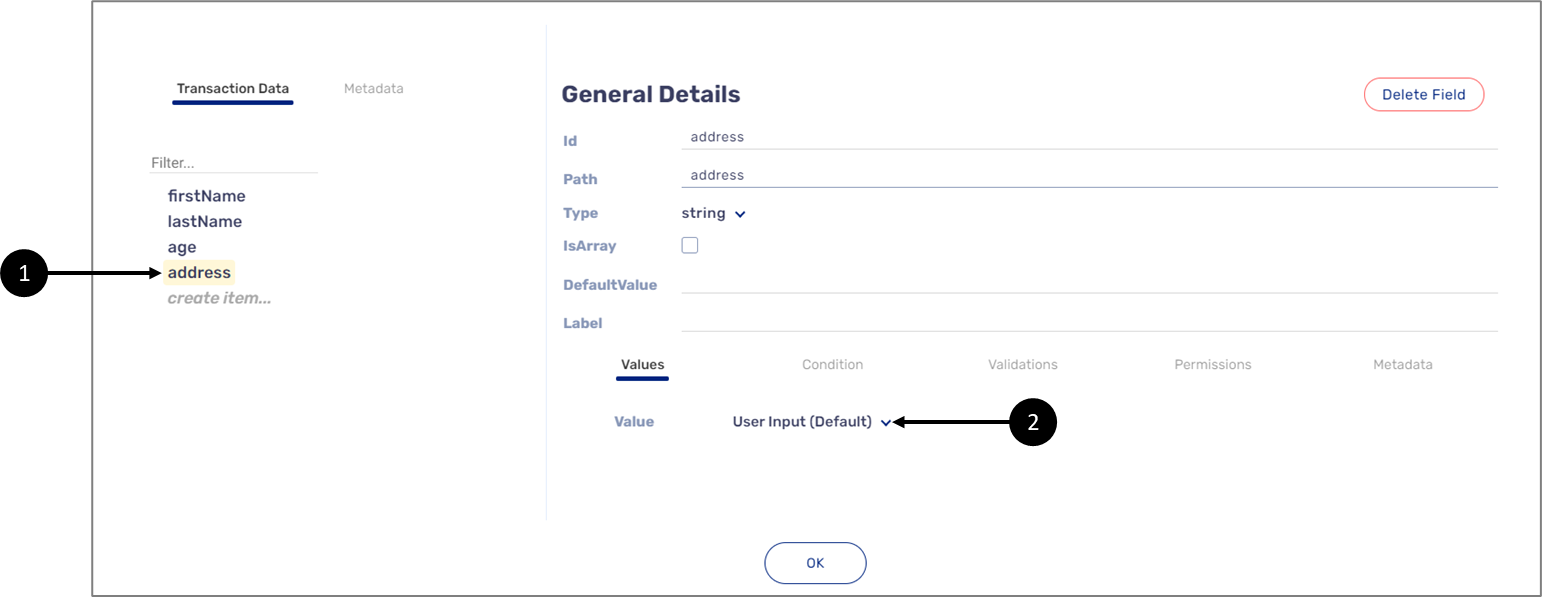
Figure 4: The Model
When setting the value to Autocomplete Service, a search bar (3) to search for an integration service appears (4) (See Figure 5):
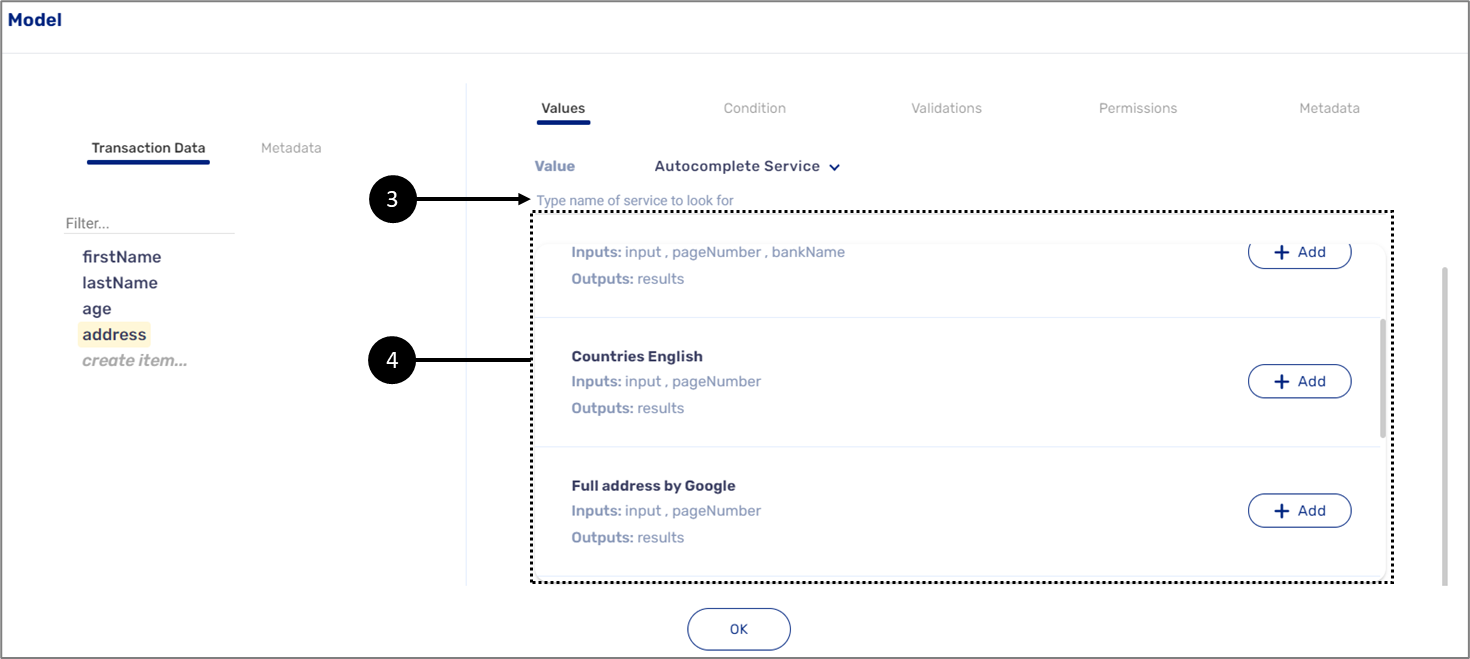
Figure 5: Autocomplete Service
After adding the service, there is a possibility to use the autocomplete to validate (5) the input information, forcing the end-user to use the autocomplete and not input information manually (see Figure 6):
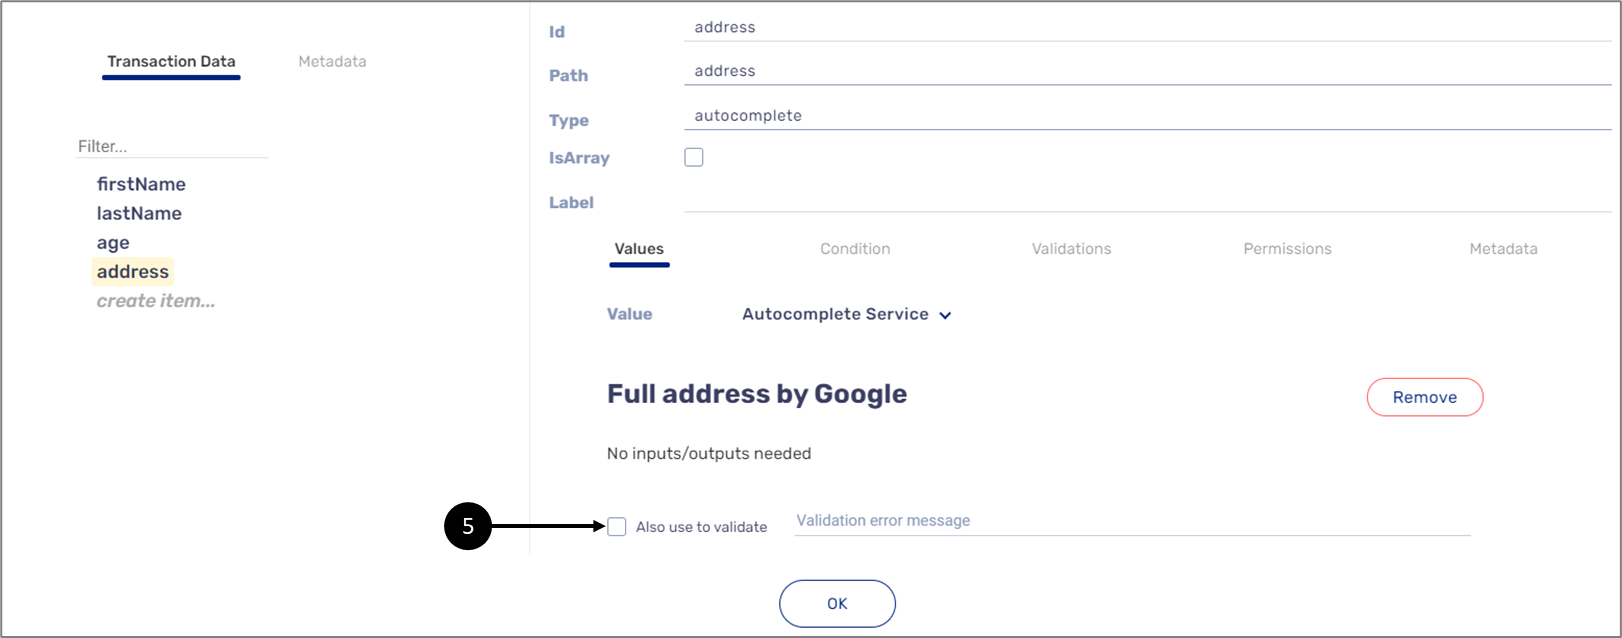
Figure 6: Validation
When an end-user inputs their address information, it will be autocompleted (6) (see Figure 7):
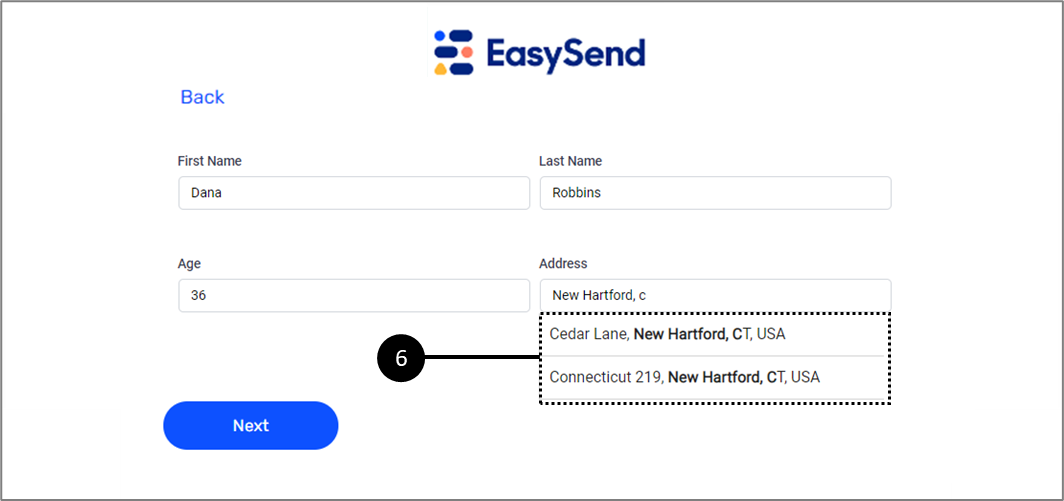
Figure 7: Autocomplete
Computed (Service)
This value displays information automatically based on other values. For example, we use the autocomplete service to automatically complete the address information the end-user starts to input. When the autocomplete is finished, the computed service will be able to receive the information, split it, and display it separately.
Computed (Service) Example
One example of a Computed (Service) usage is for auto-completing specific address information, for example, automatically completing the address of a bank branch according to a specific bank name and branch number.
Figure 8 displays a Webflow with three Input Text components. For the first two - Bank Name and Branch Number, the end-user will start typing, and the information will be completed automatically. For the third - Branch Address, the information will be completed automatically based on the information from the first two.
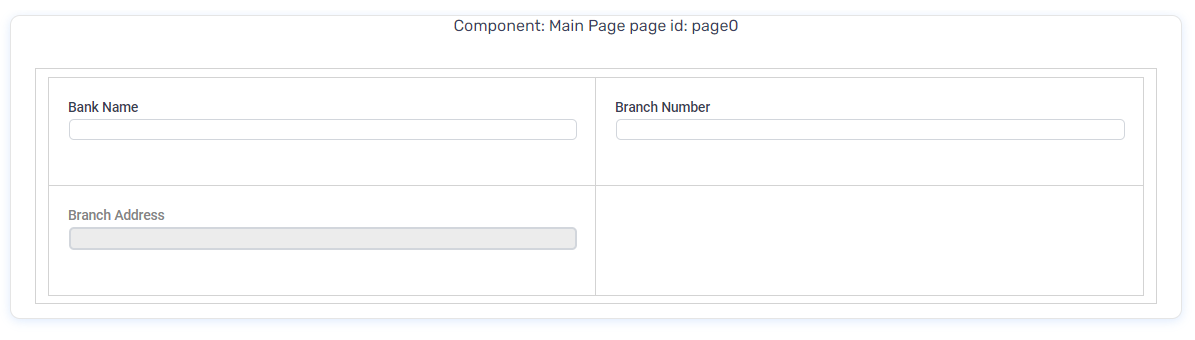
Figure 8: Webflow with Four Text Input Components
Figure 9 displays the Model of the Webflow. The value of the bankName transaction data item (1) must be set to Autocomplete Service (2) with the appropriate integrated service, in this
example - Bank (3):
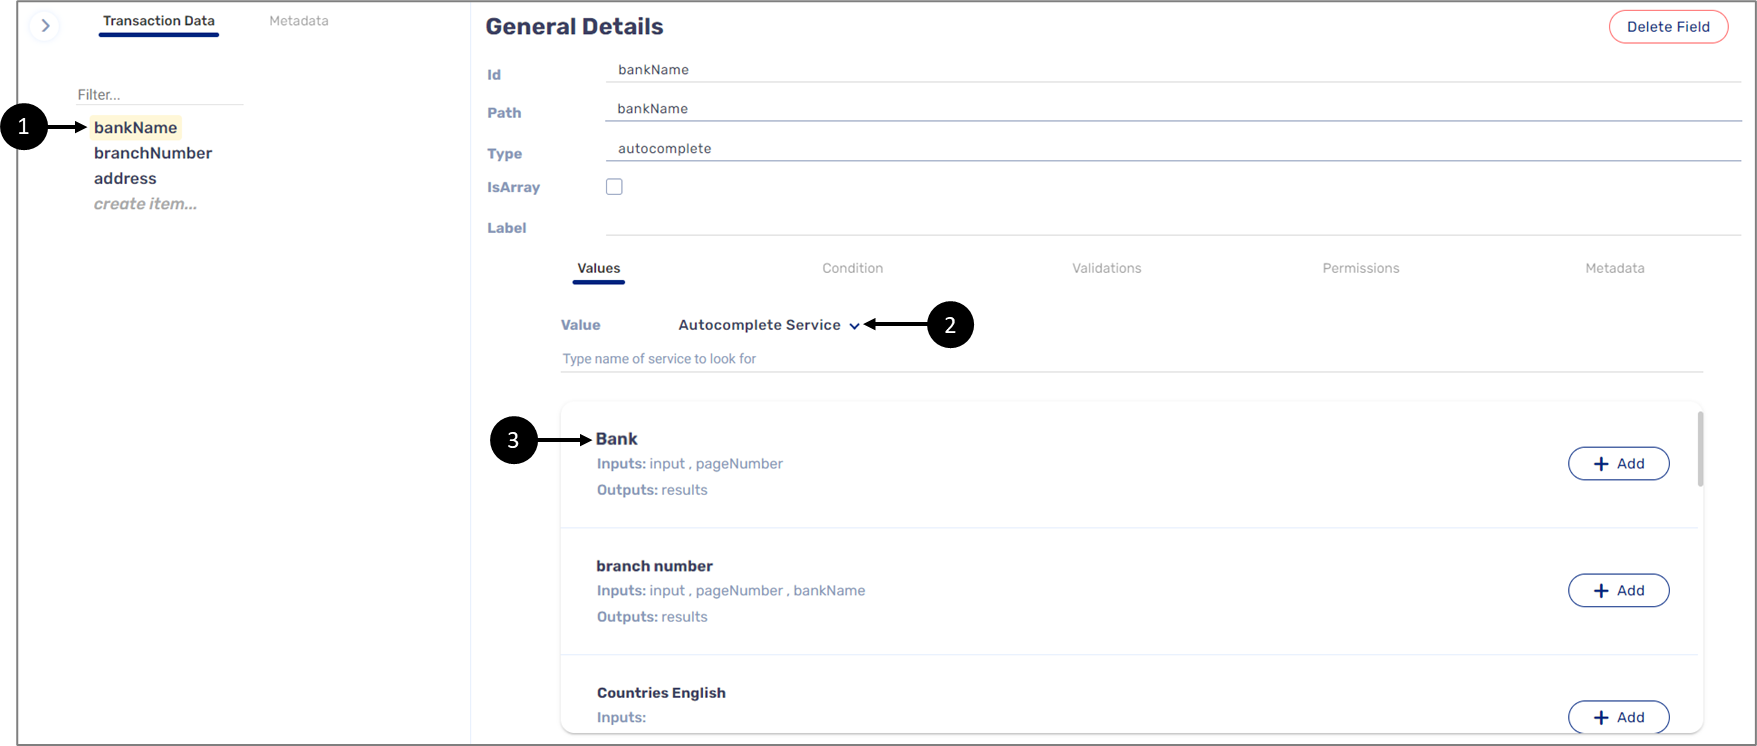
Figure 9: bankName Transaction Data Item
The value of the branchNumber transaction data item (4) must be set to Autocomplete Service (5) as well and with the appropriate integrated service, in this example - branch
number (6) (see Figure 10):
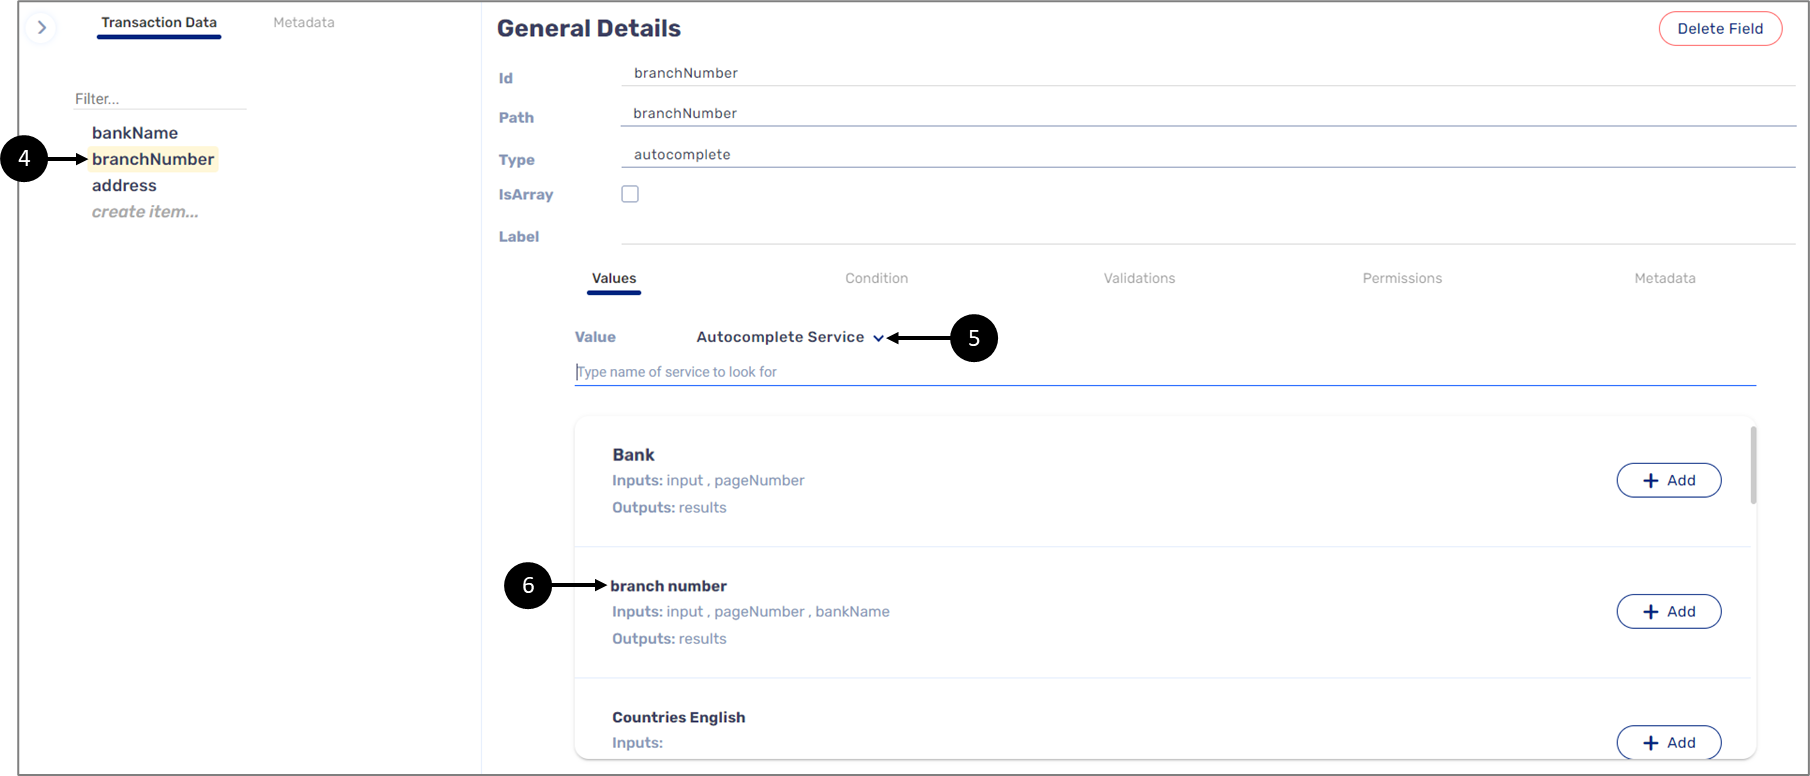
Figure 10: branchNumber Transaction Data Item
The value of the last transaction data item, the address (7), will be set to Computed (Service). When setting the value to computed (Service), a search bar (8) to search for service integrations appears. In this example, the branch address integration service (9) is chosen (see Figure 11):
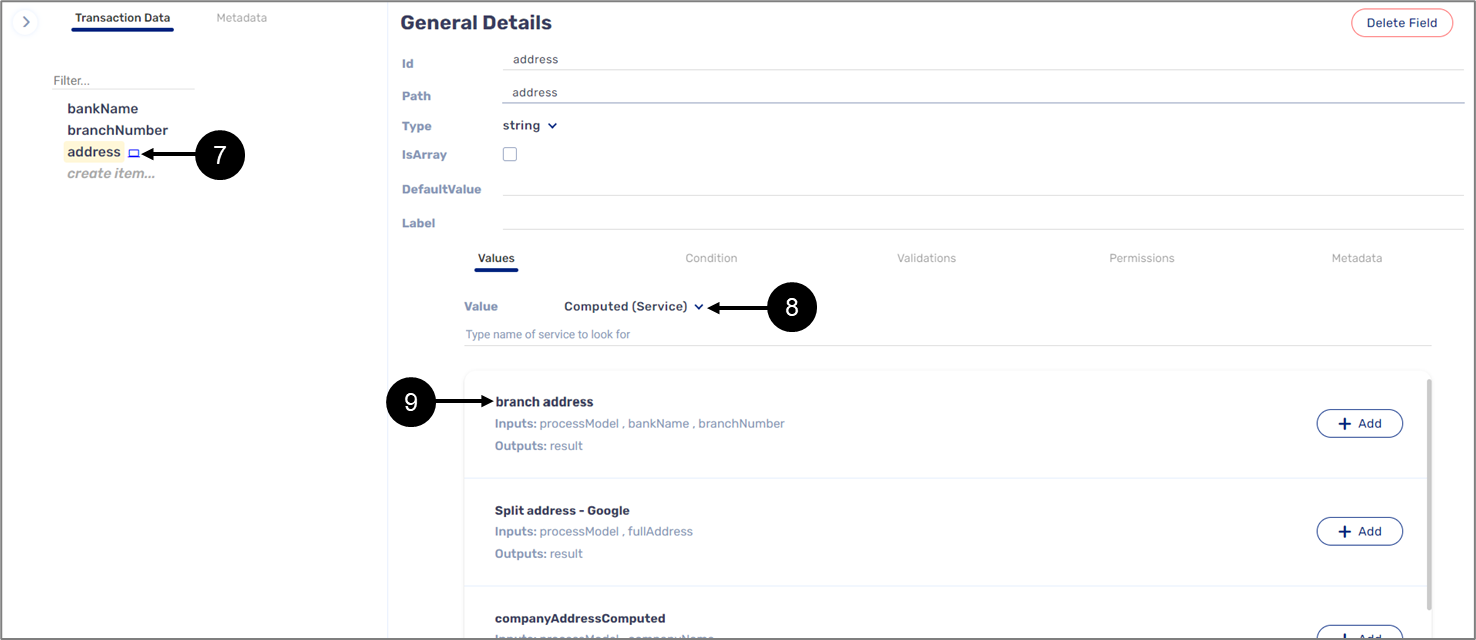
Figure 11: address Transaction Data Item
 icon appears next to the transaction data item implemented with the Computed (Service) value.
After selecting the integration service, it must be connected to relevant transaction data items from the Model by inputting their names, in this example, the bankName (10) and the
branchNumber (11) are added (see Figure 12):
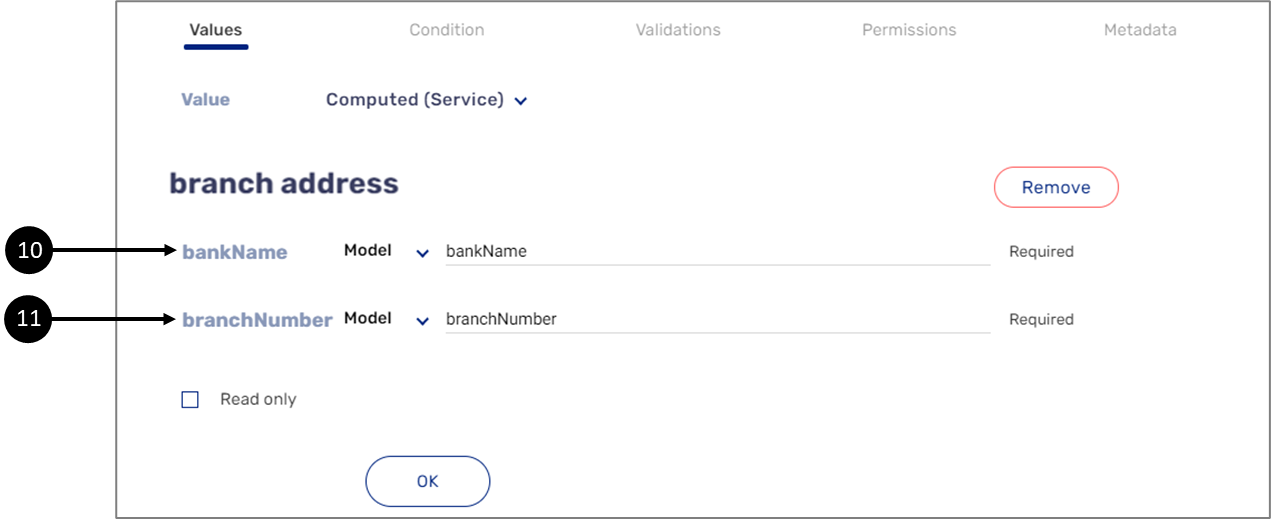
Figure 12: Setting the Computed Service
If the transaction data item to add is nested inside an object, write, and select the object first and then input a dot (.) and select the transaction data item within the object. It is also possible to input two dots (..) and then select the transaction data item within the object (see Figure 13):

Figure 13: Nested Transaction Data Item
After the name of the bank and the number of the branch are input, the address of the branch is completed automatically (12) (see Figure 14):
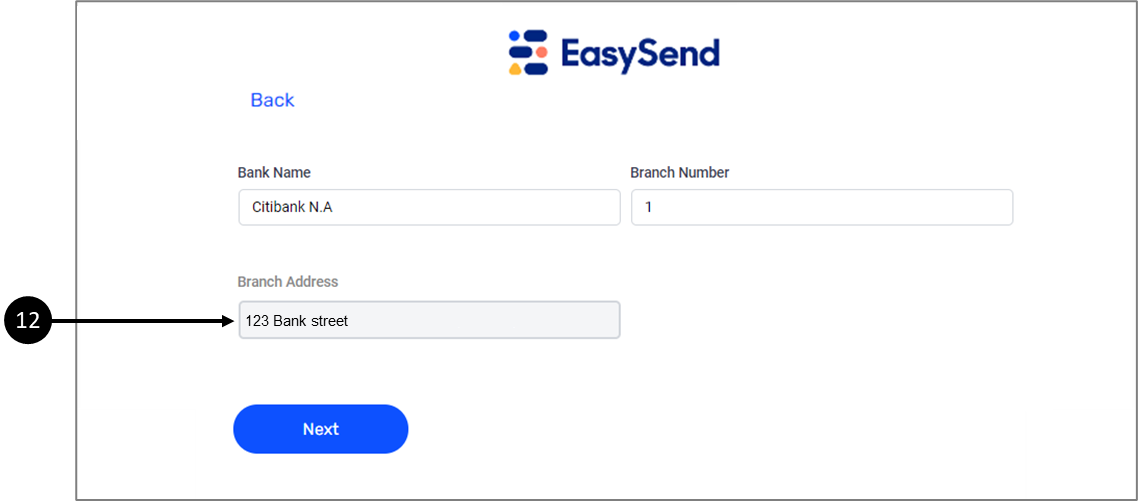
Figure 14: Branch Address
Computed (Inline)
This value is designed to duplicate information. When an end-user inputs information using a Text Input component, that information will be copied to other Text Input components that are associated with transaction data items set with the Computed (Inline) value.
Computed (Inline) Example
One example of a Computed (Inline) usage is for duplicating information that appears more than once in a digital process For example, if an end-user needs to input his email a few times when filling out information.
Figure 15 displays a Webflow with two Main Pages. The first Main Page contains four Input Text components, one of which is for inputting an email address for registration. The second Main Page contains one Text Input component for inputting an email to receive notifications. The email address will be duplicated from the Text Input component on the first Main Page to the Text Input component on the Second Main Page:

Figure 15: Webflow with Two Main Pages and Text Input Components
Figure 16 displays the Model of the Webflow. The value of the notificationsEmail transaction data item (1) is set to User Input (Default) (2):

Figure 16: notificationsEmail transaction data Item
When setting the value to Computed (Inline) (3), there are three computed options to select from (4) - no, alias, and custom. In this article, we will cover the alias option only (see Figure 17):

Figure 17: Computed (Inline)
The alias option duplicates information to the transaction data item that its value set to Computed (Inline) from the added transaction data item (5) from the Model (see Figure 18):

Figure 18: Setting the alias
If the transaction data item to add is nested inside an object, write, and select the object first and then input a dot (.) and select the transaction data item within the object. It is also possible to input two dots (..) and then select the transaction data item within the object (see Figure 19):
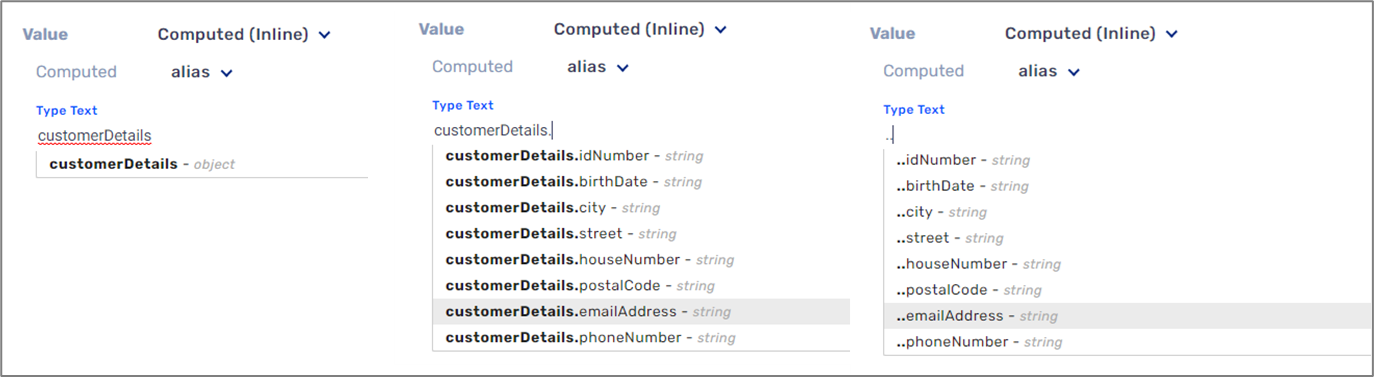
Figure 19: Nested Transaction Data Item
After the email is input into the Text Input on the first page (6), it will be duplicated into the Text Input on the second page (7) (see Figure 20):
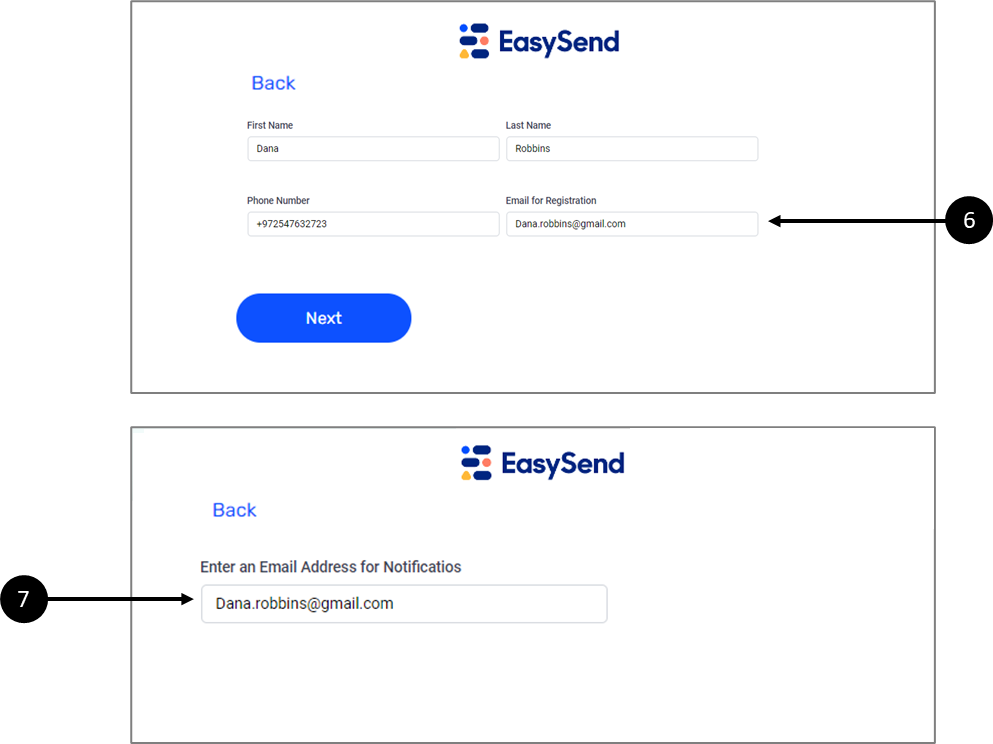
Figure 20: Duplicated Email
Multi-option (Static)
When using this value, a list of selectable options is created using the Model. While using the digital process, the end-user manually inputs information and then selects a desired option from the matching results displayed on the list.
Multi-option (Static) Example
Figure 21 displays a Webflow with Input Text components. For the first three - First Name, Last Name, and Age, the end-user will input the information manually, but for the fourth one - the Favorite Color the end-user will start typing, and options will be displayed:
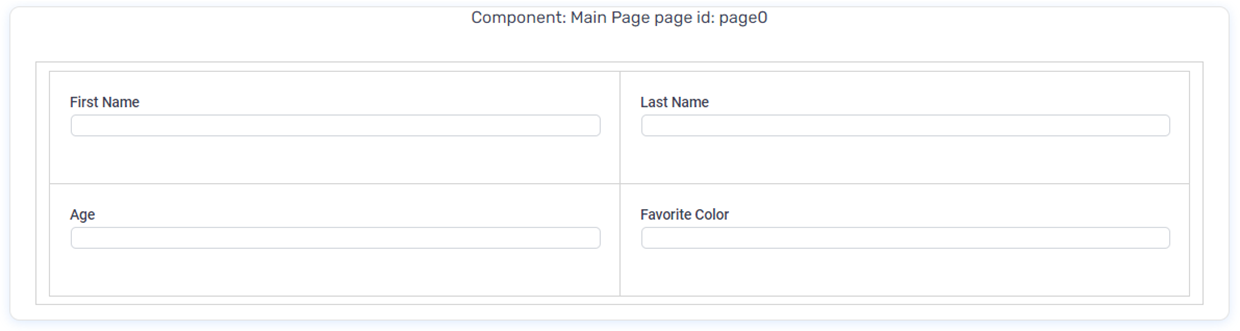
Figure 21: Webflow with Four Text Input Components
Figure 22 displays the Model of the Webflow. The value of the favoriteColor transaction data item (1) is set to User Input (default) (2):
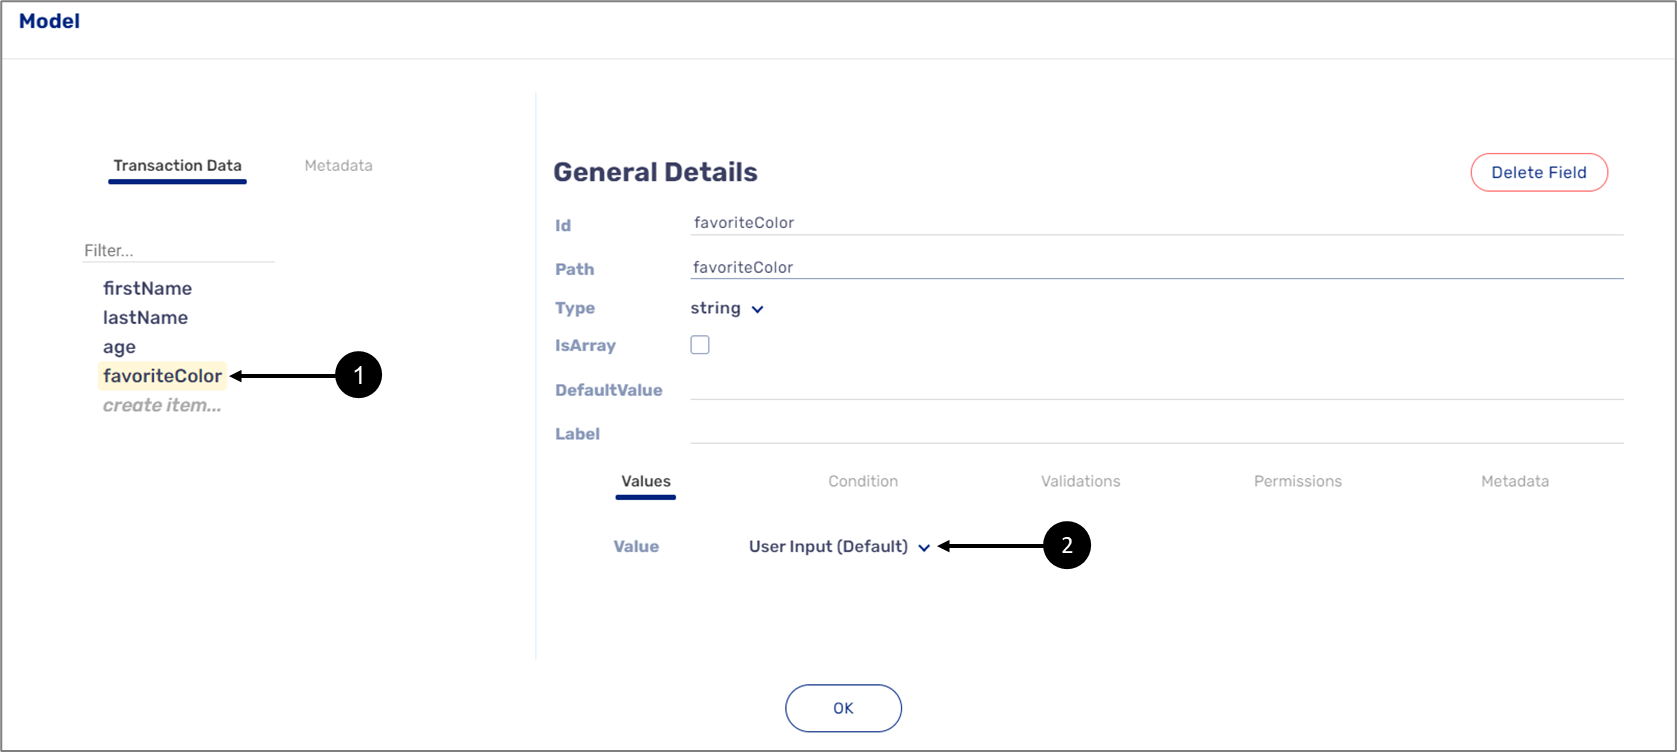
Figure 22: The Model
When setting the value to Multi-option (Static), static options can be added by clicking the + Add button (3) and entering an Option text (4) and Option Value (5) (See Figure 23):
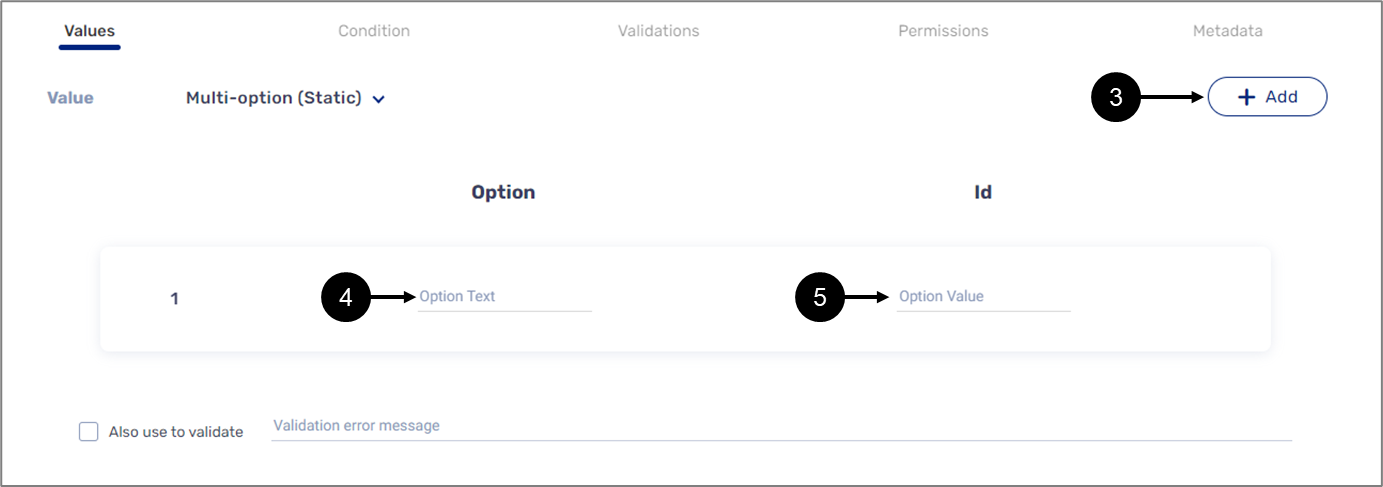
Figure 23: Multi-option (Static)
When checking the Also use to validate checkbox (6), the end-user will be forced to select one of the options and will not be able to input information manually (see Figure 24):
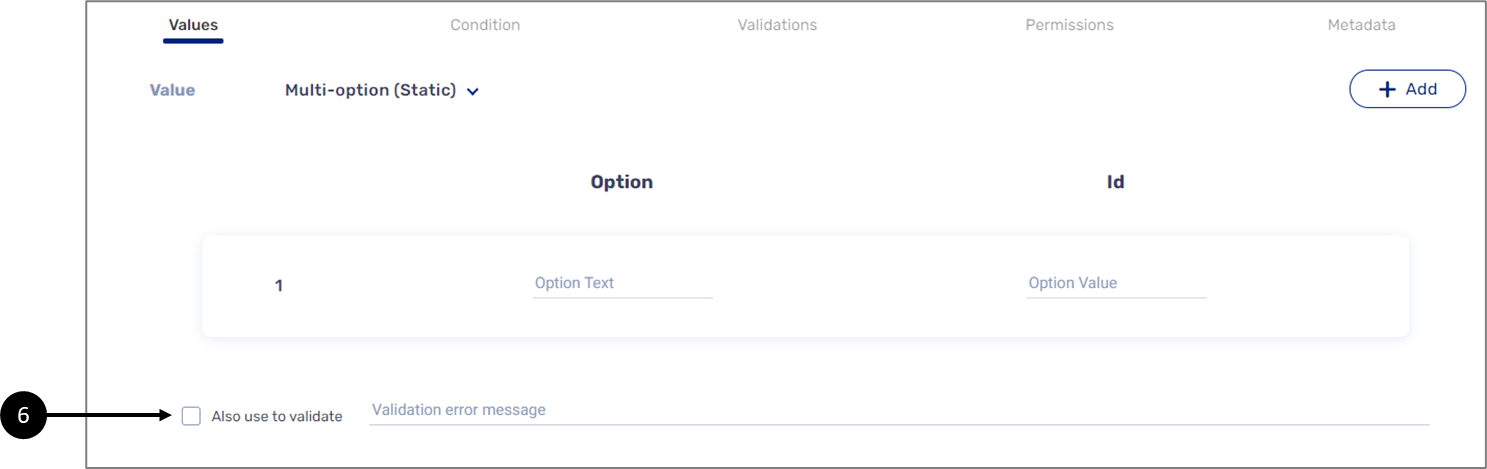
Figure 24: Validation
When an end-user starts filling out the information, matching options appear (7) (see Figure 25):
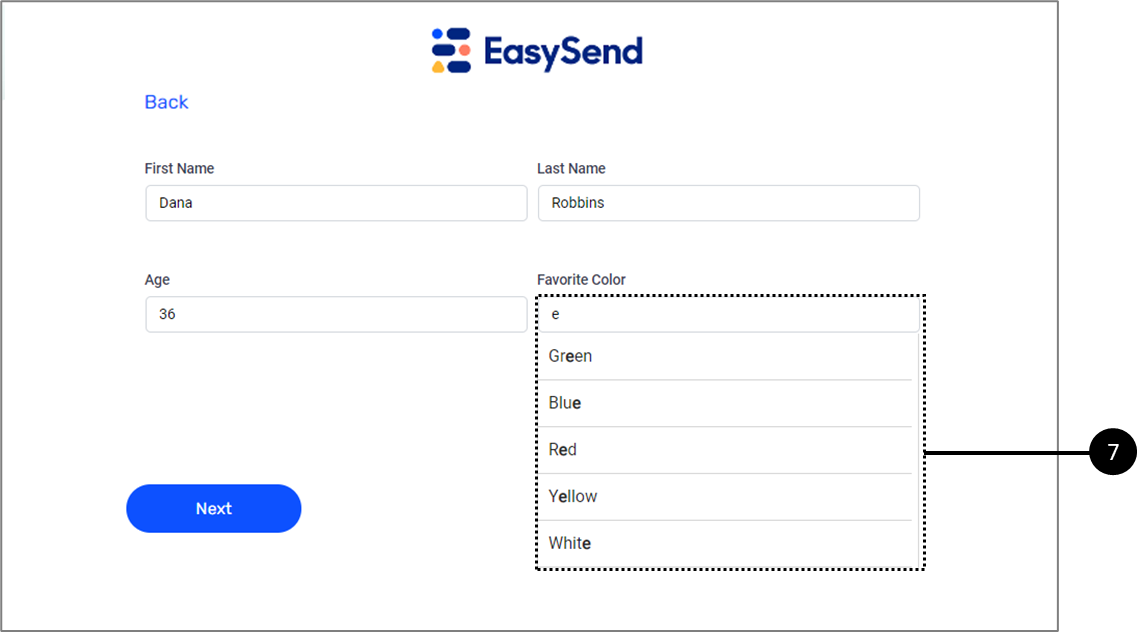
Figure 25: Displayed Options
If the Also use to validate checkbox was checked, an error message (8) will appear if one of the options was not selected (see Figure 26):
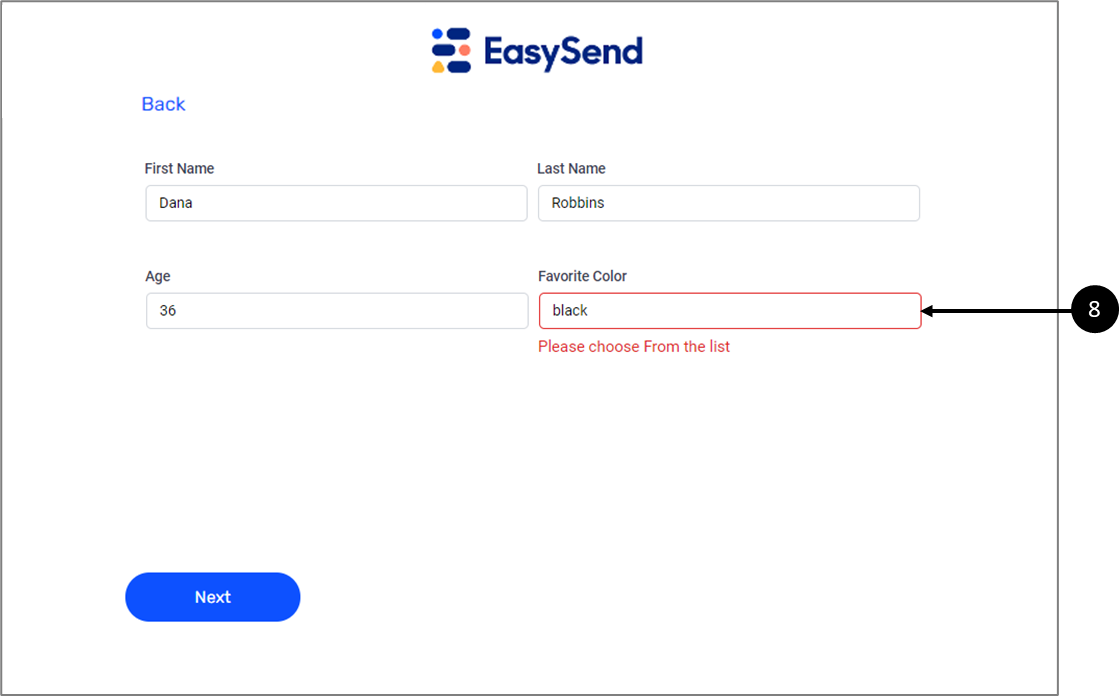
Figure 26: Error Message
How to Set the Multi-option (Static) Value?
(See Figure 27 to Figure 29)
To set the Multi-option (Static) value, perform the following steps:
- Click the desired transaction data item (1) that is connected to the component you want to implement with the Multi-option (Static) value.
- Select the Multi-option (Static) value (2).
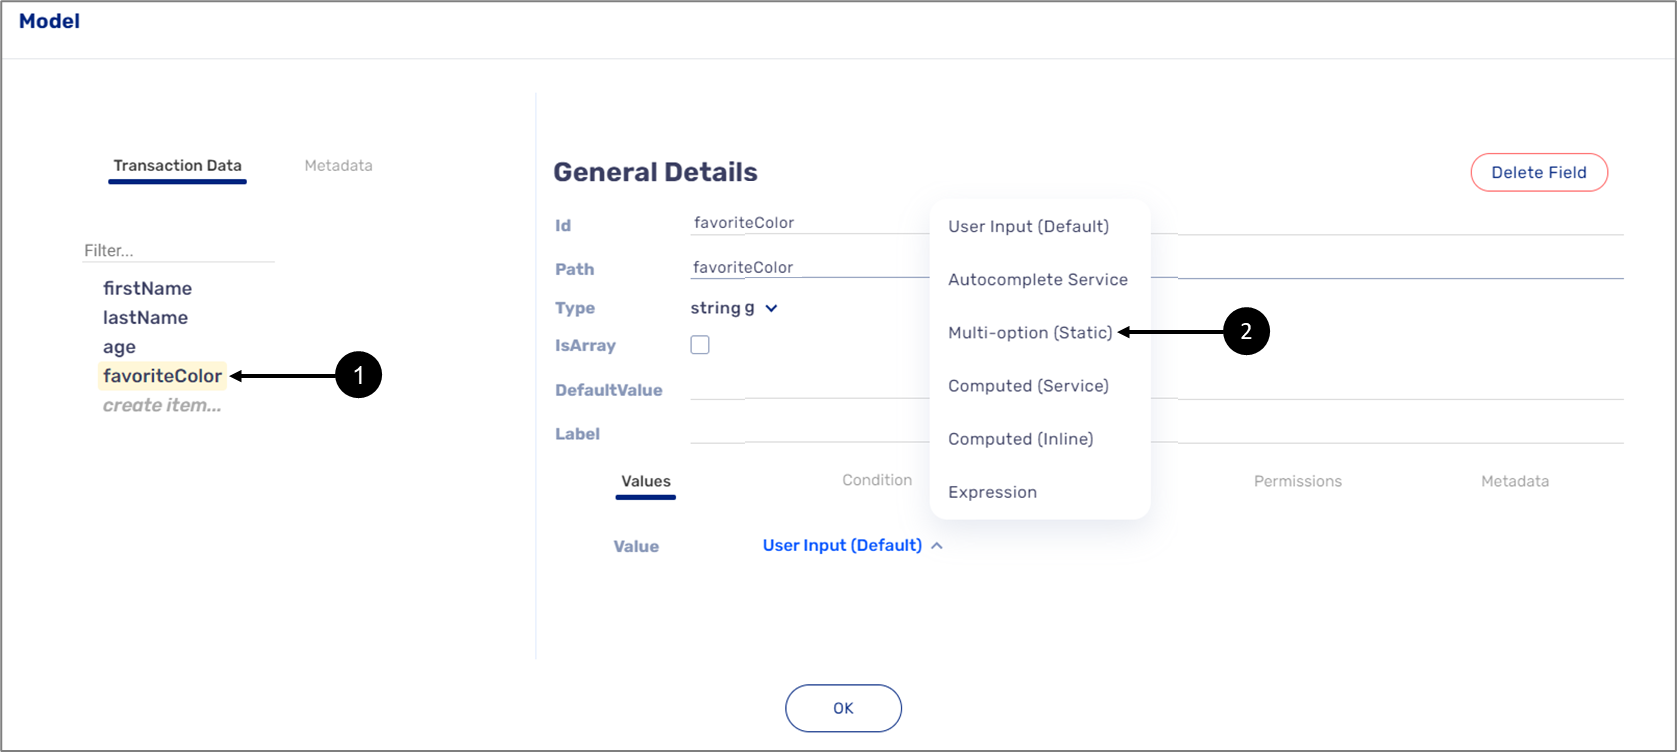
Figure 27: Multi-option (Static)
Result:
The Multi-option (Static) fields appear:
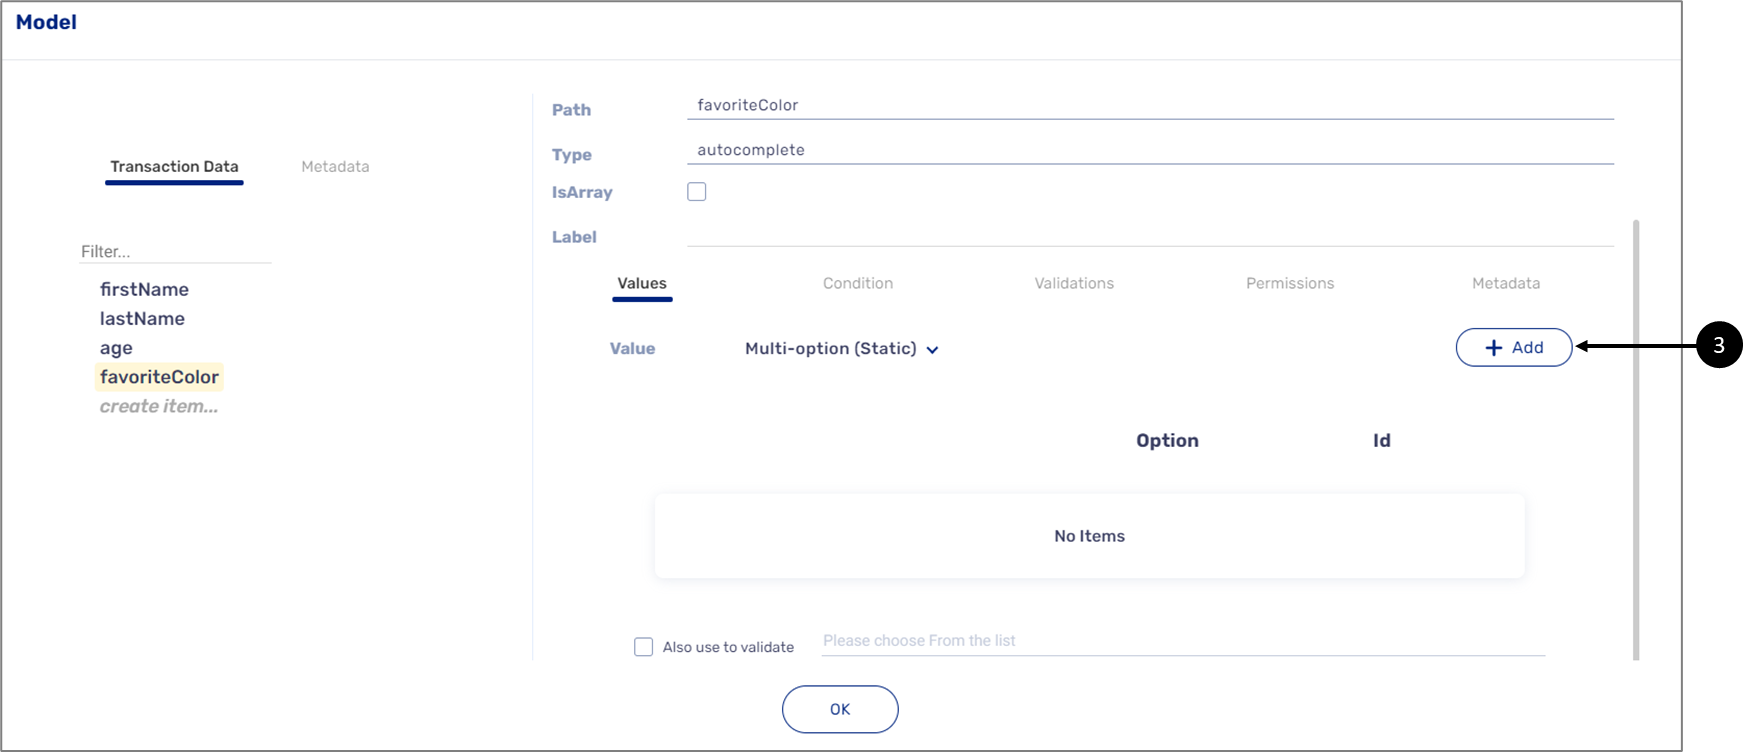
Figure 28: The + Add Button
- Click the + Add button (3):
Result:
A numbered line with an Option Text and Option Value appears:
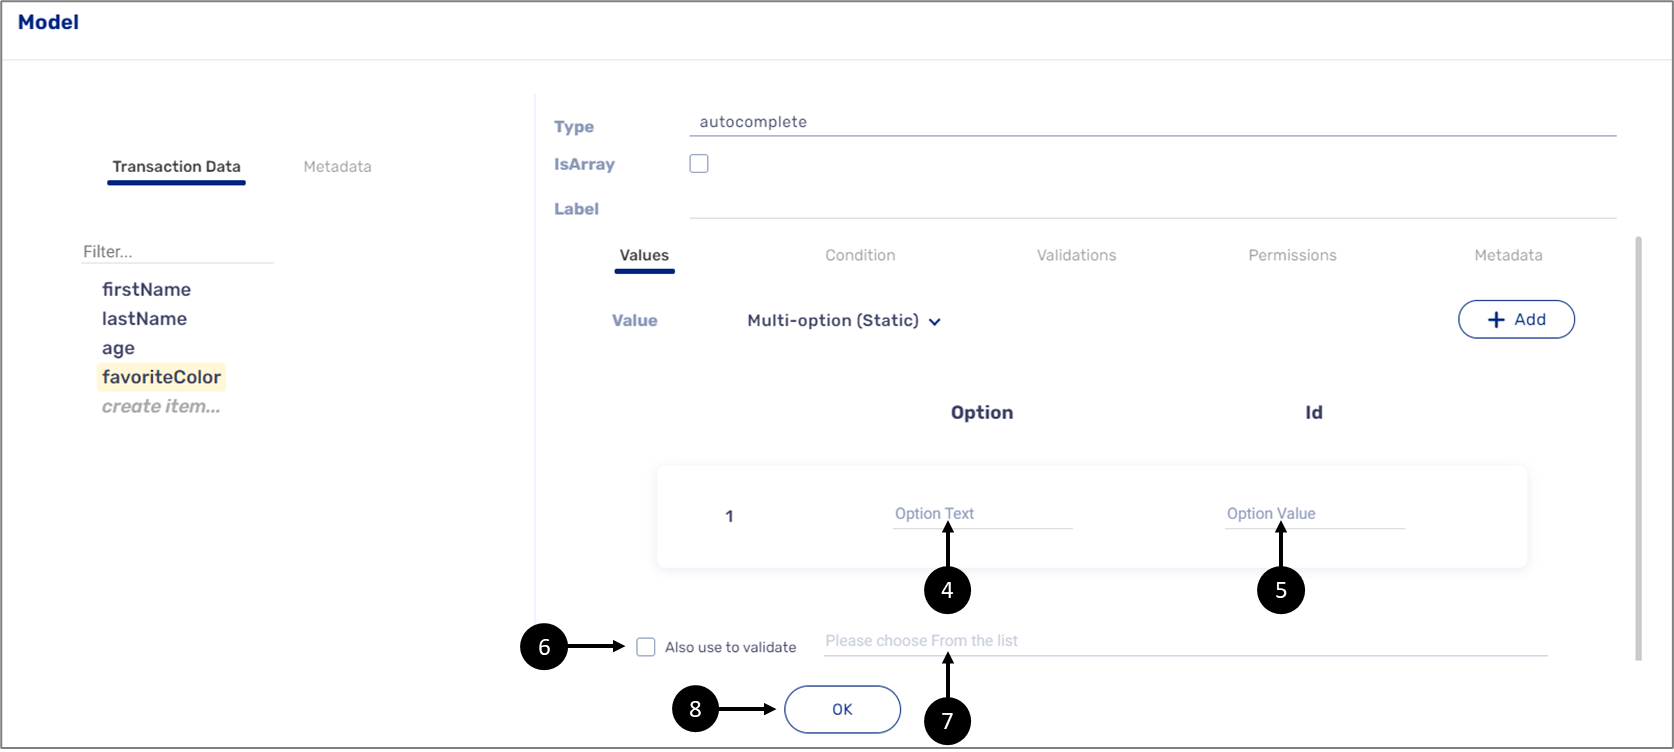
Figure 29: Option Text and Option Value
- Enter the Option Text (4).
- Enter the Option Value (5).
- Repeat steps 3 to 5 until all options are added.
- If necessary, turn to a selection of one of the options to mandatory:
- Click the Also use to validate checkbox (6).
- Enter an error message (7).
- Click the OK button to finish (8).
Expression
This value enables you to use dynamic fields and conditions to output and display information on a Text Input component. A dynamic field is a transaction data item associated with a Webflow component and exists within the Model.
Expression Value Fields and Options
Figure 30 and Table 1 describe the Expression value fields and options.
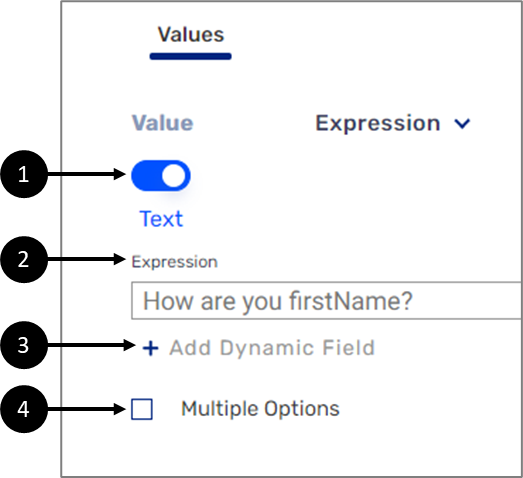
Figure 30: Expression Value Fields and Options
Table 1: Expression Value Fields and Options
Number | Name | Description |
| Text/Number Switch | Enables to toggle between a text expression and a number expression |
 | Expression | Enables to write an expression |
 | +Add Dynamic Field | Enables to add dynamic field to the expression |
| Multiple Options |
NOTE For additional information about adding conditions to the expression, see the Expression Value with Conditions section |


Simple Expression
A simple expression can be a text or number expression depending on the setting of the switch, with a combination of static and dynamic fields.
Simple Number Expression Example
When switching to the Number option, it is possible to perform simple calculations. For example, a Webflow contains three Text Input components - Policy Monthly Payment, Payment with VAT, and Yearly Payment (see Figure 31):
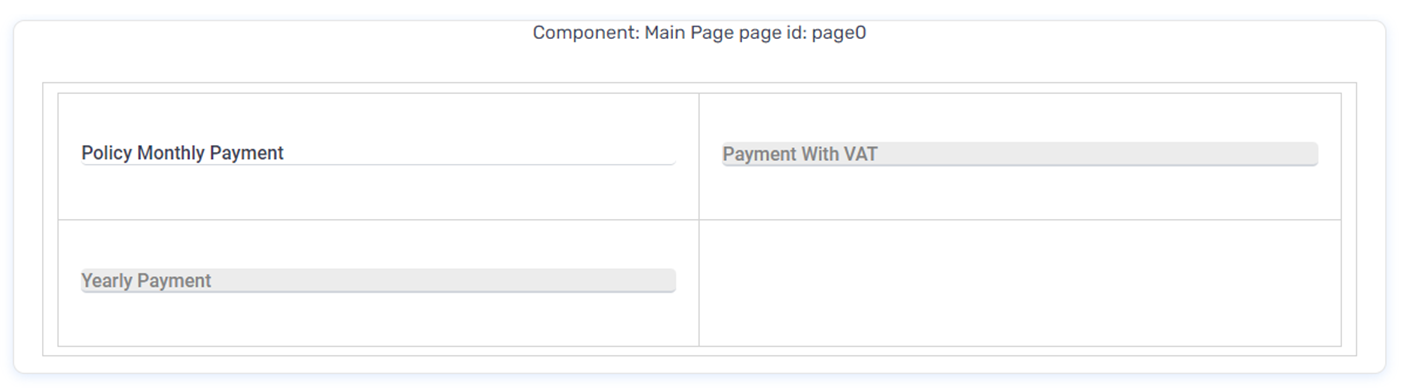
Figure 31: Webflow with Three Input Text Components
By adding dynamic fields and static expressions to the Expression field, simple calculations can be performed, such as:
- Calculating the amount of the monthly policy payment with a fixed 17% VAT (1) (see Figure 32):
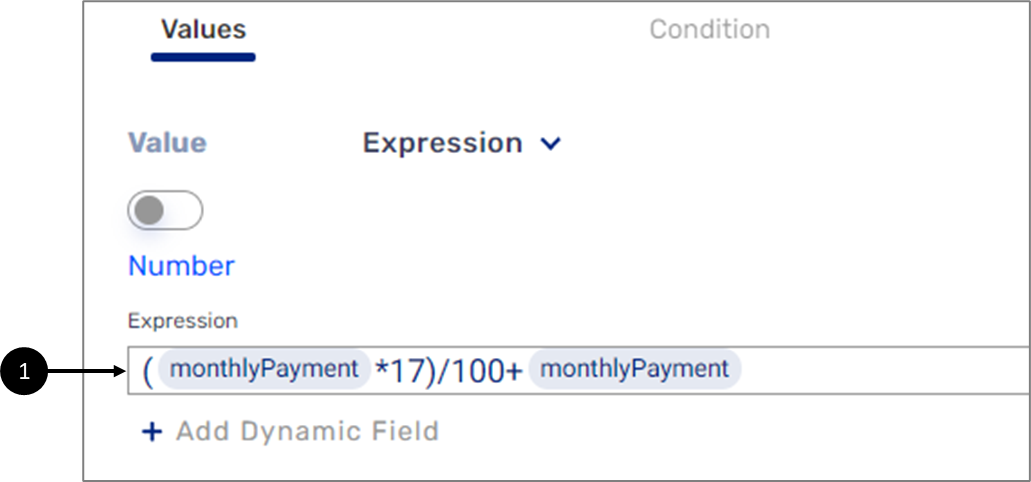
Figure 32: Simple Calculation 1 of 2
- Calculating the amount of the yearly payment based on the value that was outputted to the Payment with Vat component (2) (see Figure 33):
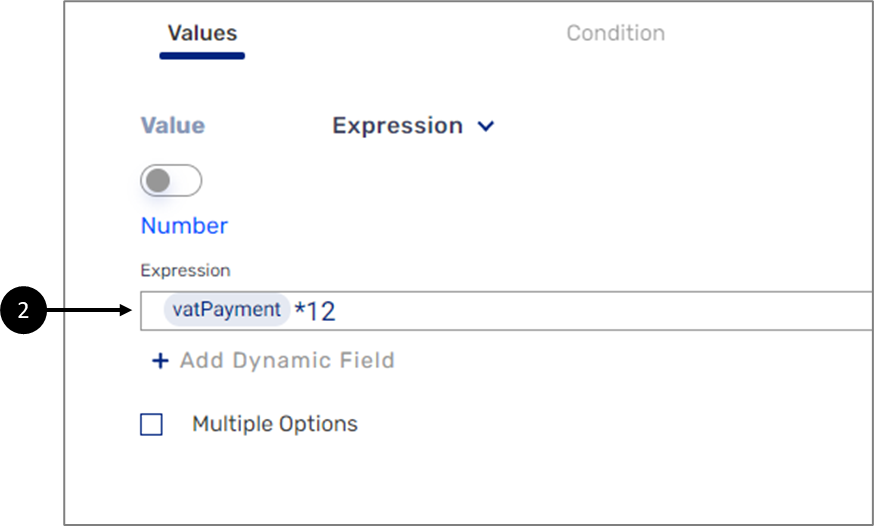
Figure 33: Simple Calculation 2 of 2
The outputs of all the calculations are displayed automatically when the end-user is filling out
information (see Figure 34):
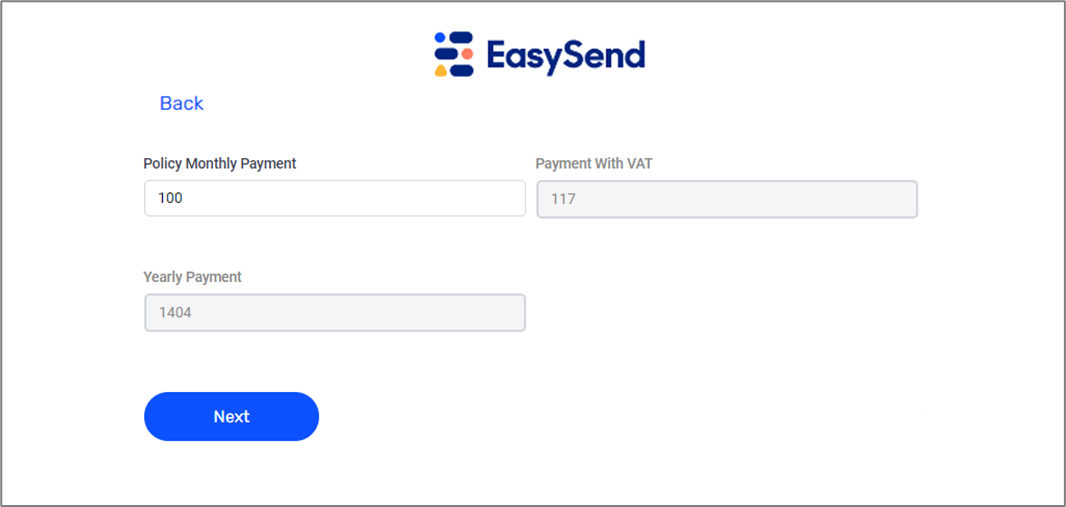
Figure 34: Calculation Output
Simple Text Expression
When switching to the Text option, the most common usage is for adding dynamic fields. For example, a Webflow contains three Text Input components - First Name, Last Name, and Full name (see Figure 35):
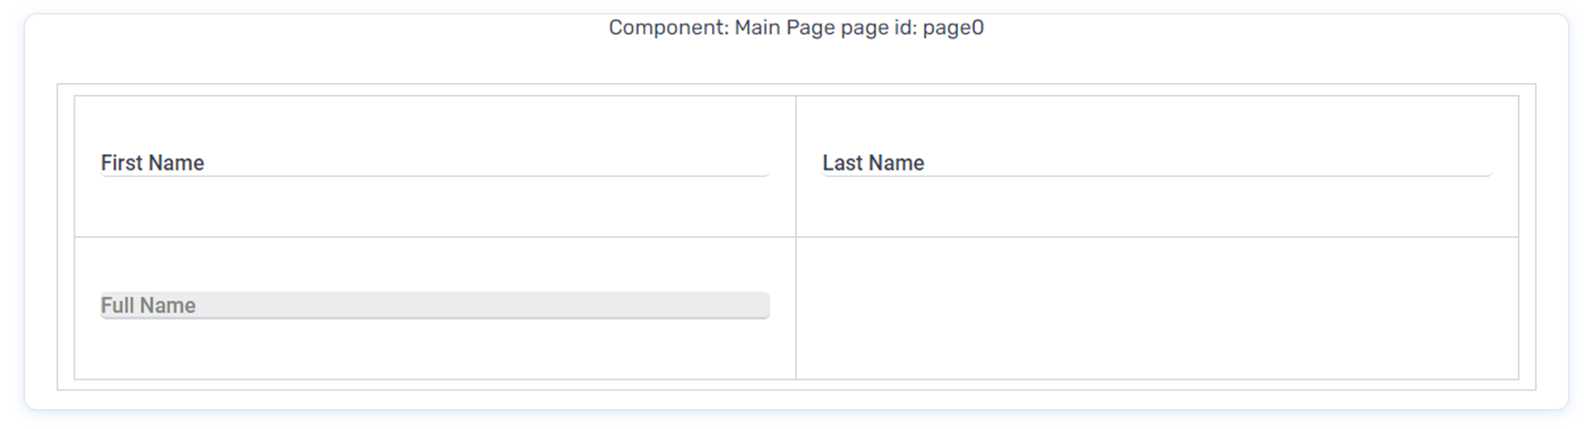
Figure 35: Webflow with Three Input Text Components
By adding dynamic fields to the Expression field (1), the output will display the full name automatically (see Figure 36):
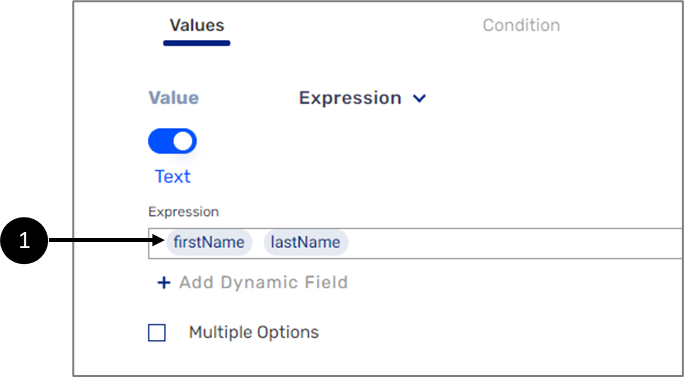
Figure 36: Dynamic Fields
The output is displayed automatically when the user is filling out information (see Figure 37):
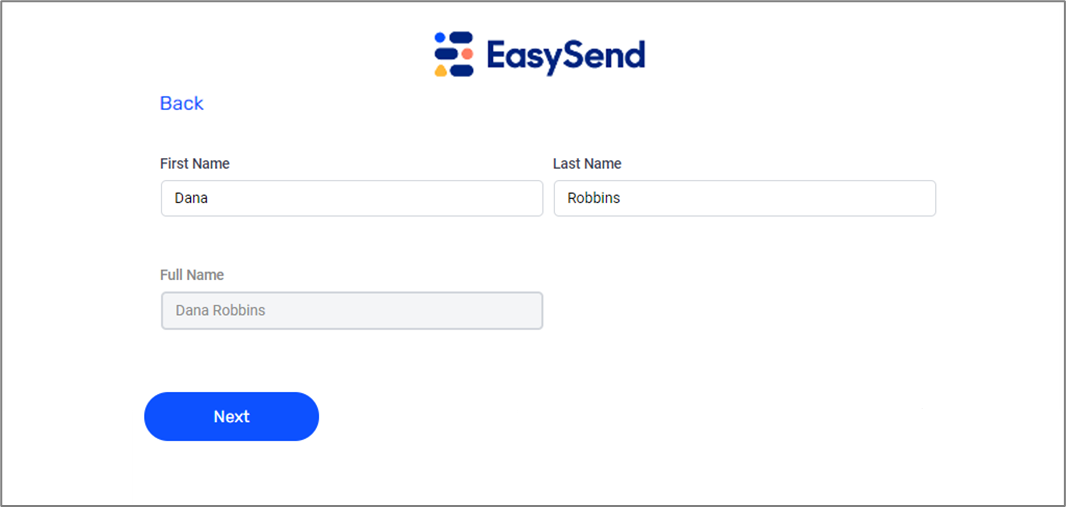
Figure 37: Expression Output
How to create a Simple Expression with Dynamic Fields?
(See Figure 38 to Figure 41)
To create a simple expression with static expressions and dynamic fields, perform the following steps:
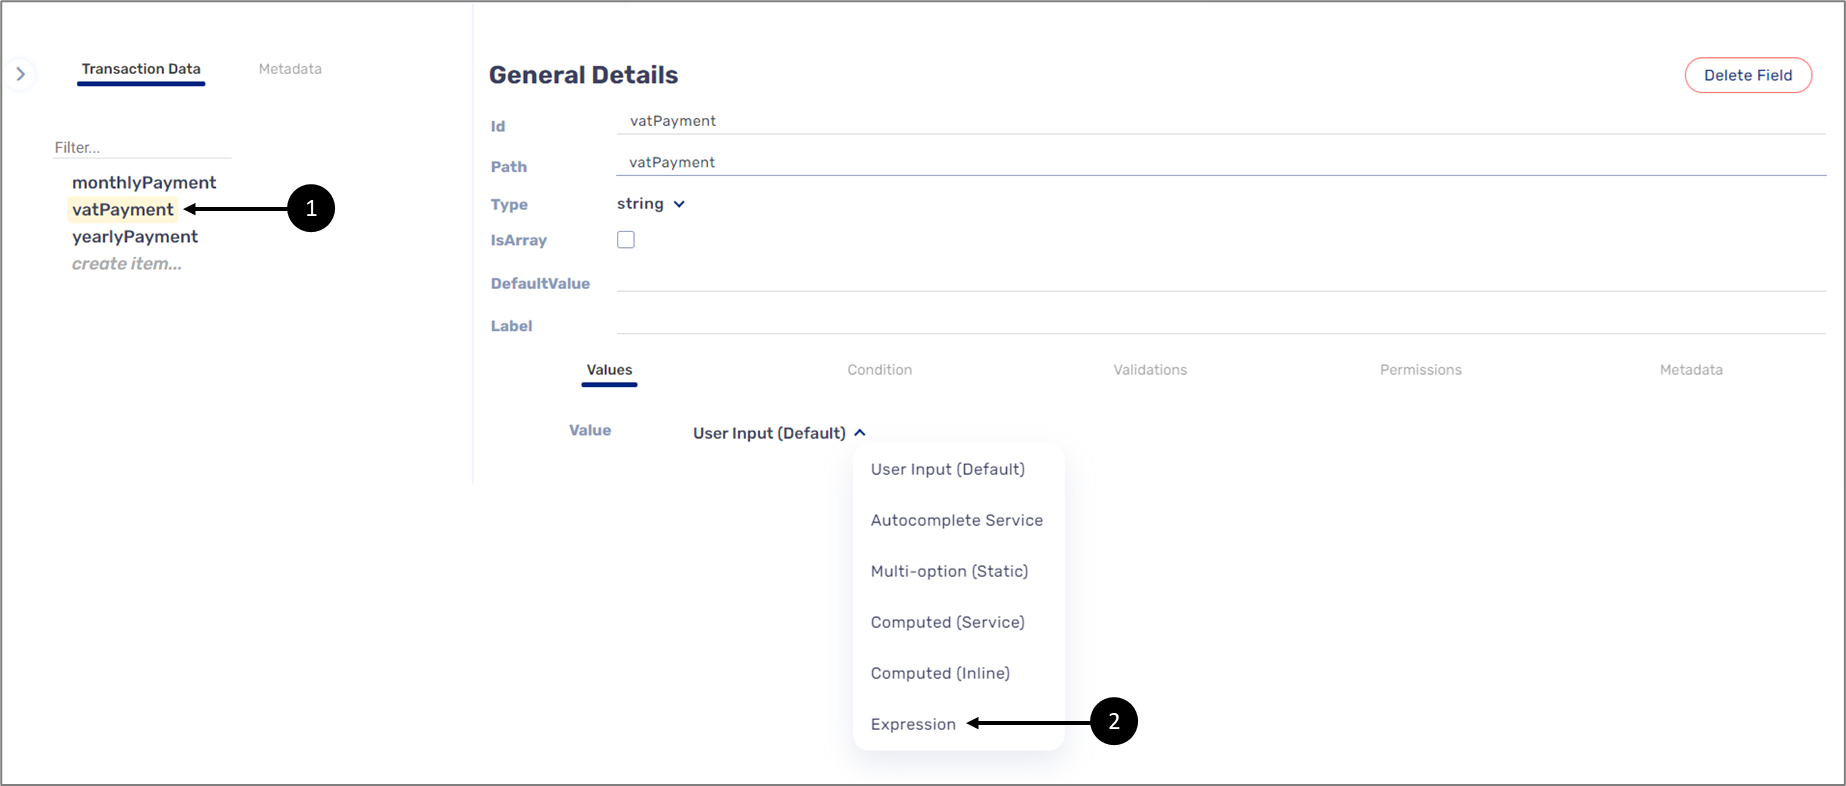
Figure 38: Expression Value
- Click the desired transaction data item (1) that is connected to the component you want to implement with the expression.
- Select the Expression value (2).
Result:
- The
 icon (3) appears next to the name of the selected transaction data item.
 - The Expression fields and options appear:
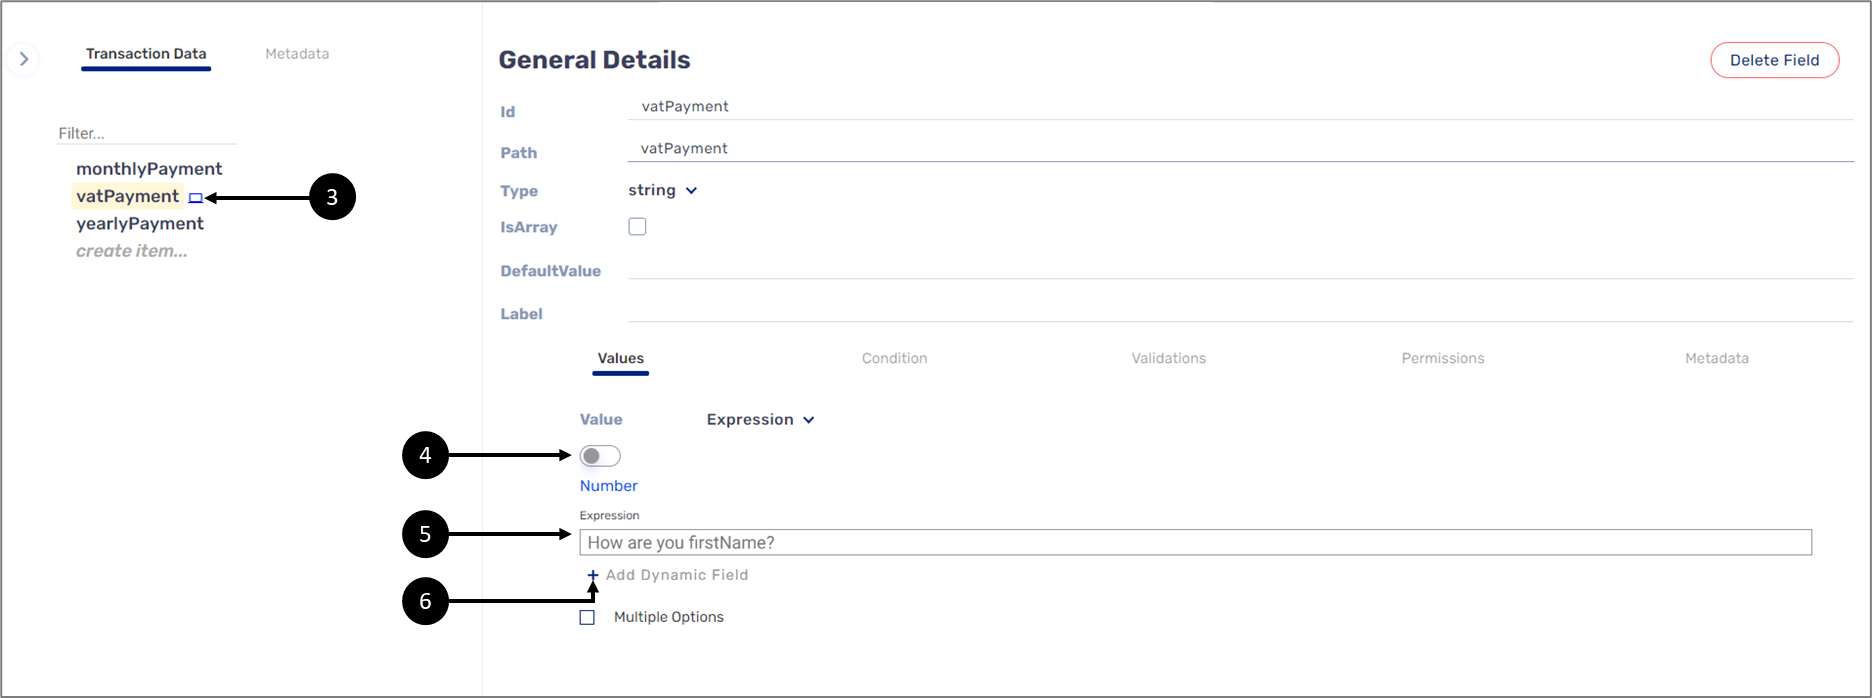
Figure 39: Expression Value Fields and Options
- Toggle the switch to Number (4).
- Write the desired expression in the Expression field (5):
- Click the +Add Dynamic Field option (6).
Result:
A dynamic field placeholder appears (7):
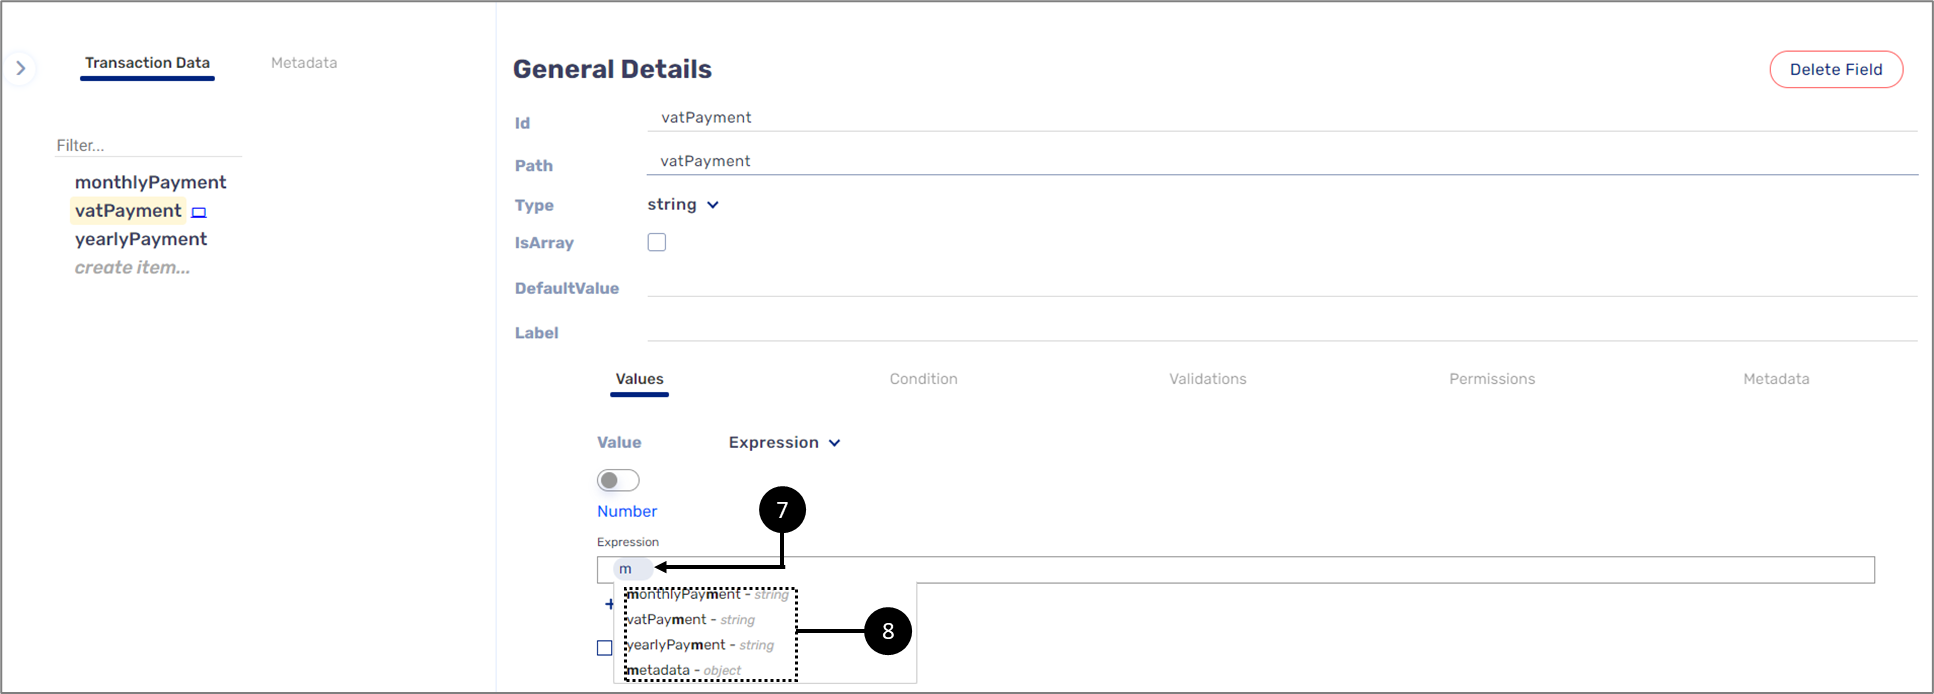
Figure 40: Adding Dynamic Fields
- Write and select the name of the transaction data item to add (8).
- Add the static expression.
- Repeat steps a to c, as necessary.
If the transaction data item to add is nested inside an object, write, and select the object first and then input a dot (.) and select the transaction data item within the object. It is also possible to input two dots (..) and then select the transaction data item within the object:

Figure 41: Nested Transaction Data Item
Expression Value with Conditions
Complex expressions can be created with conditions that will determine when the expression appears and in which variation.
conditions are enabled by checking the Multiple Options checkbox (1) and clicking the + Add button (2) (see Figure 42):
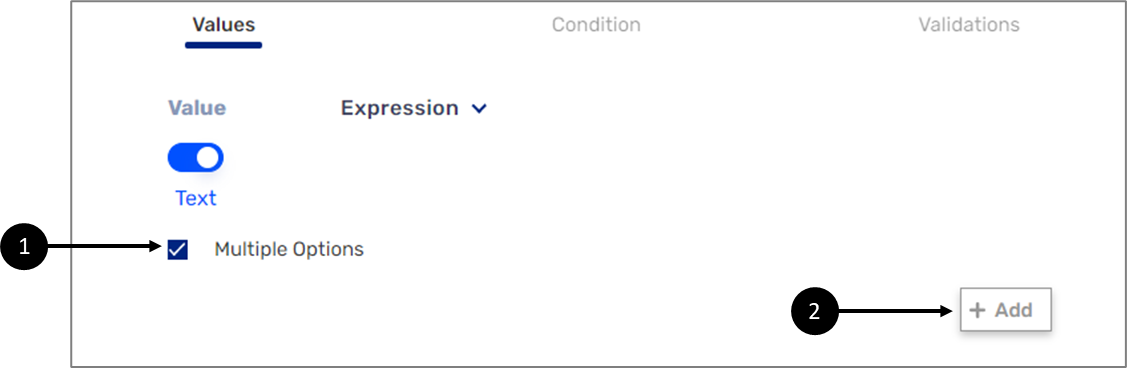
Figure 42: Adding Condition
Expression Value with Conditions - Fields and Options
Figure 43 and Table 2 describe the added fields and options to the Expression Value when working with conditions.
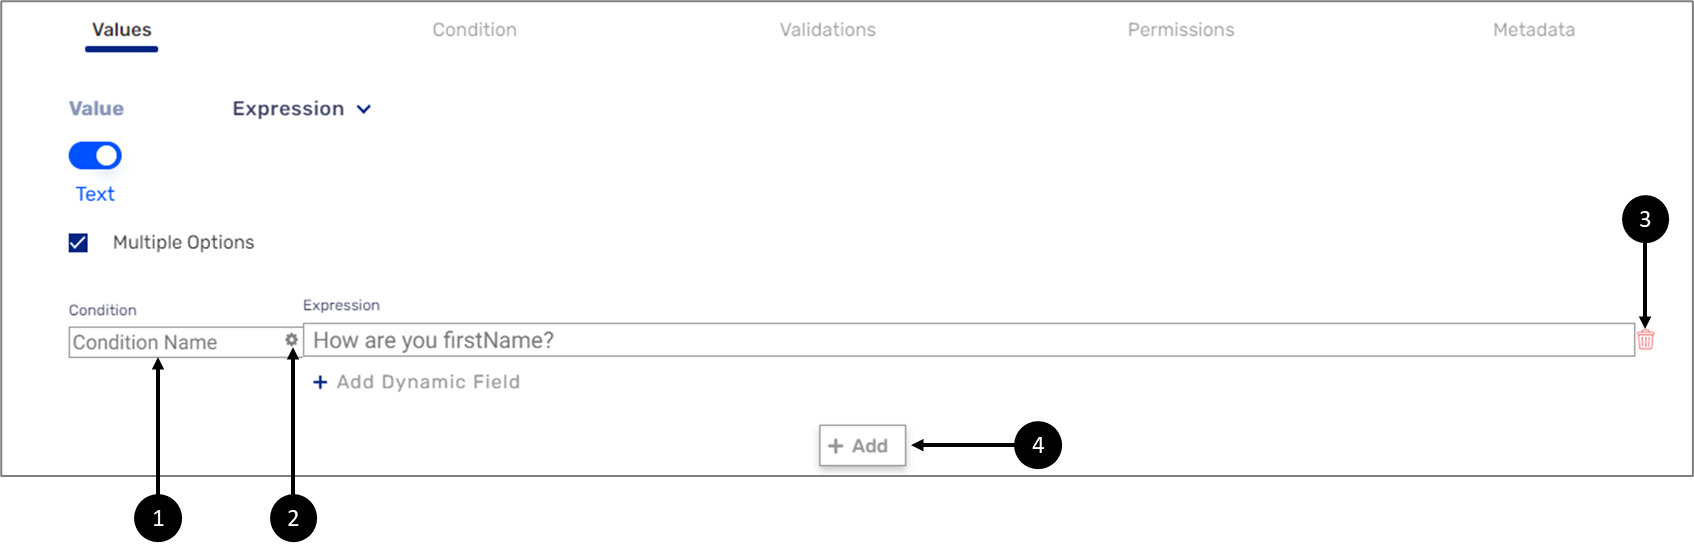
Figure 43: Added Fields and Options
Table 2: Added Fields and Options
Number | Icon | Name | Description |
| - | Condition Name | Enables to set the name of the condition |
|
| Condition Settings | Enables to set the logical expression parameters of the condition NOTE For additional information about condition settings, see the Condition Settings section |
|
| Delete | Enables to delete the expression and the condition |
| - | +Add | Enables to add additional expressions with conditions |


Condition Settings
Figure 44 and Table 3 describe the condition settings.
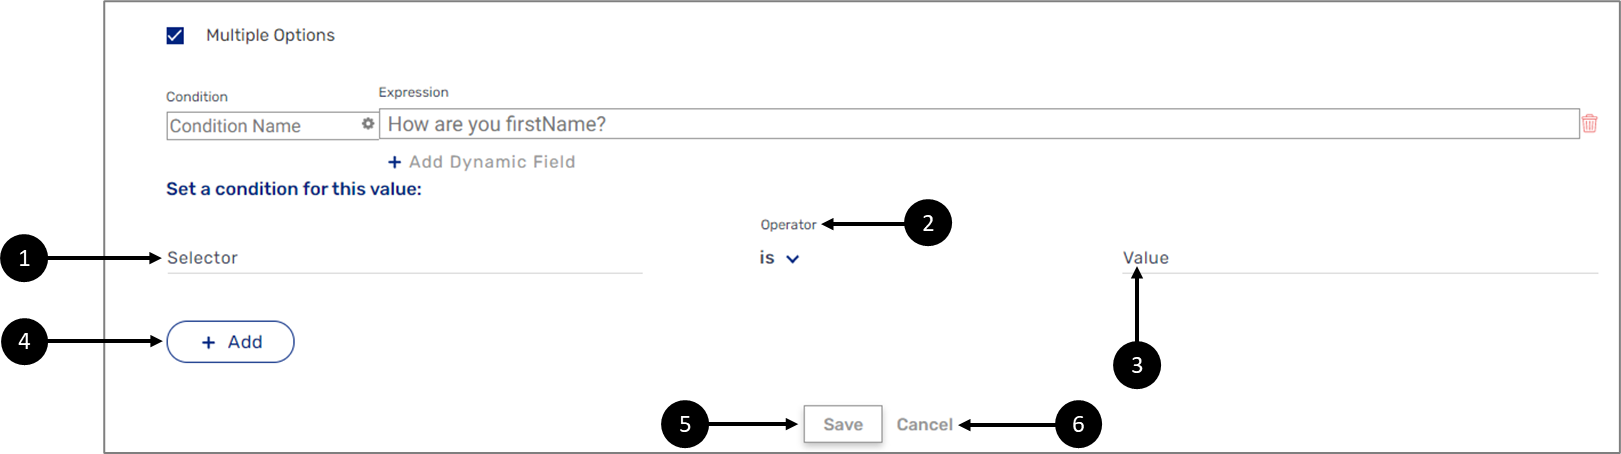
Figure 44: Condition Settings
Table 3: Condition Settings
Number | Name | Description |
| Selector | Enables to select transaction data item that will trigger the condition |
| Operator | Enables to select the compartment option that will trigger the condition:
|
| Value | Enables to set a string that is compared against the Selector according to the selected Operator to trigger the condition |
| +Add | Enables to add additional logical expressions to the condition NOTE When there are two or more conditions, the operation between them must be set - and/or |
| Save | Enables to save the changes |
| Cancel | Enables to discard the changes |


Expression Value with Condition Example
In this example, a Webflow contains three Text Input components - First Name, Last Name, and Full Name. The Webflow also has a Radio Question component with options to select
gender (see Figure 45):
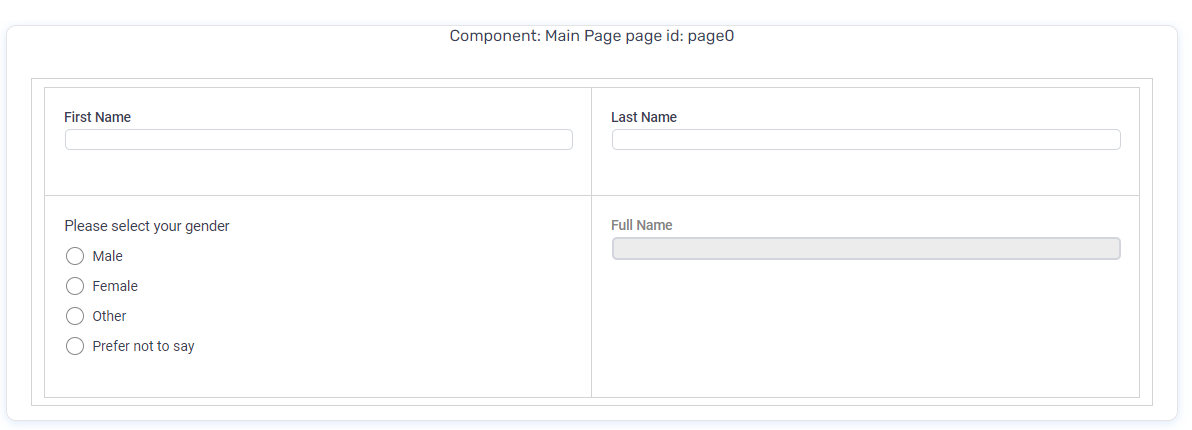
Figure 45: Webflow with Three Input Text Components and a Radio Question
By creating expressions with dynamic fields and conditions, a personalized message will be created according to the input information - first name, last name, and gender. First, the expressions with a static message and dynamic fields are created (1) (see Figure 46):
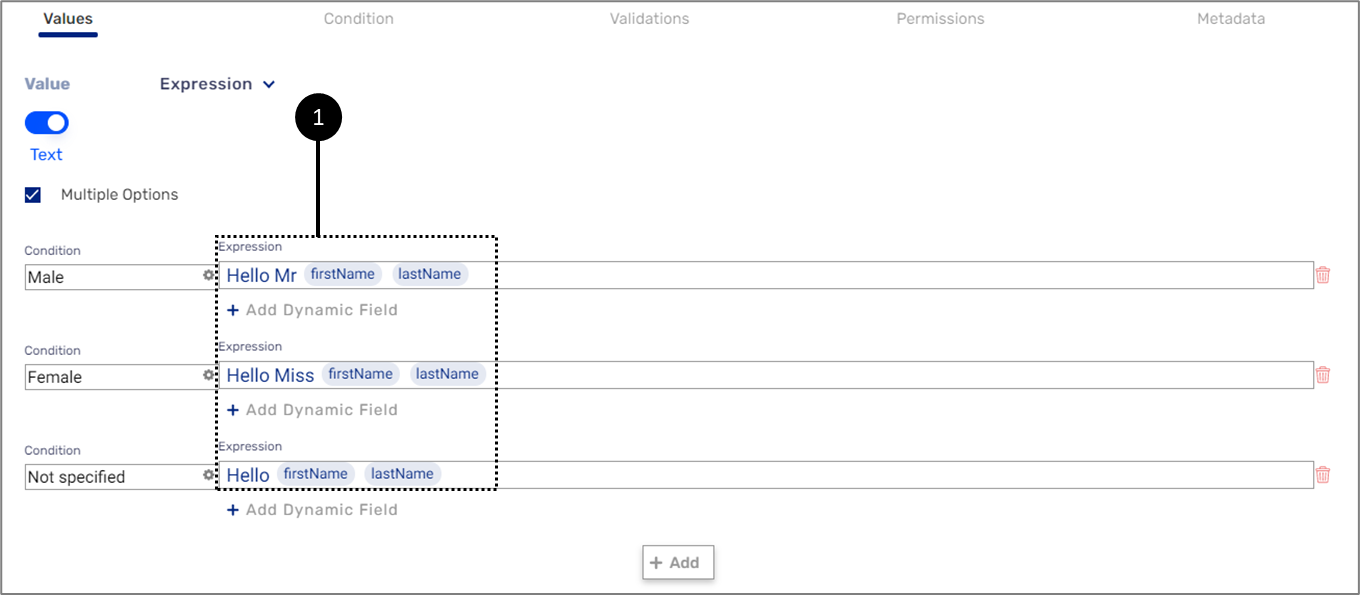
Figure 46: Expressions with a Static Message and dynamic fields
Second, the logical expressions are set - the Selector (1), the Operator (2), and the Value (3) for every condition (see Figure 47):
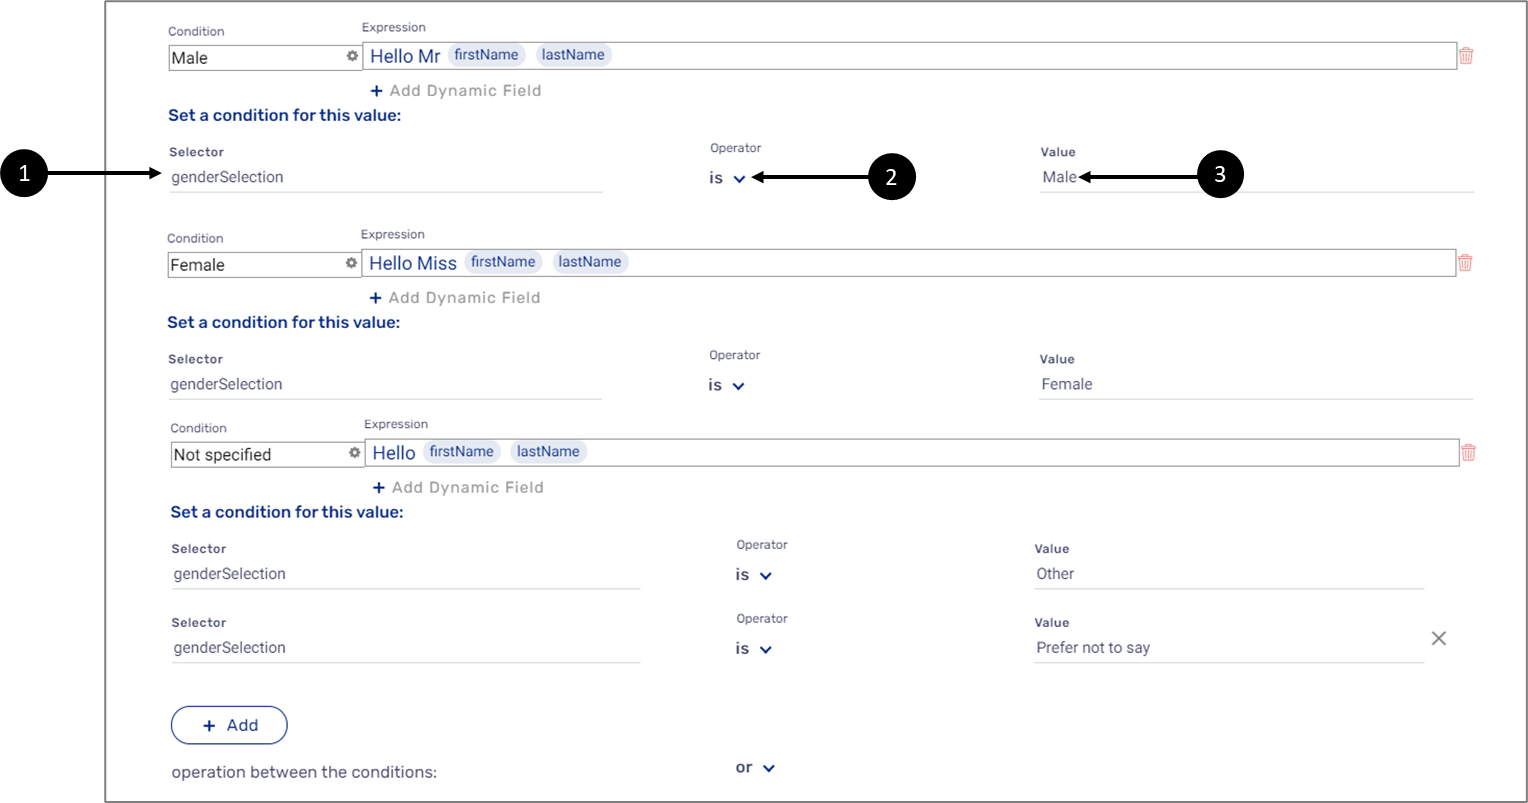
Figure 47: Conditions - Selector, Operator, and Values
The outputs are displayed automatically when the end-user is filling out information (see Figure 48):
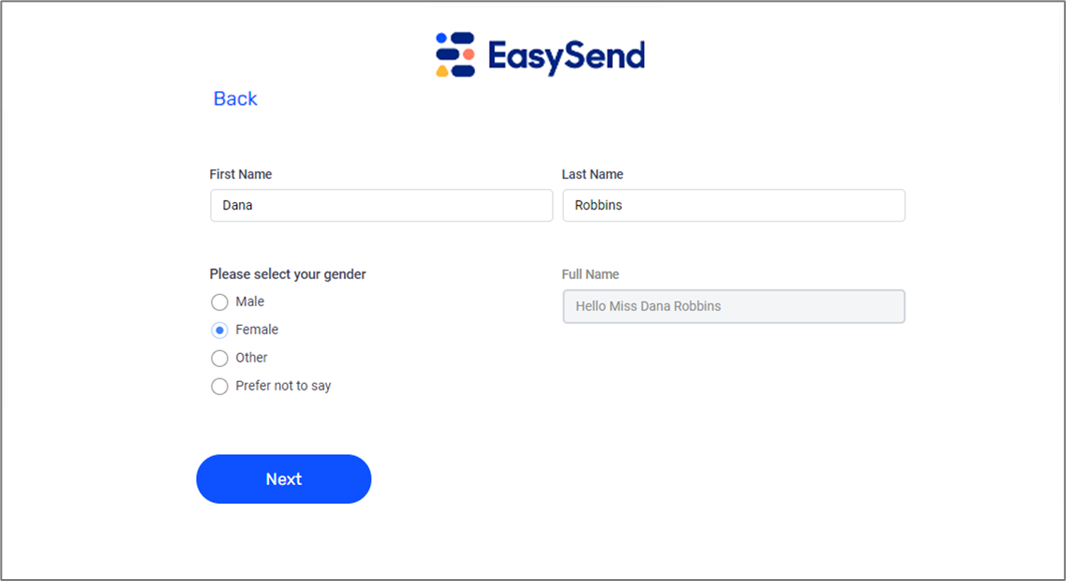
Figure 48: Expression Output
How to Create an Expression with Conditions
(See Figure 49 to Figure 57)
To create an expression with a condition, perform the following steps:
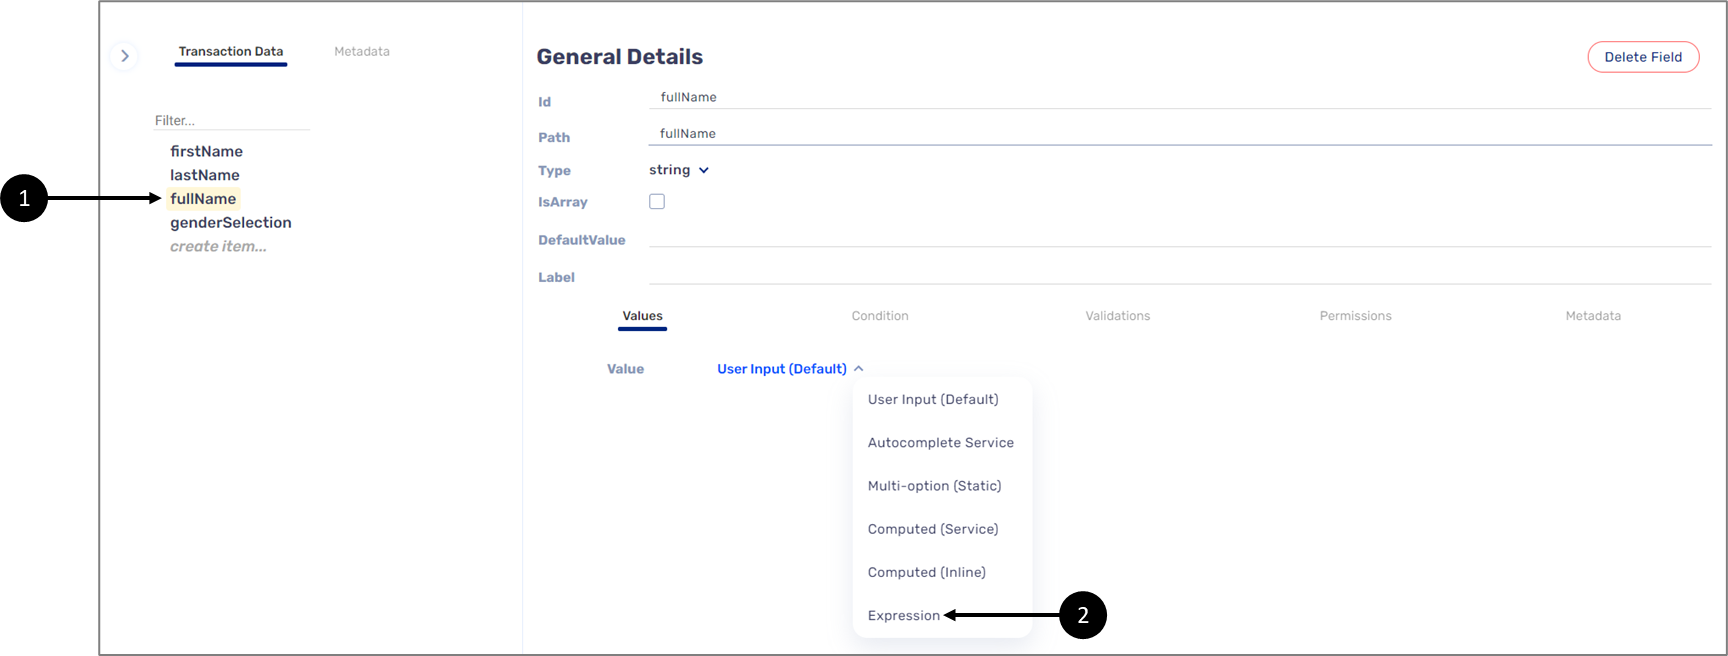
Figure 49: Expression Value
- Click the desired transaction data item (1) that is connected to the component you want to implement with the expression and the condition.
- Select the Expression value (2).
Result:
- The
 icon (3) appears next to the name of the selected transaction data item.
 - The Expression fields and options appear:

Figure 50: Multiple Options Checkbox
- Check the Multiple Options checkbox (4).
Result:
The +Add button (5) appears:
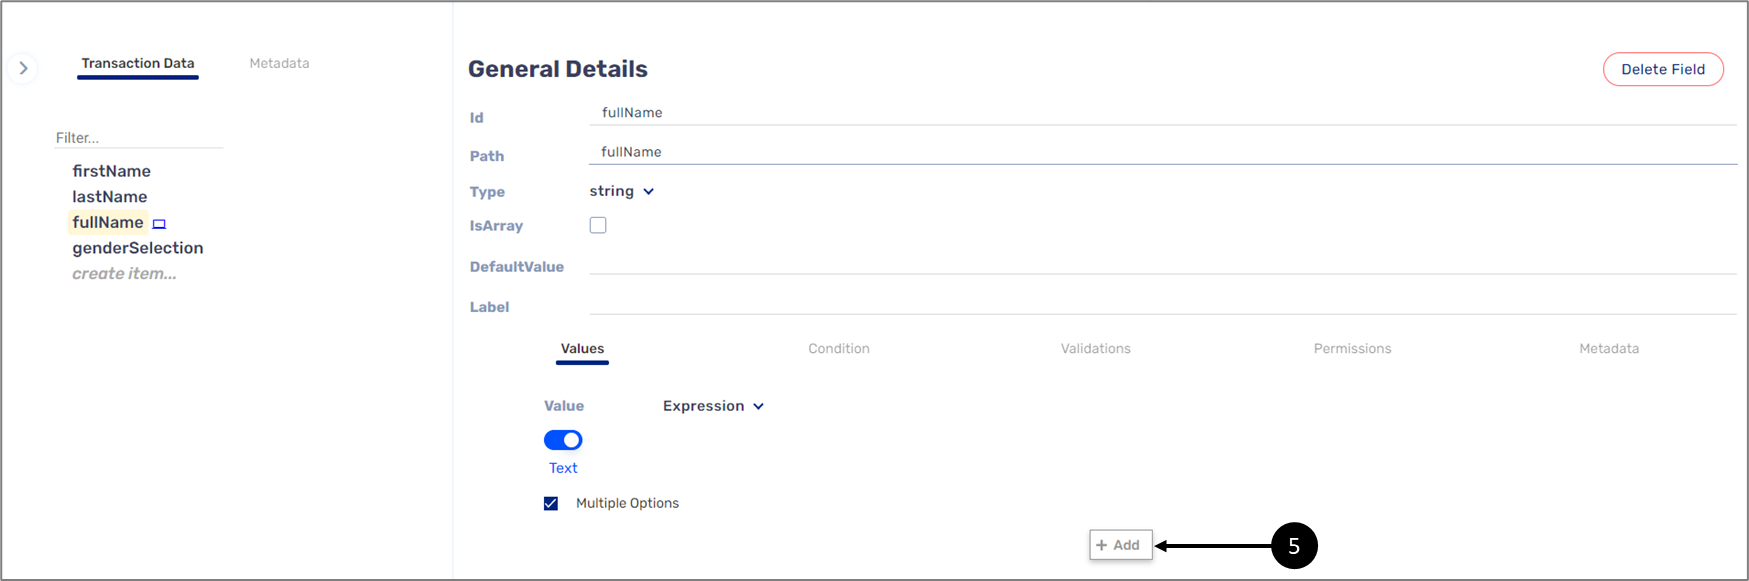
Figure 51: +Add Button
- Click the +Add button (5).
Result:
The Condition (6) and the Expression (7) appear:
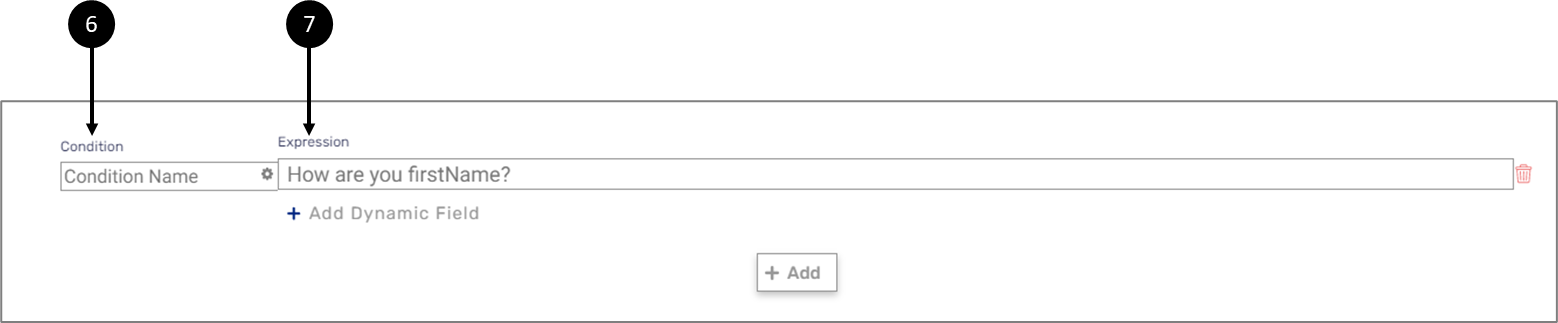
Figure 52: Condition and Expression
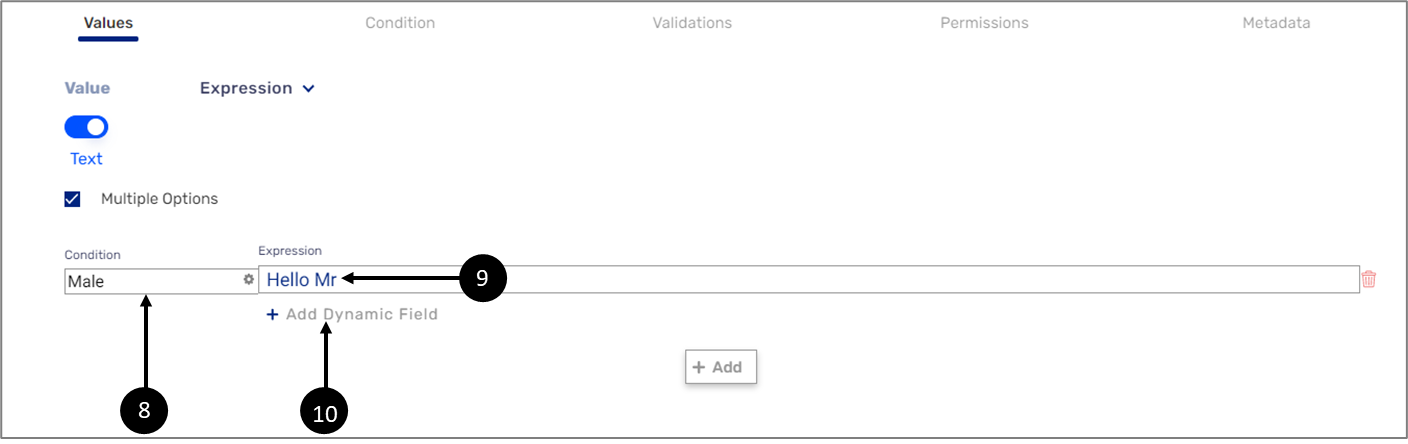
Figure 53: Setting the Condition and the Expression 1 of 3
- Set the condition and expression:
- Enter the Condition Name (8).
- Write the static expression (9).
- Click the +Add Dynamic Field option (10).
Result:
A dynamic field placeholder appears (11):
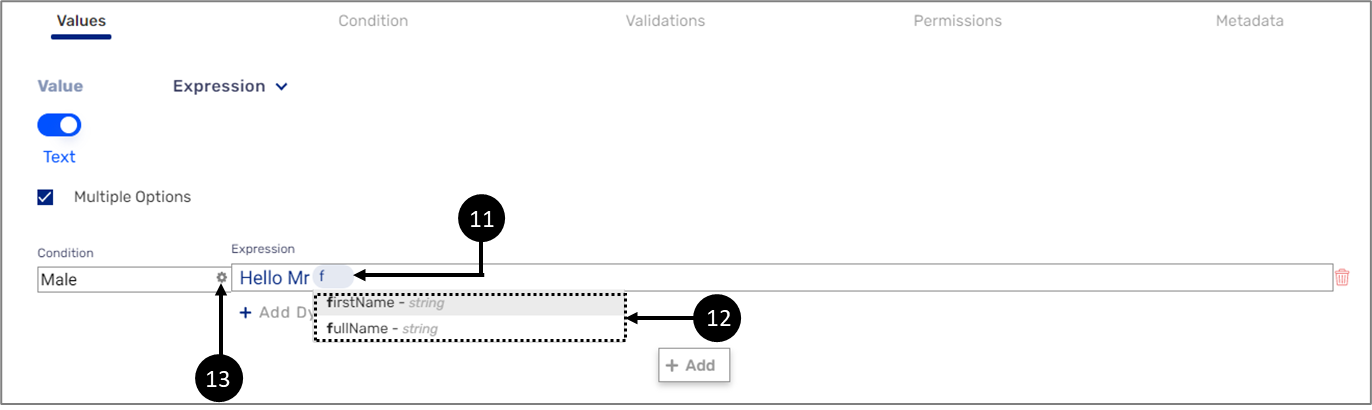
Figure 54: Setting the Condition and the Expression 2 of 3
- Write and select the name of the transaction data item to add (12).
- Repeat steps c and d as necessary to add more dynamic fields.
- Click the condition settings icon (13).
If the transaction data item to add is nested inside an object, write, and select the object first and then input a dot (.) and select the transaction data item within the object. It is also possible to input two dots (..) and then select the transaction data item within the object:
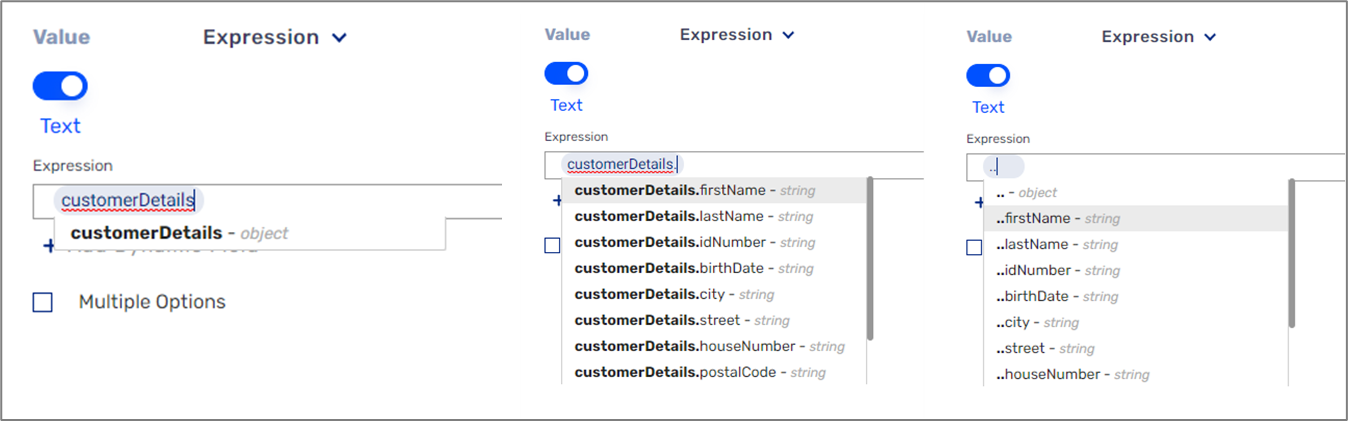
Figure 55: Nested Transaction Data Item
Result:
The logical expression fields of the condition appear:
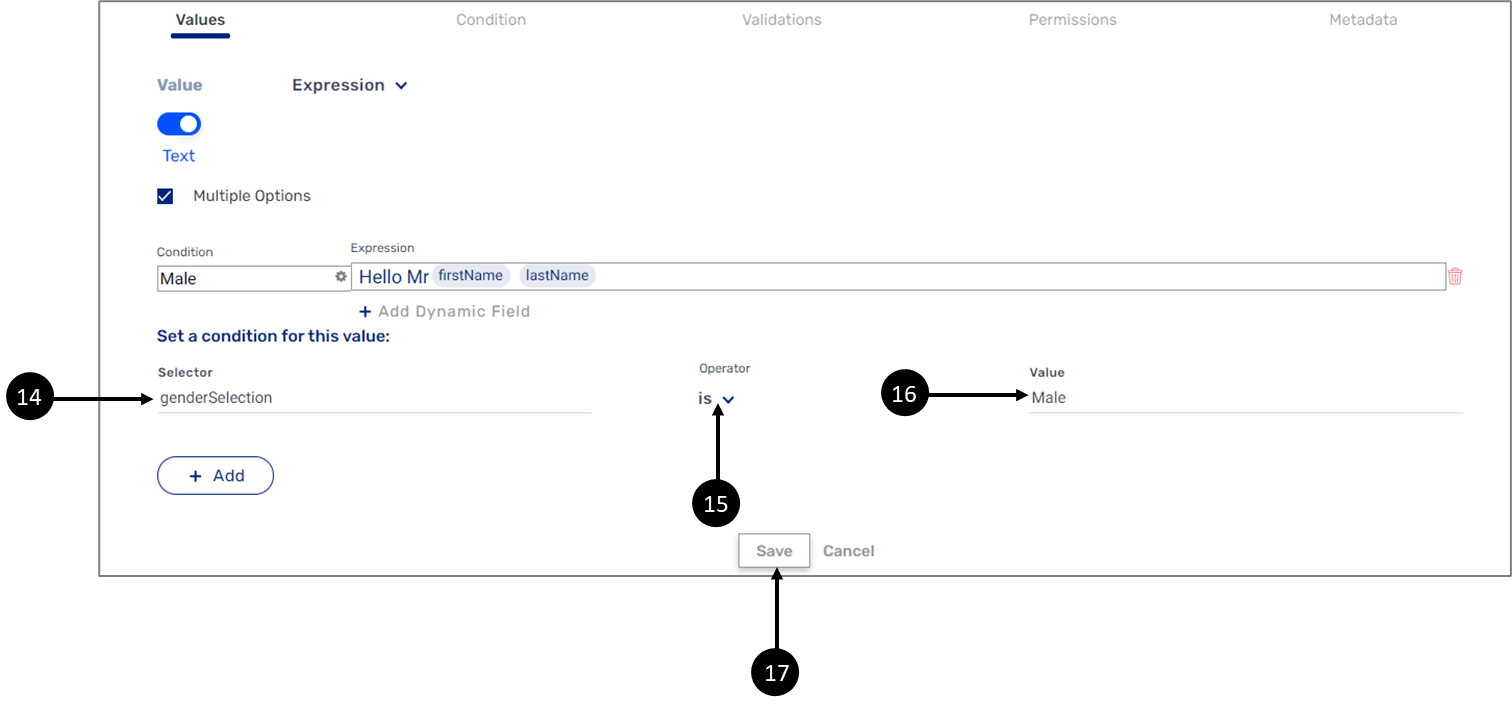
Figure 56: Setting the Condition and the Expression 3 of 3
- Set the Selector, write, and select the name of the transaction data item to add (14).
- Select the Operator (15).
- Set the Value (16).
- Click the Save button (17) to make the condition disappear.
- Repeat steps 4 and 5 to add more expressions and conditions, as necessary.
If the transaction data item to add is nested inside an object, write, and select the object first and then input a dot (.) and select the transaction data item within the object. It is also possible to input two dots (..) and then select the transaction data item within the object:
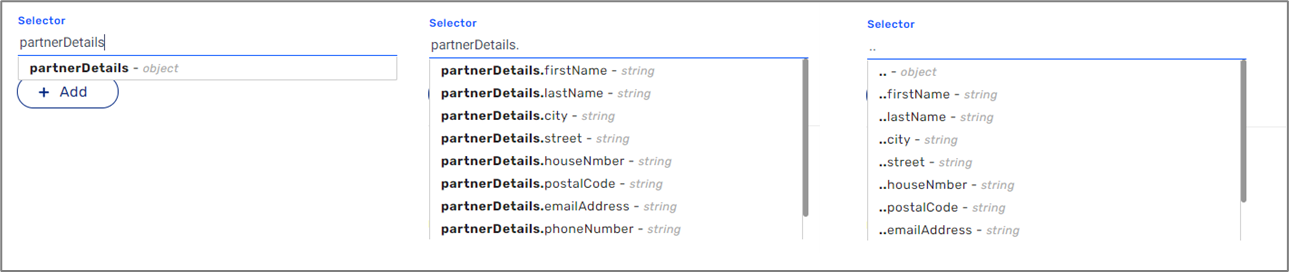
Figure 57: Nested Transaction Data Item
Formula Editor
(See Figure 58)
The Formula Editor enables EasySend's platform users to use built-in operators, functions, and model data items to create simple and complex conditions, logical expressions, and calculations. To access the Formula Editor article, click here.
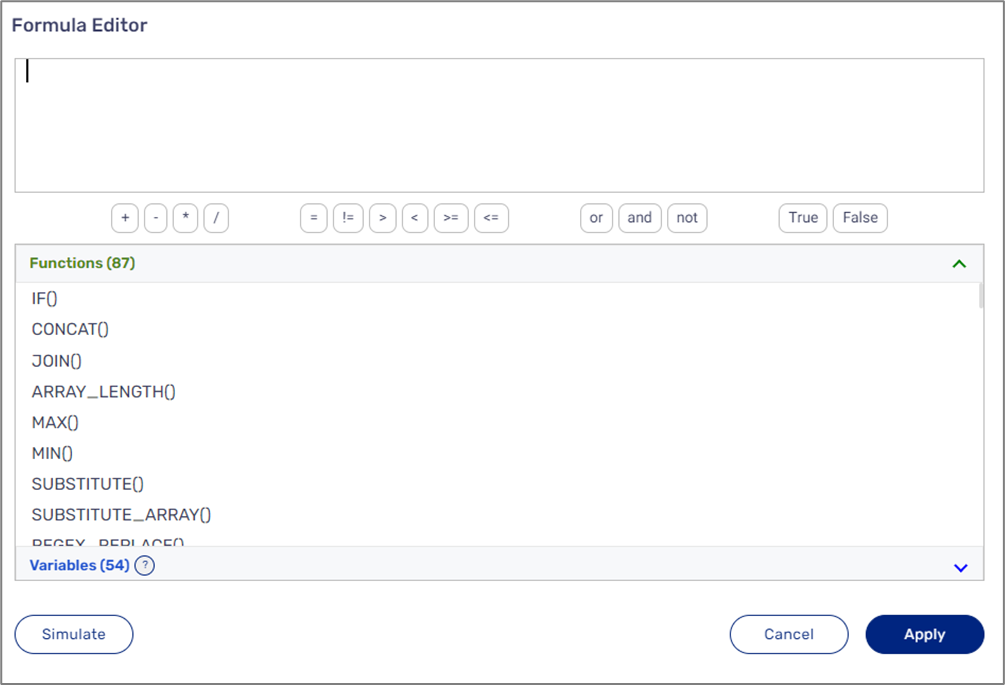
Figure 58: Formula Editor
How to Videos
To quickly learn how to use the different Value options, watch the following videos:
- Model Values - Arithmetic:
- Model Values - Advanced Expressions:
- Model Values - Simple Expressions:
- Model Values - Multi-Option (static):
- Model Values - Computed Service:
- Model Values - Computed Inline:
- Model Values - Formula Editor: