Article Overview
The following article describes the Transaction Log screen. It details its structure and explains how to use it for platform-wide troubleshooting.
Why Use The Transaction Logs Screen?
The Transaction Logs screen is an operational tool that enables platform users to receive a detailed view of the status of their transactions and manage them. Using the Transaction Logs screen, platform users can maintain, investigate, and troubleshoot different issues by performing the following actions:
- Locating a transaction or a group of transactions by using flexible filters and new free-text search capabilities.
- Understanding transaction status and delving into multiple services and steps.
- Monitor any kind of failed service execution - during or at the end of the transaction, read the error message, or download a log file.
- Check email status directly from the email vendor platform, for example, opened by the end-user or rejected.
- Download email attachments.
- Resume transactions, re-run transactions, and services.
- Monitor webhooks and retries.
Navigate to the Transaction Logs Screen
(See Figure 1 and Figure 2)
To navigate to the Transaction Logs screen, perform the following steps:
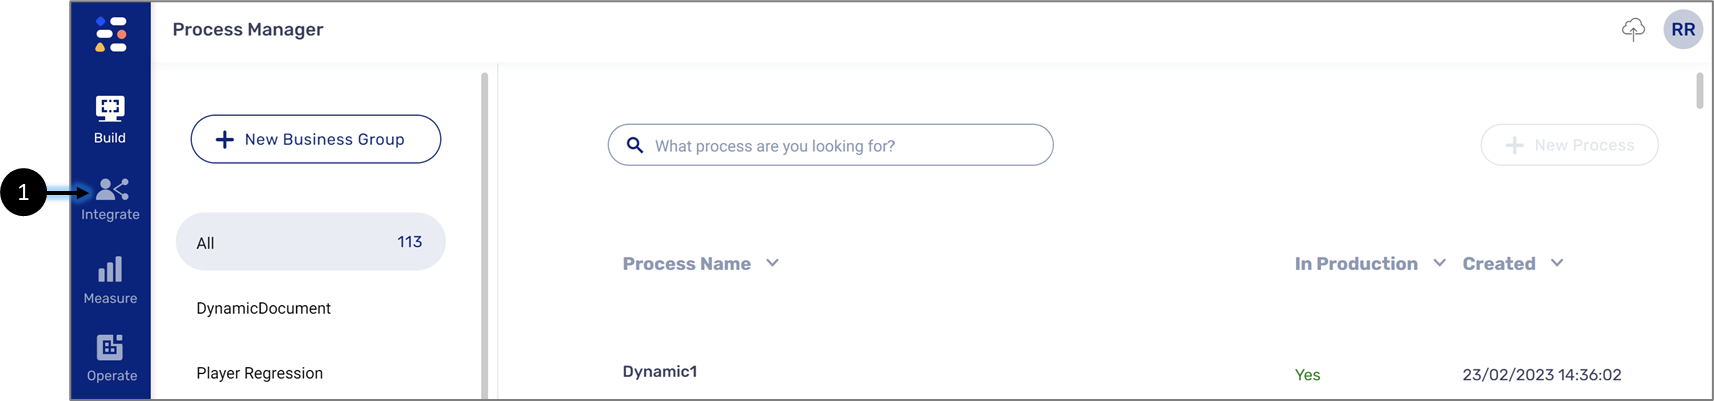
Figure 1: Integrate Tab
- Click the Integrate tab (1).
Result:
The Integrate tab options appear:
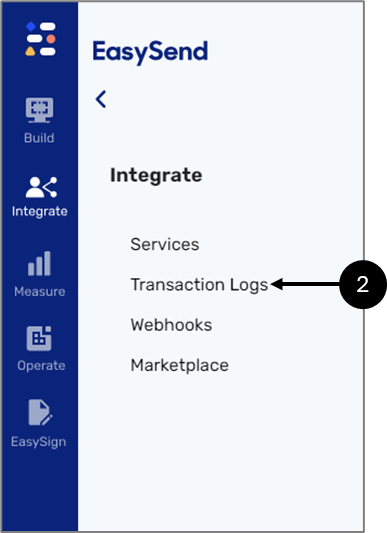
Figure 2: Transaction Logs Option
- Click the Transaction Logs option (2).
Transaction Logs Screen
Figure 3 and Table 1 describe the structure of the Transaction Logs screen.
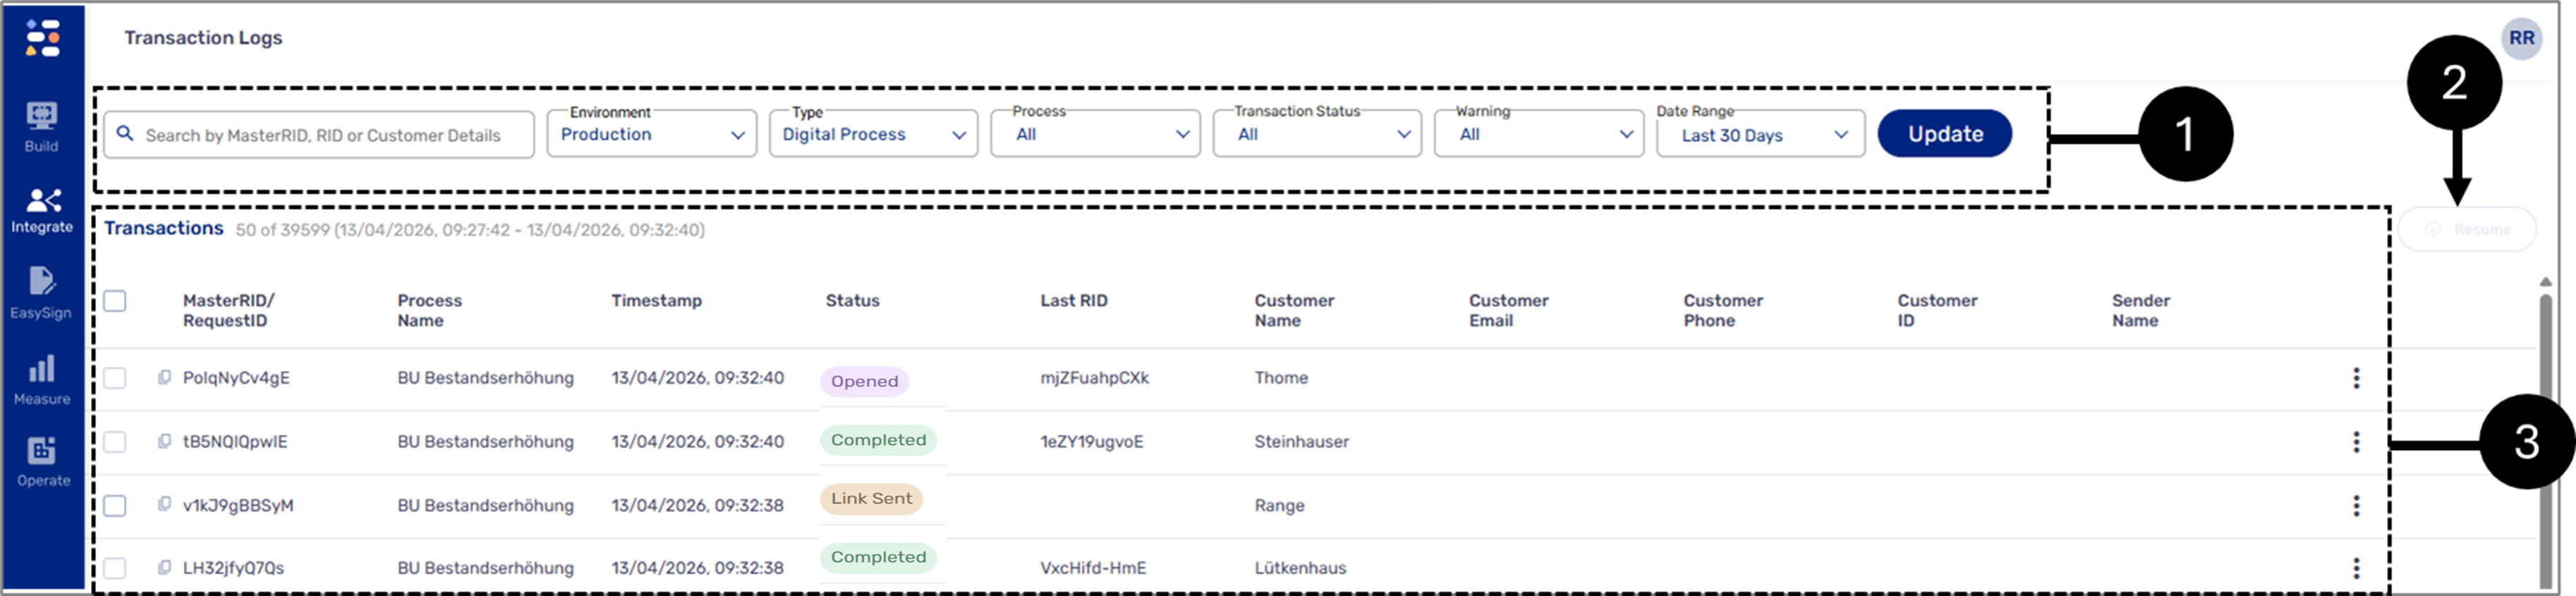
Figure 3: Transaction Logs Screen
Table 1: Transaction Logs Screen
# | Name | Description |
1 | Search and Display Filters | Enables displaying and filtering the transactions list by:
NOTE If you cannot search transactions by customer details, upgrade your environment's servers to version 57.8.0 or higher. For additional information, please contact our support team
NOTE For additional information about the transaction status, see the Transaction Section - General Structure
NOTE Once you have selected all the desired filters, apply them by clicking the Update button |
2 | Resume | Enables resuming a single or several transactions; this will result in re-running all the actions and steps of a transaction’s last RID NOTE
|
| 3 | Transactions | Displays a list of transactions with detailed information |
Transactions Section
The following sections describe the transactions section.
Transaction Section - General Structure
(See Figure 4)
The transactions section displays a list of transactions with the following information:
a unique identifier of an EasySend transaction.
- MasterRID/Request Identifier:
- MasterRID - a unique identifier of an EasySend transaction.
- Request Identifier - a unique identifier of an EasySign transaction.
- Process Name
- Timestamp of the last status change
- Last RID - an RID is a unique identifier of an EasySend step. The RID is nested under the masterRID. When creating a transaction, it can be divided into steps, for example, when using the Workflow Manager. Each step will receive its own unique RID as part of its URL, for example: player-demo.easysend.app/customer/onboarding/page0/0?lang=en&rid=qDzVpy_U7gY. This column displays the last RID, or the last executed step, of the transaction.
- Status:
- Link Sent - triggered when a process link is launched.
- Opened - triggered when a process link is clicked and opened.
- Processing - a temporary status indicating background operations are in progress, such as an integration.
- Incomplete - used when a transaction ends with non-critical errors (an incorrect email address or a failed CRM field update) that do not stop the overall process.
- Completed - the transaction finished successfully without any errors.
- Failed - the transaction could not be completed due to a critical error that prevented further processing.
- A transaction with failed service/s can still have a Completed status. In this case, the
 will appear indicating that the failures did prevent its progress.
 - If the indicator is not available for you, upgrade your environment servers to version 57.8.0 or above. For additional information, please contact our support team.
- Customer Name
- Customer Email
- Customer Phone
- Customer ID
- Sender Name - the name of the agent who sent the transaction's link.
- Additional actions (located under the
 icon):
- Re-Run
- View Logz.io
- The View Logz.io option is only available for internal EasySend usage.
- For additional information about Re-Run, see the Using Re-Run - Transaction section.
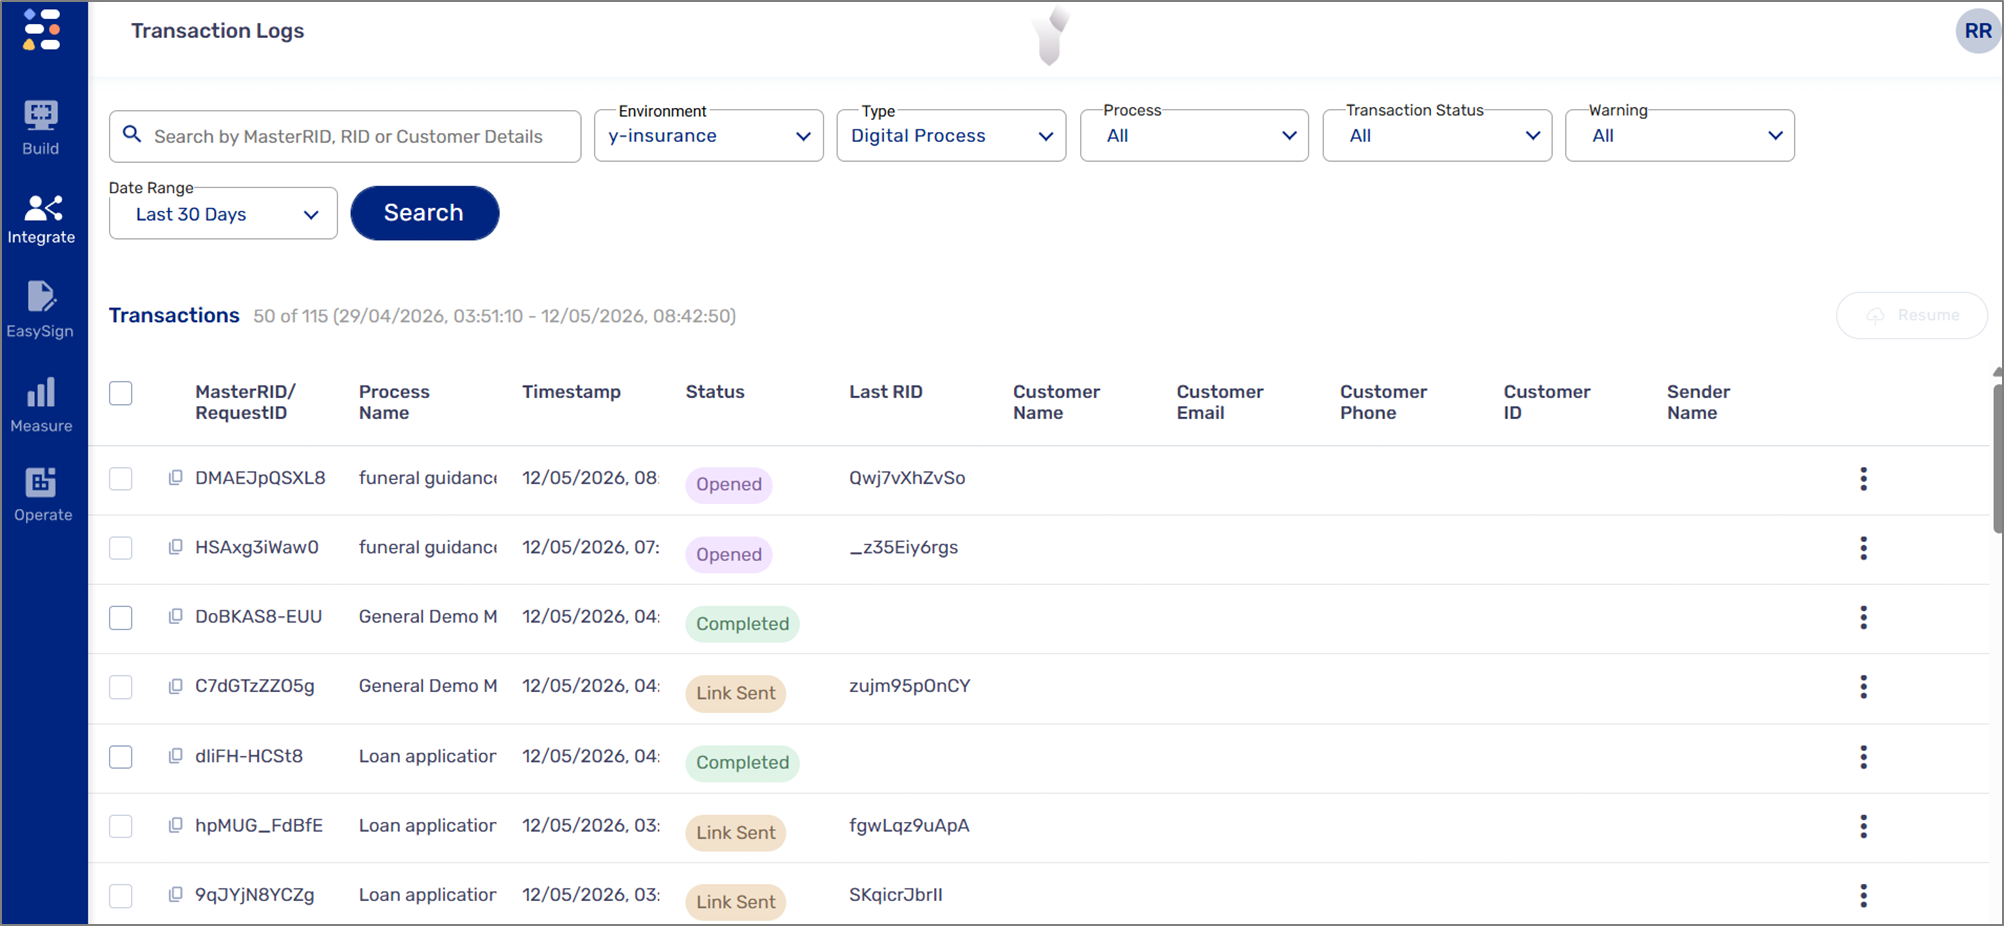
Figure 4: Transactions
Transaction List - Data Presentation and Organization
(See Figure 5 to Figure 7)
The data presented in the transaction list is organized into three different levels:
- First level - transaction. Each row in the list is a unique transaction of a digital process.

Figure 5: First Level - Transaction
- For additional information about the first level, see the Transaction Section - General Structure section.
- To drill down to the second level, click a transaction's MasterRID/RequestID.
- Second level - service. Each row in the list represents a technical occurrence (as specified in the Type column) that was attempted during a specific transaction. Technical occurrences include:
- Integrations
- Initiation integrations:
- Salesforce
- Dynamic 365
- Guidewire
- Workflow Communication service email:
- Start
- Notification
- Complete
- Co-browsing
- Save & Continue
- Webhooks:
- Simple
- custom
- In Webflow Integration
- Validation Error
- EasySign Output (EasySend email/SMS)
- Workflow outputs (EasySend email/SMS):
- Start
- Notification
- Complete
- Co-browsing
- Save & Continue
- The information displayed at this level is:
- Service Name
- Service Type
- Rid
- Webflow Name
- Timestamp of the last status change
- Service Status:
- Completed
- Failed
- Not Run
- Error Message
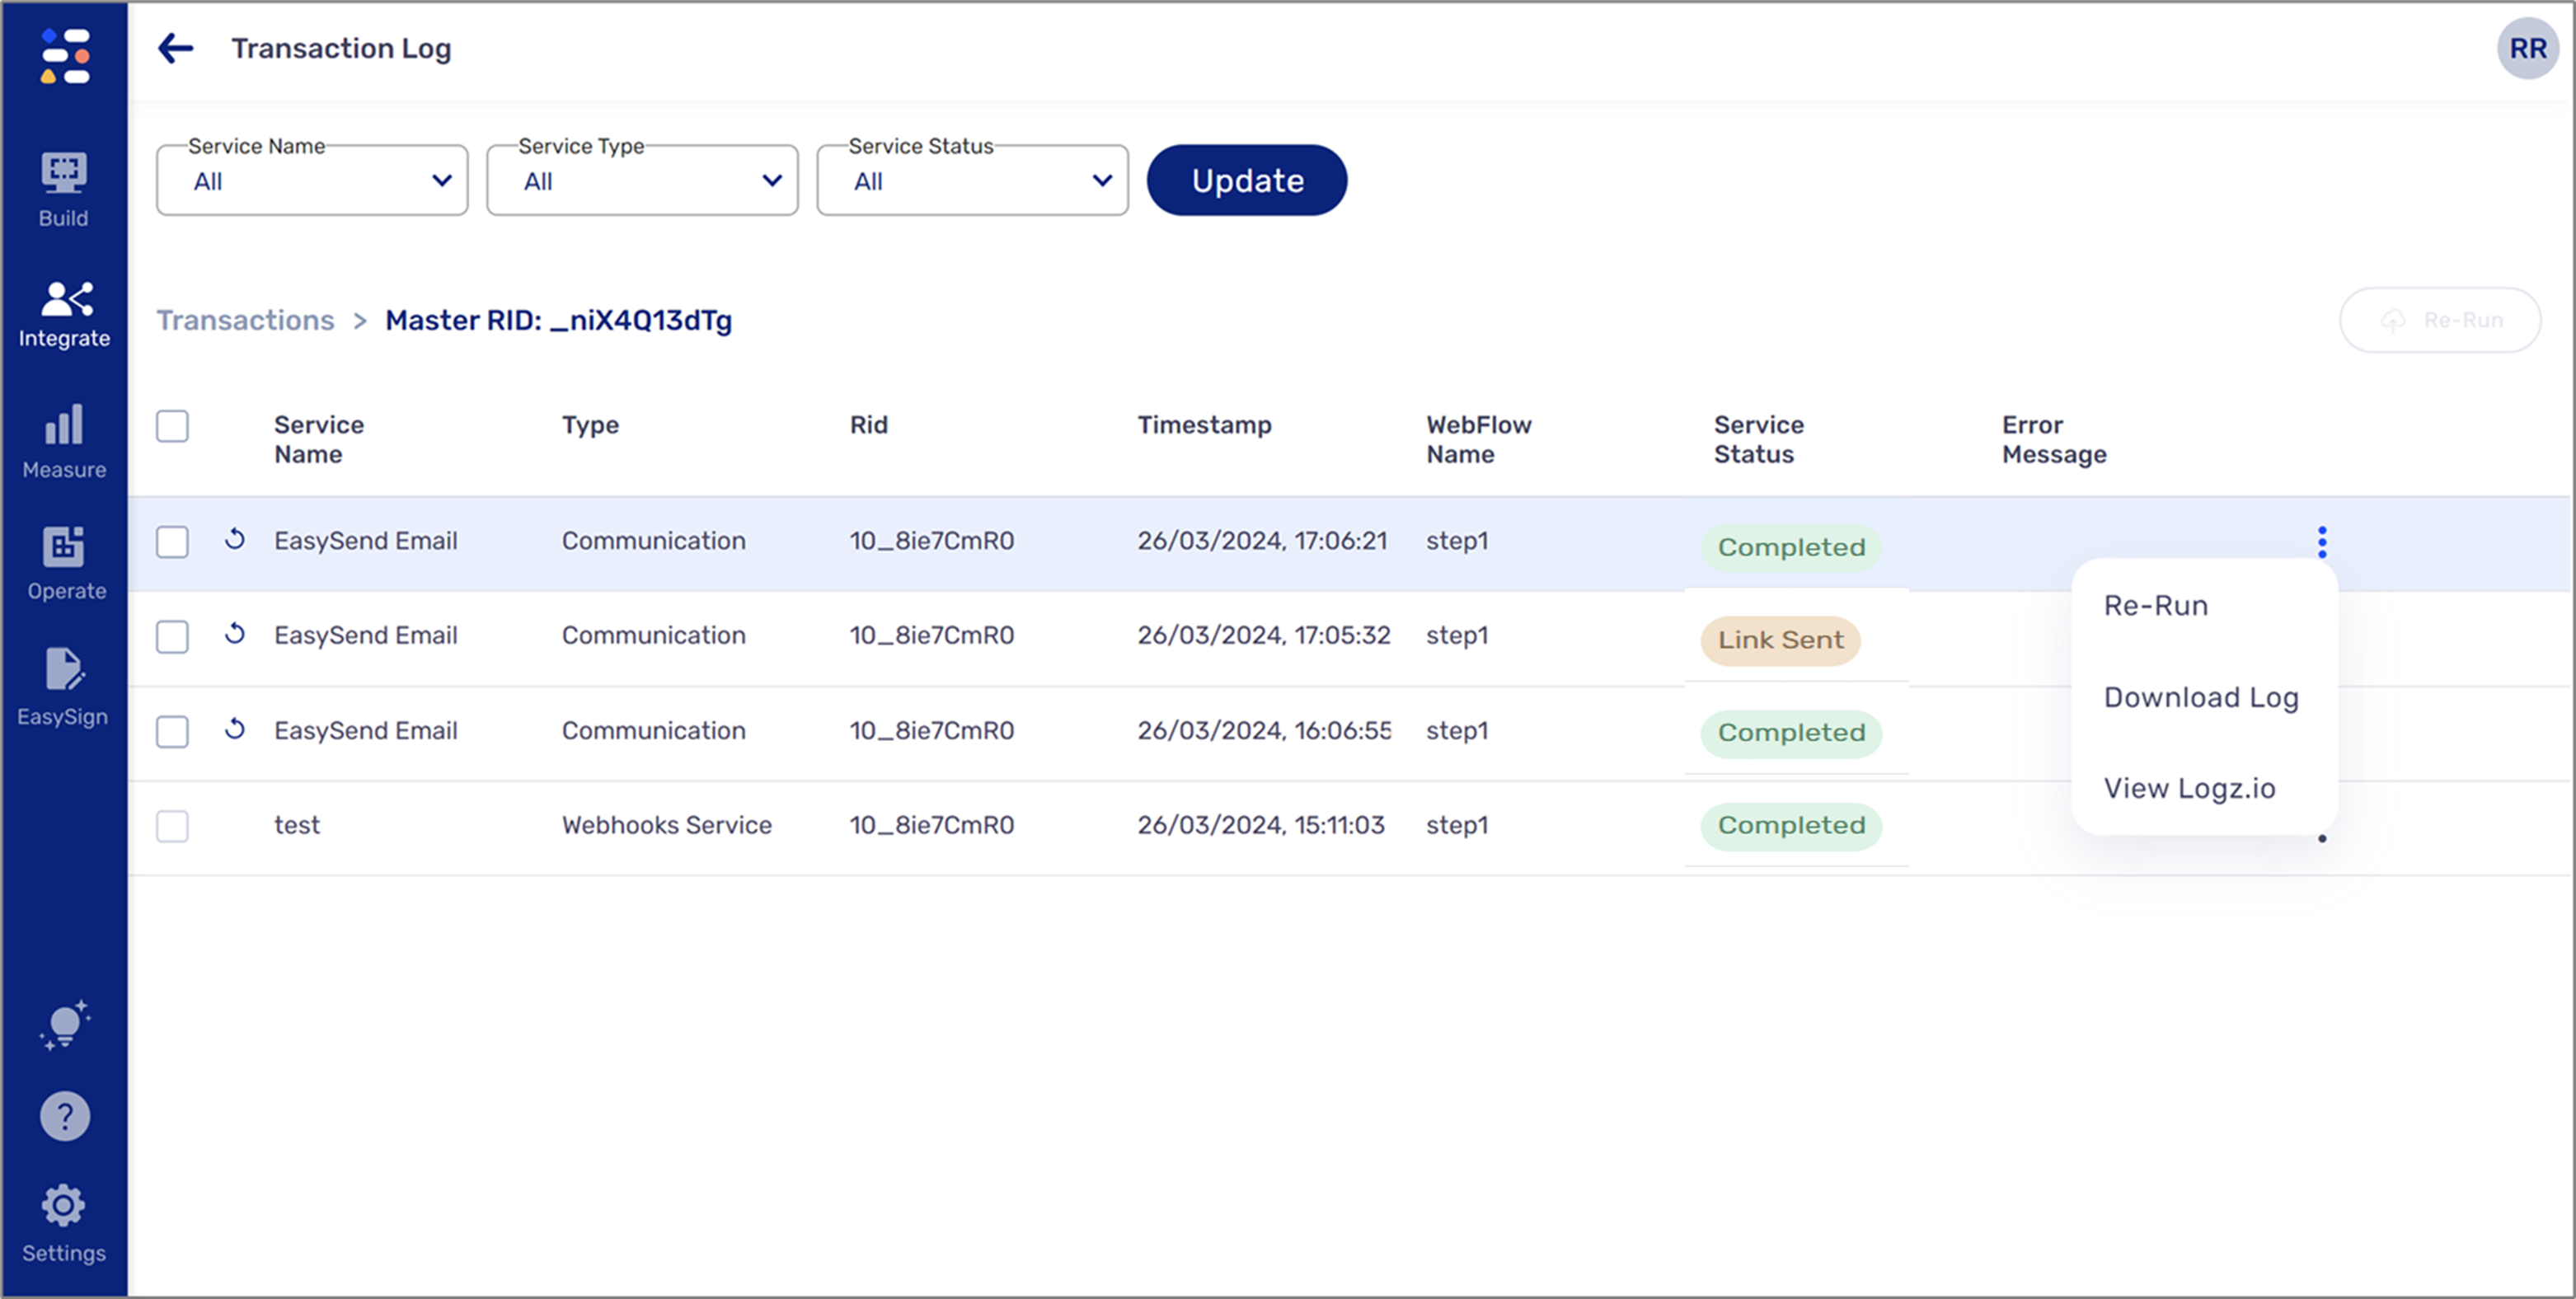
- Additional actions:
- Re-run
- Download Log
- View Logz.io
- The View Logz.io option is only available for internal EasySend usage.
- The Re-Run button located on this screen will become available after selecting one or more services. For additional information about using the Re-run button/option, see the Using Re-Run - Service section.
- For additional information about the Download Log option, see the Investigating Failures using JSON Files section.
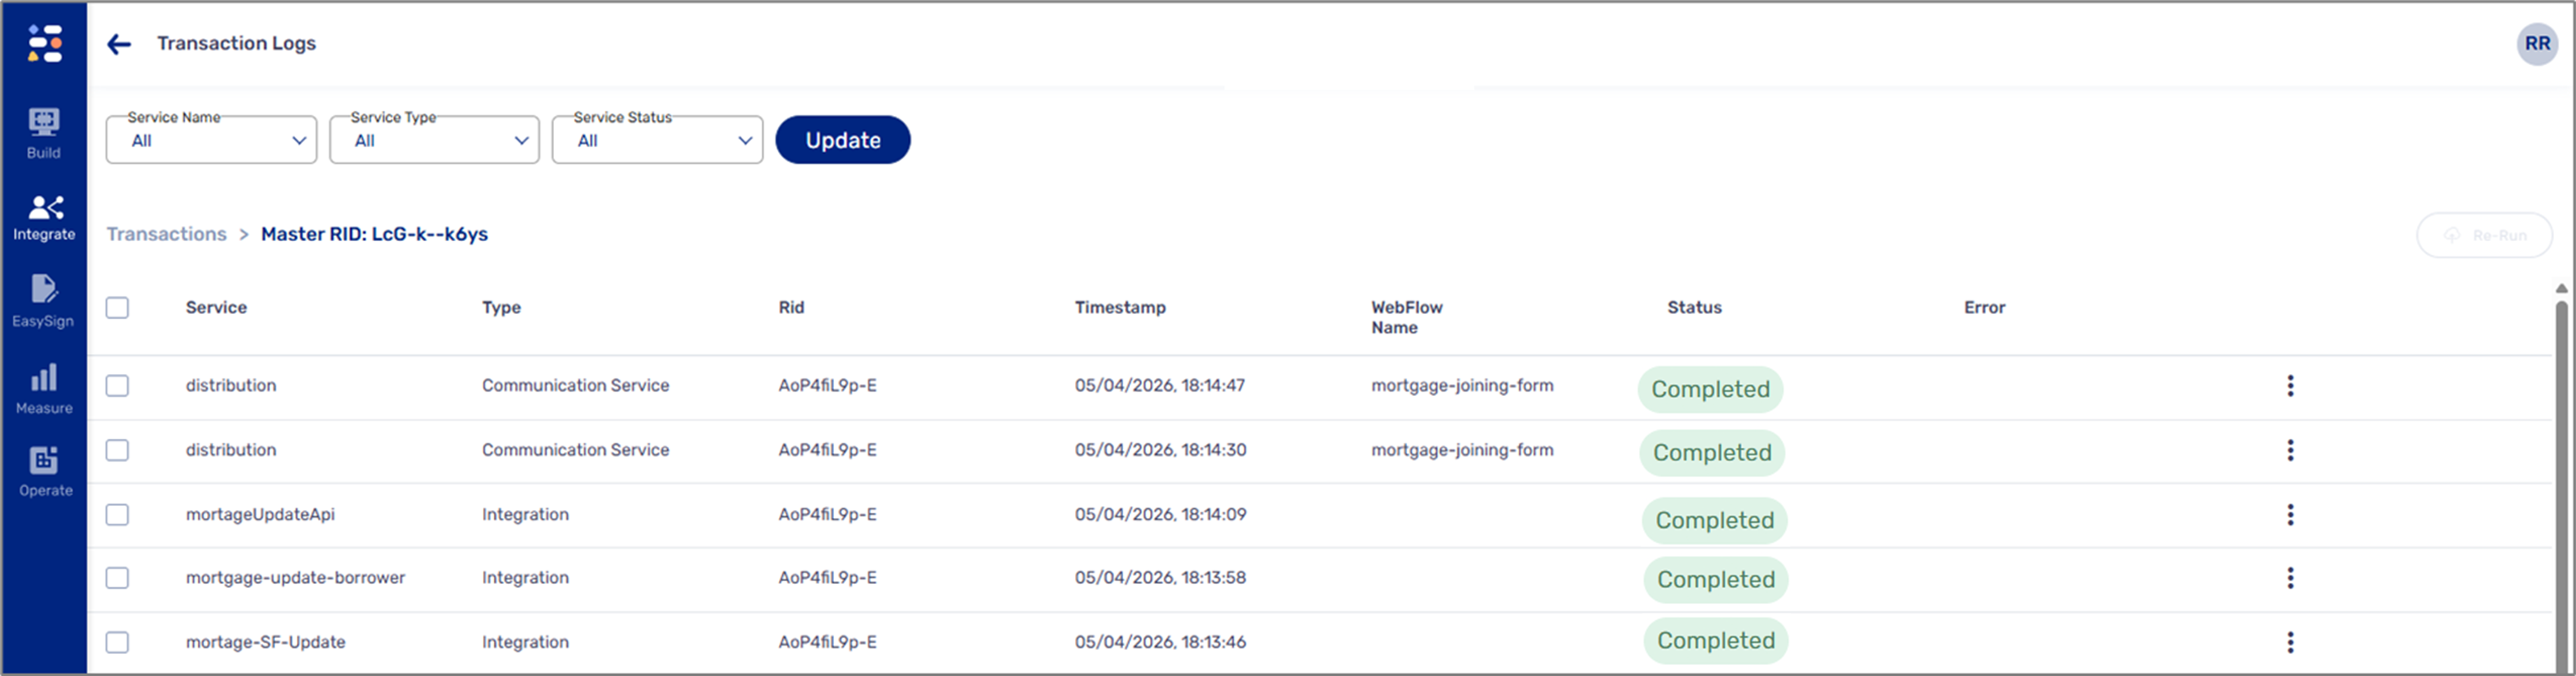
Figure 6: Second Level - Service
- Third level - step. Each row in the list is a step of a service that was attempted during a specific transaction. The information displayed at this level is:
- Step Name
- Step Type
- Timestamp of the last status change
- Status:
- Completed
- Failed
- Retry Count
- Error Message
- Download Log - downloads a JSON file with information about the step.

Figure 7: Third Level - Step
Communication Service and Step Level Email Status
(See Figure 8 to Figure 10)
When a service includes an email communication through one of EasySend's default email providers, it will display the following information:
- Service - EasySend Email
- Type - Communication
- Block Id/RID:
- Block Id - the unique identifier of the email as described in the new version of the Workflow Manager.
- RID - the unique identifier of the step. Relevant for transactions with the old version of the Workflow Manager.
- Role - the role attached to the email block or the step
- Timestamp of the last status change
- Status - displays the status of the current step as it was sent from the provider to the end-user:
- Completed
- Failed
- Error Message
- Additional actions:
- Re-run
- Download Log
- View Logz.io
- The View Logz.io option is only available for internal EasySend usage.
- The Re-Run button located on this screen will become available after selecting one or more services. For additional information about using the Re-run button/option, see the Using Re-Run - Service section.
- For additional information about the Download Log option, see the Investigating Failures using JSON Files section.
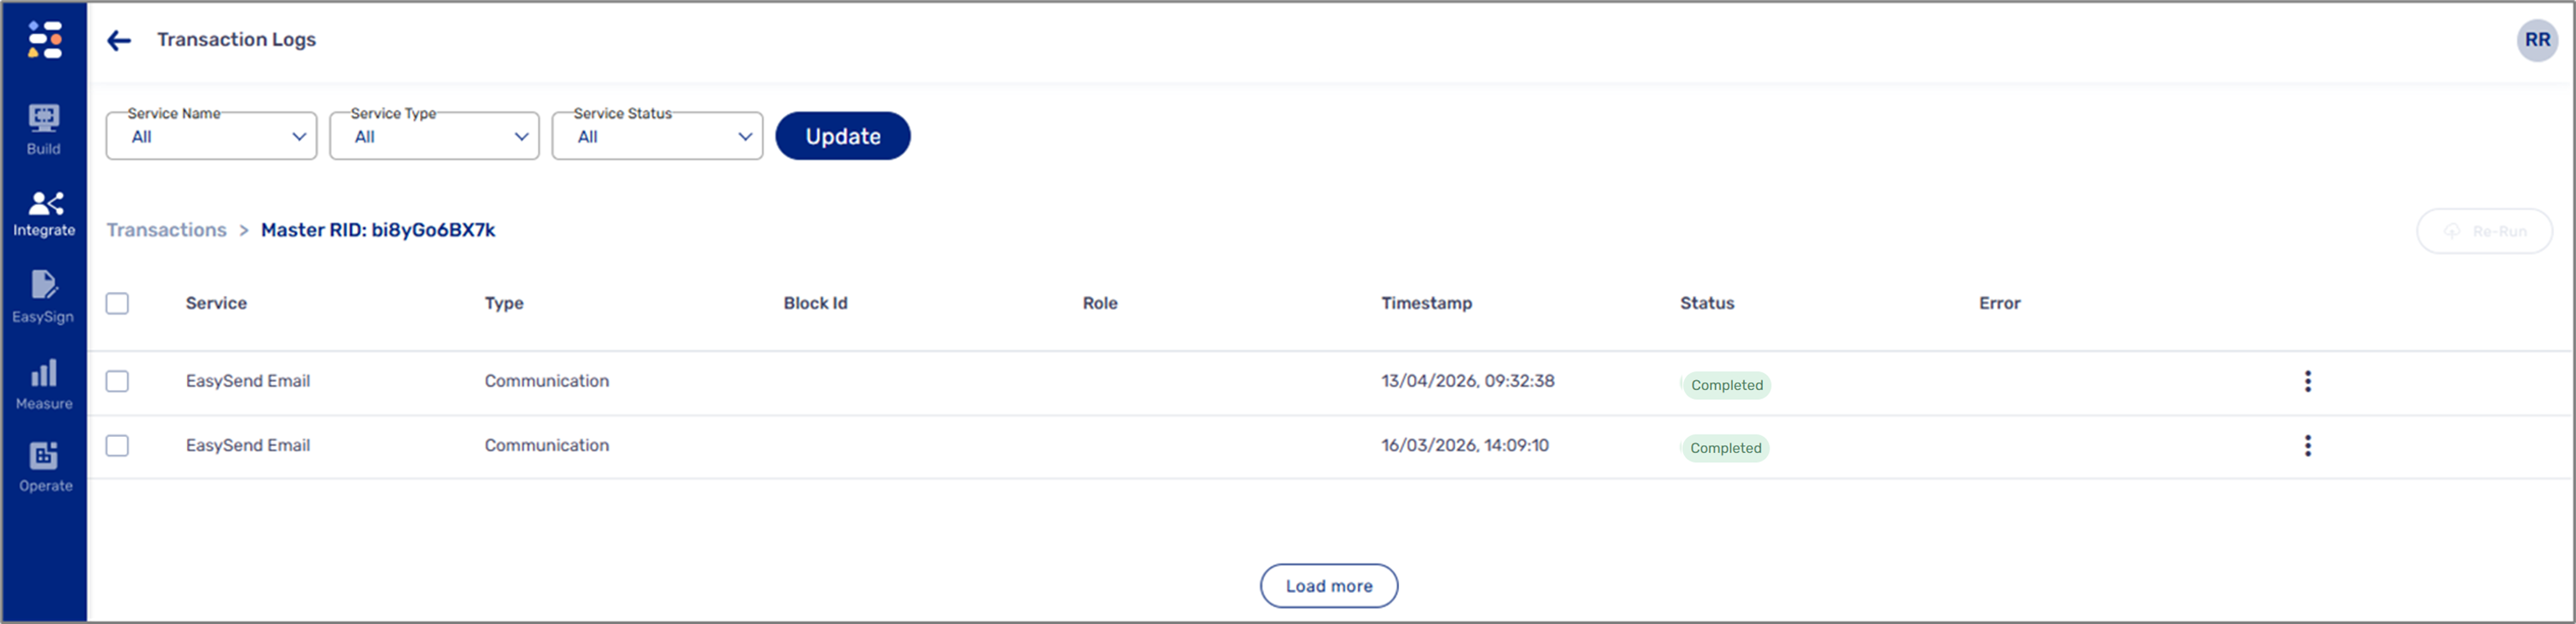
Figure 8: Email Communication Service
When delving into the third level step, it displays the following information:
- Communication Type
- Recipients
- Timestamp
- Status - displays the updated status of the email directly from the email provider
- Details - contains the Provider Details button, which details the status received from the provider (see Figure 10)
- Attachments - enables you to download the email's attachments
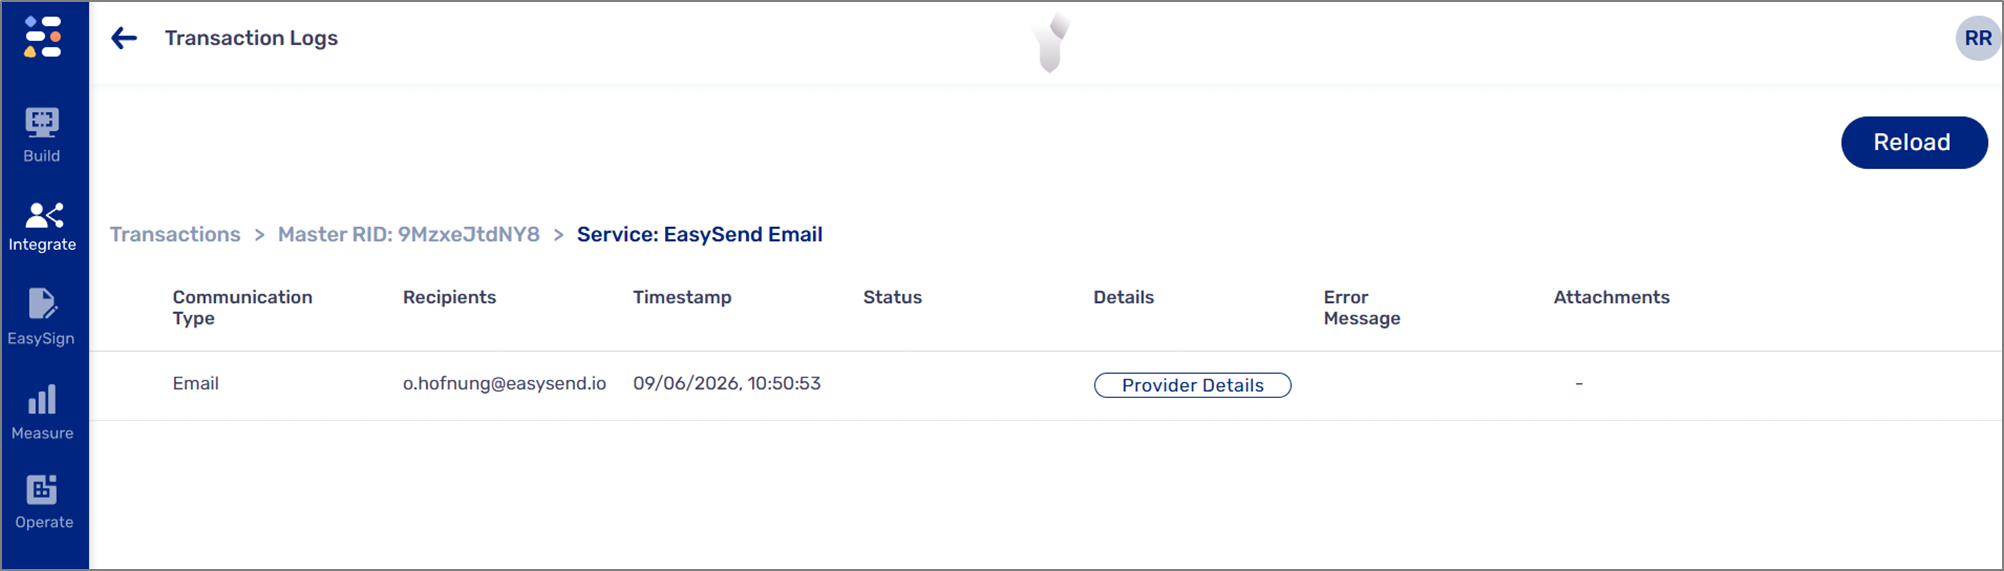
Figure 9: Email Communication Step

Figure 10: Email Details
Troubleshooting Scenarios
The following sections describe how to use the Transaction Logs screen for different troubleshooting scenarios.
Viewing Transactions Status
(See Figure 11)
To display transactions and their status, perform the following steps:
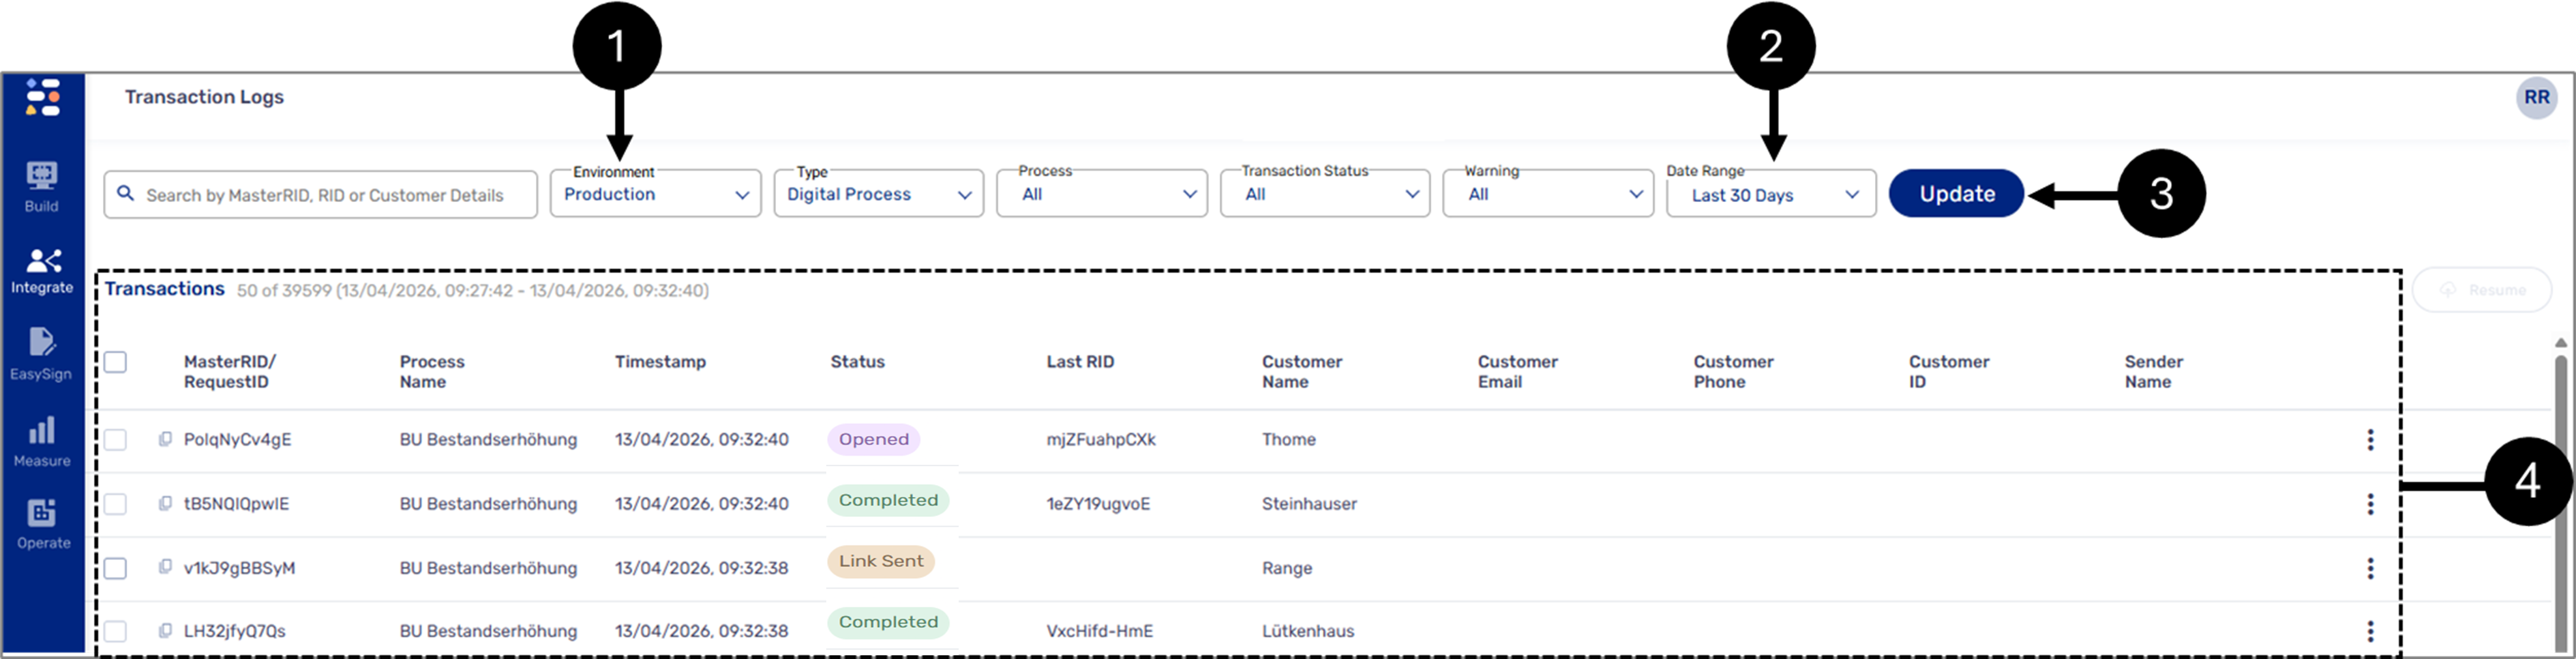
Figure 10: Displaying Transactions
- Select an Environment (1).
- Set a Date Range (2).
- Click the Update button (3).
Result:
A list of transactions appears (4).
- If some or all transactions are not displayed after clicking the Update button, adjust the display filters and click the Update button again. If the Load more button appears, use it to load additional transactions.
- If you are looking for a specific transaction according to its Master RID or Request ID, search and copy the information using the Journey Tracker. Click here for additional information about the Journey Tracker.
Investigating Failures Using JSON Files
(See Figure 12 to Figure 18)
A transaction can have a כailed status due to issues with a service or services. To investigate failures using JSON files, perform the following steps:
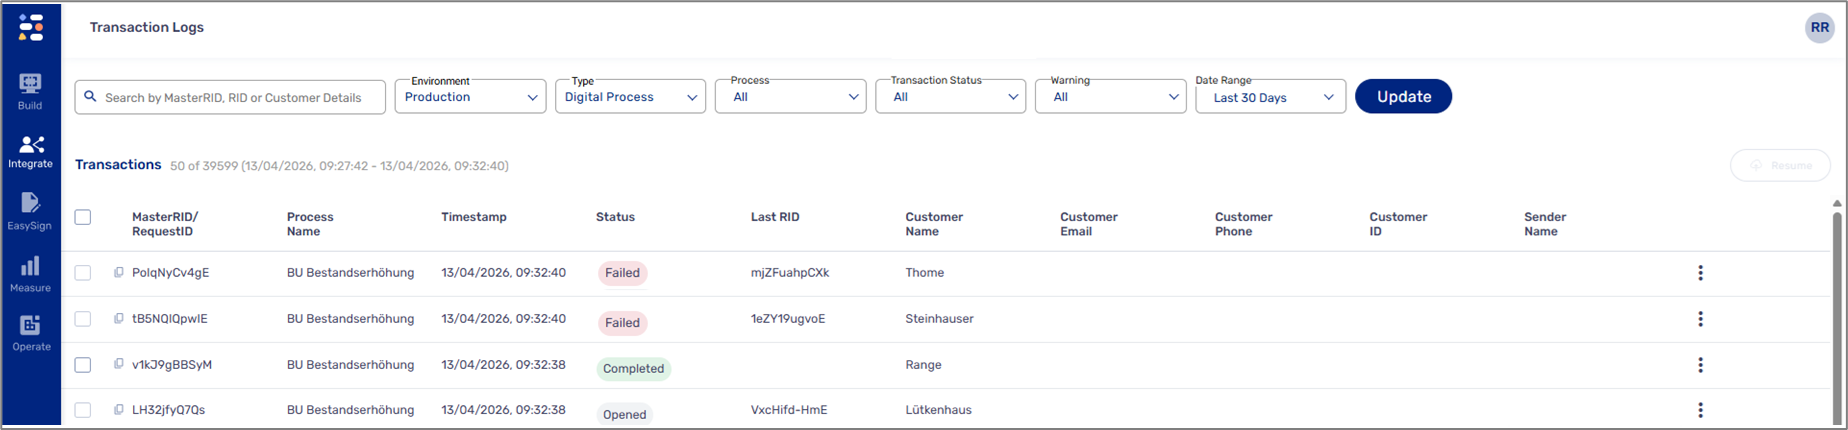
Figure 12: List of Transactions
- Locate the desired failed transaction from the list and click it.
Result:
The service level list appears:
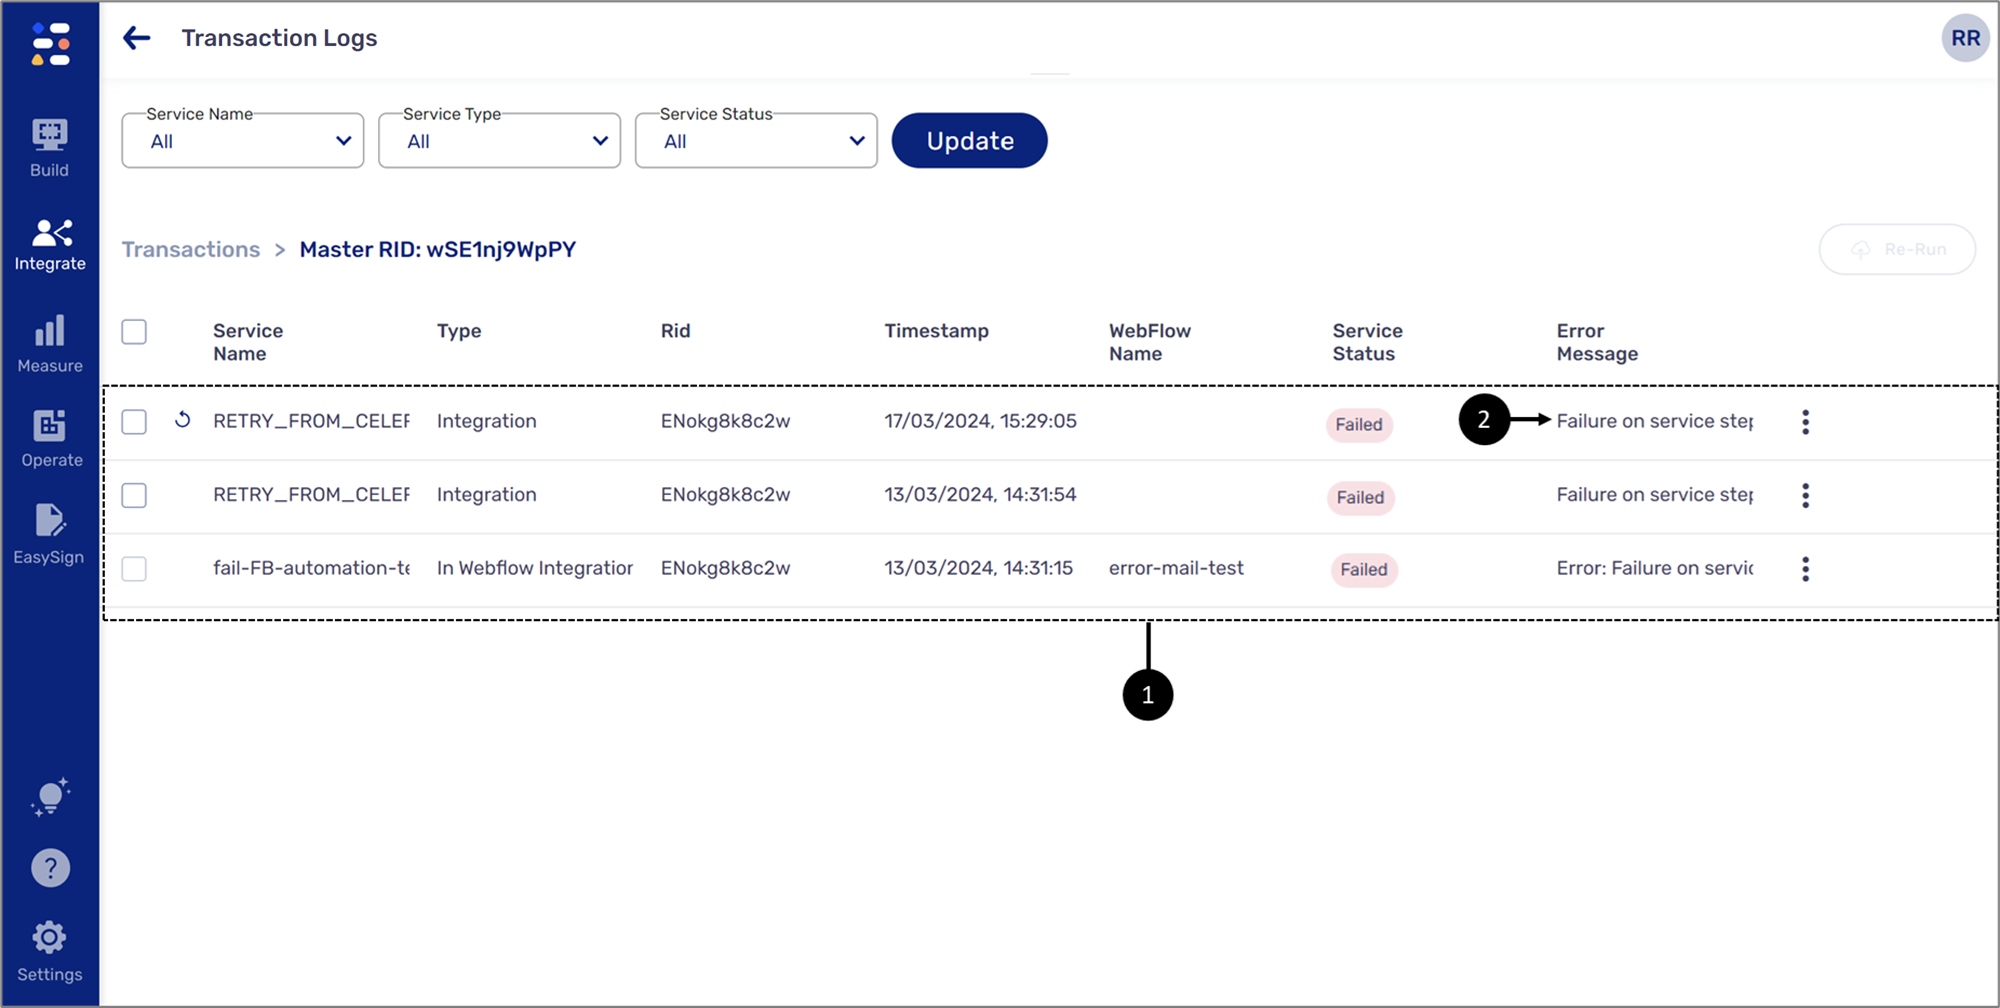
Figure 13: Error Message
- From the list (1), locate the failed service.
- Read the Error Message (2).
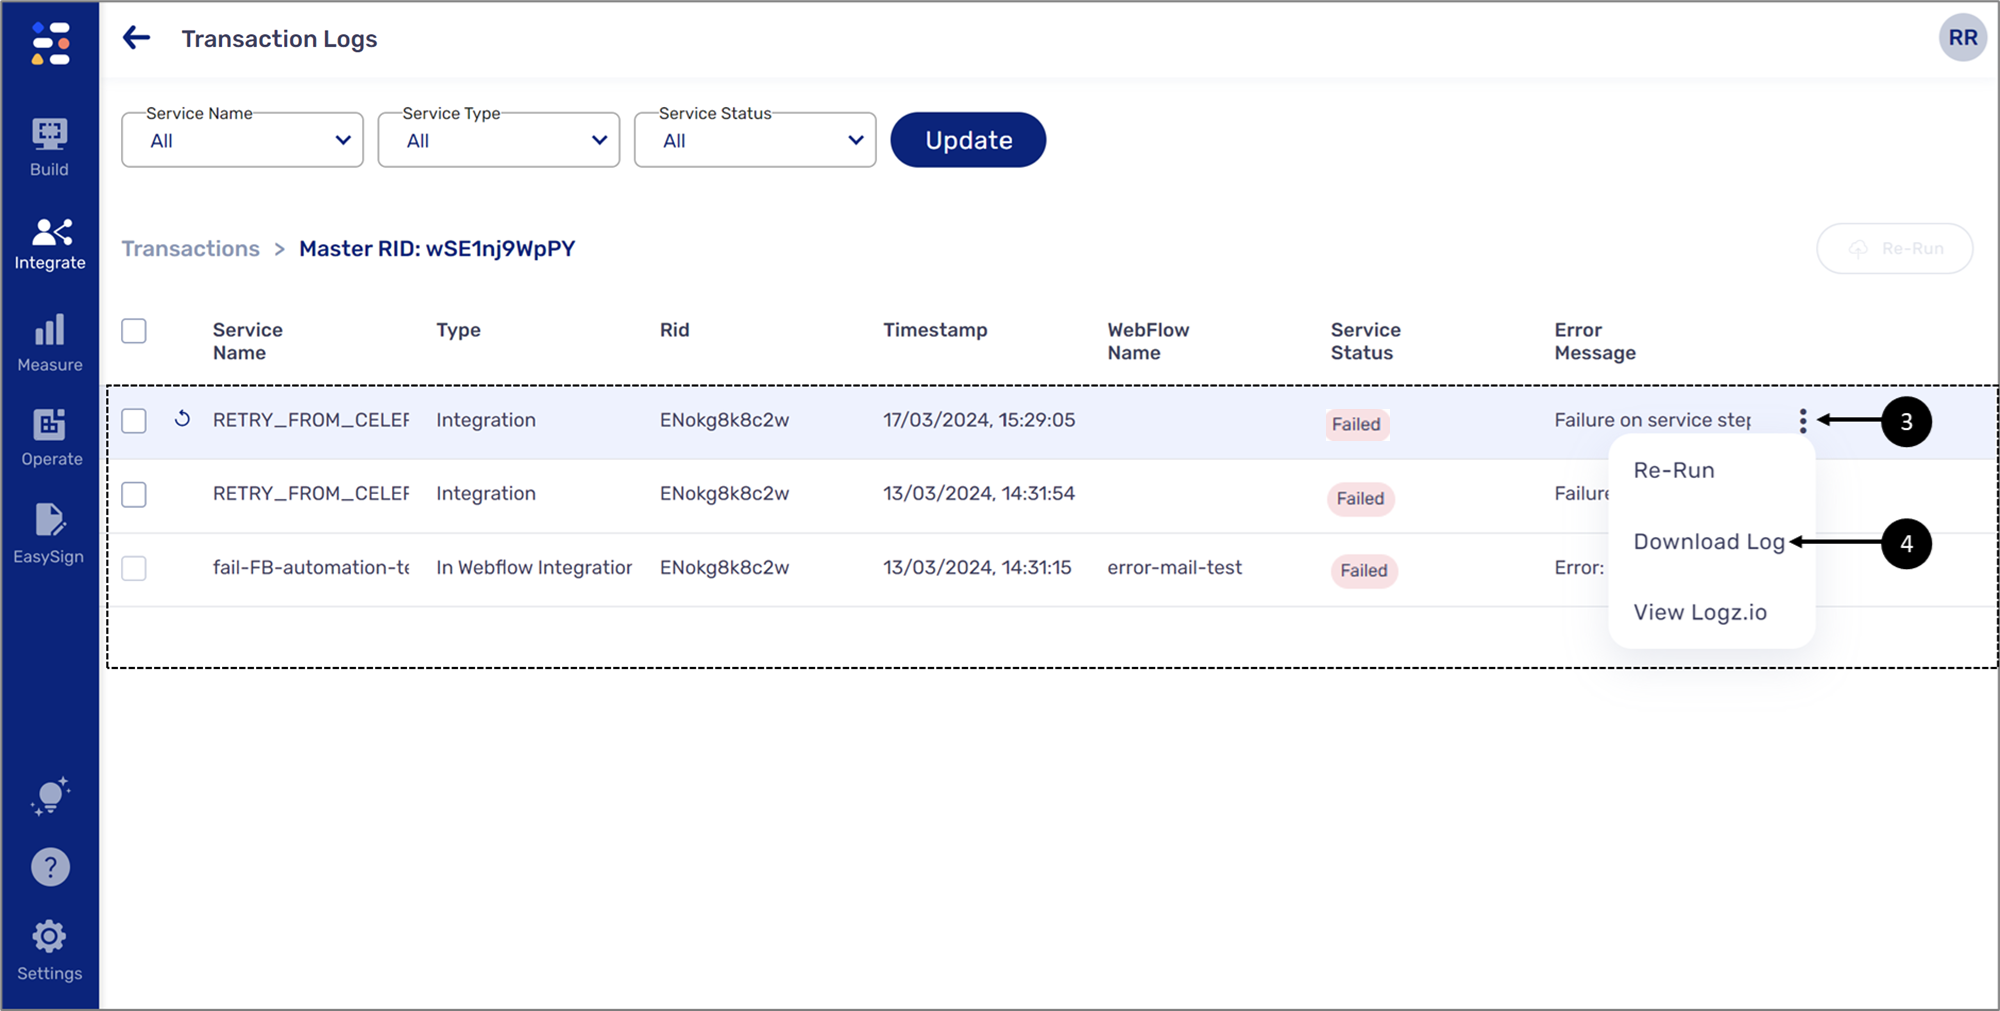
Figure 14: Download Log
- Continue the investigation by clicking the three dots (3) and clicking the Download Log option (4).
Result:
A JSON file is downloaded.
- Open the JSON file using software such as Notepad ++.
- A JSON is unreadable without using dedicated software such as Notepad ++ or Microsoft WordPad. To continue, make sure you have suitable software.
- In our examples, we will use Notepad ++ with a JSON Viewer plugin and the Format Viewer option.
- To learn about the failure using the JSON file:
- Search for objects with keywords such as "null" or "false".
- Navigate to the bottom of the JSON file and search for the "error" field.
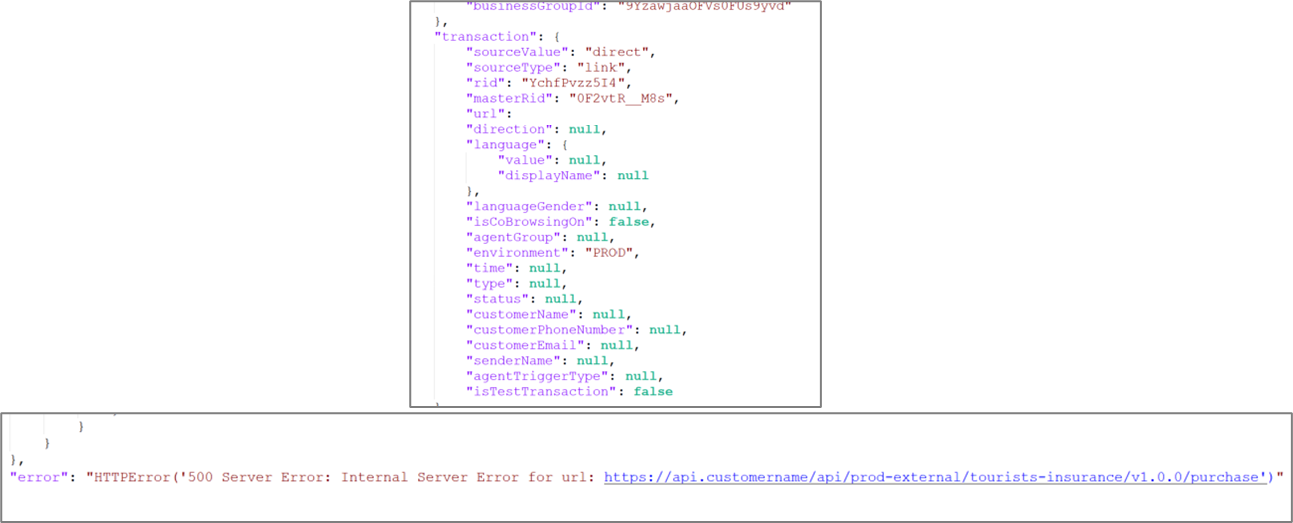
Figure 15: JSON File Information Example
- To investigate the step/s of the service, click it (5).
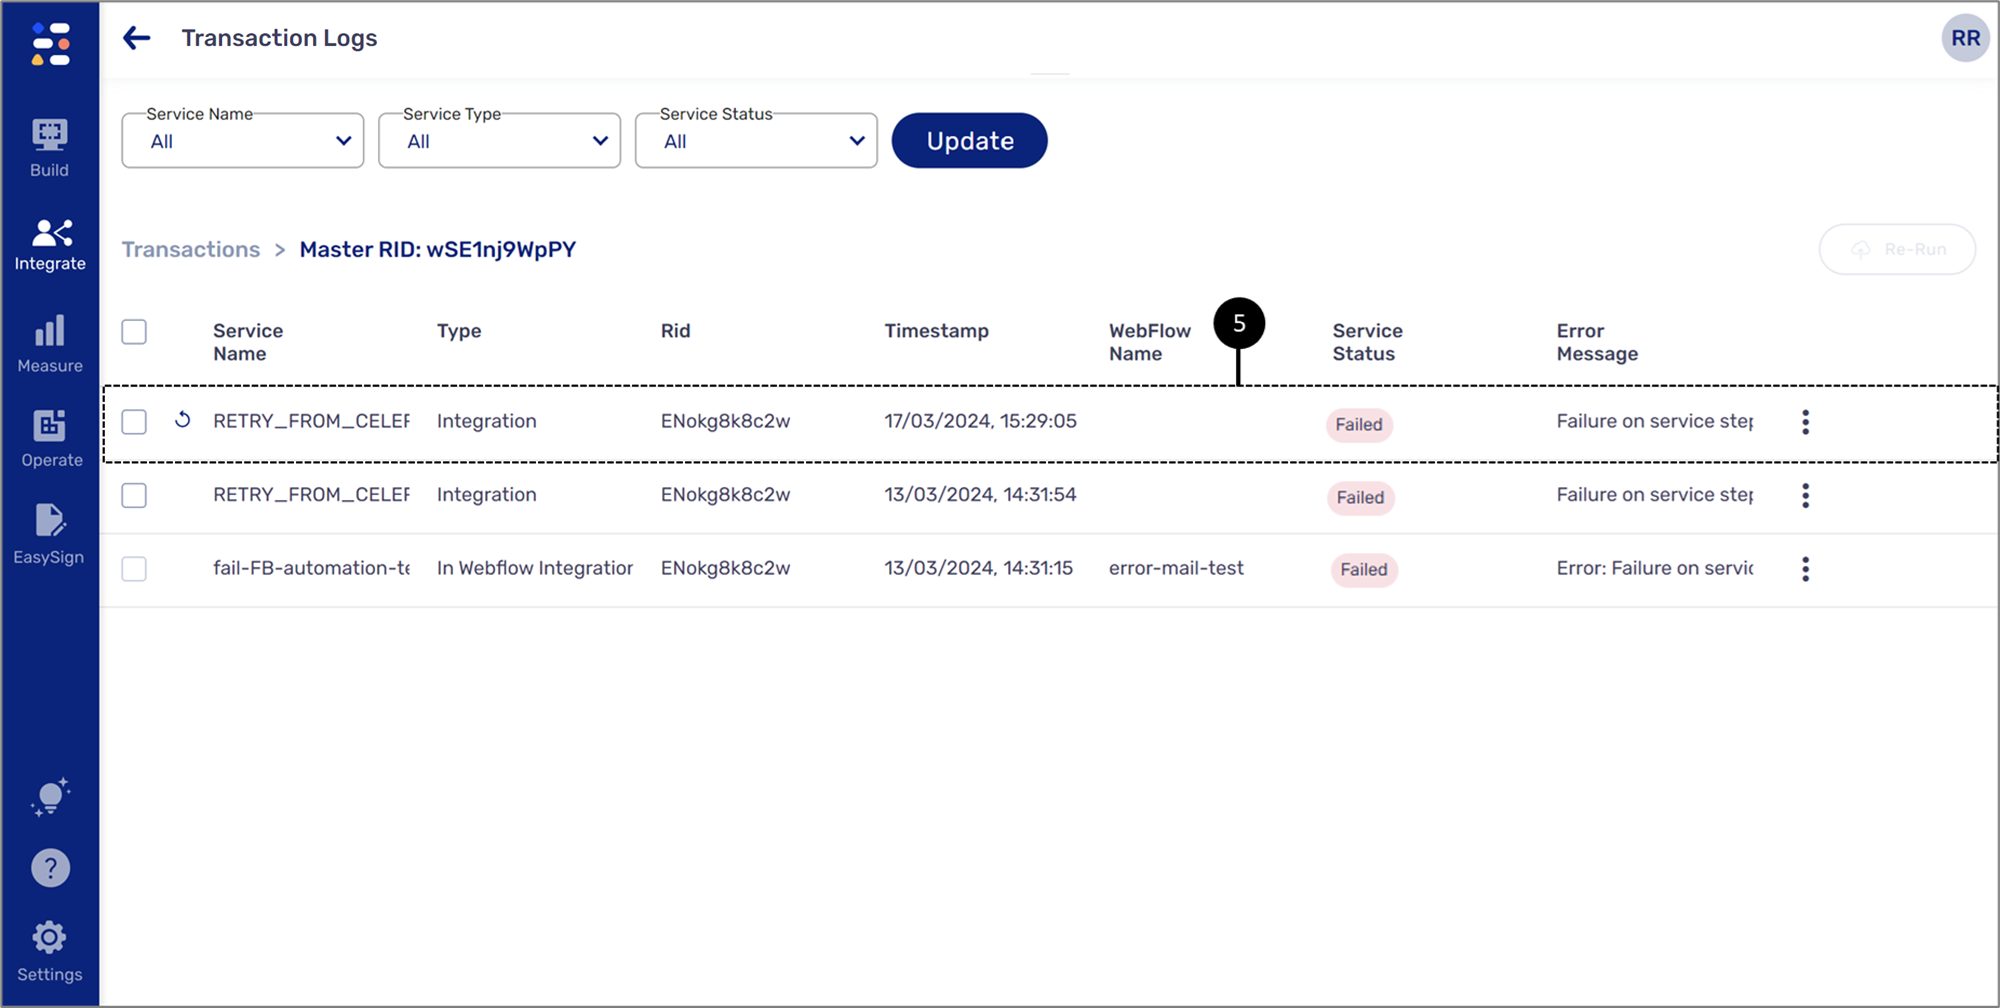
Figure 16: Failed Service
Result:
The step level list appears:

Figure 17: List of Steps
- From the list (6), locate the failed step and read the Error Message (7).
- Click the icon (8) to download the JSON file.
Result:
A JSON file is downloaded.
- Open the JSON file using software such as Notepad ++.
- A JSON file is unreadable without using dedicated software such as Notepad ++ or Microsoft WordPad. To continue, make sure you have suitable software.
- In our examples, we will use Notepad ++ with a JSON Viewer plugin and the Format Viewer option.
- To learn about the failure using the JSON file:
- Search for objects with keywords such as "null" or "false".
- Navigate to the bottom of the JSON file and search for the "error" field.
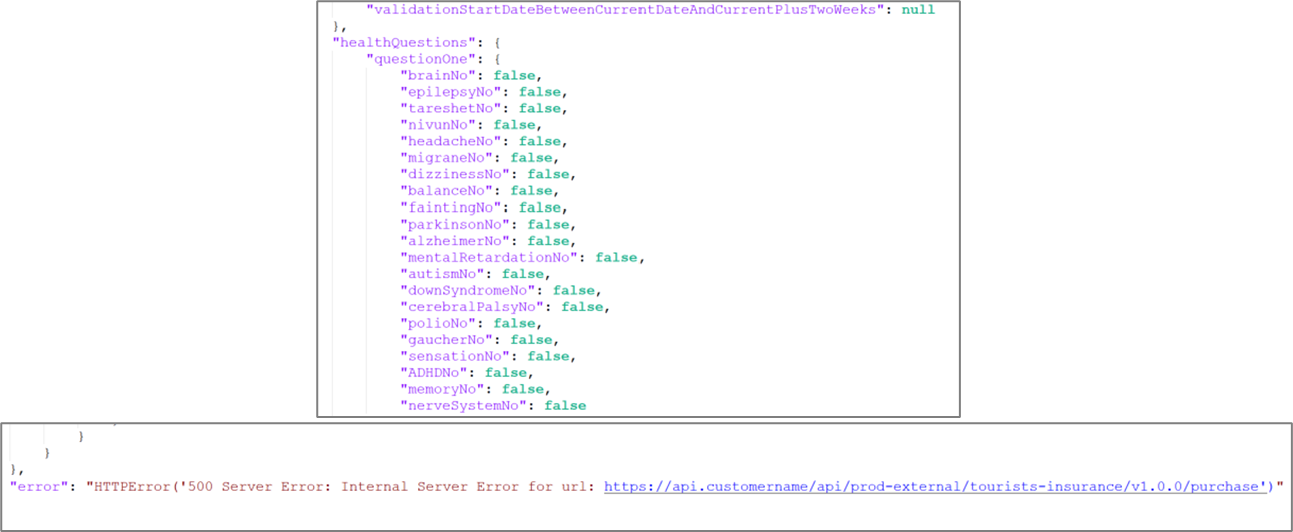
Figure 18: JSON File Information Example
Viewing Email Status and Retrieving Attachments
(See Figure 19 to Figure 22)
When a service includes an email communication through one of EasySend's default email providers, it is possible to view the status of the email and retrieve its attachments. To do so, perform the following steps:
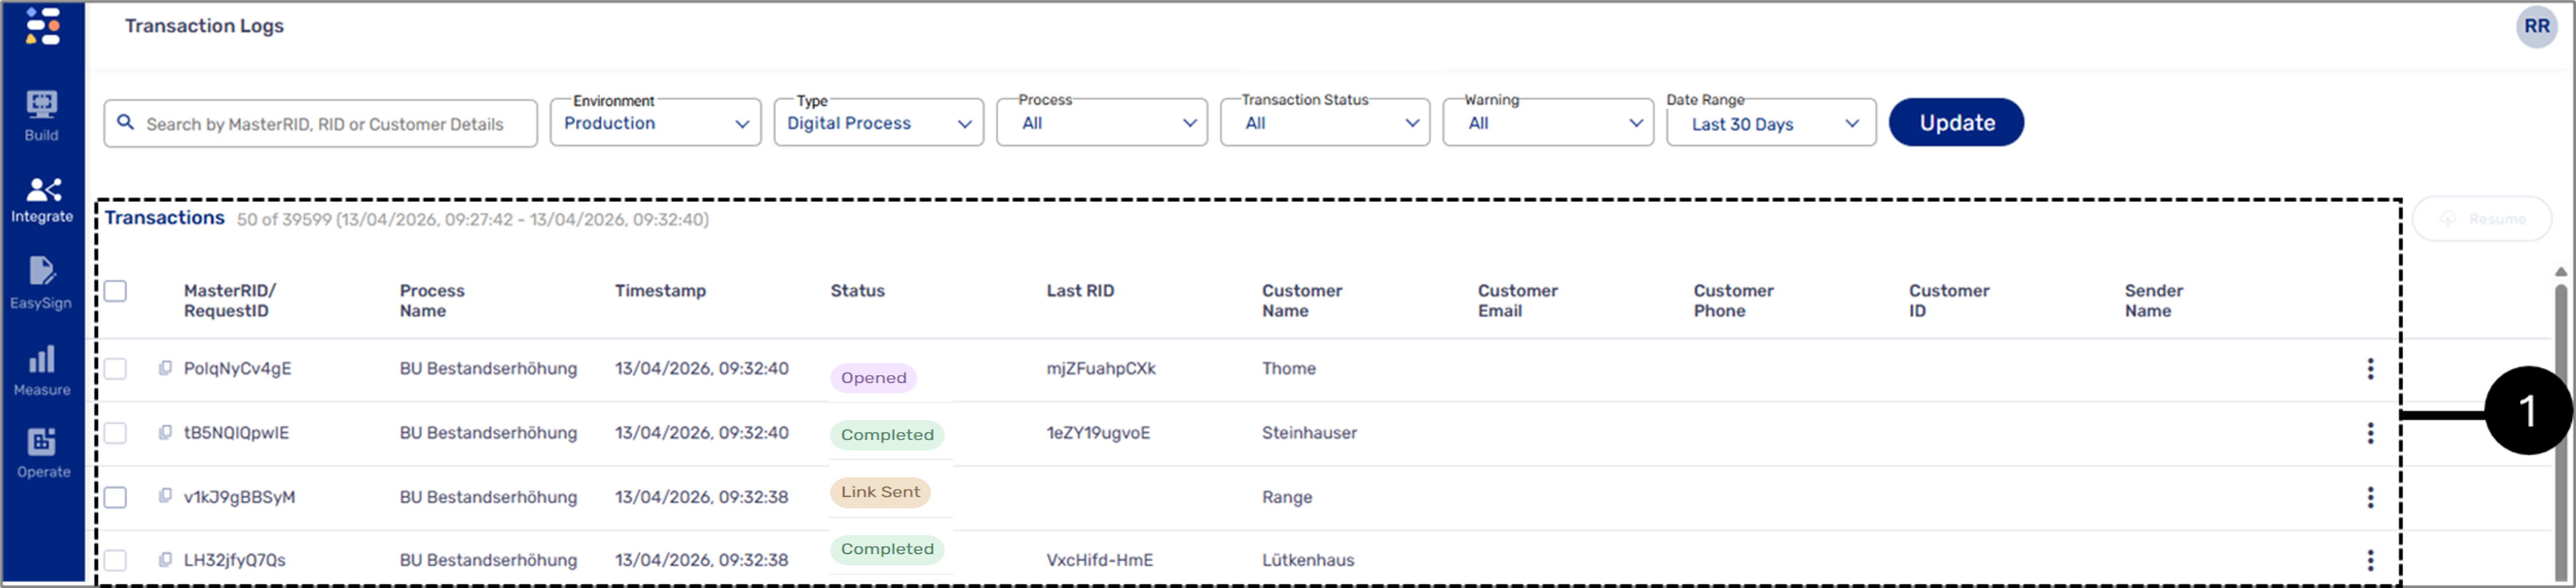
Figure 19: List of Transactions
- Locate the desired transaction from the list (1) and click it.
Result:
The service level list appears:
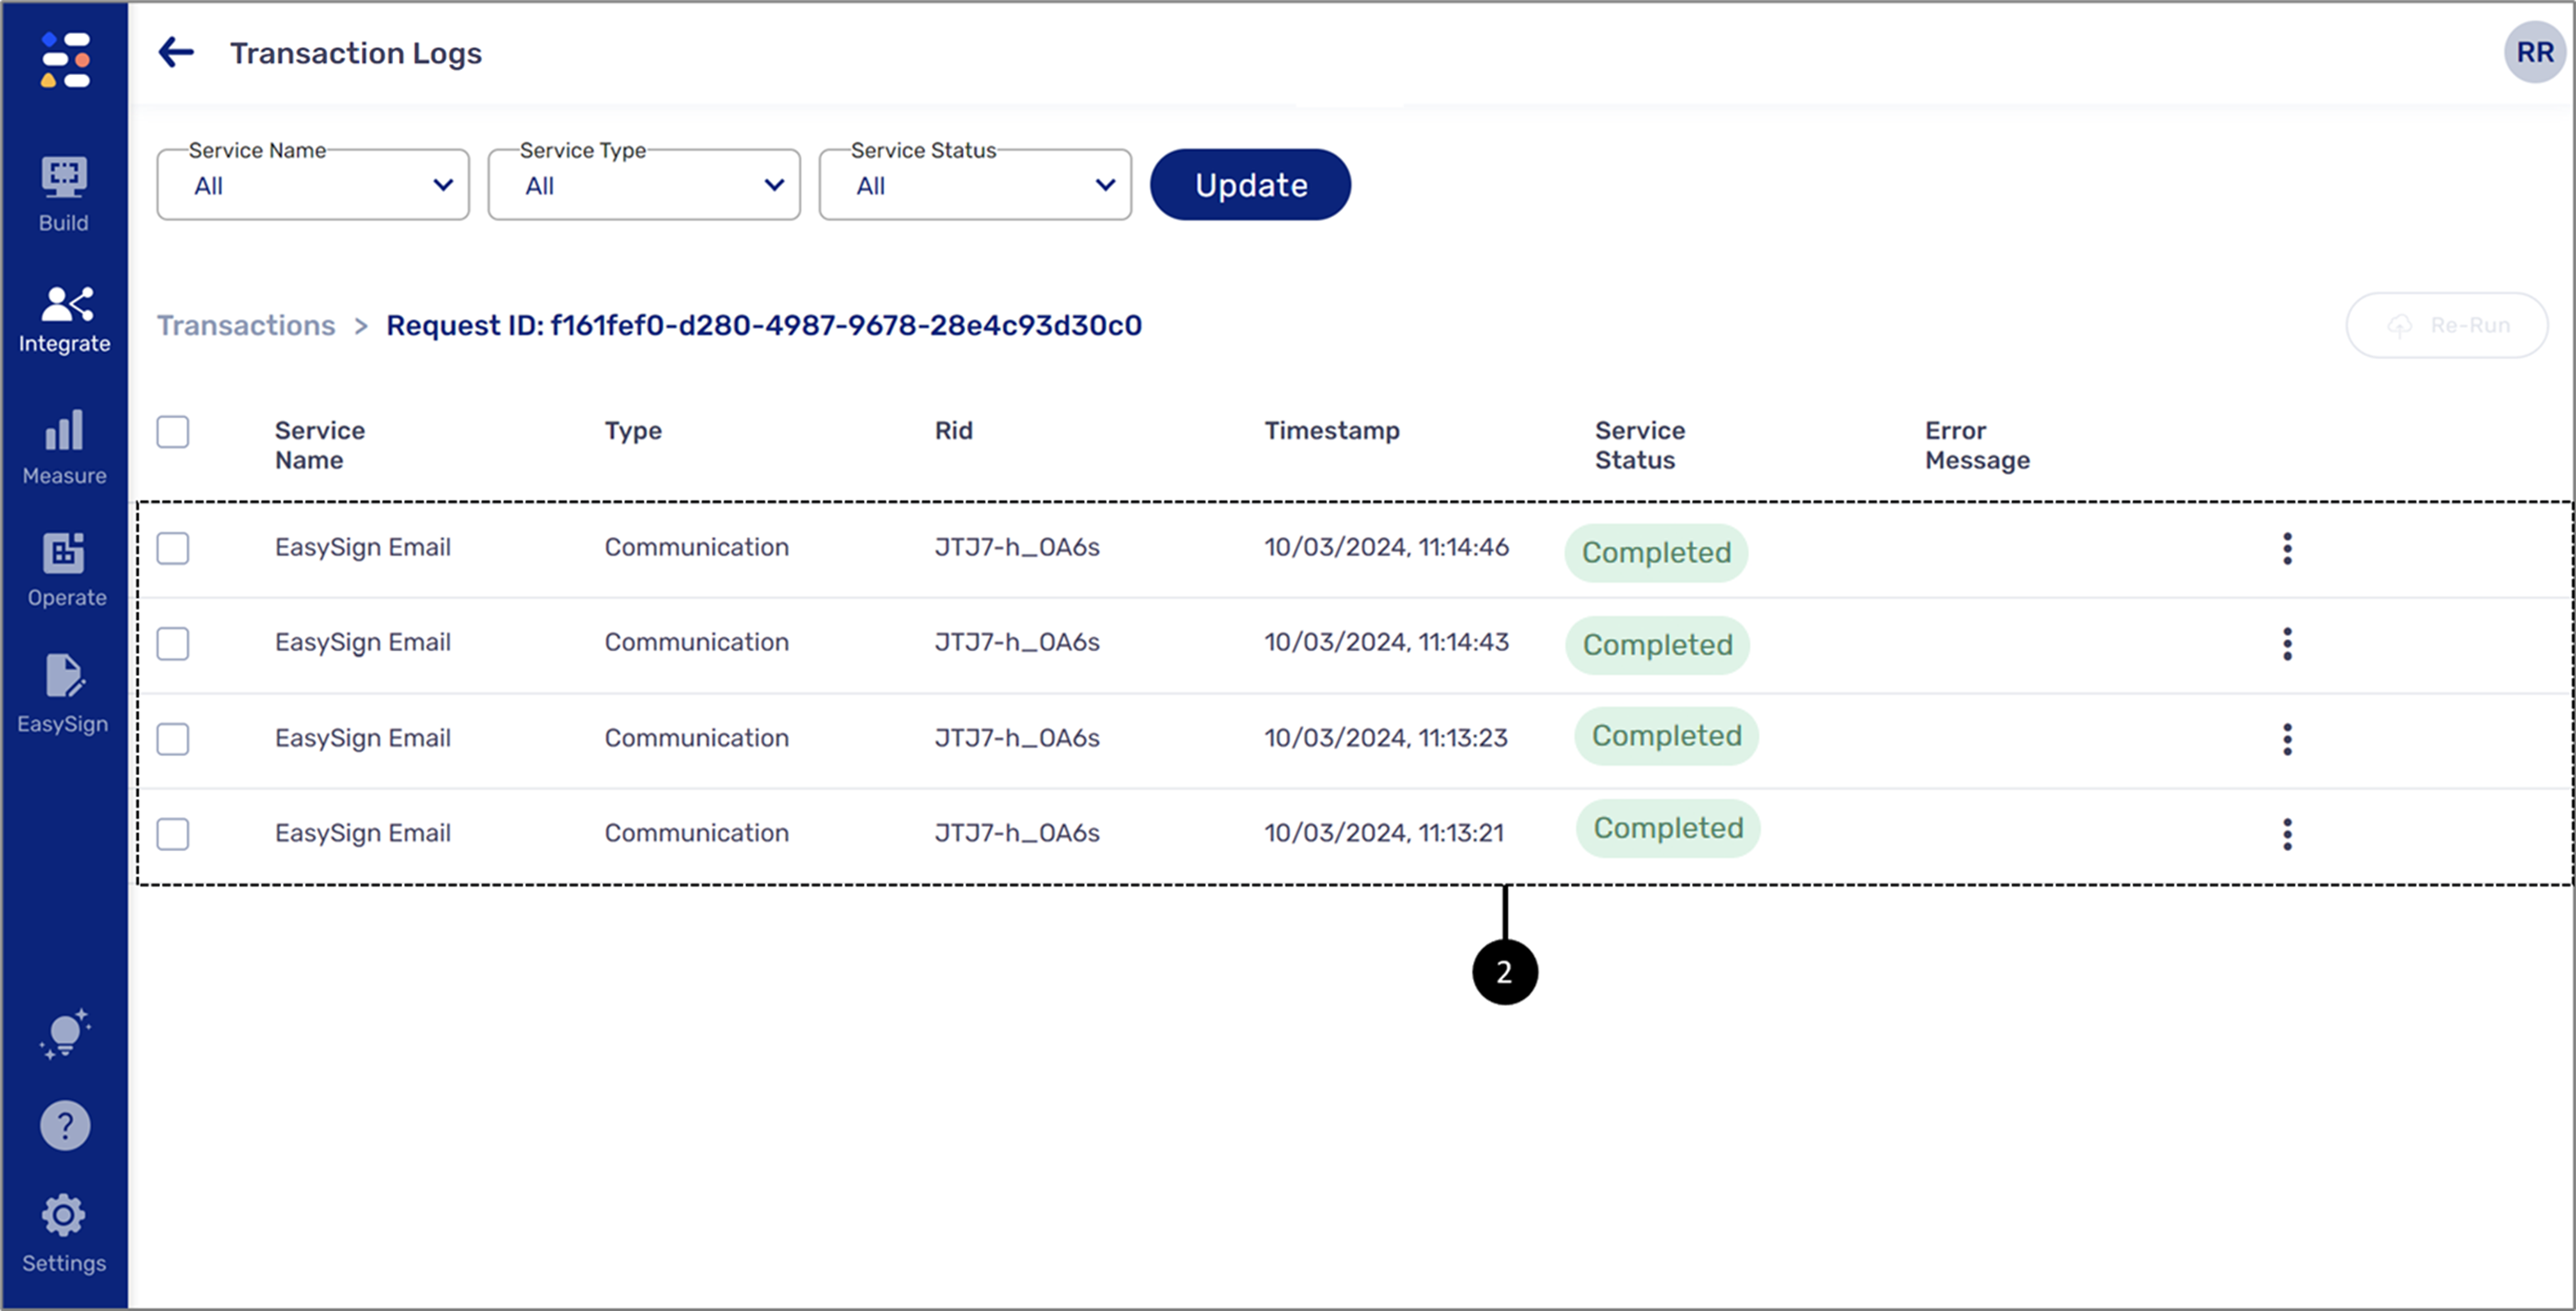
Figure 20: List of Services
- From the list (2), locate the desired service with an email service and click it.
Result:
The service's step appears:
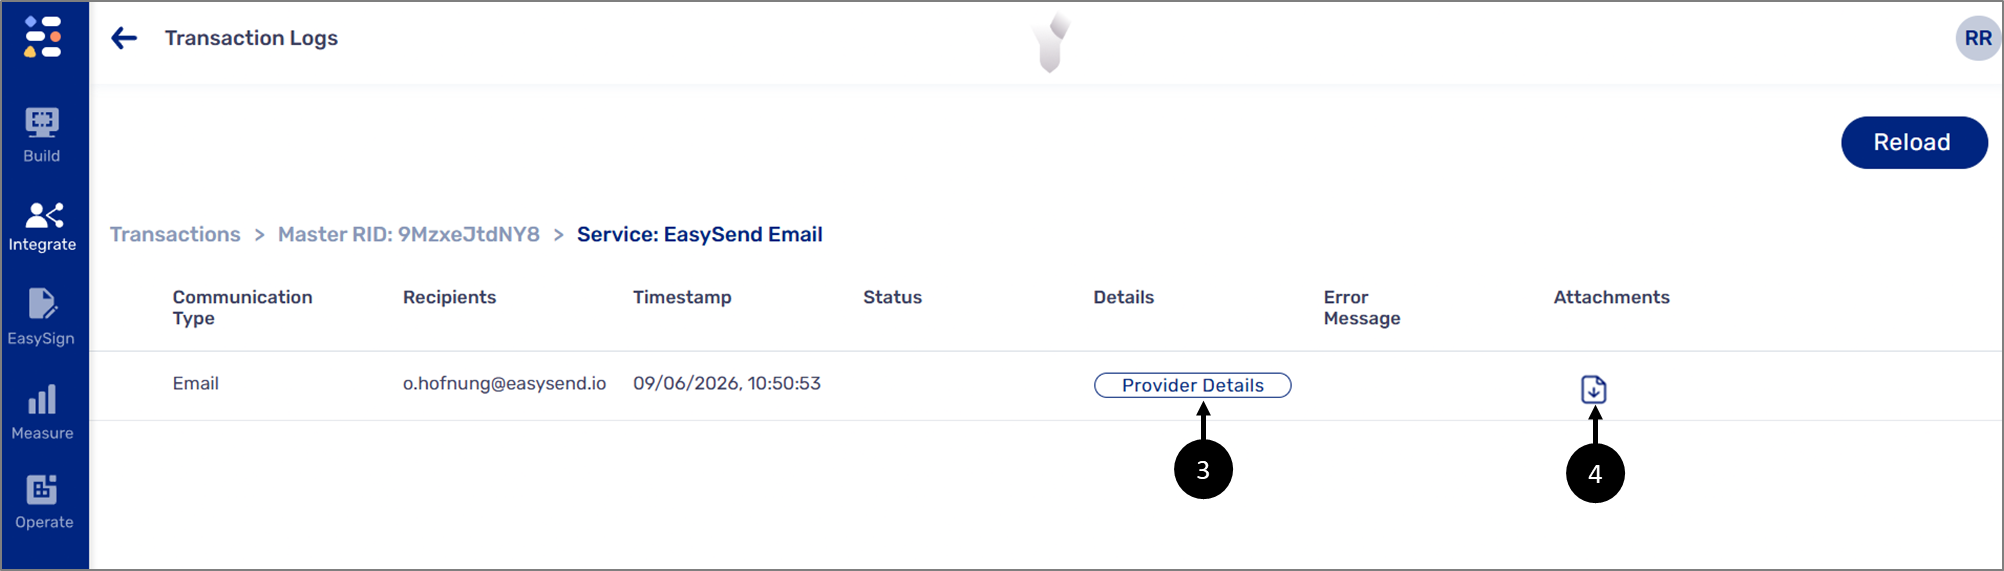
Figure 21: Step
- Click the Provider Details button (3).
Result:
The Email Details window appears:
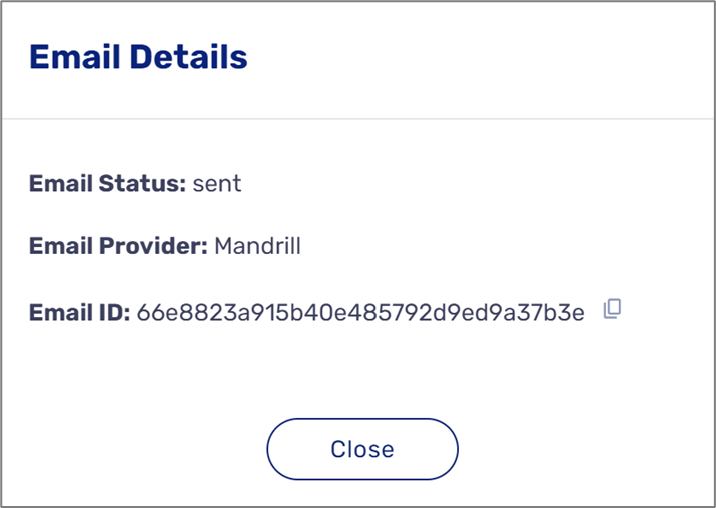
Figure 22: Email Details Window
- Click the icon (4) to download the email attachment.
Using Resume
(See Figure 23 to Figure 25)
Resuming transactions will result in re-running all the actions and steps of the transaction’s last RID, and may have implications on user data, communications sent, and/or data storage. To use the Resume button, perform the following steps:
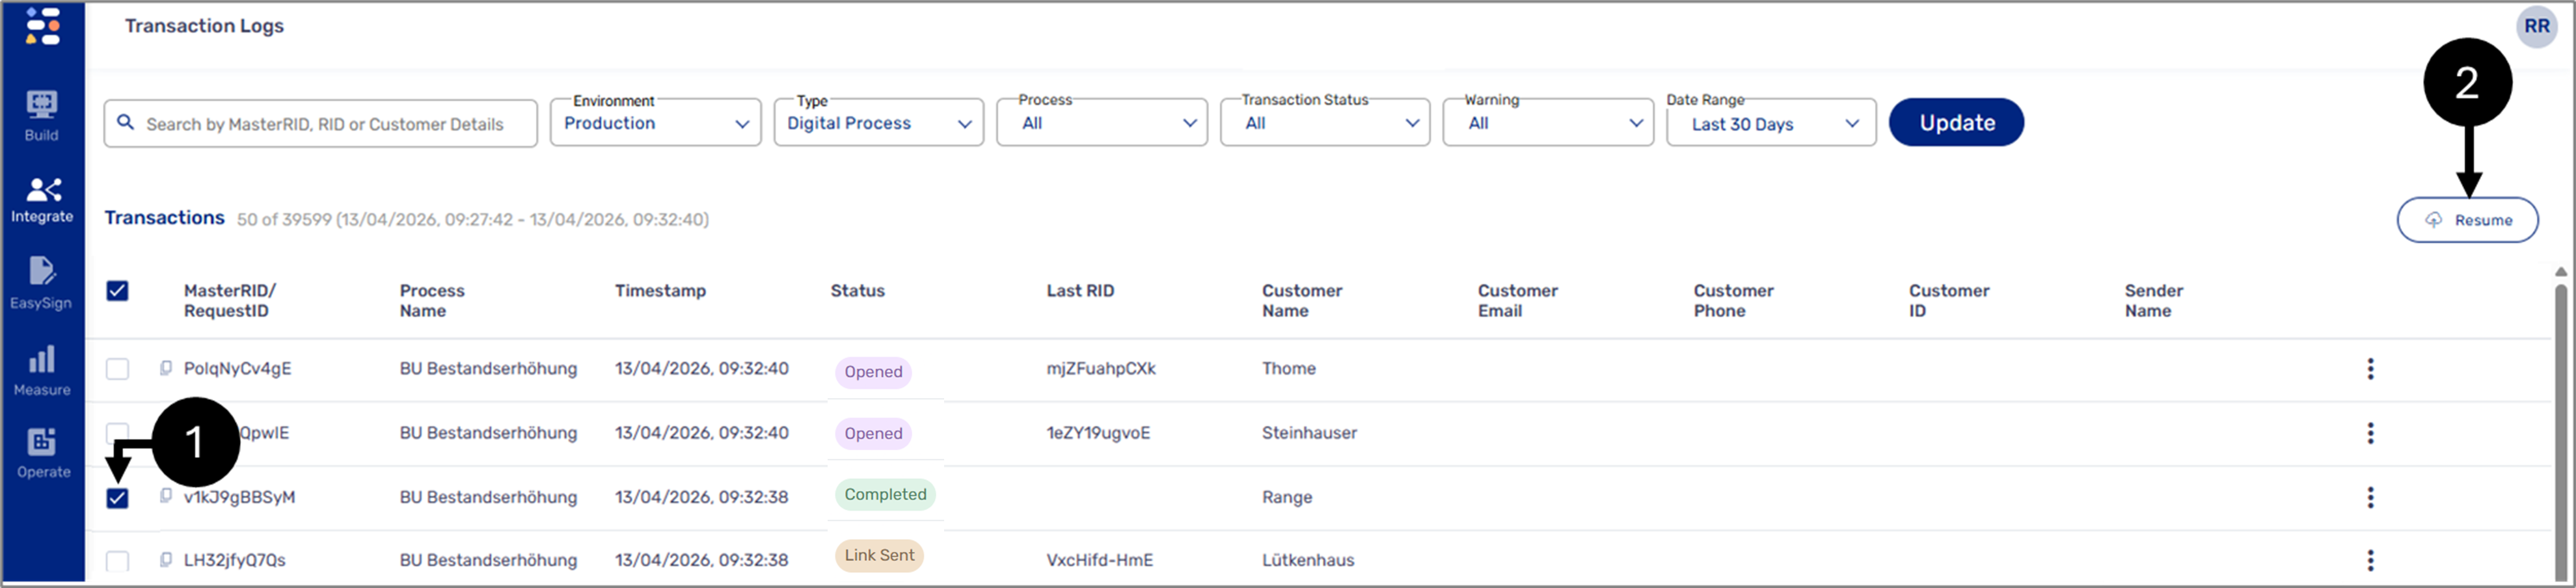
Figure 23: Resume Button
- Locate the desired transaction and check its checkbox (1) (Repeat this step for any additional desired transactions).
- Click the Resume button (2).
Result:
The Resume Transactions window appears:
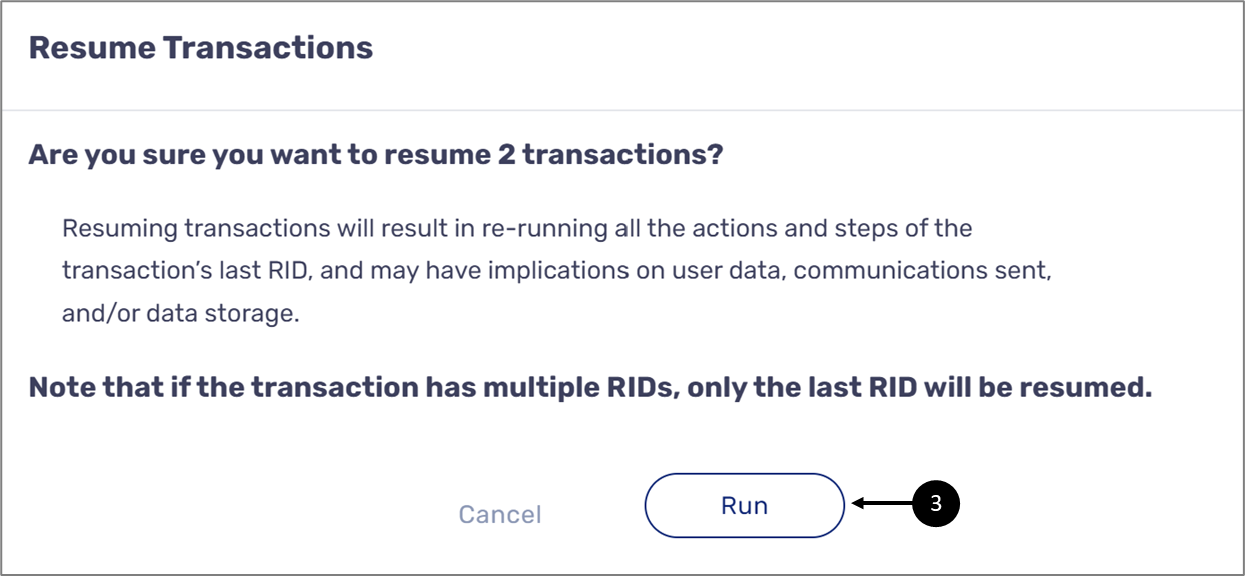
Figure 24: Resume Transactions Window
- Click the Run button (3).
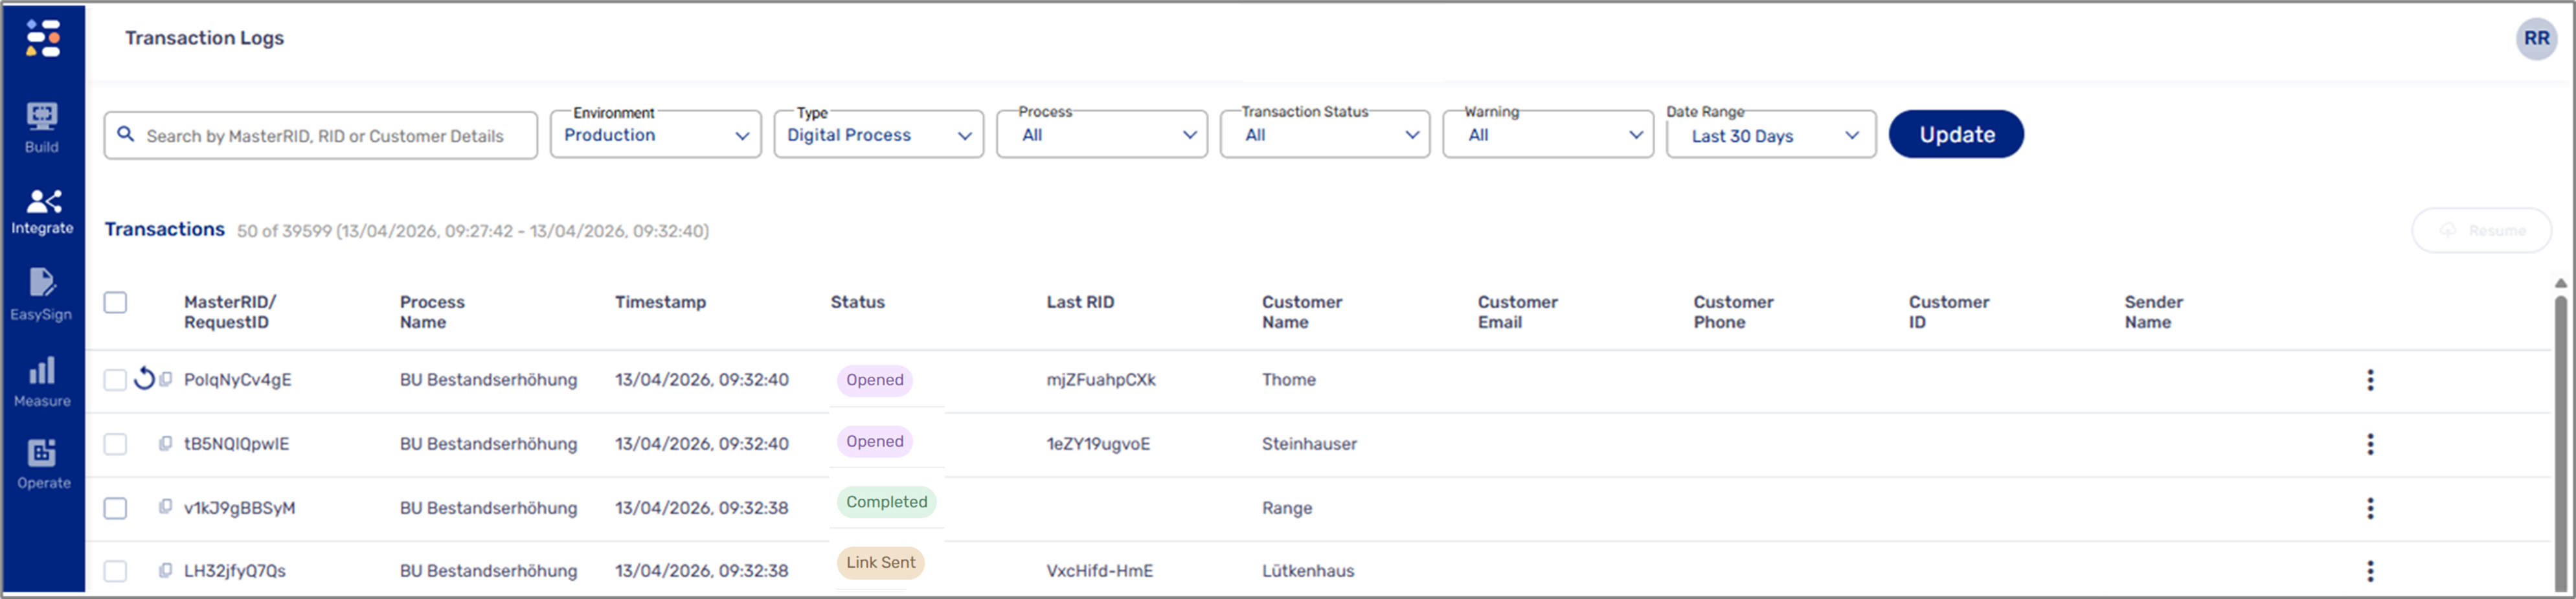
Figure 25: Resumed Transactions
All actions and steps of the transaction's last RID start a re-run process. When the transactions appear again, a resumed transaction will appear at the top of the list, and its status will update according to the resume process result. The  icon will appear next to it.
icon does not appear, upgrade your environment servers to version 57.8.0 or above. For additional information, please contact our support team.Using Re-Run - Transaction
(See Figure 26 to Figure 28)
Re-running a transaction will result in running all subsequent functions, actions, and services that occur at the end of the step as if the end-user clicked submit. The Re-Run option is accessible only for transactions with at least one step (RID) that have been completed or failed. To use the Re-Run button to resubmit a transaction, perform the following steps:
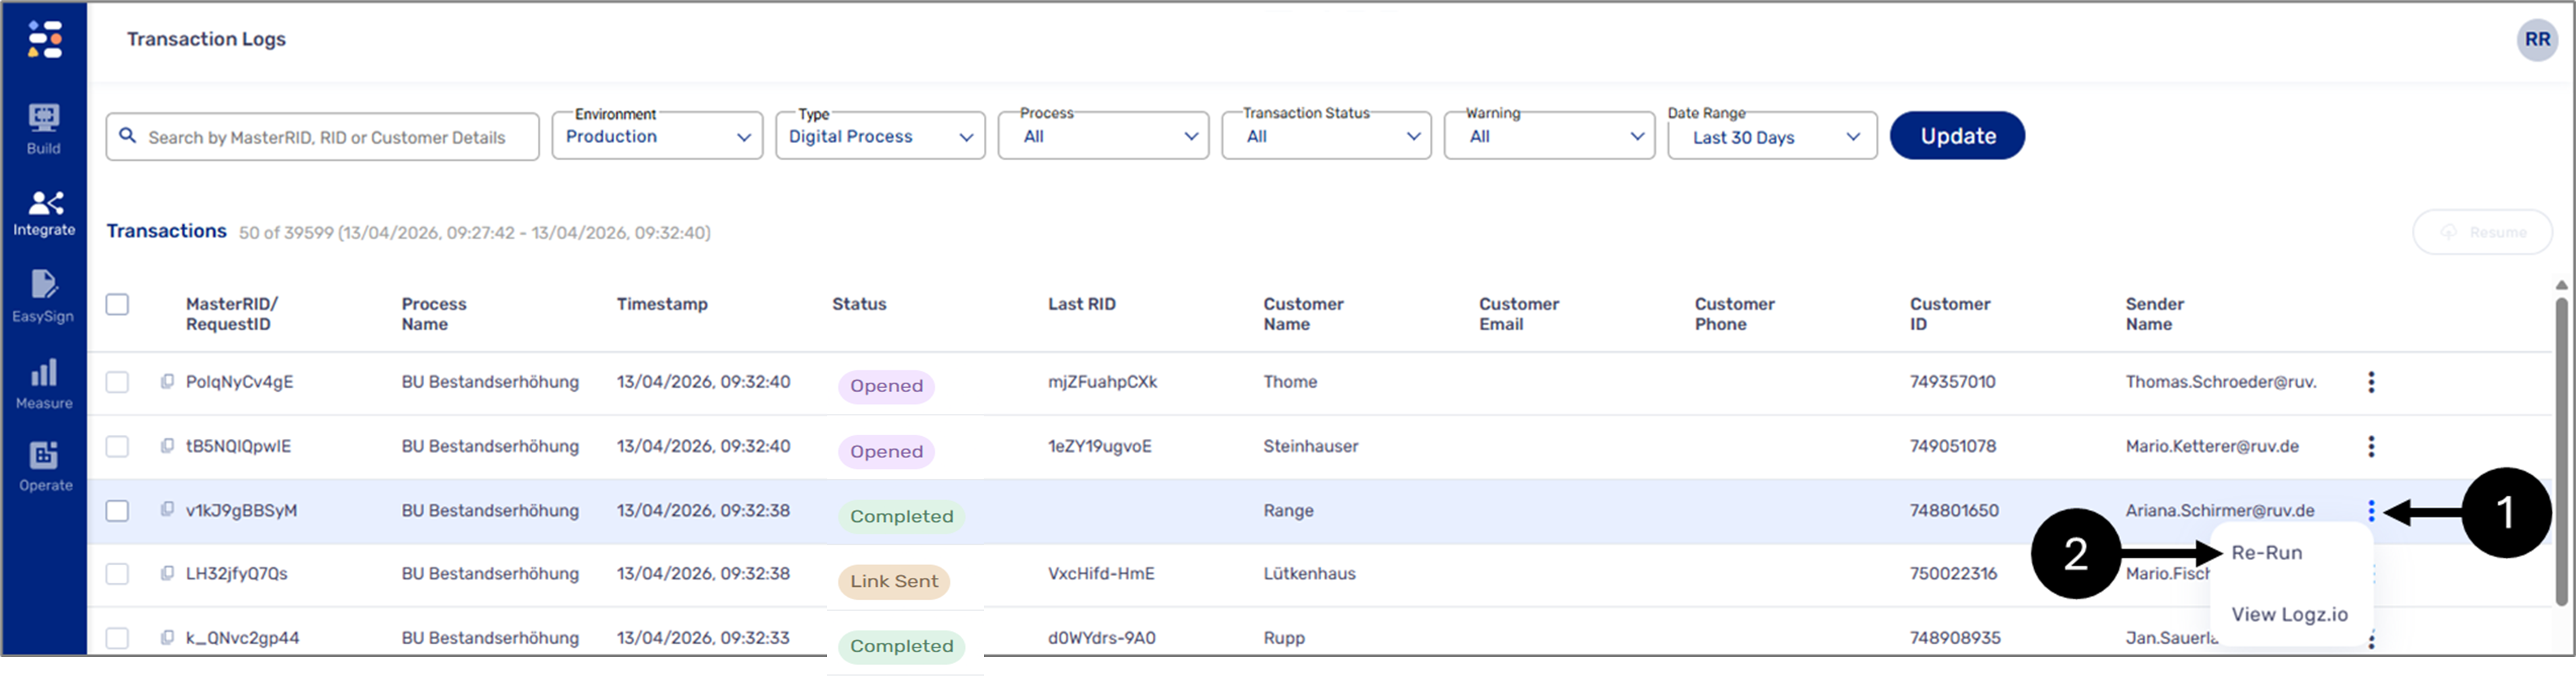
Figure 26: Re-Run Option
- Locate the desired transaction, click the three dots (1), and then the Re-Run option (2).
Result:
The Re-Run Transaction window appears:
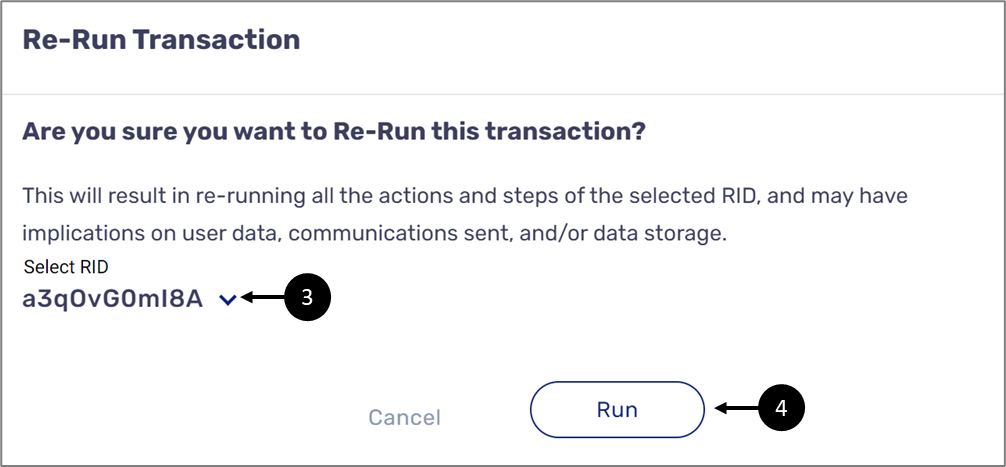
Figure 27: Re-Run Transaction Window
- Select RID (3).
- Click the Run button (4).
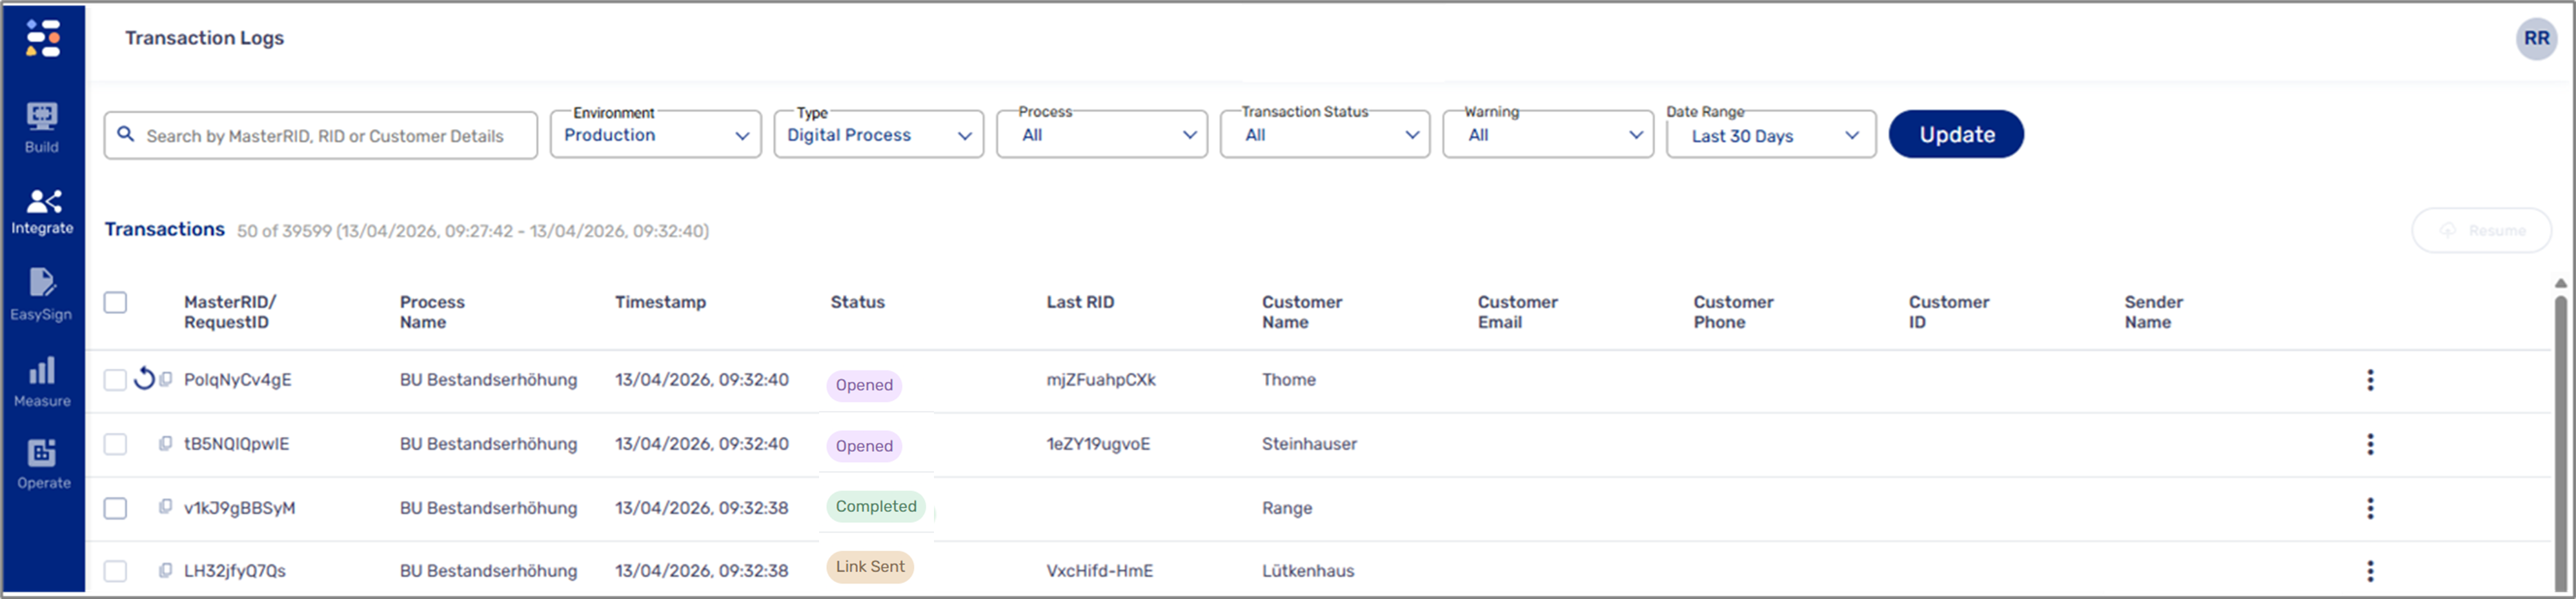
Figure 28: Re-Run Transactions
All subsequent functions, actions, and services that occur at the end of the step are run again. When the transactions appear again, a re-run transaction will appear at the top of the list, and its status will update according to the result. The icon will appear next to it.
icon does not appear, upgrade your environment servers to version 57.8.0 or above. For additional information, please contact our support team.Using Re-Run - Service
(See Figure 29 to Figure 32)
The Re-Run button/option enables you to resubmit one service or more. This will result in rerunning all actions/steps and may have implications on user data, communications sent, and data storage. To use the Re-Run button to resubmit a service, perform the following steps:
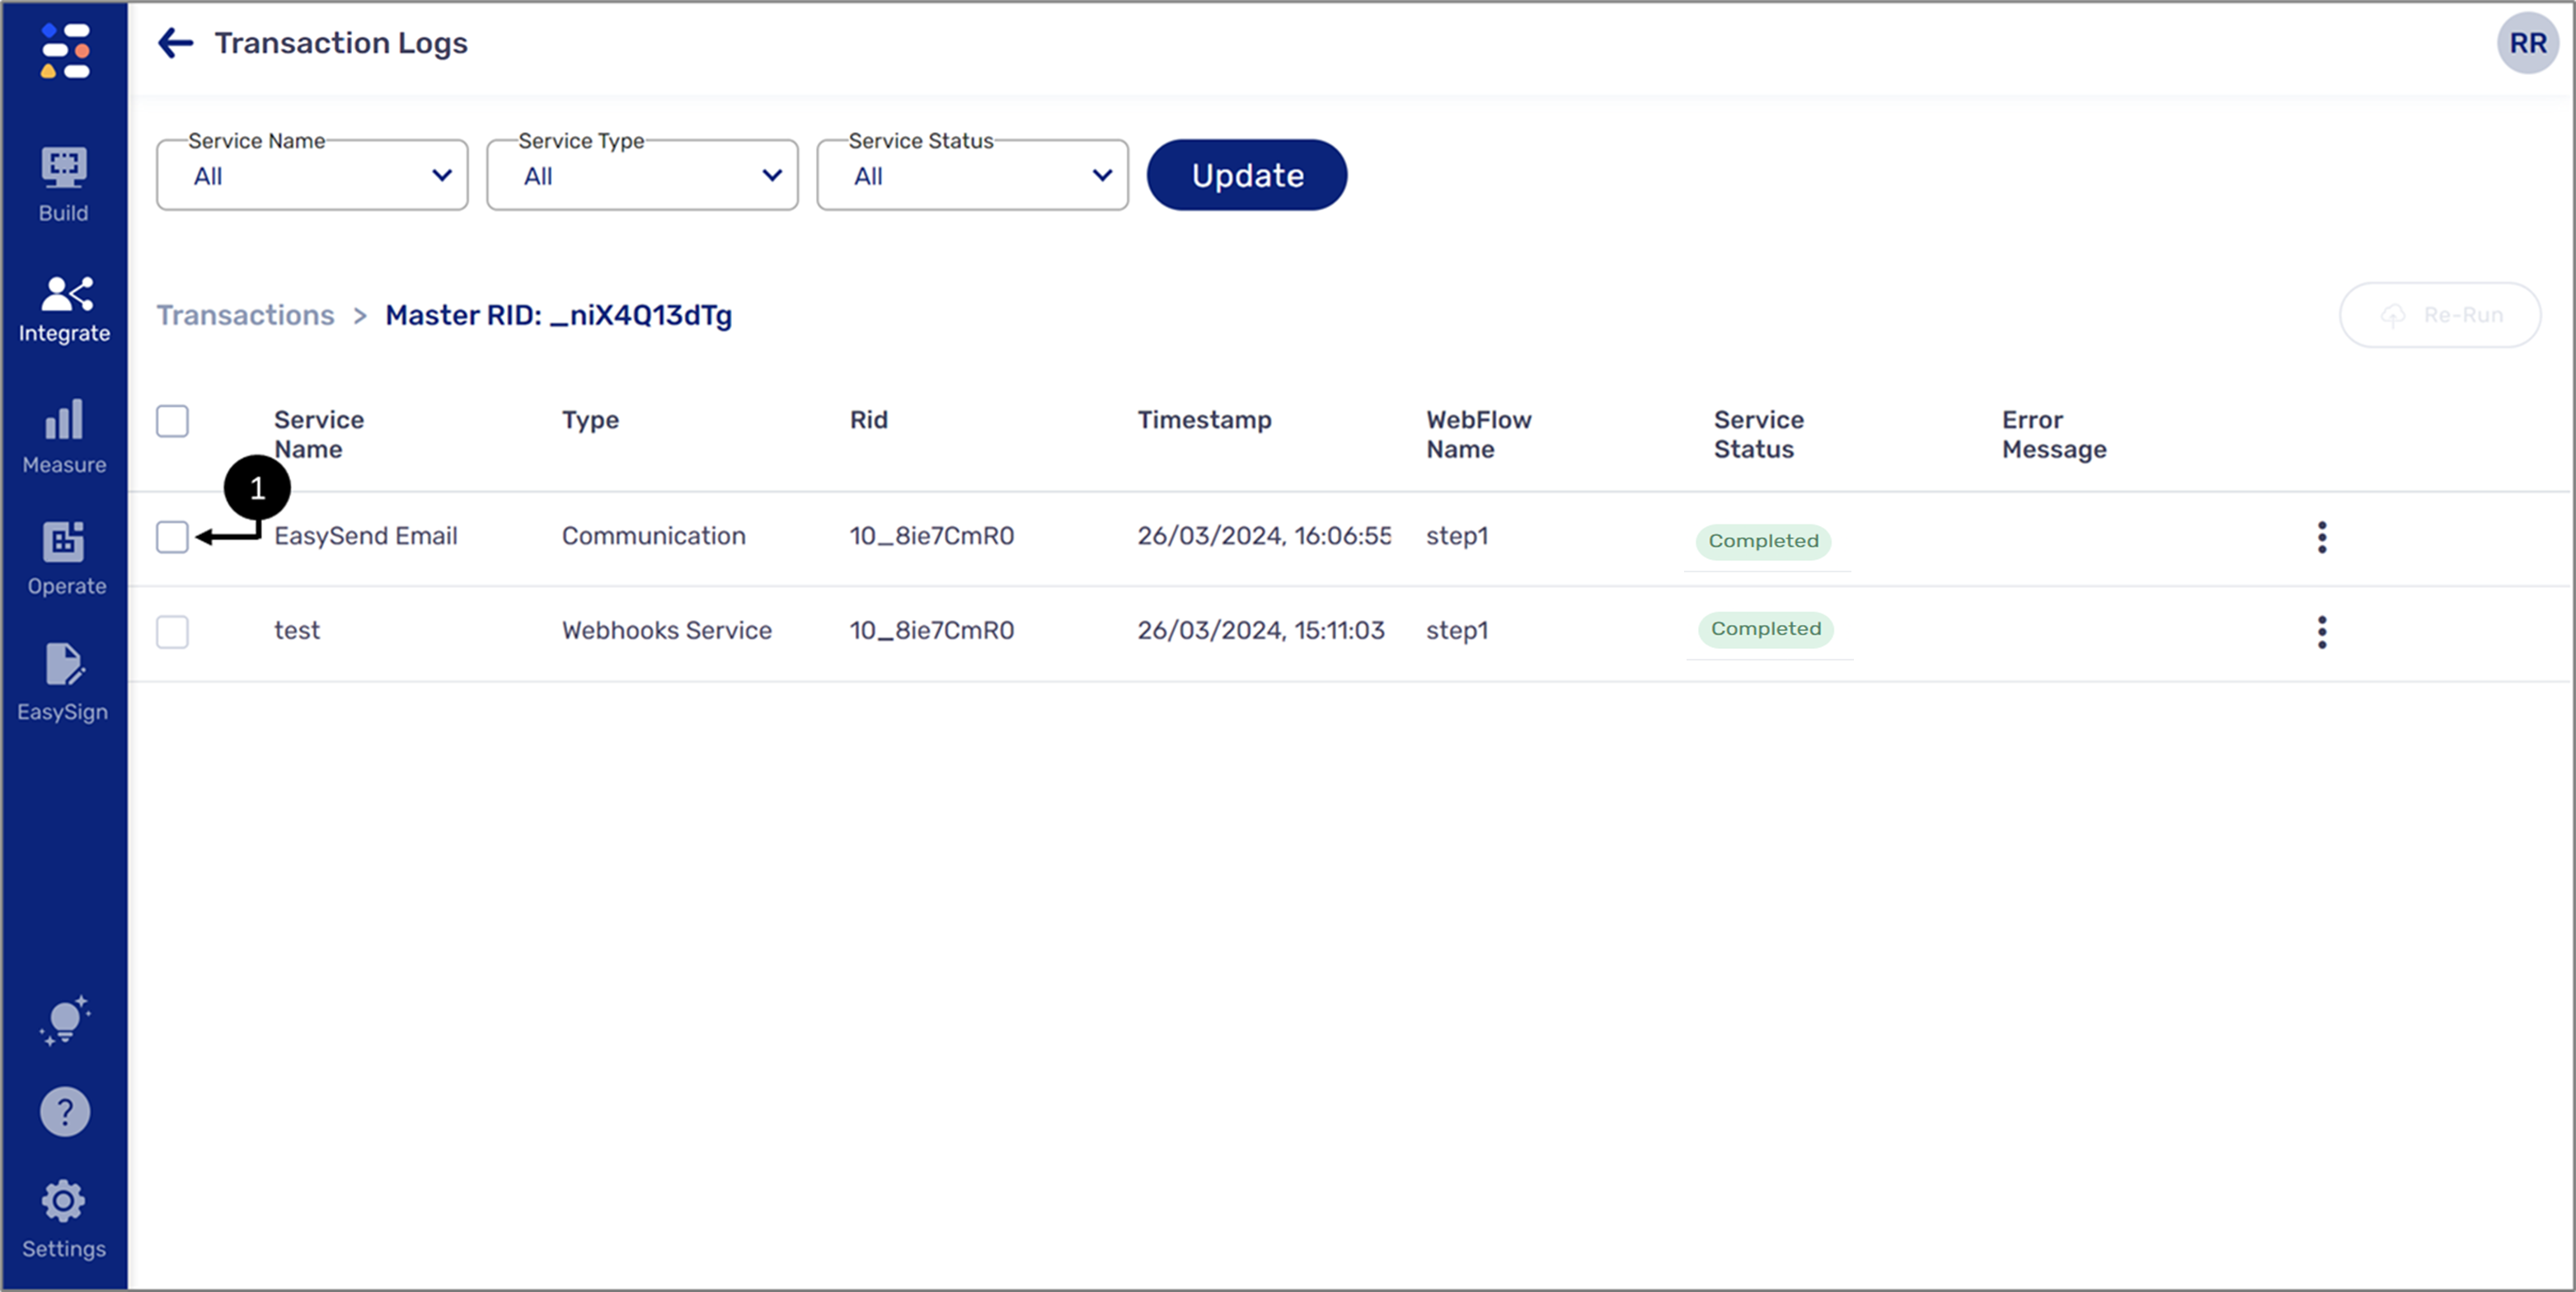
Figure 29: List of Services
- Locate the desired service from the list and check its checkbox (1) (repeat this step for any additional desired services).
Result:
The Re-Run button (2) is now active:
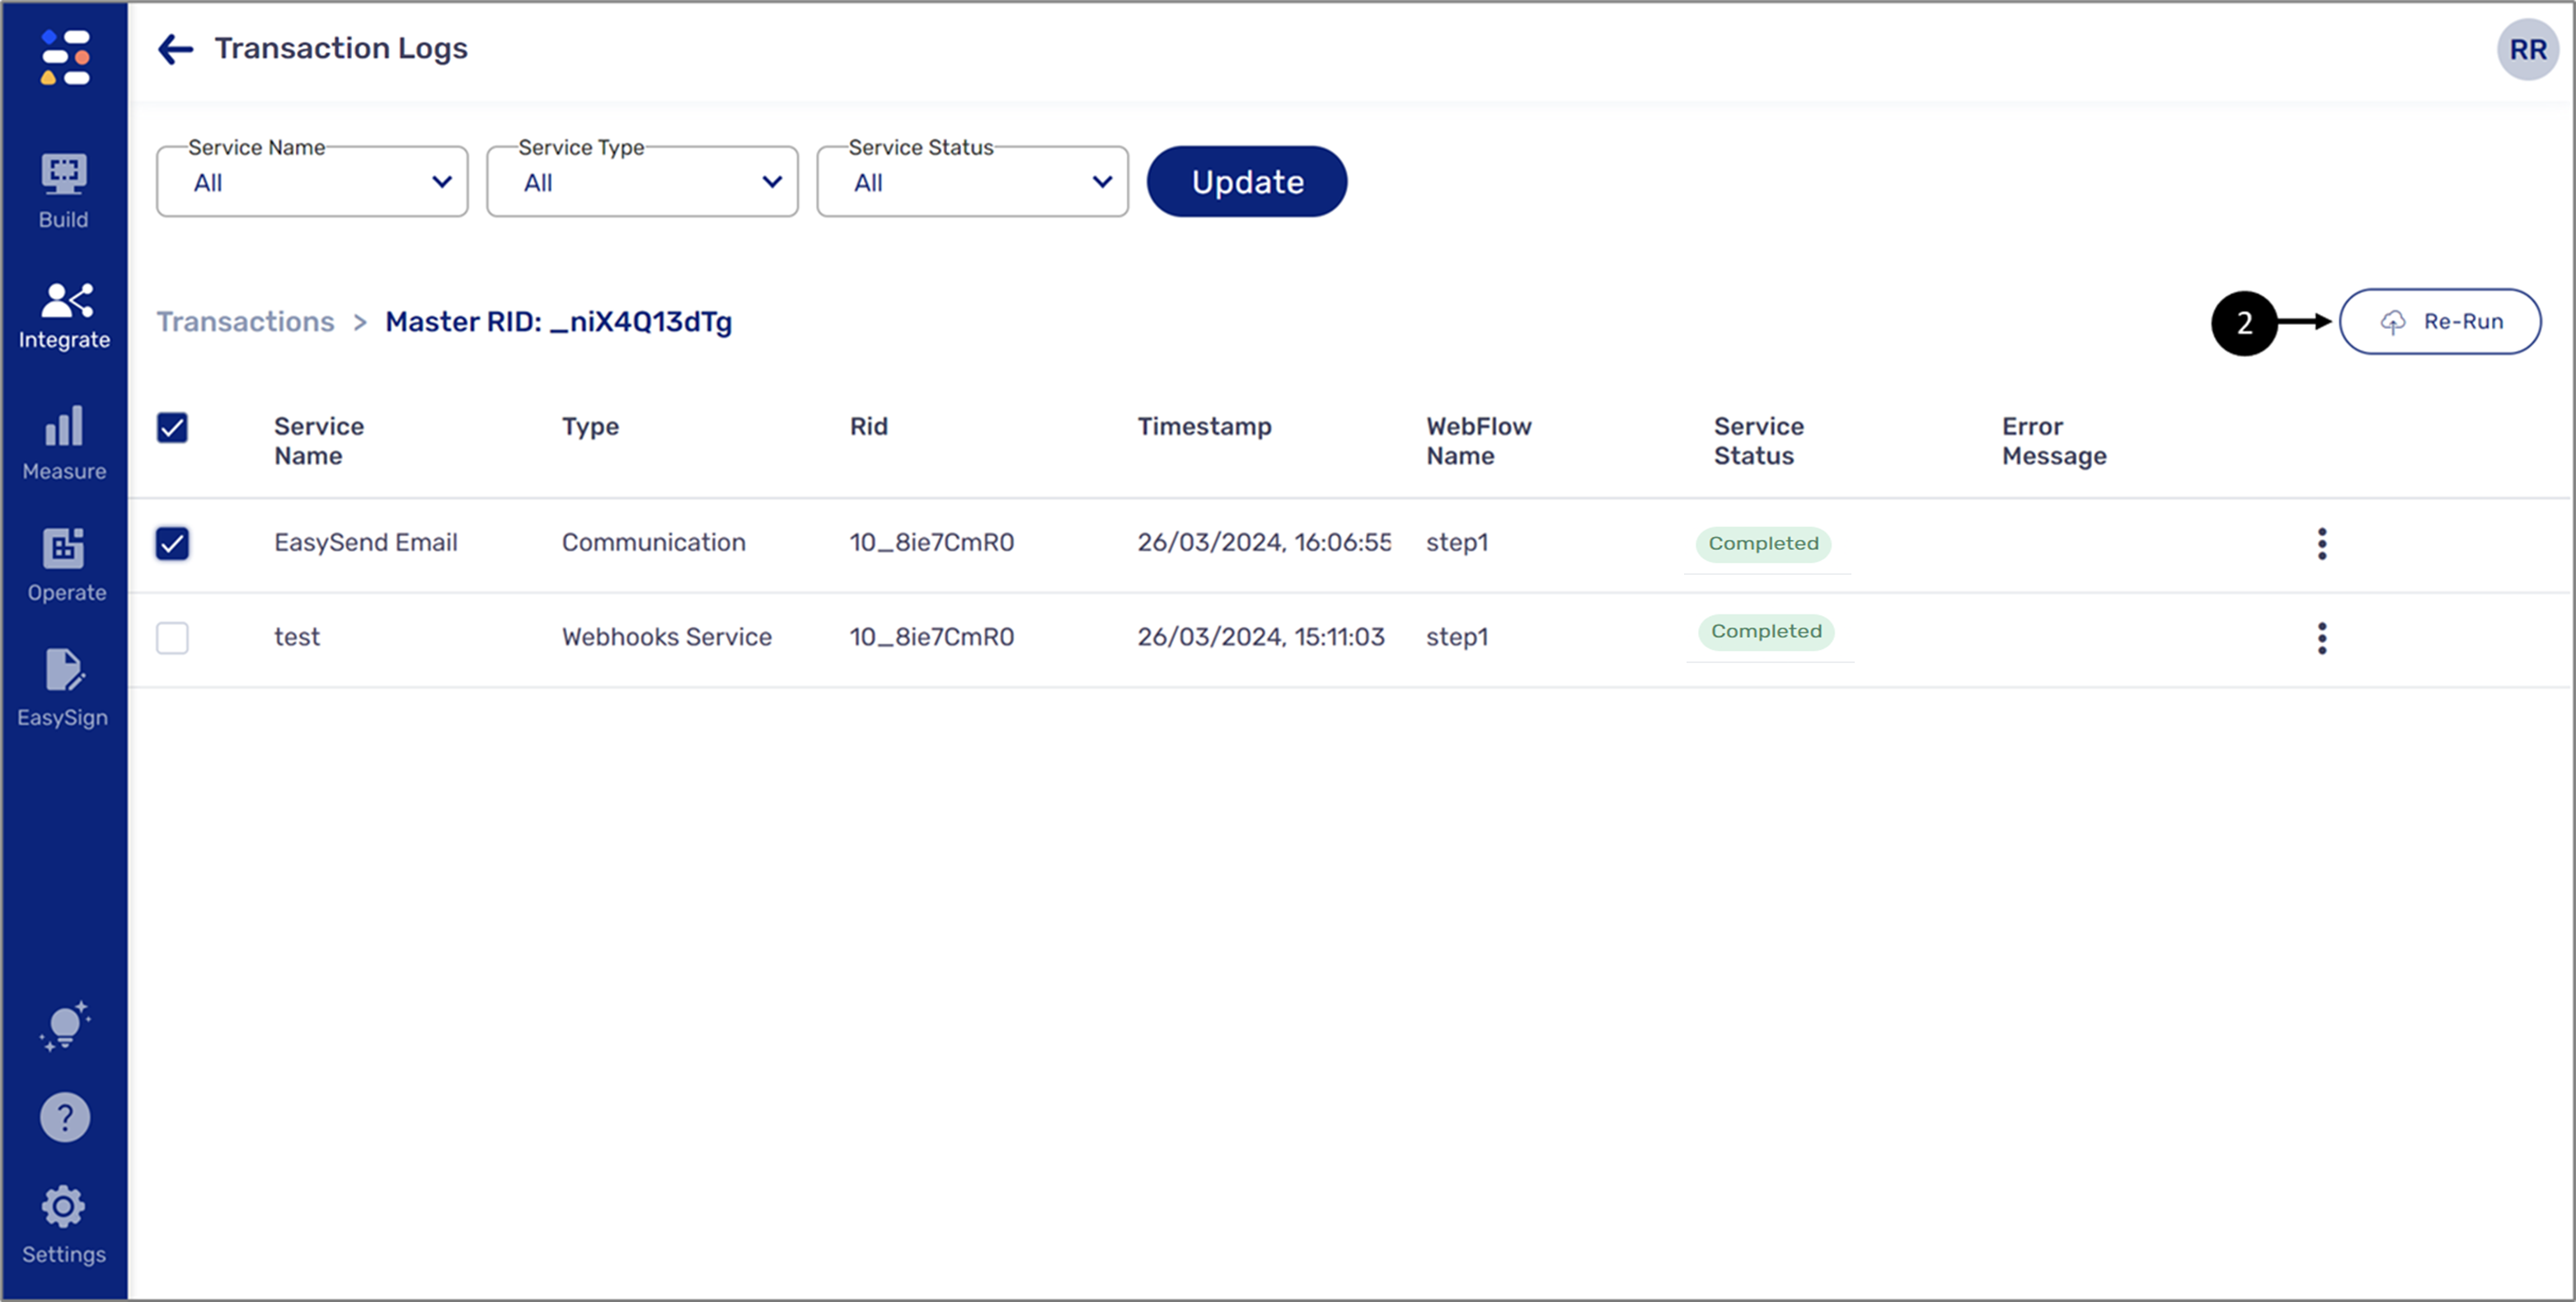
Figure 30: Active Re-Run Button
- Click the Re-Run button.
Result:
The Re-Run Services window appears:
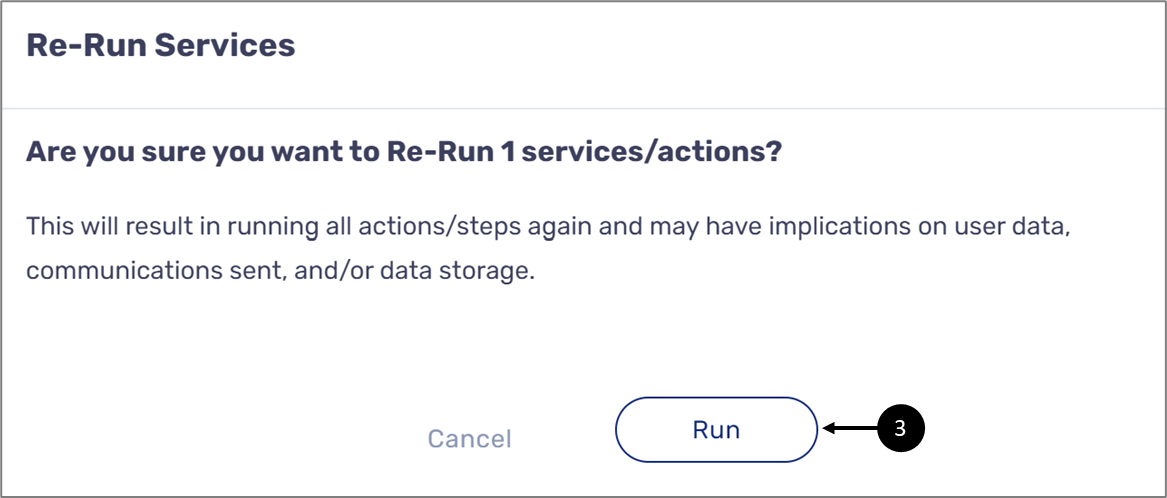
Figure 31: Run Button
- Click the Run button (3).
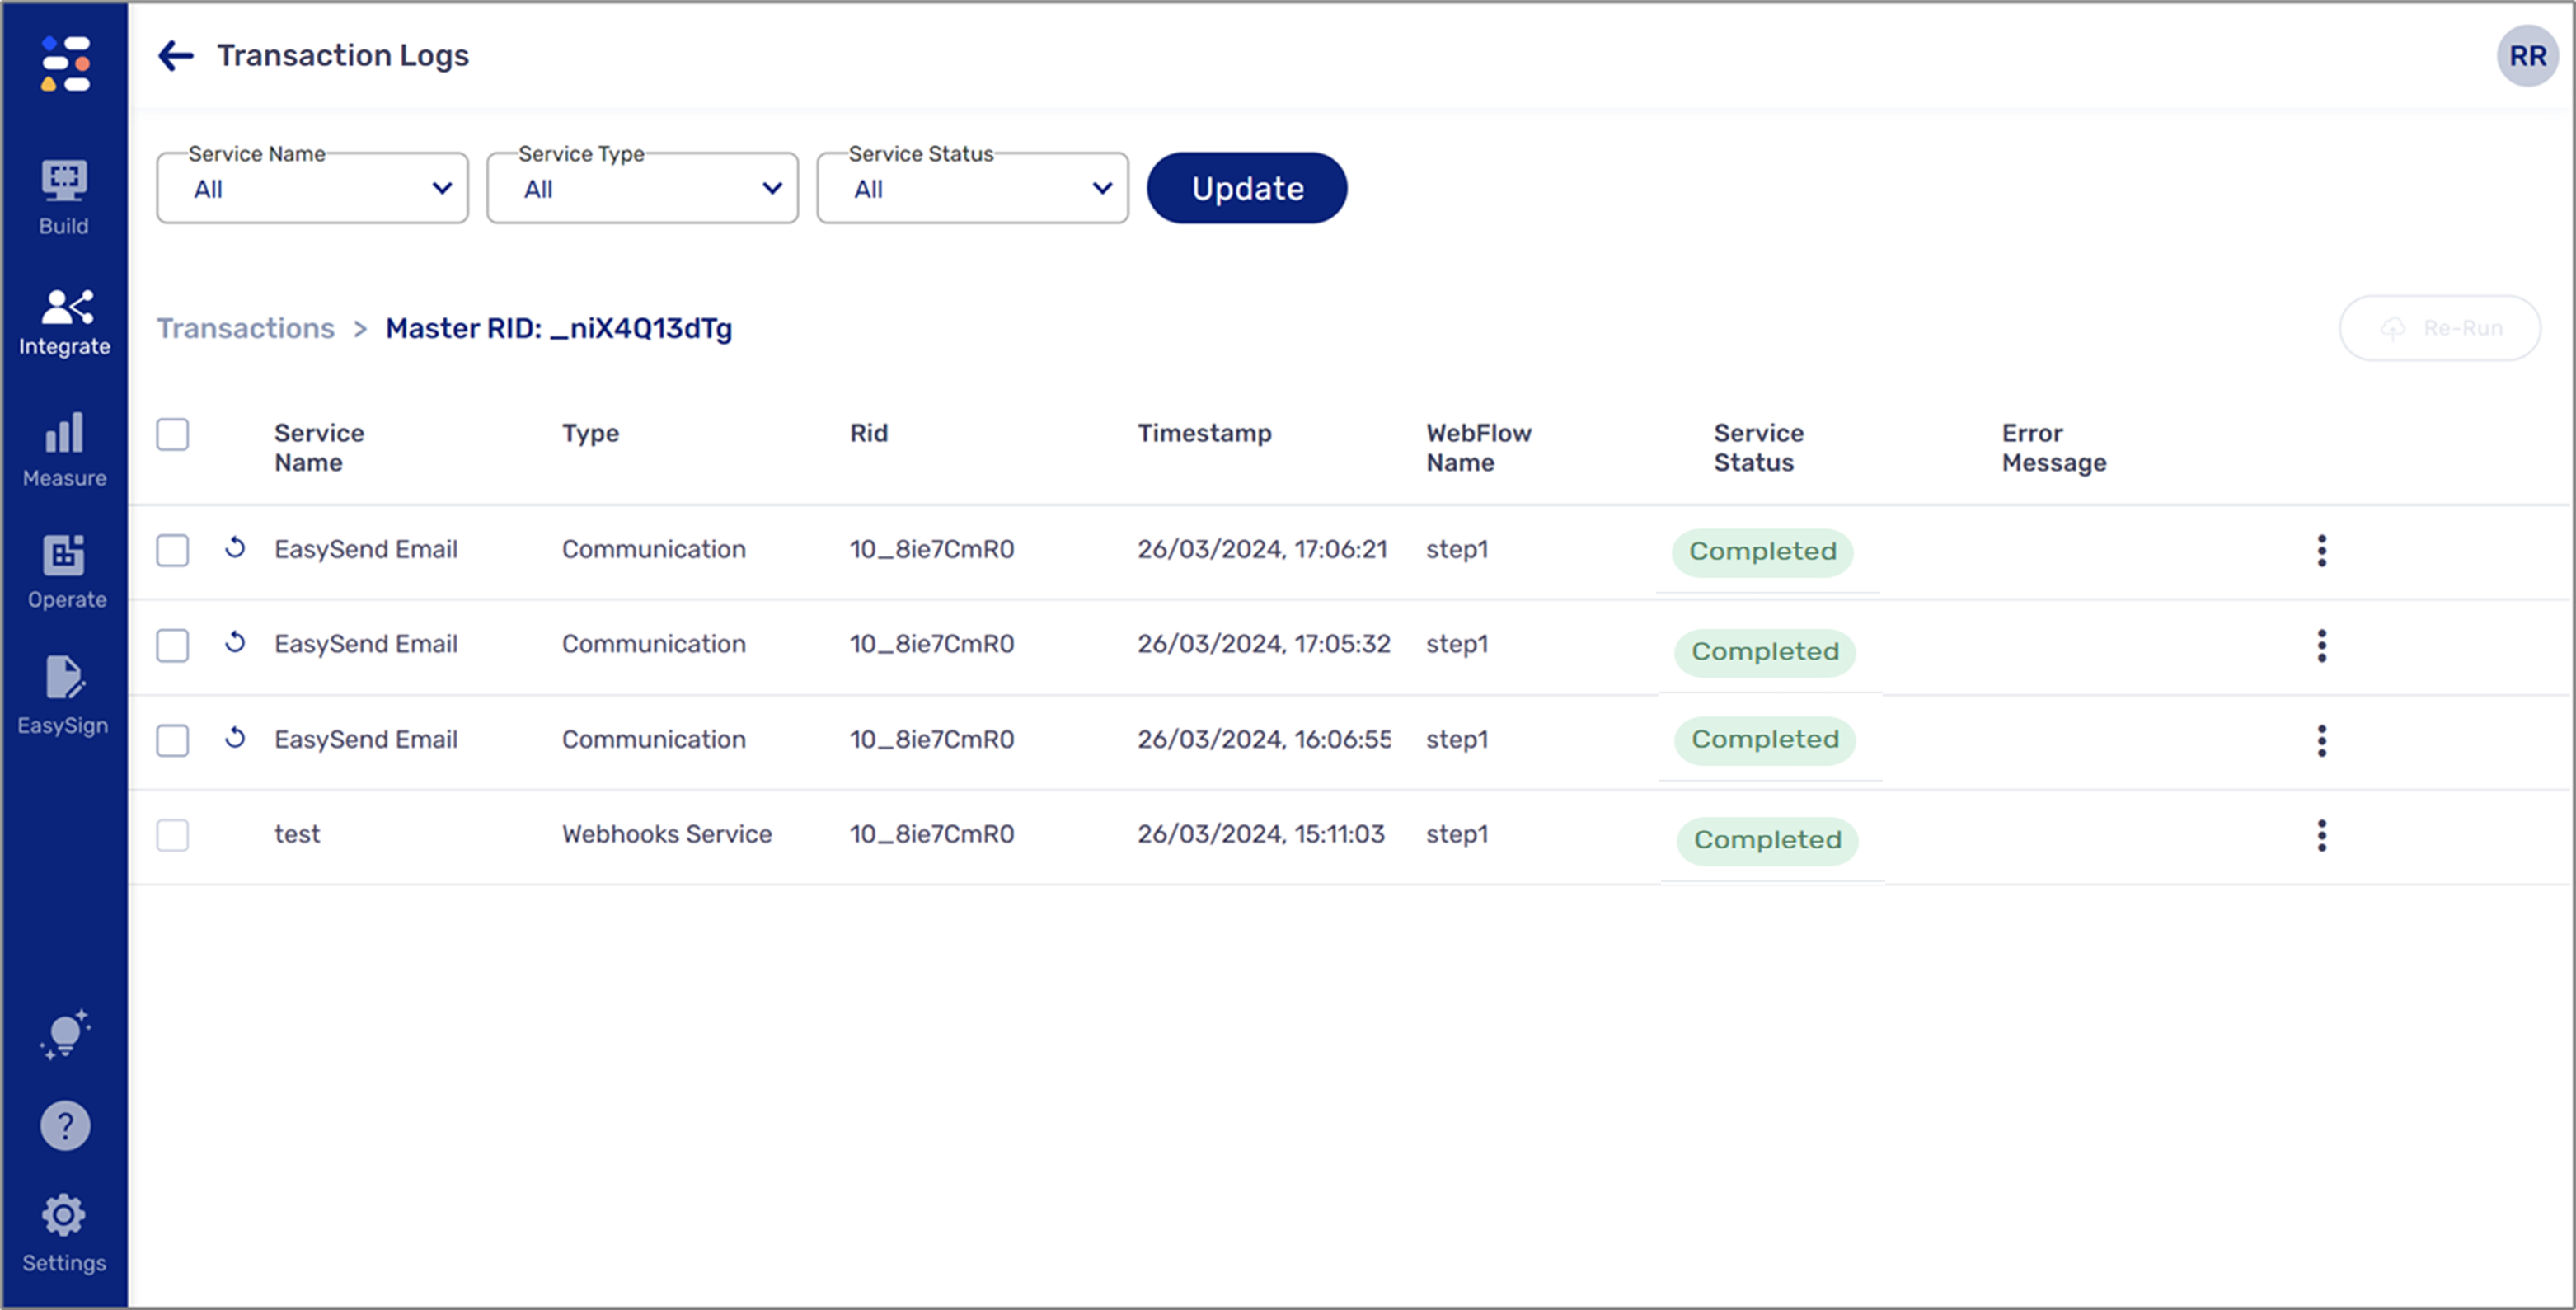
Figure 32: Re-Run Services
All actions and steps of the service started a re-run process. When the services appear again, a new instance of the re-run service will appear at the top of the list, and its status will update according to the result. The icon will appear next to it.
icon does not appear, upgrade your environment servers to version 57.8.0 or above. For additional information, please contact our support team.- You can also use the Re-Run option by clicking the three dots and then Re-Run.
- The Re-Run option will not be available for In Webflow Integration services and Webhook services.
Escalation to EasySend's Support
In some cases, after exhausting all self-troubleshooting options, you may be required to escalate the problem to EasySend's support. For example:
- If any of the features or capabilities are not available in your environment, you need to upgrade your servers. For additional information, contact EasySend's support.
- A transaction is in a Failed status, but all services are in a Completed status. In this case, try to resume or re-run the transaction (as described in the Using Resume section and in the Using Re-Run - Transaction) or re-run its services (as described in the Using Re-Run - Service section). If the problem persists, contact EasySend's support.
- A transaction is in a failed status, and no services are visible. In this case, try to resume or re-run the transaction (as described in the Using Resume section and in the Using Re-Run - Transaction). If the problem persists, contact EasySend's support.
- A transaction is in Processing status. In this case, wait for its status to change, but if the problem persists, contact EasySend's support.
Tagging
(See Figure 33 and Figure 34)
The Customer Name, Customer Email, Customer Phone, Customer ID, and Sender Name will be empty by default unless metadata tagging is performed. To perform the tagging:
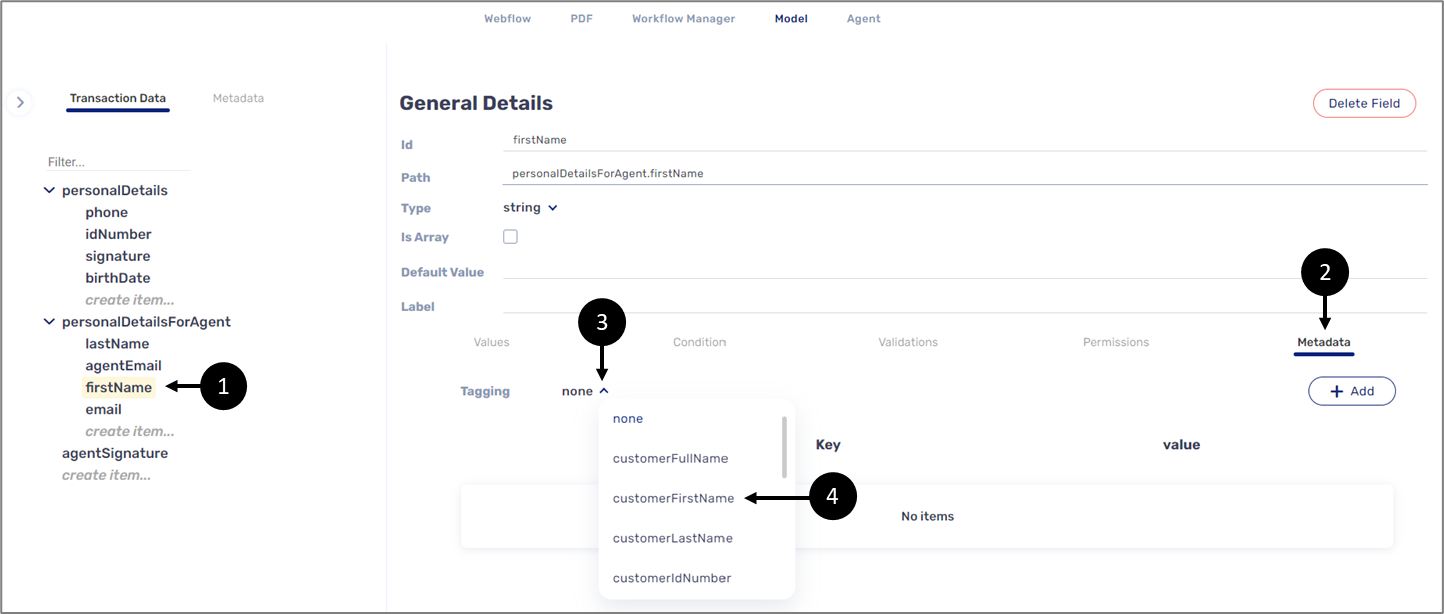
Figure 33: Tagging 1 of 2
- Access the Model screen of the digital process.
- Click the relevant data item for the name information (1).
- Click Metadate (2).
- Click the Tagging dropdown (3).
- For example, click customerFirstName (4).
Result:
The data item is tagged:
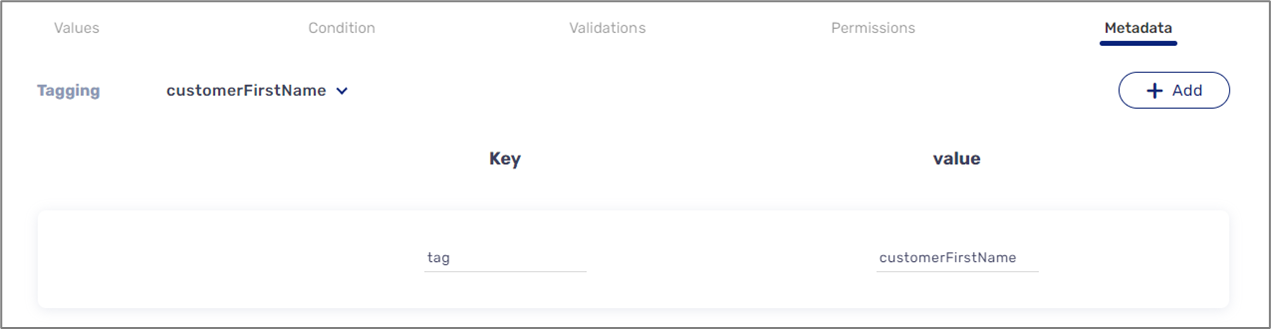
Figure 34: Tagging 2 of 2
- Repeat steps 1 to 5 until all the fields are tagged.
- Perform a deployment.