Salesforce App Installation
- PDF
Salesforce App Installation
- PDF
Article summary
Did you find this summary helpful?
Thank you for your feedback
Article Overview
The following document describes the steps required to install the EasySend Application (App) in your Salesforce environment. Follow the steps below to get started.
EasySend App Installation
(See Figure 1 to Figure 3)
To install the EasySend App, perform the following steps:
- Sign into Salesforce.
NOTE
a user with administrative privileges is required.
- Go to Salesforce AppExchange.
NOTE
- If the following window appears, select a connected Salesforce account:
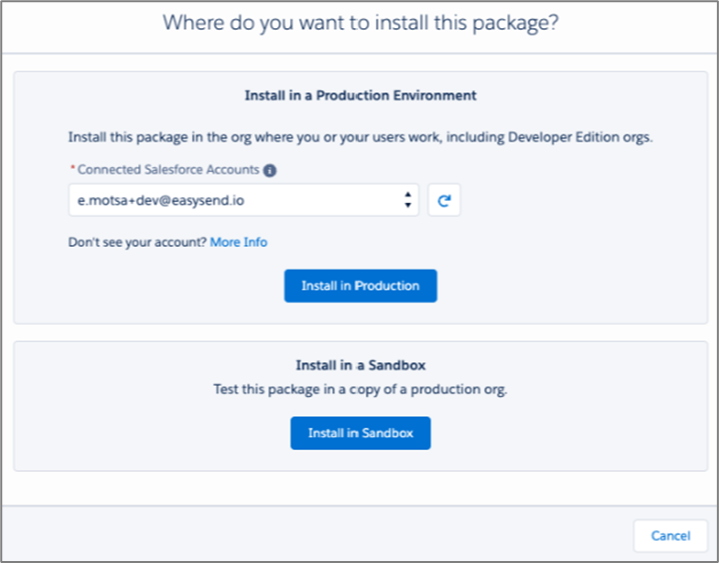
- If the following window appears, agree to the terms and conditions and confirm to proceed with the installation:

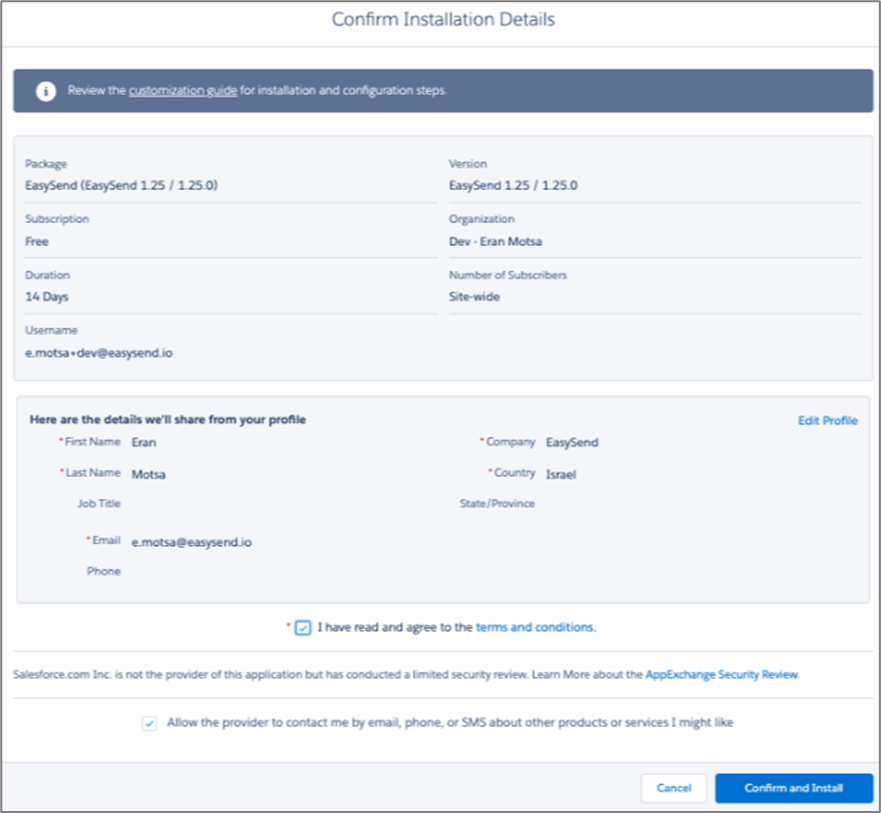
- Choose for whom this App should be installed. If you do not have a preference please select Install for All Users (1) and click Install (2).
.PNG)
Figure 1: EasySend Installation
Result:
The installation starts:

NOTE
The installation may take a few minutes.
Configuring Access Permissions
After the app is installed, you will need to configure access permissions. The configuration enables both EasySend to access your Salesforce environment, and Salesforce to access your EasySend environment. To configure access permissions, perform the steps described in the following sections:
- Connect to EasySend's Application
- Input Information in EasySend’s Metadata Object
- Set Remote Site Settings
- Manage Profiles that Have Access to EasySend in Salesforce
- Create a User for EasySend’s App Interactions
- Set Salesforce Objects
Connect to EasySend's Application
(See Figure 4 to Figure 8)
To connect to EasySend's application, perform the following steps:
- Click the
 icon and then click Setup.
 icon and then click Setup.
Result:
The Setup section appears:

Figure 4: Setup Tab
- Using the search bar (1), search for Profiles (2) and click it.
Result:
The Profiles section appears:

Figure 5: Profiles
- Click System Administrator (3).
Result:
The profile of the selected user appears:

Figure 6: Assigned Connected Apps
- Click Assigned Connected Apps (4).
Result:
The Assigned Connected Apps section appears:

Figure 7: Edit
- Click the Edit button (5).
Result:
The following sections appear:

Figure 8: EasySend Connected App
- Click the EasySend Connected App (6).
- Click Add (7).
- Click Save (8).
Input Information in EasySend’s Metadata Object
(See Figure 9 to Figure 15)
To input information in EasySend’s metadata object, perform the following steps:
- Click the icon and then click Setup.
Result:
The Setup section appears:

- Using the search bar (1), search for Custom Metadata Types (2) and click it.
Result:
The Custom Metadata Types section appears:

- Click Manage Records (3).
Result:
The Easysend Settings section appears:

- View the Easysend Settings section:
- If a custom metadata exists with an Edit option, click it.
- If no custom metadata and Edit option exist, click the New button (4).
- Update the following fields (5):

Figure 12: Easysend Settings Edit
- Label (required).
- Easysend settings Name (required).
NOTE
A unique name used by the API and managed packages. The name must begin with a letter and use only alphanumeric characters and underscores. The name cannot end with an underscore or have two consecutive underscores.
- Target URL (required) - your EasySend platform's player URL. The URL can be found after deploying and preview a digital process using your EasySend's environment.

Figure 13: EasySend platform's Player URL
NOTE
- The URL contains your customer Id (customerName) and the selected server it was deployed to to, for example dev.easysend.app.
- For your sandbox environment use the dev EasySend player environment, and for your production salesforce environment, use your production EasySend player.
- APIKey (required) - your EasySend API key (provided by the EasySend team).
NOTE
For your sandbox environment use the dev EasySend player API Key, and for your production salesforce environment, use your production EasySend player API Key.
- Customer Id (required) - your EasySend customer Id. The customer Id can be found in your EasySend's environment.
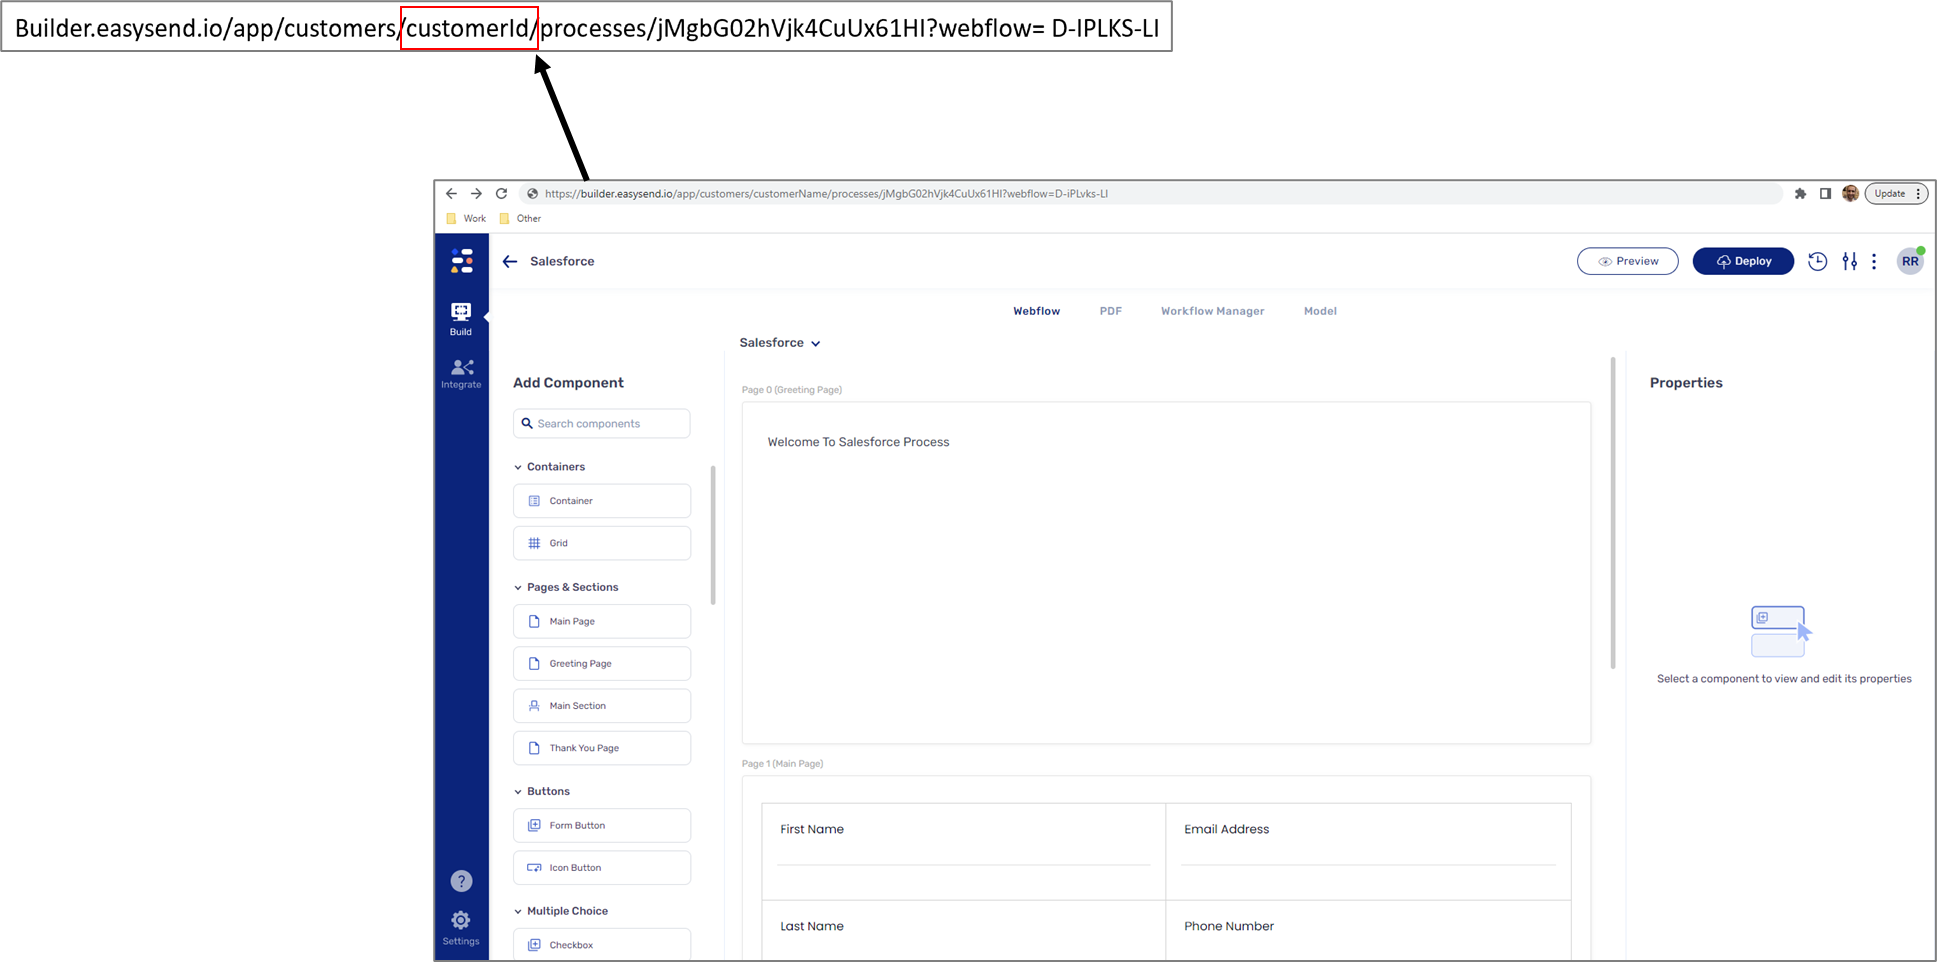
Figure 14: Customer Id
- Fields - the information to input here will be the names of different Salesforce fields that hold relevant values:
- Email field - the Salesforce field name that populates the Email information.
- Phone field - the Salesforce field name that populates the Phone # information.
- Default Process Field - the Salesforce field name that populates a process Id information. The process will be displayed first by default when the process list is presented to users. The process Id can be found on the URL of process page (see Figure 15) using your EasySend's environment.NOTETo configure process Id you must deploy the process first.
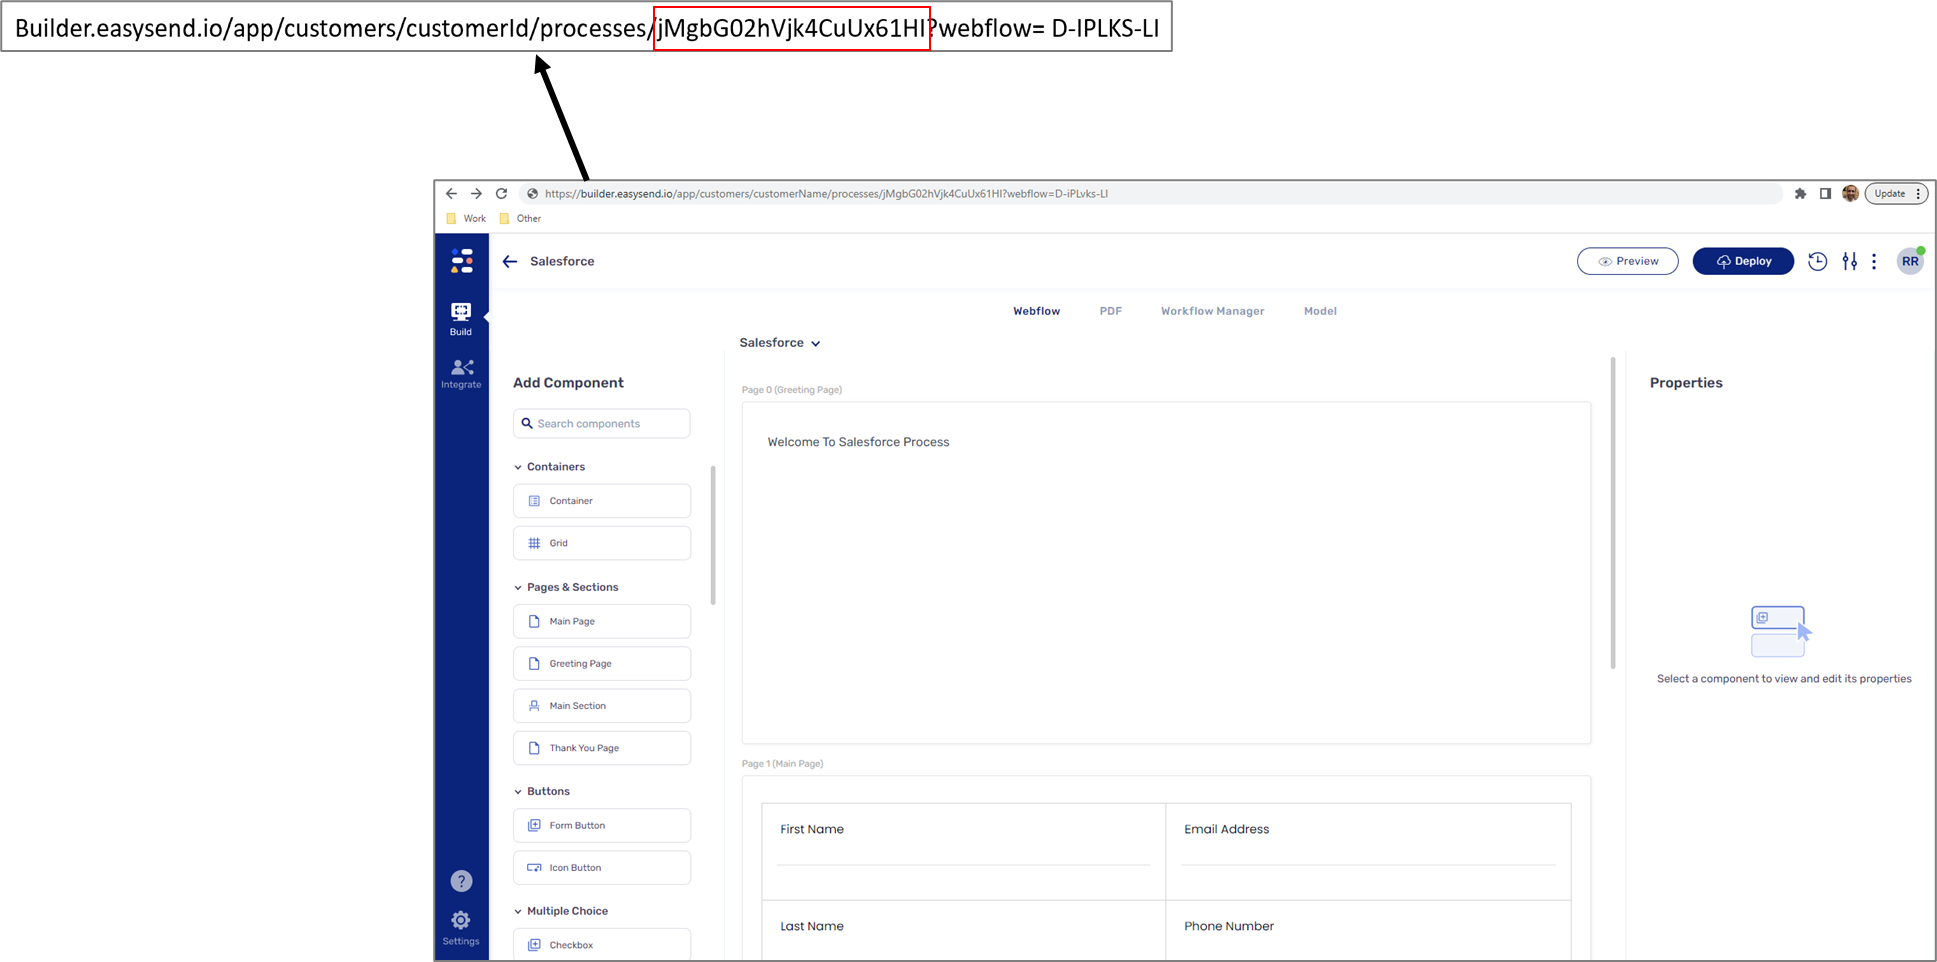 Figure 15: Process Id
- Business group field - the Salesforce field that populates the business group identifier (API) created in the Object Manager - Account section. Digital process can be initiated from a specific business group, for additional details, see the Apply a Business Group Selection section.
- Show All Processes:
- When checked - displays all available processes.
- When not checked - displays only the defined default process.
 Figure 15: Process Id
NOTE
The Show all Processes checkbox should by checked by default.
- Hide customer link:
- When checked - hides the customer link when a digital process is initiated.
- When not checked - displays the customer link when a digital process is initiated.
- EasySend Process List - used to define which processes will be displayed on the process dropdown list according to process Ids.
NOTE
Use a comma to separate between process Ids.
- Default Role - set a default role for co-browsing.
- Click the Save & New button (6).
NOTE
If some of the fields do not appear, see the Update the Page Layout section.
Set Remote Site Settings
(See Figure 16 to Figure 18)
To set remote site settings, perform the following steps:
- Click the
 icon and then click Setup.
 icon and then click Setup.
Result:
The Setup section appears:

Figure 16: Remote Site Settings
- Using the search bar (1), search for Remote Site Settings (2) and click it.
Result:
The Remote Site Settings section appears:

- Look for the easysend_io (3) under the Namespace Prefix column and click Edit (4).
Result:
The Remote Site Edit (Managed) section appears:

- Change Remote Site URL (5) to be the same as the Target URL (the EasySend Player URL).
Manage Profiles that Have Access to EasySend in Salesforce
(See Figure 19 to Figure 29)
To manage Profiles that have access to EasySend in Salesforce, perform the following steps:
- Click the
 icon and then click Setup.
 icon and then click Setup.
Result:
The Setup section appears:

Figure 19: Manage Connected Apps
- Using the search bar (1), search for Manage Connected Apps (2) and click it.
Result:
The Manage Connected Apps section appears:

Figure 20: Manage EasySend Connected App
- Locate the EasySend Connected App (3) and click it.
Result:
The EasySend Connected App section appears:

Figure 21: EasySend Connected App
- Click the Edit Policies button (4).
Result:
The EasySend Connected App fields become editable:

- Under the OAuth Policies section (5), set Permitted Users (6) to Admin approved users are pre authorized.
- Click the Save (7).
Result:
The EasySend Connected App section appears:

Figure 23: Manage Profiles
- Click Manage Profiles (8).
Result:
The Application Profile Assignment section appears:

Figure 24: Application Profile Assignment
- Check the boxes of appropriate profiles to choose which users have access to this application (9).
- Click Save (10).
- Click the
 icon again and then click Setup.
 icon again and then click Setup.
Result:
The Setup section appears:

- Using the search bar (11), search for Profiles (12) and click it.
Result:
The Profiles section appears:

- Choose the desired profiles that EasySend needs to act on behalf of. If you do not have a preference click Standard User (13).
Result:
The Standard User section appears:

Figure 27: Standard User Section
- configure access to EasySend’s metadata object:
- Under the Apps section (14) click Custom Metadata Types (15).
Result:
The Custom Metadata Types section appears:

- Click the Edit button (16).
Result:
The Available Custom Metadata Types appear:

Figure 29: Adding Custom Metadata Type
- Click the easysend_io.easysend settings (17).
- Click the Add button (18).
- Click the Save button (19).
Create a User for EasySend’s App Interactions
(See Figure 30 to Figure 32)
To create a user for EasySend’s application interactions, perform the following steps:
- Click the
 icon and then click Setup.
 icon and then click Setup.
Result:
The Setup section appears:

- Using the search bar (1), search for Users (2) and click it.
Result:
The Users section appears:

- Click the New User button (3).
Result:
The New User section appears:

Figure 32: New User Information
- Input information for the EasySend user (4).
- Verify that the email and the username are written in the following format:
salesforce+{customerName}-{environmentType}@easysend.io, for example:
- salesforce+globalInsuracne-prod@easysend.io
- salesforce+globalInsurance-dev@easysend.io
NOTE
The information is not case-sensitive.
- Assign the EasySend user with a profile, according to the objects it needs access for (see Manage Profiles that Have Access to EasySend in Salesforce).
- Verify that the profile appears in the list of checked profiles (see Manage Profiles that Have Access to EasySend in Salesforce).
NOTE
Please make sure that contact your EasySend account manager to enable Salesforce integration in your EasySend Builder. (Please note that this might include additional charges).
Set Salesforce Objects to Trigger an EasySend Process
(See Figure 33 to Figure 44)
To set Salesforce objects to trigger an EasySend process, perform the following steps:
- Click the
 icon and then click Setup.
 icon and then click Setup.
Result:
The Setup section appears:

- Using the search bar (1), search for Object Manager (2) and click it.
Result:
The Object Manager section appears:

Figure 34: Object Manager Section
- Click an object from the list (3) to add an EasySend button to.
Result:
The Details section appears:

- Click Buttons, Links, and Actions (4).
Result:
The Buttons, Links, and Actions section appears:

Figure 36: Buttons, Links, And Actions Section
- Click New Action (5).
Result:
The New Action section appears:

- Set the following (6):
- Action Type to Lightning Component.
- Lightning Component to easysend_io:easysendLink.
- Height to 550px.
- Label to EasySend Link.
NOTE
The Name updates automatically when the Label is set.
- Click the Save (7) button.
- Click the
 icon again and then click Setup.
 icon again and then click Setup.
Result:
The Setup section appears:

- Using the search bar (8), search again for Object Manager (9) and click it.
Result:
The Object Manager section appears:

Figure 39: Object Manager Section
- Click the same object you clicked in step 3.
Result:
The Details section appears:

- Click Page Layouts (10).
Result:
The Page Layouts section appears:

Figure 41: Page Layouts Section
- Click the desired layout from the list (11) to add the EasySend button to.
Result:
The Layout section appears:

- Click Mobile & Lightning Actions (12).
- In the Salesforce Mobile and Lightning Experience Actions (13) click the override the predefined actions option (14).
Result:
A list of actions appears:

- Drag and drop the EasySend Link component (15) into the list of actions.
- Click the Save button (16).

- Your object will now have an EasySend Link button associated with it.
View EasySend Sessions
(See Figure 45 and Figure 46)
To view EasySend sessions related list (custom object that generated when an EasySend Link is created), perform the following steps:

Figure 45: Edit Page
- Go to the object page (for example any Account page) where you want to see the EasySend sessions related list.
- Click the
 icon (1) and then click Edit Page (2).
 - Drag the eSSessionsRelatedList custom component wherever you want to see it on page. For example, it can be under the Related, Details tabs or a new created tab.
 icon (1) and then click Edit Page (2).
Figure 46: eSSessionsRelatedList Custom Component
NOTE
To view objects in EasySend, we need them to be Searchable, and Layoutable
Update the Page Layout
(See Figure 47 to Figure 51)
To update the page layout of an EasySend’s metadata object, perform the following steps:
- Click the
 icon and then click Setup.
 icon and then click Setup.
Result:
The Setup section appears:

- Using the search bar (1), search for Custom Metadata Types (2) and click it.
Result:
The Custom Metadata Types section appears:

Figure 48: Custom Metadata Types
- Click the name (under Label (3)) of the desired custom metadata.
Result:
The Easysend Settings (Managed) section appears:

- Locate the Page Layouts section (4).
- Click the Edit button (5).
Result:
The easysend settings Layout section appears:

Figure 50: easysend settings Layout and Highlights Panel
- Drag the desired fields form the section (6) and the place them into the Highlights Panel section (7):
Result:
The Highlights Panel is updated:

Figure 51: Updated Highlights Panel
- Click the Save button (8).
Hebrew Translations
Salesforce supports the translation of its User Interface (UI) and custom labels to Hebrew. To translate to Hebrew, perform the steps described in the following sections:
- Adding the Hebrew Language
- Translating the UI to Hebrew
- Overriding Custom Labels
Adding the Hebrew Language
(See Figure 52 to Figure 55)
To add Hebrew as an available language for translation in Salesforce, perform the following steps:
- Click the
 icon and then click Setup.
 icon and then click Setup.
Result:
The Setup section appears:

- Using the search bar (1), search for Language Settings (2) and click it.
Result:
The Language Settings section appears:

Figure 53: Language Settings Section
- Check the checkbox to enable end-users languages.
Result:
The Available Languages section displays languages:

Figure 54: Available Languages
- Select the Hebrew language from the list (4).
- Click the Add button (5).
- Click the Save button (6).
Result:
The Hebrew language is added to the Displayed Languages section:

Figure 55: Displayed Languages
Translating the UI to Hebrew
(See Figure 56 to Figure 58)
To translate to Hebrew, perform the following steps:
- Click the
 icon and then click Settings.
 icon and then click Settings.
Result:
The Personal Information section appears:

Figure 56: Language & Time Zone
- Click Language & Time Zone (1).
Result:
The Language & Time Zone section appears:

- Click Language dropdown (2) and select the Hebrew language (עברית).
- Click the Save button (3).
Result:
The UI is translated to Hebrew:

NOTE
Once the translation is complete, update the Time Zone and Locale accordingly.
Overriding Custom Labels
(See Figure 59 to Figure 66)
To translate custom labels, perform the following steps:
- Click the
 icon and then click Setup.
 icon and then click Setup.
Result:
The Setup section appears:

- Using the search bar (1), search for Translation Language Settings (2) and click it.
Result:
The Translation Language Settings section appears:

Figure 60: Translation Language Settings Section
- Click the Enable button (3).
Result:
The Translation Workbench is enabled:

Figure 61: Translation Workbench
- Click the
 icon and then click Setup.
 icon and then click Setup.
Result:
The Setup section appears:

- Using the search bar (4), search for Custom Labels (5) and click it.
Result:
The Custom Labels section appears:

- Select a custom label from the list (6) and click its name.
Result:
The custom label details appear:

Figure 64: Custom Label Details
- To override the custom label translation (7), click Override (8) or click New Local Translations Overrides (9).
Result:
The New Translation section appears:

Figure 65: New Translation Section
- Enter a new Hebrew translation (10).
- Click the Save button (11).
Result:
The new Hebrew translation (12) appears under the Local Translations / Overrides section:

Figure 66: Local Translations / Overrides Section
NOTE
In case that changes were not updated on components after performing the overriding custom label translation, switch the UI language from Hebrew to English and again from English to Hebrew as described in the Translating the UI to Hebrew section.
Apply a Business Group Selection
When initiating a digital process through a Salesforce account, there is a possibility to initiate processes only from a specific business group. The following sections describe how to apply this feature.
Step 1: Create a business Group Field in an Account
(See Figure 67 to Figure 78)
To create a new business group field in an account, perform the following steps:
- Click the icon and then click Setup.
Result:
The Setup section appears:
- Using the search bar (1), search for Object Manager (2) and click it.
Result:
The Object Manager section appears:

Figure 68: Object Manager - Account
- Click Account (3).
Result:
The Object Manager - Account section appears:

Figure 69: Account - Fields & Relationship
- Click Fields & Relationship (4).
Result:
The Fields & Relationships section appears:

Figure 70: Account - Fields & Relationship
- Click New (5).
Result:
The New custom Field section appears:

Figure 71: New Custom filed Section
- Click Text (6).
- Click Next (7).
Result:
The New custom Field section updates:

Figure 72: Filed Label and Length
- Enter the details (8):
- Field Label - business Group name. The name must be entered exactly as it appears in the Process Manager screen in your EasySend's platform.
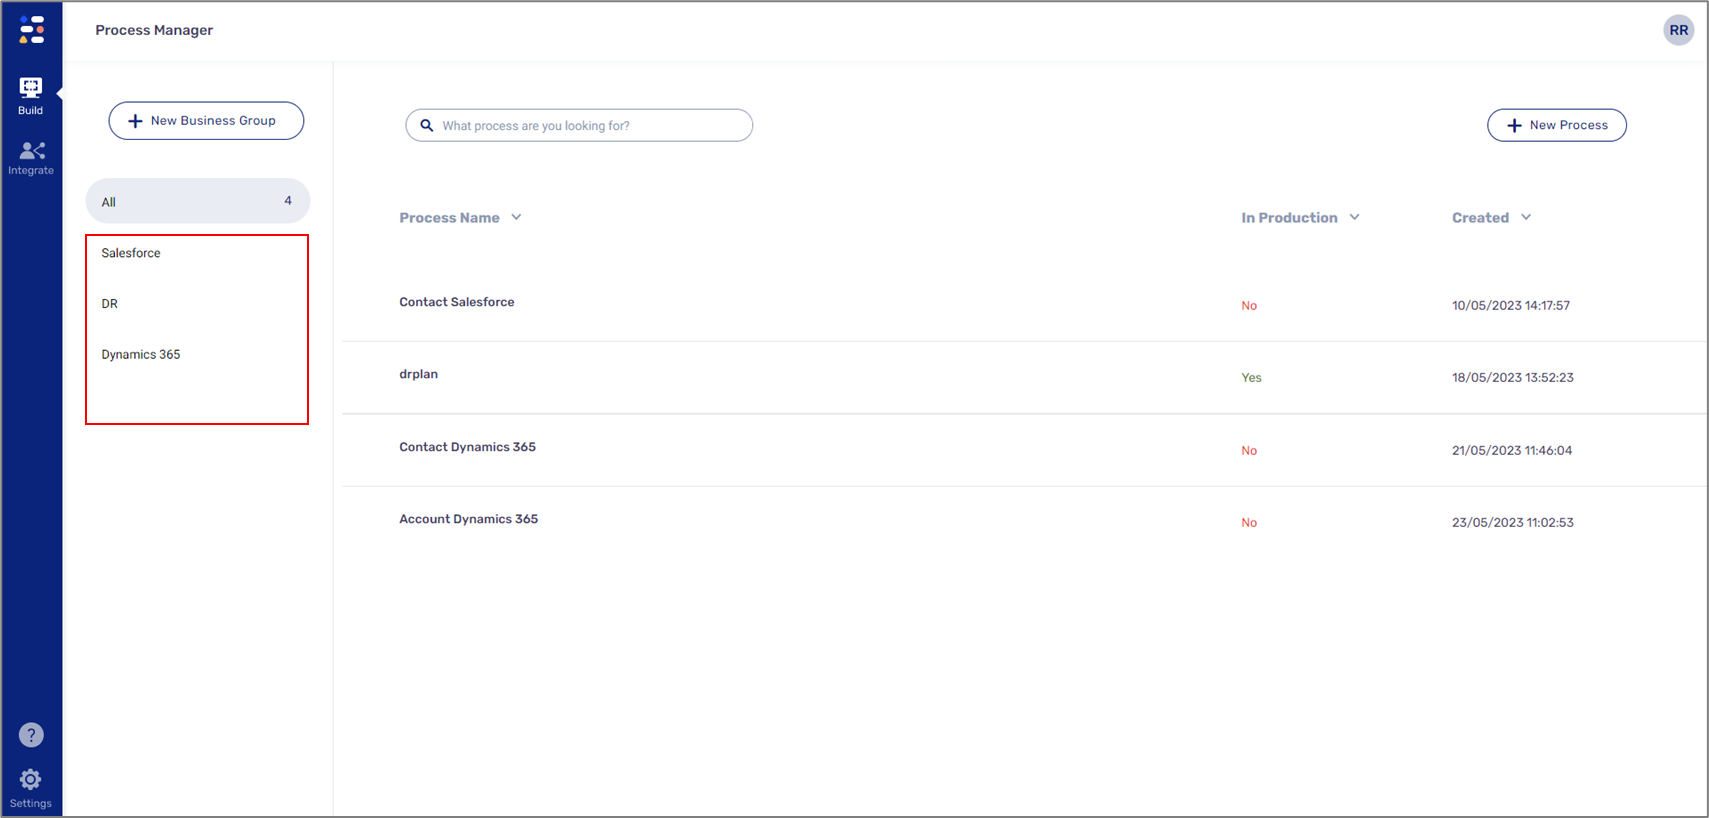 Figure 73: Business Groups
 - Length - for example 50.
- Field Label - business Group name. The name must be entered exactly as it appears in the Process Manager screen in your EasySend's platform.
- Click Next (9).
 Figure 73: Business Groups
Result:
The New custom Field section updates:

Figure 74: Next
- Click Next (10).
Result:
The New custom Field section updates:

Figure 75: Save
- Click Save (11).
Result:
The Fields & Relationship section appears:

Figure 76: Add Business Group
- the business Group is added (12).
- Click Page Layouts (13).
Result:
The Page Layouts section appears:

Figure 77: Page Layouts Section
- Click Account Layout (14).
Result:
The Account Detail section appears:

Figure 78: Added Business Group
- Verify that the business Group is added (15).
Step 2: Adding the Business Group Identifier (API)
(See Figure 79 to Figure 82)
To add the business group identifier (API), perform the following steps:
- Click the icon and then click Setup.
Result:
The Setup section appears:
- Using the search bar (1), search for Custom Metadata Types (2) and click it.
Result:
The Custom Metadata Types section appears:
- Click Manage Records (3).
Result:
The Easysend Settings section appears:

Figure 81: Customer Settings - Edit
- Click Edit (4).
Result:
The EasySend Settings Edit section appears:
- In the Business group filed section copy and paste the business group identifier (API) you created in Step 1 (5).

Figure 82: business Group Identifier (API)
Step 3: Set the Business Group in an Account Page
(See Figure 83)

Figure 83: Business Group in an Account Page
To set a business group in an account page, perform the following steps:
- In the account page, set the Business Group name (1).
- Click Save (2).
Step 4: Platform Validations Deployment
(See Figure 84)
When selecting digital processes from business groups for the first time, it is mandatory to preform a deployment from the EasySend's platform Validations screen.

Figure 84: Validations Screen
Was this article helpful?