Process Mapping
- PDF
Process Mapping
- PDF
Article summary
Did you find this summary helpful?
Thank you for your feedback!
Article Overview
The following article describes the process mapping feature. It explains what the feature is, its structure, and how to use it.
What is Process Mapping?
Process mapping enables you to visually break down and map the flow of a digital process from end to end and step-by-step while having a strategic overview. For example, you can:
- Specify process integration requirements.
- Add multiple stages and connect them to show a workflow.
- Define roles for each stage.
- Write descriptions and notes that will help other stakeholders understand the purpose of a process.
- Navigate to different areas within the platform for advanced configuration.
NOTE
To watch a short video about process mapping, click here.
Accessing the Feature
Process Mapping is available for new processes and is accessible in two ways.
Webflow Screen
(See Figure 1)
To access the feature using the Webflow screen, perform the following steps:
- Create a new process to access a new Webflow.
Result:
The Webflow screen appears:
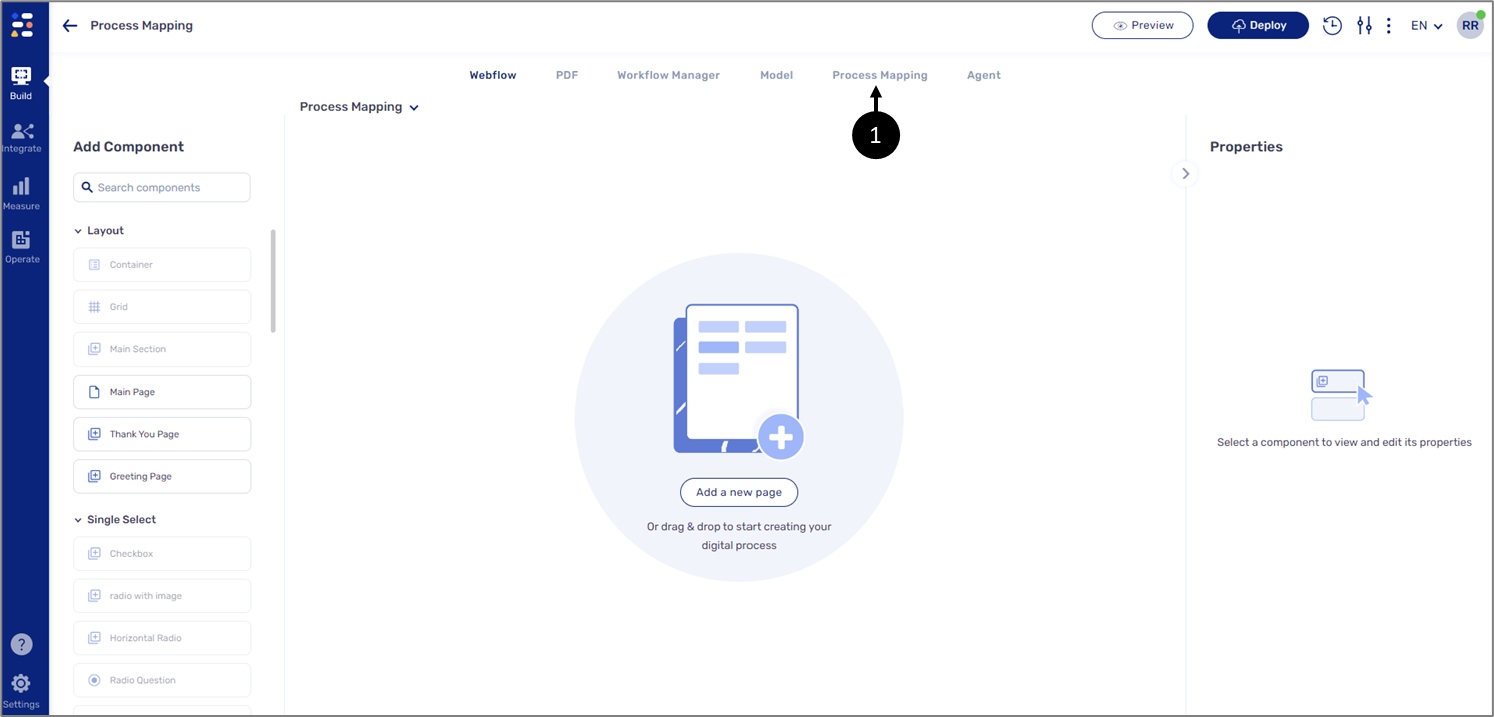
Figure 1: Process Mapping Tab
- Click the Process Mapping Tab (1).
Process Manager Screen
Important!
Process Mapping is only available for newly created processes only.
(See Figure 2)
To access the feature using the Process Manager screen, perform the following steps:
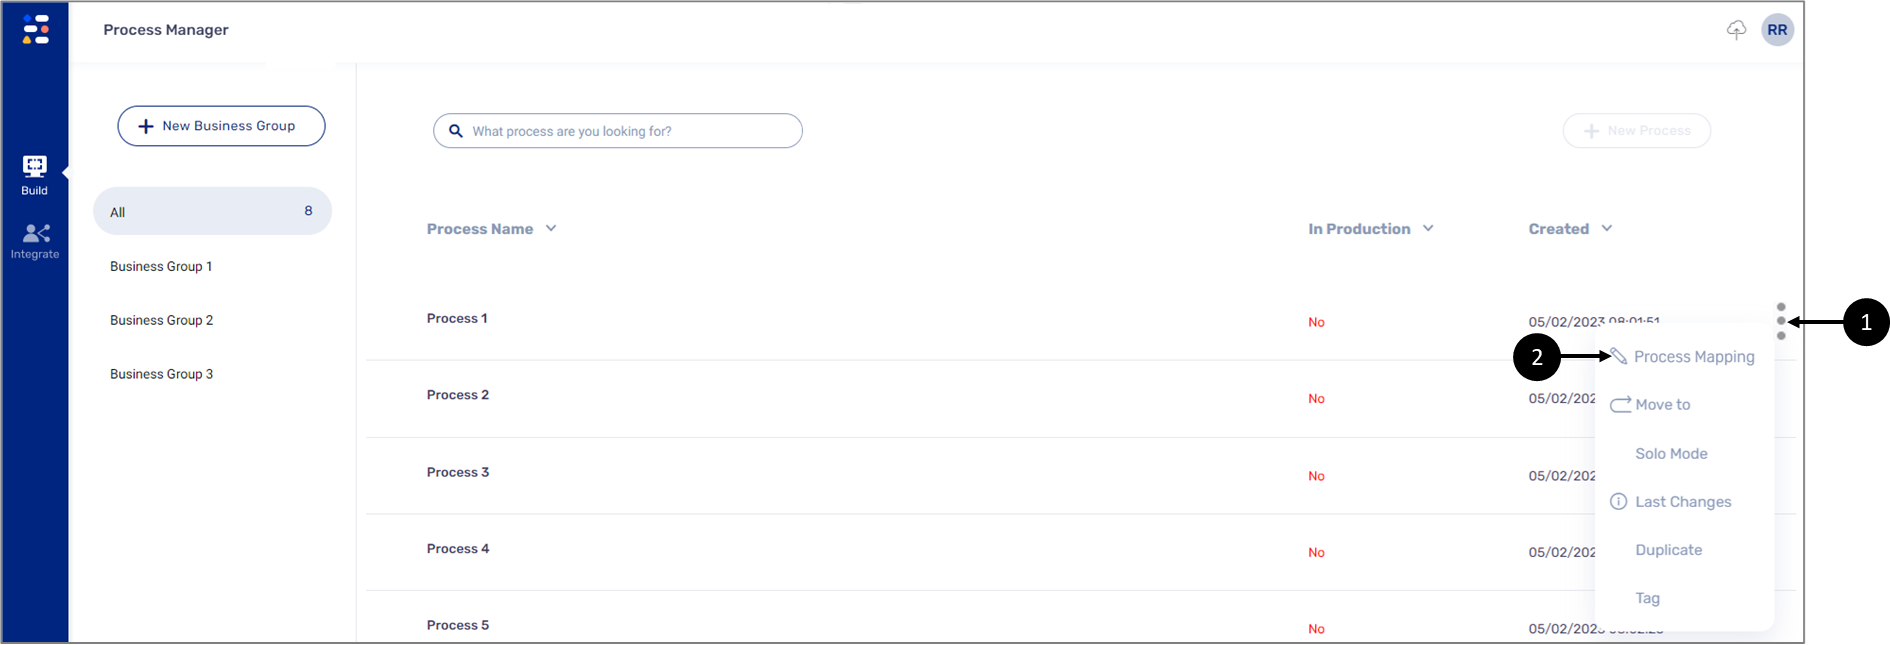
Figure 2: Process Mapping Option
- Access the Process Manager screen.
- Hover over the created process.
- Click the three dots (1).
- Click the Process Mapping option (2).
Process Mapping Screen
Figure 3 and Table 1 describe the structure of the Process Mapping screen.
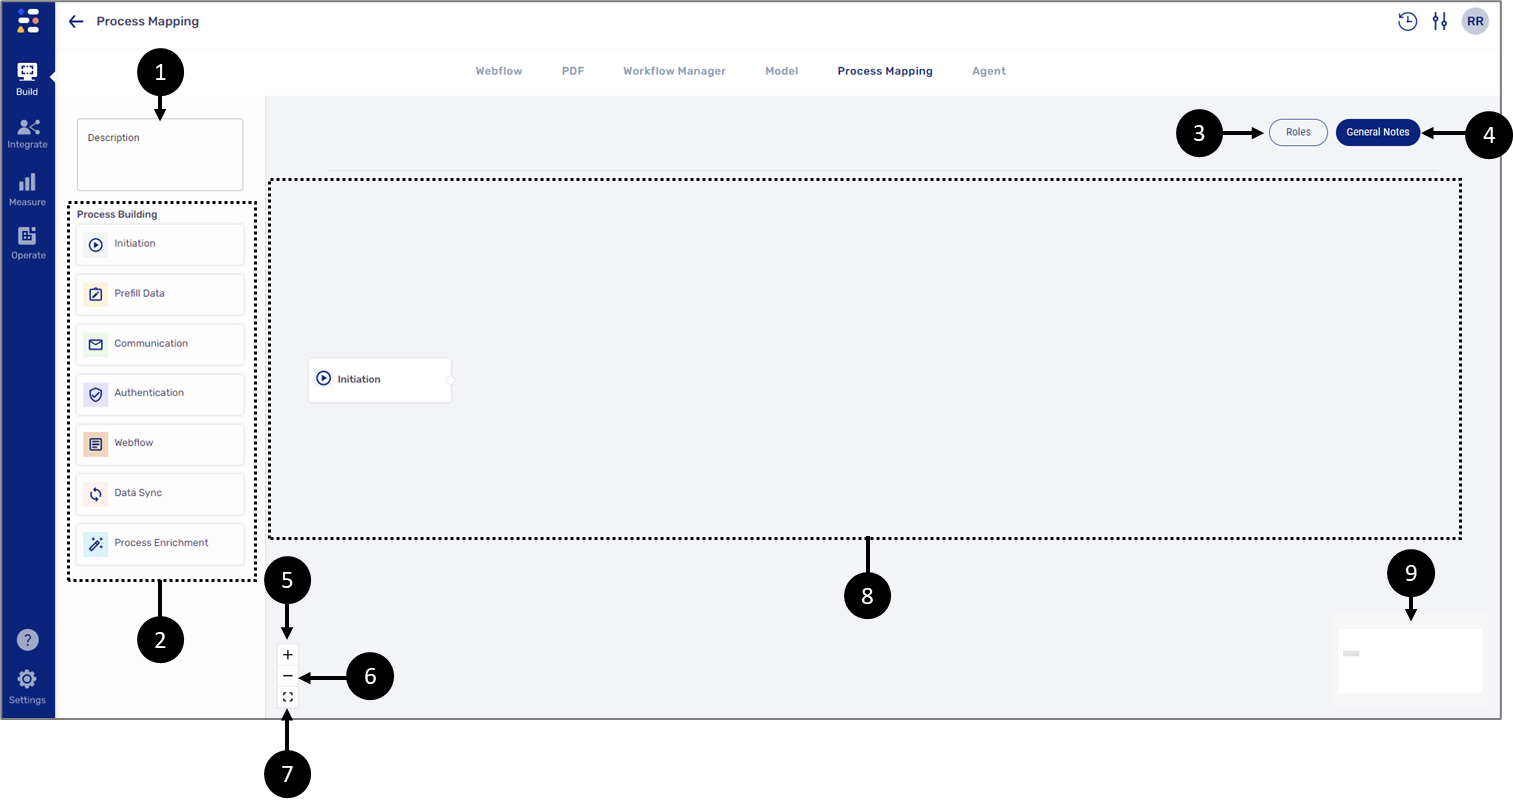
Figure 3: Process Mapping Screen
Table 1: Process Mapping Screen
No. | Icon | Name | Description |
1 | - | Description | Enables to write a general description about the process |
2 | - | Process Building | Contains the elements to visualize and map the flow of a process using drag-and-drop NOTE For additional information, see the Process Building Stages section |
3 | - | Roles | Enables to add roles NOTE Roles are assigned to stages, for additional information, see the Creating Roles section |
| 4 | - | General Notes | Enables to add general notes about the process |
| 5 |  | Zoom in | Enables to zoom in the canvas |
| 6 |  | Zoom out | Enables to zoom out the canvas |
| 7 |  | Fit view | Enables to fit the view of the canvas |
| 8 | - | Canvas | Contains the stages used for visualizing and mapping the flow of the process NOTE
|
| 9 | - | Mini map | Enables to navigate the canvas |
Process Building Stages
(See Figure 4)
The Process building section contains the following stages:
- Initiation
- Prefill Data
- Communication
- Authentication
- Webflow
- Data Sync
- Process Enrichment
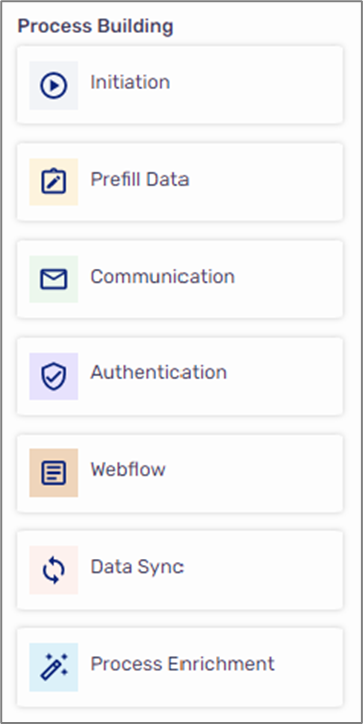
Figure 4: Process Building Stages
Initiation
(See Figure 5)
This is the first stage that specifies where the process starts. The stage appears by default when a new canvas is created.
Figure 5: Initiation
Prefill Data
(See Figure 6)
This stage indicates that the process contains pre-populated information from a specified source.
Figure 6: Prefill Data
Communication
(See Figure 7)
This stage indicates that there is an interaction with the end-user via email or SMS.
Figure 7: Communication
Authentication
(See Figure 8)
This stage specifies that end-user verification must occur to proceed with the process.
Figure 8: Communication
Webflow
(See Figure 9)
This is the stage in which the end-users interact with the digital process, for example:
- Fill out the information
- Upload documents
- Provide eSignatures
Figure 9: Webflow
NOTE
To learn more about Webflows, click here.
Data Sync
(See Figure 10)
This is the stage in which different types of files are uploaded after the process or one of its steps were submitted. The files will be integrated externally with a chosen system, for example, with a CRM system or a database.
Figure 10: Webflow
Process Enrichment
(See Figure 11)
We will use this stage to show that the process interacts with external systems or resources to enrich it. For example, using APIs for autocomplete or interfacing with databases to extract and display data.
Figure 11: Process Enrichment
Stages and Canvas
The following sections describe how to work with stages and the canvas.
Creating Roles
(See Figure 12)
Each Process Mapping instance is created with a default role - Customer. Additional roles are created by clicking the Roles button (1) and the + Add Role option (2). When checking the checkbox (3) of a role the stages in the canvas are filtered according to their assigned roles and become available/unavailable accordingly.
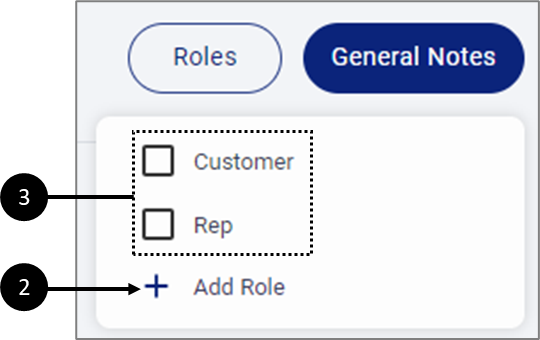
Figure 12: Creating Roles
NOTE
Role names must be unique: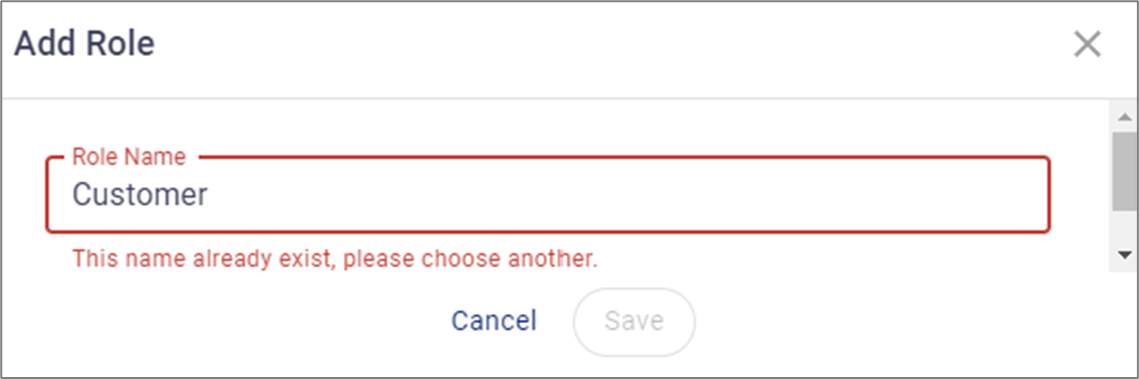
Adding Stages
(See Figure 13)
Stages from the Process Building section are added to a canvas by dragging and dropping, for example:
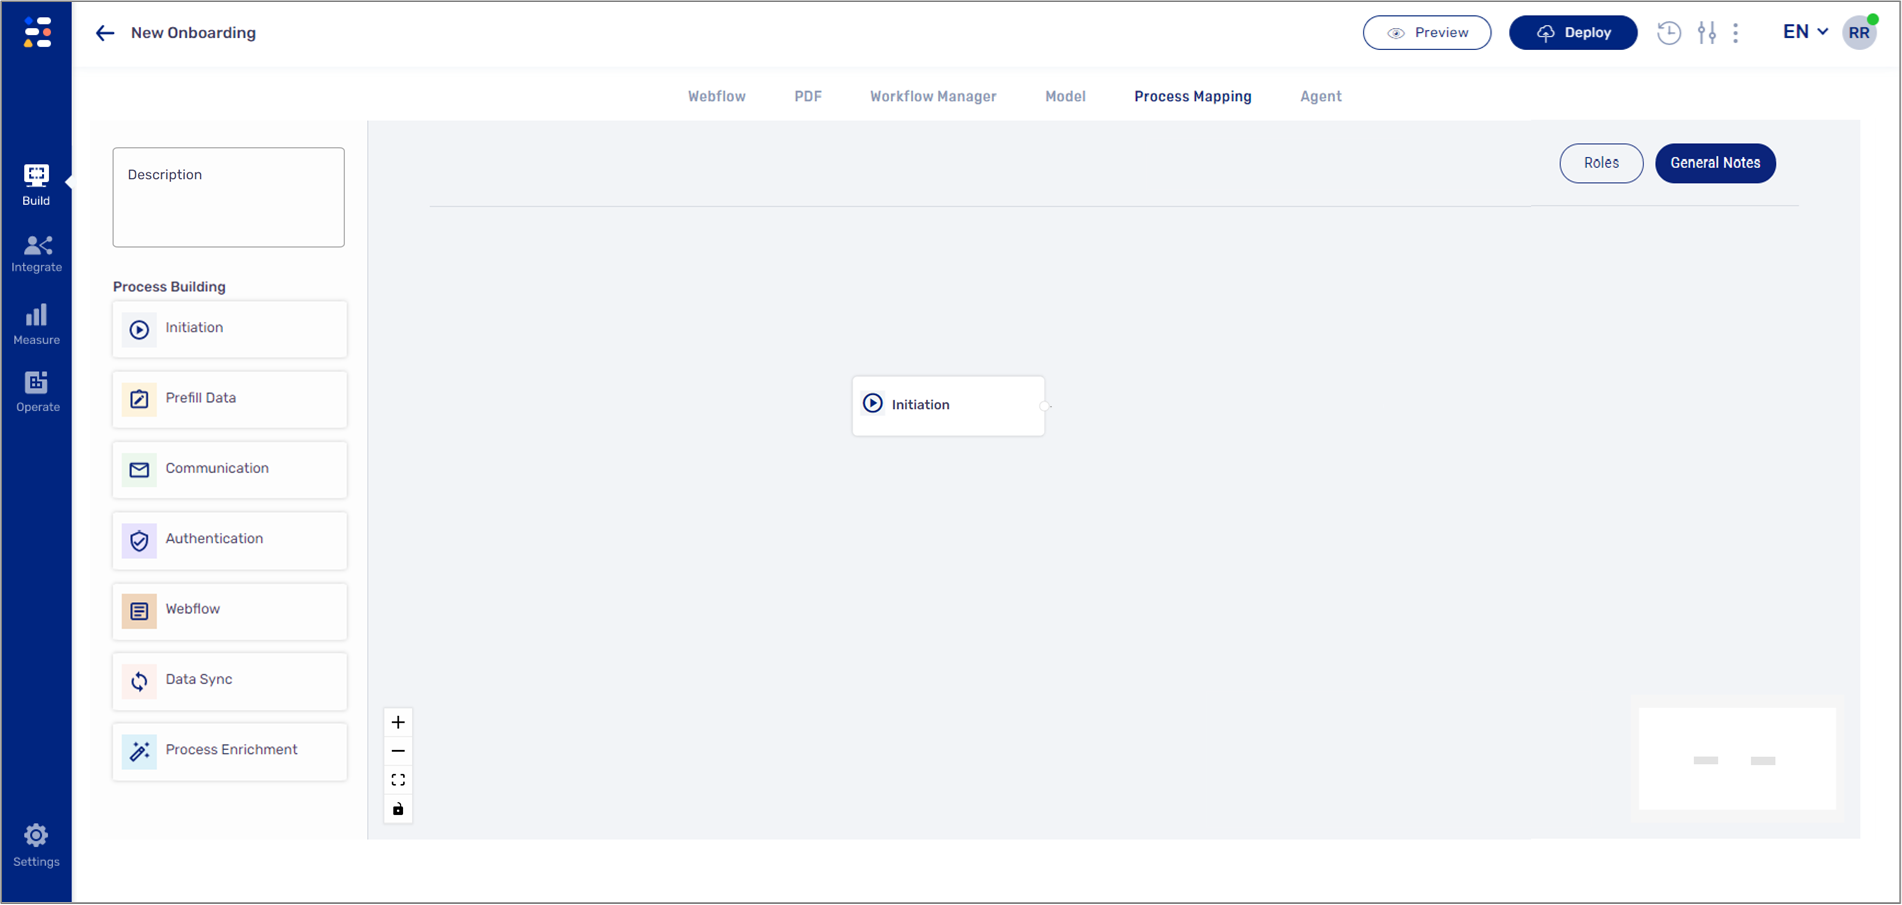
Figure 13: Added Stage
Configuring Stages
(See Figure 14 to Figure 17)
To configure a stage that was added to the canvas, we will click it and then use its properties (appearing on the left pane), for example, properties for the Initiation stage (1):
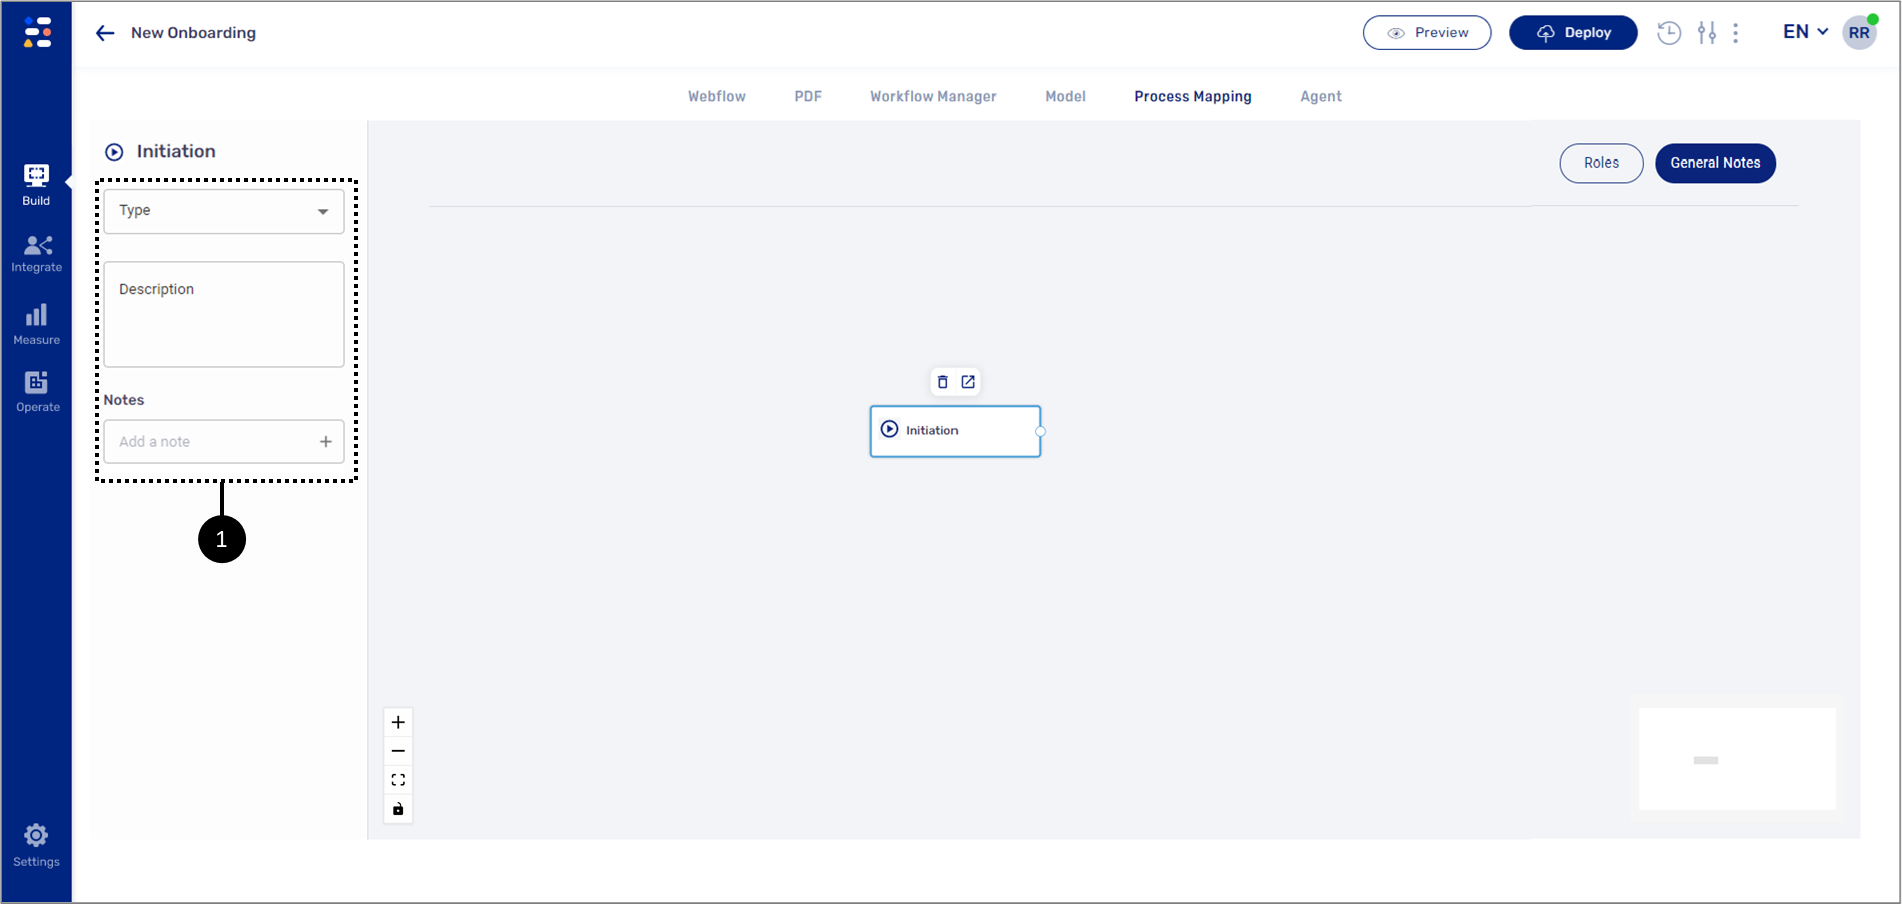
Figure 14: Properties
NOTE
When clicking a stage, two additional options appear  delete and navigate. For additional information about the navigate option, see the Navigating Within the Platform section.
delete and navigate. For additional information about the navigate option, see the Navigating Within the Platform section.In some cases, configuring the properties of the stage will change its visual appearance. For example:
- When adding roles:
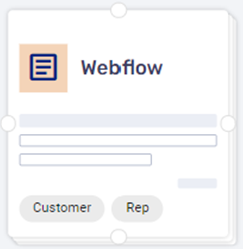
Figure 15: Roles
- When setting a type:

Figure 16: Type
- When specifying files to upload:
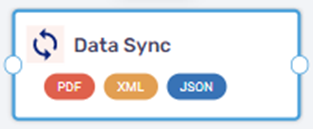
Figure 17: Files
Initiation Properties
(See Figure 18)
Using the properties of the Initiation stage we can configure the type of initiation, or where the process is generated from, including:
- CRM:
- Salesforce
- Microsoft Dynamics
- Guidewire
- Website Link
- Journey Sender
- Custom API
In addition, we can write a specific description of the stage and add notes.
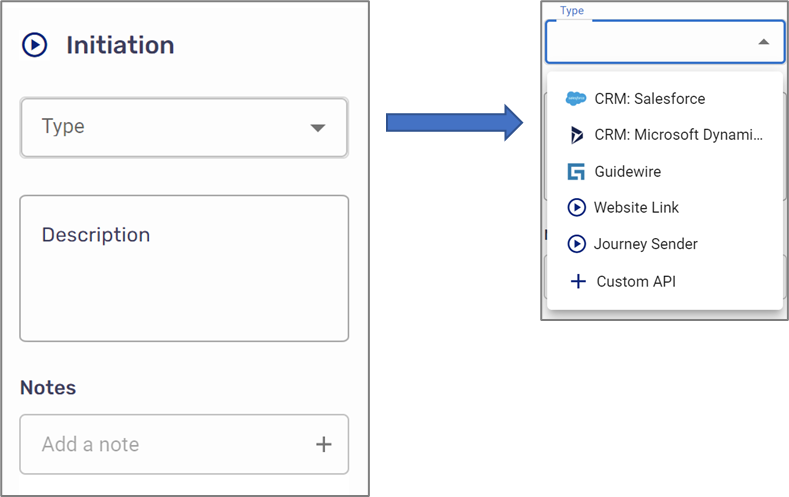
Figure 18: Intimation Properties
Prefill Data Properties
(See Figure 19)
Using the properties of the Prefill Data stage we can configure the source of the data that will be populated into the process:
- CRM:
- Salesforce
- Microsoft Dynamics
- Guidewire
- Custom API
In addition, we can write a specific description of the stage and add notes.
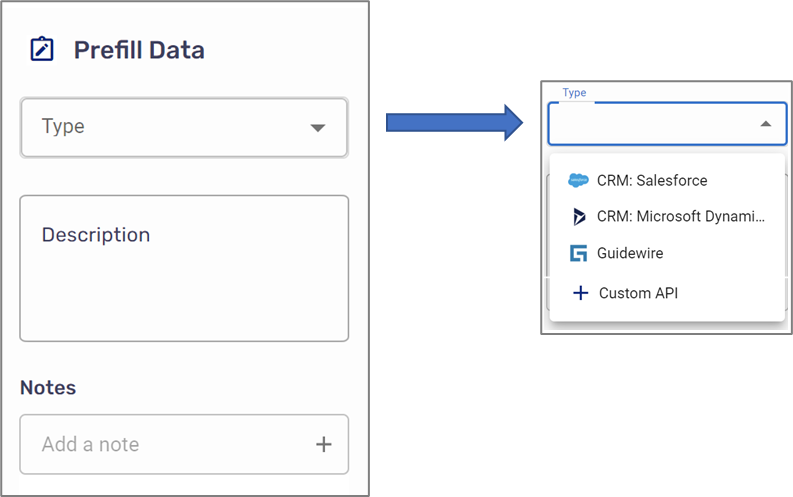
Figure 19: Prefill Data Properties
Communication Properties
(See Figure 20)
Using the properties of the Communication stage we can configure the type of communication channel for interacting with the end-user:
- Email (checked by default)
- SMS
In addition, we can assign a role to the stage, write a specific description of the stage and add notes.
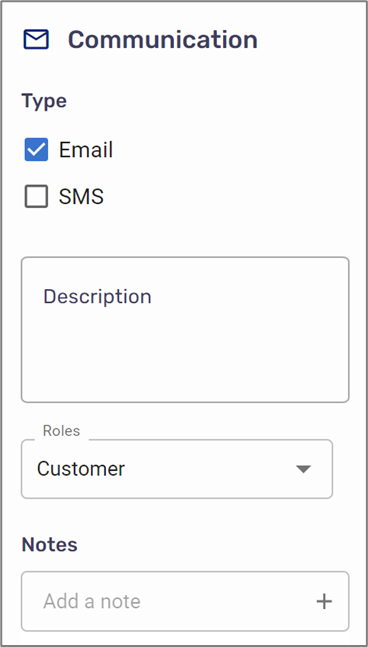
Figure 20: Communication Properties
Authentication Properties
(See Figure 21)
Using the properties of the Authentication stage we can configure its type:
- One Time Password (OTP)
- Single Sign On (SSO)
- Custom Authentication
In addition, we can write a specific description of the stage and add notes.
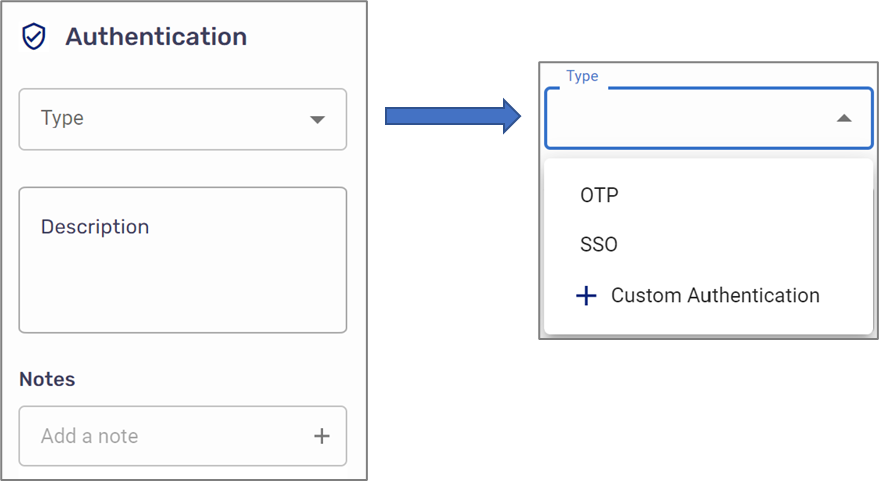
Figure 21: Authentication Properties
Webflow Properties
(See Figure 22)
Using the properties of the Webflow stage we can configure its name and assign a role to it.
In addition, we can write a specific description of the stage and add notes.
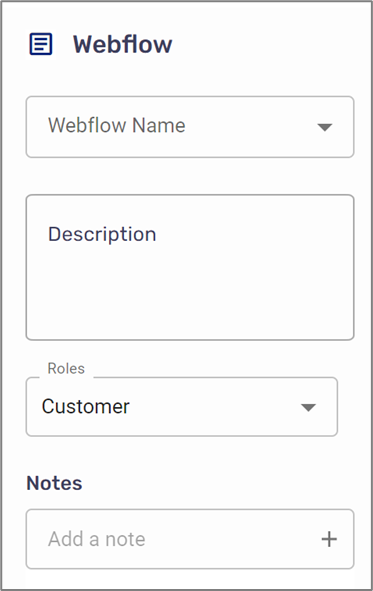
Figure 22: Webflow Properties
Data Sync Properties
(See Figure 23)
Using the properties of the Data Sync stage we can configure:
- Where the information will be integrated:
- CRM:
- Salesforce
- Microsoft Dynamics
- Guidewire
- Custom API
- CRM:
- What files to include in the information upload:
- XML
- JSON
In addition, we can write a specific description of the stage and add notes.
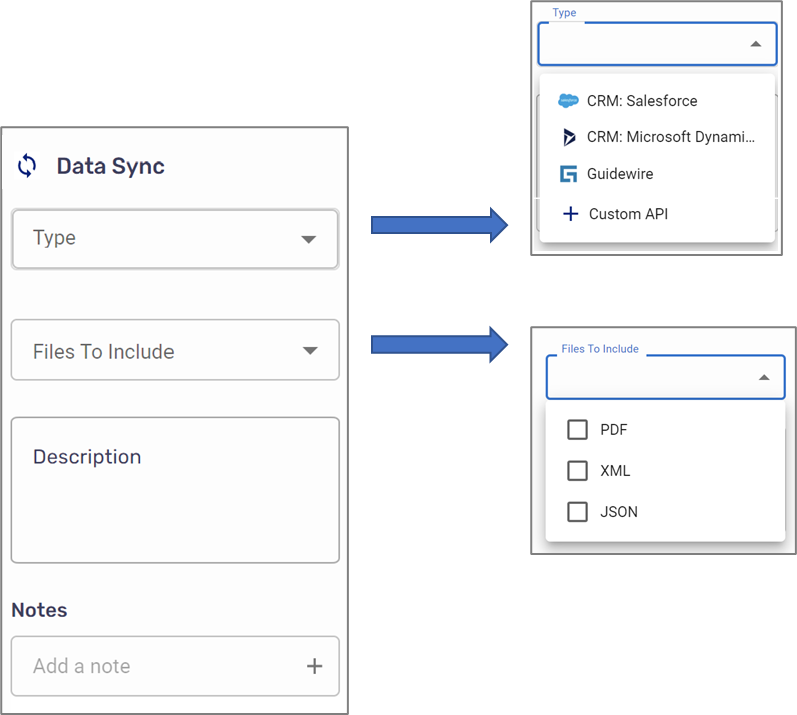
Figure 23: Information Upload Properties
Process Enrichment Properties
(See Figure 24)
Using the properties of the Process Enrichment stage we can configure the source that will enrich the process:
- CRM:
- Salesforce
- Microsoft Dynamics
- Guidewire
- Custom API
In addition, we can assign a role to the stage, write a specific description of the stage, and add notes.
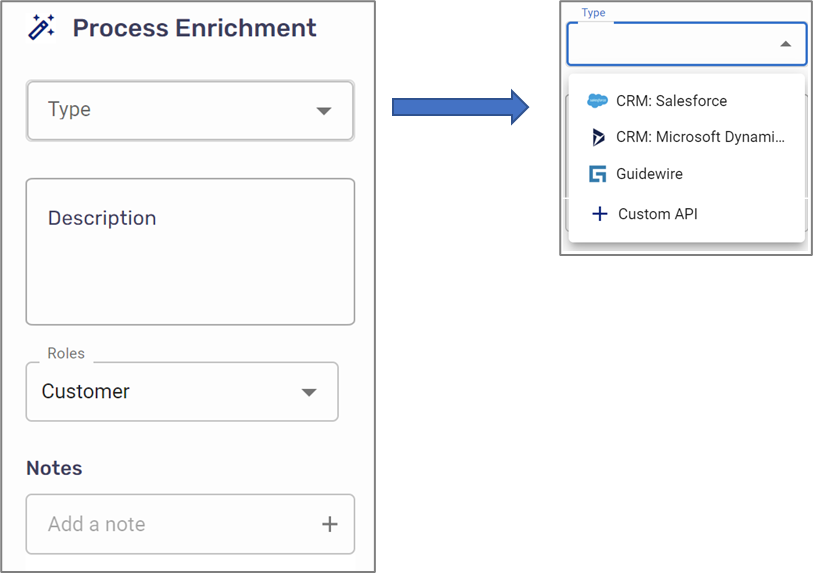
Figure 24: Process Enrichment Properties
Connecting Stages
(See Figure 25)
To map stages and create detailed visualizations to better understand the relationship between them, we need to establish connections. Each stage has at least one connection point (1), for example:
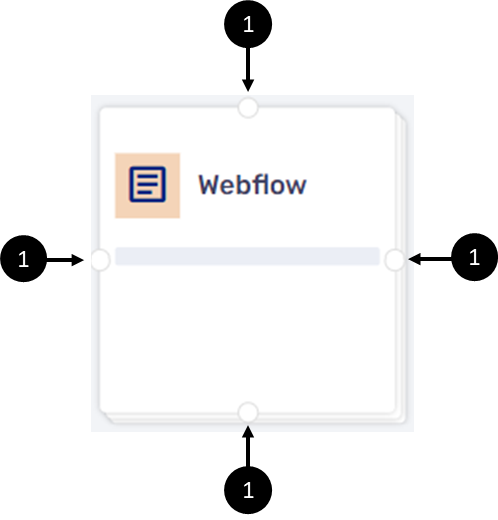
Figure 25: Stage Connecting Points
To establish a connection between stages we will hover over a connection point and wait for the icon to appear. Then, with the left click, we will pull a connecting line toward the next stage and attach it to a connection point, for example:
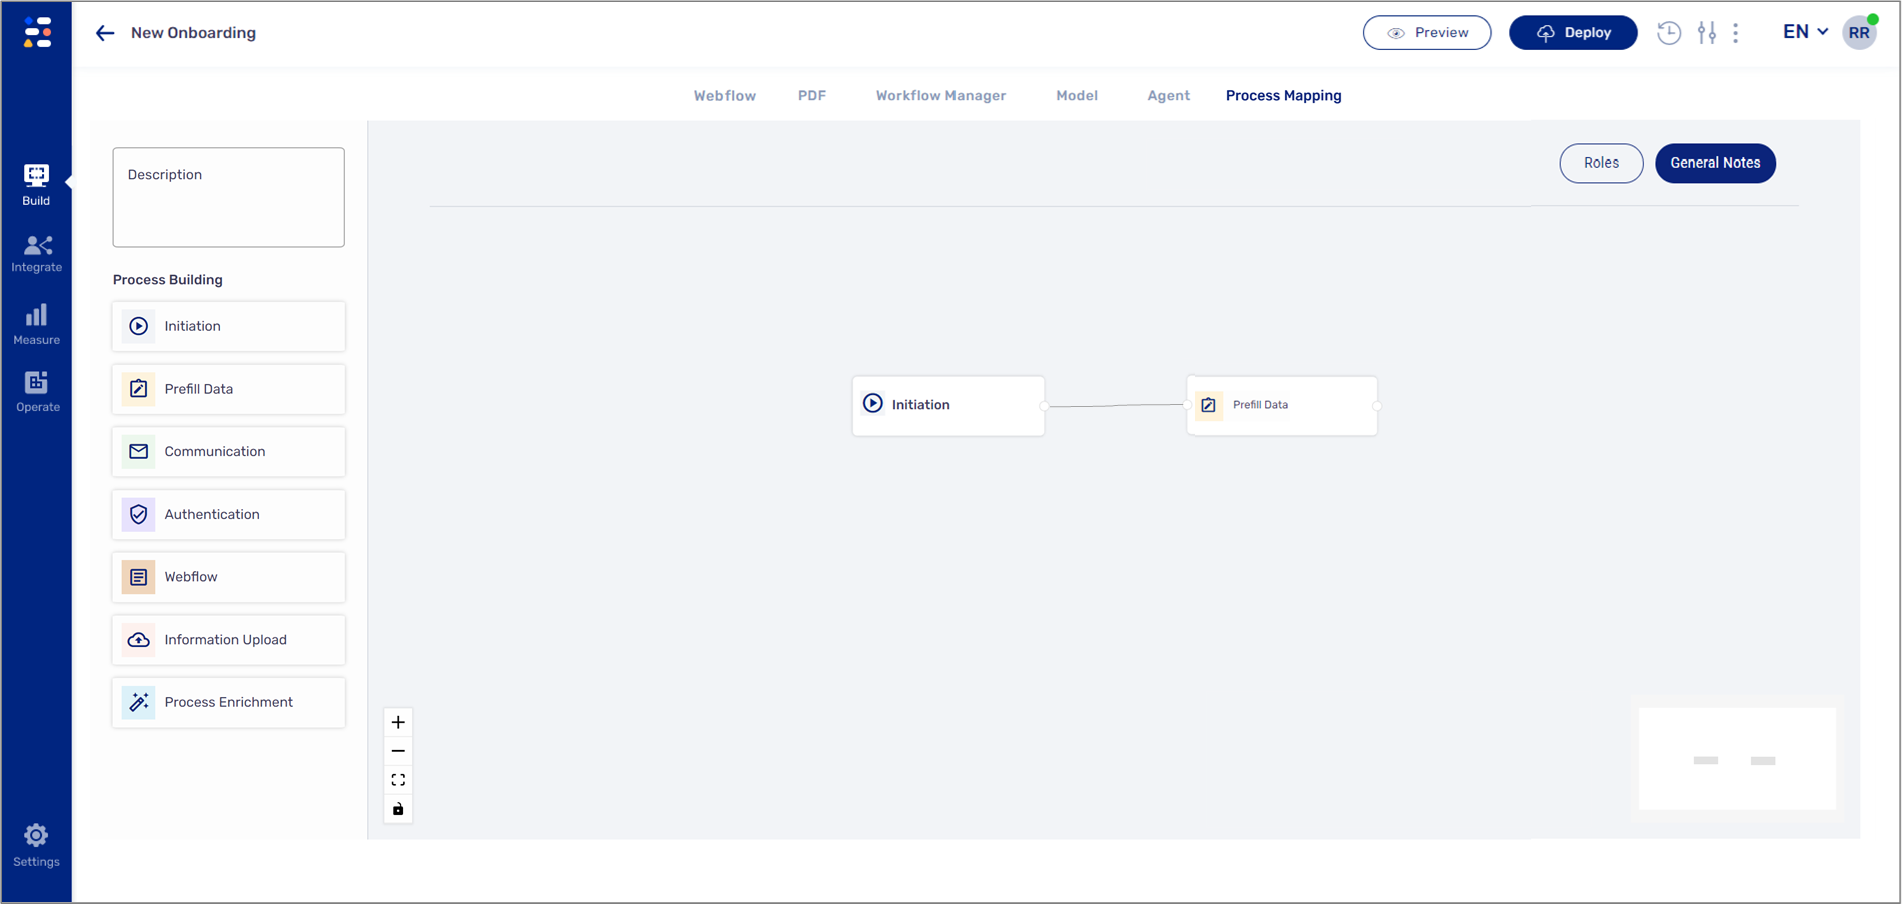
Figure 26: Connected Stages
Usage Example
The following sections describe an example of a Process Mapping use case.
Customer Onboarding Process
- A customer calls a call center, asks to join a company, and leaves personal details.
- A representative locates the customer details in an internal system and uses it to send a process link via email or SMS.
- The customer receives the link and clicks it.
- To access the process, the customer enters an OTP.
- When the process starts, the customer interacts with it:
- Fills out information - some of the information is autocomplete due to API integration.
- Upload documents.
- Provides eSigantures.
- Submit it.
- After the process is submitted and closed by the customer, the provided information (including files) integrates back into the internal system.
Mapping and Visualizing the Process
(See Figure 27 to Figure 44)
To map and visualize the process, we will perform the following steps:
- Create the additional relevant roles, in our example - Rep.
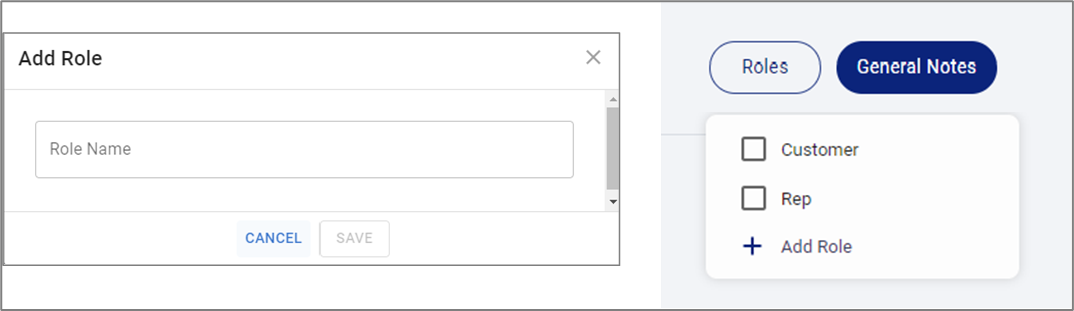
Figure 27: Adding Roles
- Click Initiation and configure it:
- Set its type - for example, CRM.
- Write a description.
- Add a note.
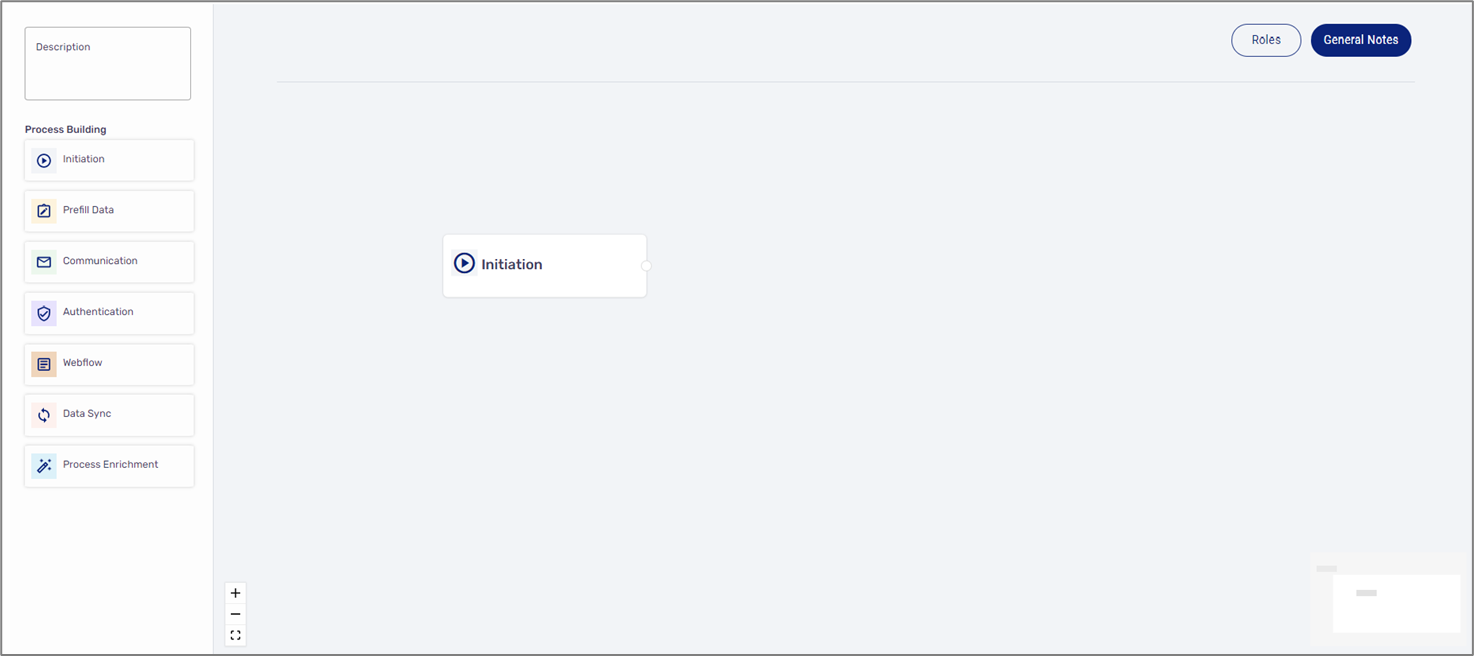
Figure 28: Initiation
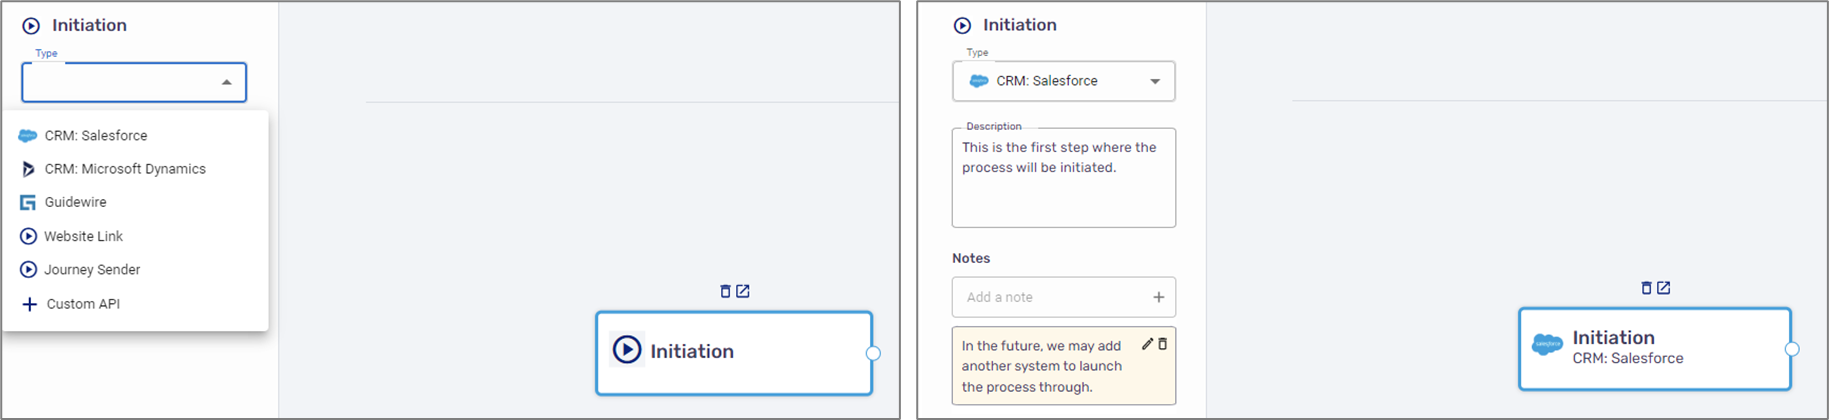
Figure 29: Configuration
- Drag and drag the second stage - Prefill Data.
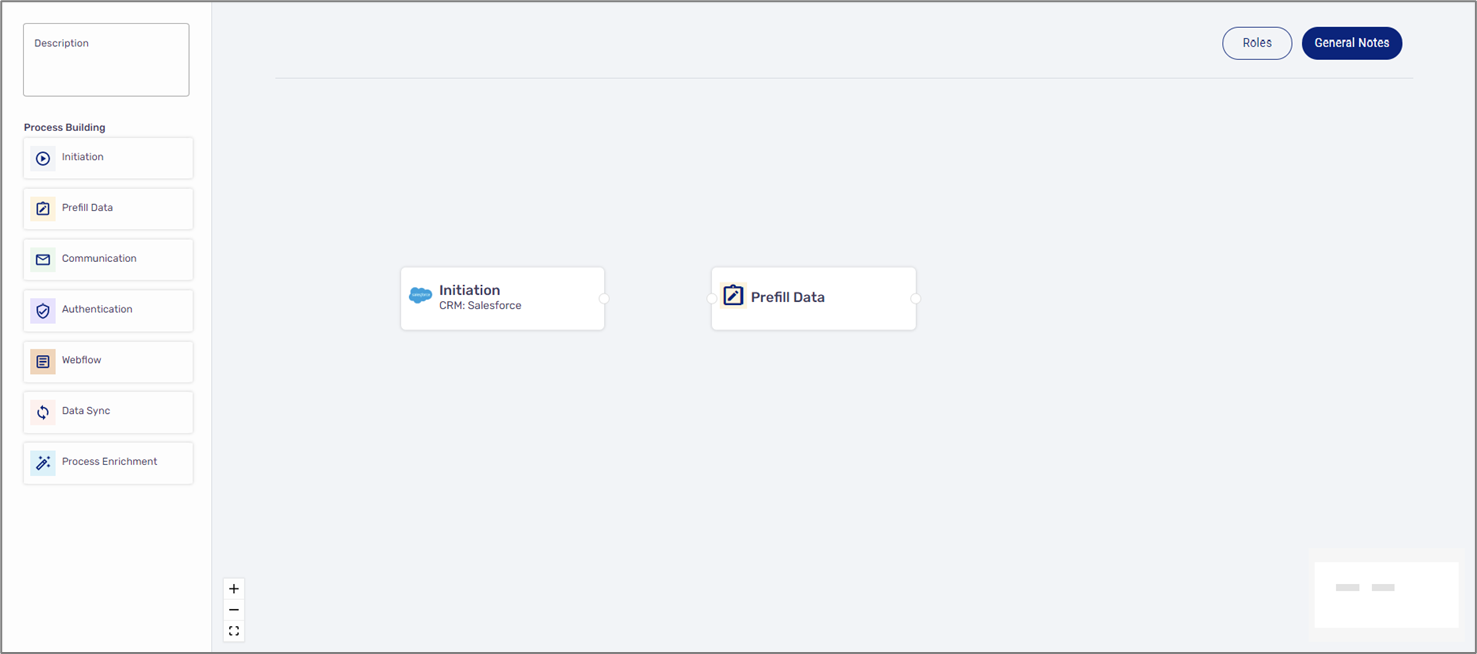
Figure 30: Prefill Data
- Click Prefill Data and Configure it:
- Set its type - the source of the prefilled data, for example, CRM.
- Write a description.
- Add a note.

Figure 31: Configuration
- Connect the stages.
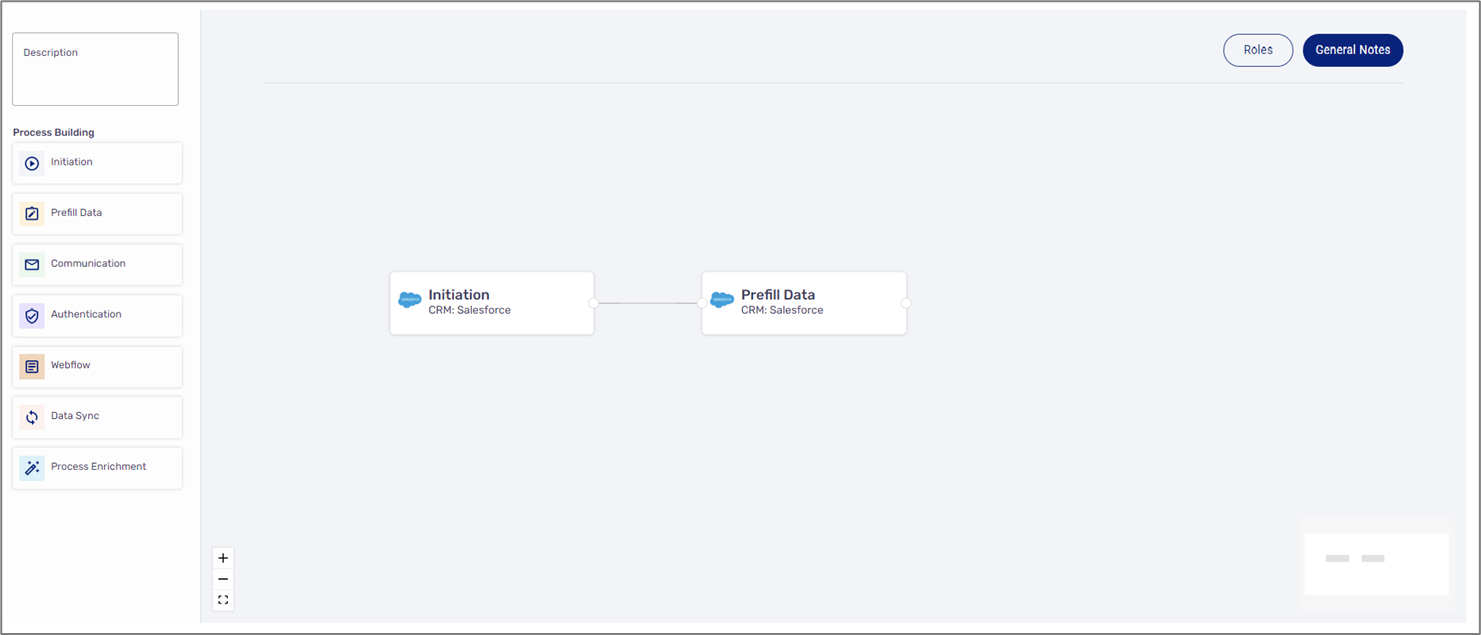
Figure 32: Connecting Stages
- Drag and drag the third stage - Communication.
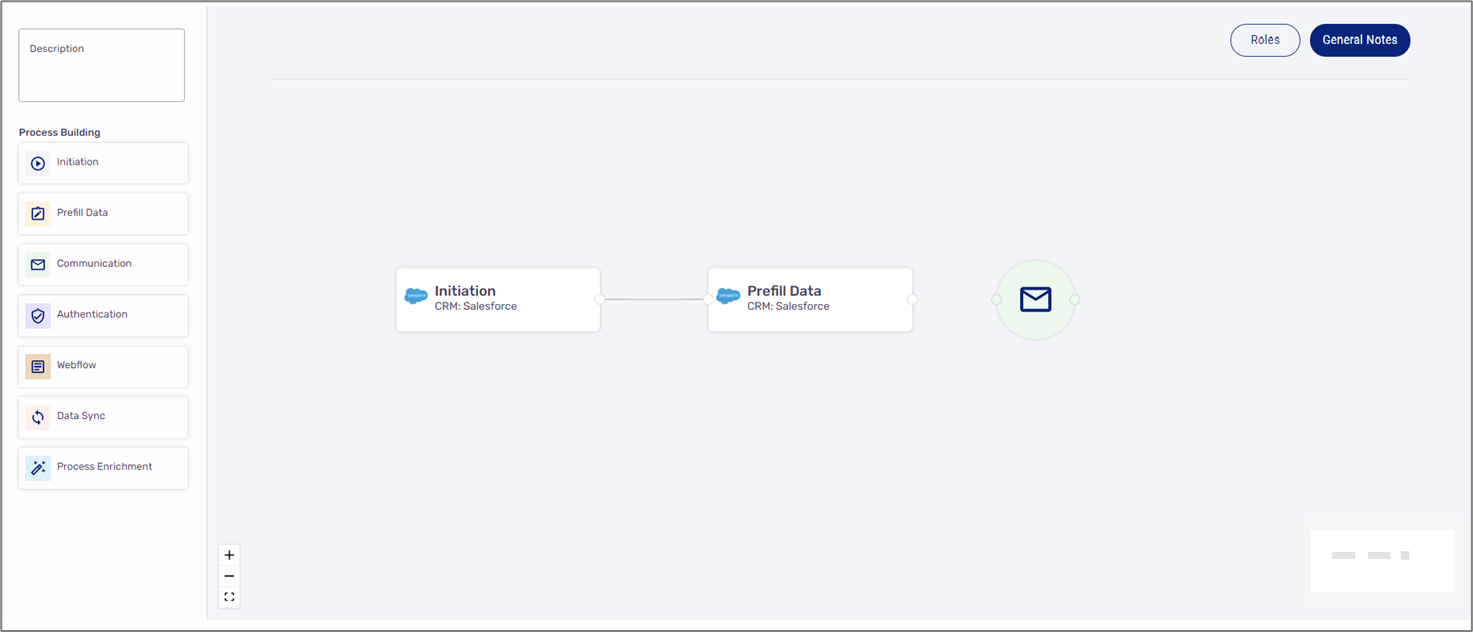
Figure 33: Communication
- Click Communication and Configure it:
- Set its type - communication channel. For example, Email.
- Assign a role - Customer.
- Write a description.
- Add a note.

Figure 34: Configuration
- Connect the stages.
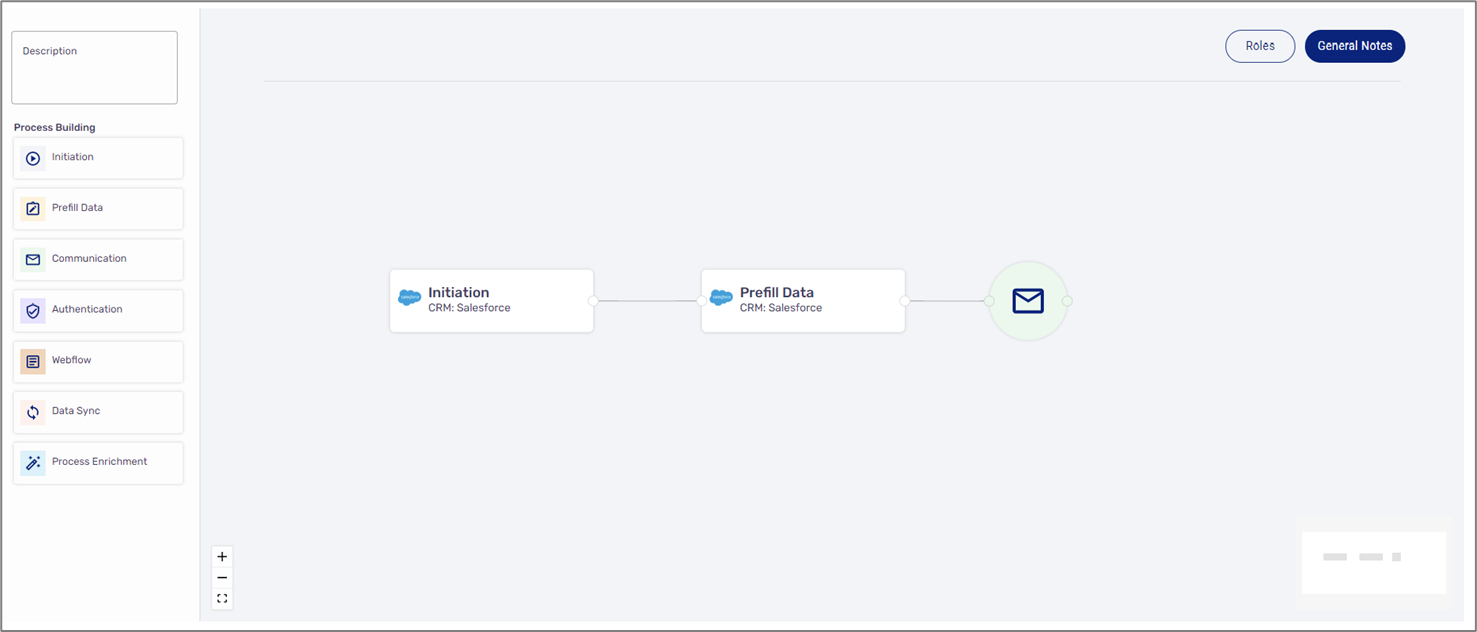
Figure 35: Connecting Stages
- Drag and drag the fourth stage - Authentication.
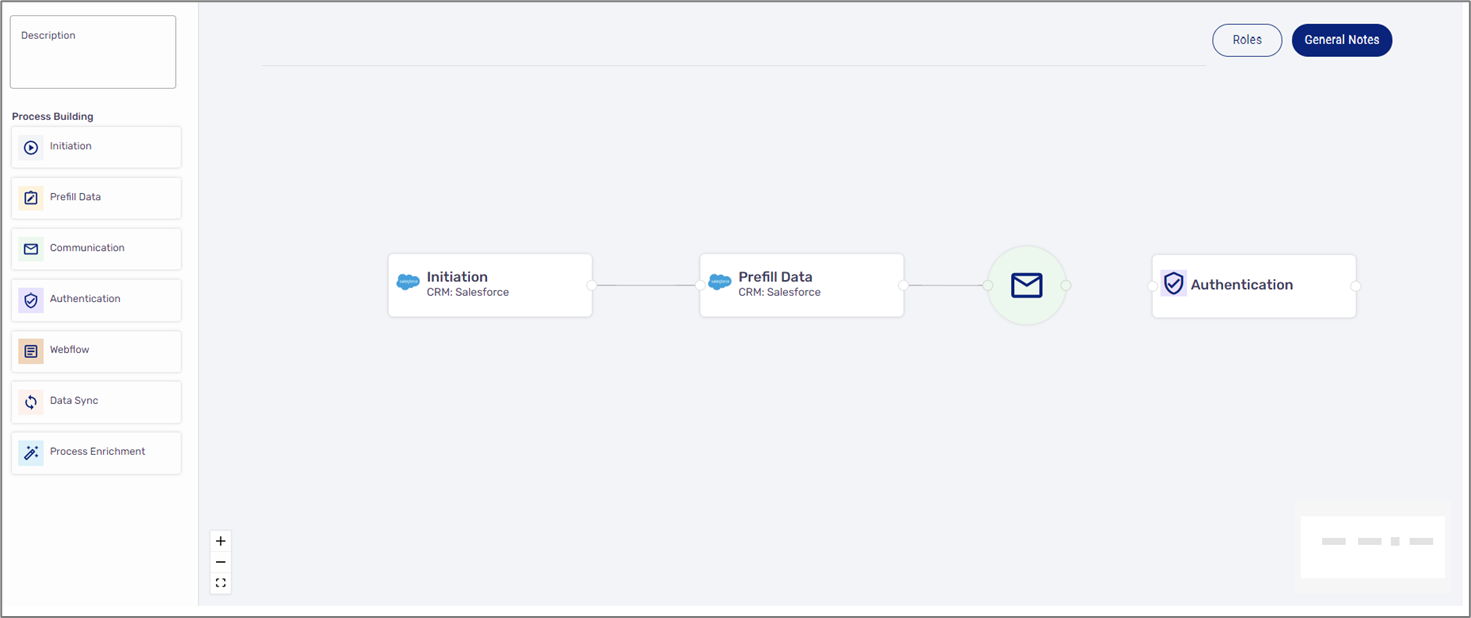
Figure 36: Adding Authentication
- Click Authentication and Configure it:
- Set its type - for example, OTP.
- Write a description.
- Add a note.
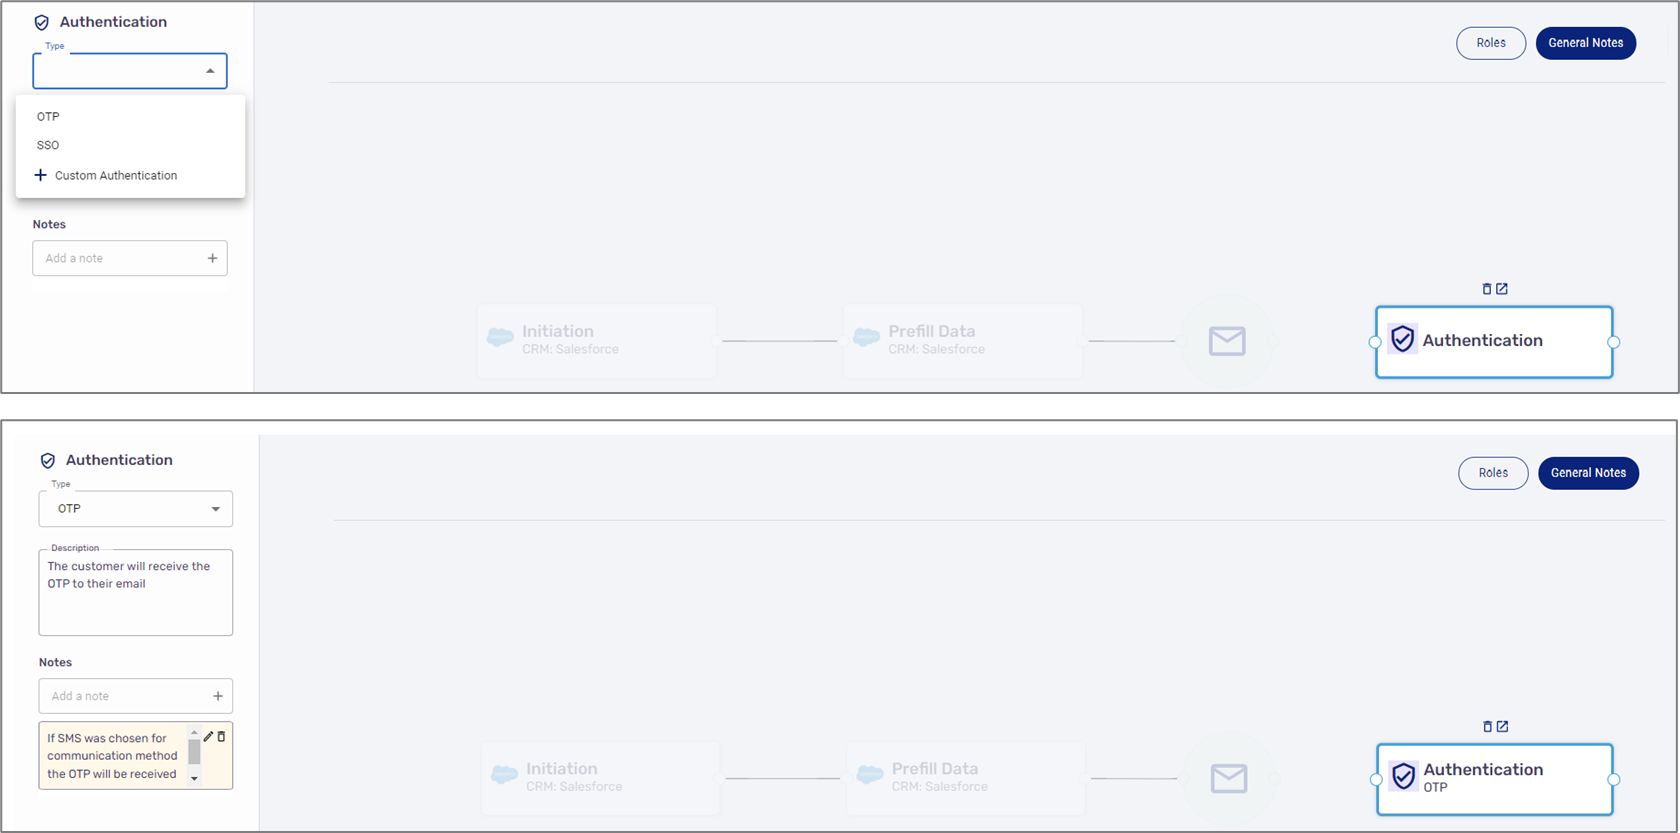
Figure 37: Configuration
- Connect the stages.
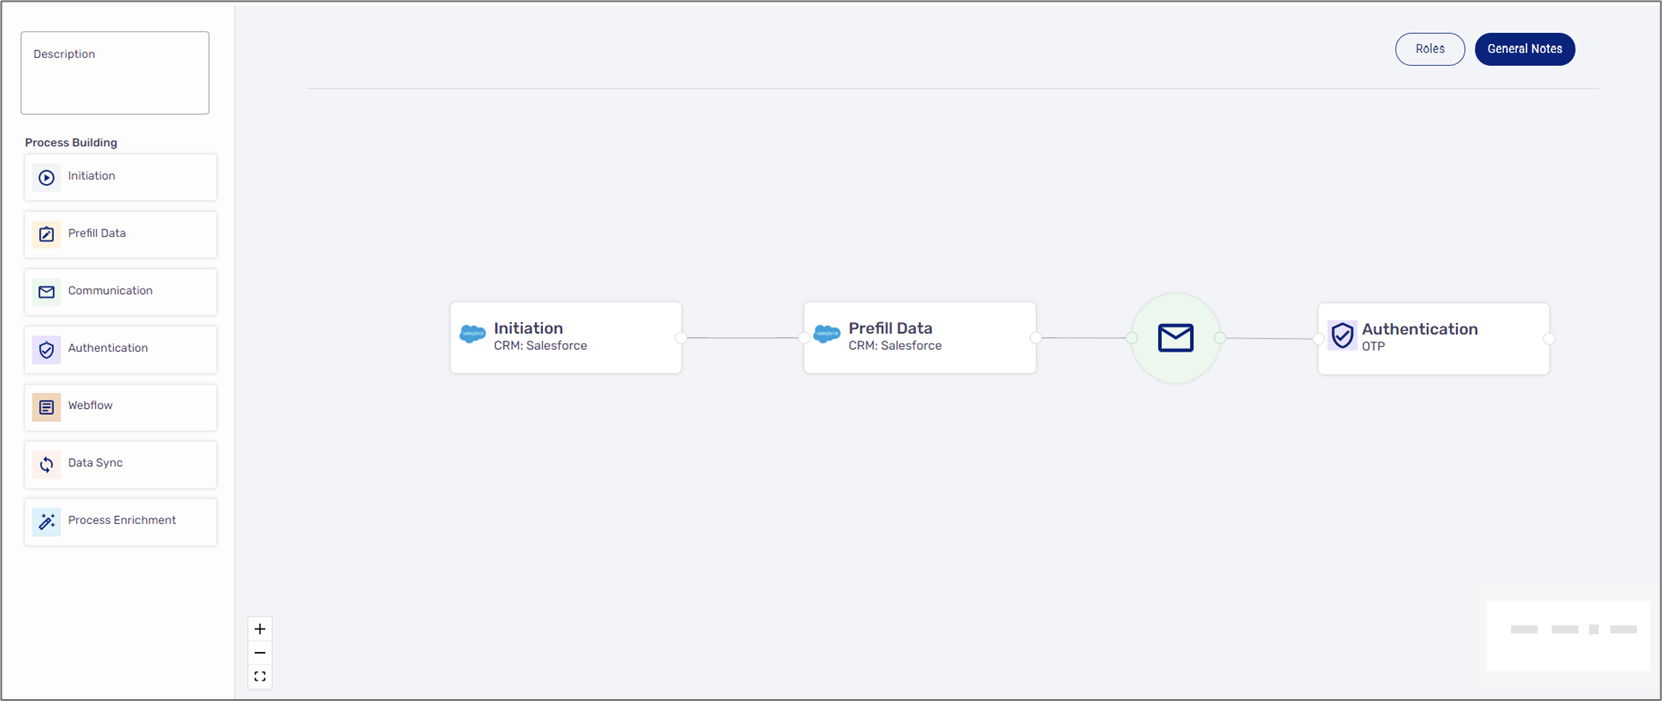
Figure 38: Connecting Stages
- Drag and drag the fifth stage - Webflow.

Figure 39: Webflow
- Click Webflow and Configure it:
- Set its name, for example, Onboarding.
- Write a description.
- Assign a role - Customer.
- Add a note.
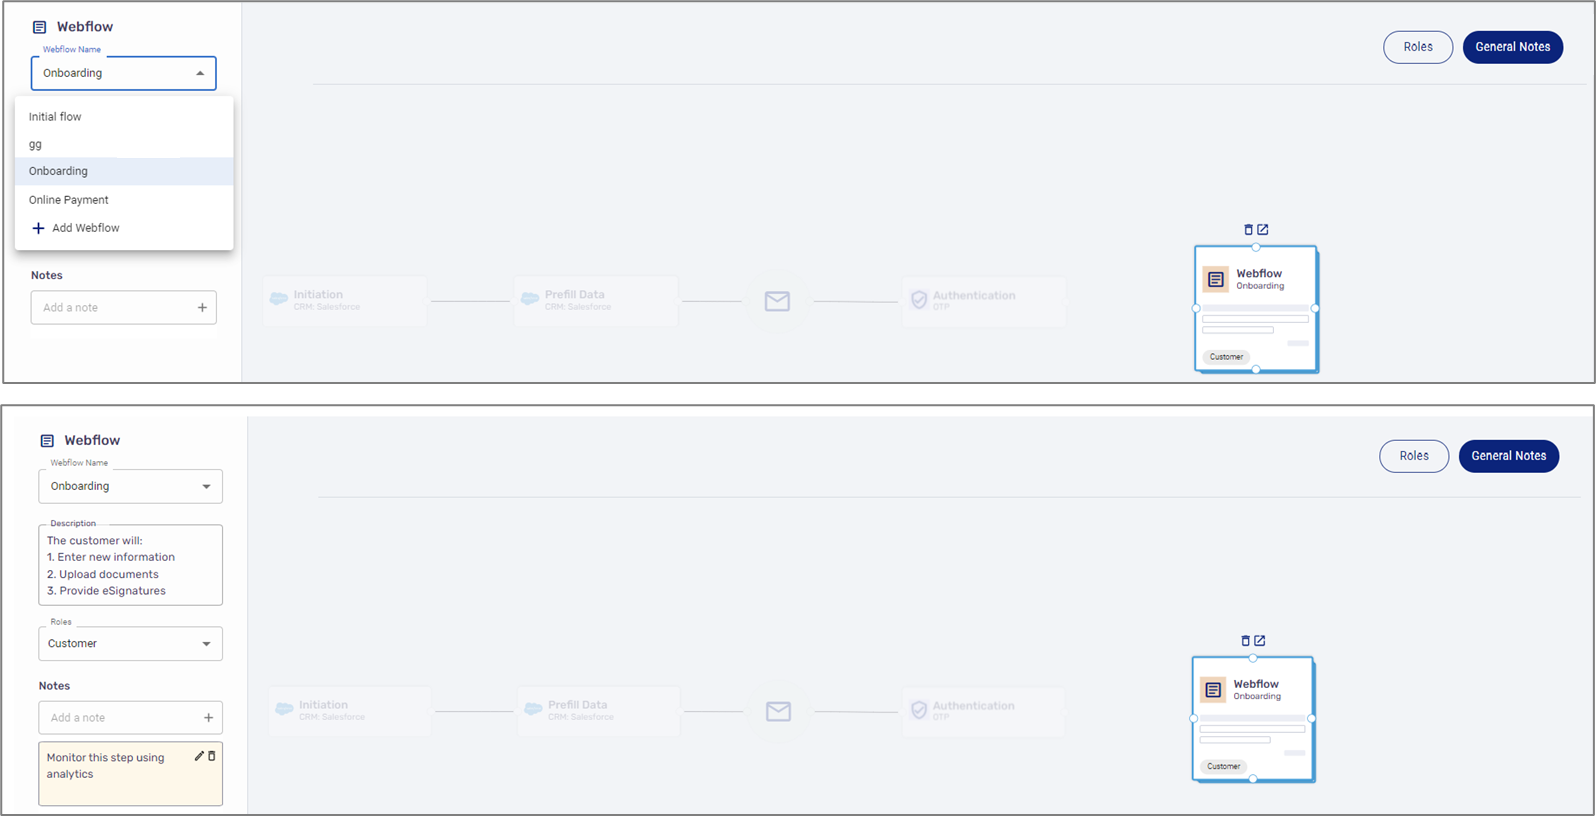
Figure 40: Configuration
- Connect the stages.
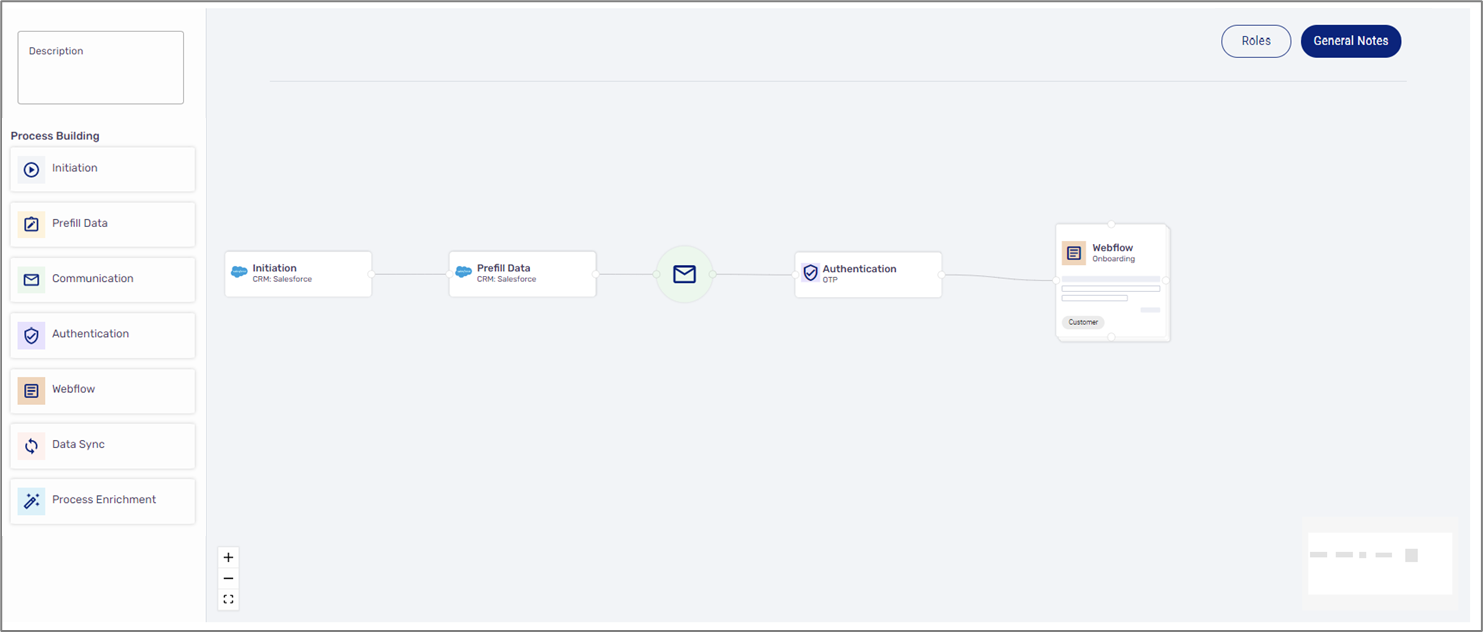
Figure 41: Connecting Stages
- Drag and drag the sixth stage - Process Enrichment.
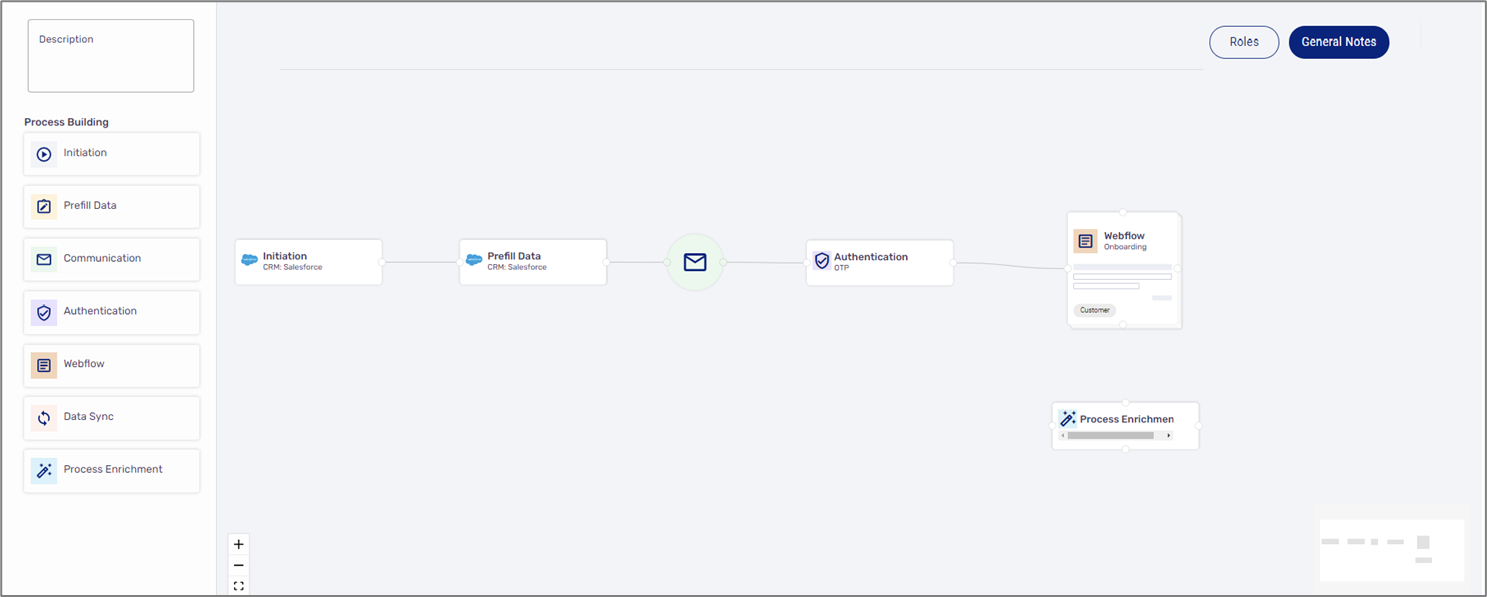
Figure 42: Process Enrichment
- Click Process Enrichment and Configure it:
- Set its type - for example, Custom API.
- Write a description.
- Assign a role - Customer.
- Add a note.
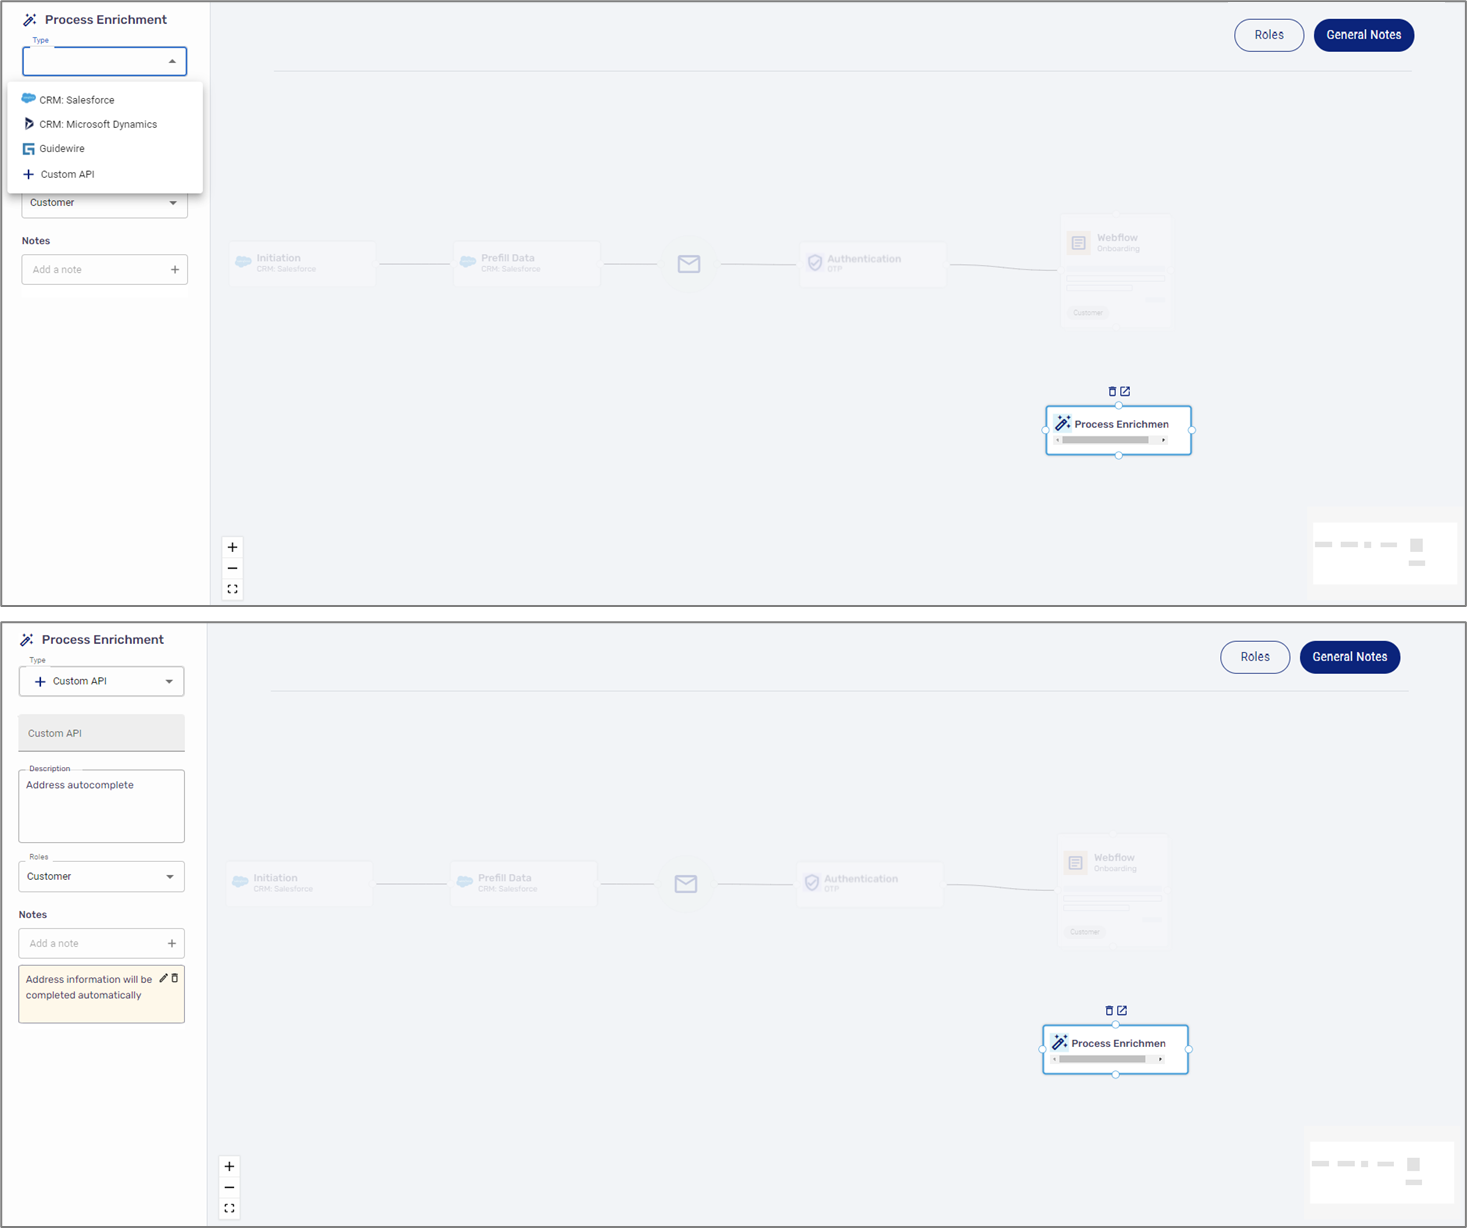
Figure 43: Configuration
- Connect the stages.
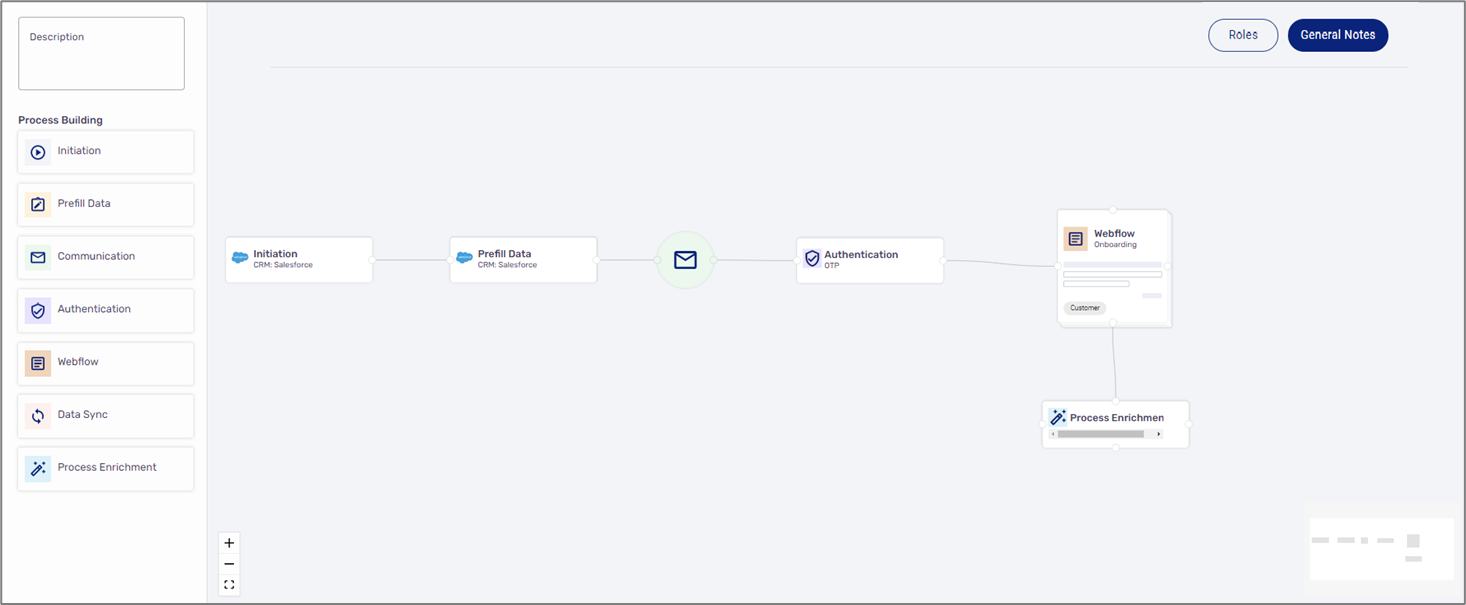
Figure 44: Connecting Stages
- Drag and drag the seventh stage - Data Sync.

Figure 45: Information Upload
- Click Data Sync and Configure it:
- Set its type - where the information will be synced. For example, CRM.
- Select which files to upload - for example PDF, XML, and JSON.
- Write a description.
- Add a note.
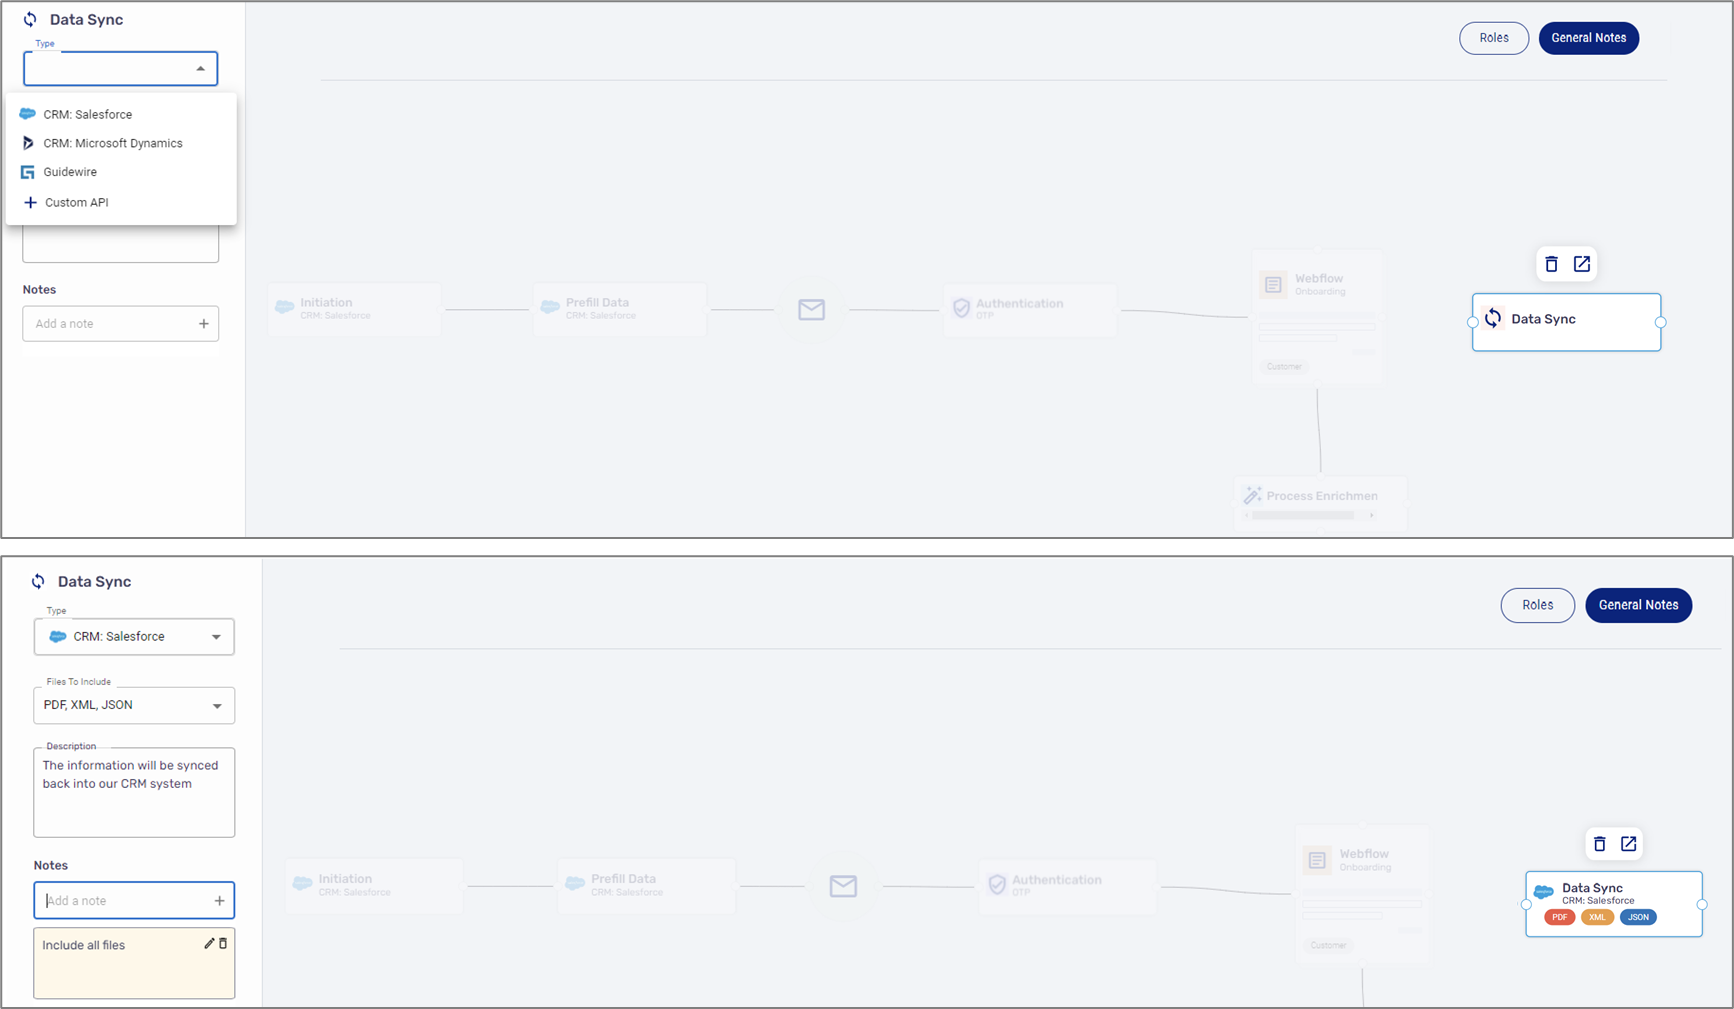
Figure 46: Configuration
- Connect the stages.
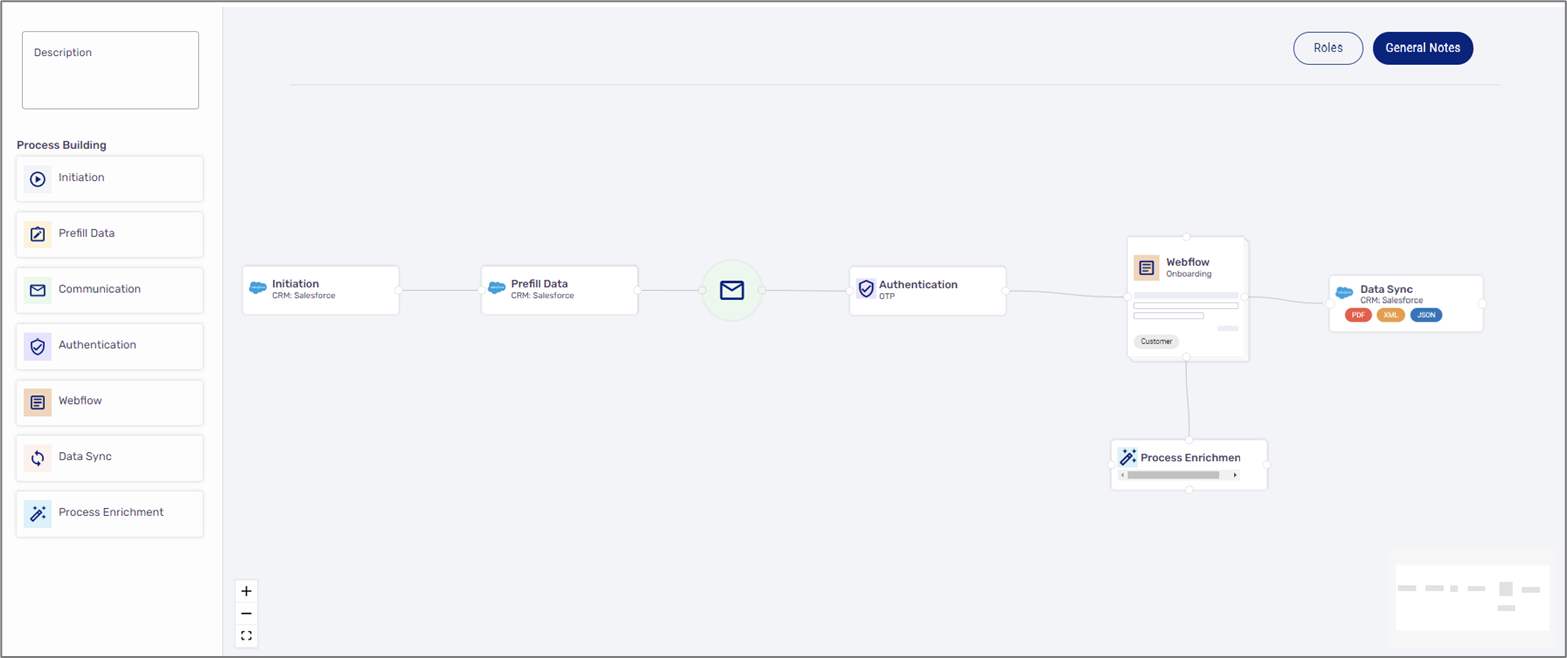
Figure 47: Connecting Sages
Navigating Within the Platform
When clicking a stage that was added to the canvas the navigation icon  appears. Using the icon it is possible to navigate to different areas within the platform. Table 2 describes the stage and the area within the platform it navigates to.
Important!
Performing changes using the Process Mapping screen will not affect the other areas in the platform. For example, deleting the Webflow Step will not delete the actual Webflow.
Table 2: Stages and Navigation
No. | Stage | Platform Area |
1 | Initiation | Workflow Manager |
| 2 | Prefill Data | Workflow Manager |
| 3 | Communication | Workflow Manager |
| 4 | Authentication | Services screen |
| 5 | Webflow | Webflow screen |
| 6 | Data Sync | Workflow Manager |
| 7 | Process Enrichment | Services screen |
Was this article helpful?