PDF Introduction
The following sections describe the idea behind digitizing your PDF forms, how to perform a PDF specification process, and implement its findings using the Builder platform. The article also describes the PDF screen and the PDF accessibility feature.
Digitizing Your PDF Files
Digital processes are an online experience with all the steps a customer needs to take to easily fill out, sign, and send important insurance, banking, or financial documents.
Your Digital process is built from one or more Webflows. Webflows can be built from scratch, but in most cases, they will be built based on pre-existing PDF forms. Those PDF forms will be digitized using the Builder platform. To be able to perform the digitization efficiently, you must examine each PDF form by using a specification process.
What is the Specification Process?
The specification is a process that helps you fully understand your PDF forms and how to transform them from paper forms to digitized forms.
How to Perform the Specification Process?
To perform the specification process, there are different questions to ask and actions to take, and it is recommended to divide them into steps.
Step 1 - Form Details
In this step, ask yourself some high-level questions, for example:
- What is the name of the form?
- What is the background of the form?
- What is the process flow (creating a diagram)?
- Where does the process of filling out the form start?
- Agent interface?
- Website?
- Where does the process of filling out the form start?
- What happens when the process ends?
- Sending an email?
- Sending an SMS?
- Both?
- Do I want it to integrate with one of my Core/CRM systems?
- What are the main actions to perform?
- Filling customer details?
- Files uploading?
- Digital signing?
Step 2 - End-User
In this step, ask yourself some questions focusing on the identity of the end user/s, for example:
- Who can fill out the form?
- Agent?
- Customer?
- Are there any potential participants?
- Authorized signatory?
- Lawyer?
- Guardian?
- What are the use cases of the form?
Step 3 - Business Perspective
In this step, ask yourself some business-oriented questions, for example:
- Why is this PDF form being digitized? Is the current process flow too complex for paper?
- What is the goal for digitizing this form?
- Will digitizing the form bring any value to the company?
- Who is the target audience?
- Insurers?
- Bank customers?
- Pension policyholders?
Step 4 - PDF Specification
In this step, go over the fields of the PDF you want to digitize so you can characterize and specify them. See Figure 1 and Table 1 for a detailed example:
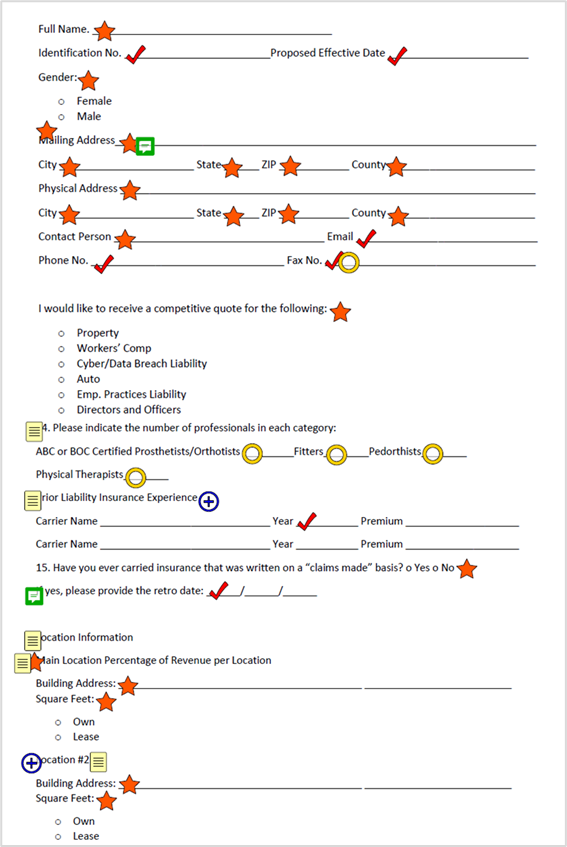
Figure 1: PDF Specification
Table 1: PDF Specification
Number | Icon | Name | Description |
1 |
| Redundant Filed | Specifies that the section/text/field is not relevant and should be removed |
2 |
| New Field | Indicates a new section/text/field that needs to be added |
3 |
| Text | Specifies different types of text to display:
|
4 |
| Validation | Specifies if a field requires validation, for example:
|
5 |
| Optional Field | Specifies if a field is considered optional |
6 |
| Condition |
|
7 |
| Array | Specifies that a field is an array with the following information:
|
8 |
| Development | Specifies if development is required (with code) |
9 |
| Explanation | Specifies another |
10 |
| Process Flow/Workflow | Specifies a step in a process/workflow regarding an end-user type, for example:
|
11 |
| Open Issue | Specifies an open issue |
12 |
| Role | Specifies if a field has different access permissions according to a role (indicates the name of the role as well):
|


Step 5 - Builder Implementation
Now you will use the Builder platform to digitize the PDF form by implementing what you have learned about it when asking questions like those described in steps 1 to 3 and when performing the specification process described in step 4.
Step 5.1 - High-Level Implementation
In this step, perform a high-level implementation using the Builder platform features:
- Process:
- Webflow - add the required number of Webflows for the process.
- Model - configure according to what was learned during the specification process, for example:
- Create data items.
- Add validations.
- Set conditions.
- PDF - upload a PDF (for additional information, see the PDFs in the Builder section).
- Workflow Manager:
- Add steps and assign roles, and Webflows.
- Create automatic communication channels for different stages of the process.
- Theme - implement the look and feel of the Webflow.
- Co-browsing - decide if a remote assistant is required.
Step 5.2 - Low-Level Implementation
In this step, perform a low-level implementation using the Builder platform features:
- Pages:
- Visibility/editing conditions.
- Roles and permissions.
- Steps in a Webflow.
- Text:
- Titles.
- Secondary titles.
- Different instructions.
- Fields - defining each field with the following information:
- Component (data) type.
- Required/optional.
- Field name.
- Field label.
- Validation.
- Visibility/editing conditions.
- Comment.
- Placeholder.
- Roles.
- Notes.
- PDF names.
- Email and SMS Messages:
- Tile.
- Content.
- Recipients.
Step 5.3 - Complex Logic
In this step, recognize areas where there is any sort of complexity in the flow:
- End pages.
- Gender microcopy (if applied).
- Personalized emails and SMS messages.
Using the following can help you better understand the complex logic:
- A diagram with flow mapping of all scenarios.
- An outline describing conditioning junctions.
- An outline describing the expected outcome at the end of each scenario.
Step 5.4 - Email and SMS Messages
In this step, specify emails and SMS messages:
- Type - start or end.
- Roles such as customer and agent.
- Message title.
- Message content.
- Add-ons such as forms and attachments.
- Complexity such as personalized text, dynamic data from the Webflow, and conditions.
Step 5.5 - Development
In this step, recognize where developer (or EasySend) involvement is required:
- Theme (customized components).
- Integrations.
- Custom validations.
- Arrays.
- Co-browsing and remote assistant.
- Complex conditions.
PDFs in the Builder
The following sections describe how to navigate to the Documents screen, detail how to create a PDF form, describe the PDF screen, and provide a description of the relationship between a document, Webflow, and Model.
Navigating to the Documents Screen
(See Figure 2)
To navigate to the documents screen, click the Documents tab (1):
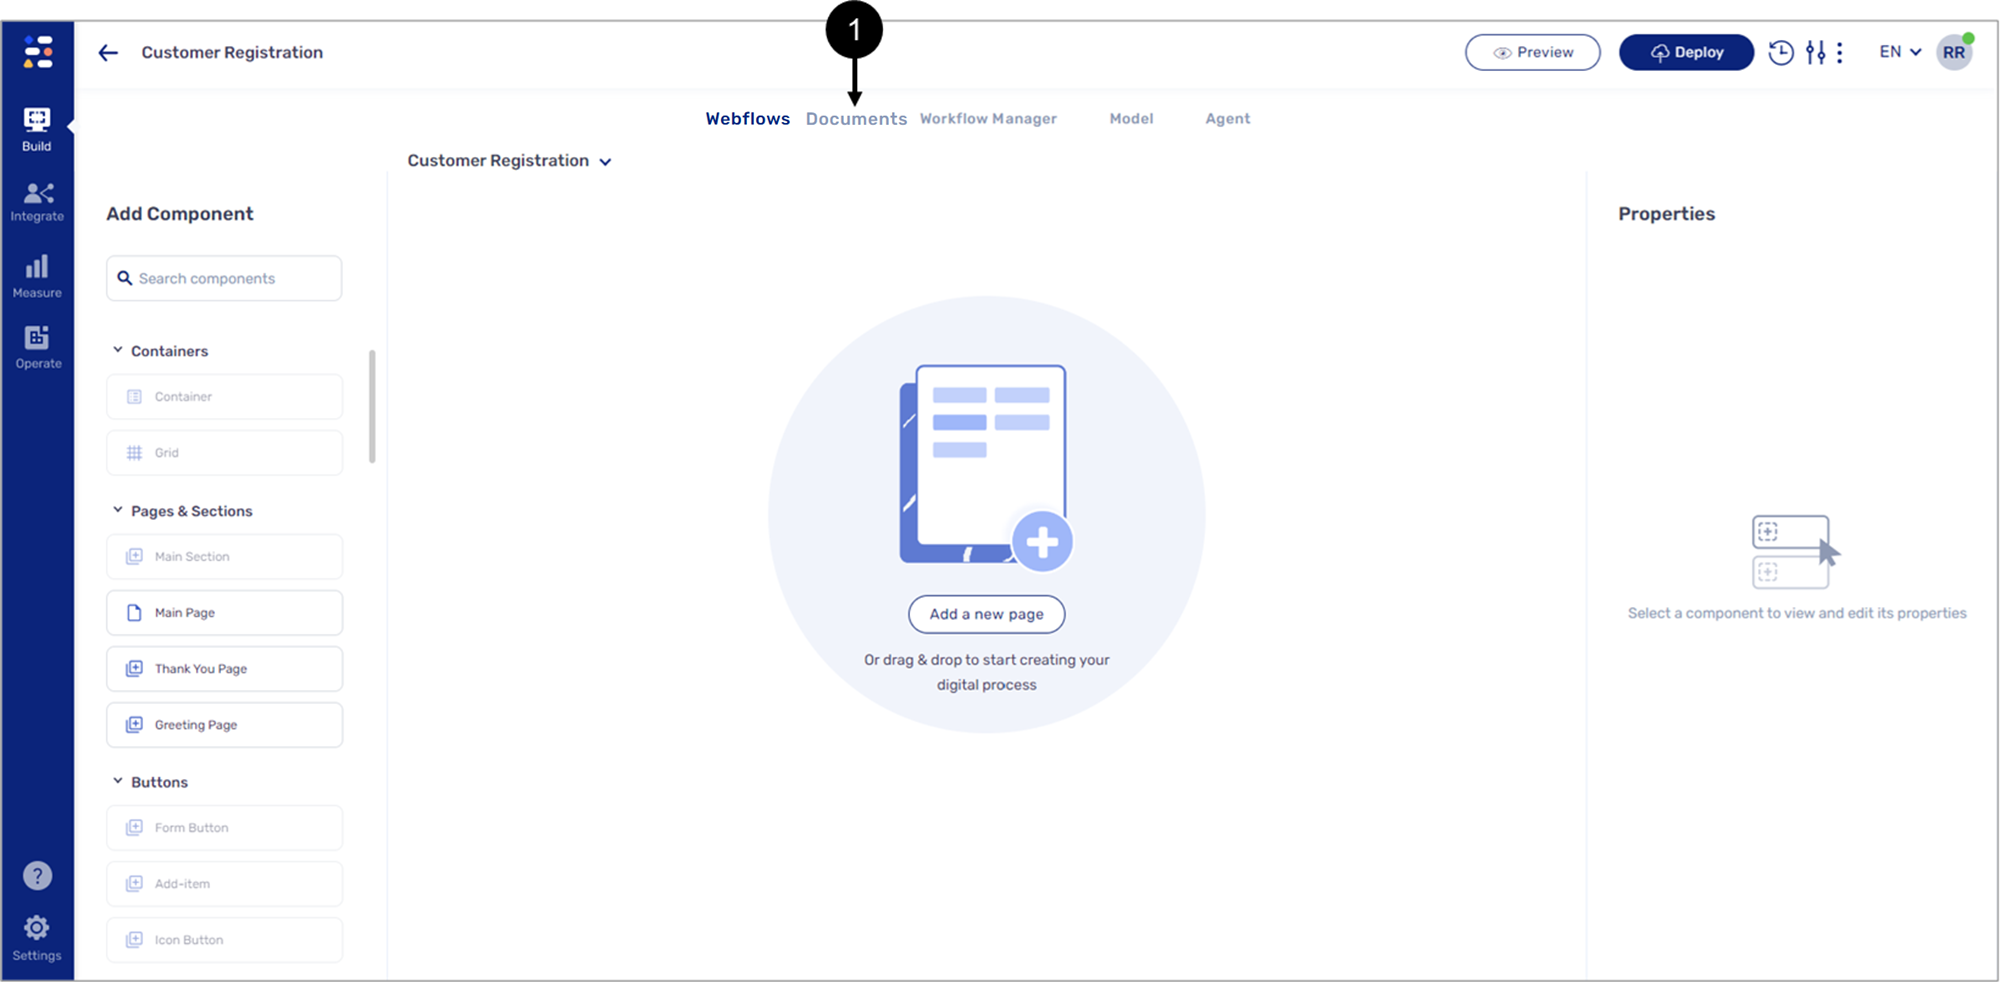
Figure 2: Documents Tab
Creating a PDF Form
(See Figure 3 and Figure 4)
To create a PDF form, perform the following steps:
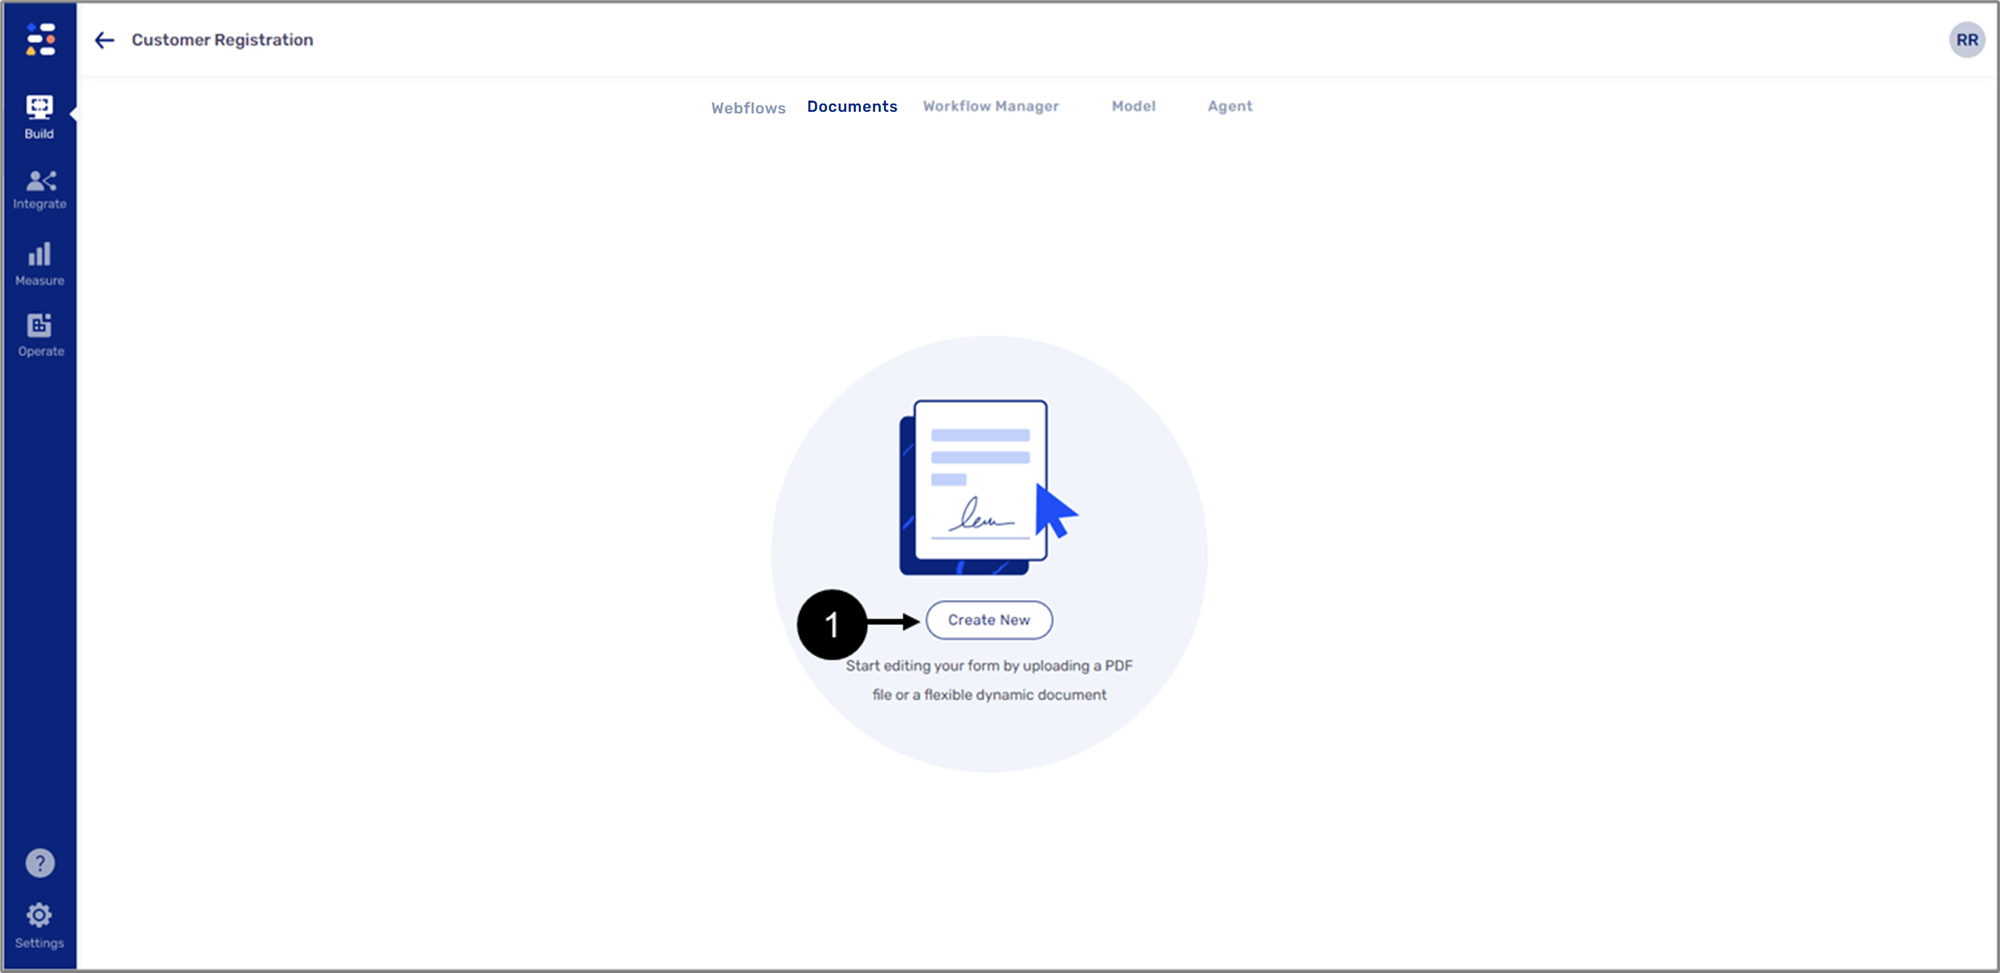
Figure 3: + Create New Button
- Click the + Create New button (1).
Result:
The Create new PDF file window appears:
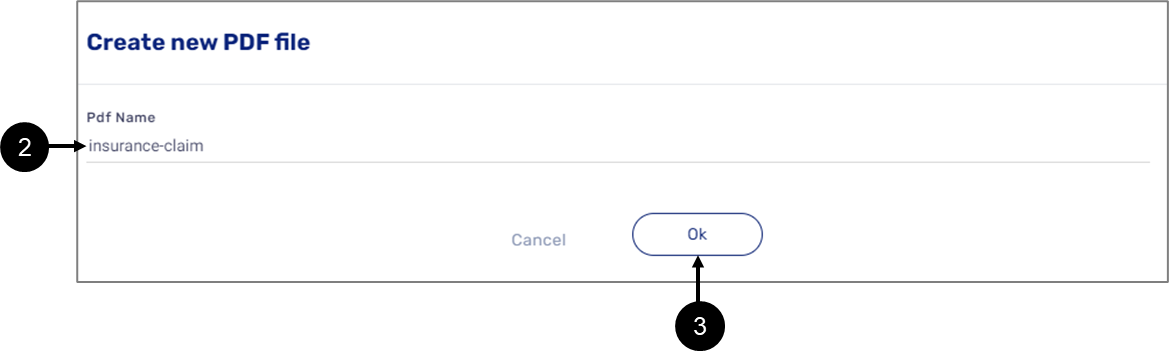
Figure 4: Create a Pdf Window
- Enter a Pdf Name (2).
- Click the Ok button (3).
Result:
The PDF form is created.
PDF Screen Description
The PDF screen is divided into different sections:
- Tools - this section contains different tools that help to mark and define the uploaded PDF fields so they can display the output of information that was input by the end-users using the digital process.
- Properties - this section contains editing options for the Tools section field types and it also displays page and field properties.NOTEField properties will become visible only once a field type from the Tools section is deployed to mark and define PDF fields, for additional information see the PDF Pages, Webflow, and Model section.
- Canvas - this section is where you will define the uploaded PDF page fields using the field types from the Tools section and edit and connect to the Model using the Properties section.
Figure 5 and Table 2 detail the structure of the PDF screen.
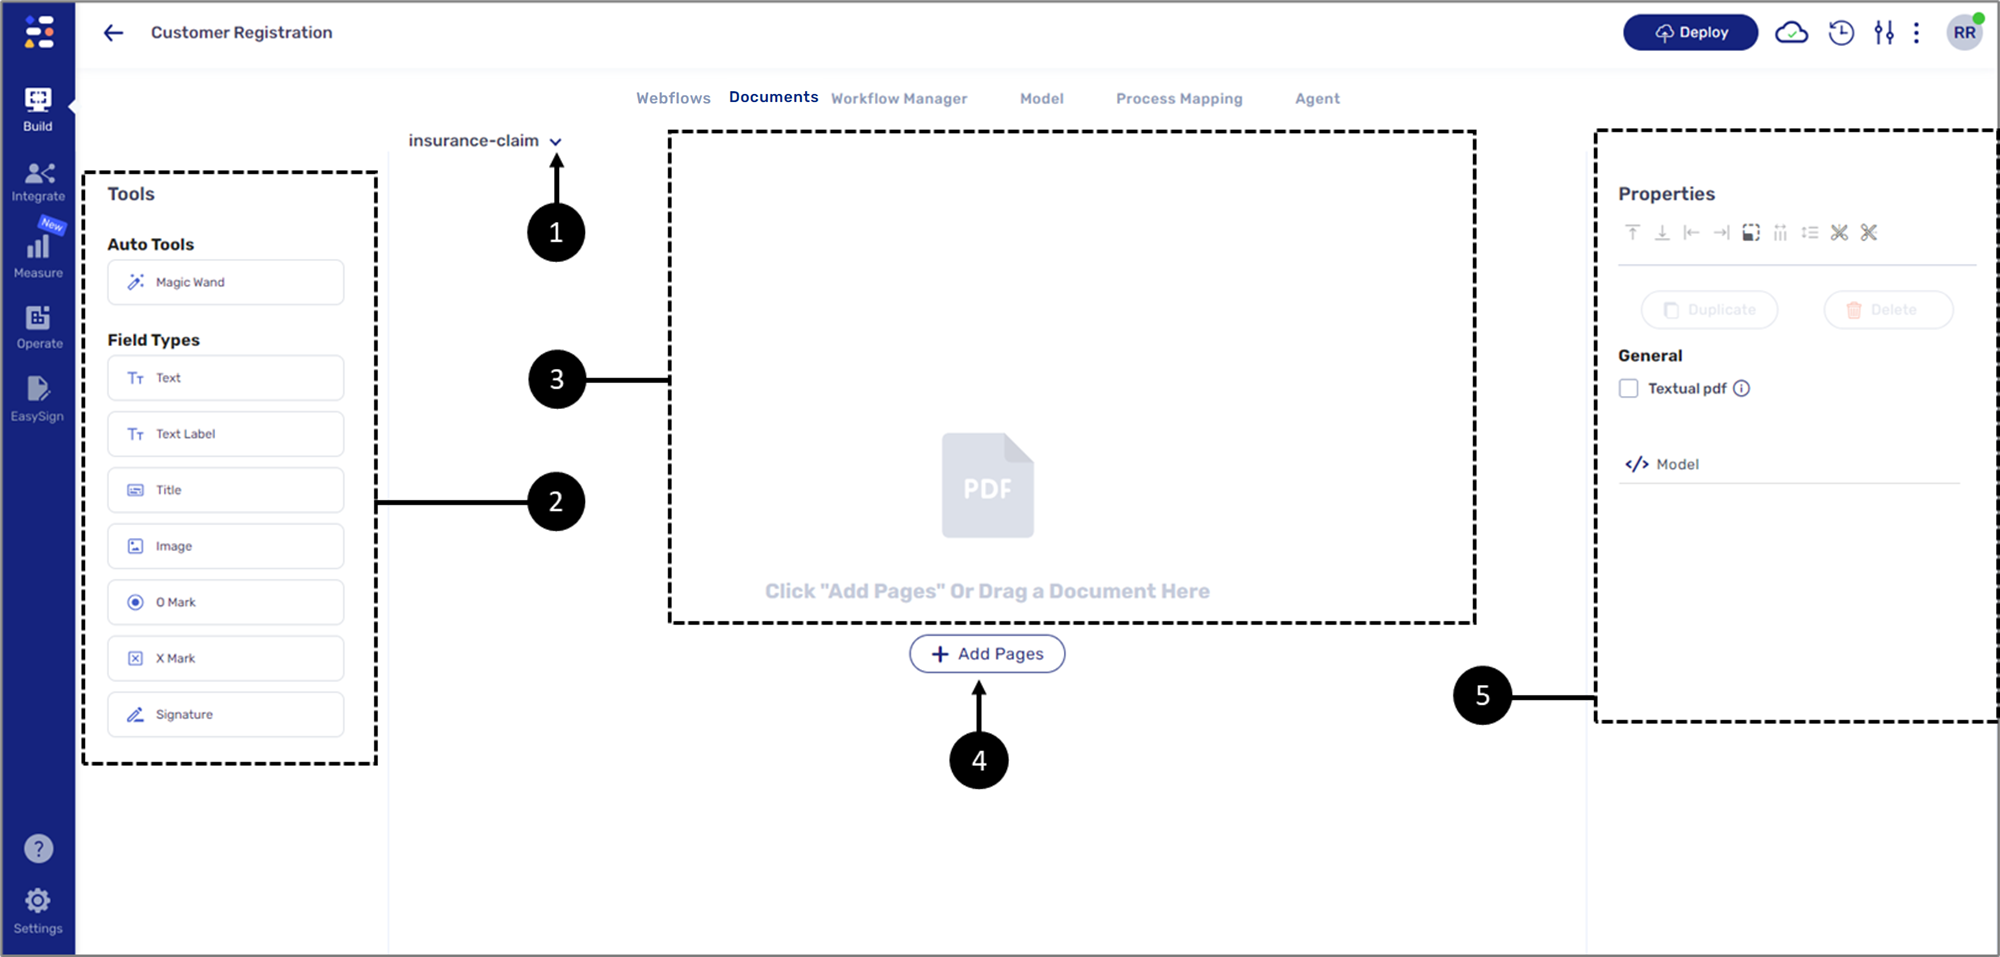
Figure 5: PDF Screen
Table 2: PDF Screen
Number | Section | Sub-Section | Icon | Name | Description |
| 1 | - | - |  | Additional Actions | Enables to perform additional actions:
|
| 2 | Tools | Auto Tools |  | Magic Wand | Enables to automatically assign field types to fields by clicking them |
| Field Types |  | Text | Enables to define a field as a text field | ||
| Text Label | Enables to define a field as a label | |||
 | Title | Enables to add a title on the PDF | |||
 | Image | Enables to define a field as an image | |||
 | O Mark | Enables to define a field as a radio question option | |||
 | X Mark | Enables to define a field as a checkbox option | |||
 | Signature | Enables to define a field as a signature field | |||
3 | - | - | - | Canvas |
|
4 | - | - | - | + Add Pages | Adds PDF pages to the form NOTE To prevent any system performance issues, the recommended maximum number of PDF pages to upload per PDF form is 30 |
5 | Properties | - |  | Top Alignment | Aligns a group of selected field types to the top |
 | Bottom Alignment | Aligns a group of selected field types to the bottom | |||
 | Left Alignment | Aligns a group of selected field types to the left | |||
 | Right Alignment | Aligns a group of selected field types to the right | |||
 | Select | Enables to select field types for:
| |||
 | Distribute Horizontally | Distributes a group of selected field types horizontally | |||
 | Distribute Vertically | Distributes a group of selected field types vertically | |||
 | Slice Vertically | Slices a concatenation of one field vertically NOTE This editing option replaces the need to mark multiple fields. For example, mark the day, month, and year in a single text field | |||
 | Slice Horizontally | Slices a concatenation of one field horizontally NOTE This editing option replaces the need to mark multiple fields. For example, mark the day, month, and year in a single text field | |||
| - | Duplicate | Duplicates a selected field type or a group of field types | |||
| - | Delete | Deletes a selected field type or a group of field types | |||
| - | Textual PDF |
NOTE For additional information, see the PDF Accessibility section | |||
 | Model | Enables to connect the PDF pages to the Model when it is required to display data from an array NOTE For additional information, see the Managing Arrays article |
Properties - Editing Options
(See Figure 6)
The options under the Properties section as used for editing the field types that were deployed to mark defined PDF fields. Once a field type is deployed, it is possible to use the Select option (1) to move, resize, duplicate, and delete it.
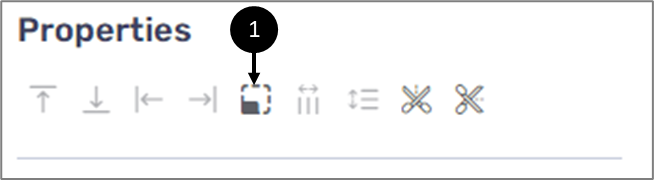
Figure 6: Select Option
Resizing Deployed Field Types
(See Figure 7 to Figure 9)
A common use case for the Select option is to resize field types after they are deployed to mark and define PDF fields. A Text field type can contain up to 250 characters; the way its text will be displayed on top of the PDF depends on its size. For example, the following PDF contains three text fields:
- First Name
- Last Name
- Address
The Text field type that was deployed to mark and define the Address field is relatively small (1):
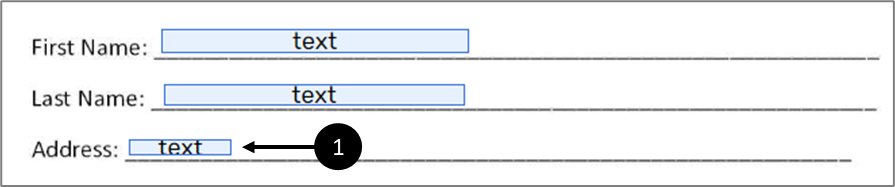
Figure 7: Select Option
In this case, after the end-user provides address information, the PDF will display it like this:
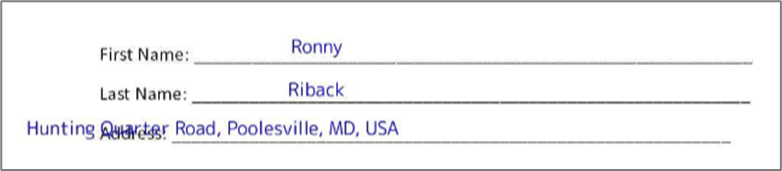
Figure 8: Select Option
The fix the issue, we will use the Select option to select the Text field type and then use the left click to move and resize it:

Figure 9: Moved and Resized
PDF Pages, Webflow, and Model
(See Figure 10)
The PDF pages you are adding to your digital process represent the structure of the Webflow you created with the different components. The pages display the output of information that the end-users input while using the digital process. Each field of an added PDF page must be marked, defined, and connected to the Model in the same way Webflow components are connected.
The connection to the Model is done through the Field Properties that appear under the Properties section, for example:
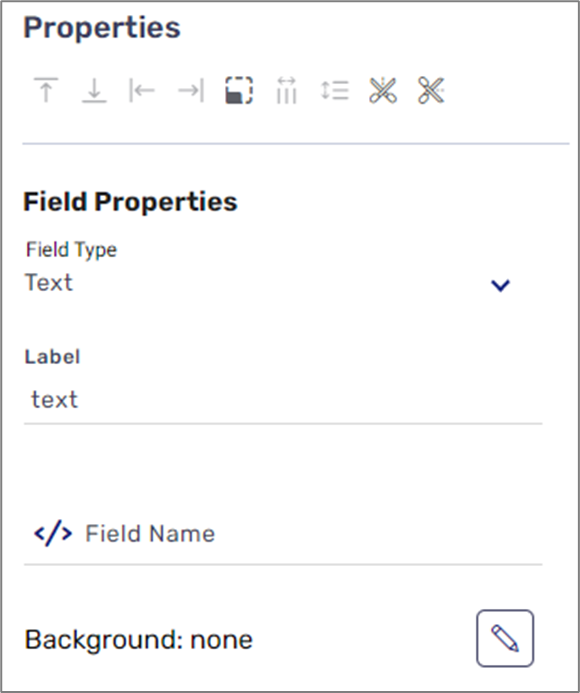
Figure 10: Text Field Type Properties
For additional information about defining PDF fields and connecting to the Model, see the Creating and defining a PDF article.
PDF Screen - More Options
(See Figure 11)
The More Options icon (1) on the PDF screen displays the same options that appear when clicking it on the Webflow screen, with an additional option (2) to download the PDF form.
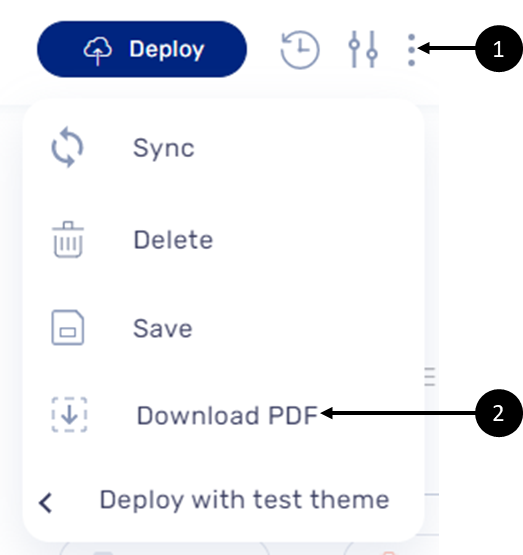
Figure 11: More Options - Download PDF
PDF Accessibility
The following sections describe the PDF accessibility feature.
The PDF accessibility feature is available on environments with version 20.12.0 and above.
What is an Accessible PDF?
A PDF document is considered accessible if it can be used/accessed by all users, including users with disabilities. For a PDF to be considered accessible, it should be compliant with different accessibility standards.
PDF Characteristics
PDFs are typically created from a source document such as Microsoft Word and are then exported into PDF format. However, many PDF files are created by scanning hard-copy documents and are simply images of text. Unfortunately, image-based PDFs are completely inaccessible as they are and require conversion into readable text using Optical Character Recognition (OCR) software before they become accessible.
How to Create an Accessible PDF Using EasySend's Platform?
(See Figure 11 to Figure 13)
To create PDFs with accessible PDF fillings, perform the following steps:
- Create markers for the Accessible Tree that work with screen readers.
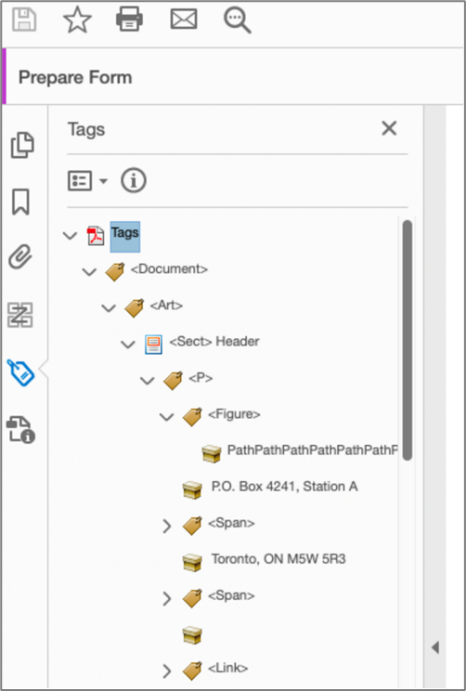
Figure 11: Accessibility Tree
- Create input fields (AcroForms) that work together with the accessibility tree you created.
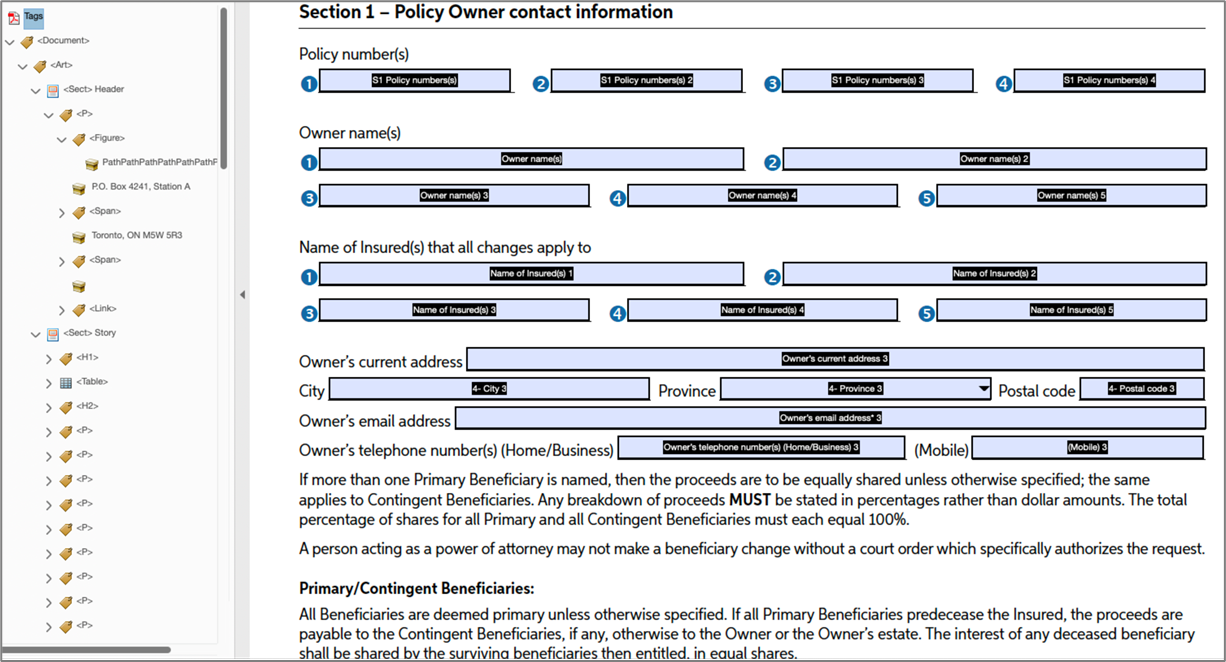
Figure 12: Fields
- Text input
- Checkbox
- Figure (for an image)
- signature
- Radio button
- Upload the PDF to EasySend's platform.
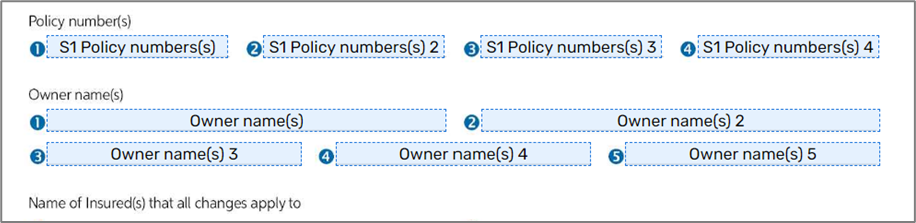
Figure 13: Uploaded Accessible PDF
Uploaded Accessible PDF
(See Figure 14 to Figure 16)
When an accessible PDF is uploaded to the platform, the following message appears:
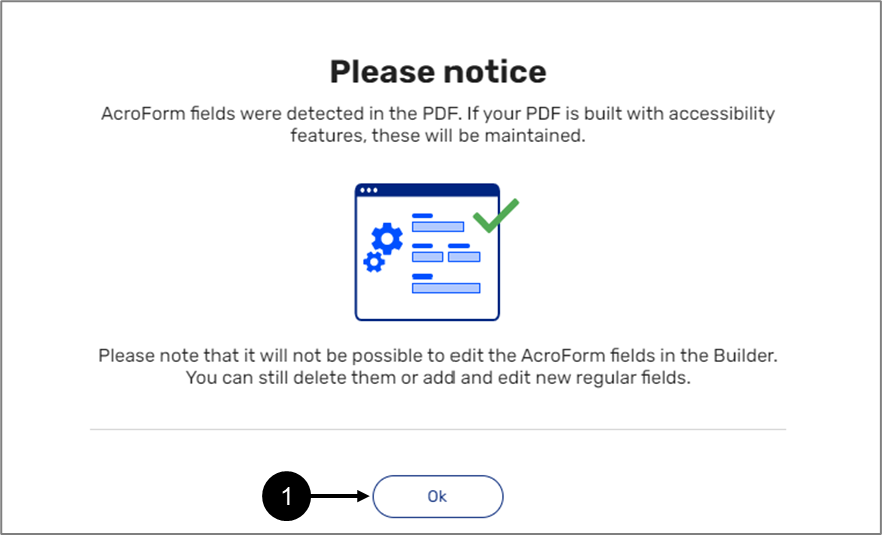
Figure 14: Uploaded Accessible PDF Example
After clicking Ok (1), to preserve the original PDF accessibility format, the Textual PDF (2) checkbox must be checked in PDF properties:
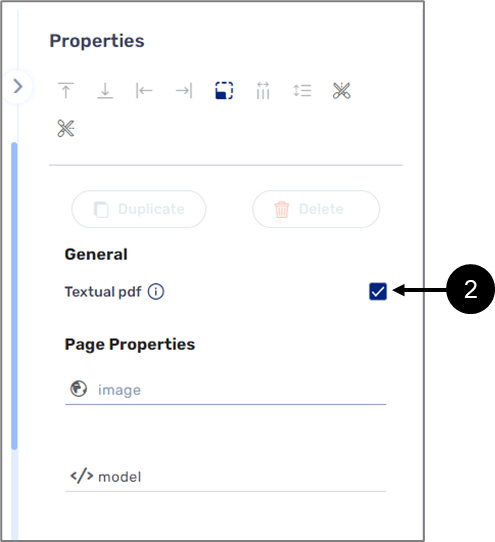
Figure 15: Textual PDF
The PDF will be displayed with marked fields with a dashed border (3). The Field Properties section will be locked for editing (4) except for the label (5), which is used internally for organizing the marked fields, and the fieldName (6), which enables the marked fields to be connected to the Model.
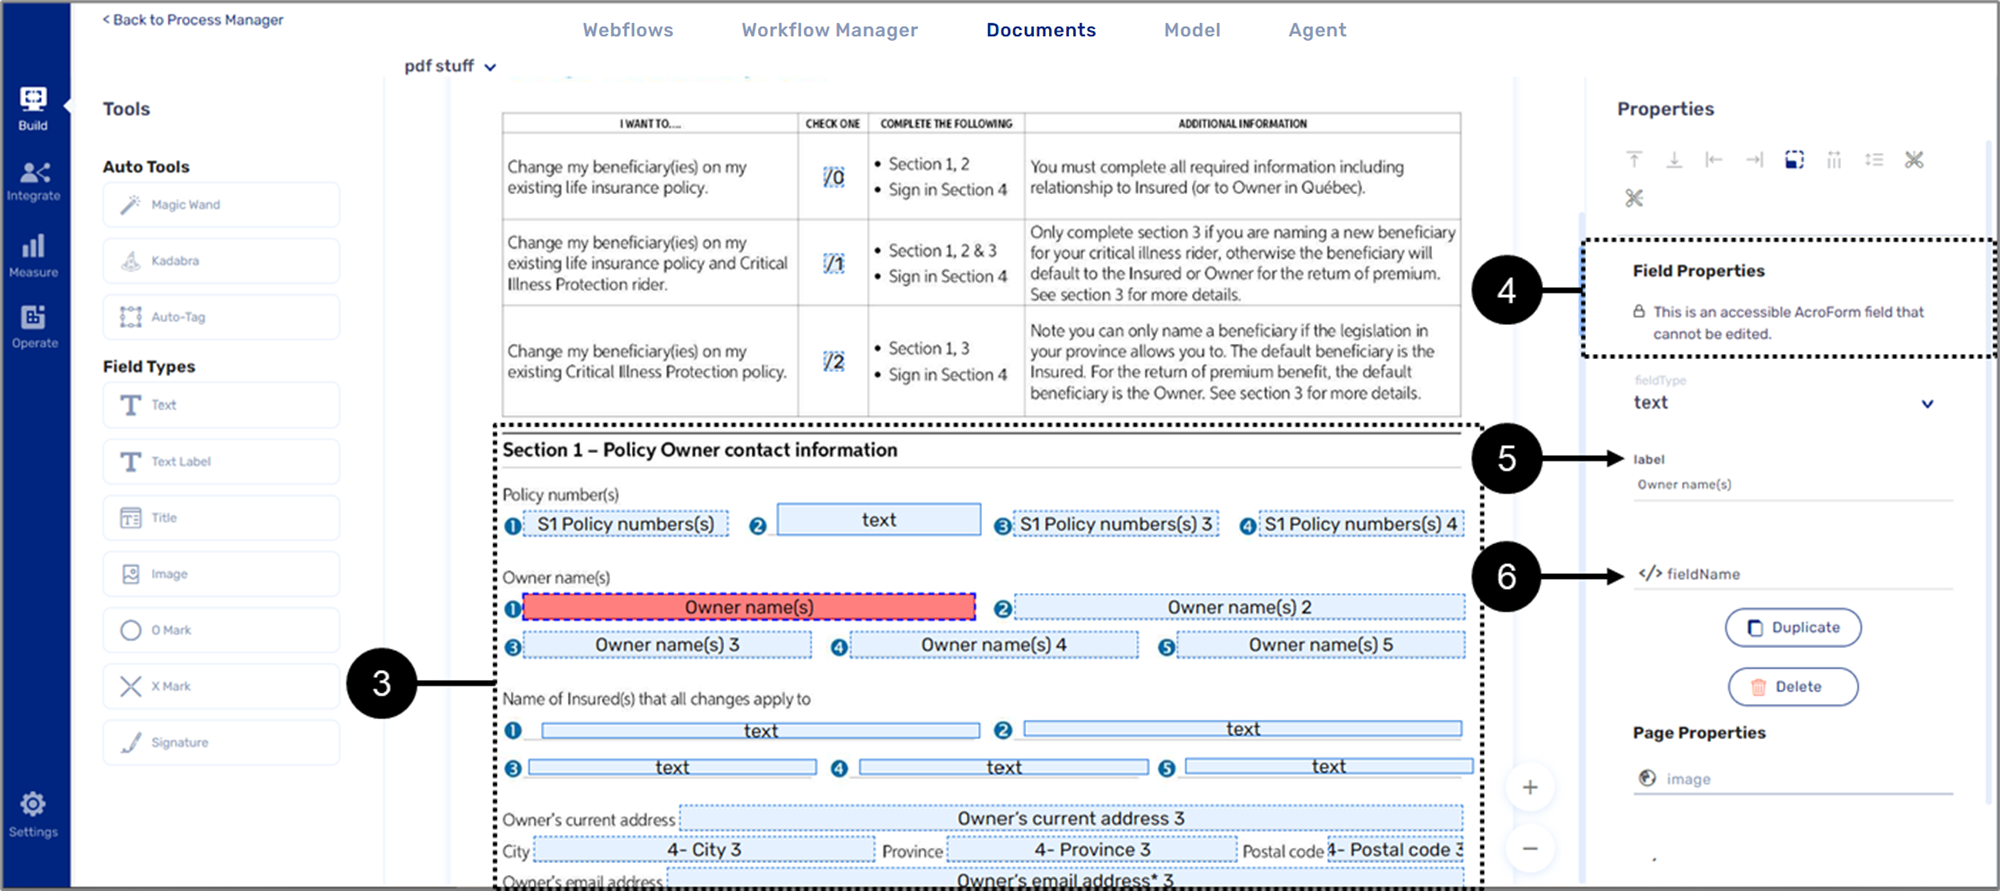
Figure 16: Uploaded Accessible PDF Example
Combining Accessible and Inaccessible Fields
A document with a combination of accessible and inaccessible fields that will not be read by a screen reader is allowed. When manually adding inaccessible fields, their border will be solid and not dashed. In addition, all the properties of an inaccessible field are editable.
Accessible PDF Troubleshooting
(See Figure 17)
In some cases, an accessible PDF is uploaded to the platform, and some of the fields are left unmarked (1):
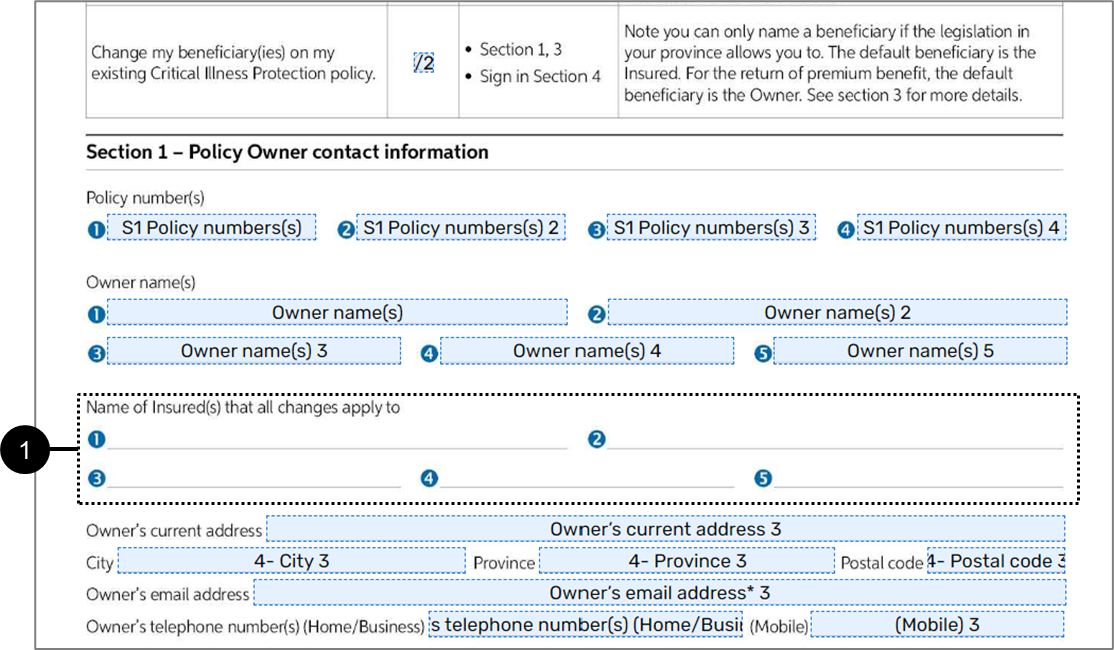
Figure 17: Uploaded Accessible PDF Example
To troubleshoot this issue, On the original PDF, verify that:
- Each field was defined with a field type supported by EasySend's platform:
- Text input
- Checkbox
- Figure (for an Image)
- Signature
- Radio button
- Each Input field has a unique name - no duplication is allowed.
- An input field name does not contain the following words:
- undefined
- null
- none
- Upload the accessible PDF to the platform again.
How to Videos
To quickly learn about the structure of the PDF screen and its features, watch the following videos.
- Creating a PDF:
- PDF Screen Overview: