Model Introduction
The following sections describe what the Model is, how to access it, and the structure of its main screen.
What is the Model?
The Model is the second layer of the digital process. It is where you set the logic and behavior of a digital process. Using the Model You can perform the following actions:
- Create transaction data items
- Associate a transaction data item with a component
- Set data types
- Select data values
- Define data visibility and editability conditions
- Apply validation rules
- Add roles and permissions
- Create formulas
- Add tags and metadata
How to Access the Model
(See Figure 1 and Figure 2)
There are two ways to access the Model. The first way is by clicking the Model tab (1):
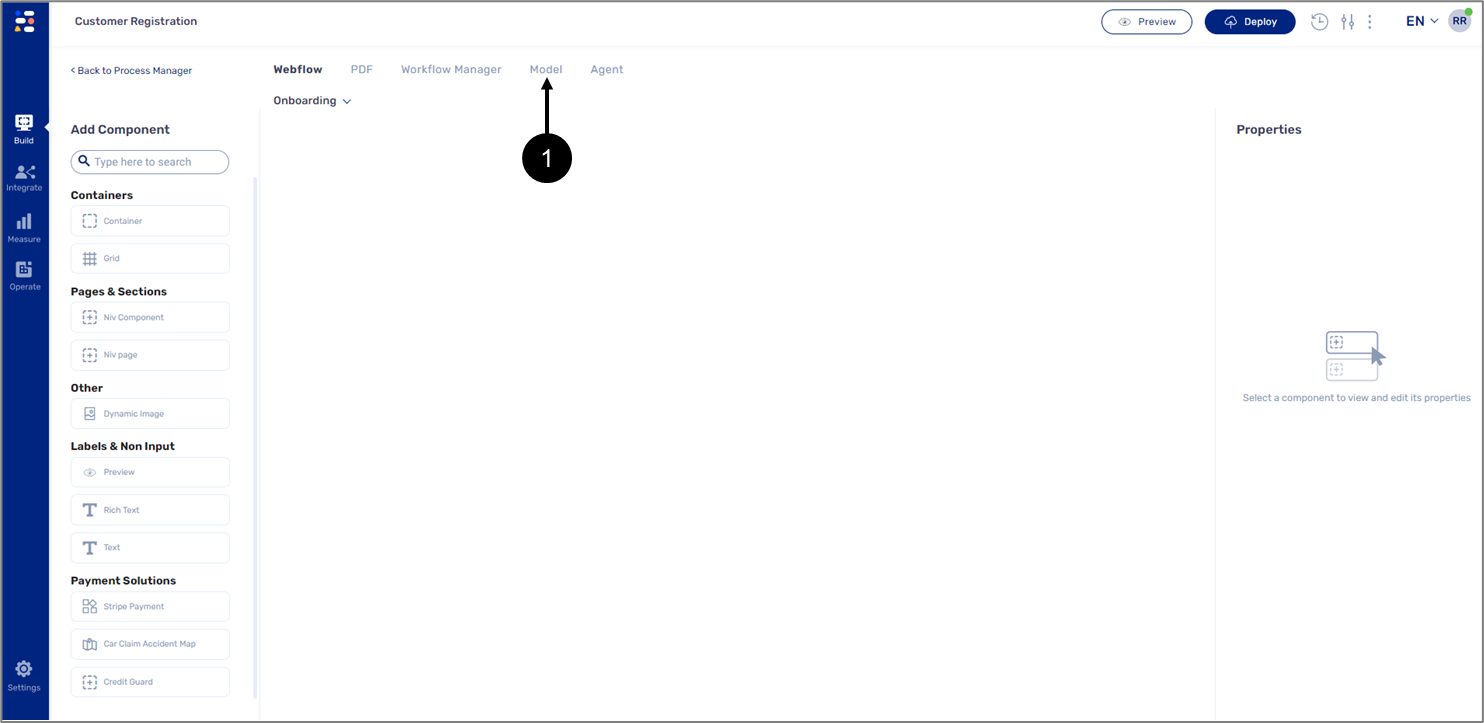
Figure 1: Model Tab
The second way to access the Model is through the Properties section after adding a component to the canvas of a Webflow:
- Drag or click a component to add it to the canvas.
Result:
The Properties section appears on the right side of the screen (1):
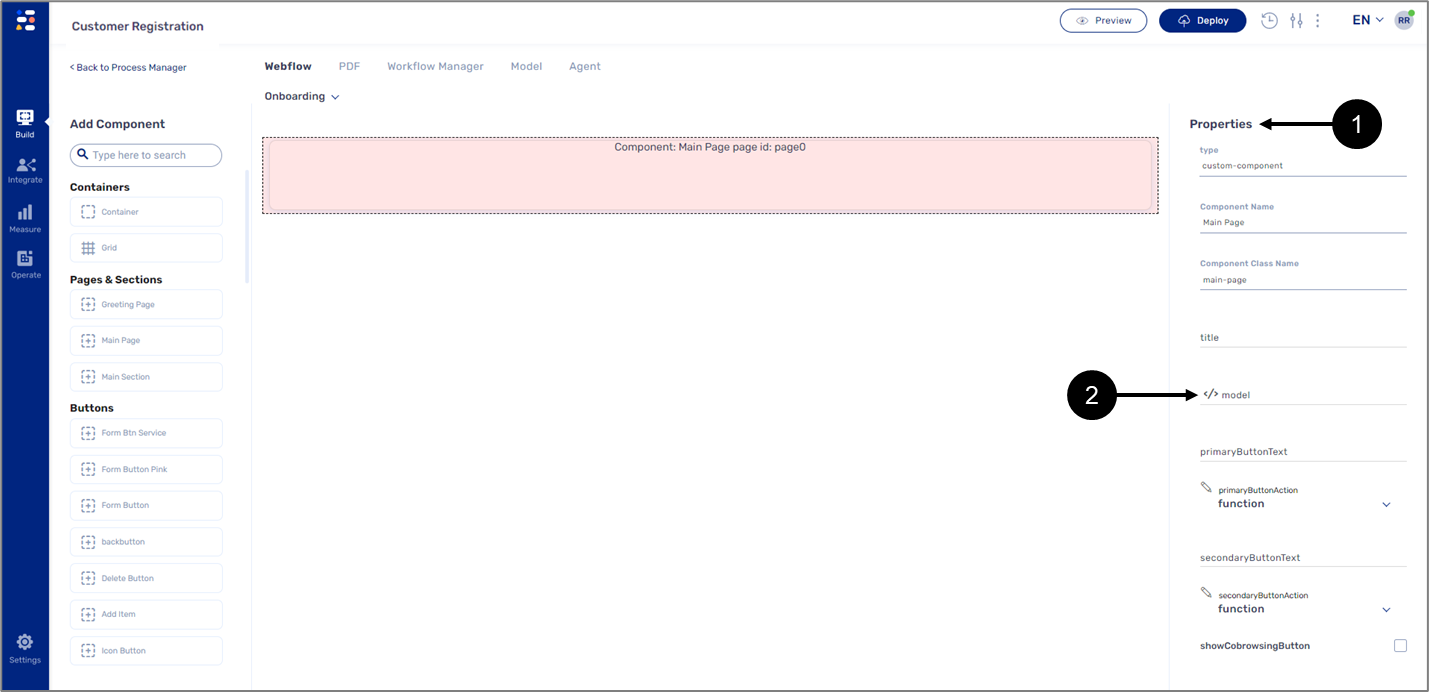
Figure 2: Properties Section
- On the Properties section, click the </> icon (2).
- The second method is usually used for connecting components to the Model, for operational usage, please use the first method.
- Some components, like the Grid, do not have the Model option on their Properties section because connecting it to the Model is not required.
Model Main Screen
Figure 3 and Table 1 describe the structure of the main screen of the Model.
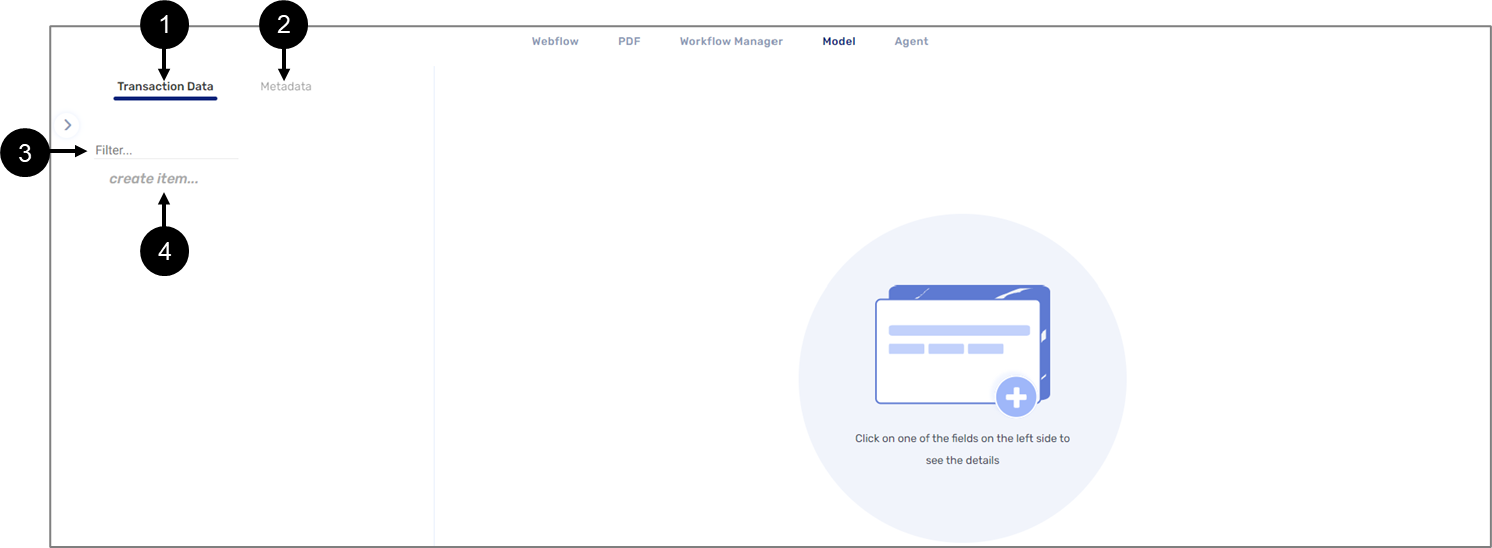
Figure 3: Model Main Screen
Table 1: Model Main Screen
Number | Name | Description |
1 | Transaction Data |
|
| 2 | Metadata | Displays the metadata NOTE For additional information about Metadata, click here. |
| 3 | Filter | Enables to search transaction data items by name |
4 | create item… | Enables to create a new transaction data item |
When clicking a transaction data item or a metadata item the General Details section appears:
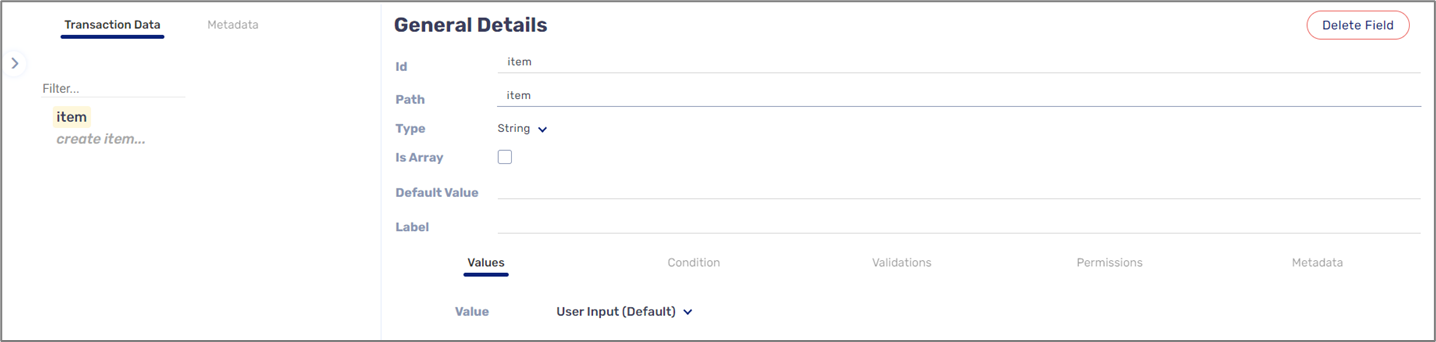
Figure 4: General Details
This section enables you to configure transaction data items/metadata items with:
- Data types
- Values
- Conditions
- Validation Rules
- Permissions
For additional information see the Model Implementation articles
Connecting the Model to a Webflow
The Model is the backend of the digital process. Adding components to a canvas of a Webflow creates the structure of the digital process, but for a digital process to function, to be able to receive and display data, and to work by what you defined and specified, the components must be connected to the Model.
Model - Transaction Data Items
(See Figure 5)
After adding components to a Webflow, you need to create transaction data items. The transaction data items define the data structure of the Webflow, and their main purpose is to connect components to the Model by association. All the information inputted through the Webflow components is stored on them. An item is created with a name and a specific data type that will be determined according to the type and functionality of the component that it will be associated with. For example, suppose a Webflow contains a Text Input component that customers use to input their first name. In that case, you will connect the component to the Model by creating a string type (1) transaction data item with a suitable name such as firstName (2), and associate it to the component.
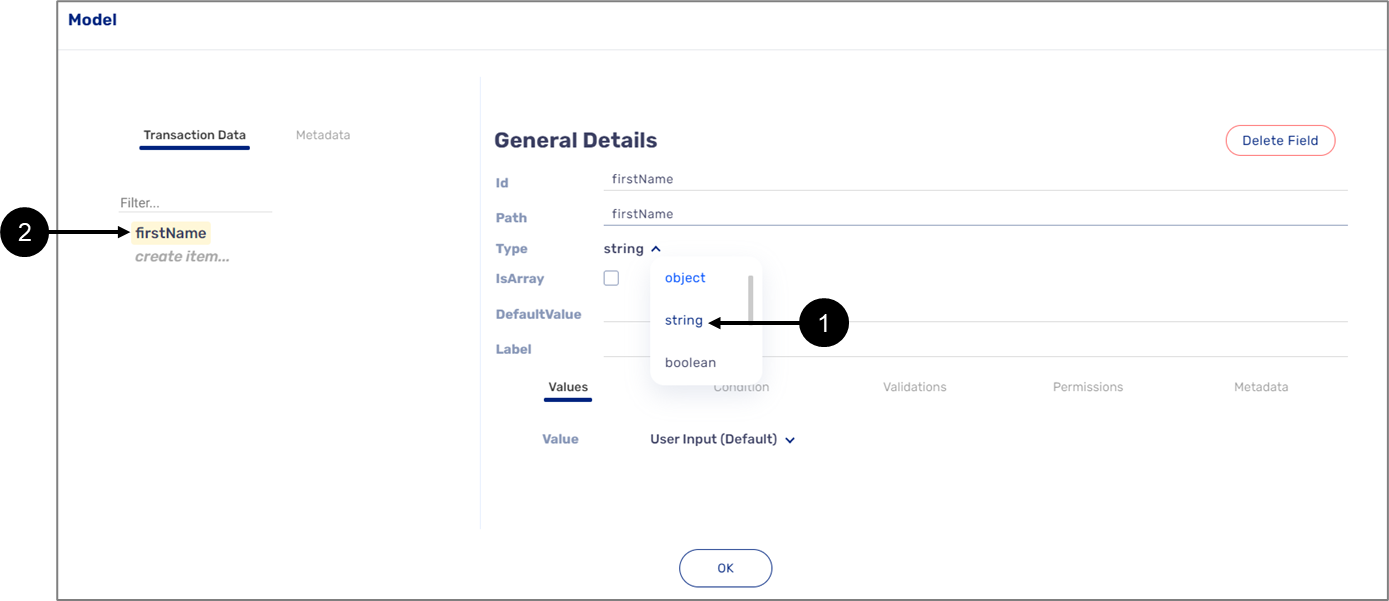
Figure 5: Transaction Data
Once the transaction data item is created, you can use it to configure additional Model features such as visibility conditions and validation rules.
The configurations will be applied to the component associated with the transaction data item (for additional information, see the Model Implementation articles).
Transaction Data Items - Right-Click Menu
(See Figure 6 and Figure 7)
Right-clicking a transaction data item displays a menu (1) that allows you to perform the following actions:
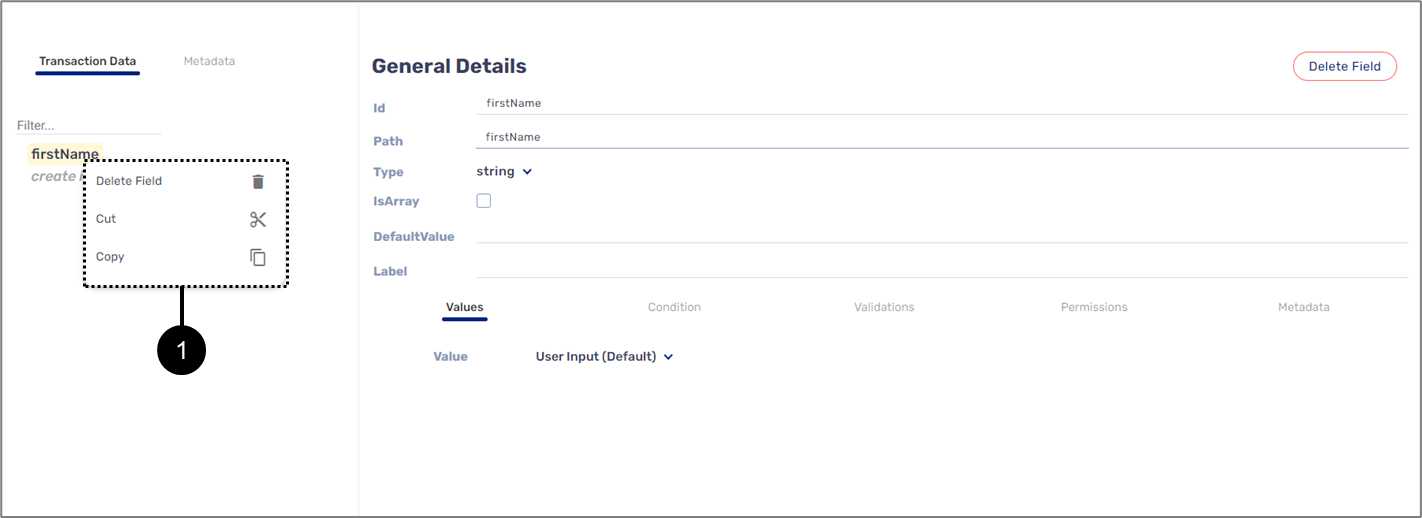
Figure 6: Right-Click Menu Options
- Delete Field
- Cut
- Copy
Once an item is cut or copied, additional paste options appear (2):
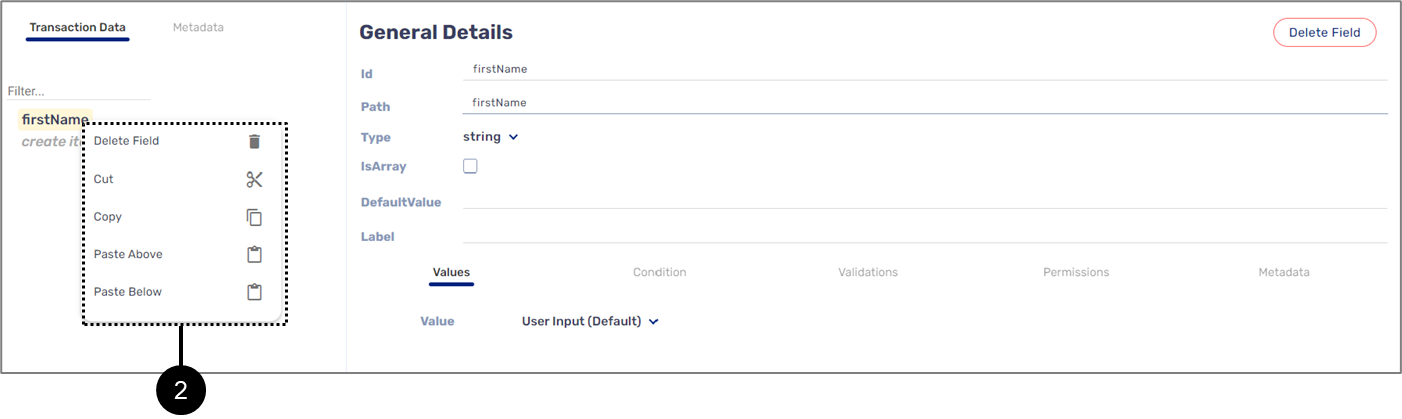
Figure 7: Additional Right-Click Menu Options
- Paste Above
- Paste Below
Transaction Data Item Details
Figure 8 and Table 2 describe the different details of a transaction data item.
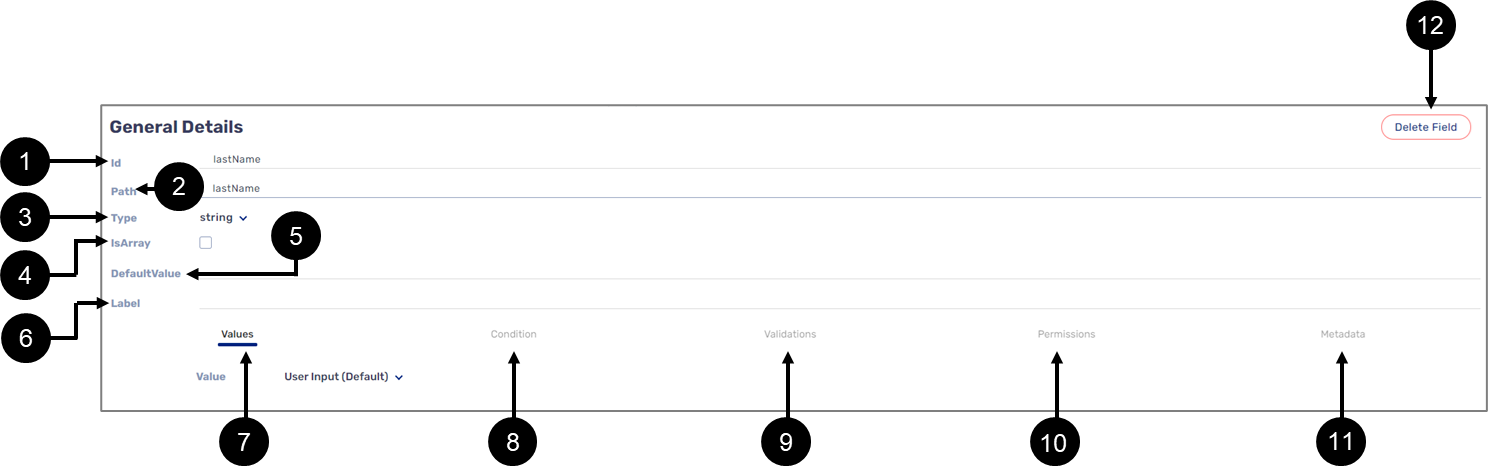
Figure 8: Transaction Data Item Details
Table 2: Transaction Data Item Details
Number | Name | Description |
1 | Id | Displays the Id of an item NOTE
|
2 | Path | Displays the path of an item NOTE
|
3 | Type | Enables to set the data type of the component associated with a transaction data item:
NOTE For additional information, see the Filed Types article |
4 | isArray | Enables to specify if a component associated with a transaction data item will function as an array |
5 | DefaultValue | Enables to set a default value for the component associated with the transaction data item. If the component is a Checkbox the default value is checked. |
6 | Label | Not in use |
7 | Values | Enables to set the data input method of the component associated with a transaction data item:
NOTE For additional information about values, see the Values article. |
8 | Condition | Enables to set conditions that determine when the component associated with a transaction data item will be:
NOTE For additional information about conditions, see the Conditions article. |
9 | Validations | Enables to apply built-in validation rules that validate the integrity of the data received through the component associated with a transaction data item NOTE For additional information about validations, see the Validations article. |
10 | Permissions | Enables to apply access permissions for a component associated with a transaction data item. The permissions are:
NOTE The permissions will be applied to different roles created through the Process Settings screen of the Webflow (for additional information about creating roles see the Configuring a Workflow article, for detailed information about permissions, see the Permissions article) |
11 | Metadata | Enables to tag a component associated with a transaction data item when conveying information to the Journey Sender NOTE For additional information, see the Journey Sender article |
12 | Delete field | Enables to delete the transaction data item |
How to Create Transaction Data Items?
There are two ways to create a transaction data item:
- Using the Model screen.
- Using the Component Properties section.
Creating a Transaction Data Item Using the Model Screen
(See Figure 9 to Figure 11)
To create a transaction data item using the Model screen, perform the following steps:
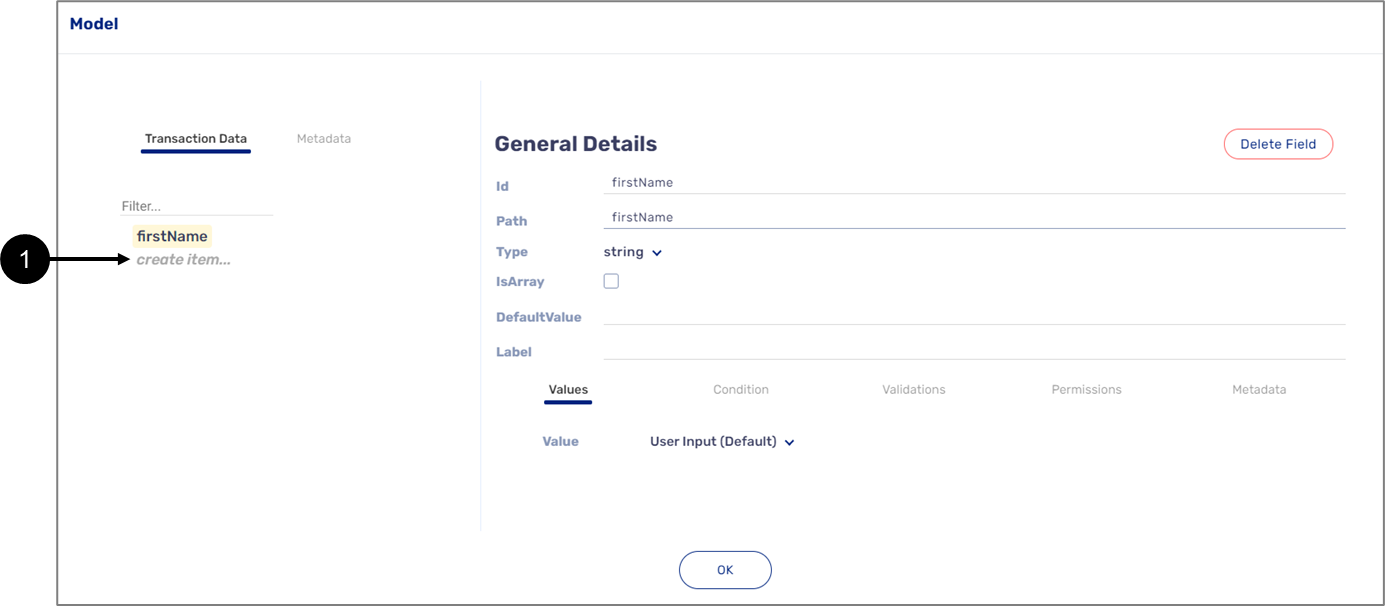
Figure 9: create item… Option
- Click the create item… option (1).
Result:
The create item… option disappears, and the item name field (2) appears:
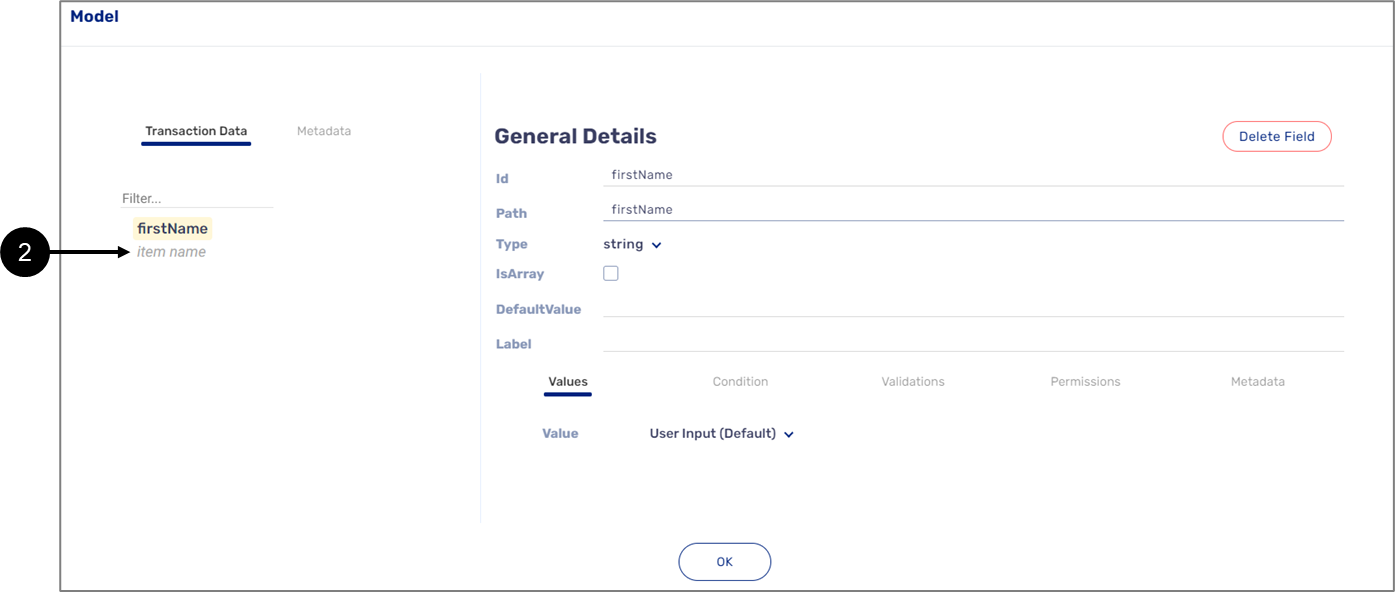
Figure 10: item name field
- Click the item name field (2), input a name, and press enter.
- A transaction data item name must be unique.
- Suppose the transaction data item name contains two words or more. In that case, the first word will be written in all lowercase letters while the next words will also be written in lowercase letters excluding the first letter of each word, for example, firstName or customerFirstName.
- Numbers, special characters such as % or &, and spaces cannot be used.
- Some words such as name, true, and false cannot be used because they are reserved JavaScript keywords.
Result:
The transaction data item is saved (3), and its details appear on the right side of the screen (4):
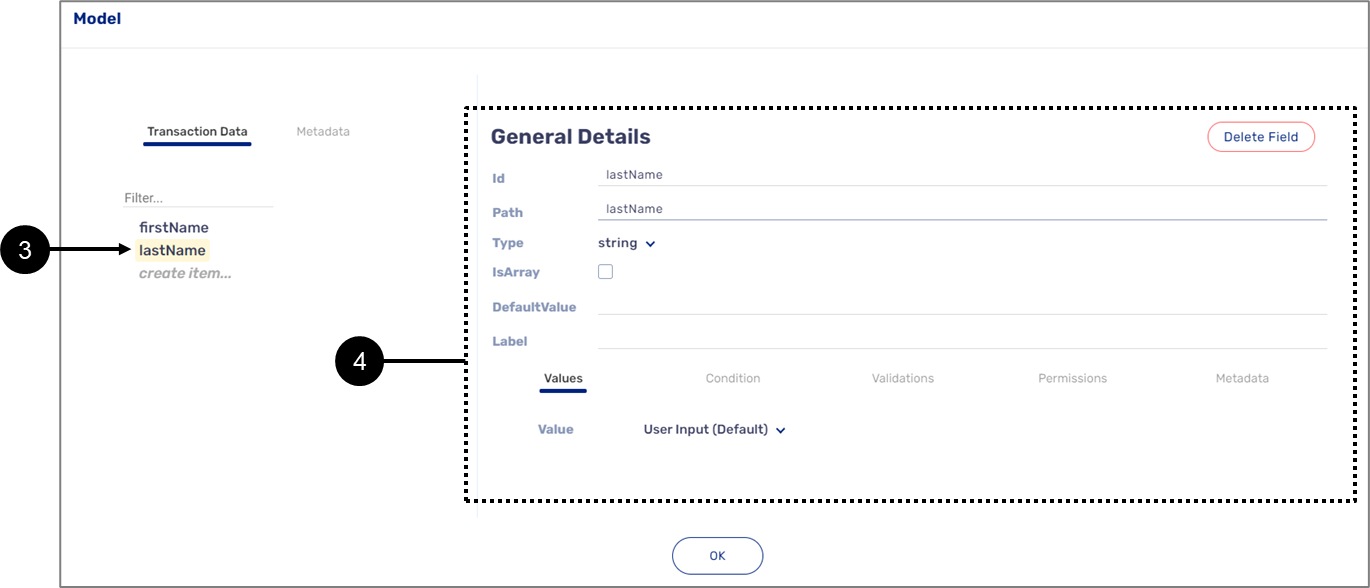
Figure 11: Created Transaction Data Type Item and its Details
For more information about how to use the details of a transaction data item to configure additional Model features, see the Model Implementation articles.
Creating a Transaction Data Item Using the Properties Section
(See Figure 12 to Figure 15)
To create a transaction data item with data type using the Properties section, perform the following steps:
- Click a component (1) that was added to the canvas.
- Click the word appearing next to the </> icon (2).
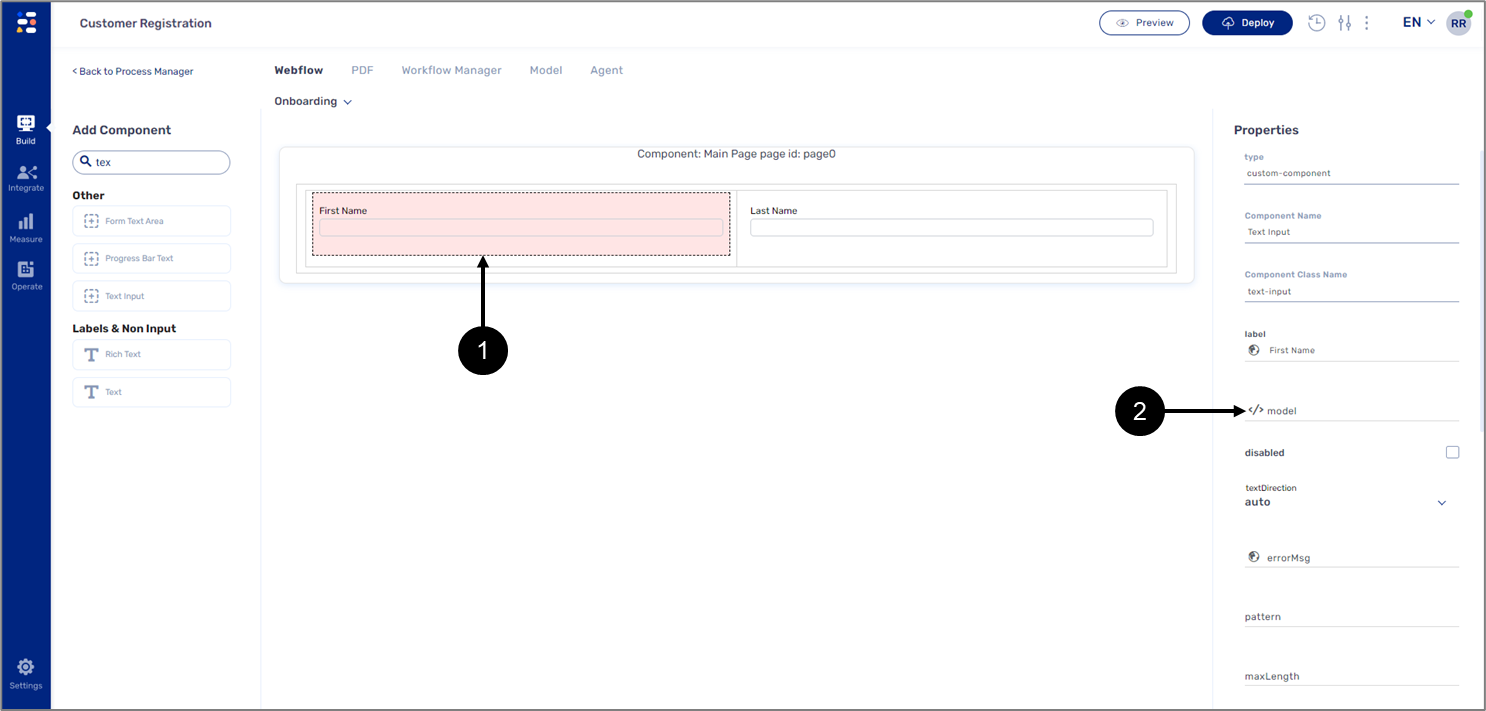
Figure 12: Properties Section
- Enter the transaction data name (3). When you are done, click the create option (4).
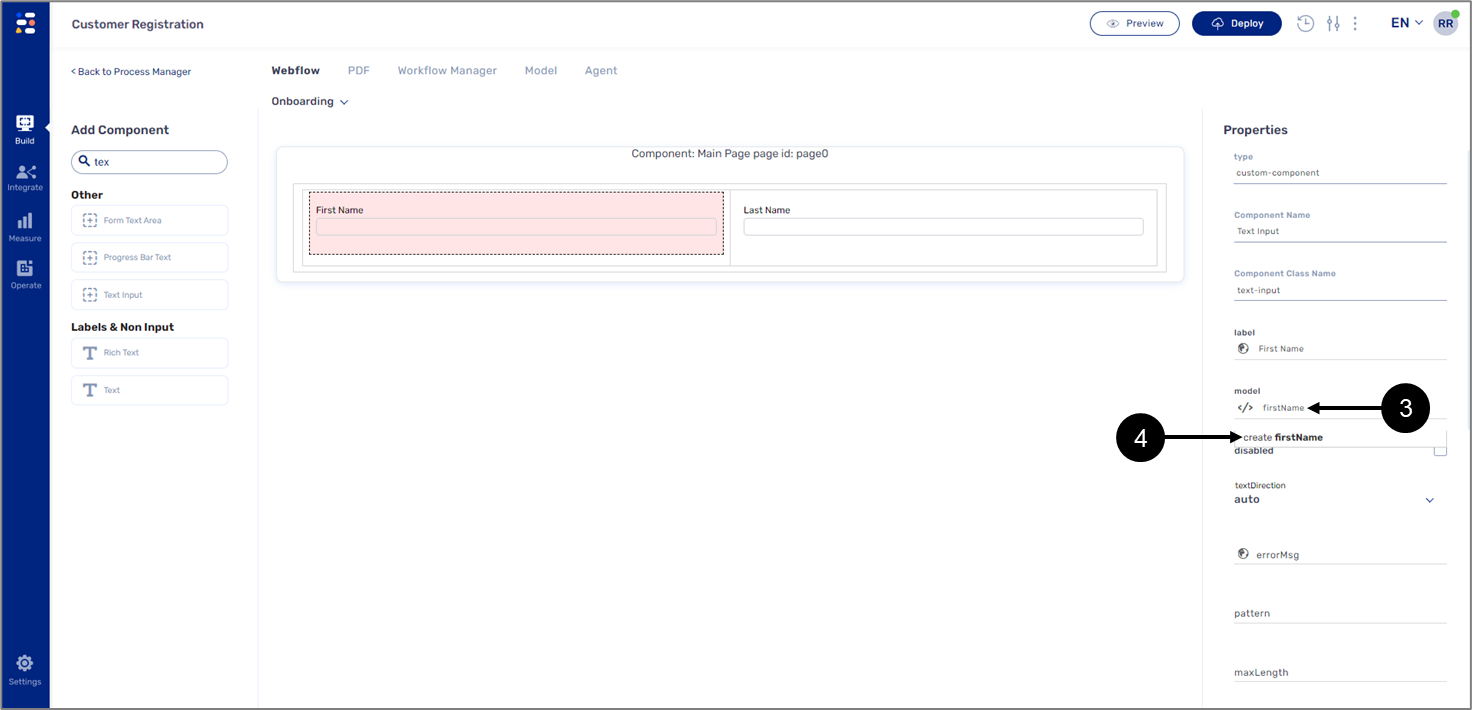
Figure 13: New Name and Create Option
- A transaction data item name must be unique.
- Suppose the transaction data item name contains two words or more. In that case, the first word will be written in all lowercase letters while the next words will also be written in lowercase letters excluding the first letter of each word, for example, firstName or customerFirstName.
- Numbers, special characters such as % or &, and spaces cannot be used.
- Some words such as name, true, and false cannot be used because they are reserved JavaScript keywords.
Result:
The transaction data item is saved:
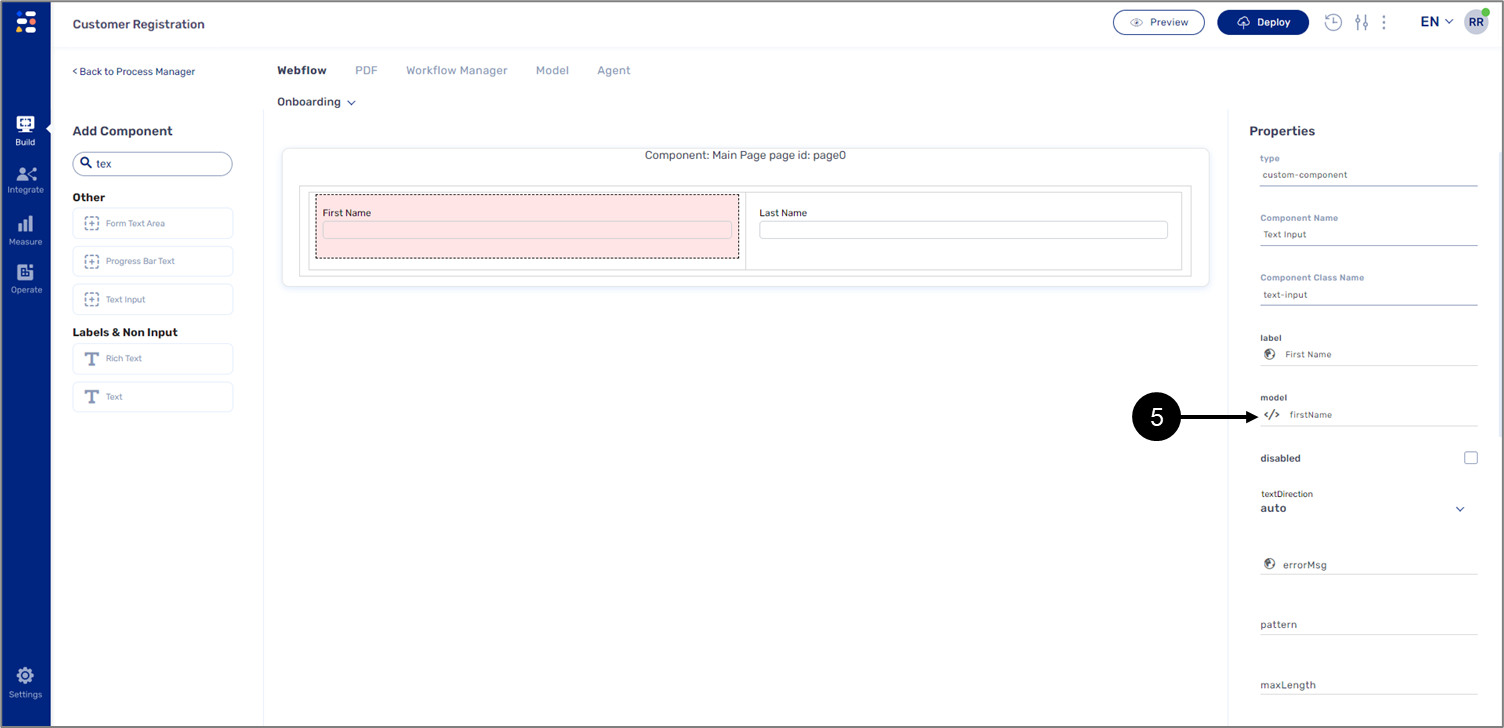
Figure 14: Accessing the Model
- Click the </> icon (5).
Result:
The Model main screen appears with the created transaction data item (6) and its details (7):
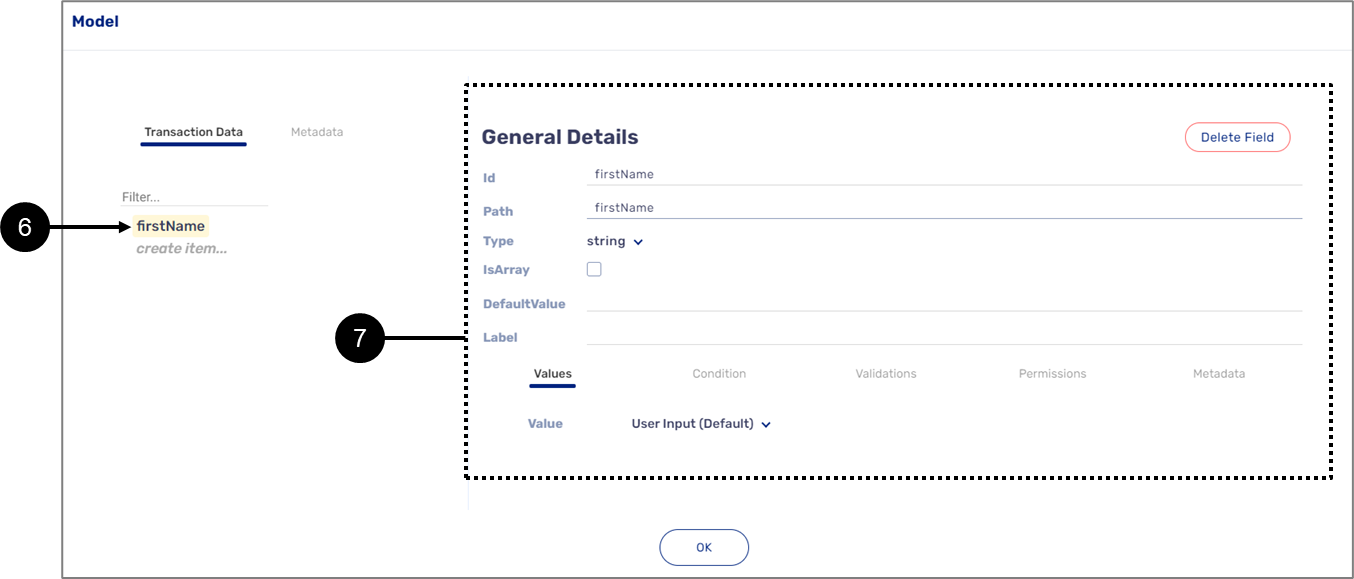
Figure 15: Created Transaction Data Type Item and its Details
How to Associate Components with a Transaction Data Item?
(See Figure 16 to Figure 20)
There are two ways to associate components with a transaction data item:
- The first way as previously described in the article (see the Creating a Transaction Data Item Using the Properties Section).
- The second way requires you to first create the transaction data item using the Model main screen:
- Perform the steps described in the Creating a Transaction Data Item Using the Model Screen section.
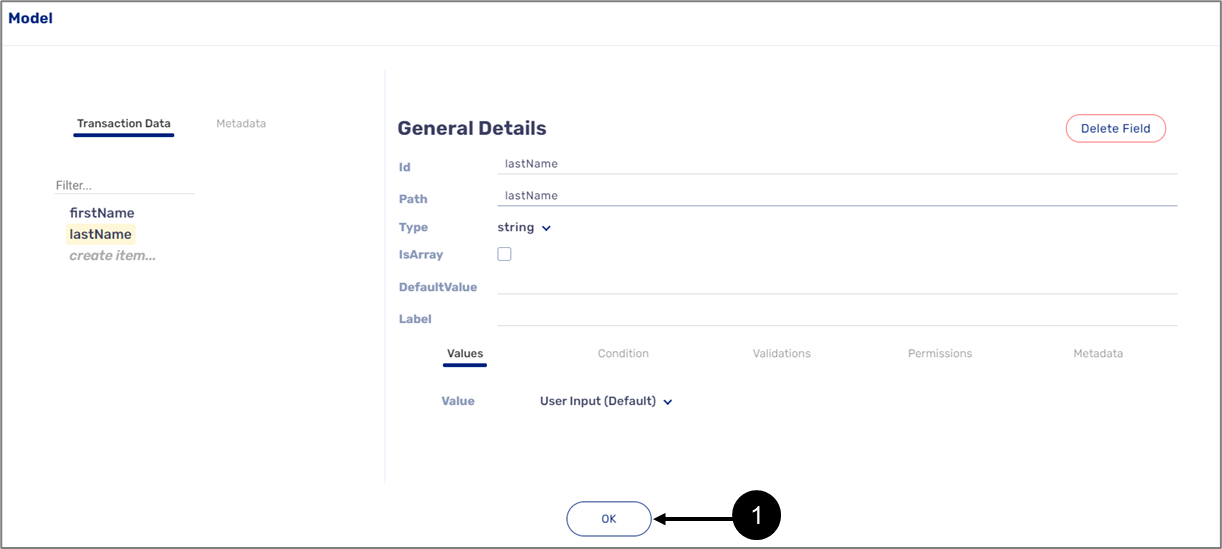
Figure 16: OK Button
- Click the OK button (1).
Result:
- The Model main screen closes.
- The Webflow main screen appears:
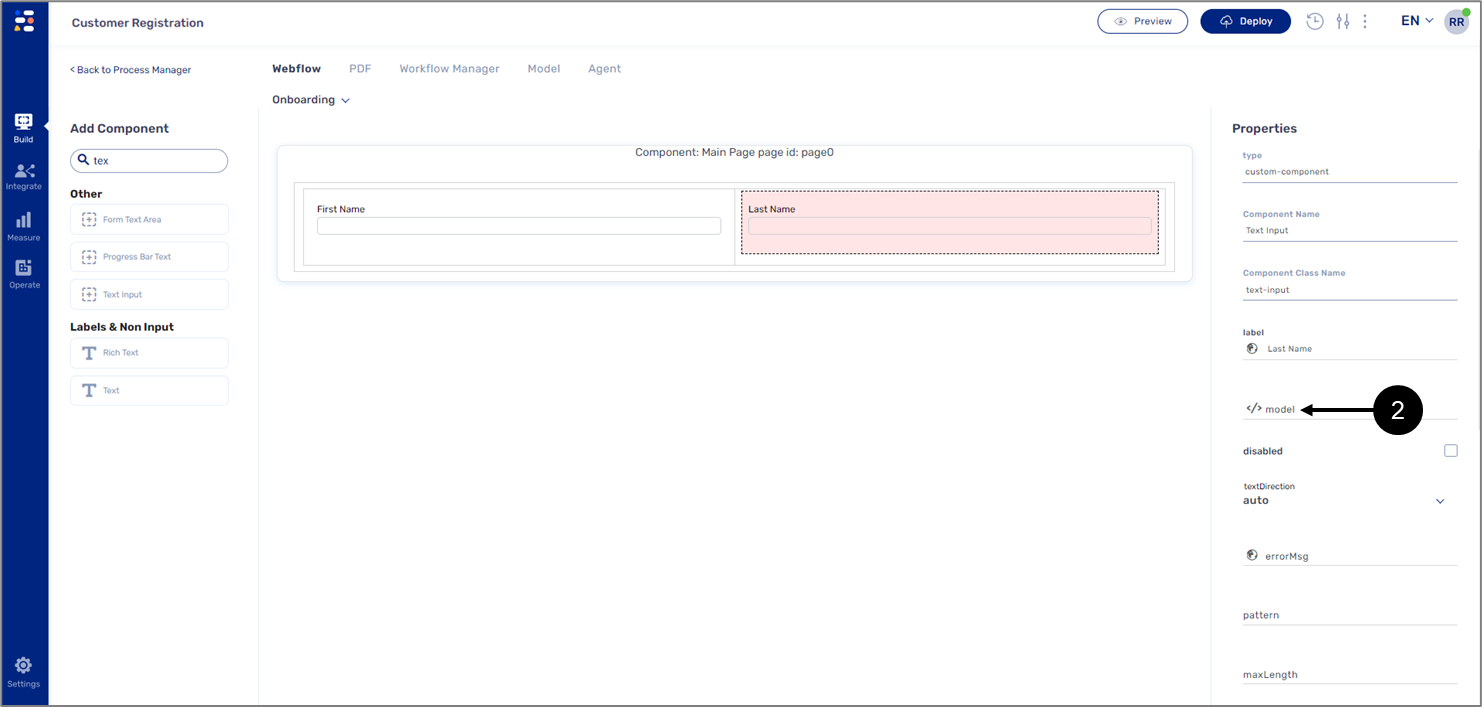
Figure 17: Properties Section
- Perform one of the following options:
- Option 1:
- Click the word appearing next to the </> icon (2).
- Type the name (3) of the transaction data item you created and click it (4).
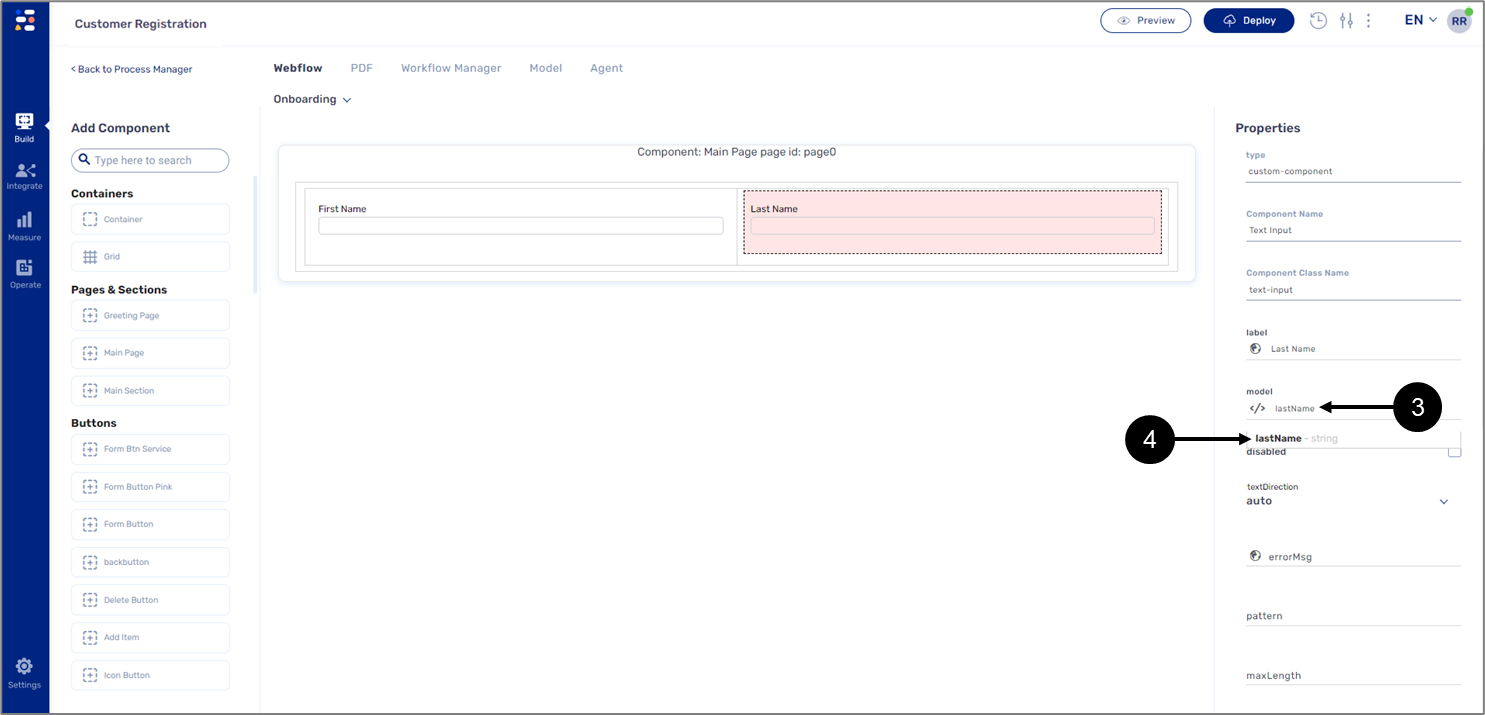
Figure 18: Transaction Data Item Name
Result:
The component is associated with the transaction data item.
- Option 2:
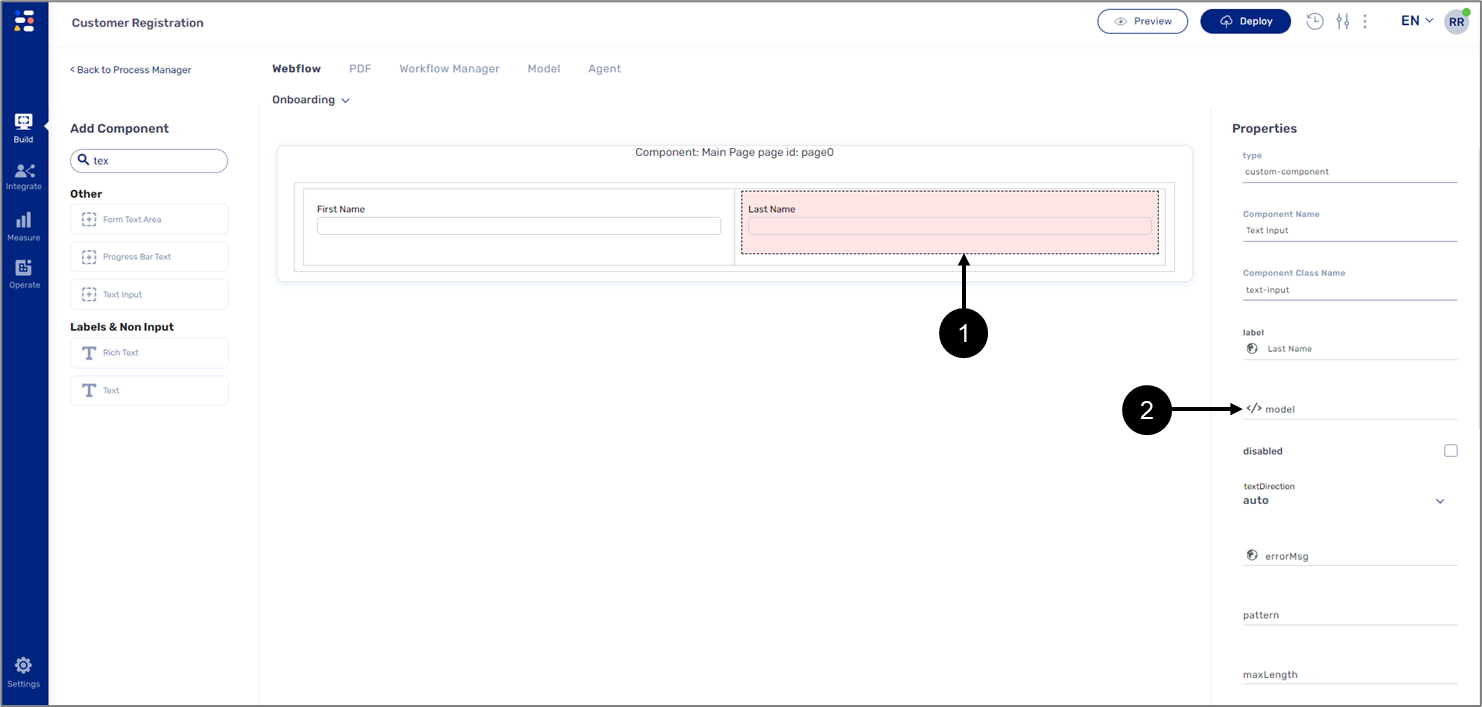
Figure 19: Accessing the Model Main Screen
- Click the desired component (1).
- Click the </> icon (2).
Result:
The Model main screen appears:
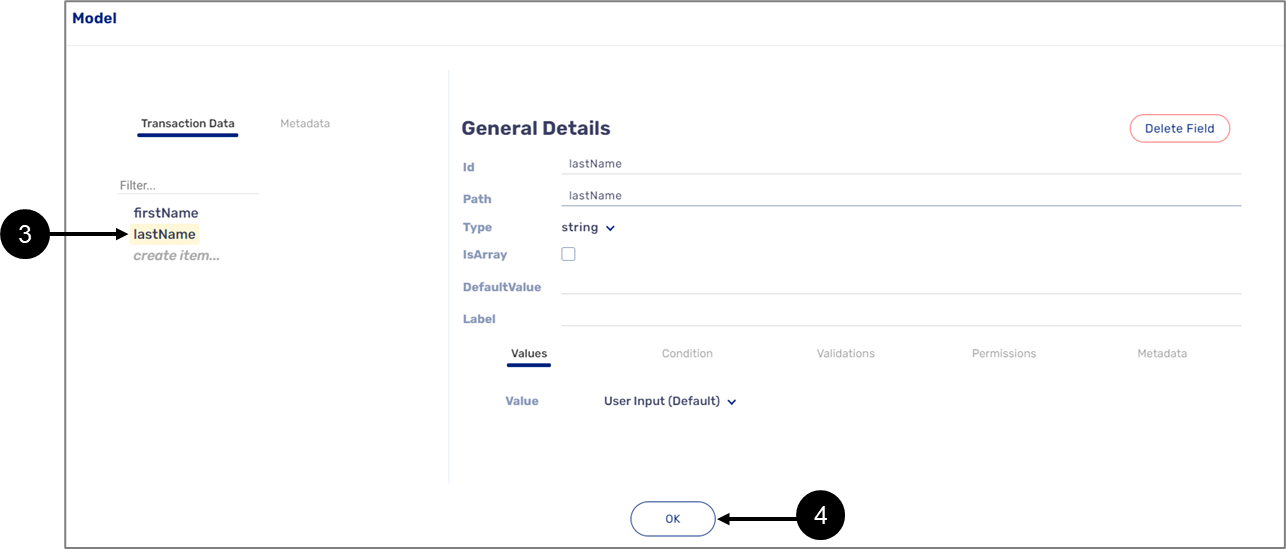
Figure 20: Transaction Data Item Association
- Click the desired transaction data item (3).
- Click the OK button (4).
Result:
The component is associated with the transaction data item.