Article Overview
The following article describes EasySend's Stripe integration.
What is Stripe?
Stripe is a global payment-processing platform that provides infrastructure for businesses to accept and manage online payments.
Integrating Stripe with EasySend enables one-time and recurring payment processing. This allows you to support an end to end digitization of data intake and payment collection within one digital process.
How to Integrate Stripe with a Digital Process
The following sections describe how to integrate Stripe with a digital process.
Add a Stripe Payment Resource
(See Figure 1)
The Stripe resource is located in the Service screen under Resources (1) and Payment (2):
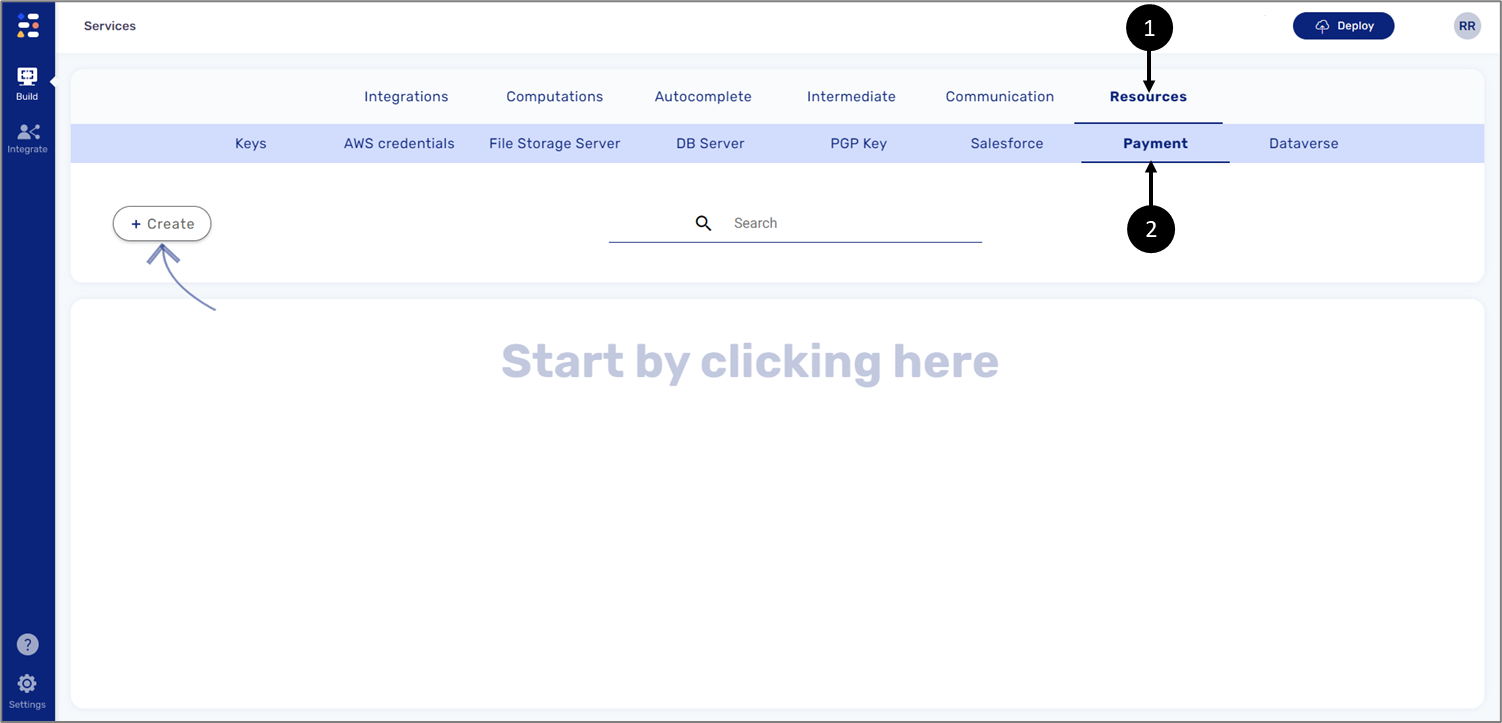
Figure 1: Resource and Payment
To configure the resource, perform the following steps (see Figure 2 to Figure 5):
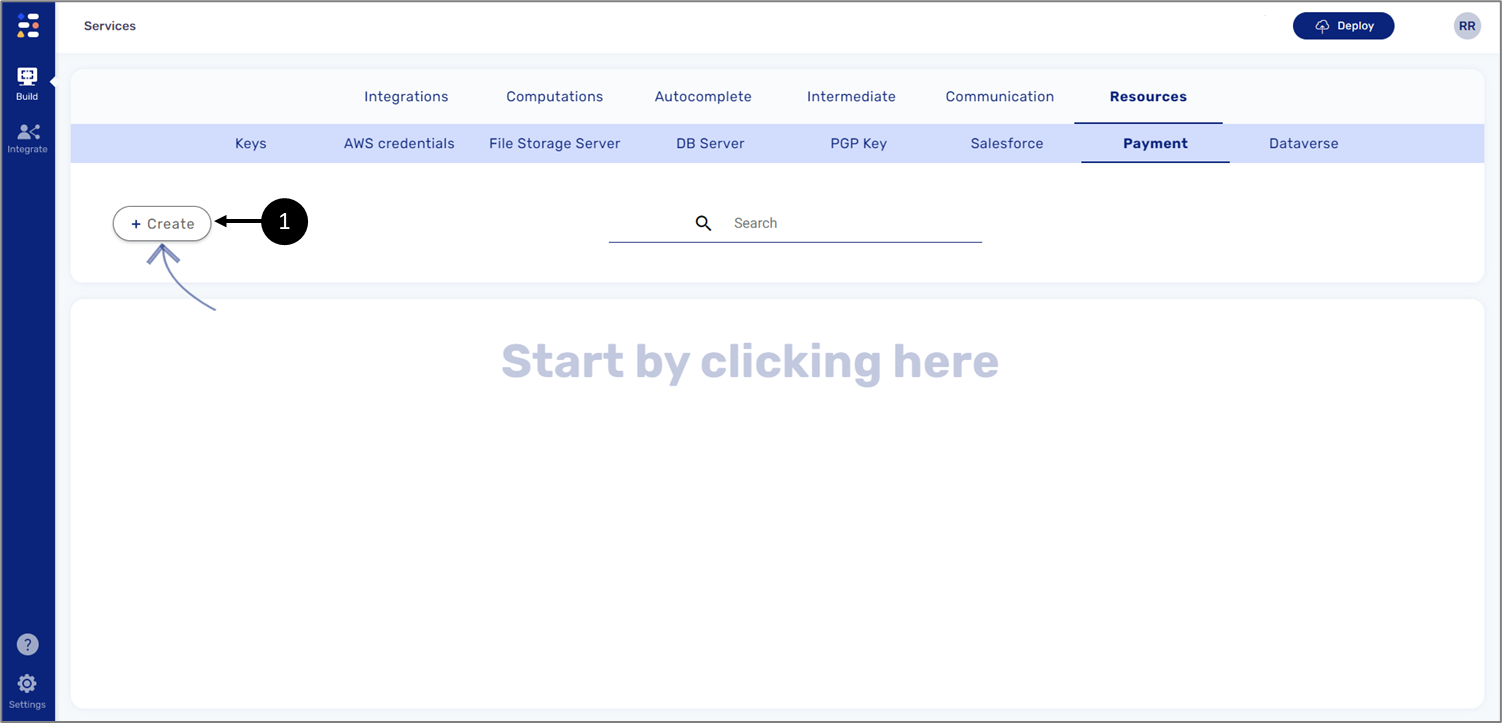
Figure 2: + Create Button
- Click + Create (1).
- On the New Payment Resource window:
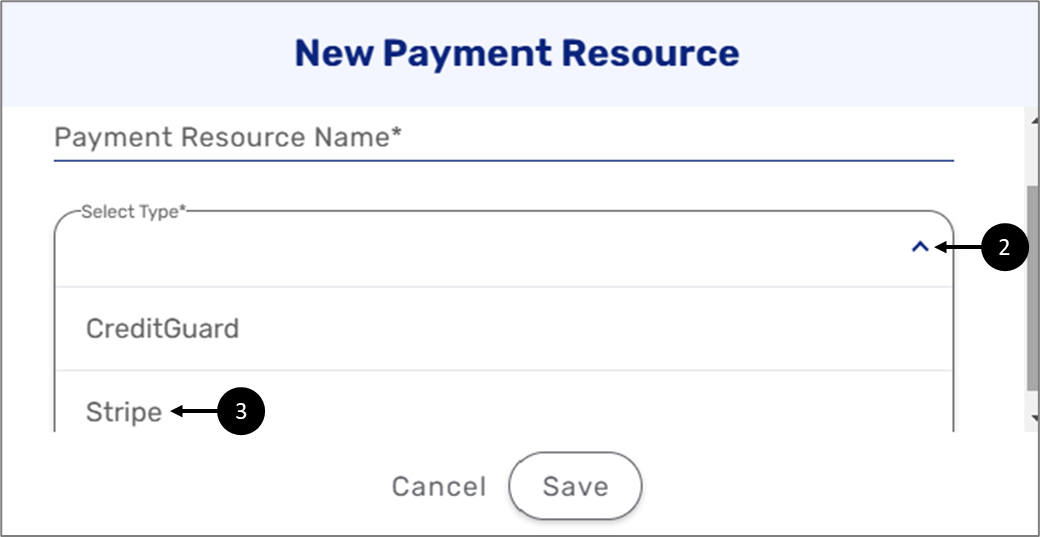
Figure 3: New Payment Resource Window 1 of 2
- Click the Select Type* dropdown (2) and select Stripe (3).
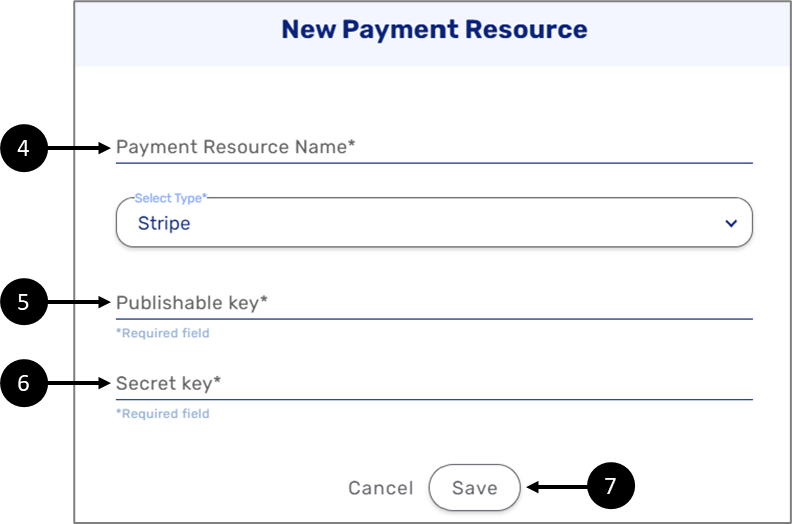
Figure 4: New Payment Resource Window 2 of 2
- Enter a Payment Resource Name (4).
- Enter a Publishable key (5).
- Enter a Secret key (6).

- Click Save (7) to add the integration.
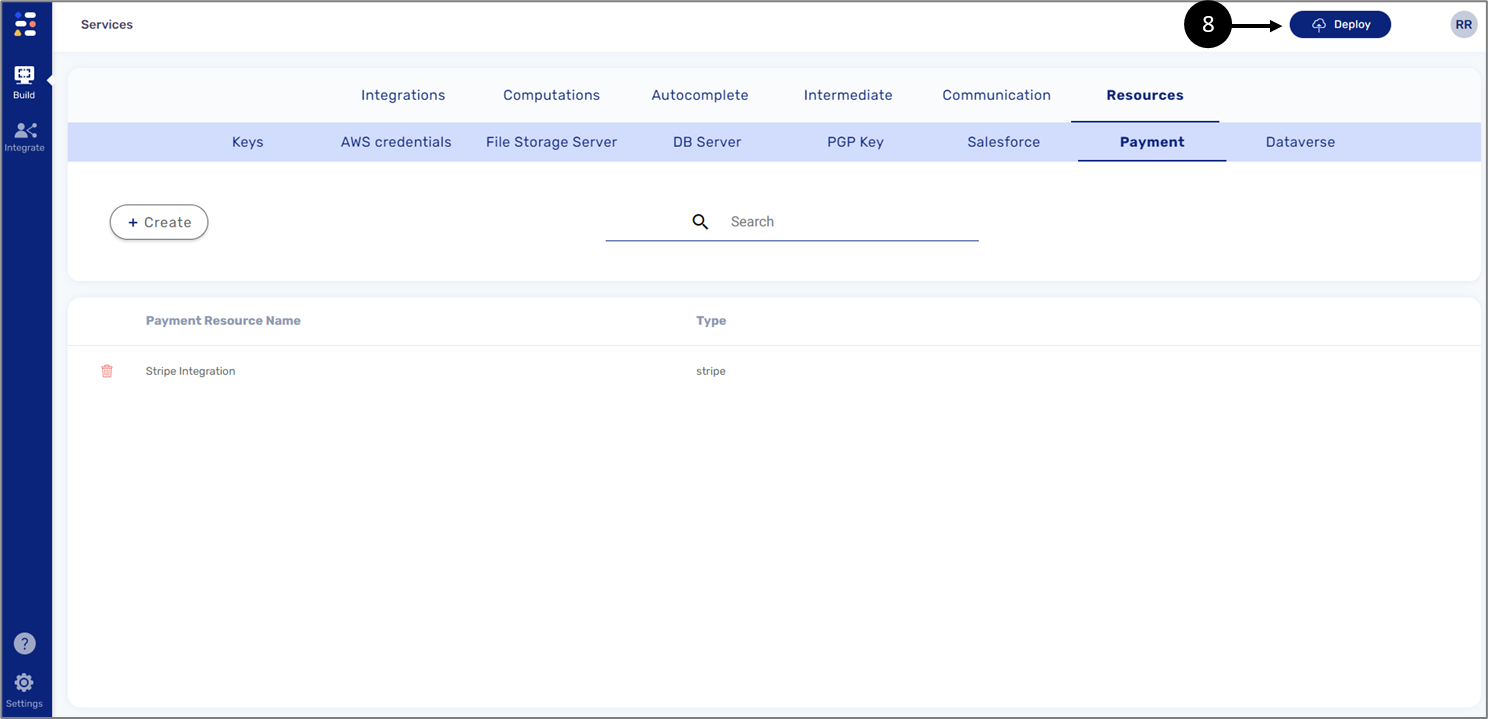
Figure 5: Deploy
- Click Deploy (8) to submit the integration.
Configure Stripe Components
(See Figure 6)
When creating a digital process and building its Webflow, there are two Stripe components to choose from. The component are located under Payment Solutions (1):
- Stripe Set Price (2) - this component is used when the price of a Stripe product is fixed or dynamically calculated.
- Stripe Catalog Price (3) - this component is used when there is an existing pre-configured Stripe price ID.
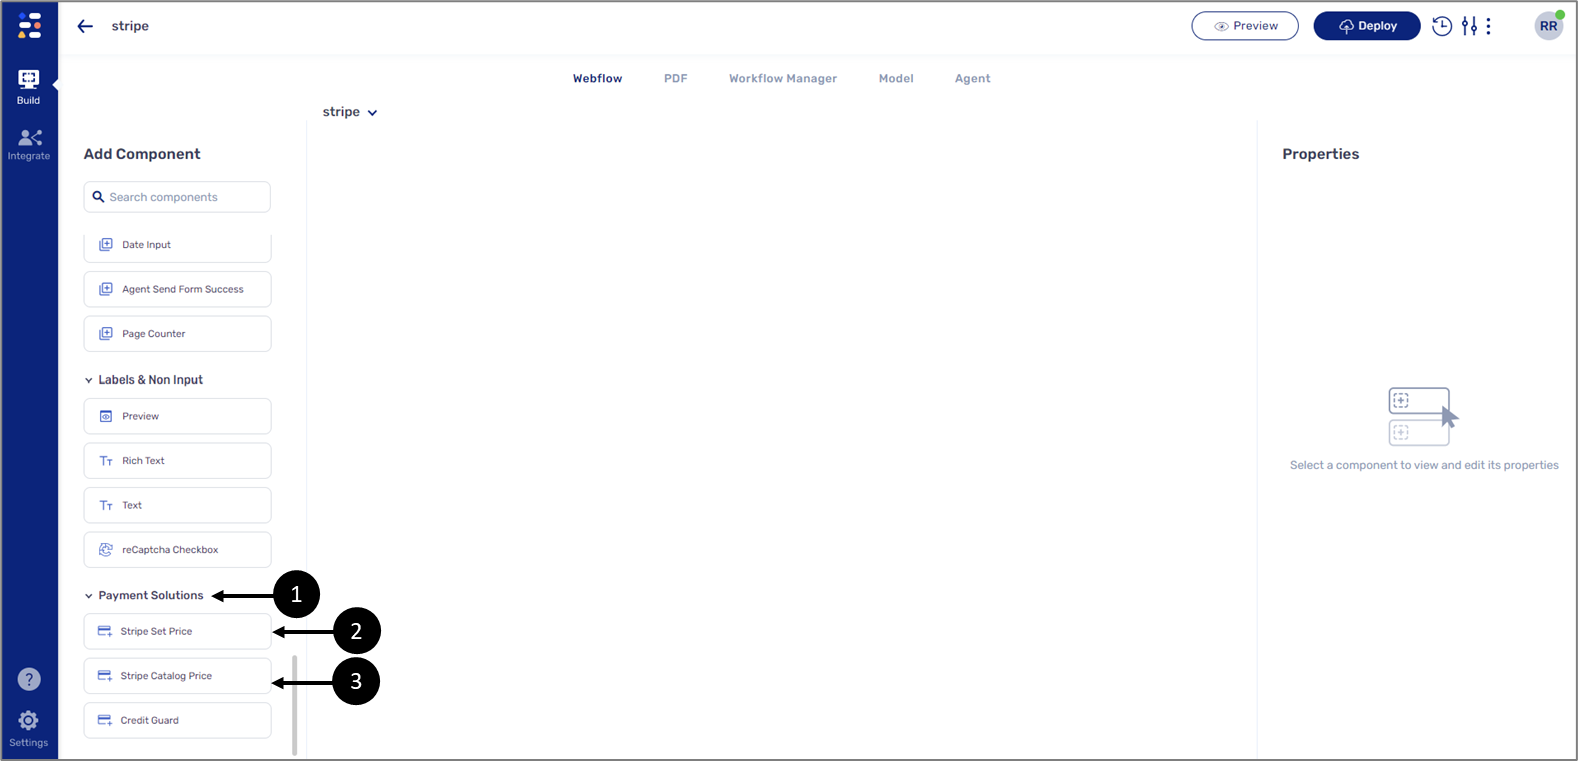
Figure 6: Stripe Components
Stripe Set Price Component Configuration
(See Figure 7 to Figure 9)
To configure the component, perform the following steps:
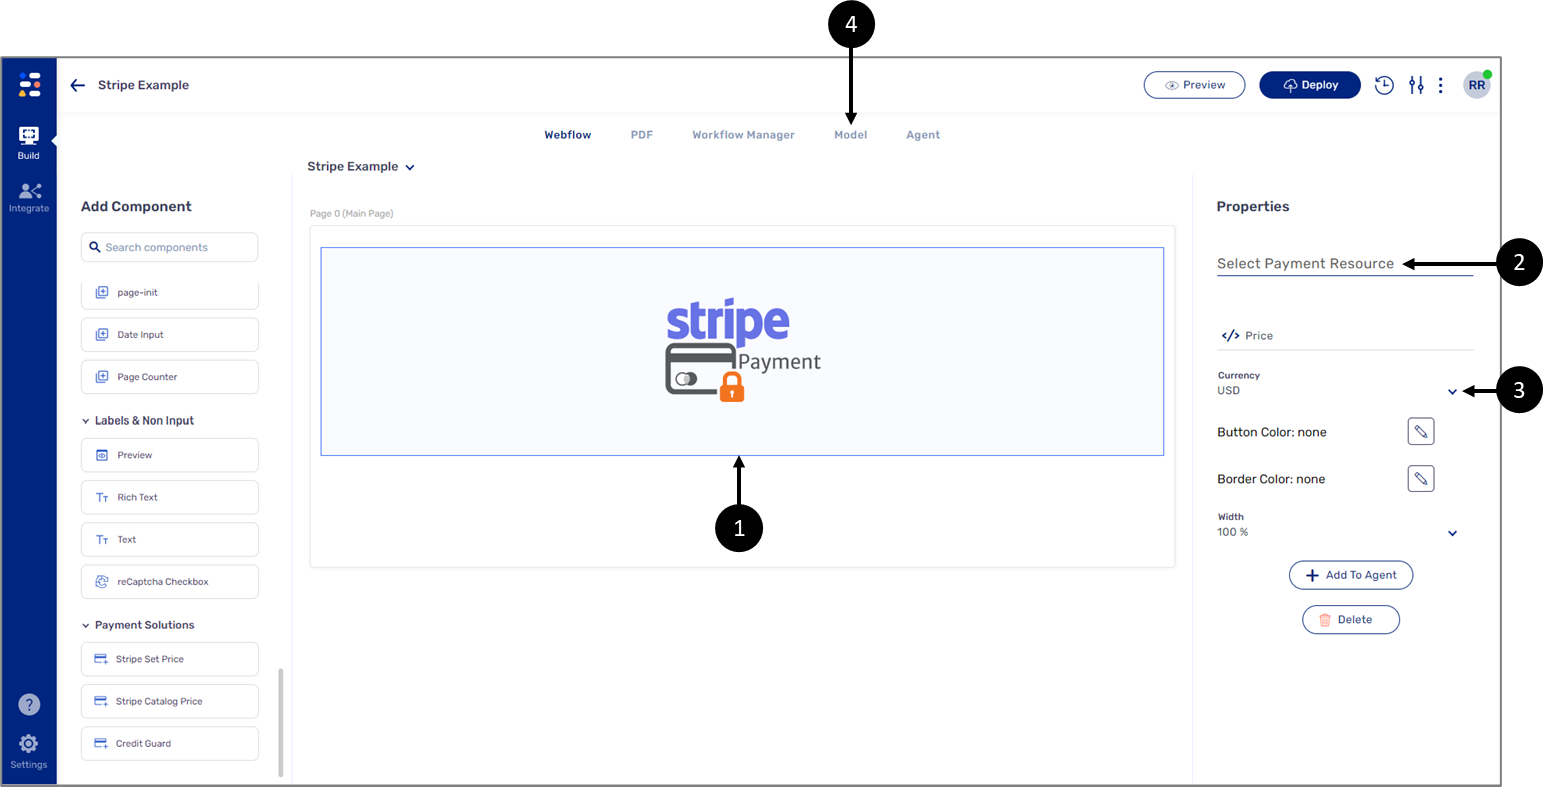
Figure 7: Configuring Stripe Component
- Drag and drop the component onto the canvas (1).
- On the component’s Properties section:
- Select the Stripe Payment Resource (2) you created in Step 1.
- Set the Currency (3).
- Navigate to the Model screen (4).
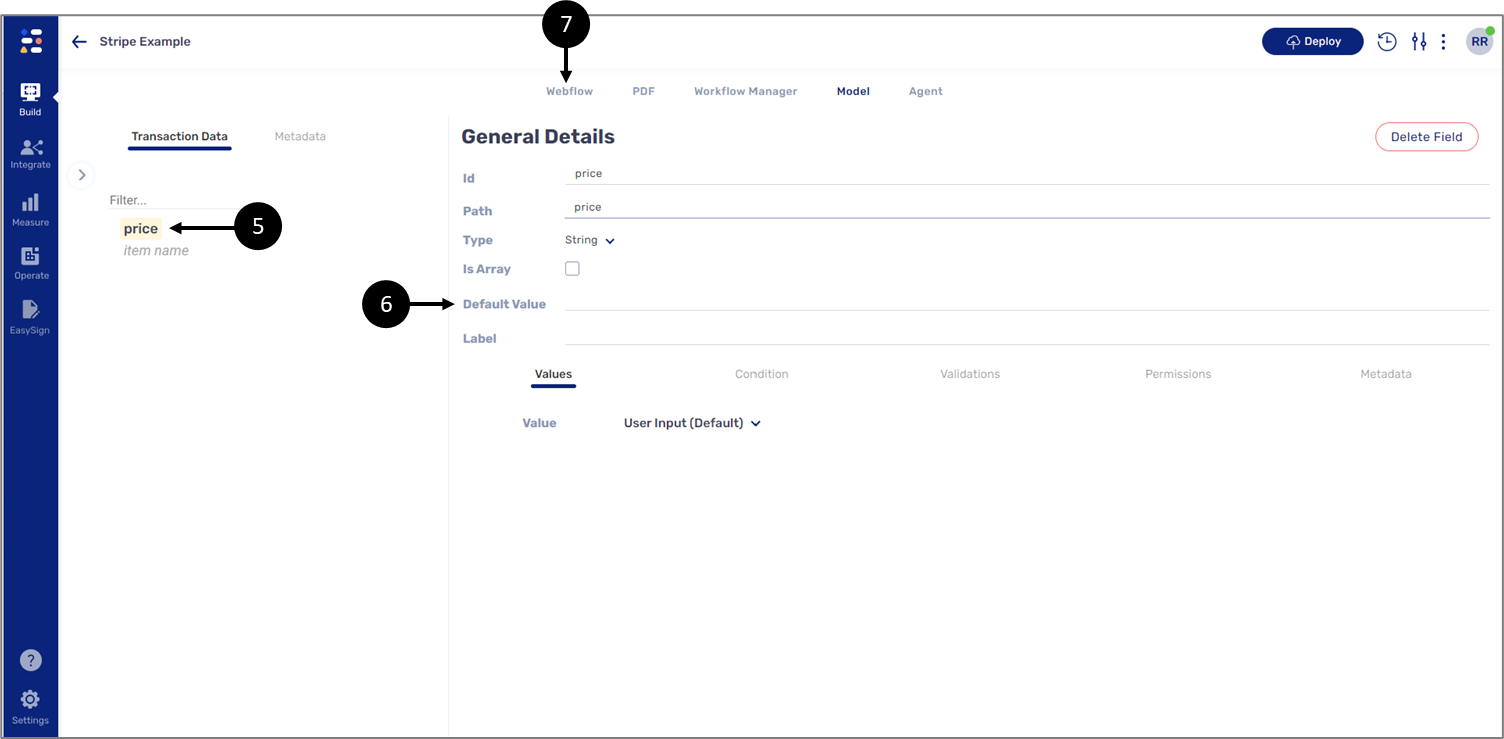
Figure 8: Model Screen
- Create a data item and name it price (5).
- Navigate to the Webflow screen (7).
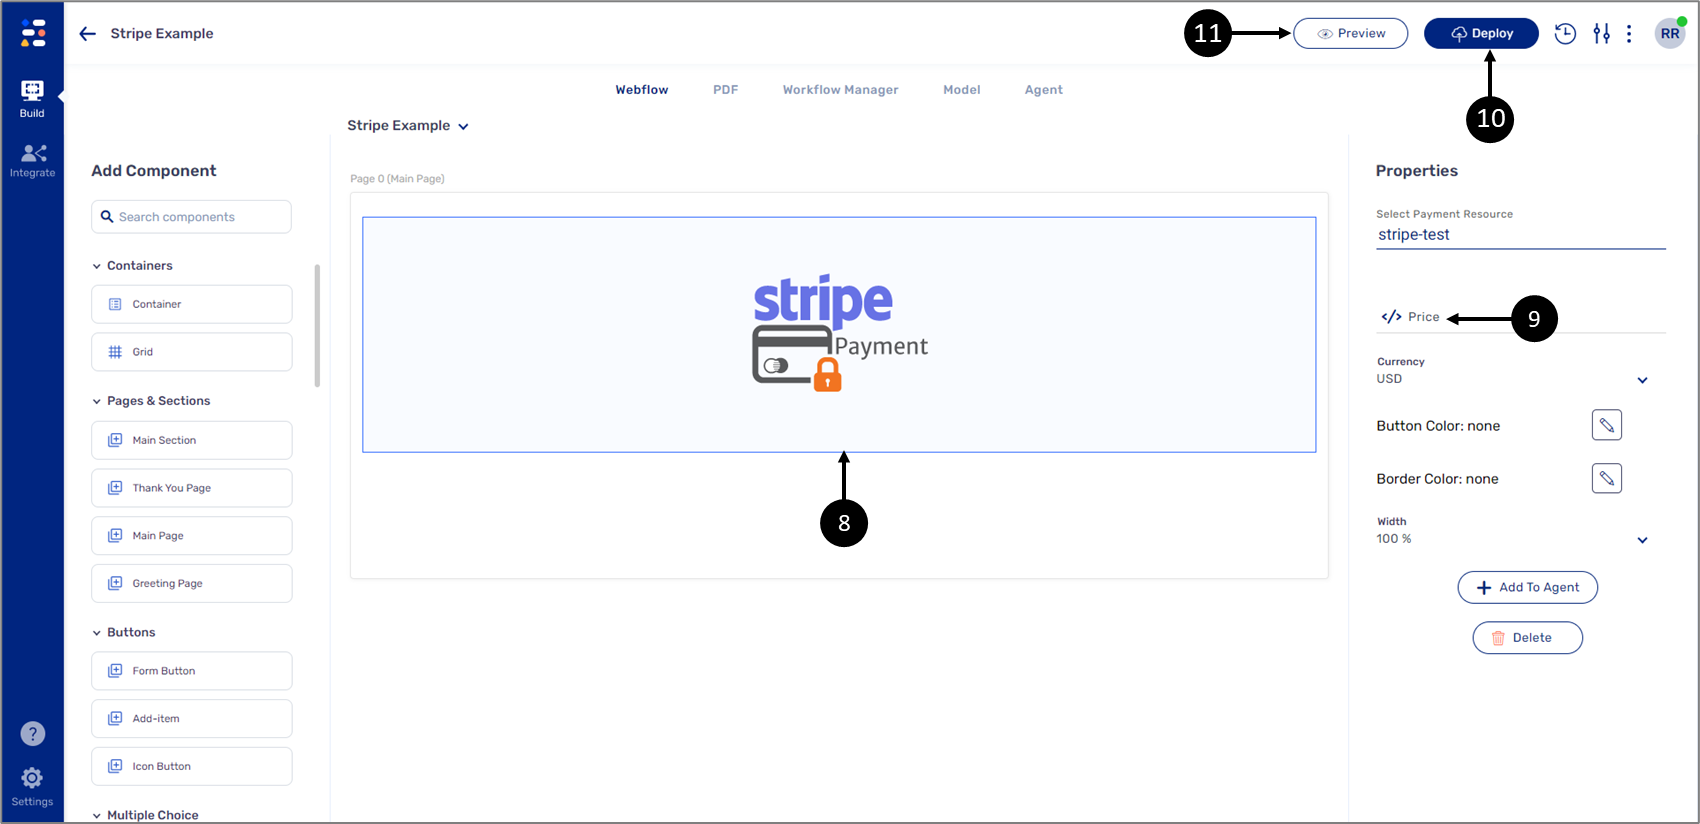
Figure 9: Connecting the Component
- Click the component (8).
- Connect the price data item to the component (9).
- Deploy (10) and Preview (11) the process.
Use The Digital Process and View The Stripe Integration
(See Figure 10 and Figure 11)
After a payment is submitted through the digital process:
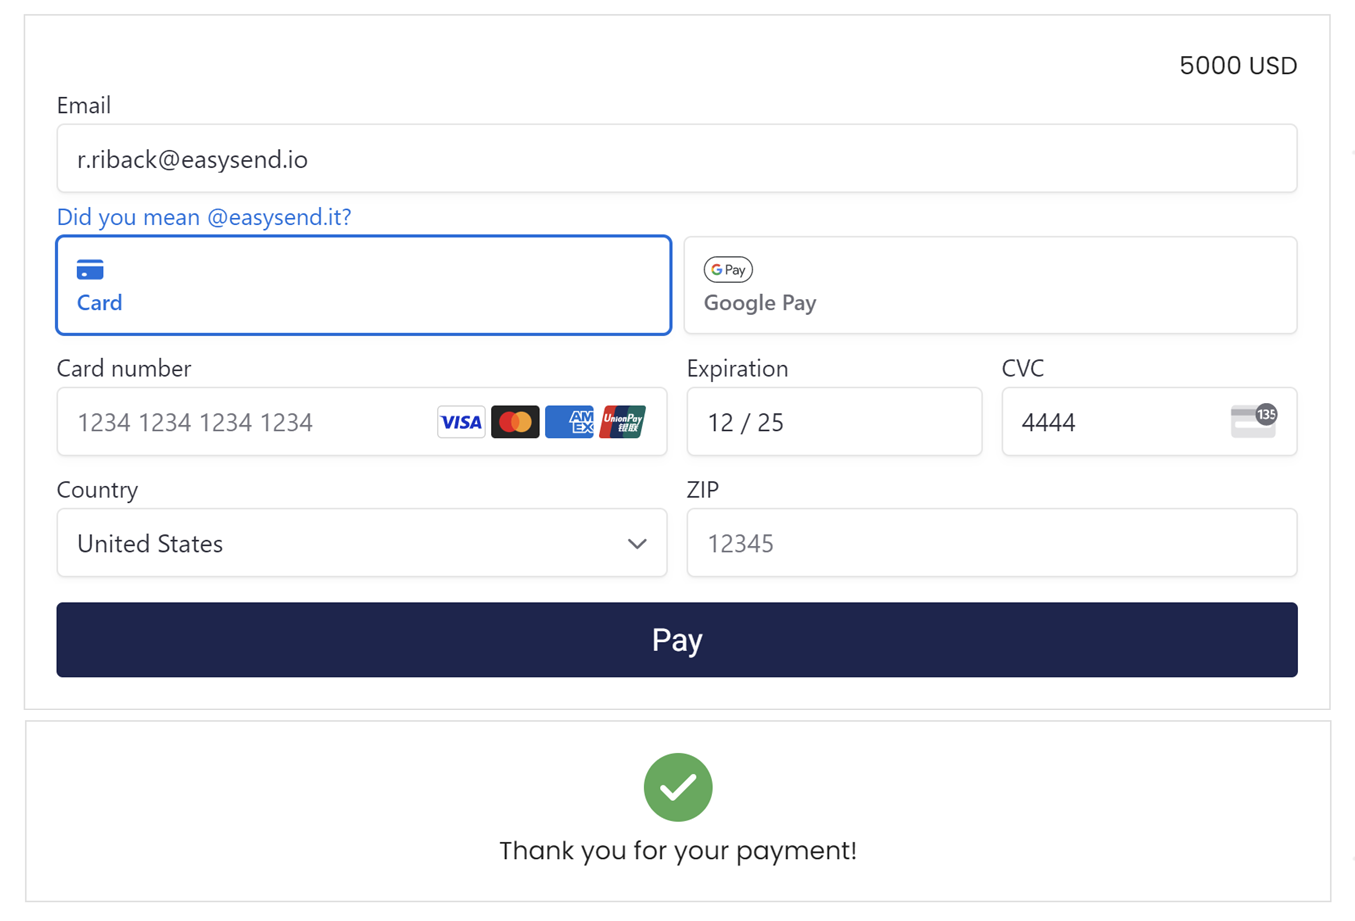
Figure 10: Submitted Payment
the information is integrated back into Stripe under Payments:
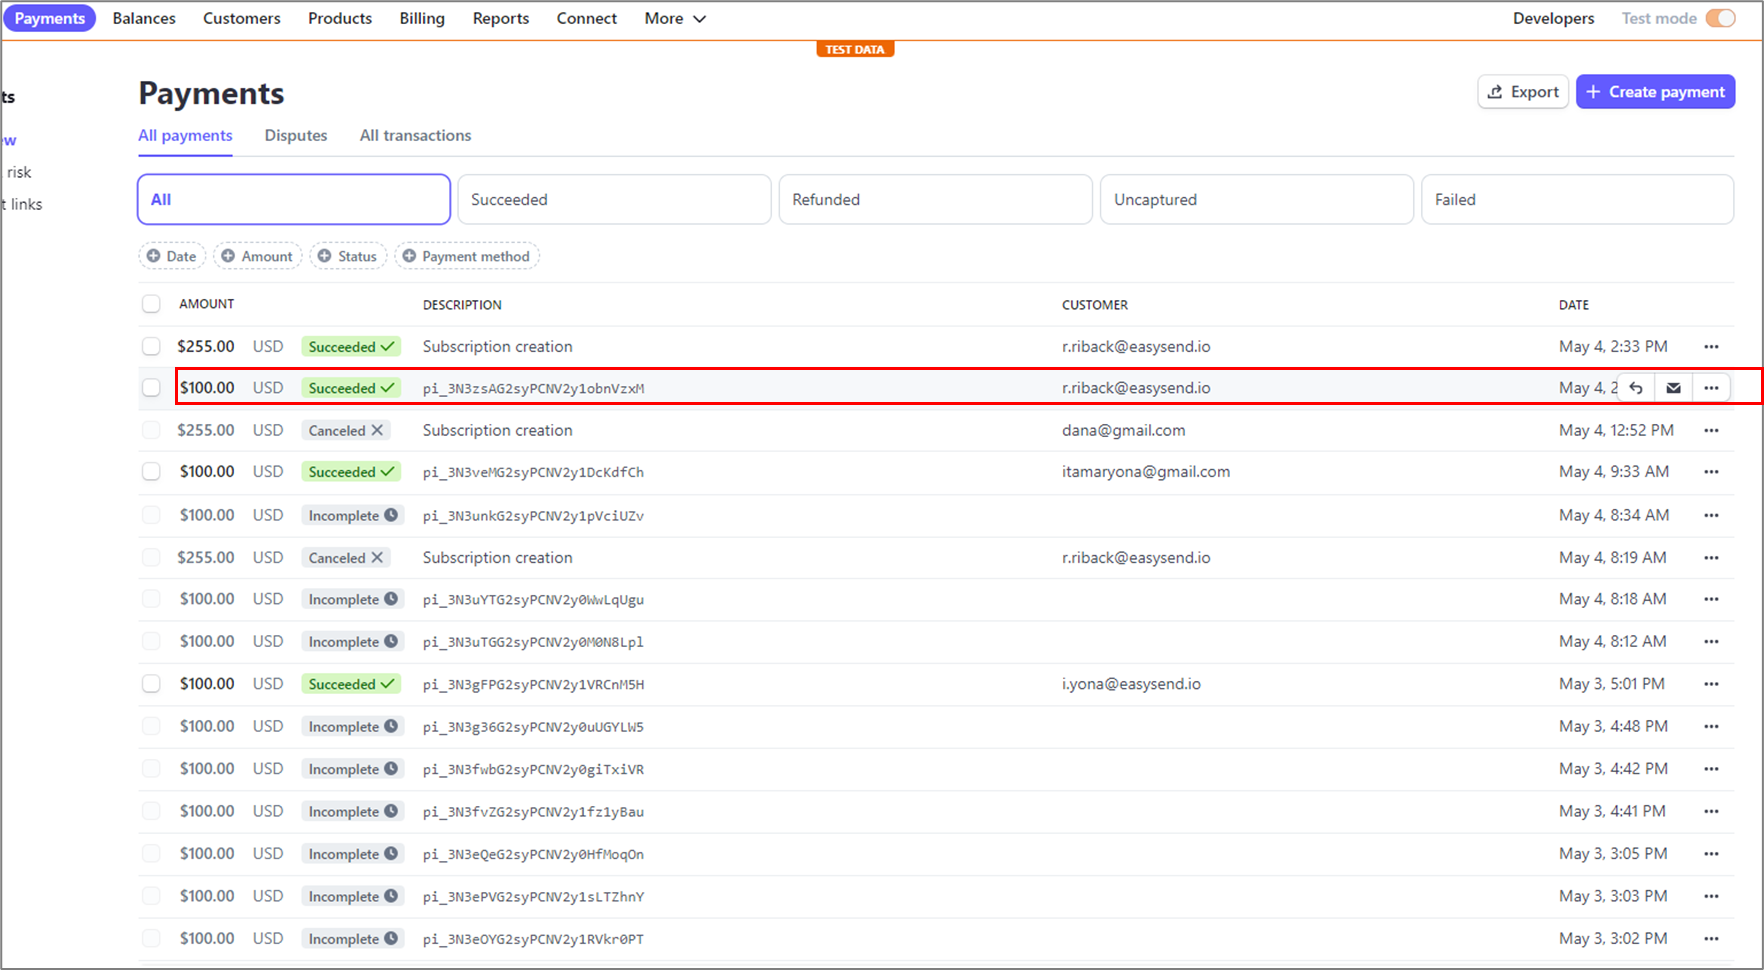
Figure 11: Stripe Payments
Stripe Catalog Price Component Configuration
(See Figure 12 to Figure 14)
- This component supports one-time and recurring payments.
- The payment interval, currency, and name must pre-defined in the user's Stripe account.
- Upon a new payment transaction, a new customer item in the user's Stripe account will be created, in addition, the digital process will pull information from Stripe and display it.
- The component requires Model configuration of mandatory fields (priceID and email) and optional fields such as full name and phone number.
- In any case, both the mandatory and optional information is integrated back to customer Stripe's record.
To configure the component, perform the following steps:
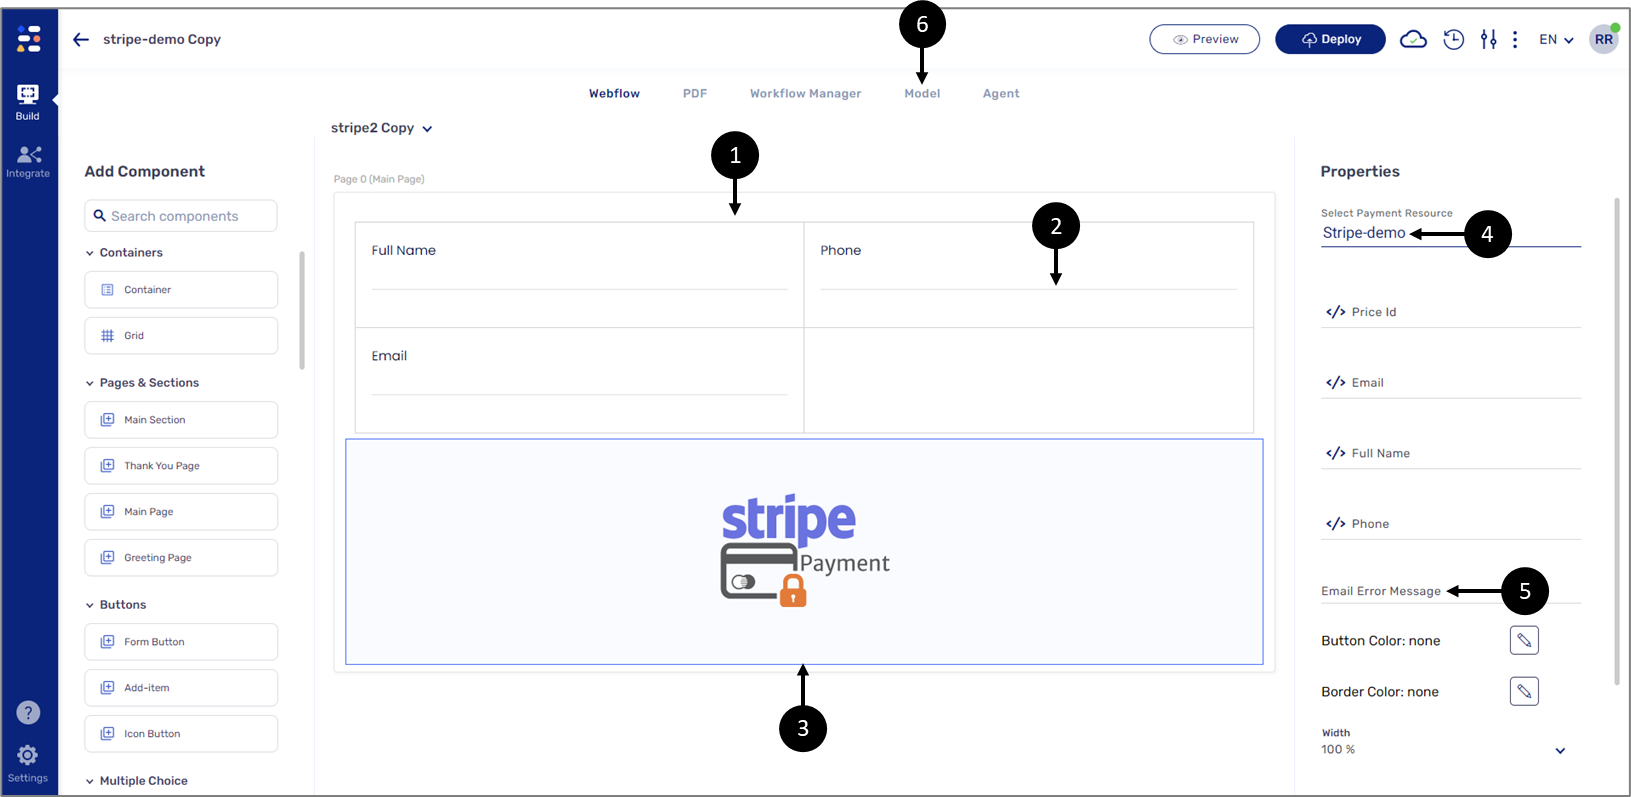
Figure 12: Stripe Catalog Price Component Configuration
- Drag and drop a Grid component (1).
- Drag and drop three Text Input components onto the Grid (2).
- Set the labels of the Text Input components:
- Full Name
- Phone
- Drag and drop the component onto the canvas (3).
- Click the Stripe component.
- On the component’s Properties section:
- Select the Stripe payment Resource (4) you created in Step 1.
- Enter an Email Error Message (5).
- Navigate to the Model screen (6).
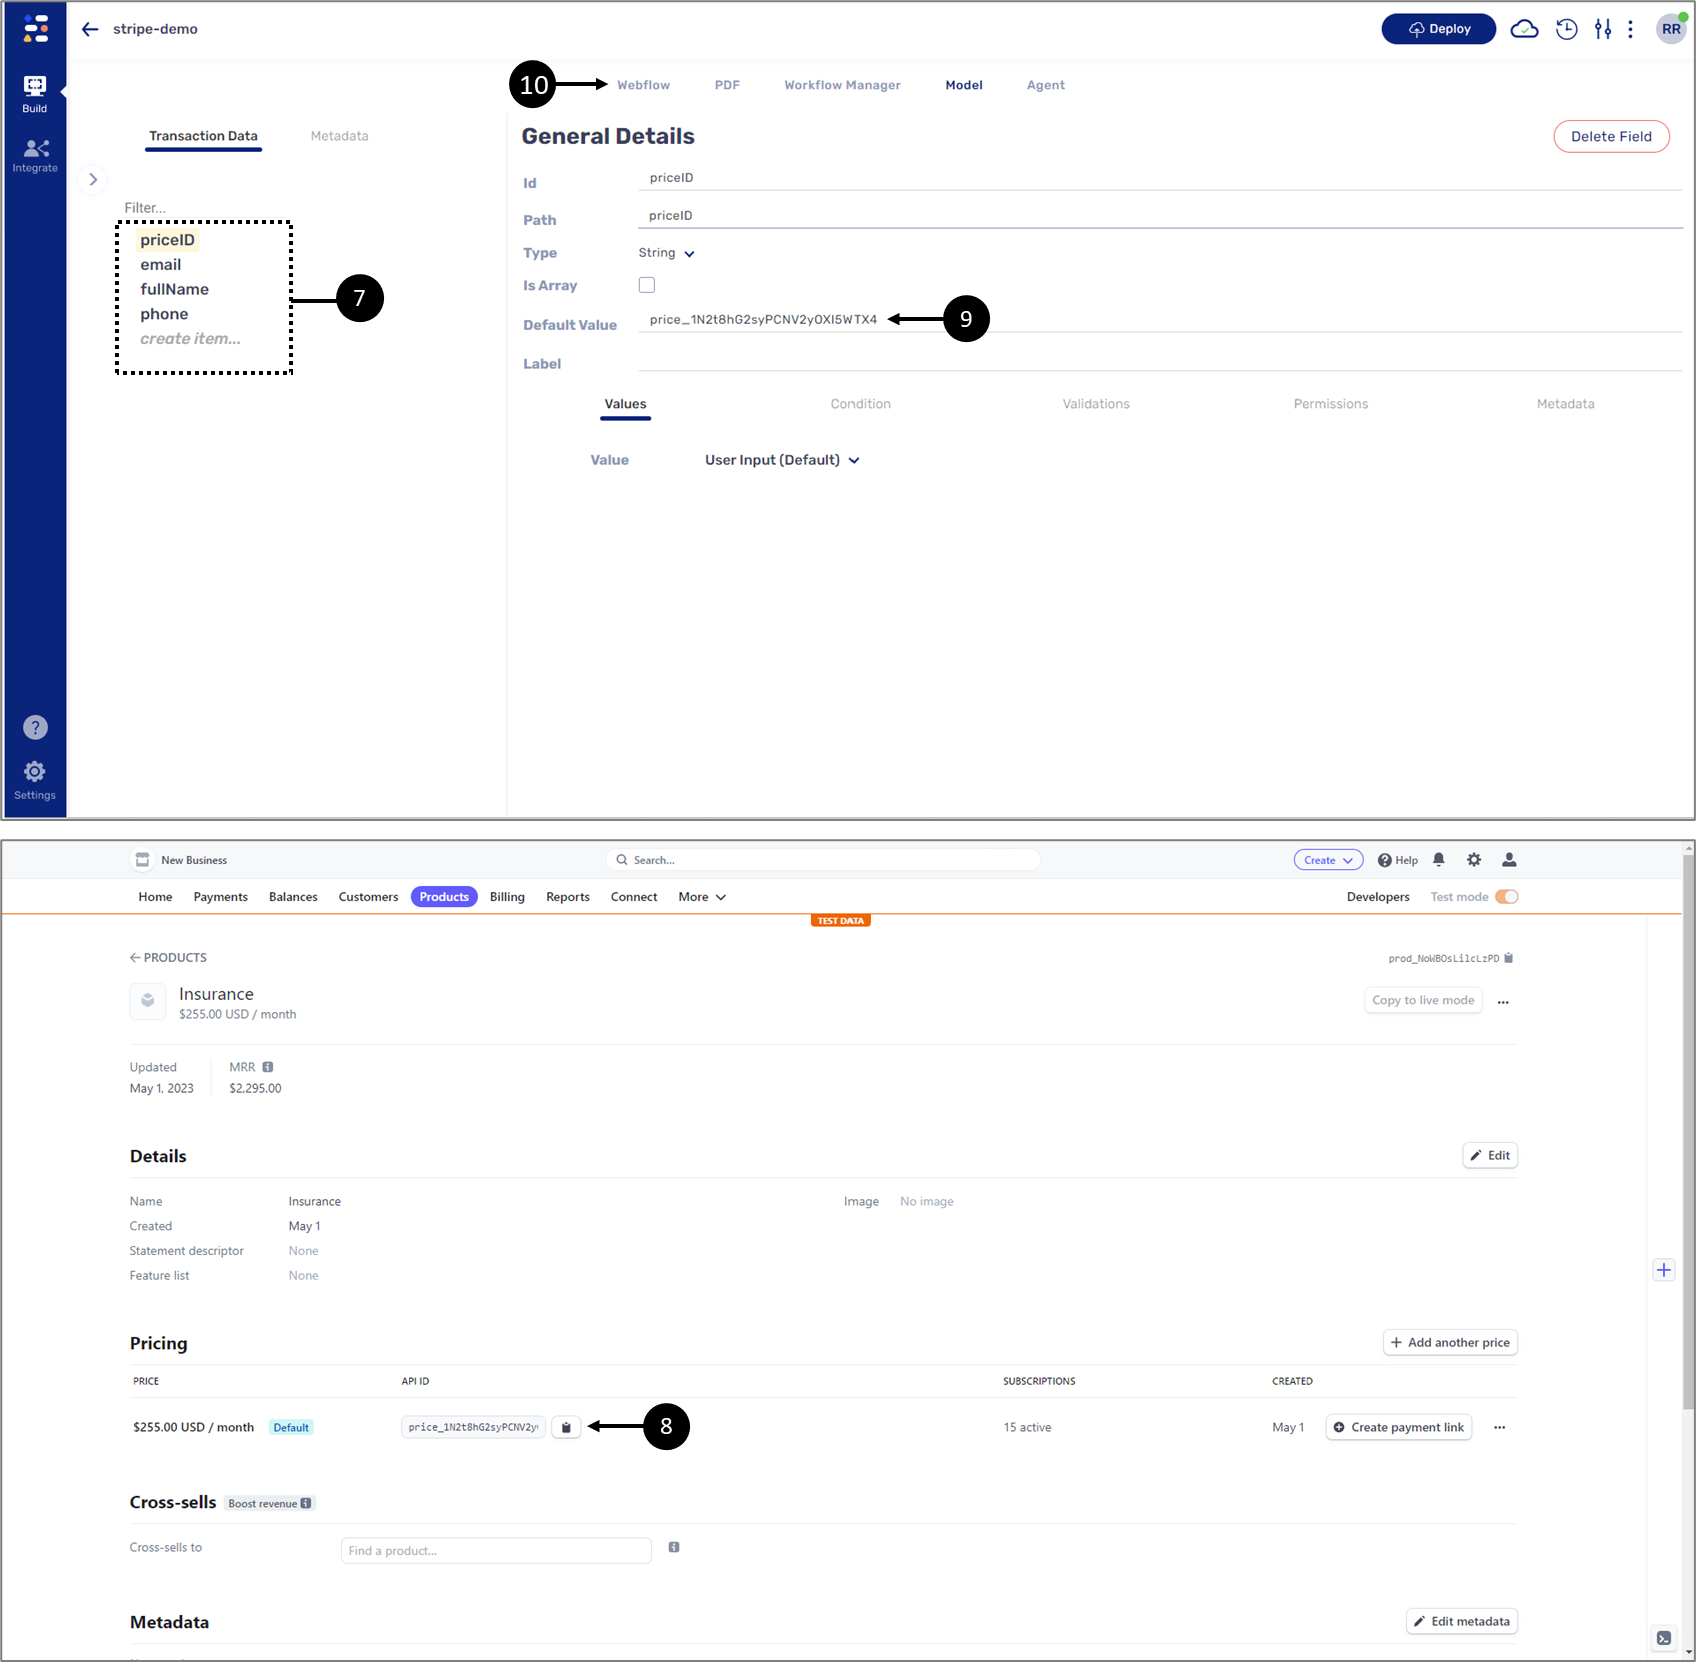
Figure 13: Model Data Items Configuration
- Create the following data items (7):
- priceID - this data item is mandatory and and will contain the API ID (8) (Stripe price ID) of the product listed in the Stripe catalog as the Default Value (9).
- email- this data data item is mandatory.
- fullName - optional.
- phone - optional.
- Navigate to the Webflow screen (10).
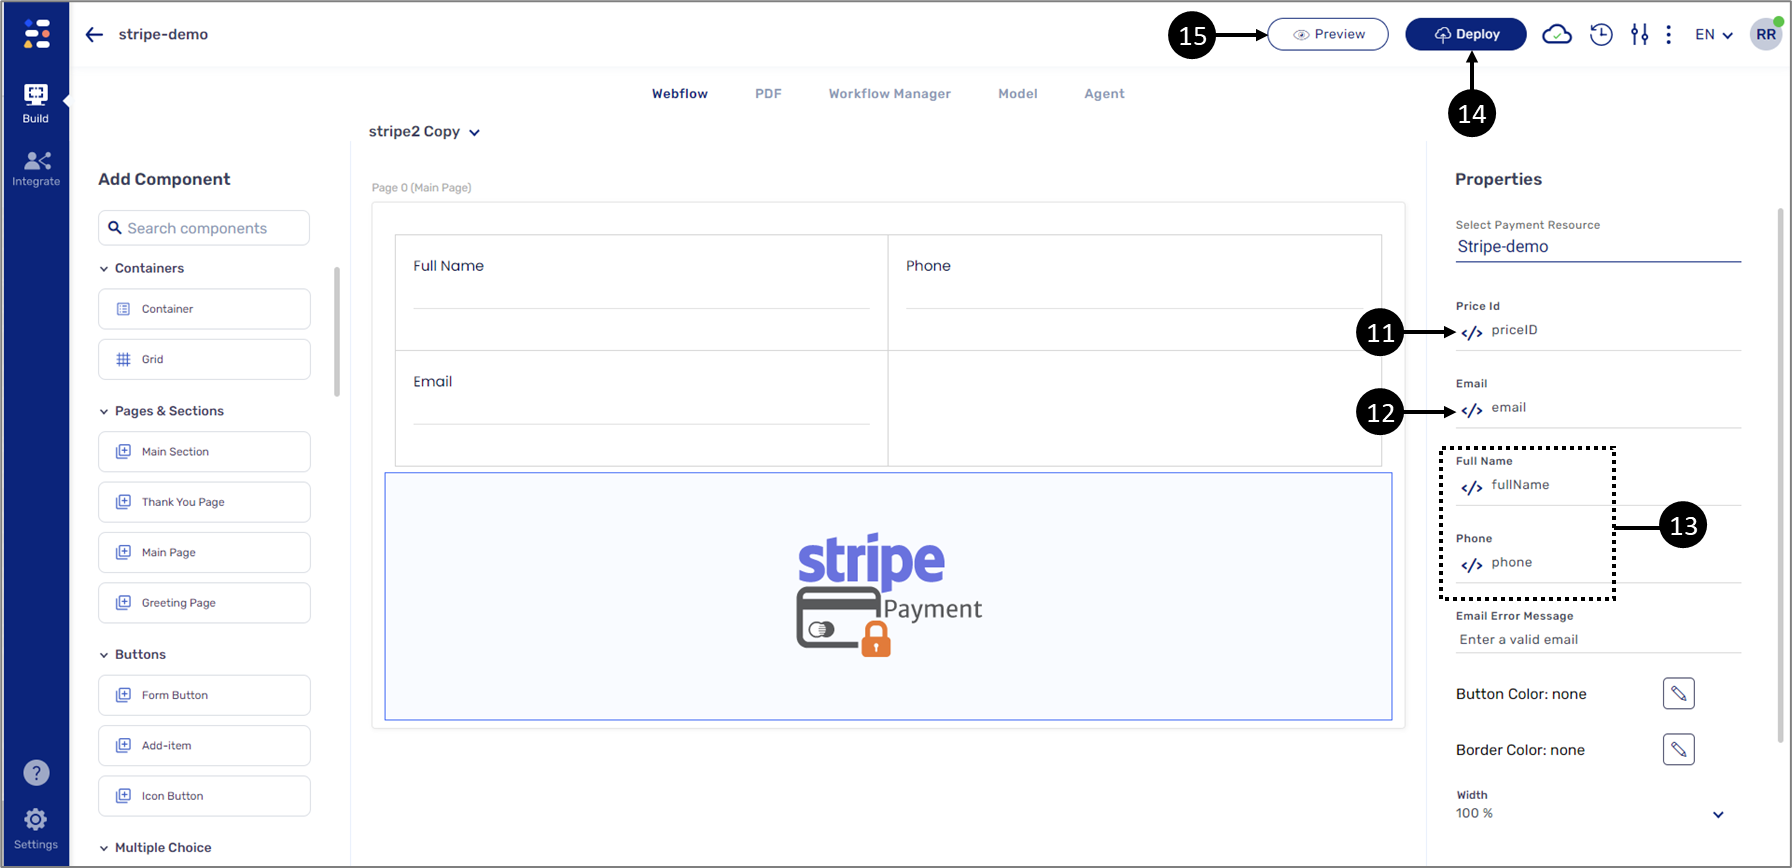
Figure 14: Connecting Data Items
- Connect the priceID data item to the Stripe component (11).
- Connect the email data item to the Text Input labeled email and to the Stripe component (12).
- Connect the fullName and phone data items to the remining Text Input components and to the Stripe component (optional) (13).
- Deploy (14) and Preview (15) the process.
Use The Digital Process and View The Stripe Integration
(See Figure 15 and Figure 16)
After a payment is submitted through the digital process:
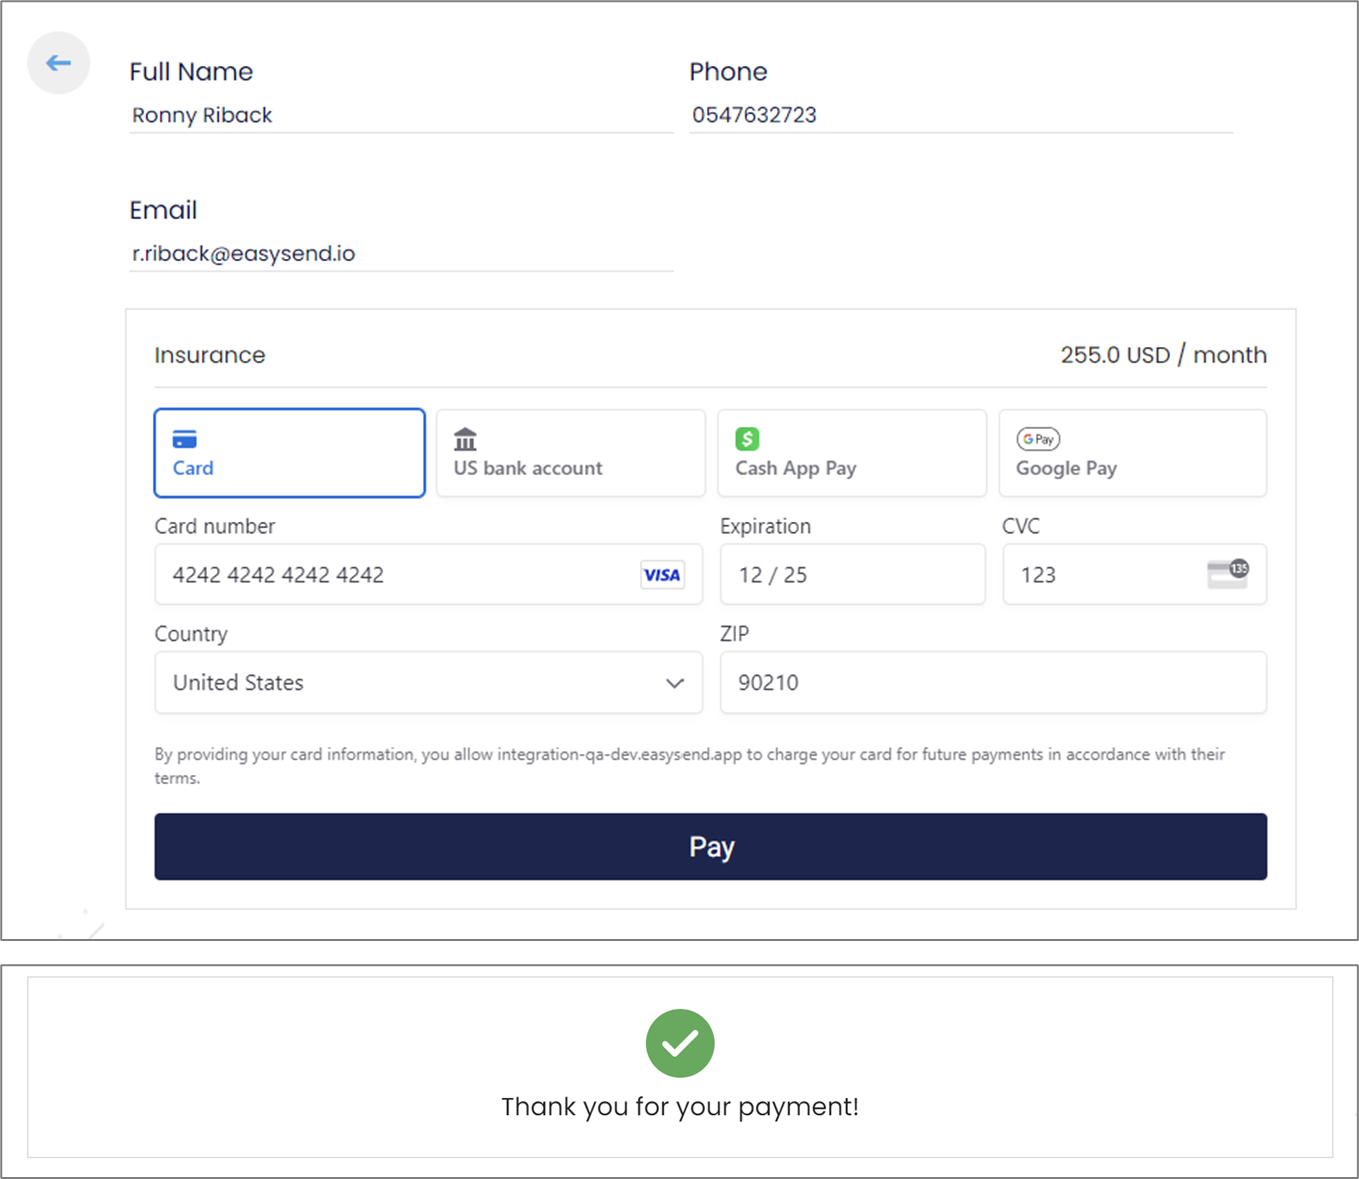
Figure 15: Submitted Payment
the information is integrated back into Stripe under Payments:
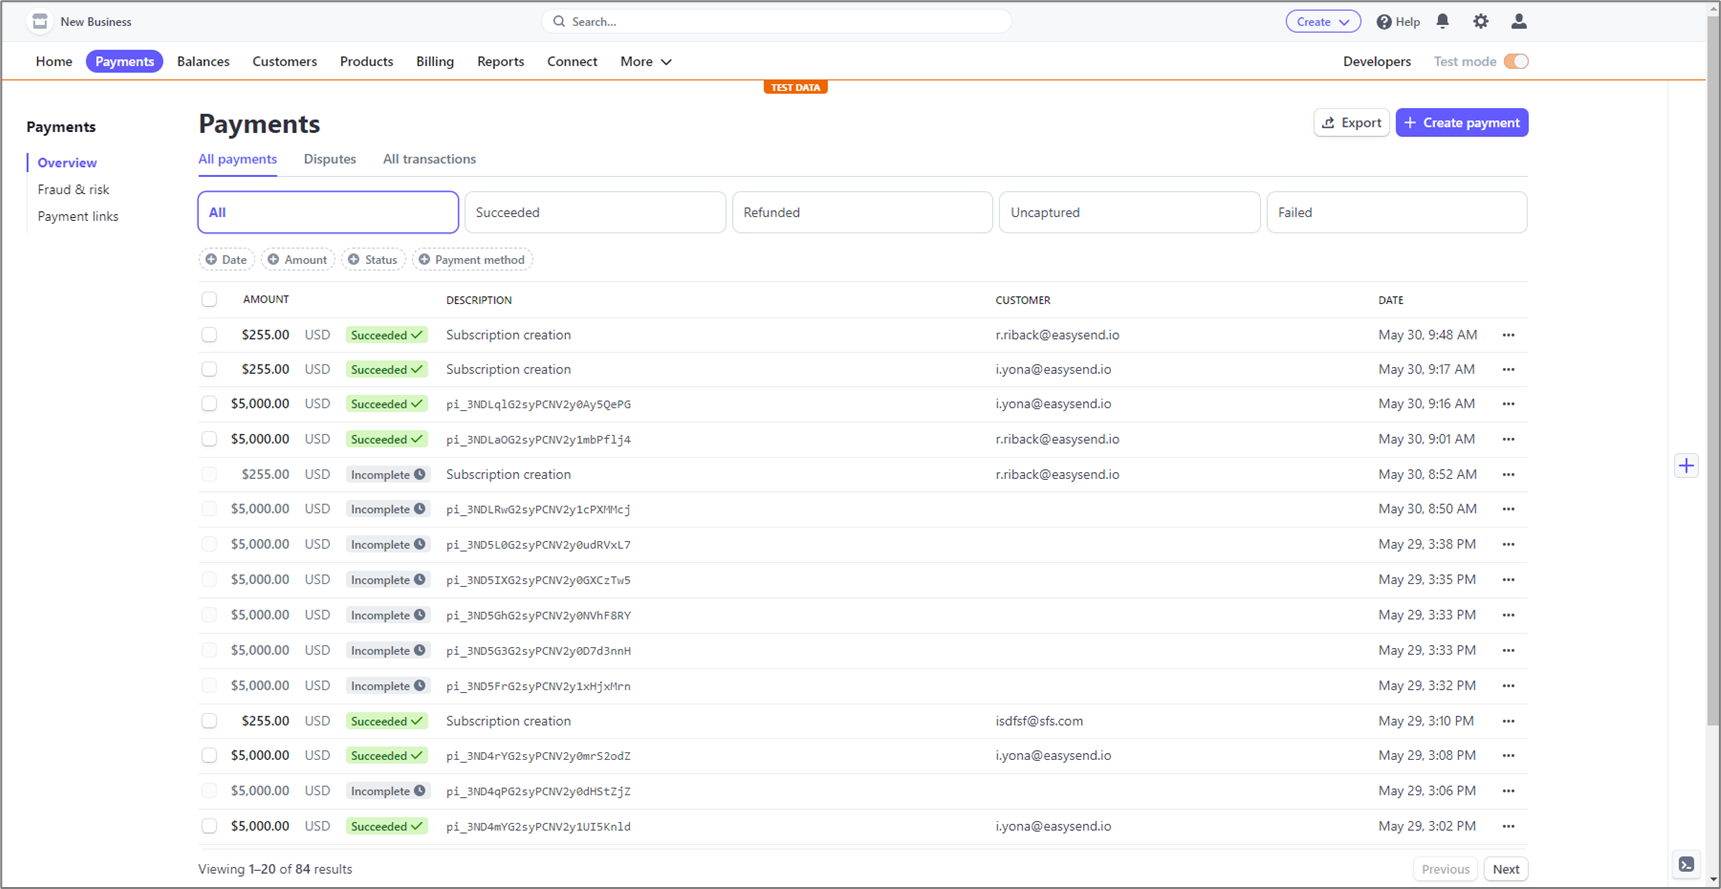
Figure 16: Stripe Payments
Calculations with a Stripe Set Price Component
It is recommended to use a calculated value for the Stripe Set Price component. Fixed values can be used in cases such as donations, when end-users can set their own amount, but the best practices it to use a calculated value. It is important to note that the calculation must be done on a digital process page appearing prior to the digital process page that contains the Stripe Set Price component. The following sections describe an example of using a calculation with a Stripe Set Price component.
Webflow
(See Figure 17)
The Webflow contains two Main Pages. The first ones contains a Grid with two Text Input components. The first Text Input, Product Price, contains the original price of a product. The second Text Input, Discount coupon, will be used by an end-user to enter a coupon code that will provide a discount and a new price for the product will be calculated. The calculated price after discount will be shown on a Rich Text component.
The second Main Page contains the Stripe Set Price component.
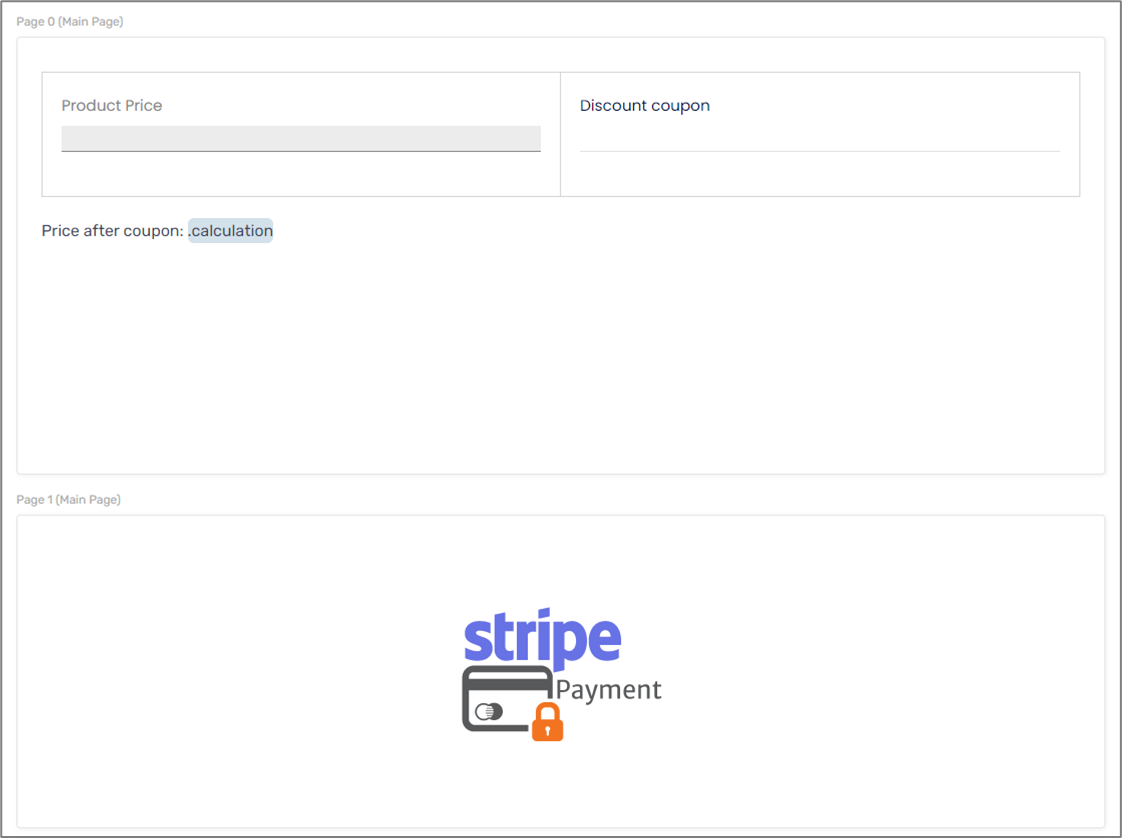
Figure 17: Webflow
Model
(See Figure 18)
The Model contains three data items. The first one, productPrice, contains the fixed price of the product and will be connected to the Text Input component labeled Product Price. The second data item, discount, will be connected to the Text Input component labeled Discount coupon. The last data item, calculation, is implemented with a formula that will calculate a new price for the product. The calculation data item will be displayed on the Rich Text component connected to the Set Price component.
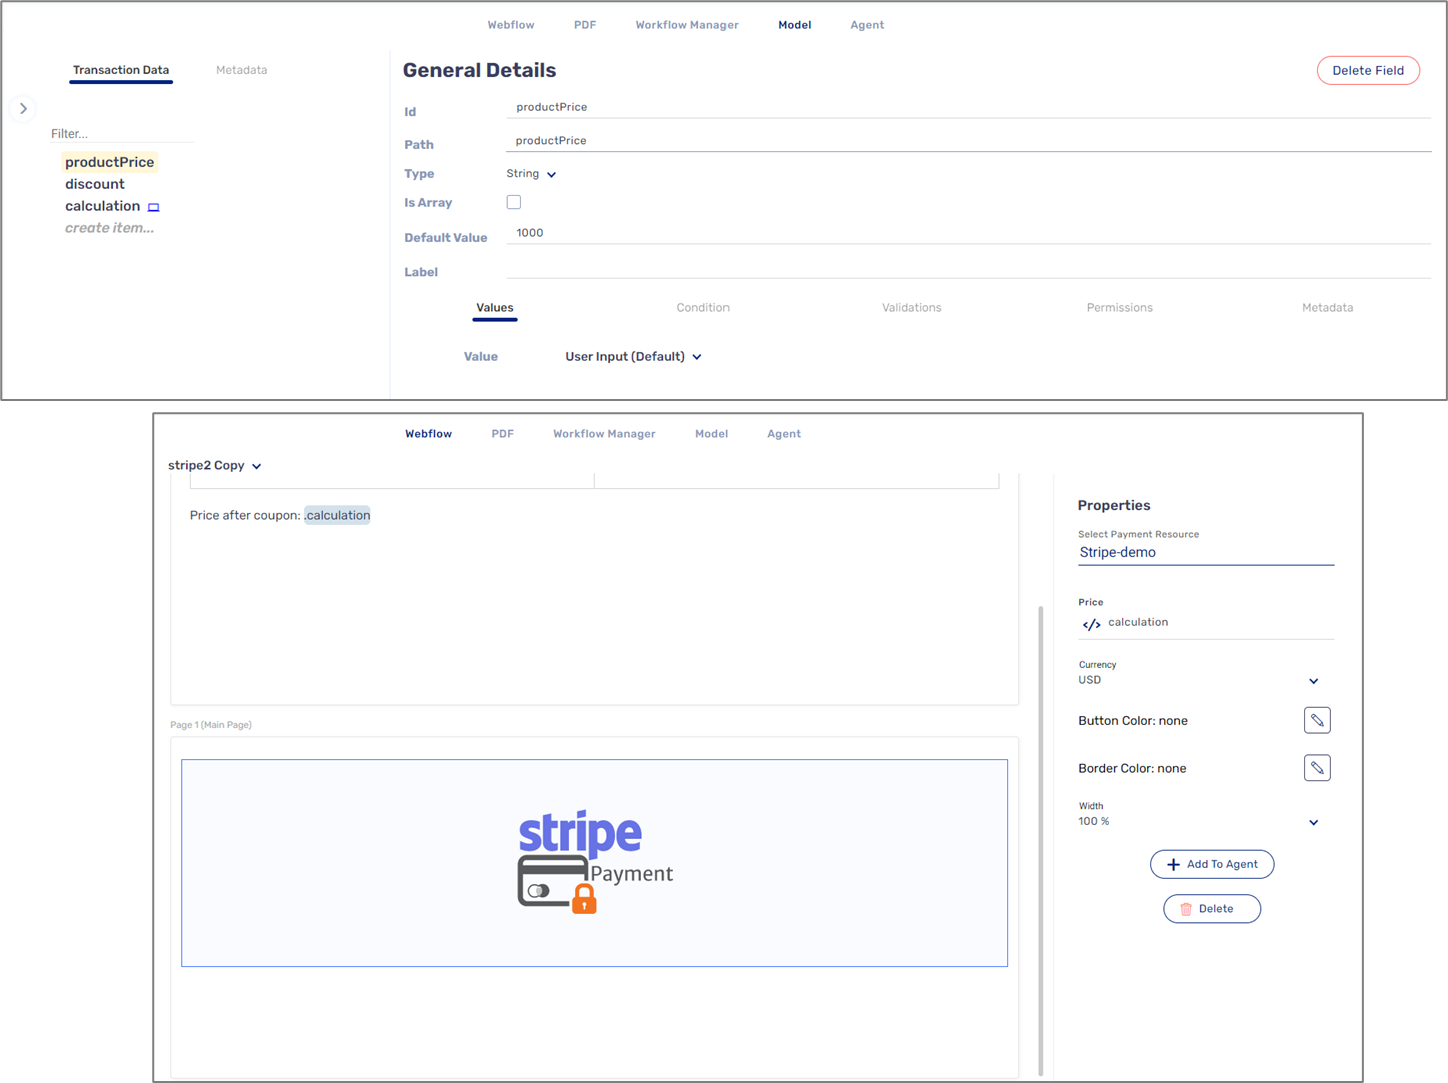
Figure 18: Model
Model - Formula
(See Figure 19)
The formula is configured to provide a discount when a valid coupon is entered. If now coupon is entered the original price is kept, for example:
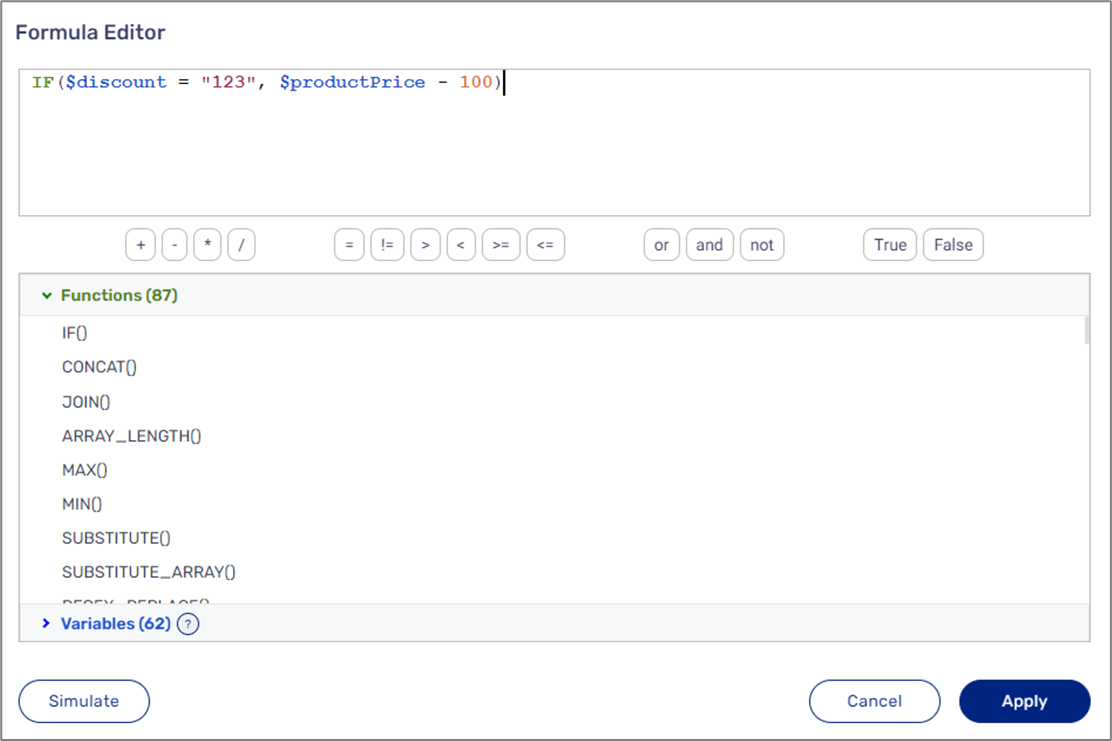
Figure 19: Model - Formula
Using the Digital Process
(See Figure 20)
When using the digital process the first page displays the original price of the product (1) and the price after coupon calculation (2). The calculation of the new price is done on the first page. When reaching to the second page that contains the Stripe component the new price will be displayed (3).
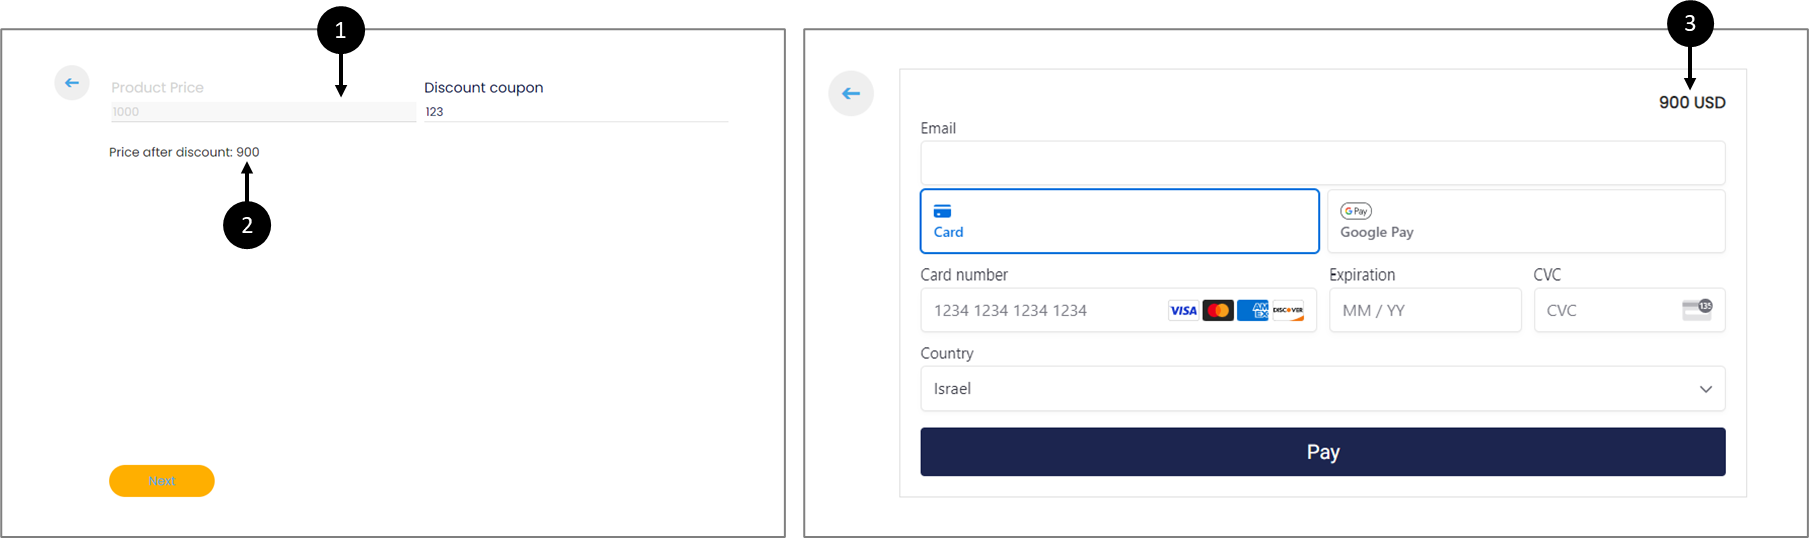
Figure 20: Calculated Price