Article Overview
The following article describes EasySend's Integrations service.
Integrations Service
This type of service is used to integrate your digital processes with external apps, resources, and platforms.
Navigating to the Integrations Tab
(See Figure 1 to Figure 3)
Integrations services in your environment are accessible using the Integrate tab (1) and the Services screen (2).
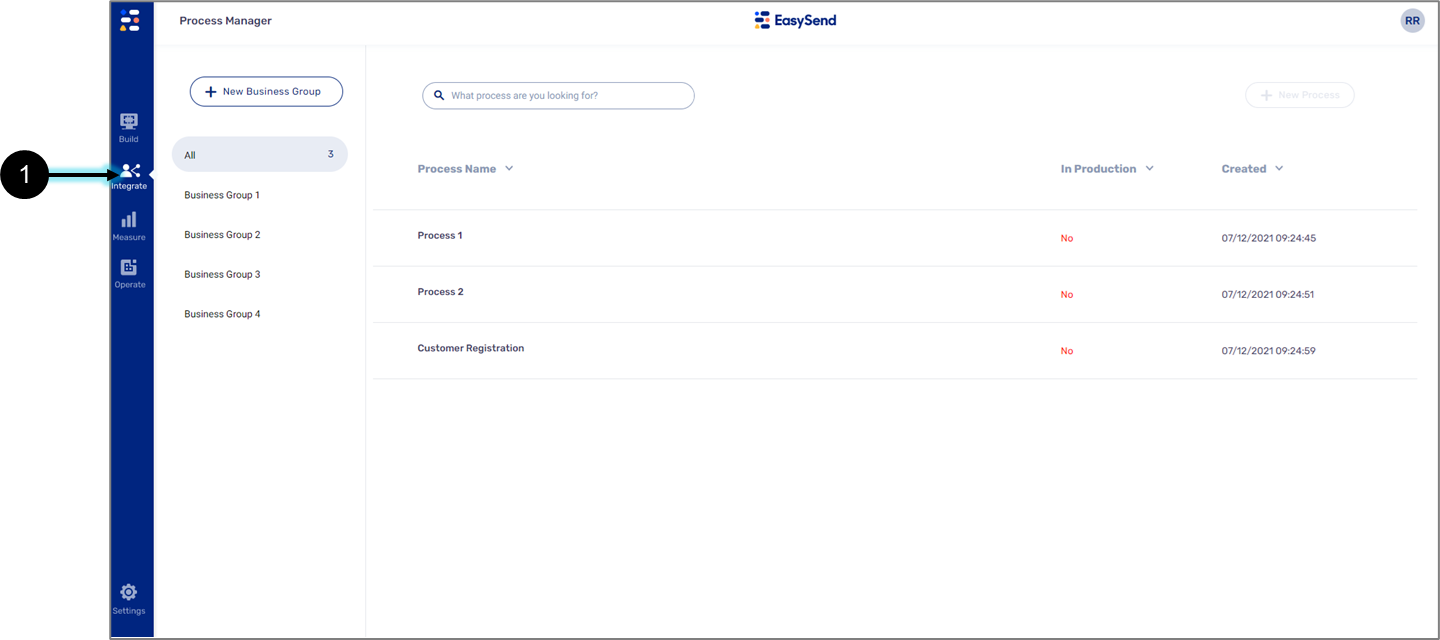
Figure 1: Integrate Tab
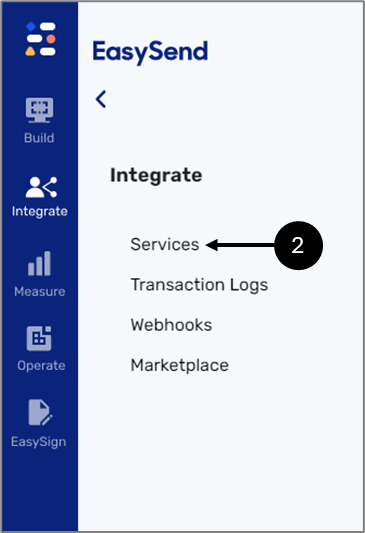
Figure 2: Services
The Services screen contains a number of tabs including Integrations (3).
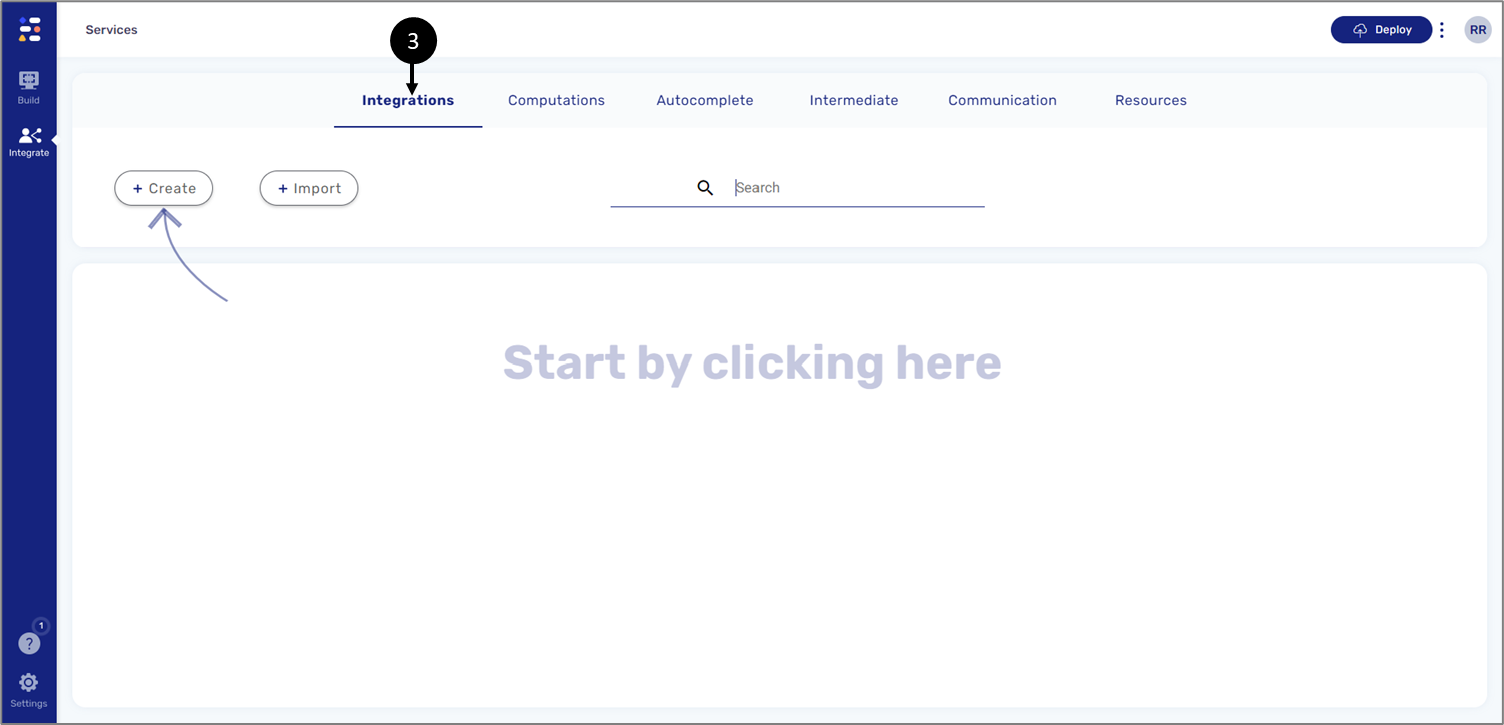
Figure 3: Autocomplete Tab
Creating an Integration Service
(See Figure 4)
Integration services can be created or imported. Clicking the + Create button (1) opens a screen for service configuration.
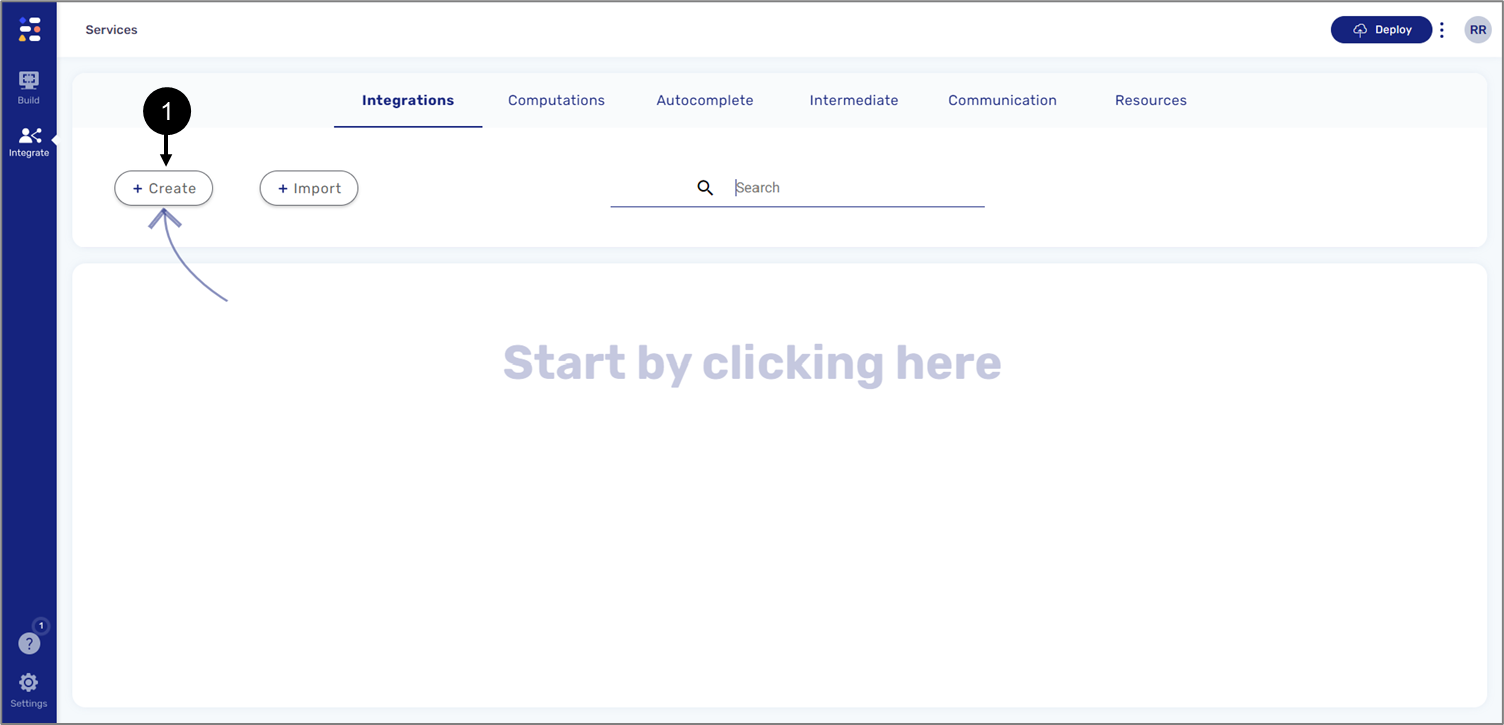
Figure 4: Creating a New Autocomplete
Integration Service Configuration
(See Figure 5)
When creating an Integration service, four sections appear:
- Service name (1) - this section is used for providing a name for the integration. If no name is provided the integration will appear as un-named.
- Inputs (2)
- Different steps (3)
- Outputs (4)
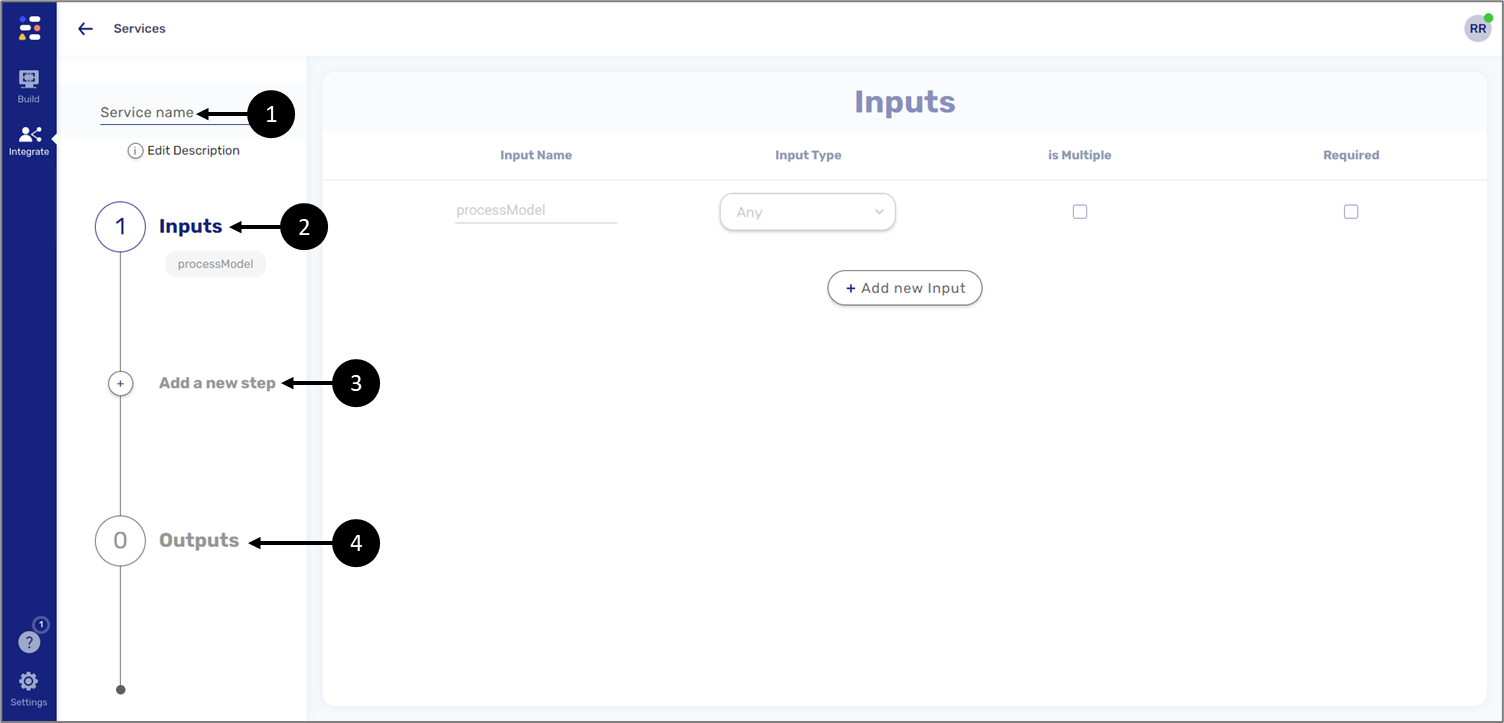
Figure 5: Integration Service
Integration Service Structure
The following sections describe the structure of an Integration service.
Inputs
(See Figure 6 to Figure 9)
By default, an Integration service contains the processModel input (1). This default value indicates that the input information used by the Integration service will come from the Model, regardless of the process that is using it. Additional inputs are added by clicking the +Add new Input button (2).
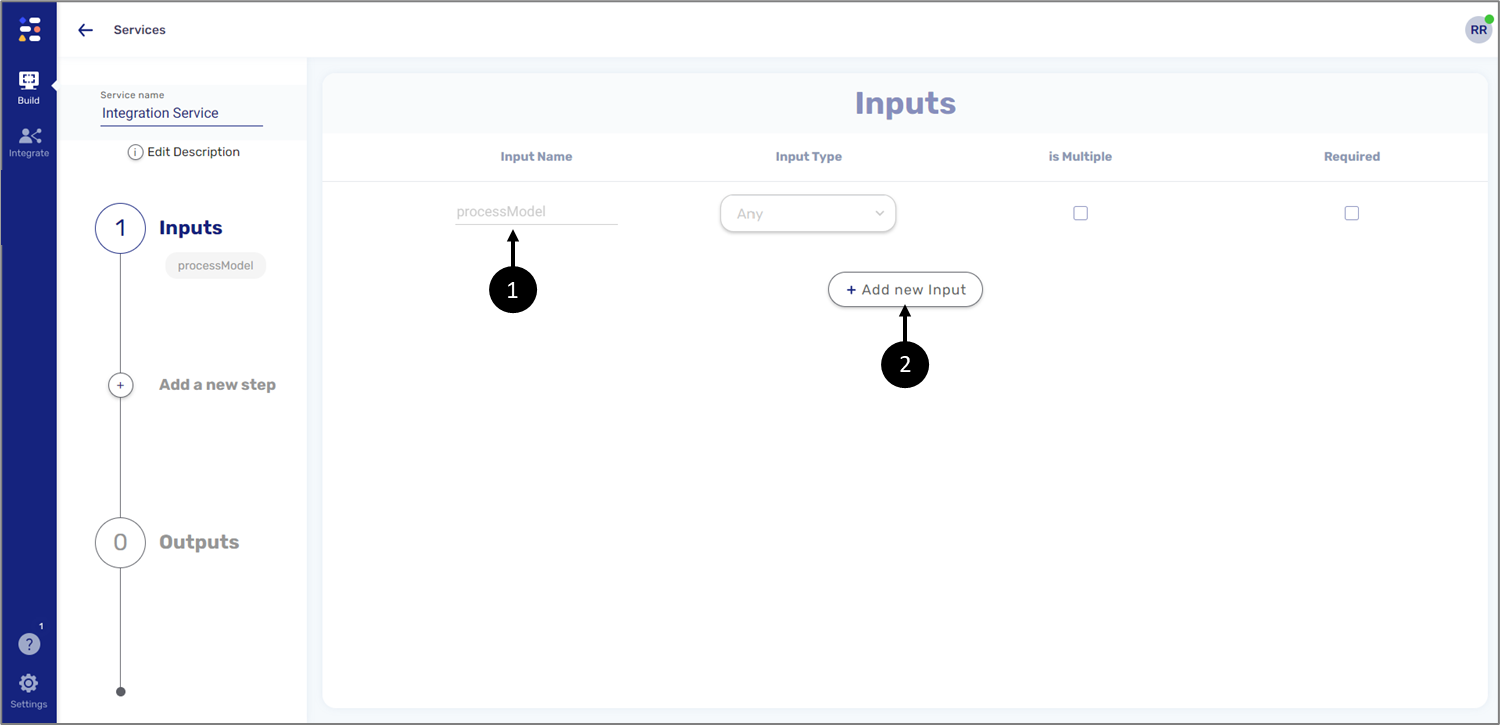
Figure 6: Inputs
When adding a new input, we must provide a name (3), set its type (4):
- String
- Number
- Boolean
- File
- Object
- Any
and indicate whether it is an array (5) and if it is required (6).
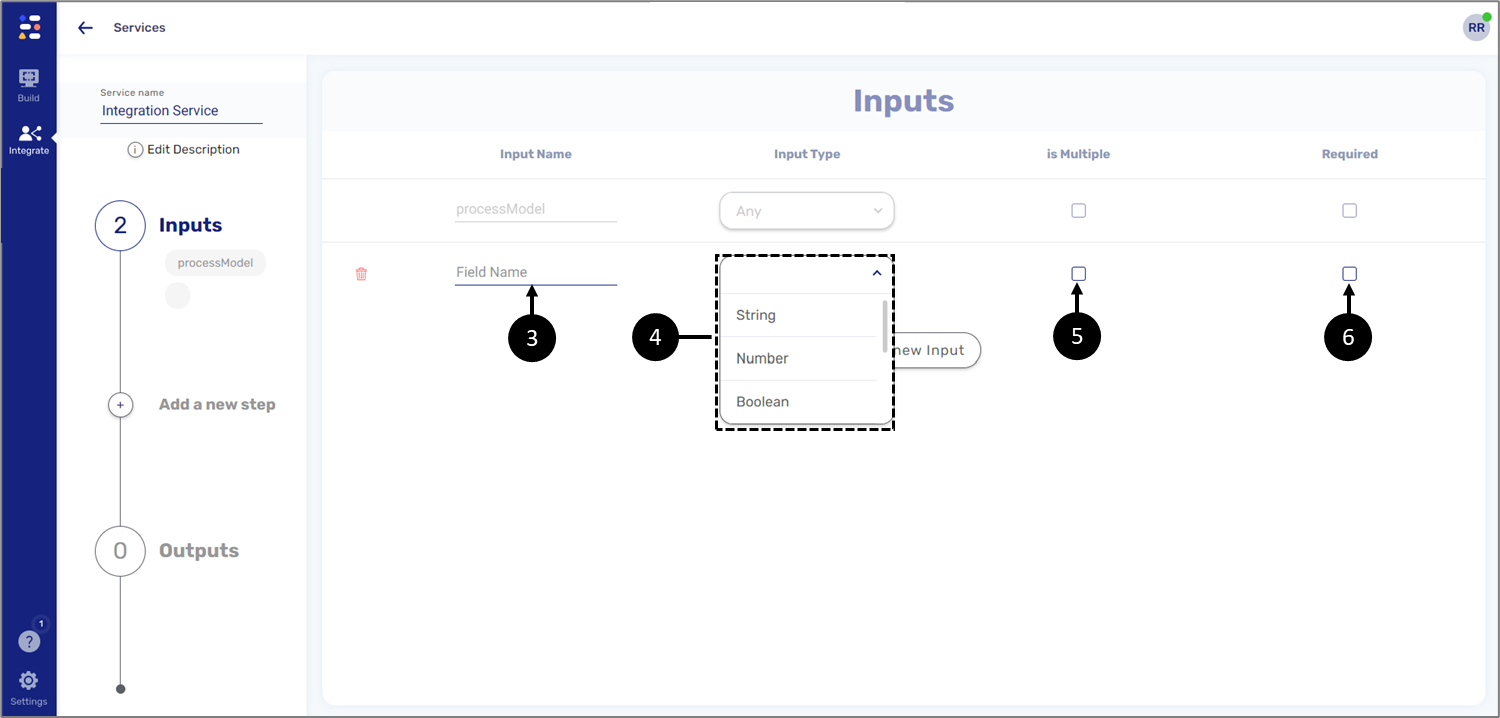
Figure 7: Adding an Input
If the selected input type is an Object, clicking the + icon (7) will open the Edit model requirements window to build its structure.
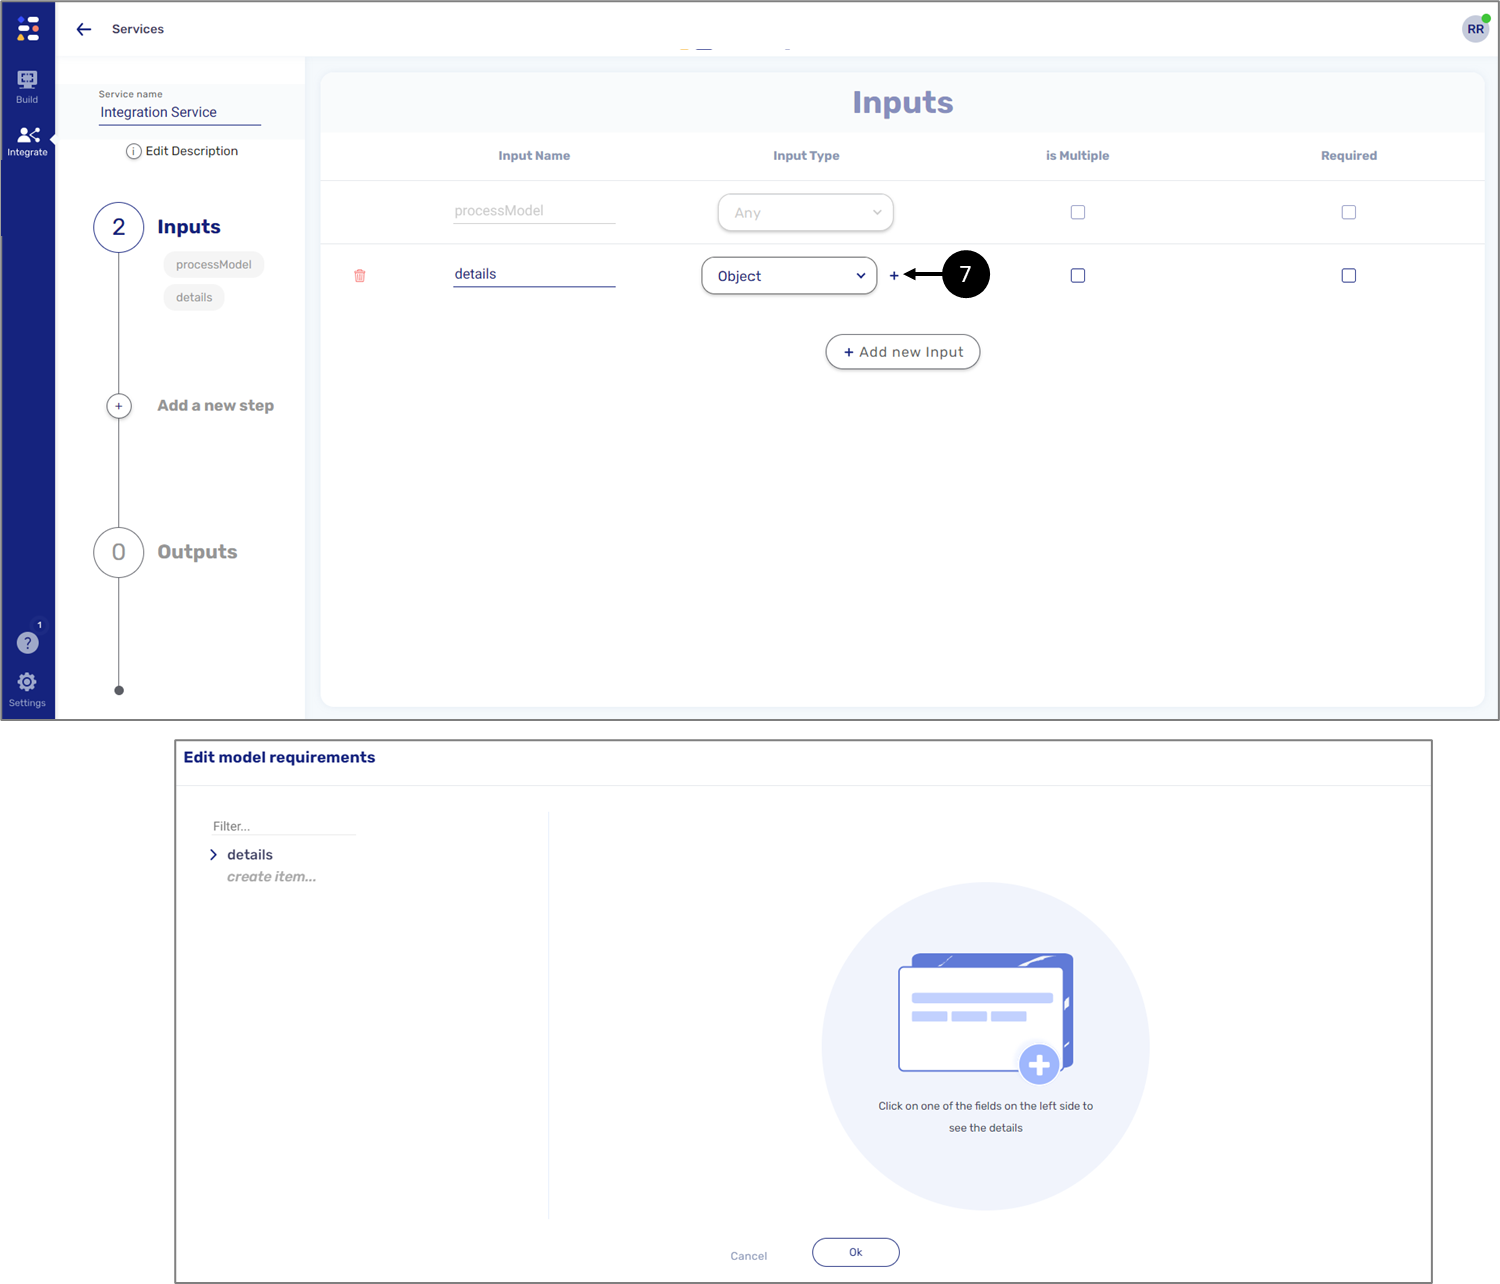
Figure 8: Object Type Input and The Edit model requirements window
The added inputs will also appear on the left side (8):
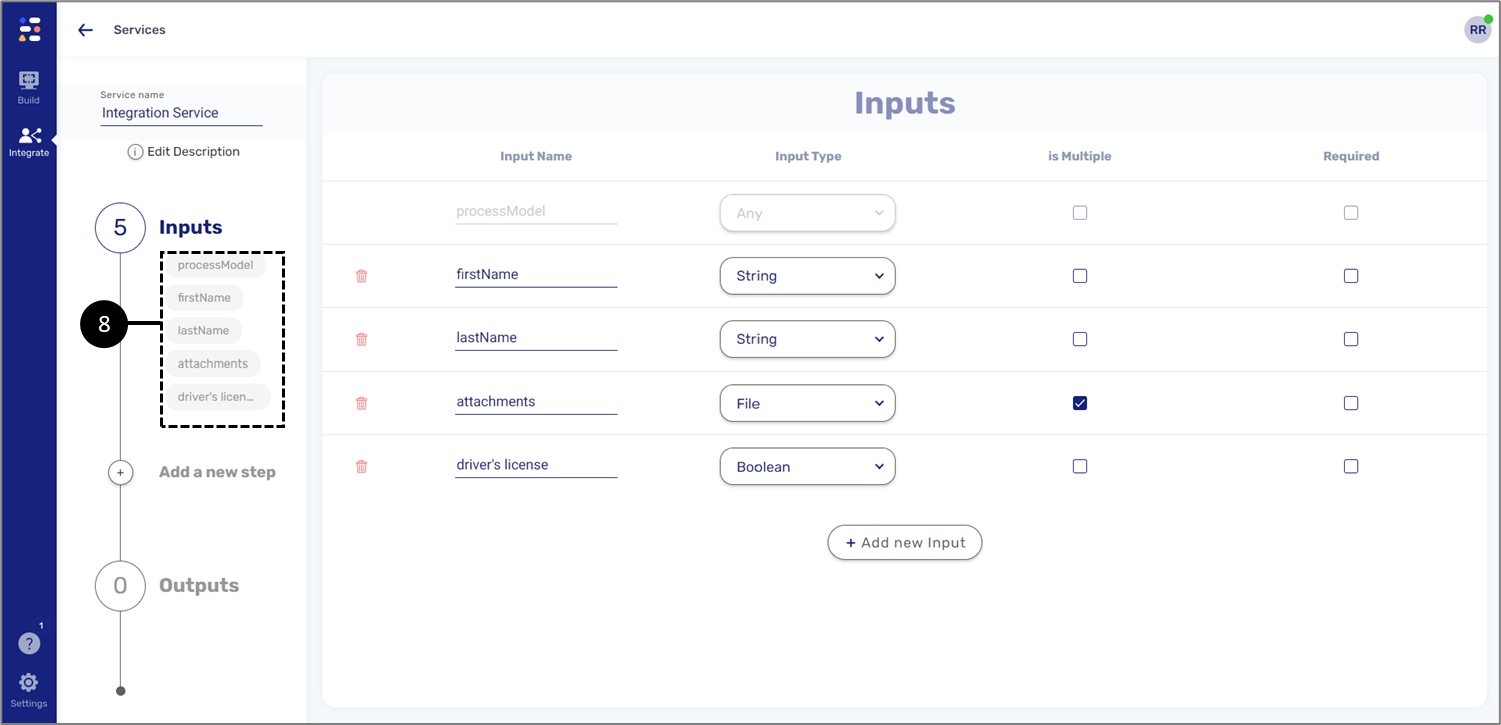
Figure 9: Added Inputs
Steps
(See Figure 10)
An Integration service can be configured with multiple steps. Each step is a different action the Integration service will perform once it is initiated. The steps are:
- Code - writing JavaScript code
- File Storage Service - adding a step to remotely store files
- Rest API Service - interfacing with an external service through a REST API call
- Computed Service - calculating expressions or values according to the defined conditions
- Email - sending emails as part of the integration service
- EasySend Service - adding an EasySend preconfigured event
- SQL Query - running an SQL query in an external database
- File Encode/Decode - encoding/decoding files with Base 64, Pretty Good Privacy (PGP), Rivest–Shamir–Adleman (RSA), JSON Web Encryption (JWE), and JSON Web Token (JWT)
- Salesforce Service - running Select, Create, and Update queries on any Salesforce object
- Dataverse - running Select, Create, and Update queries on any Dataverse object
- Hashing - converting to hashed hexadecimal value with a Secure Hash Algorithm (SHA), for example, SHA512
Each step has a short description of what it does and what are its inputs and outputs.
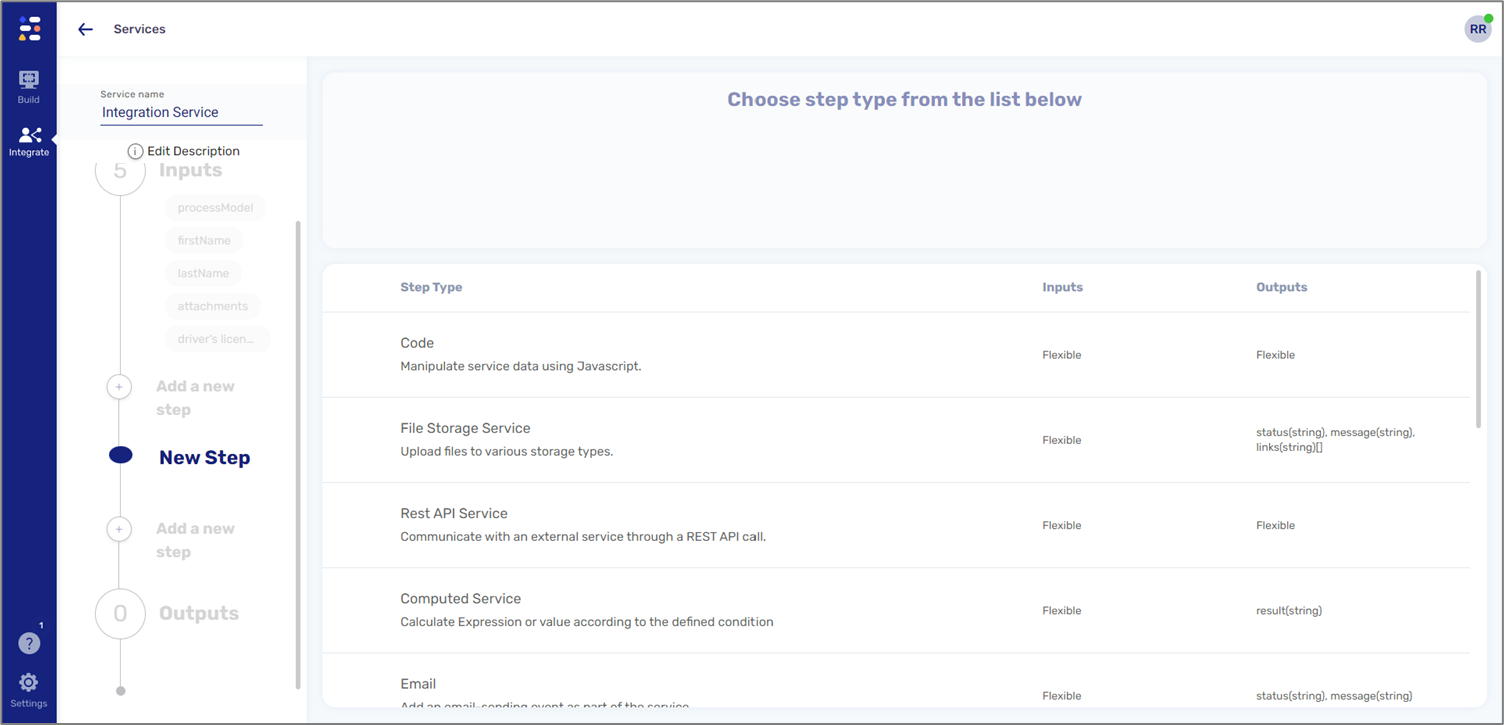
Figure 10: Steps
Outputs
(See Figure 11 to Figure 14)
The last section of the Integration service is Outputs. This section specifies what will be the outputs of the Integration service and their source. The configuration of the Outputs section usually matches the configuration of the Inputs section - the number of inputs/outputs and set types.
Each output will receive a name (1), type (2):
- String
- Number
- Boolean
- File
- Object
- Any
and an indication of whether it is an array (3) and its source value (4):
- Constant - a set value, for:
- String
- Number
- Boolean - True or False
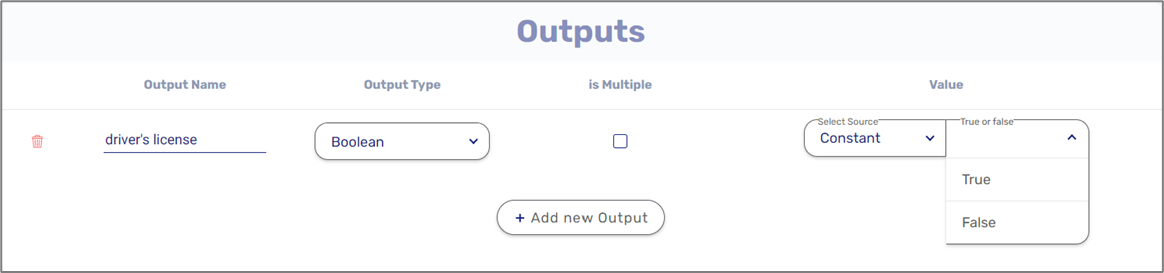
Figure 11: Constant
- Model - when selecting this option the value can be taken from:
- The Inputs section - for example: input.firstName or inputs.attachments
- The Outputs section of an added step
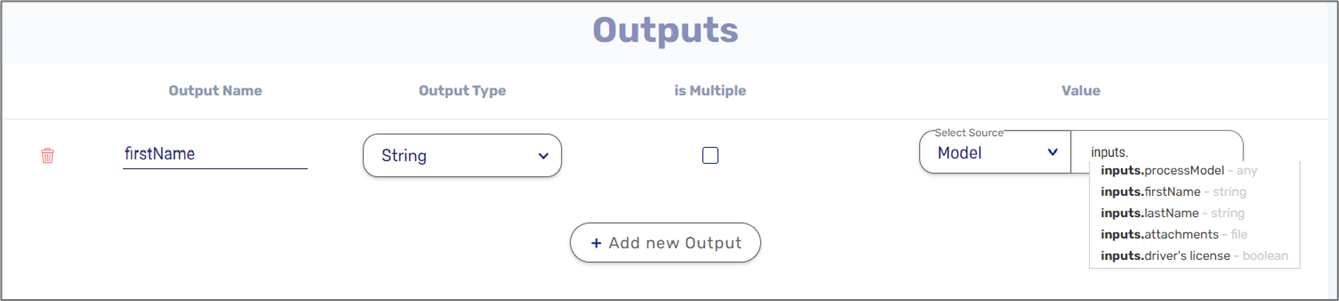
Figure 12: Model
- Metadata - when selecting this option the value is taken from the Model's metadata items, for example global.current.Date_MMDDYY
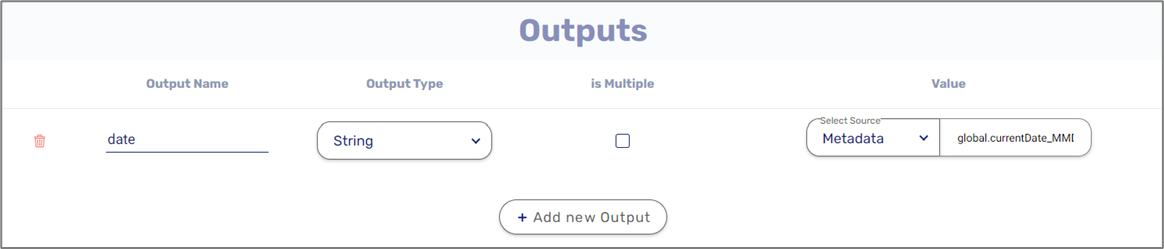
Figure 13: Metadata
- Empty
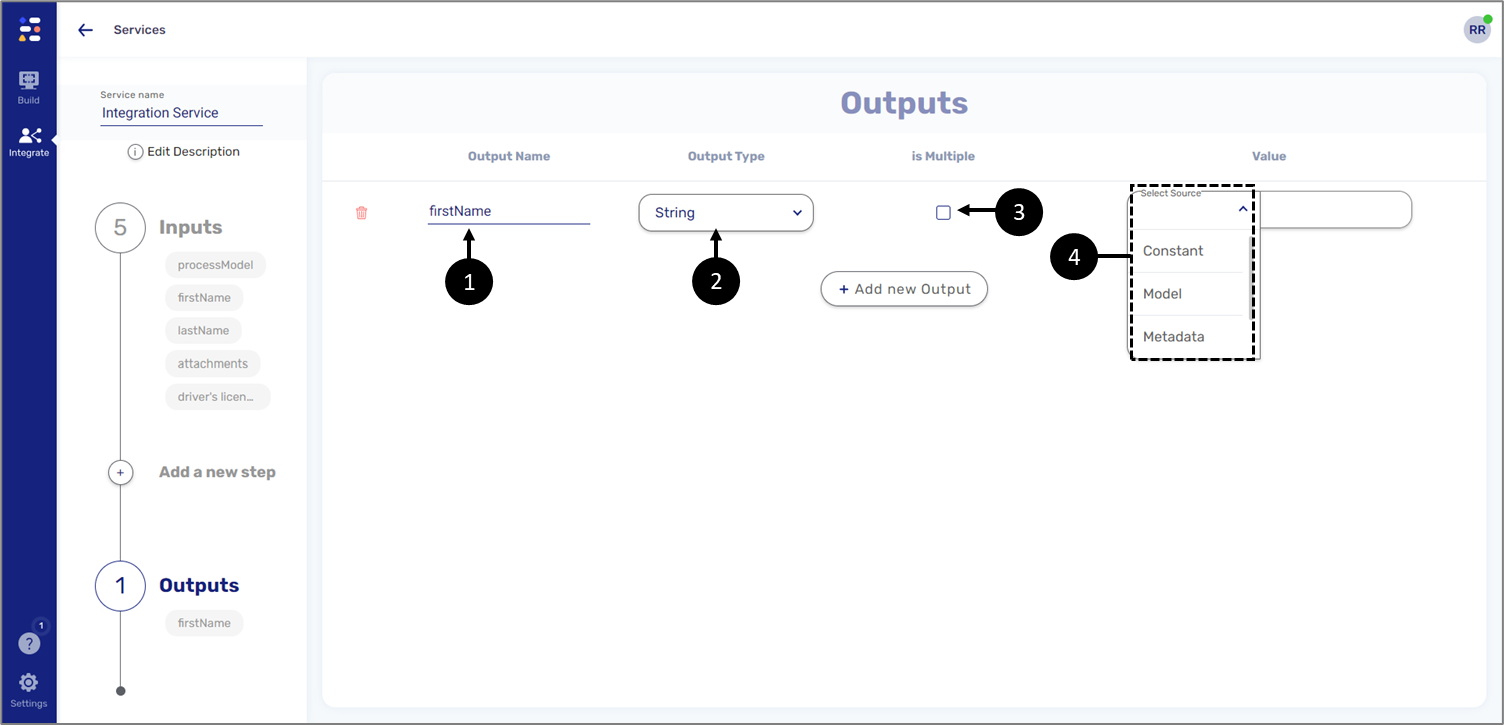
Figure 14: Added Output
- The Integration service must be deployed to every environment server in which it will be used.
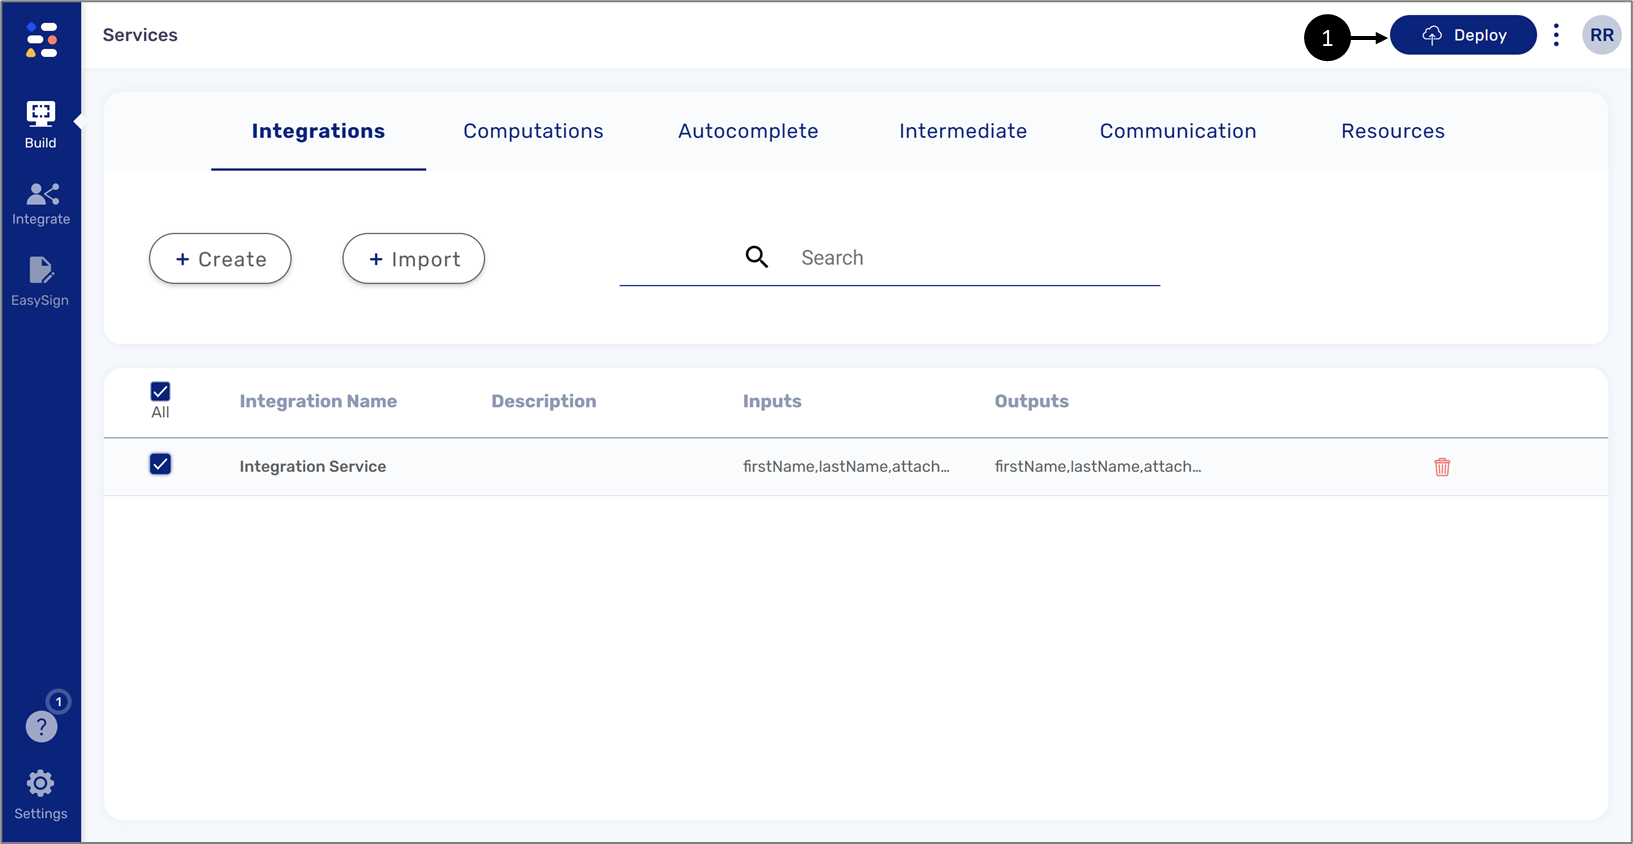
- For additional information about service deployment, click here.
Importing an Integration Service
(See Figure 15)
If your Builder platform environment has available Integration services to import, clicking the + Import (1) will display the Import window. The available Integration services to import will appear by clicking the dropdown (2).
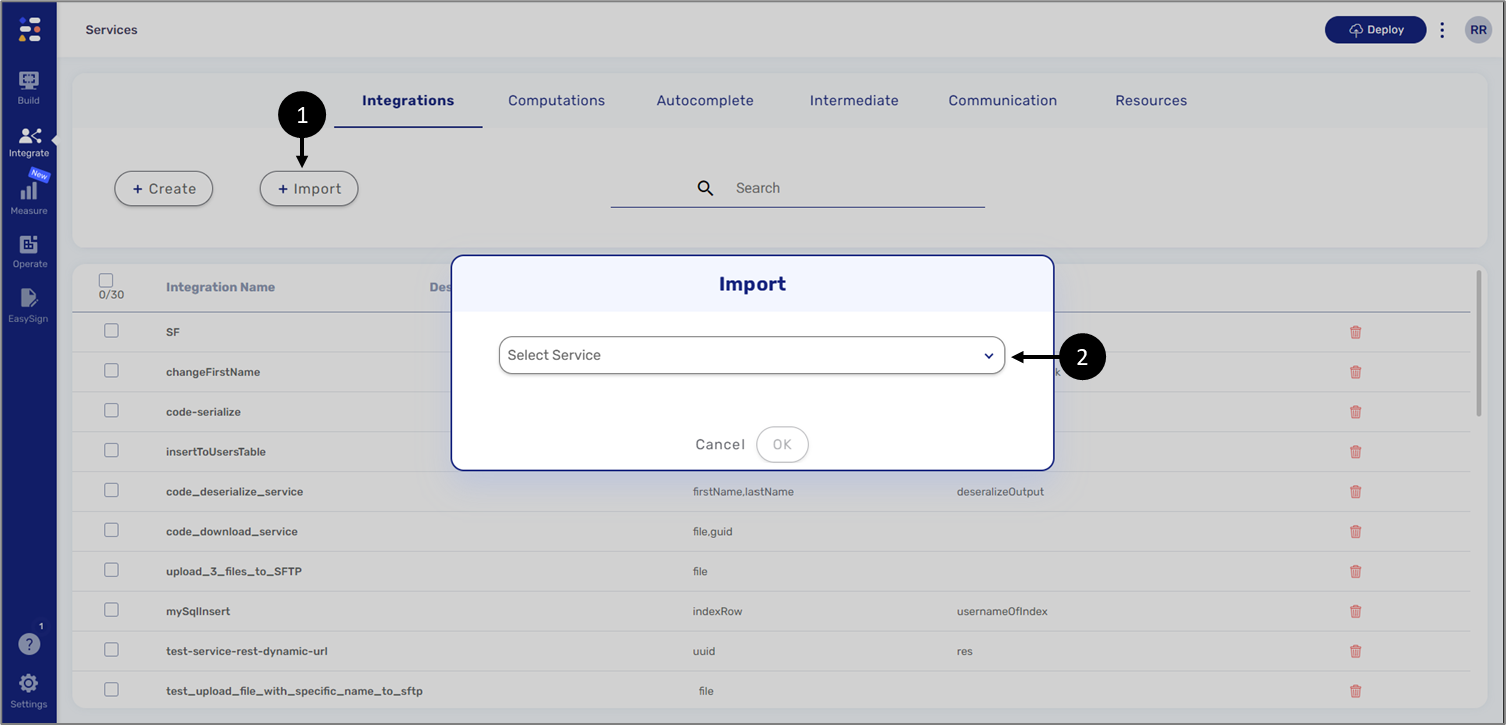
Figure 15: Importing an Integration Service
- The imported integration service must be deployed to all relevant environment servers.
- You can now select a single service or multiple services for deployment. For additional information, click here.
Integration Service Example - Inserting Values into a database
The following sections describe how to create an Integration service that inserts values into a database.
Inputs
(See Figure 16)
The Inputs section includes the procssModel default input. We will add additional String type inputs (1).
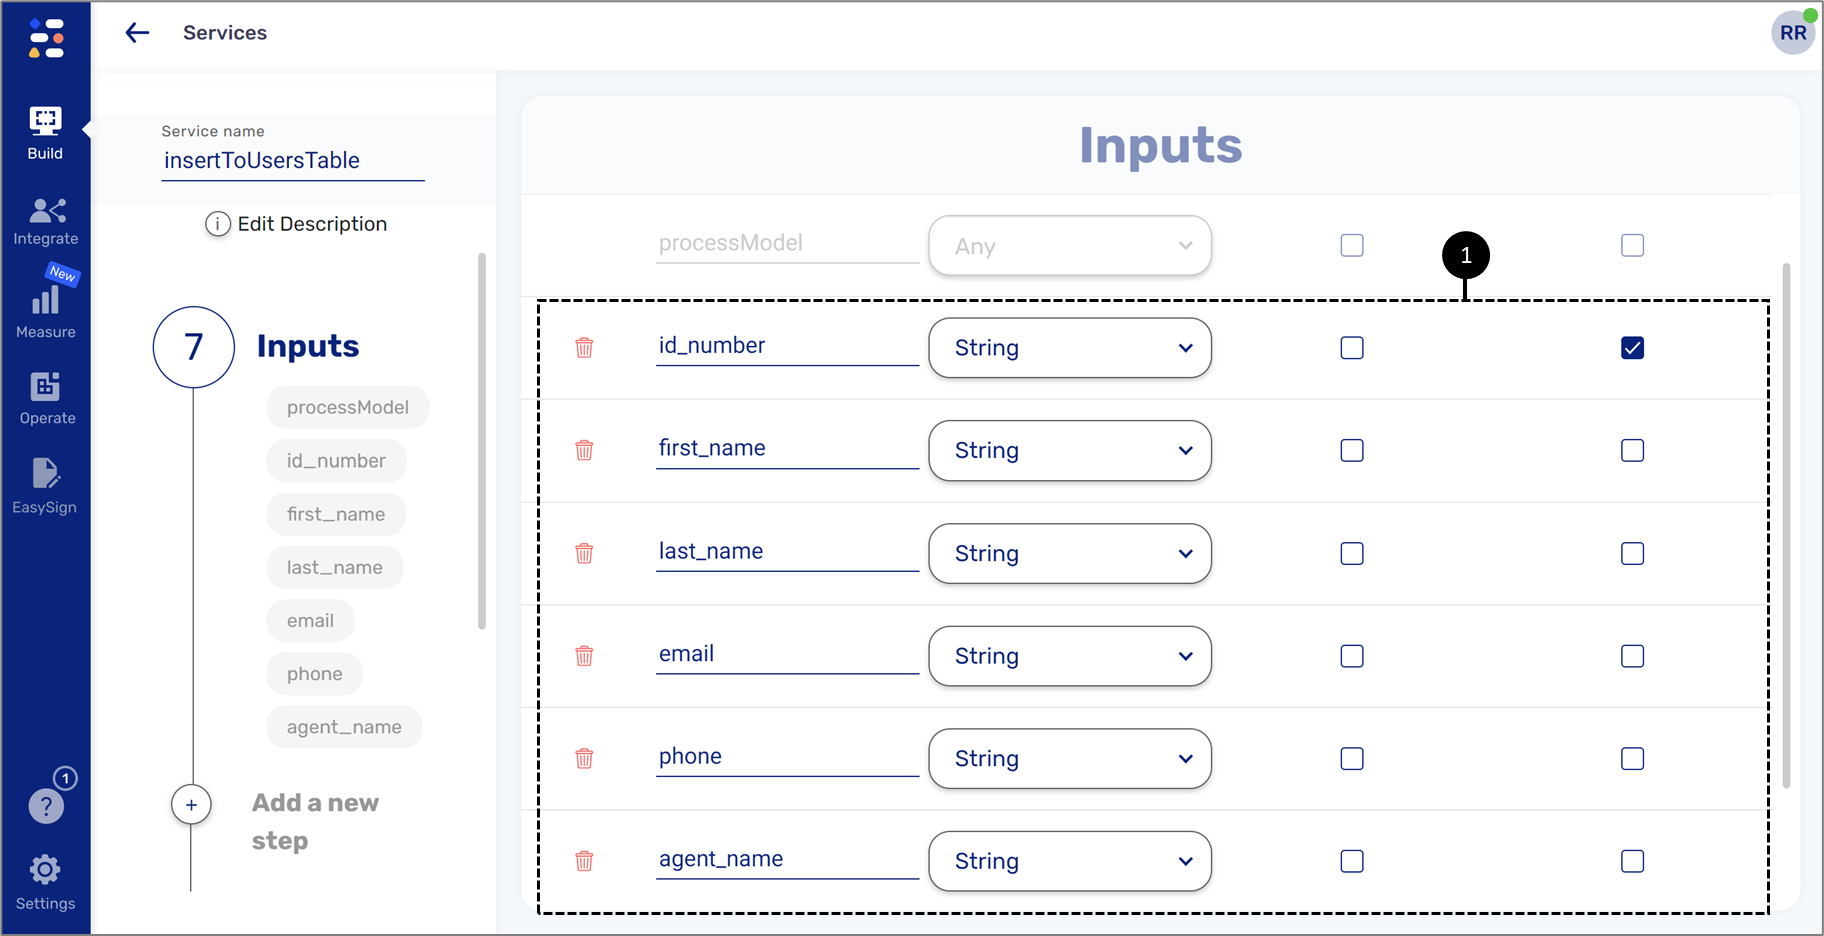
Figure 16: Inputs
Steps
(See Figure 17)
The step we will use for the Integration service is SQL Query. Using this step we select a DB Server (1) and a Database Name (2) that were created under the Resources tab. We also assign an internal name for the table (3).
Because we are inserting values inside the selected DB, the Query Type will be set to Insert (4). We will configure the step's query according to the Inputs section configuration, to match the number of items, their type, and source (5).

Figure 17: SQL Query Step Structure
- Remember, the Integration service must be deployed to every environment server it will be used.
- You can now select a single service or multiple services for deployment. For additional information, click here.
Webflow and Model Structure
(See Figure 18 and Figure 19)
The structure of the Webflow and the Model must enable the end-user to input all the required information according to the configuration of the Inputs section and the SQL Query step. For example:
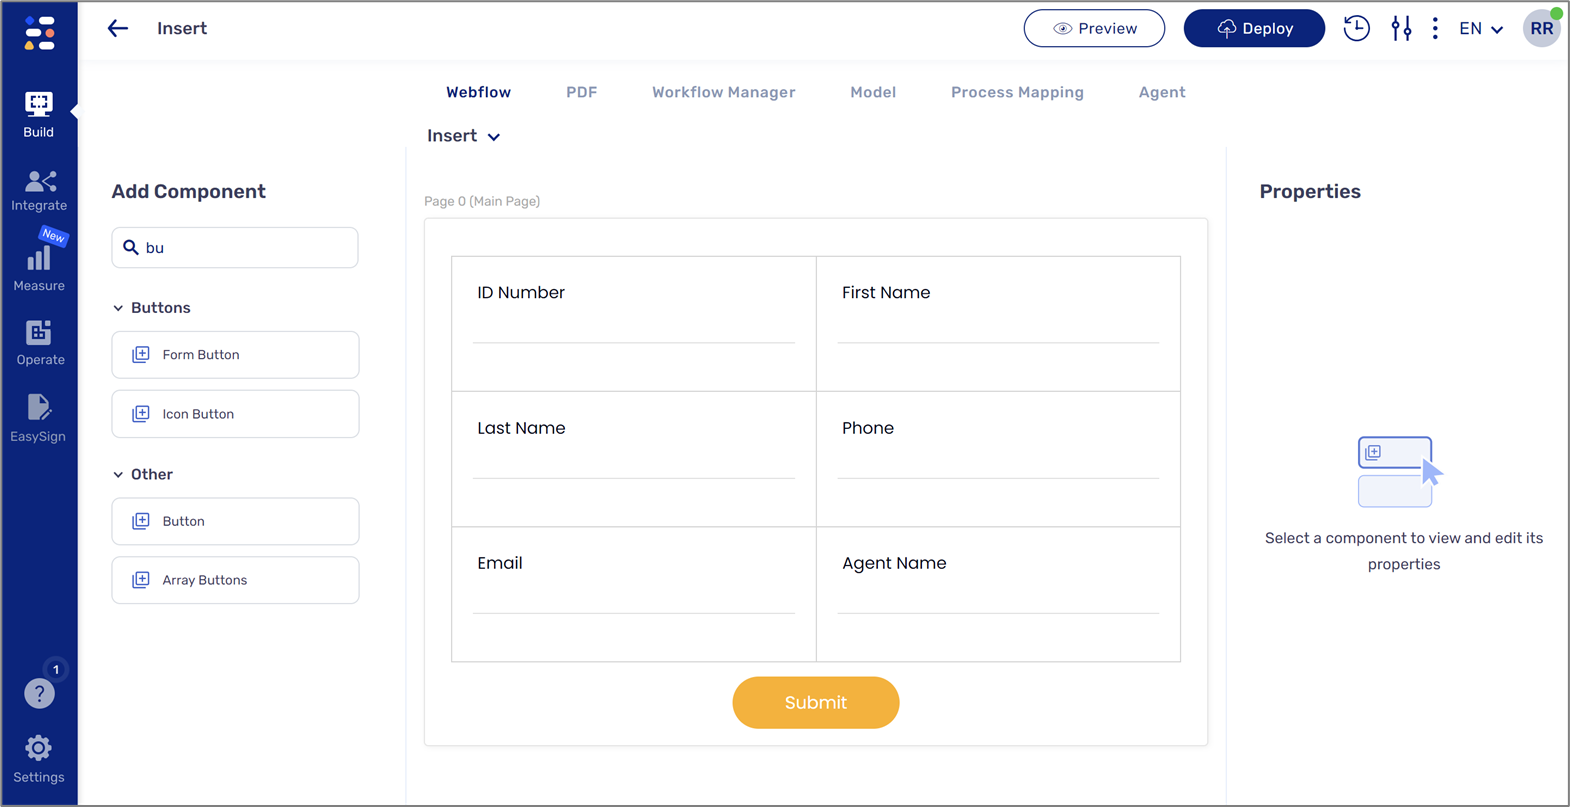
Figure 18: Webflow Structure
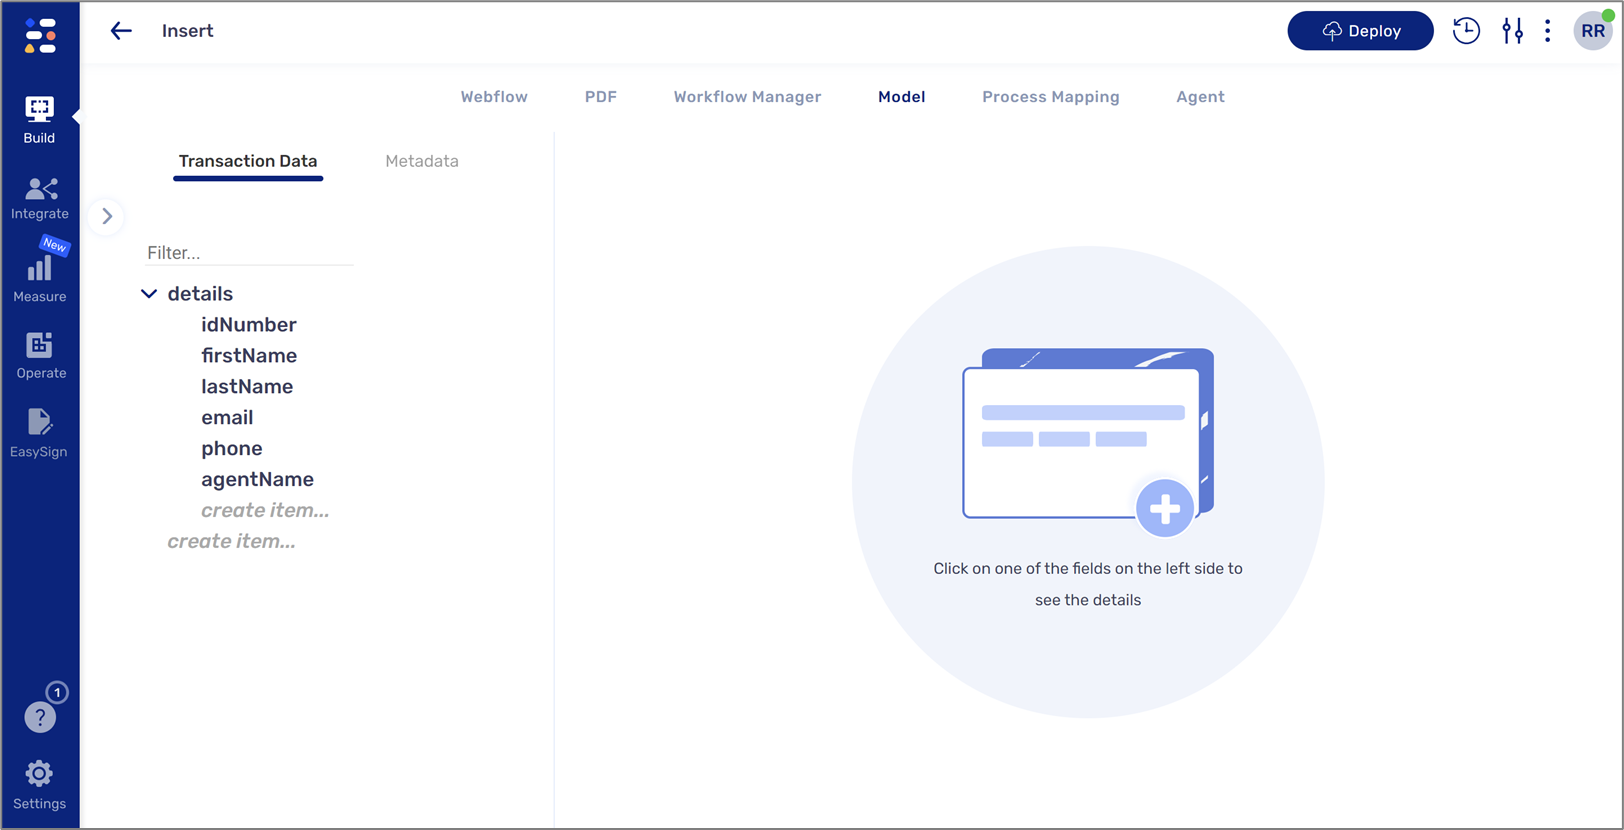
Figure 19: Model Structure
Initiating the Integration
(See Figure 20 to Figure 23)
To initiate the Integration service, we will navigate to the Workflow Manager screen and add a new Integration (1).
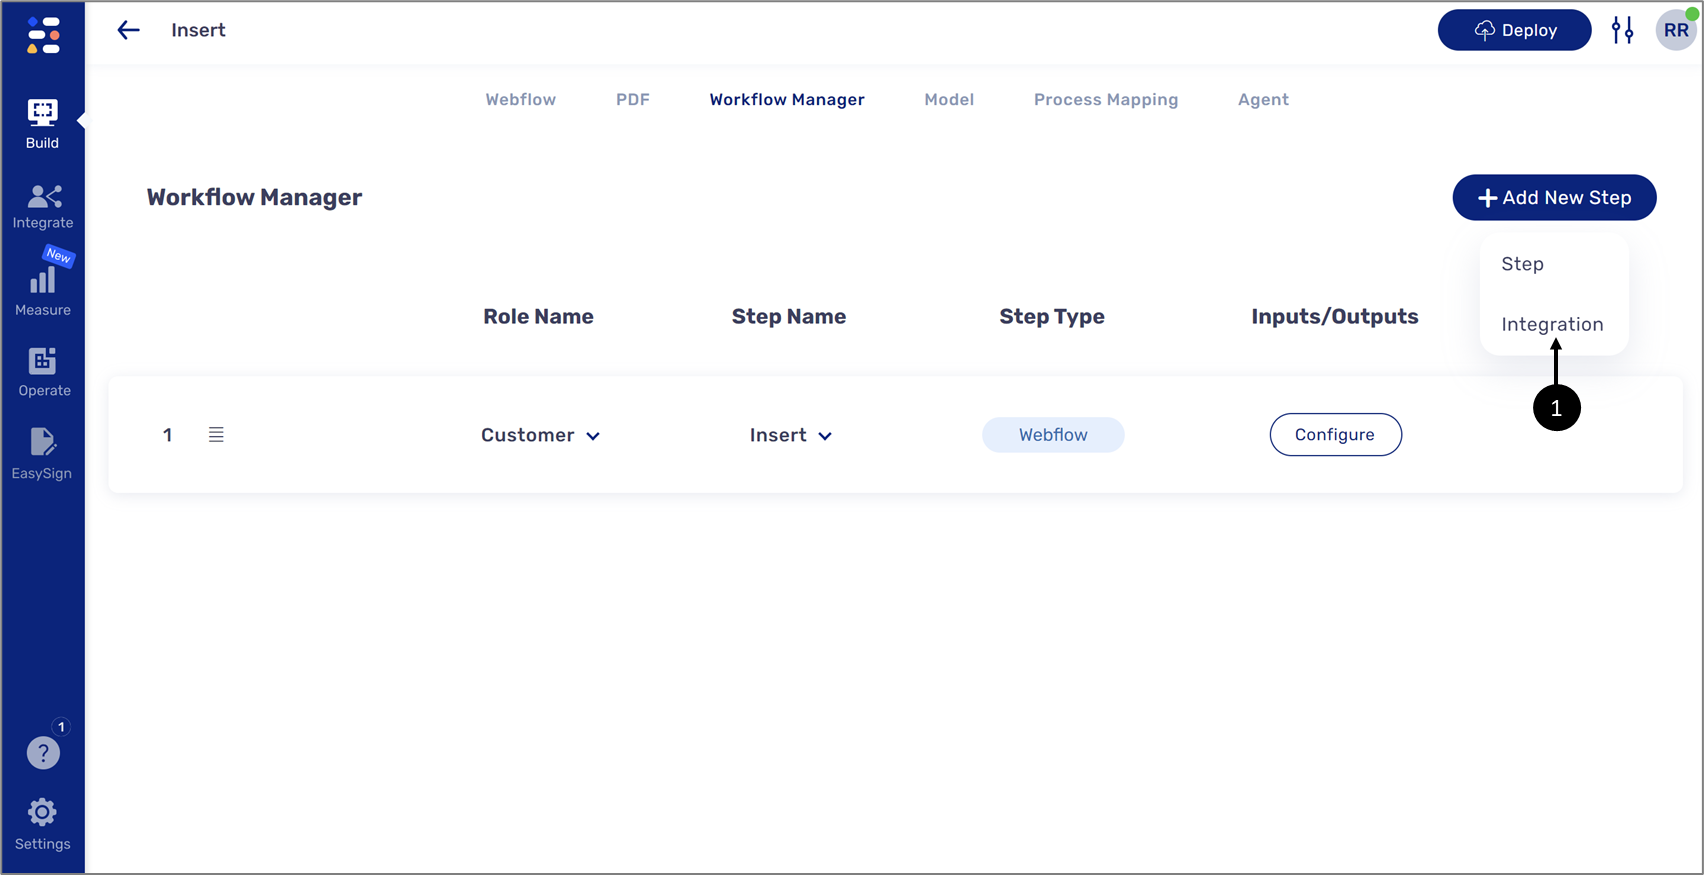
Figure 20: Adding an Integration
From the Service Lookup list (2), we will select the desired Integration service.
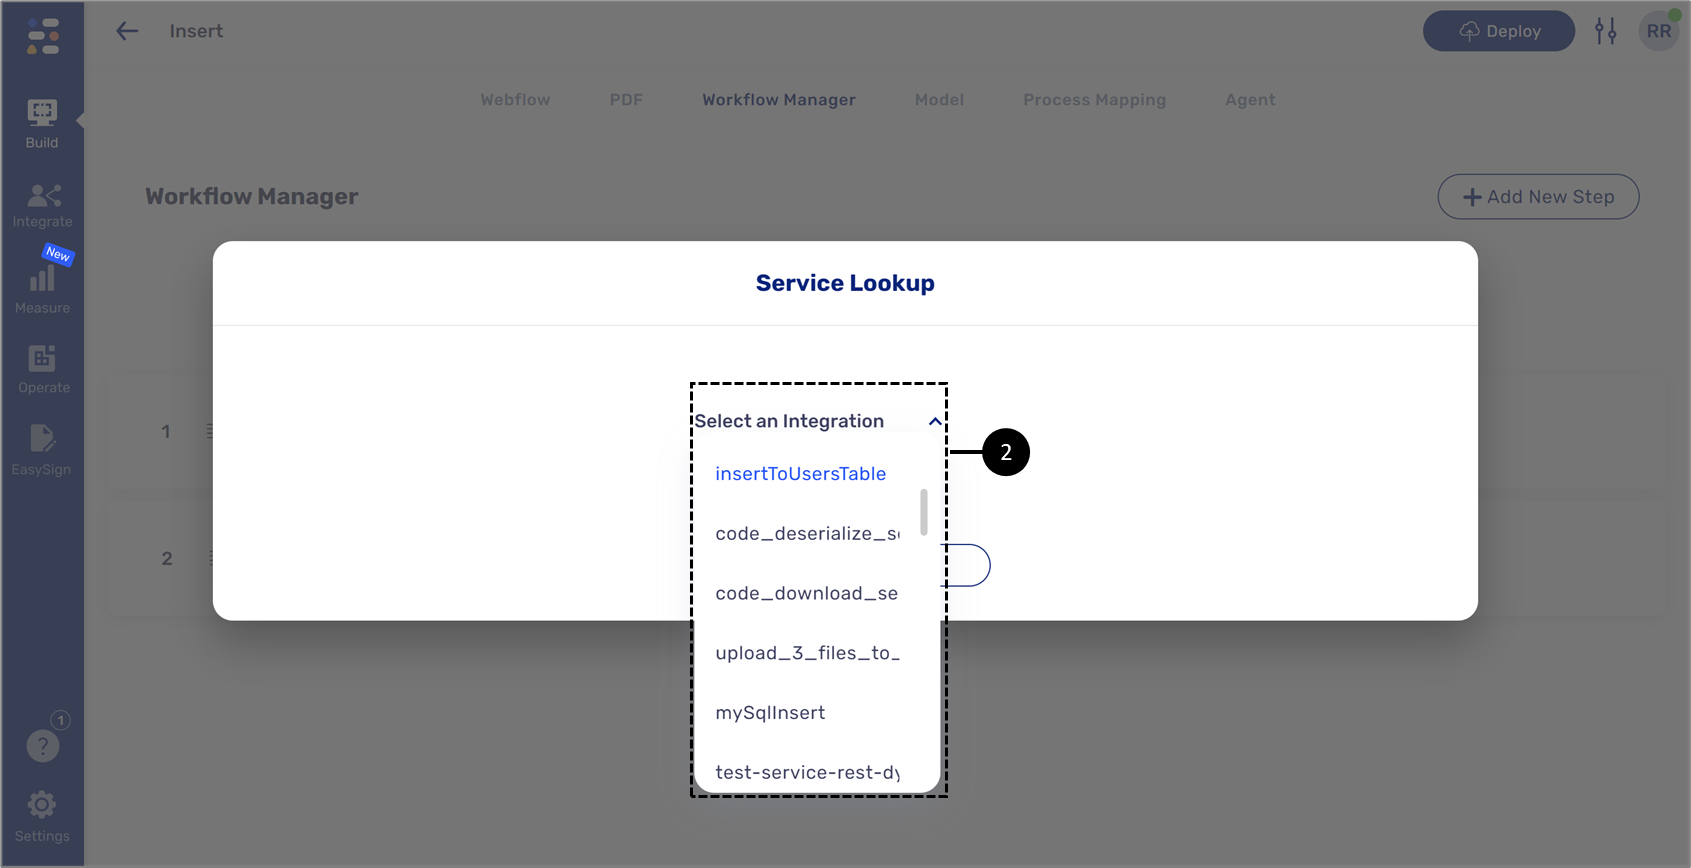
Figure 21: Service Lookup Window
We will configure the inputs by connecting them to the Model data items (3) and clicking ok (4).
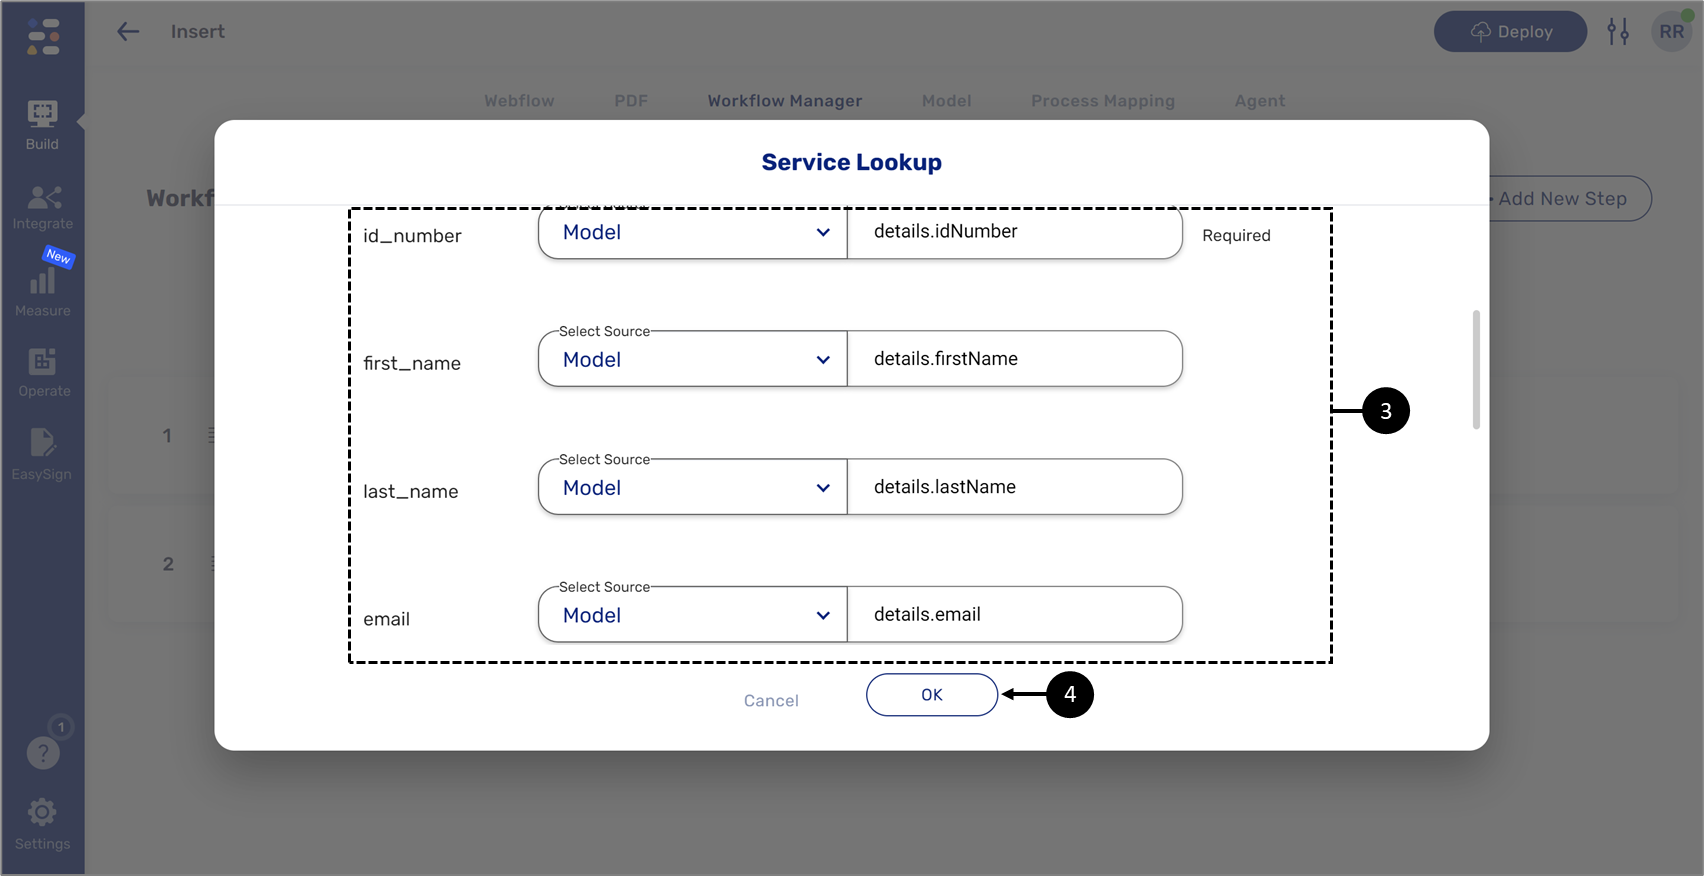
Figure 22: Configuring Inputs
The Integration is added and will be initiated as the last step of the process.
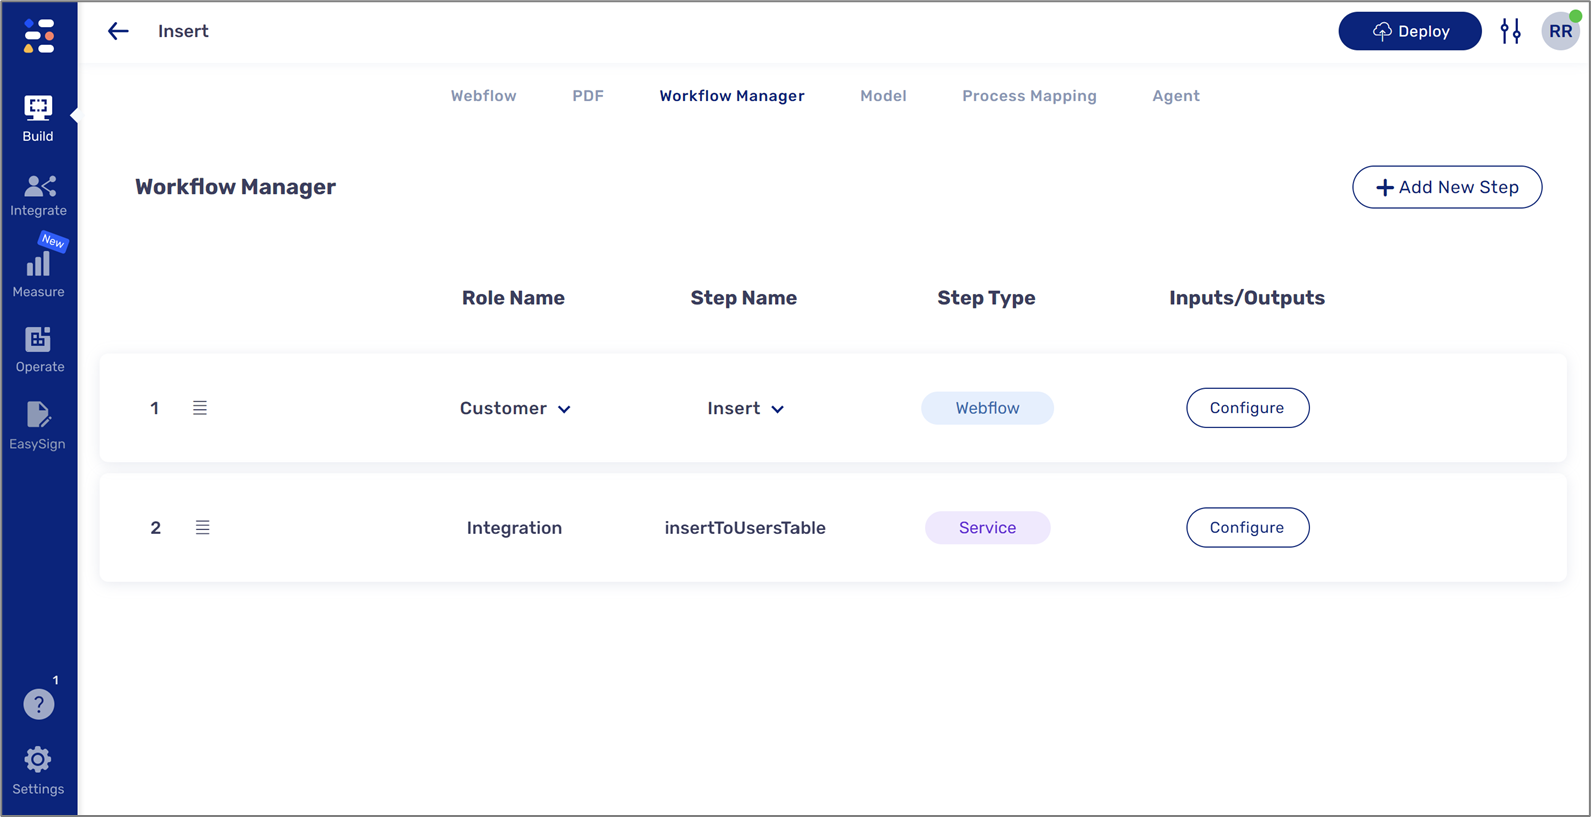
Figure 23: Added Integration