Article Overview
The following article describes how to integrate EasySend in your Dataverse applications.
Step 1: Import EasySend to your Power Apps Environment
(See Figure 1 to Figure 6)
To import EasySend to your Power Apps environment, perform the following steps:
- Access your Power Apps environment.
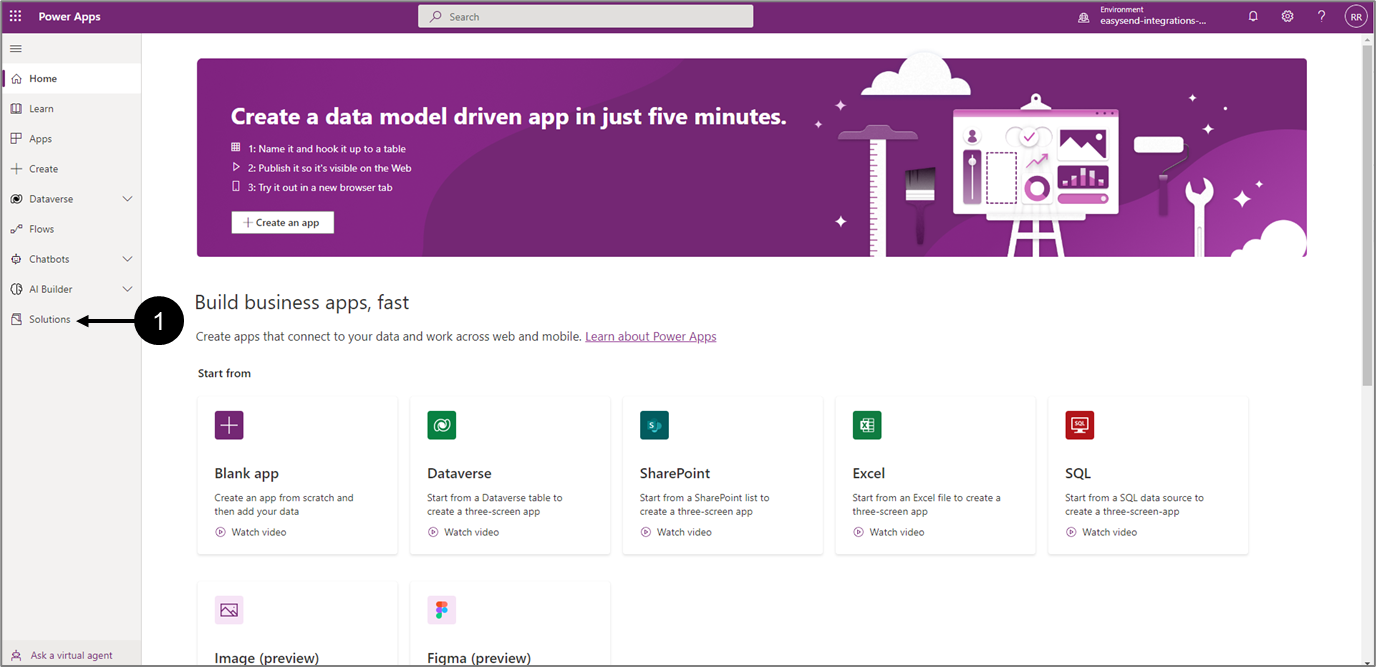
Figure 1: Power Apps Environment
- Click Solutions (1).
Result:
The Solutions screen appears:
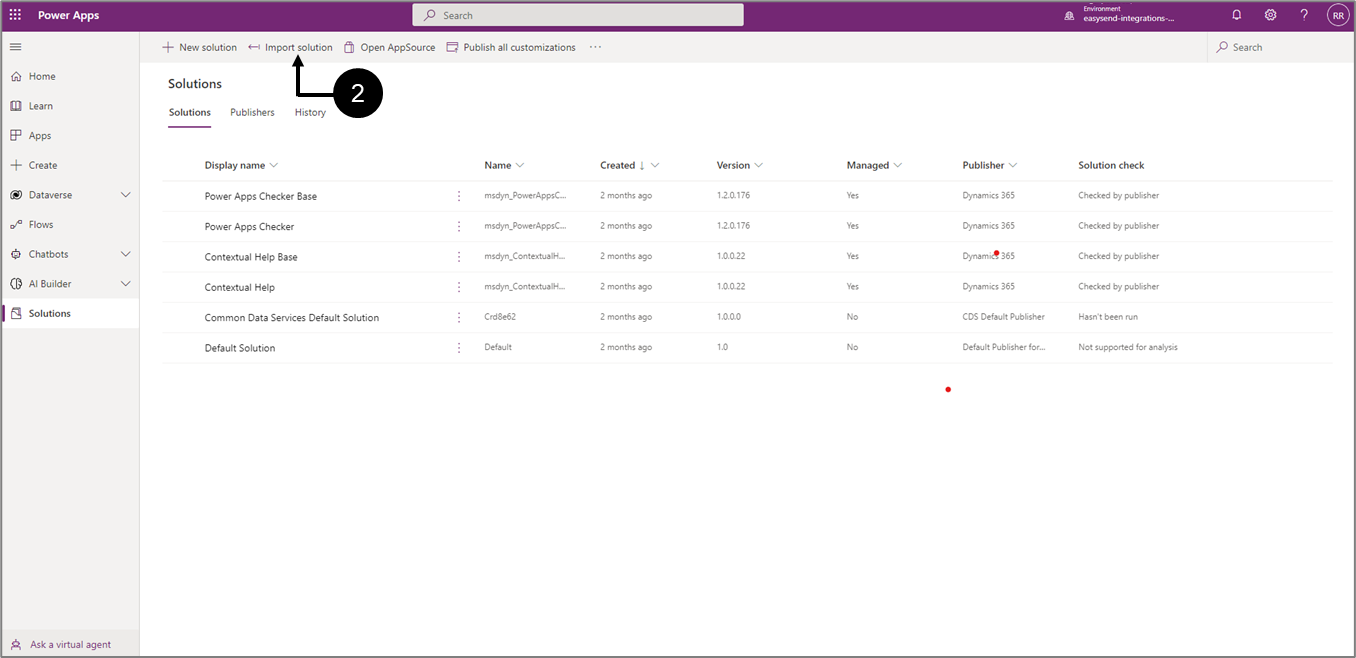
Figure 2: Import Solution
- Click Import Solution (2).
Result:
The Import a solution section appears:
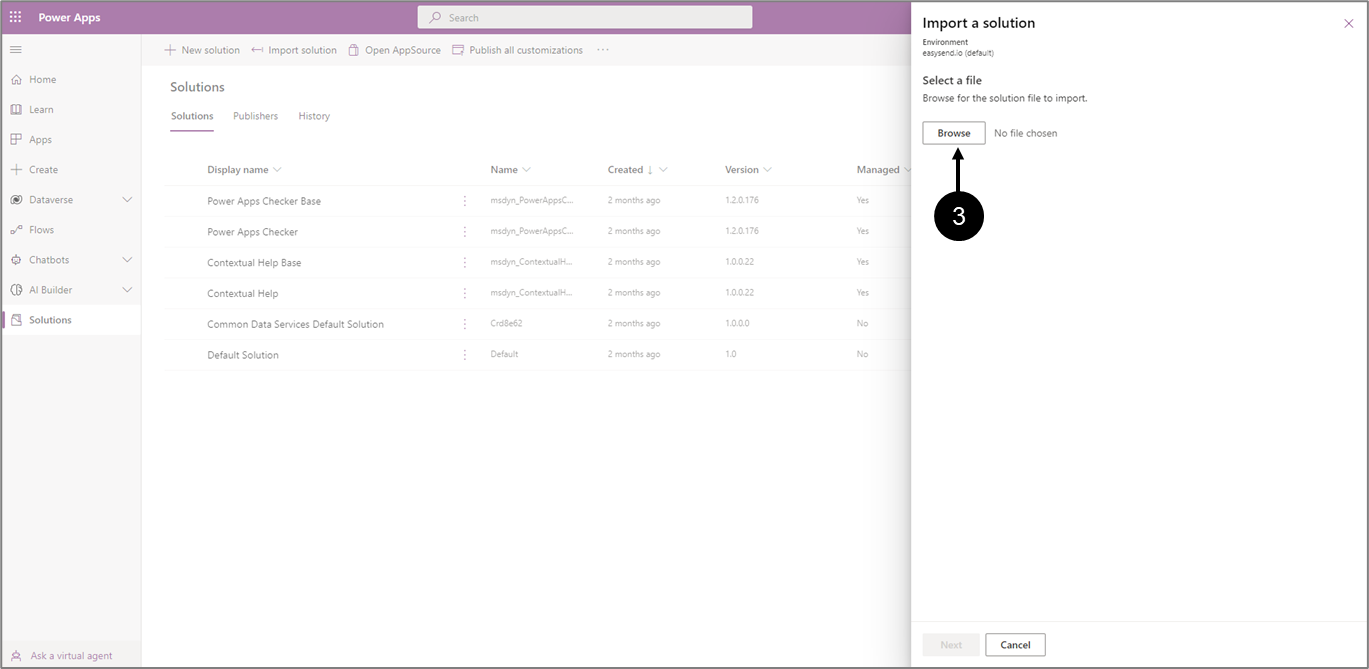
Figure 3: Import a solution - Browse
- Click Browse (3) and select the file to import.
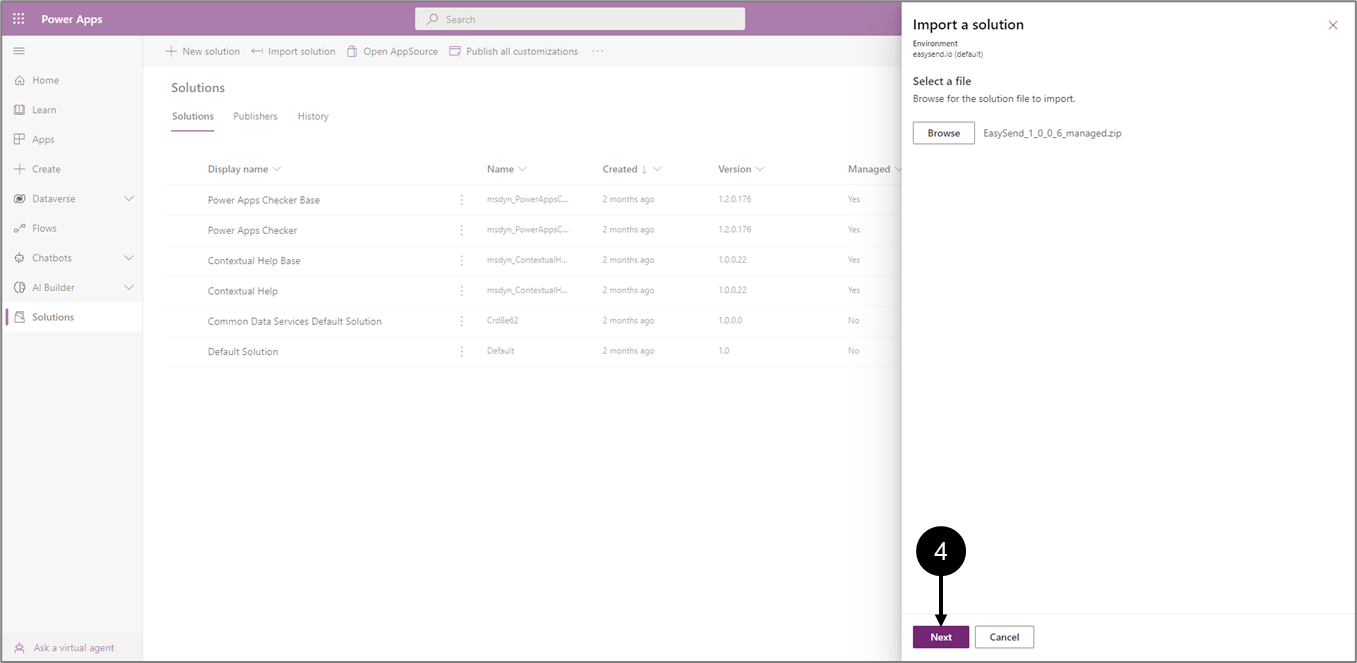
Figure 4: Import a solution - Next (Example)
- Click Next (4) and wait for the process to finish.
Result:
The Import button (5) appears:
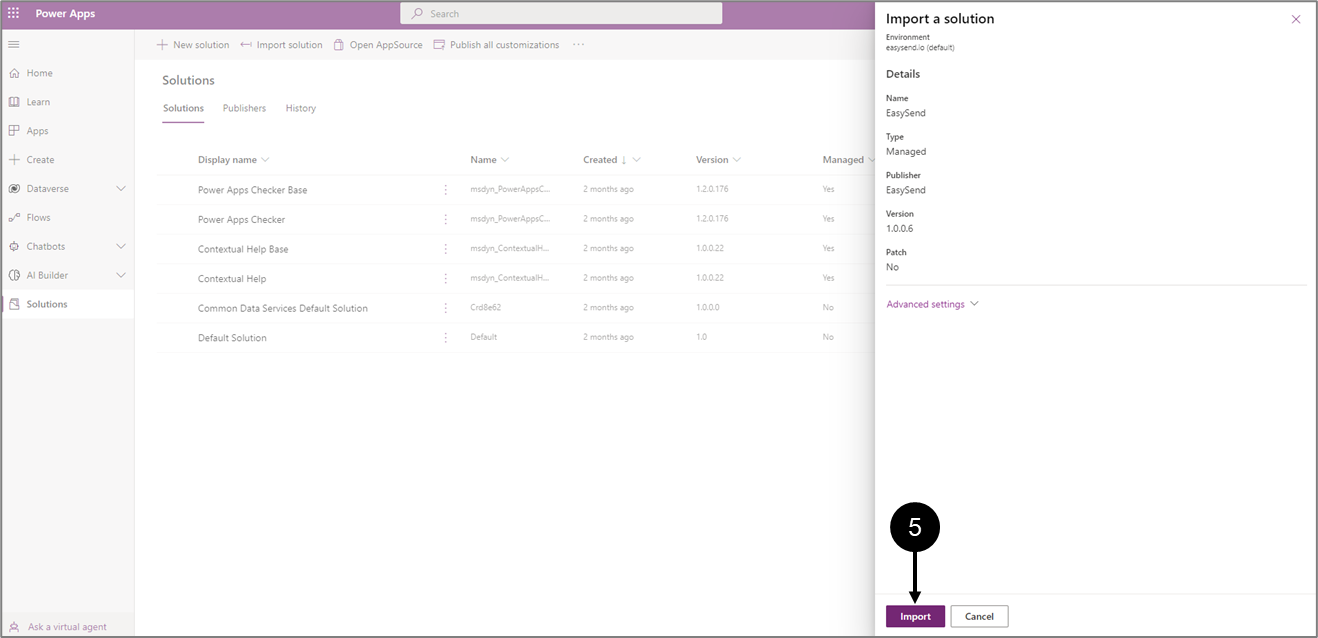
Figure 5: Import a solution - Import
- Click Import (5).
- Wait for the process to finish (6).
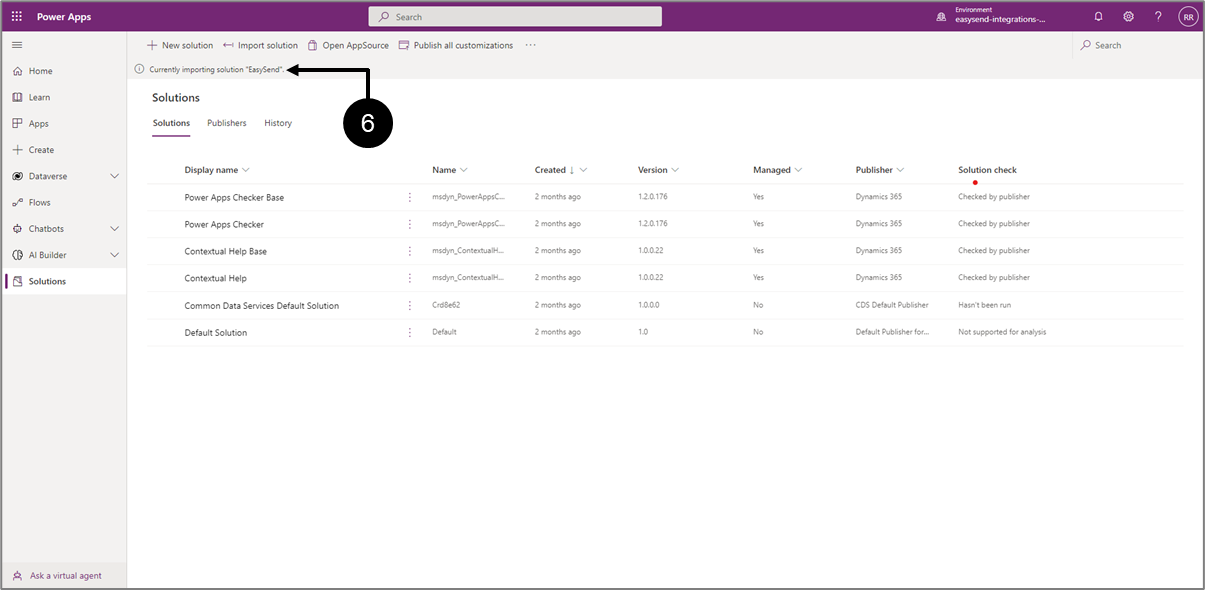
Figure 6: Import Process

Step 2: Adding a Custom Page to your App
(See Figure 7 to Figure 14)
To add a custom page to your App, perform the following steps:
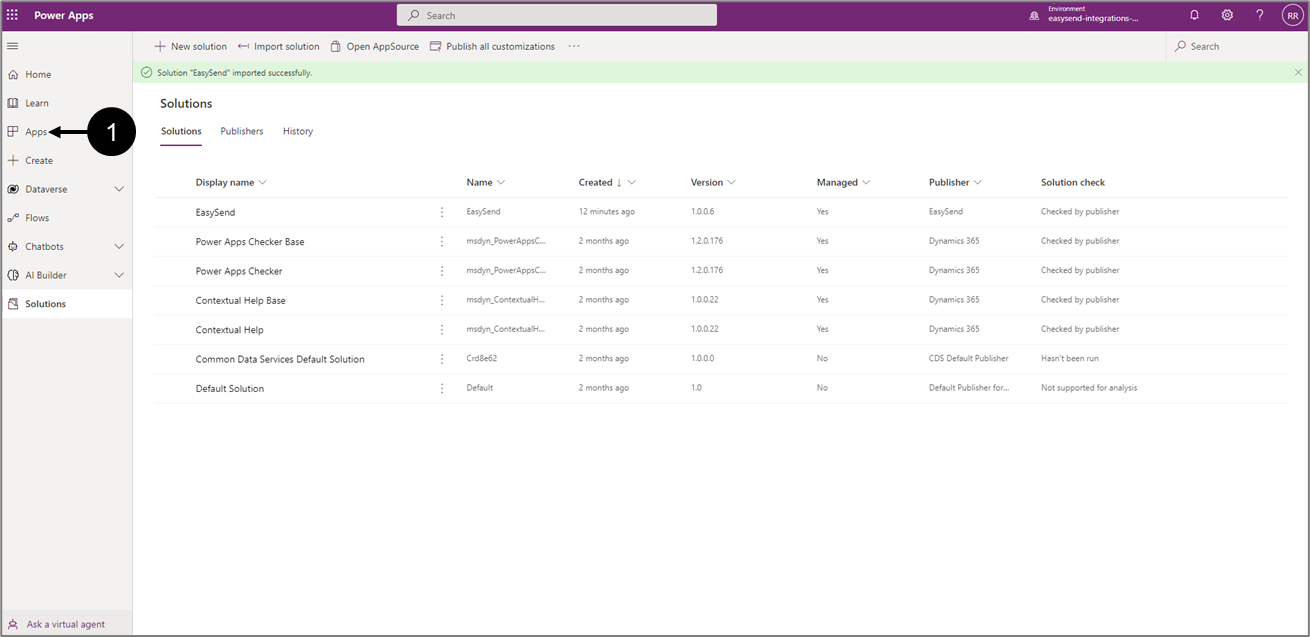
Figure 7: Apps
- Click Apps (1).
Result:
The Apps screen appears:
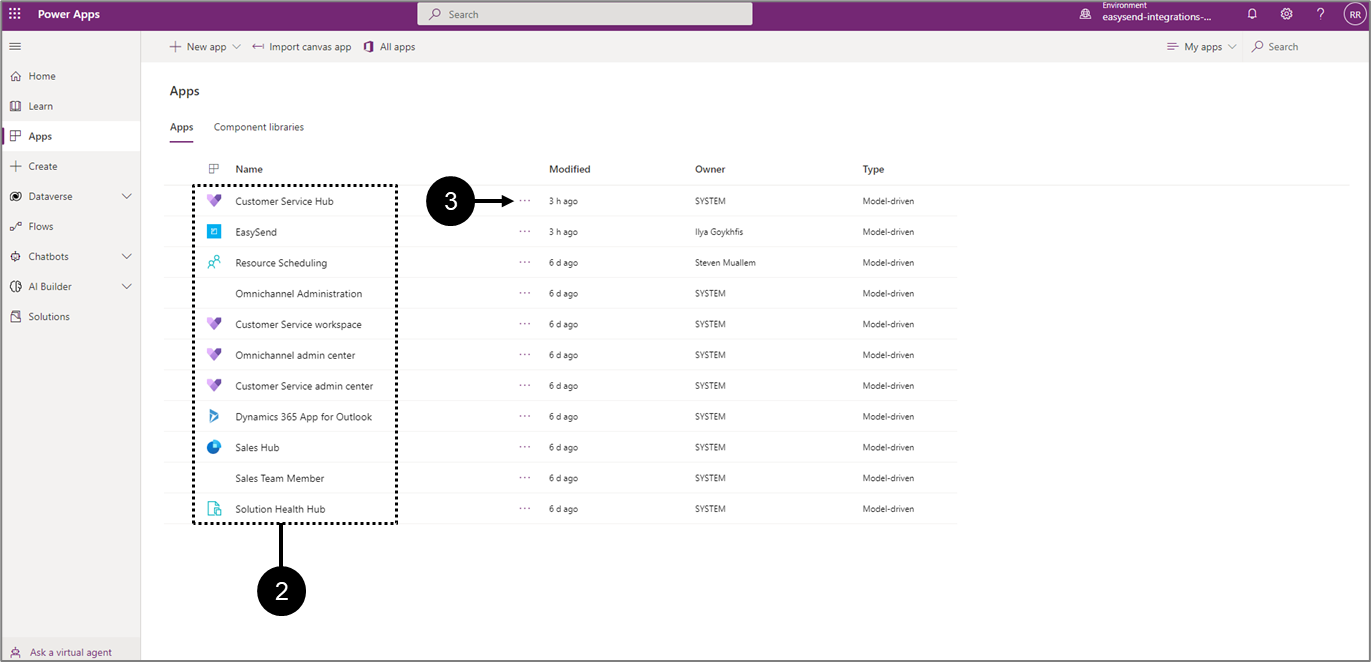
Figure 8: Apps Screen
- Locate the desired App (2).
- Click its three dots (3).
Result:
A new menu appears:
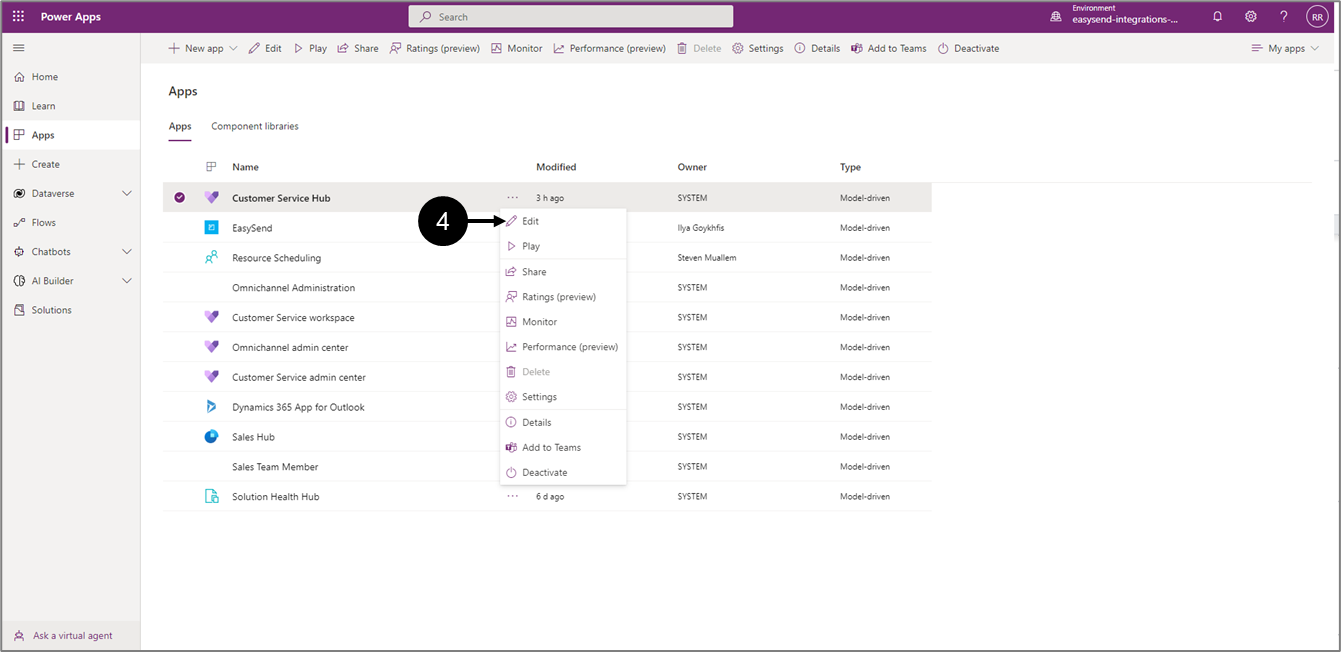
Figure 9: Edit
- Click Edit (4).
Result:
The following screen appears:

Figure 10: + Add Page
- Click + Add page (5).
Result:
The Add page window appears:
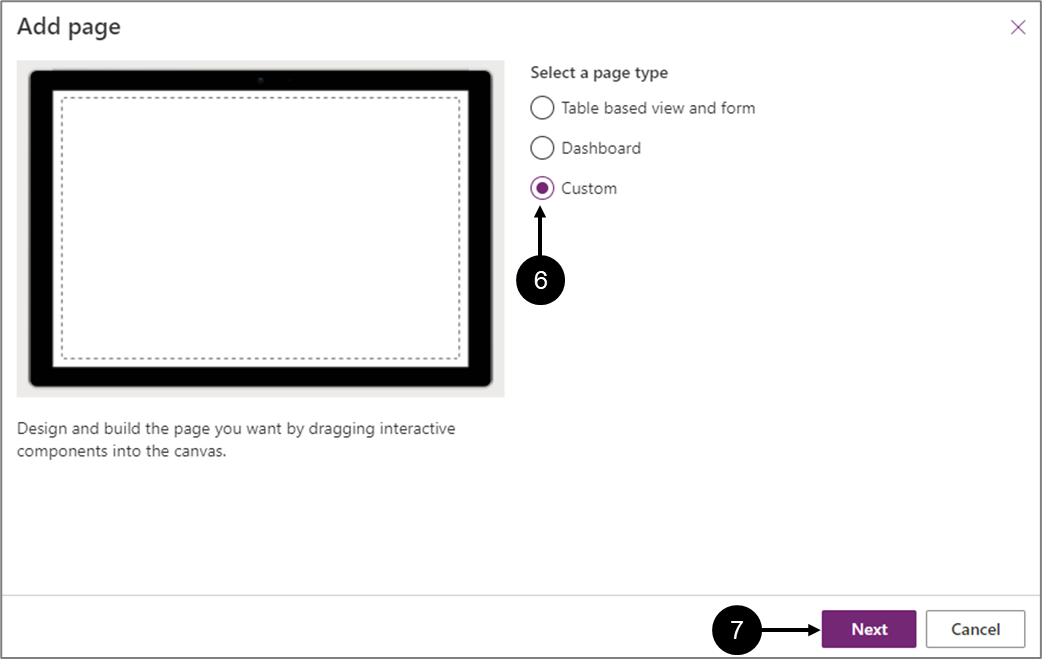
Figure 11: Add page Window
- Click Custom (6).
- Click Next (7).
Result:
The Add custom page window appears:
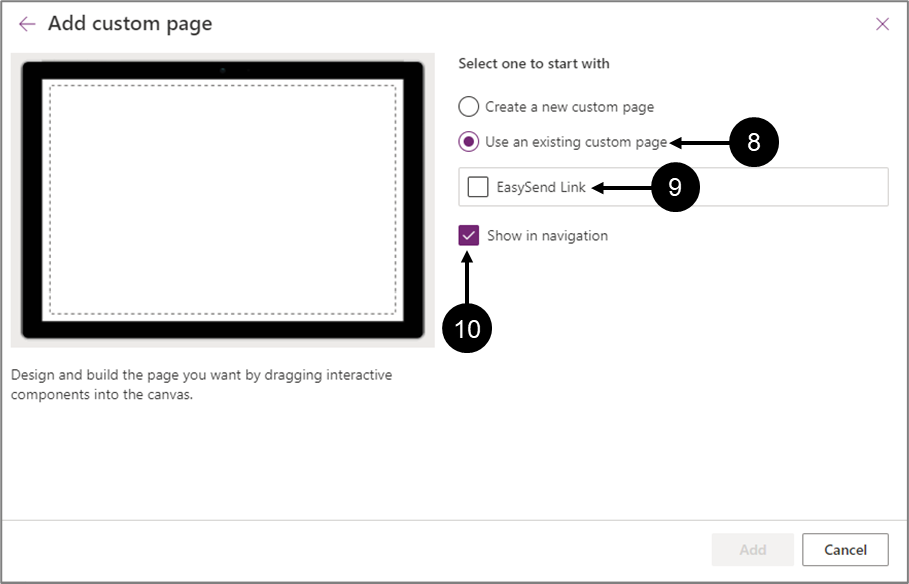
Figure 12: Add custom page Window
- Click Use an existing custom page (8).
- Check the EasySend Link checkbox (9).
- Uncheck the Show in navigation checkbox (10).
Result:
The Add custom page window is configure and the Add button (11) becomes enabled:
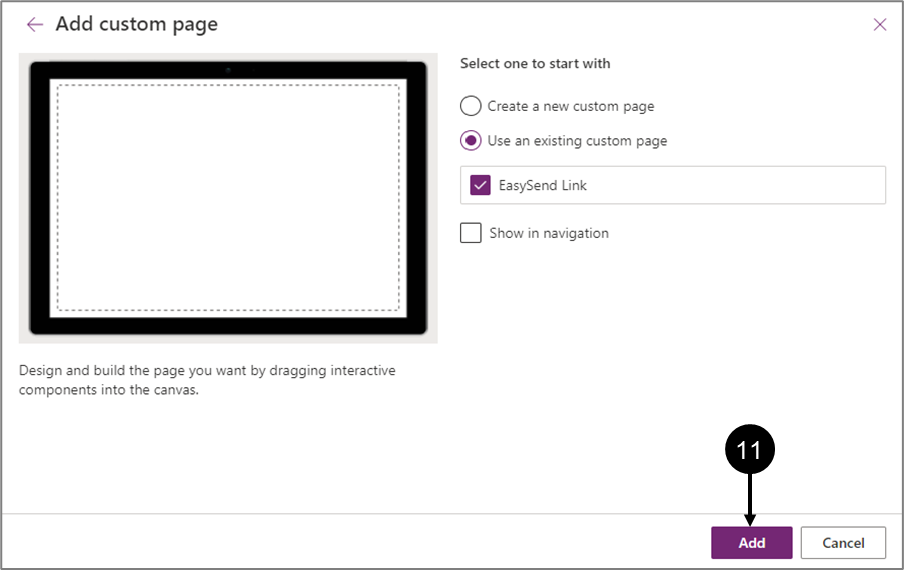
Figure 13: Add custom page Window - Add
- Click Add (11).
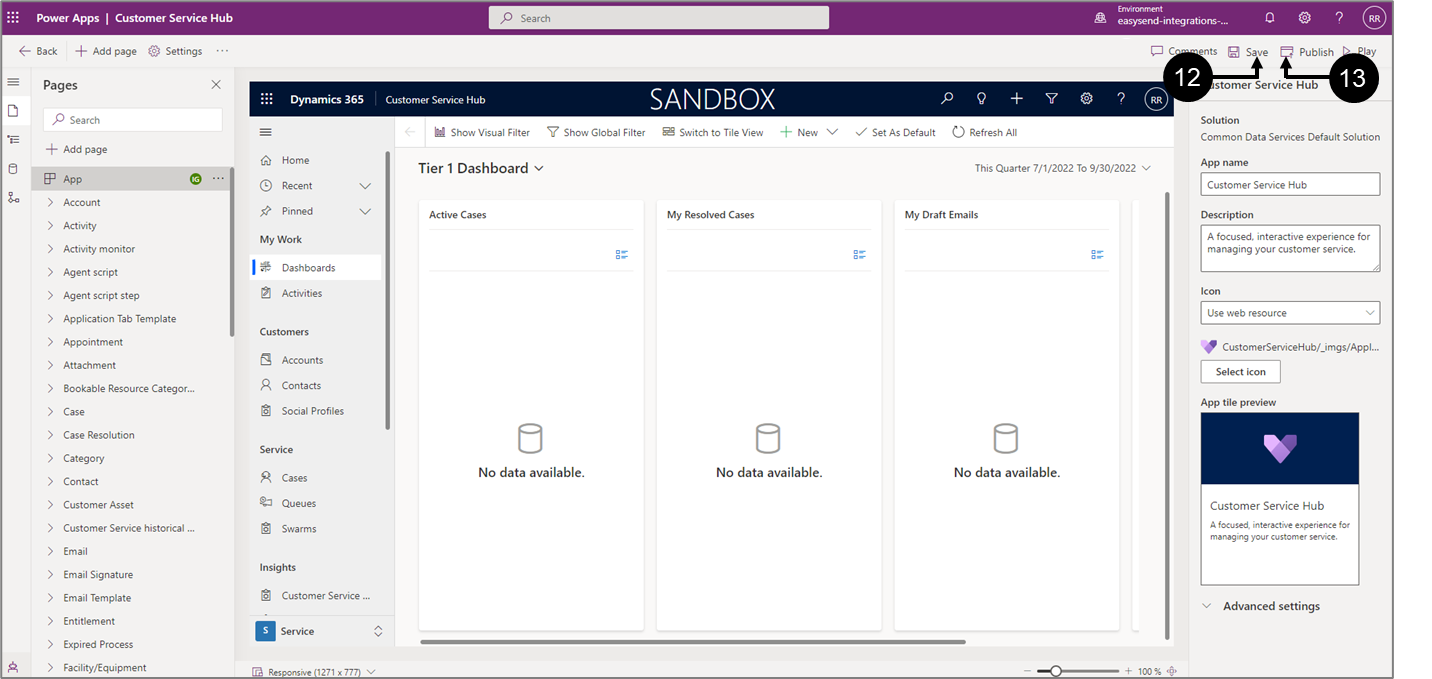
Figure 14: Save and Publish
- Click Save (12) and wait for the process to finish.
- Click Publish (13) and wait for the process to finish.
Step 3: Adding an EasySend Button to your App
(See Figure 15 to Figure 27)
To add an EasySend button to your App, perform the following steps:

Figure 15: Apps
- Click Apps (1).
Result:
The Apps screen appears:

Figure 16: Apps Screen
- Locate the desired App (2).
- Click its three dots (3).
Result:
A new menu appears:

Figure 17: Edit
- Click Edit (4).
Result:
The following screen appears:
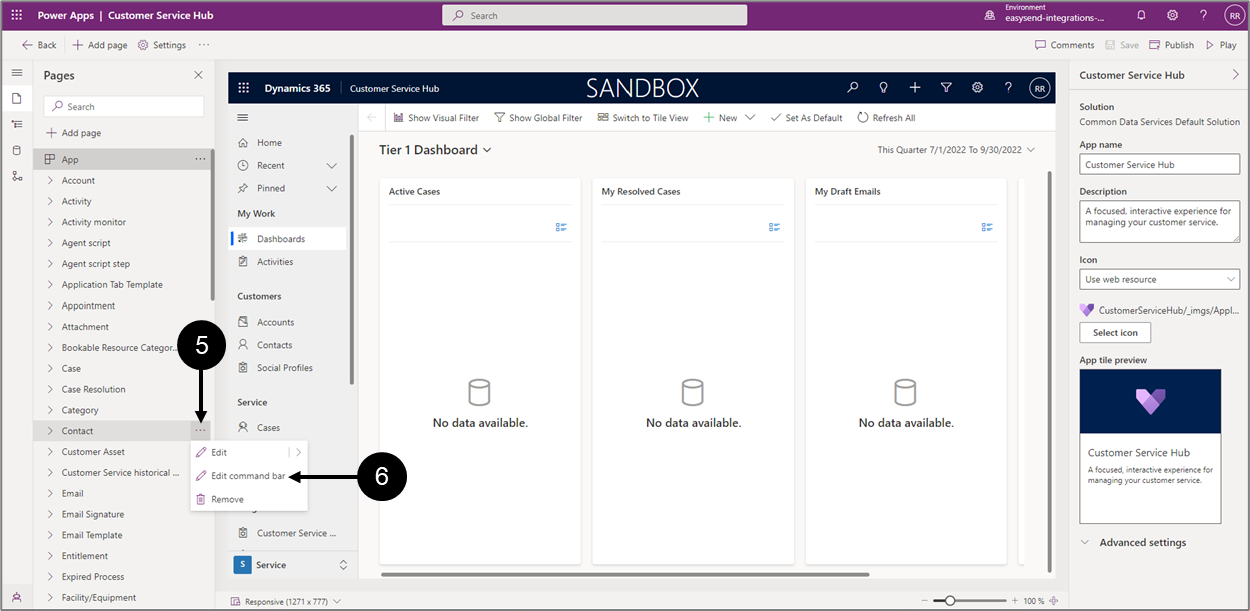
Figure 18: Contact
- Choose the object you want to add the EasySend button to (for example Contact).
- Click the three dots (5).
- Click Edit command bar (6).
Result:
The Edit command bar for Contacts window appears:
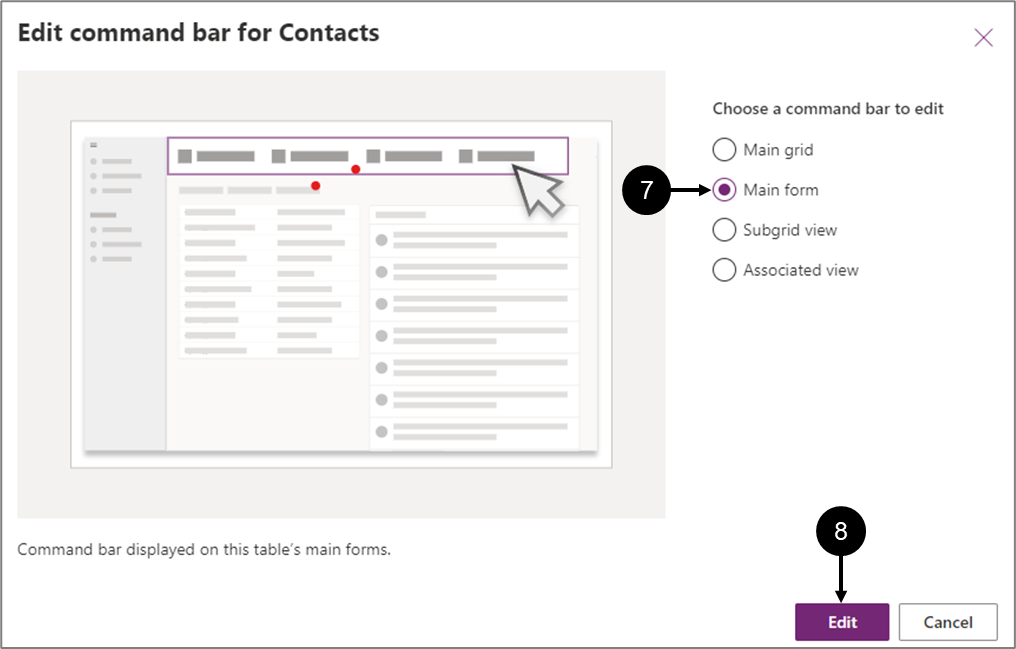
Figure 19: Edit command bar for Contacts Window
- Click Main form (7).
- Click Edit (8).
Result:
The following window appears:

Figure 20: + New
- Click + New (9).
- Click Command (10).
Result:
The Create a component library window appears:
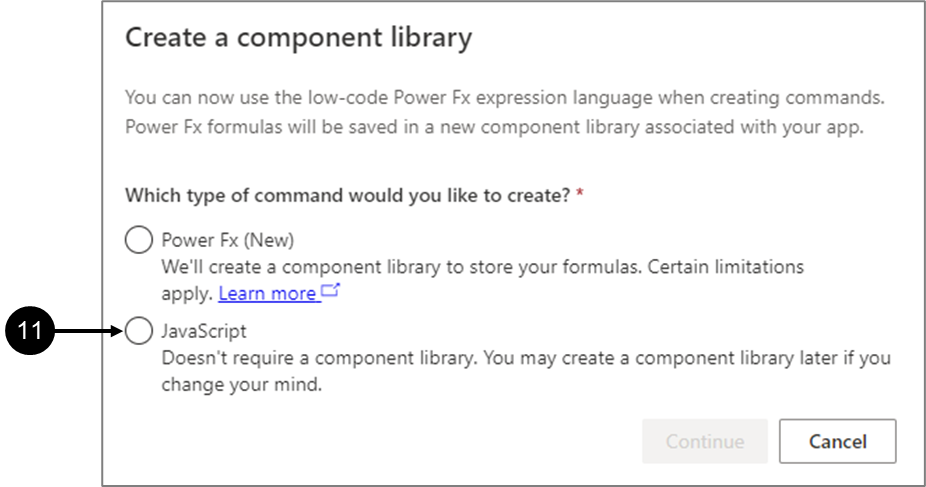
Figure 21: Create a component library Window
- Click JavaScript (11).
Result:
The Continue button (12) becomes enabled:
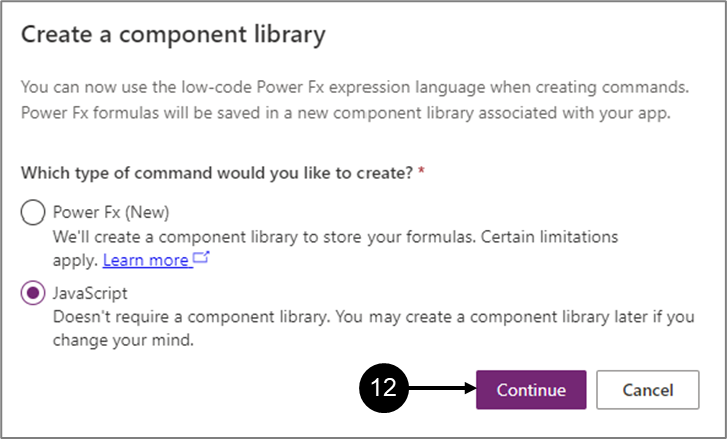
Figure 22: Continue Button
- Click Continue (12).
Result:
A button is added (13):
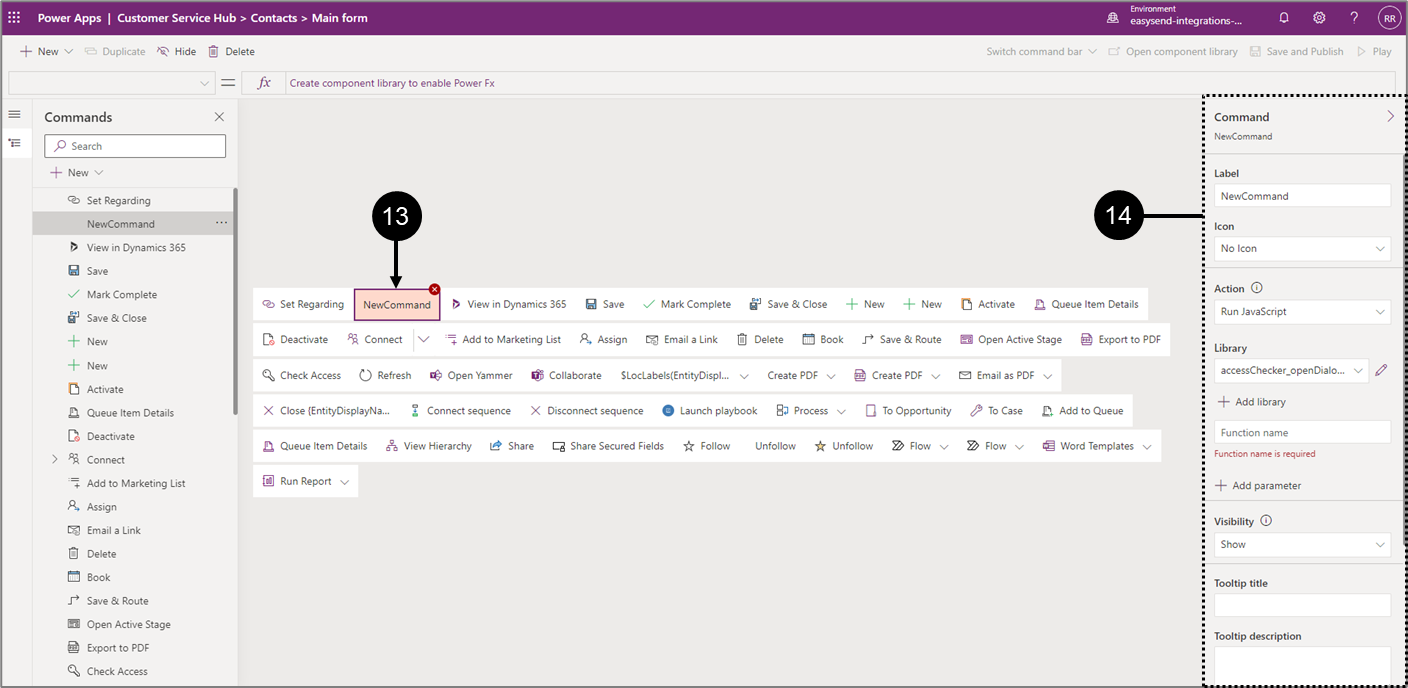
Figure 23: Added Button
- Customize the button (14):
- Set the Label, for example: “EasySend Link”.
- Select an Icon.
- Verify Action is set to Run JavaScript.
- Click + Add library:
Result:
The Add JavaScript Library window appears:
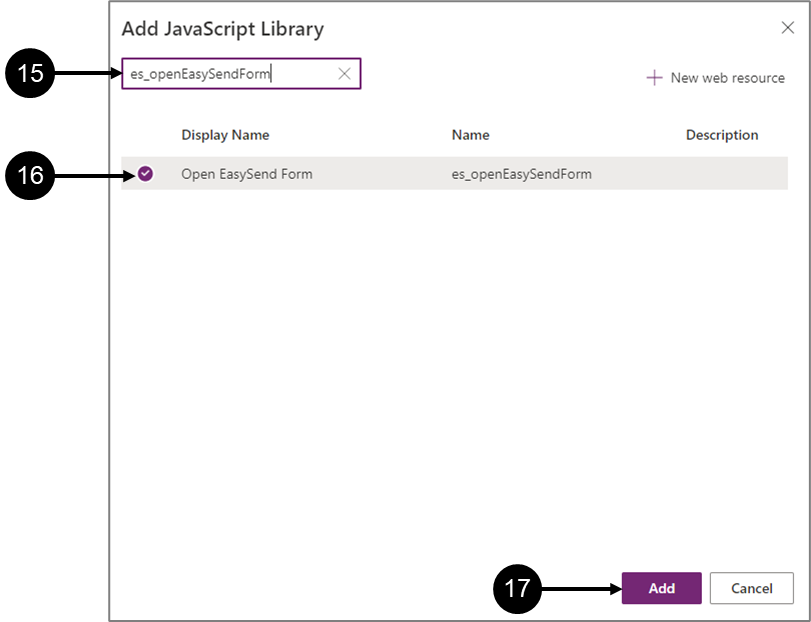
Figure 24: Add JavaScript Library Window
- Use the search bar and search for “es_openEasySendForm” (15).
- Click Open EasySend Form (16).
- Click Add (17).
Result:
The Library is updated:
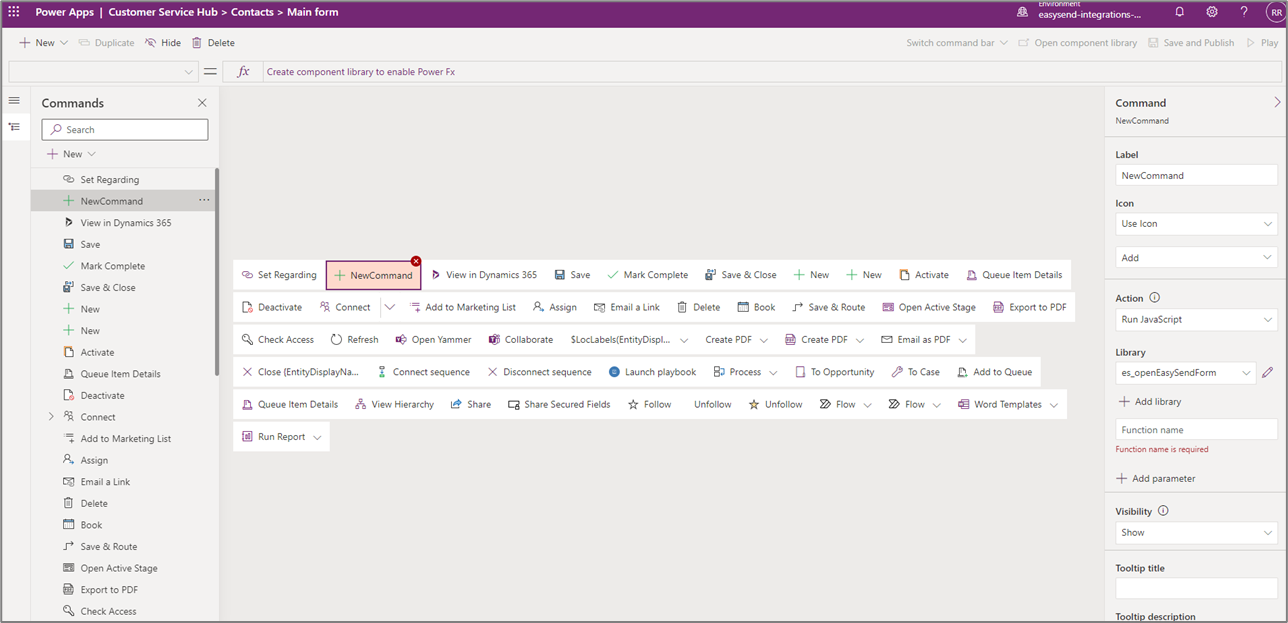
Figure 25: Button Customization
- Set the Function name to “openApp”.
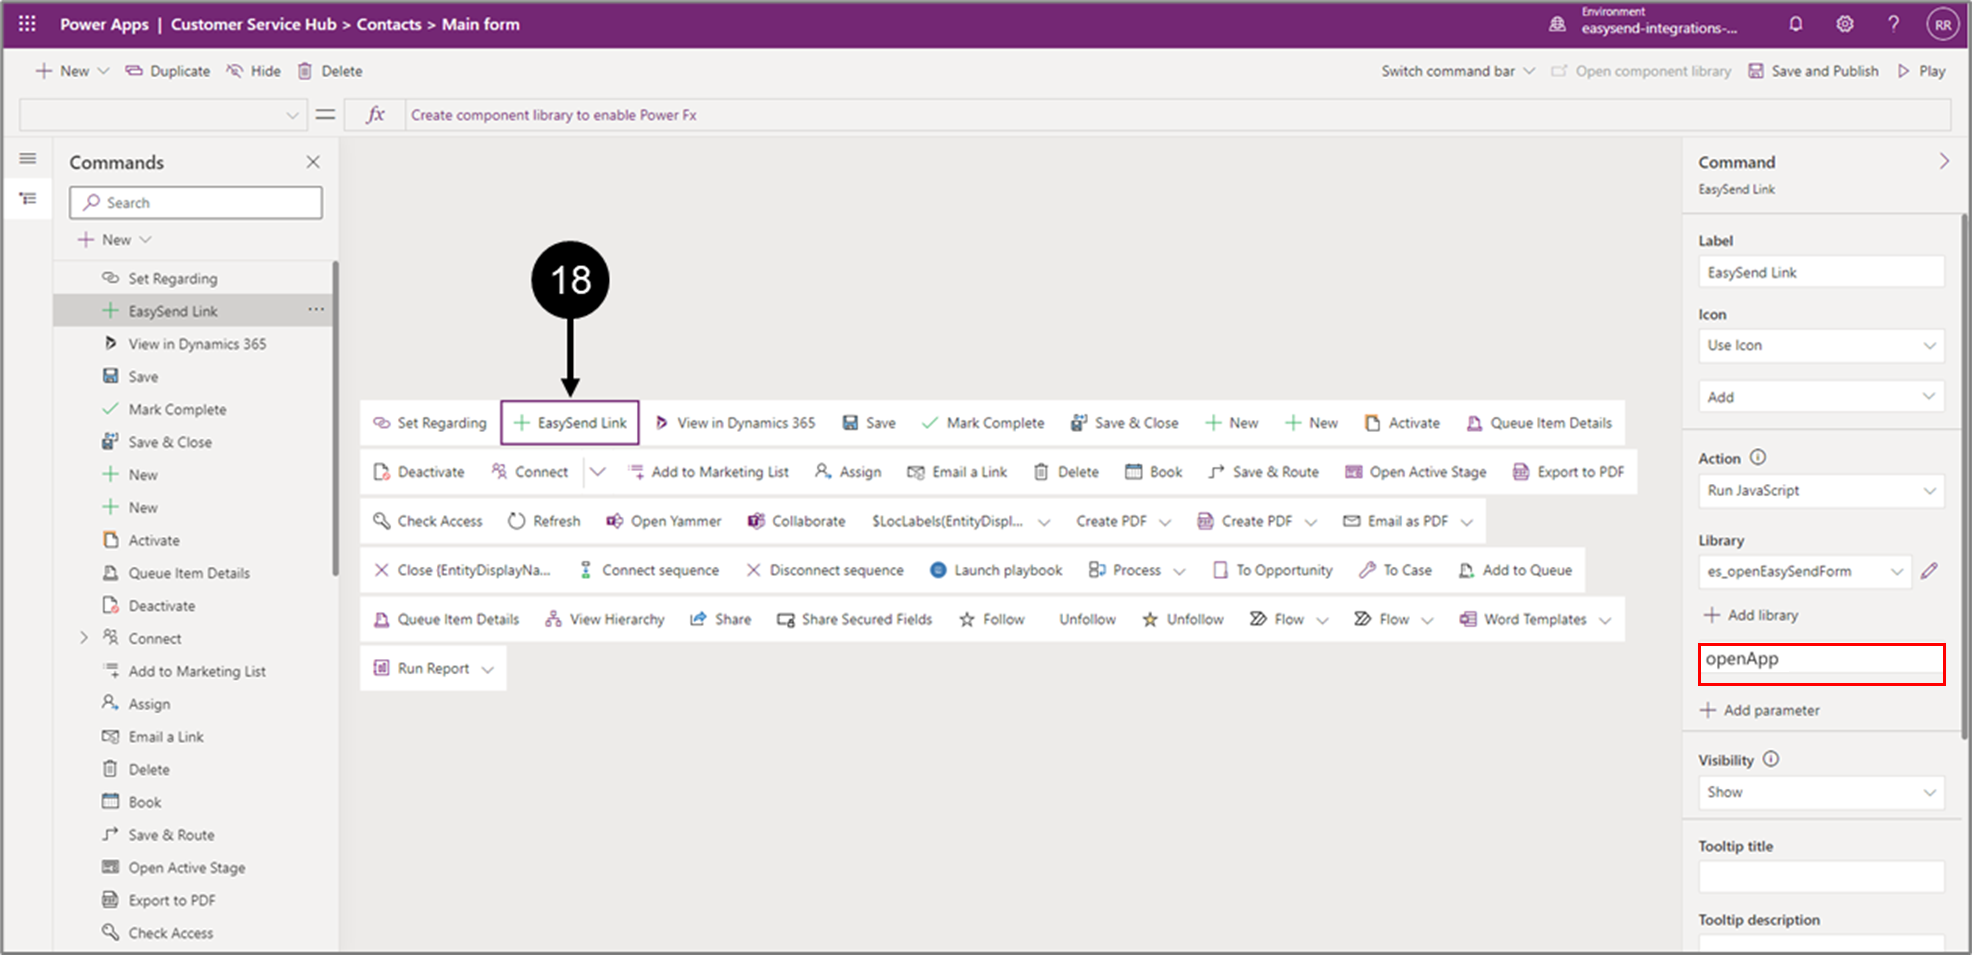
Figure 26: Moving the button
- Drag and drop the button (18) to a different location on the bar.
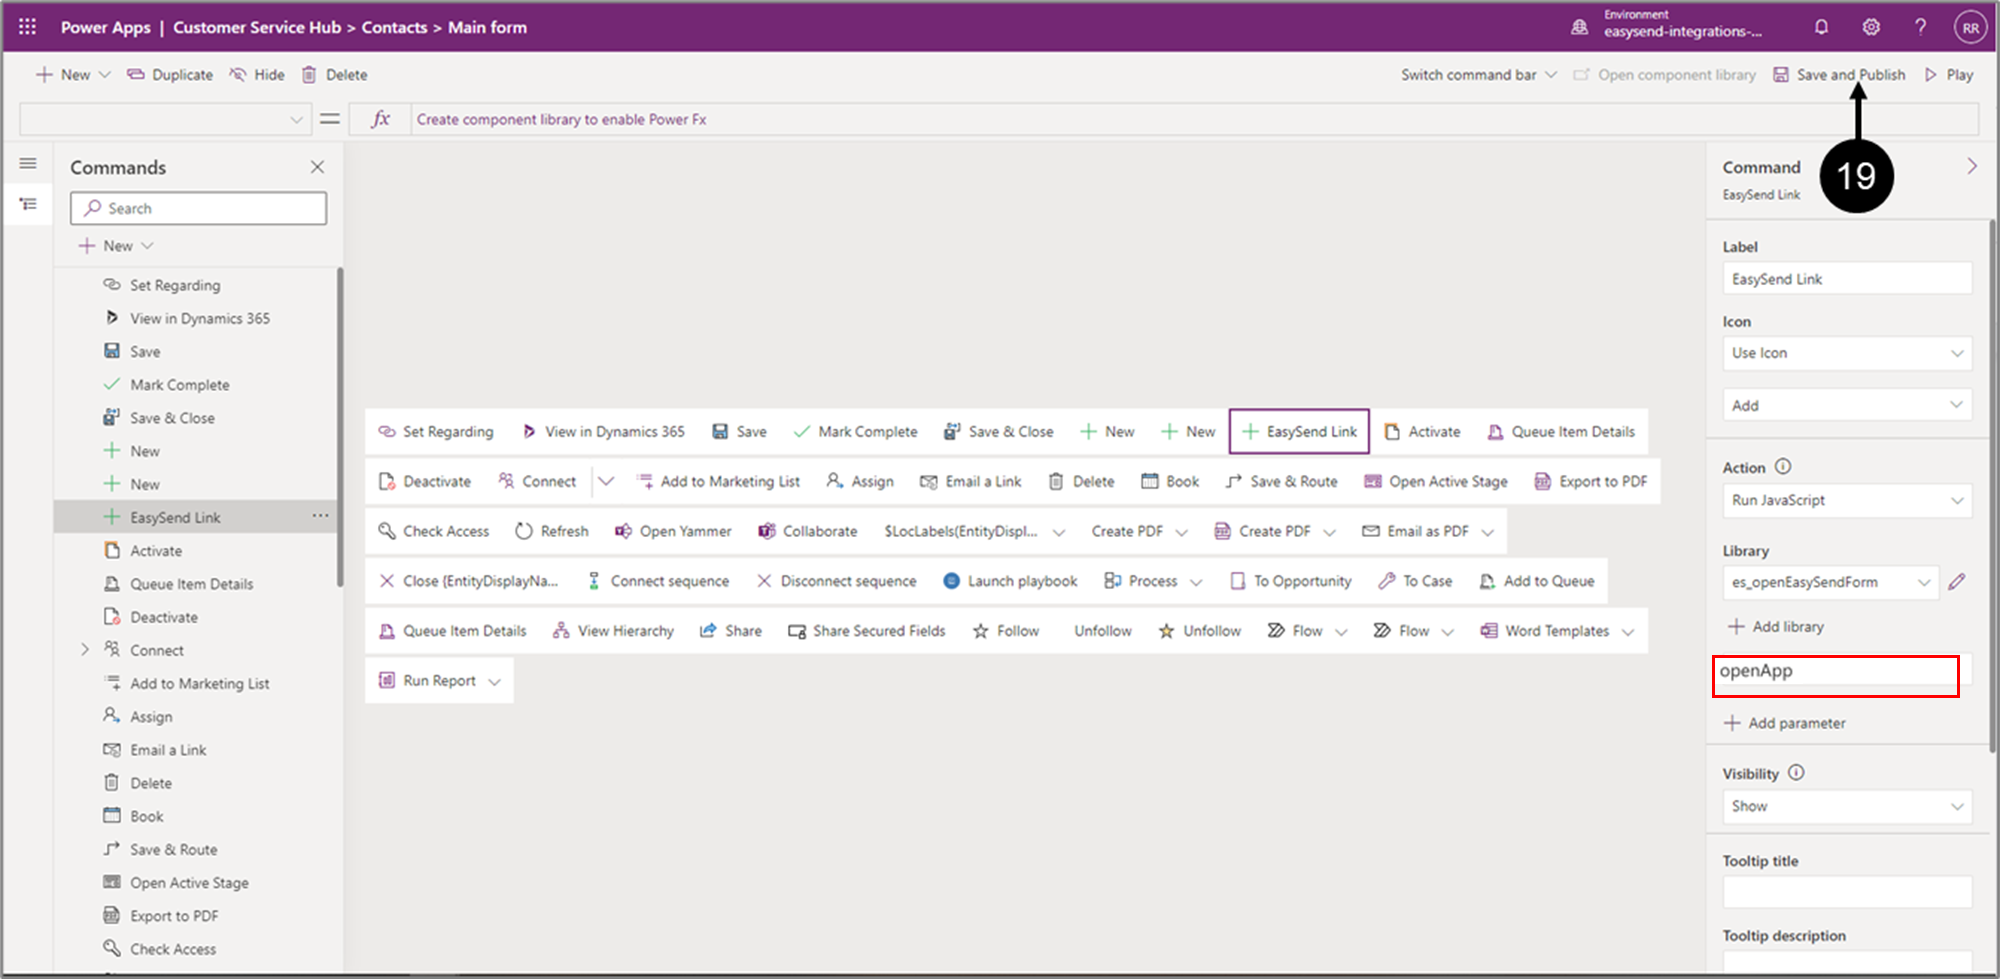
Figure 27: Save and Publish
- Click Save and Publish (19) and wait for the process to finish.
Step 4: Adding an EasySend Sessions Related List
(See Figure 28 to Figure 41)
To add an EasySend button to your App, perform the following steps:
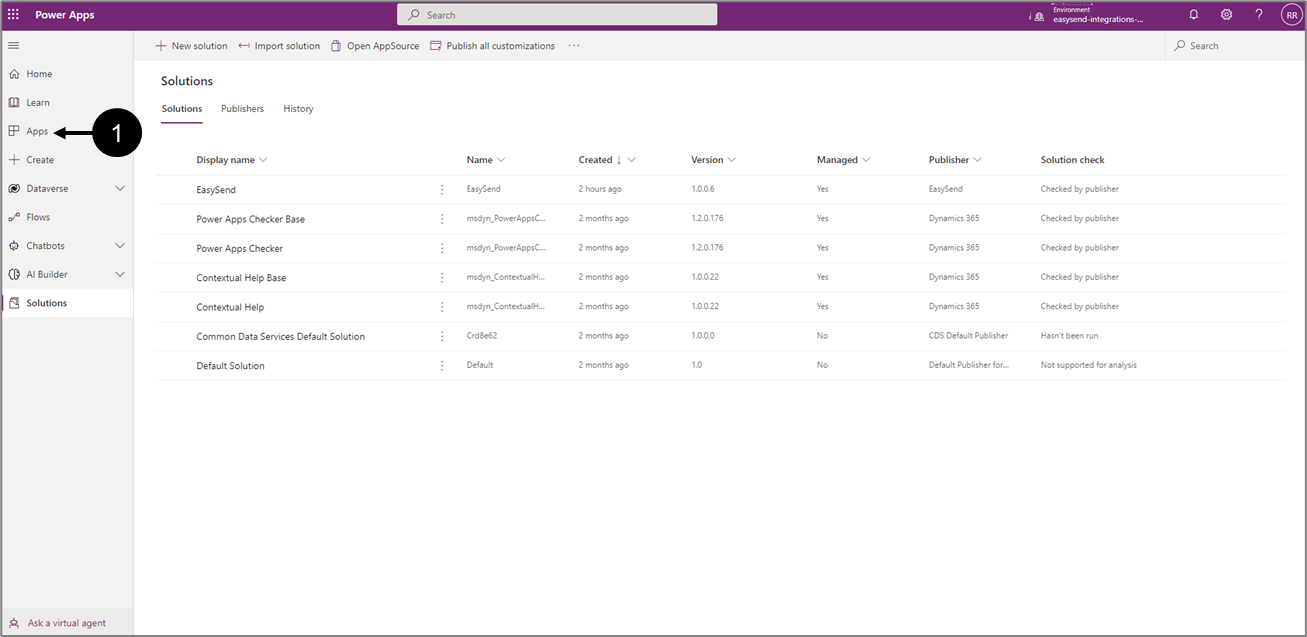
Figure 28: Apps
- Click Apps (1).
Result:
The Apps screen appears:

Figure 29: Apps Screen
- Locate the desired App (2).
- Click its three dots (3).
Result:
A new menu appears:

Figure 30: Edit
- Click Edit (4).
Result:
The following screen appears:
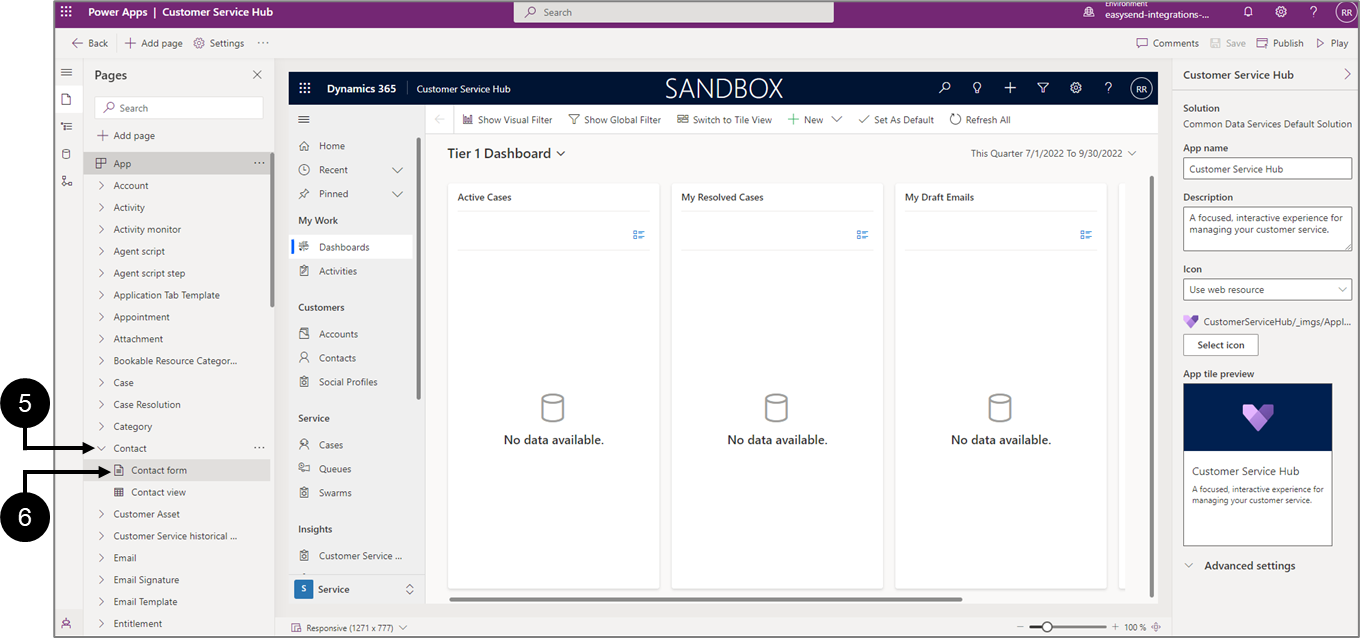
Figure 31: Contact
- Choose the object you want to add the EasySend button to (for example Contact).
- Click the dropdown (5).
- Click Contact Form (6).
Result:
The Contact Form section appears:
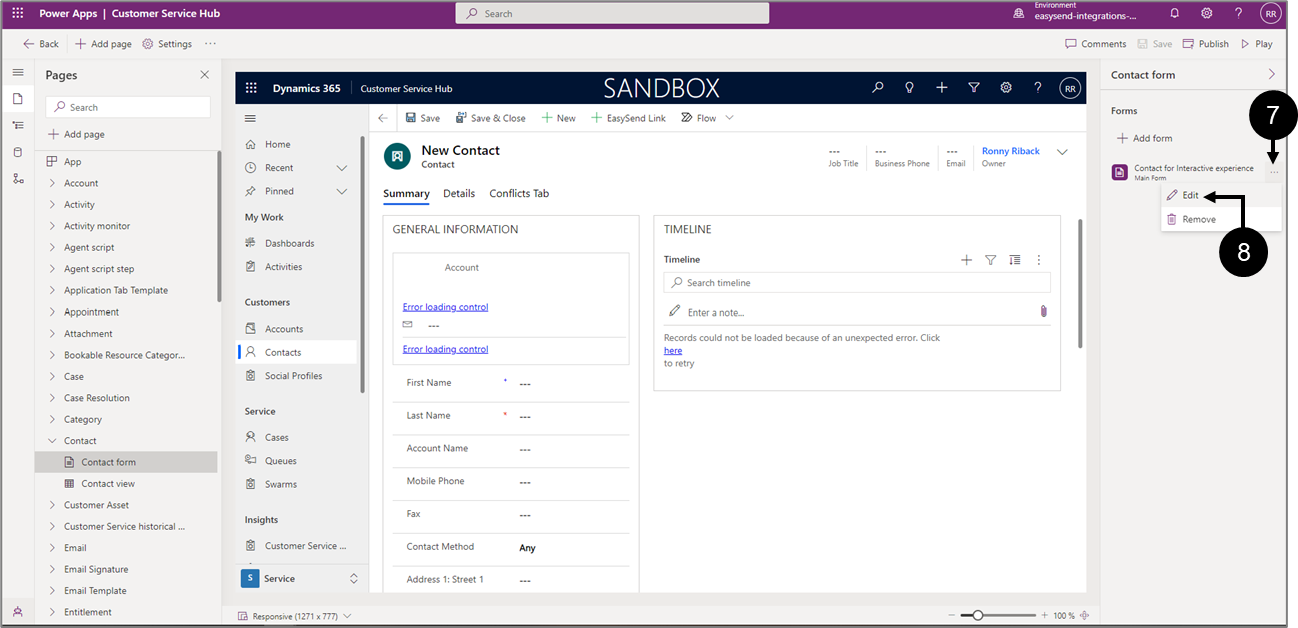
Figure 32: Contact Form
- Click the three dots (7) next to Contact for Interactive experience.
- Click Edit (8).
Result:
The Form screen appears:
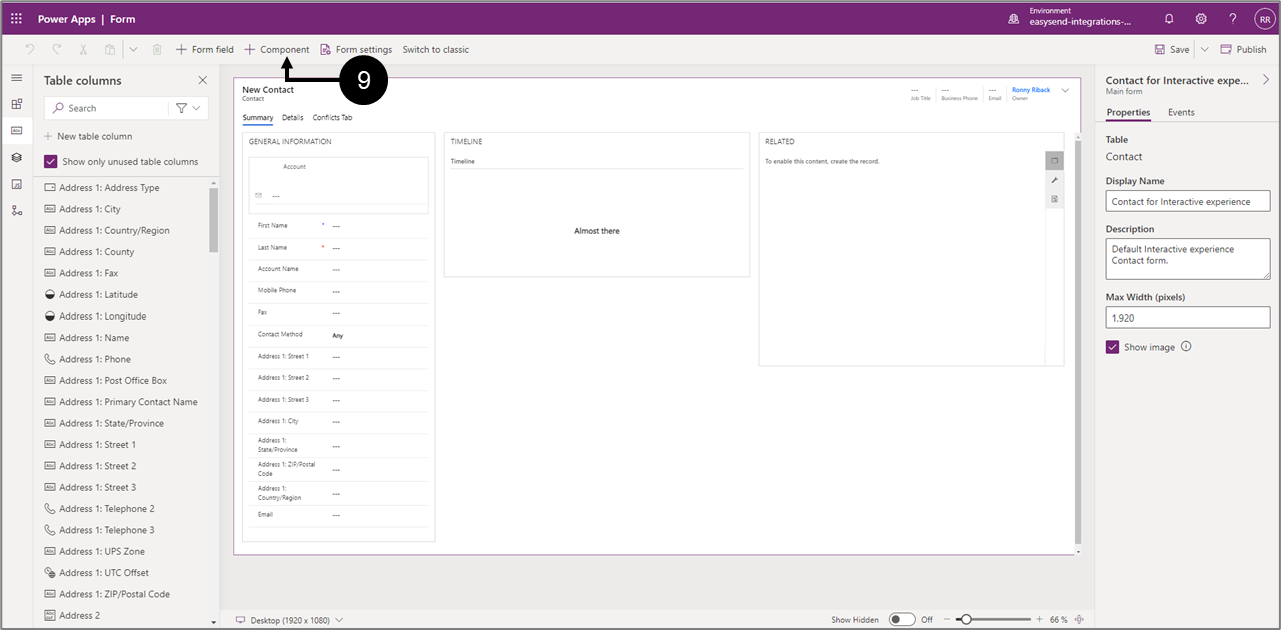
Figure 33: + Component
- Click + Component (9).
Result:
The Layout section appears:
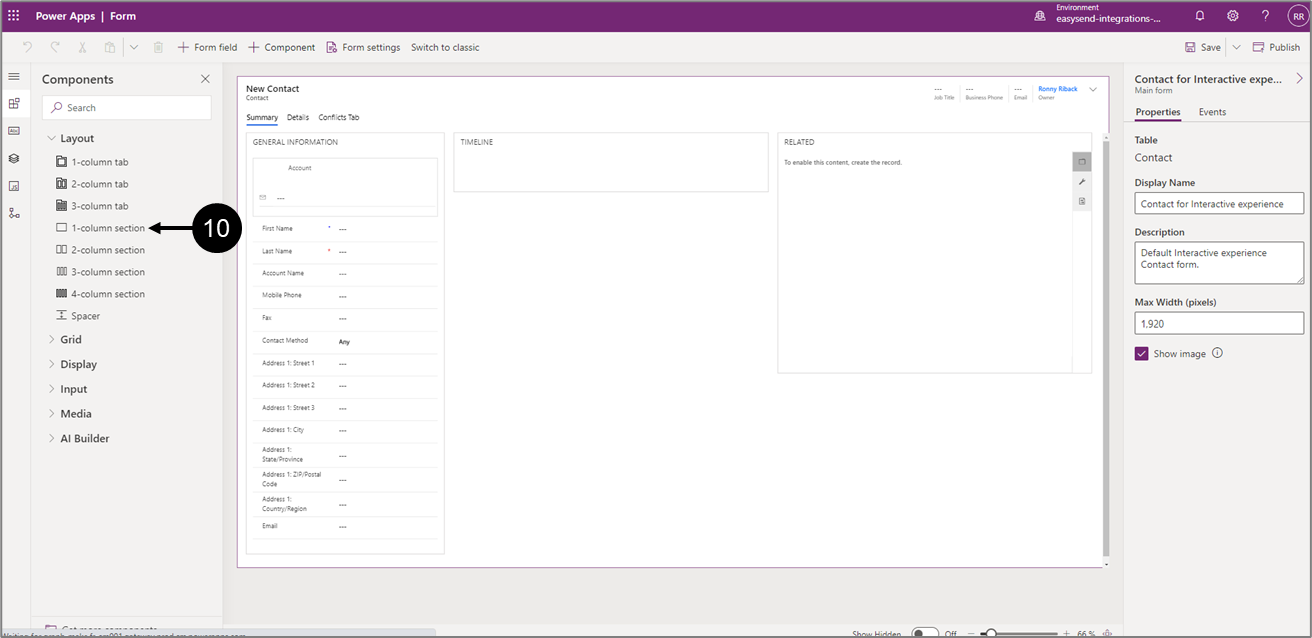
Figure 34: 1-column section
- Click 1-column section (10).
Result:
A New Section is added (11):
Figure 35: New Tab - Grid - Subgrid
- Click Grid (12).
- Click Subgrid (13).
Result:
The Select subgrid view window appears:
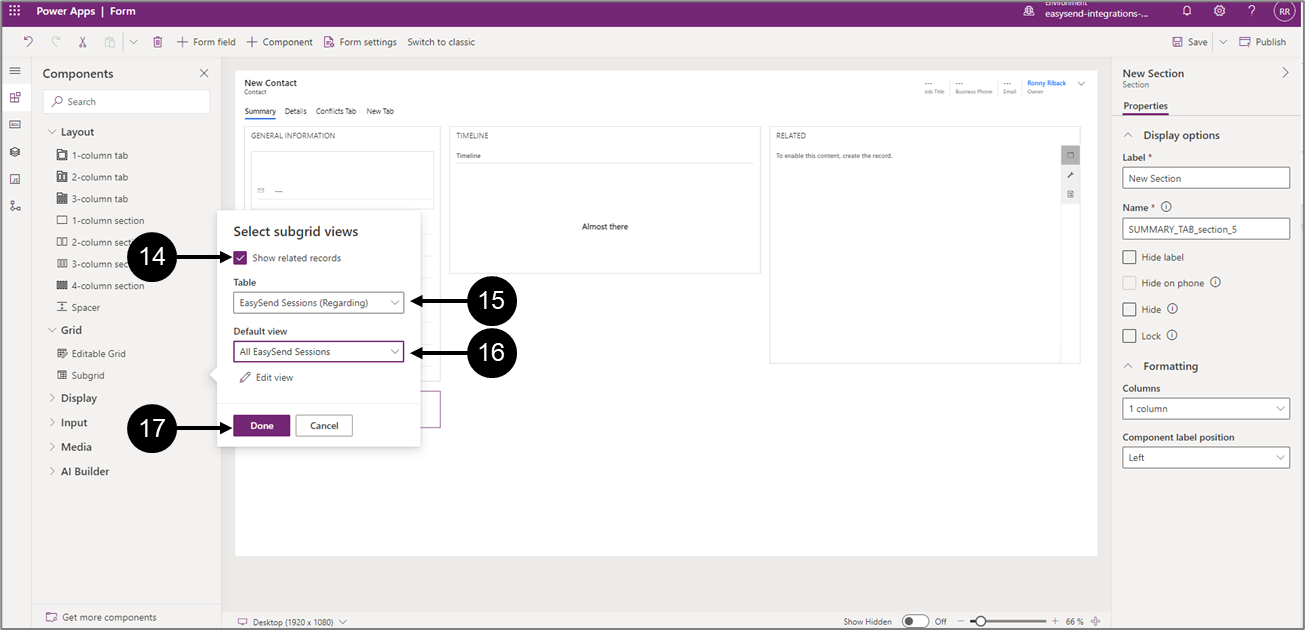
Figure 36: Select subgrid view Window
- Check the Show related records checkbox (14).
- Under Table, select EasySend Sessions (Regarding) (15).
- Under Default view, select All EasySend Sessions (16).
- Click Done (17).
Result:
The Display options for the new subgrid appear:
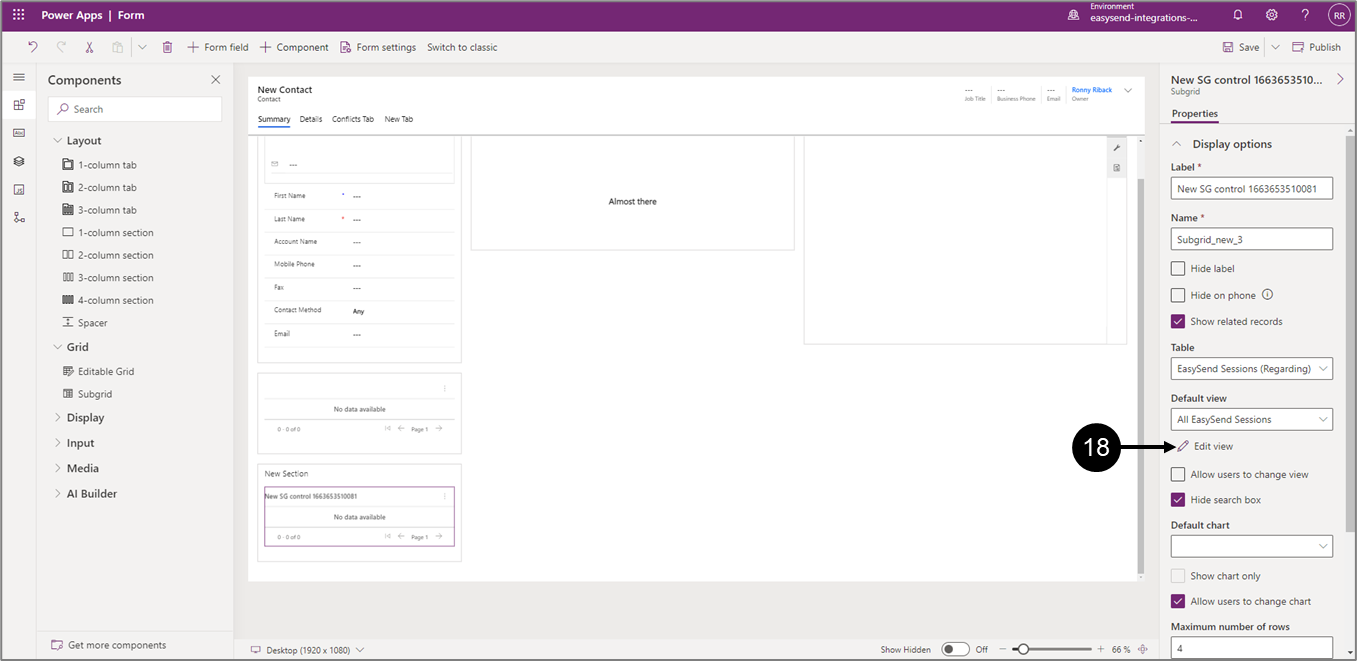
Figure 37: Display Options - Subgrid
- Click Edit View (18).
Result:
The View screen appears:
- On the Table columnspane, click to add the following columns:
- Process Name
- Date Created
- Session Status
- EasySend Master RID
- EasySend Link
- Click the Sort by dropdown and select Date Created.
- Click Save and publish.
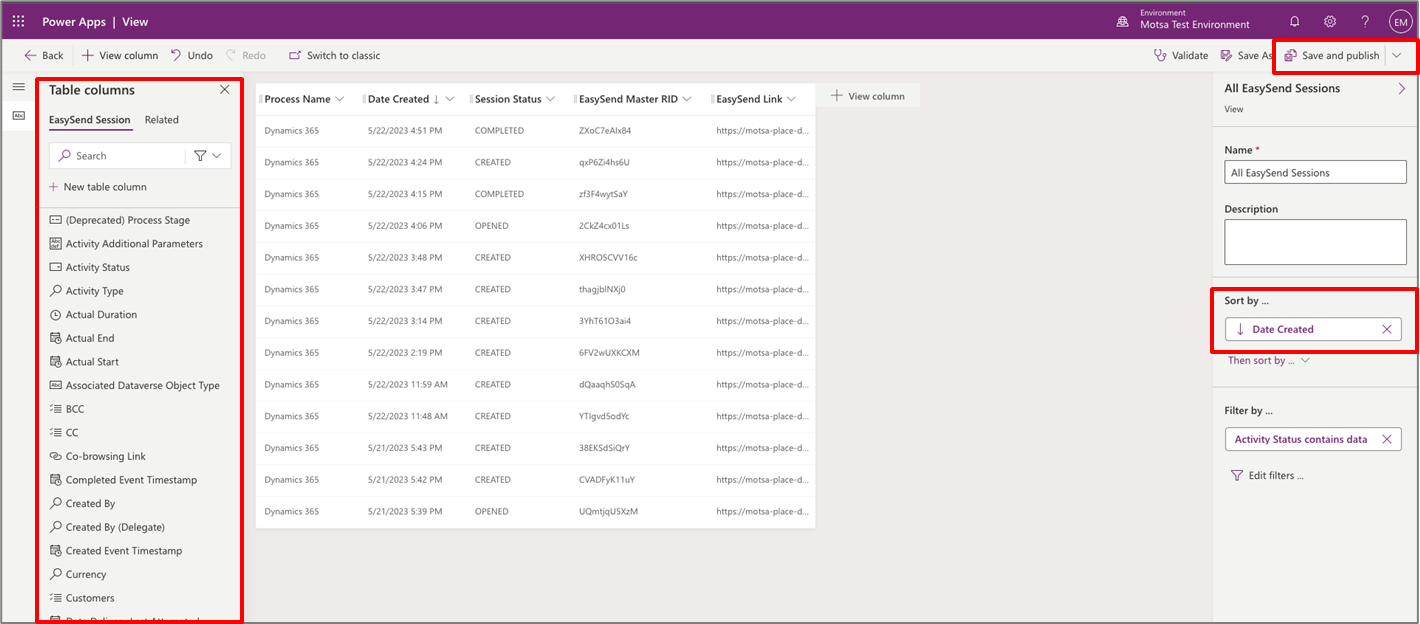
Figure 38: View Screen
- Return to the Form screen.
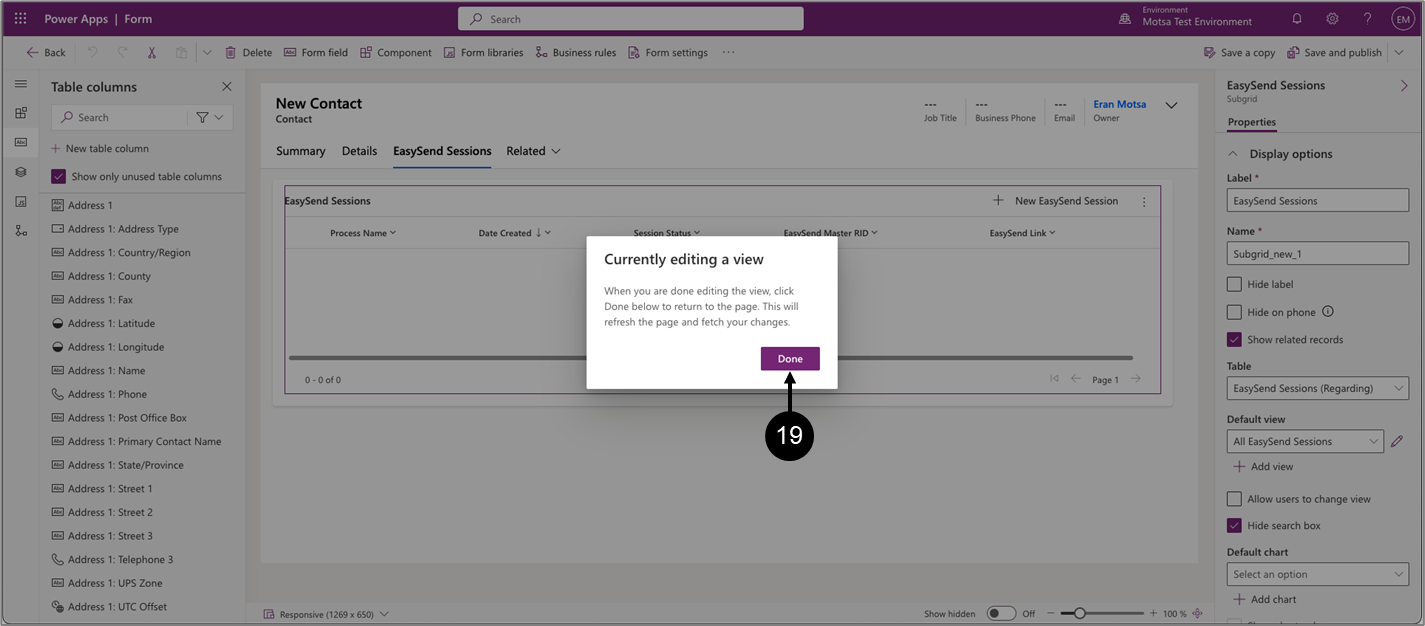
Figure 39: Form Screen
- Click Done (19).
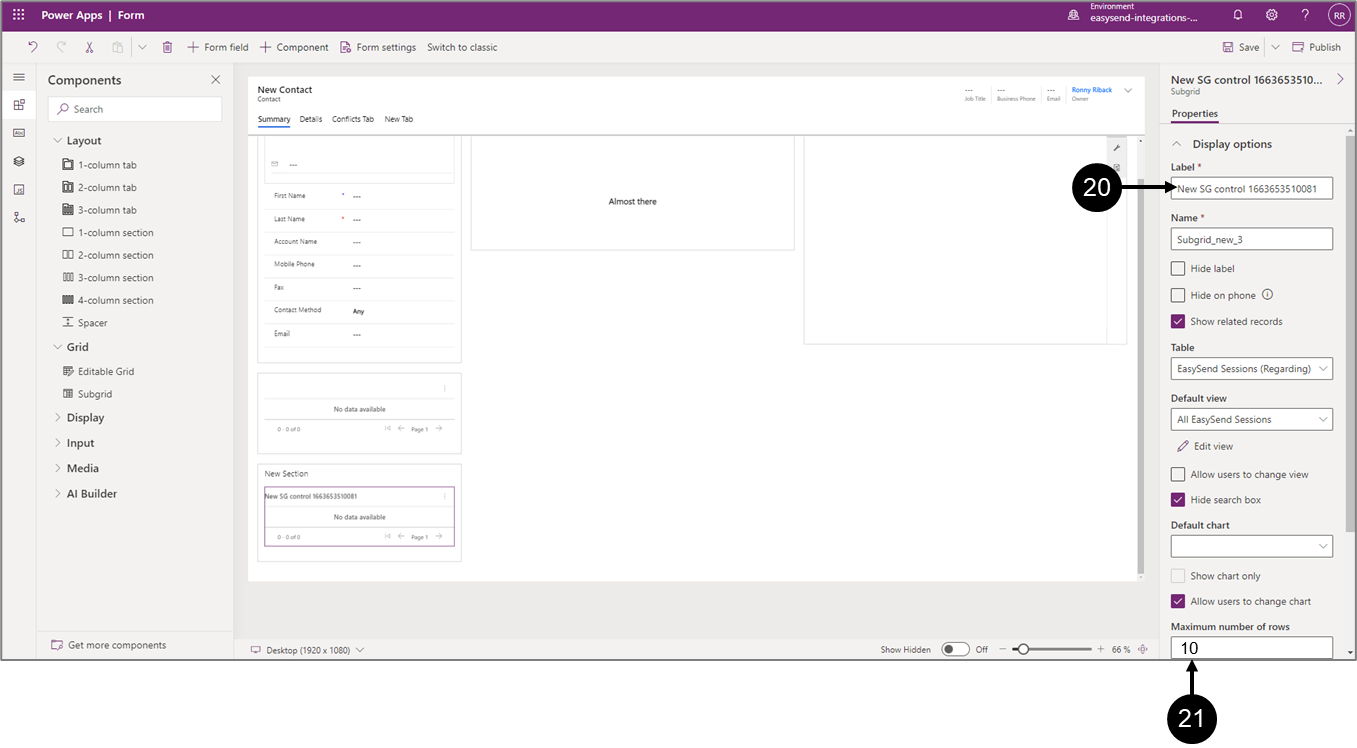
Figure 40: Label
- Edit the Label (20), for example: “EasySend Sessions”.
- Update the Maximum number of rows to 10 (21).
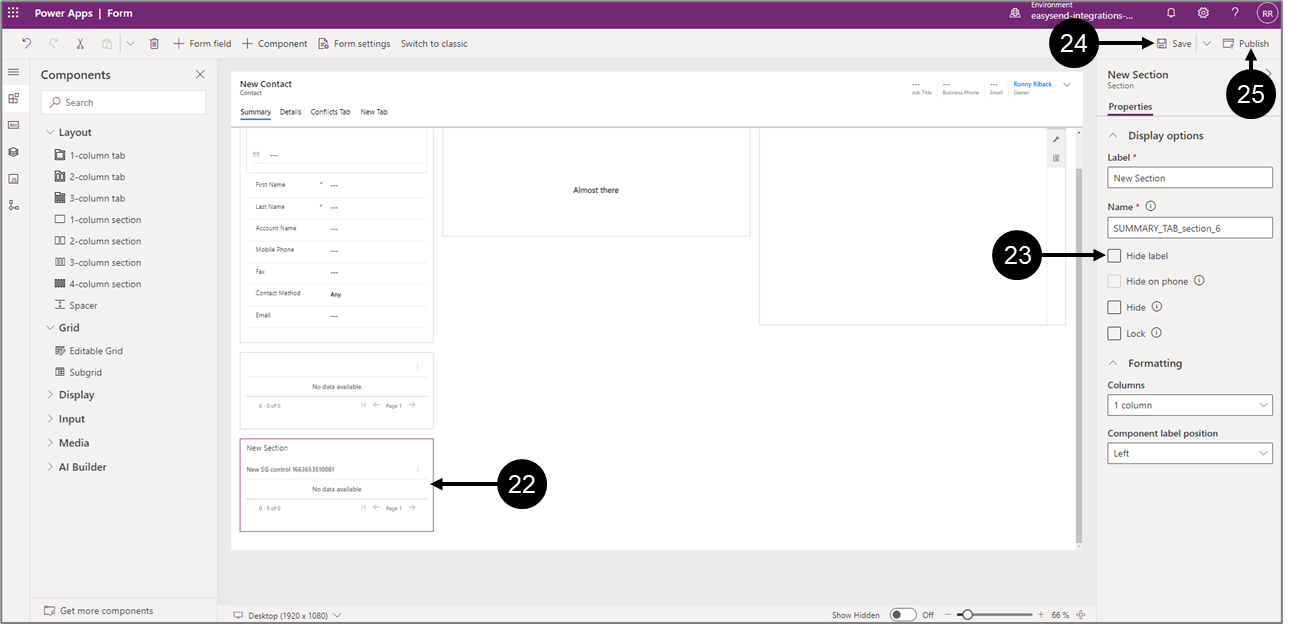
Figure 41: Display Options - New Section
- Click the New Section (22).
- Check the Hide label checkbox (23).
- Click Save (24) wait for the process to finish.
- Click Publish (25) wait for the process to finish.
Step 5: Configure EasySend Settings
(See Figure 41 to Figure 52)
To configure EasySend settings, perform the following steps:

Figure 41: Apps
- Click Apps (1).
Result:
The Apps screen appears:
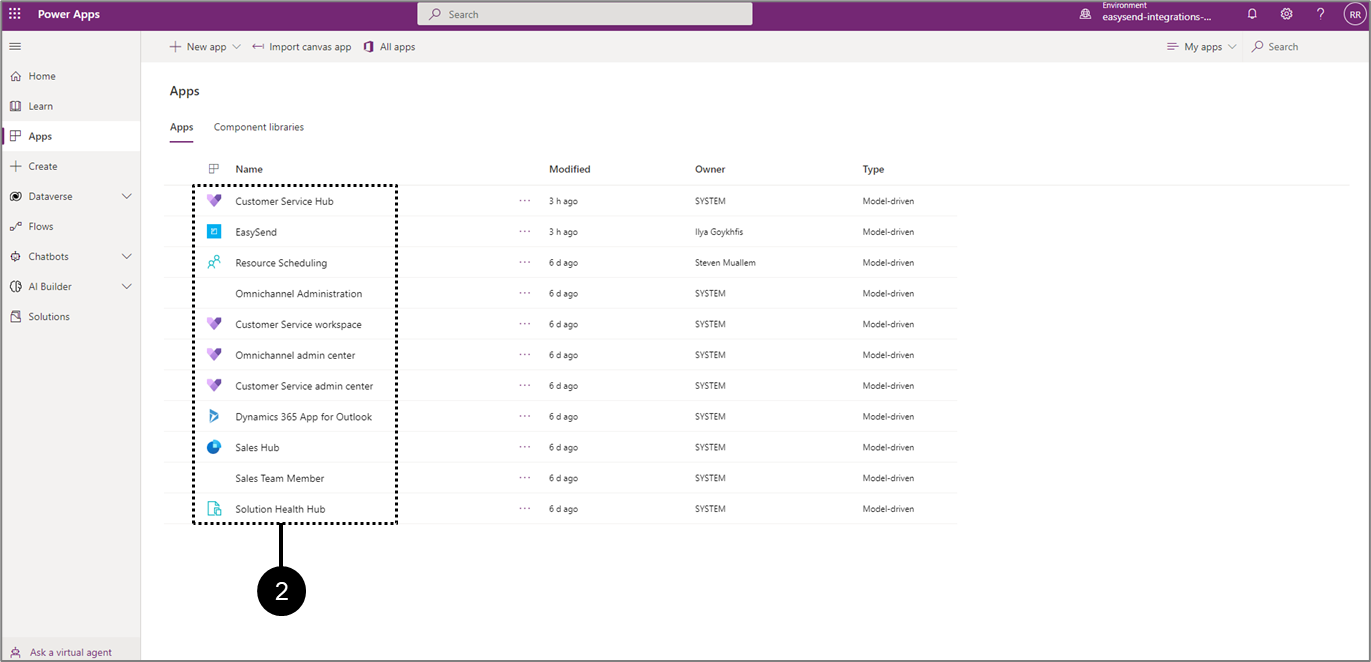
Figure 42: Apps Screen
- Click the desired App (2).
Result:
The Main screen of the App appears:

Figure 43: Main Screen
- Click Settings (3).
Result:
A list of options appear:
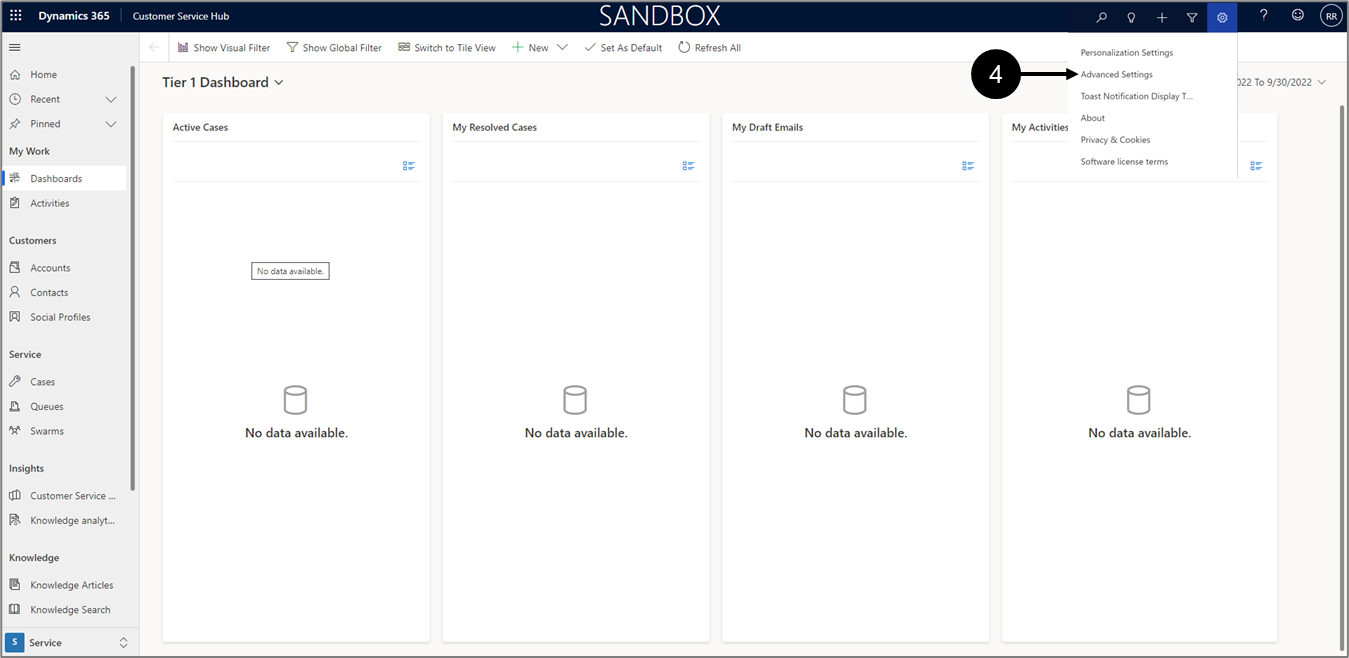
Figure 44: Advanced Settings
- Click Advanced Settings (3).
Result:
The Business Management screen appears:
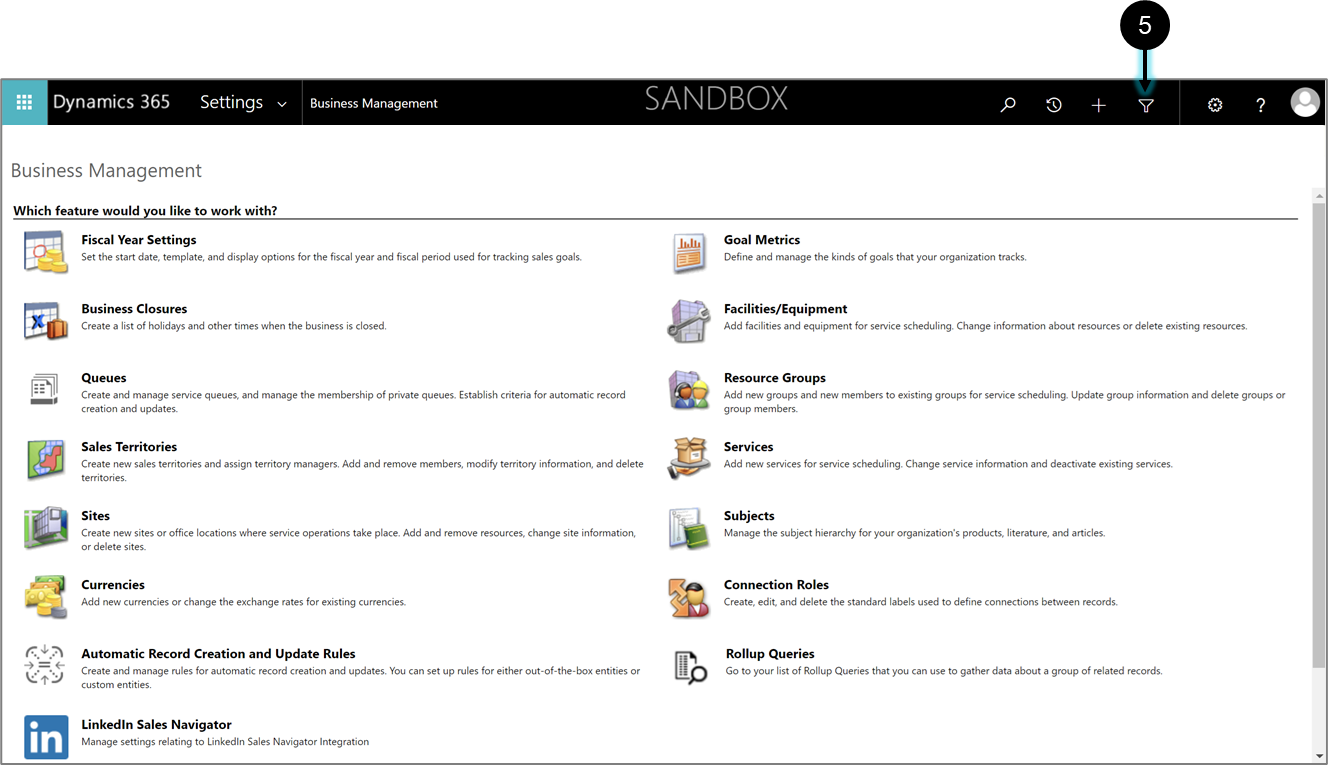
Figure 45: Business Management Screen
- Click Advanced Find (3).
Result:
The Advanced Find Window screen appears:
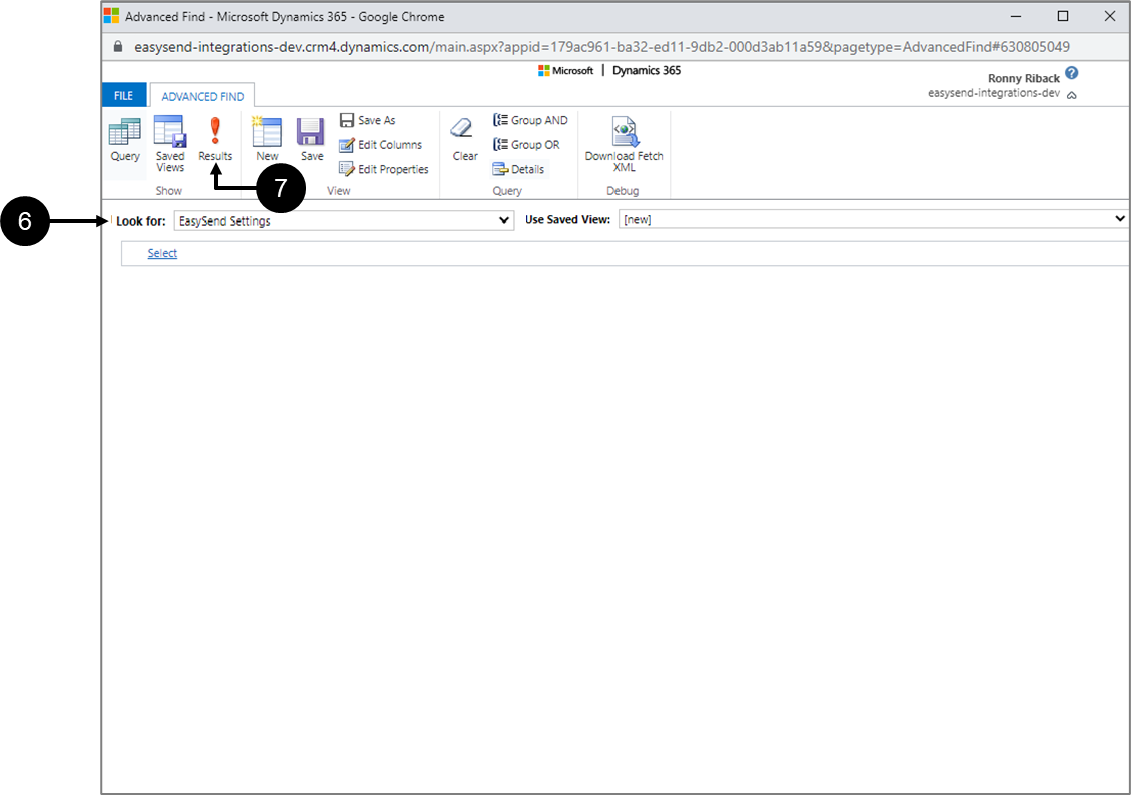
Figure 46: Advanced Find
- Under Look for select EasySend Settings (6).
- Click Results (7).
Result:
The New EasySend Settings button (8) appears:
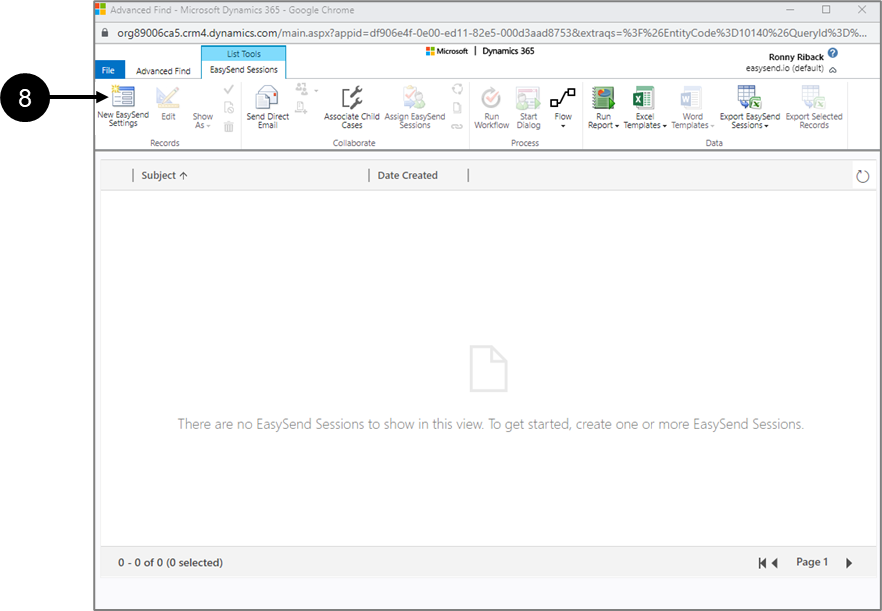
Figure 47: New EasySend Settings
- Click New EasySend Settings (6).
Result:
The New EasySend Settings window appears:
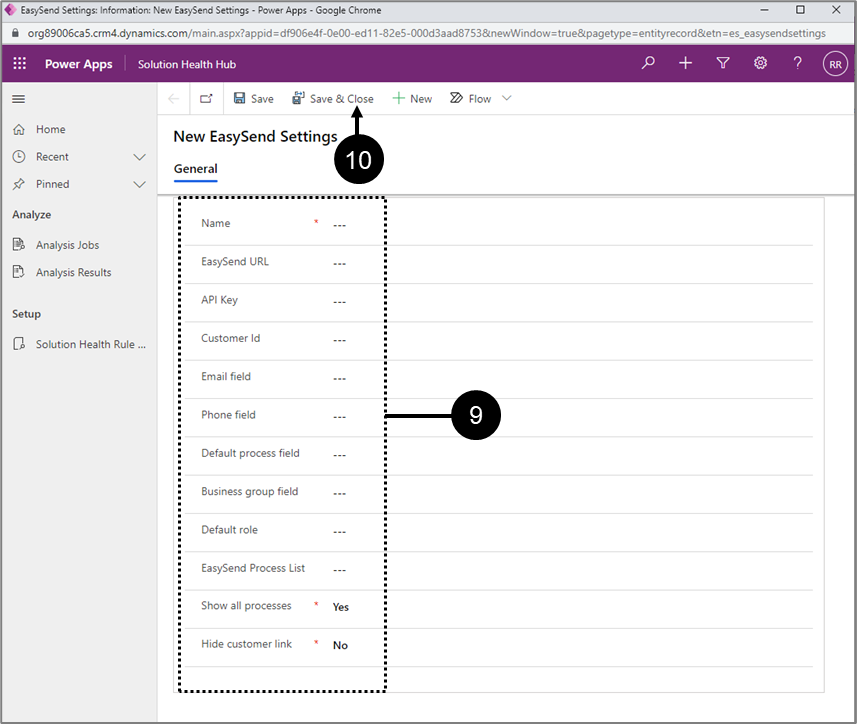
Figure 48: Settings
- Configure the settings (9):
- Name, for example: “Config”.
- EasySend URL (required) - your EasySend platform’s player URL. The URL can be found after deploying and previewing a digital process using your EasySend's environment.
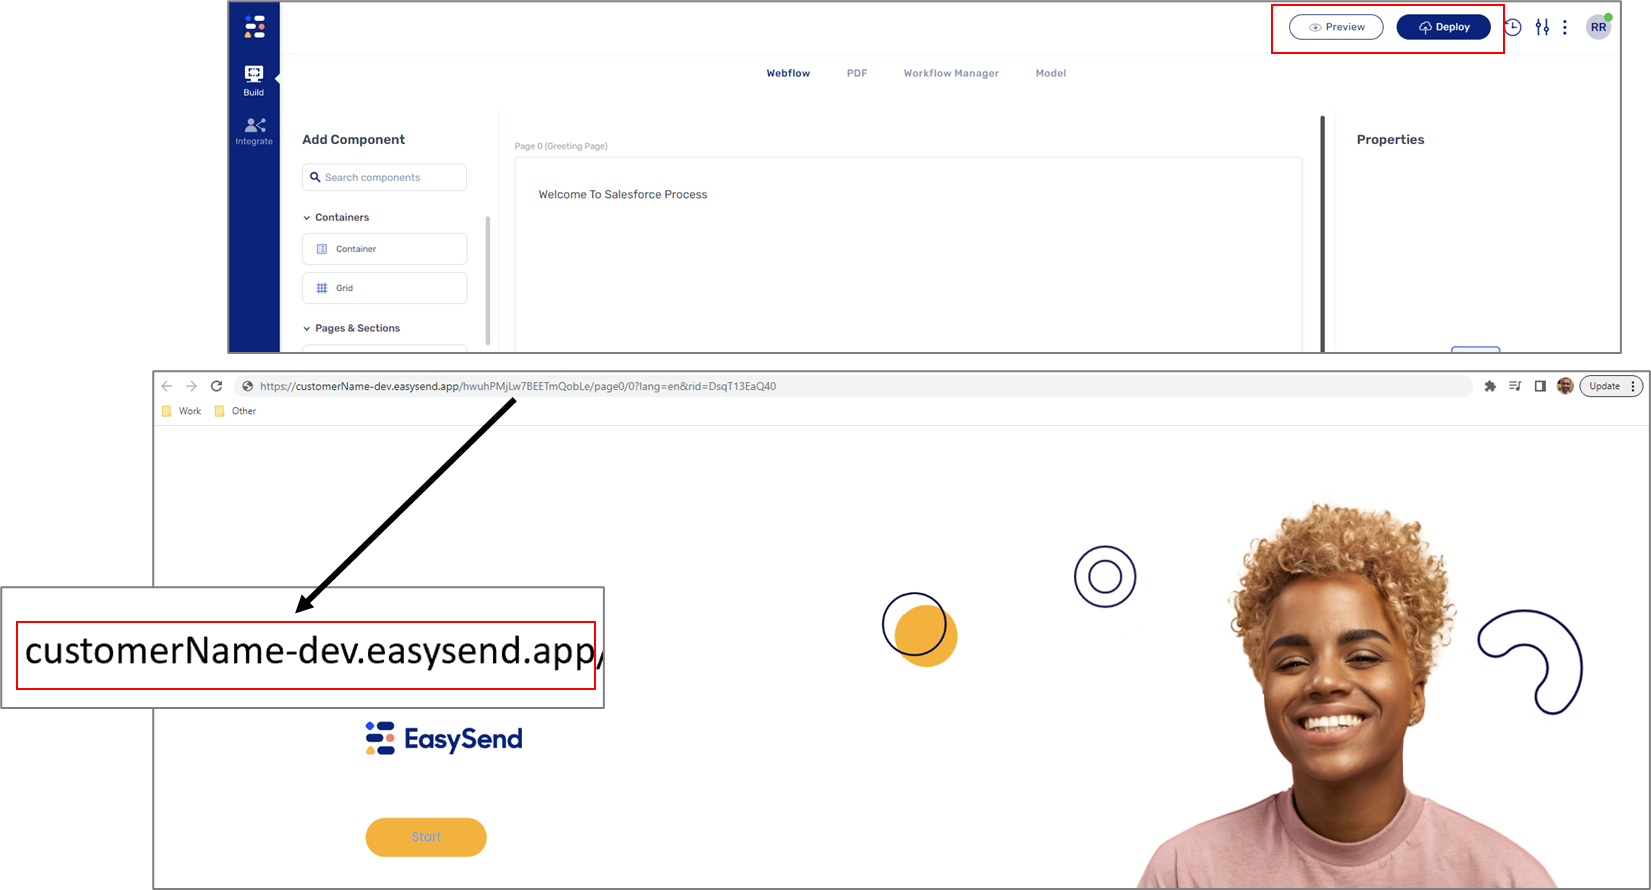 Figure 49: EasySend Platform's Player URL
 - APIKey (required) - your EasySend API key (provided by the EasySend team).
- Customer Id (required) - your EasySend customer Id. The customer Id can be found in your EasySend's environment.
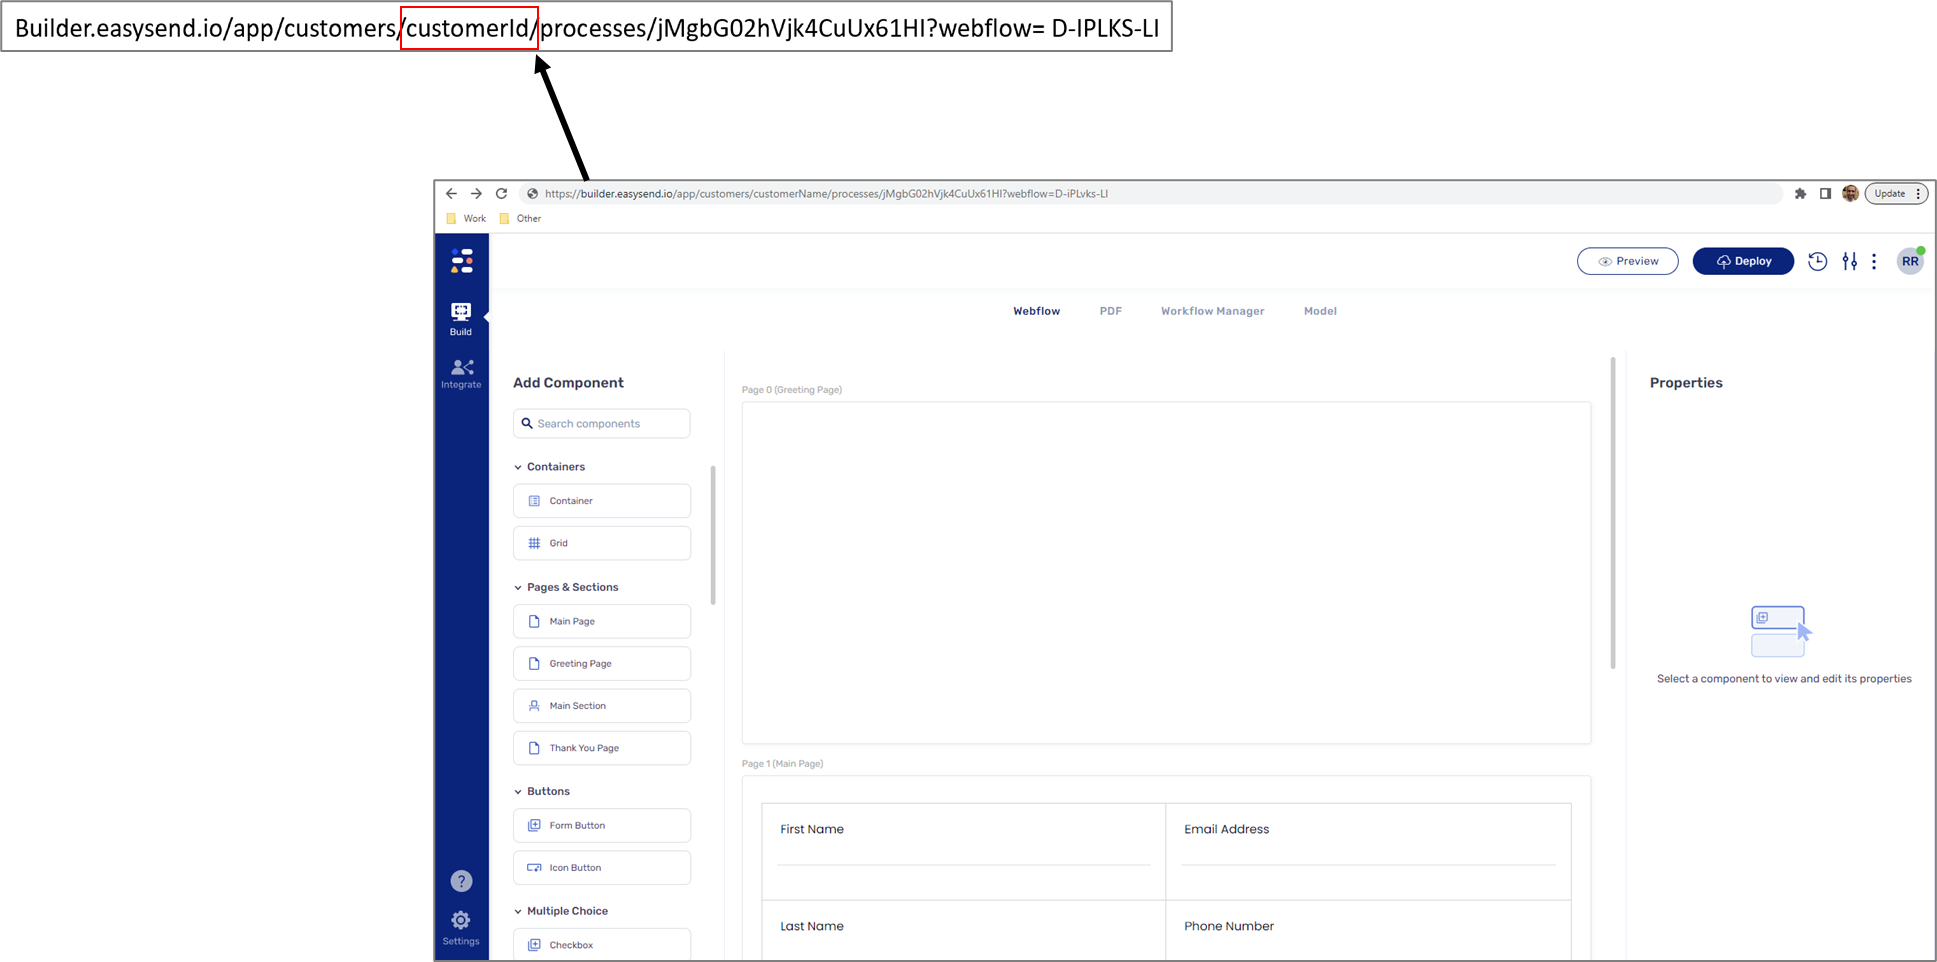 Figure 50: Customer Id
 - Fields - the information to input here will be the names of different Dynamics 365 fields that hold relevant values:
- Email field - the Dynamics 365 field name that populates the Email information.
- Phone field - the Dynamics 365 field name that populates the Phone # information.
- Default Process Field - the Dynamics 365 field name that populates a process Id information. The process will be displayed first by default when the process list is presented to users. The process Id can be found after deploying and previewing a digital process using your EasySend's environment.
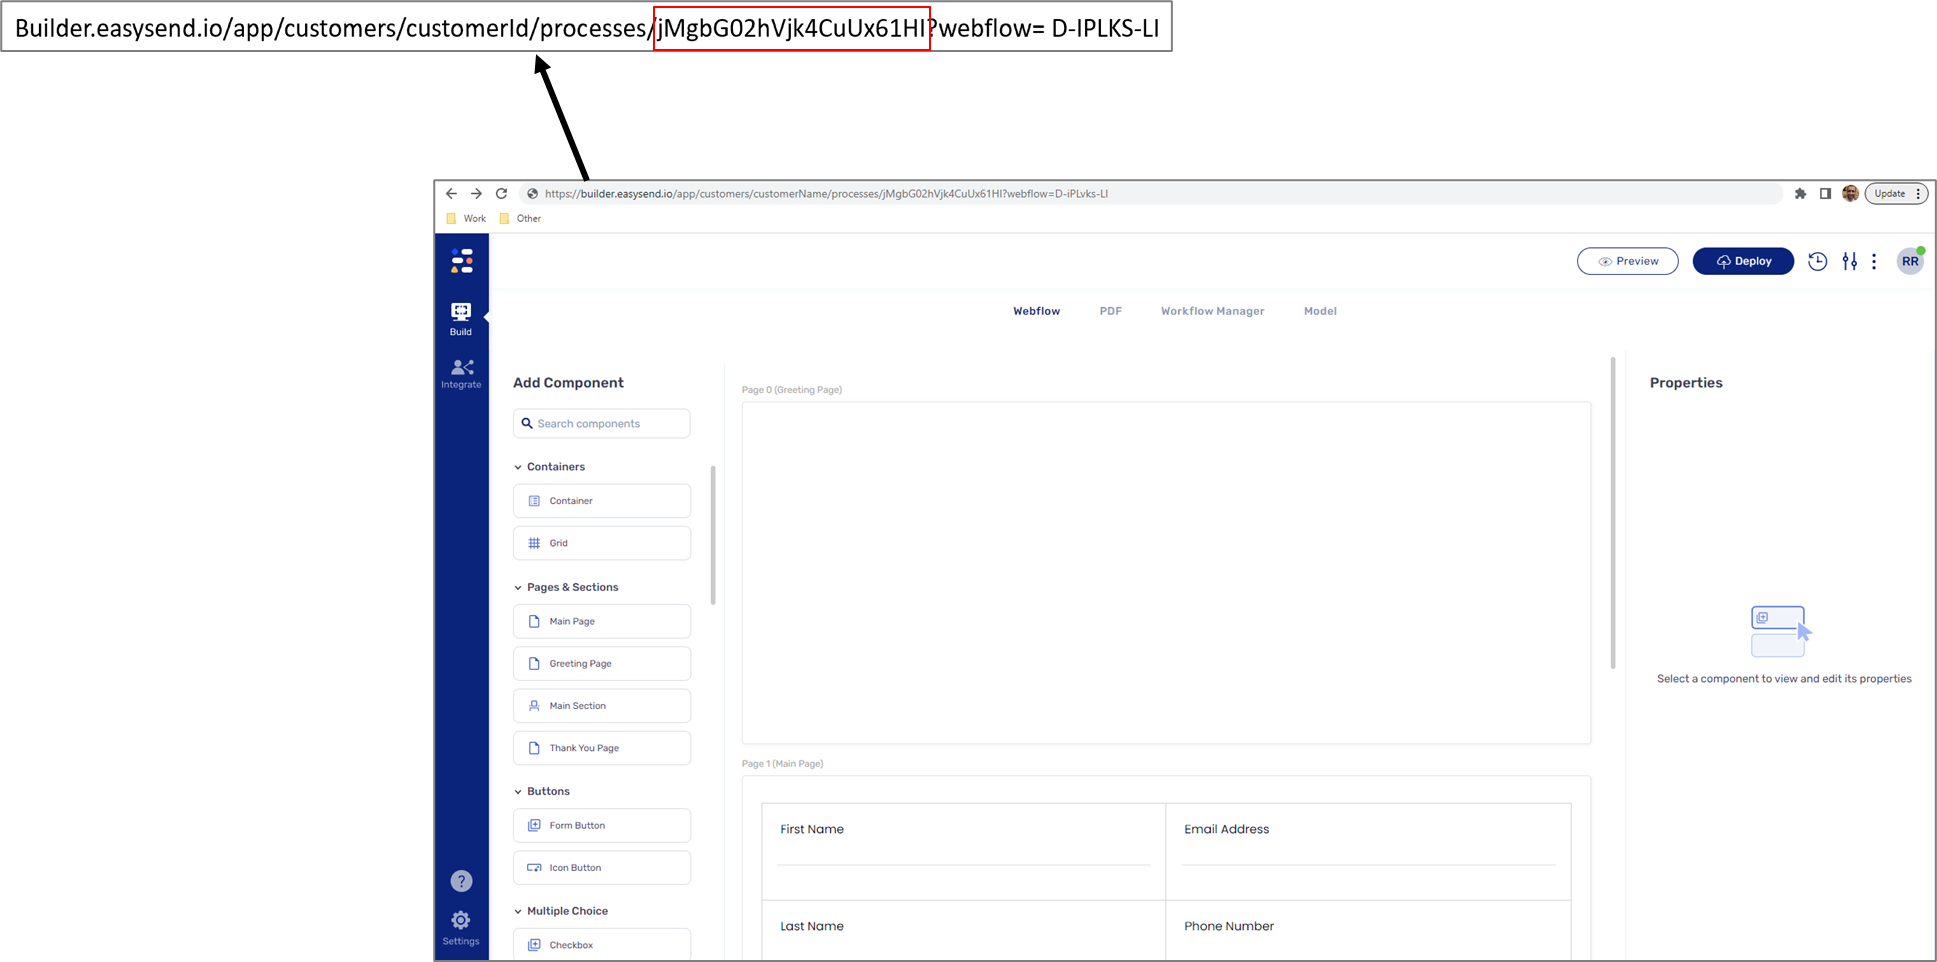 Figure 51: Process Id
 - Business group field - contains the business group identifier. Digital process can be initiated from a specific business group.
 Figure 52: Business Groups
- Default Role - set a default role for co-browsing.
- EasySend Process List - used to define which processes will be displayed on the process dropdown list according to process Ids. Process Ids are separated by a comma.
- Show All Processes:
- When checked - displays all available processes.
- When not checked - displays only the defined default process.
- Hide customer link:
- When checked - hides the customer link when a digital process is initiated.
- When not checked - displays the customer link when a digital process is initiated.
- Click Save & Close (10).