What are the Model Field Types?
Field types within the Model are variables assigned to transaction data items. The connection between a field type and a transaction data item is determined according to the Webflow component associated with the transaction data item and according to the expected behavior of the Webflow component such as:
- What type of data does the Webflow component receive or display.
- What type of data does the Webflow component return (for expressions and conditioning).
- What action does the Webflow component perform (file uploading or creating digital signature).
Webflow Components and Model Field Types
Table 1 displays a list of Webflow components and their most used field type.
Table 1: Webflow Components and Model Field Types
Number | Webflow Component | Field Type |
| 1 | Main Page | object |
| 2 | Container | object |
| 3 | Checkbox | boolean |
| 4 | Radio Question | string |
| 5 | Text Input | string |
| 6 | Running Number Indicator | object |
| 7 | Array Buttons | object |
| 8 | Upload Component | file |
| 9 | Signature | signature |
| 10 | Date Input | string |
Field Types Description
The following sections describe the Model field types and provide common usage examples.
String
A string is defined as an array of characters. The string field type is commonly used for:
- Inputting Values:
- User input - textual, numeric, and special characters
- Computed
- Expression
- Create Conditioning and Expressions - returning a string value output that can be used for expressions and conditioning.
- For additional information about inputting Values and creating Expressions, see the Values article.
- For additional information about conditioning, see the Conditions article.
Usage Example - Inputting User Data
Step 1 - Creating your Webflow
Figure 1 displays a Webflow with four Text Input components (1) that are used for inputting personal details and a Radio Question with four options (2) for selecting a marital status:

Figure 1: Webflow Example
Step 2 - Creating transaction data Items with Data Field Types
Figure 2 displays a Model with five transaction data items (3) with a selected string data field type (4) for each:
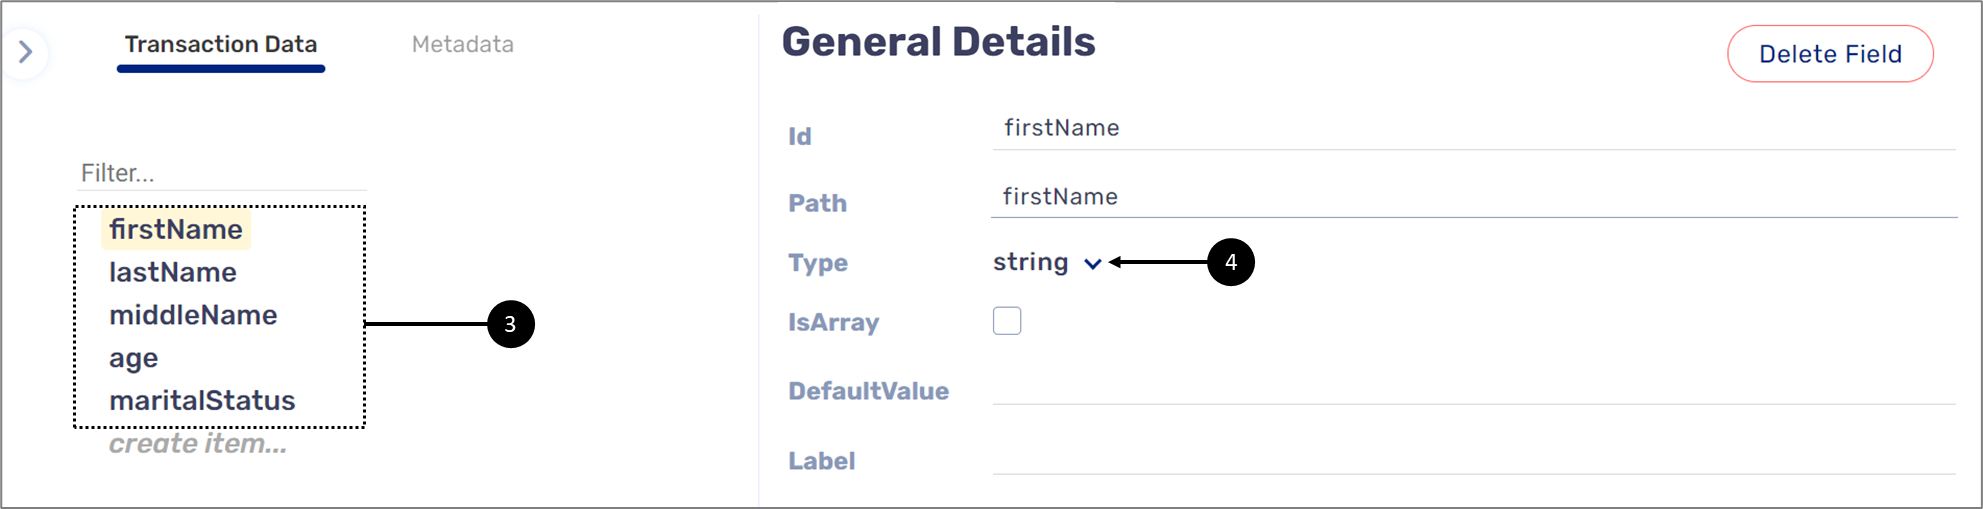
Figure 2: Transaction data Items and string Field Type
Step 3 - Connecting the Webflow with the Model
Figure 3 displays an example of the Radio Question component connected to the Model (5):
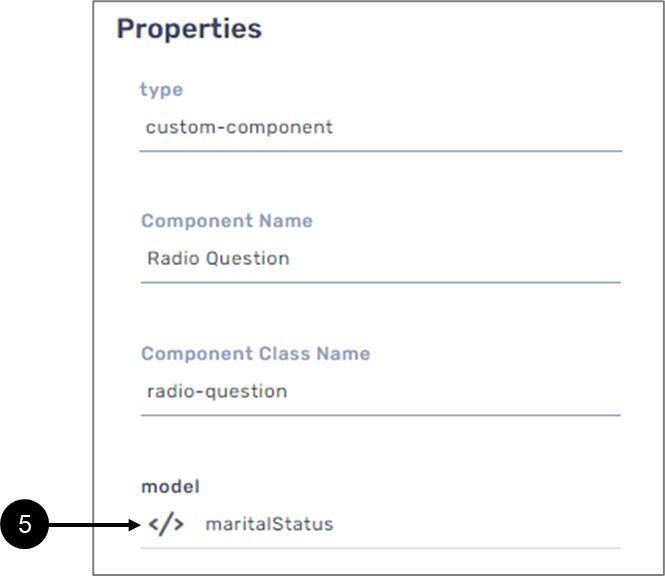
Figure 3: Connection to the Model
Object
An object is a logical data structure. The object field type is commonly used for containing related transaction data items for creating logical data structures. When implementing conditioning and permissions to an object, the transaction data items nested inside of it will inherit them as well.
- For additional information about conditioning, see the Conditions article.
- For additional information about permissions, see the Permissions article.
Usage Example - Grouping Related Transaction Data Items
Step 1 - Creating your Webflow
Figure 4 displays a Webflow with four Text Input components (1) that are used for inputting personal details and a Radio Question with four options (2) for selecting a marital status:

Figure 4: Webflow Example
Step 2 - Creating Transaction Data Items with Data Field Types
Figure 5 displays a Model with a transaction data item (3) that its field type is an object (4):
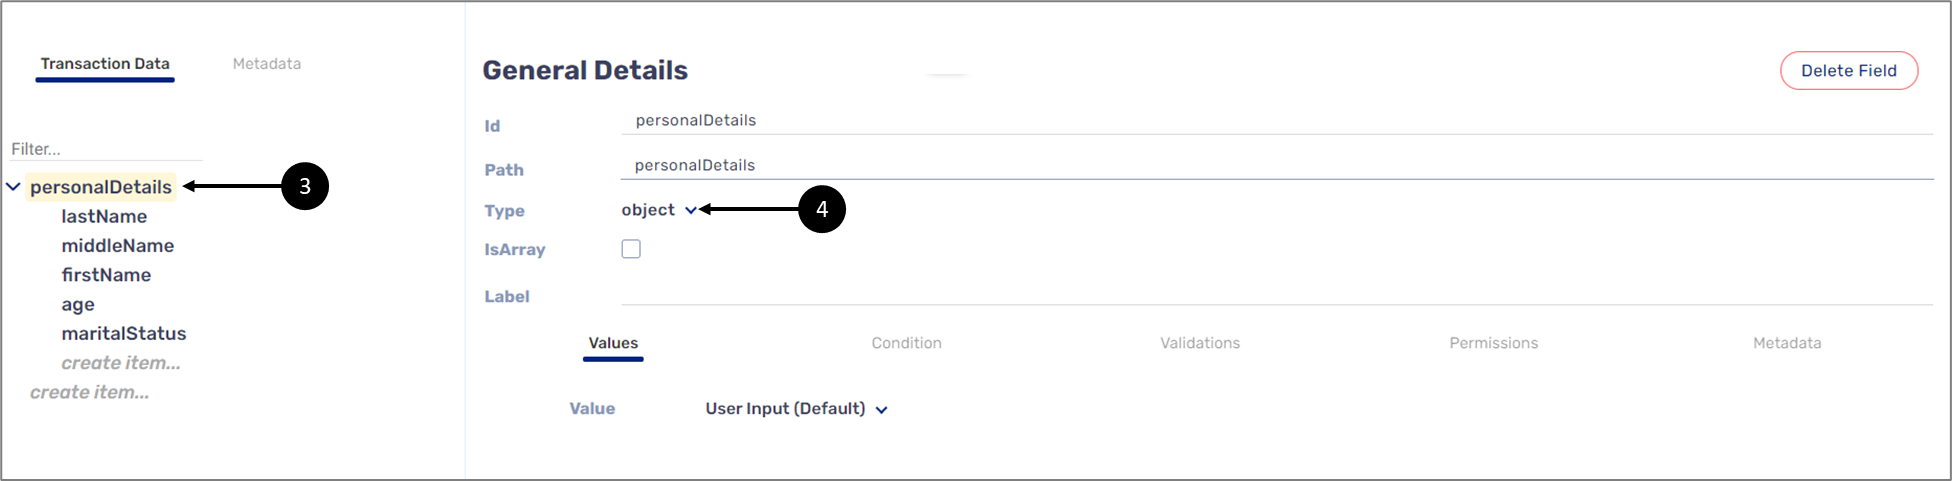
Figure 5: Transaction Data Item with an object Field Type
The create item.. option (5) nested inside the object, enables to create transaction data items that will also be directly nested inside the object (see Figure 6):
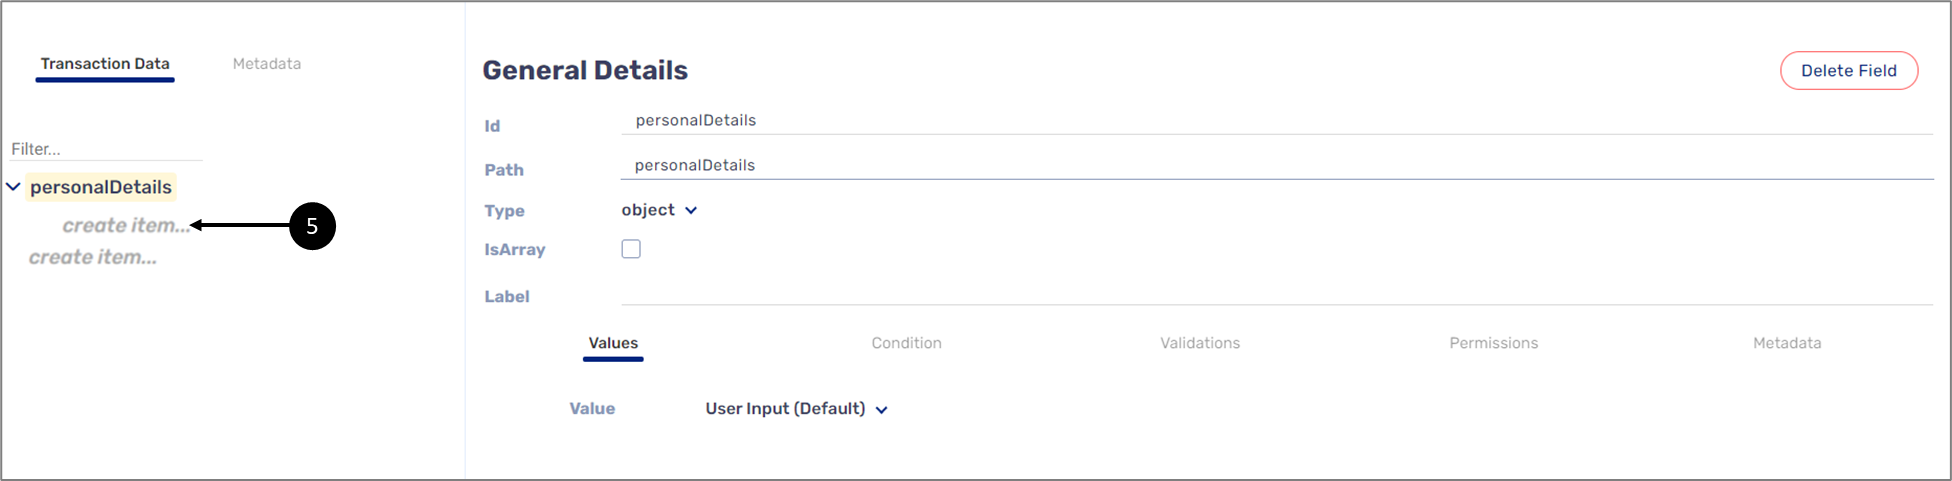
Figure 6: create item.. Option
Figure 7 displays five other transaction data items (5), with a selected string data field type (6) for each. The transaction data items are directly created and nested under the personalDetails data transaction item:
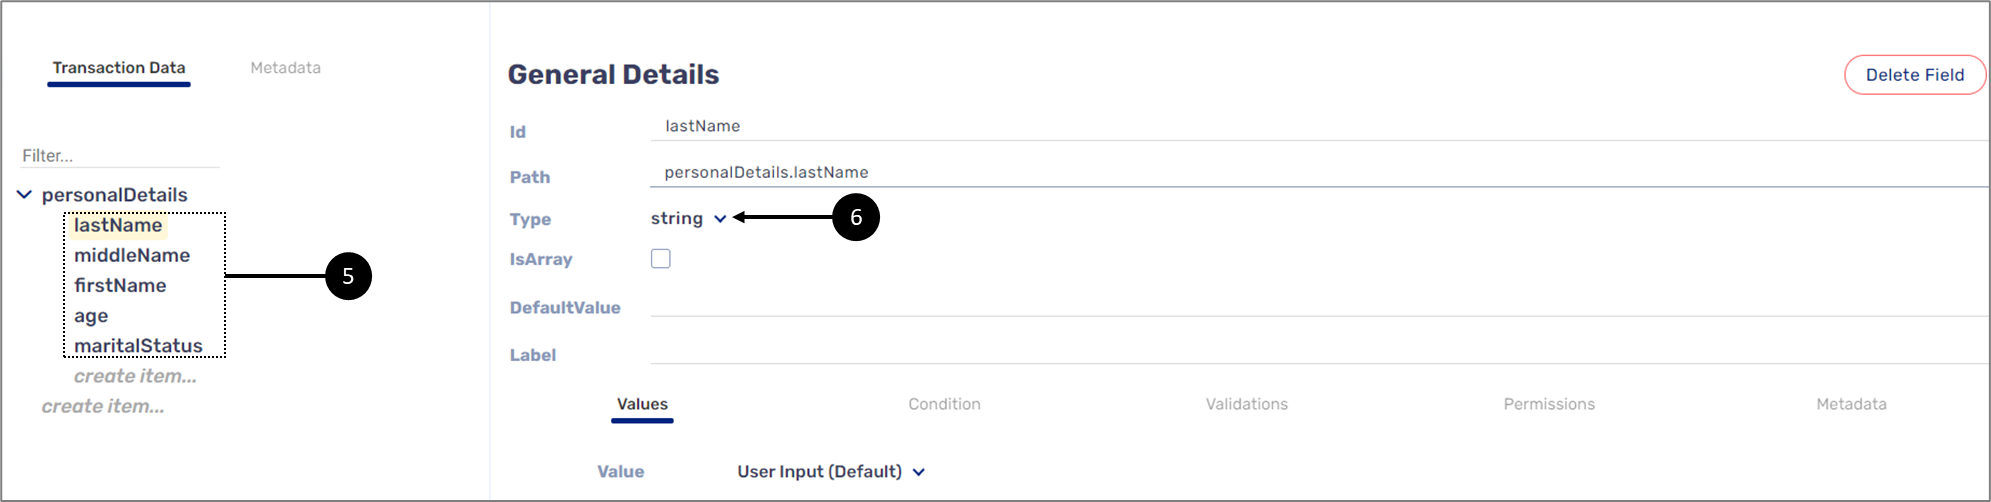
Figure 7: Nested Transaction Data Item with a string Field Type
- It is possible to cut, copy, and paste transaction data items using the right-click menu.
- It is possible to drag transaction data items inside and outside the object for restructuring.
- It is possible to reuse transaction data item names within different objects.
Step 3 - Connecting the Webflow with the Model
Figure 8 displays an example of the Radio Question component connected to the Model (7):
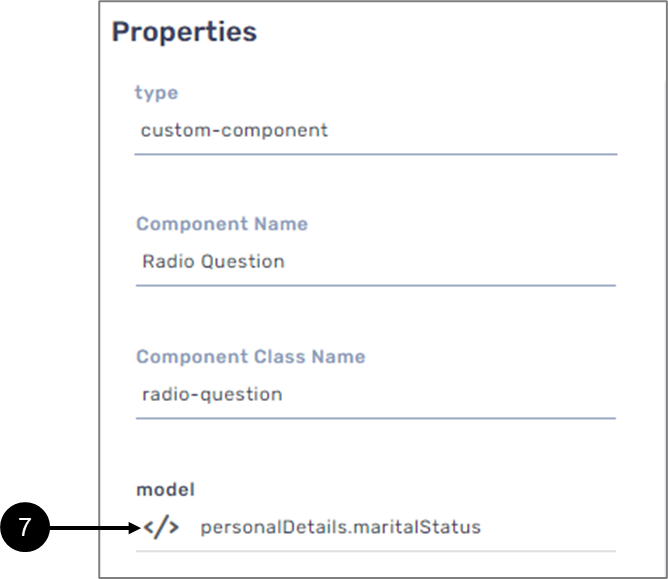
Figure 8: Connection to the Model
In this example, the component is connected to a transaction data item that is nested under an object, so the pattern of its name is: object name.transaction data item name, for example: personaDetails.maritalStatus.
When connecting the component to the Model through the Properties section (8), the connection is done by writing the name of the object, inputting a dot (.), and selecting the appropriate transaction data item within the object (see Figure 9):
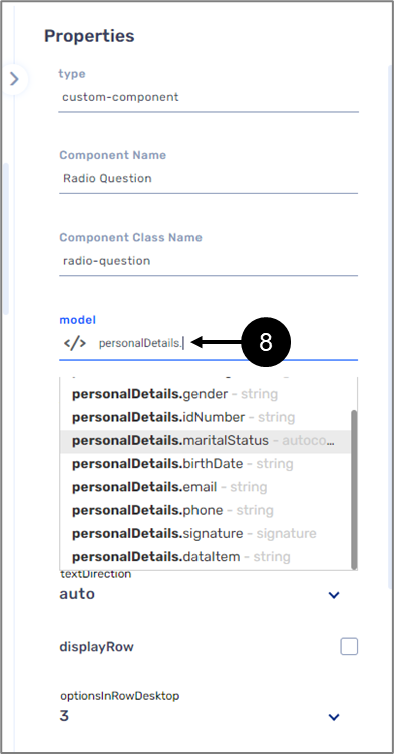
Figure 9: object and Transaction Data Item Selection 1 of 2
When a Container or a Main Page components are connected to an object you can connect other components that are placed inside a container or on top of the Main Page to the Model by inputting a dot (.) (9) and then selecting the appropriate data item from a list (see Figure 10):
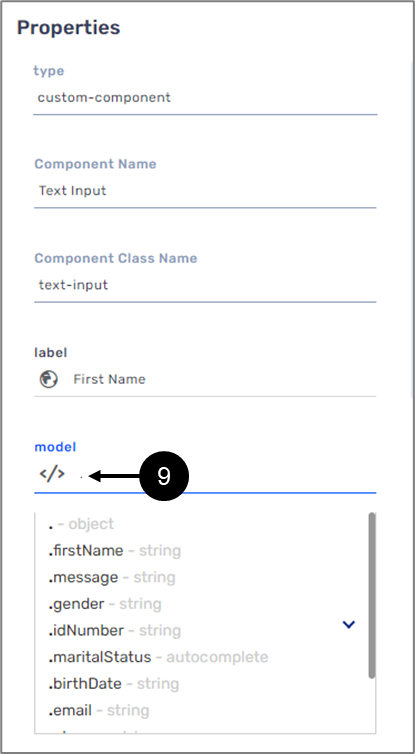
Figure 10: object and Transaction Data Item Selection 2 of 2
Boolean
A boolean field type has one of two possible values, which is intended to represent the two truth values of logic:
- True
- False
The boolean field type is associated with a Checkbox component and is used for returning a boolean output that can be used for conditioning.
Usage Example - Displaying Components according to Conditioning
Step 1 - Creating your Webflow
Figure 11 displays a Webflow with two Checkbox components (1). The rest of the components underneath (2) are conditioned to appear or not according to the selected Checkbox component (Yes or No) and the returned boolean value (true or false):
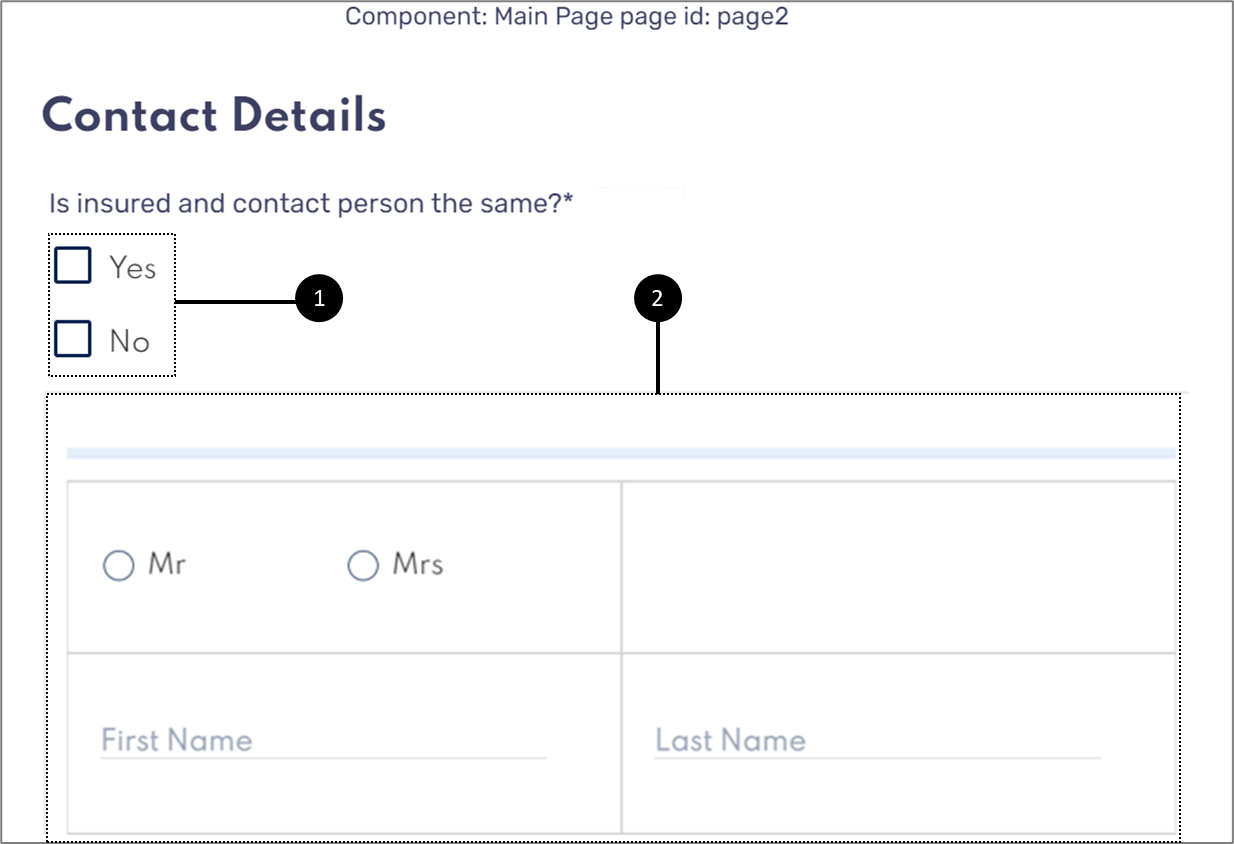
Figure 11: Checkbox Components
Step 2 - Creating Transaction Data Items with Data Field Types
Figure 12 displays a Model with two transaction data items (3) with a boolean field type (4):
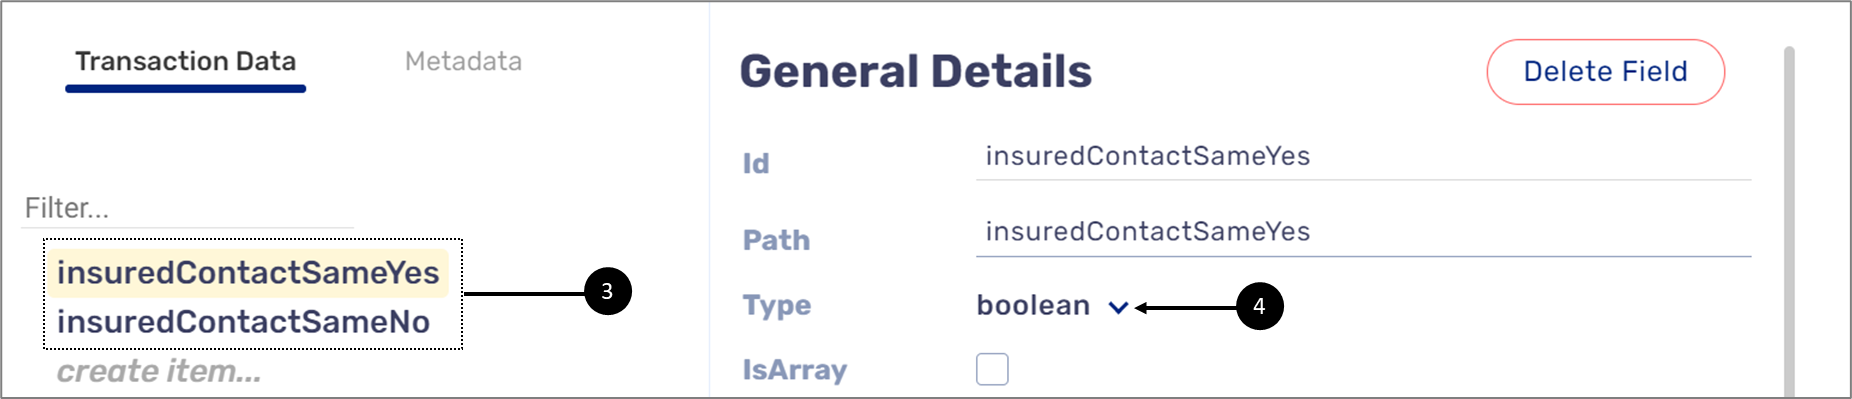
Figure 12: Transaction Data Items and boolean Field Type
Step 3 - Connecting the Webflow with the Model
Figure 13 displays an example of the Checkbox component connected to the Model (5):
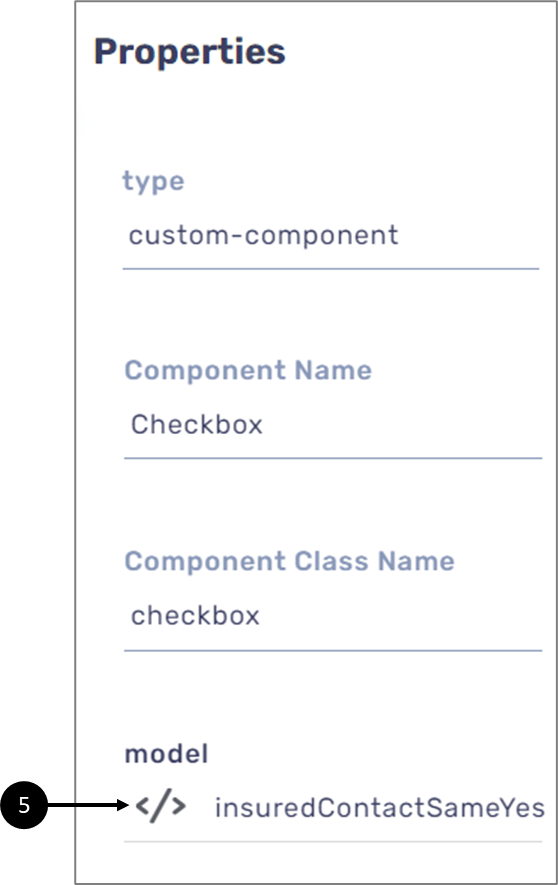
Figure 13: Connection to the Model
Depending on the choice a user makes while filling in the information, the conditioned fields will appear (see Figure 14):
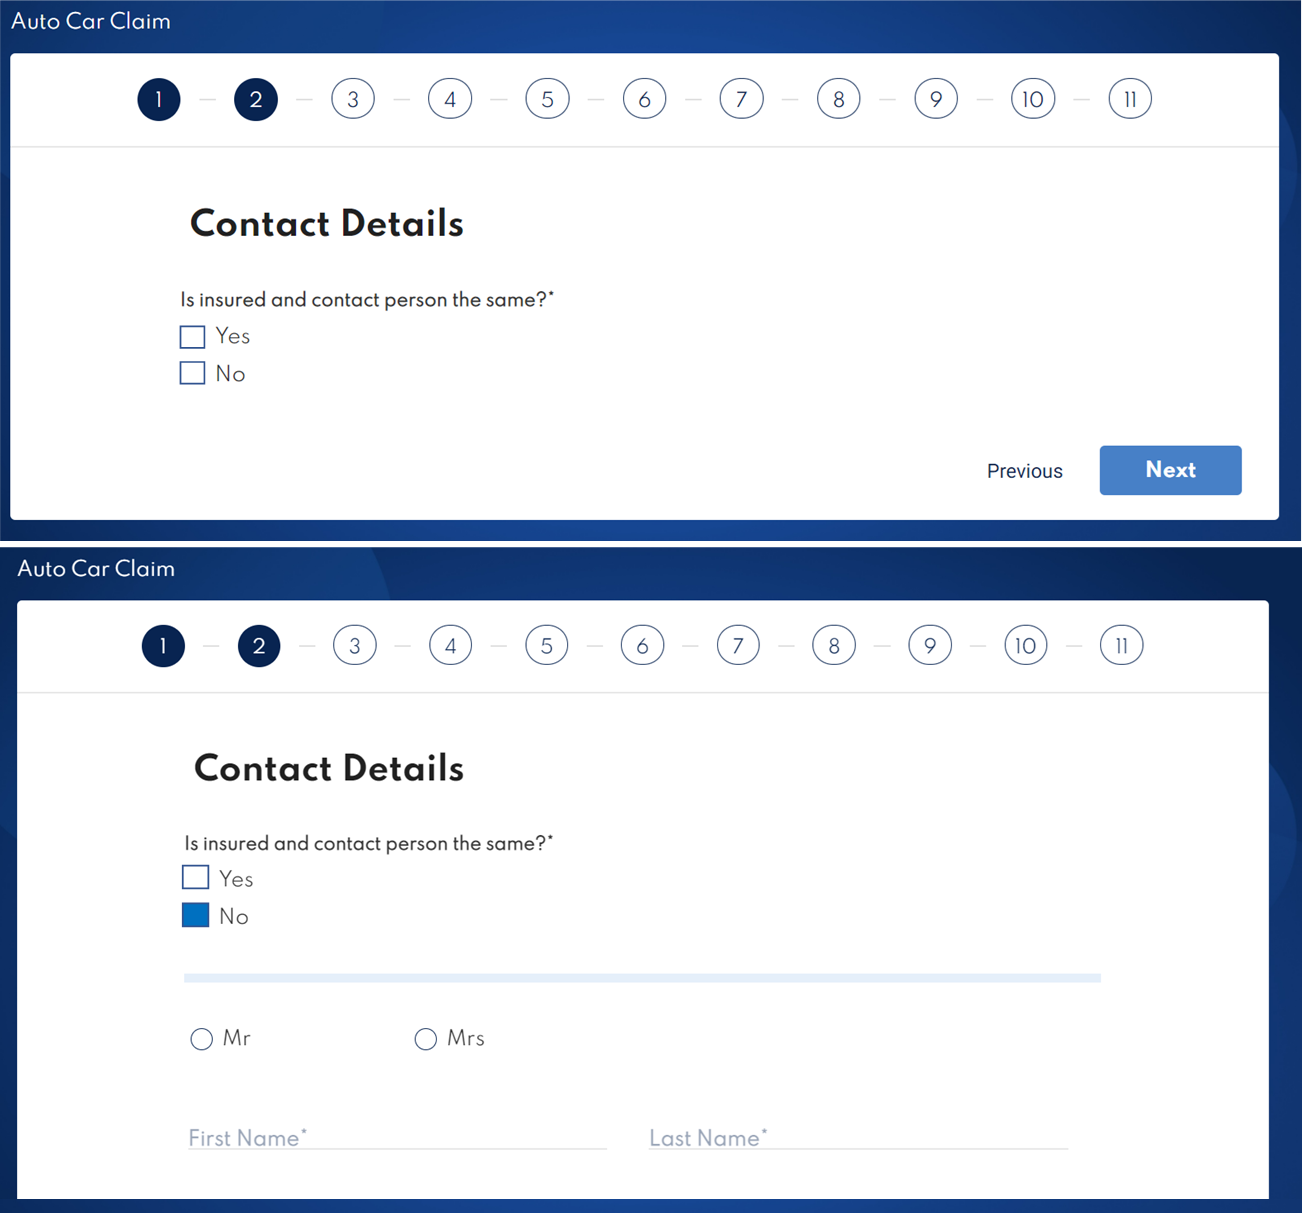
Figure 14: Conditioning Example
File
A file field type is associated with the Upload component and used for uploading different types of files.
Usage Example - Uploading a File
Stage 1 - Creating your Webflow
Figure 15 displays a Webflow with an Upload component (1):
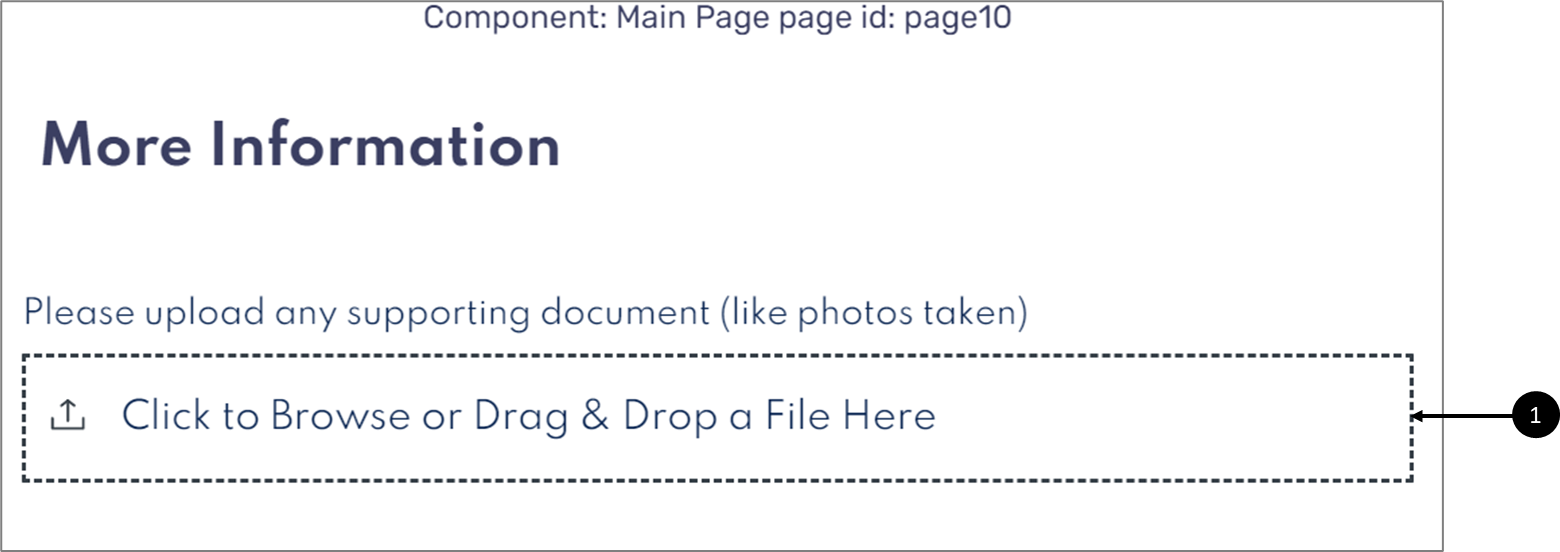
Figure 15: Upload Component
Step 2 - Creating Transaction Data Item with Data Field Type
Figure 16 displays a Model with a transaction data item (2) with a file field type (3):
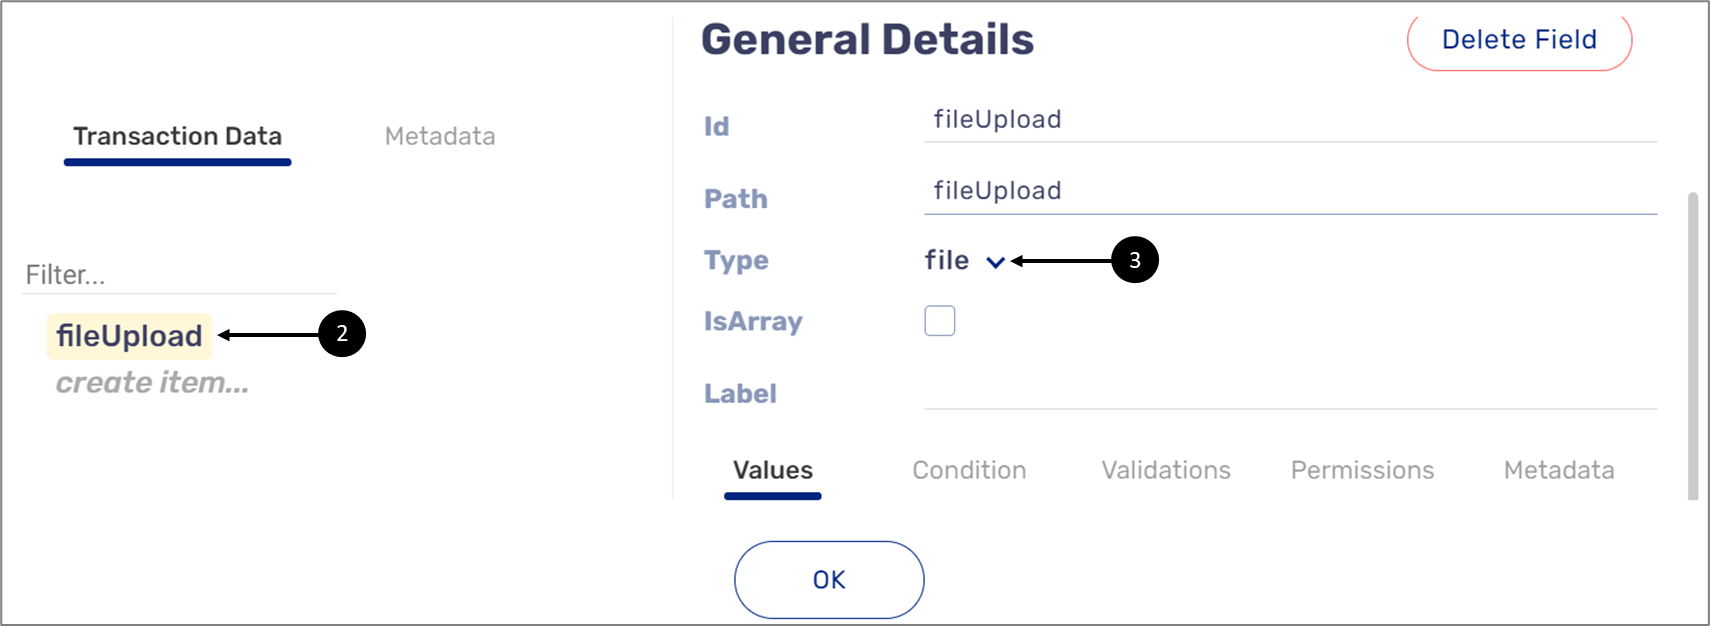
Figure 16: Transaction Data Item and file Field Type
Step 3 - Connecting the Webflow with the Model
Figure 17 displays an example of the Upload component connected to the Model (4):
Figure 17: Connection to the Model
Signature
A signature field type is used with the Signature component for creating a new digital signature.
Usage Example - Creating a New Digital Signature
Stage 1 - Creating your Webflow
Figure 18 displays a Webflow with a Signature component (1):
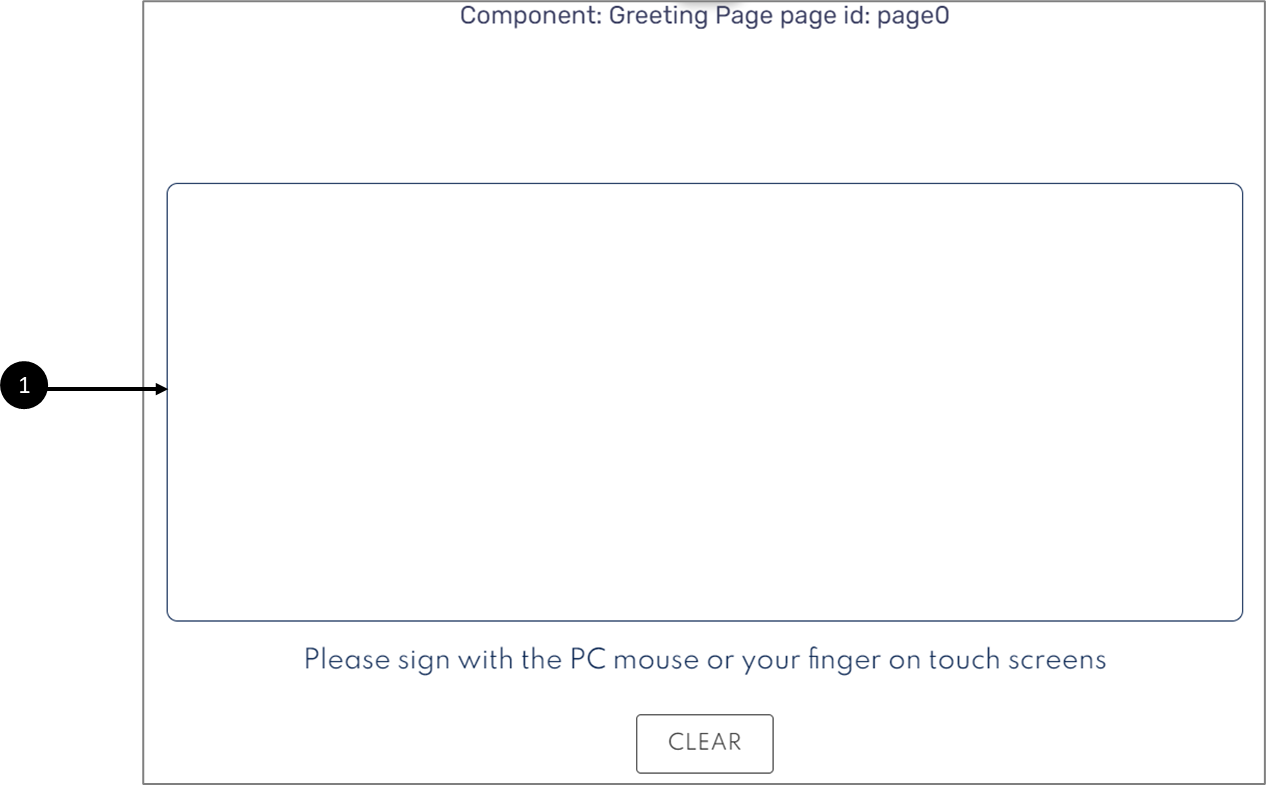
Figure 18: Signature Component
Step 2 - Creating Transaction Data Item with Data Field Type
Figure 19 displays a Model with a transaction data item (2) with a signature field type (3):
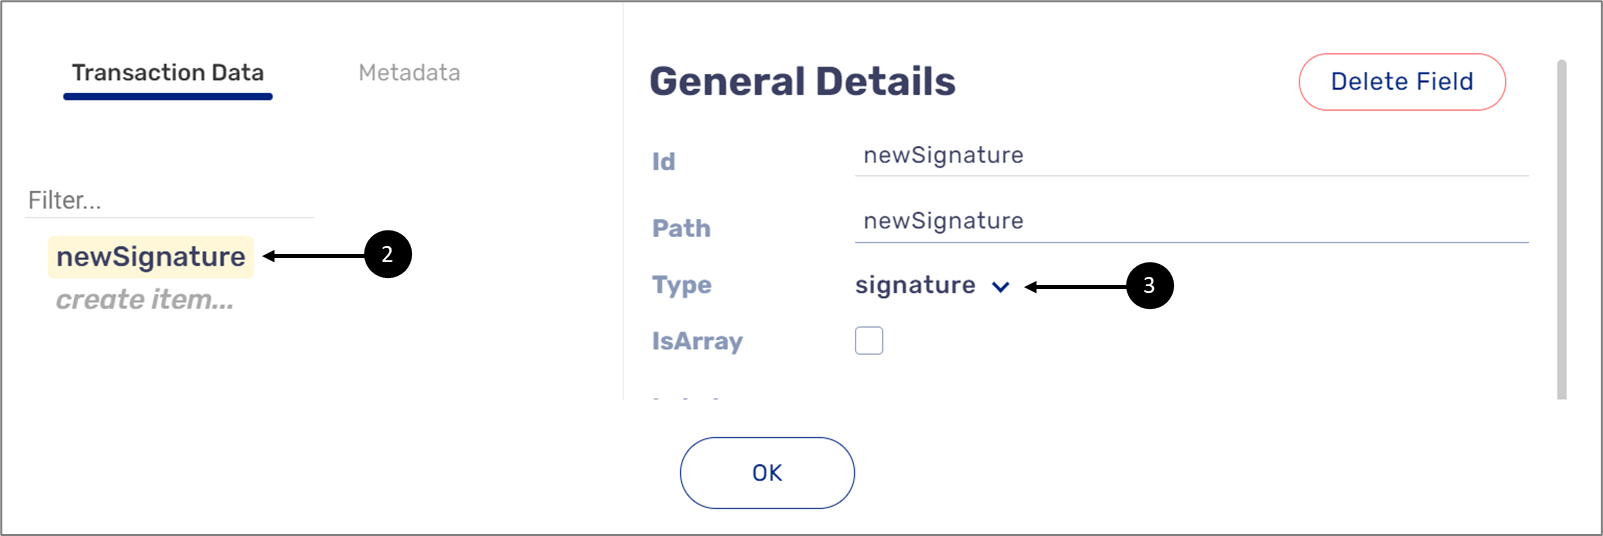
Figure 19: Transaction Data Item and file Field Type
Step 3 - Connecting the Webflow with the Model
Figure 20 displays an example of the Signature component connected to the Model (4):
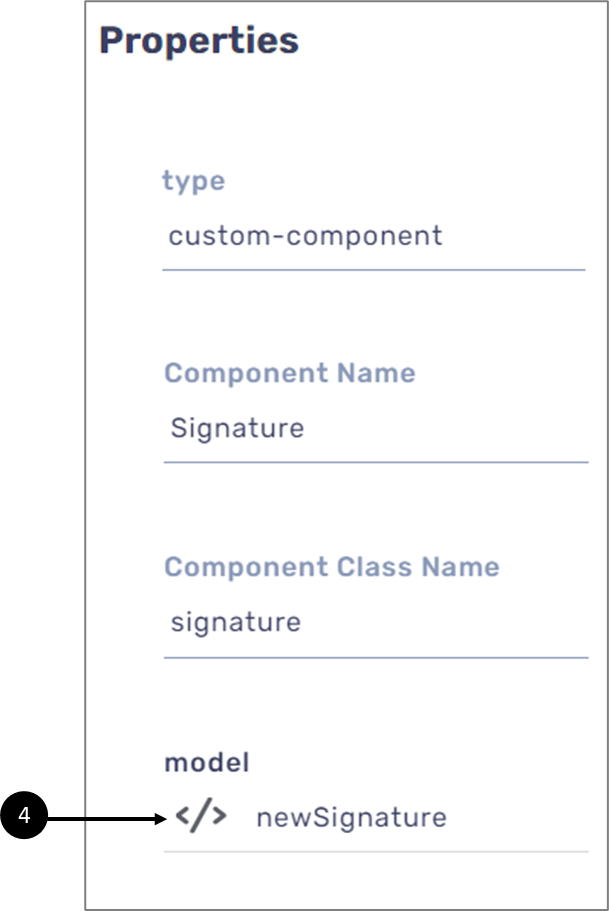
Figure 20: Connection to the Model