EasySend Webflow Update - What’s Changed and When to Use Each Version
- PDF
EasySend Webflow Update - What’s Changed and When to Use Each Version
- PDF
Article summary
Did you find this summary helpful?
Thank you for your feedback!
Article Overview
The following article highlights the key differences between EasySend’s old and new AI-generated Webflow. By using the comparison tables provided in this article, you can evaluate each version and determine which one best suits you when building a digital journey.
AI-Generated Webflow Overview
(See Figure 1 and Figure 2)
The new AI-generated Webflow represents a major leap forward in how digital journeys are built, designed, and integrated. With a modernized interface and enhanced performance, it now makes it even easier for teams to create complex, user-friendly experiences without writing a single line of code.
This updated version introduces a unified drag-and-drop environment that allows you to design layouts, apply business logic, manage integrations, and preview user interactions, all from a single, centralized canvas. A built-in CRM connector enables seamless two-way data flows, while new AI capabilities allow you to generate fully functional journeys from a simple text prompt.
In addition, the revamped Theme screen gives you full control over branding and styling, ensuring every journey is consistent with your organization’s visual identity. Whether you're starting with the AI Generator, uploading a PDF, selecting a template, or creating from scratch, the AI-generated Webflow provides the flexibility, scalability, and speed teams need to launch digital journeys with confidence.
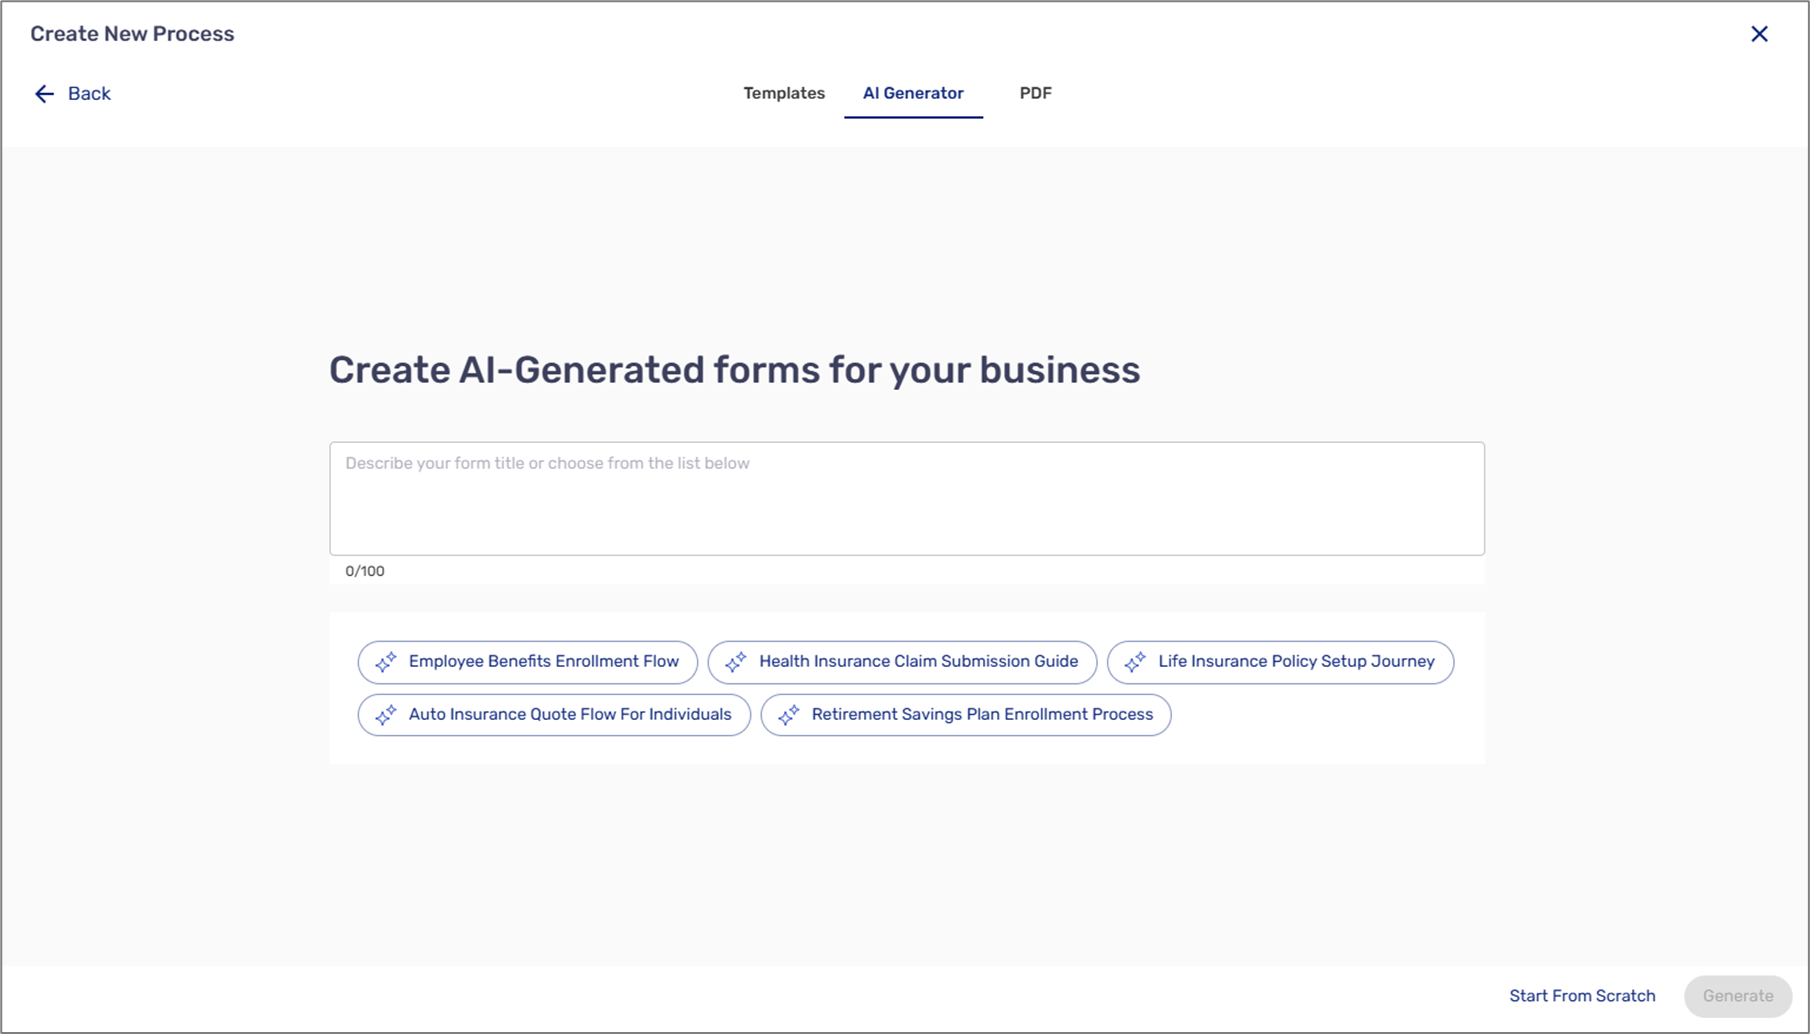
Figure 1: AI Generator
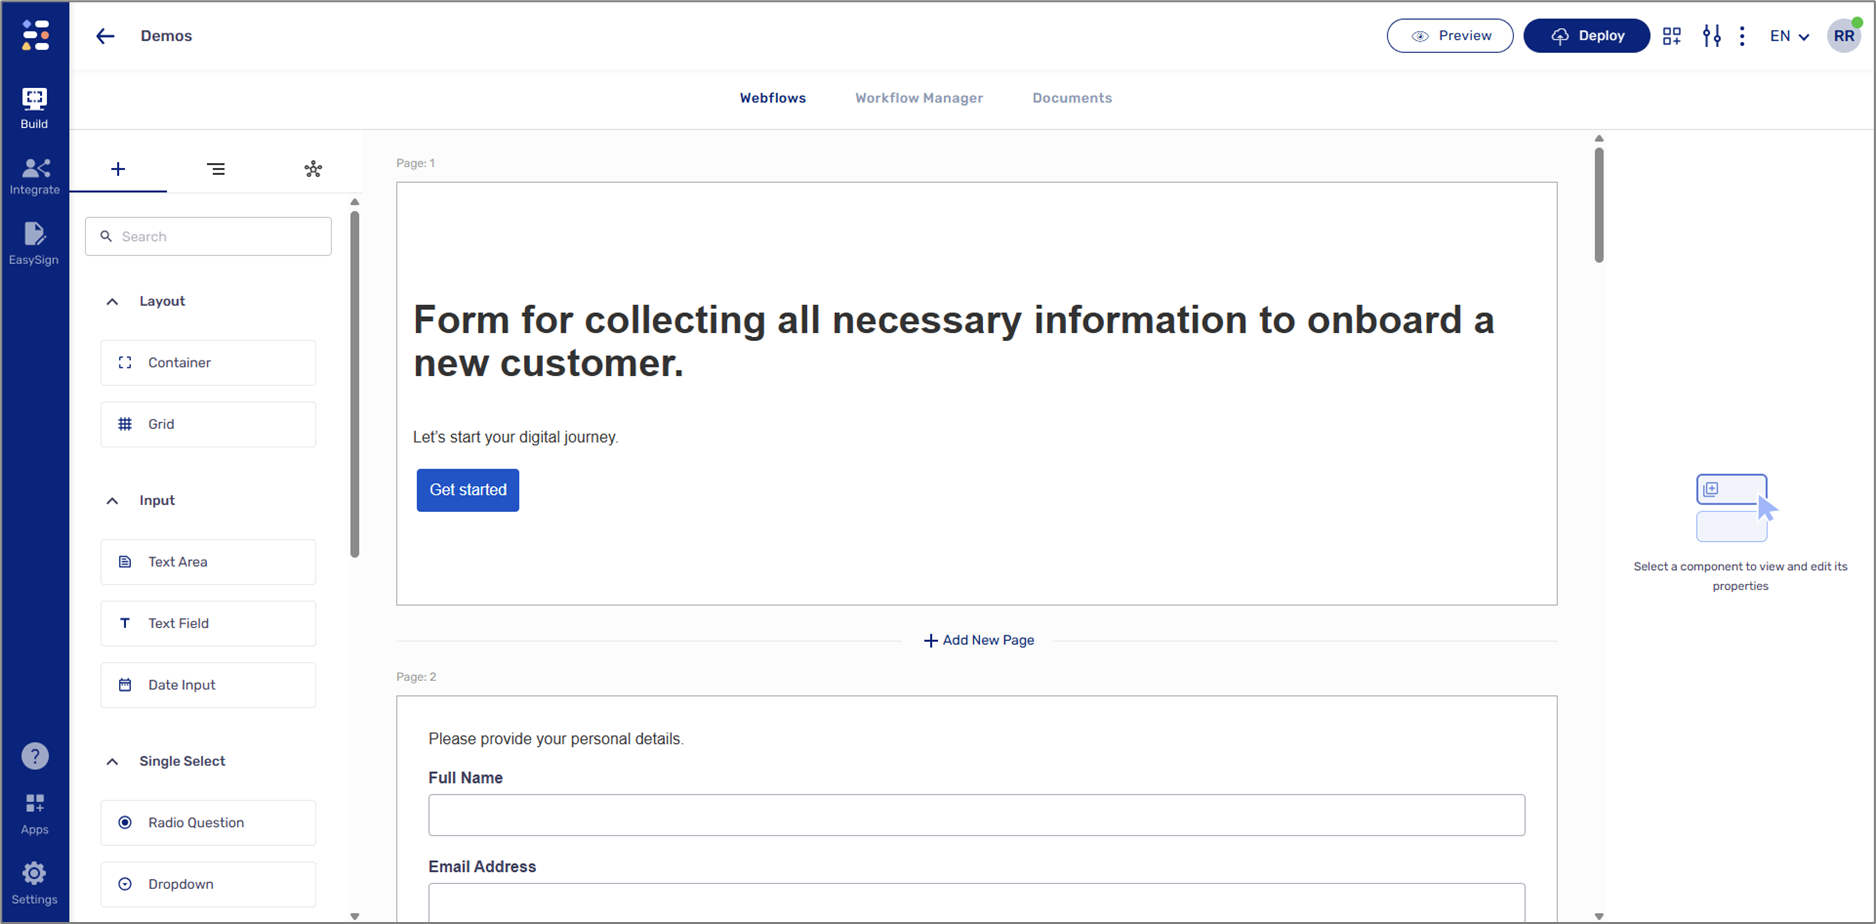
Figure 2: AI-Generated Webflow Example
Creating an AI-Generated Webflow
(See Figure 3)
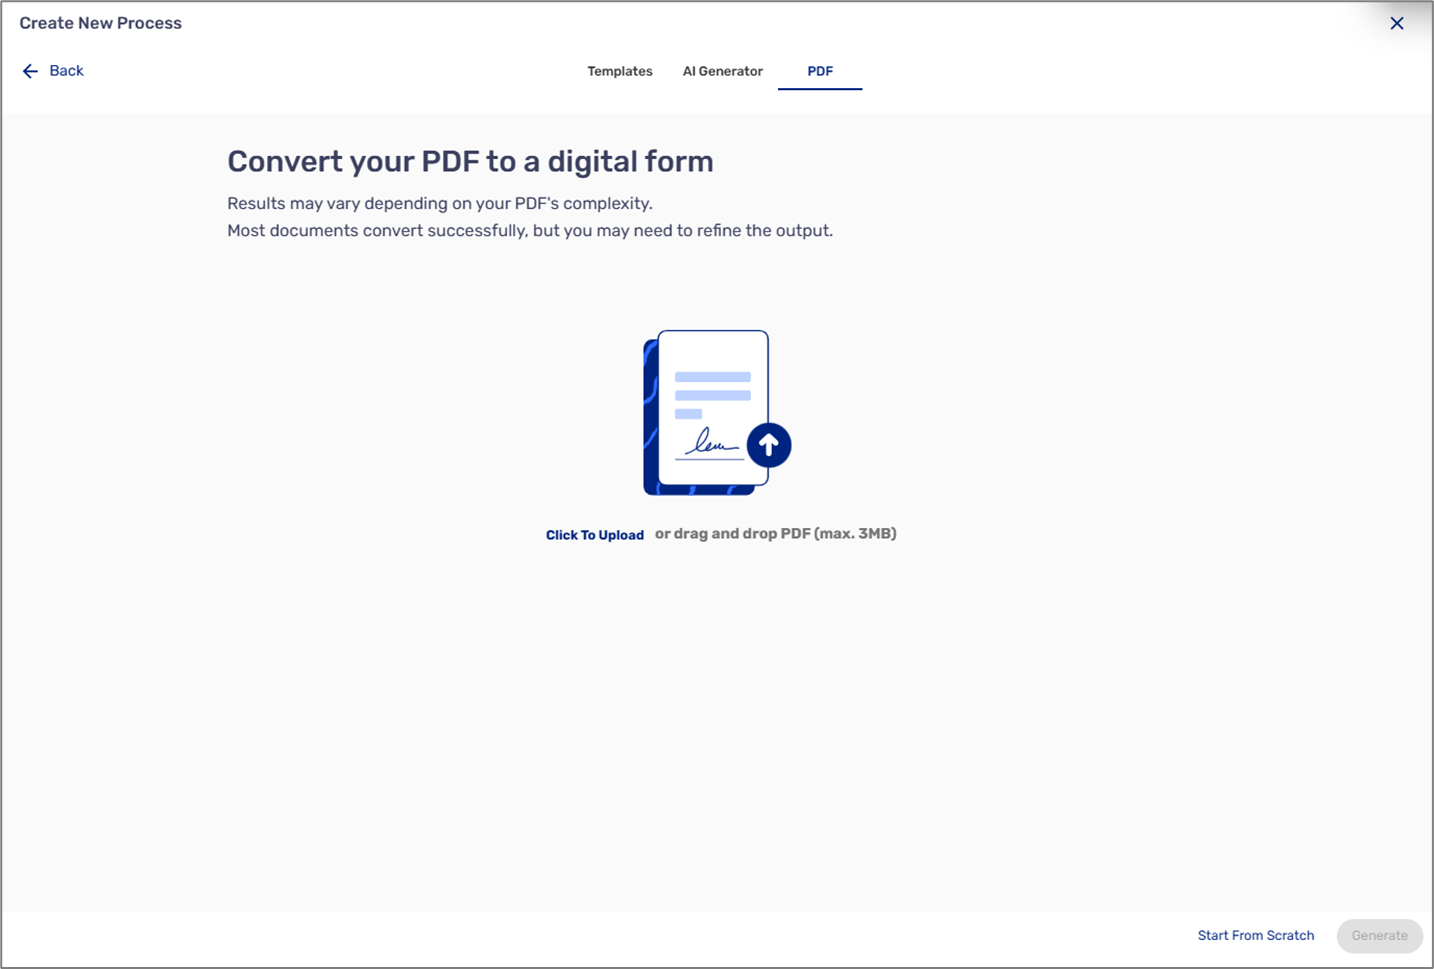
There are four ways to create an AI-Generated Webflow:
- Templates (1) - using a template to develop your process (default option).
- AI Generator (2) - utilizing AI to build your first process by describing what you need.
- PDF (3) - converting an uploaded PDF into a process.
- Starting From Scratch (4).
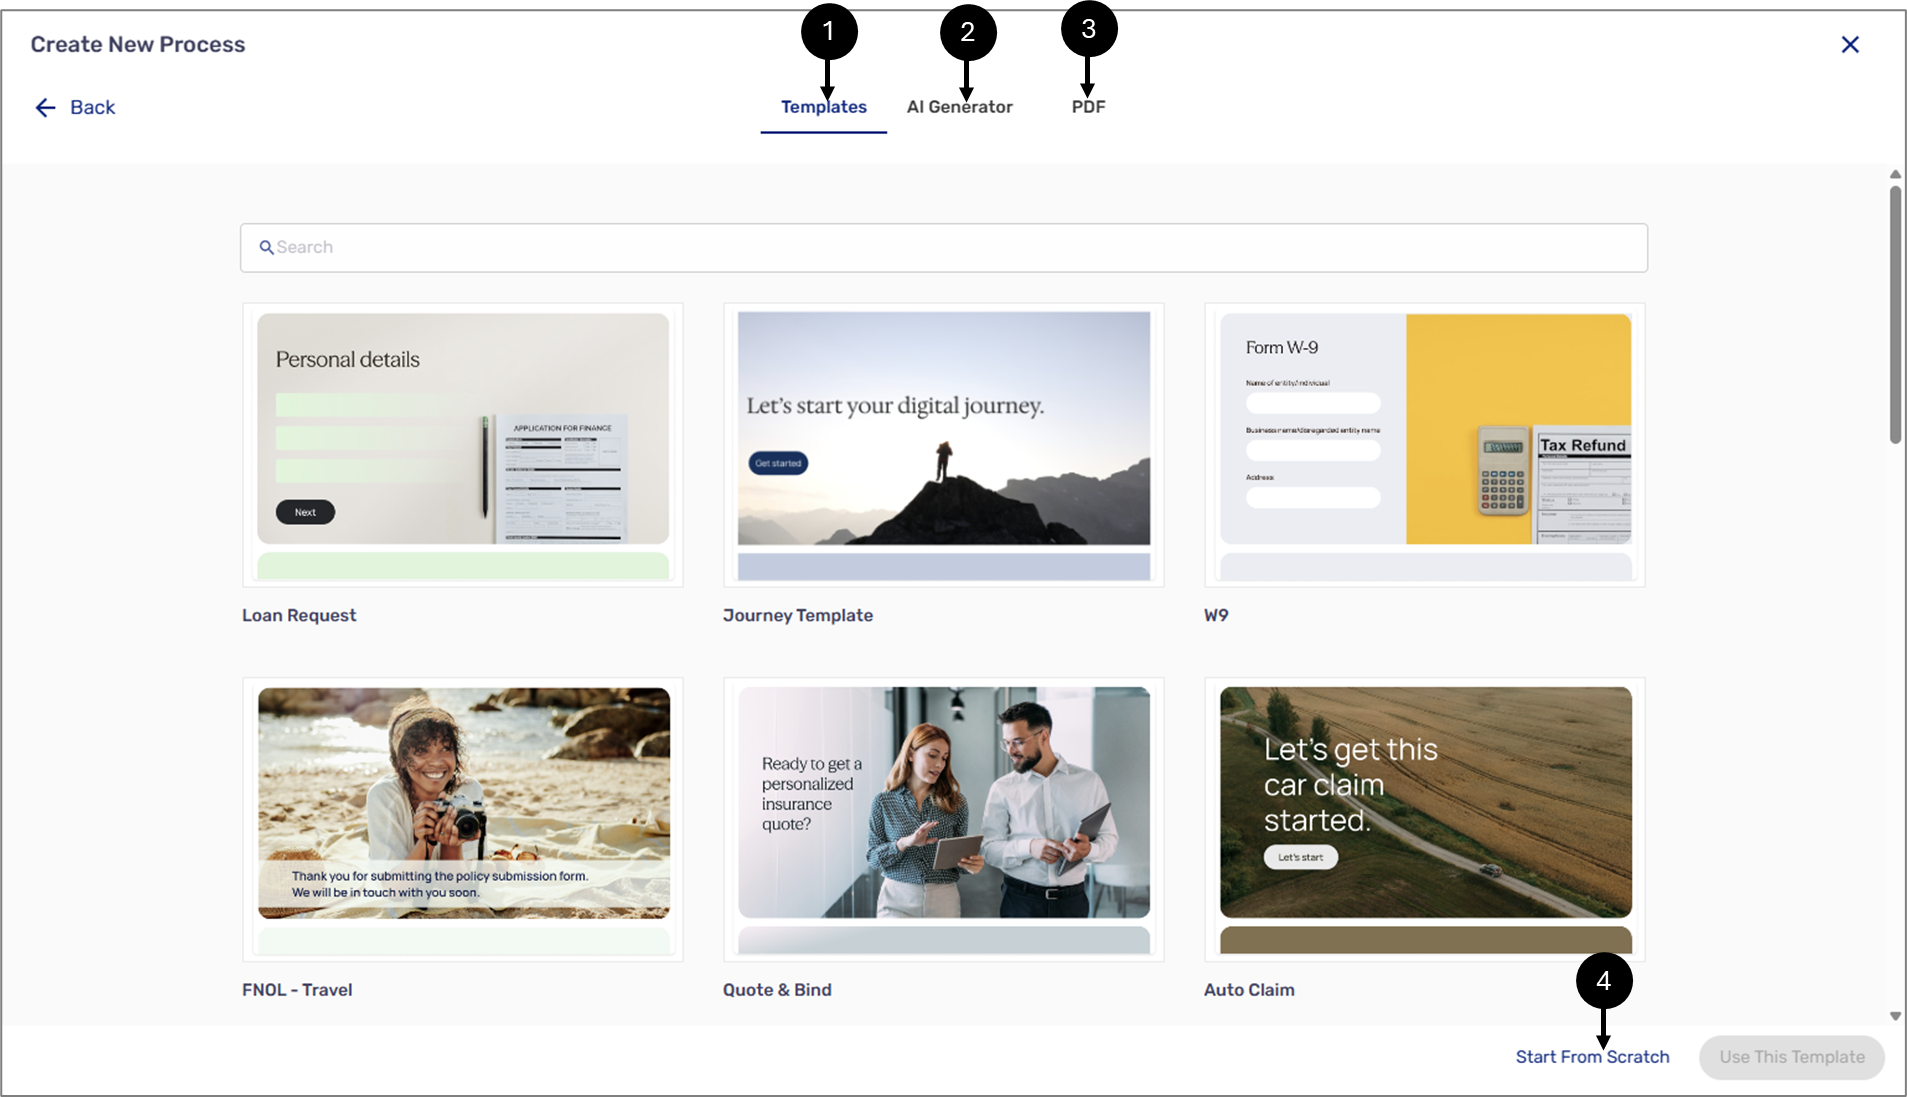
- Figure 3: Creating an AI-Generated Webflow
Templates
(See Figure 4)
When the selected option is Templates, choose a template from the list. After clicking the Use This Template button, the Webflow screen will appear with its physical structure built and with an applied theme according to the selected template.
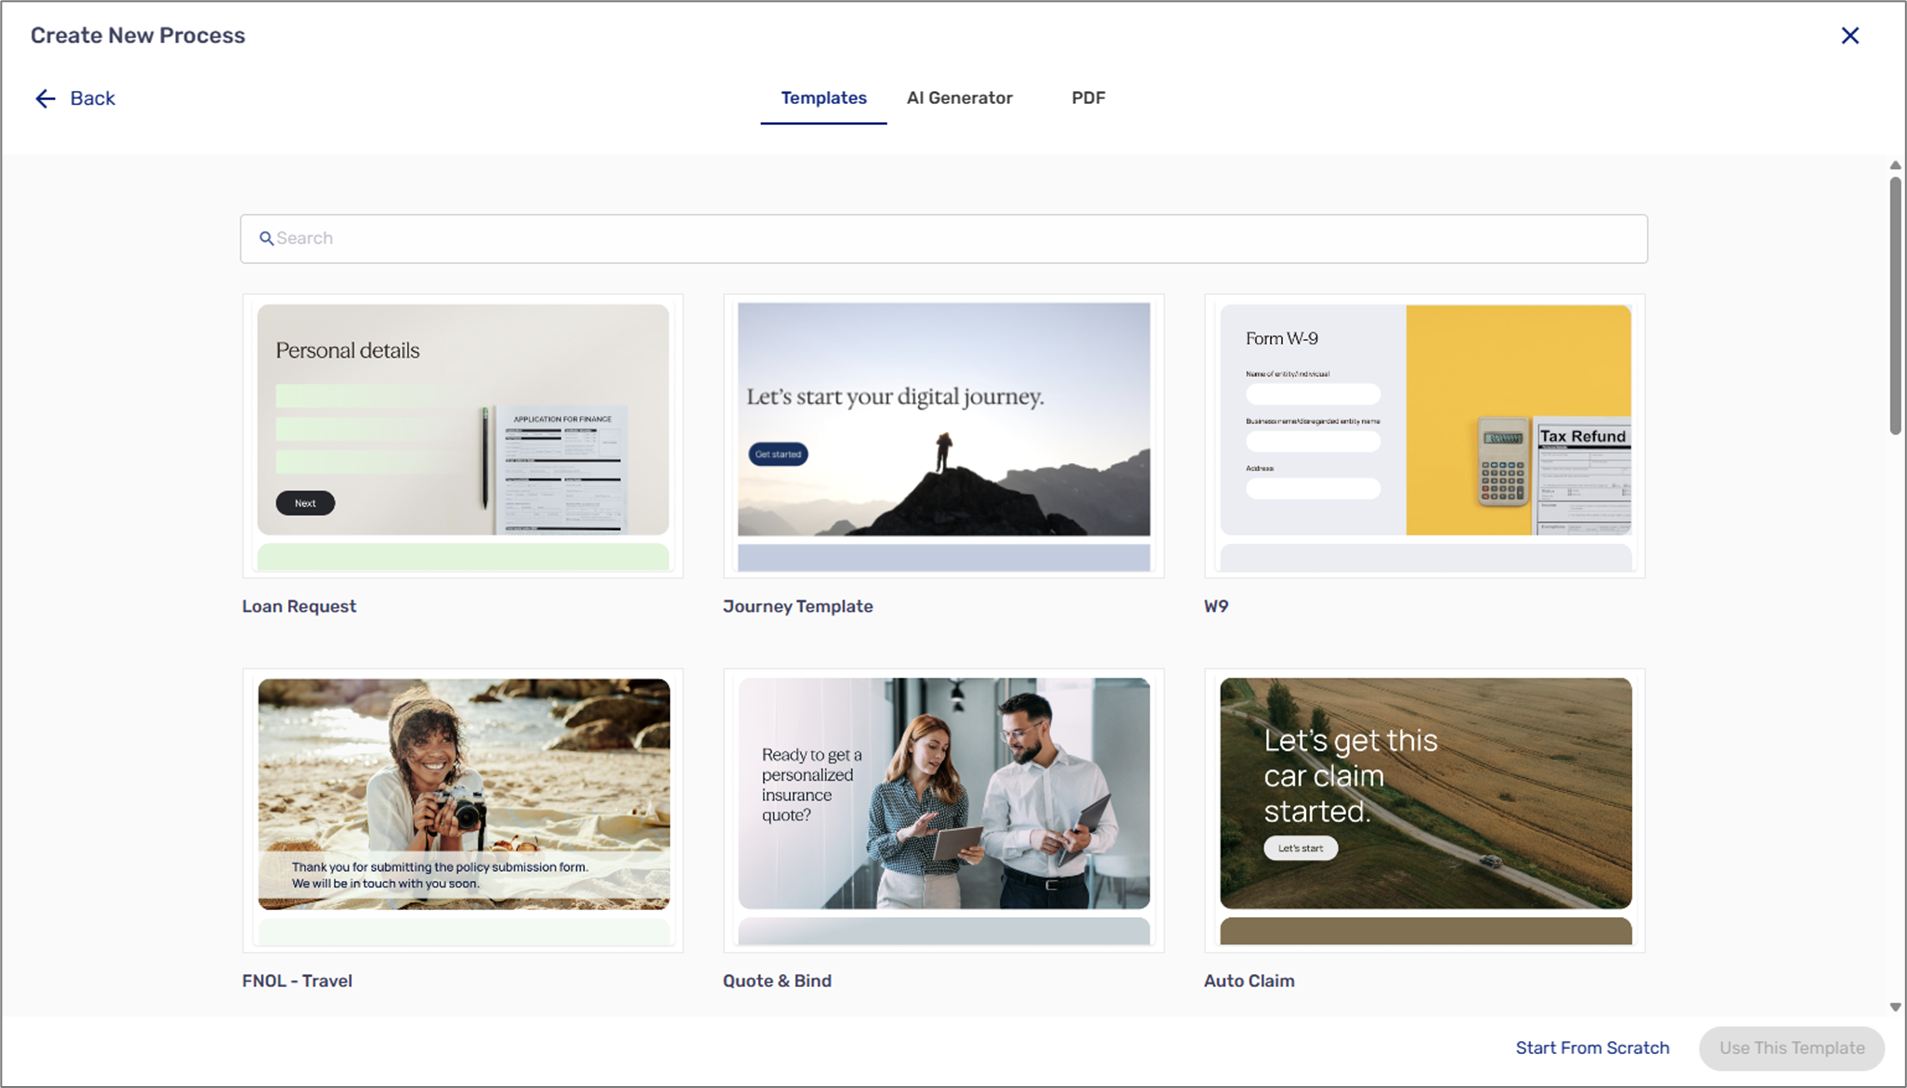
- Figure 4: Templates
AI Generator
(See Figure 5)
When the selected option is AI Generator, describe the title of your process, or choose one option from the list. After clicking the Generate button, the Webflow screen will appear with its physical structure already built.
- Figure 5: AI Generator
(See Figure 6 and Figure 7)
When the selected option is PDF, upload your existing PDF form.
- Figure 6: PDF
After clicking the Generate button, two things will happen:
- The Webflow screen will appear with its physical structure built according to the uploaded PDF.
- The uploaded PDF will appear under the Documents tab, and its fields will be automatically tagged, connected to data items, and defined.
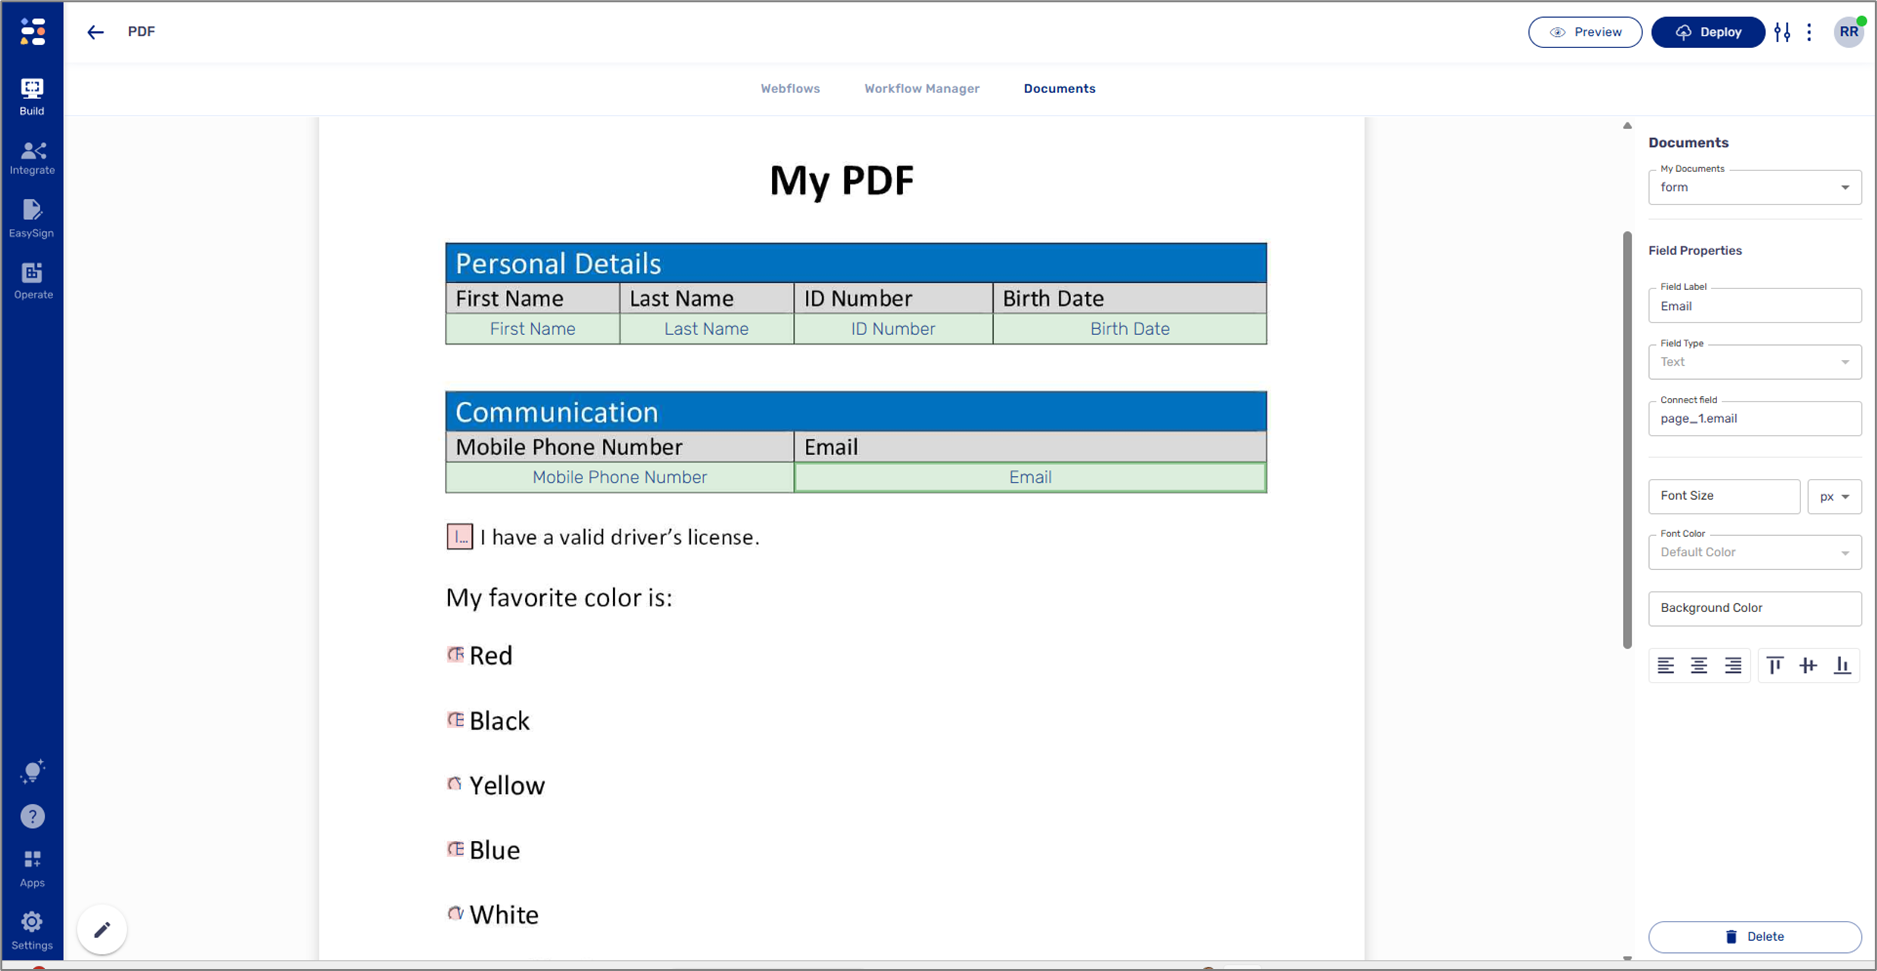
- Figure 7: Tagged, Connected, And Defined PDF Fields
NOTE
For additional information about tagging, connecting, defining, and displaying an uploaded PDF, click here.
Start From Scratch
(See Figure 8)
When the selected option is Start from Scratch, the Webflow appears with three built-in pages:
- Welcome Page
- Page
- Thank You Page
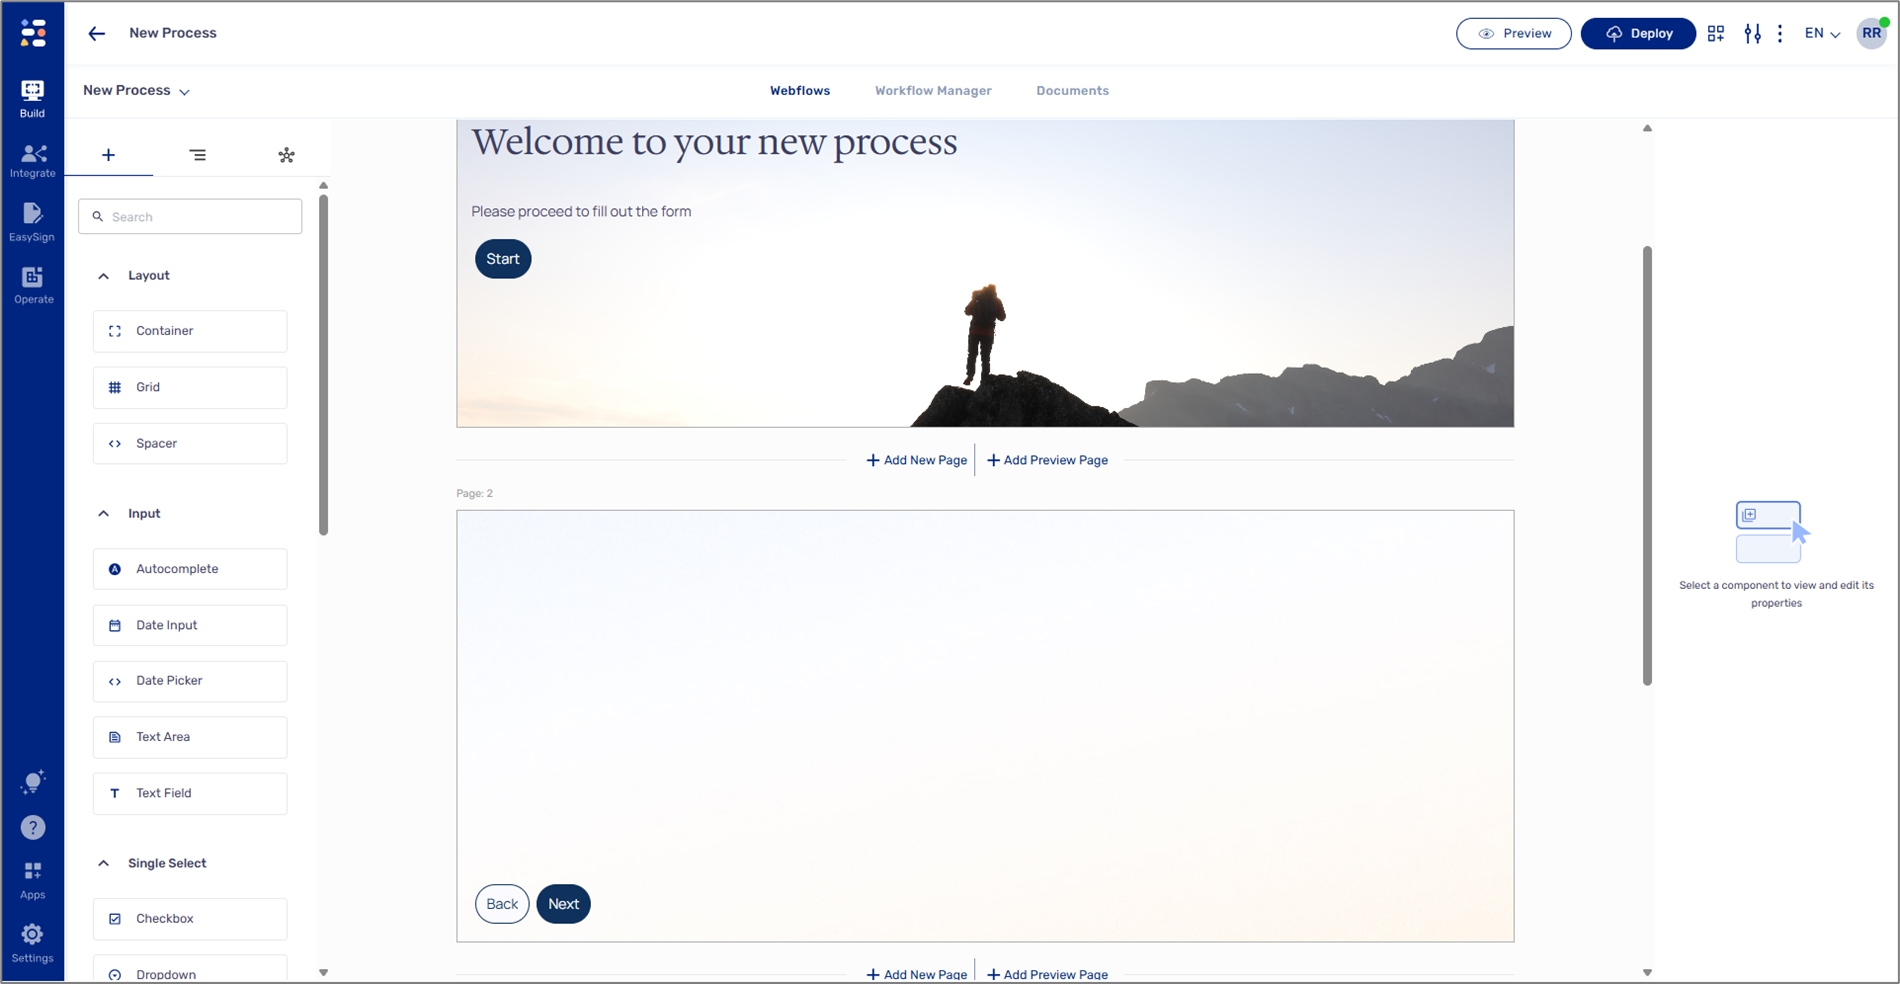
- Figure 8: Start From Scratch
Comparison Table
The following sections outline the key differences between the old and new AI-generated Webflow versions.
General
| Capabilities | AI-Generated Webflow | Old Webflow | Notes |
| Security | V | V | |
| Accessibility | V | V |
Branding
For each type of Webflow, it is mandatory to use the designated theme (see Figure 9):
- AI-generated Webflow (1).
- Old Webflow (2).

Figure 9: Themes
NOTE
| Capabilities | AI-Generated Webflow | Old Webflow | Notes |
| Multiple themes | V | V | - |
| Theme variants | X | V | |
| Design capabilities | V - OOTB | V - OOTB + Customized | |
| Custom domain | V | V | |
| Embedded processes | V | V | Read about embedded processes here |
Webflow Enrichment
| Capabilities | AI-Generated Webflow | Old Webflow | Notes |
| Can create multiple Webflows per process | V | V | - |
| End users' roles and permissions | V | V | |
| Multiple PDFs | V | V | Read about the Documents tab here |
| Validations | V - OOTB | V - OOTB + Customized | |
| Autocomplete | V | V | Read about autocomplete here |
| Computations | X | V | Read about computations here |
| Formula | V | V | Read about the Formula Editor here |
| Data items |
| V - need to manually create and connect to components | |
| OTP | V | V | Read more about OTP here |
| Player SSO (Auth provider) | X | V | Read more about SSO here |
| Integrations in Webflow | X | V | - |
| Pre-defined co-browsing | V | V | Read more about pre-defined co-browsing here |
| End-user invite to co-browsing | X | V | Read more about user invite to co-browsing here |
| Save and continue later | X | V | Read more about Save and continue later here |
| Multi language | V | V | Read more about multi langauage here |
| Keyboard Shortcuts | V | X | Standert Window/Mac keyboard shortcuts |
AI
| Capabilities | AI-Generated Webflow | Old Webflow | Notes |
| PDF to process | V - up to five pages automatically per Webflow | X | - |
| Prompt to process | V - up to five pages automatically per Webflow | X | - |
| Templates | V | X | - |
Initiation Options
| Capabilities | AI-Generated Webflow | Old Webflow | Notes |
| Direct link | V | V | - |
| Journey Sender | X | V | Read more about the Journey Sender here |
| Bulk Sender | V | V | Read more about the Bulk Sender here |
| Generate link API | V | V | Read more about the APIs here |
| Send link API | V | V |
CRM Connectors
| Capabilities | AI-Generated Webflow | Old Webflow | Notes |
| Salesforce | V - built-in connector, automatic integration | V - manually created integration | Read more about the AI-generated Weblfow Salesforce integration and its capabilities here |
| Microsoft Dynamics | X | V - manually created integration | Read more about Microsoft dynamic integration here |
| monday.com | V - built-in connector, automatic integration | X | Read more about monday.com integration here |
Communication options
| Capabilities | AI-Generated Webflow | Old Webflow | Notes |
| EasySend email provider | V | V | - |
| EasySend SMS provider | V | V | - |
| External communication provider | V | V | Read about using an external communication provider here |
Integrations options
| Capabilities | AI-Generated Webflow | Old Webflow | Notes |
| Rest API | V | V | Read more about EasySend integration capabilities here |
| S3 | V | V | |
| SFTP | V | V | |
| DB | V | V | |
| Credit Guard | X | V | Read more about the Credit Guard integration here |
| Stripe | X | V | Read more about the Stripe integration here |
Was this article helpful?