Article Overview
The following article describes the structure of the Services screen, as well as the platform's services and integration capabilities.
What is the Services Screen?
The Services screen allows you to integrate your digital processes with different third-party apps and REST API services.
Navigate to the Services Screen
(See Figure 1 and Figure 2)
To navigate to the Services screen, perform the following steps:
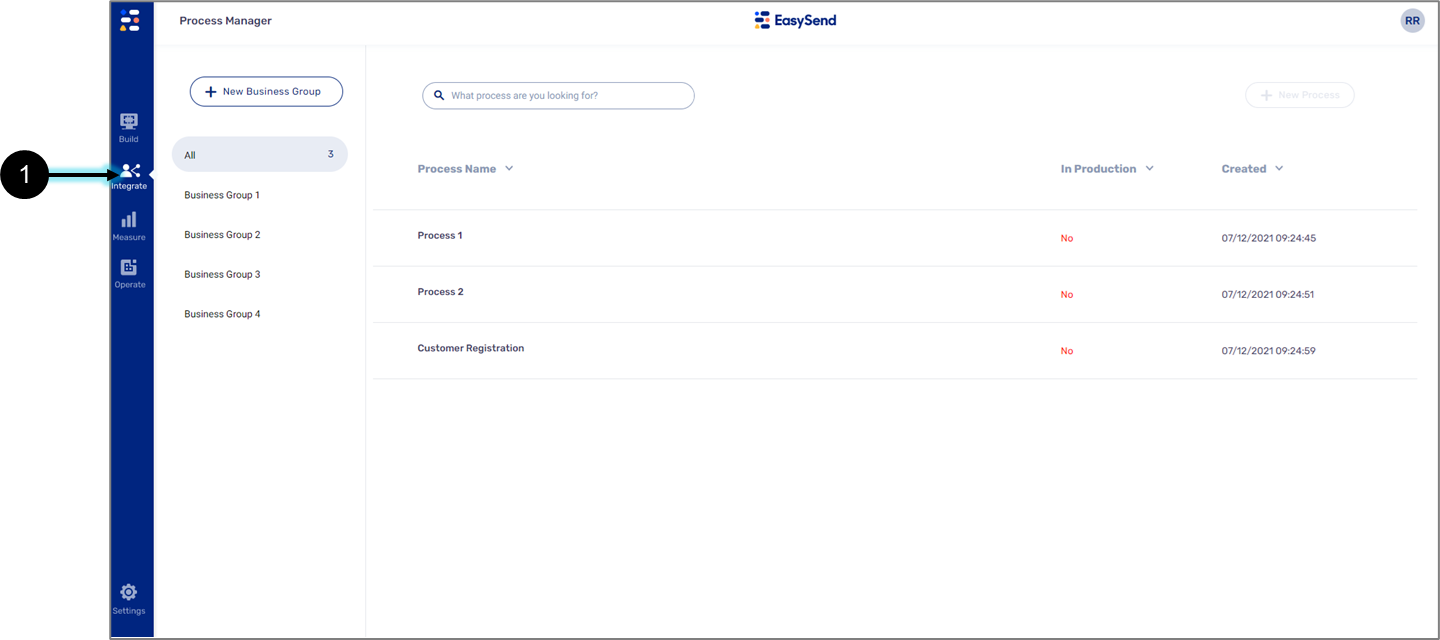
Figure 1: Integrate Tab
- Click the Integrate tab.
Result:
The Integrate tab options appear:
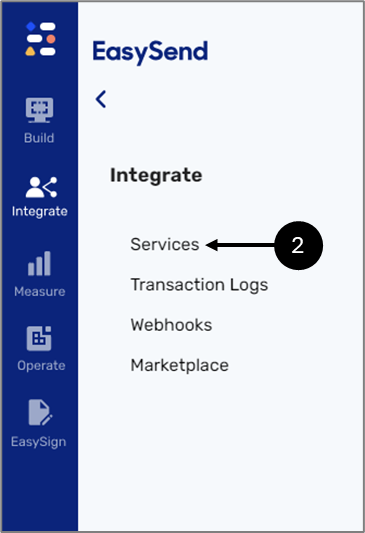
Figure 2: Services
- Click the Services option (2).
Services Screen Structure
Figure 3 and Table 1 describe the structure of the Services screen.
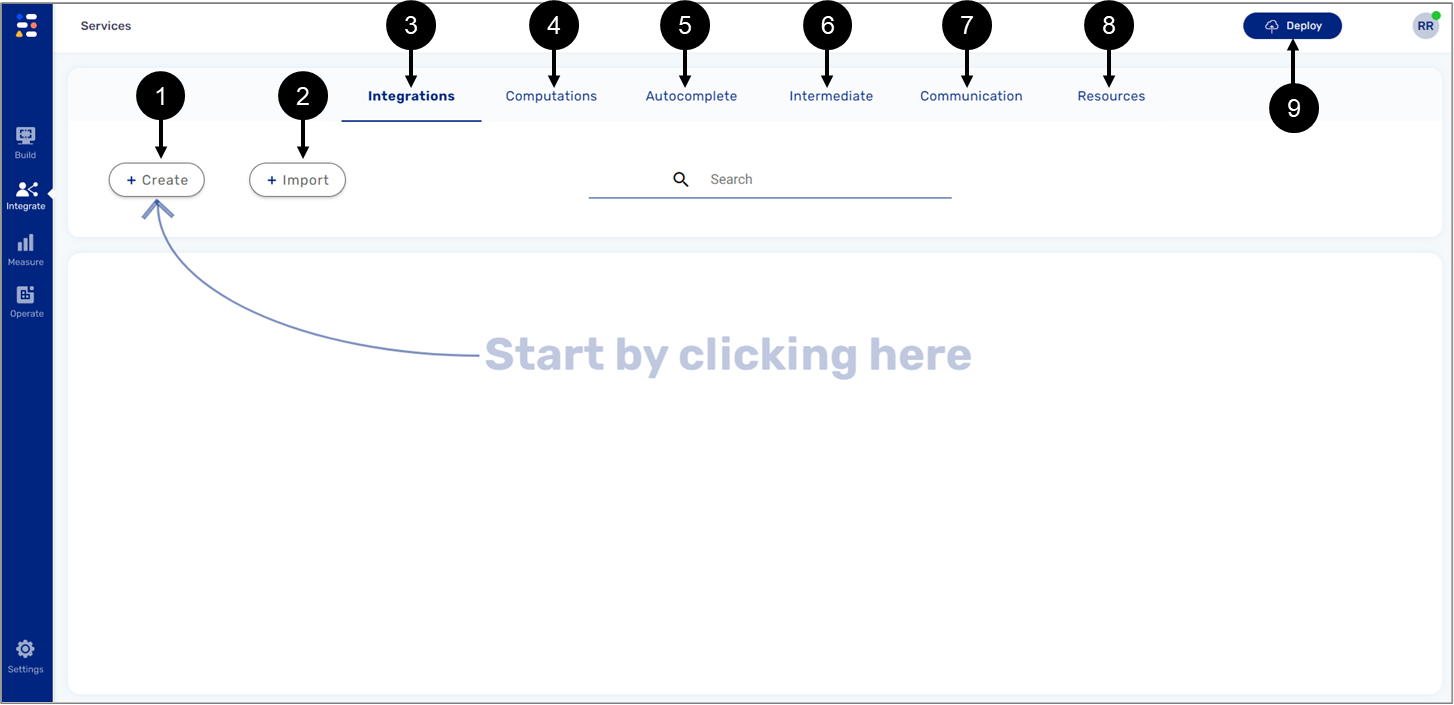
Figure 3: Services Screen
Table 1: Services Screen
Number | Name | Description |
| + Create |
NOTE This button appears in every category |
| + Import | Enables creation of a new service. NOTE This button appears in every category |
| Integrations |
|
| Computations | Enables pre-filled fields with calculated values that are fetched from a remote web-service/resource in real-time. |
| Autocomplete | Enables pre-filled fields with values that are fetched from a remote web-service/resource in real-time. |
| Intermediate | Enables a nested service within a service. It can be added to a service as an additional step. |
| Communication | Enables step integration in the workflow of a digital process with external communication services. |
| Resources | Enables management of assets such as credentials, certificates, and servers. NOTE
|
| Deploy | Enables publishing new changes made using the service screen into a selected server or environment |


Created Services
(See Figure 4)
Once a service is created, it will appear in a list (1) containing the following information:
- Name
- Description
- Inputs (if applicable)
- Outputs (if applicable)
The Search bar (2) enables you to search for a service within the list.
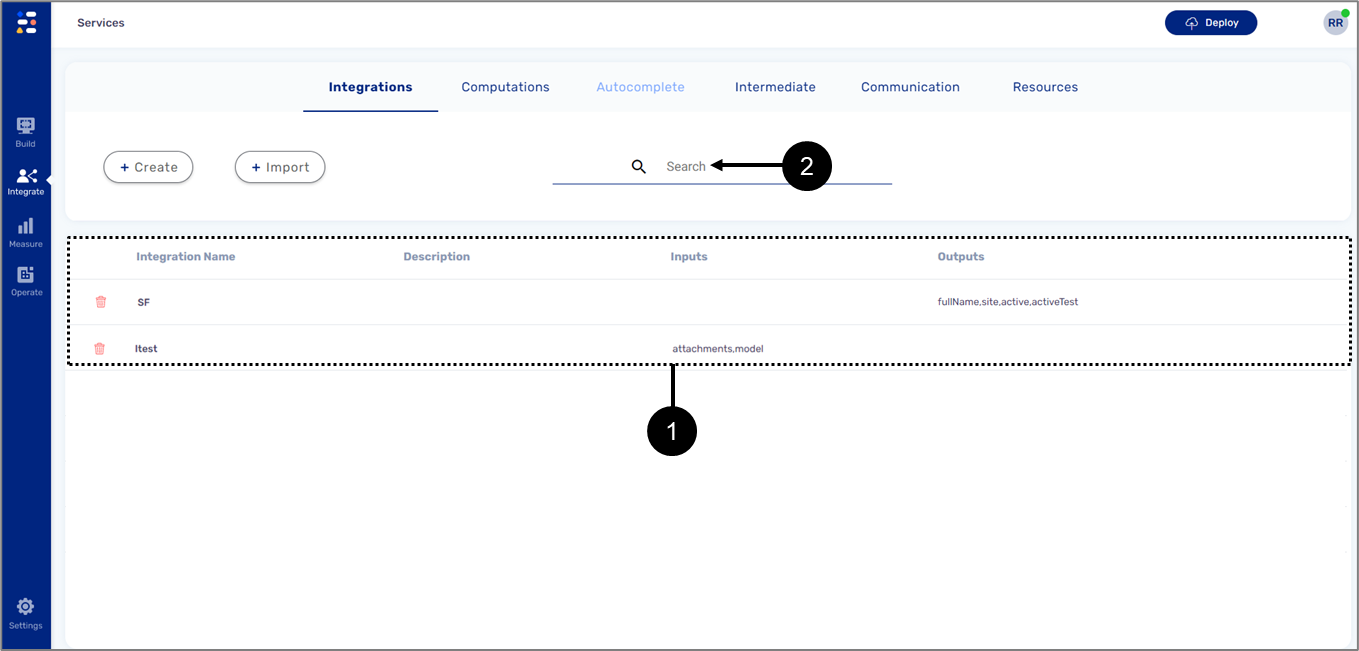
Figure 4: Created Services
Resources Screen
Contains and enables creating (1) the following resources: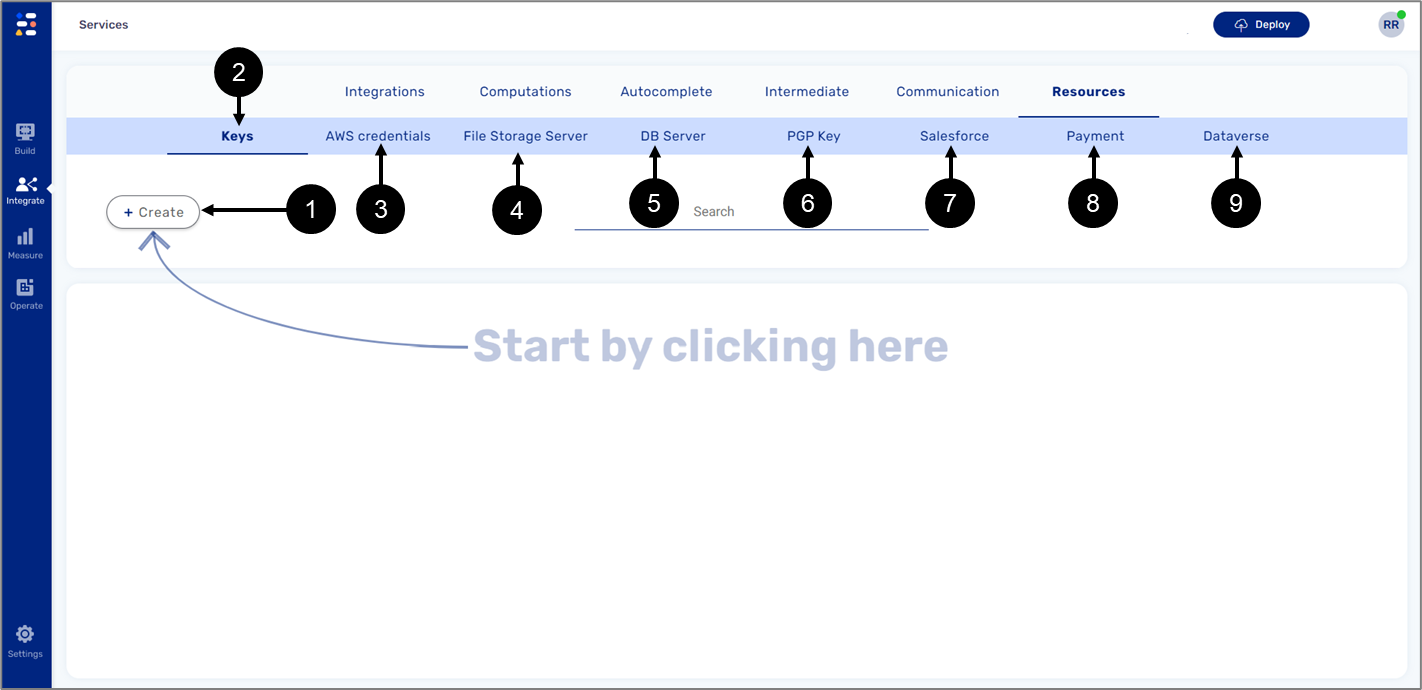
Figure 5: Resources Screen
- Keys (2)
- Amazon Web Services (AWS) credentials (3)
- File Storage Server (4)
- Database (DB) Server (5)
- Pretty Good Privacy (PGP) Key (6)
- Salesforce (7)
- Payment (8)
- Dataverse (9)
Keys
(See Figure 6)
Key Based Authentication is a more secure and encrypted method of authorization that allows a user to gain access to target resources with the help of secret keys that are stored and guarded in a secure location by the end user. This resource can be used in the File Encode-Decode step within a service (see the Step Type - File Encode/Decode section).
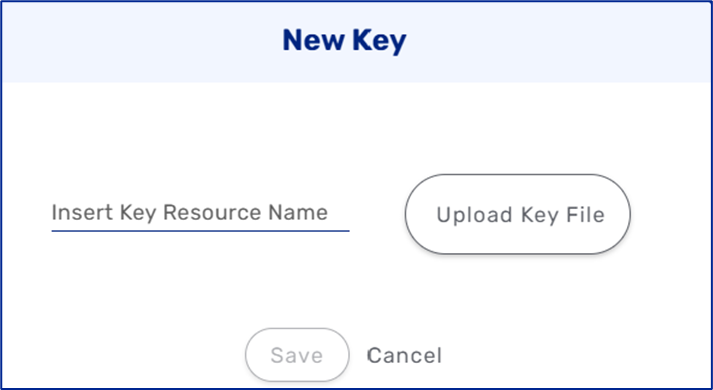
Figure 6: Creating a New Key
AWS Credentials
(See Figure 7)
When interacting with AWS, you use your AWS security credentials to verify your identity and whether you have permission to access the resources that you are requesting. AWS uses the security credentials to authenticate and authorize your requests. For example, if you want to download a protected file from an Amazon Simple Storage Service (S3) bucket, your credentials must allow that access. If your credentials are not authorized to download the file, AWS denies your request.
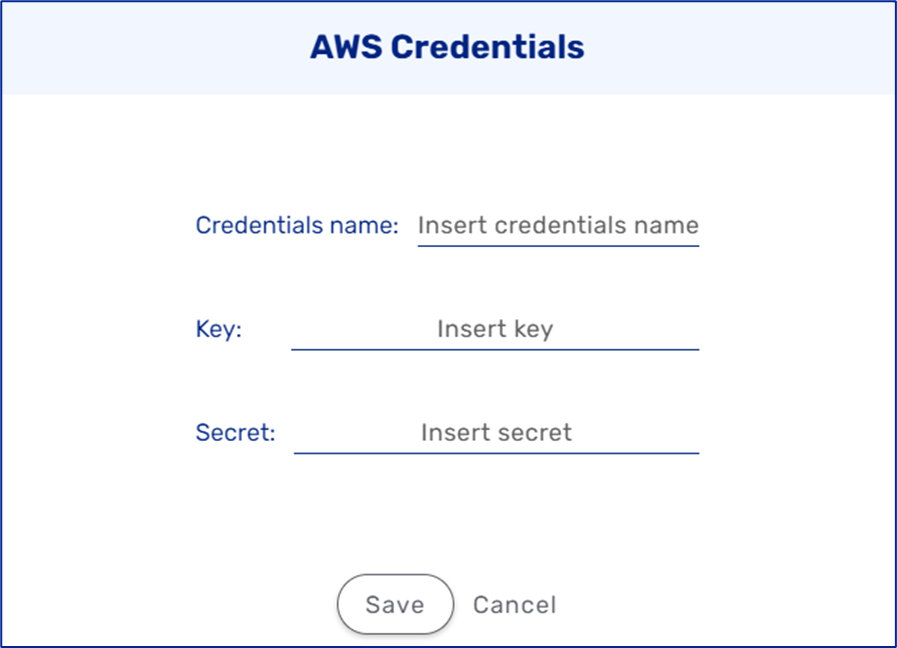
Figure 7: AWS Credentials
File Storage Server
(See Figure 8 to Figure 12)
Creates a file storage resource that can be used in the File Storage Service step within a service (see the Step Type - File Storage Service section). There are four different types of file storage servers to choose from:
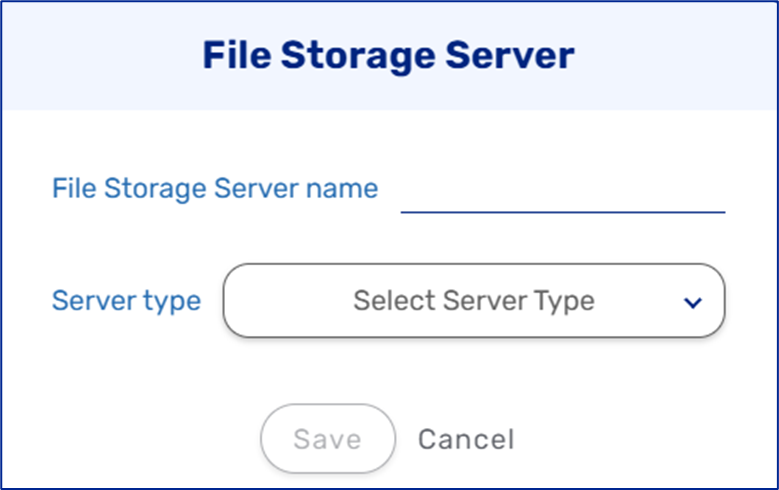
Figure 8: File Storage Server Selection
- S3 (requires AWS credentials):
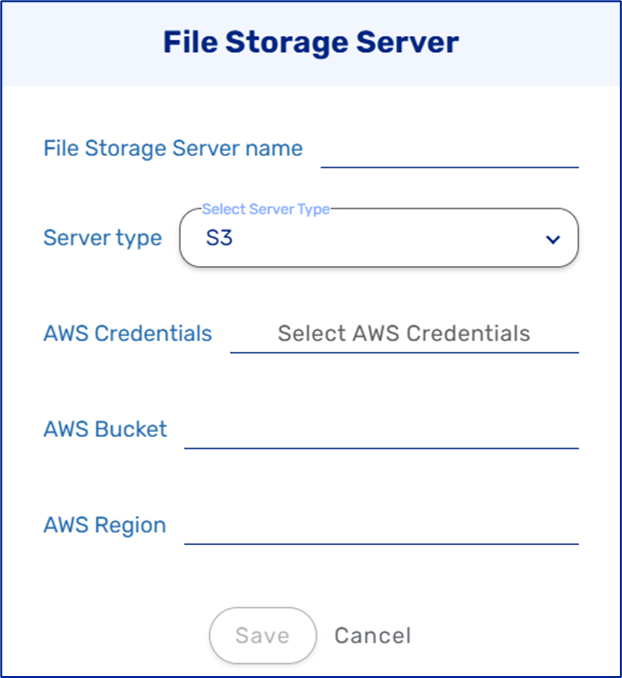
Figure 9: Server Type - S3
- Local Disk:

Figure 10: Server Type - Local Disk
- File Transfer Protocol (FTP):
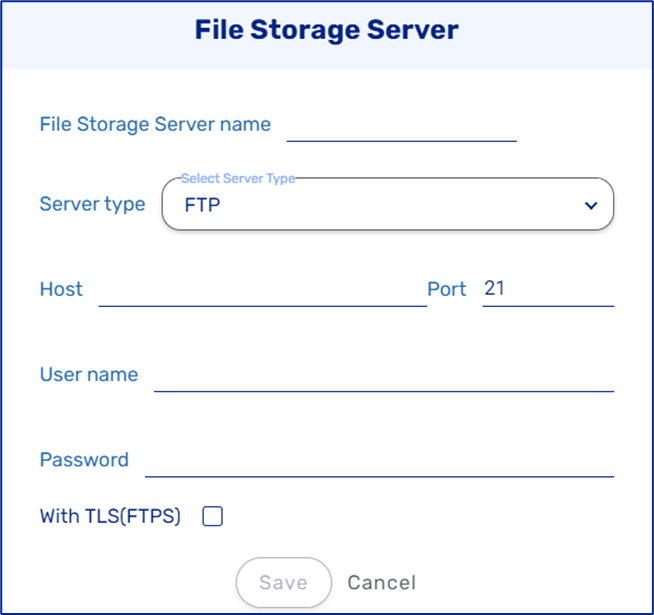
Figure 11: Server Type - FTP
- Secure Shell (SSH) File Transfer Protocol (SFTP):
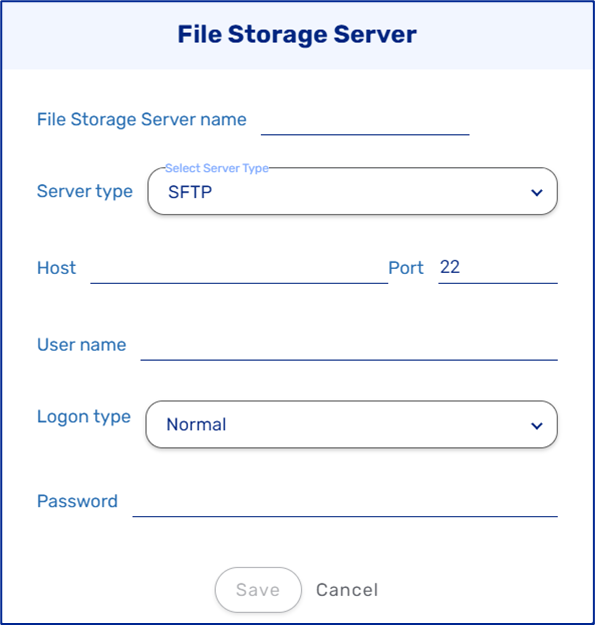
Figure 12: Server Type - SFTP
DB Server
(See Figure 13 to Figure 15)
Creates a DB server. This resource can be used in the SQL query - step within a service (see the Step Type - SQL Query section). There are three different types of DB servers to choose from:
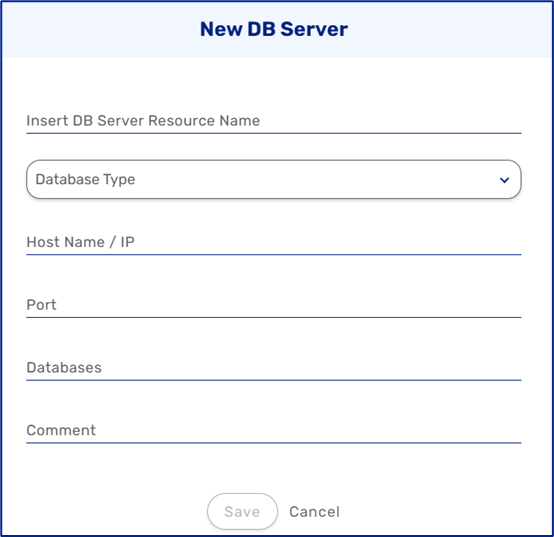
Figure 13: New DB Server Selection
- MySQL and PostgreSQL
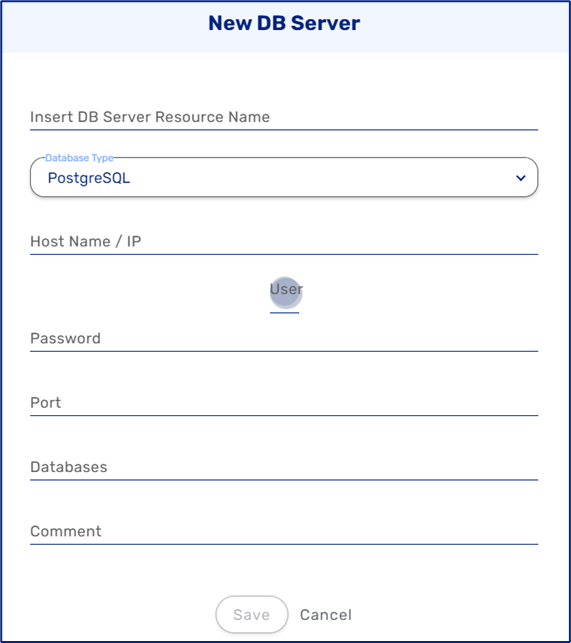
Figure 14: DB Server Type - MySQL and PostgreSQL
- Microsoft SQL Server:
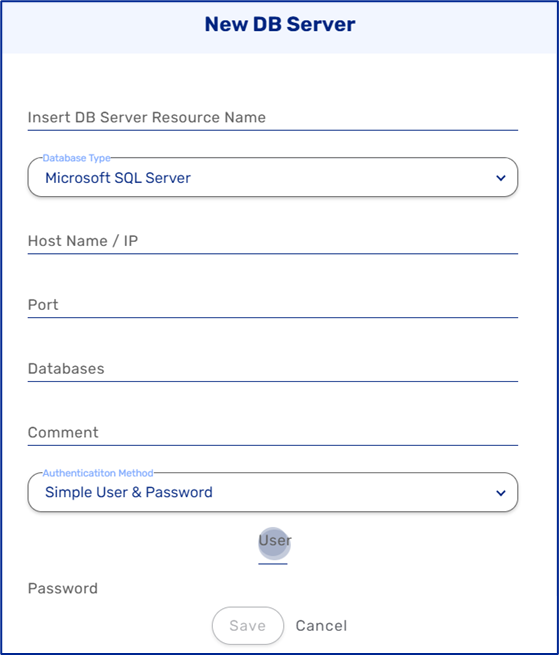
Figure 15: DB Server Type - Microsoft SQL Server
PGP Key
(See Figure 16)
An encryption program that provides cryptographic privacy and authentication for data communication. PGP is used for signing, encrypting, and decrypting texts, e-mails, files, directories, and whole disk partitions and to increase the security of email communications. This resource can be used in the File Encode/Decode step within a service
(see the Step Type - File Encode/Decode section).

Figure 16: New PGP Keys
Salesforce
Creates a new Salesforce environment. For detailed information about Salesforce two-way integration, see the Salesforce EasySend Two-way Integration article.
Payment
(See Figure 17)
Creates a new payment resource:
- Credit Guard - for additional information, see the Credit Guard Integration with a Digital Process section.
- Stripe
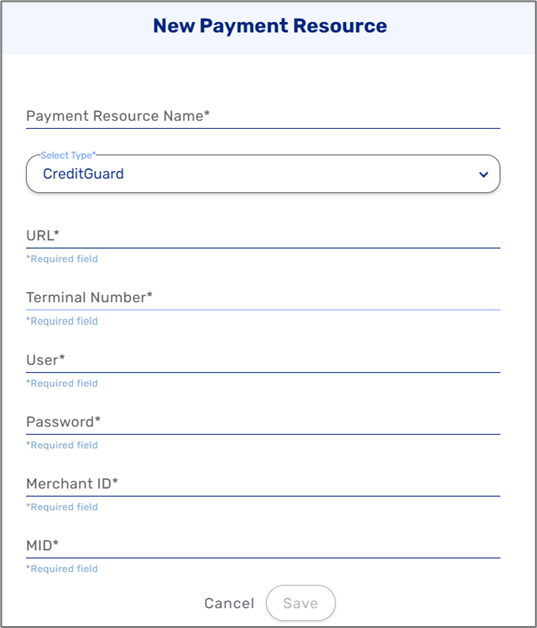
Figure 17: New Payment Resource - Credit Guard
Dataverse
Creates a new Dataverse environment. For detailed information about Dynamics 365 two-way integration, see the Dynamics 365 EasySend Two-Way Integration article.
Creating a New Service
(See Figure 18)
The + Create button (1) allows you to create any type of service described in the Services Screen Structure section.
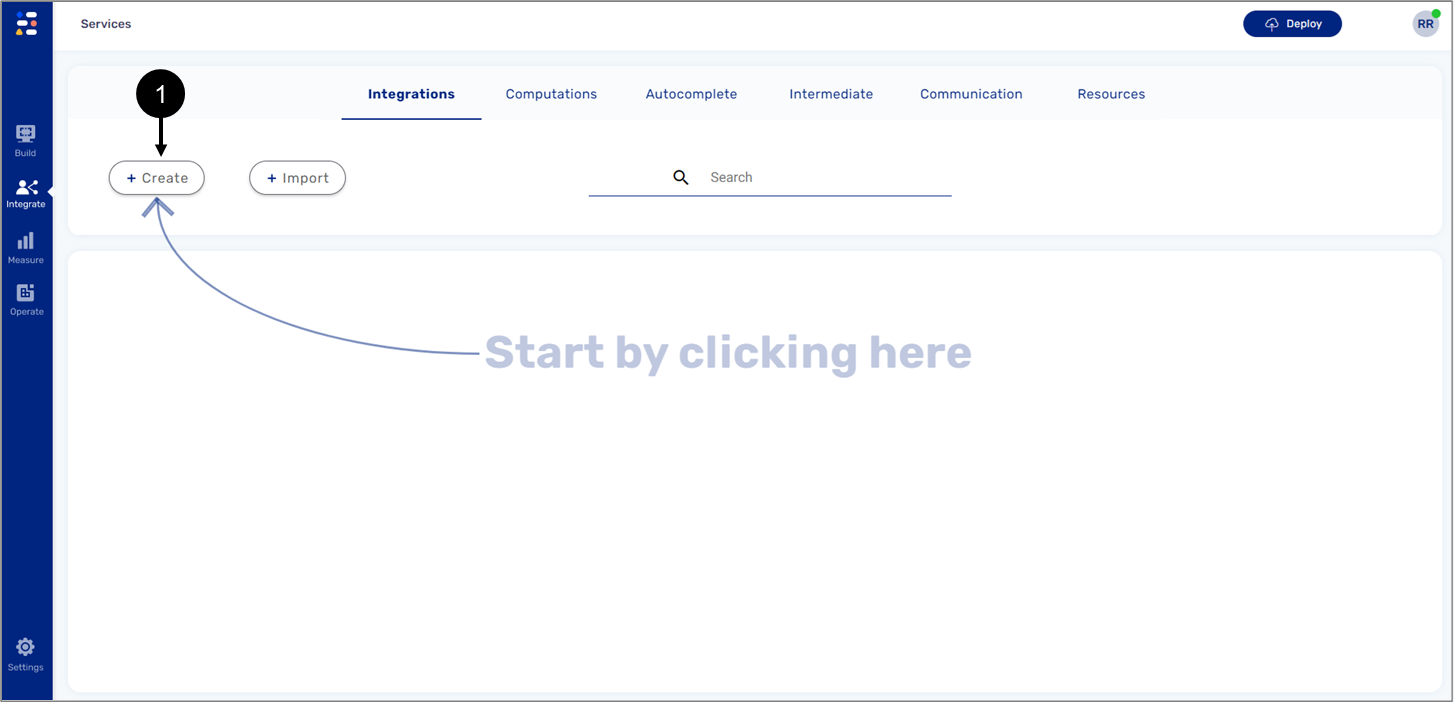
Figure 18: + Create Button
Once the button is clicked, the service configuration screen appears.
Service Configuration Screen
(See Figure 19)
Each service contains a name (1), description (2), inputs (3) , steps (4), and outputs (5):
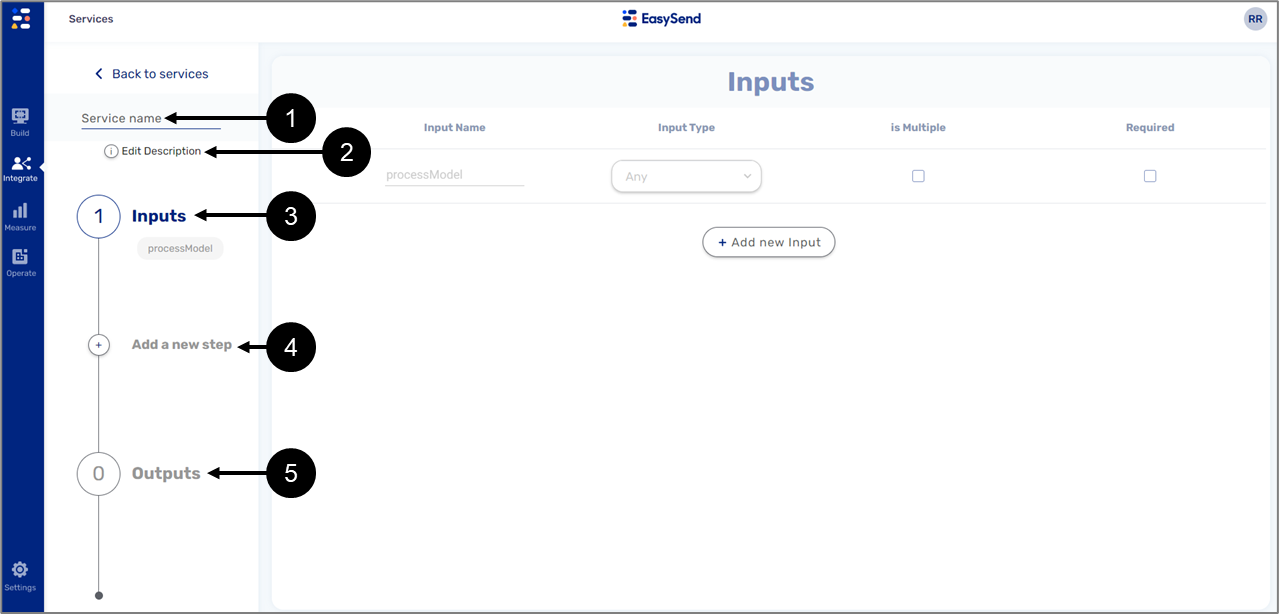
Figure 19: Service Configuration Screen
- Inputs - define the parameters that the service should expect to receive.
- Steps - define the different actions that will occur when the service is activated. An integration can contain multiple steps.
- Outputs - define the parameters that the service should return as an output.
Inputs
(See Figure 20)
A service starts with one un-editable default input. The + Add New Input button (1) enables you to add additional inputs (2).

Figure 20: Added Input
Each added input contains the following information:
- Input Name
- Input Type:
- String
- Number
- Boolean
- File
- Object - when an Object is selected, a plus icon appears. The icon allows you to open the Model screen and select an object type data item.
- Any
- Is Multiple:
- when checked - indicates if the input is an array
- when not checked - indicates if the input is not an array
- Required
Steps
(See Figure 21)
Clicking the Add new step option (1) displays a list of new steps to add with the following information:
- Step Type and description
- Inputs
- Outputs
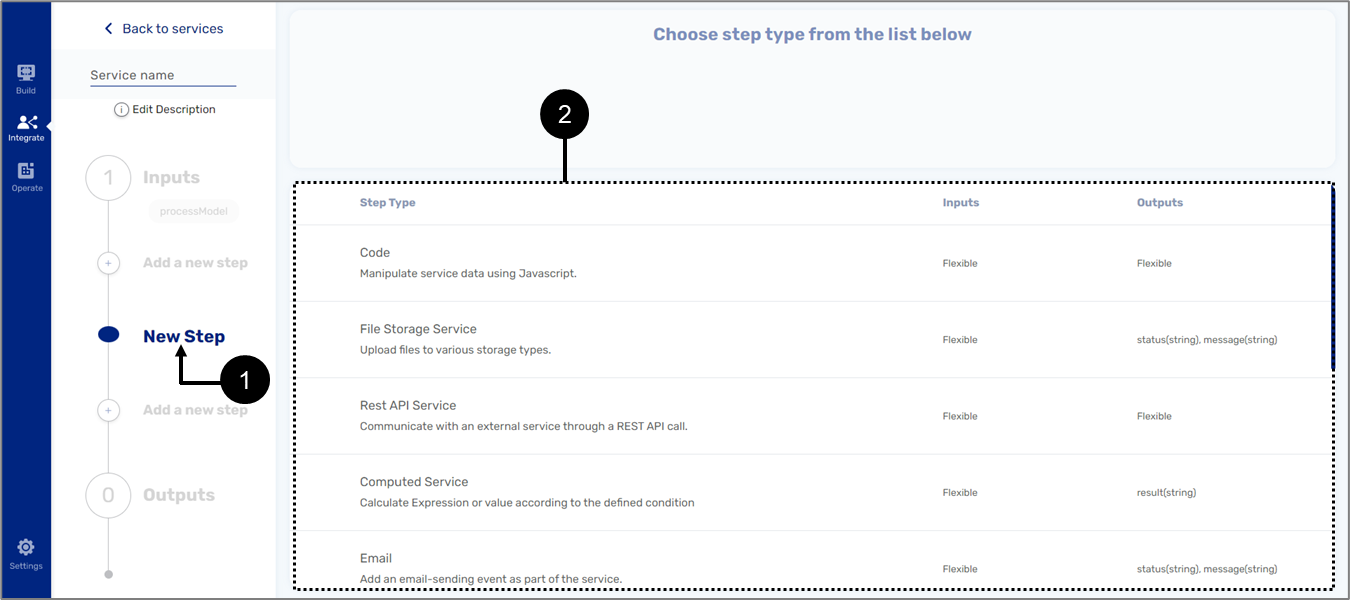
Figure 21: Steps
Step Types
(See Figure 22)
- Code - manipulates service data using JavaScript.
- File Storage Service - uploads files to various storage types.
- Rest API Service - communicates with an external service through a REST API call.
- Computed Service - calculates expressions or values according to the defined conditions.
- Email - adds an email-sending event as part of the service.
- EasySend Service - adds an Easysend preconfigured event as a step of the service.
- SQL Query - runs an SQL query in an external database.
- File Encode/Decode - encodes/decodes files with Base 64, PGP, RSA, JWE, and JWT.
- Salesforce Service - runs Select, Create, and Update queries on any Salesforce object (for additional information, see the Salesforce EasySend Two-way Integration article).
- Dataverse - runs Select, Create, and Update queries on any Dataverse object (for additional information, see the Dynamics 365 EasySend Two-Way Integration article).
- Hashing - converts strings to hashed hexadecimal value with a Secure Hash Algorithm (SHA), for example, SHA512.
When selecting a step, a name must be provided, and then the step screen appears.
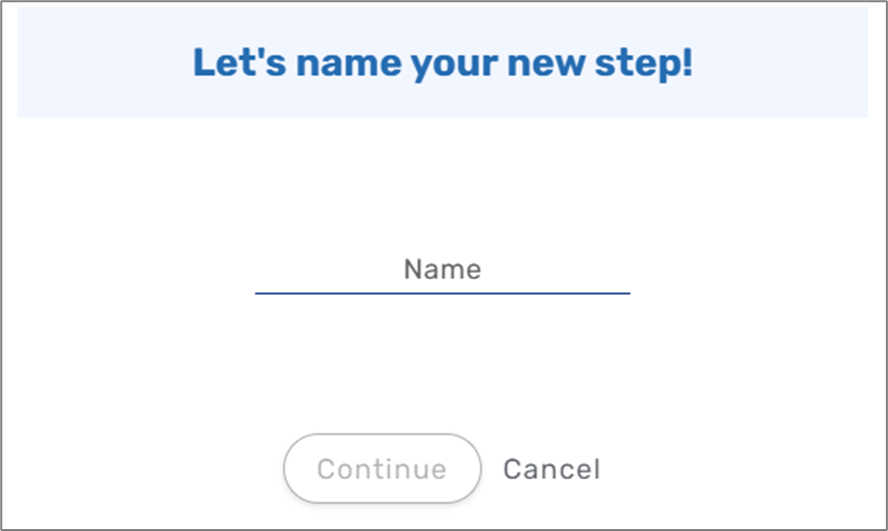
Figure 22: Naming a Step
Step Type - Code
(See Figure 23)
A Code step type contains a Code block (1), Inputs (2), and Outputs (3).
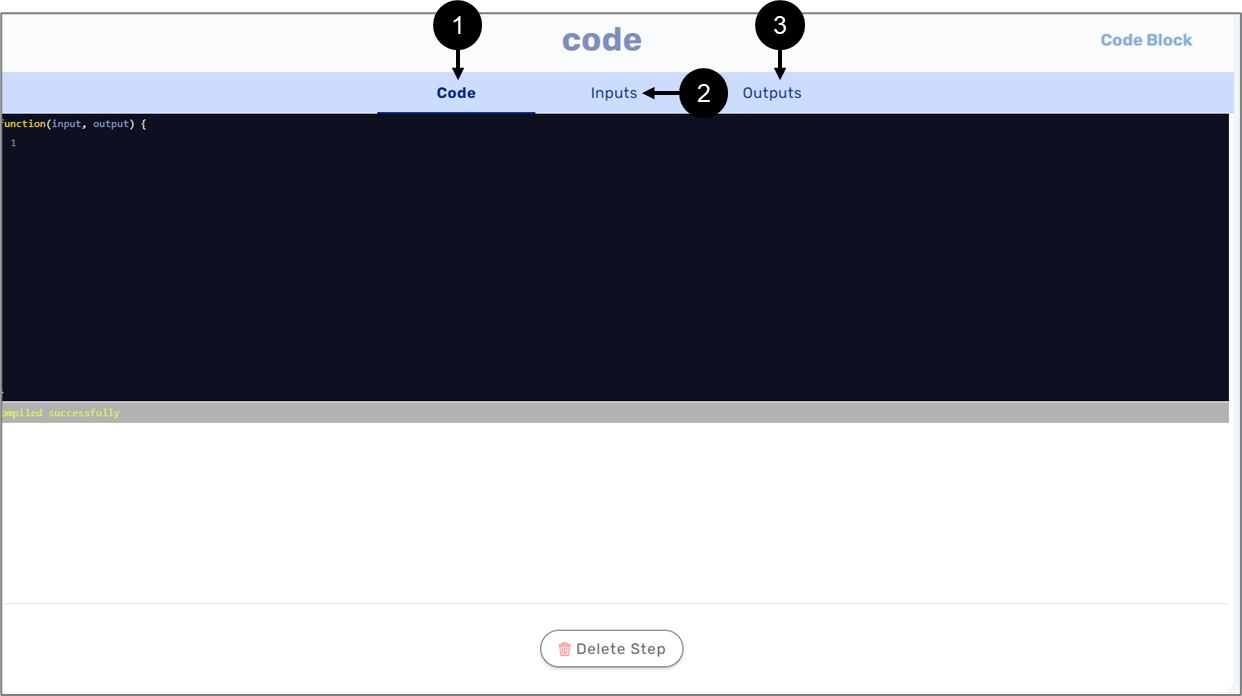
Figure 23: Step Type - Code
When adding a new input, it must contain the following information (see Figure 24):
- Field Name
- Input Type:
- String
- Number
- Boolean
- File
- Object - when an Object is selected, a plus icon appears. The icon allows you to open the Model screen and select an object type data item.
- Any
- Is Multiple:
- when checked - indicates the input is an array
- when not checked - indicates the input is not an array
- Select Source:
- Constant
- Model
- Metadata
- none
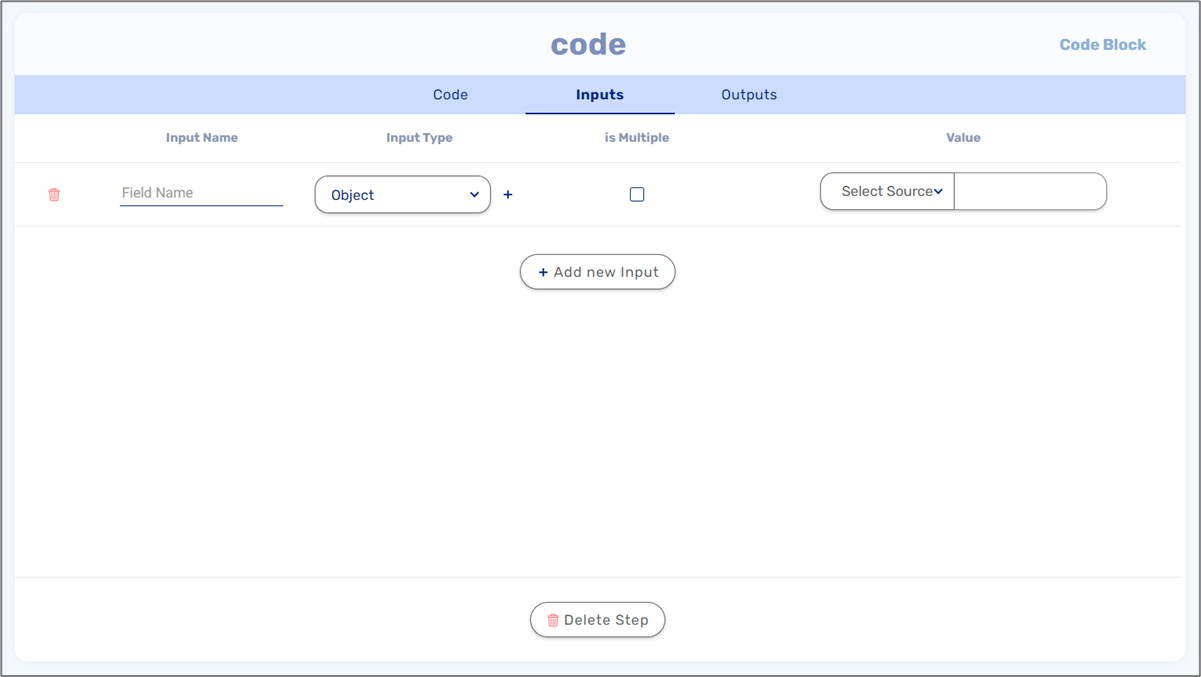
Figure 24: Inputs
When adding a new output, it must contain the following information (see Figure 25):
- Field Name
- Output Type:
- String
- Number
- Boolean
- File
- Object - when an Object is selected, a plus icon appears. The icon allows you to open the Model screen and select an object type data item.
- Any
- Is Multiple:
- when checked - indicates the input is an array
- when not checked - indicates the input is not an array
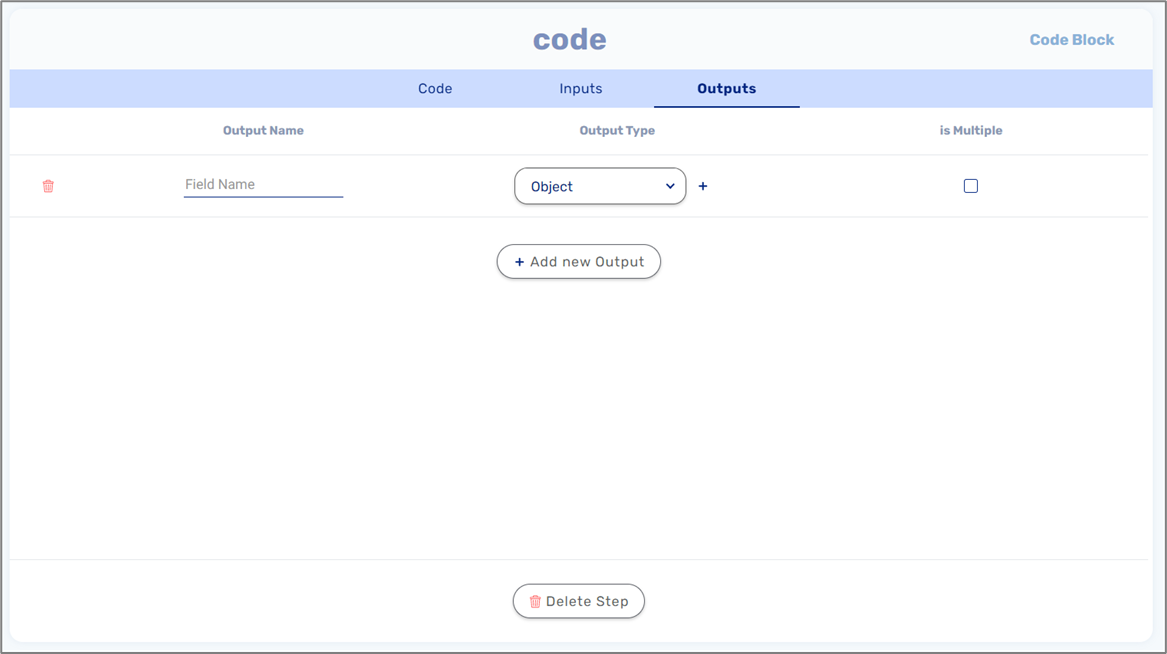
Figure 25: Outputs
Step Type - File Storage Service
(See Figure 26)
A File Storage Service step type contains a checkbox (1) that allows you to use different file storage (2) per environment or server, for example, a production environment or a QA environment.
You can select which files to upload (3) from different sources: Model data item or metadata. Additional options are to set the path (4) and File Name (5) using dynamic fields.
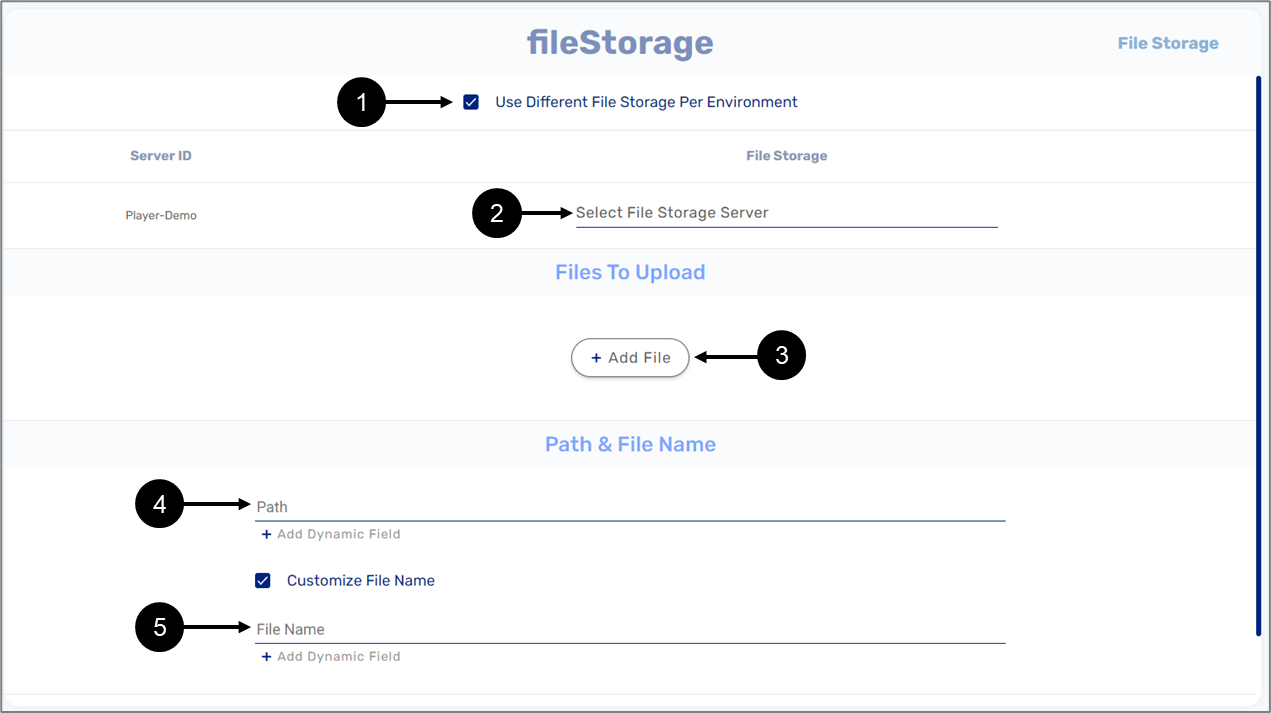
Figure 26: Step Type - File Storage Server
Step Type - Rest API Service
(See Figure 27 and Figure 28)
A Rest API Service step type contains parameters for a Rest API Request (1) and a
Response (2). A request can utilize a different URL per environment (3) and can also indicate whether the API requires authentication (4). The URL (5) can be set using dynamic fields and contains URL Parameters. Once a parameter is added (6), it must contain a name and value that is selected from a specific source: Constant, Model, or Metadata. In addition, a Rest API method (7) must be selected: GET, POST, or PUT.
A request can also utilize different headers (8) per environment and once a header is added (9), it must contain a name and value that is selected from a specific source: Constant, Model, or Metadata.
The content of the request can be triggered directly from a server (10) and its type (11) can be: JSON, form-data, Raw String, or Blob. When a content item is added (12), it must contain a name and type (String, Number, Boolean, File), and source (Constant, Model, Metadata).
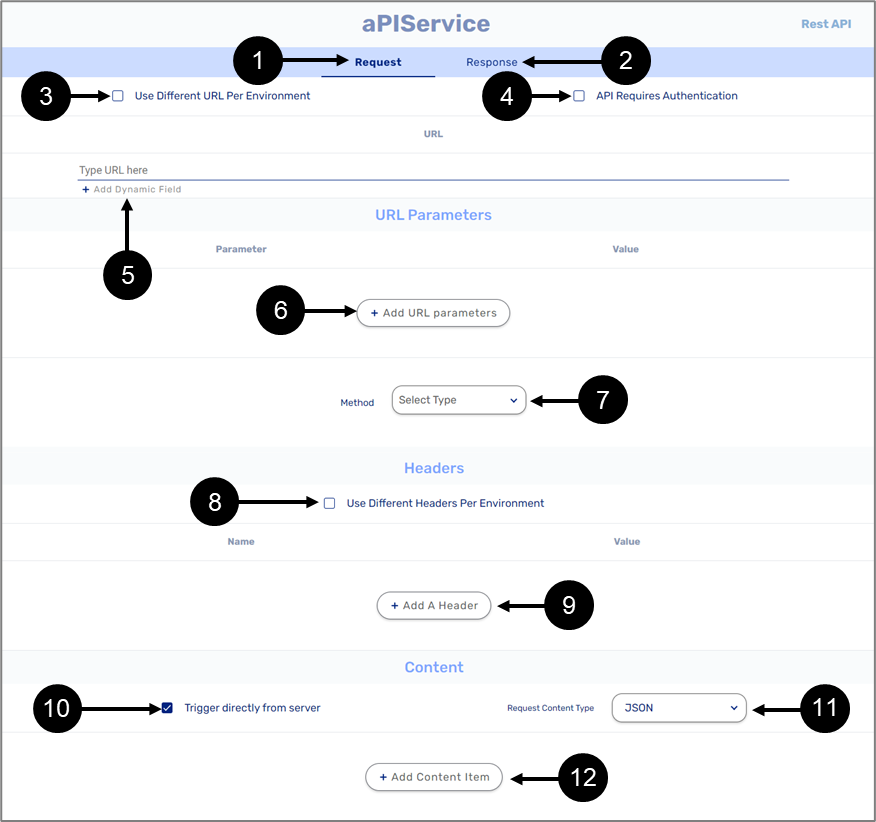
Figure 27: Step Type - Rest API Service (Request)
When configuring the Rest API response, its content type will be set (13) (JSON, form-data, Raw String, or Blob) and outputs will be added (14).
Each output contains the following information:
- Field Name
- Output Type:
- String
- Number
- Boolean
- File
- Object - when an Object is selected, a plus icon appears. The icon allows you to open the Model screen and select an object type data item.
- Any
- Is Multiple:
- when checked - indicates the input is an array
- when not checked - indicates the input is not an array
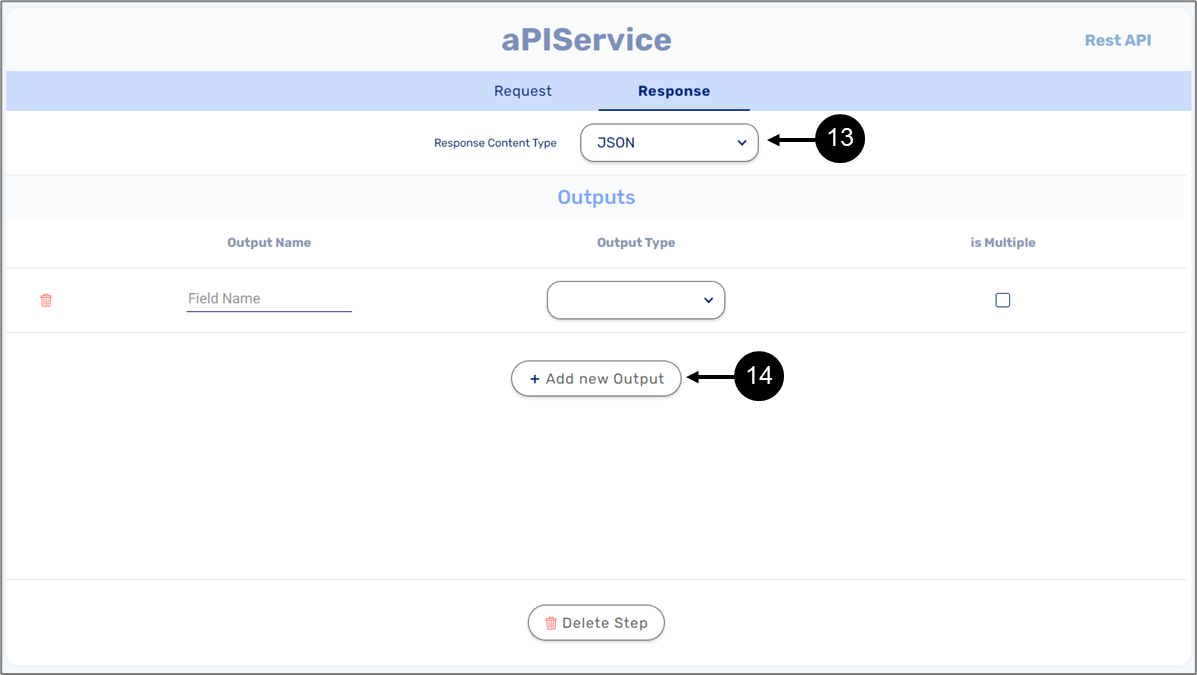
Figure 28: Step Type - Rest API Service (Response)
Step Type - Computed Service
(See Figure 29)
A Computed Service step type contains a toggle (1) to set its expression to be a number or text expression. Once a computed service is added, it contains a condition (3) and a value that contains static text and dynamic fields (4).
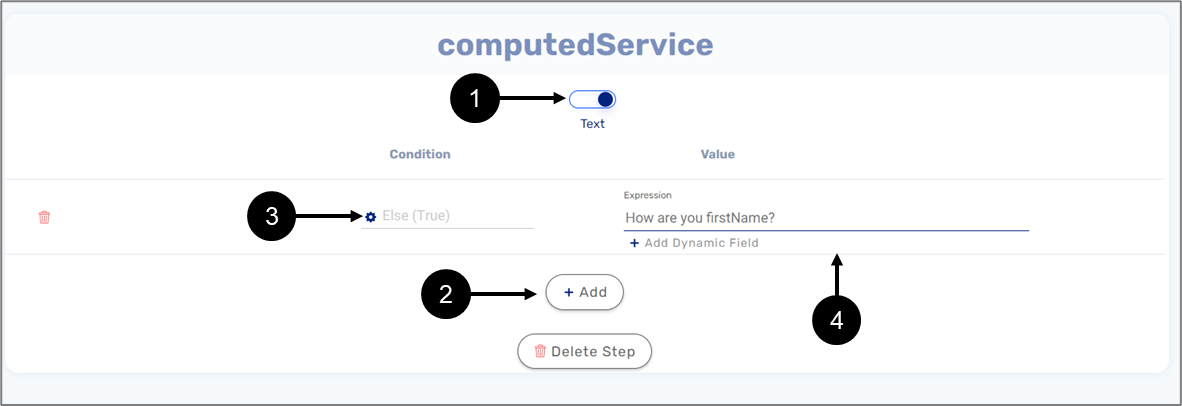
Figure 29: Step Type - Computed Service
Step Type - Email
(See Figure 30)
An Email step type contains a line to add recipients (1) and the subject of the email (2). The content of the email (3) will be written with dynamic fields, and attachments can also be added from different sources: Model or Metadata. Once an attachment is added, its name can be customized.
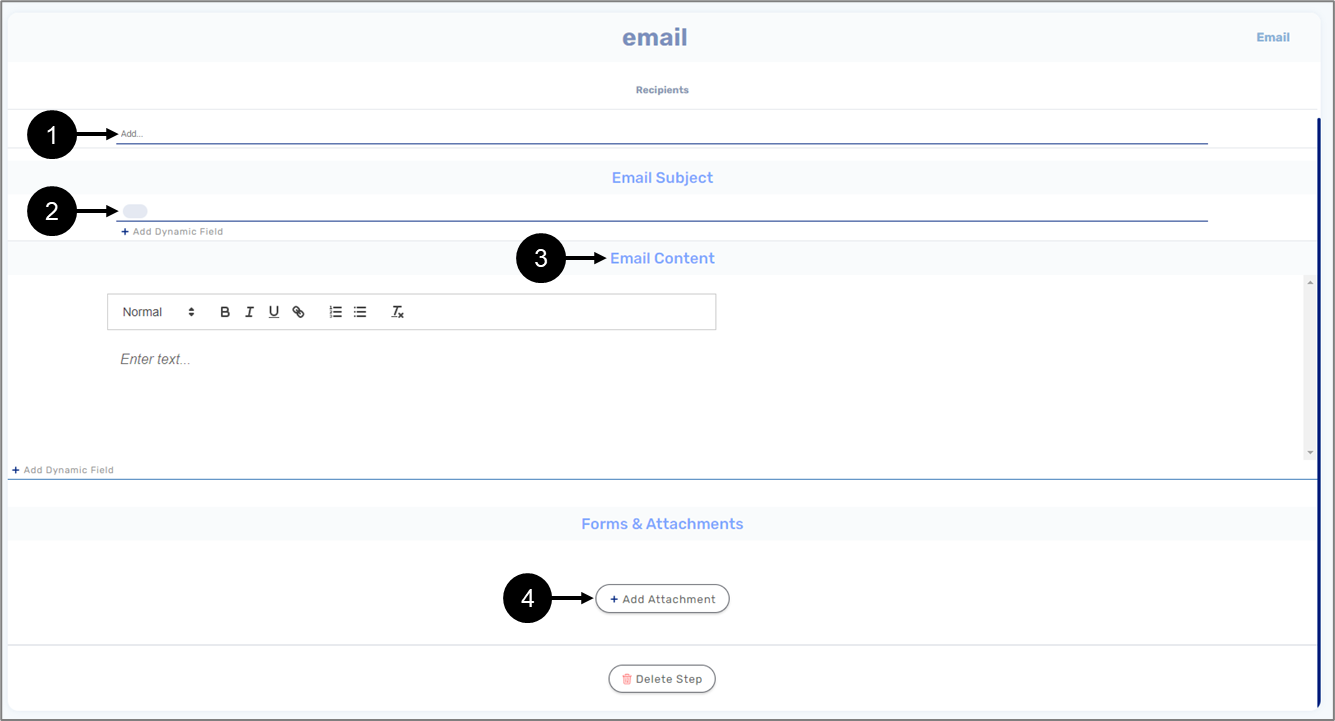
Figure 30: Step Type - Email
Step Type - EasySend Service
(See Figure 31)
An EasySend Service step type contains three tabs: ID (1) where the ID of the service is set, Input, and Outputs.

Figure 31: Step Type - EasySend Service
When adding a new input, it must contain the following information (see Figure 32):
- Field Name
- Input Type:
- String
- Number
- Boolean
- File
- Object - when an Object is selected, a plus icon appears. The icon allows you to open the Model screen and select an object type data item.
- Any
- Is Multiple:
- when checked - indicates the input is an array
- when not checked - indicates the input is not an array
- Select Source:
- Constant
- Model
- Metadata
- None
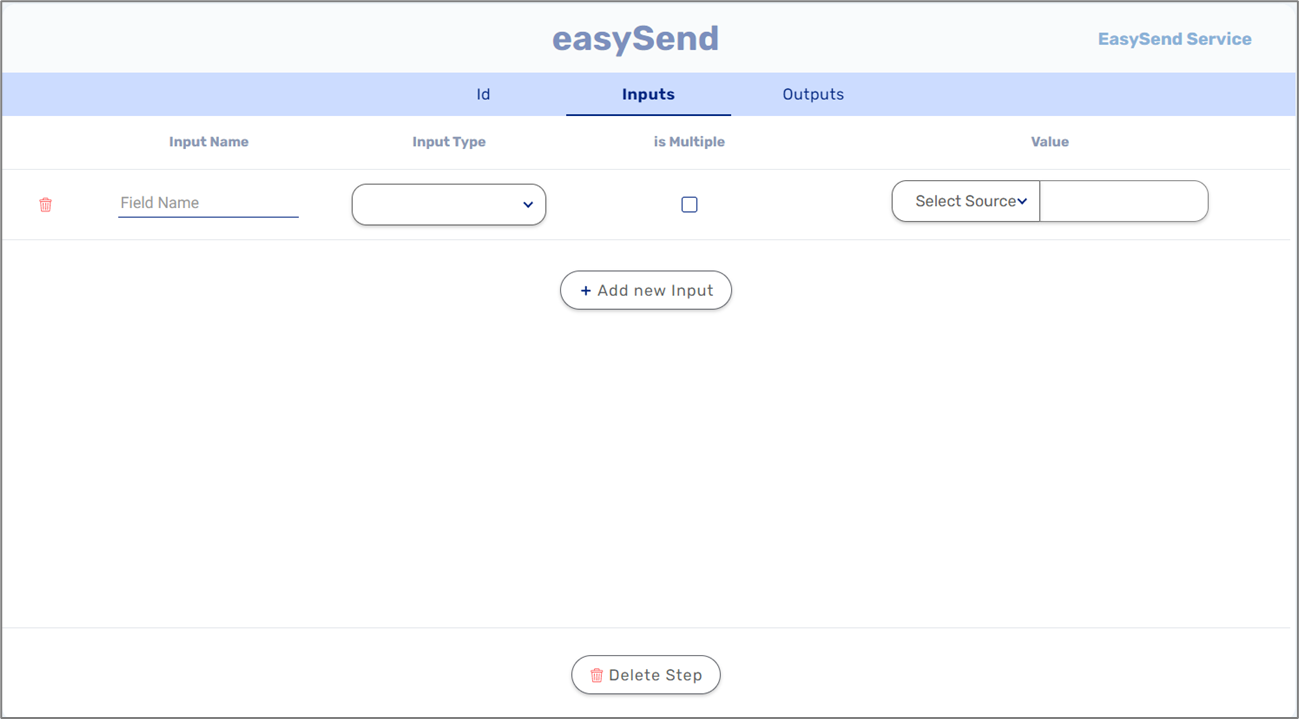
Figure 32: Inputs
When adding a new output, it must contain the following information (see Figure 33):
- Field Name
- Output Type:
- String
- Number
- Boolean
- File
- Object - when an Object is selected, a plus icon appears. The icon allows you to open the Model screen and select an object type data item.
- Any
- Is Multiple:
- when checked - indicates the input is an array
- when not checked - indicates the input is not an array
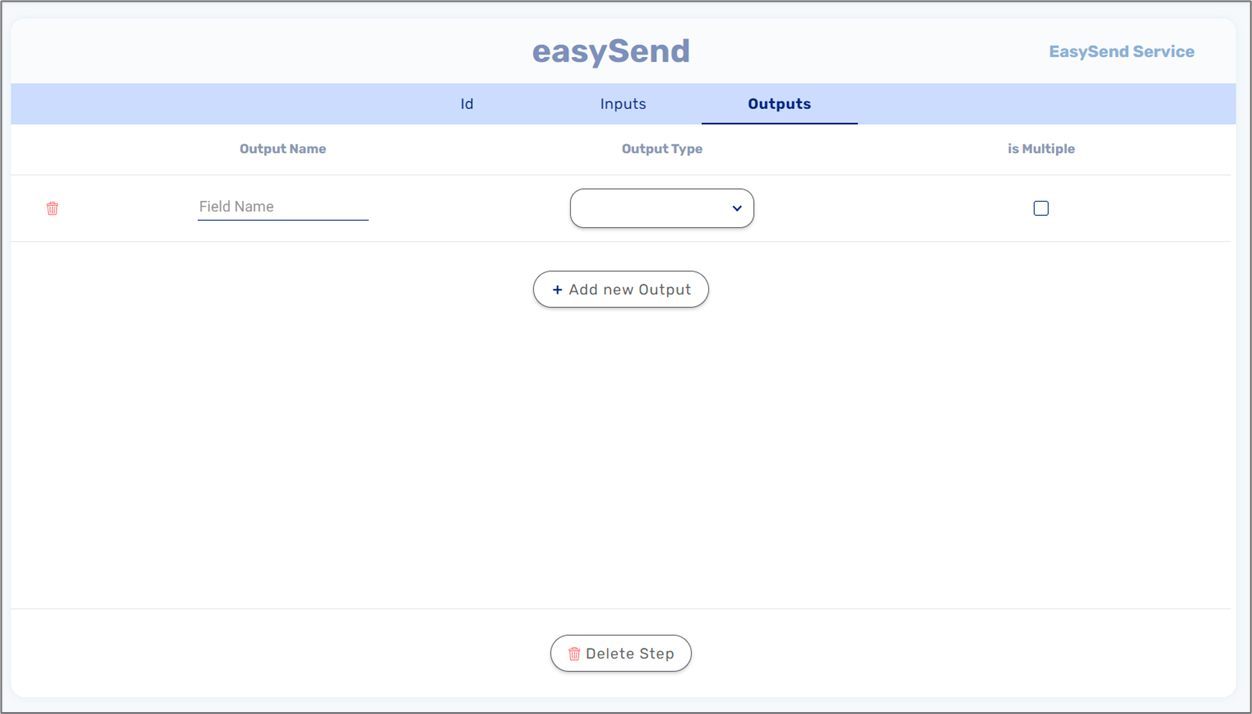
Figure 33: Outputs
Step Type - SQL Query
(See Figure 34)
An SQL query step type allows you to use a different DB server per environment. When a DB server is created (2) it must be selected between three different types and configured. For additional information, see the DB Server section.
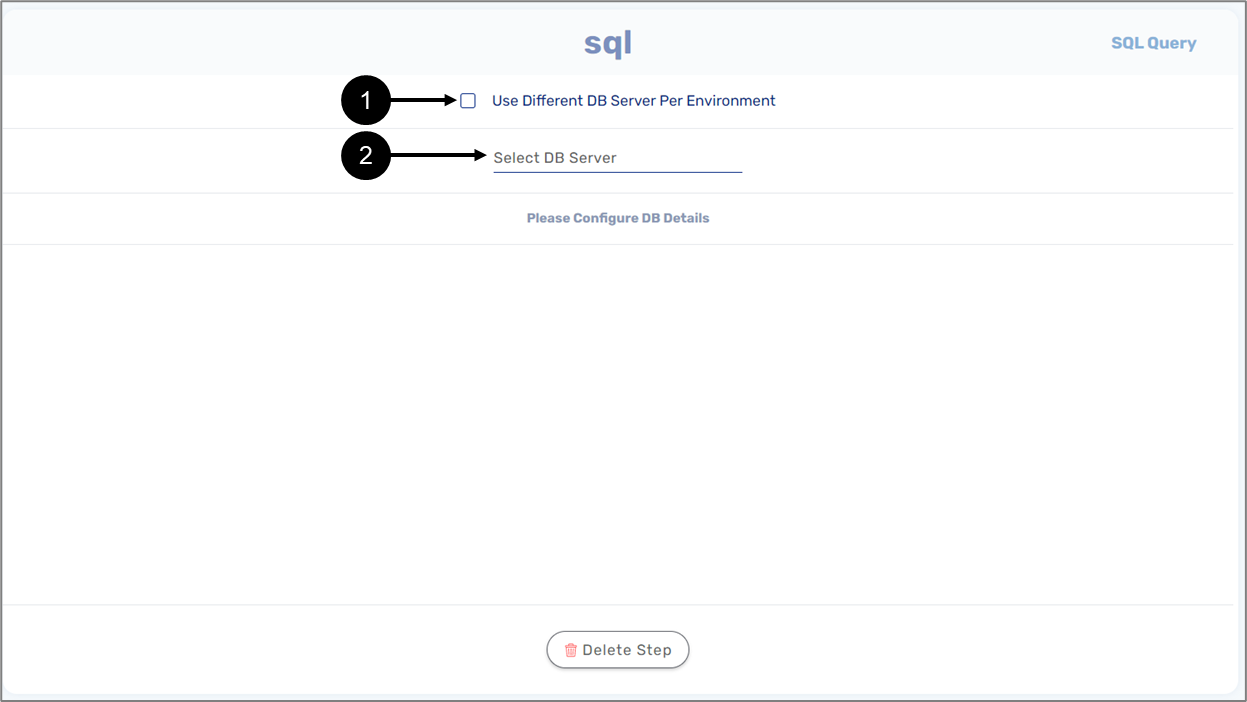
Figure 34: Step Type - SQL Query
Step Type - File Encode/Decode
(See Figure 35)
A File Encode/Decode step type allows you to encrypt/decrypt files. An encryption/decryption can be selected from five different types:
- Base64 (currently not supported).
- PGP encryption.
- RSA.
- JSON Web Encryption (JWE).
- Sign JSON Web Token (JWT).
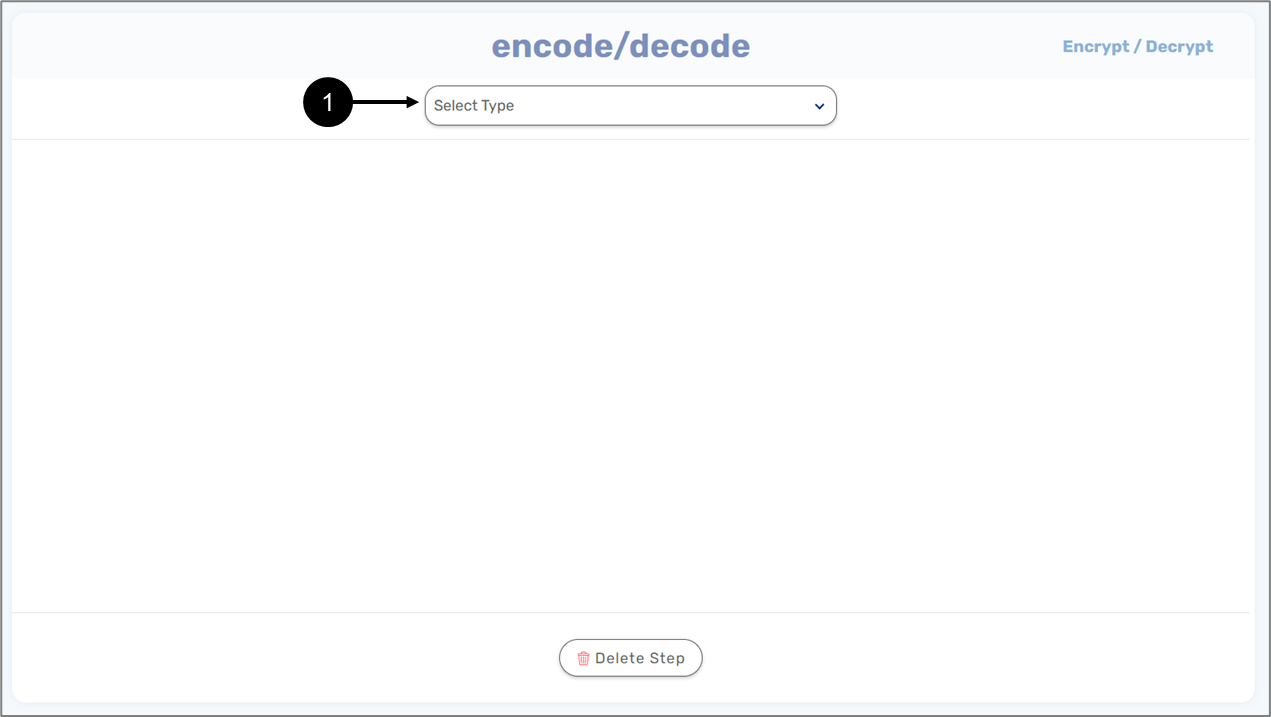
Figure 35: Step Type - Encode/Decode
PGP Encryption
(See Figure 36)
A different PGP encryption can be used per environment (1). A PGP key must be selected (see the PGP Key section). Once a file is added (3), it will contain a name and value from a selected source: Model or Metadata.
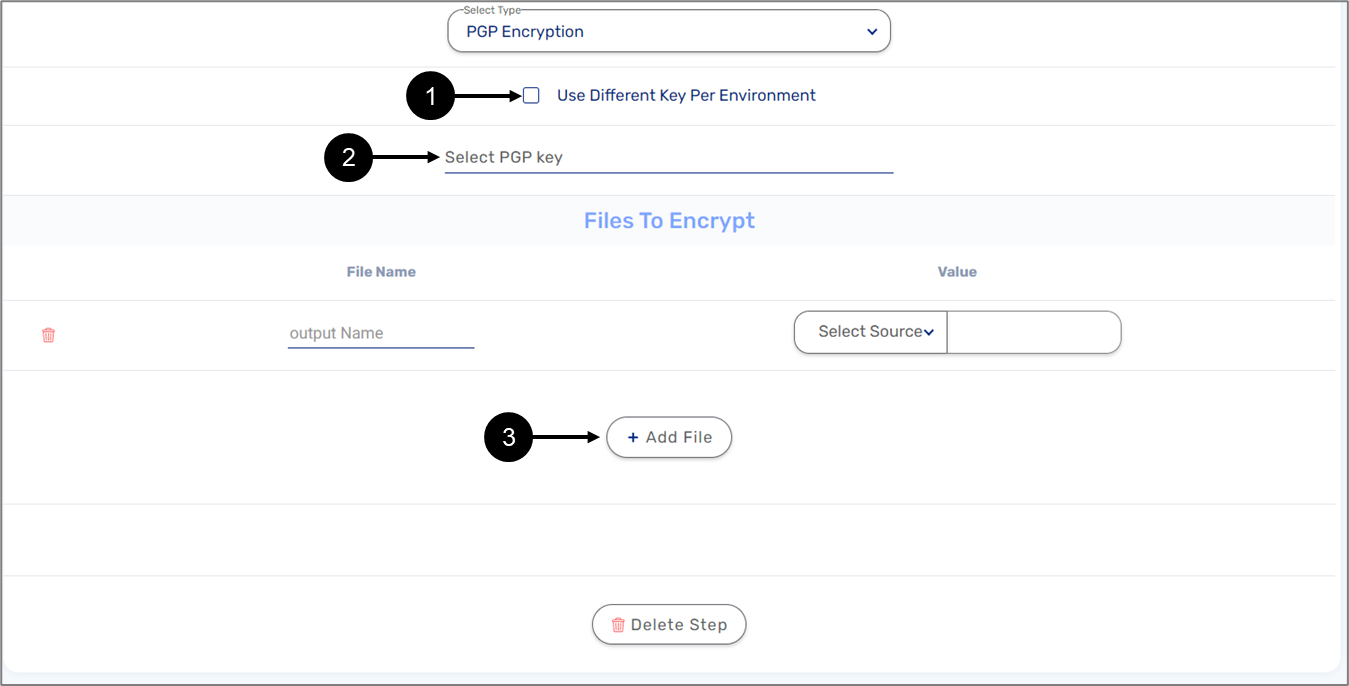
Figure 36: PGP Encryption
RSA Encryption
(See Figure 37)
A different RSA encryption can be used per environment (1). An encryption key must be selected (see the Keys section). The RSA operation must be set by selecting a Padding Scheme (3), Operation (4), and a Hash Algorithm (5). Once a file is added (6), it will contain a name and value from a selected source: Model or Metadata.
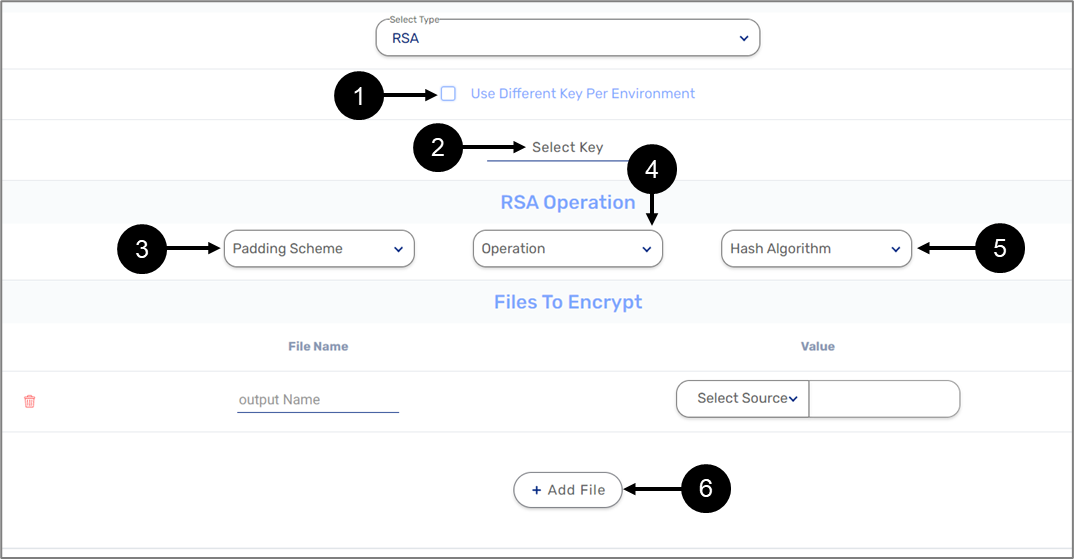
Figure 37: RSA Encryption
JWE
(See Figure 38)
JWE is a means of representing encrypted content using JSON data structures. A digital key must be selected (2)(see the Keys section) but a different one can be used per environment (1). JWE Headers must be added. When clicking the + Add Header button (3) for the first time three headers are added automatically:
- alg (mandatory) - for selecting a key management algorithm:
- RSA-OAEP
- RSA-OAEP-25
- A128KW
- A192KW
- A256KW
- dir
- ECDH-ES
- ECDH-ES+A128KW
- ECDH-ES+A192KW
- ECDH-ES+A256KW
- A128GCMKW
- A192GCMKW
- A256GCMKW
- PBES2-HS256+A128KW
- PBES2-HS256+A192KW
- PBES2-HS256+A256KW
- enc (mandatory) - for selecting content encryption algorithm -
- A128CBC-HS256
- A192CBC-HS384
- A256CBC-HS512
- A128GCM
- A192GCM
- A256GCM
- New header (not mandatory) - for adding a header according to one of three different sources:
- Constant
- Model
- Metadata
Once data to encrypt is added (4), it will contain a name and value from a selected source: Constant, Model or Metadata.
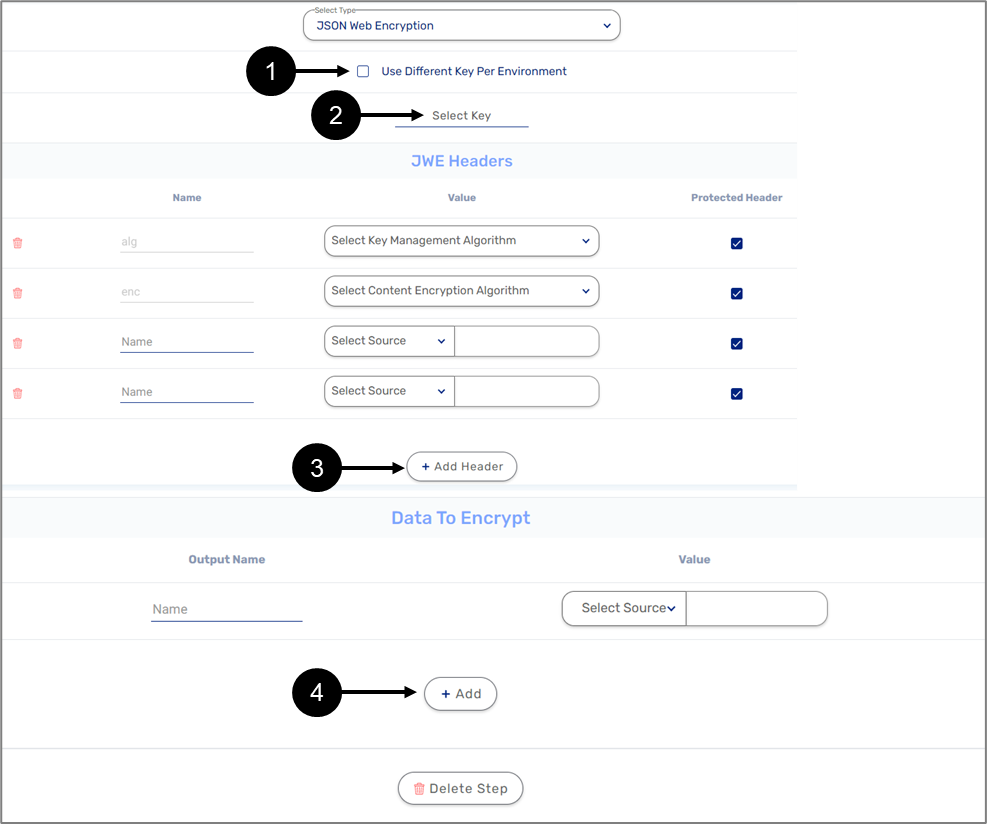
Figure 38: JWE Encryption
JWT
(See Figure 39)
JWT is a compact, URL-safe means of representing claims to be transferred between two parties. A digital key must be selected (2)(see the Keys section) but a different one can be used per environment (1). In addition to the key, a JSON Web Signature and Encryption (JOSE) must be selected from the following options:
- HS256
- HS384
- HS512
- RS256
- RS384
- RS512
- ES256
- ES384
- ES512
- PS256
- PS384
- PS512
When When adding a claim (4)The source can be a Constant, from the Model, or Metadata. In general, the JWT specification defines seven reserved claims that are not required, but are recommended to add to allow interoperability with third-part applications:
Name | Description | Type |
| iss (issuer) | Issuer of the JWT | string |
| sub (subject) | Subject of the JWT (the user) | string |
| aud (audience) | Recipient for which the JWT is intended | string |
| exp (expiration time) | Time after which the JWT expires | int |
| nbf (not before time) | Time before which the JWT must not be accepted for processing | int |
| iat (issued at time) | Time at which the JWT was issued; can be used to determine age of the JWT | int |
| jti (JWT ID) | Unique identifier; can be used to prevent the JWT from being replayed (allows a token to be used only once) | int |
For an output, only one JWT token is allowed and must be provided with a name (5).
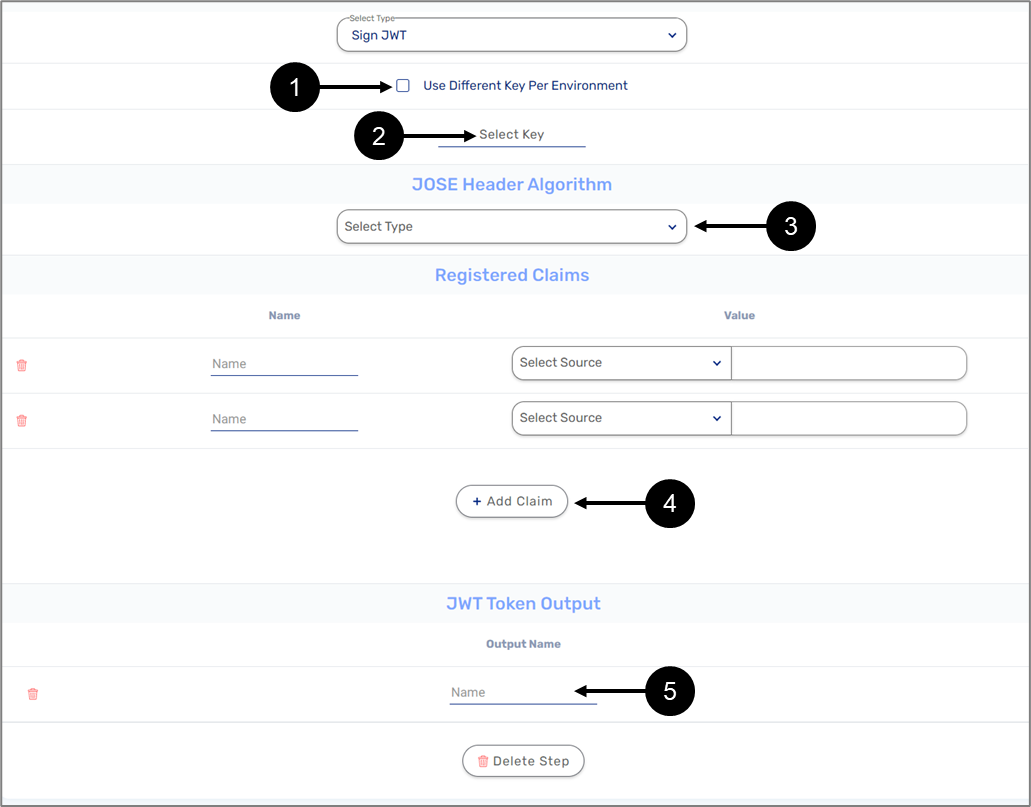
Figure 39: JWT Encryption
Step Type - Hashing
(See Figure 40)
A Hashing step type allows you to convert strings to hexadecimal value with SHA. The step must be configured with one of the following a Hash Algorithms (1):
- MD5
- SHA-1
- SHA-224
- SHA-256
- SHA-384
- SHA-512
Added outputs (2) must receive a name, source, and value. A source can be a Constant, from the Model, or Metadata.
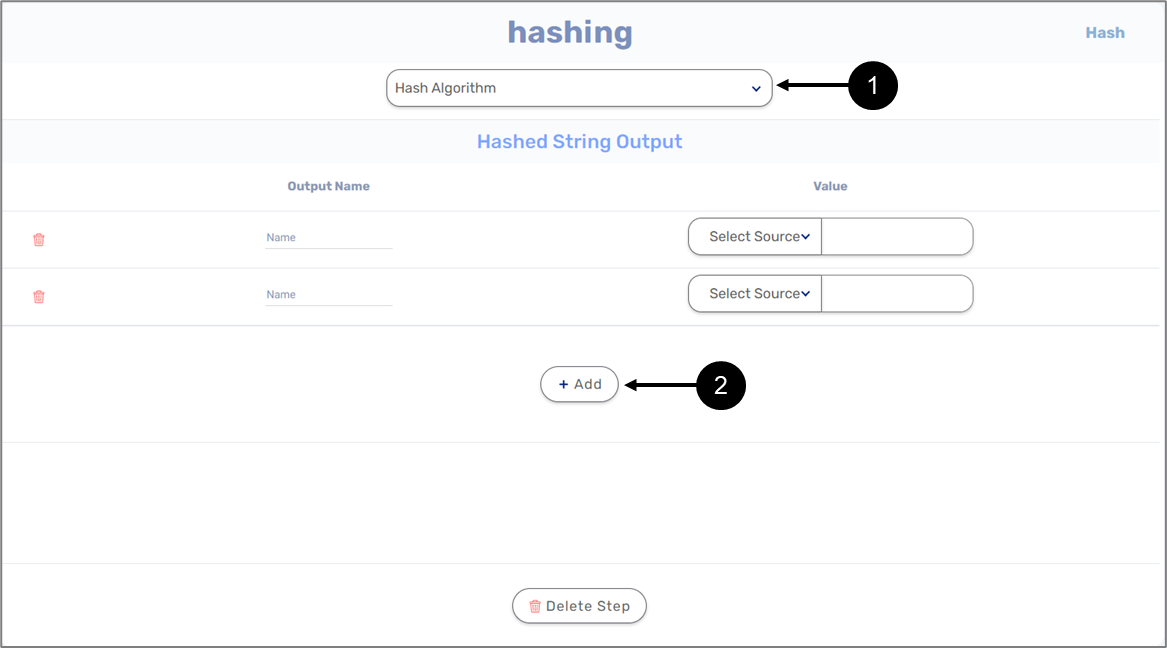
Figure 40: Step Type - Hashing
Outputs
(See Figure 41)
A service contains one output. An output contains the following information:
- Output Name
- Output Type:
- String
- Number
- Boolean
- File
- Object - when an Object is selected, a plus icon appears. The icon allows you to open the Model screen and select an object type data item.
- Any
- Is Multiple:
- when checked - indicates the input is an array
- when not checked - indicates the input is not an array
- Value:
- Constant
- Model
- Metadata
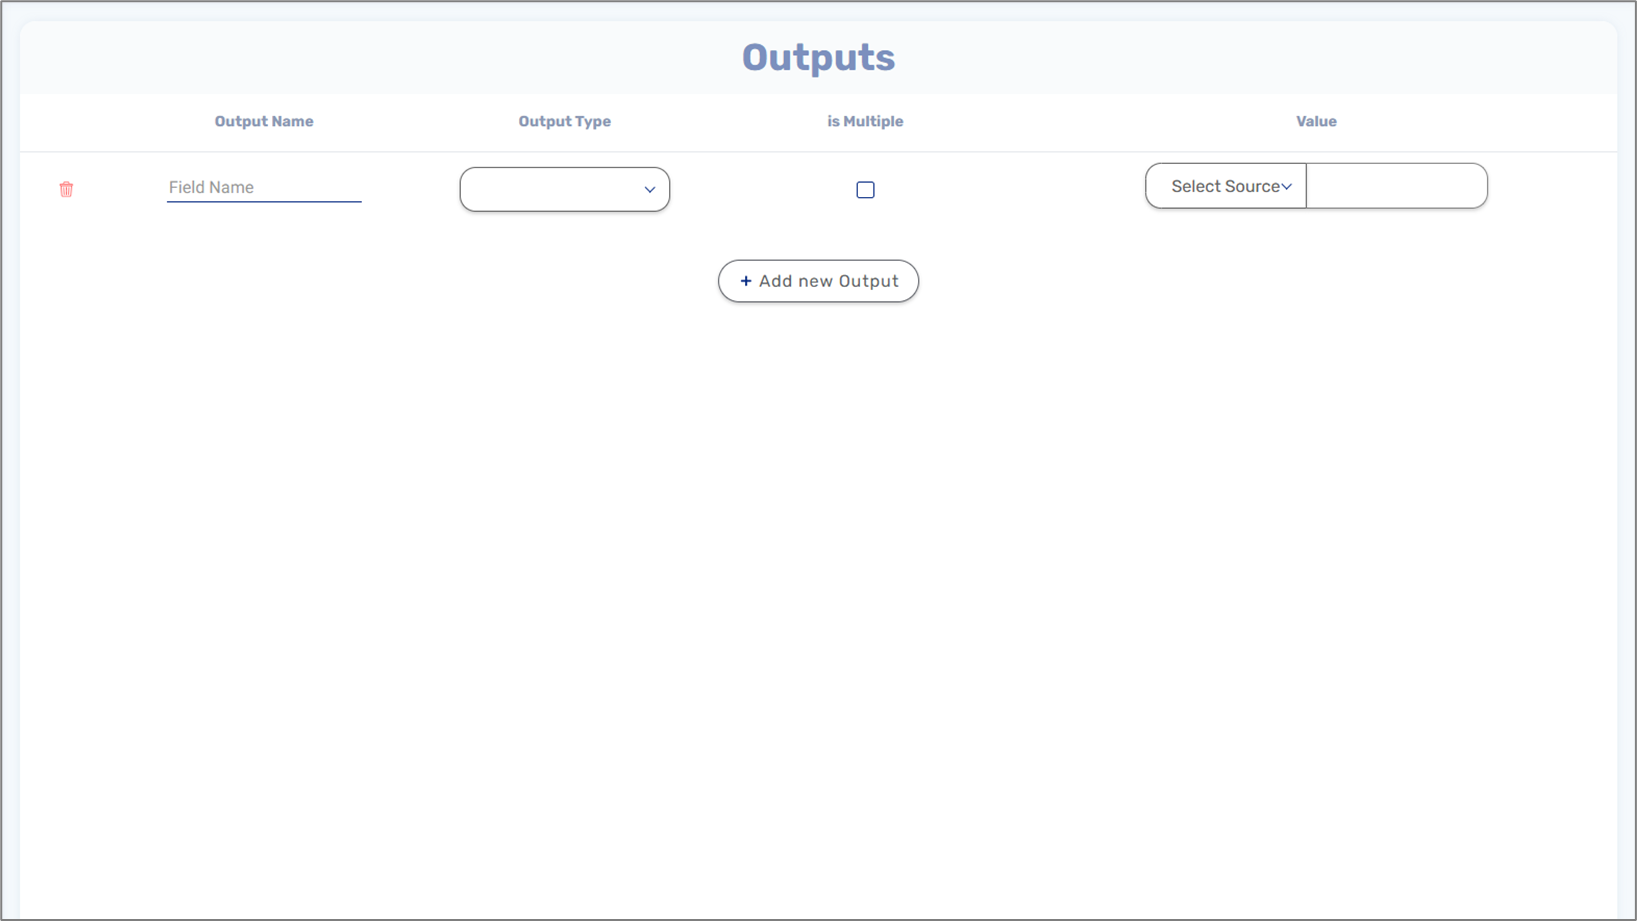
Figure 41: Outputs
Initiating Services
The following sections describe use cases for each service.
Integration
(See Figure 42 and Figure 43)
An integration service can be initiated from the Workflow Manager as an integration step, for example when implementing hashing with JWT:
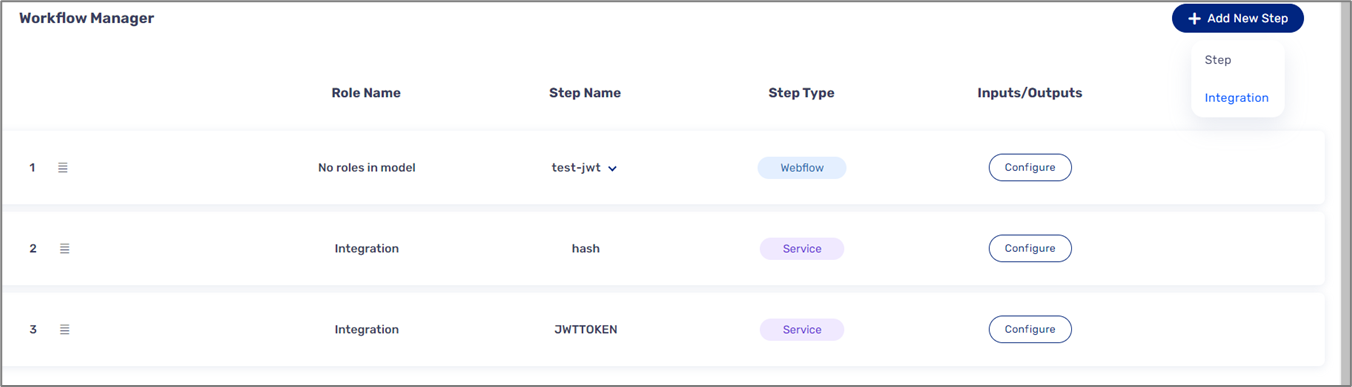
Figure 42: Integration Step
- An integration service can be initiated from a Webflow using the properties section of a button component:
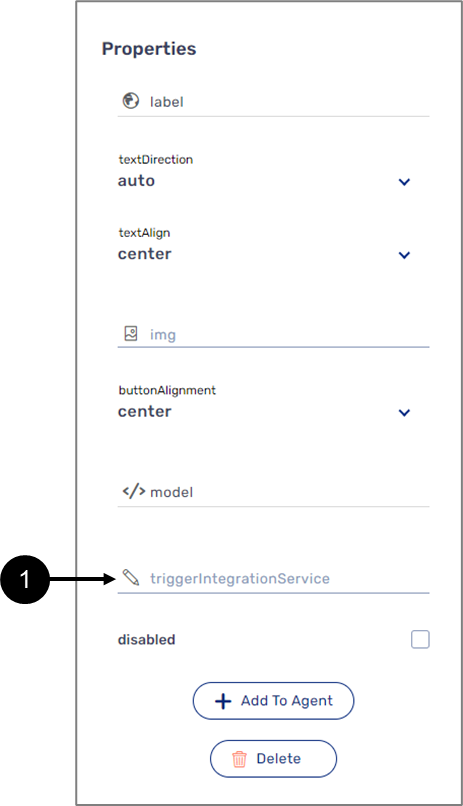
Figure 43: Integration Step
Computations
(See Figure 44)
Computations are initiated using the Model screen by changing a Value from User Input to Computed (Service):
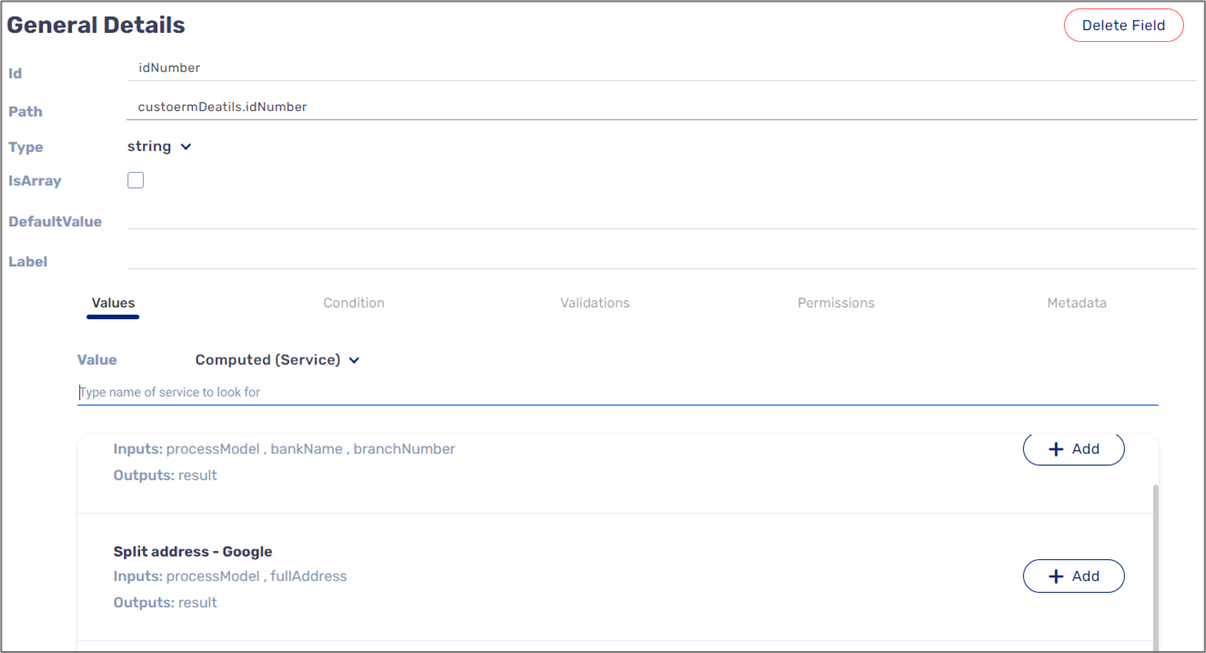
Figure 44: Computed Service
Autocomplete
(See Figure 45)
Autocomplete is initiated using the Model screen by changing a Value from User Input to Autocomplete Service:
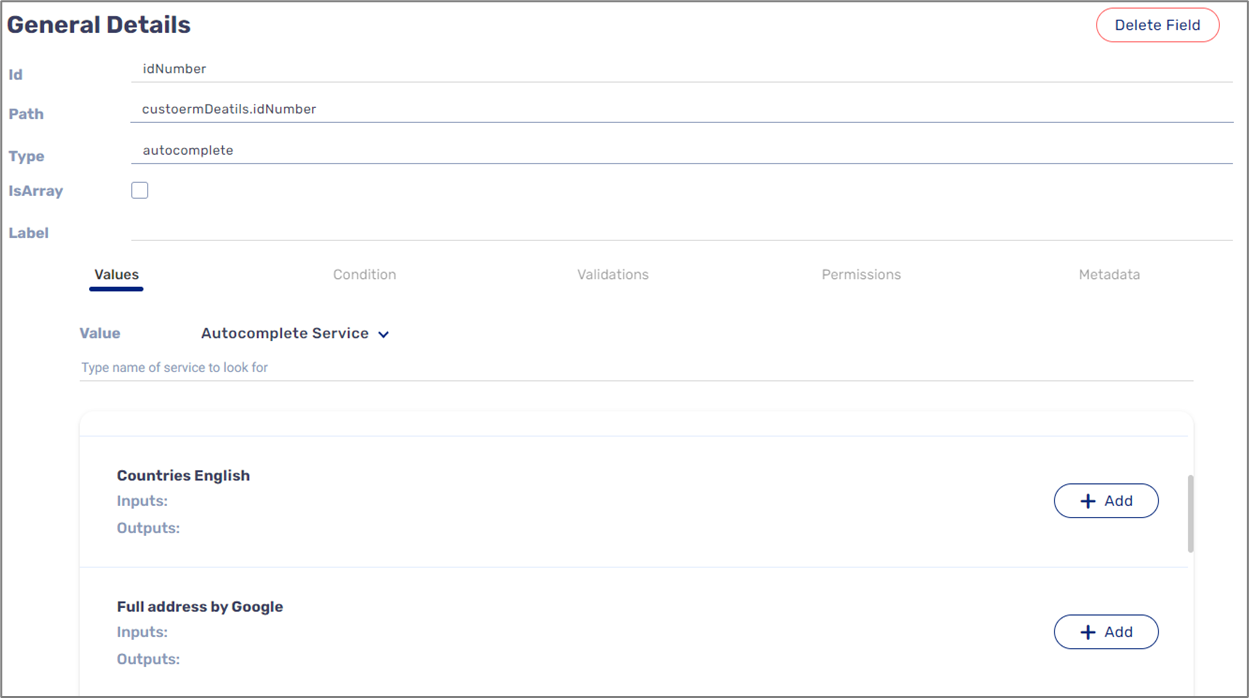
Figure 45: Autocomplete Service
Intermediate
An intermediate service is added into another service as an additional step. For additional information, see the Steps section.
Communication
(See Figure 46)
A communication service is initiated from the Workflow Manager, when configuring a Webflow step with an output communication service:
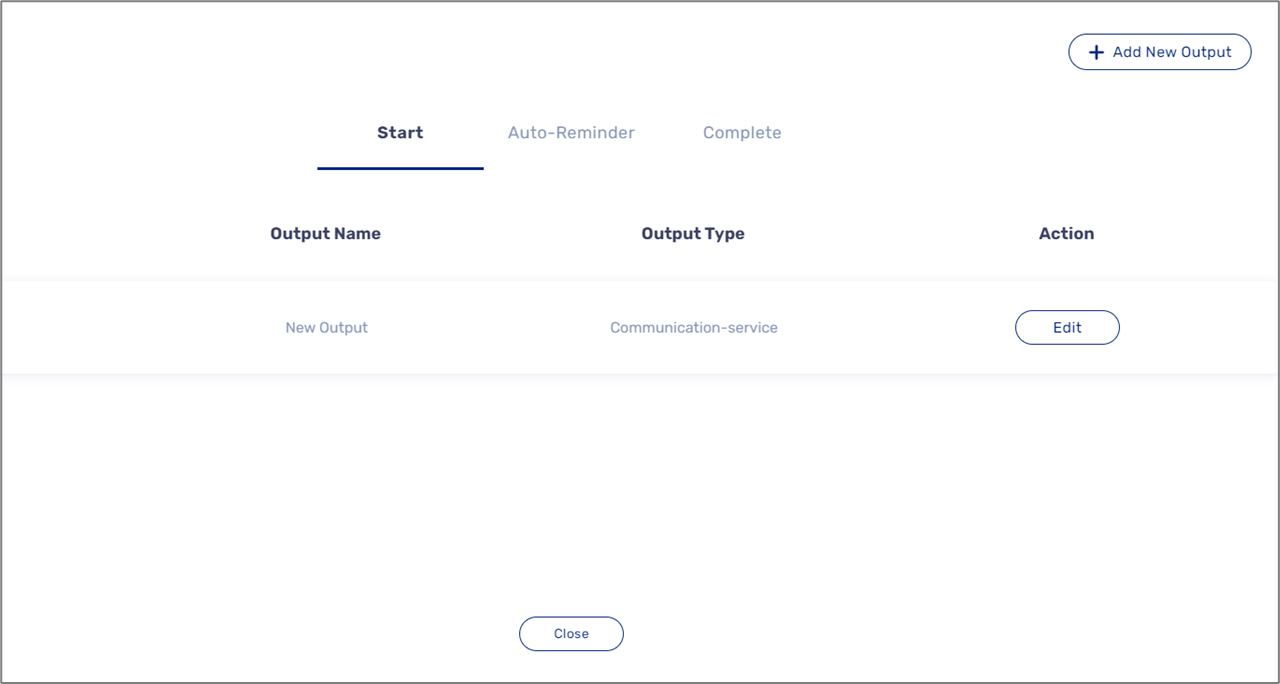
Figure 46: Communication Service
Import Services
(See Figure 47 and Figure 48)
EasySend services can be imported and used in any environment. An imported service is imported as read-only and cannot be modified. An integration that relies on global intermediates will include them as well.
When clicking the Import button (1), if a service is available to import, the Import window will appear allowing you to select a service to import:
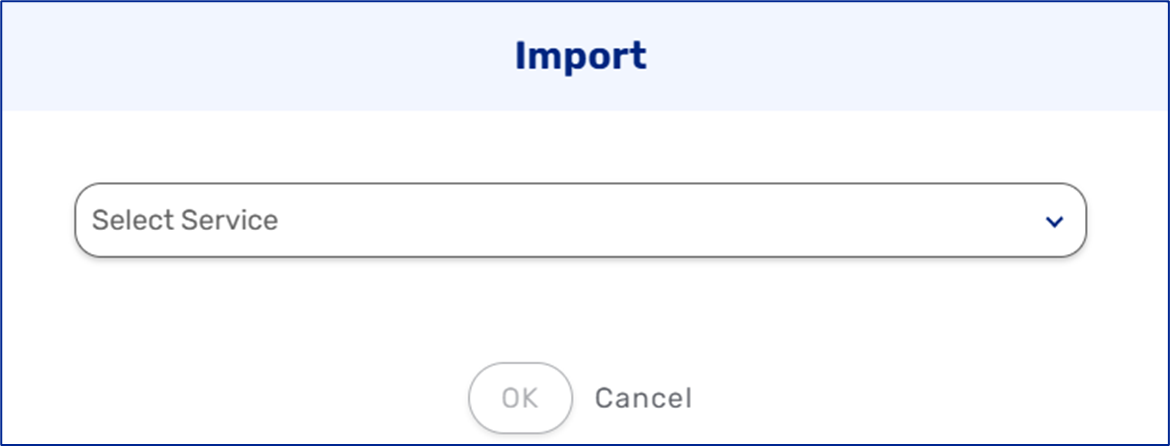
Figure 47: Import window
If no services are available to import, the Import window will appear but with a message indicating no services are available.

Figure 48: No New Services to Import
Credit Guard Integration with a Digital Process
Credit Guard payment service can be integrated with a digital process. The following sections describe the required steps to perform the Integration.
Step 1: Creating Credit Guard Resource
(See Figure 49)
A Credit Guard resource must be created (see the Payment section) with the following information:
- URL
- Terminal Number
- User
- Password
- MID
- CG Version
- Card ID
- Description
- All fields except Description are required.
- The information is provided by Credit Guard.
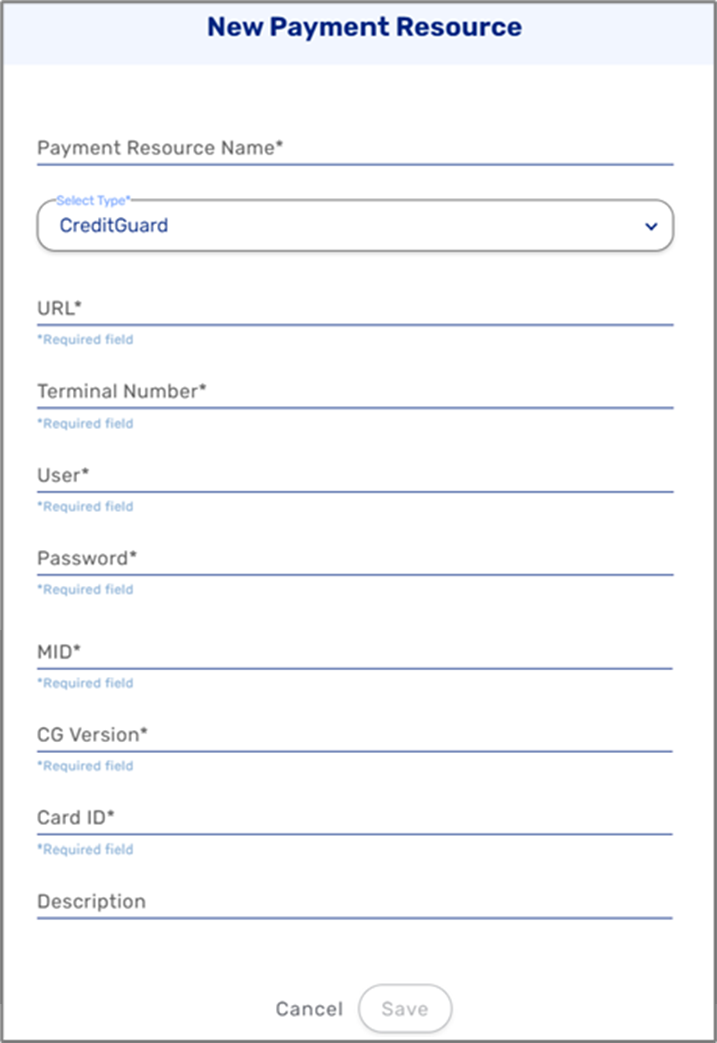
Figure 49: Credit Guard Resource
Step 2: Adding and Configuring a Credit Guard Component
(See Figure 50 and Figure 51)
To add and configure a Credit Guard component, perform the following steps:
- Navigate to the Webflow screen.
- Under Payment Solutions, drag and drop the Credit Guard component (1) onto the canvas.
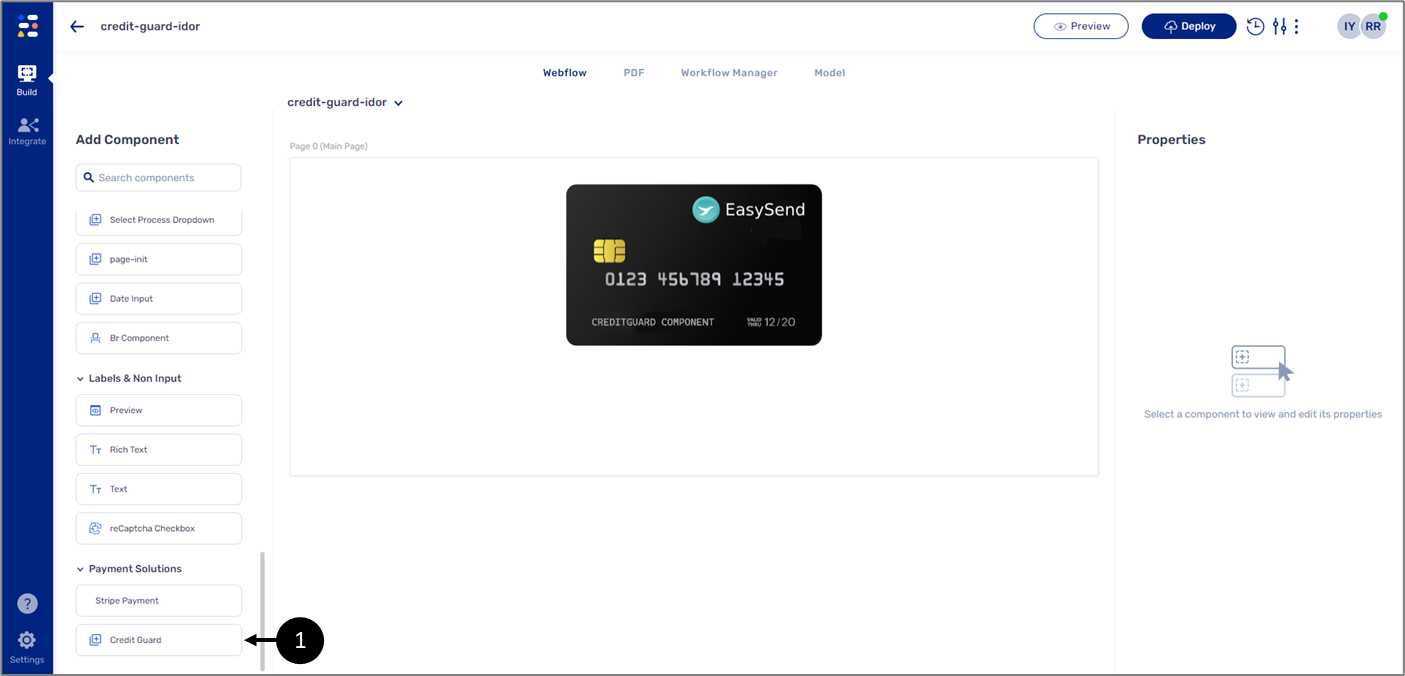
Figure 50: Credit Guard Component
- Click the component it to display its Properties section.
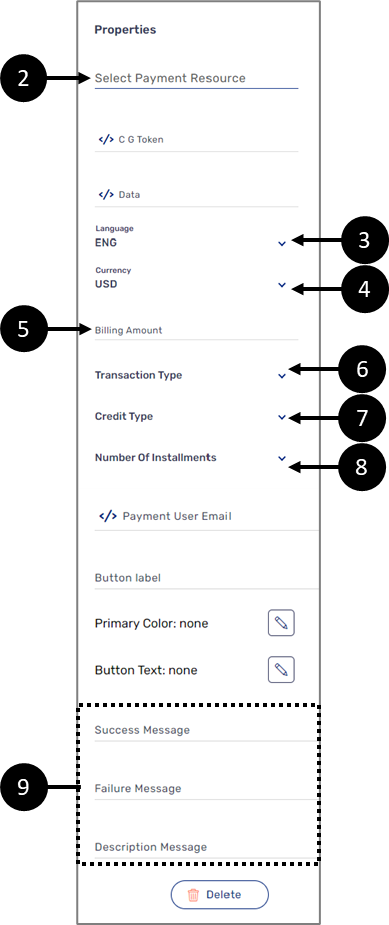
Figure 51: Credit Guard Properties
- Configure the properties:
- Connect it to the created Credit Guard resource (2).
- Set the Language (3).
- English (ENG)
- Hebrew (HEB) NOTEThe selected language will affect how Credit Guard components are displayed while viewing the digital process:
- Text direction
- Text (including the default Description message)
- Button labels
- Set the Currency (4).
- ILS
- USD
- EUR
- Enter the Billing Amount (5) - the billing amount must be written in cents, for example: when writing 50000 the displayed amount will be 500.00.
- Set the Transaction Type (6):
- Debit
- Recurring Debit
- Set the Credit Type (7):
- Regular Credit
- Installments
- Set the Number Of Installments (8):
- 1 - 12
- 1 - 12, 24
- 1 - 12, 24, 36
- Write the following messages (9):
- Success
- Failure
- Description
It is possible to override the message with new text or remove it by entering " " in the Description Message field.
Step 3: Create Credit Guard Data Structure
(See Figure 52)
In the Model screen create the following required data structure:
- creditGuard (object)
- CG_Token (string)
- CG_Data (object)
- cardId (string)
- You can add more data items under CG_Data to display additional information, for example:
- cardMask (string)
- cardExpiration (string)
- sessionCD (string)
- cardBrand (object)
- code (string)
- text (string)
- creditType (object)
- code (string)
- text (string)
- id (string)
- authNumber (string)
- statusText (string)
- You can also create a data item to display user email information, for example: emailModelValue (string).
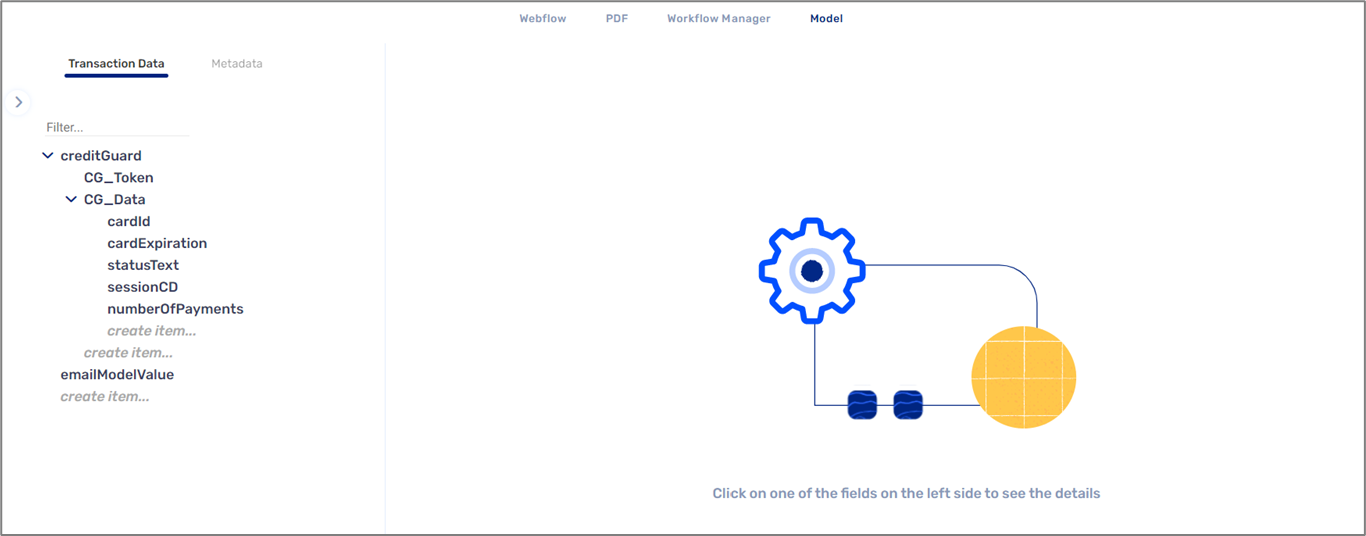
Figure 52: Data Structure
Step 4: Connecting Data Items
(See Figure 53)
Connect the properties to data items according to Table 2:
Table 2: Connecting Data Items
Property | Connect to |
C G Token | creditGuard.CG_Token |
Data | creditGuard.CG_Data |
Payment User Email | emailModelValue NOTE This data item must also be connected to a data input component such as a Text Input |
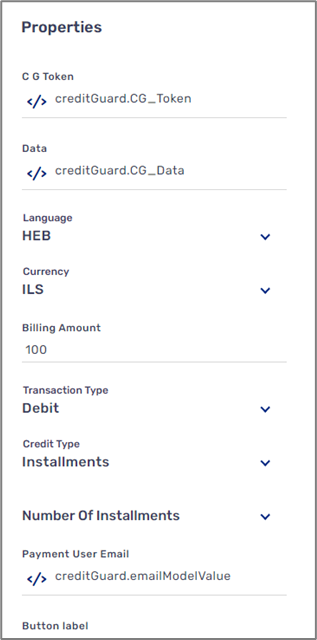
Figure 53: Credit Guard Component Properties
Step 5: Deploy and Preview
(See Figure 54)
After configuring the properties and connecting the data items click the Deploy button to start the deployment process and then click Preview.
Please note that deployment warnings will occur if:
- A Success message, a Failure message, or both are missing.
- The Credit Type is set to Installments but the Number Of Installments was not set.

Figure 54: Deployment Warnings
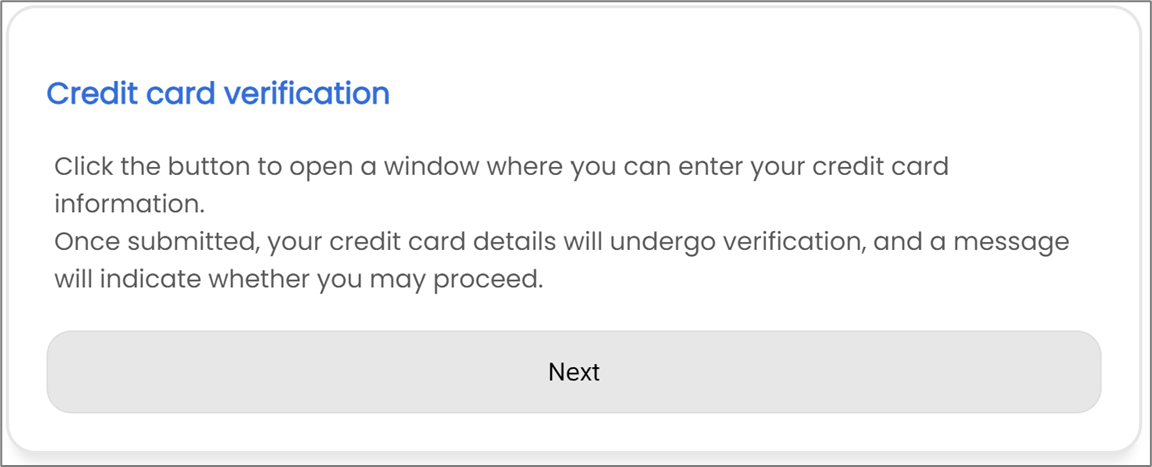
Figure 55 displays an example of a digital process intergraded with Credit Guard:
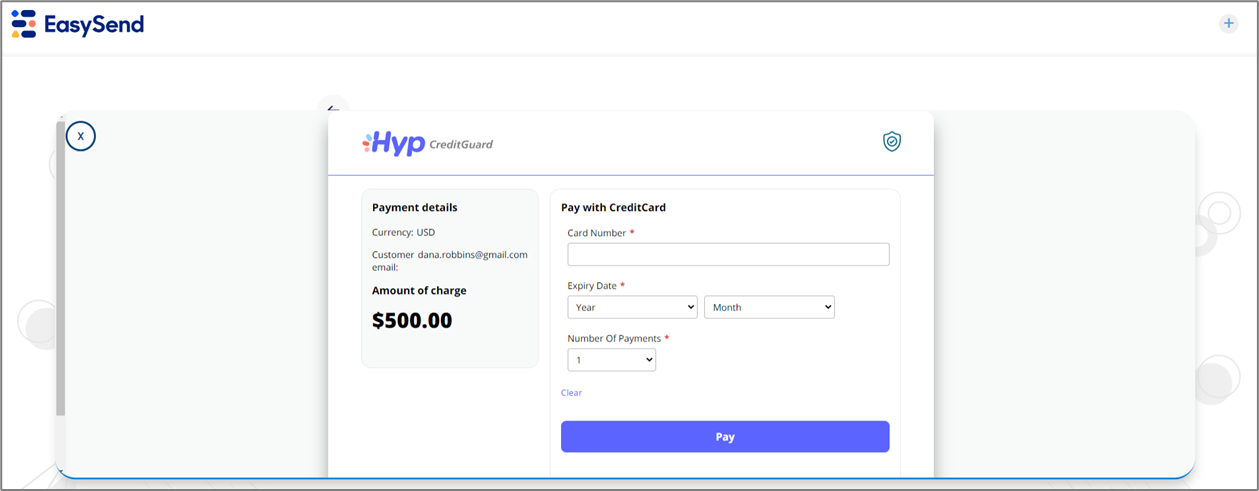
Figure 55: Digital Process with Credit Guard
Hashing and JWT Example
The following sections describe an example of hashing and JWT usage.
Step 1: Model Data Items
(See Figure 56)
With the rest of the data items you created to connect Webflow components, create additional data items for hashing and JWT, for example:
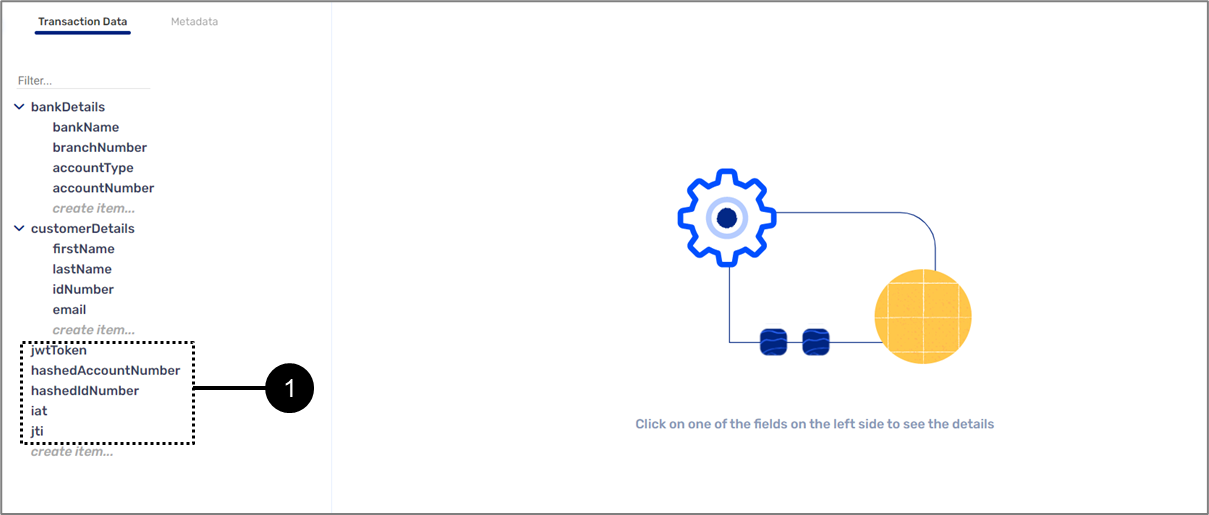
Figure 56: Model Data Items
Step 2: Create a Service with a Hash Step
(See Figure 57 to Figure 59)
Create a service with the following:
- Create inputs:

Figure 57: Inputs
- Add hashing step:
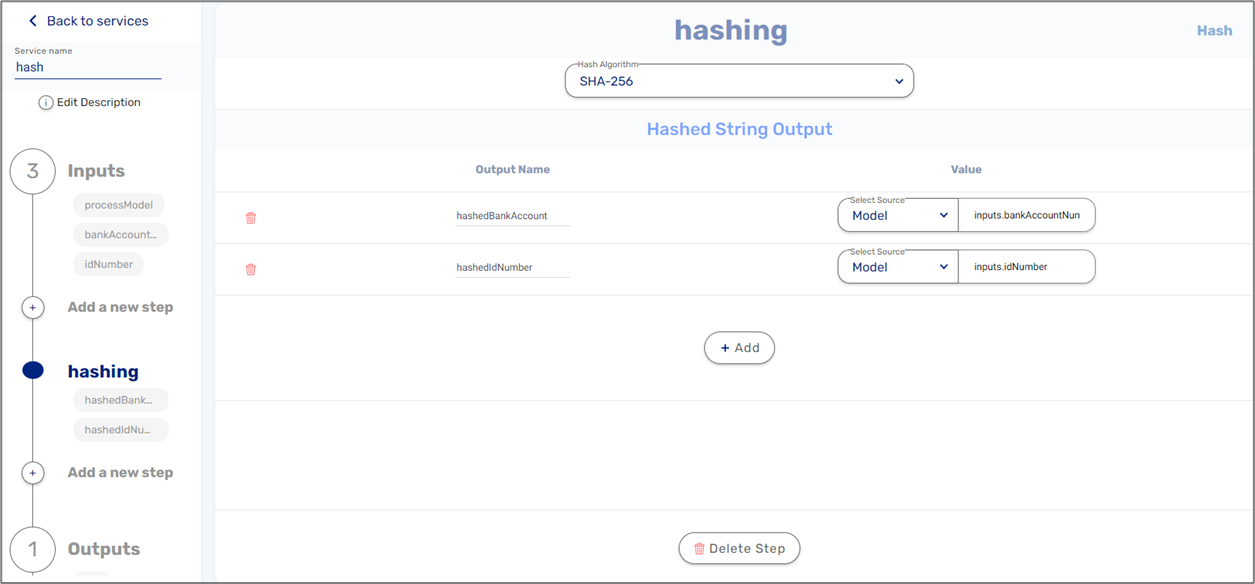
Figure 58: Hashing Step
- Add outputs:
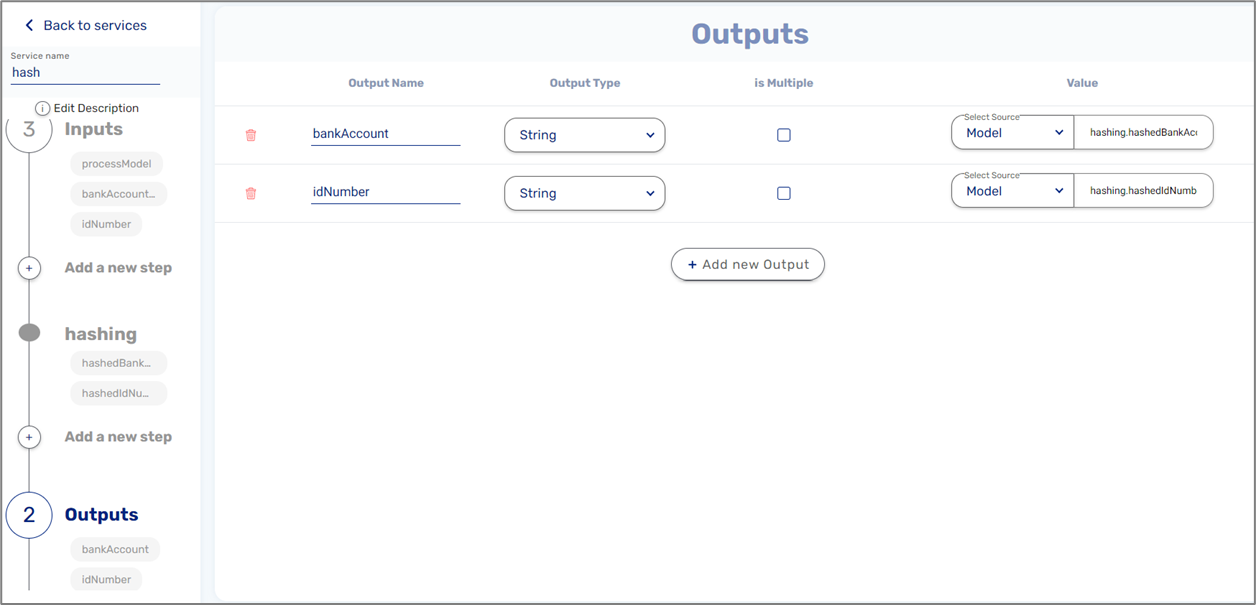
Figure 59: Outputs
Step 3: Create a Service with a File Encode-Decode Step (JWT)
(See Figure 60 to Figure 62)
Create a service with the following:
- Create inputs:
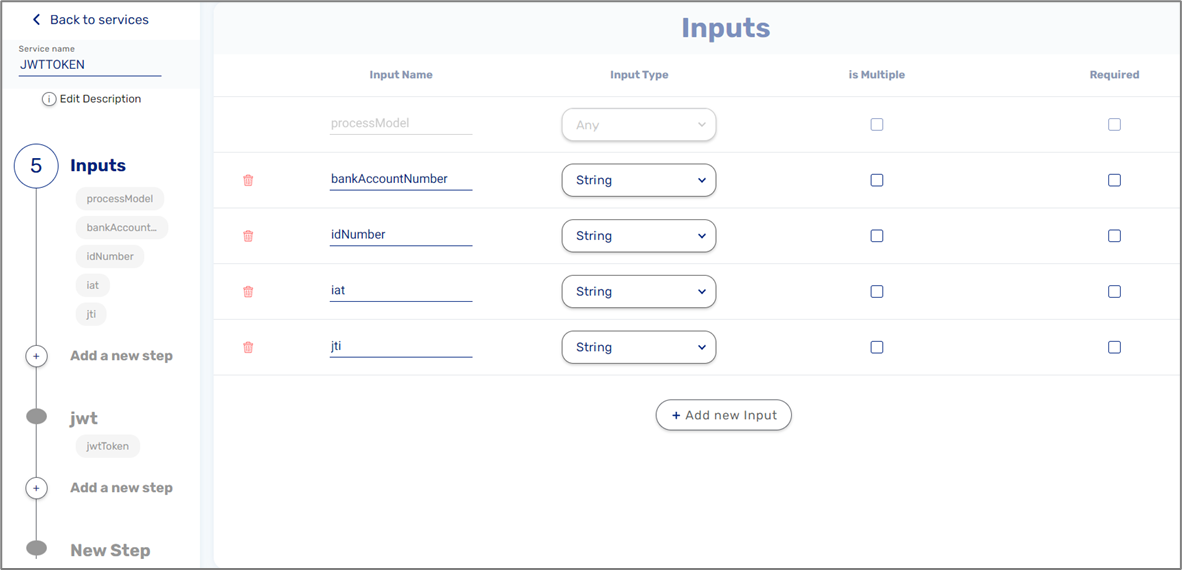
Figure 60: Inputs
- Add a File Encode-Decode step:

Figure 61: File Encode-Decode Step
- Add an output:
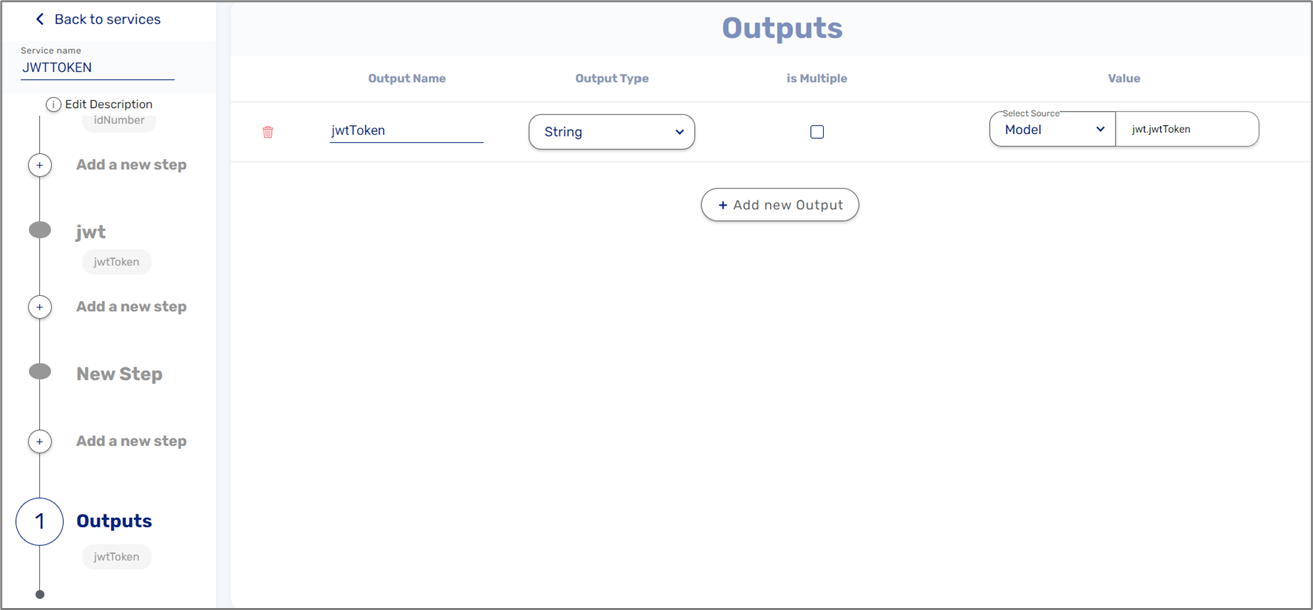
Figure 62: Outputs
Step 4: Configure the Workflow Manager
(See Figure 63 to Figure 65)
Configure the workflow with two different steps:
- Create an Integration step for the hashing service created in Step 2 and configure it:
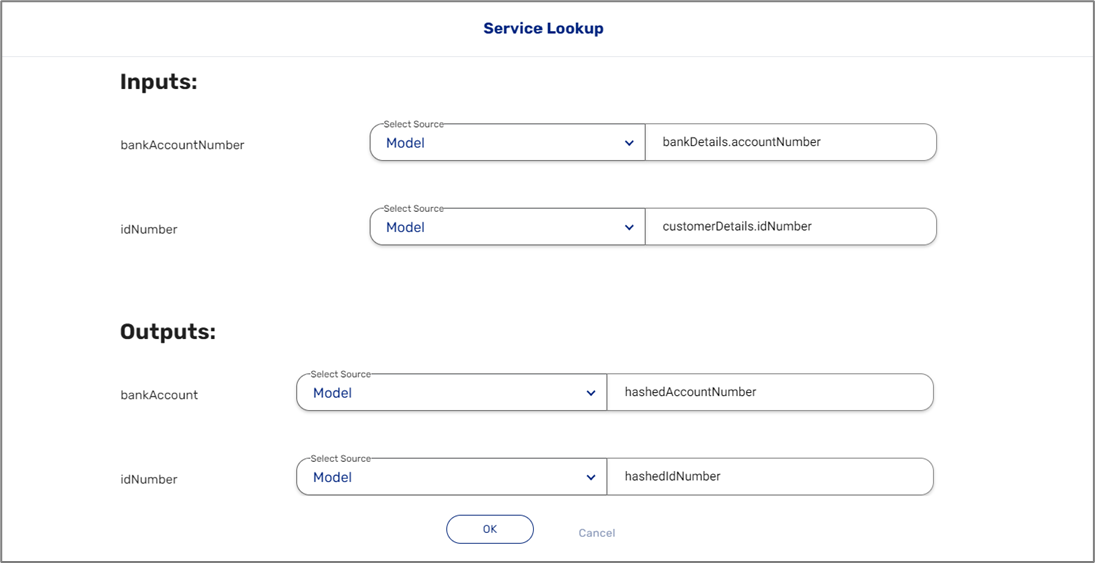
Figure 63: Integration Step (Hashing)
- Create an Integration step for the JWT service created in Step 3 and configure it:
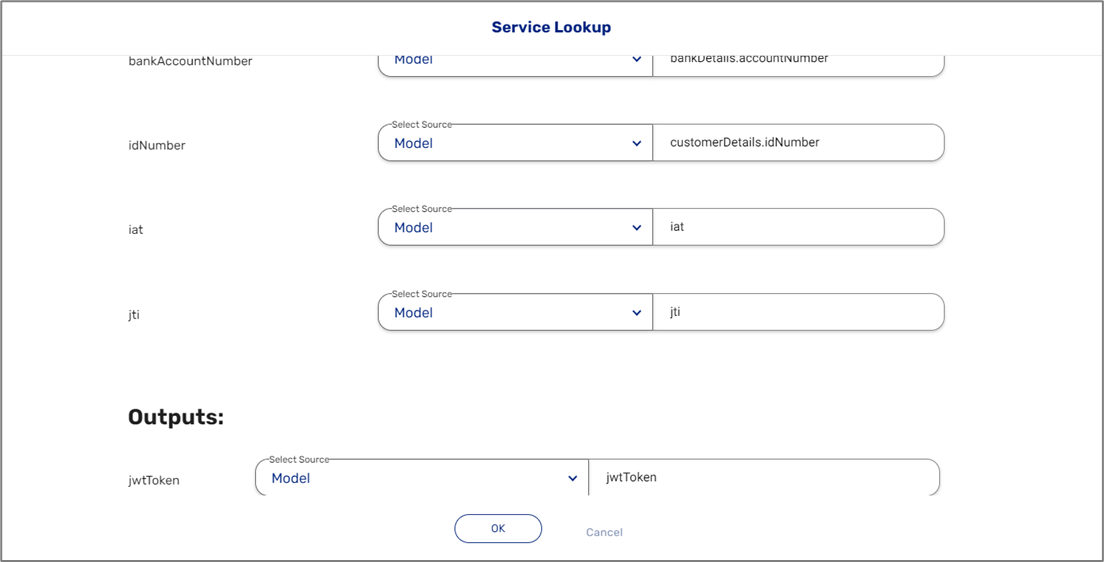
Figure 64: Integration Step (File Encode-Decode (JWT))
- When the two steps are configured, click the Deploy button:
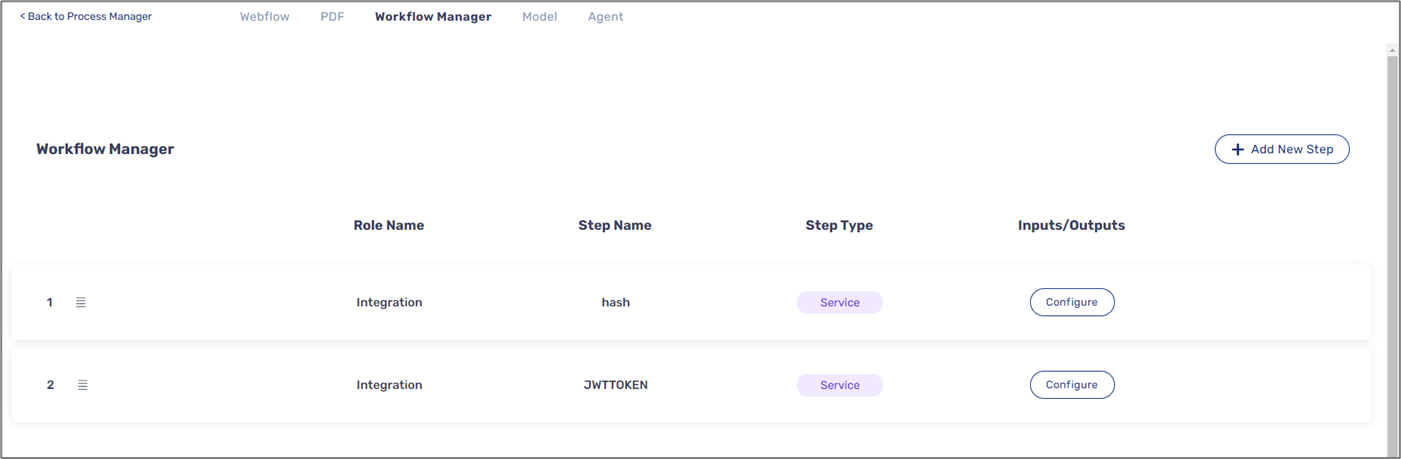
Figure 65: Configured Steps