Background
The following document describes how to perform two-way integration between Dynamics 365 and EasySend.
Data Prefill: from Dynamics 365 to a Digital Process
The following sections describe how to prefill a digital process with data from Dynamics 365.
Step 1: Creating Dynamics 365 Resource
(See Figure 1 to Figure 7)
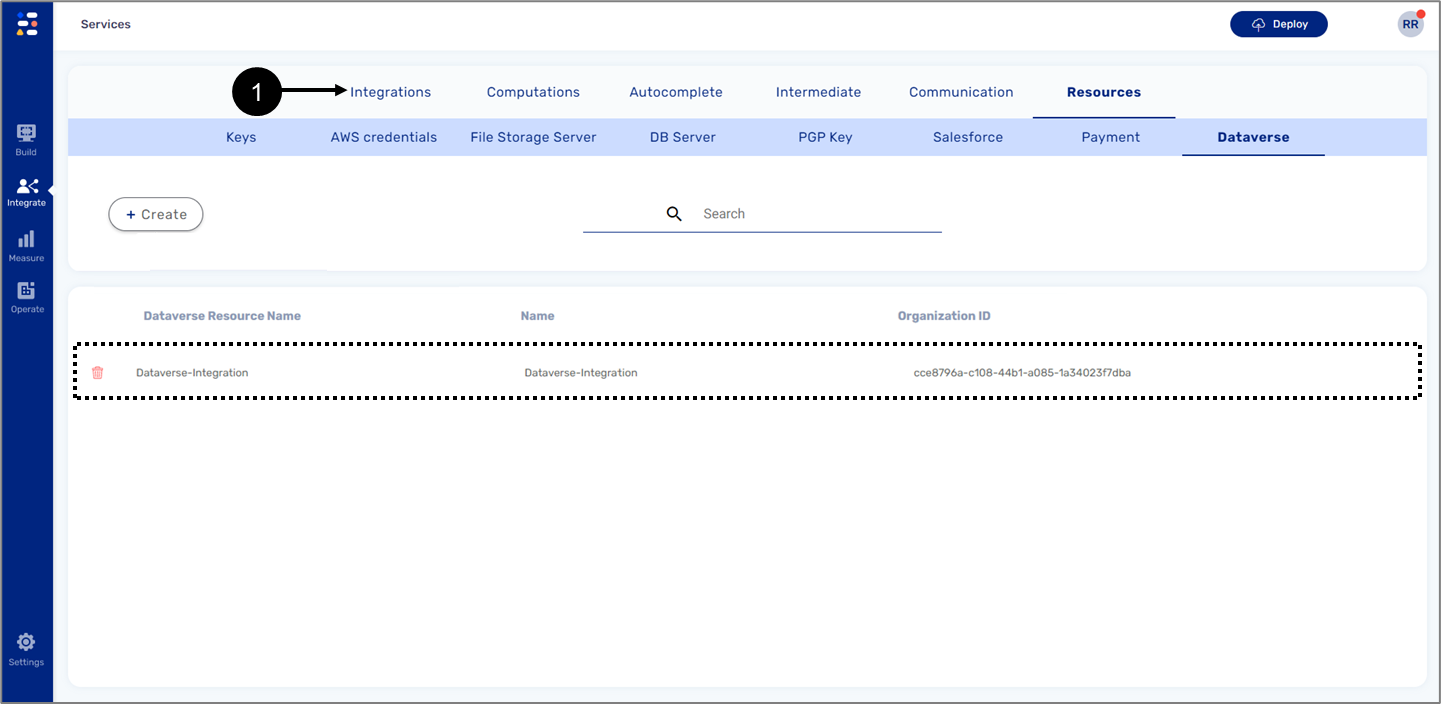
To create a Dynamics 365 resource using the Services screen, perform the following steps:
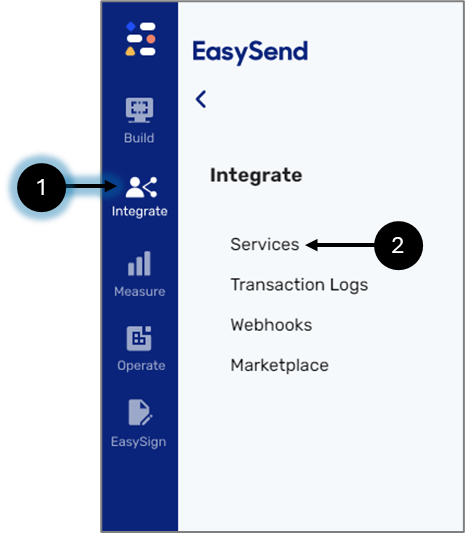
Figure 1: Integrate Tab and Services Option
- On the Builder platform, open the required environment.
- Click the Integrate tab (1).
- Click the Services option (2).
Result:
The Services screen appears:
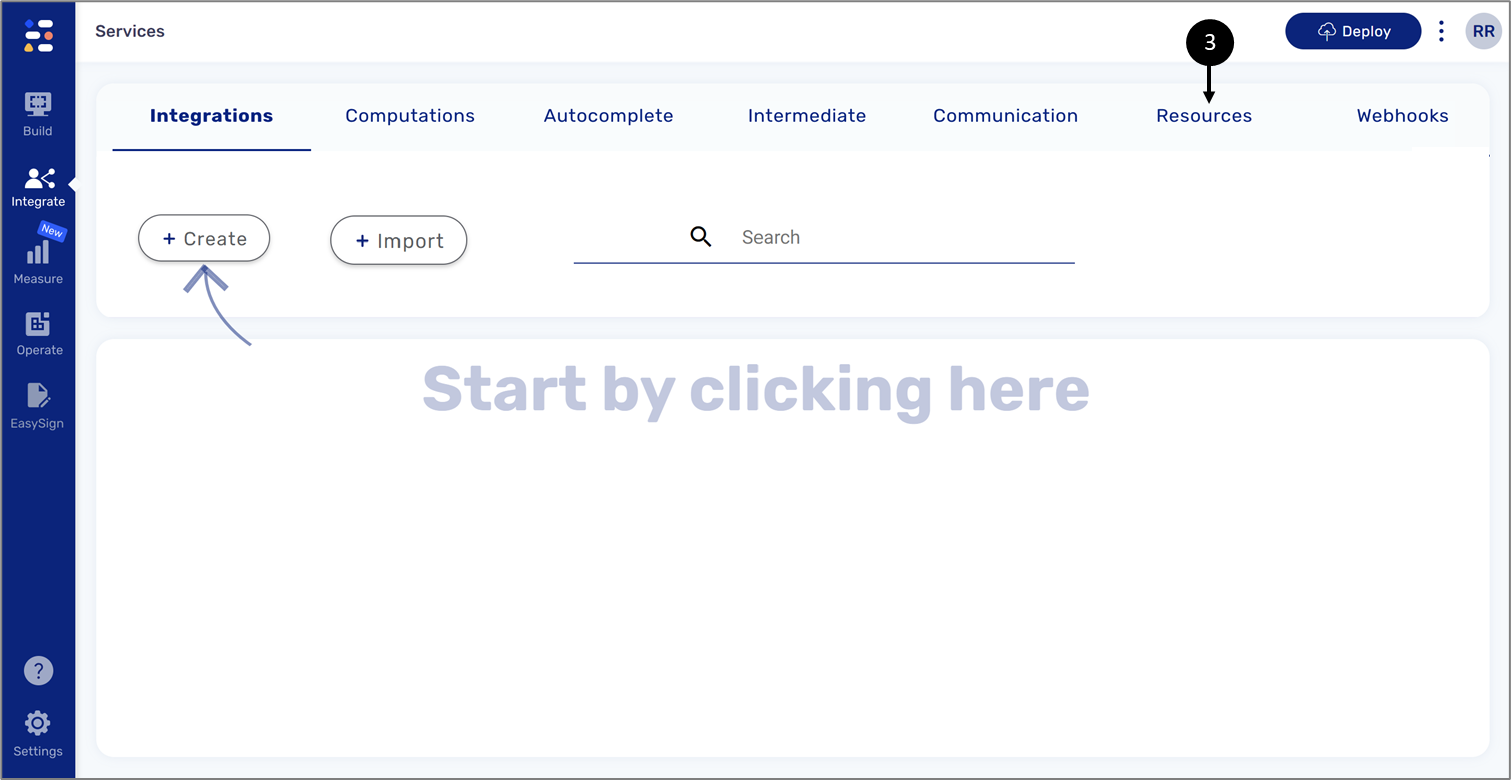
Figure 2: Resources
- Click Resources (3).
Result:
Additional options appear:
Figure 3: Dataverse Option and + Create Button
- Click Dataverse (4).
- Click the + Create button (5).
Result:
The New Dataverse Connection window appears:

Figure 4: New Dataverse Connection Window
- According to your needs, select a resource (6):
- For Secret, provide the following information :
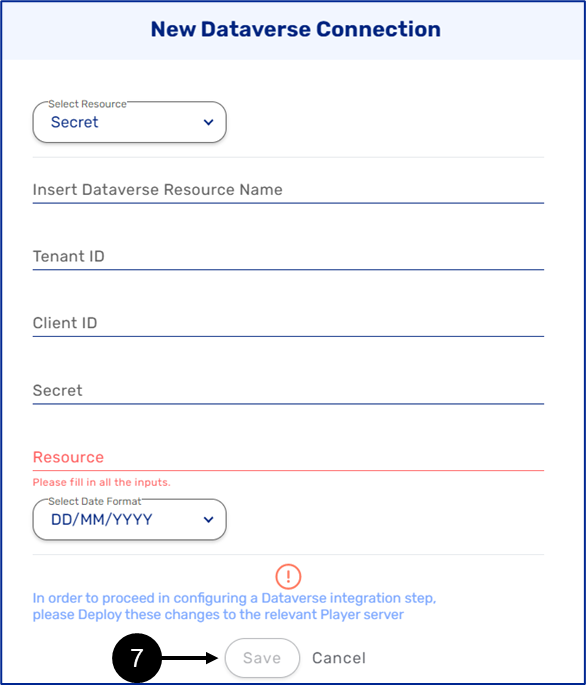
Figure 5: Secret Resource
- Dataverse Resource Name, free text no restrictions
- Tenant ID (Directory) that you copied and saved during the application user setup
- Client ID (Application) that you copied and saved during the application user setup
- Secret - the value that you copied and saved during the application user setup
- Resource - the URL of your Dynamics 365 environment
- Date Format
- For Certificate, provide the following information :

Figure 6: Certificate Resource
- Dataverse Resource Name, free text no restrictions
- Tenant ID (Directory) that you copied and saved during the application user setup
- Client ID (Application) that you copied and saved during the application user setup
- Certificate File
- Resource - the URL of your Dynamics 365 environment
- Date Format
- When you are done, click the Save button (7).
Result:
The new Dataverse resource is added (8):
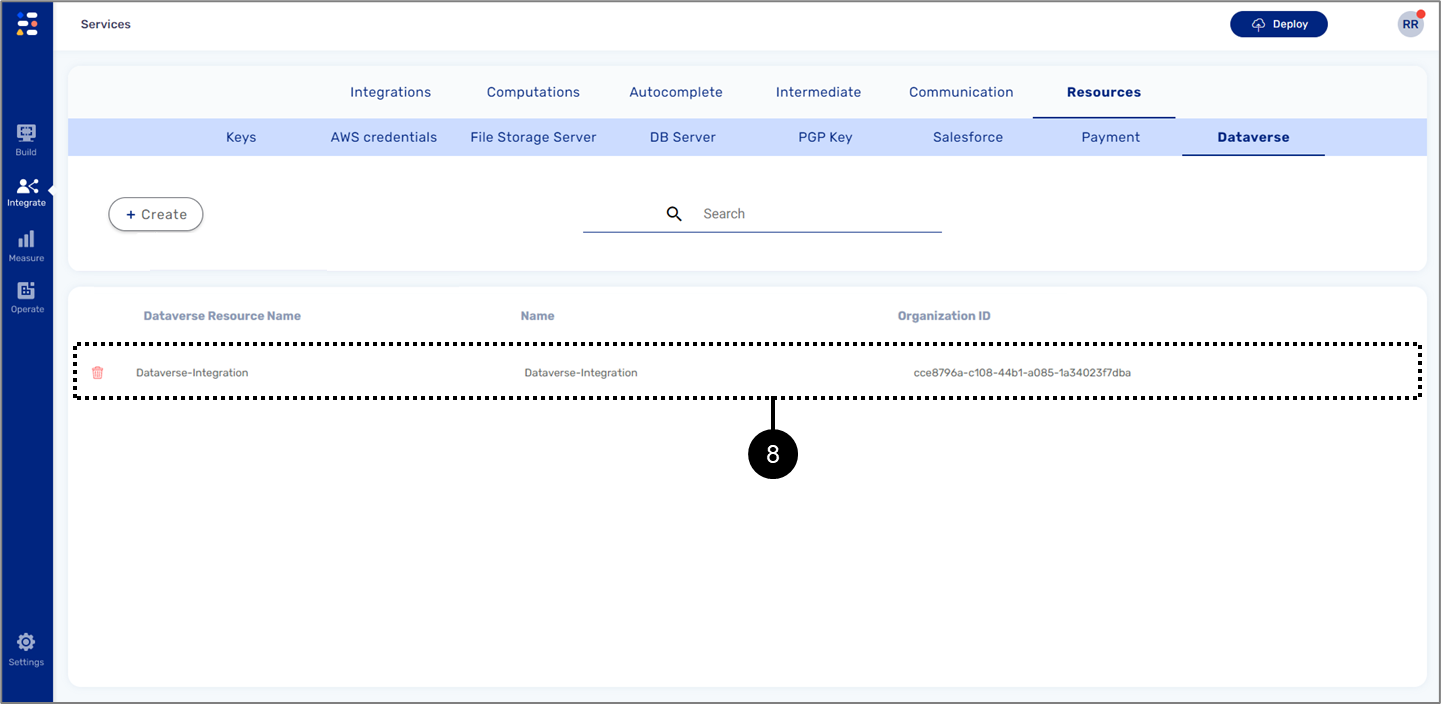
Figure 7: New added Dataverse Resource
Step 2: Creating an Integration - Adding a New Step
(See Figure 8 to Figure 16)
To add a new integration step, perform the following steps:
- Click Integrations (1).
Result:
The + Create button appears (2):
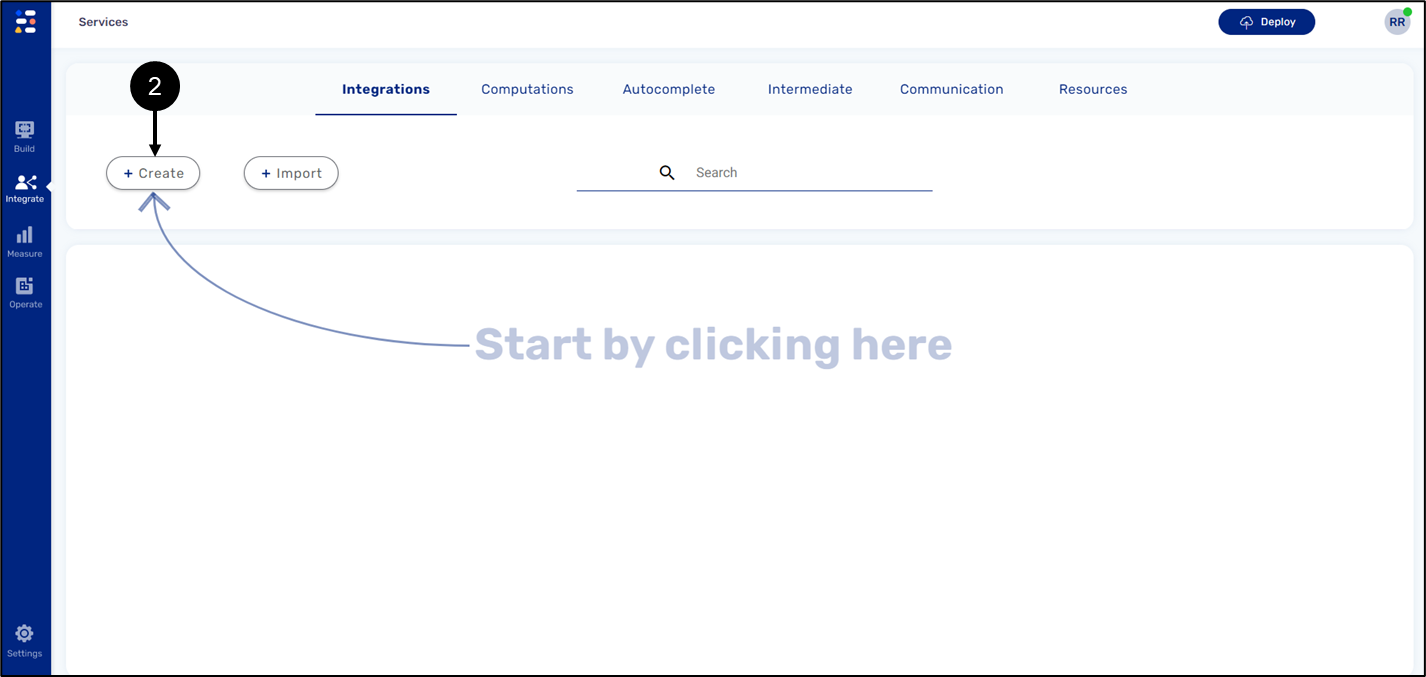
Figure 9: + Create Button
- Click the + Create button (2).
Result:
The following screen appears:
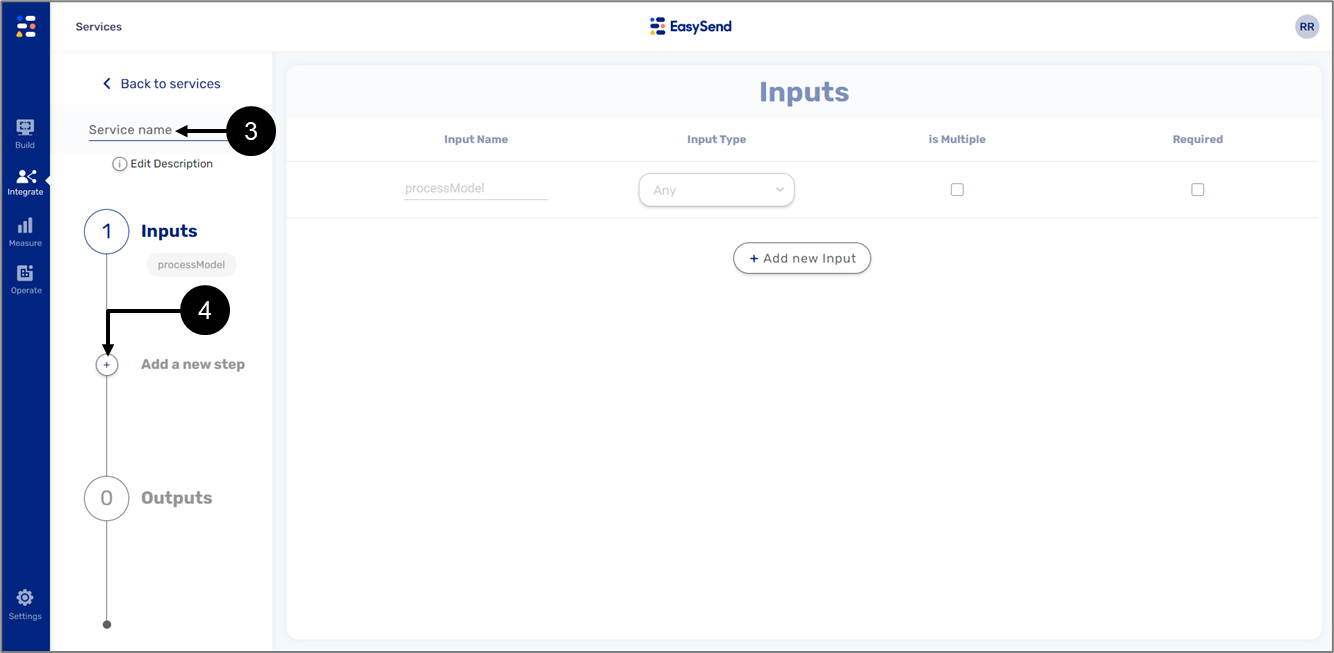
Figure 10: Add a new step Button
- Enter a Service name (3).
- Click the Add a new step button (4).
- A list of steps appears:
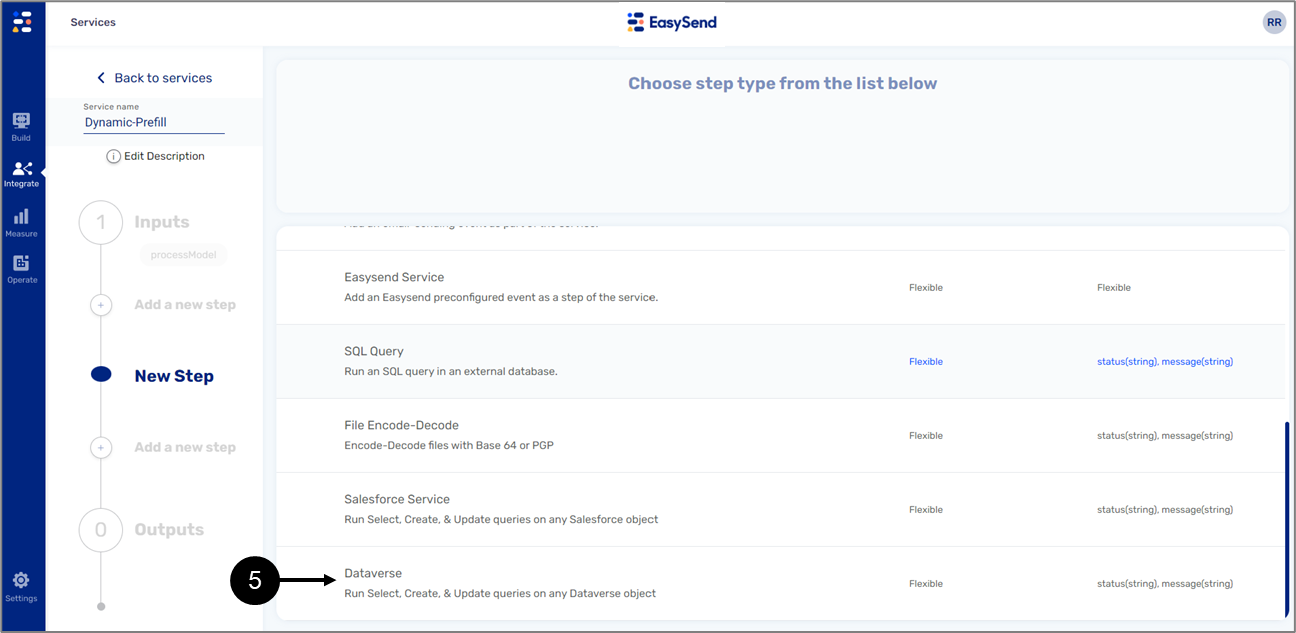
Figure 11: Dataverse
- Locate and click Dataverse (5).
Result:
The following window appears:

Figure 12: Name your Step
- Enter a Name (6).
- Click the Continue button (7).
Result:
The following screen appears:
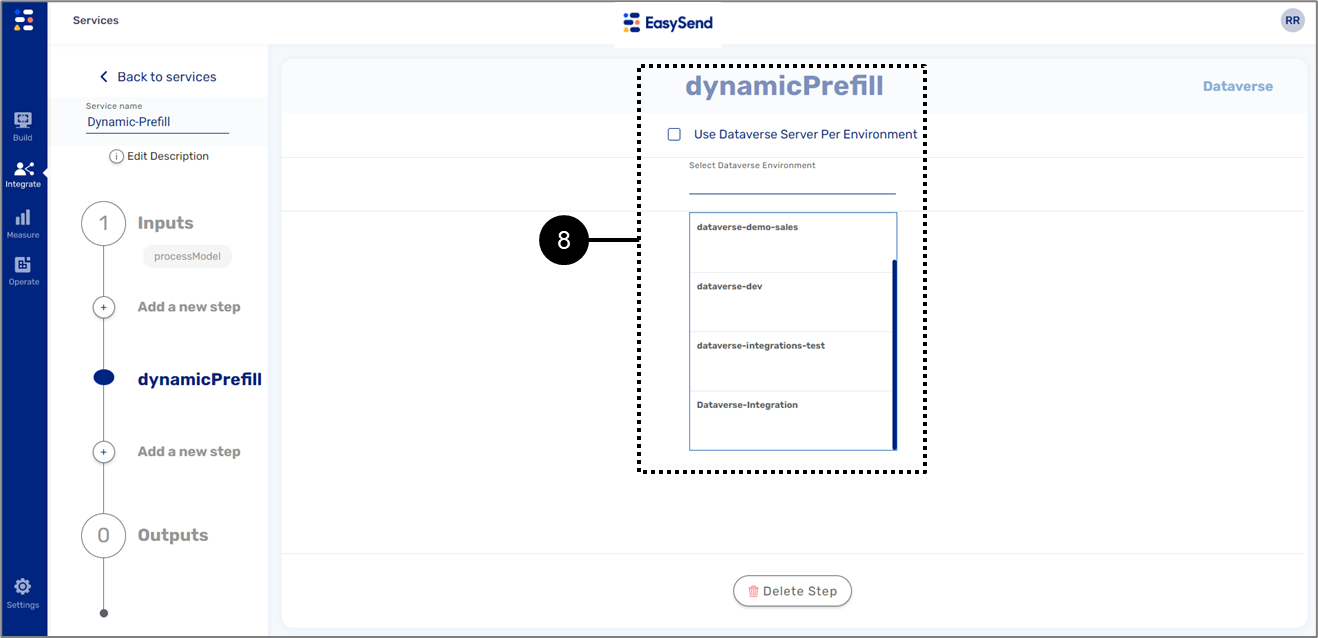
Figure 13: Dataverse Resource
- Click and select the Dataverse resource (8) created in Step 1: Creating Dynamic 365 Resource.
Result:
The Object | Record Type section appears:
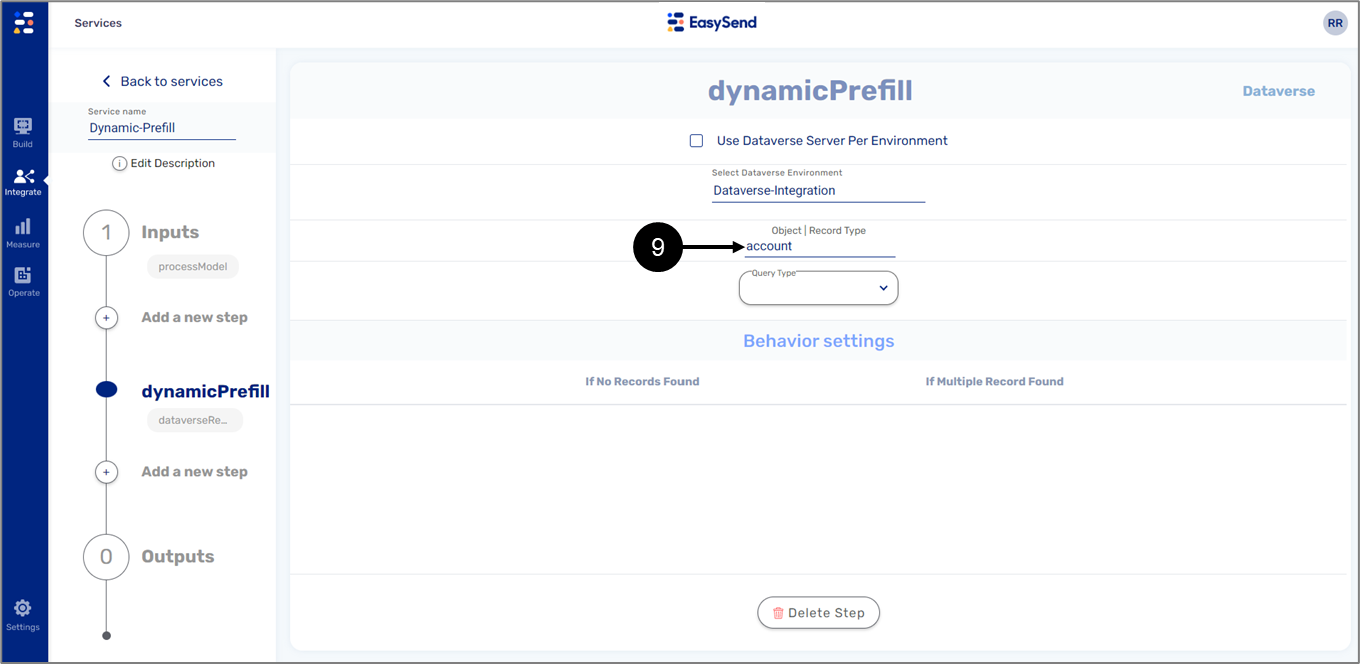
Figure 14: account
- Enter the Object |Record Type - account (9).
Result:
The Query Type dropdown (10) appears:
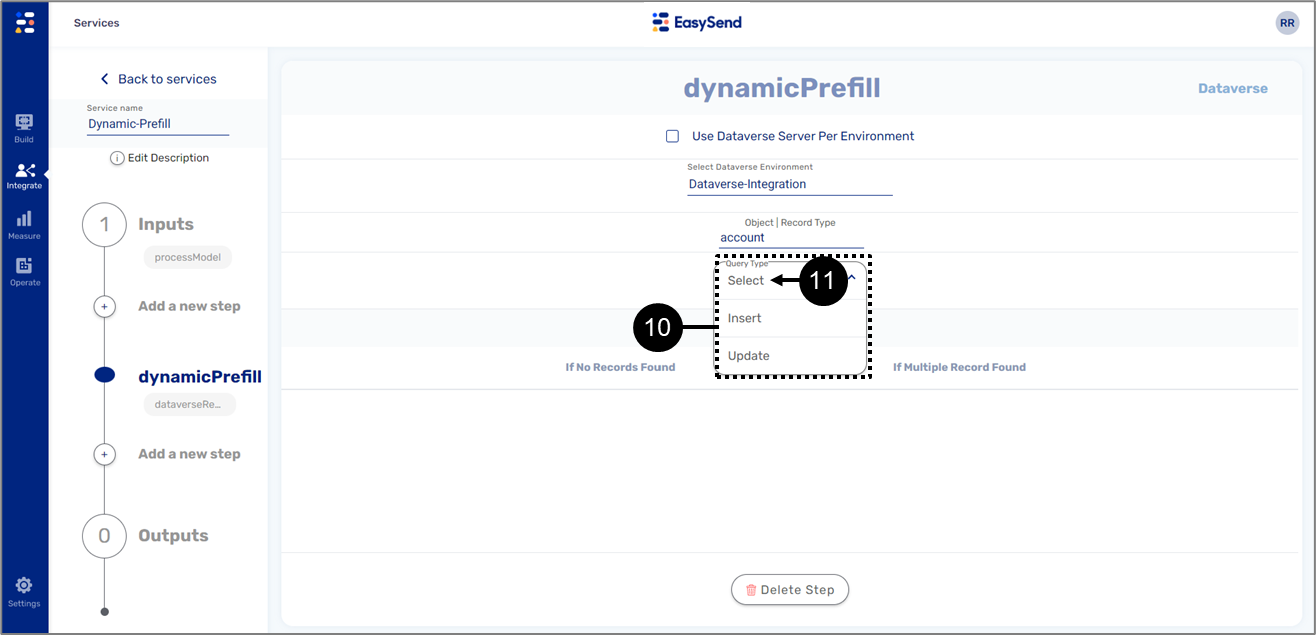
Figure 15: Query Type - Select
- Click the Query Type dropdown (10) and click Select (11).
Result:
The Search/Select criteria (12) and the Output (13) sections appear:
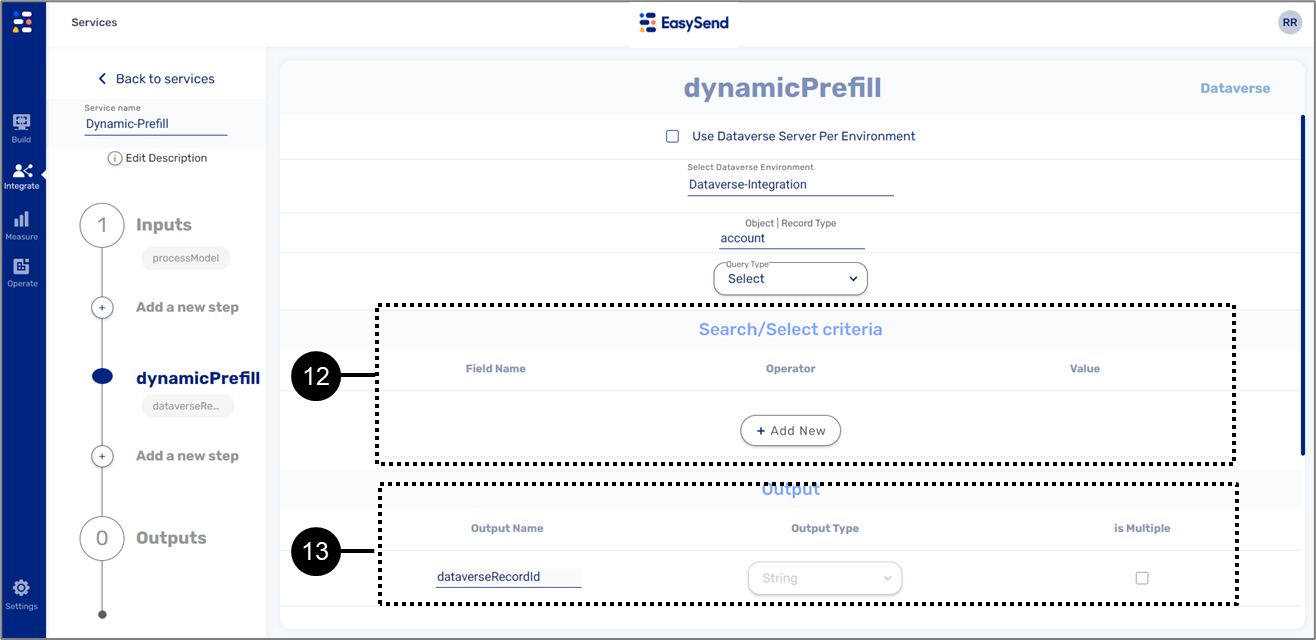
Figure 16: Search/Select criteria and the Output Sections
Step 3: Configuring the New Step - Search/Select criteria
(See Figure 17 and Figure 18)
This section contains the fixed Dataverse record ID (dataverseRecordId) that connects the relevant Dynamics 365 object (account) to EasySend.
To add a new search/select criteria perform, the following steps:
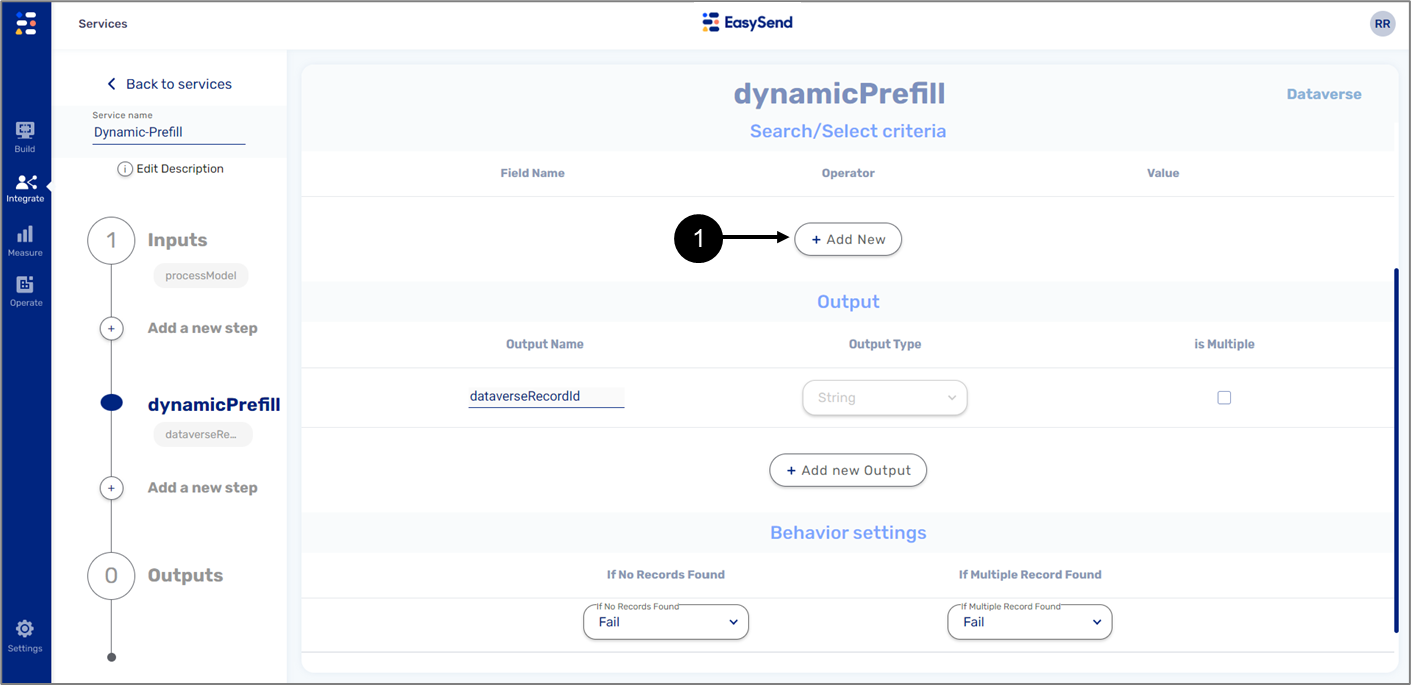
- Click the + Add New button (1).
Result:
A new search/select criteria line appears (2):

Figure 18: New Search/Select criteria Line
- Enter a Field Name (3) - accountid.
- Click the Operator dropdown (4) and select the operator Is.
- Click the Select Source dropdown (5) and Select Metadata.
- Enter the value dataverse.dataverseRecordId (6).
Step 4: Configuring the New Step - Output
(See Figure 19 to Figure 21)
To add new outputs from Dynamic 365, perform the following steps:
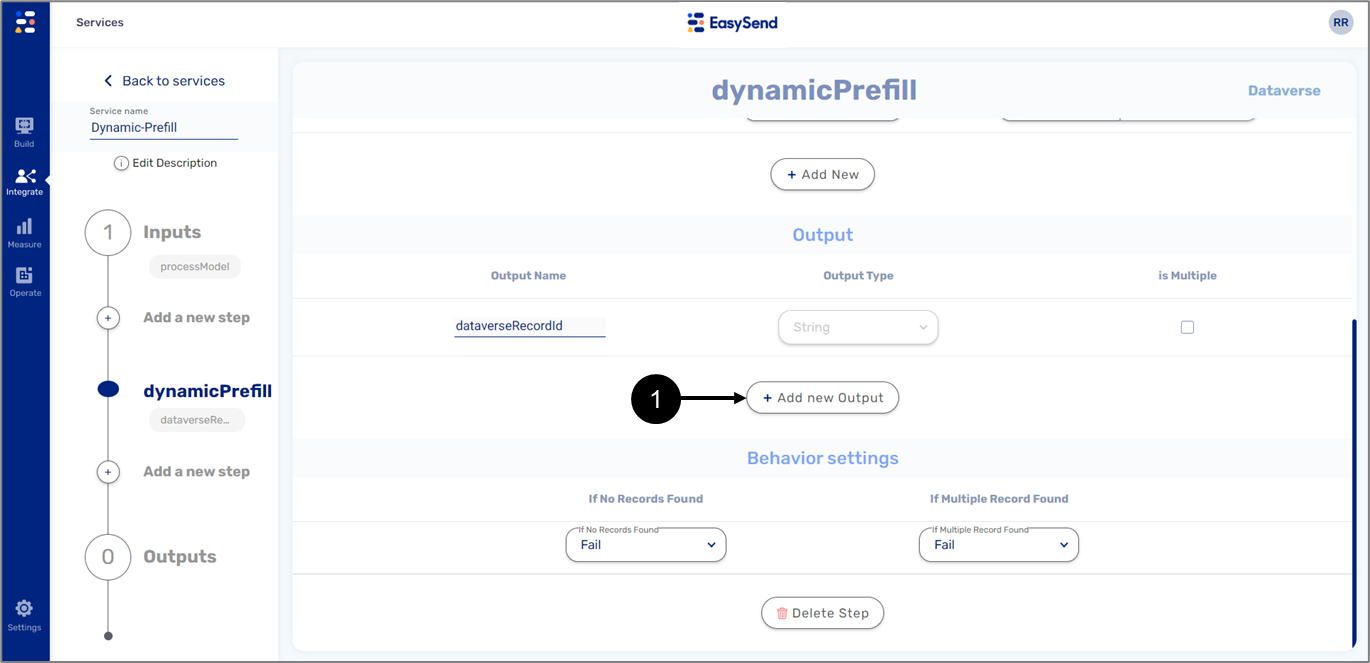
Figure 19: + Add new Output button
- Click the + Add new Output button (1).
Result:
A new output line appears (2):
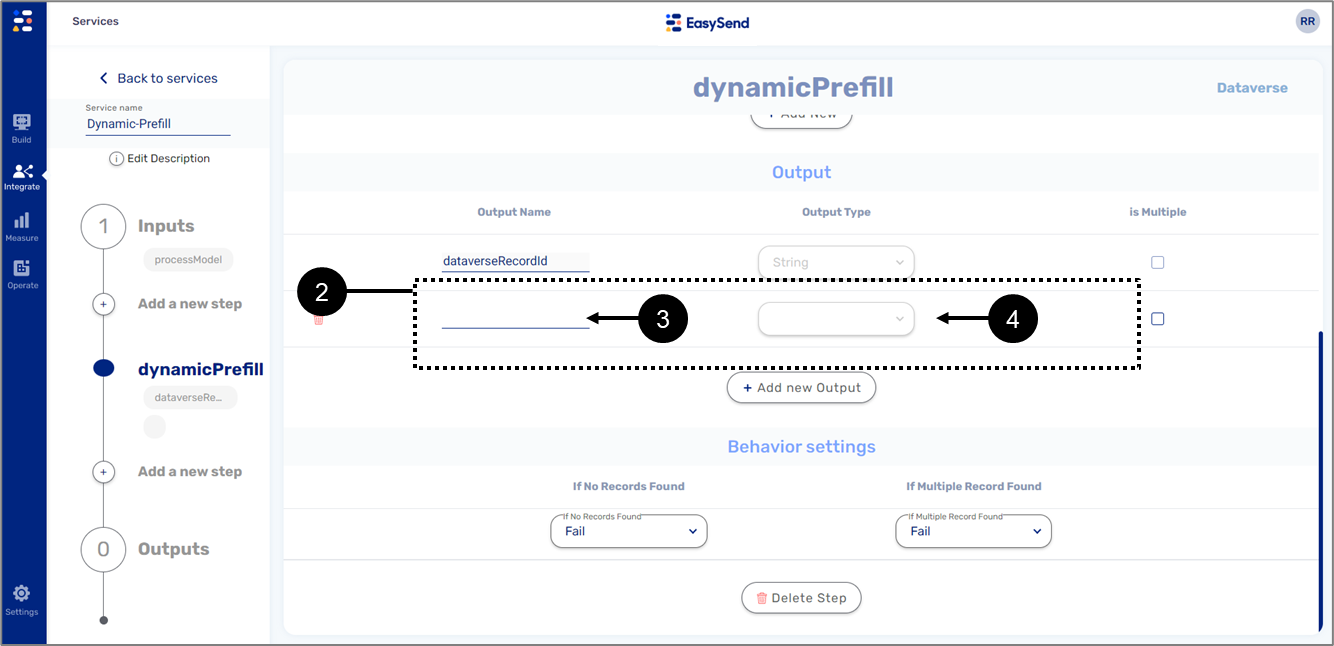
Figure 20: New Output Line
- Enter an Output Name (3).
- Click the dropdown and select an Output Type (4).
- Repeat steps 1 to 3, as necessary.
Result:
All the outputs are added (5):

Working with Multiple Records
When adding a record that is multiple (array) it is mandatory to specify it by checking the is Multiple checkbox and by selecting one of the options found under the Behavior settings section:
- Select All
- Select First Created
- Select Last Created
- Select Last Modified
- Select All (Legacy)
The difference between Select All and Select All (Legacy) is in the data structure of the returned records:
For Select All (Legacy):
{
  "firstname": {
    [
      "Ronny",
      "Dana"
    ]
  },
  "lastname": {
    [
      "Riback",
      "Robbins"
    ]
  },
  "email": {
    [
      "r.riback@easysend.io",
      "d.robbins@easysend.io"
    ]
  }
}
For Selecting All:
{
  [
    "firstname": "Ronny",
    "lastname": "Riback",
    "email": "r.riback@easysend.io"
  ],
  [
    "firstname": "Dana",
    "lastname": "Robbins",
    "email": "d.robbins@easysend.io"
  ]
}Step 5: Adding Outputs
(See Figure 22 to Figure 26)
To add a new output, perform the following steps:
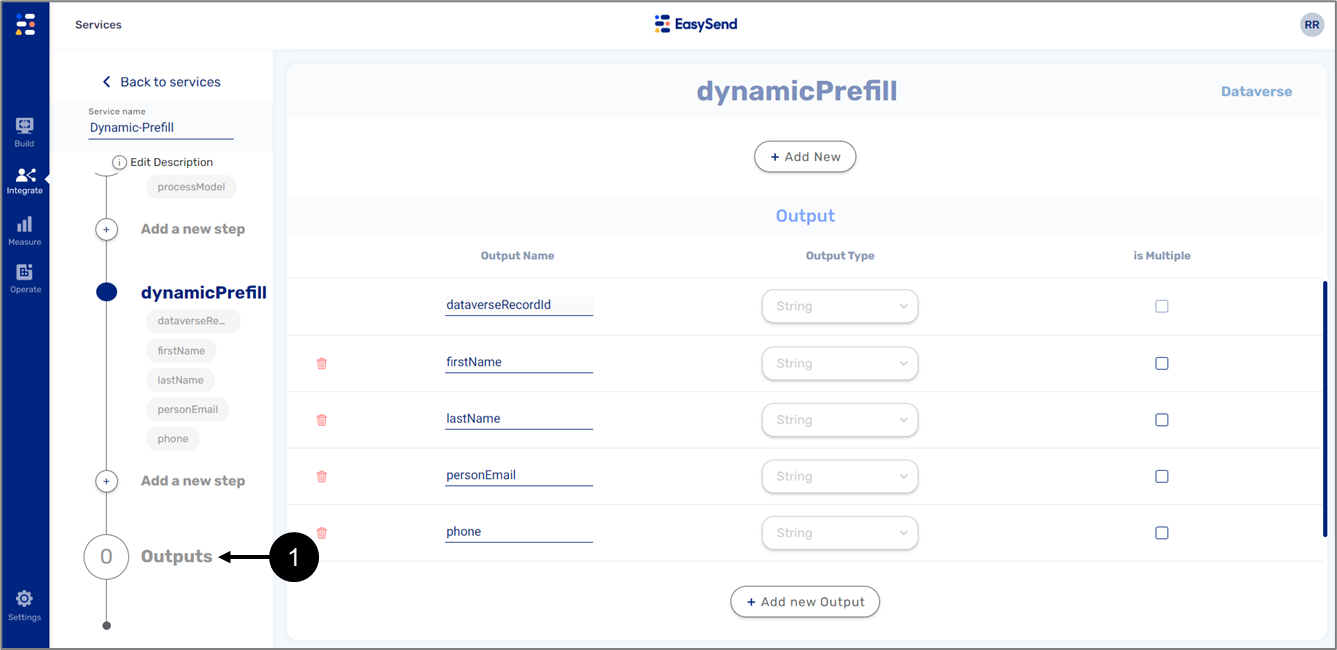
- Click Outputs (1).
Result:
The Outputs screen appears:
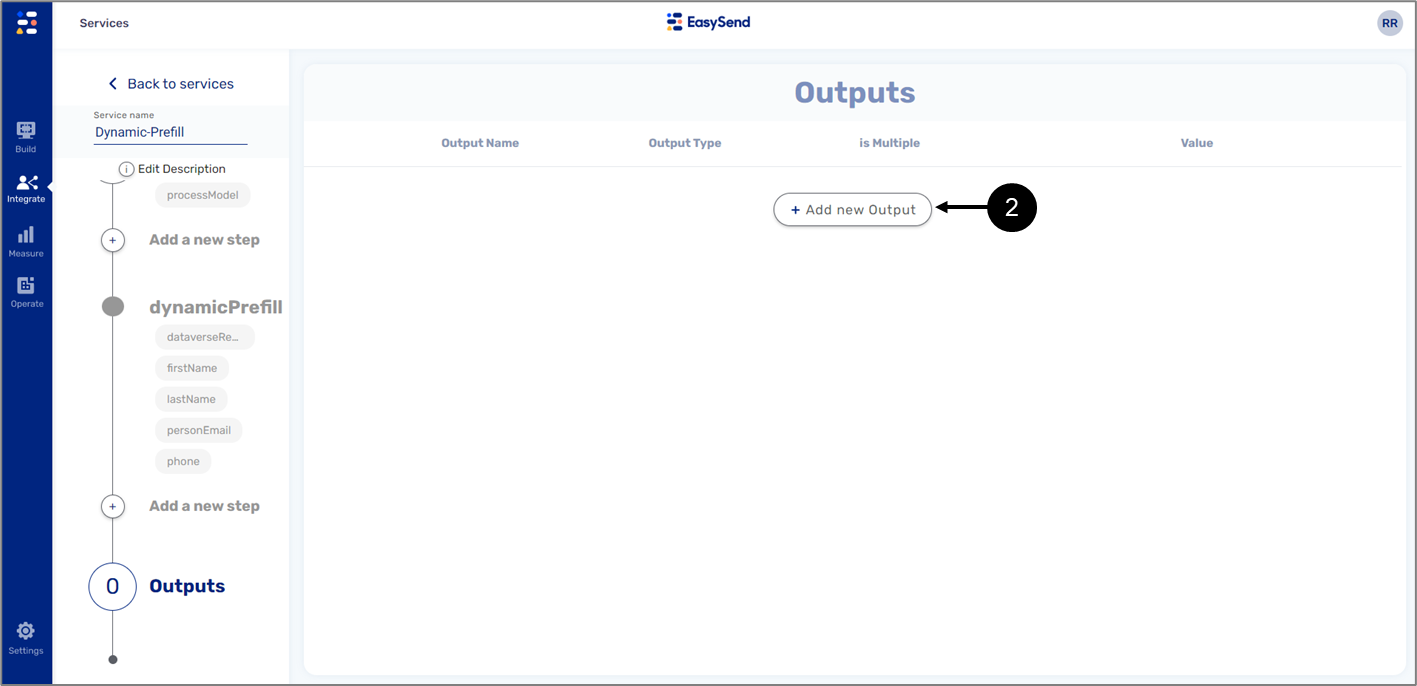
Figure 23: + Add new Output
- Click the + Add new Output button (2).
Result:
A new output line appears (3):
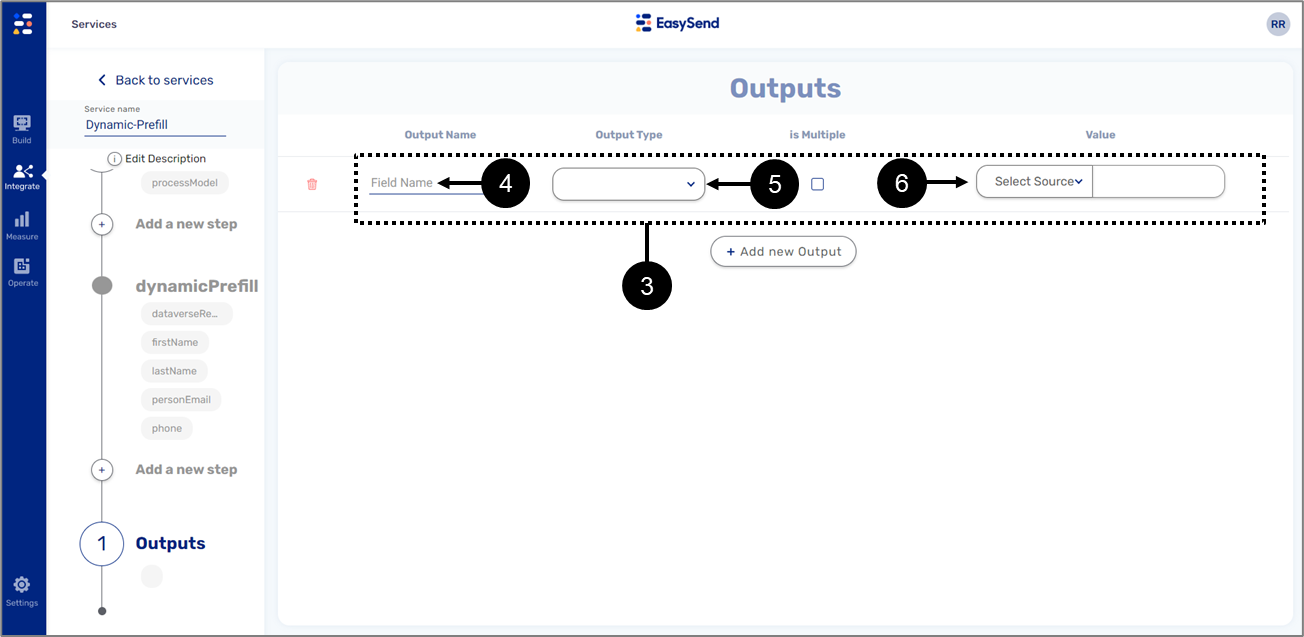
Figure 24: + A new Output Line
- Enter a Field Name (4).
- Click the Output Type dropdown (5) and select the output type.
- Click the Select Source dropdown (6) and select Model.
Result:
The new output line is configured (7):
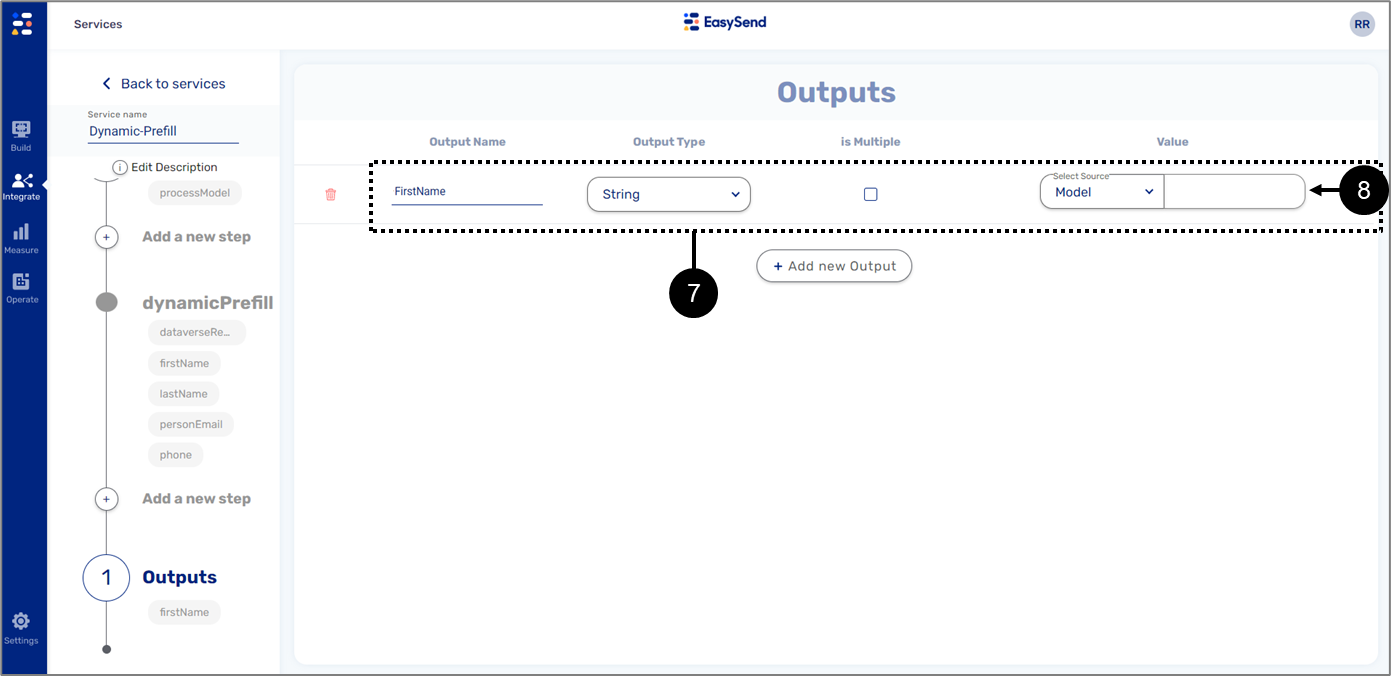
Figure 25: + Model Value
- Enter a Model value - starting with name of the new step created in Step 2: Creating an Integration - Adding a New Step followed by a dot (.) and one of its outputs as described in Step 4: Configuring the New Step - Output, for example: dynamicPrefill.firstName.
- Repeat steps 2 to 6 until all the outputs are added, for example:
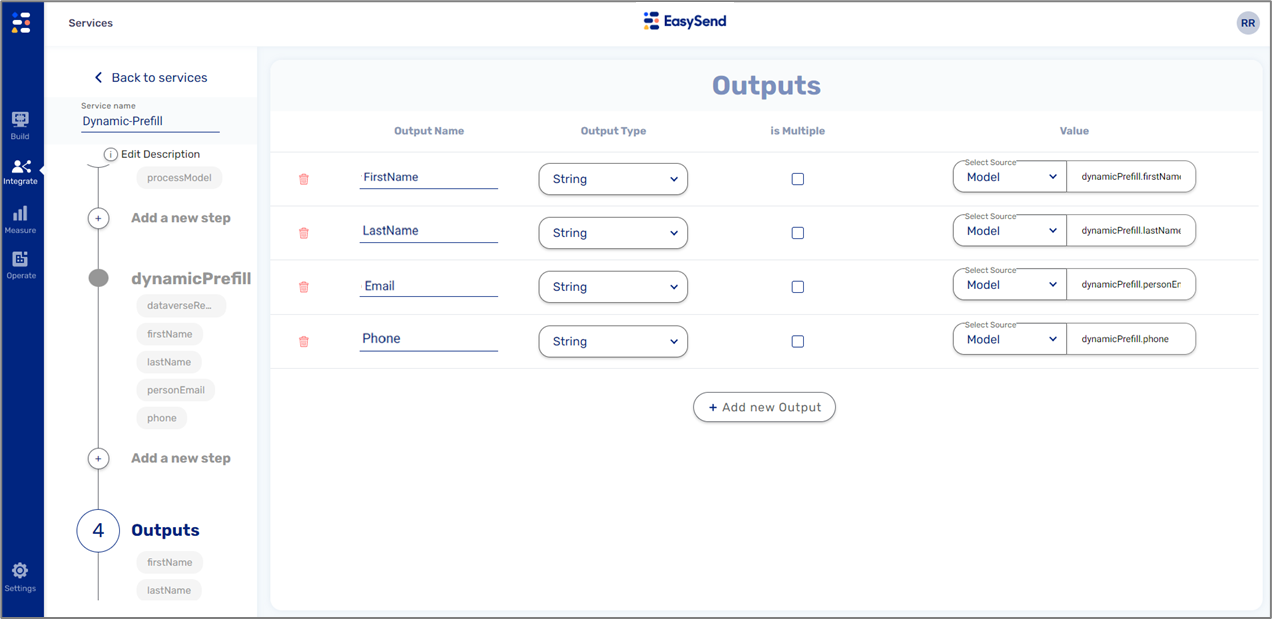
Figure 26: Added Input Step Outputs
Step 6: Services Screen Deployment
(See Figure 27 to Figure 29)
To publish the changes made in Steps 1 to 5, perform the following steps:
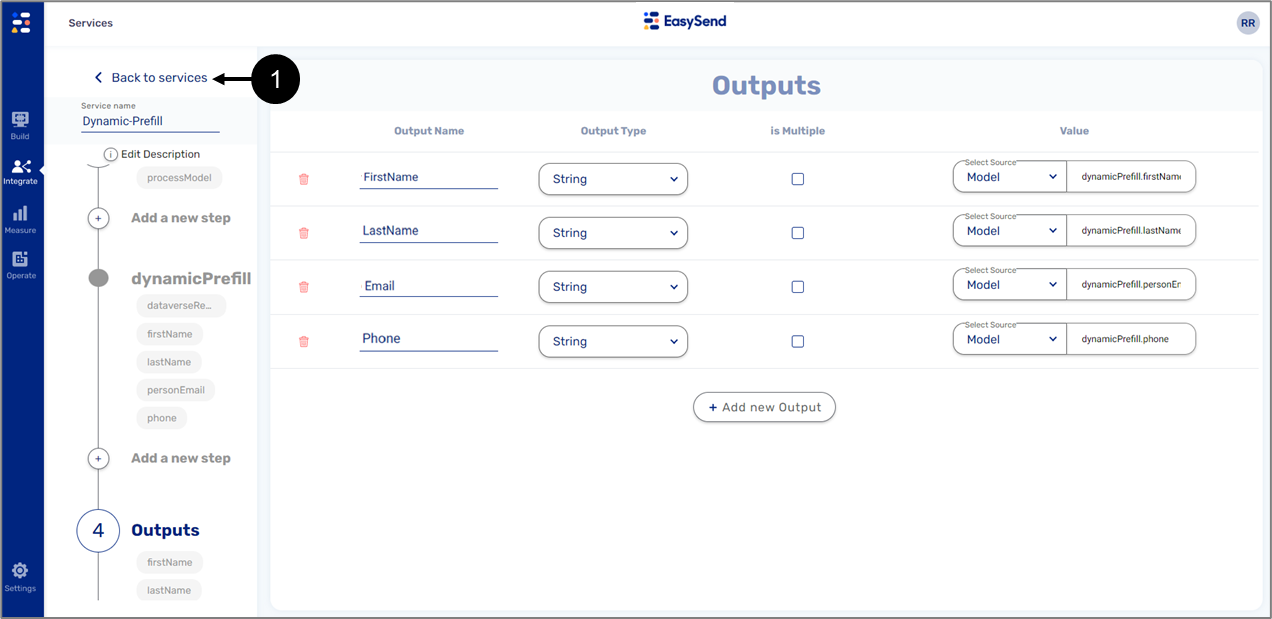
- Click < Back to services (1).
Result:
The Services main screen appears:
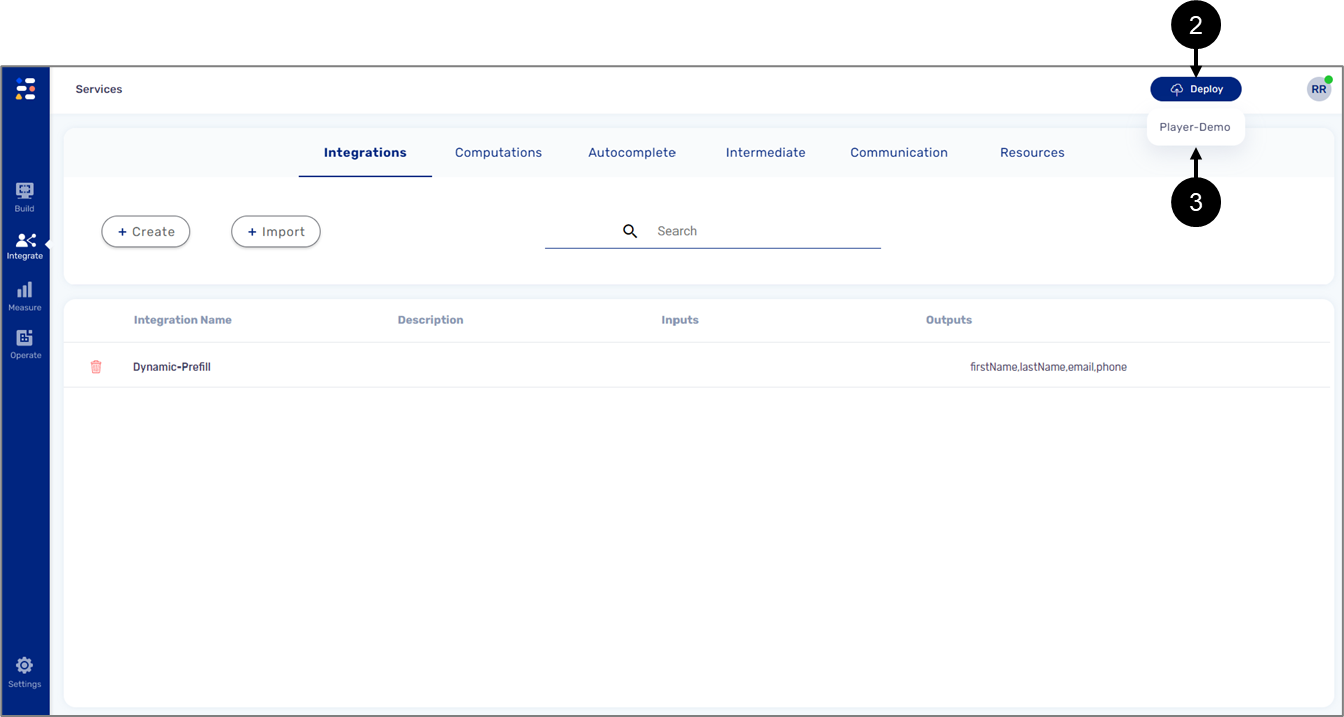
Figure 28: Deployment
- Click the Deploy button (2) and select the appropriate environment (3).
- Wait until the deployment process is over as indicated by the indicator (4).
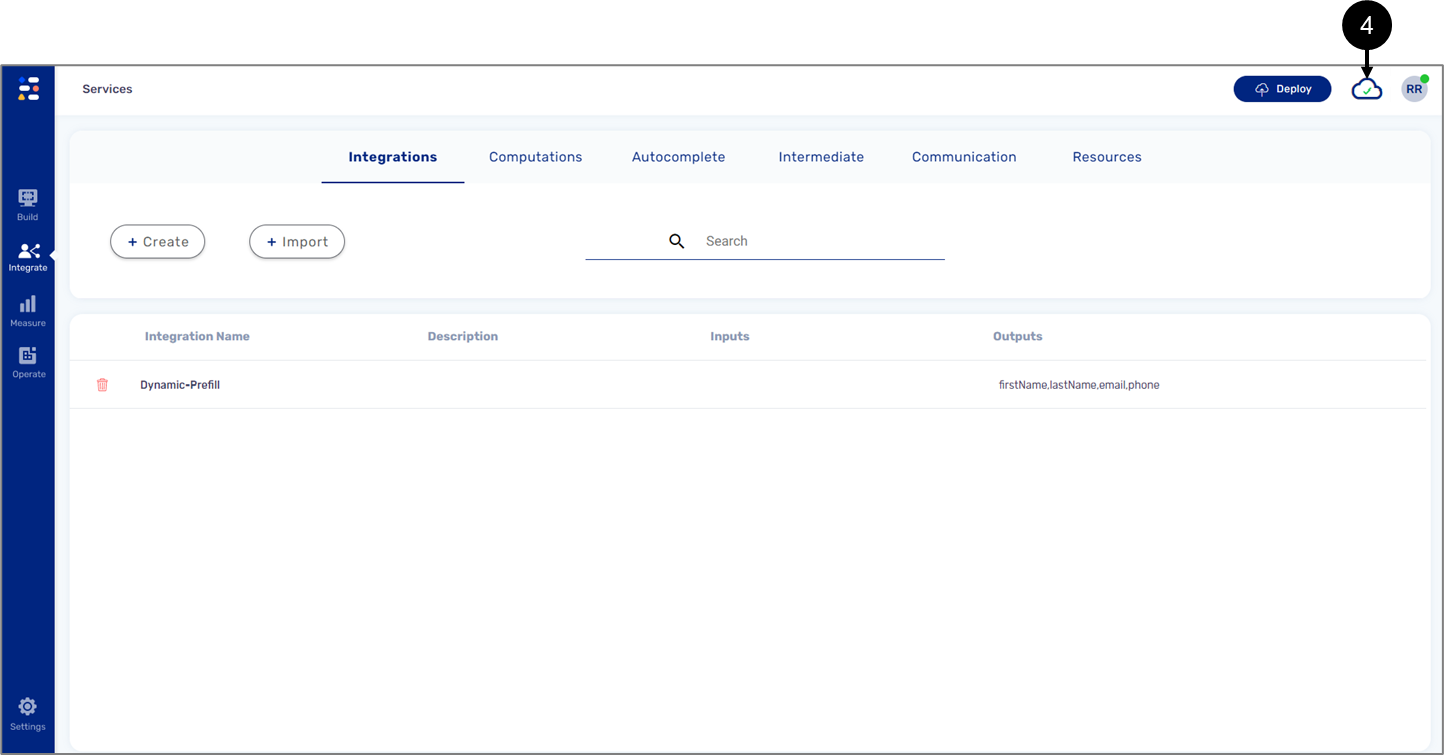
Figure 29: Deployment successful
Step 7: Workflow Manager Configuration
(See Figure 30 to Figure 37)
To configure the Workflow Manager, perform the following steps:
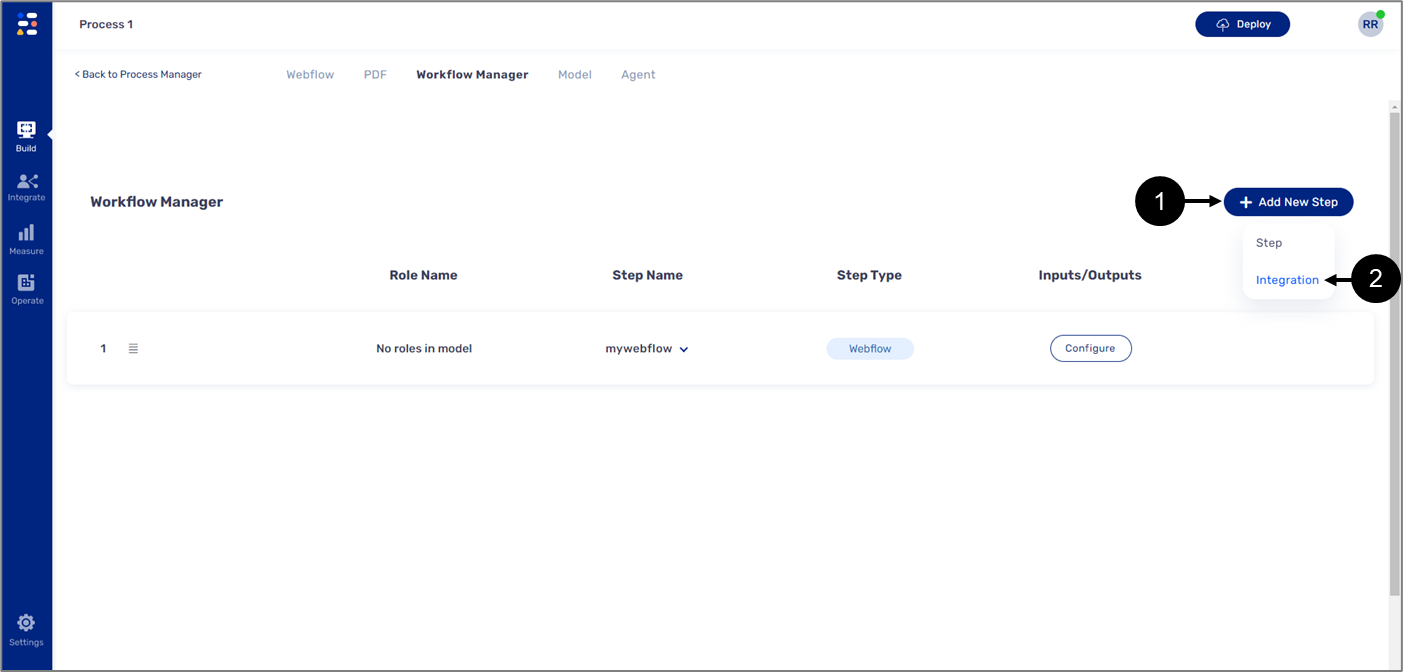
Figure 30: + Add New Step Button and Integration
- Click the + Add New Step button (1) and click Integration (2).
Result:
The Service Lookup window appears:

Figure 31: Select an Integration
- Click the Select an Integration dropdown (3) and select the integration (4) created in Step 2: Creating an Integration - Adding a New Step.
Result:
A list of outputs that were added in Step 5: Adding Outputs appears:
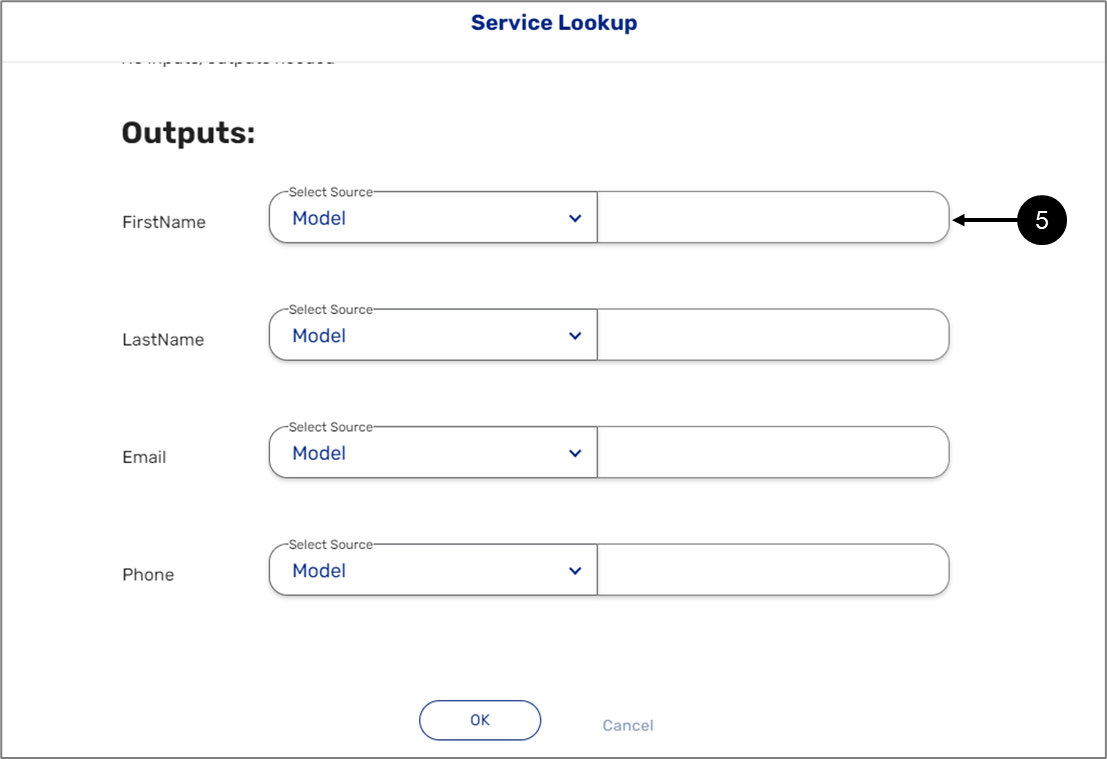
Figure 32: Connecting Outputs to the Model
- Connect each output to its appropriate data item in the Model (5).
Result:
All outputs are connected to the Model:
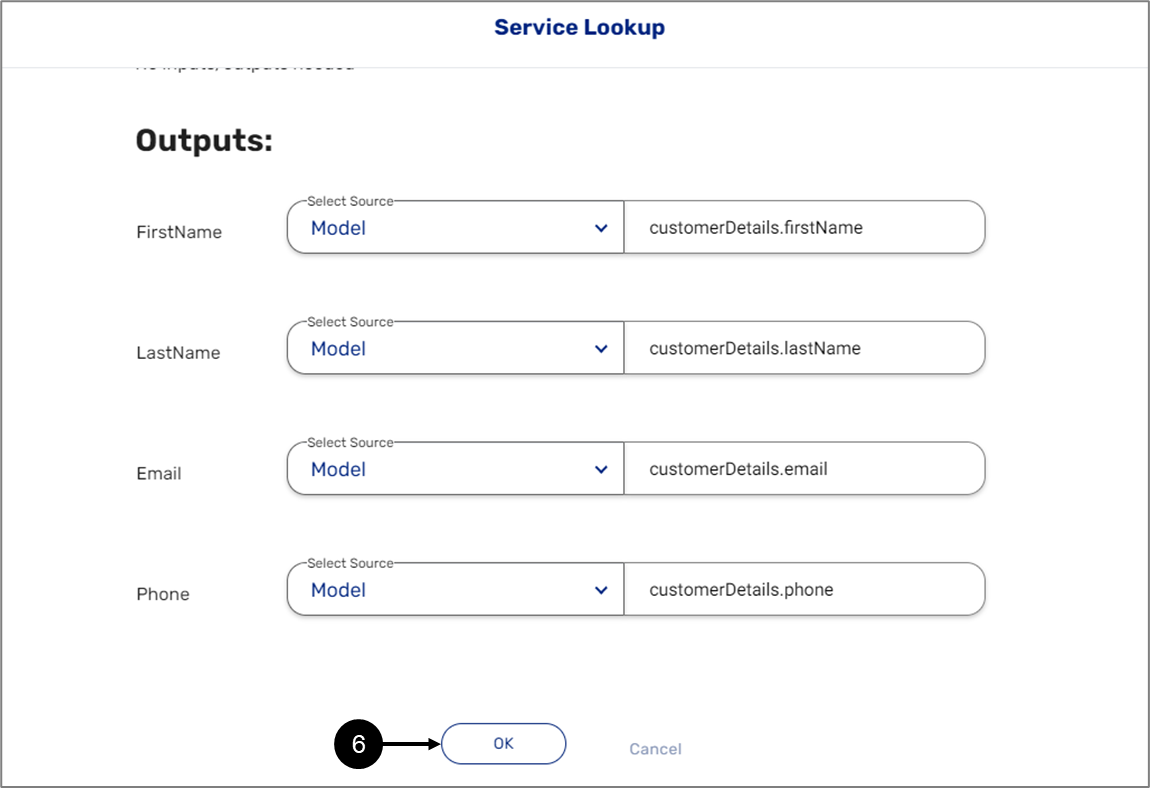
Figure 33: OK Button
- Click the OK button (6).
Result:
The integration is added to the workflow (7):
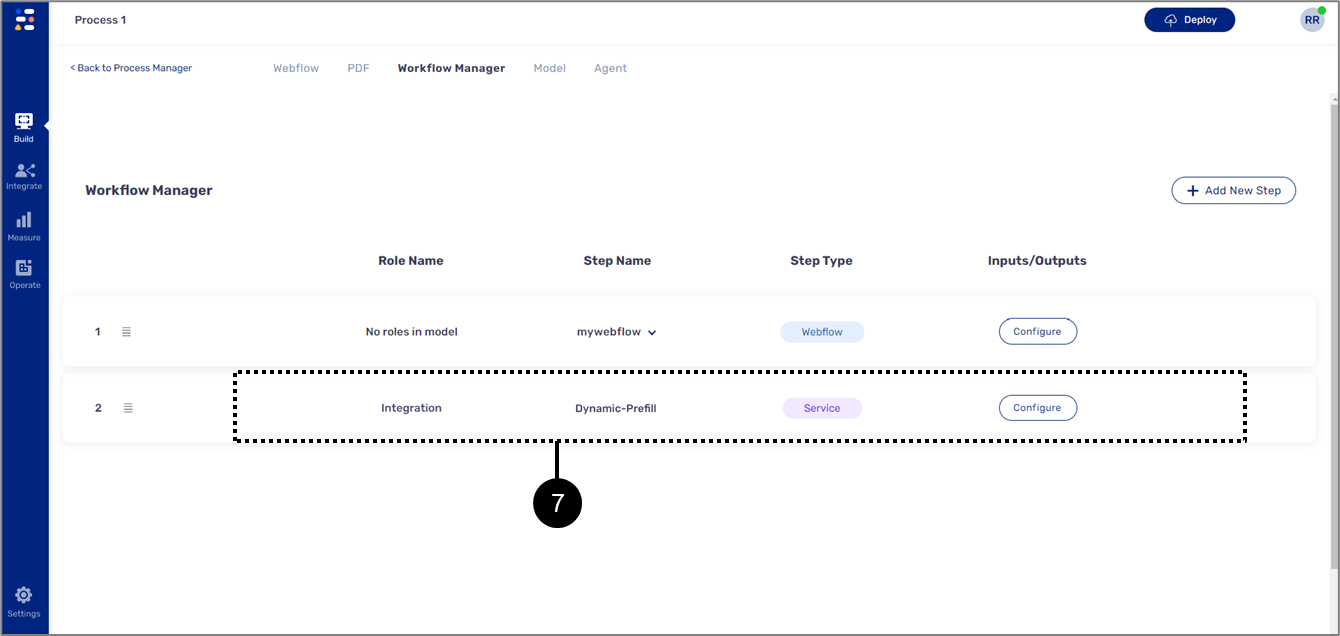
Figure 34: Added Integration
- Hold and drag (8) the added integration and place it on top as number 1.
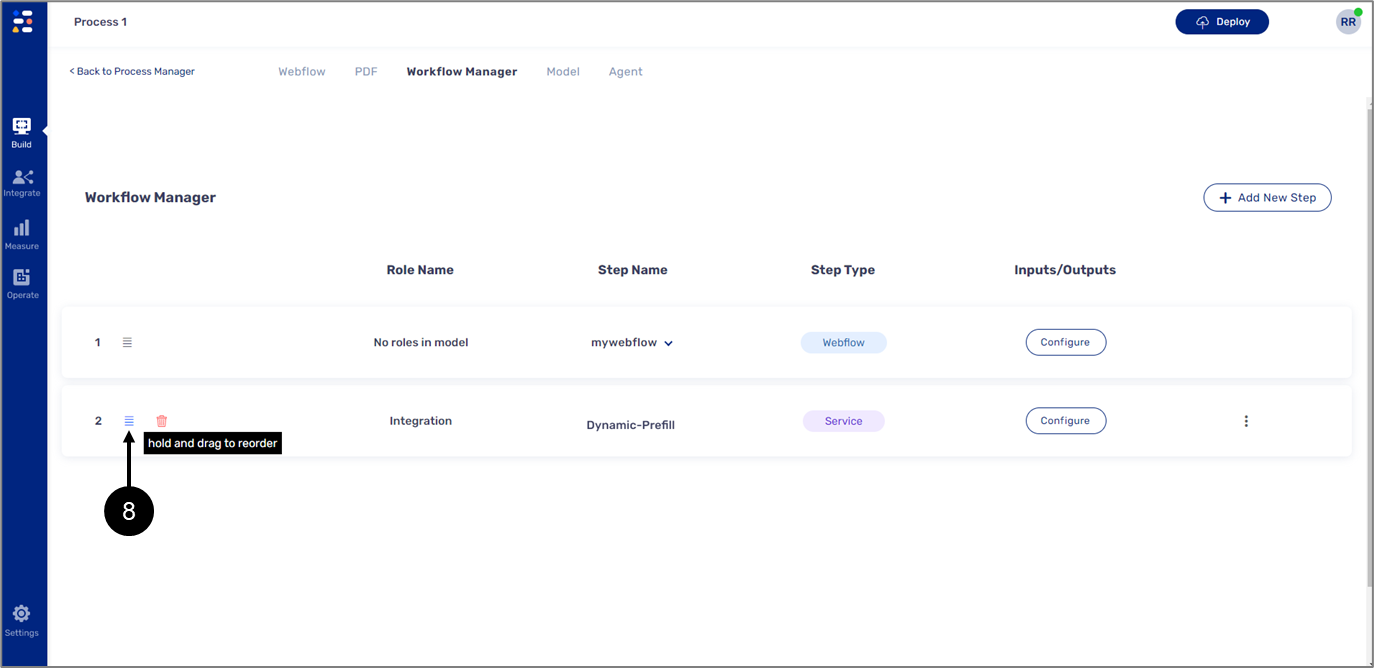
Figure 35: Hold and Drag
- Click the Deploy button (9) and select the appropriate environment (10).
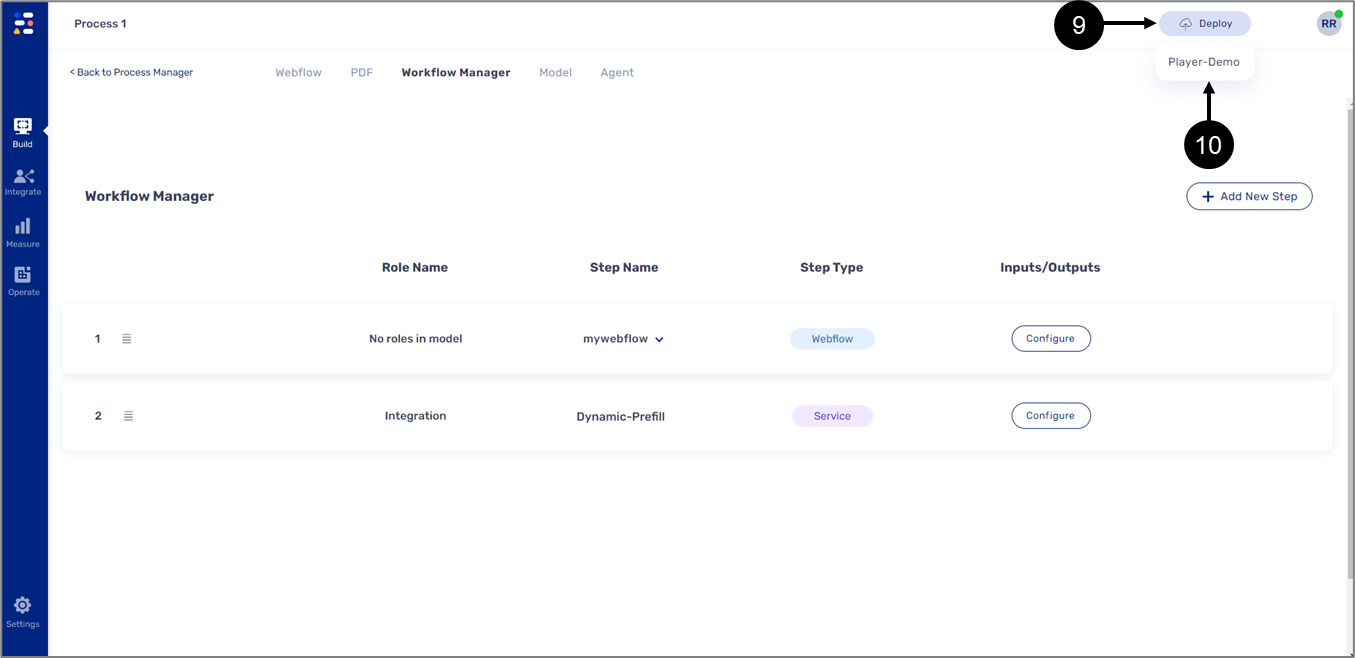
Figure 36: Deployment Process
- Wait until the deployment process is over as indicated by the indicator (11).
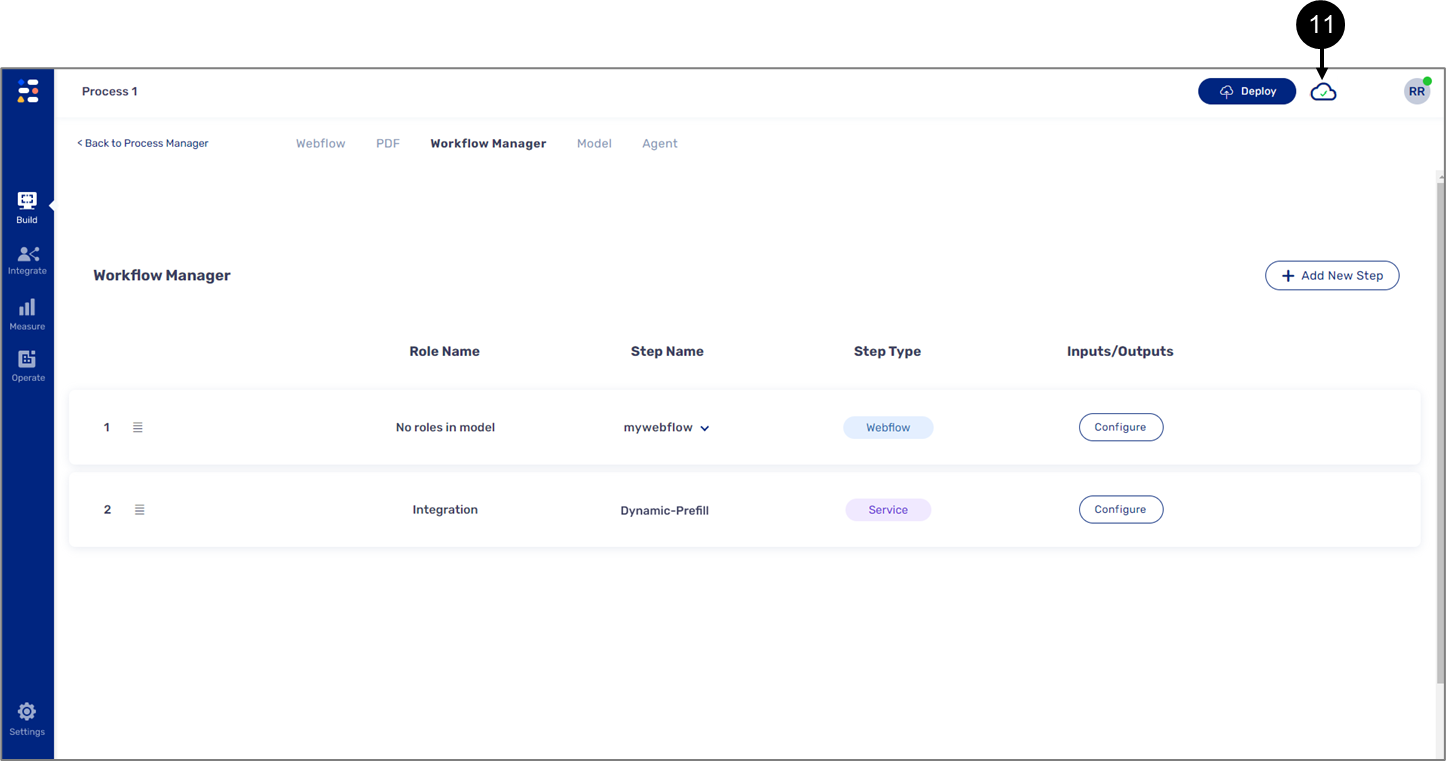
Figure 37: Deployment successful
Step 8 (Optional): Validations Deployment
(See Figure 38 to Figure 40)
To publish changes from the Validations screen, perform the following steps:
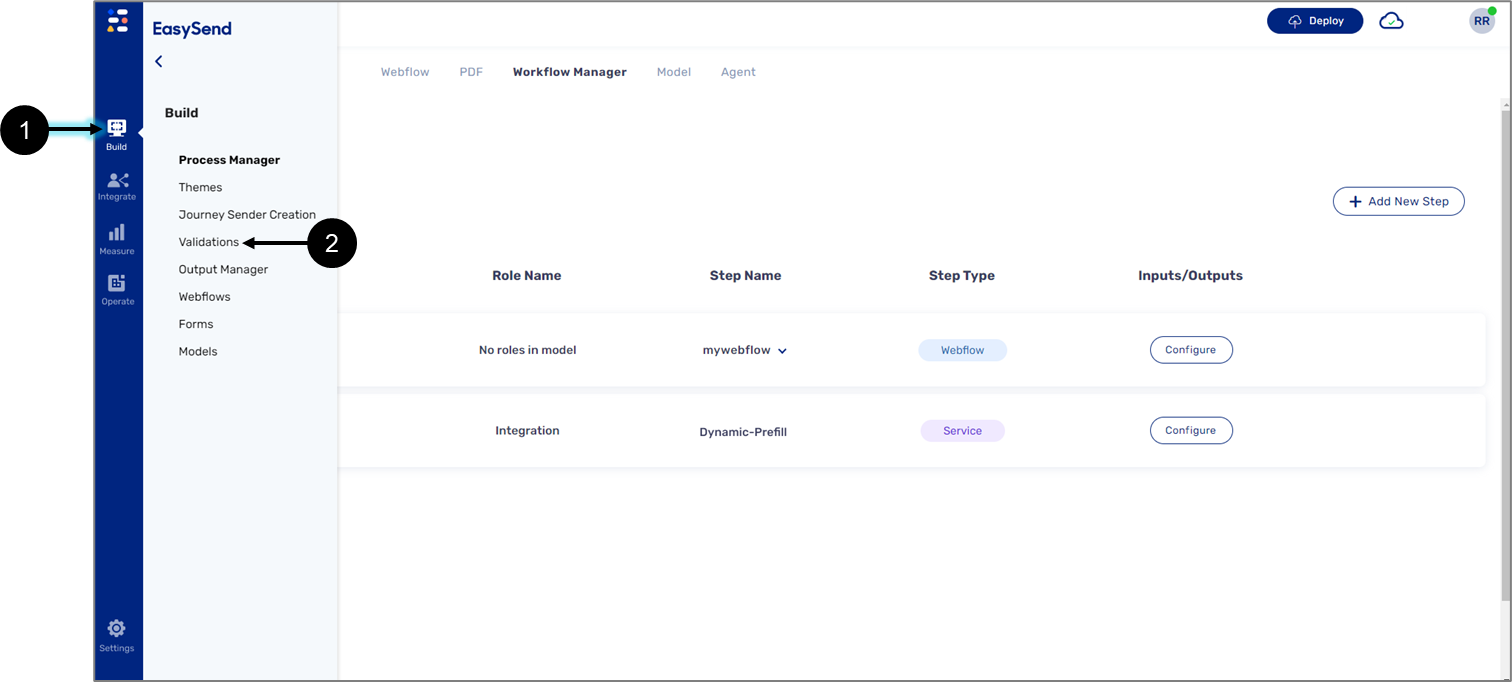
Figure 38: Build Tab -> Validations
- Click the Build tab (1).
- Click Validations (2).
Result:
The Validations screen appears:
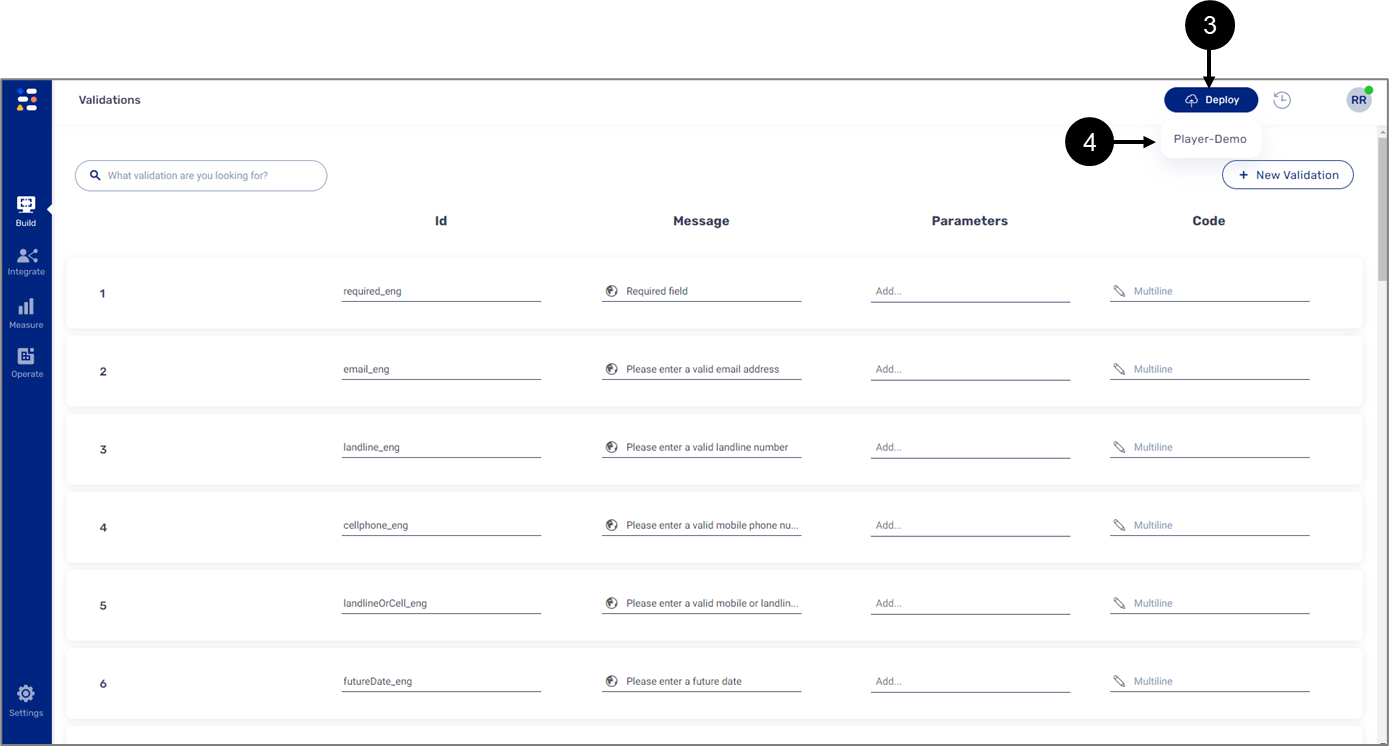
Figure 39: Deployment Process
- Click the Deploy button (3) and select the appropriate environment (4).
- Wait until the deployment process is over as indicated by the indicator (5).
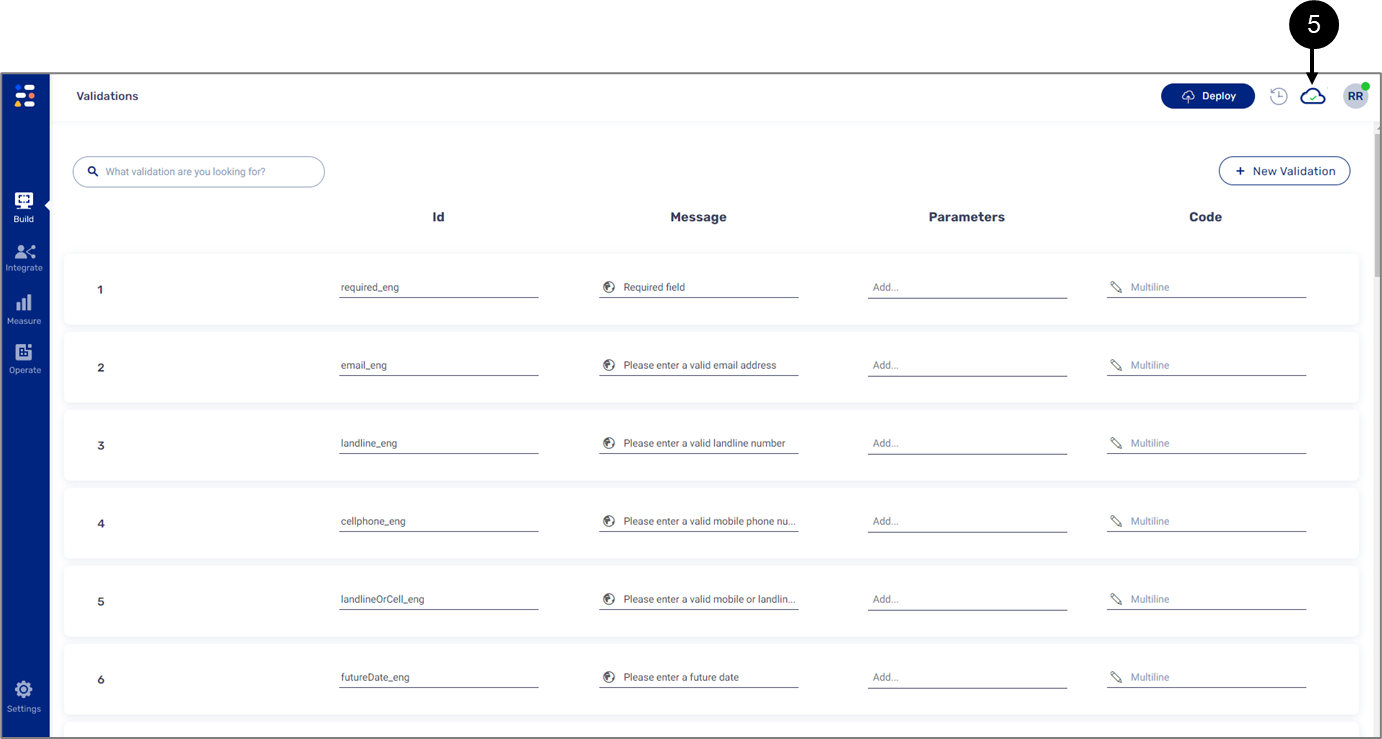
Figure 40: Deployment successful
Step 9: Digital Process Deployment
Open the desired digital process and perform the deployment process. Verify that the selected environment matches the environment selected in Steps 6, 7, and 8.
Step 10: Sending an EasySend Link from Dynamics 365
(See Figure 41 and Figure 42)
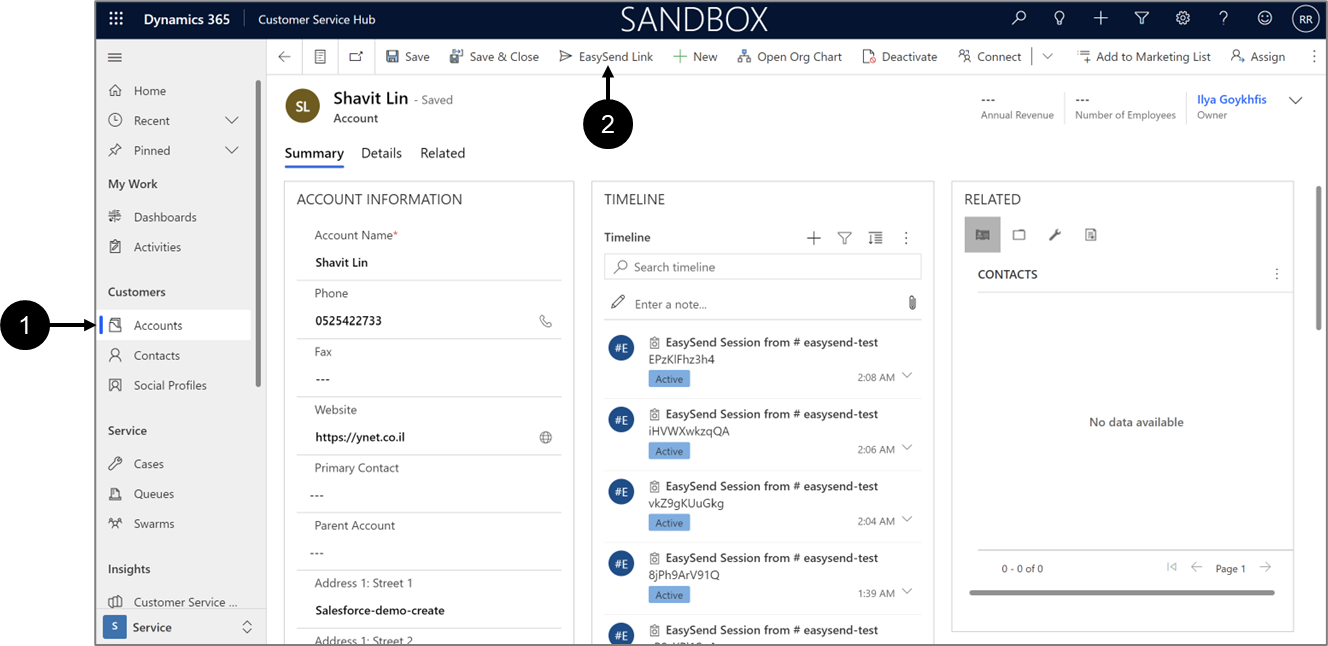
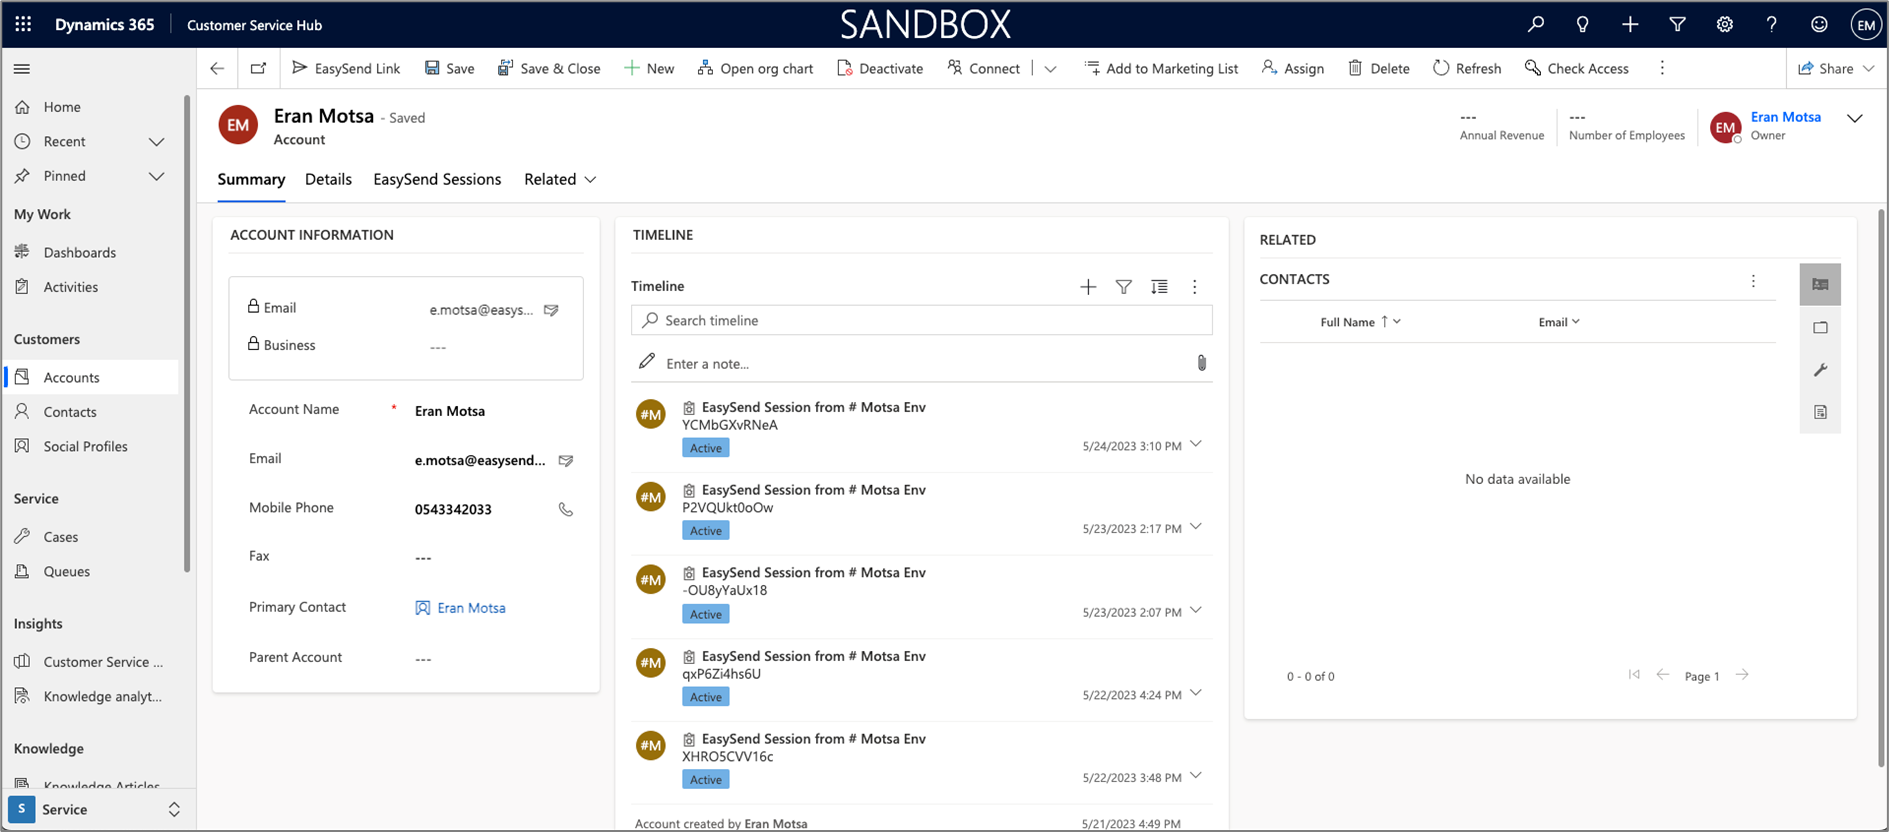
From your Dynamics 365 environment, access an account (1). Click the EasySend Link button (2) and follow the instructions on the screen.

Figure 41: Dynamic 365 Account
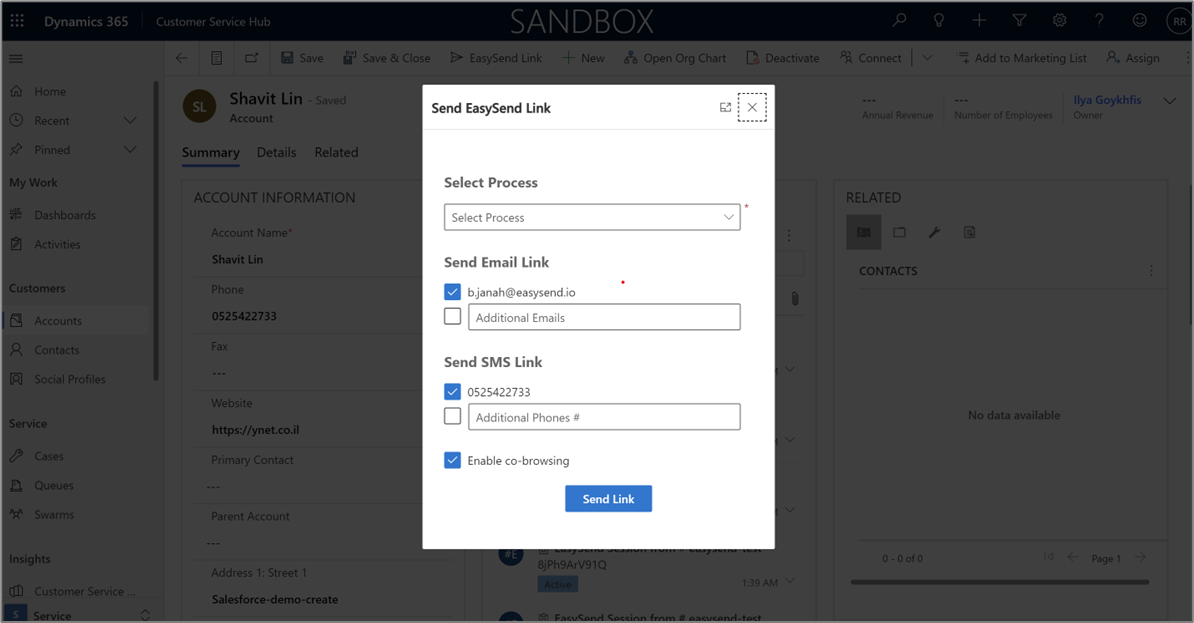
Figure 42: Selecting a Digital Process
Trigger Email and SMS sending from Dynamic 365
The following sections describe how to trigger Email and SMS sending from Dynamic 365.
Step 1: Trigger Email Sending
(See Figure 43 to Figure 46)
To trigger Email sending from Dynamic 365, perform the following steps:
- Navigate to the Workflow Manager screen.
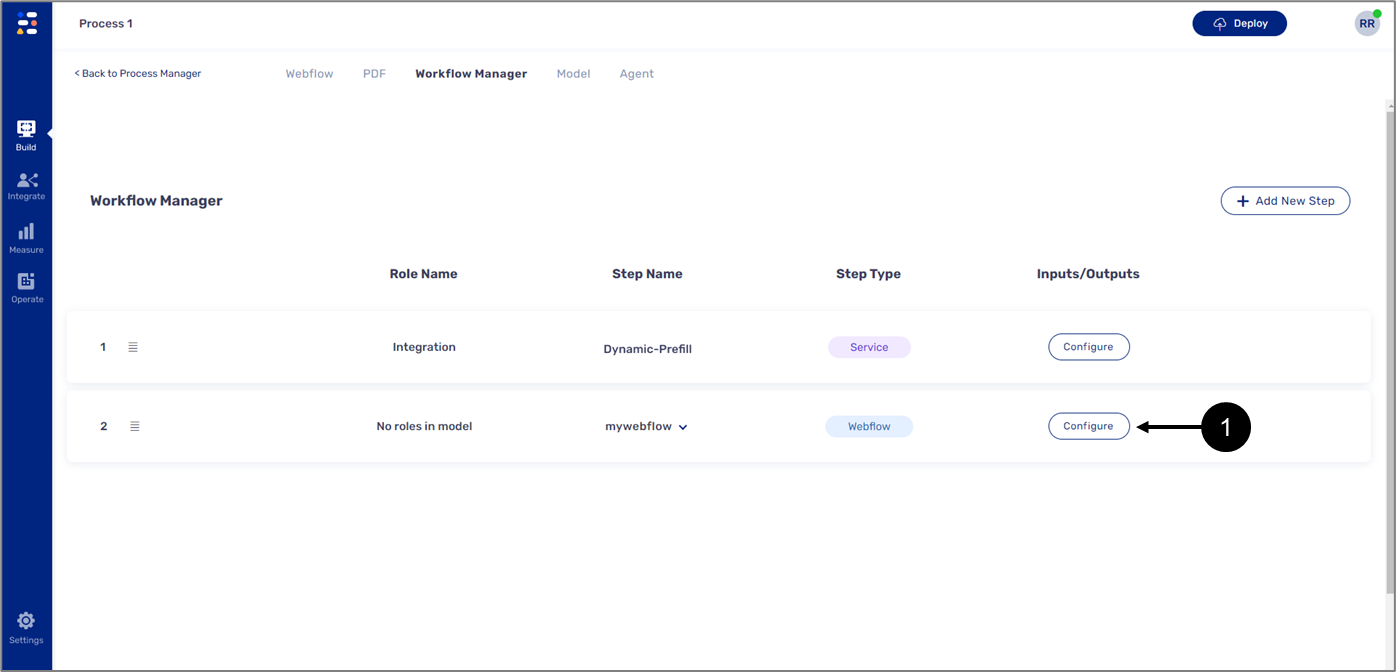
- Click the Configure button (1) of the relevant step.
Result:
The following window appears:
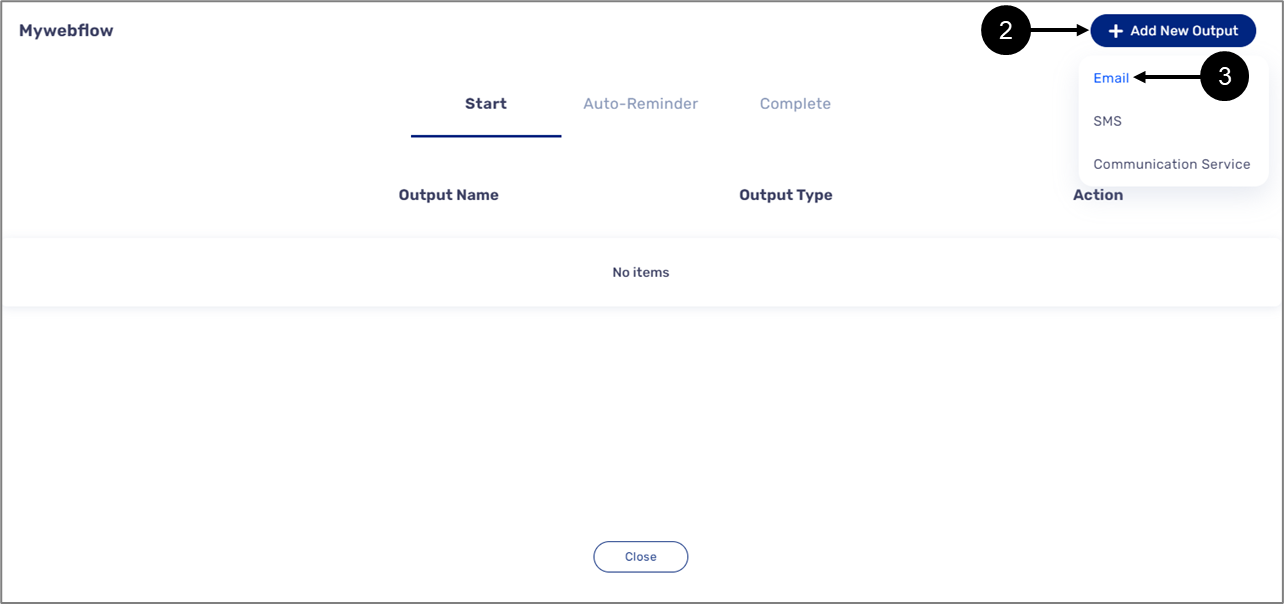
Figure 44: Adding a New Output
- Click the + Add New Output button (2) and click Email (3).
Result:
New email output is added:
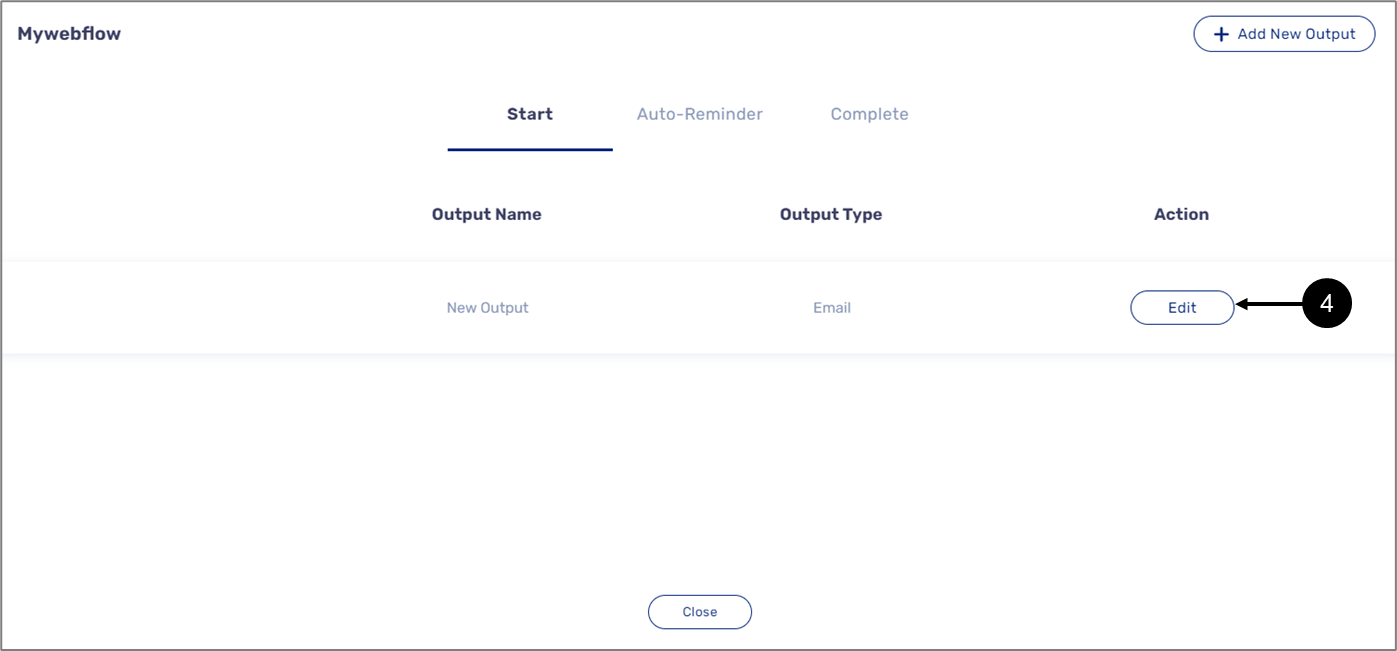
Figure 45: Editing Email Output
- Click the Edit button (4).
Result:
The Email Details window appears:
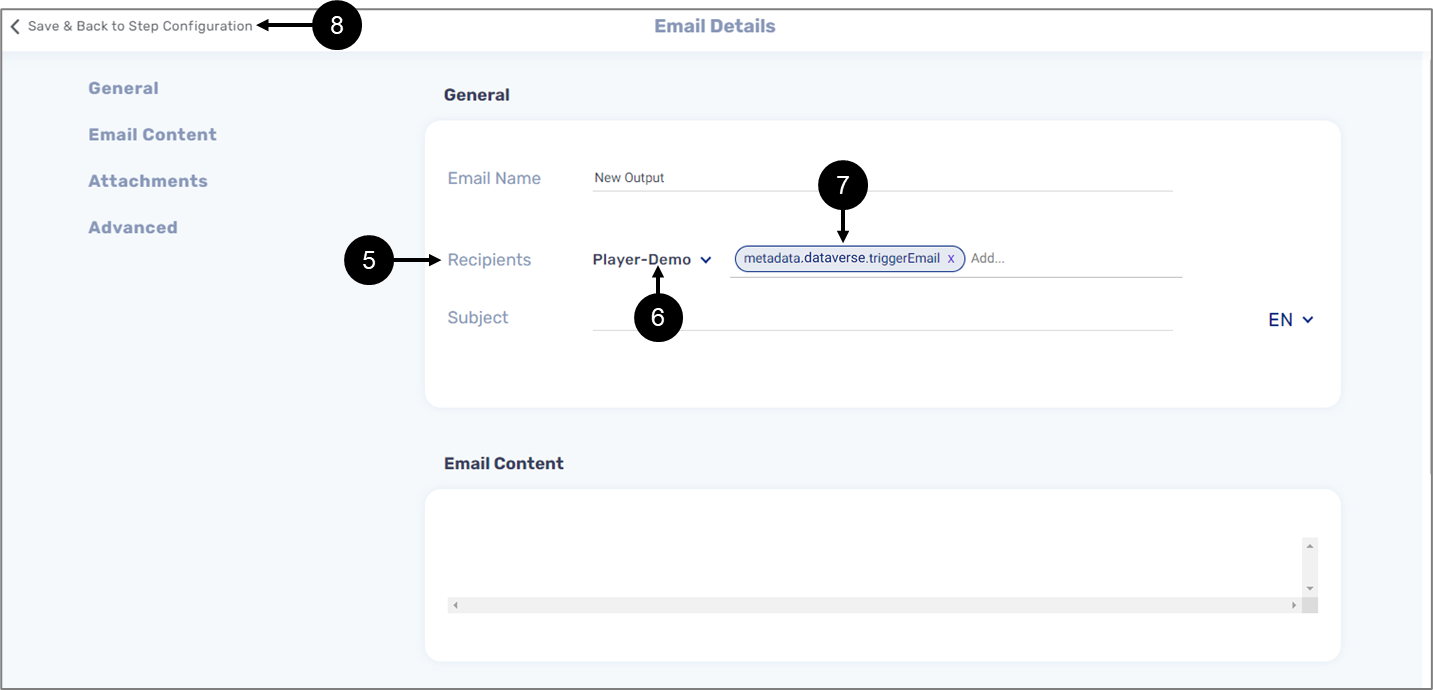
Figure 46: Email Details Window
- Locate the Recipients (5).
- Verify the appropriate environment (6) is selected.
- Add the following recipient: metadata.dataverse.triggerEmail (7).
- Configure the rest of the email details.
- Click < Save & Back to Step Configuration (8).
Result:
The changes are saved, and the Email Details window is closed.
Step 2: Trigger SMS Sending
(See Figure 47 to Figure 49)
To trigger SMS sending from Dynamics 365, perform the following steps:
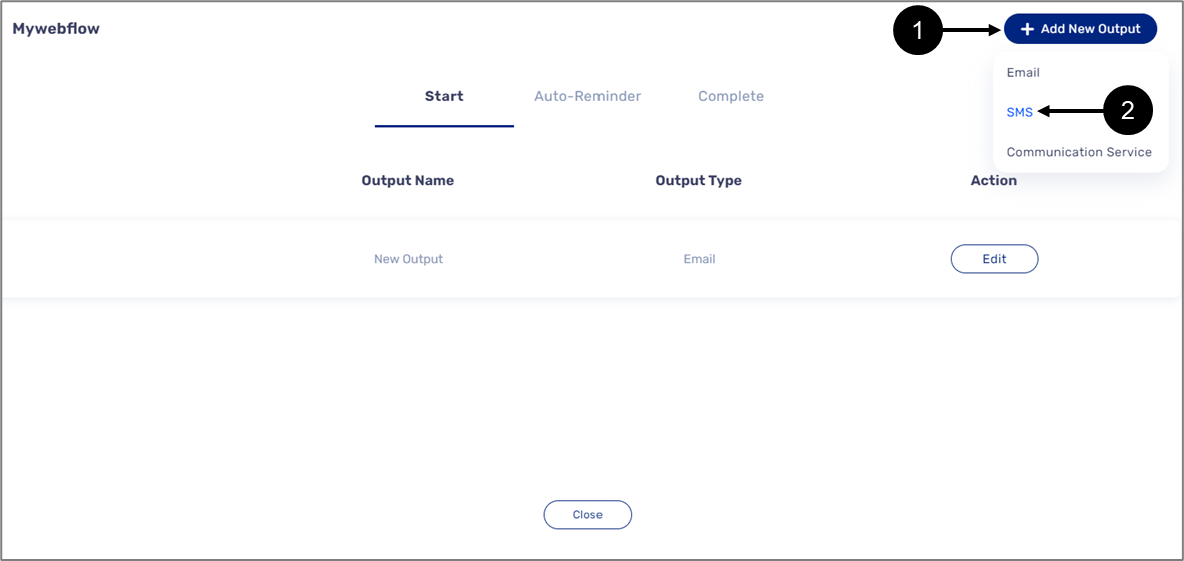
Figure 47: Adding a New Output
- Click the + Add New Output button (1) and click SMS (2).
Result:
New SMS output is added:
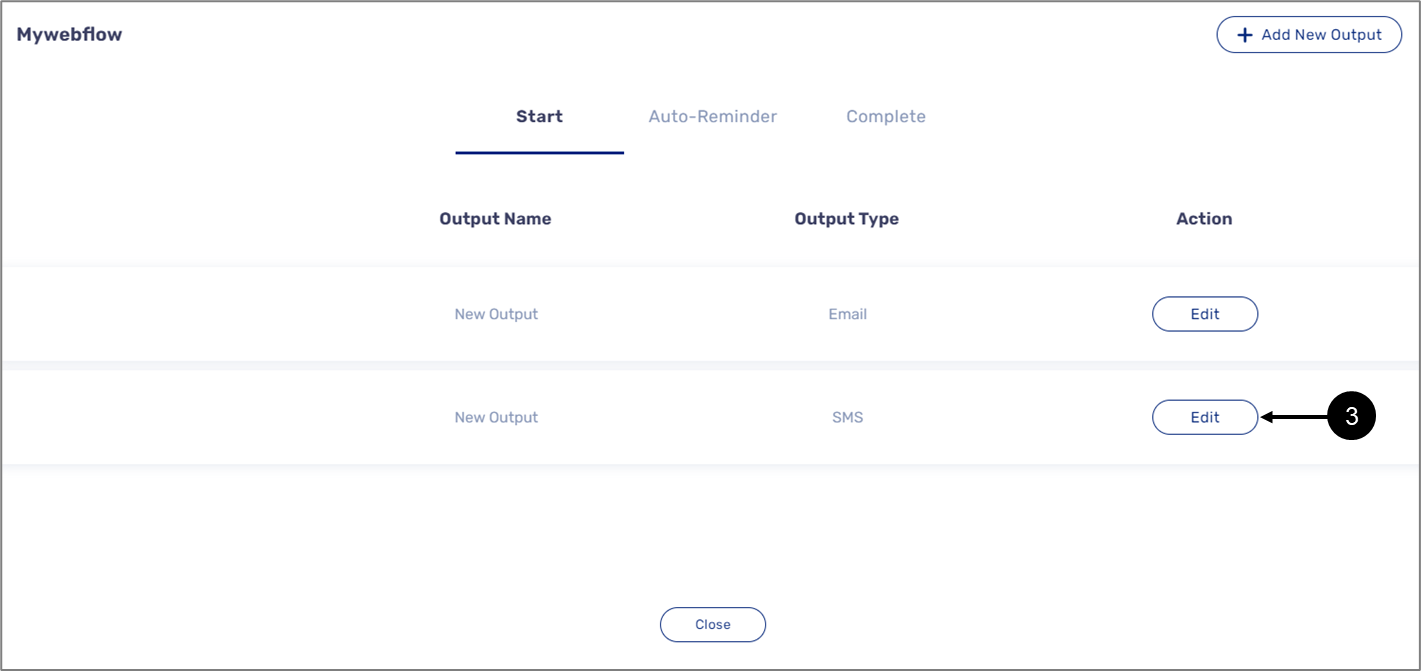
Figure 48: Editing SMS Output
- Click the Edit button (3).
Result:
The SMS Details window appears:
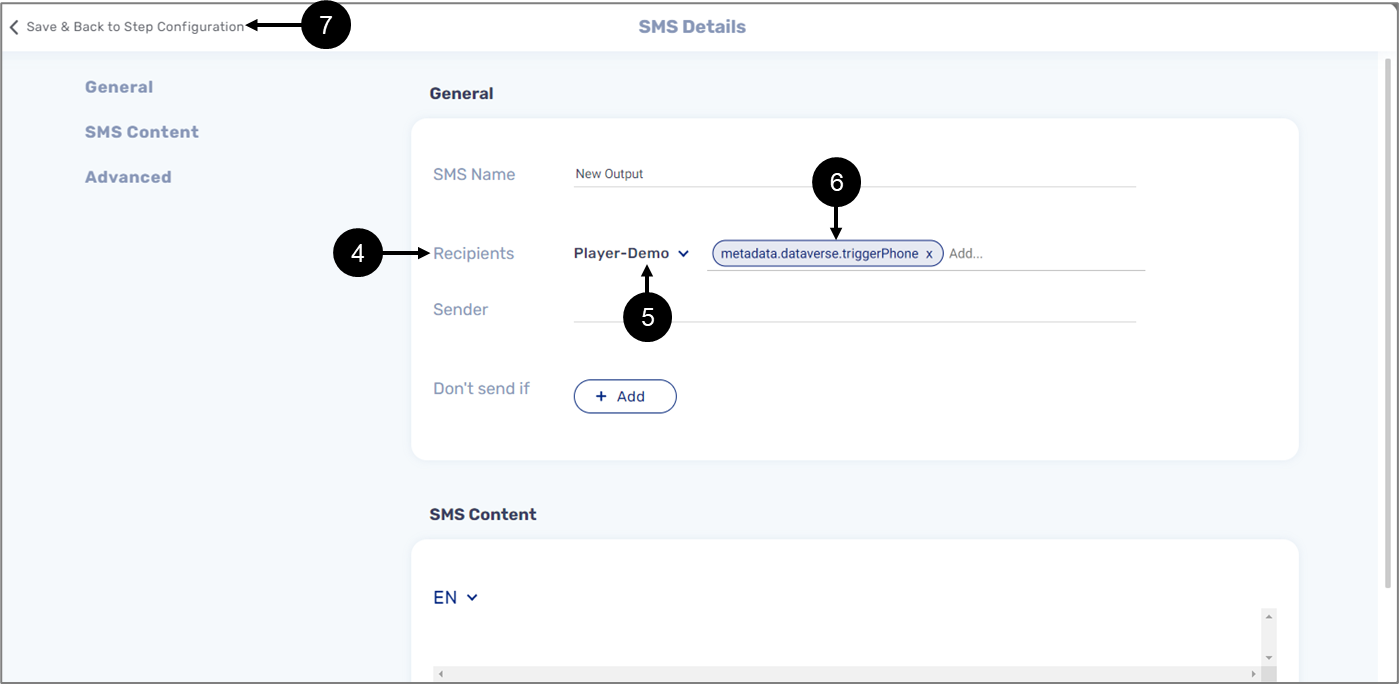
- Locate the Recipients (4).
- Verify the appropriate environment (5) is selected.
- Add the following recipient: metadata.dataverse.triggerPhone (6).
- Configure the rest of the SMS details.
- Click < Save & Back to Step Configuration (7).
Result:
The changes are saved, and the SMS Details window is closed.
Step 3: Workflow Manager Deployment
Publish the changes made to the workflow manager by clicking the Deploy button and selecting the appropriate environment.
Step 4: Adding Email and SMS Information on Dynamic 365
(See Figure 50)
After clicking the EasySend Link button on the Dynamic 365 account, select the digital process (1) add the desired Email address (2), the desired phone number (3) for SMS, and click the Send Link button (4).
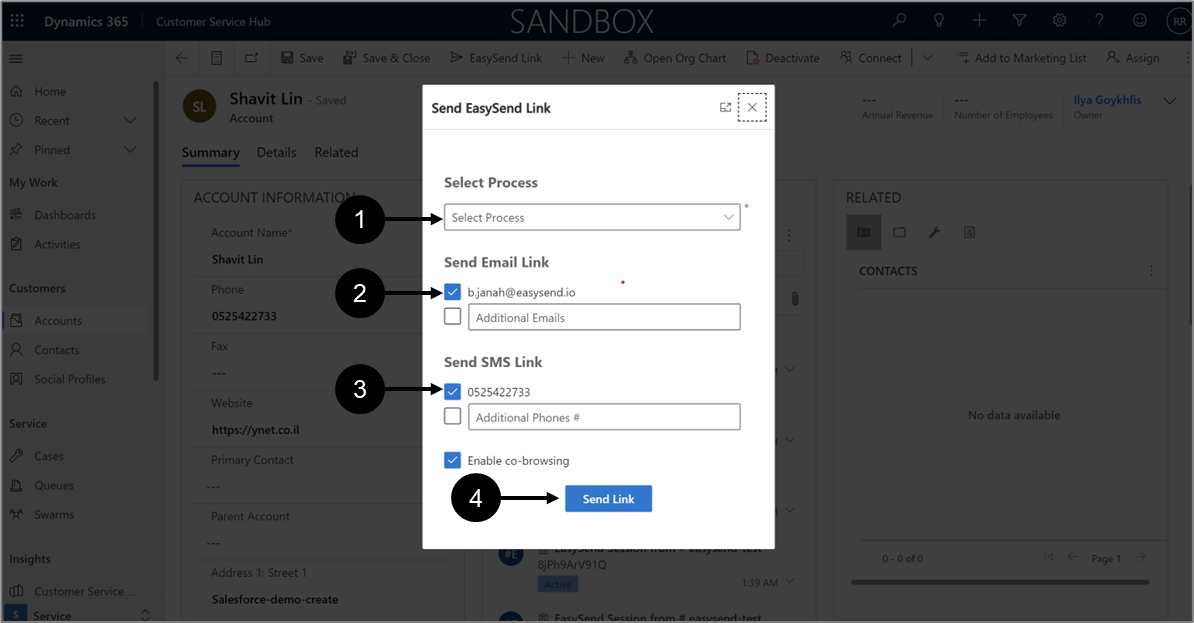
Figure 50: Adding Email Address and Phone Number
Updating Dynamic 365: From a Digital Process to Dynamic 365
The following sections describe how to update Dynamic 365 data from a digital process.
Step 1: Creating an Integration - Adding a New Step
(See Figure 51 to Figure 59)
To add a new step, perform the following steps:
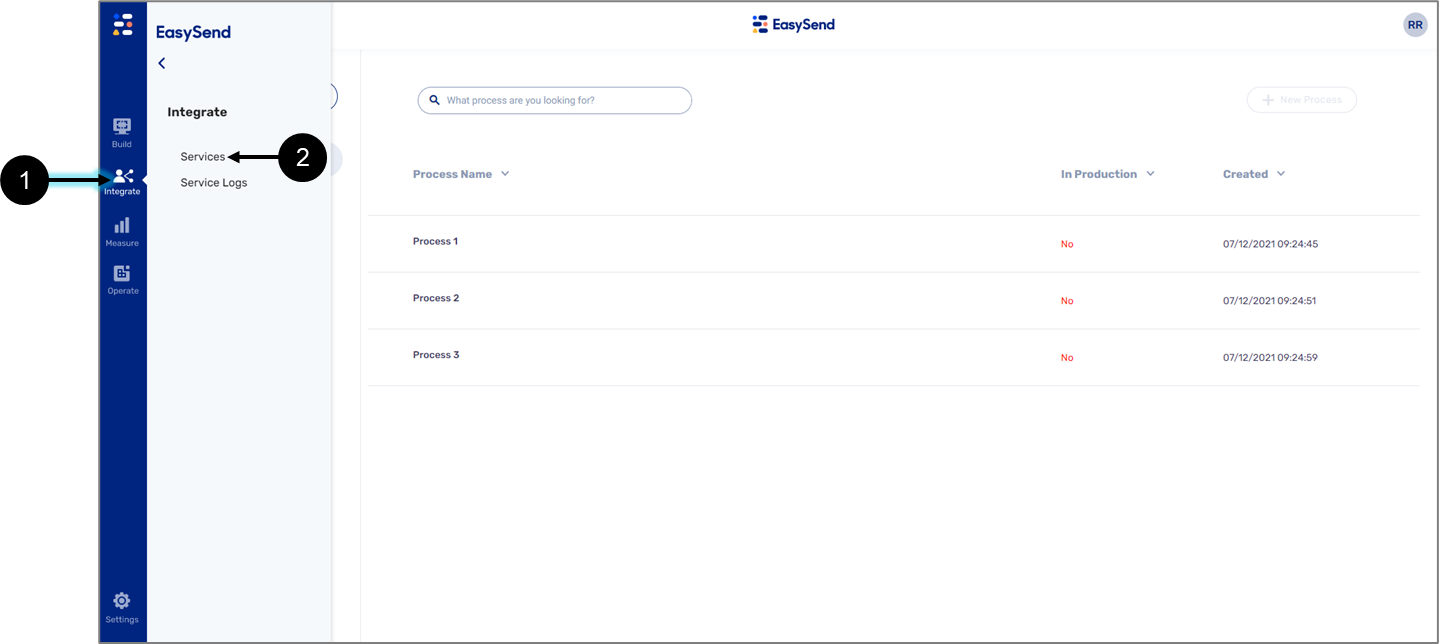
Figure 51: Integrate Tab and Services Option
- On the Builder platform, open the relevant environment.
- Click the Integrate tab (1).
- Click the Services option (2).
Result:
The Services screen appears:
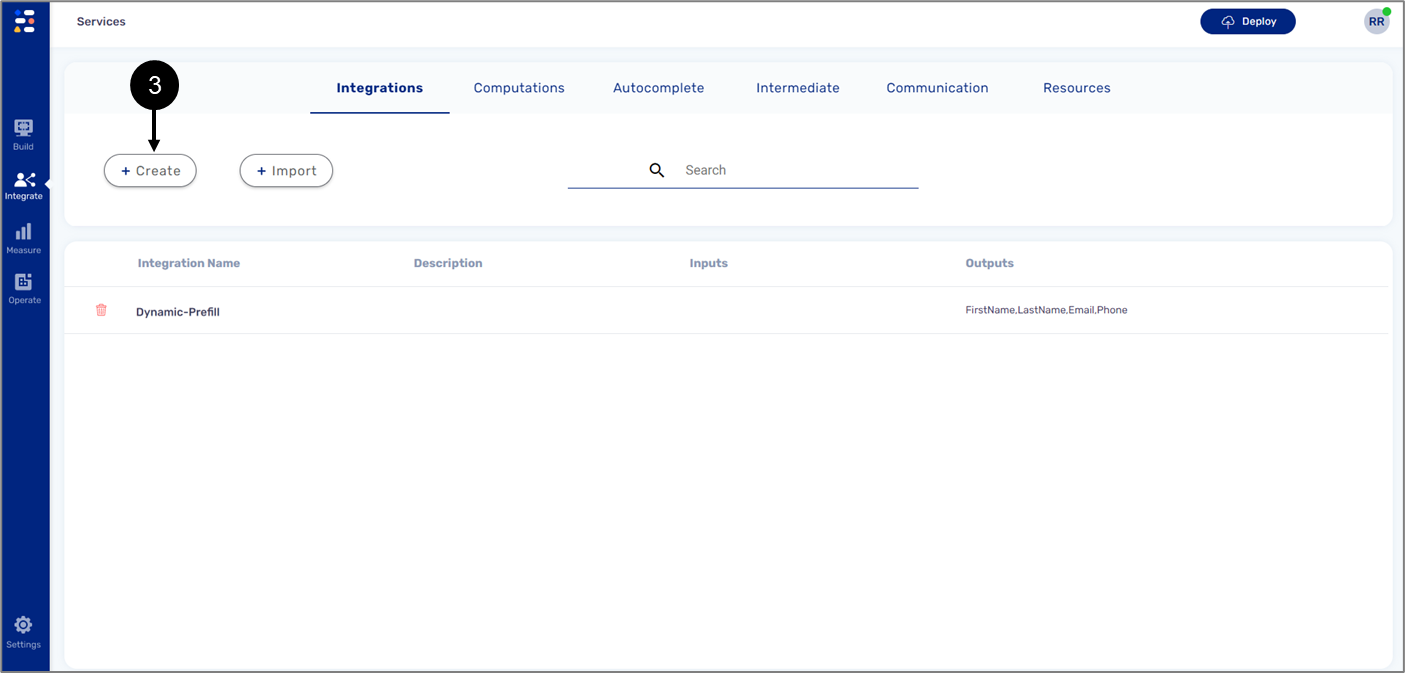
Figure 52: + Create Button
- Click the + Create button (3).
Result:
The following screen appears:
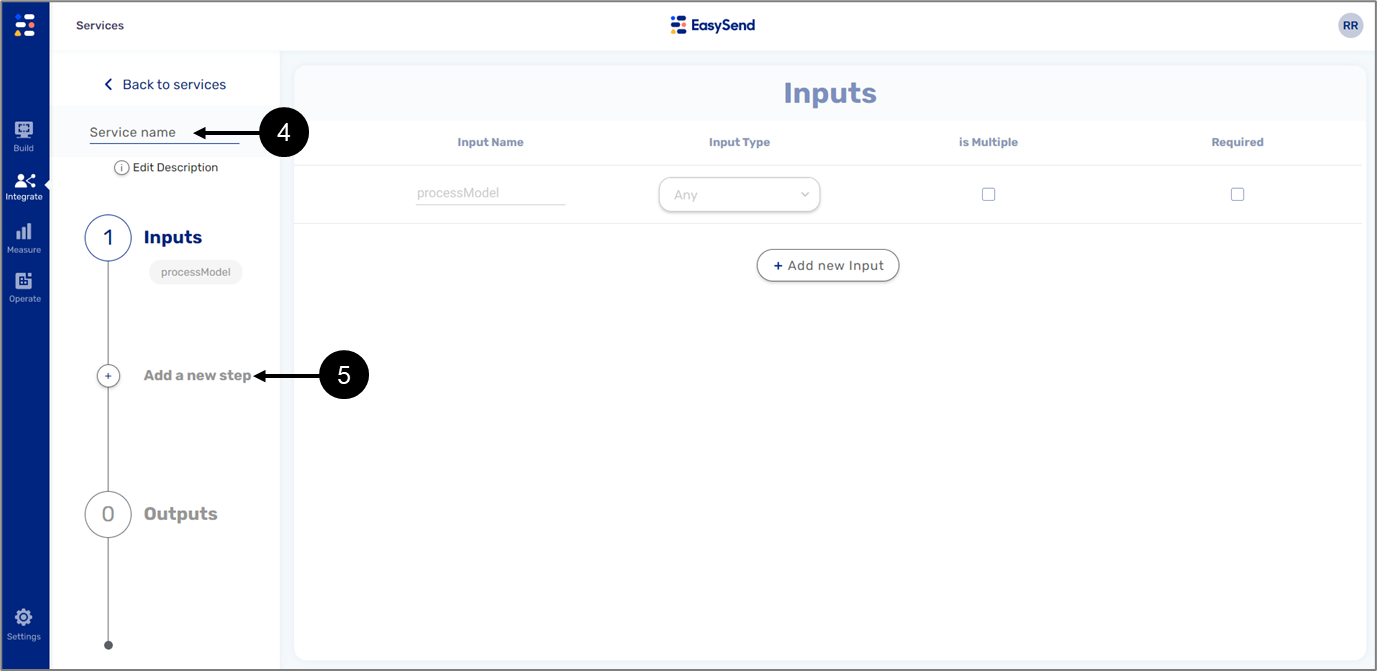
Figure 53: Add a new step Button
- Enter a Service name (4).
- Click the Add a new step button (5).
- A list of steps appears:
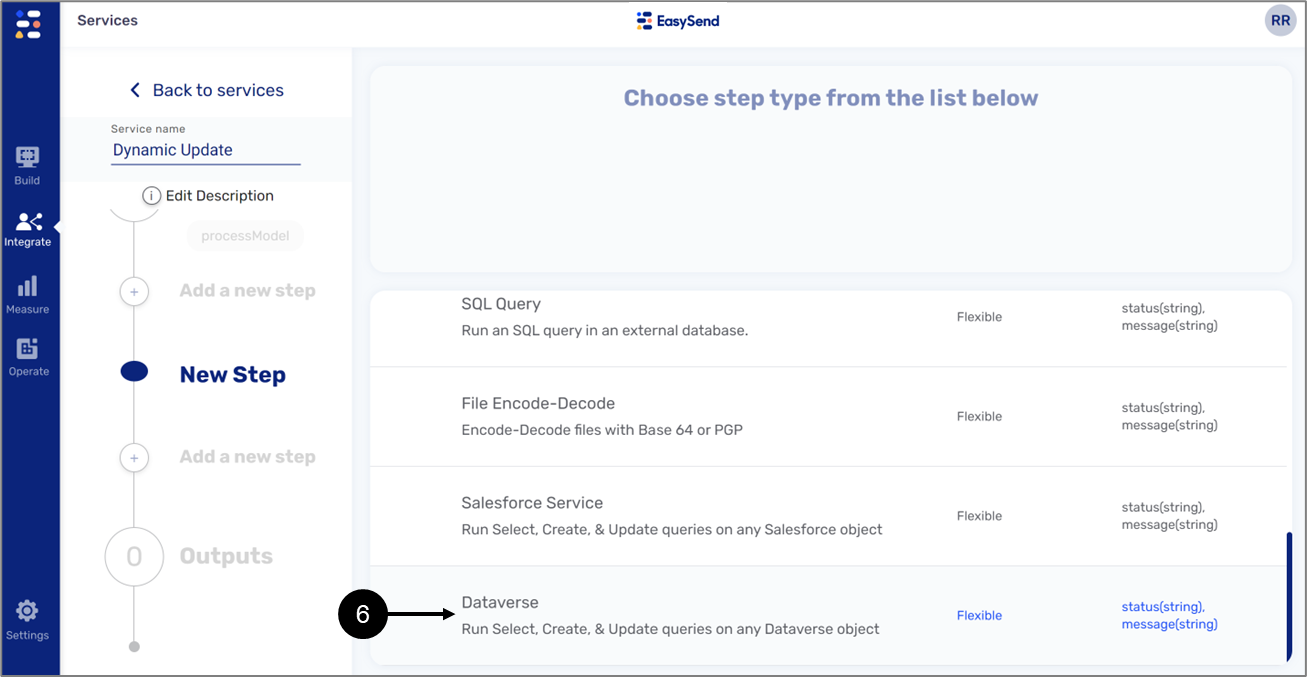
Figure 54: Dataverse
- Locate and click Dataverse (6).
Result:
The following window appears:

Figure 55: Name your Step
- Enter a Name (7).
- Click the Continue button (8).
Result:
The following screen appears:
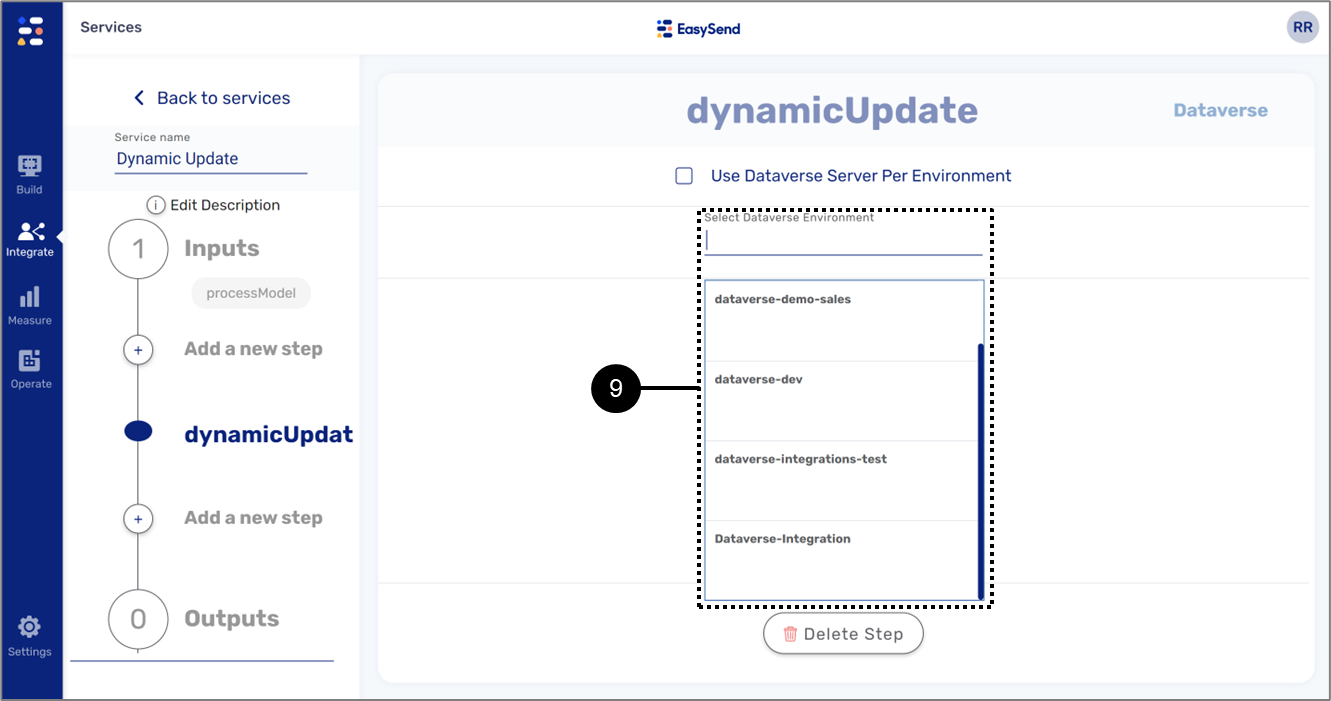
Figure 56: Dataverse Resource
- Click and select the Dataverse resource (9) created in Step 1: Creating Dynamic 365 Resource.
Result:
The Object | Record Type section appears:
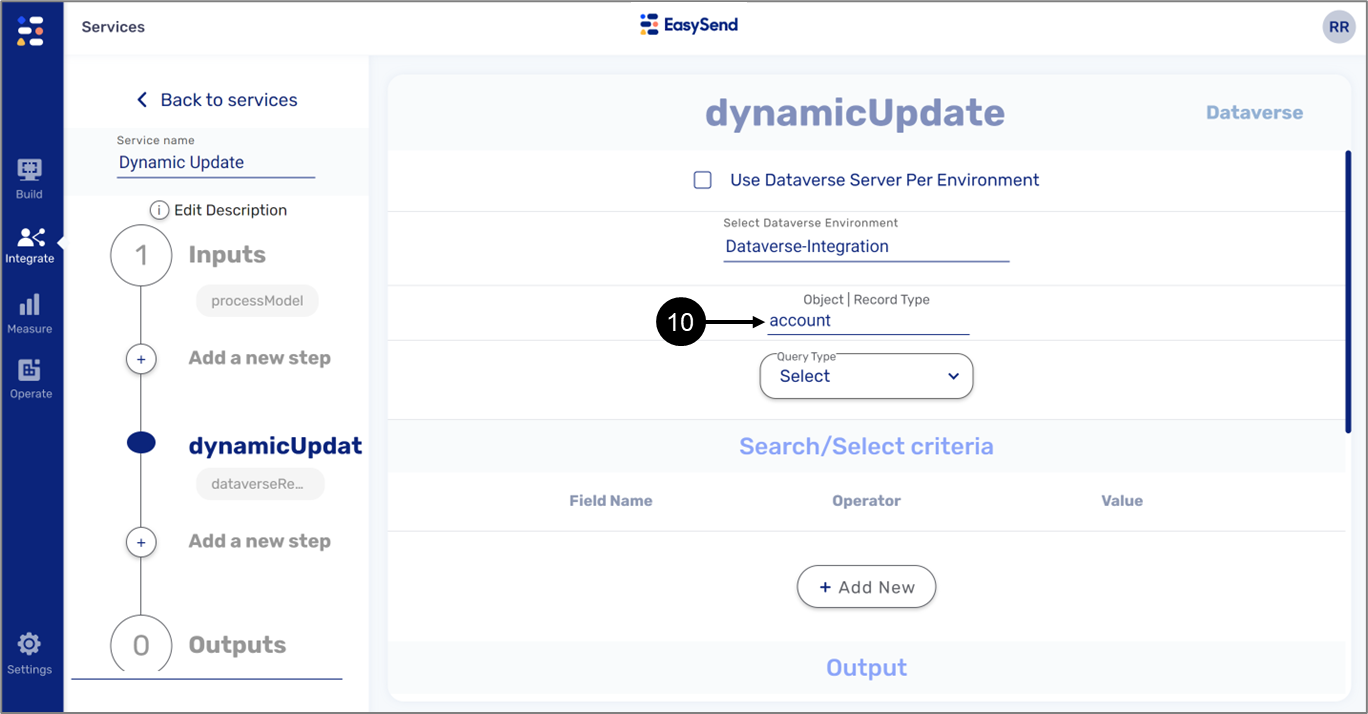
Figure 57: account
- Enter the Object |Record Type - account (10).
Result:
The Query Type dropdown (11) appears:
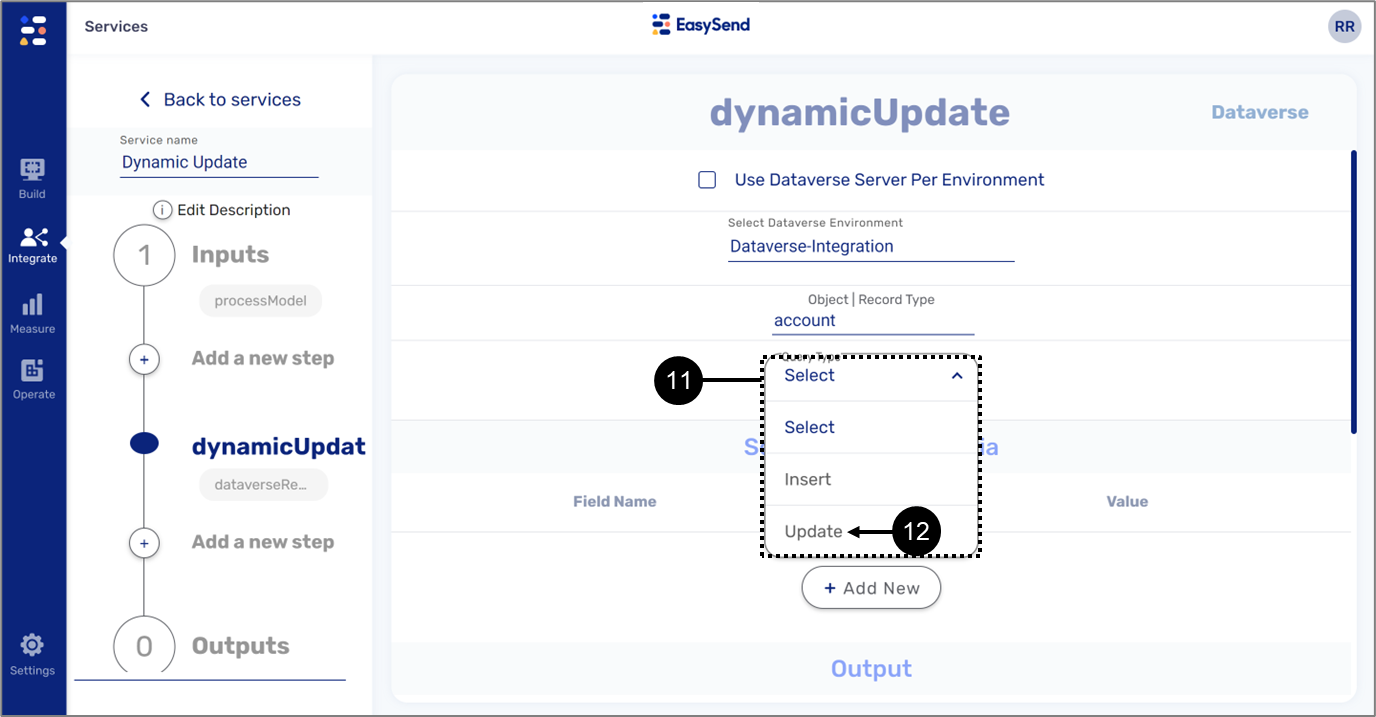
Figure 58: Query Type - Update
- Click the Query Type dropdown (11) and click Update (12).
Result:
The Search/Select criteria (13), Update Criteria (14), and Output (15) sections appear:
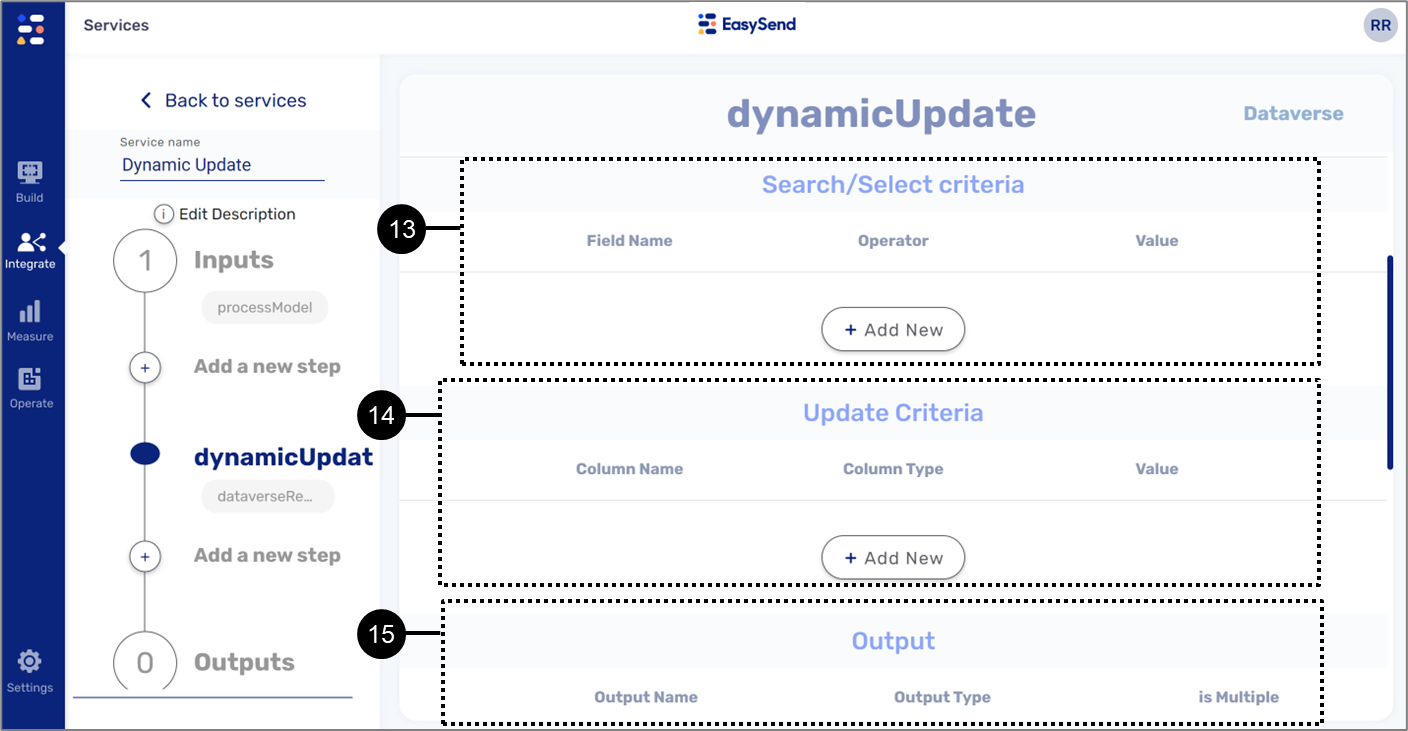
Figure 59: Search/Select criteria and the Output Sections
Step 2: Configuring the New Step - Search/Select criteria
(See Figure 60 to Figure 62)
This section contains the Dataverse record ID that connects the relevant Dynamic 365 object (account) to EasySend.
To add a new search/select criteria perform, the following steps:
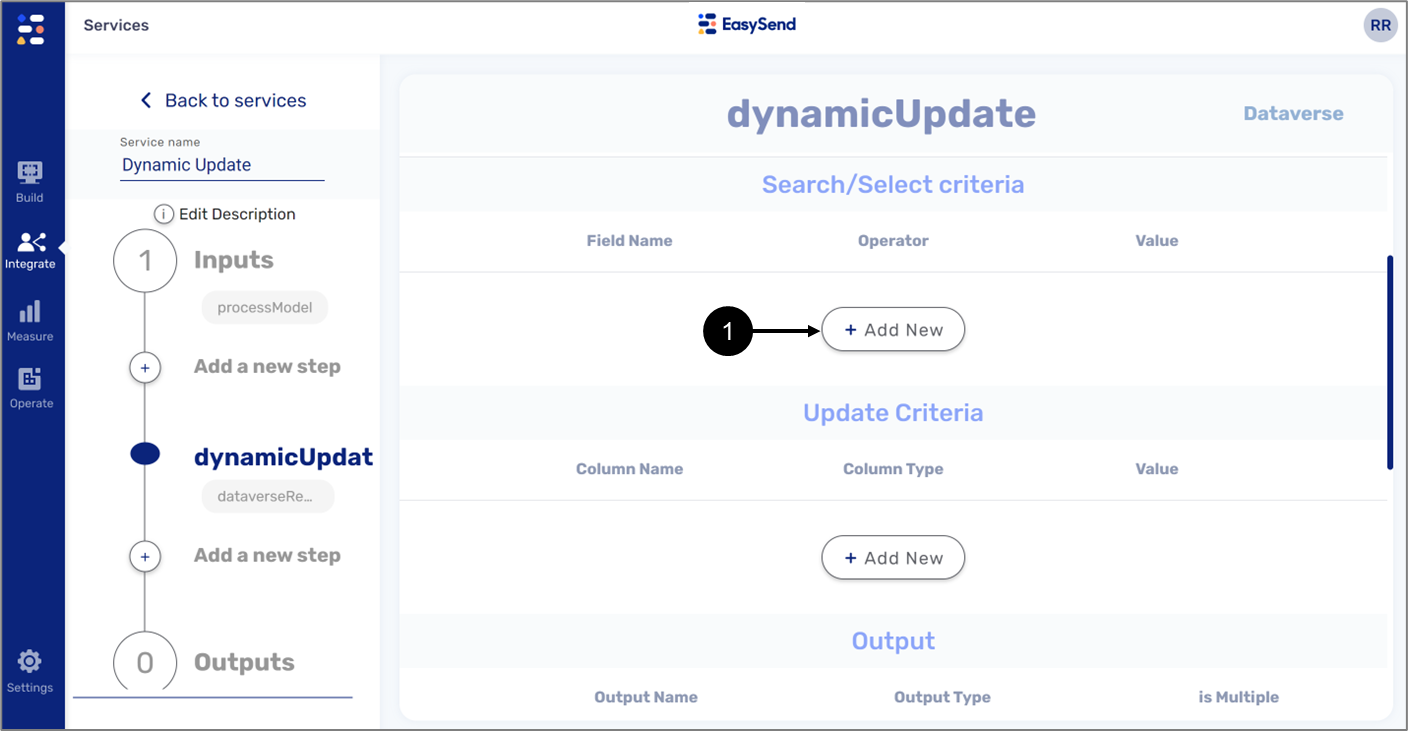
- Click the + Add New button (1).
Result:
A new search/select criteria line appears (2):
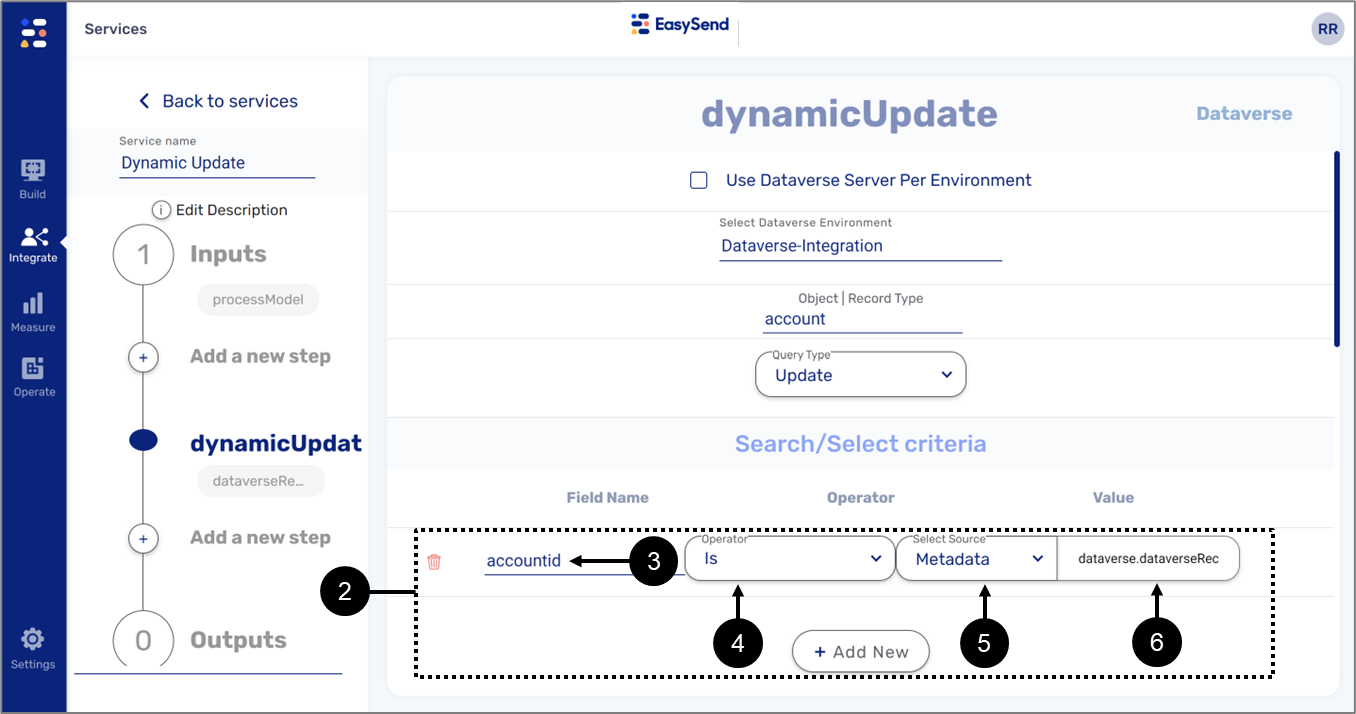
Figure 61: New Search/Select criteria Line
- Enter a Field Name (3) - Id.
- Click the Operator dropdown (4) and select the operator Is.
- Click the Select Source dropdown (5) and select Metadata.
- Enter the value (6) dataverse.dataverseRecordId.
Step 3: Configuring the New Step - Update Criteria
(See Figure 62 to Figure 70)
To add a new update criteria, perform the following steps:
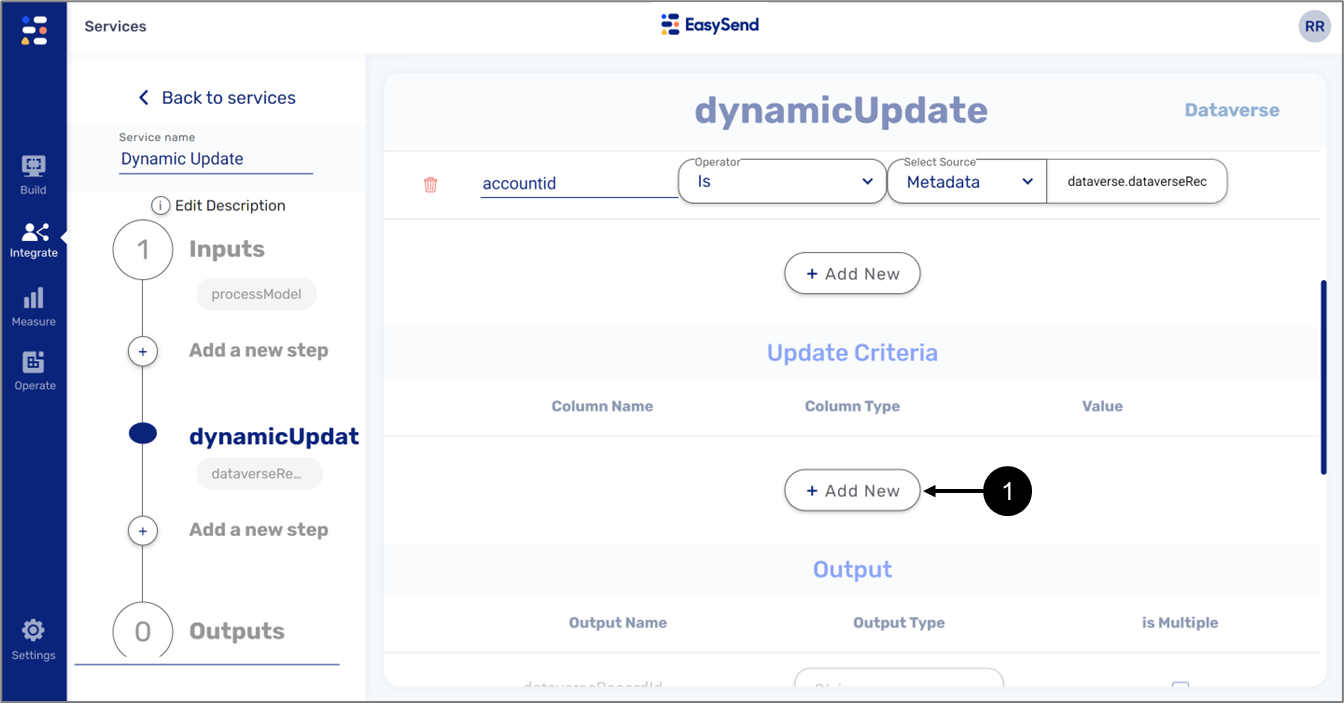
- Click the + Add New button (1).
Result:
A new update criteria line appears (2):
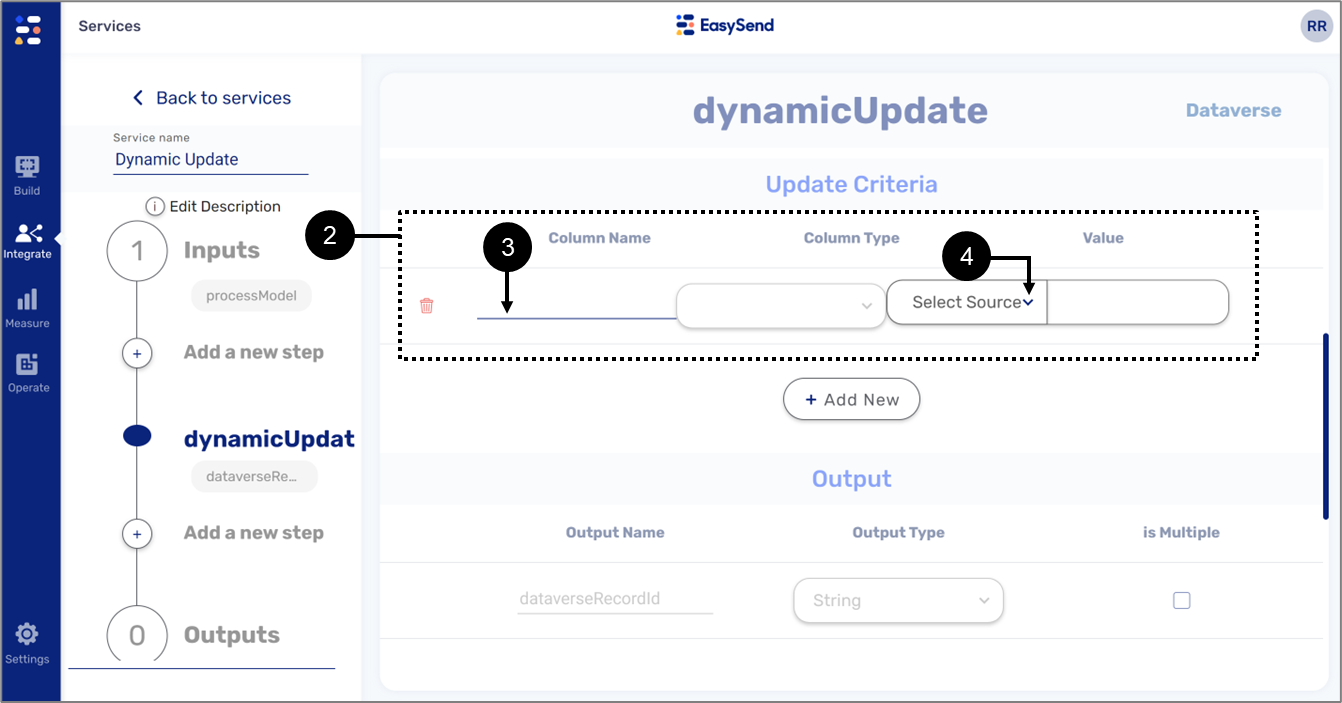
Figure 63: New Line
- Enter a Column Name (3).
- Click the Select Source dropdown (4) and Select Model.
Result:
The new update criteria line is configured (5):
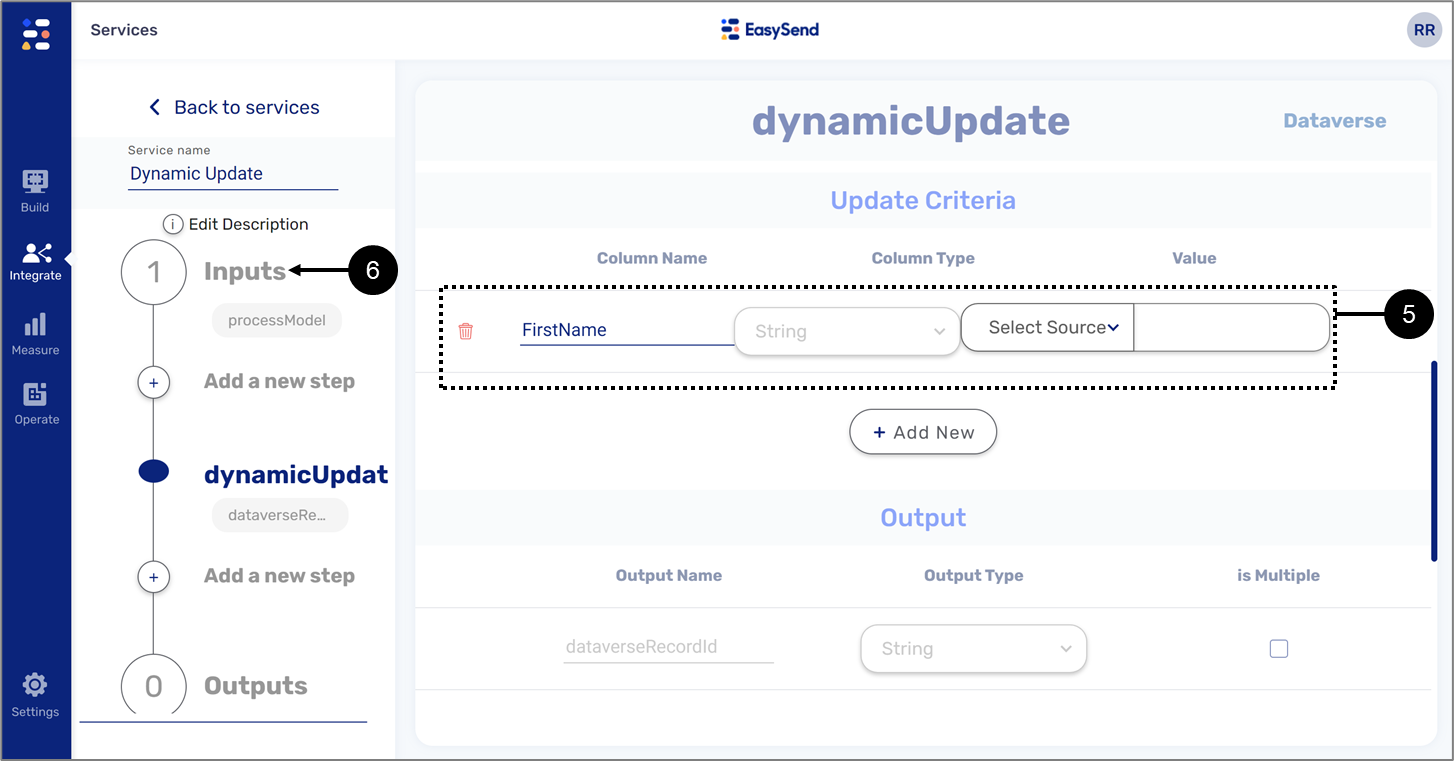
Figure 64: Inputs
- Click Inputs (6).
Result:
The Inputs screen appears:
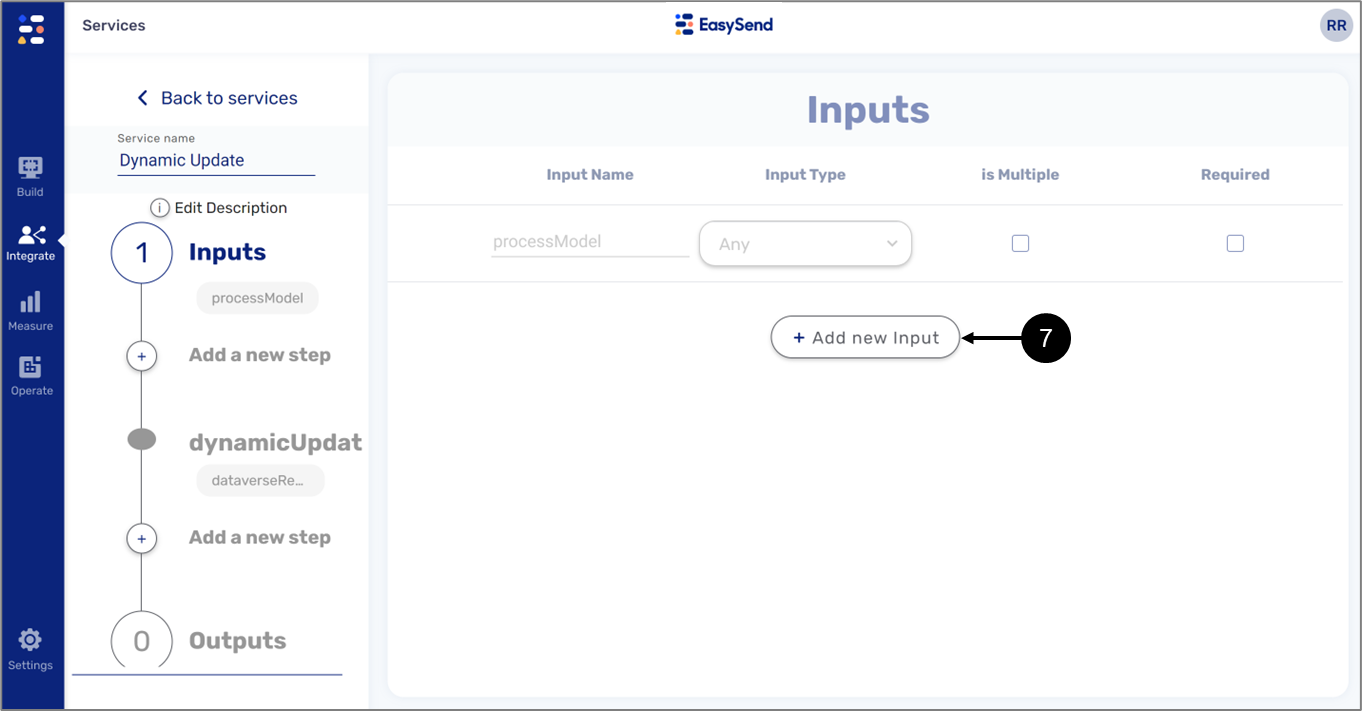
Figure 65: Inputs Screen
- Click the + Add new Input button (7).
Result:
A new input line (8) is added:
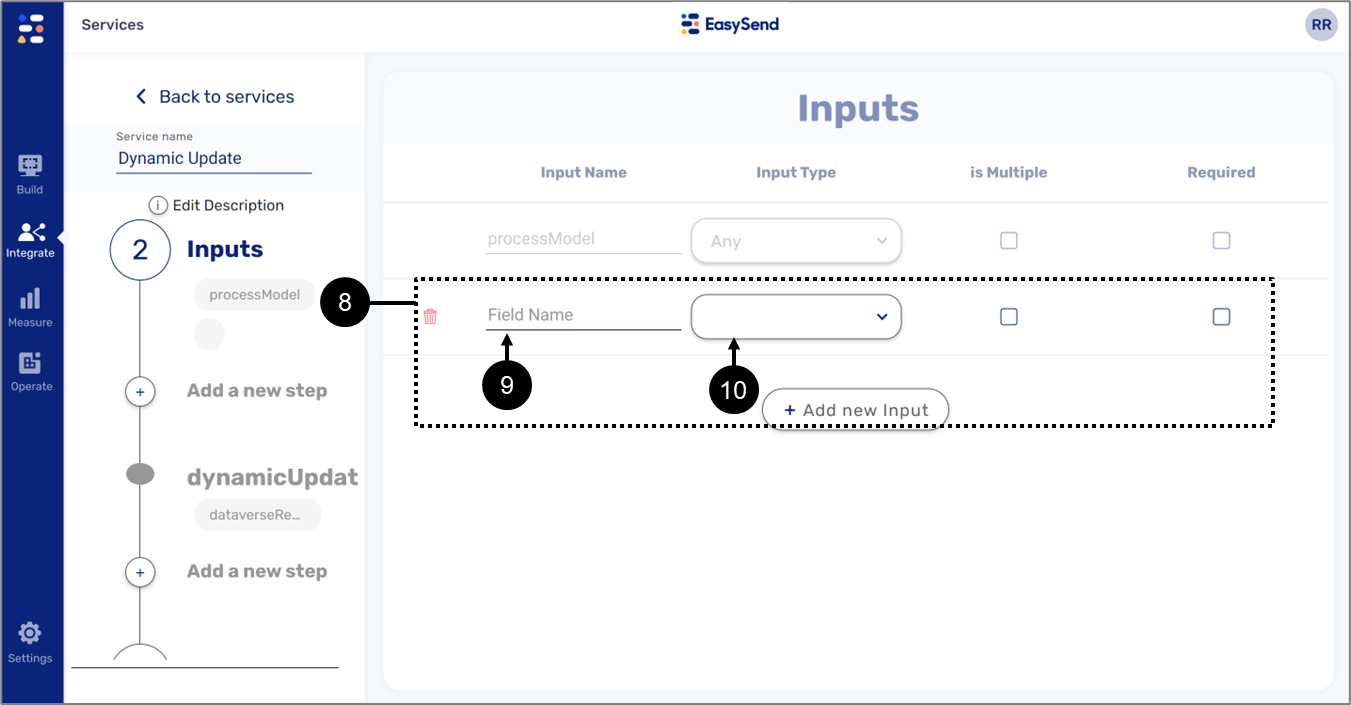
Figure 66: New Input Line
- Enter an Input Name (9).
- Select an Input Type (10).
Result:
The input line (11) is configured:
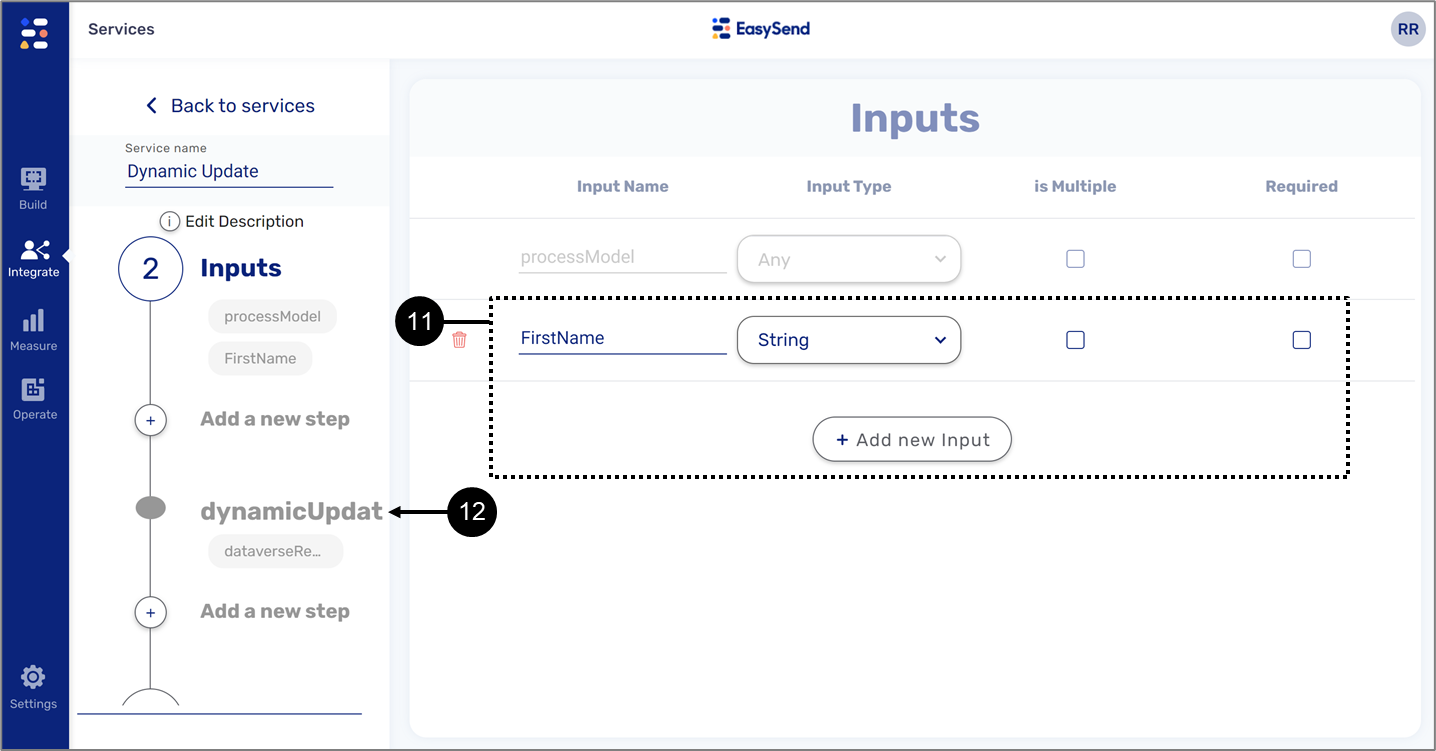
Figure 67: Input Line
- Return to the Step (12).
Result:
The Update Criteria section appears:

Figure 68: New Value
- On the output line under Value (13) enter the input name created in step 6 in the following format: inputs.Input Name, for example: inputs.FirstName (14).
- Repeat steps 1 to 9 until all Dynamics 365 outputs that were created in Step 4: Configuring the New Step - Output are added.
At the end of this Step, the Inputs screen and the Update Criteria section contain the exact number of manually added inputs (15) and outputs (16), for example:
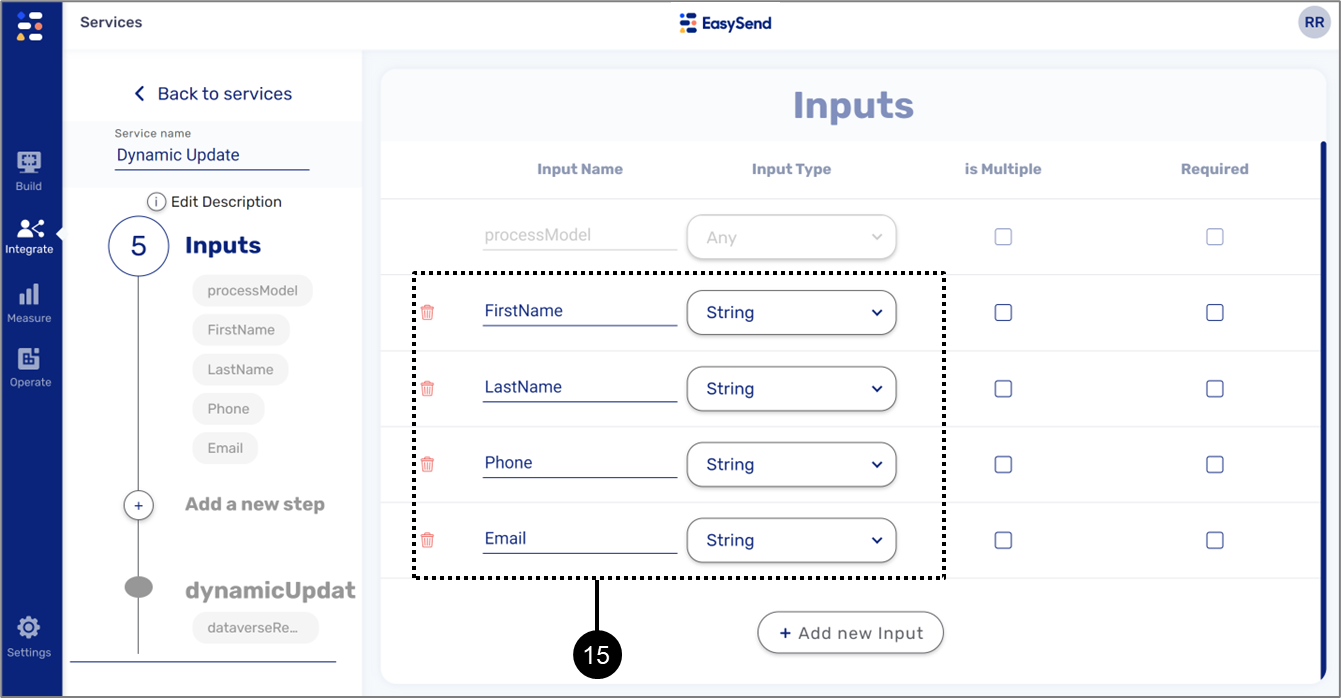
Figure 69: Added Inputs

Step 4: (Optional) Insert Data to Dynamic 365 From a Digital Process
The following sections describe how to insert data to Dynamic 365 from a digital process.
Step 4a: Adding a New Insert Step
(See Figure 71 to Figure 77)
To add a new insert step, perform the following steps:
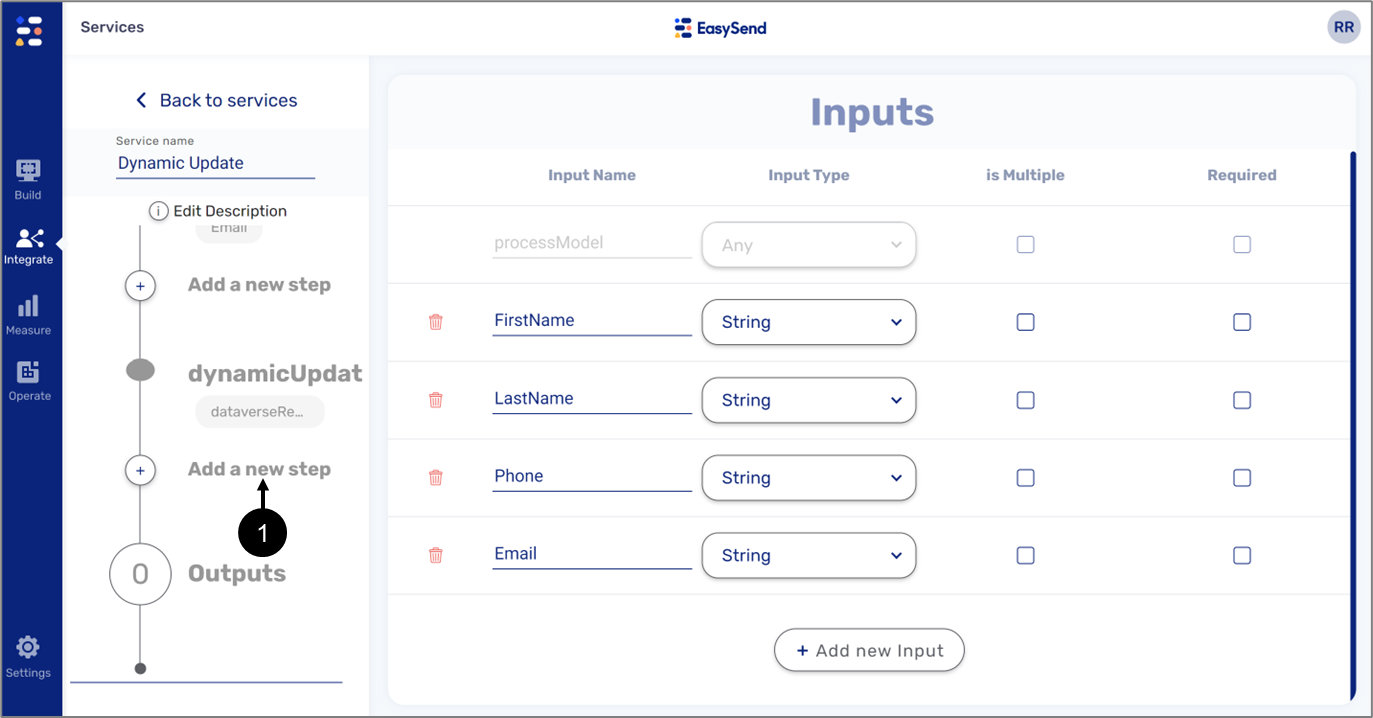
Figure 71: Add a new step Button
- Click the Add a new step button (1).
- A list of steps appears:
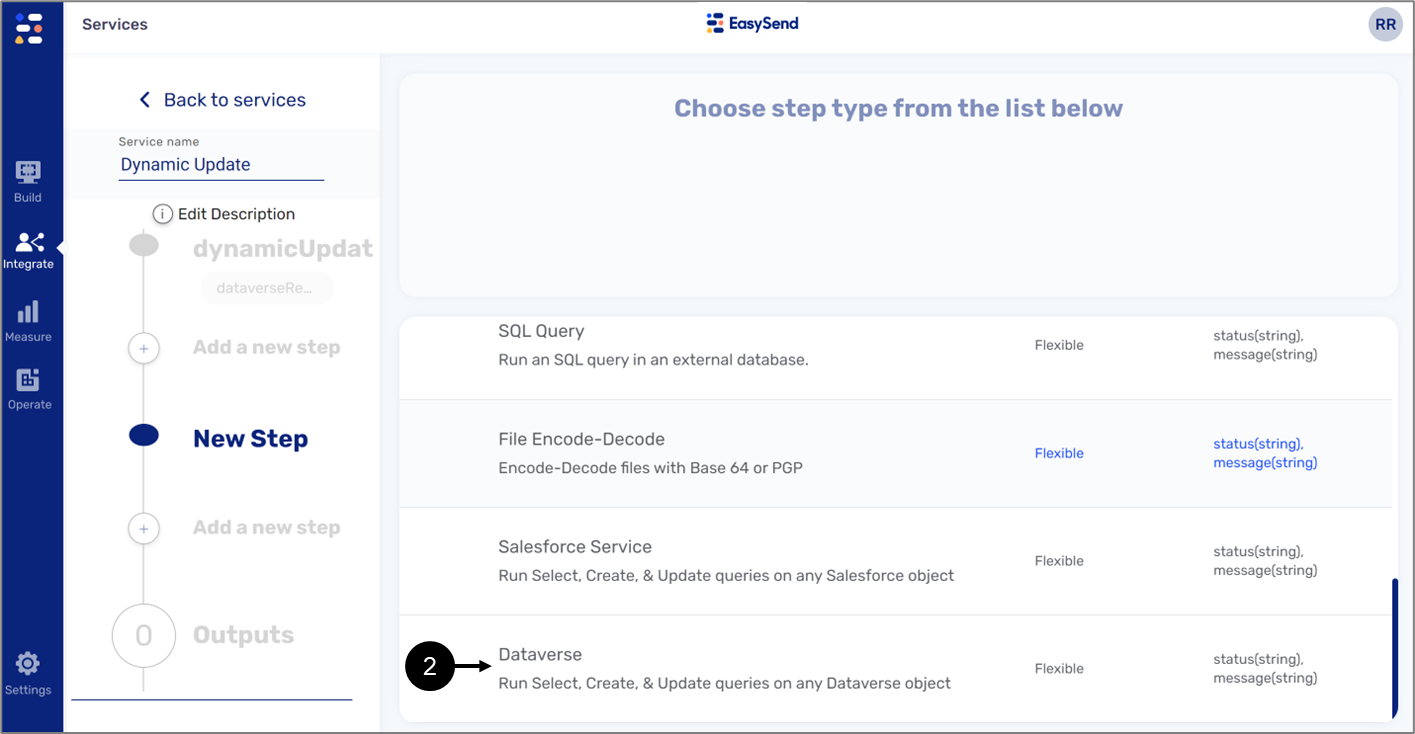
Figure 72: Dataverse
- Locate and click Dataverse (2).
Result:
The following window appears:
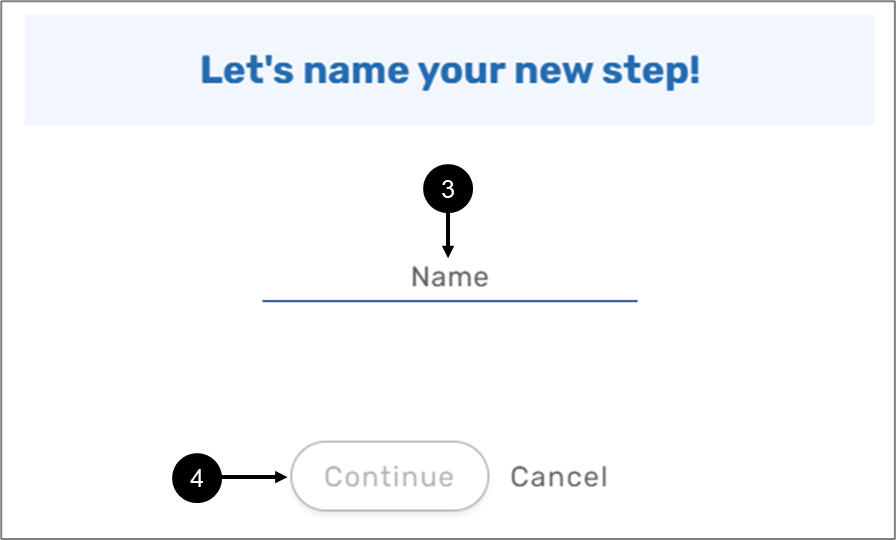
Figure 73: Name your Step
- Enter a Name (3).
- Click the Continue button (4).
Result:
The following screen appears:
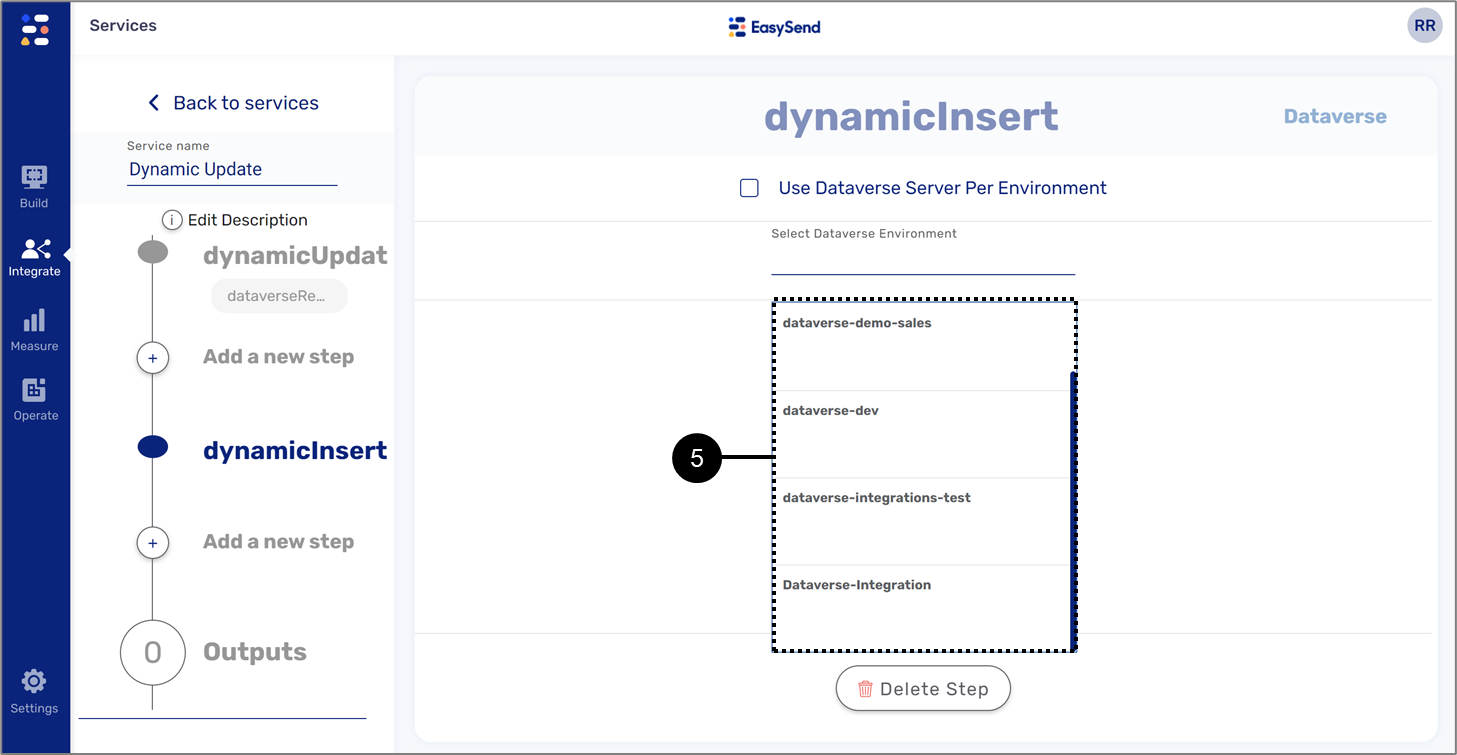
Figure 74: Dynamic 365 Resource
- Click and select the Dataverse resource (5) created in Step 1: Creating Dynamic Resource.
Result:
The Object | Record Type section appears:
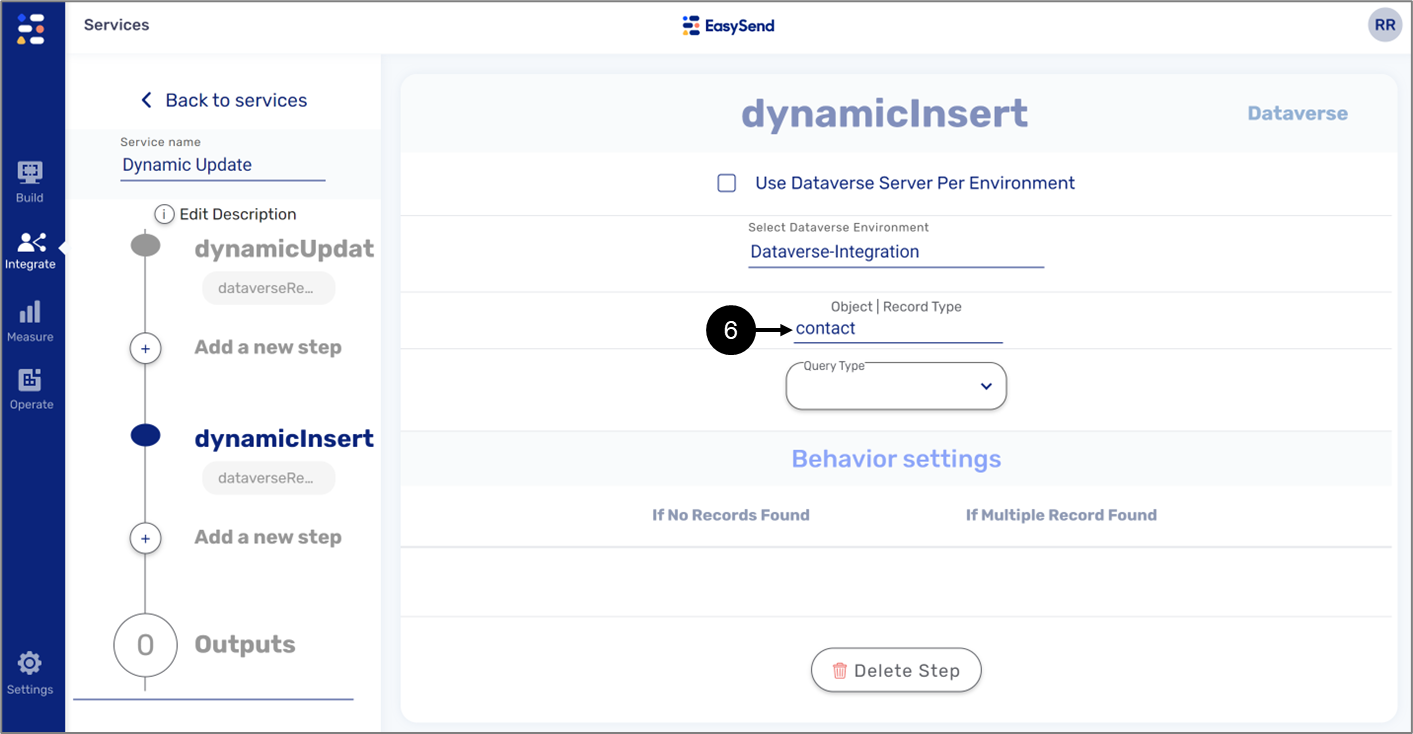
Figure 75: contact
- Enter the Object |Record Type - contact (6).
Result:
The Query Type dropdown (7) appears:

Figure 76: Query Type - Insert
- Click the Query Type dropdown (7) and click Insert (8).
Result:
The Insert criteria (9) and the Output (10) sections appear:
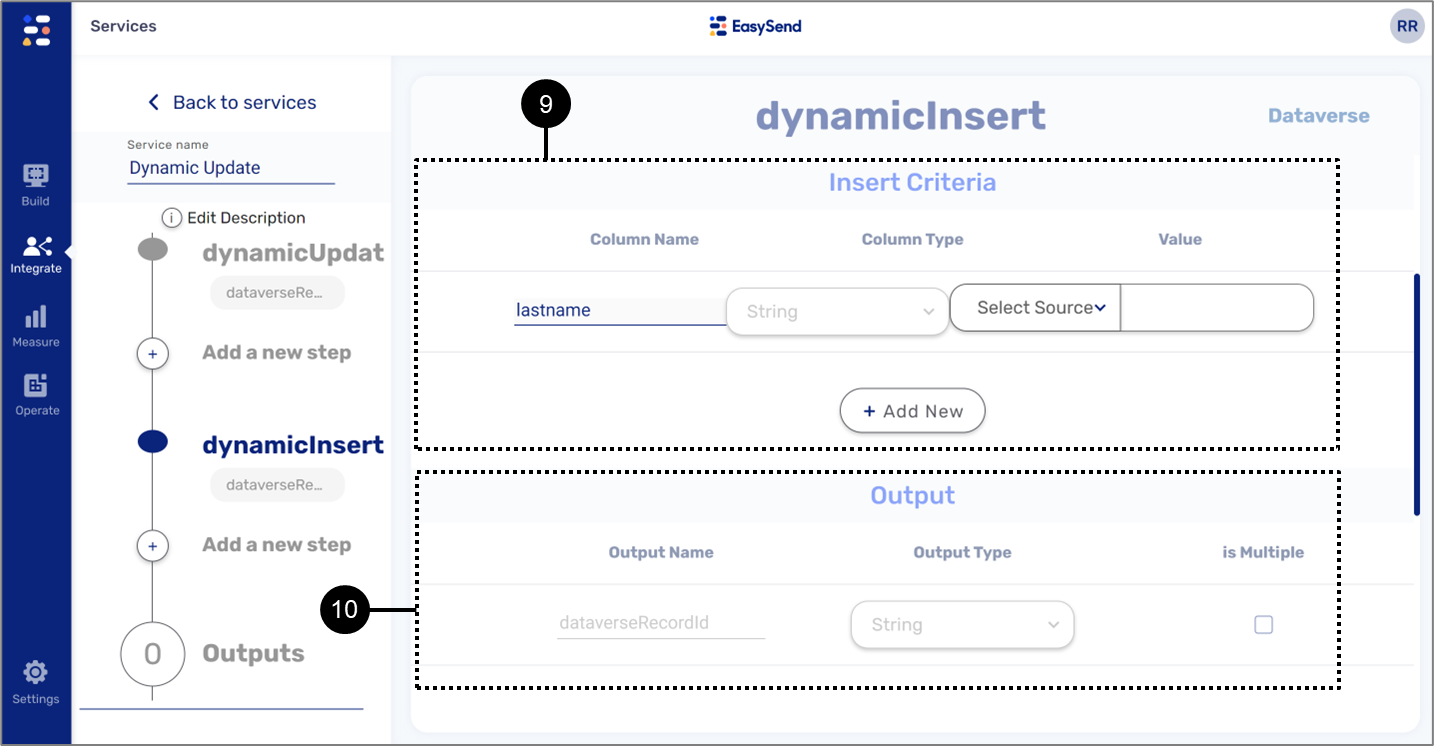
Figure 77: Insert criteria and the Output Sections
Step 4b: Configuring the New Step – Insert Criteria
(See Figure 78 to Figure 80)
To configure the insert criteria, perform the following steps:
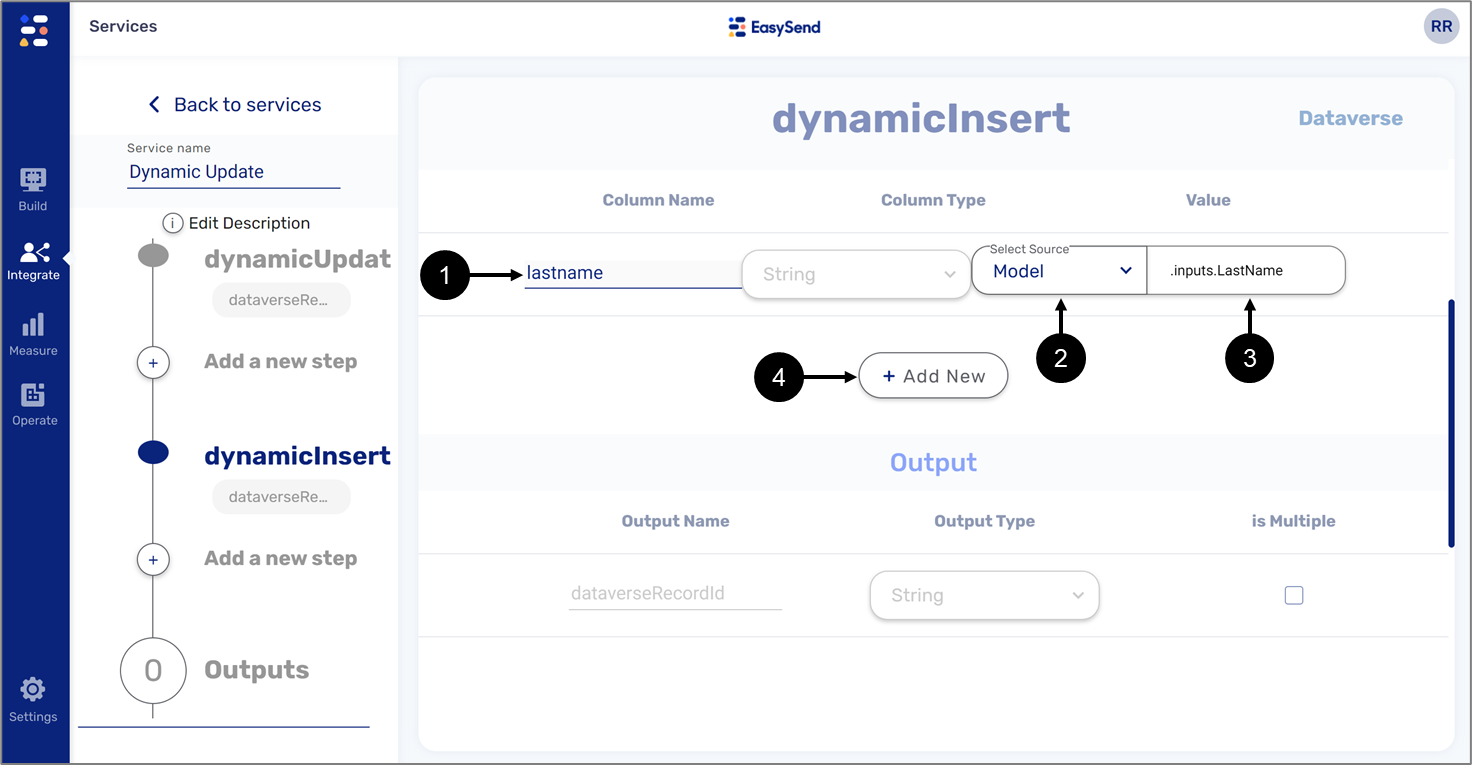
- Set the lastname (1) by selecting a source (2) and value (3).
- Click the + Add New button (4).
Result:
A new insert line (5) is added:
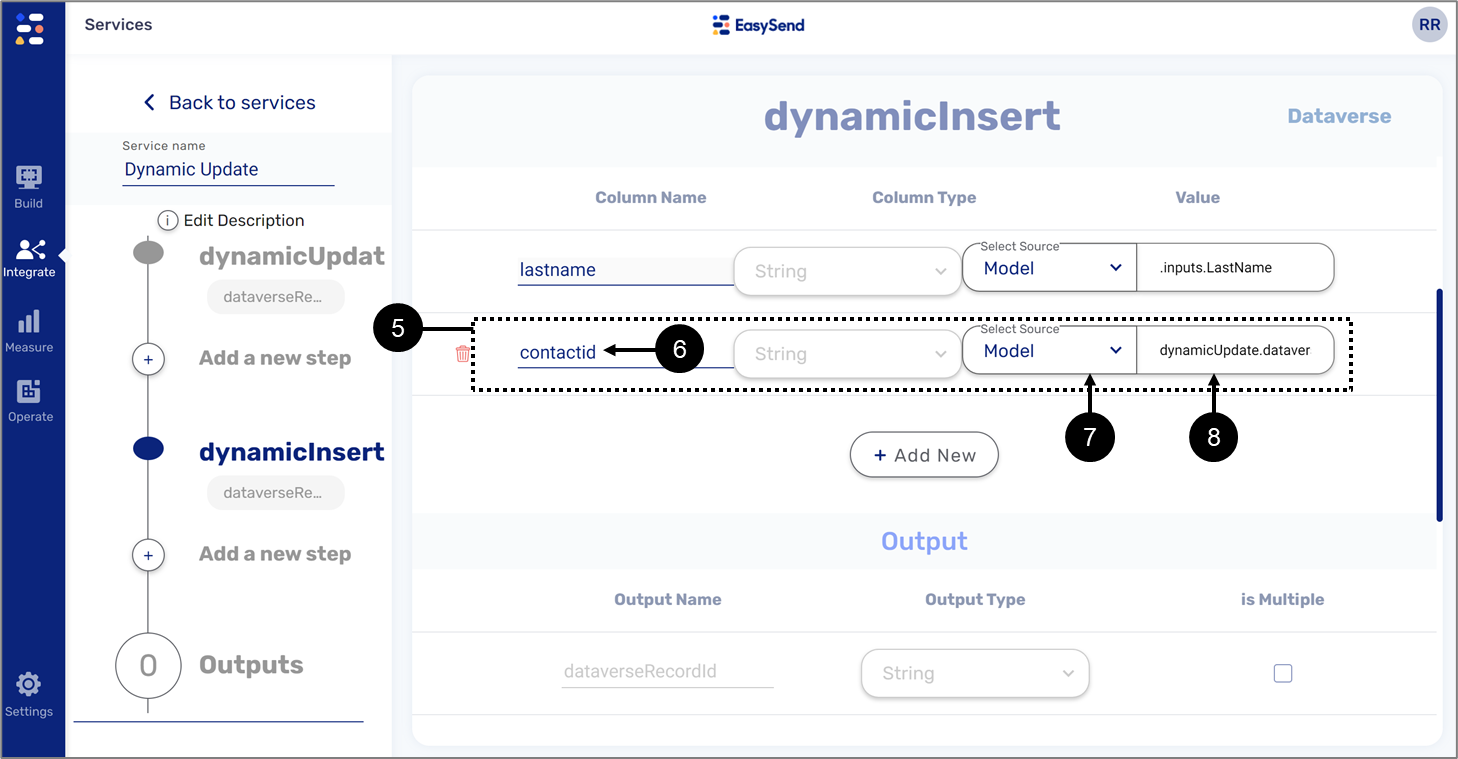
Figure 79: New Insert Line
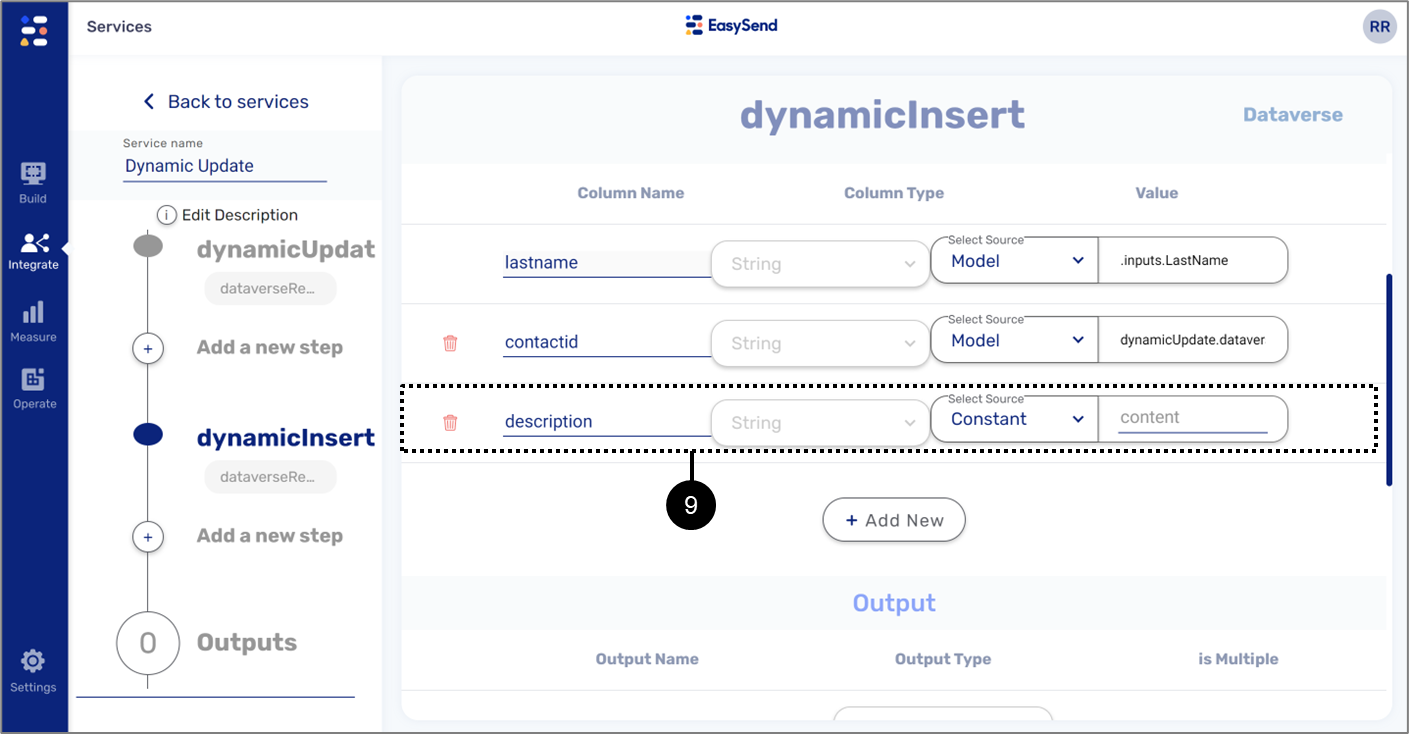
- Enter the Column Name - contactid (6), set the source to Model (7), and enter the value dynamicUpdate.dataverseRecordId (8).
- Click the + Add New button and add additional columns, for each added column select and add the source and value, for example (9):
Step 5: Services Screen Deployment
To publish the changes made in Steps 1,2, and 3, return to the Services screen, click the Deploy button, and select the appropriate environment.
Step 6: Workflow Manager Configuration
(See Figure 81 to Figure 87)
To configure the Workflow Manager, perform the following steps:
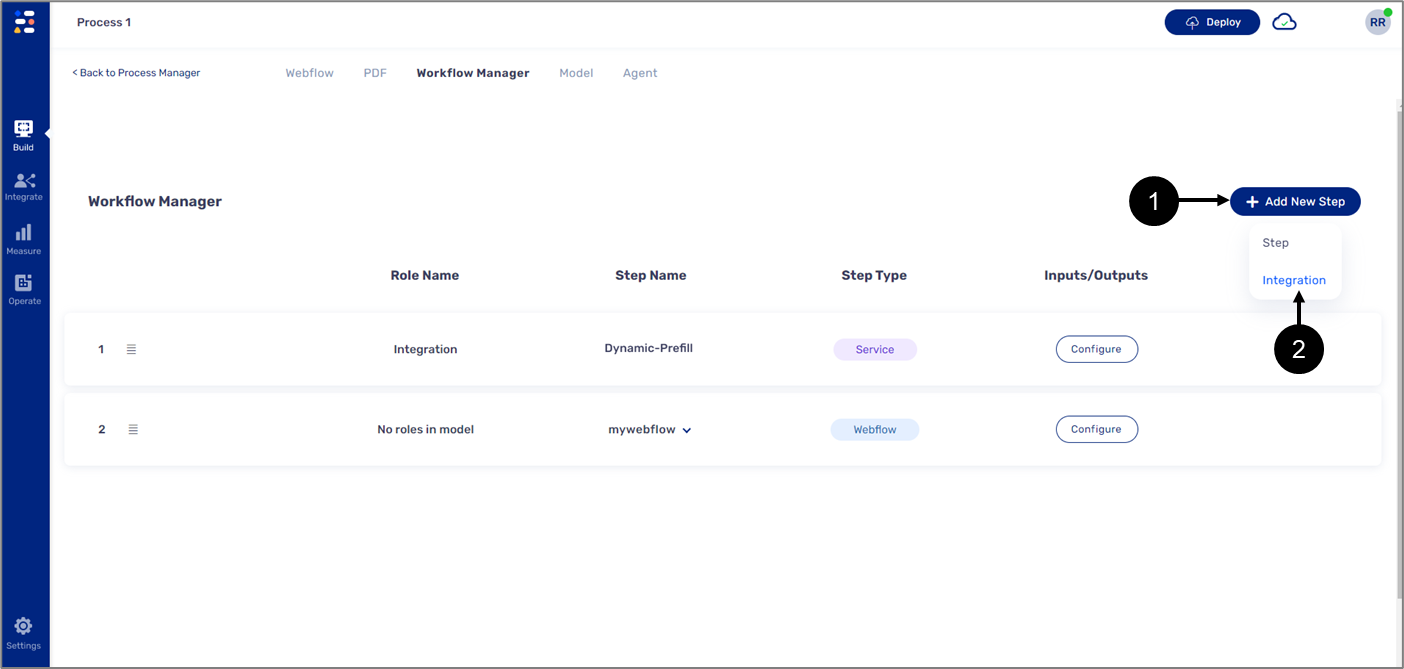
Figure 81: + Add New Step Button and Integration
- Click the + Add New Step button (1) and click Integration (2).
Result:
The Service Lookup window appears:
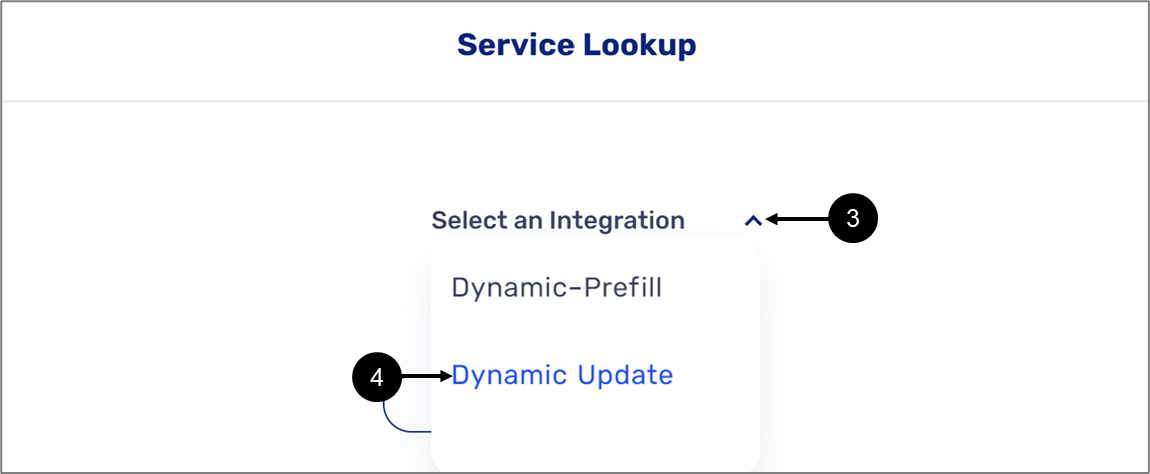
Figure 82: Select an Integration
- Click the Select an Integration dropdown (3) and select the integration (4) created in Step 1: Creating an Integration - Adding a New Step.
Result:
A list of inputs that were added in Step 3: Configuring the New Step - Update Criteria appear:
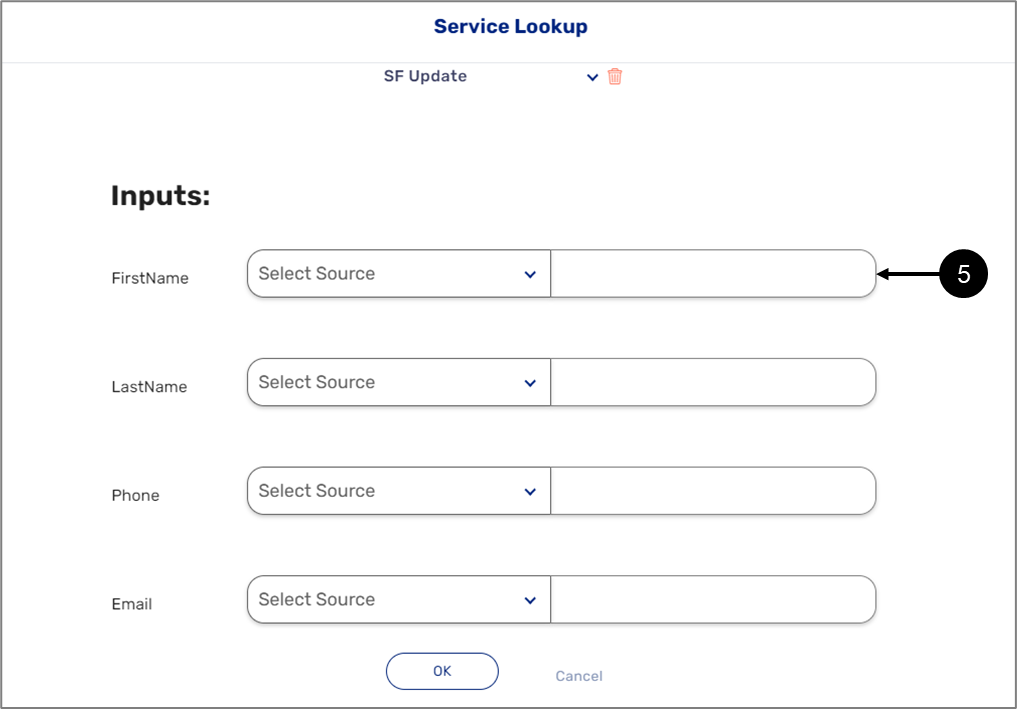
Figure 83: Connecting Outputs to the Model
- Connect each input to its appropriate data item in the Model (5).
Result:
All inputs are connected to the Model:
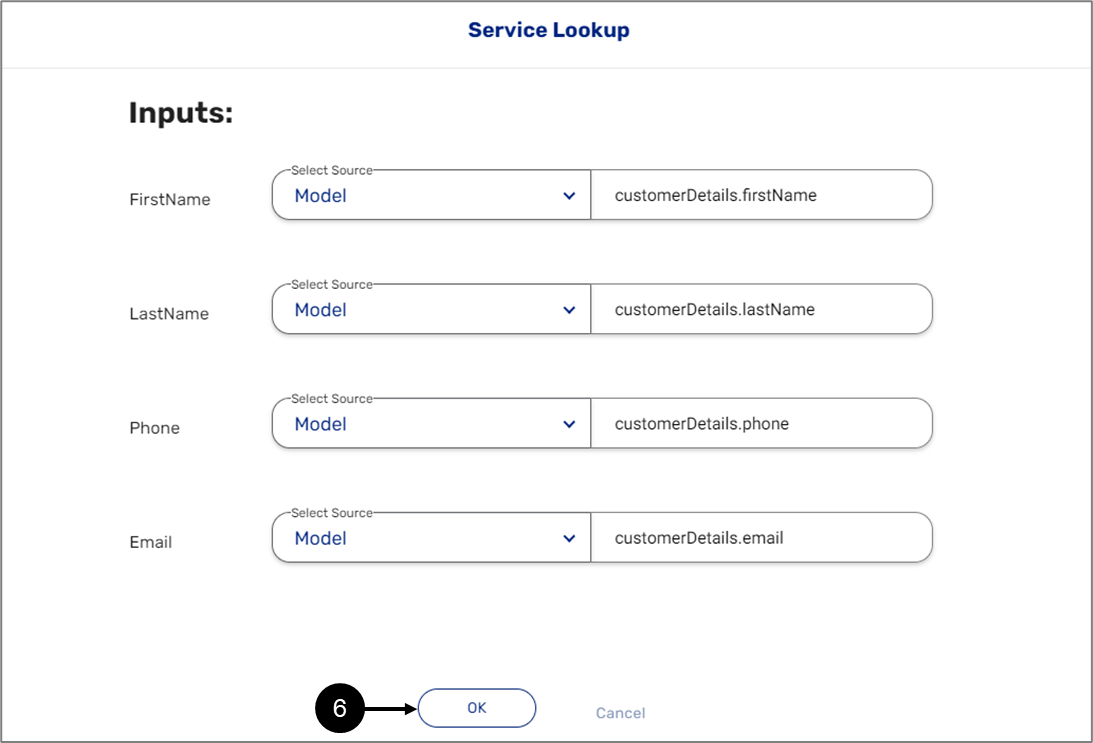
Figure 84: OK Button
- Click the OK button (6).
Result:
The integration is added to the workflow:
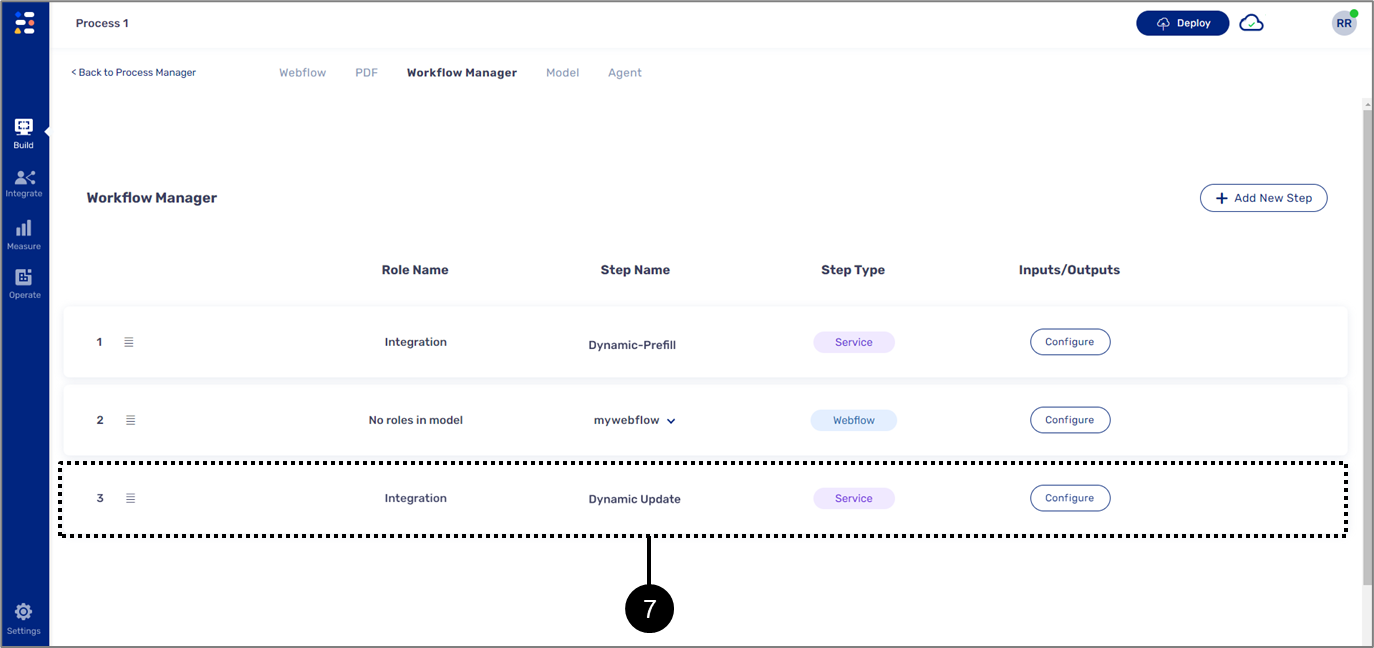
Figure 85: Added Integration
- Click the Deploy button (8) and select the appropriate environment (9).
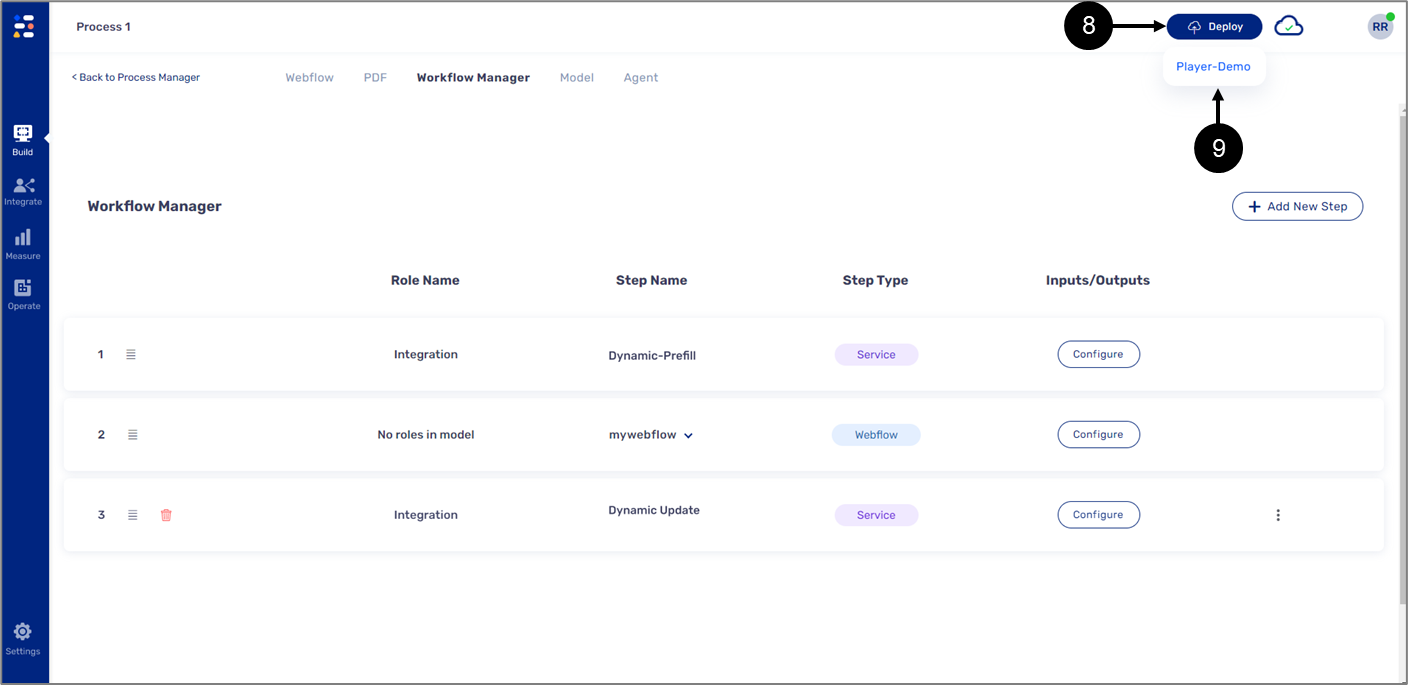
Figure 86: Deployment Process
- Wait until the deployment process is over as indicated by the indicator (10).
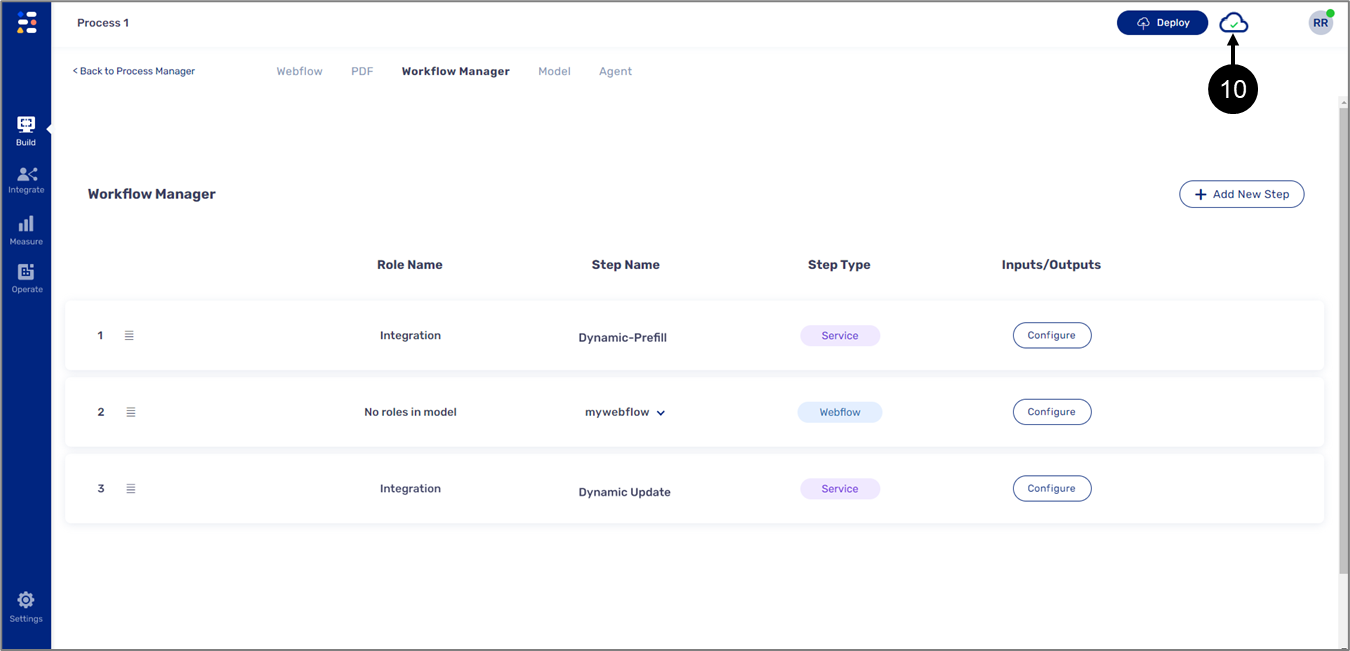
Figure 87: Deployment successful
Step 7: Sending an EasySend Link from Dynamic 365
(See Figure 88)
From your Dynamic 365 environment, access an account (1). Click the EasySend Link button (2) and follow the instructions on the screen. Once the digital process is submitted, relevant data according to the configurations made in Steps 1 to 5 is updated and inserted inside Dynamic 365 (account and contact).

Figure 88: Dynamics 365 Account
Insert Attachments Into Dynamics 365 From a Digital Process
The following sections describe how to insert attachments to Dynamics 365 from a digital process.
Step 1: Add a File Input
(See Figure 89 to Figure 92)
To add a file input, perform the following steps:
Figure 89: Integrate Tab and Services Option
- On the Builder platform, open the relevant environment.
- Click the Integrate tab (1).
- Click the Services option (2).
Result:
The Services screen appears:
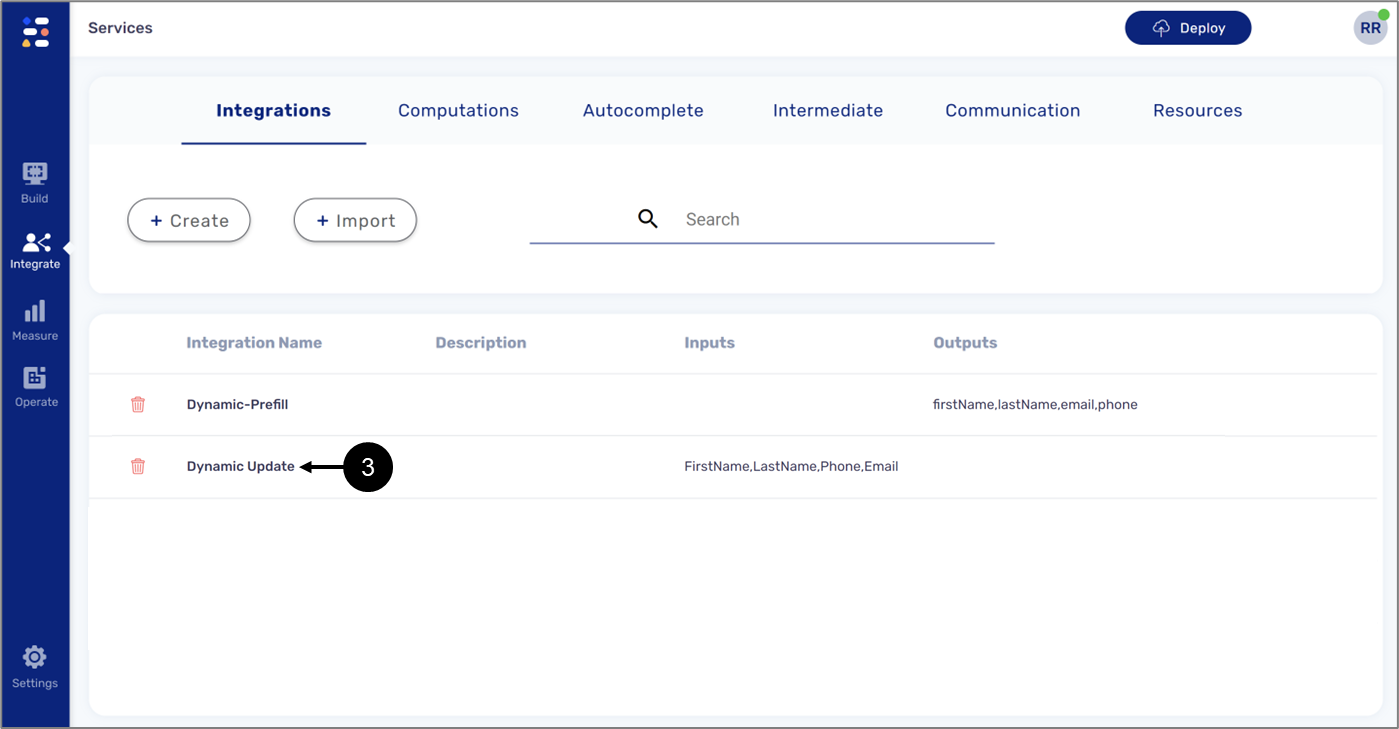
Figure 90: Update Integration
- Click the update integration you created in Step 1: Creating an Integration - Adding a New Step (3).
Result:
The following screen appears:
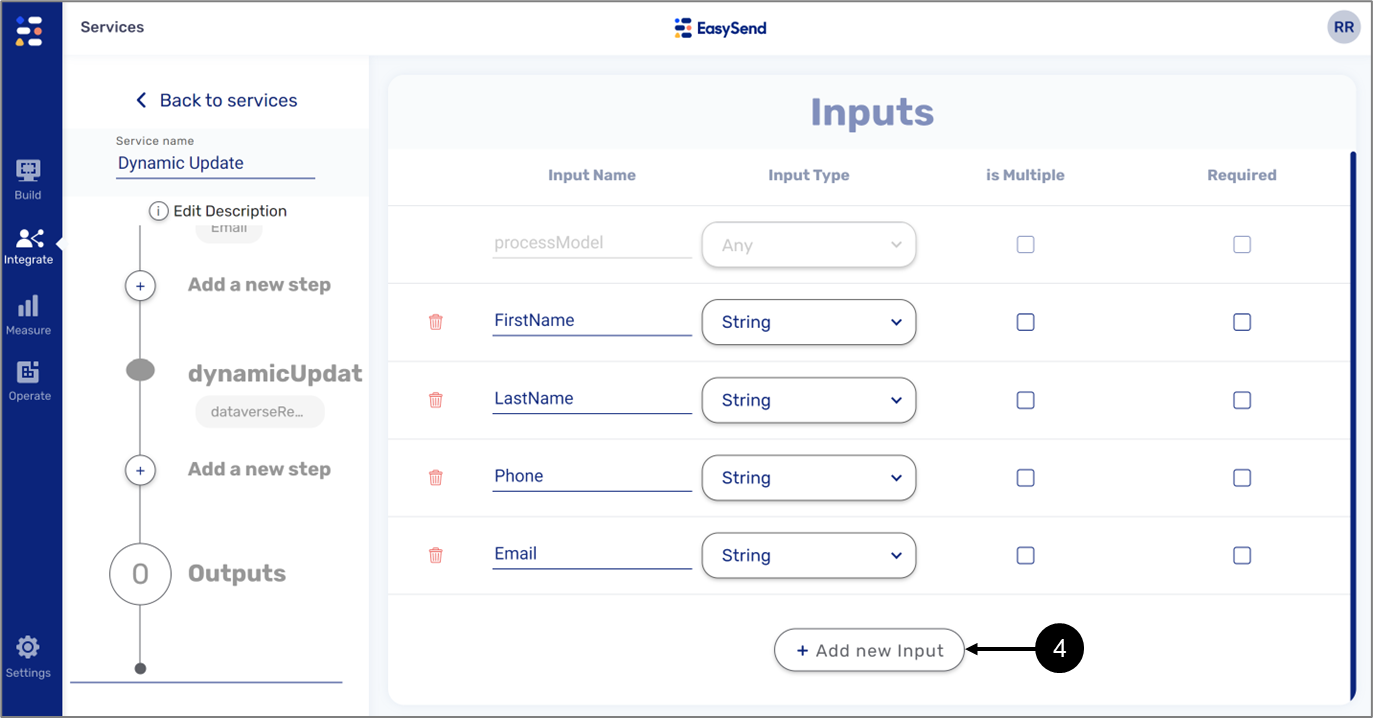
Figure 91: + Add new Input
- Click Add a new Input button (4).
Result:
A new input line (5) appears:
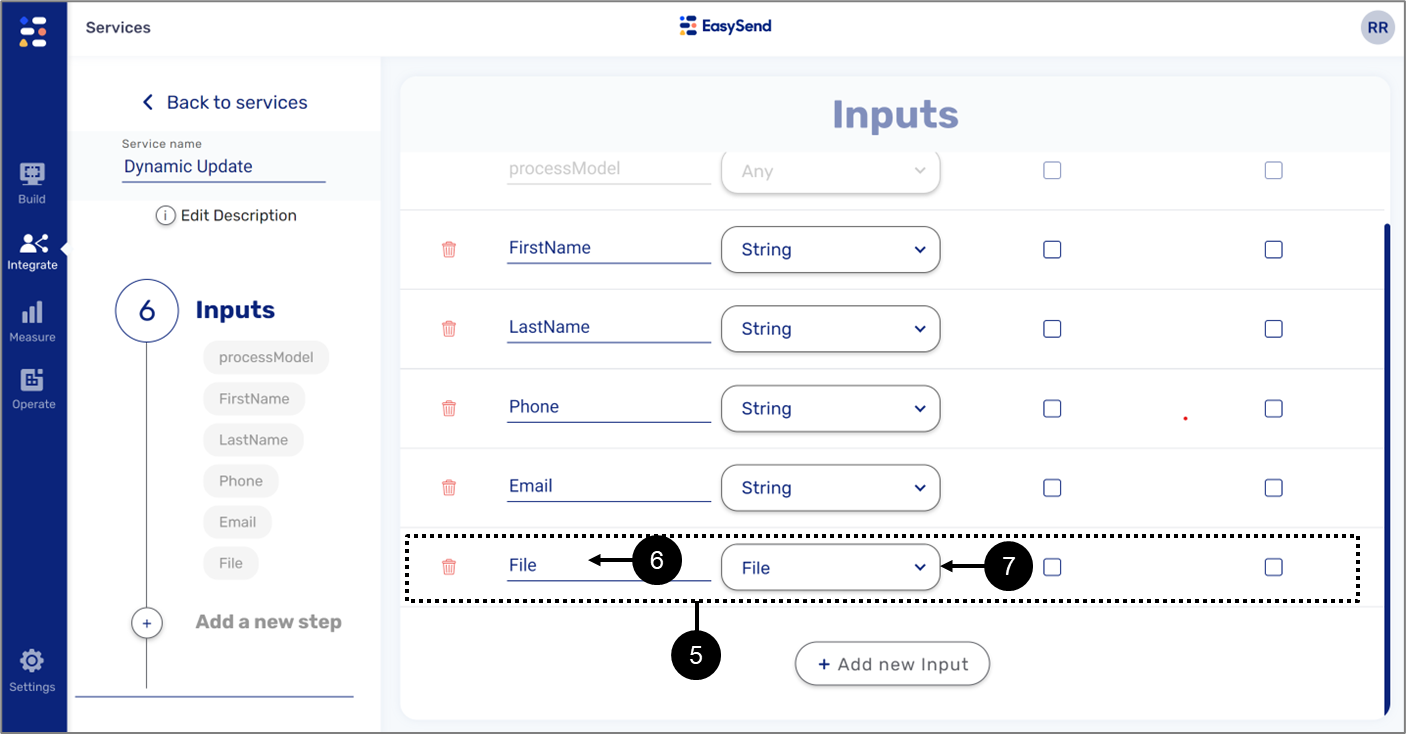
- Enter the Input Name (6).
- Select the Input Type (7) - File.
Step 2: Configure the Update Integration
(See Figure 93 to Figure 95)
To configure the update integration, perform the following steps:
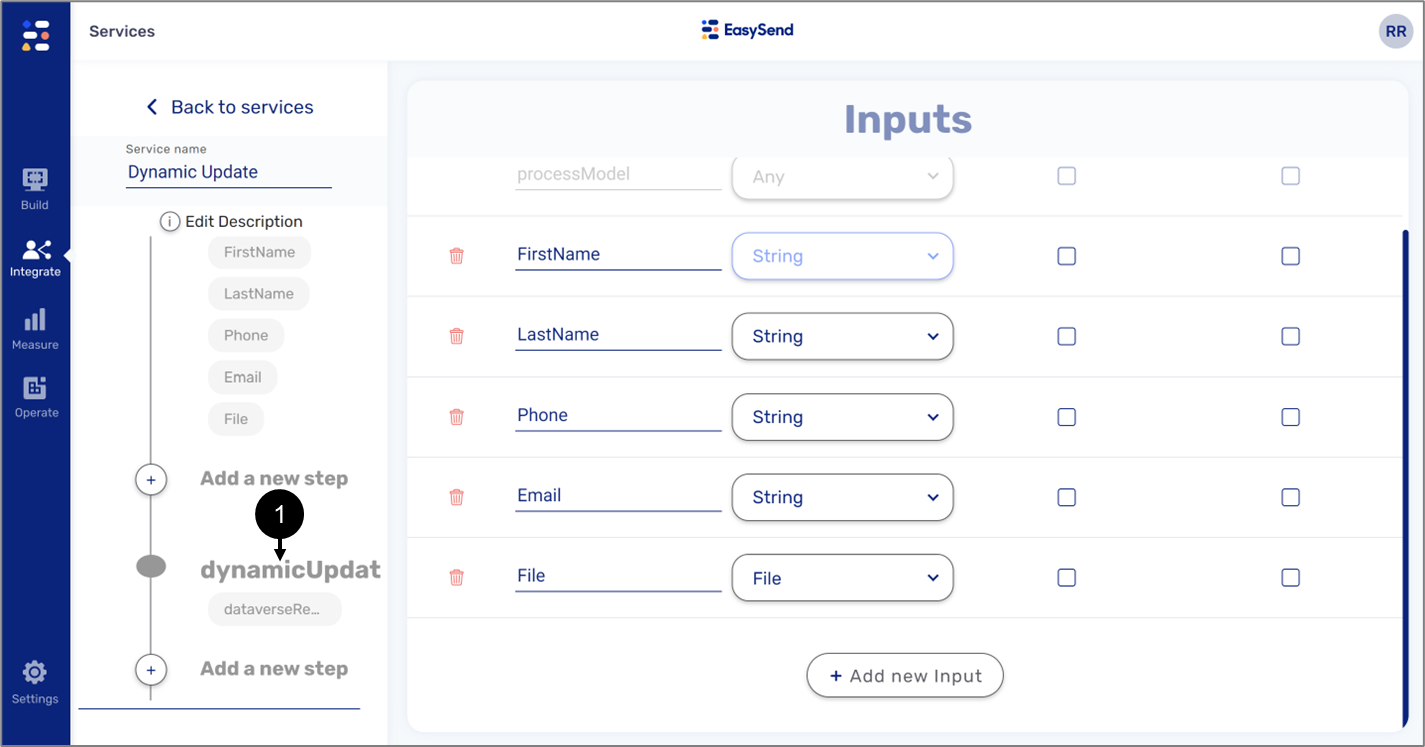
- Click the update integration you created in Step 1: Creating an Integration - Adding a New Step (1).
- Scroll down to the Files to Upload section.
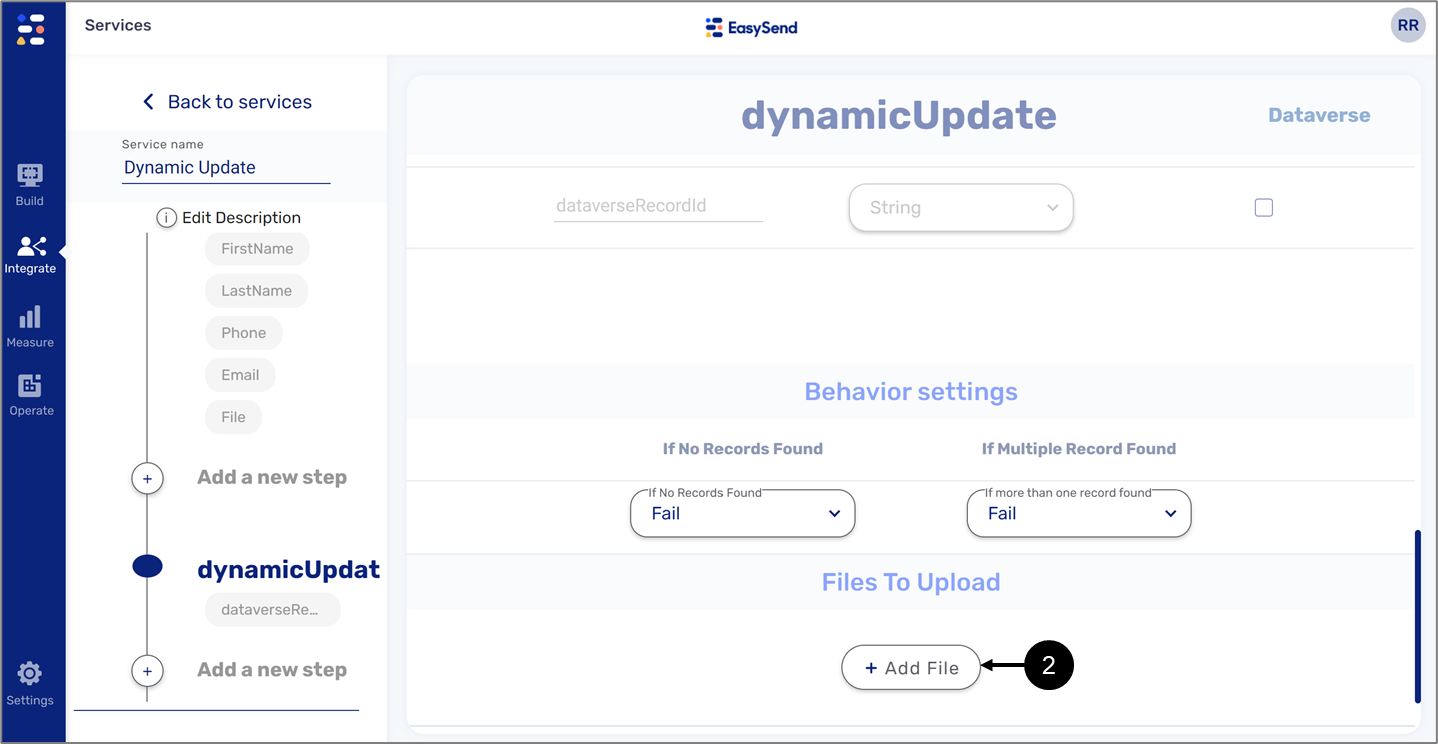
Figure 94: + Add File Button
- Click the + Add File button (2).
Result:
A new file selector (3) appears:
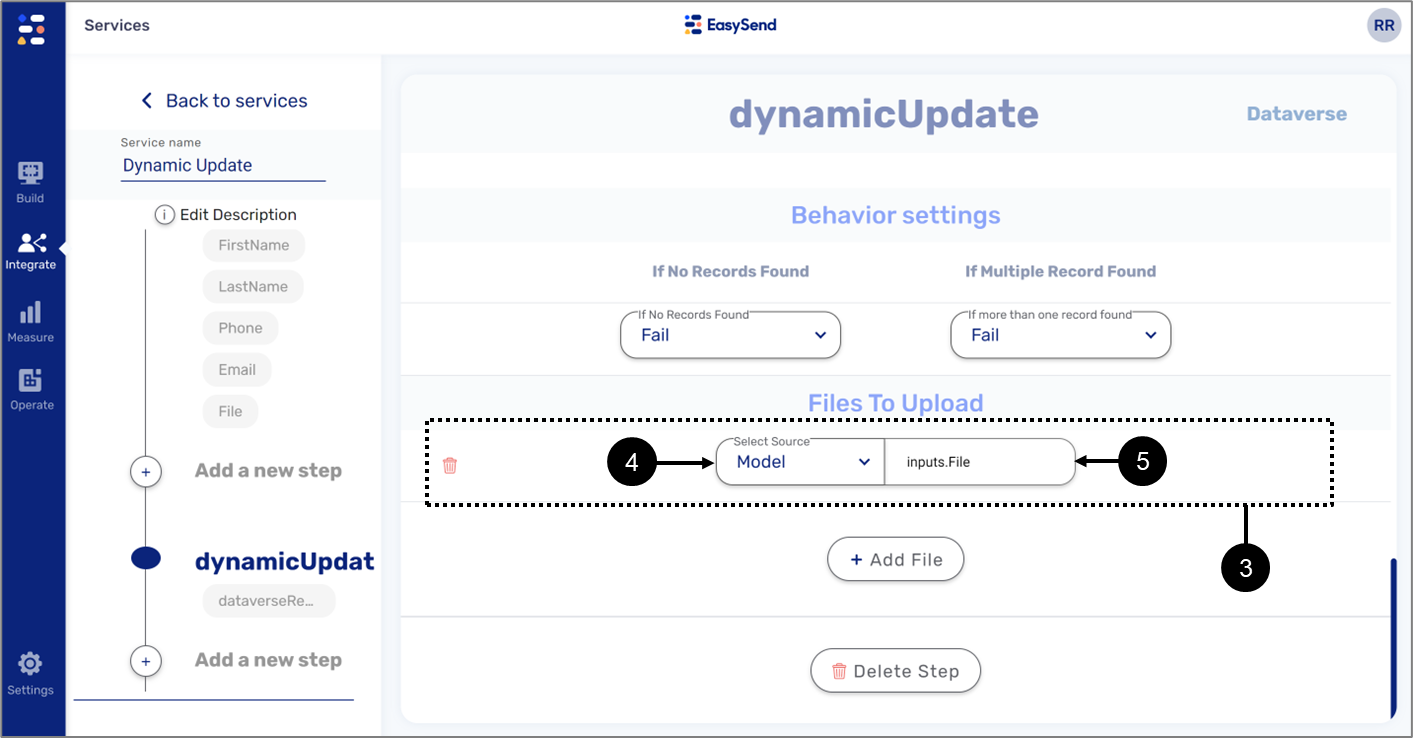
- Select the source - Model (4).
- Select the input, for example, inputs.File (5).
Step 3: Services Screen Deployment
To publish the changes made in Steps 1 and 2, return to the Services screen, click the Deploy button and select the appropriate environment.
Step 4: Workflow Manager Configuration
(See Figure 96 to Figure 99)
To configure the Workflow Manager, perform the following steps:
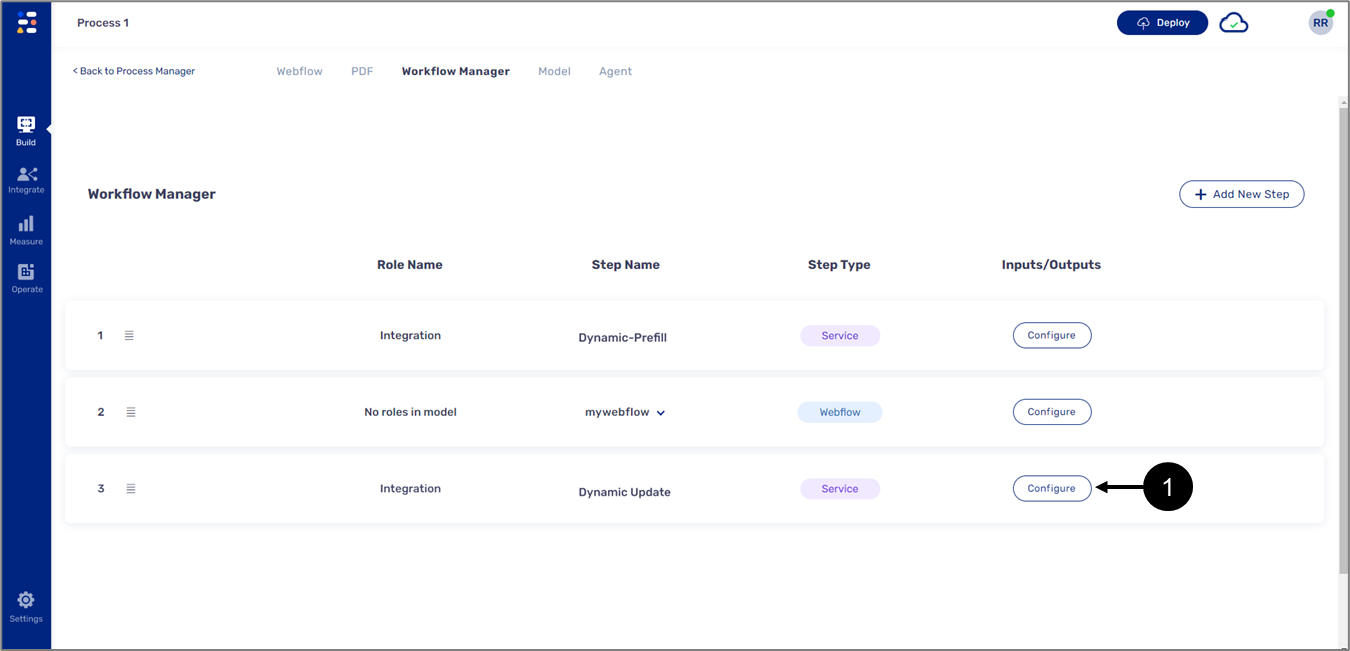
- Click the Configure button (1) of the update integration.
Result:
The Service Lookup window appears:
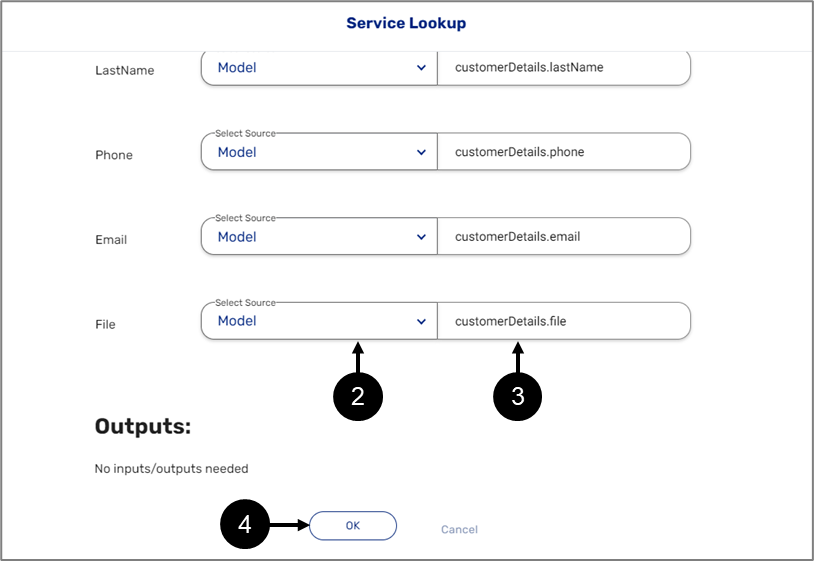
Figure 97: Service Lookup Window
- Select the source of the file - Model (2).
- Set the Model data item (3).
- Click the OK button (4).
Result:
The Workflow Manager screen appears:

Figure 98: Deployment Process
- Click the Deploy button (5) and select the appropriate environment (6).
- Wait until the deployment process is over as indicated by the indicator (7).
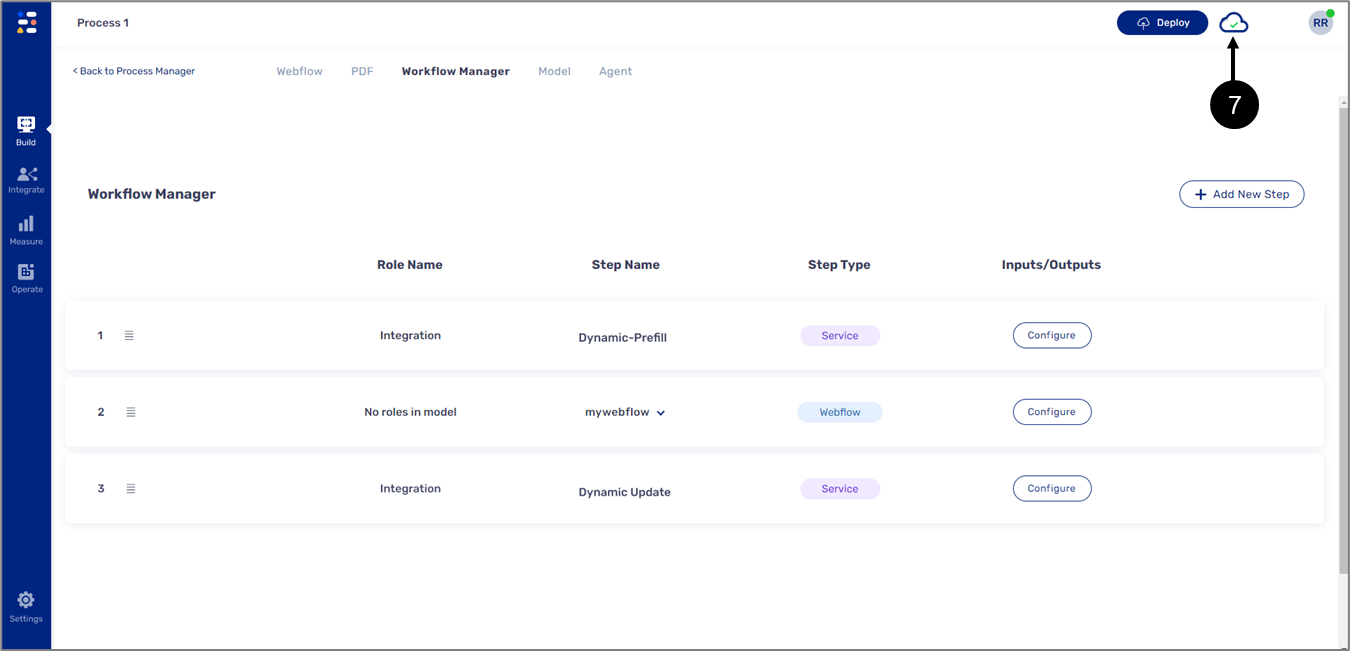
Figure 99: Deployment successful
Step 5: Sending an EasySend Link from Dynamics 365
(See Figure 100)
From your Dynamics 365 environment, access an account (1). Click the EasySend Link button (2) and follow the instructions on the screen. Once the digital process is submitted, relevant data according to the configurations made in Steps 1 to 5 is updated and inserted inside Dynamics 365 (account, contact, and attachments).