Conditions
- PDF
Conditions
- PDF
Article summary
Did you find this summary helpful?
Thank you for your feedback!
Article Overview
The following article describes how to set behavioral conditions with examples.
What are Behavioral Conditions?
Behavioral conditions are used for showing, hiding, or disabling parts of a digital process. The parts can be:
- Fields
- Sections
- Entire pages
Setting Behavioral Conditions
(See Figure 1)
Conditions are implemented on Webflow components. When clicking a component, the Behavior tab appears on the right section. The Behavior tab includes the + Add Condition option (1).
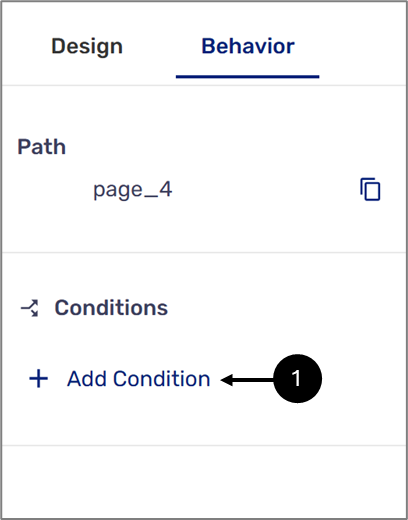
Figure 1: Behavior Tab
After clicking the option, the Edit Condition window appears.
The Edit Condition Window
(See Figure 2 and Figure 3)
The Edit Condition window enables you to build a logical expression of one condition or more. A logical expression contains the following:
- Rule:
- Outcome (1):
- Show if
- Hide if
- Read-only if
- Is True Trigger (2)
- Outcome (1):
- Calculation Method (3):
- + Add Condition - A logical expression can include more than one condition. After clicking the + Add Condition button (4) another condition row appears. When adding more than one condition, it is mandatory to set the operation between them:
- And
- Or
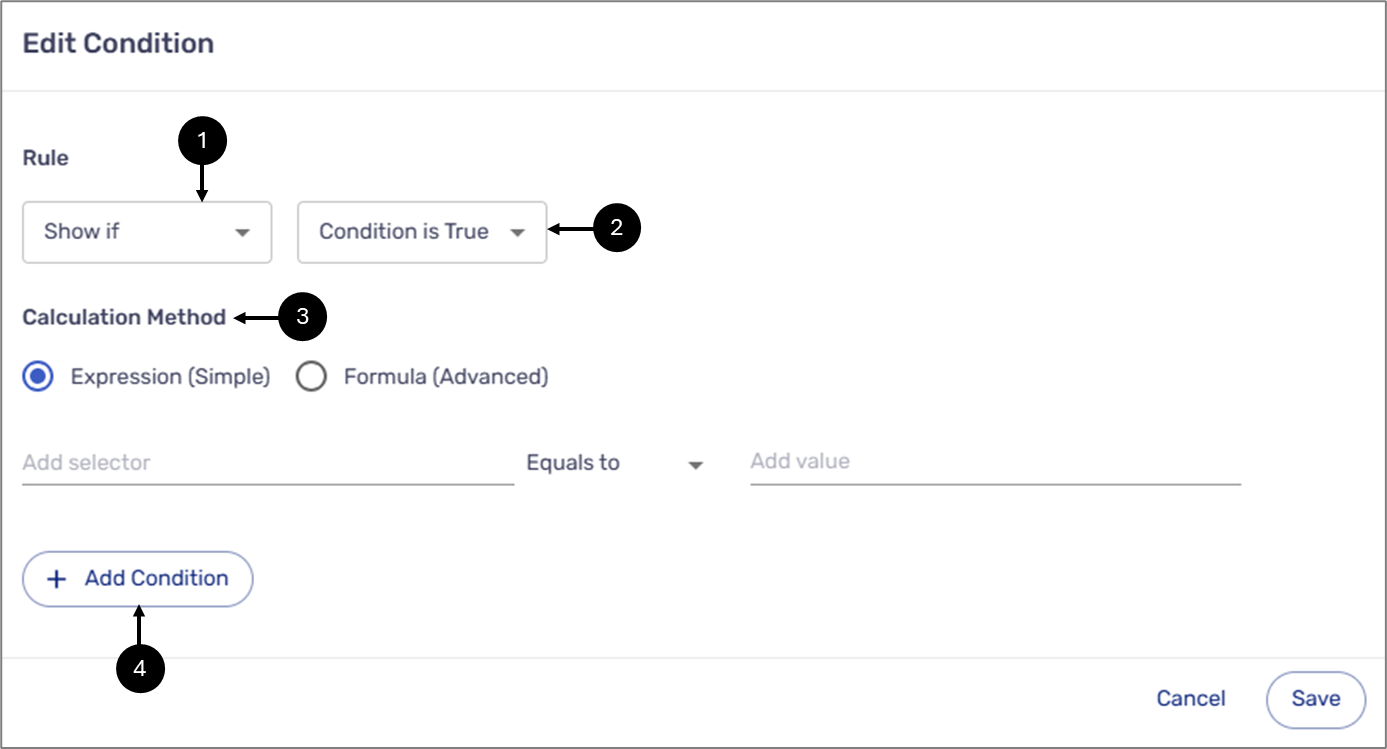
Figure 2: Edit Condition Window
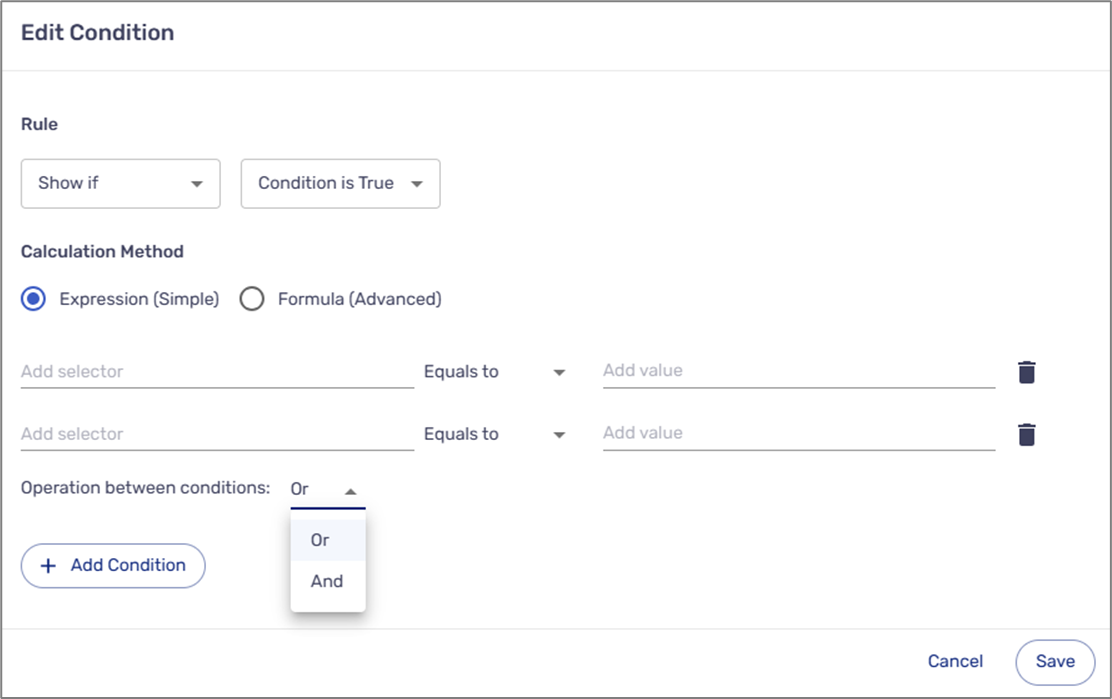
Figure 3: Operation Between Conditions
Simple Expression Condition
(See Figure 4)
When the calculation method is Expression (Simple) (set by default), a condition contains the following fields:
- Add selector (1) - a data item or metadata item. A Selector is added in one of three ways:
- Using the Behavior tab of a component to copy and paste its path into the Selector field (see Figure 5).
- Clicking the Add selector field and selecting a data item or a Metadata item from the list (see Figure 6).
- Typing a component's path according to the physical layout and logical hierarchy - starting with the Page component and moving down the hierarchy by inputting a dot (.), for example, page_5.container_6.textField_7. In this example, the desired component, the Text Field, is inside a Container that is placed on a Page (see Figure 7).
- Typing the path of a Metadata item and moving down the hierarchy by inputting a dot (.), for example, global.currentTime (see Figure 8). To read more about Metadata items, click here.
NOTE
- Because a Grid is not an Object-type component, it is not part of the hierarchy when typing the component's path.
- The [] icon signifies an arra,y and the [*] signifies array items.
- You can access a specific array item by entering its location. For example, array[0].monthlySalary.
- Comparison Operators (2):
- Equal to
- Is not
- Greater than
- Less than
- Is Empty
- Is Not Empty
- Value (3):
- Textual or numeric for string-type components:
- Text Area
- Text Input
- Date Input
- Radio Group
- Dropdown
- True or False in case the added Selector is a boolean-type component - Checkbox.
- Textual or numeric for string-type components:

Figure 4: Simple Expression Fields

Figure 5: Behavior Tab - Copy Path
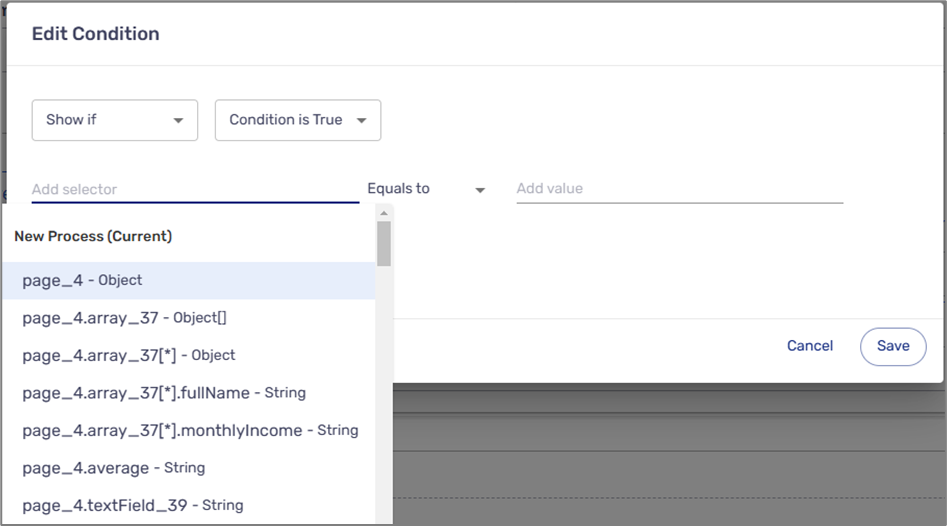
Figure 6: Add Selector Field
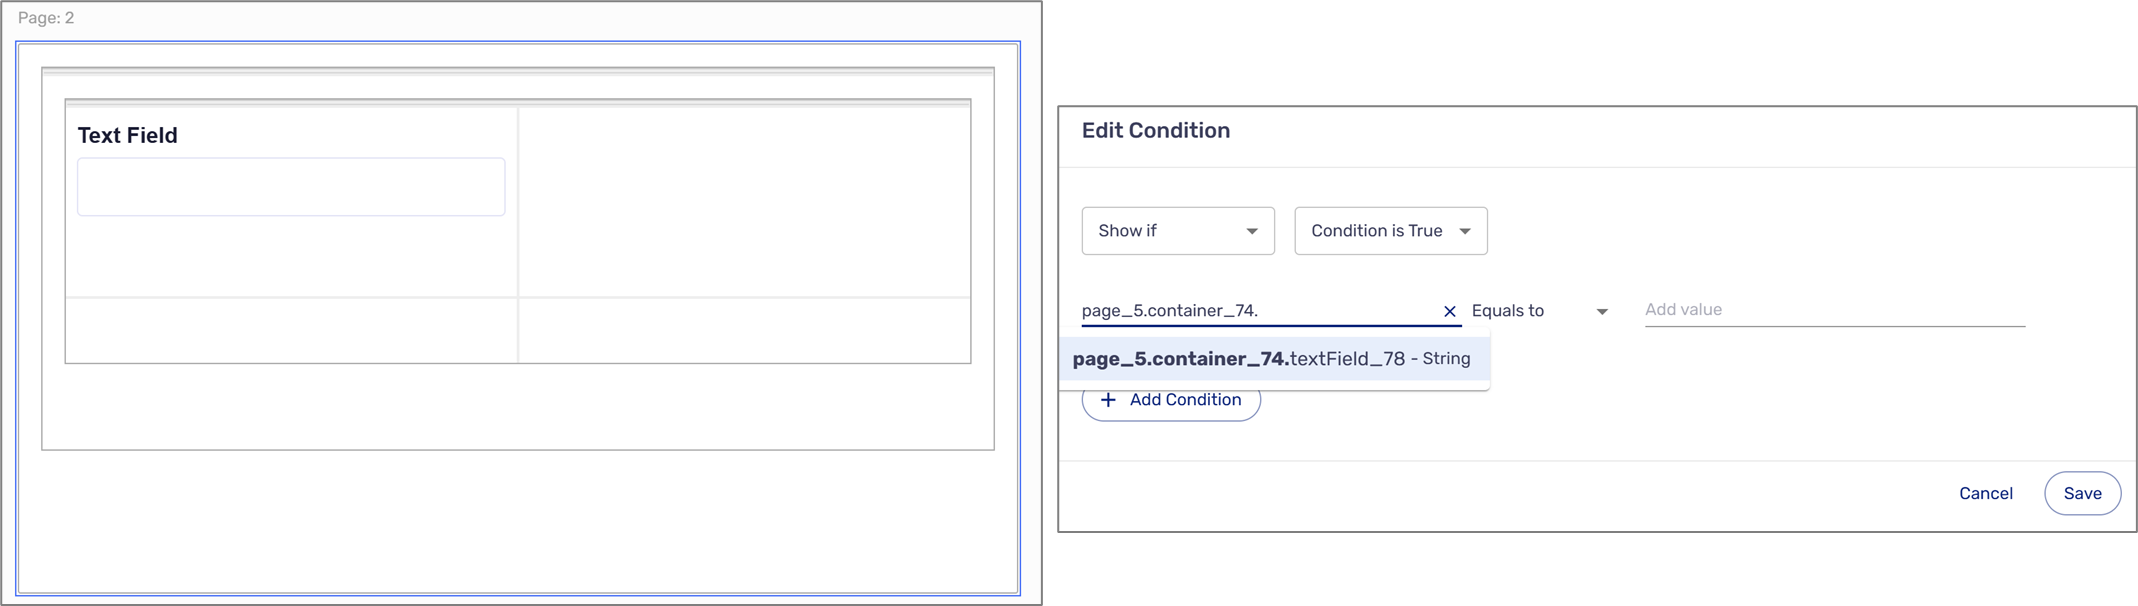
Figure 7: Physical Structure and Hierarchy
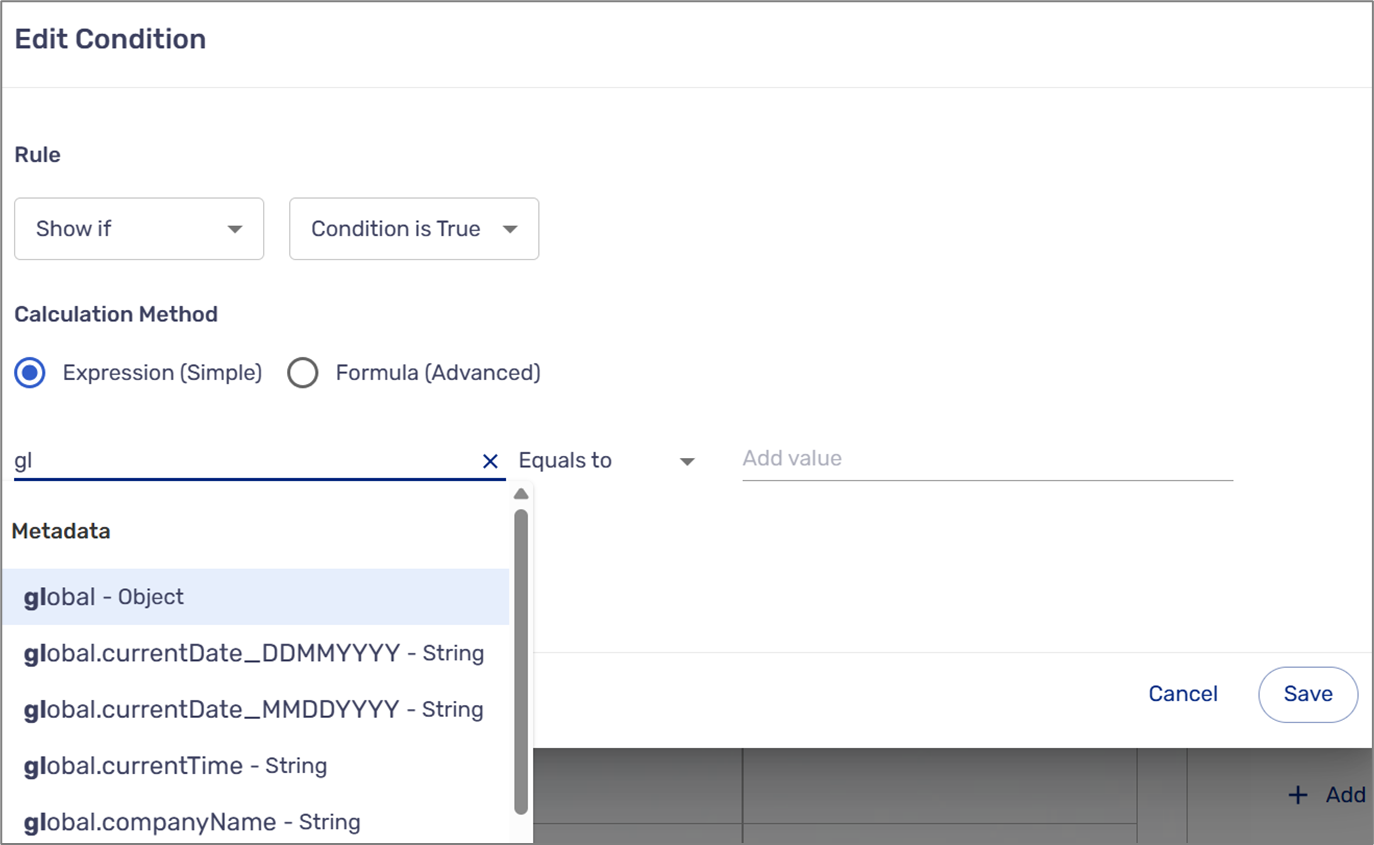
Figure 8: Metadata Items
Advanced Formula Condition
(See Figure 9 and Figure 10)
When the calculation method is Formula (Advanced), after clicking the Create button (1), the Formula Editor window appears. The editor enables you to build formulas. It contains:
- Operators
- Functions
- Variables:
- Data items
- Metadata items
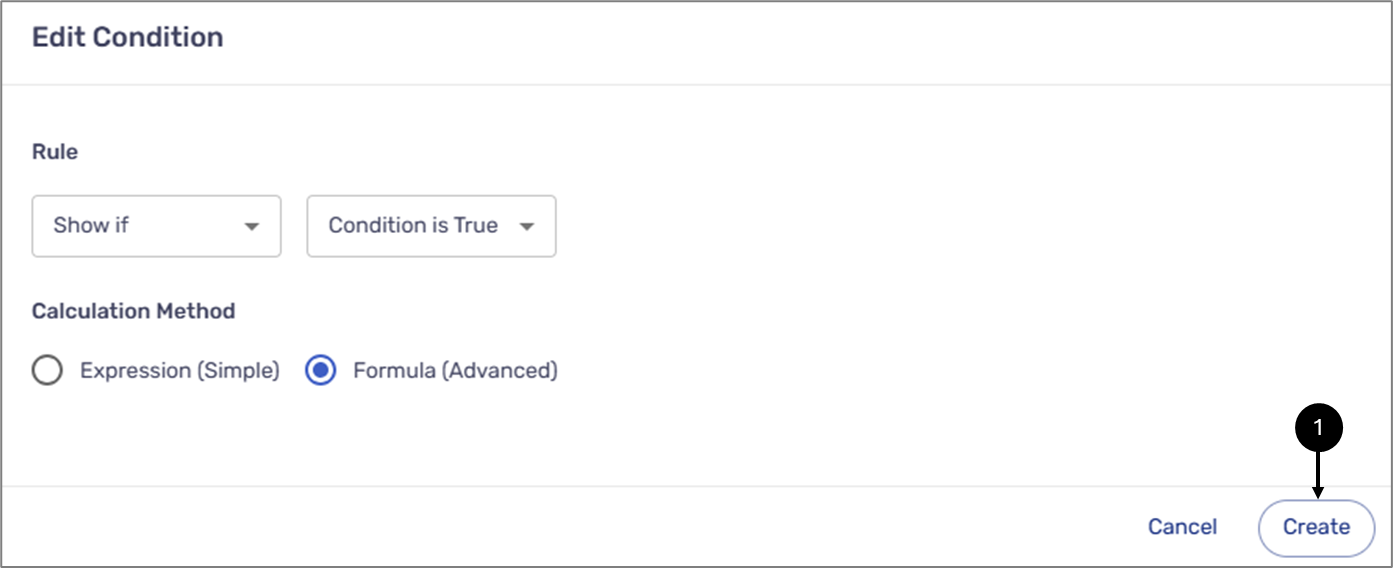
Figure 9: Edit Condition - Formula (Advanced)
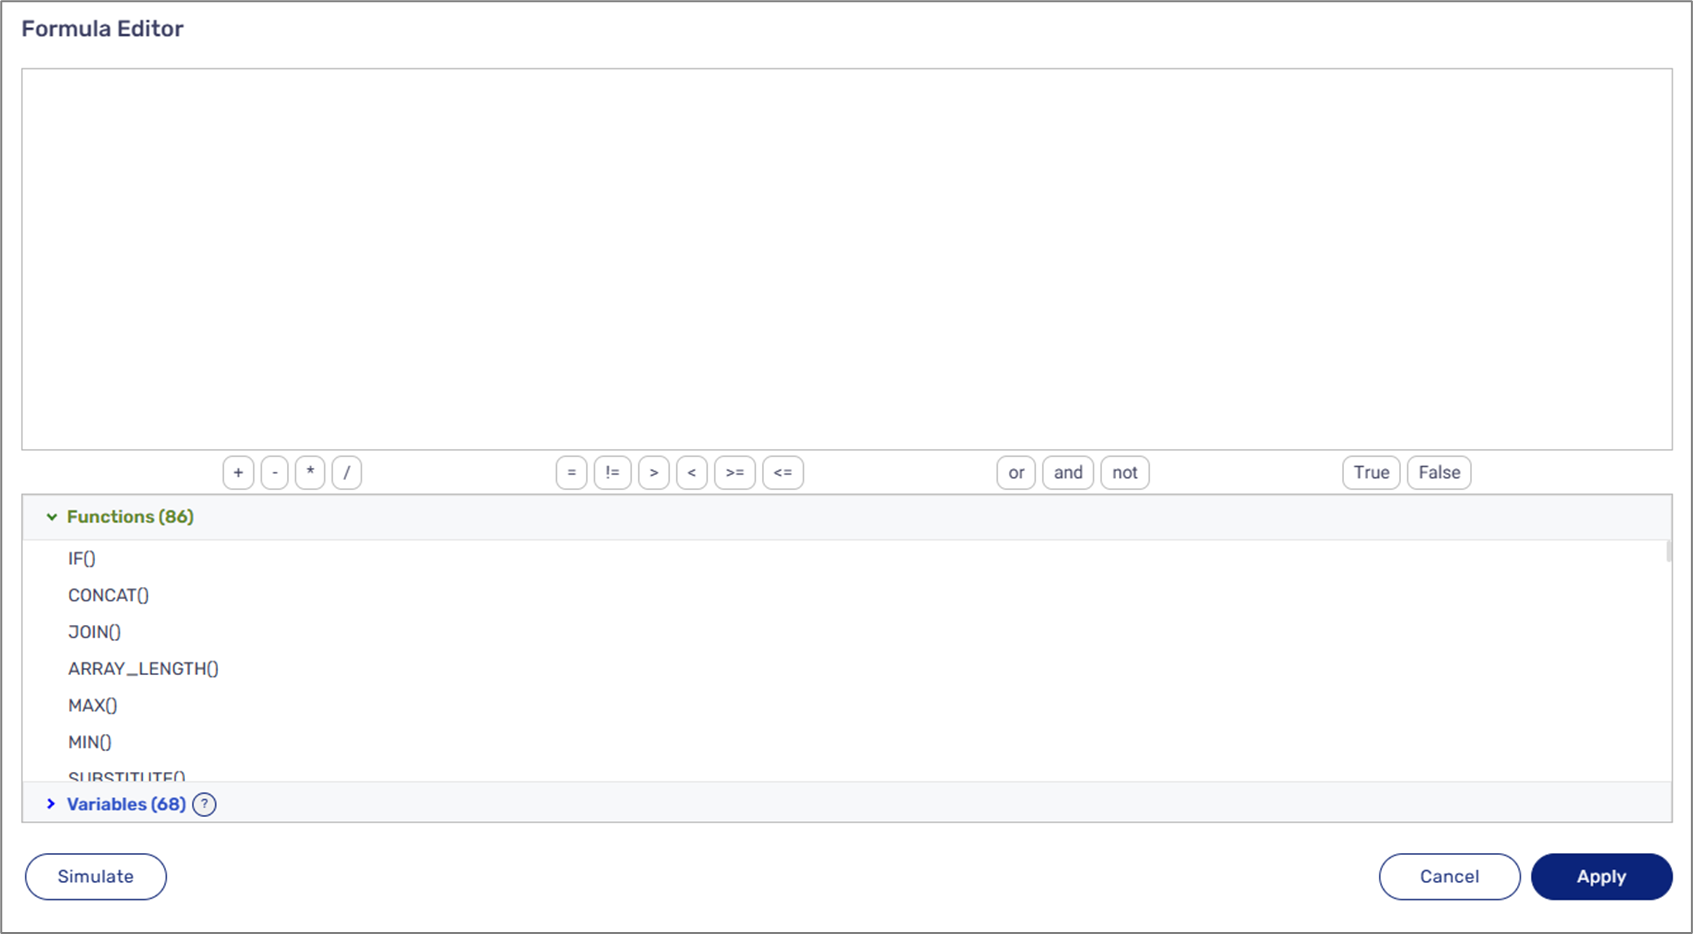
Figure 10: Formula Editor Window
NOTE
For a detailed description of the Formula Editor and how to use it, click here.
Usage Examples
The following sections describe condition usage examples.
Displaying a Page According to a Radio Group Option Selection
(See Figure 11 to Figure 15)
Overview:
This example describes creating a condition based on a Radio Group option selection. According to the selection, a whole Page component will be displayed or hidden.
Physical Structure:
The Webflow includes two Page components. The first Page contains a Radio Group component with two options, Yes and No.
The second Page contains a Static Text and a Grid with three Text Field components and a Date Input component to input information about a spouse.
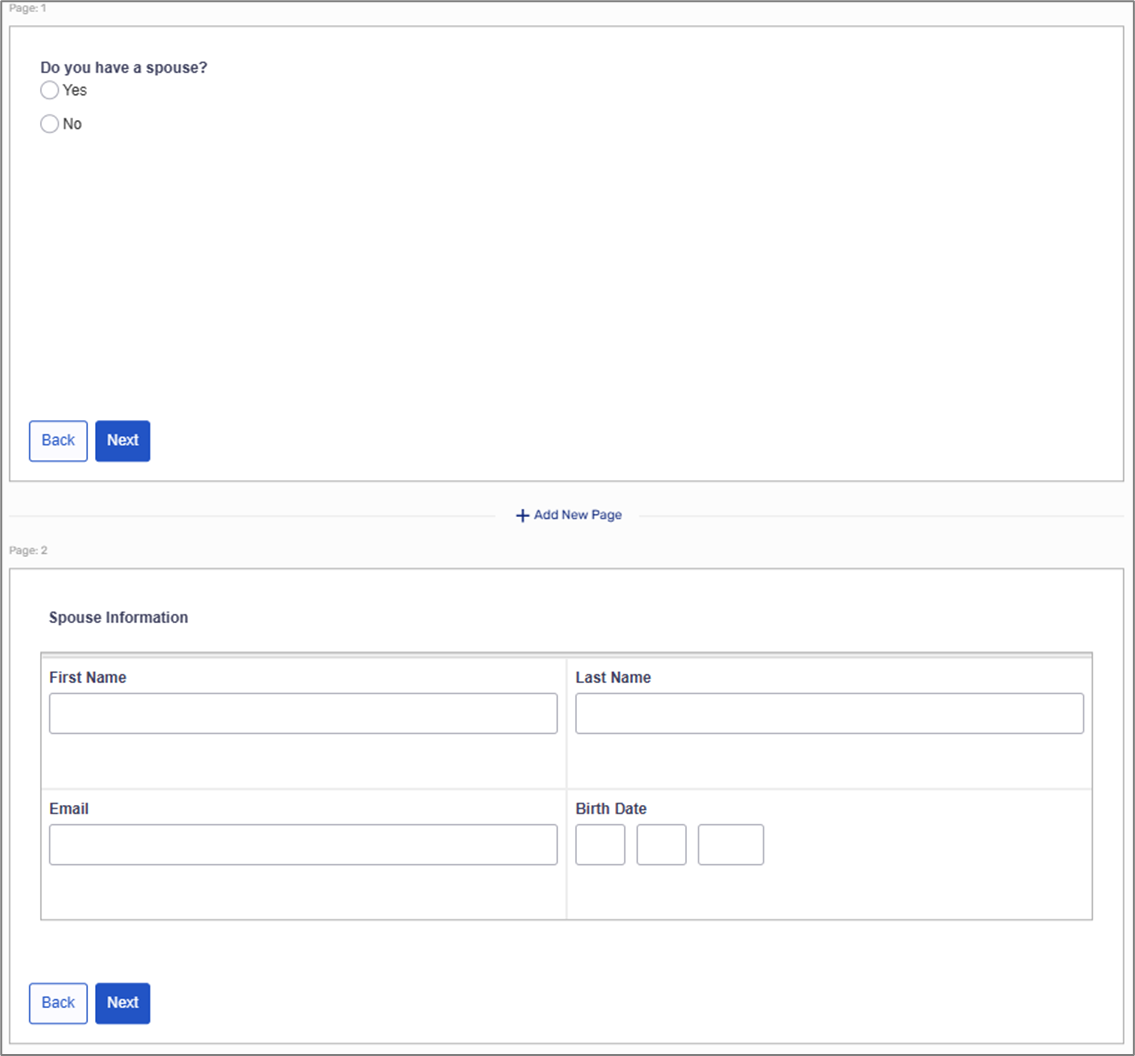
Figure 11: Physical Structure
Condition Usage:
If the end-user indicates they have a spouse, the second page will appear. If a spouse is not involved, the second Page will be hidden.
Building the Condition:
To build the condition, perform the following steps:
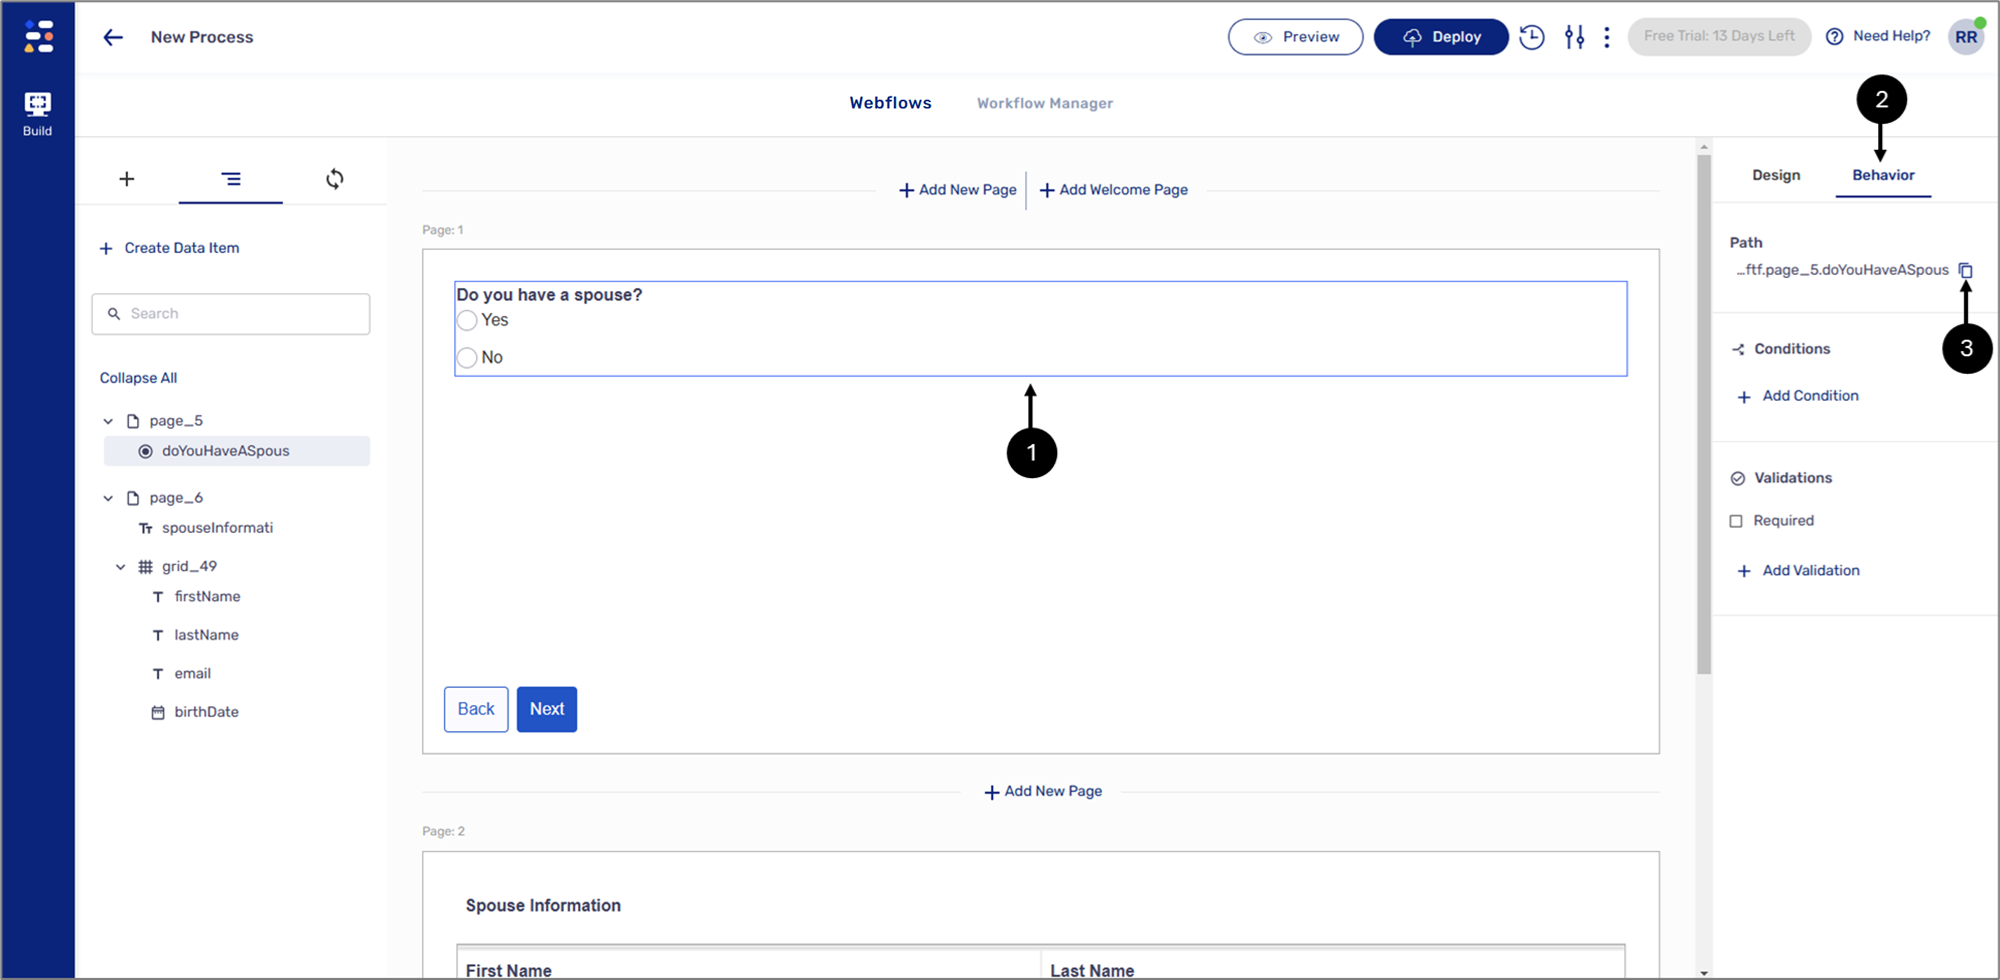
Figure 12: Radio Group Component
- Click the Radio Group component (1).
- Click the Behavior tab (2).
- Click the icon to copy the path of the component (3).
- Click the second Page (4).
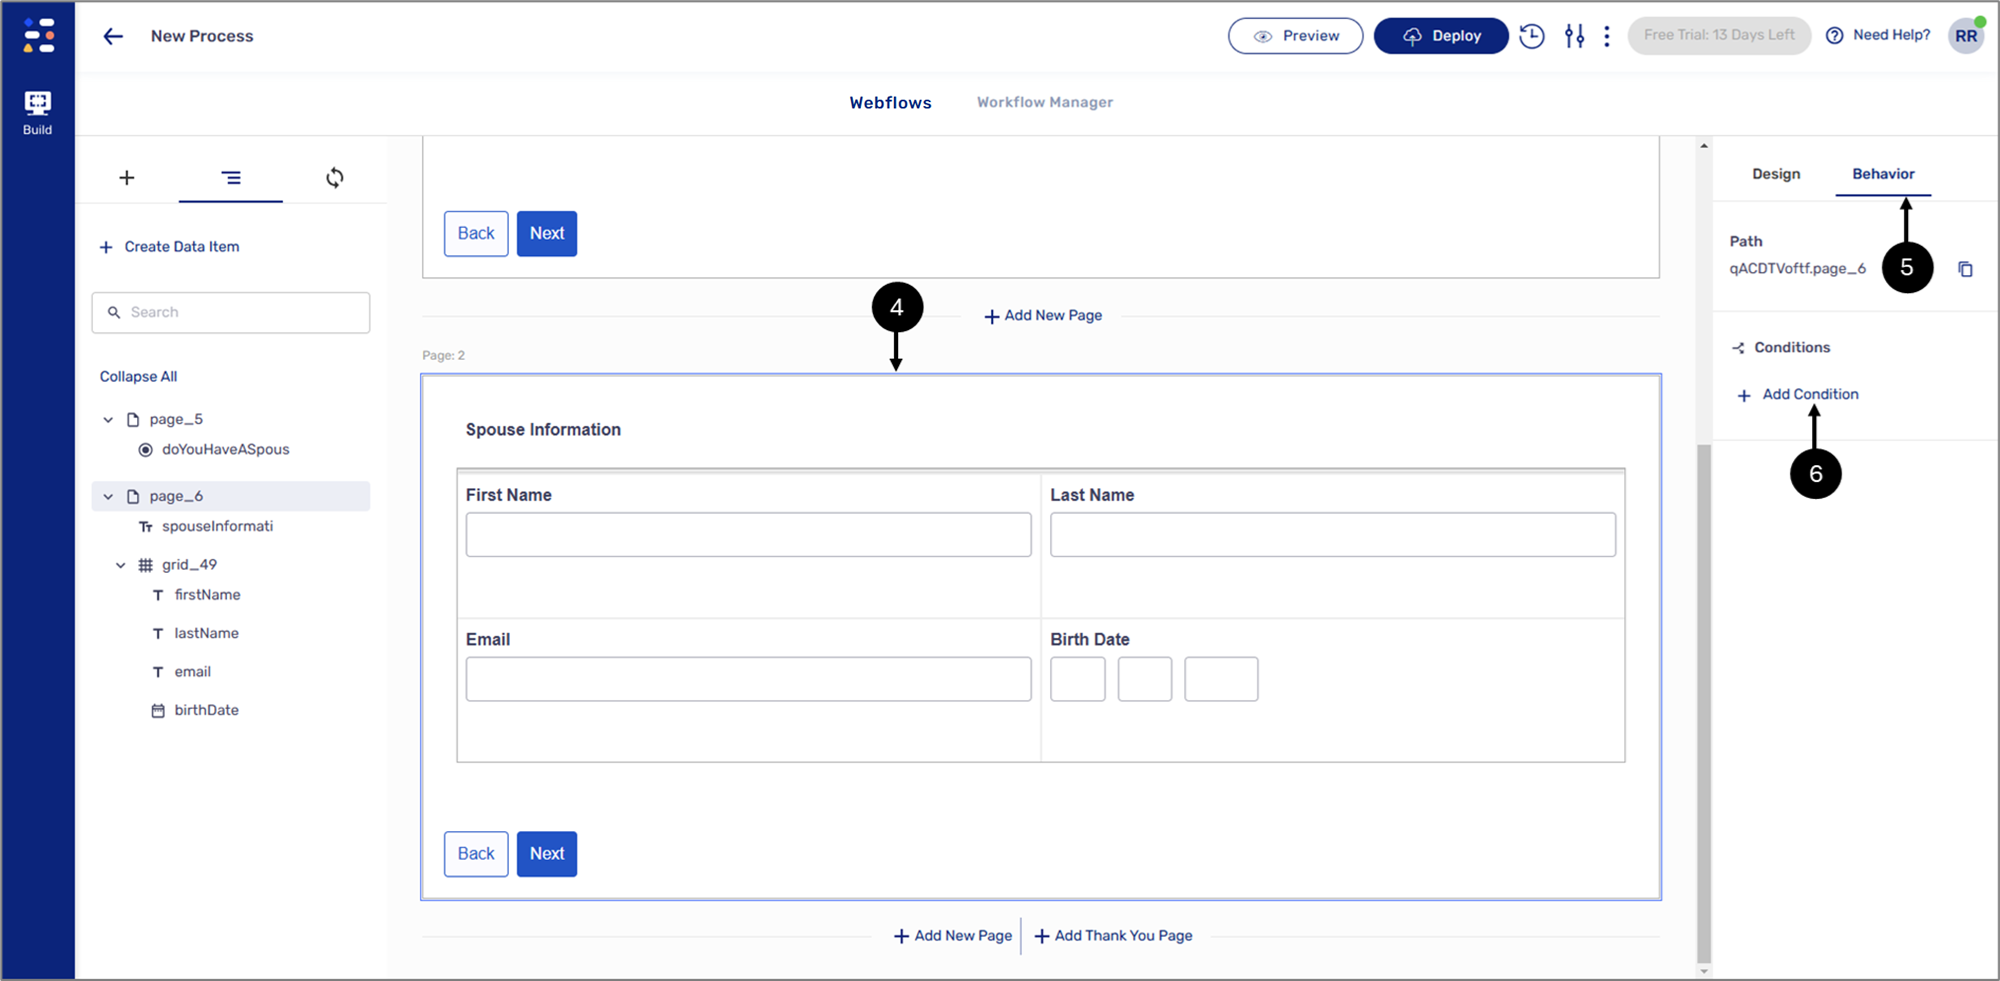
Figure 13: + Add Condition
- Click the Behavior tab (5).
- Click the + Add Condition option (6).
Result:
The Edit Condition window appears:
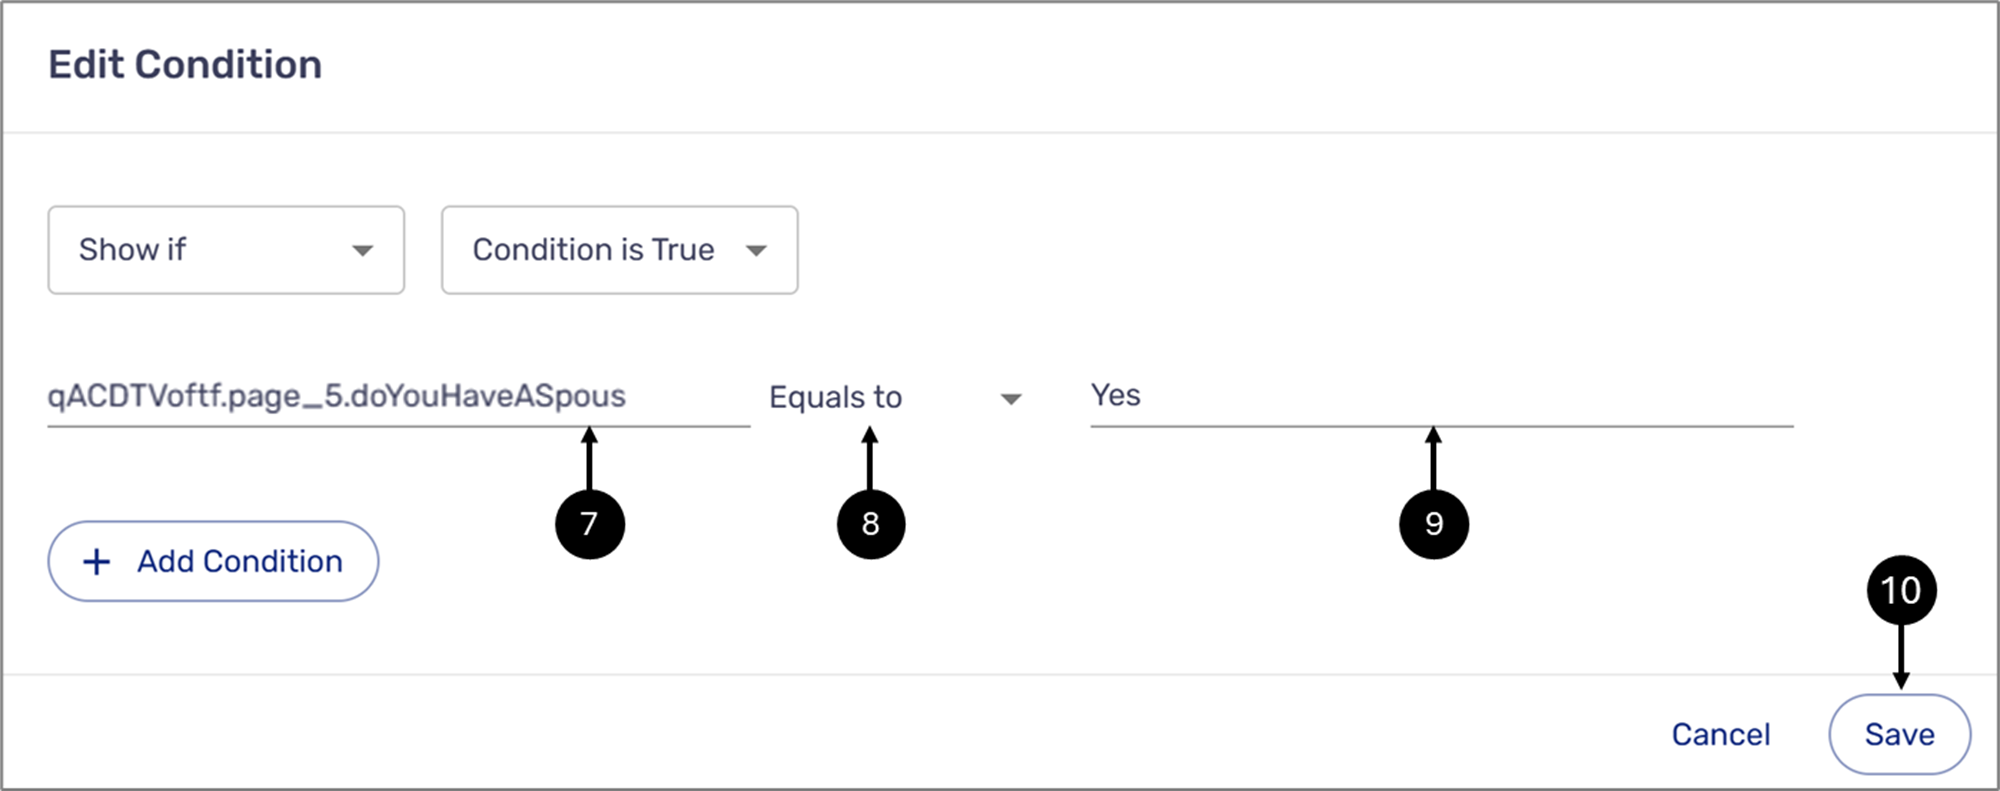
Figure 14: Edit Condition Window
- Paste the Radio Group component path as the Selector (7).
- Verify the comparison operator is set to Equals to (8).
- Set the Value to Yes (9).
- Click the second Save button (10).
Result:
The condition is set (11):
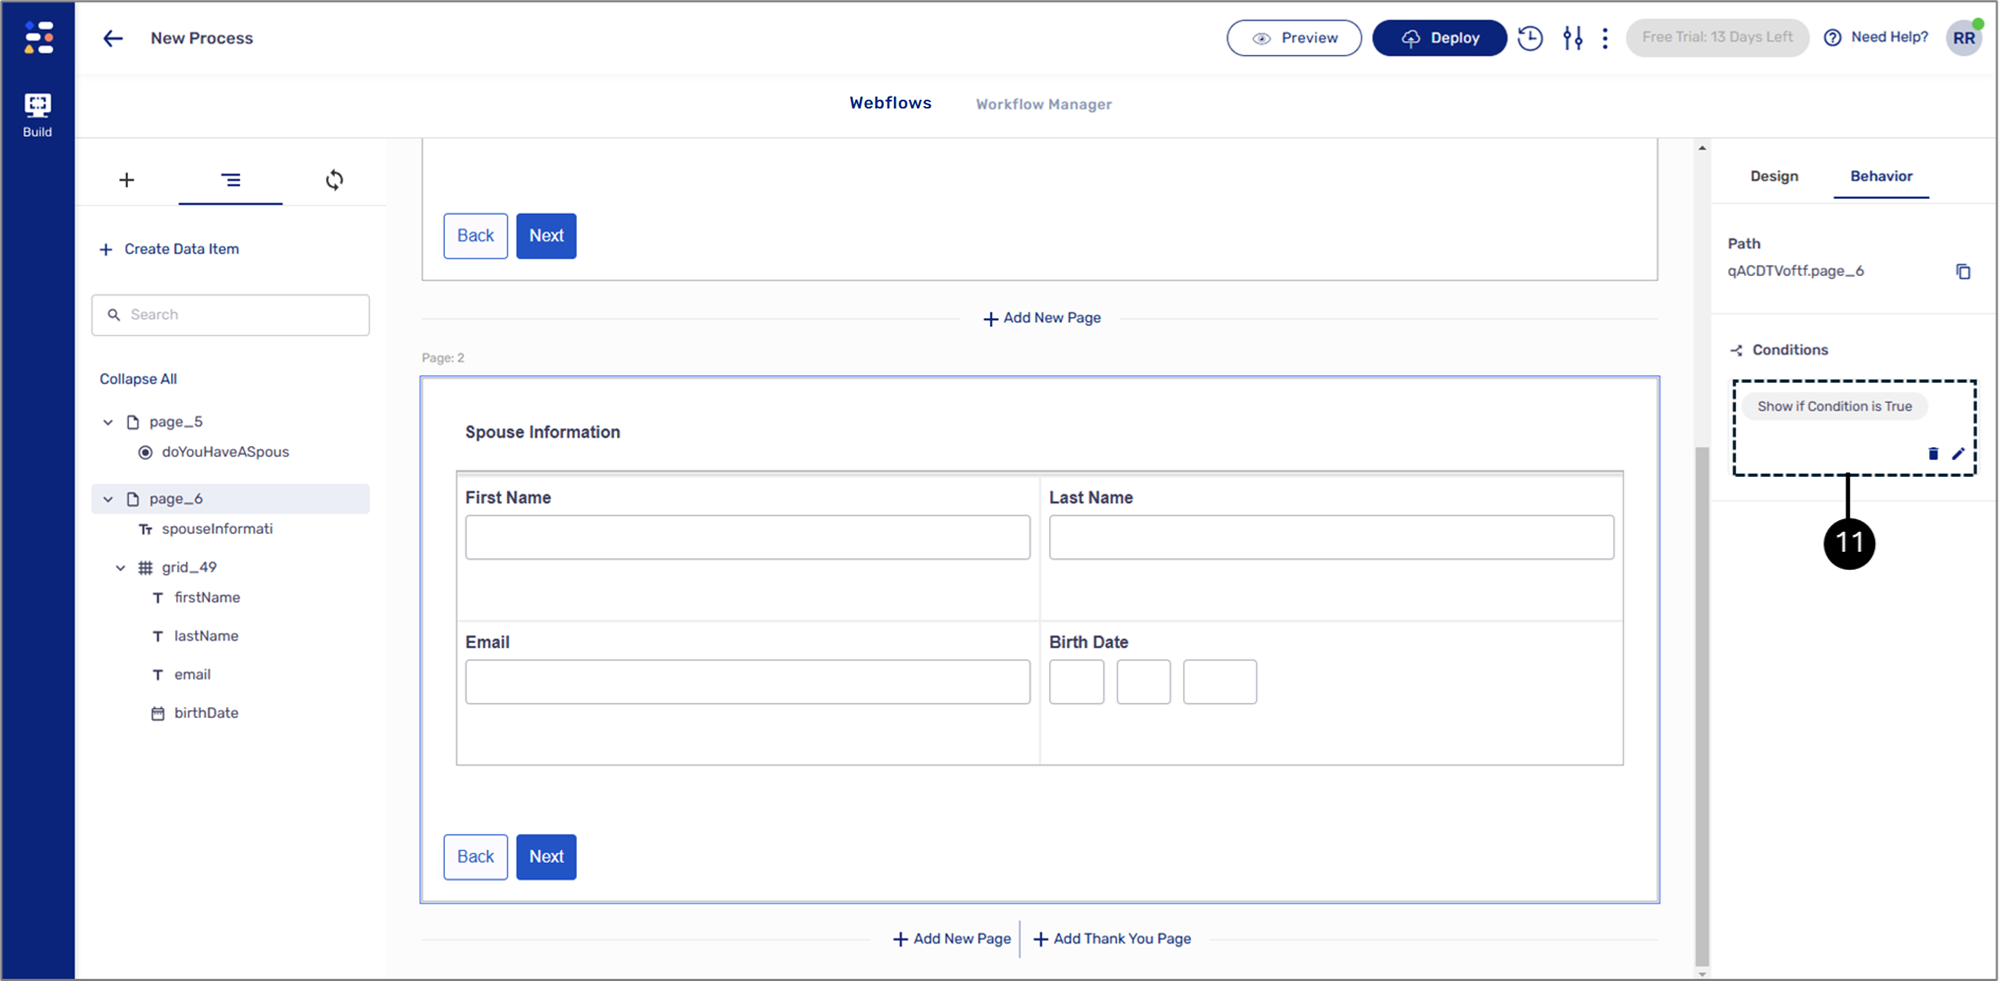
Figure 15: Set Condition
Displaying a Section According to Multiple Dropdown Selections
(See Figure 16 to Figure 20)
Overview:
This example describes how to create a condition based on two dropdown selections. According to the selections, a section will be displayed or hidden.
Physical Structure:
The Webflow includes a Page component. The Page contains a Grid with two Dropdown components. Underneath the Grid is a Container with a second Grid containing three Text Field components and a Radio Group component.
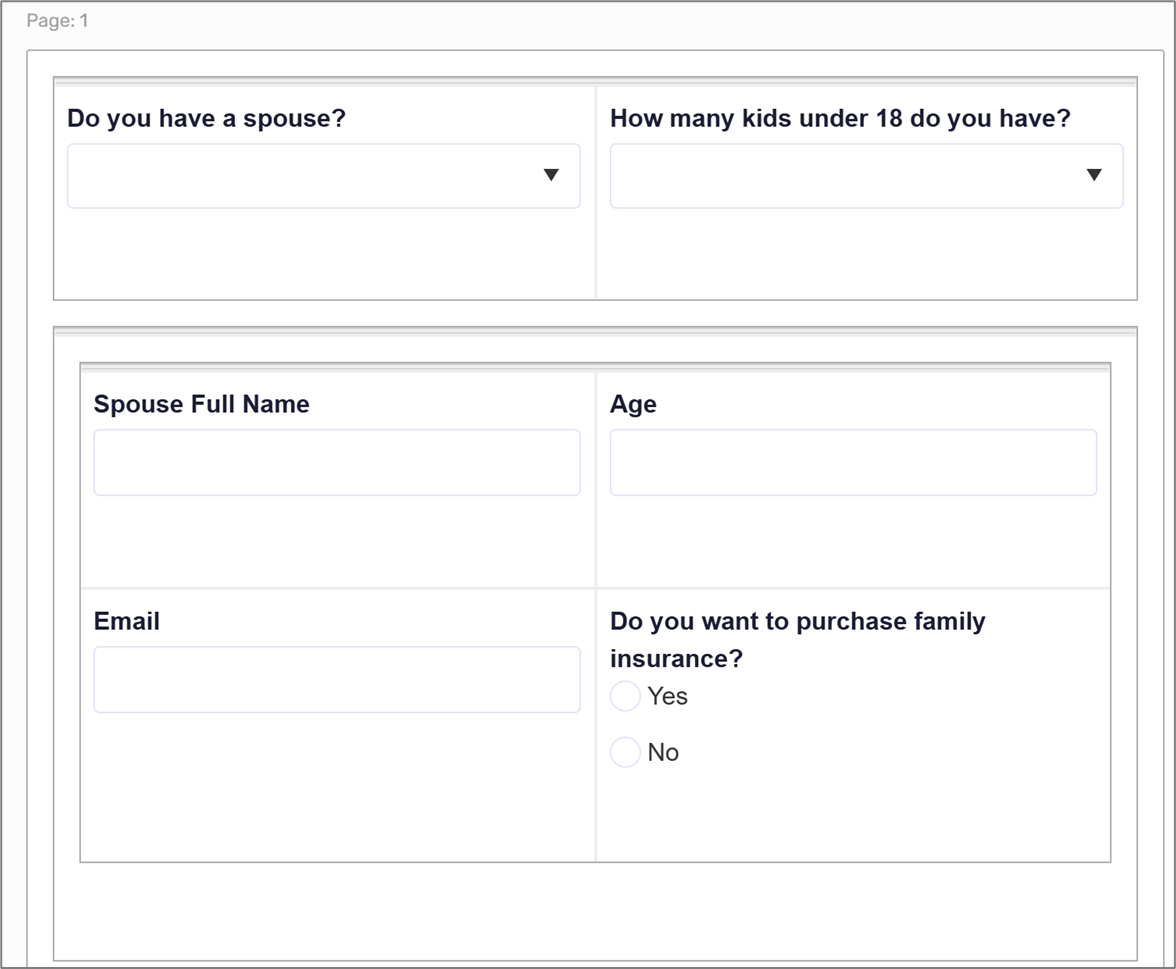
Figure 16: Physical Structure
Condition Usage:
If the end-user indicates they have a spouse and at least one child under the age of 18, the section will appear. If only one of the conditions is true or both are false, the section will not appear.
Building the Condition:
To build the condition, perform the following steps:
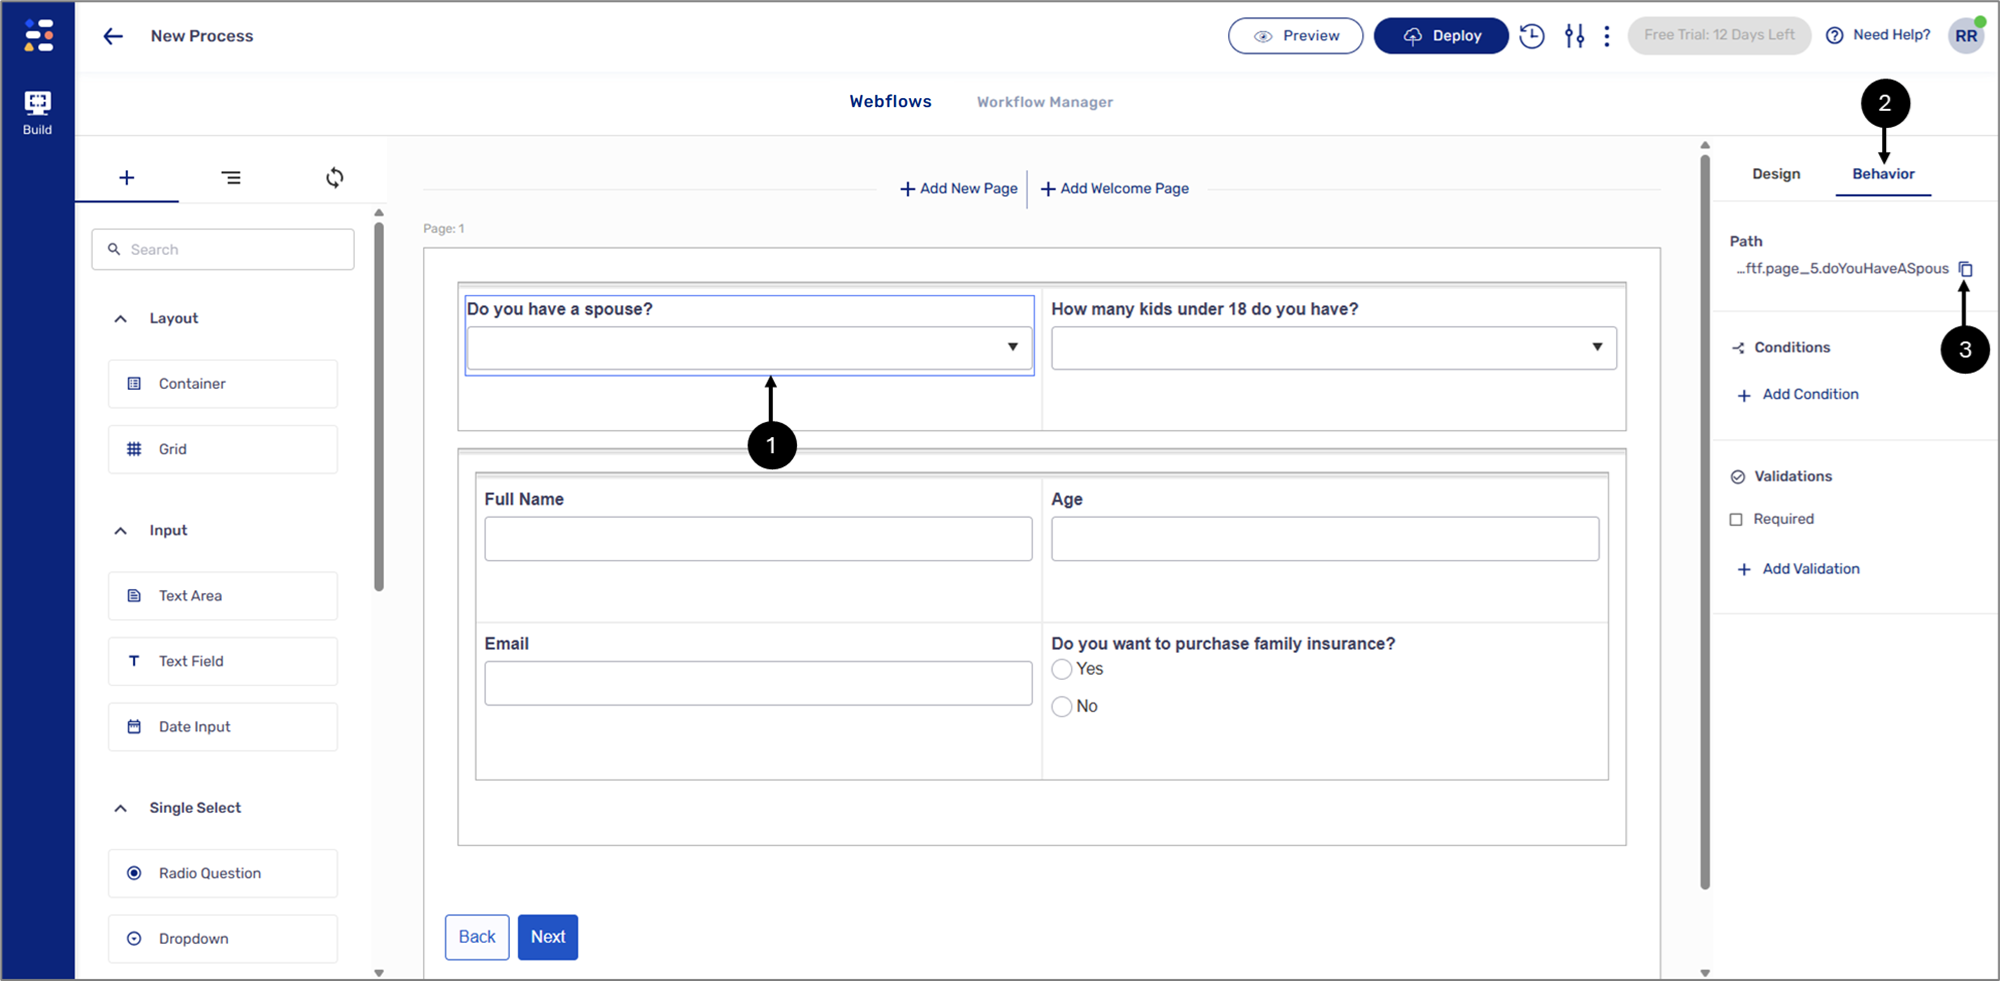
Figure 17: Dropdown Component
- Click the first Dropdown component (1).
- Click the Behavior tab (2).
- Click the icon to copy the path of the component (3).
- Click the Container component (4).
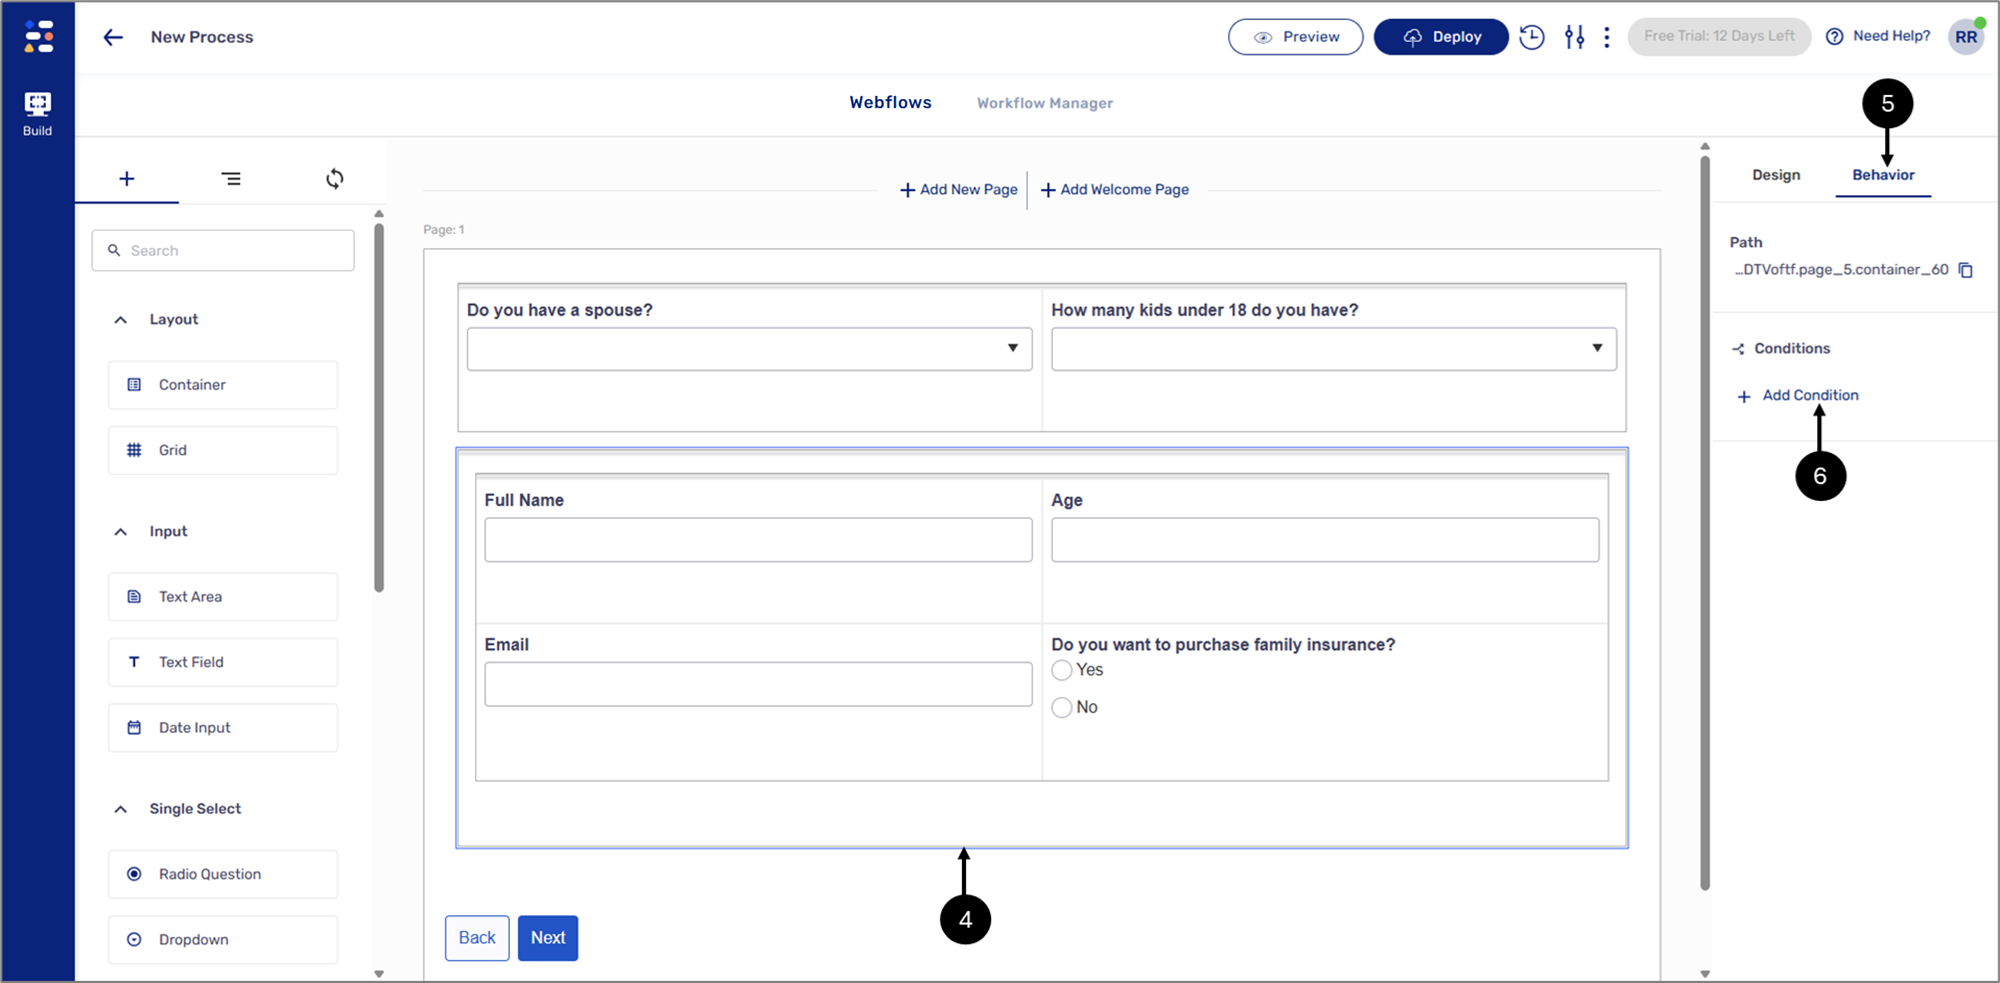
Figure 18: + Add Condition
- Click the Behavior tab (5).
- Click the + Add Condition option (6).
Result:
The Edit Condition window appears:
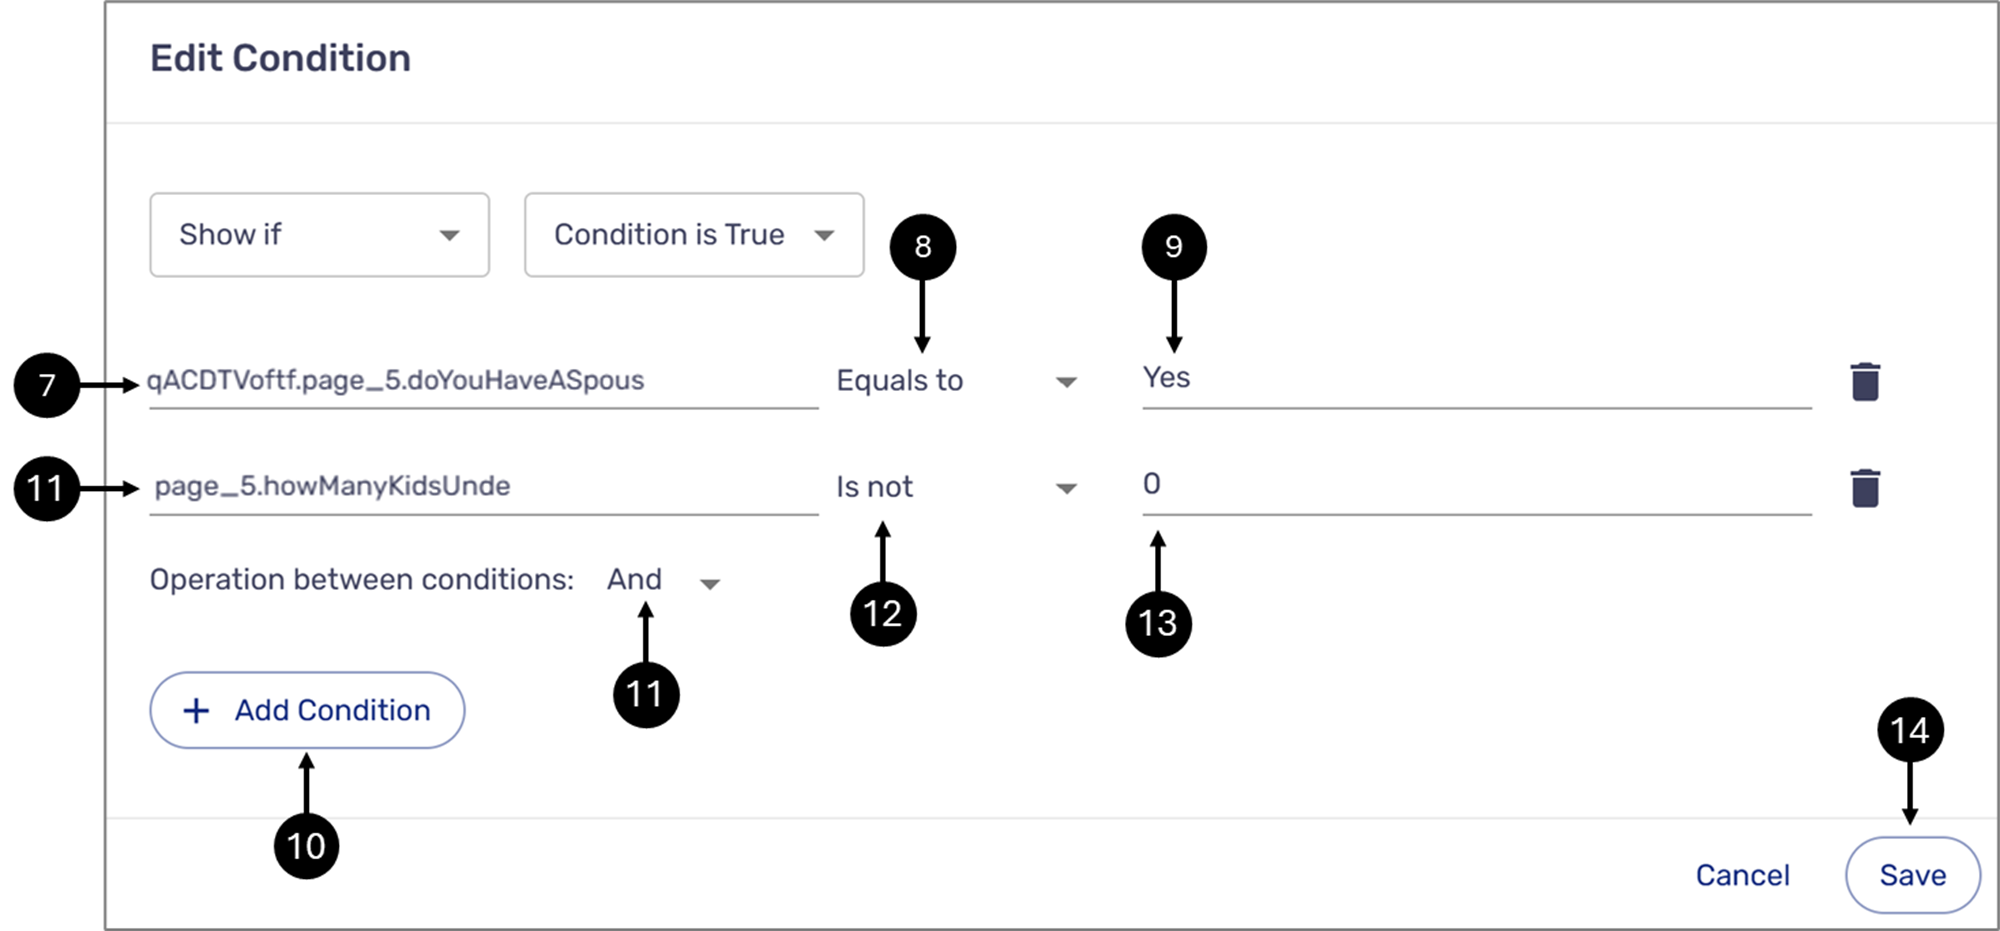
Figure 19: Edit Condition Window
- Paste the Dropdown component path as the Selector (7).
- Verify the comparison operator is set to Equals to (8).
- Set the Value to Yes (9).
- Click the + Add Condition button (10).
- Click the Add selector field and select the second dropdown (11).
- Set the comparison operator to ls Not (12).
- Set the Value to 0 (13).
- Click the second Save button (14).
Result:
The condition is set (15):
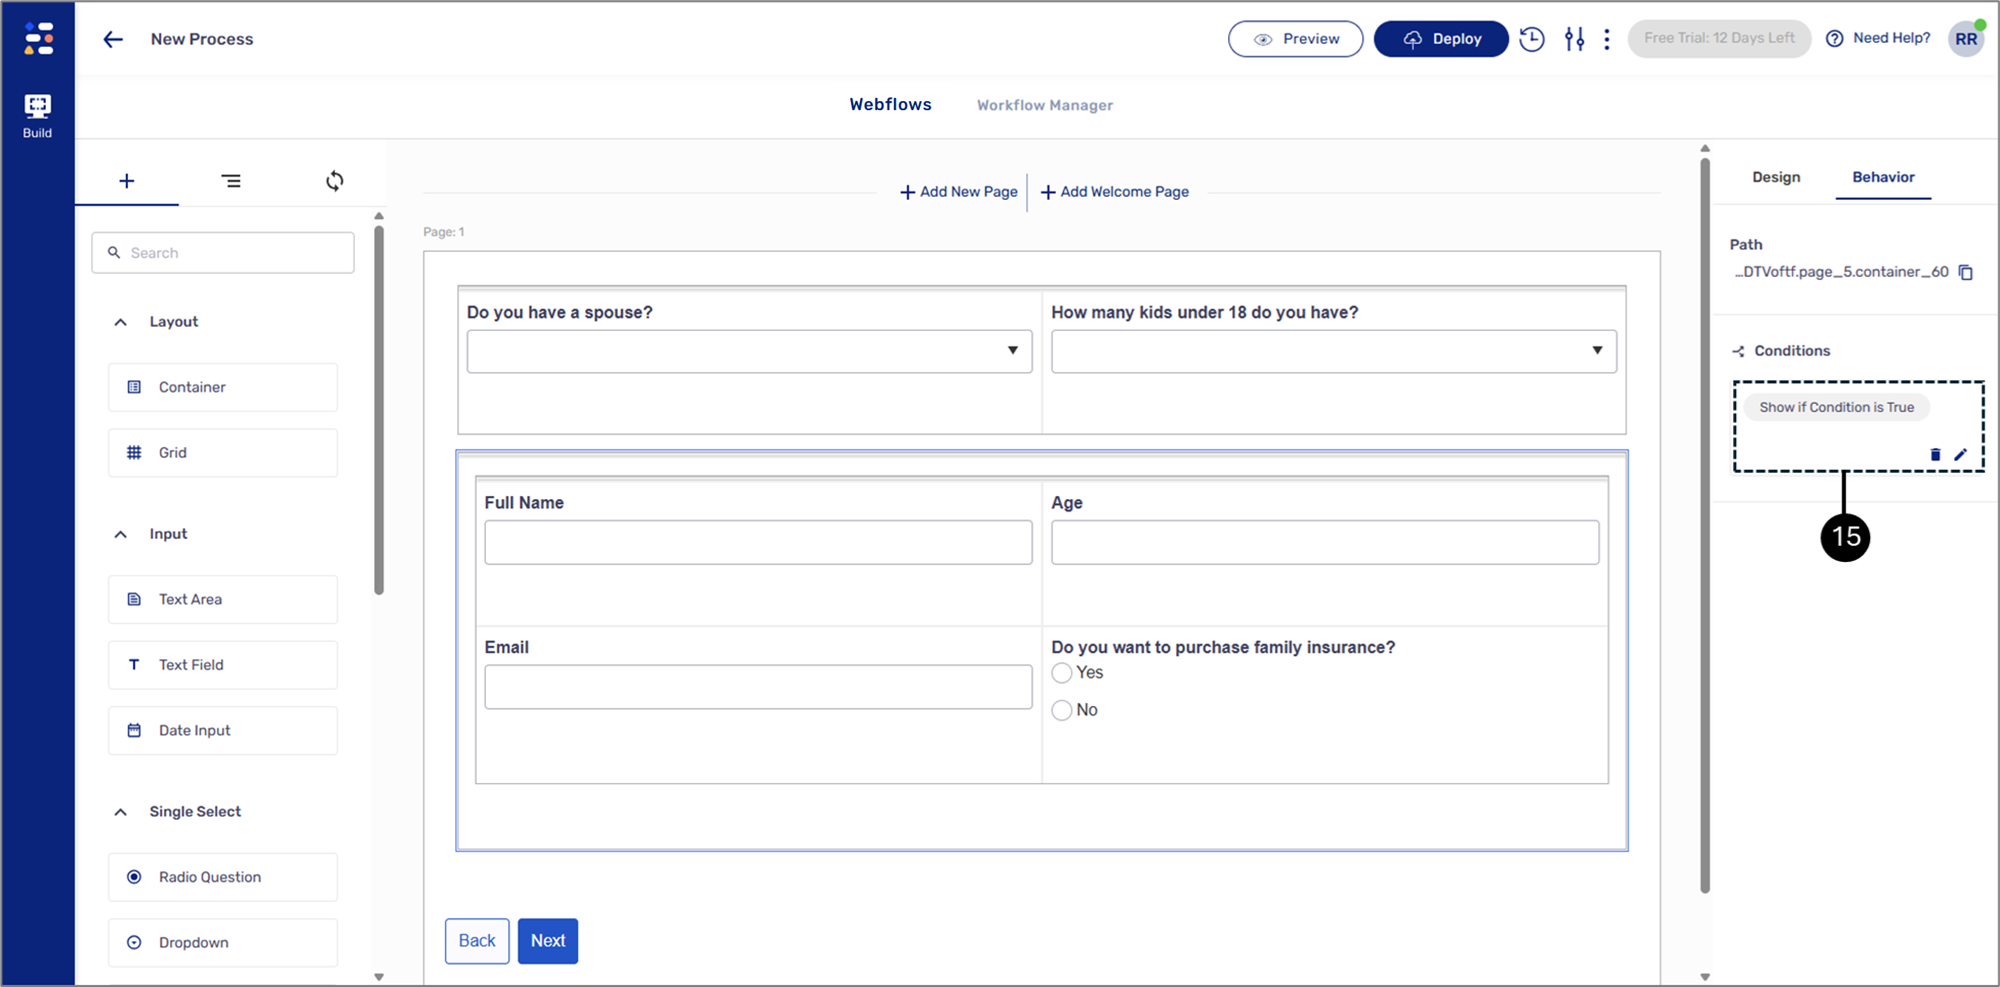
Figure 20: Set Condition
Disabling an Array According to a Checkbox Input
(See Figure 21 to Figure 25)
Overview:
This example describes how to create a condition based on a Checkbox input. According to the input, an array will become read-only.
Physical Structure:
The Webflow includes a Page component. The Page contains a Checkbox and an Array with a Grid and two Text Fields.
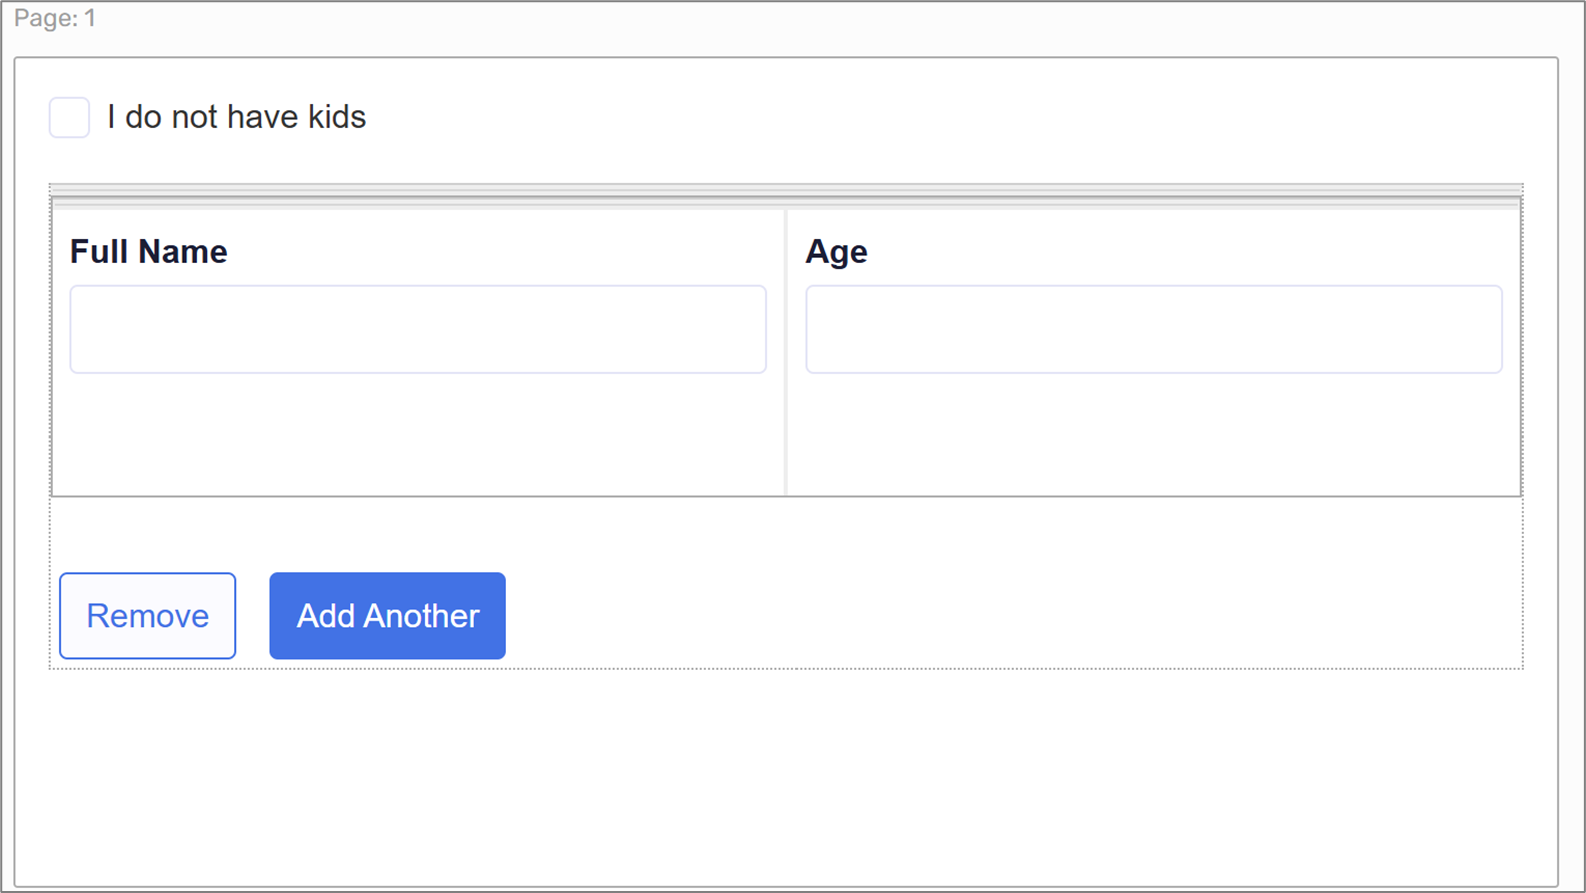
Figure 21: Physical Structure
Condition Usage:
If the end-user indicates they have a spouse, the second page will appear. If a spouse is not involved, the second Page will be hidden.
Building the Condition:
To build the condition, perform the following steps:
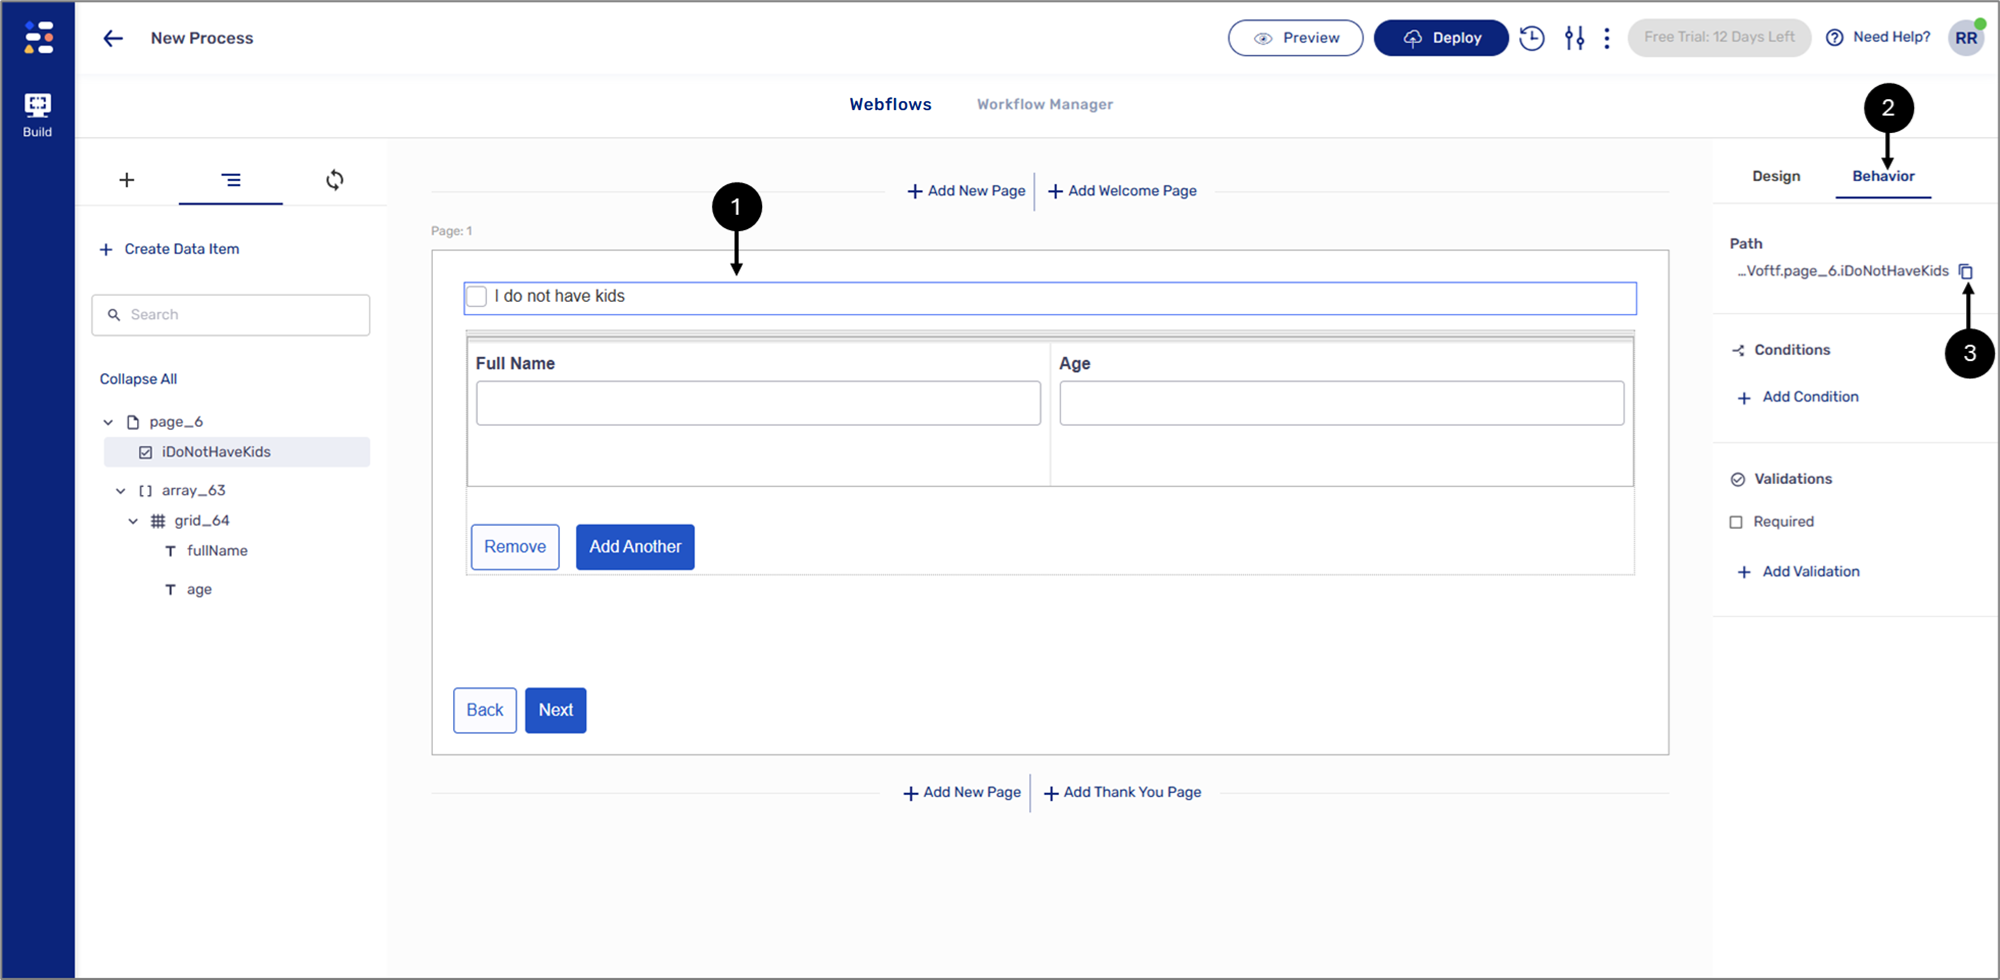
Figure 22: Radio Group Component
- Click the Checkbox component (1).
- Click the Behavior tab (2).
- Click the icon to copy the path of the component (3).
- Click the Array (4).
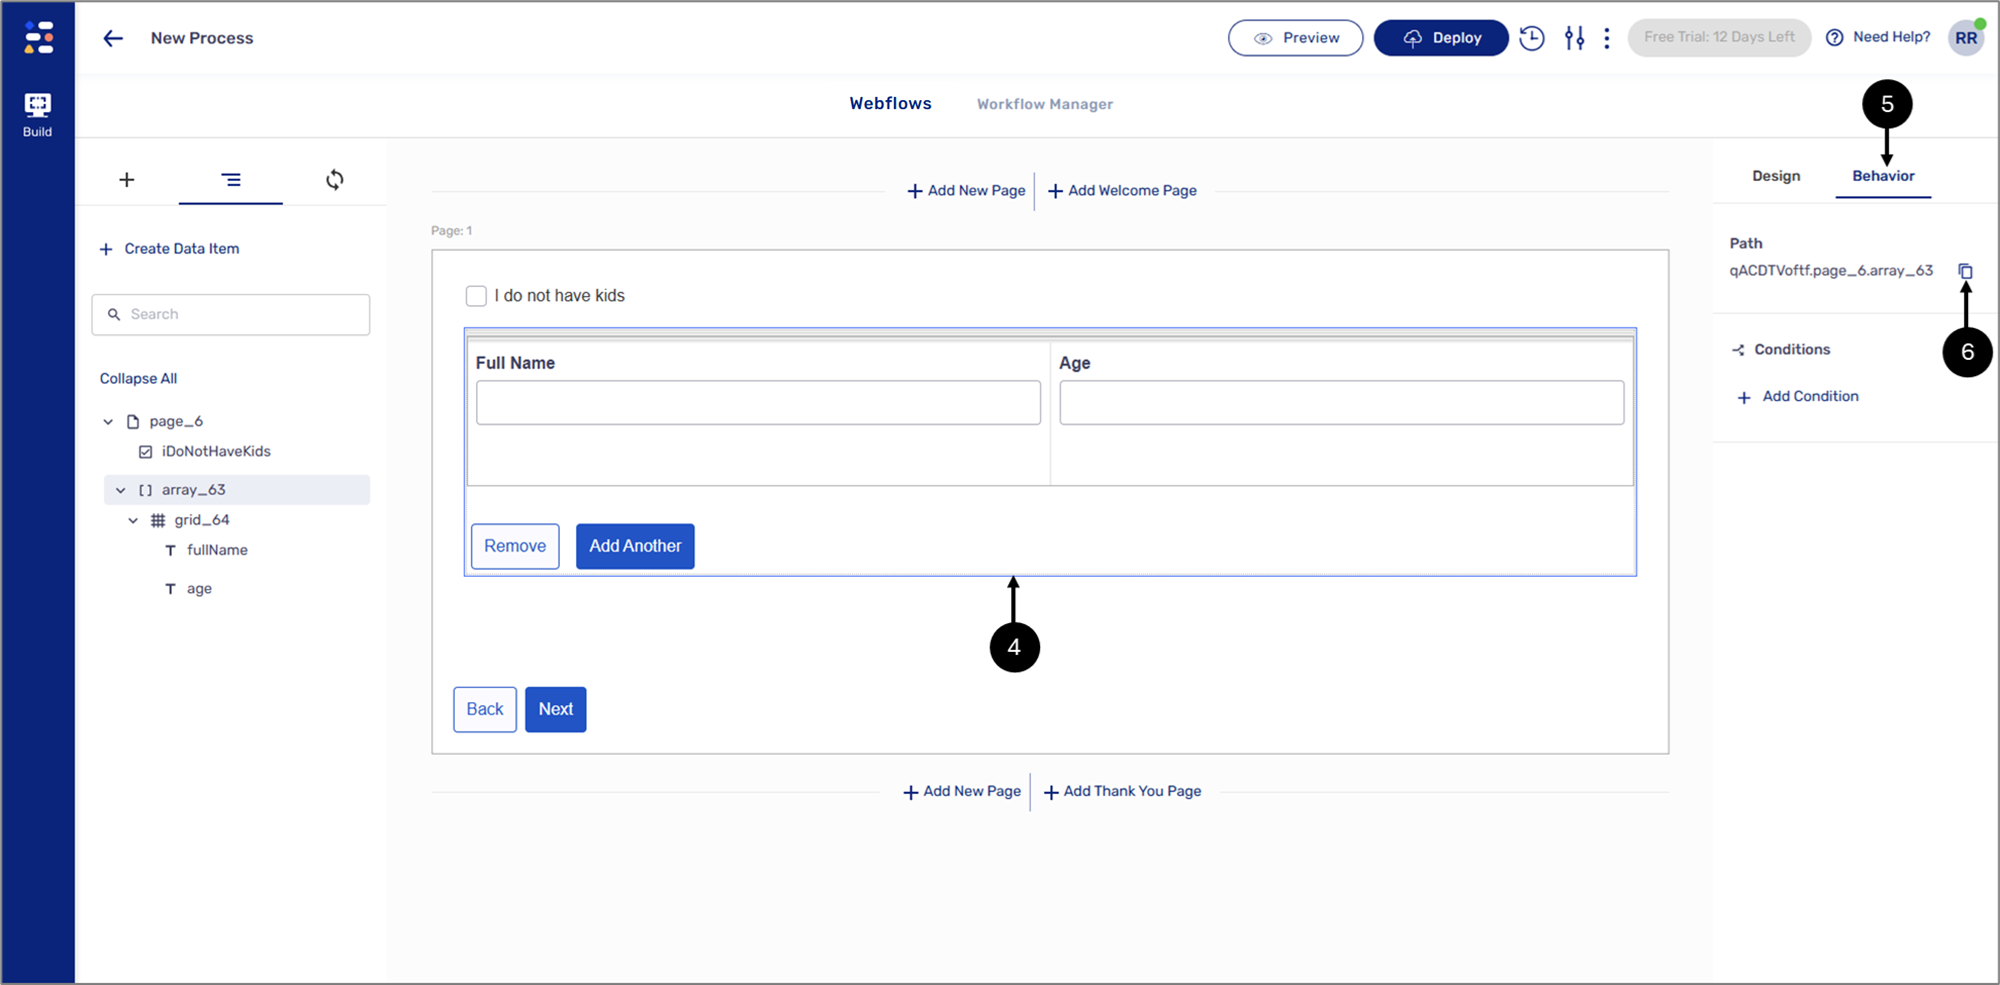
Figure 23: + Add Condition
- Click the Behavior tab (5).
- Click the + Add Condition option (6).
Result:
The Edit Condition window appears:
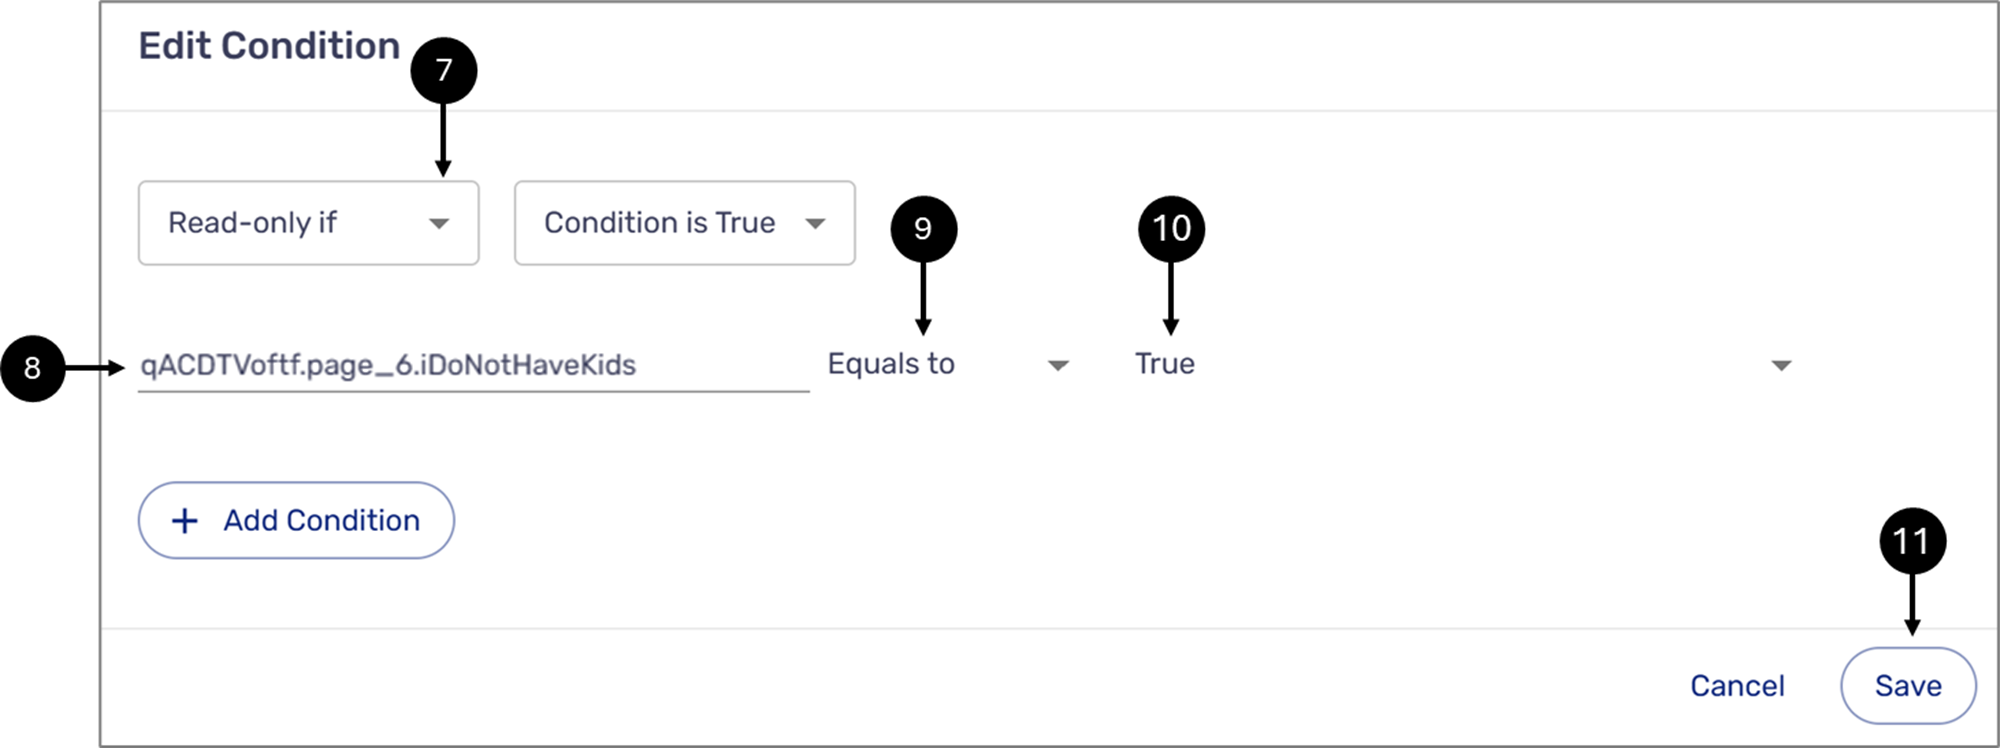
Figure 24: Edit Condition Window
- Set the outcome to Read-only if (7).
- Paste the Checkbox component path as the Selector (8).
- Verify the comparison operator is set to Equals to (9).
- Set the Value to True (10).
- Click the second Save button (11).
Result:
The condition is set (12):
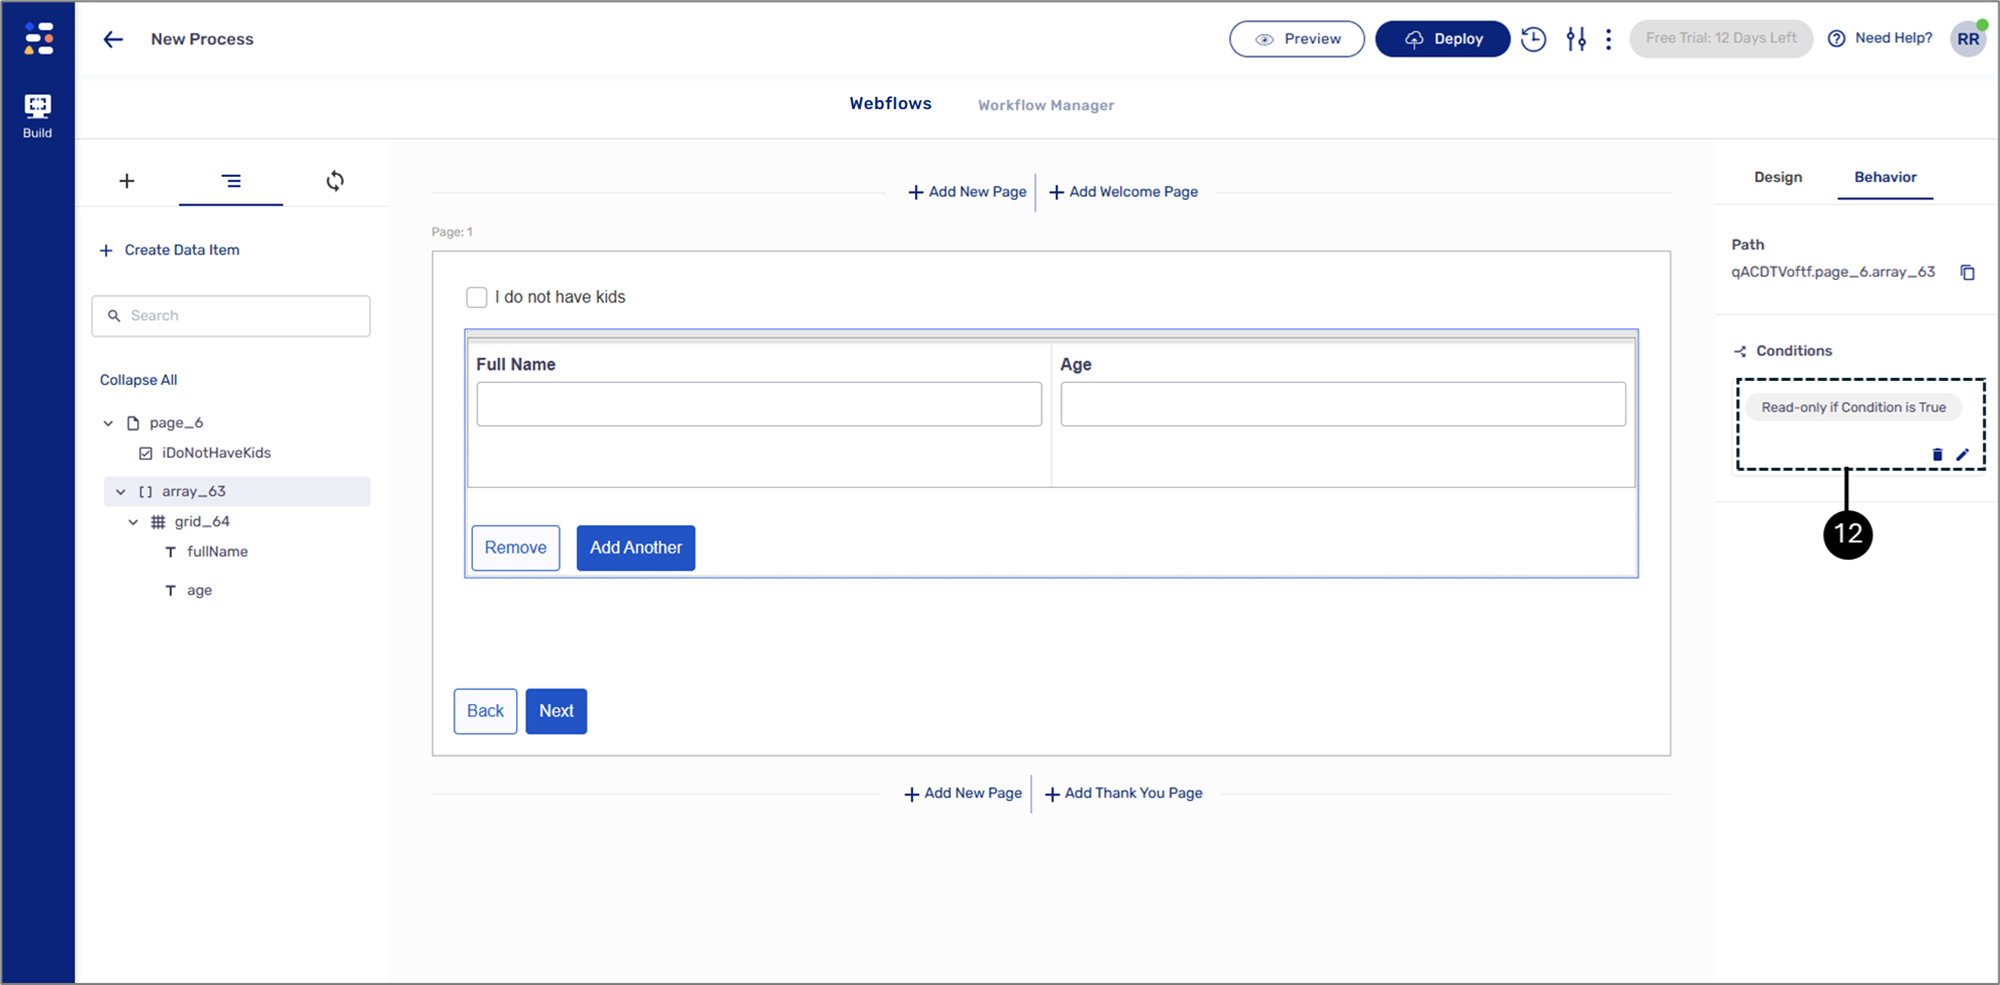
Figure 25: Set Condition
Displaying Fields According To a Formula
(See Figure 26 to Figure 29)
Overview:
This example describes how to create a condition based on a formula. According to the calculation, the text will be displayed.
Physical Structure:
The Webflow includes a Page component. The Page contains two Text Fields for input and a Container with Text.
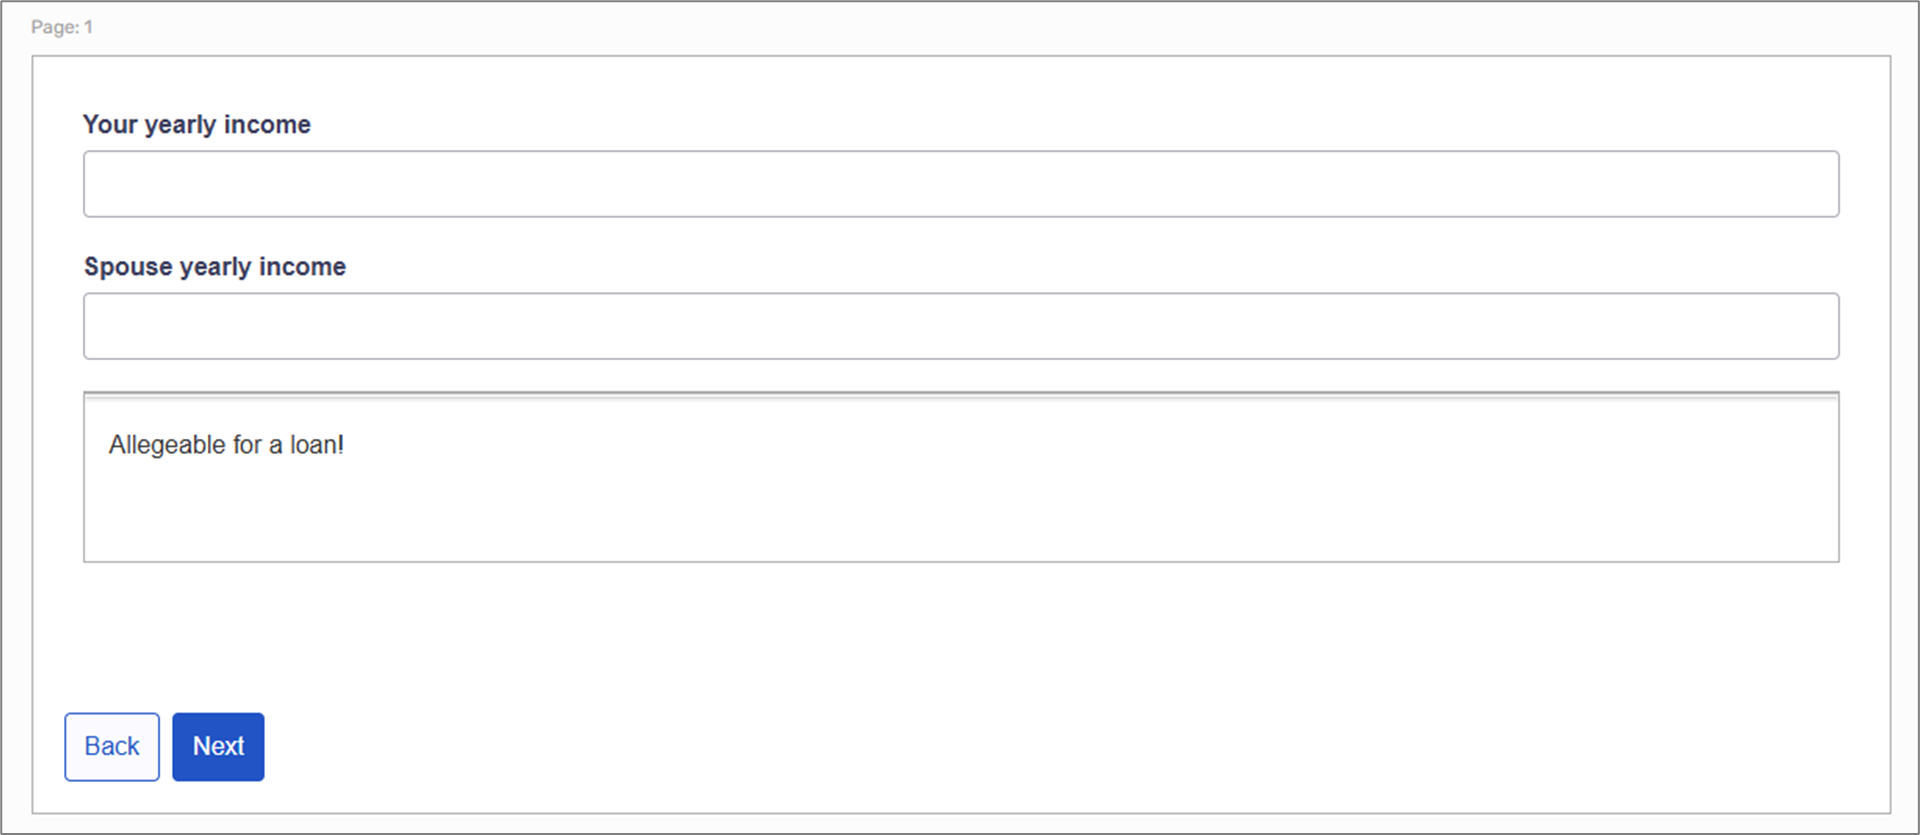
Figure 26: Physical Structure
Condition Usage:
The end-user inputs their and their spouse's yearly income. If the joint income is bigger than 60,000$, the Text will appear.
Building the Condition:
To build the condition, perform the following steps:
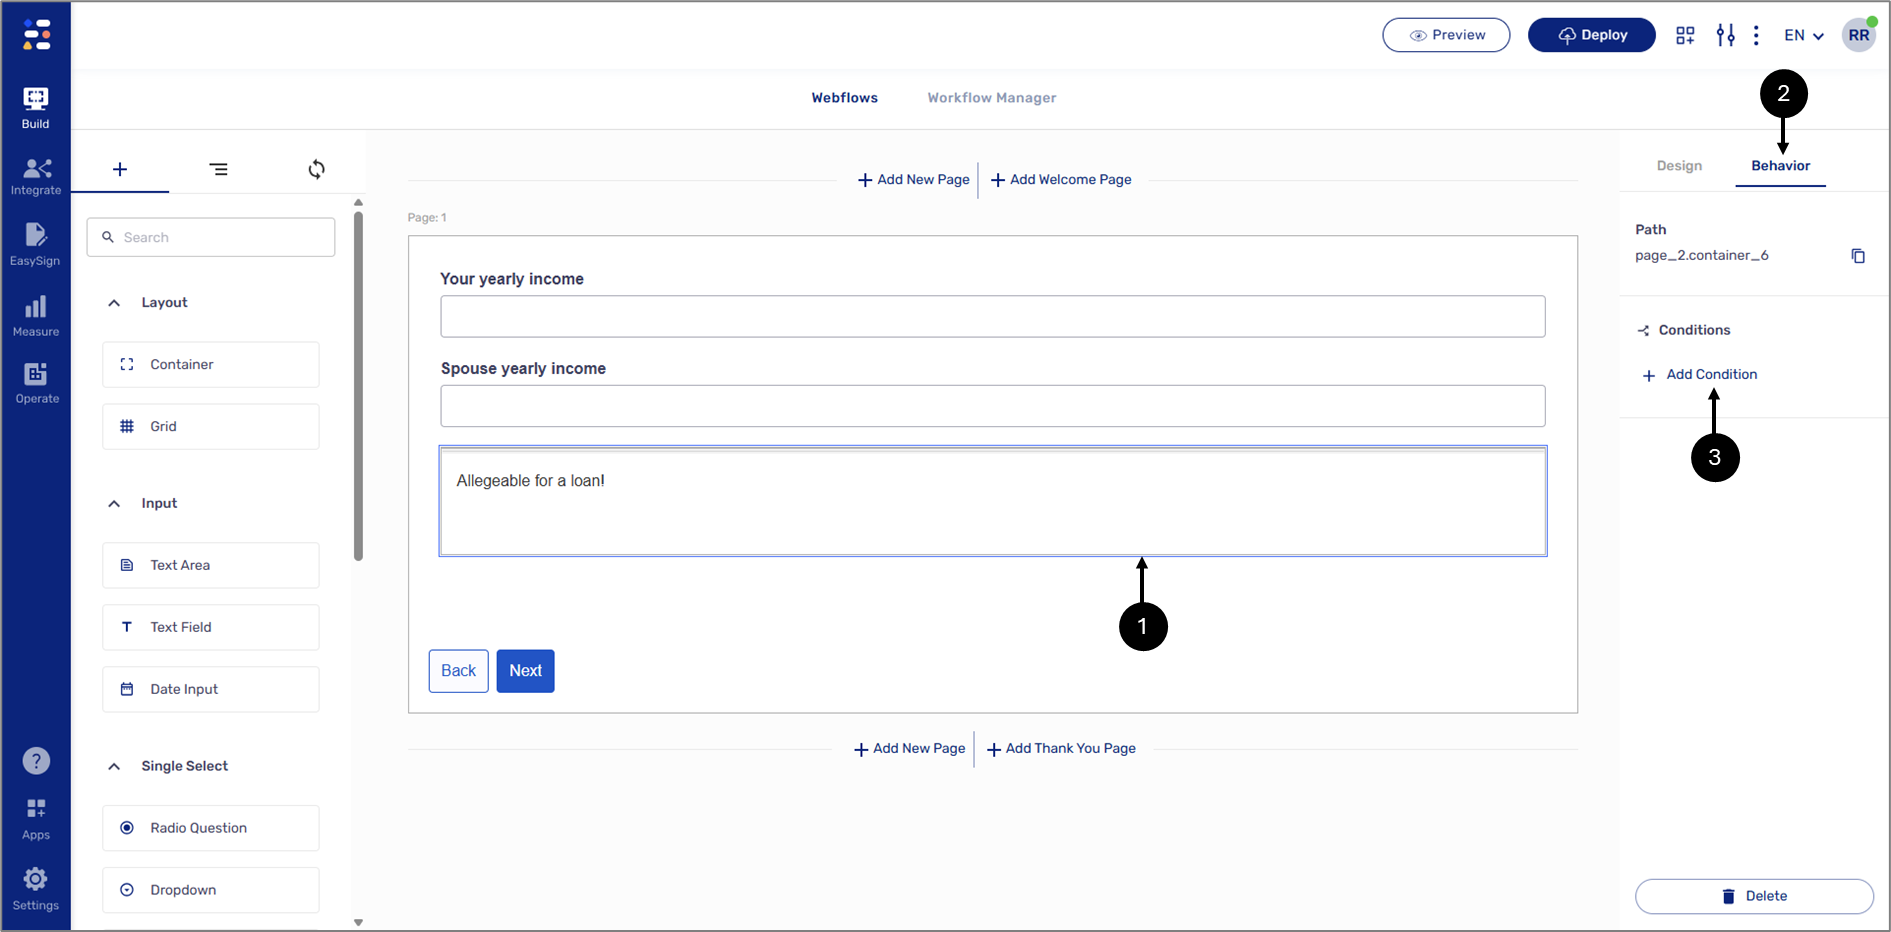
Figure 27: Container Component
- Click the Container component (1).
- Click the Behavior tab (2).
- Click the + Add Condition button (3).
Result:
The Edit Condition window appears:
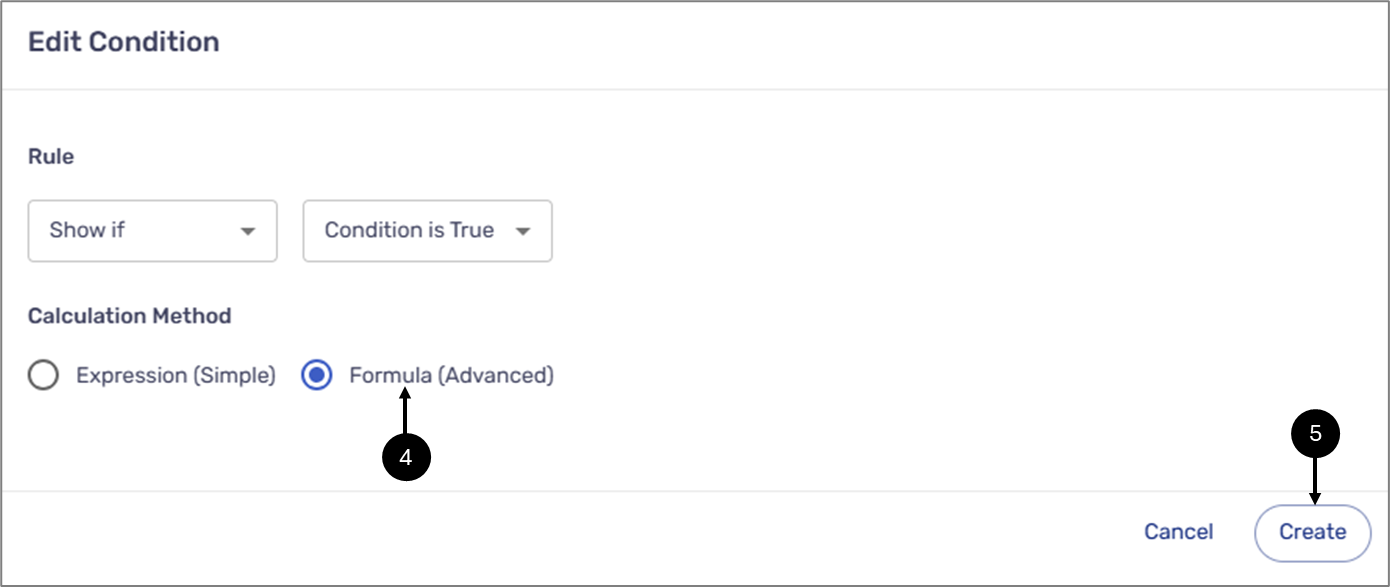
Figure 28: Edit Condition Window
- Set the calculation method to Formula (Advanced) (4).
- Click the Create button (5).
Result:
The Formula Editor window appears:
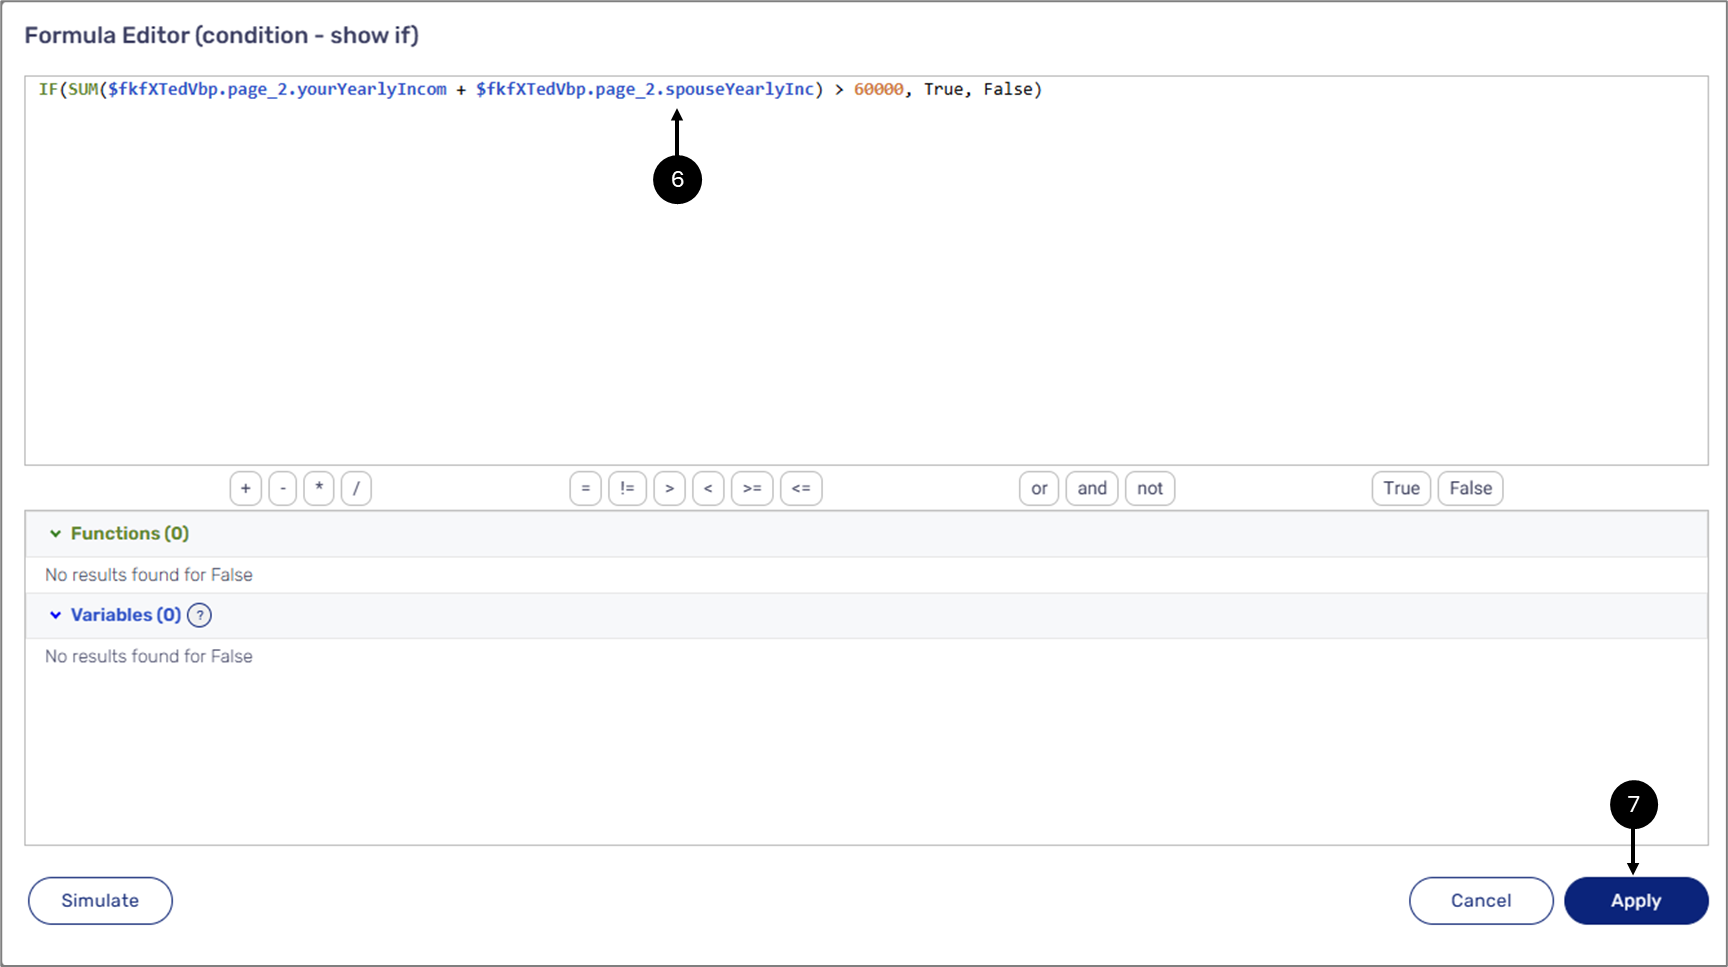
Figure 28: Formula Editor Window
- Build the formula (6).
- Click the Apply button (7).
Result:
The condition is set (8):
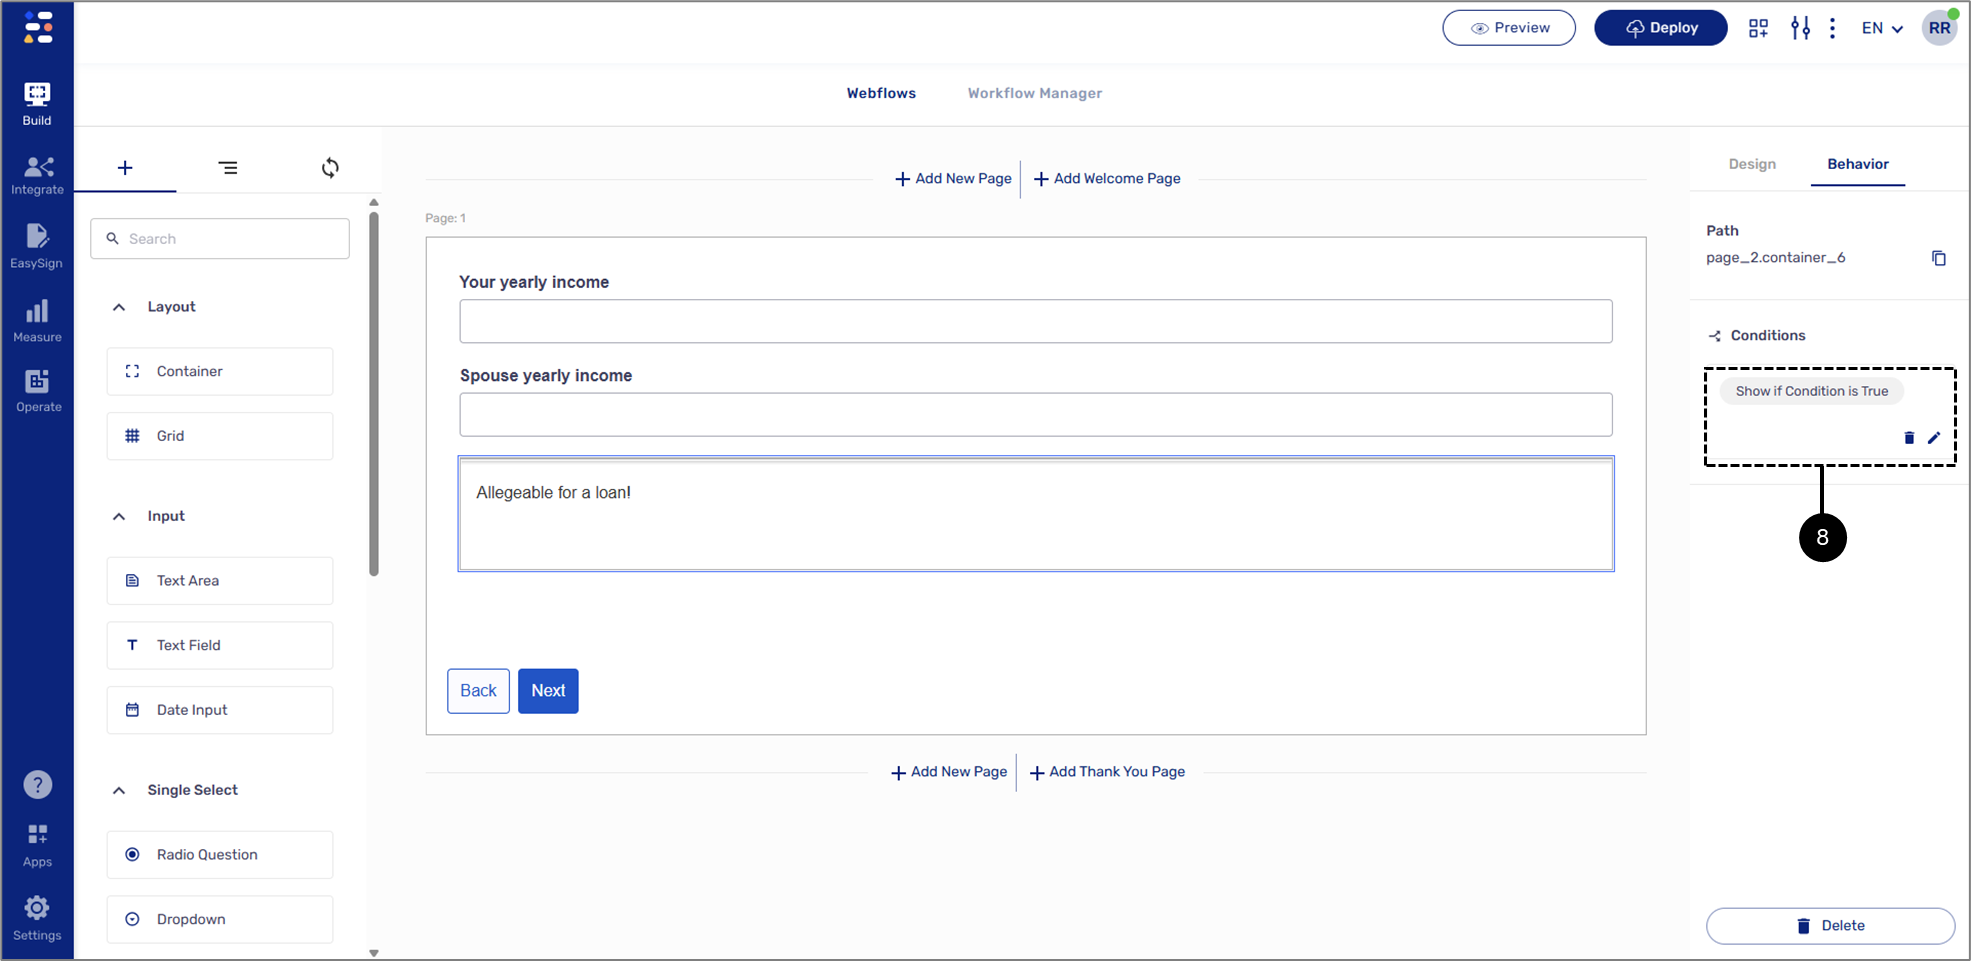
Figure 29: Set Condition
Was this article helpful?